
SuperPlaneLaser 3D - Laser pointer Laserliner - Free user manual and instructions
Find the device manual for free SuperPlaneLaser 3D Laserliner in PDF.
| Product Type | 3D Laser Level |
| Brand | Laserliner |
| Model | SuperPlaneLaser 3D |
| Dimensions (W x H x D) | 85 x 125 x 130 mm |
| Weight (including batteries) | 650 g |
| Power supply | 4 AA alkaline batteries 1.5 V or rechargeable batteries |
| Battery life | Approx. 6 h (3 planes), 10 h (2 planes), 25 h (1 plane) |
| Accuracy | ±0.35 mm/m |
| Self-leveling range | ±3° |
| Working range | 15 m (depending on ambient brightness) |
| Laser wavelength | 650 nm |
| Laser class | 2 (< 1 mW) – EN 60825-1:2014 |
| Key features | 360° horizontal line, two 360° vertical lines, tilt mode, pendulum system with transport lock, PowerBright technology |
| Care and cleaning | Clean with a slightly damp cloth, avoid solvents and abrasive products. Remove batteries for extended storage. Store in a dry and clean place. |
| Safety | Laser class 2 – do not stare into beam, do not point at eyes, use below eye level (1.40–1.90 m). |
| Compliance | EMC Directive 2014/30/EU, WEEE Directive |
| Operating conditions | 0°C to 50°C, 80% RH, max altitude 4000 m |
| Storage conditions | -10°C to 70°C, 80% RH |
Frequently Asked Questions - SuperPlaneLaser 3D Laserliner
User questions about SuperPlaneLaser 3D Laserliner
0 question about this device. Answer the ones you know or ask your own.
Ask a new question about this device
Download the instructions for your Laser pointer in PDF format for free! Find your manual SuperPlaneLaser 3D - Laserliner and take your electronic device back in hand. On this page are published all the documents necessary for the use of your device. SuperPlaneLaser 3D by Laserliner.
USER MANUAL SuperPlaneLaser 3D Laserliner
Completely read through the operating instructions, the „Warranty and Additional Information" booklet as well as the latest information under the internet link at the end of these instructions. Follow the instructions they contain. This document must be kept in a safe place and if the laser device is passed on, this document must be passed on with it.
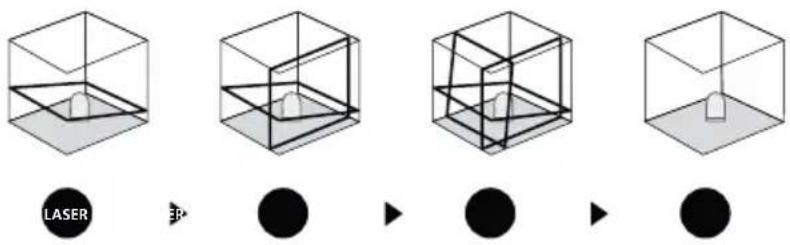
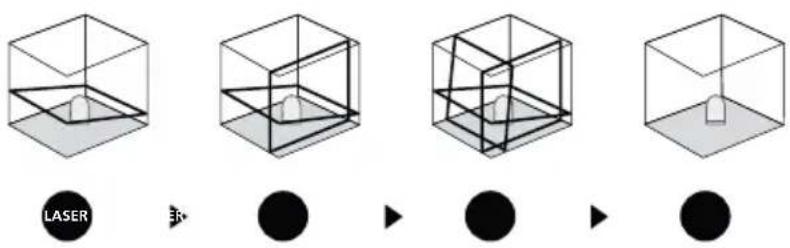
Three-dimensional laser with a horizontal and two vertical 360^ laser circles and slope function for aligning tiles, wall studding, windows, doors etc.
General safety instructions
- The device must only be used in accordance with its intended purpose and within the scope of the specifications.
- The measuring tools and accessories are not toys. Keep out of reach of children.
- Modifications or changes to the device are not permitted, this will otherwise invalidate the approval and safety specifications.
- Do not expose the device to mechanical stress, extreme temperatures, moisture or significant vibration.
- The device must no longer be used if one or more of its functions fail or the battery charge is weak.
Safety instructions
Using class 2 lasers
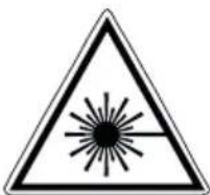
Laser radiation!
Do not stare into the beam!
Class 2 laser
<1 mW·650 nm
EN 60825-1:2014
- Attention: Do not look into the direct or reflected beam.
- Do not point the laser beam towards persons.
- If a person's eyes are exposed to class 2 laser radiation, they should shut their eyes and immediately move away from the beam.
- Under no circumstances should optical instruments (magnifying glass, microscope, binoculars) be used to look at the laser beam or reflections.
- Do not use the laser at eye level (1.40...1.90 m)
- Reflective, specular or shiny surfaces must be covered whilst laser devices are in operation.
- In public areas shield off the laser beam with barriers and partitions wherever possible and identify the laser area with warning signs.
Safety instructions
Dealing with electromagnetic radiation
The measuring device complies with electromagnetic compatibility regulations and limits in accordance with the EMC Directive 2014/30/EU.
- Local operating restrictions – for example, in hospitals, aircraft, petrol stations or in the vicinity of people with pacemakers – may apply. Electronic devices can potentially cause hazards or interference or be subject to hazards or interference.
Special product features

Automatic alignment of the device with a magnetically dampened pendulum system. The device is brought into initial position and aligns itself autonomously.

Transport LOCK: The device is protected with a pendulum lock during transport.

Devices with PowerBright technology have special high-performance diodes to produce super bright laser lines. These remain visible over longer distances, in bright ambient light and on dark surfaces.
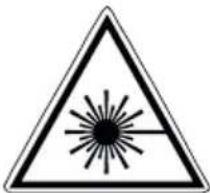
Number and direction of the lasers
H = horizontal laser
V = vertical laser
S = slope function
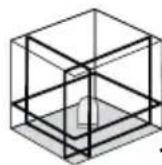
1H360° 2V360° S
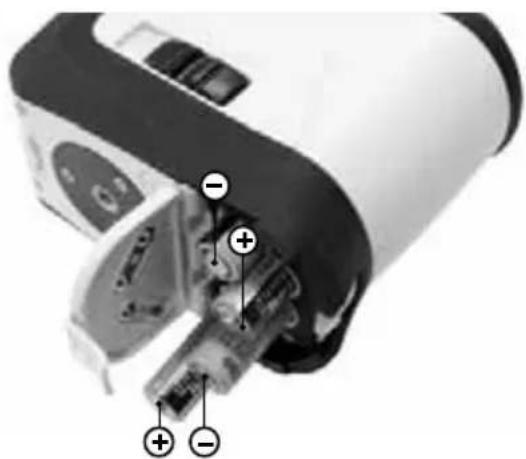
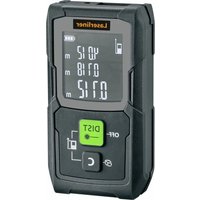
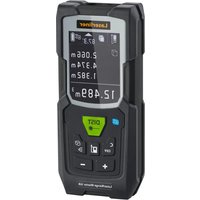
Inserting the batteries
Open the battery compartment (3) and insert the batteries in accordance with the installation symbols, ensuring the correct polarity.
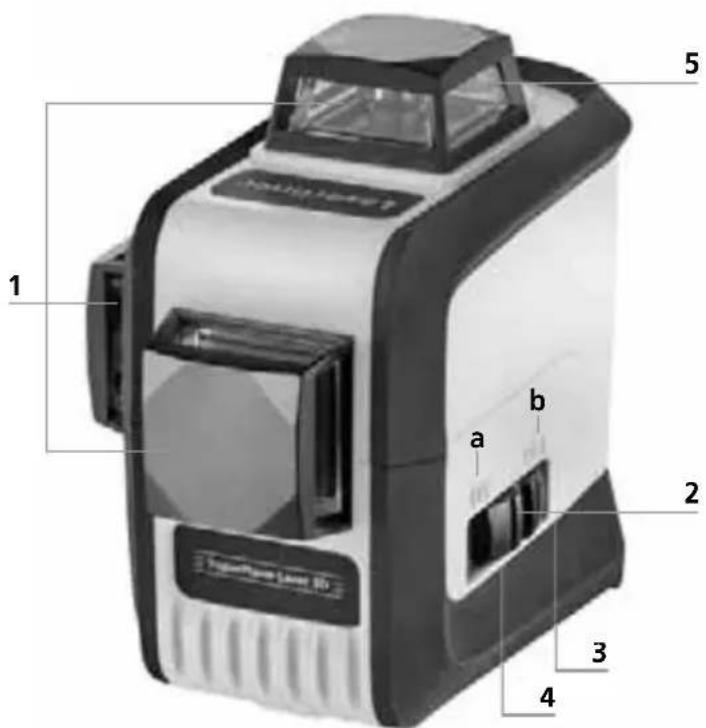
1 Laser emitting window
2 Slide switch a ON
b OFF / Slope mode / Transport lock
3 Battery compartment (bottom)
4 1/4" tripod threads (bottom)
5 Laser line selection button / Slope mode on

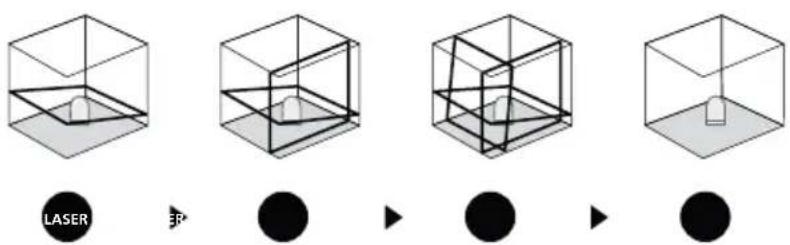
When transporting always switch off all lasers, secure the pendulum and set the slide switch to "OFF"!
Low battery indicator: All laser lines flash for 3 seconds and then go out when the battery charge is low.
2Horizontal and vertical levelling
Release the transport restraint, set slide switch (2) to "ON". The horizontal laser line appears. The laser lines can be switched individually with the selection button.

The transport restraint must be released for horizontal and vertical levelling. The laser lines flash when the device is outside the automatic levelling range of 3^ . Position the device such that it is within the levelling range.
3 Slope mode
Do not release the transport restraint, set slide switch (2) to "OFF" and switch on slope mode by pressing and holding (3 seconds) button 5. Select the laser with the selector button (5). Sloping planes and tilts can now be measured. In this mode, the laser lines no longer align automatically. This is signalised by the laser lines flashing.
Preparing the calibration check:
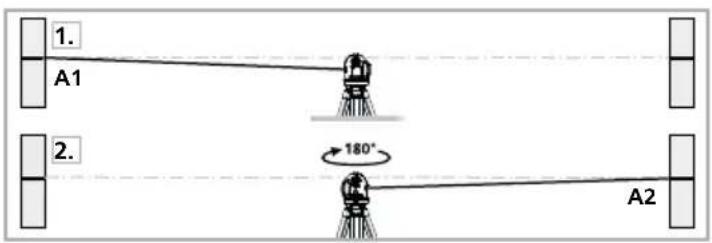
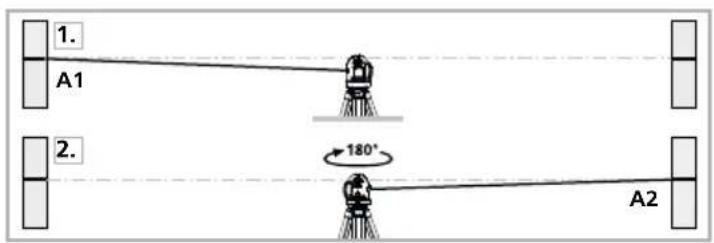
It is possible for you to check the calibration of the laser. To do this, position the device midway between 2 walls, which must be at least 5 metres apart. Do this by turning the unit on, thus releasing the transport restraint (cross laser on). Please use a tripod.
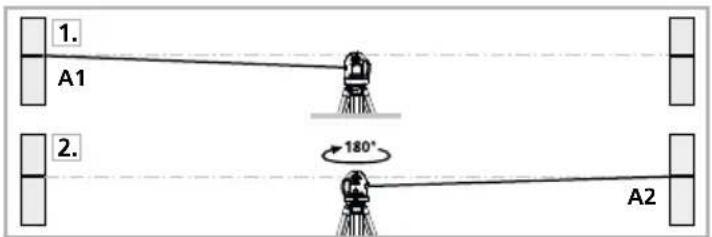
Performing the calibration check:
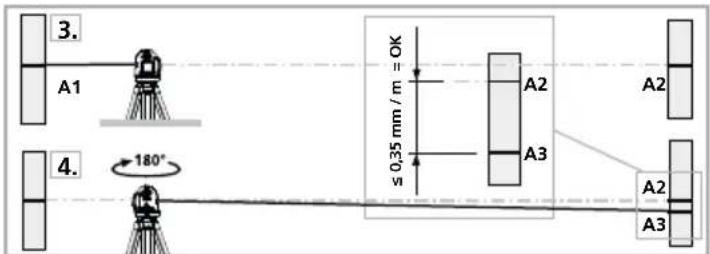
- Mark point A1 on the wall.
-
Turn the device through 180^ and mark point A2. You now have a horizontal reference between points A1 and A2.
-
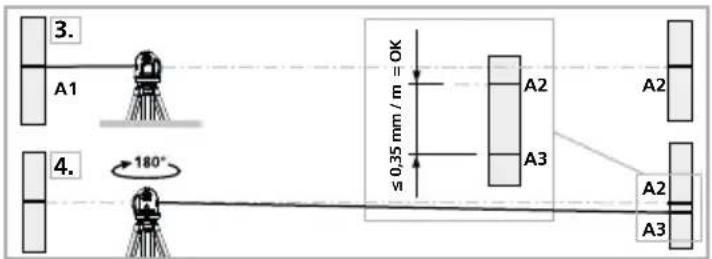
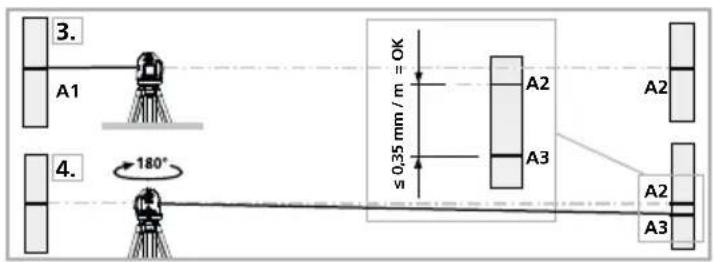
Position the device as near as possible to the wall at the height of point A1.
- Turn the device through 180^ and mark point A3. The difference between points A2 and A3 is the tolerance.
When A2 and A3 are more than 0.35mm / m apart, an adjustment is necessary. Contact your authorised dealer or else the UMAREX-LASERLINER Service Department.
Checking the vertical line:
Position the device about 5m from a wall. Fix a plumb bob with a line of 2.5m length on the wall, making sure that the bob can swing freely. Switch on the device and align the vertical laser to the plumb line. The precision is within the specified tolerance if the deviation between the laser line and the plumb line is not greater than ± 1.75mm .
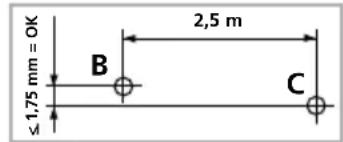
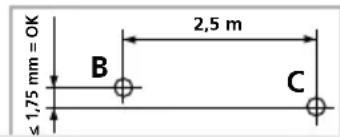
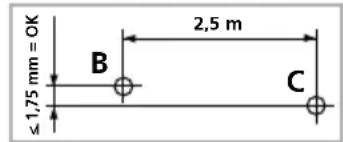
Checking the horizontal line:
Position the device about 5m from a wall and switch on the cross laser. Mark point B on the wall. Turn the laser cross approx. 2.5m to the right and mark point C. Check whether the horizontal line from point C is level with point B to within ± 1.75mm . Repeat the process by turning the laser to the left.
Regularly check the adjustment before use, after transport and after extended periods of storage.
Information on maintenance and care
Clean all components with a damp cloth and do not use cleaning agents, scouring agents and solvents. Remove the battery(ies) before storing for longer periods. Store the device in a clean and dry place.
| Technical data (Subject to technical alterations. 18W10) | |
| Self-levelling range ± 3° | |
| Precision ± 0.35 mm / m | |
| Operating range (depending on room illumination) | 15 m |
| Laser wavelength 650 nm | |
| Laser class 2 / < 1 mW | |
| Power supply | 4 x 1.5 V alkaline batteries (type AA) / rechargeable batteries |
| Operating time with 3 laser levels with 2 laser levels with 1 laser level | approx. 6 hours approx. 10 hours approx. 25 hours |
| Operating conditions | 0...50°C, 80%rH, no condensation, max. altitude 4000 m |
| Storage conditions -10°C...70°C, 80% rH, no condensation | |
| Weight (incl. batteries) 650 g | |
| Dimensions (W x H x D) 85 x 125 x 130 mm | |
EU directives and disposal
This device complies with all necessary standards for the free movement of goods within the EU.
This product is an electric device and must be collected separately for disposal according to the European Directive on waste electrical and electronic equipment.
Further safety and supplementary notices at: http://laserliner.com/info?an=supplalas3pl
Laserliner
!
| Tekniske data (Det tas forbehold om tekniske endringer. 18W10) | ||
| Selvnivelleringsområde ± 3° | ||
| Nøyaktigkeit ± 0,35 mm / m | ||
| Arbeidsområde (avhengig av omgivelseslys) | 15 m | |
| Laserbølgelengde 650 nm | ||
| Laserklass 2 / < 1 mW | ||
| Strømforsyning 4 x 1,5 V alkalibatterier (type AA) / oppladbare batterier | ||
| Driftstid med 3 lasernivær med 2 lasernivær med 1 lasernivå | ca. 6 timer ca. 10 timer ca. 25 timer | |
| Arbeidsbetingelser | 0...50°C, 80% rH,/DD,/DD,/DD,/DD,/DD,/DD,/DD,/DD,/DD,/DD,/DD,/DD,/DD,/DD,/DD,/DD,/DD,/DD,/DD,/DD,/DD,/DD,/DD,/DD,/DD,/DD,/DD,/DD,/DD,/DD,/DD,/DD,/DD,/DD,/DD,/DD,/DD,/DD,/DD,/DD,/DD,/DD,/DD,/DD,/DD,/DD,/DD,/DD,/DD,/DD, DD, DD, DD, DD, DD, DD, DD, DD, DD, DD, DD, DD, DD, DD, DD, DD, DD, DD, DD, DD, DD, DD, DD, DD, DD, DD, DD, DD, DD, DD, DD, DD, DD, DD, DD, DD, DD, DD, DD, DD, DD, DD, DD, DD, DD, DD, DD, DD, DD, DD, DDR, DDR, DDR, DDR, DDR, DDR, DDR, DDR, DDR, DDR, DDR, DDR, DDR, DDR, DDR, DDR, DDR, DDR, DDR, DDR, DDR, DDR, DDR, DDR, DDR, DDR, DDR, DDR, DDR, DDR, DDR, DDR, DDR, DDR, DDR, DDR, DDR, DDR, DDR, DDR, DDR, DDR, DDR, DDR, DDR, DDR, DDR, DDR, DDR, DDR, DD, DDR, DDR, DDR, DDR, DDR, DDR, DDR, DDR, DDR, DDR, DDR, DDR, DDR, DDR, DDR, DDR, DDR, DDR, DDR, DDR, DDR, DDR, DDR, DDR, DDR, DDR, DDR, DDR, DDR, DDR, DDR, DDR, DDR, DDR, DDR, DDR, DDR, DDR, DDR, DDR, DDR, DDR, DDR, DDR, DDR, DDR, DDR, DDR, DD, DD, DD, DD, DD, DD, DD, DD, DD, DD, DD, DD, DD, DD, DD, DD, DD, DD, DD, DD, DD, DD, DD, DD, DD, DD, DD, DD, DD, DD, DD, DD, DD, DD, DD, DD, DD, DD, DD, DD, DD, DD, DD, DD, DD, DD, DD, DD, DD,_DD, DD, DD, DD, DD, DD, DD, DD, DD, DD, DD, DD, DD, DD, DD, DD, DD, DD, DD, DD, DD, DD, DD, DD, DD, DD, DD, DD, DD, DD, DD, DD, DD, DD, DD, DD, DD, DD, DD, DD, DD, DD, DD, DD, DD, DD, DD, DD, DD, DD, MD, MD, MD, MD, MD, MD, MD, MD, MD, MD, MD, MD, MD, MD, MD, MD, MD, MD, MD, MD, MD, MD, MD, MD, MD, MD, MD, MD, MD, MD, MD, MD, MD, MD, MD, MD, MD, MD, MD, MD, MD, MD, MD, MD, MD, MD, MD, MD, MD, MD, DD, DD, DD, DD, DD, DD, DD, DD, DD, DD, DD, DD, DD, DD, DD, DD, DD, DD, DD, DD, DD, DD, DD, DD, DD, DD, DD, DD, DD, DD, DD, DD, DD, DD, DD, DD, DD, DD, DD, DD, DD, DD, DD, DD, DD, DD, DD, DD, DD, dd, dd, dd, dd, dd, dd, dd, dd, dd, dd, dd, dd, dd, dd, dd, dd, dd, dd, dd, dd, dd, dd, dd, dd, dd, dd, dd, dd, dd, dd, dd, dd, dd, dd, dd, dd, dd, dd, dd, dd, dd, dd, dd, dd, dd, dd, dd, dd, dd, dd, DD, DD, DD, DD, DD, DD, DD, DD, DD, DD, DD, DD, DD, DD, DD, DD, DD, DD, DD, DD, DD, DD, DD, DD, DD, DD, DD, DD, DD, DD, DD, DD, DD, DD, DD, DD, DD, DD, DD, DD, DD, DD, DD, DD, DD, DD, DD, DD, DD, HH, HH, HH, HH, HH, HH, HH, HH, HH, HH, HH, HH, HH, HH, HH, HH, HH, HH, HH, HH, HH, HH, HH, HH, HH, HH, HH, HH, HH, HH, HH, HH, HH, HH, HH, HH, HH, HH, HH, HH, HH, HH, HH, HH, HH, HH, HH, HH, HH, HH, DD, DD, DD, DD, DD, DD, DD, DD, DD, DD, DD, DD, DD, DD, DD, DD, DD, DD, DD, DD, DD, DD, DD, DD, DD, DD, DD, DD, DD, DD, DD, DD, DD, DD, DD, DD, DD, DD, DD, DD, DD, DD, DD, DD, DD, DD, DD, DD, DD, BB, BB, BB, BB, BB, BB, BB, BB, BB, BB, BB, BB, BB, BB, BB, BB, BB, BB, BB, BB, BB, BB, BB, BB, BB, BB, BB, BB, BB, BB, BB, BB, BB, BB, BB, BB, BB, BB, BB, BB, BB, BB, BB, BB, BB, BB, BB, BB, BB, BB, DD, DD, DD, DD, DD, DD, DD, DD, DD, DD, DD, DD, DD, DD, DD, DD, DD, DD, DD, DD, DD, DD, DD, DD, DD, DD, DD, DD, DD, DD, DD, DD, DD, DD, DD, DD, DD, DD, DD, DD, DD, DD, DD, DD, DD, DD, DD, DD, DD, CC, CC, CC, CC, CC, CC, CC, CC, CC, CC, CC, CC, CC, CC, CC, CC, CC, CC, CC, CC, CC, CC, CC, CC, CC, CC, CC, CC, CC, CC, CC, CC, CC, CC, CC, CC, CC, CC, CC, CC, CC, CC, CC, CC, CC, CC, CC, CC, CC, CC, DD, DD, DD, DD, DD, DD, DD, DD, DD, DD, DD, DD, DD, DD, DD, DD, DD, DD, DD, DD, DD, DD, DD, DD, DD, DD, DD, DD, DD, DD, DD, DD, DD, DD, DD, DD, DD, DD, DD, DD, DD, DD, DD, DD, DD, DD, DD, DD, DD, GG, Mål (B x H x D) 85 x 125 x 130 mm | |
I I I I I I I I I I I I I I I I I I I I I I I I I I I I I I I I I I I I I I I I I I I I I I I I I I I I I I I I I I I I I I I I I I I I I I I I I I I I I I I I I I I I I I I I I I I I I I I I I I I
3 PexnHa HAKNoHa
He oTcoeHnHry fHKCaTOp IJRA TpaHCnOPTnOBKn, nepeBecTI non3yHKoBbI nepeKlOuAteJIb (2) B noJIOXeHne "OFF" (BblKJI.) n BKIOUHTb pexm haKIOHa dIInTeJIbHbIM (3 cekyHdbI) HaxaTneM KHOKN 5. Bbl6paTb Na3epHbIe IyHu KNHkOy Bbl6opa (5). TepeMoXHO Co3DaBaTb HaKIOHHbIe NLOCKOCTN IIN yIbI hAKNoHa. B 3tOM pexmJe Ia3epHbIe IINHn 60JIbSe He BblpaBHNaIOTcA bTOMaTHueckn. TaKe COCTOHNe CnHaIIIN3npyetcnyTEM MIRAHnla3epHbIX IINHn.
IoproToBka K npOBepke KaII6pOBKn:
KaHbOBy Ka3epa MoXHO KOHTpoJIPOBaTb. UCTaHOBtB npI6Op NocepeHMeJy 2 cTeHaMn, paCToHHe MeJy KOTOpbIMN COCTaBnEe T He MeHee 5 M. BKnIOUHTe npI6Op, OCBO6OJN DnA 3TOrO fIKCaTOp dIra TpaHCnOPTupOBKn (Ja3epHbI KpeCT BKJIOUeH). HauNyUHne pe3yJIbTaTbI KaJIb6pOBKn MOxHO NOUYtB, ecII npI6Op yCTaHOBJIeH Ha IStaTbI.
PpOBepka KaJIn6pOBKn:
-
HaheCte Ha cTeHe ToKy A1.
2.Повернite npибор Ha 180°и hahecnite Toky A2.Tenepb y Bac ectb ropn3oHTaIbHaЯ IHHЯ Мжdy TocrkAmA1 n A2. -
NocTaBbTe npnbop kaK moXHo 6nHexe K CTHe Ha BBICOT ToCK A1. OtperynpyuTe npnbop.
4.Повернite np60р Ha 180°иHaHeCnTe Tocky A3.Pa3Hua Mekdy Toukamn A2 nA3 ABJRAETcIOnyCTmblM OTKIOHeHneM.

EcnA2nA3 paXoJATc 6OJIe Yem Ha 0,35 MM Ha KaKdIe M, Tpe6yETc HAcTpoJa. B 3OM cIyae Bam Heo6xOIMOCB8aTbCnABTOpHOBAHbIM DInIepom NII IN cepBnCHbIM OTJeNOM UMAREX-LASERLINER.
PpOBePkA BepTKKaJIbHOJ JINHIN:
Noctabte npnbop Ha paoctoHn Okono 5 M ot ctebl. C nomoo bio hypa 3akpeiTe Ha cteHe OTBeC dInHO 2,5 M. C nomoo bio khoNok V1 u V2 oTperynpyte na3ep, coBmecTb ero lyu c linnei OTBeca. OTKIOHeHne MeJdy na3epom N u Hypom OTBeCa no BepTKKaJIH He doJIxHo ppeBbIaTb ± 1,75 MM.
PpOBepKa rOpN3oHTaJIbHOJ LInHn:
IocTaBbTe npi6Op Ha paCCToHnO kONo 5 M OT cTeHb I BKJIIOUHTe
peKePcCTHbI Ja3ep. CdeNaIte OTMeTKy B Ha cTHe. NObopaHbAte npi6Op,
noka JIa3epHbI Kpct He cDunHeTcra Ha 2,5 M BnpaBO. CdeNaIte OTMeTKy C.
PacCToHHe MeJxdy Tropn3OHTaJIbHbIMn LInHnAMn, PPOBeJeHHbIMn Yepez 3TN
DBe TOckN, He DoJIxHo npeBbIaTb ± 1 ,75 MM. NOBToprTe 3aMepbl,
NobopauVBaI npi6Op BJIeBO.

PeryIpaHNo npOBepaIte IocTnpOBky nepei NcnoJIb3OBAHneM, nocIe TpaHCnOpTnpOBKn I dIInTeJIbHOro XpaHeHHa.
HΦopMaζη no o6cnyxNbHaHnO u yXoγ
Bce KOMnoHentbO uHnAaTb CnEka BnaJxHO CaIeTKo; He NcNoJIb3OBaTb YnCTaUne CpeIcTBa, a6pa3NBhIe MaTePnJIb I n paCTBOpHTeN. Ipeep dIInTeJIbHbIM XpaHeHnEM npi6bopa o8a3aTeJIbHO BbIHyt b 13 Hero 6aTaPeIO/ 6atapeN. Pnp6op XpaHNTb B YnCTOM n cyXOM MeCTe.
Ja3epHe BnnpomHIOBHaHH! He cnpraMOByBaTn nOJIaN Ha npOMiHb!
Ia3ep Klacy 2
<1 MBT·650 HM
EN 60825-1:2014
- YBara: He duBntncsHa npMn nn BiD6tN npomihb.
-He haoDHTIa3epHnI pomHb Ha IIOeJ. - JaepHe BnpomHOBaHHKnacy 2 NotpanbB OKO, IInbHO 3akpntu Oti Ta HeraiHo BiDBeCTn rOIOBy Bi npomeHa.
-3a6opohnEbCnINBNTncHa na3epHnI npomHb a6o Ioro dzepKaJIbHe BiO6paXeHHape3 6ydb-aki ONTHHi npuadn (nyny, mikpockon, biHKlb too).
-Пдчасвикористаняпшиладу пазерни ромінь He noBHeH 3HaXoДИТСЯ ha pIBHi oueN (1,40 - 1,90 M). - Nobepxhi, kI do6pe BiIDbBAIOB cBIITNO, dzepkaJIbHI a6o 6nckyHi nobepxhi NOBHHI 3aTyIaTNCra nIq Yac ekcnnyatauII na3epHnx npictpoiB.
-Пд ус поведеня робит полneyу标明юбинх дорг загалього корпctуваннашлaxy пожджени лазерно поменя baxано BCTaHOВNTN oropoxi ta nepehoChi utn, a 3OHу diлazерно поменя познUTN пореджваими 3HaKaMn.
Bka3iBkn 3Texhikn 6e3neKn
KhoNka Bn6Opy Ia3epHnx Jhiin / PekIM Haxiny yBIM.

ДлгТранспортуваимьВci naЗери cnid 3abЖди ВIMNKaTN, МятнкИ 6LOkyBaTN, ВIMNKaЧ nepeBecTN B NOLOженЯ "OFF"!
IHnKaia Low Bat.: npHn3bKomy pIBHi 3apany 6atapei Bci na3epHI liHH 6nMaIOb npOTAROM 3cekyHd, a NOTIM BMnKaIOTBcA.
2 Topn3OHTaJIbHe i BepTnKaJIbHe HibeJIIOBaHHa
3Hrtn CNTemy 6nOKyBaHHBMMKau (2) nepeBecTn B noNoXeHH "ON". 3'RAIeTBcra TOpN3OHTaJIbHa Ia3epHa liH. KhoNkoIO Bu6Opy MoXHa BMNKaTI Na3epHi liHII NooDInHci.
I I y pa3i bixoyn 3a mexi diaanaohy aBOMATnHOrO HIEJIOBAHnHa 3" na3epHI iHII noHnAOTb 6JIMaTn. Po3taWyIne npnilad Tak, oob biH nOtpnB y mexi diaanaohy aBOMATnHOrO HIEJIOBAHnH.
EpxnM Haxny
CnCTemy 6IIOkyBaHHMaJTHNka NiJ cac TpaHCnopTyBaHH He BIMNKaTN, NOB3yHKOBn nepemNKauch (2) nepeBeCTn y noJoxeHH "OFF" ta yBIMKHyTN pexm HaxIny TpNBALIM HATNCKaHHM (3 cekyHn) KnaBiSi 5. KhoNkoO (5) Bbpatn Ia3ep. Tenep MoXHa npauOBaTN C NoxINMI NOBepXHaMn a6o HaxInam. Y cbomy pexmI na3epHI liHII Bxe ABTomaTHNO He BupIBHIOITbcr. Ppo ce cnoBIuae 6JImaHHa na3epHNx liHi.
PiIroTobKa nepeBipKn KaJI6pyBaHnHa:
Kani6pyBaHHa na3epa moXHa nepeBiprTn. YcTaHOBItb npuJa y ceHtrpi mix 2 CTiHaMn, 0o BiDanaHei OHa BID oNDHOI zOHaImeHs Ha 5 M. BBIMKHyTN npuJad, dIra 3bOrO 3HrTn cICTeMy 6JIokyBaHHa (Jia3epHn Xpctt BBIMKn.) IIN ONTImaJIbHOI nepeBipKn BVkOpNCTOByBaTn StTaTnB.
Ipebipka kani6pyBaHHa:
-
NomitbTe Kpanky A1 Ha CTHI.
2.Поверніприлад Ha 180° i nomітБе кpanky A2.Tenep mix Kpankamn A1iA2 BCTaHOBJIeHe rOpN3OHTaJIbHe BiДHошЕHHЯ. -
BCTaHOBHT npuaJyKOMora 6nXue do CTiH Na BucOTi KpanKn A1.
- Поверніт b пилад Ha 180° i nomіт bte крапку A3. Пзни міх A2 i A3 e дonyckom.

A2iA3 po3pi3HraTbc8 6inbwe Hx Ha 0,35 MM / M, nToPi6He IocTnpyBaHH.
3BepHtbcjdoKpamHnuiuBcepbicnBidinUMAREX-LASERLINER.
Ipebipka BepTKaJIbHOI liHII:
BCTAHOBHTN npnlaH ha BiDCTaHi npn6I. 5 M BiD CTINH. Ha CTIH npNKpInNTN BNCOK 3 WHypOM DOBXHIO 2,5M, BVCK NOBHN H BInbHO pyXaTcR. BBIMKHyTN npnlaH i HabecTN BePTkAJIbHNI Ja3ep Ha SHyp. ToHICTb 3HaXoDHTBC R Mexax IOnyCKy, kUO BiIXnJIeHHra MIX IInIEIO Ja3epa i WHypOM CTAHOBTb He 6InbWe ± 1,75 MM.
Ipebipka ropu3oHTaJIbHOI liHii:
BCTAHOBHTN npHnad Ha BiDCTaHI npn6I. 5 M BiD CTiHi I BBIMKHyTN na3epHn Xpect. NomiHTN Ha cTIHi Kpanky B. NObepHyTn na3epHn Xpect npn6I. Ha 2,5 M npabOpuy i nomHTN Kpanky C. NepebipTu, YH rOpn3OHTaNbHa liHia nyHKTy C 3hAxoNDtBCra Ha TiJ Xe Bucoti ± 1,75 MM, 00 i nyHKTy B. NOBTOPTu npoec 3 NoBepTaHHm libopyu.

PeryIpyHNo nepeBipRte IocTnpyBaHHn peep BnKOpNCTaHHm, nCn TpaHCnOpTyBaHHra Ta TpNbAloro 36epirAHnn.
Ihctpykui3TexHiHoro 06cnyroByBaHHra Ta dOgna
Bci KOMnoHEnTn CnI d OunuBaTu 3BOJooKeHO TKAHHIO, YHKaTI 3aCTOCyBaHHa MIOUHX a6o ChTqHx 3acO6iB, a TaKoX pozHHNKIB. Ipeep TpRbAINM 36epirAHNm CnI d BNTaHTn eJeMeHr (-TN) XKNBHeHH. 36epiratn npncpti y uNCTOMy, cyxomy Micui.
Uldised ohutusjuhised
V = raza laser verticala
Hnctpykun 3a 6e3oNaCHOCT
Pa6ota cIa3epn ot Klaac 2
Ja3epHo JbueHne!
He IeJaTe CpeUy Ia3epnIy IbY!
Ja3ep klae 2
<1MBT·650HM
EN 60825-1:2014
-BHIMaHHe:HeIeJaTeBINpeKTHNnOtpaEHHJIb4.
-He HacouBaIte Ia3epHnI JbU KbM Xopa.
- Ako Ia3epHo IbueHne OT KlaC 2 nonaIHe B OKTo, OunTe Tpr6Ba Cb3HaTeJHO da ce 3aTBoPrt N IraBATA BeHaRa Da CE IpemeCTn HaCTpaHn OT JbHa.
- Hnkora He rIeJaTe Ia3epHnI bU nn HeroBOTo OtpaxKeHne C ontuHn np6Opn (nya, MkPOcKoN, daneKoRJIed, ...).
- He n3no3BaIte Ja3epa Ha HnBOTO Ha OHTe (1,40...1,90 M).
- IIO BpeMe Ha pa6oTa C na3epHn yCTpoiCtBa cnIHO OTrpa3raBauNTe,OrneJaIHNTe NIN rnaHcObnte IOBbpxHOCTu Tp6Ba Da ce NOKpNBaT.
- Ha MeCTa C O6IeCTBcH TpaΦN IO Bb3MOXHOCT OrpaHnHaBaIte NbTg HA NbTu Cape KanaU INI INpeHocMn CTeH N O6O3HaueTe 30HaTa Ha Ja3epa C npdeynpeDntenH Ta6eH.
INHCTpykun 3a 6e30nacHOCT
Pa6oTa C eJIeKTpOMaHHTHO JbYeHne
-ИзмерВATEннЯурдса3впрдпсаняигранчнite CTOnHOCTN 3a eJektpomarHHTHaTc bBmecTnMoCT cbrnaCHOДиpeKtNBA2014/30/ECOTHOCHOeJektpomarHHTHaTcCBMecTnMoCT.
- Tp6Ba Da ce cna3BaT IokaJIHnTe OrpaHnueHnB pa6oTaTa, KaTo HAp. B 6OJIHnU, B CamOJETn, Ha 6eH3NHOCTaHcnn nIi B 6IIN3OCT Do IInca C neICMeKbpN. CbIeCTByBa Bb3MOxHOCt 3a OnaCHO BnIaHne nIi CMyUeHne OT eNeKTPOHNu ypeNi.
CneuaJIHn XapaKTepeNCTnKn Ha npOdyKTa

AToMaTHUHO NOpaBHaBe Ha ypeHa Pe3 MaHTHHO 3aTnxBaIa MaxoBa CnCTeMa. YpeBc Ce NoCTaB R OCHOBHO NIOJKeHne I Ce NpPaBHbCaMOCToTeHNO.

TpaHcnpTha BLOKINPOBKA: YpeIbT ce 3aunTaBa npn TpaHcnpT Upe3 MaxoBa BLOKINPOBka.

CneuHaHn IIOJN C BnOcKa MoUHocr HeepuPa MHOrO CBeTnI Na3epHn IINHN B ypeNi cTexHOnoTn PowerBright. Te octaBt BnIMn Ha No-DbIg Pa3CToRn, npn o6KpbXeHne CApka CBETnHa N Bbpxy TbMn IOBbPxHOCTN.
V = fuggoleges lézer
S = dōlèsszög Funktion

1H360° 2V360° S
Elemek behelyezese
- Three-dimensional laser with a horizontal and two vertical 360° laser circles and slope function for aligning tiles, wall studding, windows, doors etc.
- General safety instructions
- Safety instructions
- Special product features
- Number and direction of the lasers
- Inserting the batteries
- 2Horizontal and vertical levelling
- Slope mode
- Preparing the calibration check:
- Performing the calibration check:
- Checking the vertical line:
- Checking the horizontal line:
- Information on maintenance and care
- EU directives and disposal
- Laserliner
- PexnHa HAKNoHa
- IoproToBka K npOBepke KaII6pOBKn:
- PpOBepka KaJIn6pOBKn:
- PpOBePkA BepTKKaJIbHOJ JINHIN:
- PpOBepKa rOpN3oHTaJIbHOJ LInHn:
- HΦopMaζη no o6cnyxNbHaHnO u yXoγ
- Bka3iBkn 3Texhikn 6e3neKn
- Topn3OHTaJIbHe i BepTnKaJIbHe HibeJIIOBaHHa
- EpxnM Haxny
- PiIroTobKa nepeBipKn KaJI6pyBaHnHa:
- Ipebipka kani6pyBaHHa:
- Ipebipka BepTKaJIbHOI liHII:
- Ipebipka ropu3oHTaJIbHOI liHii:
- Ihctpykui3TexHiHoro 06cnyroByBaHHra Ta dOgna
- Uldised ohutusjuhised
- Hnctpykun 3a 6e3oNaCHOCT
- INHCTpykun 3a 6e30nacHOCT
- CneuaJIHn XapaKTepeNCTnKn Ha npOdyKTa
- Elemek behelyezese
Brand : Laserliner
Model : SuperPlaneLaser 3D
Category : Laser pointer