USER MANUAL NikolaTesla Libra BLF83 ELICA
EN Use and Maintenance
Download your Manual
3b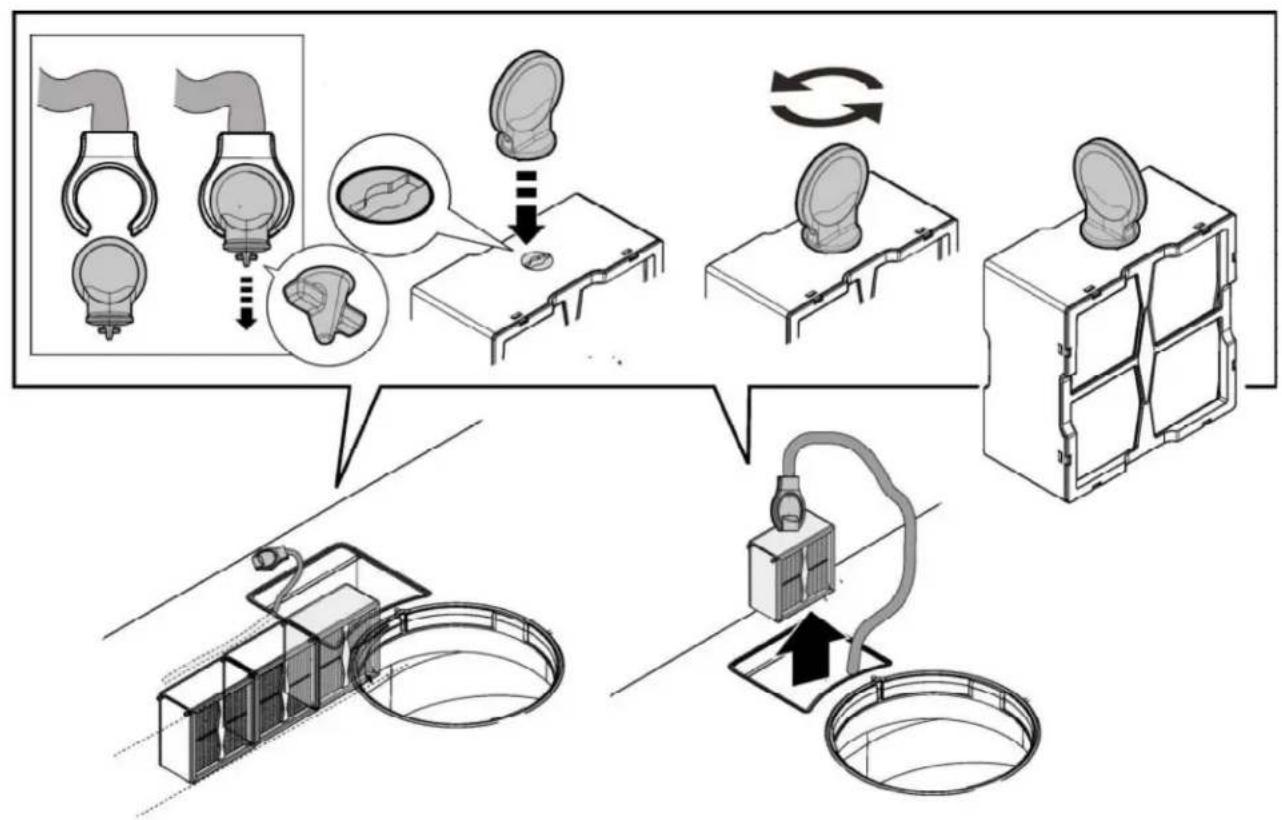
IT
1. INSTRUCTIONS FOR USE
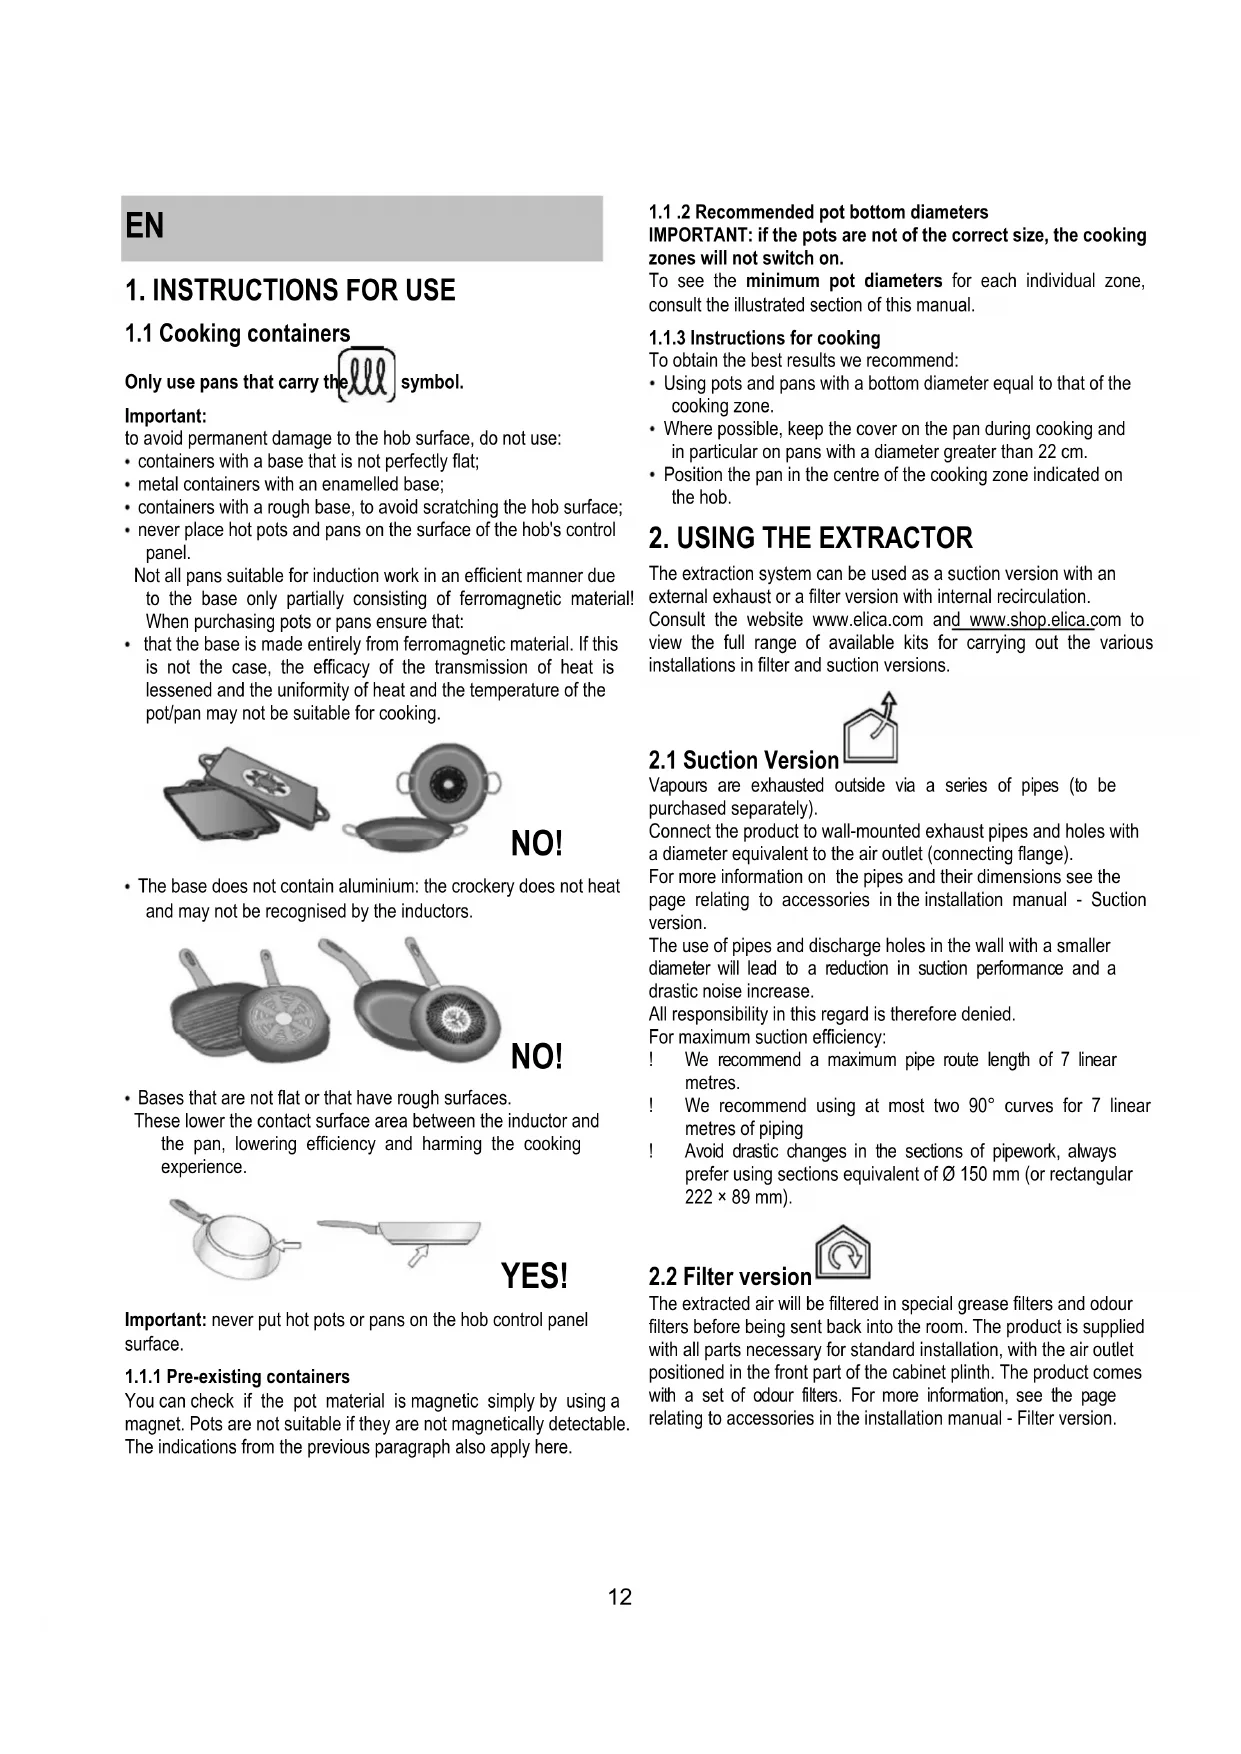
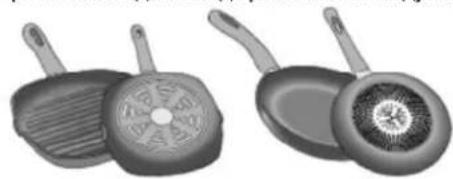
1.1 Cooking containers Only use pans that carry the symbol.
Important:
to avoid permanent damage to the hob surface, do not use:
- containers with a base that is not perfectly flat;
- metal containers with an enamelled base;
- containers with a rough base, to avoid scratching the hob surface;
- never place hot pots and pans on the surface of the hob's control panel.
Not all pans suitable for induction work in an efficient manner due to the base only partially consisting of ferromagnetic material! When purchasing pots or pans ensure that:
- that the base is made entirely from ferromagnetic material. If this is not the case, the efficacy of the transmission of heat is lessened and the uniformity of heat and the temperature of the pot/pan may not be suitable for cooking.
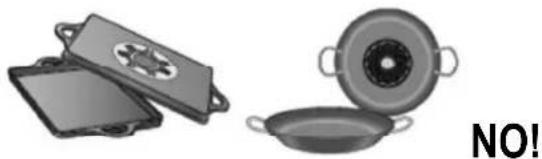
- The base does not contain aluminium: the crockery does not heat and may not be recognised by the inductors.
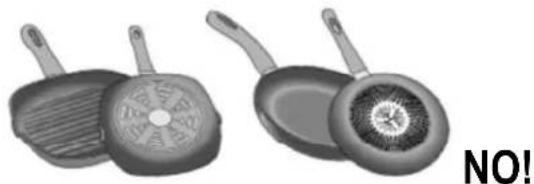
- Bases that are not flat or that have rough surfaces.
These lower the contact surface area between the inductor and the pan, lowering efficiency and harming the cooking experience.
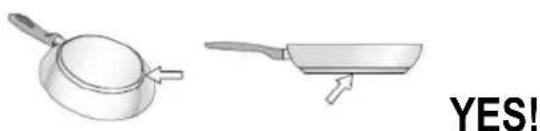
Important: never put hot pots or pans on the hob control panel surface.
1.1.1 Pre-existing containers
You can check if the pot material is magnetic simply by using a magnet. Pots are not suitable if they are not magnetically detectable. The indications from the previous paragraph also apply here.
1.1.2 Recommended pot bottom diameters
IMPORTANT: if the pots are not of the correct size, the cooking zones will not switch on.
To see the minimum pot diameters for each individual zone, consult the illustrated section of this manual.
1.1.3 Instructions for cooking
To obtain the best results we recommend:
- Using pots and pans with a bottom diameter equal to that of the cooking zone.
- Where possible, keep the cover on the pan during cooking and in particular on pans with a diameter greater than 22 cm.
- Position the pan in the centre of the cooking zone indicated on the hob.
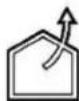
The extraction system can be used as a suction version with an external exhaust or a filter version with internal recirculation.
Consult the website www.elica.com and www.shop.elica.com to view the full range of available kits for carrying out the various installations in filter and suction versions.
2.1 Suction Version
Vapours are exhausted outside via a series of pipes (to be purchased separately).
Connect the product to wall-mounted exhaust pipes and holes with a diameter equivalent to the air outlet (connecting flange).
For more information on the pipes and their dimensions see the page relating to accessories in the installation manual - Suction version.
The use of pipes and discharge holes in the wall with a smaller diameter will lead to a reduction in suction performance and a drastic noise increase.
All responsibility in this regard is therefore denied.
For maximum suction efficiency:
We recommend a maximum pipe route length of 7 linear metres. We recommend using at most two 90° curves for 7 linear metres of piping! Avoid drastic changes in the sections of pipework, always prefer using sections equivalent of 0.150 mm (or rectangular 222 x 89 mm).

2.2 Filter version
The extracted air will be filtered in special grease filters and odour filters before being sent back into the room. The product is supplied with all parts necessary for standard installation, with the air outlet positioned in the front part of the cabinet plinth. The product comes with a set of odour filters. For more information, see the page relating to accessories in the installation manual - Filter version.
3. OPERATION
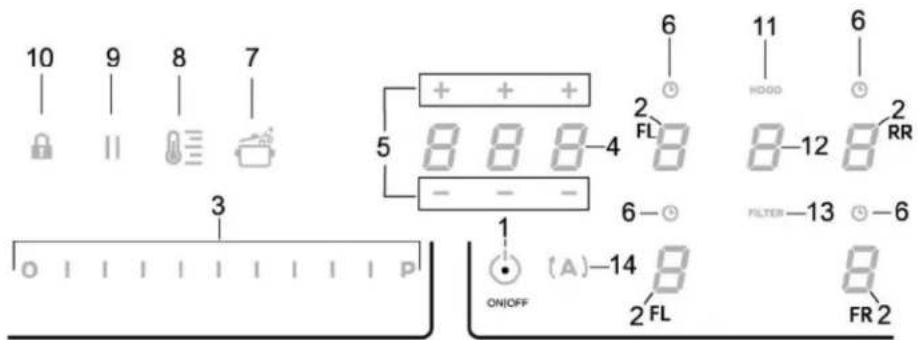
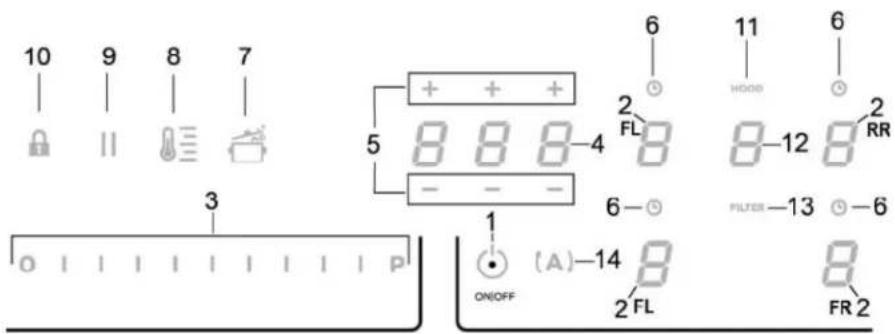
3.1 Control panel
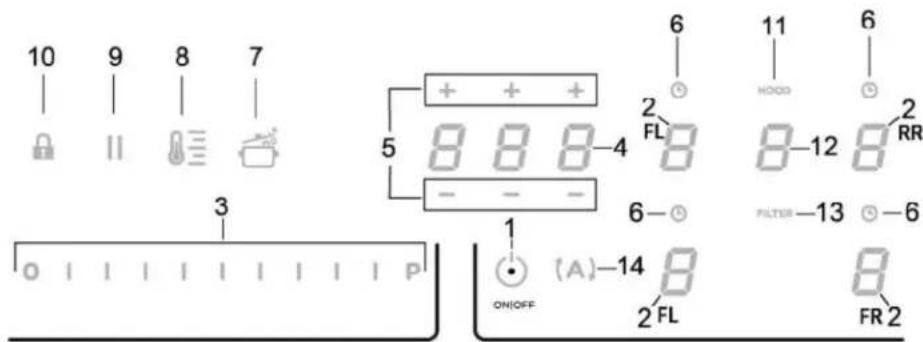
- ON/OFF hob/extractor system
- Selection of the cooking zones / Cooking zone display
- Increase/decrease cooking power level and extraction speed (power). Display the cooking power level and extraction speed (power).
- Activate "STAND ALONE" timer
Display: "STAND ALONE" timer / Cooking Zones Timer.
- Increase/Decrease "STAND ALONE" Timer time / Cooking Zones timer
- Activation of Cooking Zones Timer. Indicator of Cooking Zones Timer active.
- Automatic Heat Up Activation.
3.2 Using the hob
3.2.1 Things to know before starting
This manual describes the main functions. Use the QR code at the front of the manual to access the full instructions online. All the functions of this hob respect the most rigorous safety norms. For this reason:
- Some functions do not activate, or deactivate automatically, if pans are removed or when they are incorrectly positioned on top of the hob.
- In other cases functions deactivate automatically after a few seconds when the selected function requires further settings that have not been input.
Wait for the display to turn off before approaching the cooking zone.
- Temperature Manager activation (Warming Function)
- Pause
- Key Lock
- Indicator Extractor active
Activate Filter Saturation Indicator
- Extractor Selection/Activation Extractor Display Display saturation carbon/ceramic Filter - Grease filter
- Reset Filter Saturation
- Activation of extractor automatic function
3.2.2 Cooking zone display
On the displays relating to the cooking areas, the following is indicated:
| Cooking zone on | 0 |
| Power level | 1...9-P |
| Residual Heat Indicator | H |
| Pot Detector | U |
| Bridge Function active | A |
| Temperature Manager Function active | U |
| Pause function | II |
| Automatic Heat UP function | R |
3.2.3 Hob features
- Safe Activation: The product is activated only in the presence of pots on the cooking zone: the heating process does not start or is interrupted if there are no pots, or if these are removed.
- Pot Detector: The product automatically detects the presence of pots on the cooking zones.
- Safety Shut Down: For safety reasons, each cooking zone has a maximum operating time, which depends on the maximum power level set.
- Residual Heat Indicator: When switching off one or more cooking zones, the residual heat is indicated with a specific visual signal on the display of the corresponding zone by the " " symbol.
3.2.4 Operation
Note: activate the required zone first
- Switching on: Briefly touch ON/OFF (1) hob/extractor: the symbol will light up;
with a long press, all available functions will be visible for a few moments, after which only the main ones will remain active; the others may be used, and are activated subsequently during use of the device.
Press ON/OFF (1) again to switch off.
- Selecting the cooking zones
Press (touch) briefly the Selection/Display (2) area corresponding to the desired cooking area.
Power Level
Touch and slide your fingers along the Selection bar (3): to the right to increase the power level; to the left to decrease the power level.
The power level set will be displayed in the Selection/Display area (2)
There are 9 power levels available + an intensive power level indicated on the display by the "P" symbol (Power Booster).
The "P" power level (Power Booster) remains active for 5 minutes, after which the power returns to the previous level.
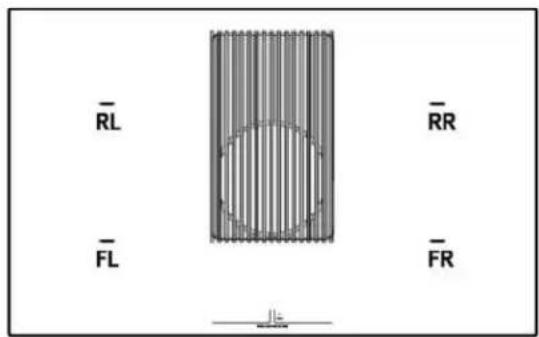
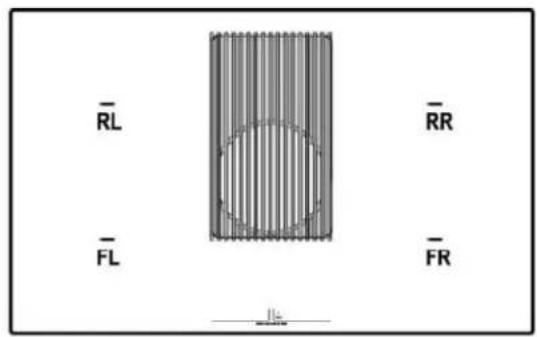
- Bridge Zones: The cooking zones FL ("Master") and RL ("Secondary") and the zones FR ("Master") and RR ("Secondary") can work as a pair or in combined mode creating a single zone thanks to the Bridge function (2 in total: 1 on the right and 1 on the left) with the same power level. This function allows evenly distributed cooking with large-sized pots and pans.
To activate the Bridge Function:
- select both cooking zones to be used simultaneously
- on the Display (2) of the "Secondary" cooking zone the "I" symbol appears
- using the Selection bar (3), it will be possible to set the Operating power level, which will be shown in the Display (2) of the "Master" cooking zone
- to disable the Bridge Function all you have to do is to repeat the activation procedure
- Power Limitation
The Power Limitation function allows the product to be used while limiting its maximum consumption.
Note: the setting must be carried out with the machine switched off, without pressing the ON/OFF (1) button, at the moment the hob is connected to the electrical system, or within 2 minutes of reconnecting to the electrical system.
To set the Power Limitation:
(which will flash, usually for the first 2 minutes after powering the product on)
- continue to press and hold (A), press all the areas, one at a time, of the Selection/Display (2) of the Cooking Zones in a clockwise direction starting from the front right zone (FR)
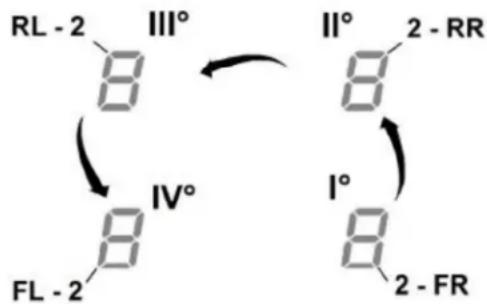
- on each press a brief audible signal will sound
- once all of the Display (2) has been pressed, the A button can be released:
- the Display (2) of the Right Left (RL) zone will display in an alternating sequence "C" and "0", to indicate that the settings can be carried out:
select the Display (2-RL)
then slide on the Selection Bar (3), until the display shows the symbols "C" and "8",
On the Display (2-FL), the current setting will be shown. $0 = 7.4 kW is the default setting.
1 = 4.5 kW,2 = 3.1 kW.
To change the Power Limitation setting:
- Press the Display (2) on the Front Left (FL) zone.
- Then slide on the Selection Bar (3) to make the new setting.
- To save the selection made, press the ON/OFF (1) button for 2 seconds; an extended audible signal will be emitted to confirm the setting.
3.2.5 Use of the scale - Product - Keys - Display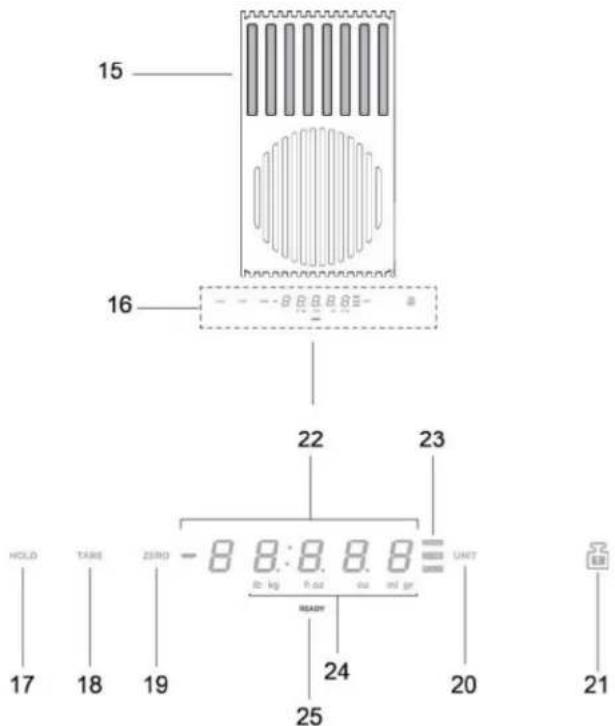
- Weighing area
- Display/Commands
- HOLD function
- TARE function
- ZERO function
- UNIT function
- LOCK function
- Numeric display of the scale
- Indicator of the function in use Indicator of the unit of measurement
- in use
- Scale indicator
The product is equipped with a scale for food incorporated
IMPORTANT:
when using the scale with pots or containers larger than 0.20cm , it is advisable to switch off the suction of the hood in order to avoid affecting the measurement of the weight;
NOTE = The pot or container must always be centred on the weighing area, avoiding to obstruct the suction area.
NOTE = the maximum load of the scale is 10KG; consider a tolerance of +l - 2g on the value of each individual weighing.
Operation
- Switch-on
To activate the scale tap the weighing area (16) or place the product to be weighed on the area itself; the display (22) activates showing a weight equal to zero or equal to the weight of the product
NOTE = if in the weighing area are already present products and these are removed, the scale will activate showing the weight of the product removed with a negative sign; vice versa, if you add other products, the scale will activate showing only the weight of the last product added
- Switching off
The scale switches off automatically: - after 2 minutes, if there are no objects on the weighing area - after 8 minutes, if there are objects on the weighing area
- UNIT function
The scale is set by default on the metric measurement system, in grams; press "UNIT" (20) to change the unit of measurement; the unit of measurement in use is displayed below the display of the scale, in the display (24)
- ZERO function
The function 'ZERO' (19) allows to bring "to zero" the numeric display of the scale, whether there are products in the weighing area or not (15); NOTE = the indicator ZERO (23) goes off when products are added or removed from the weighing area (and the weight of the products will be shown);
TARE function
The function "TARE" (18) allows to gradually weigh different foods without having to remove them from the weighing area, and be able to have both the weight of each single food that total weight use:
- position the first product in the weighing area, the display (22) displays the weight "1"
- press "TARE" (18), the weight in the display (22) is reset
- add another product in the weighing area, the display (22) displays the weight "2"
- press again "TARE" (18) the display (22) displays the weight "1" + the weight "2"
NOTE = it is possible to add products up to the maximum load of the scale
NOTE = to exclude the weight of container from the total weight, carry out initially the tare through the "ZERO" (19) function NOTE = to exit from the function "TARE" press "ZERO" (19)
HOLD function
The "HOLD" function (17) allows you to store the weight currently displayed and then recall it to add or subtract it from the new weight on the scale. The stored weight remains in memory until the scale is switched off.
Use:
- Place the product in the weighing area.
- Keep "HOLD" (17) pressed until the weight in the display starts to flash: the value has been stored.
NOTE: You may proceed by removing the weight from the scale and use it in all its functions.
NOTE: Repeat a new long press to store a new weight; only the last weight saved will remain in memory.
By pressing "HOLD" (17) at any time you can view the stored value; it appears and flashes for a few seconds in the display (23). Within this time, pressing "HOLD" (17) again adds the stored weight to the weight on the scale. The display (23) shows the total value and the bright indicator "HOLD" (23) remains lit to inform that the function is still active.
By pressing "HOLD" (17) again, the stored weight is subtracted from the weight shown in the display. The display (23) shows the value of the difference and automatically exits the function.
Example:
- Stored weight: 1 kg. Weight on the scale when calling the function: 2 kg. Weight "added" that appears in the display: 3 kg (1 kg + 2 kg). Weight "subtracted" before exiting the function: 2 kg (3 kg - 1 kg).
LOCK function
The "LOCK" function (21) is used to prevent the scale from
being activated when various objects are placed in the weighing area.
To activate this function, hold "LOCK" (21) pressed until the scale display turns off.
Do the same to deactivate the function: hold "LOCK" (21) pressed until the scale display turns back on.
NB: after 30 minutes of the "LOCK" function being active, the scale turns off and "LOCK" is deactivated.
- Switching on: Briefly touch ON/OFF (1) hob/extractor: the symbol lights up.

Touch again to switch off.
Switching on the extractor:
- Touch the Selection Zone (12) to activate the extractor.
Touch the Selection Zone (12) to activate the extractor.
- The extractor is equipped with 3 levels of extraction speed (power). Touch and slide your fingers along the Selection bar (3): towards the right to increase or to the left to decrease the extraction power.
The extractor is equipped with 3 levels of extraction speed (power). Touch and slide your fingers along the Selection bar (3): towards the right to increase or to the left to decrease the extraction power.
The extraction power will be displayed in the Selection/Display (12) area
The product has 2 additional power levels (above level 3).
The product has 2 additional power levels (above level 3)
- Power Booster 2: timed for 5 min.
Power Booster 2: timed for 5 min.
after which the power returns to the previously set level.
Touch and slide with the fingers along the Selection bar (3) (over level 3) and activate the Power Booster 1
The Power Booster level 1 is indicated in the Selection / Display area (12) with the number "4" flashing
Touch and slide with the fingers along the Selection bar (3) (over level 3) and activate the Power Booster 2
The Power Booster level 2 is indicated in the Selection / Display area (12) with the symbol P" flashing
3.4 Power tables
| Power level | Cooking type | Use (depending on cooking experience and habits) |
| Max power | P | Heat quickly | raises the temperature of food in a short space of time to boiling point water, or to quickly heat cooking liquids |
| 8-9 | Fry - boil | browning, starting cooking, fry frozen products, boil quickly |
| High power | 7-8 Brown - fry - boil - grill | browning, fast rolling boil, cooking and grilling (for brief periods, 5-10 minutes) | |
| 6-7 Brown - cook - stew - fry - grill | browning, slow rolling boil, cooking and grilling (for medium periods, 10-20 minutes), pre-heat accessories | |
| Medium power | 4-5 | Cook - stew - fry - grill | stewing, light rolling boil, cooking (for long periods), dressing pasta |
| 3-4 | Cooking - simmering - thickening - creaming | longer cooking (rice, sauces, roasts, fish) with accompanying liquids (e.g. water, wine, stock, milk), dressing pasta |
| 2-3 | Cooking - simmering - thickening - creaming | longer cooking (volumes less than one litre: rice, sauces, roasts, fish) with accompanying liquids (e.g. water, wine, stock, milk) |
| Low power | 1-2 | Melt - thaw - keep warm - stir | melting butter, gently melting chocolate, defrosting small products |
| 1 Melt - thaw - keep warm - stir | keeping small portions of just-cooked food warm or maintaining dishes at serving temperature and creaming risottos | |
| OFF 0 Support surface | | Hob in stand-by or off (possible presence of residual heat from the end of cooking, signalled by H-L-O) |
4. MAINTENANCE
Caution! Before any cleaning or maintenance, make sure the cooking zones are switched off and the heat indicator has turned off.
4.1 Maintaining the hob
4.1.1 Cleaning
The hob must be cleaned after each use.
Important: Do not use abrasive sponges or pads, they may ruin the glass. Do not use irritant chemical detergents such as oven sprays or stain removers. After each use, let the hob cool down completely to remove encrusted on dirt and stains. Use a soft cloth, paper towel or specific products to clean the hob (follow the Manufacturer's instructions).
DO NOT USE STEAM JET CLEANERS!!!
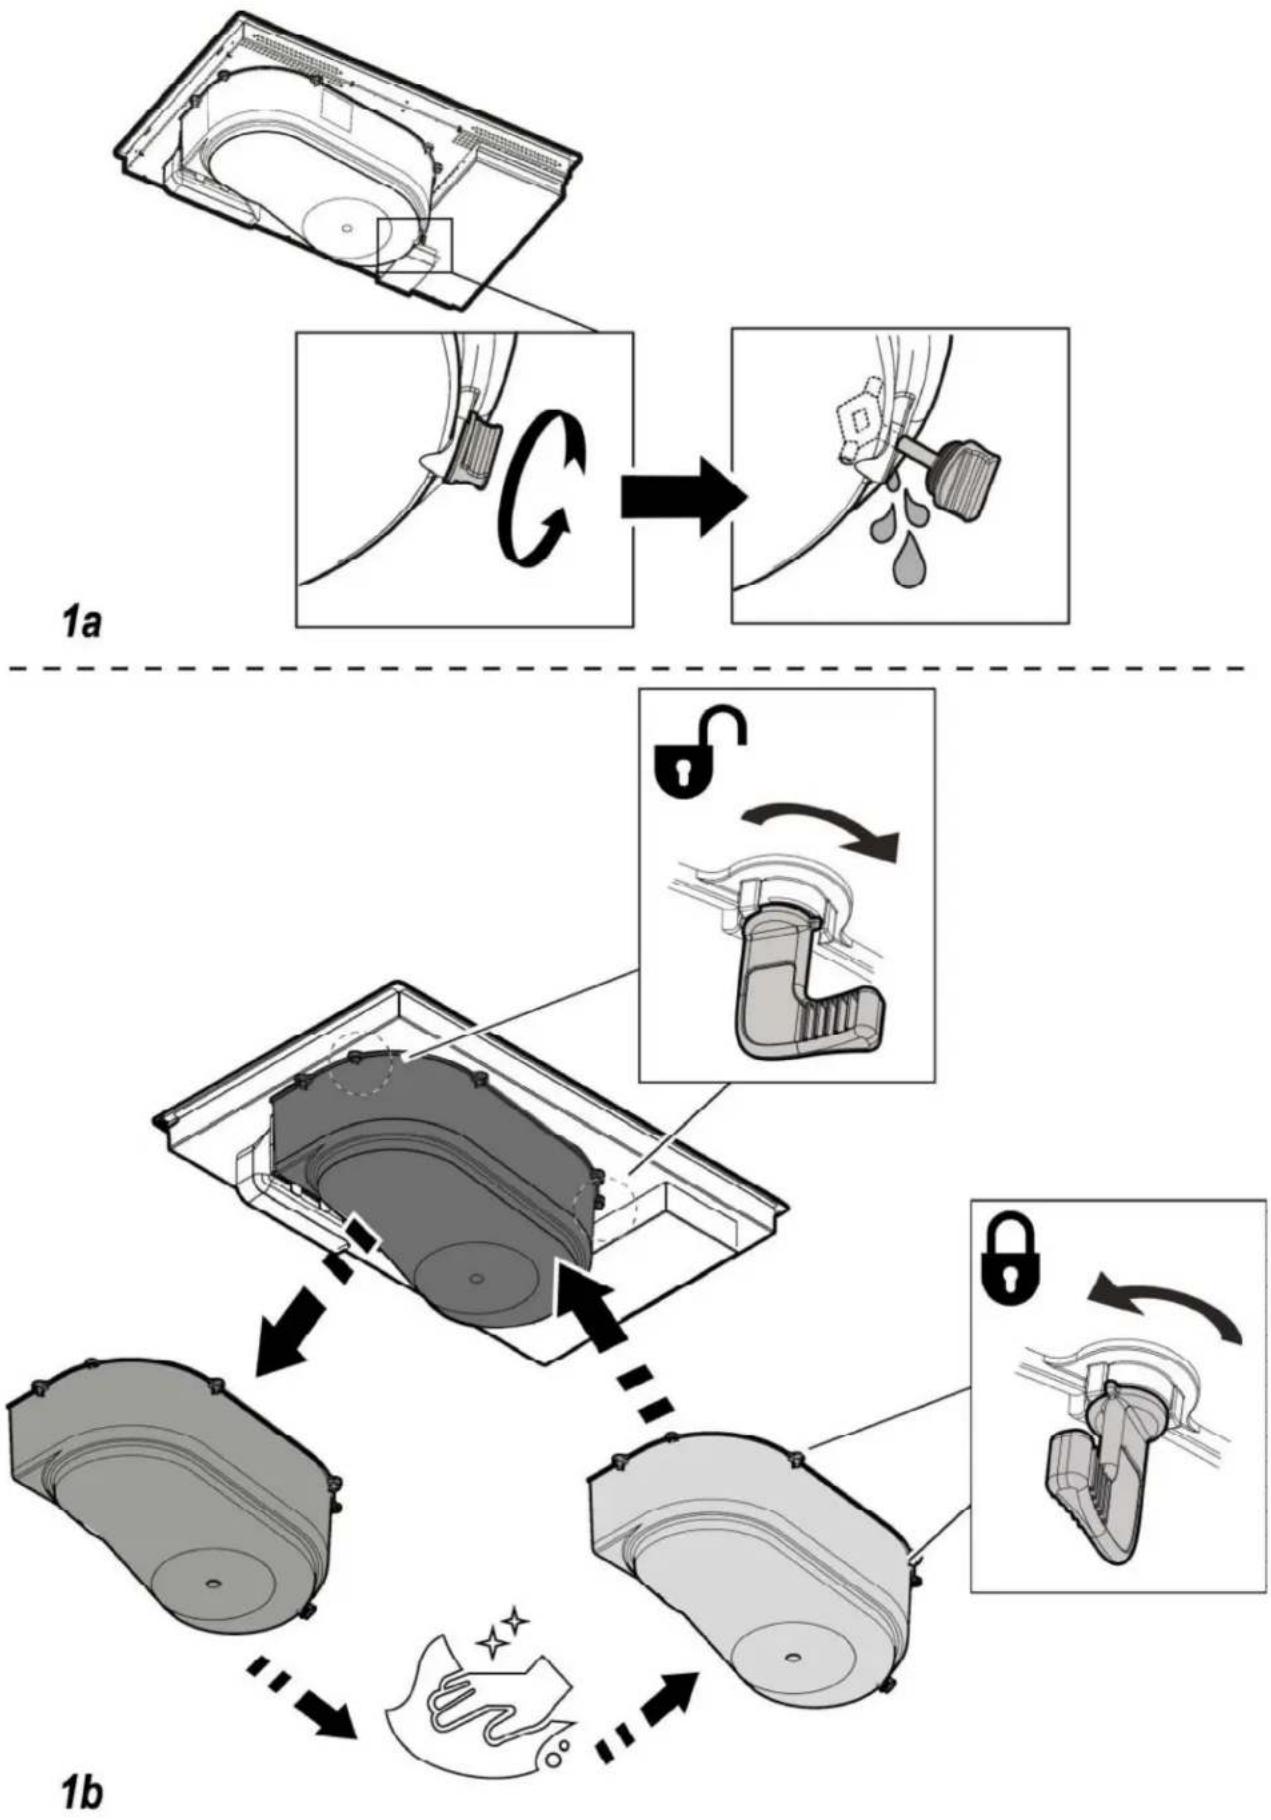
Important: In the event of the accidental spillage of large quantities of liquid from pans it is possible to drain by using the discharge valve, on the lower section of the product, in order to remove any residues and ensuring maximum hygiene levels are maintained. Fig. 1a
For a more thorough and in-depth clean the lower tank can be removed completely. Fig. 1b
4.2 Maintenance of the extractor system
4.2.1 Cleaning
Clean using ONLY a cloth dampened with neutral liquid detergent. DO NOT CLEAN WITH TOOLS OR INSTRUMENTS. Do not use abrasive products. DO NOT USE ALCOHOL!
4.2.2 Grease filter
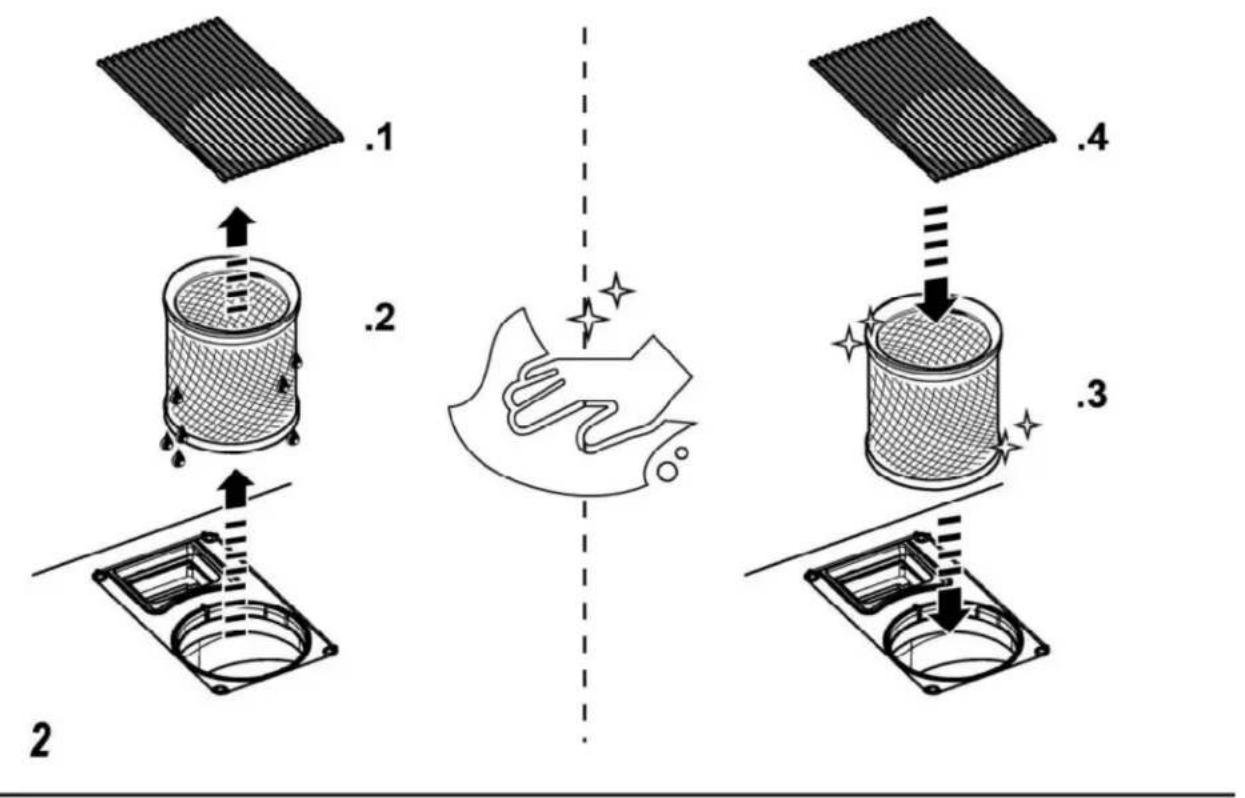
Fig. 2
Traps cooking grease particles.
The grease filter must be cleaned once a month using non aggressive detergents, either by hand or in the dishwasher, which must be set to a low temperature and a short cycle. When washed in a dishwasher, the grease filter may discolor slightly, but this does not affect its filtering capacity.
4.2.3 Odour filter
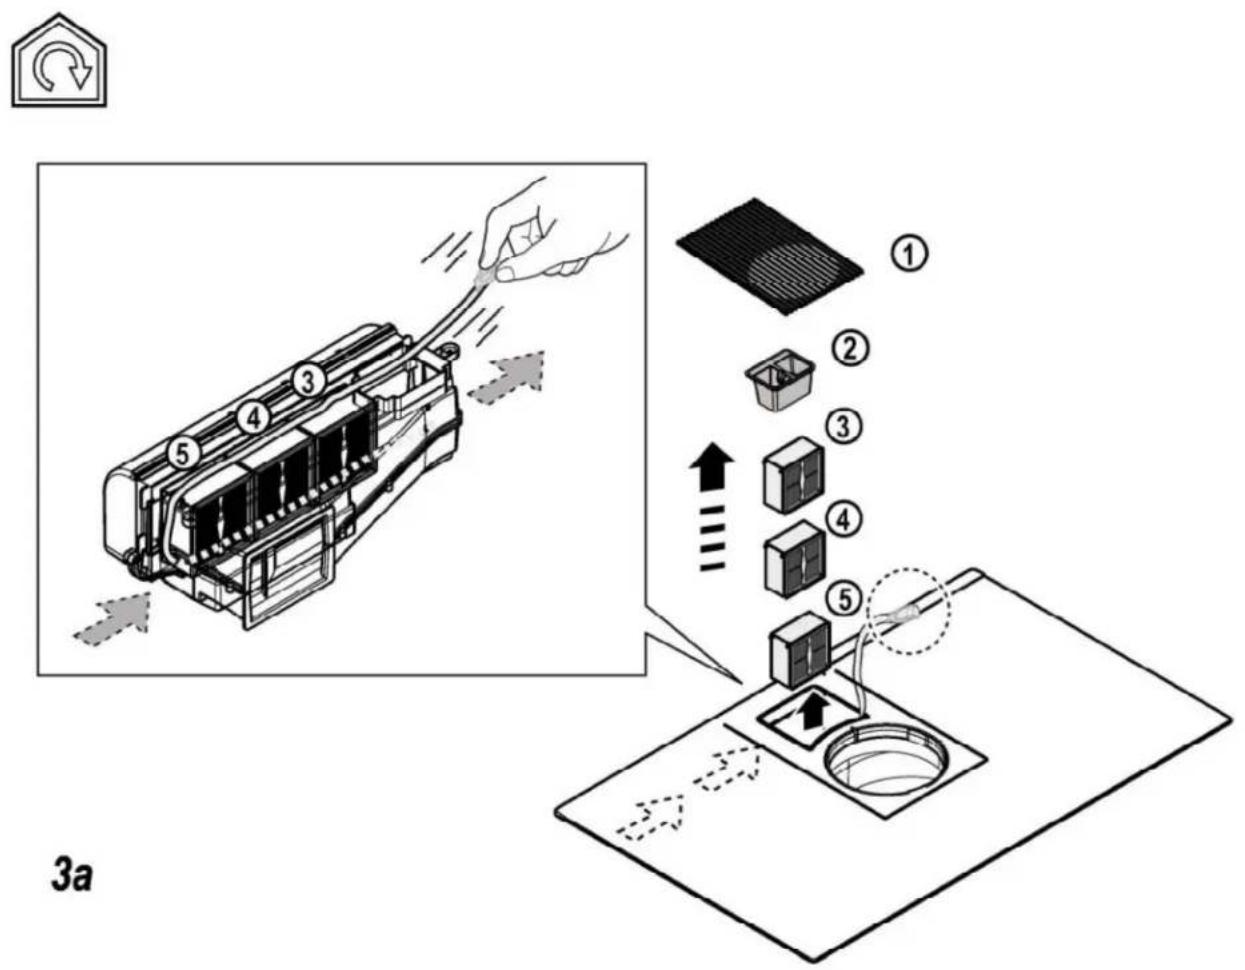
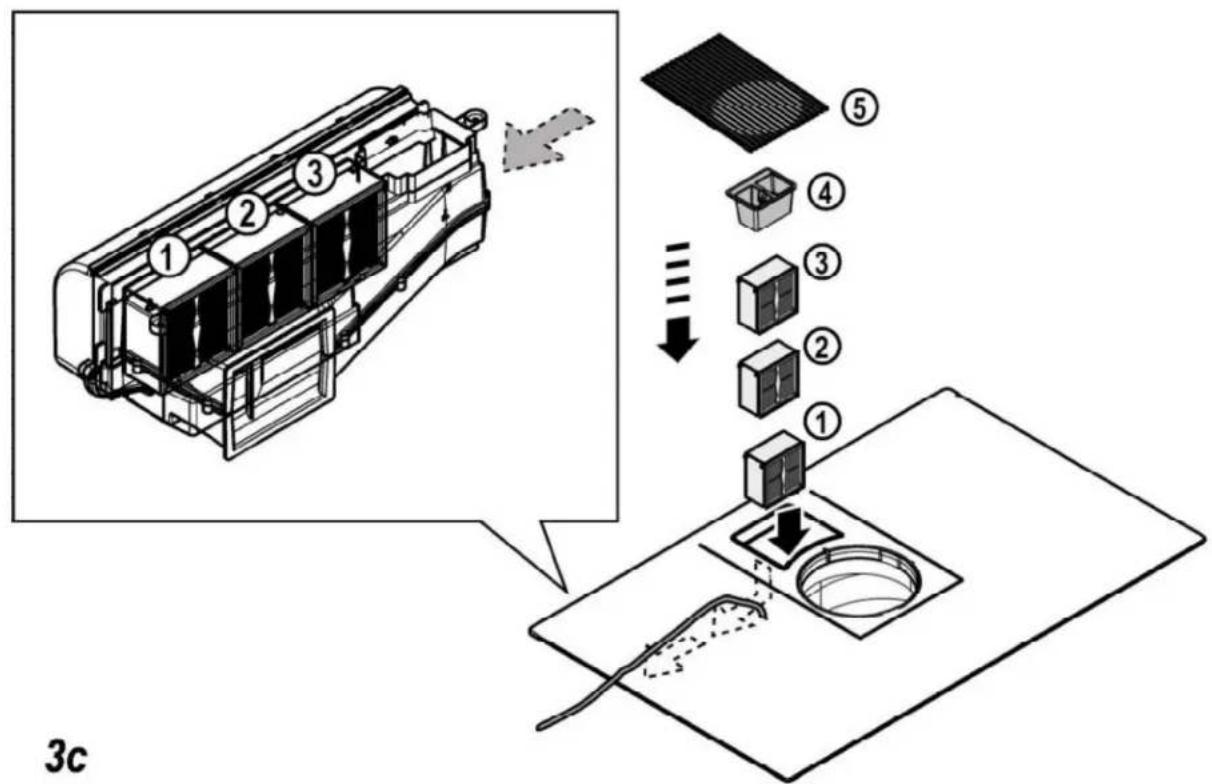
(For filter version only) Fig. 3a-b-c It absorbs unpleasant odors caused by cooking.
The product comes with a set of odour filters. The saturation of the odour filters can occur after somewhat prolonged use depending on the type of cooking and how regularly the grease filter is cleaned. The odour filters can be thermally regenerated every 2/3 months in an oven pre-heated to 200°C for 45 minutes. The correct regeneration of the filter ensures that it can constantly filter efficiently for 5 years.
2. SYSTEM DESCRIPTION
EXTRACTION
The extraction unit can be configured in two ways, either with external extraction or with internal recirculation.
Refer to the websites www.elica.com and www.shop.elica.com/ia to see the full range of available kits, so that you can carry out the various installations, both with recirculation and extraction.

2.1 Extraction version
The fumes are expelled towards the outside (the pipe must be purchased separately).
Connect the flue pipe to the extraction unit using a connection ring (flange connection).
For more information about the pipes and their sizes, see the page of the installation manual with the accessories - extraction version.
The use of pipes and extensions of the unit smaller than the diameter can cause a reduction of the extraction capacity as well as an increase in noise.
In any case, avoid any obstruction. To achieve the maximum extraction performance:
3.2.2 Display for kokesoner
The display for the various kokesoner is shown:
0 = 7.4 kW (standard setting)
1 = 4.5 kW 2 = 3.1 kW
To make changes in Power Limitation (power limiter)
Press the display (2) to move left (FL) - use the Selection line (3) to make the new setting - to save the selection, press the ON/OFF button (1) for 2 seconds. An acoustic signal will be emitted to confirm the selection.
3.2.1 Things to know before you start
Power on for the suction system:
Press the zone selection (12) to activate the suction system
1.1 Cookware for cooking
Use cookware that is marked with the symbol
Important:
To avoid permanent marks on the surface of the hob, never use:
Cookware with rough or damaged bases; metal cookware with sharp edges; cookware with a rough base, to avoid scratching the hob surface; - Never place hot pans or pots on the hob control surface. Do not use cookware that is not suitable for induction cooking, as this may be due to the fact that they are not made of ferromagnetic material!! When purchasing pans or pots, check that: - The base is made of ferromagnetic material. Otherwise, the efficiency of heat transfer will be reduced, as well as its even distribution, with the temperature of the pan/pot surface required for cooking.
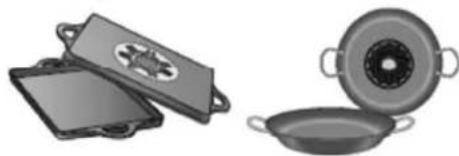
NO!
- The base must not contain aluminum: aluminum does not heat up and therefore may not be detected by the induction zones.
NO!
Do not place the base on the glass surface. The contact surface between the induction zone and the cookware base affects the efficiency and the cooking results.
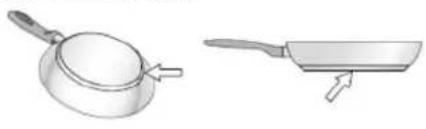
A!
Important: Never place hot pans or pots on the hob control surface.
1.1.1 Cooking hob, with which you can dispose
You can check whether the materials are suitable for the hob with an ordinary magnet. Hobs that are not suitable will not be attracted by the magnet. In this case, follow the instructions from the previous paragraph.
1.1.2 Diameter of the hob pans
IMPORTANT: if the pans are not of suitable size, the hob will not activate.
To determine the minimum diameter of the pan to be used in each zone, see the illustrations placed in this manual.
1.1.3 Cooking instructions
To achieve the best possible results, we recommend:
- Use pans with a diameter equal to the cooking zone. If possible, during cooking, leave the lid on the pans. Preferably, use pans with a height of at least 22 cm. - Place the pan in the center of the cooking zone, marked on the top.
2. USE OF THE EXTRACTOR HOOD
The extraction system can be used in the version with extraction or with recirculation. The hood is equipped with a motor with external suction.
Visit www.shop.elica.com to check the complete range of accessories, so that you can perform the different types of installation, both in the version with extraction and in the version with recirculation.
To achieve maximum extraction efficiency,
it is recommended to use a maximum duct length of 7 linear meters. It is recommended to use a maximum duct length of 7 linear meters and to use at most two 90° bends. Avoid reducing the duct section, giving preference to the section that reduces to 150 mm (or rectangular with dimensions 222 x 89 mm).
2.2 Filter version

The extracted air will be filtered through special grease filters and anti-odor filters, before being reintroduced into the room. The product is supplied with everything necessary for standard functioning with air outlet in the upper part of the hood. The product is equipped with a set of anti-odor filters. For more information, see the page dedicated to accessories in the manual with instructions - Filter version.
3. FUNCTIONS
3.1 Control panel
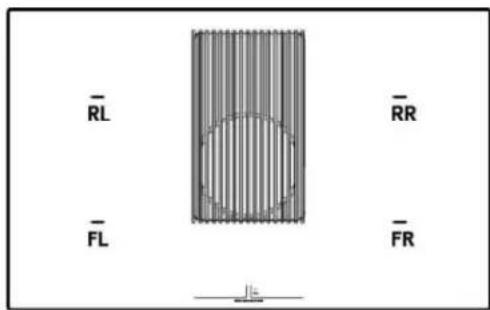
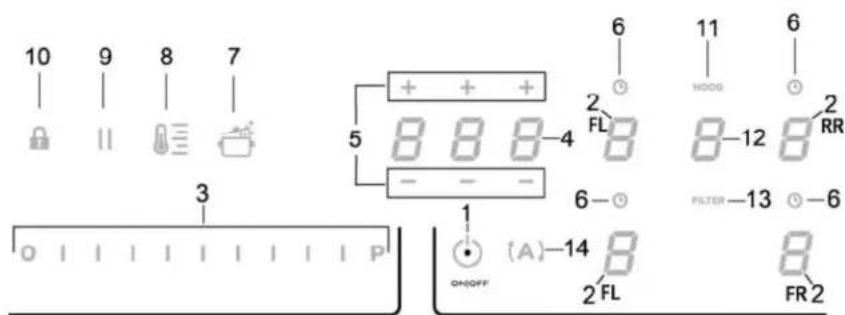
Touch sensors / Display
- ON/OFF button for cooking zones / extraction system
- Cooking zone selection / Cooking zone display
- Increase/Decrease of cooking power and speed (power) of extraction
- Activation of Timer "STAND ALONE" / Timer for cooking zones.
- Increase/Decrease of Timer "STAND ALONE" / Timer for cooking zones
- Activation of zone timer for cooking / Indicator zone timer for cooking ACTIVE
- Activation of automatic heating (automatic heating).
3.2 Use of the cooking hob
3.2.1 What you need to know before you start using the hob
This manual describes the basic functions. Use the QR code placed on the first pages to access the internet for full instructions.
All functional products are designed in compliance with the strictest safety standards. For this reason:
Some functions are activated or deactivated automatically when the cookware is present and when the cookware is correctly placed on the cooking surface. In other cases, the functions are activated or deactivated automatically after a few seconds, when the function does not require additional adjustment that is not provided.
The appliance must be installed in accordance with the installation instructions.
- Activation (Temperature Key) (Warming Function) (Heating Function)
- Pause
- Key Lock
- Indicator active aspirator Activation of the indicator for filter replacement
- Selection/Activation of aspirator Selection of aspirator Selection of filter type: Metal or Charcoal filter - Filter reset
- Activation of automatic function of aspirator
3.2.2 Cooking Zone
On the cooking zone, which is part of the heating zones, the following is located:
| Въю既可以 за за говende | 0 |
| Нъю на Мошиноct | 1...9 P |
| Residual Heat Indicator
(Индikатор за Остына
Толлпа) | H |
| Pot Detector (Дetectор за калки) | U |
| Фунkedия Bridge akтураза) | 7 |
| Фунkedия Temperature Manager
(Temператуpen Менихьр)
akтураза) | U |
| Фунkedия Палда | II |
| Фунkedия Automatic Heat UP
(Aвтomatuarною Harpoвае) | 8 |
3.2.3 Characteristic plate
- Safe Activation: The product activates only when the key is pressed on the heating zones: The heating elements do not start if the key is pressed or if the key is removed. Pot Detector: The product detects automatically the presence of the key on the heating zones.
- Safety Shut Down: For safety reasons, each heating zone has a maximum operating time, which depends on the set power level. Residual Heat Indicator: When one or more heating zones are switched off, the residual heat is indicated with a visual signal on the display of the corresponding zone, by means of the symbol "H".
3.2.4 Functioning
3a6eKka: mBpBO aKTbUpaIte KeHaHaTa 30Ha.
BknouBaHe:OoN@F (kpaTko
NOT 3a
TOTBeHe/ acnnpaTOP: CmB0JbT CBETBa;
C eHNO yIbIKeHO DOKOCBaHe, BCNUH HANuHn FyHKmN Ie CTaHAT BNDIMN 3a HAKOJIKO CEkyHn, CNeI KOET Oe OCTaHAT AKTNBHn CAMO rnaBHnTE; dpyrTe Ie MoT Da 6bDat N3NON3BaHn N Ie ce AKTNBnpat, B NOcneDCTBnE, NO Bpeme Ha ynotpe6ata Na YCTPOINCTBOTo.
HaTnCHete OTHOBO ON/OFF (1)3a Da n3KIOHHTe.
- 1360p Ha 30Hn 3a ToTbeHe
DOKOCHETe (HaTNCHTe) 30HATA 3a H36Op/Dncnnei (2)
Cb0TBcTBAuHaXeHaHaTa3OHa 3aTOBHe.
HnBOHaMoOhoCT
Iokochete n n3Hete npbCTa no DbKnHaTa Ha JeHTata 3a n36op (3):
Ha DaCHO 3a DaCe yBENH HBNOTO Ha MOUHOCT;
HA JARBO 3A DA CE HAMAMHIBOTO HA MOLHOCT.
3aIaHTo HnBO Ha MoUHoc, Iue Ce Bn3yAn3npa B coHaTa 3a N36Op/Dncnnei (2)
HaHnHHTe HnBa Ha MOuHcT ca 9 + eHNO INHTeH3NBO HnBO Ha MOuHcT, NOCOHeHO Ha DnCInJe Cbc CmBOna P Power Booster (ycnBATE Ha MOuHcT).
The Power Booster (power amplification) function remains active for 5 minutes, after which the power is returned to the previous level.
Bridge Zones: The heating zones ("Master") and RL ("Secondary") and the zones FR ("Master") and RR ("Secondary") can be paired and controlled together, creating a common output of 2:1 or 1:1 with the zones and the power output. This function allows even heating of large areas and thick workpieces.
To activate the Bridge function:
- Select simultaneously the two heating zones you want to use.
- On the display (2) of the "Secondary" heating zone, a symbol will appear.
- Using the selection knob (3), it will be possible to set the power level (power) of operation, which will be visualized on the display (2) of the "Master" heating zone. To deactivate the Bridge function, it is sufficient to repeat the same activation procedure.
Power Limitation
The Power Limitation function allows the product's operation to be configured by limiting its maximum power consumption.
Note: The setting must be performed with the device unplugged, without pressing the ON/OFF button (1), at the moment of connecting the heating tool to the electrical outlet, or when reconnecting the electrical outlet itself, within the following 2 minutes.
To set the Power Limitation:
- Press (A) (which will flash, only for the first 2 minutes after the product is powered on).
- Continue to hold down (A). Press it repeatedly, each time selecting the desired zone on the display (2) of the heating zones, following the clockwise direction, starting from the FR zone.
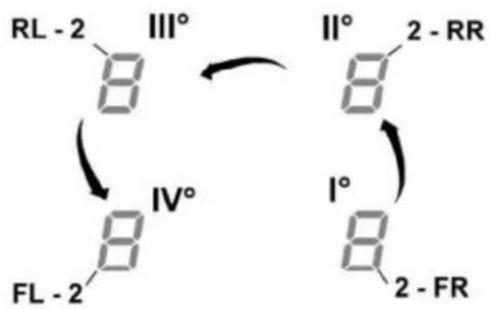
- With each press, a short audible signal will be emitted.
- PRESS THE "TARE" BUTTON (2), if possible, to release the zero point at that moment:
- The display (2) will show the zero value (0) and will indicate the required sequence of symbols "C" and "0", after which, if possible, the printout will be made:
Display test (2-RL)
Press the print button (3) in sequence, until the symbols "C" are not visualized on the display
On the display (2-FL) the current setting will be visualized
Press the "HOLD" button (17) until the visualized value on the display is released;
On the display (23) the difference value is visualized and it is printed automatically from the function.
Printout:
-Set value: 1KG
- Value, entered above the scale without printing of the function: 2KG
-Value "collected", visualized on the display: 3KG (1KG+2KG)
- Value "released", before printing from the function: 2KG (3KG - 1KG)
LOCK FUNCTION
The "LOCK" function (21) blocks the use of the scale, to avoid incorrect weighing, when different objects are placed in the weighing zone;
To activate this function, press and hold "LOCK" (21) until the display of the scale does not turn off;
Press the button to activate the function: press "LOCK" (21) until the display turns off and the device is not switched on.
After 30 minutes from activating the "LOCK" function, the device turns off and "LOCK" is deactivated.
3.3 Use of the suction system
Switching on: press briefly ON/OFF (1) for heating/suction: the symbol lights up.
Press again to switch off.
Switching on the suction:
Press the selection zone (12) to activate the suction.
The product has 2 power levels (lowest 3).
Power Booster (power boost) 1: with timer for 15 min.
Power Booster (power boost) 2: with timer for 5 min.
After that, the power returns to the previously set level.
Press and turn the selection dial (3) (lowest 3) to activate Power Booster (power boost) 1.
The Power Booster (power boost) 1 level is shown in the selection/display zone (12) with the number "4" flashing.
Press and turn the selection dial (3) (lowest 3) to activate Power Booster (power boost) 2.
The Power Booster (power boost) 2 level is shown in the selection/display zone (12) with the symbol "P" flashing.
3.4 Power Levels
Important: Never place pans or skillets on the control panel.
1.1.1 Previously used cookware
You can check if the pan material has magnetic properties using a simple magnet. The pan is not suitable for use if the magnet does not react to it. In this case, the instructions of the previous
paragraph apply.
1.1.2 Recommended materials for pans and cookware
Important: If the cookware parameters do not match, the cooking zones will not activate.
To find out the minimum diameter of cookware for cooking on each individual zone, see the illustrated part of this manual.
1.1.3 Instructions for the cooking process
For optimal results, it is recommended.
- Use skillets and pans with a diameter equal to the diameter of the cooking zone.
- If possible, cover the cookware with a lid during cooking, especially if its height exceeds 22 cm. Place the cookware in the center of the cooking zone, as indicated by the cooking zone marking.
2. USE OF THE EXTRACTOR HOOD
The steam extraction system can be installed in the exhaust version, with discharge outside, or in the filtering version, with recirculation. See the websites www.elica.com and www.shop.elica.com to familiarize yourself with the full range of kits for the different versions of the system, both filtering and exhaust.
2.1 Exhaust version with extraction
Connect the hood to the ventilation duct system (the hood is purchased separately).
Connect the appliance to the exhaust pipes and to the openings in the wall, which have a diameter equal to the diameter of the outlet opening (connecting flange). For more details on pipes and their dimensions, see the accessories pages of the installation and mounting manual - exhaust version with evacuation. Using exhaust pipes and wall openings with a smaller diameter will lead to a deterioration of the exhaust system's performance and a significant increase in noise levels. Therefore, in all cases, the manufacturer disclaims all responsibility.
To ensure maximum exhaust efficiency
The recommended pipe length is 7 linear meters. It is recommended to have no more than two 90° bends in the pipe run. Avoid sharp changes in the air duct cross-section, preferably maintaining a constant cross-section corresponding to 150 mm (for rectangular ducts - 222 x 89 mm).

2.2 Filtering version
The extracted air is filtered using special grease and odor-absorbing filters, and then returned to the room. The appliance is supplied with everything necessary for standard installation with an air inlet opening in the front part of the furniture hood. This appliance is equipped with a set of reusable filters. For more details, see the accessories pages of the installation and mounting manual - Filtering version.
3. OPERATION OF THE APPLIANCE
3.1 Control panel
Sensor buttons (TOUCH)/Display
- ON/OFF (ON/OFF) for hob surface/exhaust
- Selection of hob zones / Selection of hob zones 3. INCREASE/DECREASE OF POWER LEVEL FOR COOKING AND SPEED (POWER) FOR EXHAUST Display of power level for cooking and speed (power) for exhaust
- Activation of the "STAND ALONE" timer (standalone) Display: "STAND ALONE" timer / hob zones timer.
- Increase/Decrease of the "STAND ALONE" timer time / hob zones timer
- Switching off the hob zones timer Indicator of the hob zones timer being switched on
- Activation of the Keep Heat function (automatic heating).
3.2 Working with the hob surface
3.2.1 What you need to know before starting work
This manual describes the main functions, and access to full instructions on the Internet requires using the QR code on the first pages.
All functions of this induction hob have been developed in compliance with the strictest safety standards. Therefore:
Some functions are not activated or are automatically deactivated in the absence of a pan on the surface or when it is incorrectly placed. In other cases, the activated functions are automatically turned off after a few seconds if you do not perform additional settings that are necessary for safe operation.
Before using the hob, wait until the display goes out.
- Activating the Temperature Manager function - temperature control (Warming Function - heating function)
- Pause
- Key Lock (button lock)
- Indicator of operation of the exhaust hood, activation of the filter contamination indicator
- Selection/deactivation of the exhaust hood for the filter contamination of the carbon/ceramic filter
- Reset of the filter contamination level
- Activation of the automatic hood function
3.2.2 Display of heating zones
On the display, corresponding to the heating zones, the following information is shown:
The current power level + intensity level are shown on the display with the symbol "Power Booster".
This power level "P" (Power Booster) operates for 5 minutes, then the power returns to the previous level.
Bridge Zones/Combined zones: The front zones (front left) ("Master/Main") and RL (rear left) ("Secondary") and zones FR (front right) ("Master/Main") and RR (rear right) ("Secondary") thanks to the Bridge/Combine function can work together as one zone (2 total: 1 right and 1 left) with a single heating power level. This function allows for even cooking in large pots.
Keep the "HOLD" button pressed until the value on the display starts to flash, this will indicate that the weight is saved in memory.
It is possible to continue by removing the weight from the scale, using it with all its functions.
Note: When pressing again for a long time to enter a new weight into memory, the old one is erased.
At any time, the saved weight value can be displayed by pressing "HOLD" (17); it will appear on the display (23), flashing for a few seconds; during this time, another press on "HOLD" (17) will add the weight in memory to the current weight measured by the scale; the total value will be displayed on the display (23), and the indicator "HOLD" (23) will remain lit, indicating that the function is active; another press on "HOLD" (17) will subtract the weight value saved in memory from the weight on the display; the difference value will be displayed on the display (23), and the function will automatically exit the active mode.
Example:
-Weight entered into memory: 1 kg -Current weight on the scale at the moment of activation: 2 kg -Total weight displayed on the display: 3 kg (1 kg + 2 kg) -Weight with "subtraction", before exiting the function from active mode: 2 kg (3 kg - 1 kg)
Turning on the extractor hood:
Touch the selection zone (12) to turn on the extractor hood.
- Speed (power) of the extractor hood:
The extractor hood has 3 speed levels (power) of extraction.
Touch and swipe along the selection line (3):
To the right to increase or to the left to decrease the extraction power.
The extraction power will be displayed in the selection/display zone (12)
Power Booster (power amplification)
The device provides 2 additional power levels (in addition to level 3)
Power Booster (power amplification) 1: with the timer set to 15 minutes
Power Booster (power amplification) 2: with the timer set to 5 minutes
Then the power will return to the previously set level.
Touch and swipe along the selection line
(3) (beyond level 3) to activate Power Booster 1
The level will be indicated in the selection/display area
(12) with the symbol "P"
3.4 Power level tables
DO NOT USE THE DEVICE WITH A STEAM JET CLEANER!!!
Important: If there is a strong liquid leak from the cartridge, it can be compensated by the valve located in the lower part of the device. To avoid the accumulation of residual deposits, perform a rinse at the maximum water level.
Fig. 1b
4.2 Maintenance of the exhaust system
4.2.1 Cleaning
Clean only with a special cloth moistened with a neutral cleaning agent. Do not use any tools for cleaning.
Do not use products containing abrasive materials. DO NOT USE ALCOHOL!
4.2.2 Grease filter
Fig. 2
Retains grease particles coming from the hob.
The filter should be cleaned monthly with non-abrasive cleaning agents, either by hand or in a dishwasher at low temperature and with a short wash cycle.
Washing in a dishwasher may cause some discoloration of the grease filter, but its filtering characteristics remain absolutely unchanged.
4.2.3 Deodorizing filter
(for deodorizing version) Fig. 3a
Removes unpleasant odors from cooking.
This appliance is equipped with a set of deodorizing filters. Saturation of the deodorizing filters occurs after prolonged use, depending on the type of cooking and the frequency of cleaning of the grease filter. Deodorizing filters can be regenerated thermally every 2/3 months in a preheated oven at 200°C for 45 minutes. Proper regeneration guarantees constant filtering efficiency for 5 years.
UK
1. INDUCTION COOKWARE
1.1 Cookware for use
Use only cookware with the symbol
Important:
To avoid irreversible damage to the hob surface, do not use cookware:
with a rough bottom; - metal with an enameled bottom; with a rough bottom, to avoid scratches on the hob panel; never place hot pans or skillets on the hob control panel.
Not all pans intended for induction hobs work well because their bottom is not fully made of ferromagnetic materials. Check cookware to ensure:
- The bottom is fully made of ferromagnetic materials. This ensures efficiency and uniformity of heat transfer, and the surface temperature of the cookware will be appropriate for cooking.
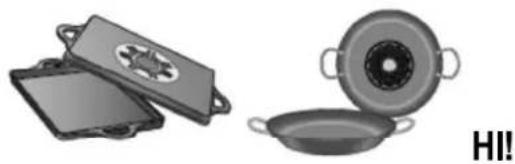
Also check for magnetism: cookware that does not attract induction hobs, or only weakly, will not work.
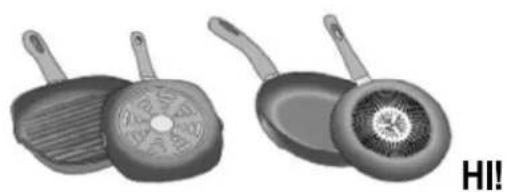
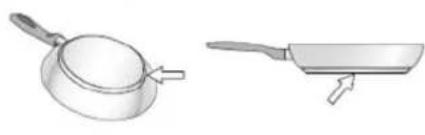
Do not use cookware with rough or uneven bottoms. They reduce the contact surface with the hob, decreasing heating efficiency and worsening cooking results.
Important: never place hot pans or skillets on the hob control panel.
1.1.1 Cookware that has been purchased
You can check whether the pan material has magnetic properties using a simple magnet. Pans that are not magnetic are not suitable for use. In this case, the instructions in the previous paragraph apply.
1.1.2 Recommended diameters for cookware IMPORTANT: If the cookware is not of the correct size, the heating zones will not activate.
To find out what the minimum diameter of the cookware is for cooking each individual zone, see the illustrated part of this manual.
1.1.3 Cookware for the cooking zones
For frying, it is recommended to use
Use frying pans with a bottom diameter equal to the diameter of the cooking zone. - It is possible to use cookware with a diameter larger than the cooking zone, but not exceeding 22 cm in height. - Place the cookware in the center of the cooking zone indicated on the cooking panel.
2. USING THE EXTRACTOR HOOD
The extractor hood can be used in recirculation mode or in extraction mode with external discharge.
See the websites www.elica.com and www.shop.elica.com to familiarize yourself with the complete range of accessories for the various versions of the hood, both filter and extraction.
2.1 Extractor hood with discharge to the outside
The hood is equipped with an outlet for connection to the air exhaust pipes (not supplied separately).
Connect the hood to the exhaust pipes and to the wall opening that has a diameter equal to the diameter of the outlet (connecting flange).
For details on pipes and installation, see the Accessories chapter of the Installation and Use Manual for the extractor hood with discharge.
Using pipes and reduction openings of smaller diameter will lead to a reduction in the performance of the hood and an increase in noise.
The manufacturer declines all responsibility for this.
To ensure maximum efficiency of the hood:
The recommended maximum length of the pipes is 7 linear meters. For each meter of pipe, it is recommended not to exceed two 90° bends. The bends should be gradual, with a minimum internal diameter of 150 mm (or for rectangular cross-sections, 222 x 89 mm).

Press and hold the "HOLD" button until the value on the display starts to blink, this will indicate that the weight is saved in memory.
The weight can be produced by removing the weight from the scale, using it with all its functions.
When pressing repeatedly for a long time to enter a new weight into memory, the old one is erased from it.
At any moment, the weight saved in memory can be displayed by pressing "HOLD" (17); it will appear on the display (23) for a few seconds; during this time, another press on "HOLD" (17) will add the weight from memory to the current weight measured by the scale; the display (23) will show the sum, and the indicator "HOLD" (23) will remain lit, indicating that the function is still active; another press on "HOLD" (17) will lead to the subtraction of the weight on the display from the weight saved in memory; the display (23) will show the difference, and the function will automatically exit the active mode.
Example:
- Weight entered into memory: 1 kg - Current weight on the scale at the moment of function activation: 2 kg - Total weight that will be displayed on the display: 3 kg (1 kg + 2 kg) - Weight with "subtraction", before exiting the function from active mode: 2 kg (3 kg - 1 kg)
Function LOCK (BLOCKING)
The "LOCK" function (21) blocks the switching on of the scale to avoid weighing different objects that fall into the weighing zone; to activate it, press and hold the "LOCK" button (21) until the scale display goes out.
In the same way, the function is deactivated by pressing and holding the "LOCK" button (21) until the scale display lights up.
Note: one minute after the activation of the "LOCK" function, the scale switches off and the "LOCK" function also stops working.
3.3 Using the ventilation system
Switching on: Briefly press the ON/OFF button (1) on the upper surface of the ventilation system: the symbol will light up.
Press it again to switch off.
Switching on the ventilation system:
Press the selection zone (12) to switch on the ventilation system.
- WbDxkictb (notyXhictb) BNTJKKN:
The device is equipped with 3 power levels (suction power) for use.
Press and hold the buttons along the selection (3): up to increase the suction power level, or down to decrease it.
The suction power level will be displayed in the selection area / on the display (12).
Press and hold the selection buttons (3) (except level 3) and activate the Power Booster suction power (Power Booster suction power) 2.
The Power Booster suction power level (Power Booster suction power) 1 is indicated in the selection area/display (12) with the symbol "P", which flashes.
3.4 Table of power levels
| Ровenvnotухноcti | Тинология вариня | З actocyвань (Винождоч 3 docbdu Та Habичok rotувань) |
| Мас.
notухнICTь | P | Швдke розirрваимя | пд'им Temnéратугій які п探测ом короткою поiodу уасу дошвдково
зakпань в разі Bodи абошвдково розirрваимь рizнх куларнix рдVIN |
| 8-9 | ЖарNTи - кИ'ЯтNTи | пдрум'янень, поаток rotувань, karінь п探测уктівшвдково
заморожувань,швдke кИ'янень |
| Виска
notухнICTь 6-7 | Пджарювати до золotистаго
Кольору - пджарювати -
КИнITи - рпILь | пдсмалувань, пдзримь сInteHcmbHORO кИнIHь, варBO i karінь як
на рtril (ненадobro, 5-10 xvin) |
| Пджарювати до золotистаго
Кольору - варNTи - тушкуbatи -
пджарювати рпILь | пдсмалувань, пдзримь Нсильного кИнIHь, karінь як
на рtridni (середи trpвалостi, 10-20 xvin), nonepeinhe пдірвань
прладя |
| Середу
notухнICTь | 4-5 | ВарNTи - тушкуbatи -
пджарювати - рпILь | тушкувань, пдзримь сna6kORO кИнIHь, варBO (трвале), духе
nobIlne Tuykubanry NaCTN |
| 3-4 | ВарNTи - кИ'ЯтNTи на
nobiHOMy BORHI - 3ryuZbyATn -
Дуve nobiHne Tuykubanry | травли вары (псс, coуси i пдзримь, поehа, рИБа) в КИнарнIX
пдинax (Hapr., BODa, BINO, byIyoh, MOnIOK), TOMlIHry MaKApOHHIX
ВиробIV |
| 2-3 | ВарNTи - кИ'ЯтNTи на
nobiHOMy BORHI - 3ryuZbyATn -
Дуve nobiHne Tuykubanry | травли rotувань (ob'emic MeHwe odHoro Литра: рИС, coуси, пдзримь,
пechен, рИБа) в КИнарнIX рdINHx (Hapr., BODa, BINO, byIyoh, MOnIOK) |
| Низык
notухнICTь | 1-2 | Розтлелнг -
po3mopoxувань - пдзримь
ТeПЛIM - Tomlinнг 3
ДodabAHnY Macla/Berukib | розтлелнг Macla, DeilekaTHe TOnlENHry ShOKoJadU, po3mopoxeHny
MaIopozmMipnIXхарOBIX pOndukTIB |
| 1 | Poztloelнг -
po3mopoxувань - пдзримь
ТeПЛIM - TomlinnRg 3
ДodabAHnY Macla/Berukib | пдзримь ТELla в НевелкIx noprjx TlByk ПО prinrotobahoi I yki,
пдзримь ТЕмпетаурri nocudy Do cepBipOBK, TOMlIHry i doBeDEHNY
do KOndiu zi pi3OTTO |
| ВIMK | 0 | Опогна поевхня | Вариьна поевхнь в ржIMi roToBHoCtI (stand-by) abо ВIMKHeHa
(Mожлamba наразын CTZamlshkoBOrO tenla nicra ЗakIHHeHry rotувань,
пр оц синанizye indikaця H-L-O) |
4. MAINTENANCE
Before starting any maintenance operation, make sure the device is switched off and the plug is disconnected from the power supply.
4.1 Maintenance of the outer surface
4.1.1 Cleaning
The outer panel should be cleaned after each use.
Important: Do not use abrasive sponges or scouring pads, as they may damage the surface. Do not use aggressive detergents, such as sprays for ovens or descaling agents. After each cleaning, allow the surface to dry, then polish it to avoid streaks. Use a soft cloth, microfiber cloth for the kitchen, or special products for outer surfaces (follow the instructions on the product).
DO NOT USE STEAM CLEANERS!!!
Important: In case of liquid or solid food boiling over from the pot, you can use the external valve located in the lower part of the device, which allows you to remove any blockages and perform cleaning while maintaining the maximum heating level, approx. 1
The lower part of the housing can be removed. Fig. 1b
4.2 System maintenance
4.2.1 Cleaning
For cleaning, use only a soft cloth or a neutral detergent. Do not use abrasive agents or tools for cleaning!
Do not use abrasive materials or alcohol. Do not use solvents!
4.2.2 Grease filter
Fig. 2a The grease filter retains grease particles during cooking.
It must be cleaned once a month with non-abrasive detergents, by hand or in the dishwasher at low temperature and with a short cycle.
When washing the metal filter in the dishwasher, it may lose color, but its filtering characteristics will not change.
4.2.3 Activated carbon filter
(1) For filter version (for recirculation systems) Fig. 3a It absorbs kitchen odors.
This product is equipped with activated carbon filters. The saturation of activated carbon filters occurs after prolonged use, depending on the type of cooking and the thickness of the grease filter. Activated carbon filters can be regenerated thermally every 2/3 months by heating them in an oven at 200°C for 45 minutes. Proper regeneration guarantees effective filtering for 5 years.
KK
1. SAFETY INSTRUCTIONS
1.1 Installation instructions
6enrici 6ap ta6anapdbf fHa naa danaHb13.
MaHb13a1:
PNTa 6eTHe 3aKbIM KeJMeYi YUH, MbIHApra TbIbIM CaBHAdbl:
Tybi teric emec bldictapdbko; Ty6i 3MaJIbMeH KaIITaIraH MetaII bIDbICTapIbKOJ; - nnta 6etHe cb3at Tycipmeyi ywiH ty6i Keip-6ydbip bIbIcTapbl KoHO; bictbIK KcctpEnepdi XeHe Ta6anapdbI nnTahbIH Backapy naHeniHbEtIe KOHa 60MaBbl.
Tynepi TeK XapbIaN FpeppomarHHTIK MATEpnaIapdAH TpyaBnDkTAH, INdyukmraIBK KoJaHaBicKa 6apbIK TaBaIAP JapaMdbI Bona 6epMeiJ! KeCTpeNep MeH TabanapDbI catbIn anFaHga, MbIaHbI eckepinj3:
bIbIcTbIH TbyI ToIbIbImeH feppomarHHITik MATEpnaanapdAn typybKepeK. OHTNEe, Kblny bepy TMIMINIIR TEMeHNDEJI, an XblnydbH 6ipkeknirim MeH KeCTpeNHI/TabaHBH Temnepatypacbi TaMaK Nicipyre CkIEKC KeJmeyi MYMKH.
BOJMAHdb!!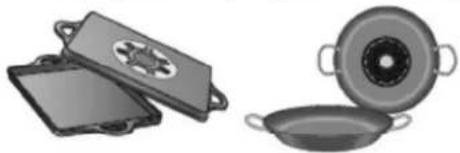
TBy6HJe aIHomHHb 60mMaybKepeK, eHTnce bIbIC Kb36aBbJ XHe OHb INyKTopnap TaHbIMaybMYMkiH.
BOJIMAIdbI!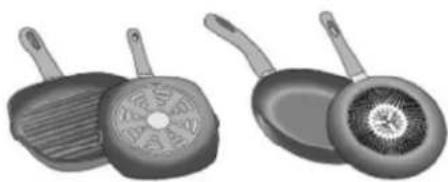
Tybi teric emec hemec 6ipkeki emec bIdbc. Onap INdykTOp MeH TabaHbH apacbHaFbI 6aHnAbHcTbI TeMeHdetin, nicipy TmimDiniri MeH canacBH HaawapNaTaBbl.
BONDAbl!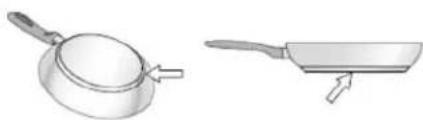
MaHbI3bI: bICTbIK tabanap MeH kactpndepdi eWkaaah newiH YCTiHE KOIMaHbI3.
1.1.1 BypbHHan KOnJa 6ap bIbictap
Kctpndin MATEPnabl MarHNTI eKeHH TeKcpey yuih kai fana MarHNTI naDanaHa anacbl. KcTppepre MarHIT Ka6bcnaca, onap kapaMaNbIa AINbIHb TaaydaBkepcTeKiWtep ocifah da KaTbICTb eckepinyi Tnic.
1.1.2 Koctpen tybiin Dpybic dnaametpnepi
Lubricants: for the correct operation of the device, lubricate the moving parts twice a year.
For the minimum diameter of the moving parts, refer to the instructions in this manual.
1.1.3 Moving parts lubrication
We recommend the following for the device:
- The diameter of the moving parts depends on the number of strokes and the table. If possible, during operation, keep the table at a height of at least 22 cm for tables. Place the moving parts in the center of the table as indicated.
2. INSTALLATION OF THE EXTRACTION SYSTEM
The extraction system can be installed for extraction or for recirculation, or with an external motor.
For the various types of extraction installation, refer to the information on the websites www.elica.com and www.shop.elica.com.

2.1 Extraction installation instructions
These are the basic instructions for installation (before connecting).
The minimum diameter of the extraction pipe (exhaust duct) must be installed according to the instructions.
For the installation of the pipes and their components, refer to the necessary characteristics in the installation instructions (extraction system).
The pipes and extraction ducts with a smaller diameter may cause a reduction in the extraction performance and an increase in noise.
Therefore, the entire system must be free of any obstacles.
For the system to function correctly
The maximum bending radius of the cable should be 7 meters. When bending at 90 degrees, the cable should be laid without tension, and the diameter of the cable bends should be at least 150 mm (for cables not exceeding 222 x 89 mm).

2.2 Water Supply Connection
The water supply connection should be made in accordance with the relevant standards and regulations. The connection point should be located at the bottom of the device body. If the device is equipped with a water connection, it should be connected to the water supply using a flexible hose with a shut-off valve.
3. Operation
3.1 Control Panel
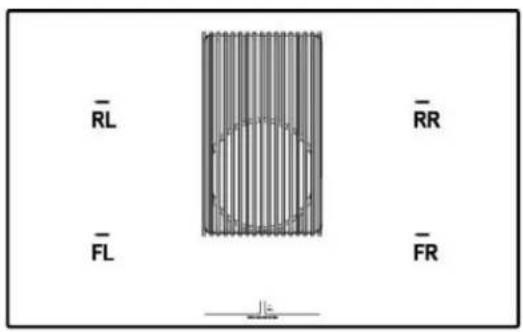
Sensors (TOUCH) / Display
- On/Off button and Reset/Stop button
- Selecting drawing parameters / Display of drawing parameters
- Adjusting the drawing speed and tension (speed) / Display of drawing speed and tension (speed)
- "STAND ALONE" mode selection / Display: "STAND ALONE" mode / selection of drawing parameters.
- "STAND ALONE" mode / adjustment of drawing parameters time
- Indicator for drawing parameters / Indicator for drawing parameters
- Automatic shutdown function.
3.2 Operation with the device
3.2.1 Before starting the device
The main functions of the device are described in this manual. Only use the device for its intended purpose, as described in the manufacturer's instructions.
The device is designed to operate under normal conditions. The following are the main characteristics:
If the device is not used as intended or is used improperly, some functions may not work automatically or may be limited. In other cases, the intended function may be impaired or the device may be damaged.
Before starting the device, read the instructions carefully.
- Temperature controller setting (optional)
- Setting
- First steps
- Indicators for setting the operating mode - indicators for setting the water level
- Operating mode selection - setting the operating mode for the heater/ceramic element - low water level
- Indicators for the water level - operation
- Automatic function of the operating mode setting
3.2.2 Instructions for use
The following instructions are provided for the user:
| Тамak Nicípy.aiMaftbyi Kocybl | 0 |
| Куат DeHreɪi | 1...9-P |
| КалдыкЖылuyинданкаторы | H |
| Кострел anbiktaftbyi | U |
| Көнір рунkkцясbl Kocvbl | 7 |
| Temnéратура реттériшi | U |
| Фунkkцясbl Kocvbl | |
| Кidірту рунkkцясbl | II |
| АВТOMaTTbl | KbI3dBiPy |
| Фунkkцясbl | |
3.2.3 Plate and function keys
Key functions: The oven is equipped with a function selector knob. The oven functions: if the function is not selected or is turned off, the heating process will not start. The temperature detector: the oven is equipped with a temperature sensor that operates automatically. For baking: at the maximum temperature setting, the oven will heat up to the maximum temperature, and the indicator light will turn on. Baking indicators: during the baking process, the baking indicator light will turn on and off according to the "H" setting.
3.2.4 Operation
Turning on: turn the function selector knob
- Turn on: ON/DEF (defrost) function
(Turn on/off) (1) First step: select the function; at the same time, all functions can be turned on at once, but then the heating elements will be turned on; they can be turned on separately; and they will be turned on when the operation is started.
To turn on/off (ON/OFF) (1) press the button.
Selecting the cooking function
(2) Press the button to select the cooking function (button).
Power level
Adjust the power level (3) by turning the knob and pressing:
The power level will increase;
To decrease the power level, turn it to the left.
The selected power level (2) will be displayed.
If there is a power level and the "P" symbol (power boost) is displayed, the power level is increased.
Bridge mode (Bridge function) 5 minutes after switching on, the device automatically starts the bridge function.
Bridge Zones (Bridge zones): The left load cell ("Heriz") and the right load cell ("Kosymsha") inputs, as well as the left and right load cell ("Heriz") and the right load cell ("Kosymsha") outputs, are connected to the bridge function. If one load cell is used, the inputs are connected in parallel (2 inputs together: 1 left, 1 right). This function is used for connecting scales and platforms together.
To enable the bridge function:
- 1. Select two inputs that will be used simultaneously - set the "Kosymsha" input's display (2) to "f" - set the "Tara" (3) parameter to "Kumys Kuat"
Set the "Heriz" parameter to the display (2) accordingly - for the bridge function to work, the necessary parameters must be set.
- Power Limitation (Power limit)
The power limitation function limits the maximum load to a preset value.
Example: For this parameter, when the load exceeds the set value, the ON/OFF (Connect/Disconnect) (1) output is activated, and the power supply is cut off or connected after 2 minutes.
EXAMPLE = Set the maximum load
The load cell's output signal will be
EXAMPLE: To set the load cell's output signal, use the "ZERO" (Set to zero) (19) function to adjust the output signal.
EXAMPLE: To use the "TARE" (Tare) function, press the "ZERO" (Set to zero) (19) function.
HOLD (Hold) function
The "HOLD" (1) function allows holding the current reading and keeping it on the display, and it is possible to take the reading from the scale; the reading is held until the scale is turned off.
- To take the reading, press the button.
Press and hold the "HOLD" key until the scale displays the weight on the screen.
EXPLANATION: To use the tare function, place the container on the scale and press the tare key.
EXPLANATION: To use the tare function, press the key briefly and then place the item on the scale; the scale will display the net weight.
Press and hold the "HOLD" key for more than 2 seconds, the display will show the held weight and the scale will beep once (23);
To use the "HOLD" key (17) to hold the current weight on the display, press the tare key again;
To check the display (23) and its functions, press and hold the "HOLD" key (23) until the display shows the held value.
If you press the "HOLD" key (17) on the scale, the held weight will be displayed on the screen; the display (23) will show the held weight and its function in automatic mode. Note:
-Function: When the tare function is active, the held weight: 2 kg
-Display: The "held" weight: 3 kg (1 kg + 2 kg)
-Function: After removing the item, the "held" weight: 2 kg (3 kg - 1 kg)
LOCK function
The "LOCK" function locks the scale's keys, preventing accidental changes to the settings during weighing.
To use this function, press and hold the "LOCK" key (21) until the scale displays the lock indicator;
To release the function, press and hold the "LOCK" key (21) again until the scale displays the unlock indicator.
The "LOCK" function will automatically activate 30 minutes after the last button press, and the scale will turn off.
3.3 Setting the time and date
First use: Turn ON/OFF the time/date display
(Press/Hold) (1) press and hold: the indicator will flash.
Press to confirm.
-To turn on the time/date display:
To turn on the time/date display, press and hold (12) until the display shows the time.
• To set the time:
When the time/date display is on, press and hold the (3) button until the hour digits flash.
Use the (3) button to adjust the hours, then press and hold to confirm.
To set the minutes, press the button to the right; to set the seconds, press the button to the left.
The time/date setting mode is indicated by (12) on the display.
Alarm
This device has 2 alarm settings (3 and 4).
Alarm 1: 15 minutes
The device is intended for household use.
(3) The user (third person) must not use the device without the first category of protective equipment and must be at least 18 years old, as specified in paragraph (12) of the rules for the use of the device.
(3) The user (third person) must not use the device without the second category of protective equipment and must be at least 18 years old, as specified in paragraph (12) of the rules for the use of the device.
3.4 Device maintenance
| Куат Deнгей | Пису Турí | Колдану (nicipy тэхирбеси щени дагдылары Карай) |
| Мakсимум
Куат
8-9 | P | Te3 Кыздыру | Тамak Temператypасьн Кыска укыт iшинde су кай hay Нукту Сду
Котереди Немес Тамak Сыкытыгн Te3 Кыздырды |
| Кусыр - Кайату | Кузэр,在 Nicipуді бcastay,Катырллган Taram'dapdny Kybpy,Te3 Кайату |
| Жorарfbi
Куат | 7-8 | Кузэр't - Кызр Кайату
OTka KaKtay | Кузэр,在 Te3 Кайату,nicipy ќени OTka Кытay (5-10 Мнутbing Кыска
укыт iшинde) |
| 6-7 | Кузэр't - Nicipу 6укыр
Куыр - OTka KaKtay | Кузэр,在,Баяу Кайату,nicipy ќени OTka Кытay (10-20 Мнутbingoptа
укыт iшинde),Косыmsa Куралдapdny and bih ana Кыздыру |
| Ораза
Куат | 4-5 | Пису - 6укыр - Кыр - OTka KaKtay | Букыр,在 aZanл Кайату,nicipy (узak yakbit),мakapон Туздыры |
| 3-4 | Пису - 6яу Кайату -
Коюату - кеничу | Узak,在узak (укivi, coystap, Кырллган et, balbik), суьытылар
(Mысалы, cy, shapan, copna, cYT), мakapон Туздыры |
| 2-3 | Пису - 6яу Кайату -
Коюату - кеничу | Узak,在icopy (bip постен виз лимер: Куш, coystap, Кырллган et,
балык), суьытылар (Mbicanly, cy, shapan, copna, cYT) |
| Төмehri
Куат | 1-2 | Еріty - Хі�иту - Хылbl Күд
сakтay - apanaactby | сарымді epity, ухокалдыл яйлел epity,шafын eнimderdiжibiy |
| 1 | Еріty - Хі�иту - Хылbl Күд
сaktay - apanaactby | Жан рись.Tау'mын KИшке Бөнітөrin Jылbl Күйнд
Тау'mылchын Temператypada уstan Tуру жени Крем-pinotto |
| ΘшIPу | 0 | Бетк 百尼кke KОлдay
Керсету | Пл'tа КүтУ Hemece ошіру рекимінда Болды (H-L-O apылbl синhan
berinetih tamak Nicipуden KeiiH Kanlby Mymkih Kanlbyk Kbi3y) |
4. TECHNICAL MAINTENANCE
Caution! Before any maintenance work, it is necessary to disconnect the device from the power supply and ensure that the indicator is off.
4.1 Maintenance of the device
4.1.1 Cleaning: Before cleaning, the device must be disconnected from the power supply. Note: Do not use abrasive sponges or hard brushes, as they may damage the surface. Do not use aggressive chemicals or solvents. After cleaning, wipe the device with a soft, dry cloth. For cleaning, use a soft cloth, warm water, or mild cleaning agents (do not use abrasive cleaners).
DANGER OF ELECTRIC SHOCK!!!
Note: If the power cord is damaged, it must be replaced by the manufacturer, its service agent, or similarly qualified persons in order to avoid a hazard. Do not immerse the device in water.
To avoid the risk of electric shock, do not expose the device to rain or moisture.
4.2 Maintenance of the device during operation
4.2.1 Cleaning: For cleaning, use only a soft, slightly damp cloth. Do not use the device or cleaning agents! Do not use abrasive cleaners. Do not use aggressive chemicals!
4.2.2 Water resistance - IPX2
The device is installed in accordance with the instructions.
Before connecting the device to the mains, make sure that the voltage and frequency of the mains match the values indicated on the nameplate.
It is possible to use a filter in the device, but it must be replaced regularly.
4.2.3 Water filter (water filter replacement)
The device must be installed without any defects.
There is a water filter. It is possible to replace the filter after a certain period of use, depending on the type of food and the frequency of use. The filter should be replaced every 45 minutes at 200°C or after 2/3 of the recommended time. Replacing the filter is necessary to ensure proper operation and safety.
ET
1. INSTRUCTIONS FOR USE
Setting the cooking power level and suction speed (power)
- Activating the Timer "STAND ALONE" Display: Timer "STAND ALONE" / Timer for cooking zones.
- Increasing/Decreasing the time of the Timer "STAND ALONE" / Timer for cooking zones
- Activating the cooking zone timer. Indicator of the active cooking zone timer
- Activation of Automatic Heat Up.
3.2 Using the cooking hob
3.2.1 What you need to know before starting
This manual describes the main functions; use the QR code on the first pages to access the complete instructions on the Internet.
All functions of this cooking hob comply with the strictest safety standards. Therefore:
- Some functions do not activate, or automatically deactivate, when there are no pans on the hob or when they are poorly positioned. In other cases, activated functions automatically deactivate a few seconds after the selected function requires additional setting that has not been performed.
Wait for the symbol on the display to turn off before approaching the cooking zone.
3.2.2 Cooking zone display
The cooking zone displays show:
8.
Enabling Temperature Manager (temperature management) (Warming Function - heating function)
- Pause
- Key Lock (key locking)
- Active hood indicator Activation of filter saturation indicator
- Selection/activation of the hood Display (screen) of the hood - filter Display of saturation of carbon/ceramic filter
- Resetting filter saturation
- Activation of the automatic hood function
| Zona za kuhanje uključena | 0 |
| Razina snage | 1...9-P |
| Residual Heat Indicato (Pokazatelj preostale topline) | H |
| Pot Detector (Otkrivanje posuda) | U |
| Aktivirana funkcjija "Bridge" (most) | N |
| Aktivirana funkcjija "Temperature Manager" (upravljanje temperaturom) | U |
| Funkcjija Pauza | II |
| Funkcjija Automatic Hat UP (automatsko zagrijavanje) | R |
3.2.3 Characteristics of the cooking hob
- Safe Activation: The product activates only in the presence of a pot: the heating process does not start or is interrupted in the absence or removal of the pot.
- Pot Detector: The device automatically detects the presence of cooking pots.
- Safety Shut Down: For safety reasons, each cooking zone has a maximum operating time, which depends on the set power level.
- Residual Heat Indicator: When one or more cooking zones are switched off, the presence of residual heat is indicated by a special visual signal on the display of the corresponding area, via the symbol "H".
3.2.4 Operation
Note: first activate the desired zone.
- Switching on: Briefly touch the ON/OFF (1) of the hob: the symbol lights up;
- Power Booster
The product has 2 additional power levels (above level 3)
- Power Booster 1: limited to 15 minutes Power Booster 2: limited to 5 minutes.
after which the power returns to the previously set level.
Touch and slide your fingers along the selection bar (3) (above level 3) and activate Power Booster 1
Power Booster level 1 is indicated in the selection/display area (12) by a flashing number "4"
Touch and slide your fingers along the selection bar (3) (above level 3) and activate Power Booster 2
Power Booster level 2 is indicated in the selection/display area (12) by a flashing symbol "P"
3.4 Power tables
| Razina snage | Vrsta kuhanja | Upotreba (na temelju iskustva i navika kuhanja) |
| Maksimalna snaga | P | Brzo zagrijavanje | povisite temperaturu hrane u kthom vremenu do brzog ključanja u slučaju vode ili brzog zagrijava tekućina za kuhanje |
| 8-9 kuharježenje - | smede piranje, početak kuhanja, prženje smrznutih proizvoda, brzo kljućanje | |
| Visoka snaga 6-7 | 7-8 | Smede piranje - prženje - kuhanje-grill | prženje, odžavanje kljućanja, kuhanje i grill (kratkotrajno, 5-10 minuta) |
| Smede piranje - dugo kuhanje - kuhanje gulaša - zaprška - grill | prženje, odžavanje blagog kljućanja, kuhanje i grill (srednjeg trajanja, 10-20 minuta), zagrijavanje pribora |
| Srednja snaga | 4-5 | Kuhanje - kuhanje gulaša - lagano zagrijavanje - grill | kuhanje gulaša, odžavanje minimarnog kljućanja, kuhanje (dugotrjno), miješanje tijstenine |
| 3-4 | Kuhanje - lagano kljućanje - zgušnjavanje -lagano zakuhavanje | dugotrjno kuhanje (riža, umaci, pečenja, riba) u prisutnosti pratečih tekucićna (npr. voda, vino, juha, mlijeko), miješanje tijstenine |
| 2-3 | Kuhanje - lagano kljućanje - zgušnjavanje -lagano zakuhavanje | prodljeno kuhanje (količine manje od jeder litre: riža, umaci, pečenja, riba) uprisustvu pratečih tekucićna (npr. voda, vino, juha, mlijeko) |
| Niska snaga | 1-2 | Rastapanje - otapanje - zadržavanje topline - lagano zakuhavanje | otapanje maslaca, lagano otapanje Čokolade, odmrzavanje malih proizvoda |
| 1 | Rastapanje - otapanje - zadržavanje topline - lagano zakuhavanje | odžavanje toplote malih porcija svježe kuhanje hrane ili odžavanje temperature jela prije posluživanja i miješanje ržota |
| OFF | 0 | Povrsina za odlaganje | Ploča za kuhanje na Poziciji stand-by ili ugašena (moguce prisustvo topline skraja kuhanja, označeno s H -L-O) |
4. MAINTENANCE
Caution! Before any cleaning or maintenance operation, make sure that the cooking zones are switched off and that the heat indicator light has gone out.
4.1 Maintenance of the cooking hob
4.1.1 Cleaning
Power Limitation
ON/OFF
Power Limitation Power Limitation
Power Limitation
www.shopelica.com, www.elica.com
(1) y/x = y/x + 1
(1)
.
.