
SPIW4122 - Air conditioner WHIRLPOOL - Free user manual and instructions
Find the device manual for free SPIW4122 WHIRLPOOL in PDF.



| Product type | Split air conditioner |
| Brand | Whirlpool |
| Model | SPIW4122 |
| Power supply | 230 V / 50 Hz |
| Refrigerant gas | R410a (GWP 2088) |
| Maximum refrigerant charge | 2.5 kg |
| Operating modes | Cooling, Heating, Ventilation, Dehumidification |
| Special functions | 6th Sense, Jet, Sleep, Around U, Super Silent, Power Save |
| Remote control | Yes, with AAA batteries (not included) |
| Timer | Programmable on/off |
| Air filter | Washable, cleaning indicator after 720 hours |
| Recommended filter cleaning | Every 200 hours of use |
| Frost protection | Yes, compressor stops if heat exchanger < 0°C |
| Automatic defrost | Yes, in heating mode (duration 6-10 min) |
| Automatic restart | Yes, adjustable via on/off button |
| Minimum room area | > 10 m² |
| Indoor installation height | ≥ 2.5 m above floor |
| Super silent mode | Yes, to reduce ambient noise |
| Operating temperature (heating) | From -7°C to 24°C outdoor |
| Operating temperature (cooling) | Up to 43°C outdoor |
Frequently Asked Questions - SPIW4122 WHIRLPOOL
User questions about SPIW4122 WHIRLPOOL
0 question about this device. Answer the ones you know or ask your own.
Ask a new question about this device
Download the instructions for your Air conditioner in PDF format for free! Find your manual SPIW4122 - WHIRLPOOL and take your electronic device back in hand. On this page are published all the documents necessary for the use of your device. SPIW4122 by WHIRLPOOL.
USER MANUAL SPIW4122 WHIRLPOOL
Instructions for use
Instructions for use
ENGLISH Instructions for use Page 4
RUSSIAN Instructions for use Page 180
- Download the complete instruction manual on docs.whirlpool.eu or call the phone number shown on the warranty booklet.
- Before using the appliance, read these safety instructions. Keep them nearby for future reference.
- These instructions and the appliance itself provide important safety warnings, to be observed at all times. The manufacturer declines any liability for failure to observe these safety instructions, for inappropriate use of the appliance or incorrect setting of controls.
- Very young children (0-3 years) should be kept away from the appliance. Young children (3-8 years) should be kept away from the appliance unless continuously supervised. Children from 8 years old and above and persons with reduced physical, sensory or mental capabilities or lack of experience and knowledge can use this appliance only if they are supervised or have been given instructions on safe use and understand the hazards involved. Children must not play with the appliance. Cleaning and user maintenance must not be carried out by children without supervision.
PERMITTED USE
- CAUTION: the appliance is not intended to be operated by means of an external switching device, such as a timer, or separate remote controlled system.
- This appliance is intended to be used in household and similar applications such as: hotels and working offices. This appliance is not for professional use.
- Always turn off the air conditioner by remote control first. Do not use the power supply circuit breaker or pull off the plug to turn it off. Disconnect the air conditioner from the power supply if it is to be left unused for a long period of time or during a thunder/lightning storm.
- Never insert obstacle in the air outlet-risk of injury. Keep ventilation openings clear of any obstruction.
- Do not place any other electrical products or household belongings under indoor unit or outdoor unit. Condensation dripping from the unit might get them wet, and may cause damage or malfunction of your property.
INSTALLATION
- The appliance must be handled and installed by two or more persons - risk of injury. Use protective gloves to unpack and install - risk of cuts.
- Installation, including electrical connections, and repairs must be carried out by a qualified technician according to national wiring rules. Do not repair or replace any part of the appliance unless specifically stated in the user manual. Keep children away from the installation site. After unpacking the appliance, make sure that it has not been damaged during transport. In the event of problems, contact the dealer or your nearest After-sales Service. Once installed, packaging waste (plastic, styrofoam parts etc.) must be stored out of reach of children - risk of suffocation. The appliance must be disconnected from all remote power supply before any installation operation - risk of electric shock. During installation, make sure the appliance does not damage the power cable - risk of fire or electric shock. Only activate the appliance when the installation has been completed.
- When moving or relocating the air conditioner, consult experienced service technicians for disconnection and reinstallation of the unit.
- The appliance shall not be installed in the laundry.
- The appliance shall be installed, operated and stored in a room with a floor area larger than 10 m². Mount the indoor unit at least 2.5 m above floor or grade level.
- The installation of pipe-work shall be kept in a room with a floor area larger than 10 m² in compliance with national gas regulations.
ELECTRICAL WARNINGS
- The power supply must be of rated voltage with special circuitry for the appliance. The diameter of the power cord must comply with requirements.
- A multi-pole switch shall be installed in the fixed wiring in accordance with the wiring rules and the appliance must be earthed in conformity with national electrical safety standards.
- An all-pole disconnection switch having a contact separation of at least 3 mm in all poles should be connected in fixed wiring in accordance with national wiring rules, and the appliance must be earthed in conformity with national electrical safety standards.
- Do not use extension leads, multiple sockets or adapters. The electrical components must not be accessible to the user after installation. Do not use the appliance when you are wet or barefoot. Do not operate this appliance if it has a damaged power cable or plug, if it is not working properly, or if it has been damaged or dropped.
- If the supply cord is damaged, it must be replaced with an identical one by the manufacturer, its service agent or similarly qualified persons in order to avoid a hazard - risk of electric shock.
- A residual current device (RCD) having rated residual operation current not exceeding 30 mA shall be incorporated in fixed wiring according to national law.
- The temperature of refrigerant circuit will be high, please keep the interconnection cable away from the copper tube.
- Ensure safe grounding and a grounding wire connected with the special grounding system of the building, installed by professionals. The appliance must be fitted with electrical leakage protection switch and an auxiliary circuit breaker with sufficient capacity. The circuit breaker must also have a magnetic and a thermal tripping function to ensure protection in case of short-circuit and overload.
| Model 9K & 12K 18K 24K | |||
| Required capacity of circuit breaker 16A 20A 25A | |||
- For the connection of power cord and cable connection between indoor and outdoor units, please see the wiring diagram on the appliance.
CLEANING AND MAINTENANCE
- WARNING: Ensure that the appliance is switched off and disconnected from the power supply before performing any maintenance operation; never use steam cleaning equipment - risk of electric shock.
DISPOSAL OF PACKAGING MATERIALS
The packaging material is 100% recyclable and is marked with the recycle symbol. The various parts of the packaging must therefore be disposed of responsibly and in full compliance with local authority regulations governing waste disposal.
DISPOSAL OF HOUSEHOLD APPLIANCES
This appliance is manufactured with recyclable or reusable materials. Dispose of it in accordance with local waste disposal regulations. For further information on the treatment, recovery and recycling of household electrical appliances, contact your local authority, the collection service for household waste or the store where you purchased the appliance. This appliance is marked in compliance with European Directive 2012/19/EU, Waste Electrical and Electronic Equipment (WEEE). By ensuring this product is disposed of correctly, you will help prevent negative consequences for the environment and human health.
The ( ) symbol on the product or on the accompanying documentation indicates that it should not be treated as domestic waste but must be taken to an appropriate collection center for the recycling of electrical and electronic equipment.
DECLARATIONS OF CONFORMITY
This product contains Fluorinated Greenhouse Gases covered by the Kyoto Protocol, the refrigerant gas being in a hermetically sealed system. (R410a, GWP 2088). The maximum refrigerant charge amount is 2.5 kg. Please refer to the rating label for detailed information.
Product description
The figures in this manual are based on the external view of a standard model. Consequently, the shape may differ from that of the air conditioner you have selected.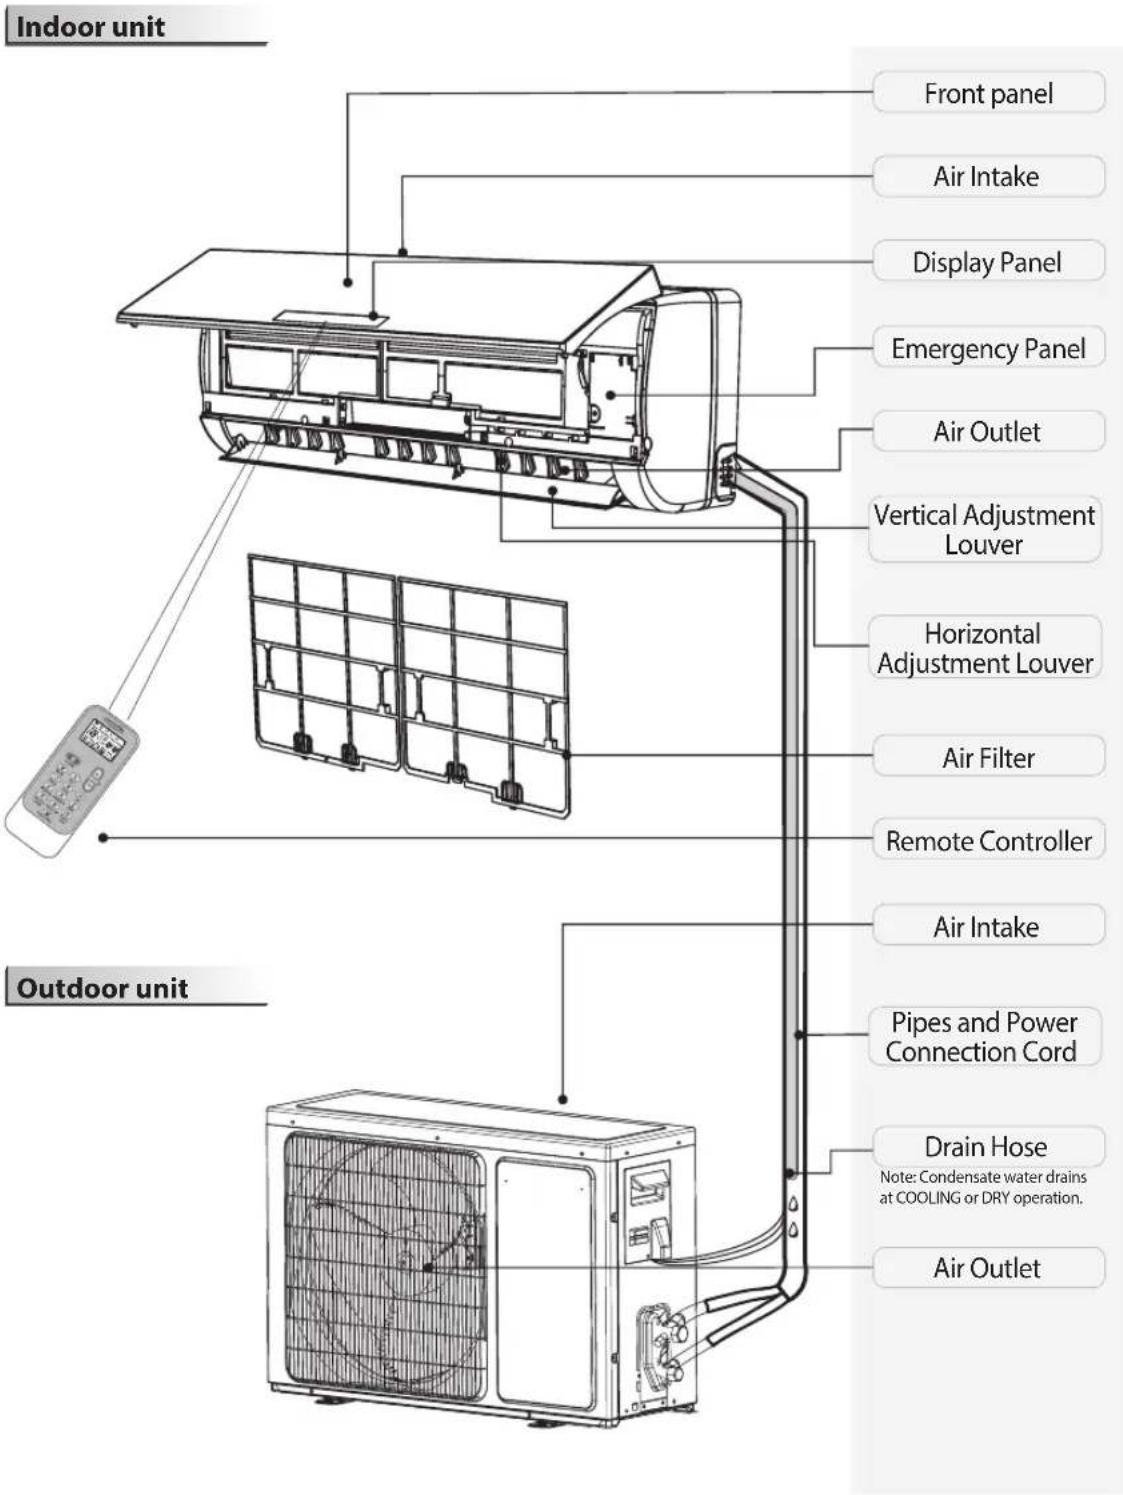
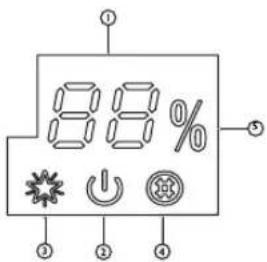
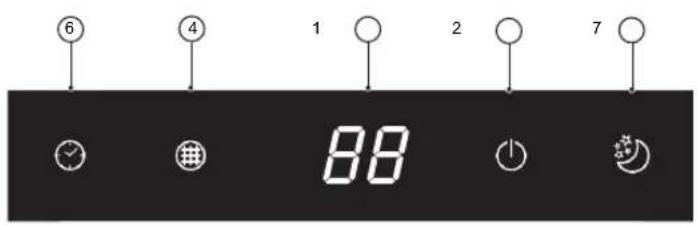
Temperature indicator (1)
08 Displays set temperature.
It shows "FC" as a reminder to clean the filter.
Running indicator (2)
It lights up during operation.
It flashes during outside unit defrosting.
6th Sense indicator (3)
It lights up when 6th sense is on.
It goes off when 6th sense ends.
Filter monitor indicator (4)
It flashes when the filter needs to be cleaned.
The filter monitor indicator flashes after 720 hours of usage as a reminder to clean the filter.
After cleaning the filter, press the filter reset button located on the indoor unit behind the front panel to stop the filter monitor indicator from flashing.
Humidity indicator (5)
It lights up when showing the humidity level.
It goes off when showing the temperature.
Timer indicator (6)
It lights up during the set time.
It goes off when timer operation ends.
Sleep indicator (7)
It lights up once sleep mode is set, the "Running" indicator will flash 10 times, then the whole display will turn off.
For air conditioners without Wi-Fi control, we recommend the Wpro SmartClim: a smart device to control the main settings of your appliance via Wi-Fi from your smartphone.
This accessory is not included in the product packaging. Please contact our After-Sales Service for more details and to purchase.
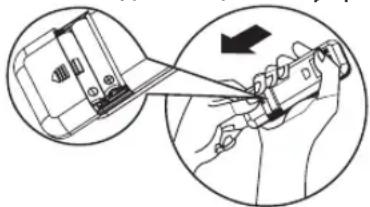
Insert the batteries into the remote control.
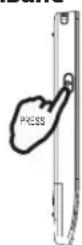
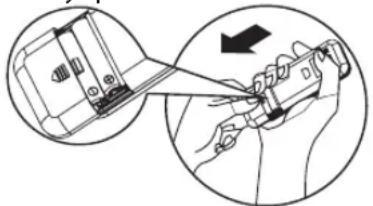
- Insert a pin and gently press down on the battery cover, then push in the direction of the arrow to remove it, as shown.
- Insert 2 AAA batteries (1.5V) into the compartment. Ensure that "+" and "-" polarity is correctly positioned.
- Close the battery cover on the remote control.
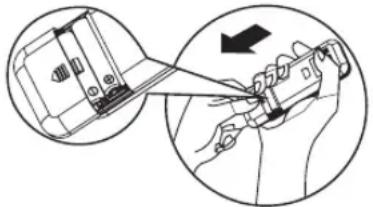
- Remote Control presetting
Each time the batteries are replaced in the remote controller, the remote controller is pre-set at Heat Pump mode. The heat pump AC remote controller can be used to control the cool only AC models.
Use RC to control the appliance
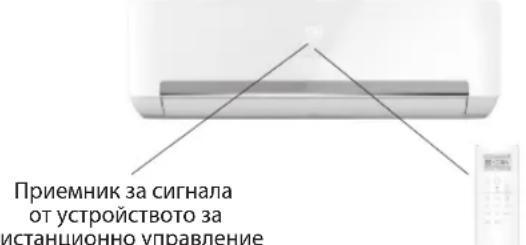
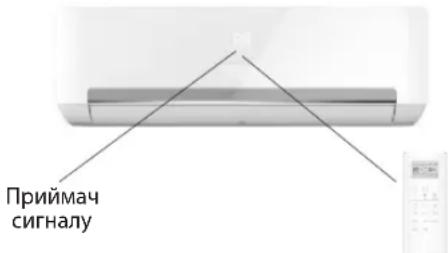
- To operate the appliance by remote control, point the remote control at the receiving device on the indoor unit, to ensure receiving sensibility.
- To send a message from remote control, the symbol will flash for 1 second. On receipt of the message, the appliance will emit a beep.
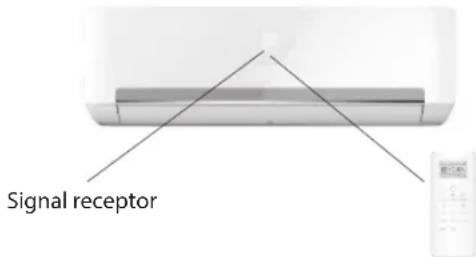
- The remote control will operate the air conditioner at a distance of up to 7 m. Each time the batteries are replaced in the remote control, the remote control is pre-set at Heat Pump mode.
Note: please follow the instruction which matches to the remote controller you receive for Air Conditioner operation.
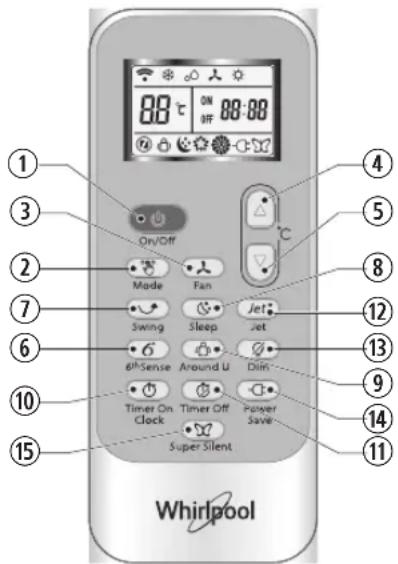
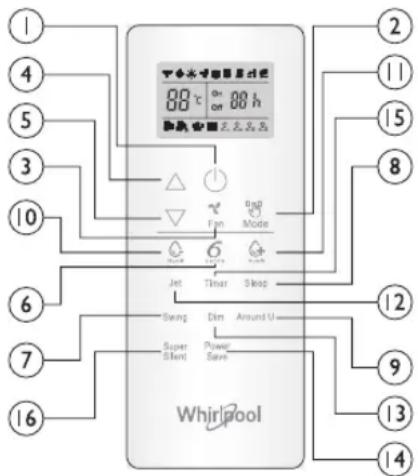
Function description of buttons (P1-04)
1. ON/OFF BUTTON
Starts or Stops the appliance by pressing this button.
3. FAN BUTTON
Used to select fan speed in sequence auto, high, medium or low.
4-5. TEMPERATURE BUTTON
Used to select the room temperature. Used to set the time in timer mode.
6. 6TH SENSE BUTTON
Sets or cancels 6th sense operation.
7. SWING BUTTON
Stops or starts horizontal adjustment louver swinging and sets the desired up/down airflow direction.
10-11. HUMIDITY BUTTON
Used to set desired humidity level, they are only available under 6th SENSE mode.
16. SUPER SILENT BUTTON
Used to start or stop the super silent operation to have a low noise environment.
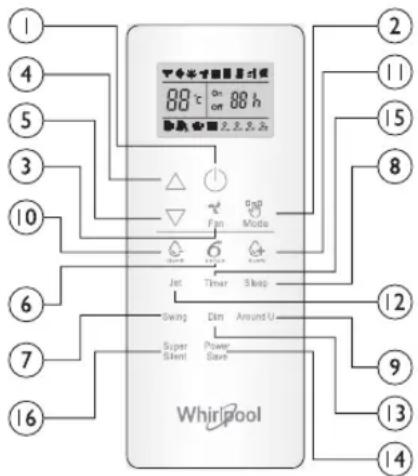
2. MODE BUTTON
Used to select the operation mode in sequence Cooling, heating or fan.
8. SLEEP BUTTON
Used to select the sleep mode in sequence of sleep 1, sleep 2, sleep 3, sleep 4 and sleep off.
9. AROUND U BUTTON
Used to set or cancel Around U function.
12. JET BUTTON
Used to start or stop fast cooling or heating.
13. DIM BUTTON
Used to turn the display light on or off on the indoor unit.
14. POWER SAVE BUTTON
Used to start or stop the power save operation.
15. TIMER BUTTON
Used to set the time to turn the appliance on or off.
Symbols on the RC display
Cooling indicator, Auto fan speed, Sleep indicator 1, Humidity plus indicator, Hi fan speed, Sleep indicator 2, Humidity minus indicator, Medium fan speed, Sleep indicator 3, Fan only indicator, Low fan speed, Sleep indicator 4, Heating indicator, Around U indicator, Jet indicator, 0, 02, eD, 0, BB, 00
Display set temperature, B, h, Display set timer
Activate the RC by pressing the UNLOCK button.
Press the button; the backlight will light up and function buttons will be activated for use. Press again to lock the remote controller. If there is no operation on the remote controller for 10 seconds, it will lock automatically.
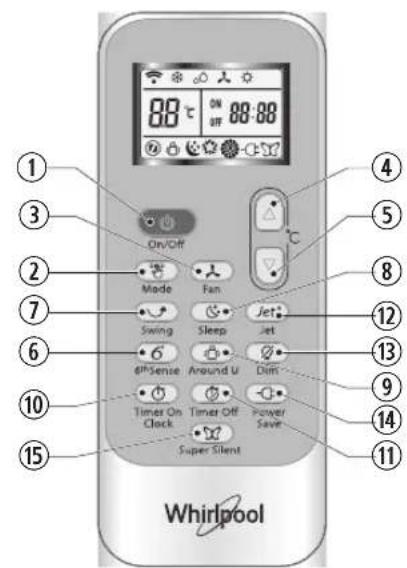
Function description of buttons (J1-3A)
1. ON/OFF BUTTON
Starts or stops the appliance by pressing this button.
2. MODE BUTTON
Used to select the operation mode in sequence of Cooling, Dry, Fan only, or Heating.
3. FAN BUTTON
Used to select fan speed in sequence Auto, High, Medium, or Low.
4-5. TEMPERATURE BUTTON
Used to select the room temperature. Used to set time in timer mode and real time clock.
6. 6TH SENSE BUTTON
Sets or cancels 6th sense operation.
7. SWING BUTTON
Stops or starts horizontal adjustment louver swinging and sets the desired up/down airflow direction.
8. SLEEP BUTTON
Sets or cancels Sleep Mode operation in sequence of Sleep 1, Sleep 2, Sleep 3, Sleep 4, or Sleep Off.
9. AROUND U BUTTON
Used to set or cancel Around U function.
10. TIMER ON/CLOCK BUTTON
Used to set the current time.
Used to set or cancel the timer on operation.
11. TIMER OFF BUTTON
Used to set or cancel the timer off operation.
12. JET BUTTON
Used to start or stop the fast cooling or heating mode.
Symbols on RC display

Cooling indicator, Sleep 1 indicator, Auto fan speed, Jet indicator

Dry indicator, Sleep 2 indicator, High fan speed, Signal transmission

Fan only indicator, Sleep 3 indicator, Medium fan speed

Heating indicator, Sleep 4 indicator, Low fan speed, Display current time

6th Sense indicator

Around U indicator

Super silent indicator
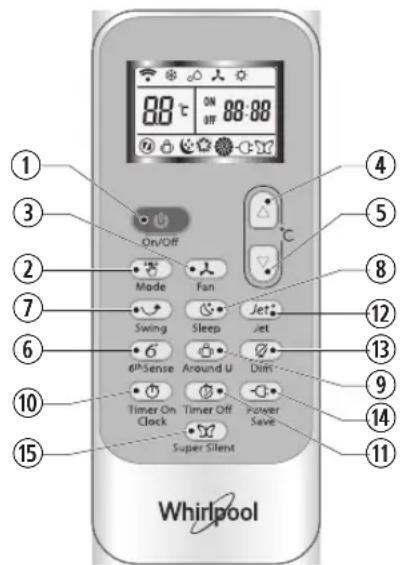
13. DIM BUTTON
Used to turn on or turn off display light on indoor unit.
14. POWER SAVE BUTTON
Used to start or stop the power save operation.
15. SUPER SILENT BUTTON
Used to start or stop the super silent operation to have a low noise environment.


88:88
Display set timer

Display set temperature

Power save indicator
PROTECTION
Operating condition
The protective device may trip and stop the appliance in the cases listed below.
| Heating | Outdoor air temperature is over 24°C |
| Outdoor air temperature is below -7°C | |
| Room temperature is over 27°C | |
| Cooling | Outdoor air temperature is over 43°C |
| Room temperature is below 21°C | |
| Dehumidifying | Room temperature is below 18°C |
If the air conditioner runs in COOLING or DRY mode with door or window opened for a long time when relative humidity is above 80%, dew may drip down from the outlet.
Features of protection device
Wait at least 3 minutes before restarting the unit after operation stops or when changing mode during operation. After connecting to power supply and turning on the appliance immediately, a delay of 20 seconds may occur before it starts to operate. If all operation has stopped, press ON/OFF button again to restart. Timer should be set again if it has been cancelled.
Features of COOLING mode
Anti-freezing
When the temperature of the indoor heat exchanger drops to 0°C or below, the compressor will stop working to protect the appliance.
Features of HEATING mode
Preheating
In order to prevent cool air blowing, 2-5 minutes are necessary to preheat the indoor unit at HEATING operation start. The indoor fan will not work during preheating.
Defrosting
In HEATING operation the appliance will defrost (de-ice) automatically to raise efficiency. This procedure usually lasts 6-10 minutes. During defrosting, the fan stops running and the running indicator flashes.
After defrosting is completed, it returns to HEATING mode automatically.
Clean front panel of Indoor Unit
1. Disconnect from the power supply
Turn off the appliance first before disconnecting from power supply.
2. Remove the front panel
Open the front panel as shown by the arrow (Fig. A).
Pull the slots at the side of the front panel with force to take out the front panel (Fig. B).
3. Clean the front panel
Wipe it with a soft and dry cloth. Use lukewarm water (below 40°C) to clean if the appliance is very dirty. After cleaning, let it dry.
4. Refit and close the front panel
Refit and close the front panel by pushing it downward.
Note:
- Do not use substances such as gasoline or polishing powder to clean the appliance.
- Do not sprinkle water onto the indoor unit. Dangerous! Electric shock!
Clean Air filter
It is necessary to clean the air filter after using it for about 200 hours. Clean the air filter every two weeks if the air conditioner operates in an extremely dusty environment.
1. Disconnect from the power supply
Turn off the appliance first before disconnecting from power supply.
2. Take out air filter (Fig. C).
- Open the front panel. 2. Press the handle of the filter gently. 3. Slide out the filter.
3. Cleaning the air filter (Fig. D)
If the filter is very dirty, clean it with a solution of lukewarm water and neutral detergent.
After cleaning, let it dry.
- Refit the filter, press the filter reset button (Fig. E) on the right side using a cylinder pin, and close the front panel.
Note:
- To avoid injury, do not touch the fins of the indoor unit with your fingers after removing the filter.
- Do not attempt to clean the inside of the air conditioner by yourself.
- Do not clean the filter in a washing machine.
Fig. A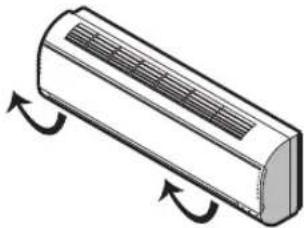
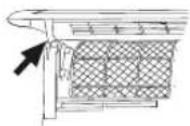
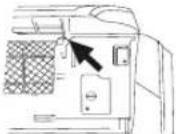
Fig. B, Fig. C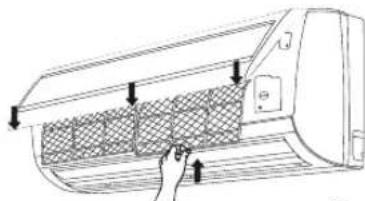
Fig. D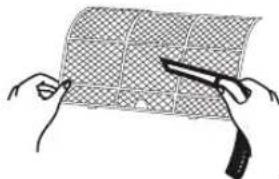
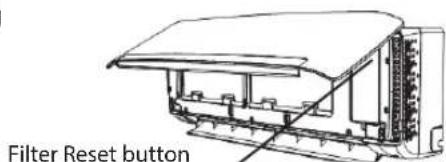
Fig. E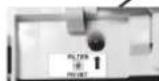
EMERGENCY OPERATION
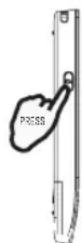
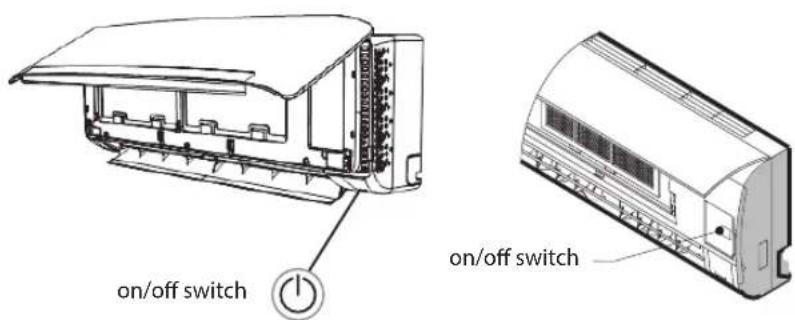
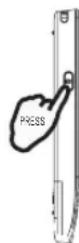
In an emergency situation or when the remote control is missing, you can control the unit by pressing the on/off switch located on the indoor unit.
- Turn on the appliance: when the unit is off, press this button; it will start up and operate in 6th SENSE mode.
- Turn off the appliance: when the unit is on, press this button; the unit will stop working.
Note: Do not press this button for a long time as it will cause malfunction.
Auto-Restart Function
If you want to set auto_restart, switch on the power supply, press the ON/OFF button on the indoor unit and hold for over 5 seconds, auto_restart is set with buzz sound.
If the auto_restart has been set, press the ON/OFF button on the indoor unit and hold for over 5 seconds, auto_restart function will be cancelled with a buzz sound and air conditioner is on standby mode.
Disposal of the batteries
To protect natural resources and to promote material reuse, please separate batteries from other types of waste and recycle them through your local, free battery return system.
Installation instruction
Installation diagram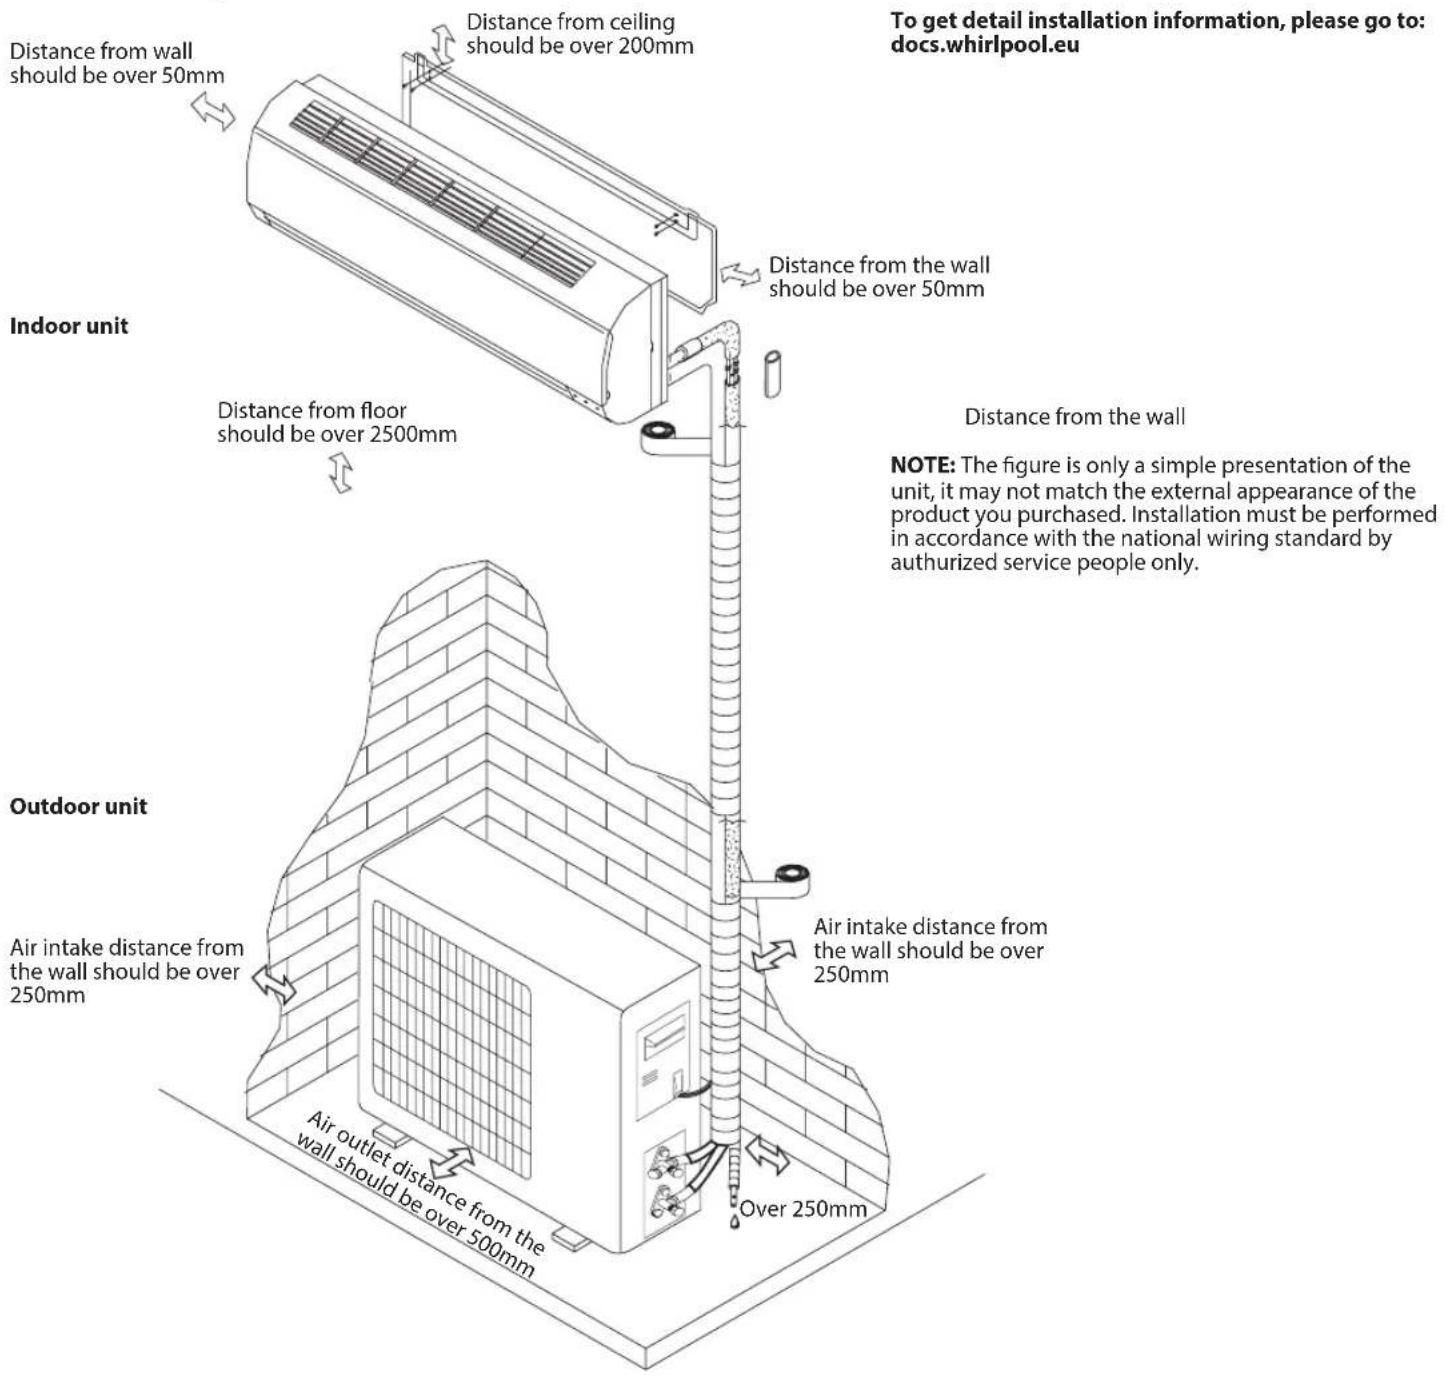
When install interconnection cord, make sure that the color of wires and the terminal No. of outdoor unit shall be same as those in indoor unit.
Cable Specifications
| Capacity (Btu/h) | Power cord Power connecting cord | |||
| Type | Normal cross - sectional area | Type | Normal cross - sectional area | |
| 7K, 9K, 12K H07 | RN-F 1.0mm | \( ^{2}\mathrm{X}3 \) H07 | RN-F 1.0mm | \( ^{2}\mathrm{X}5 \) |
| 18K H07RN | -F 1.5mm | \( ^{2}\mathrm{X}3 \) H07 | RN-F 1.5mm | \( ^{2}\mathrm{X}5 \) |
| 24 K H07RN | -F 2.5mm | \( ^{2}\mathrm{X}3 \) H07 | RN-F 2.5mm | \( ^{2}\mathrm{X}5 \) |
Operation problems are often due to minor causes, please check and refer to the following chart before contacting the service. This may save time and unnecessary expenses.
| Trouble Analysis | |
| Does not run | ·Is the protection device or fuse blown? ·Please wait for 3 minutes and start again, protection device may be preventing unit to work. ·Are the remote control batteries low? ·Is the plug not properly plugged? |
| No cooling or heating air | ·Is the air filter dirty? ·Are the intakes and outlets of the air conditioner blocked? ·Is the temperature set properly? ·Are doors or windows open? |
| Ineffective control | ·Has there been a strong interference (from excessive static electricity discharge, power supply voltage abnormality)? Note that operation will be abnormal, in this case unplug from the power supply and re-plug after 2-3 seconds. |
| Does not operate immediately | ·3 minute delay will occur when changing mode during operation. |
| Peculiar smell | ·This smell may come from another source such as furniture, cigarette etc, which is sucked in the unit and blown out with the air. |
| A sound of running water | ·Normal behaviour caused by the flow of refrigerant in the air conditioner. ·Defrosting sound in heating mode. |
| Cracking sound | ·The sound may be generated by the expansion or contraction of the front panel due to temperature changes. |
| Mist sprays from the outlet | ·Mist is present in the room with low temperature? Normal behaviour due to cool air discharged from indoor unit during COOLING or DRY operation mode. |
| Running indicator flashes but indoor fan stops | ·The unit is shifting from heating mode to defrost. The indicator will light off and return to heating mode. |
Note: If the problems still have, turn off the appliance and disconnect from power supply, then contact the nearest Whirlpool Authorized Service Center. Do not attempt to move, repair, disassemble, or modify the appliance by yourself.
AFTER SALES SERVICE
Before contacting the Customer Care Centre:
- Try to solve the problem yourself based on the descriptions given in the "Troubleshooting".
- Turn the appliance off and restart it to see if the fault persists.
If after carrying out the above checks, the fault persists, contact the Customer Care Centre.
Please give:
- a short description of the fault;
- the exact model of the air conditioner;
- the service number (this is the number found below the word Service on service sticker which is located on the side or on the bottom of the indoor unit). The service number can also be found in the warranty booklet;
- your full address;
- your telephone number.
If repair work has to be carried out, contact the
Customer Care Centre (Use of original spare parts and a proper repair is guaranteed).
You will need to present the original invoice.
Failure to comply with these instructions could compromise the safety and quality of your product.
SERVICE 0000 000 0000
Note: if you want the full manual for your appliance, please help to download it from website through below link: docs.whirlpool.eu using QR code

EMERGENCY OPERATION
2. "MODE" TEST (MODUS TEST)
9. "AROUND U" TEST (OMGEVINGSTEST)
- "MODE" TEST (MODUS TEST)
- "SWING" TEST (ZWAAL TEST)
- "SLEEP" TEST (SLAAP TEST)
3. BOTAO FAN (DEVENTOINHA)
2. MODE BUTTON (MODALITY)
- MODE BUTTON (MODALITY)
Press the button for operation
of the appliance. If it does not
and the appliance's handle
Installed temperature

hh Installed timer

Signal transmission
MAINTENANCE AND CARE
Indicator for timer (6)
3. FAN BUTTON
Used to select the fan speed in the sequence auto, high, medium, or low.
4-5. TEMPERATURE BUTTON
Used to select the room temperature. Used to set the time in timer mode.
6. 6th SENSE BUTTON
3. FAN BUTTON
Used to select the fan speed in the sequence auto, high, medium, or low.
4-5. TEMPERATURE BUTTON
Indicator for Cooling

Dry indicator

Sleep 1 indicator (rest) Auto fan speed

indicator (rest) High fan

(high

fan speed)

Fan only indicator

Heating indicator

Sleep 3 indicator

It lights up during operation.
6th Sense indicator (3)
6th Sense indicator (3)
Lights up when 6th Sense is turned on.
Goes out when 6th Sense is turned off.
Filter monitoring indicator (4)
4-5. TEMPERATURE BUTTON
This button is used to set the room temperature. It is also used to set the time in timer mode.
6. 6TH SENSE BUTTON
4-5. TEMPERATURE BUTTON
This button is used to set the room temperature.
4-5. HEAT EXCHANGER
4-5. HEAT EXCHANGER
Displays the set temperature.
Displays "FC" as a reminder that the filter needs cleaning.

Operating mode indicator (2)
Lights up continuously during operation.
Flashes during defrosting and draining in the outdoor unit.

Used for installation
At the required humidity levels
(Available only in "6TH SENSE" mode).
16. SUPER SILENT BUTTON ("SUPER SILENT" MODE)
Used to turn on
Turn off super silent mode
Maximum low noise level.
Symbols on the display of the remote control


Indicator of reduced humidity

Indicator of reduced humidity

Indicator of regime

"Ventilator only"

Indicator of regime

Function indicator

Air circulation

Function indicator "Turbo"

Automatic selection of fan speed

High fan speed

Medium fan speed

Low fan speed

Regime indicator "Superquiet"

Night mode "Night 4"

Setting the timer

Timer setting indicator

Overheat protection

MODE button (mode switch)
Used to select
the operating mode in the following sequence:
Cooling
Heating or Ventilation
SLEEP button ("Night" mode)
Used to select the night
mode in the following sequence:
"Night 1", "Night 2", "Night 3",
"Night 4" and "Night Off".
AROUND U button (function
JET button ("Turbo" function)
Used to turn on
High-speed heating
of the room.
DIM button (brightness adjustment)
Used to turn on
Backlight of the
internal block.
POWER SAVE button (function
energy saving
Used to turn on
The device turns on and off.
Energy saving.
TIMER button
Used for the timer.
Turning the device on and off.
Activate the remote control by pressing the lock button.
Press the button, it will turn on.
Backlight and functions.
The buttons are touch-sensitive.
Used for locking.
Remote control.
To control, press the button.
again. If within 10
seconds the remote control
will be executed.
In operating mode, it will be
automatically blocked.
Remote control functions
Description of button functions (J1-3A)
1. ON/OFF button
When this button is pressed, the device turns on or off.
2. MODE button (mode switching)
Used to select the operating mode in the specified sequence: "Cooling",
"Dehumidification", "Fan only" or "Heating".
3. FAN button (fan)
Used to select the fan speed in the specified sequence: "Auto", "High", "Medium" and "Low".
4-5. TEMPERATURE button (temperature selection)
Used to select the temperature in the room. Used to set the time in timer mode and hours in real time.
6. "6TH SENSE" button
Sets or cancels the "6th sense" mode.
7. SWING BUTTON (SWING ADJUSTMENT)
Used to enable or disable the swing function and to adjust the position of the swing, as well as to select the desired air flow direction (up/down).
8. SLEEP BUTTON (SLEEP MODE)
Used to select the sleep mode in the following sequence: "Sleep 1", "Sleep 2", "Sleep 3", "Sleep 4", and "Sleep Off".
9. AROUND U BUTTON (AIR CIRCULATION FUNCTION)
Used to enable or disable the air circulation function.
10. TIMER ON/CLOCK BUTTON (TIMER ON SETTING)
Used to set the current time. Used to activate or deactivate the timer on.
11. TIMER OFF BUTTON (TIMER OFF SETTING)
Used to activate or deactivate the timer off.
12. JET BUTTON (TURBO FUNCTION)
Used to enable or disable the turbo function.
13. DIMMER BUTTON (BRIGHTNESS ADJUSTMENT) Used to turn on or off the display backlight of the indoor unit.
14. POWER SAVE BUTTON (ENERGY SAVING FUNCTION)
Used to enable or disable the energy saving function.
15. KHONKA SUPER SILENT (PEXKIMA "CYNEPTUXM")
Used to enable or disable the super silent mode at the maximum low noise level.
Symbol for the display of the remote control

Indicator "Cooling"

Mode indicator "Night 3"
Mode indicator "Night"
Function "Air circulation"

Automatic selection of fan speed
High fan speed

Medium fan speed

Low fan speed
Mode indicator "Super silent"

Function indicator "Turbo"
Reset

88 Temperature setting indicator
Time setting indicator

Set temperature indicator

Energy saving mode indicator
PROTECTION
Shutdown conditions
The protection system may turn off and stop the device in the cases specified below.
Air filter error
The air filter should be cleaned approximately every 200 hours of operation. When operating the unit in a very dusty environment, it is recommended to clean the air filter every two weeks.
1. Disconnect from power supply
Before disconnecting the device from the power supply, turn it off.
2. Remove the air filter (Fig. C).
- Open the front panel. 2. Gently press on the filter handle. 3. Pull out the filter.
3. Clean the air filter (Fig. D)
If the filter is heavily soiled, clean it with a warm soapy solution or a neutral cleaning agent. Allow it to dry.
- Install the filter in place, press the filter reset button (Fig. E) on the right side using a thin cylindrical object, then close the front panel.
Notes:
- Do not touch the ozone filter with your hands until it has cooled inside to avoid injury.
- Do not attempt to clean the inside of the condenser yourself. Do not put the air filter in the dishwasher.
6th Sense indicator (3)
Lights up when the 6th Sense is on.
Goes out when the 6th Sense is off.

Filter status indicator (4)
Lights up when the filter needs to be cleaned.
The filter status indicator will light up after 720 working hours to remind you that the filter needs to be cleaned.
When you clean the filter, press the button located on the inner side to reset the indicator, to turn off the light.

Humidity indicator (5)
Lights up when the display shows relative humidity. Does not light up when the display shows temperature.

Timer indicator (6)
Lights up when the timer is set.
Goes out when the timer is cancelled.

Setting the remote control for heating mode (7)
The remote control is switched to heating mode. The indicator for the switched-on state lights up, after which the settings are displayed.
For climate devices that cannot be controlled via Wi-Fi connection, we recommend the SmartClim Pro: an intelligent device for controlling the basic functions of the climate device via Wi-Fi from your smartphone. This accessory is not included in the delivery package of the climate device. For additional information and purchase, please contact our department for after-sales service.
Remote control device
Installing the batteries of the remote control device
- Slide the cover in the direction of the arrow, then press the latch of the battery compartment and remove it in the direction of the arrow (see figure).
- Insert 2 AAA batteries (1.5V) into the compartment. Pay attention to the correct polarity marked with "+" and "-".
- Close the latch of the battery compartment of the remote control device.
- Initial state of the remote control device
When the batteries are inserted and the cover is closed, the remote control device is set to heating mode; if the climate device can only operate in cooling mode, this mode does not work, but the remote control device can still be used.
Using the remote control device to control the climate device
To control the climate device via the remote control device, you must point the device at the receiver on the indoor unit to ensure signal reception. - When sending a signal from the device, the symbol lights up for 1 second. When receiving a signal, a beep is emitted.
- The device can control the climate device from a distance of up to 7 meters. - When the batteries of the remote control device are inserted, the heating mode is set.
Note: The above-mentioned settings are intended for the model of the device that was delivered with the climate device you purchased.
Functional description of the buttons (P1-04)
- BUTTON 3 ON/OFF (TURNING ON AND OFF)
Turning the unit on and off.
- FAN BUTTON (VENTILATOR) Used to adjust the speed of the ventilator in a specific mode; AUTOMATIC, HIGH, MEDIUM, LOW.
4-5. TEMPERATURE BUTTON (TEMPERATURE) Used to set the temperature in the room.
The timer buttons are used to set the time.
- BUTTON 6th SENSE
Turns the 6th Sense mode on and off.
- SWING BUTTON (AIRFLOW DIRECTION)
Starts or stops the horizontal louvres movement and sets the direction of the airflow (up-down).
10-11. HUMIDITY BUTTON (HUMIDITY)
Used to set the humidity. Works only in 6th Sense mode.
- SUPER SIL BUTTON (SUPER SILENT MODE)
Used to turn on and off the super silent mode with a very low noise level.
Symbols on the screen of the remote control
- MODE BUTTON (OPERATING MODE)
This button is used to set the operating mode: heating, cooling, ventilation.
- SLEEP BUTTON (SLEEP MODE) is used to select the sleep mode in the sequence: 1, 2, 3, 4, off.
- AROUND U BUTTON
Used to turn on and off the Around U function.
- JET BUTTON (FAST
COOLING OR HEATING) is used to turn on and off the fast cooling and heating function.
- DIM BUTTON (TURNING ON AND OFF THE DISPLAY)
Used to turn on and off the display on the indoor unit.
- POWER SAVE BUTTON (ECONOMY MODE)
Used to turn on and off the economy mode of operation.
- TIMER BUTTON (TIMER) is used to set the time for turning on and turning off the device.
Activation of the remote control device by pressing the off button
When the button is pressed, the screen lights up and the functional
Press the button to turn on the device. Press the button again to turn off the device.
If within 10 seconds the button is not pressed, the device will turn off automatically.
Indicator for cooling mode, indicator for increased humidity, indicator for decreased humidity, indicator for ventilation mode, indicator for heating mode (1) indicator around, indicator 6
Indicator for fast cooling mode, indicator for heating
Automatic adjustment of fan speed 2-
High fan speed, medium fan speed, low fan speed, indicator for timer
6th Sense
Indicator for mode 1, indicator for mode 2, indicator for mode 3, indicator for mode 4, indicator for set temperature, indicator for timer time, indicator for signal reception
Functional description of the buttons (J1-3A)
- ON/OFF button (turn on and off) By pressing the button, the device turns on and off.
- MODE button (operation mode) Used to set the operation mode in the following: cooling, humidifying, ventilation, heating.
- FAN button (fan) Used to change the fan speed in the following order: automatic, high, medium, low. 4-5. TEMPERATURE button (temperature) Used to set the temperature in the room. In timer mode, used to set the time. Used also when setting the clock.
- 6th SENSE button
Turns on and off the 6th Sense mode.
- SWING button (air flow direction)
Press the button to set the desired temperature on the horizontal air flow and set the direction of the air flow (up-down).
- SLEEP BUTTON (SLEEP MODE)
Used to select the sleep mode. In sequence: 1, 2, 3, 4, off.
- AROUND U BUTTON
Used to turn on and off the Around U function.
- TIMER ON/CLOCK BUTTON (TIME TO TURN ON OR FOR SETTING THE CLOCK)
Timer indicator

Heating mode indicator

Sleep mode indicator

Fan speed indicator
Indicator light

6th Sense indicator

Around U indicator

Turbo mode indicator

Set temperature indicator

Economy mode button
PROTECTION
Conditional operation
The protection device may operate and stop the unit in the following cases.
6th Sense indicator (3)
It lights up when the 6th Sense function is activated. It goes off when the 6th Sense function is deactivated.
2. MODE BUTTON
It is used to select the operating mode in the order: Cooling, Heating, or Ventilation.
8. SLEEP BUTTON
It is used to select the sleep mode in the order: Sleep mode 1, Sleep mode 2, Sleep mode 3, Sleep mode 4, and Sleep mode off.
9. AROUND U FUNCTION BUTTON
It is used to set or cancel the Around U function.
12. JET FUNCTION BUTTON
It is used to start or stop rapid cooling or heating.
- 6th SENSE FUNCTION BUTTON
- SLEEP BUTTON (STANDBY MODE)
Sets or cancels operation in standby mode in the order Standby Mode 1, Standby Mode 2, Standby Mode 3, Standby Mode 4, and Standby Mode off.
- AROUND U FUNCTION BUTTON
- DIM BUTTON (ILLUMINATION)
Sets the set temperature.
When the filter needs cleaning, the «FC» indicator appears.

OPERATION INDICATOR (2)
It lights up during normal operation of the device.
It lights up when the outdoor unit is defrosting.

6TH SENSE INDICATOR (3)
Lights up when 6th sense is activated.
Lights up when 6th sense is activated.

FILTER CHECK INDICATOR (4)
It lights up when the filter needs cleaning.
The check indicator lights up after 200 hours of use to remind of the need to clean the filter.
The filter is located on the inner side behind the front panel, according to the sequence, about the adoption of the filter contamination indicator.

Humidity indicator (5)
It indicates when the humidity level is displayed.
It indicates when the temperature is displayed.

Temperature indicator (6)
It indicates the set time period.
It indicates when the temperature will end.

Standby mode indicator (7)
It indicates the set standby mode, the indicator will flash more than 10 times, then it will turn off.
Installing batteries in the remote control
- Insert the screwdriver and carefully press on the battery cover and push in the direction of the arrow to remove it, as shown in the picture.
- Insert 2 AAA batteries (1.5 V) into the compartment. Make sure the polarity is correct with "+" and "-" on the batteries.
- Put the battery cover back on the remote control.
- Preliminary setting of the remote control: Every time the batteries of the remote control are replaced, it is automatically reset to heat pump mode. The heat pump remote control can be used for cooling only for models with cooling.
Using the remote control to control the device
The remote control is set to remote control mode. To ensure direct signal reception, point the remote control directly at the indoor unit. When sending a command from the remote control, the signal will be transmitted for about 1 second. When receiving the command, the sound signal will be heard.
The remote control can control the air conditioner from a distance of up to 7 m. When replacing the batteries of the remote control, the heating mode will be set temporarily.
Note: Follow the instructions for the remote control provided for controlling the air conditioner.
Description of buttons (P1-04)
Used to set the humidifier on or off.
Activate the remote control by pressing the UNLOCK button.

Cooling indicator

Automatic fan speed setting mode

Operation mode indicator 1
Press the button, the display will light up, and the function buttons will be activated.

Humidity increase indicator

High fan speed

Operation mode indicator 2
Activate the remote control. To unlock the remote control,

Humidity decrease indicator

CepeHwBnKicTb BeHTnIaTopa

Ihdkatoppexmy OikybaHH3
NOBTOPOHaTNCHTb KHONKy KaHnPyNbTi DnCTaHcuiHoro KepyBaHHHe BnKOHyBaTN 6yNb-Aknx Di npotrarom 10

IHnKaTOpYbIMKHeJIiueBeHTnIaTopa

Hn3bKa WBNKicTBeHTNIArTopa

IHHKaTOp pexmmy oukyBaHnHa RinepaXy
cekyH, noTo 6ynde ABTomaTuHO 3a6nokOBaHO.

IHnKaTOp fyHKuii «Around U»

IHdNkaTop 6e3uymHO pOboTn IHdNkaTop 6th SENSE

H DnCnJIeBCTaHOBNEHO Taimepa
cekyH, noTo 6ynde ABTomaTuHO 3a6nokOBaHO.


IhdkaTopfhyHKuii «AroundU
BCTaHOBJIeHH a6o ckacyBaHH p60tN 6 th sense.
7. KHONKA «SWING» (KOJIUNBAHHA)
3ynnnae 3aynycka e rupnOHTaIbHe pepyIOBaHH KONBAHH JauHO3iHoipeuITK Ta BCTaHOBIO6axAHn HAnpMOK NOBITPAHORo NOTOKY BROPy/BHN3.
8. SLEEP MODE BUTTON (SLEEP MODE)
The sleep mode can be set or canceled in the following sequence: "Sleep mode 1", "Sleep mode 2", "Sleep mode 3", "Sleep mode 4" or "Sleep mode off".
9. "AROUND U" MODE BUTTON
Used to set or cancel the "Around U" function.
10. TIMER ON/CLOCK BUTTON (TIMER ON/CLOCK)
Used to set the clock. Used to set or cancel the timer on function.
11. TIMER OFF BUTTON
Used to set or cancel the timer off function.
Symbols on the display for remote control

Position indicator

Sleep mode 1 indicator

Defrost function indicator

Sleep mode 2 indicator
Fan speed indicator
Sleep mode 3 indicator

Heating indicator
Defrost

6th Sense indicator
Around function
Protection
Operating conditions
The appliance can be damaged and the device can be switched off in the cases listed below.
| Harpibahna | Temnepayps Зовнибого поитра пегвшиу€ 24°C |
| Temnepayps Зовнибого поитра нжча 3a -7°C | |
| Temnepayps y пимішени пегвшиу€ 27°C | |
| Охоложенna | Temnepayps Зовнибого поитра пегвшиу€ 43°C |
| Temnepayps y пимішени пегвшиу€ 21°C | |
| Осуш Bavannah | Temnepayps y пегмішени нжча 3a 18°C |
12. JET MODE BUTTON
Used for quick or intensive cooling or heating.
13. DIM BUTTON
Used to dim or brighten the display on the internal unit.
- POWER SAVE BUTTON Used to turn on or off the power saving mode.
- SUPER SILENT MODE BUTTON
Check the start or operation of the equipment without proper operation with low voltage.

Automatic mode of the fan speed setting

High quality of the fan

Fan speed indicator

Low fan speed indicator

Silent mode indicator

Jet function indicator


By the installed timer
Display of the cooling mode

Display of the heating mode
Setting the timer for the remote control
When the unit is in cooling or fan mode, if the doors or windows are open for a long time and the humidity is higher than 80%, condensation may drip from the air outlet. Functional characteristics of the device
Before starting the device, make sure that the power plug is connected and the mode is set correctly. After connecting to the power source and turning on the device, there may be a 20-second delay before it starts operating. If the device operation was completely stopped, press the "ON/OFF" button again to restart it. The timer can be set again if you have set it. Functions of the "Cooling/Anti-freeze" mode
If the temperature inside the heat exchanger drops to 0°
If the compressor stops working properly, the device will shut down. The functions of the "HEATING" mode: Before starting the heating mode, it is necessary to preheat the internal block for 2-5 minutes. During preheating, the internal fan does not operate. When operating in "HEATING" mode, the device automatically performs defrosting (increased heating) to improve efficiency. This procedure usually lasts 6-10 minutes. During defrosting, the fan stops and the indicator light flashes. After defrosting is completed, the device automatically returns to "HEATING" mode.
Technical maintenance
Cleaning the front panel of the indoor unit
1. Disconnect from power source
First turn off the device, then disconnect from the power source.
2. Removing the front panel
Open the front panel as indicated by the arrow (Fig. A). With effort, pull the tabs on the sides of the front panel to remove the front panel (Fig. B).
3. Cleaning the front panel
Wipe it with a dry soft cloth. If the device is very dirty, use a mild detergent in warm water (with a temperature not exceeding 40°C). After cleaning, dry the panel.
4. Installing and closing the front panel
Install it in place and close the front panel, pressing it downwards.
Note:
Do not use substances such as gasoline or abrasive powders to clean the device. Do not spray water on the indoor unit. This is dangerous! It may cause electric shock!
Cleaning the air filter
The air filter should be cleaned after approximately 200 hours of use. If the device operates in a heavily dusty environment, clean the air filter every two weeks.
1. Disconnect the device from the power source.
Close the windows first, then disconnect from the power source.
2. Removing the air filter (Fig. C).
- Open the front panel. 2. Press the filter latch carefully. 3. Pull out the filter.
3. Cleaning the air filter (Fig. D)
If the filter is very dirty, clean it with a solution of neutral detergent in warm water. Rinse and let it dry in the shade. 4. Reinstall the filter: press it onto the housing for reinstallation (Fig. E) from the right side with the help of the guide pin and close the front panel.
Note:
- To avoid injury, do not touch the plastic parts of the internal block with your fingers after removing the filter. Do not attempt to clean the internal part of the condenser yourself. Do not wash the filter in a washing machine.
EMERGENCY MODE
In case of an emergency or if the remote control is missing, you can control the device by pressing the ON/OFF switch located on the internal block.
- Turning on the device: if the device is off, press the button once; the device will start and operate in "6th SENSE" mode. Turning off the device: if the device is on, press the button once; the device will stop working.
Note: Do not hold the button pressed for a long time, as this will cause malfunction.

- PERMITTED USE
- INSTALLATION
- ELECTRICAL WARNINGS
- CLEANING AND MAINTENANCE
- DISPOSAL OF PACKAGING MATERIALS
- DISPOSAL OF HOUSEHOLD APPLIANCES
- DECLARATIONS OF CONFORMITY
- PRODUCT DESCRIPTION
- TEMPERATURE INDICATOR (1)
- RUNNING INDICATOR (2)
- TH SENSE INDICATOR (3)
- FILTER MONITOR INDICATOR (4)
- HUMIDITY INDICATOR (5)
- TIMER INDICATOR (6)
- SLEEP INDICATOR (7)
- INSERT THE BATTERIES INTO THE REMOTE CONTROL
- REMOTE CONTROL PRESETTING
- USE RC TO CONTROL THE APPLIANCE
- FUNCTION DESCRIPTION OF BUTTONS (P1-04)
- ON/OFF BUTTON
- FAN BUTTON
- TEMPERATURE BUTTON
- TH SENSE BUTTON
- SWING BUTTON
- HUMIDITY BUTTON
- SUPER SILENT BUTTON
- MODE BUTTON
- SLEEP BUTTON
- AROUND U BUTTON
- JET BUTTON
- DIM BUTTON
- POWER SAVE BUTTON
- TIMER BUTTON
- SYMBOLS ON THE RC DISPLAY
- ACTIVATE THE RC BY PRESSING THE UNLOCK BUTTON
- FUNCTION DESCRIPTION OF BUTTONS (J1-3A)
- TIMER ON/CLOCK BUTTON
- TIMER OFF BUTTON
- SYMBOLS ON RC DISPLAY
- PROTECTION
- OPERATING CONDITION
- FEATURES OF PROTECTION DEVICE
- FEATURES OF COOLING MODE
- ANTI-FREEZING
- FEATURES OF HEATING MODE
- PREHEATING
- DEFROSTING
- CLEAN FRONT PANEL OF INDOOR UNIT
- DISCONNECT FROM THE POWER SUPPLY
- REMOVE THE FRONT PANEL
- CLEAN THE FRONT PANEL
- REFIT AND CLOSE THE FRONT PANEL
- NOTE
- CLEAN AIR FILTER
- TAKE OUT AIR FILTER (FIG. C)
- CLEANING THE AIR FILTER (FIG. D)
- EMERGENCY OPERATION
- NOTE: DO NOT PRESS THIS BUTTON FOR A LONG TIME AS IT WILL CAUSE MALFUNCTION
- AUTO-RESTART FUNCTION
- DISPOSAL OF THE BATTERIES
- INSTALLATION INSTRUCTION
- AFTER SALES SERVICE
- BEFORE CONTACTING THE CUSTOMER CARE CENTRE
- IF AFTER CARRYING OUT THE ABOVE CHECKS, THE FAULT PERSISTS, CONTACT THE CUSTOMER CARE CENTRE
- MODE" TEST (MODUS TEST)
- AROUND U" TEST (OMGEVINGSTEST)
- BOTAO FAN (DEVENTOINHA)
- MODE BUTTON (MODALITY)
- MAINTENANCE AND CARE
- INDICATOR FOR TIMER (6)
- FILTER MONITORING INDICATOR (4)
- HEAT EXCHANGER
- SUPER SILENT BUTTON ("SUPER SILENT" MODE)
- SYMBOLS ON THE DISPLAY OF THE REMOTE CONTROL
- MODE BUTTON (MODE SWITCH)
- SLEEP BUTTON ("NIGHT" MODE)
- AROUND U BUTTON (FUNCTION
- JET BUTTON ("TURBO" FUNCTION)
- POWER SAVE BUTTON (FUNCTION
- ACTIVATE THE REMOTE CONTROL BY PRESSING THE LOCK BUTTON
- REMOTE CONTROL FUNCTIONS
- DESCRIPTION OF BUTTON FUNCTIONS (J1-3A)
- MODE BUTTON (MODE SWITCHING)
- FAN BUTTON (FAN)
- TEMPERATURE BUTTON (TEMPERATURE SELECTION)
- TH SENSE" BUTTON
- SWING BUTTON (SWING ADJUSTMENT)
- SLEEP BUTTON (SLEEP MODE)
- AROUND U BUTTON (AIR CIRCULATION FUNCTION)
- TIMER ON/CLOCK BUTTON (TIMER ON SETTING)
- TIMER OFF BUTTON (TIMER OFF SETTING)
- JET BUTTON (TURBO FUNCTION)
- DIMMER BUTTON (BRIGHTNESS ADJUSTMENT) USED TO TURN ON OR OFF THE DISPLAY BACKLIGHT OF THE INDOOR UNIT
- POWER SAVE BUTTON (ENERGY SAVING FUNCTION)
- KHONKA SUPER SILENT (PEXKIMA "CYNEPTUXM")
- SYMBOL FOR THE DISPLAY OF THE REMOTE CONTROL
- SHUTDOWN CONDITIONS
- AIR FILTER ERROR
- DISCONNECT FROM POWER SUPPLY
- REMOVE THE AIR FILTER (FIG. C)
- CLEAN THE AIR FILTER (FIG. D)
- NOTES
- FILTER STATUS INDICATOR (4)
- SETTING THE REMOTE CONTROL FOR HEATING MODE (7)
- REMOTE CONTROL DEVICE
- INSTALLING THE BATTERIES OF THE REMOTE CONTROL DEVICE
- INITIAL STATE OF THE REMOTE CONTROL DEVICE
- USING THE REMOTE CONTROL DEVICE TO CONTROL THE CLIMATE DEVICE
- FUNCTIONAL DESCRIPTION OF THE BUTTONS (P1-04)
- SYMBOLS ON THE SCREEN OF THE REMOTE CONTROL
- FUNCTIONAL DESCRIPTION OF THE BUTTONS (J1-3A)
- CONDITIONAL OPERATION
- AROUND U FUNCTION BUTTON
- JET FUNCTION BUTTON
- OPERATION INDICATOR (2)
- FILTER CHECK INDICATOR (4)
- TEMPERATURE INDICATOR (6)
- STANDBY MODE INDICATOR (7)
- INSTALLING BATTERIES IN THE REMOTE CONTROL
- USING THE REMOTE CONTROL TO CONTROL THE DEVICE
- DESCRIPTION OF BUTTONS (P1-04)
- ACTIVATE THE REMOTE CONTROL BY PRESSING THE UNLOCK BUTTON
- KHONKA «SWING» (KOJIUNBAHHA)
- SLEEP MODE BUTTON (SLEEP MODE)
- AROUND U" MODE BUTTON
- TIMER ON/CLOCK BUTTON (TIMER ON/CLOCK)
- SYMBOLS ON THE DISPLAY FOR REMOTE CONTROL
- OPERATING CONDITIONS
- JET MODE BUTTON
- TECHNICAL MAINTENANCE
- CLEANING THE FRONT PANEL OF THE INDOOR UNIT
- DISCONNECT FROM POWER SOURCE
- REMOVING THE FRONT PANEL
- CLEANING THE FRONT PANEL
- INSTALLING AND CLOSING THE FRONT PANEL
- CLEANING THE AIR FILTER
- DISCONNECT THE DEVICE FROM THE POWER SOURCE
- REMOVING THE AIR FILTER (FIG. C)
- EMERGENCY MODE
- NOTE: DO NOT HOLD THE BUTTON PRESSED FOR A LONG TIME, AS THIS WILL CAUSE MALFUNCTION
Brand : WHIRLPOOL
Model : SPIW4122
Category : Air conditioner