SUPW1 - Wall mount SONY - Free user manual and instructions
Find the device manual for free SUPW1 SONY in PDF.

| Product type | Wall mount |
| Brand | Sony |
| Model | SUPW1 |
| Compatible with | Sony TVs KE-42MR1 and KE-50MR1 |
| Mount weight | 8.0 kg |
| Dimensions (KE-42MR1, 0° angle) | 720 x 160 x 173 mm (W x H x D) |
| Dimensions (KE-50MR1, 0° angle) | 856 x 166 x 307 mm (W x H x D) |
| Adjustable tilt angle | 0°, 5°, 10°, 15°, 20° |
| Wall mounting type | Mounting plate with at least 8 M8 screws (not included) |
| Materials | Steel |
| Color | Black (not specified, common estimate) |
| Installation | By a qualified professional |
| Maximum supported load | 53 kg for KE-42MR1, 39 kg for KE-50MR1 |
| Key features | Secure wall mounting, adjustable tilt, cable management |
| Care and cleaning | Clean with a soft, dry cloth, do not apply force on the screen |
| Safety | Do not disassemble, do not use with other devices, do not block ventilation |
| Spare parts and repairability | Screws for hook attachment supplied, wall screws not supplied. Contact a Sony dealer. |
Frequently Asked Questions - SUPW1 SONY
User questions about SUPW1 SONY
0 question about this device. Answer the ones you know or ask your own.
Ask a new question about this device
Download the instructions for your Wall mount in PDF format for free! Find your manual SUPW1 - SONY and take your electronic device back in hand. On this page are published all the documents necessary for the use of your device. SUPW1 by SONY.
USER MANUAL SUPW1 SONY
Thank you for purchasing this product.
To Customers
Sufficient expertise is required for installing this product. Be sure to subcontract the installation to Sony dealers or contractors and pay adequate attention to safety during the installation.
WARNING
If the safety precautions are not observed and the product is used incorrectly, it may result in a fire or serious injury.
This instruction manual shows the important precautions necessary to prevent accidents and to promote the correct handling of the product. Be sure to read this instruction manual thoroughly and use the product correctly. Be sure to keep this instruction manual available for future reference.
For Sony Dealers
Sufficient expertise is required for installing this product. Be sure to read this instruction manual thoroughly to do the installation work safely. We are not liable for any damage or injury caused by mishandling or improper installation. After installation, please hand this installation manual to the customers.
This Wall-Mount Bracket is designed by Sony for use with the specified product. Do not use this bracket with equipment other than the following product.
Specified product: Flat panel Colour Television (KE-42MR1/KE-50MR1)
On Safety
Products by Sony are designed with safety in mind.
If the product is used incorrectly, however, it may result in serious injury through a fire, an electric shock or by causing the product to topple over. Be sure to observe the proper safety precautions to prevent accidents.
For Customers
WARNING
If the following precautions are not observed, there is a possibility of either death or serious injury through a fire, an electric shock or an explosion.
Be sure to subcontract the installation to qualified contractors and keep small children away during the installation.
If persons other than qualified contractors install the Wall-Mount Bracket, the following accidents may happen.
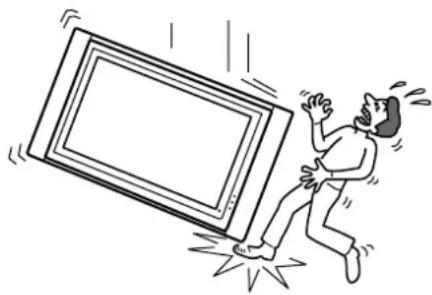
- The Display Unit may fall and cause a serious injury such as a bruise or a fracture during an earthquake.
- If the wall on which the Wall-Mount Bracket is installed is unstable, uneven, or not perpendicular to the floor, the unit may fall and cause injury or property damage. The wall should be capable of supporting a weight of at least four (4) times the Display Unit weight (KE-42MR1: 53 kg × 4 = 212 kg, KE-50MR1: 39 kg × 4 = 156 kg).
- If the installation of the Wall-Mount Bracket on the wall is not sufficiently sturdy, the unit may fall and cause injury or property damage.
Be sure to subcontract the installation to qualified contractors when moving or dismounting the Wall-Mount Bracket.
If persons other than qualified contractors transport or dismount the Wall-Mount Bracket, the Display Unit may fall and cause injury or property damage. Be sure that two or more persons carry or dismount the Wall-Mount Bracket.
Do not spill liquid of any kind on the Display Unit.
If you allow the Display Unit to get wet, this may result in a fire or an electric shock.
Do not remove bolts, etc., after mounting the Display Unit.
If you do so, the Display Unit may fall.
Do not disassemble or make alterations to the parts of the Wall-Mount Bracket.
If you do so, the Wall-Mount Bracket may fall and cause injury or property damage.
Do not mount any equipment other than the specified product.
This Wall-Mount Bracket is designed for use with the specified product. If you mount equipment other than the specified product, it may fall and cause injury or property damage.
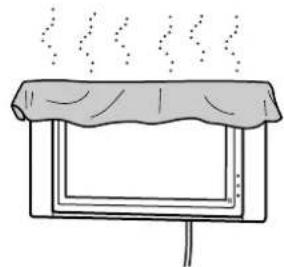
Do not block the ventilating holes on the Display Unit.
If you block the ventilating holes on the Display Unit by covering the top of the Display Unit with a cloth or the like, the Display Unit may become overheated and this may cause a fire.
Do not apply any load other than the Display Unit on the Wall-Mount Bracket.
If you do so, the Display Unit may fall and cause injury or property damage.
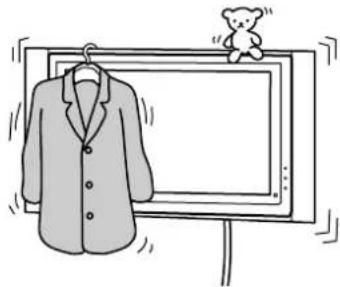
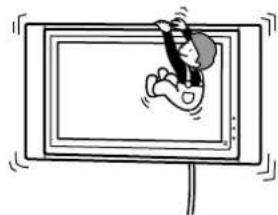
Do not lean on or hang from the Display Unit.
The Display Unit may fall and the user may be caught under the weight of the unit and suffer serious injury.
To prevent a fire or an electric shock, do not expose the Display Unit to rain or moisture.
If you allow the Display Unit to get wet, this may result in a fire or an electric shock.
Never place the Display Unit in hot, humid or excessively dusty places. Do not install the Display Unit where it may be exposed to mechanical vibrations.
If you do so, this may cause a fire or an electric shock.
Keep flammable objects or open flames (e.g. candles) away from the Display Unit.
To prevent a fire, keep flammable objects or open flames (e.g. candles) away from the Display Unit.
CAUTION
If the following precautions are not observed, there is a possibility of injury or property damage.
Do not install the Wall-Mount Bracket on wall surfaces where the corners or the sides of Display Unit would protrude away from the wall surface.
Do not install the Wall-Mount Bracket on wall surfaces such as a pillar, where the corners or the sides of Display Unit would protrude away from the wall surface. If a person or object happens to hit the protruded corner or side of the Display Unit, this may cause injury or property damage.

Do not handle the product with excessive force during cleaning or maintenance.
Do not apply excessive force on the topside of the Display Unit.
If you do so, this may cause injury or property damage by causing the Display Unit to fall.
Do not install the Display Unit over or under an air-conditioner.
If you do so, the Display Unit may be exposed to air currents from the air-conditioner. This may result in a malfunction of the Display Unit.
Precautions
- If you use the Display Unit installed on the Wall-Mount Bracket for a long time, the wall behind or above the Display Unit may become discolored or the wallpaper may come unstuck, depending on the material of the wall. If the Wall-Mount Bracket is removed after installing them on the wall, the screw holes are left.
- If you have routed 300 ohm feeder cables behind the wall, we recommend that you change them to 75 ohm coaxial cables.
If it is necessary to continue to use 300 ohm feeder cables, be sure to confirm that sufficient space is available between the Display Unit and the feeder cables behind the wall before starting the installation.
Consult your contractor on an appropriate installation location where the Display Unit suffers no radio noise before starting the installation.
WARNING To Customers
Sufficient expertise is required for installing this product. Be sure to subcontract the installation to Sony dealers or contractors and pay adequate attention to safety during the installation.
To Sony Dealers
The following instructions are for Sony Dealers only. Be sure to read safety precautions described above and pay adequate attention to safety during the installation, maintenance and checking of this product.
Be sure to install the Wall-Mount Bracket securely to the wall following the instructions in this instruction manual.
If any of the screws are loose or fall out, the Wall-Mount Bracket may fall and cause injury or property damage. Be sure to use the appropriate screws for the material of the wall and install the unit securely, using eight or more M8 or the equivalent screws.
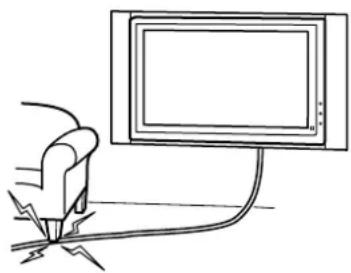
Do not allow the Power Cord or the Display Cable to be pinched.
If the Power Cord or the Display Cable is pinched between the unit and the wall or is bent or twisted by force, the metallic part of the cord or cable may be exposed and cause a short circuit or a break in the cord or cable. This may cause a fire or an electric shock.
Be sure to use the supplied screws and attachment parts properly following the instructions given in this instruction manual. If you use substitute items, the Display Unit may fall, and cause bodily injury to someone or damage to the Display Unit.
Be sure to assemble the bracket properly following the instructed procedure explained in this instruction manual.
If any of the screws are loose or fall out, the Display Unit may fall, and cause bodily injury to someone or damage to the Display Unit.
Be sure to tighten the bolts and screws securely in the designated position.
If you fail to do so, the Display Unit may fall, and cause bodily injury to someone or damage to the Display Unit.
Be careful not to subject the Display Unit to shock during installation.
If the Display Unit is exposed to shock, it may fall or break apart. This may cause injury.
Be sure to install the Display Unit on a wall that is both perpendicular and flat.
If you fail to do so, the Display Unit may fall and cause injury.
After proper installation of the Display Unit, secure the cables properly.
If people or objects get tangled in the cables, this may result in injury.
Be careful not to hurt your hands or fingers during the installation.
Be careful not to hurt your hands or fingers when installing the Wall-Mount Bracket or the Display Unit.
The screws needed to secure the Wall-Mount Bracket to the wall are not supplied.
Use the appropriate screws for the wall material and structure when mounting the Wall-Mount Bracket.
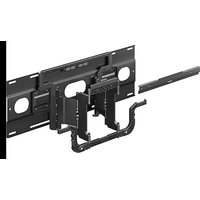
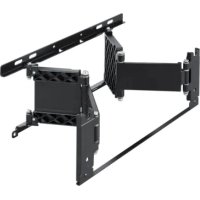
Step 1: Check the parts required for the installation
1
Prepare a Phillips driver and the appropriate screws (eight or more M8 or the equivalent screws, not supplied), depending on the material of the wall, beforehand.
2
Open the package and check the parts.

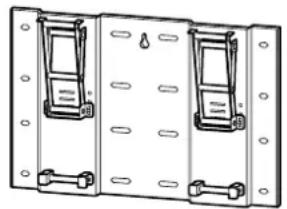
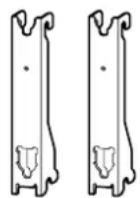
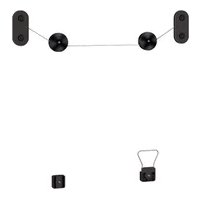
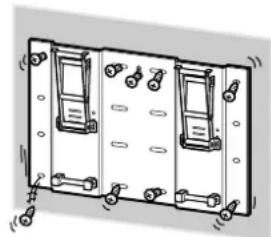
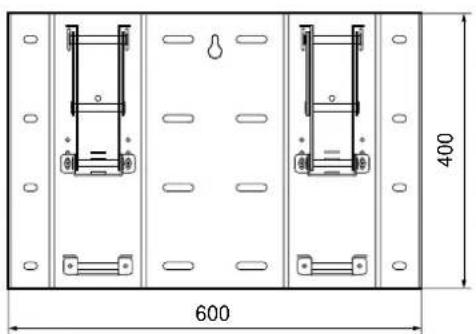
Screws (+PSW5× 12) (2) Plate Unit (1) Mounting Hook Unit (2)
Step 2: Decide on the installation location

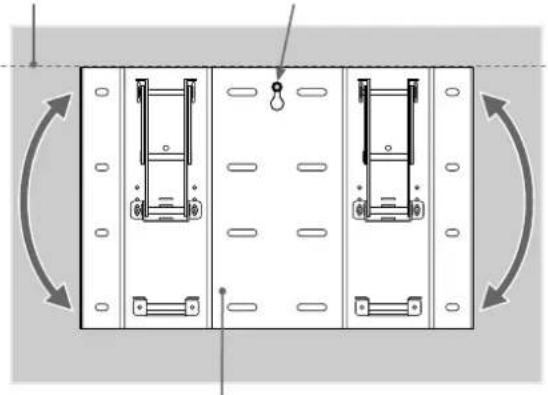
1
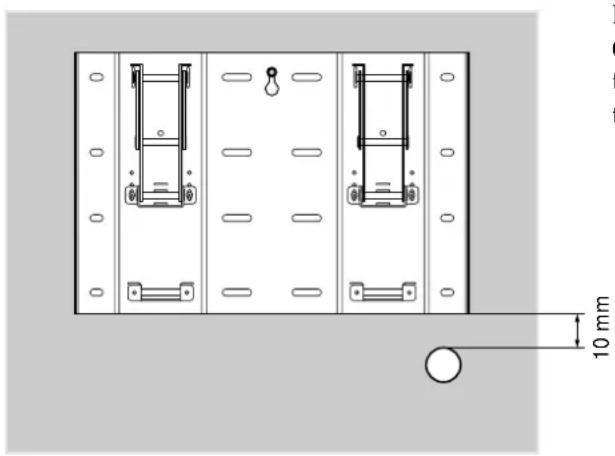
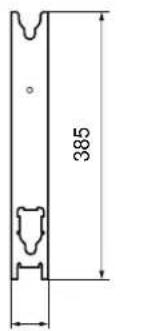
Be sure to keep the distance between the Plate Unit and the ceiling or the protruding parts of the wall as shown in the diagram on the left.
Tip
See the cross section diagram in "Specifications" (p.15 (GB)) for details on dimensions when the Display Unit is installed on the wall.
Step 3: Install the Plate Unit on the wall
1
Align the unit so that it is exactly level.
Screw hole to be used for temporarily attaching the bracket.
Plate Unit
Screw the Plate Unit to the wall temporarily and align the position of the Plate Unit so that it is exactly level.
WARNING
- The screws securing the Wall-Mount Bracket to the wall are not supplied.
- Be sure to use the appropriate screws, depending on the material and structure of the wall.
2

Fix the Plate Unit to the wall using eight or more M8 or the equivalent screws (not supplied).
1 Be sure to tighten the screws securely so that they will not come loose.
Firmly tighten the screw screwed in temporarily in Procedure 1.
WARNING
- We recommend using the screw hole locations specified in the diagram on the left when attaching the Plate Unit temporarily. If the Plate Unit cannot be attached securely enough, use additional screws.
- Be sure to confirm that the Plate Unit is securely fixed to the wall.
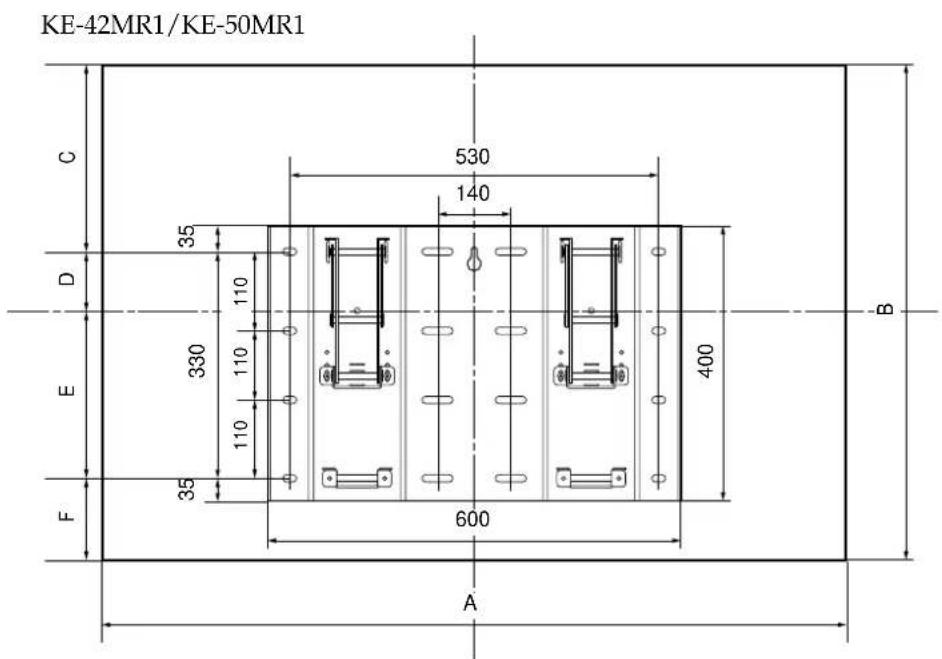
KE-50MR1 Unit: mm
| A B | C D E F |
| 1,573 856 342 86 | 244 184 |
KE-42MR1 Unit: mm
| A B | C D E F |
| 1,352 720 208 152 | 178 182 |
3
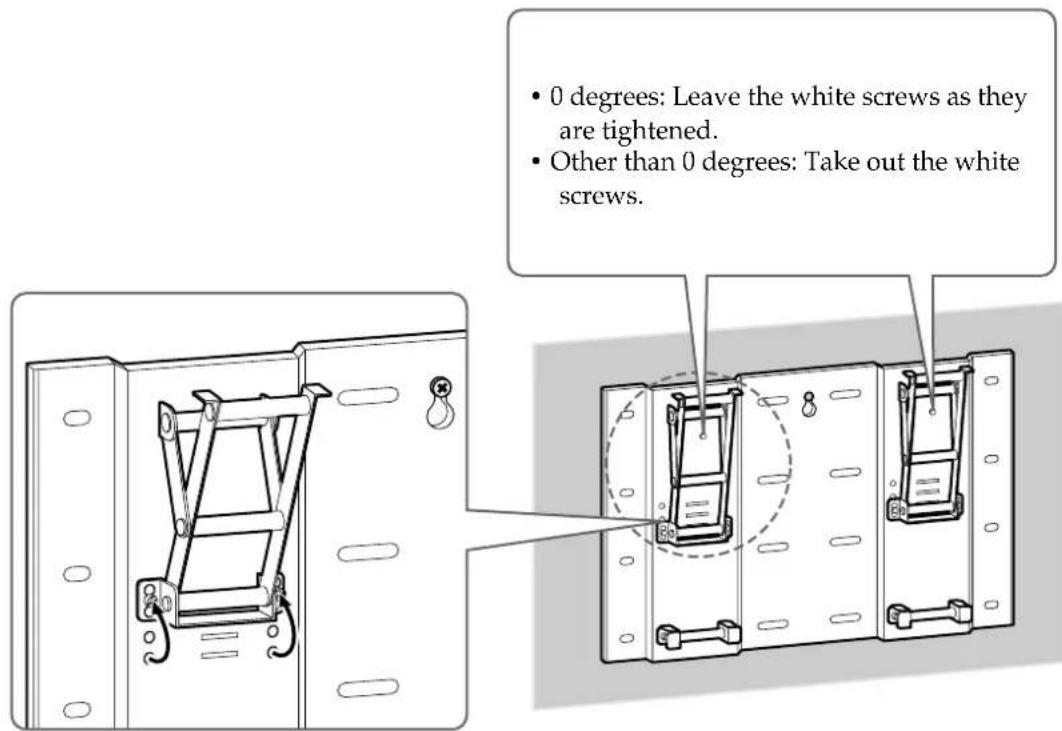
Adjust the angle of the arms.
Take out the screws from the right and left sides of the arm base. Then choose the notch corresponding to the desired angle (0, 5, 10, 15 or 20 degrees) and fit the arm base to it.
Firmly secure each arm base using the screws taken out in Procedure 1.
Note
Be sure to adjust the angles of the right and the left arms to the same angle.
Step 4: Install the Display Unit
WARNING
Be sure to complete the installation before connecting the Power Cord to the wall outlet. If you allow the Power Cord to be pinched under or between pieces of equipment, this may result in a short circuit or an electric shock. If you stumble over the Power Cord or the Display Interface Cable, the stand may topple over, and this may result in injury.
1
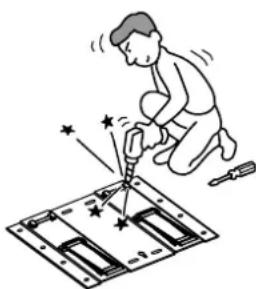
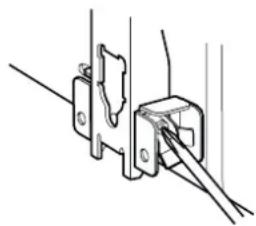
Hitch the Mounting Hook Unit on the hooks on the rear side of the Display Unit. Then slide the Mounting Hook Unit and fix it using the supplied screws (+PSW5× 12)
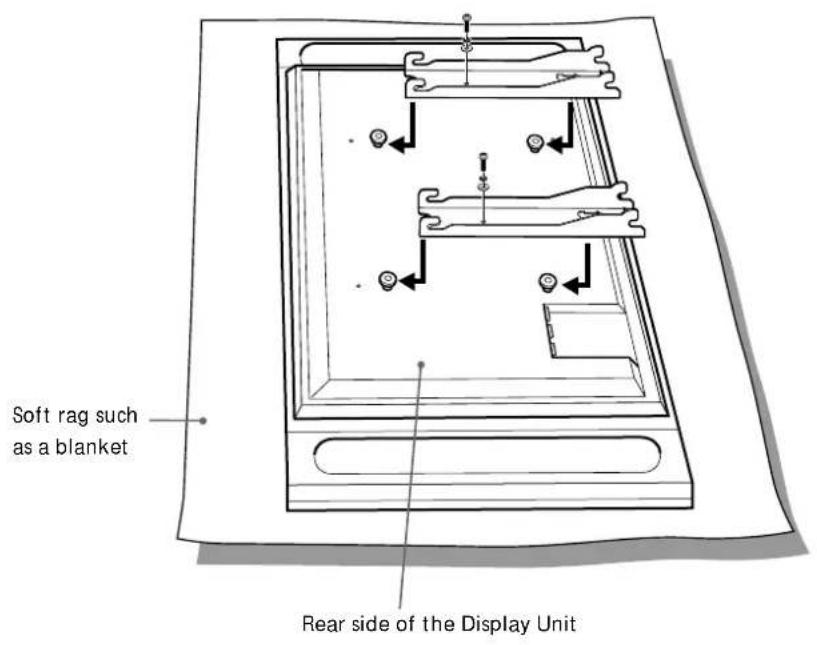
Connect the Power Cord and the Display Cable supplied with the Display Unit to the Display Unit.
Connect the Power Cord and the Display Cable to the connectors on the rear side of the Display Unit.
Tip
See the instruction manual of the Flat Panel Colour Television (KE-42MR1/KE-50MR1) for more details on connecting the Power Cord and the Display Cable.
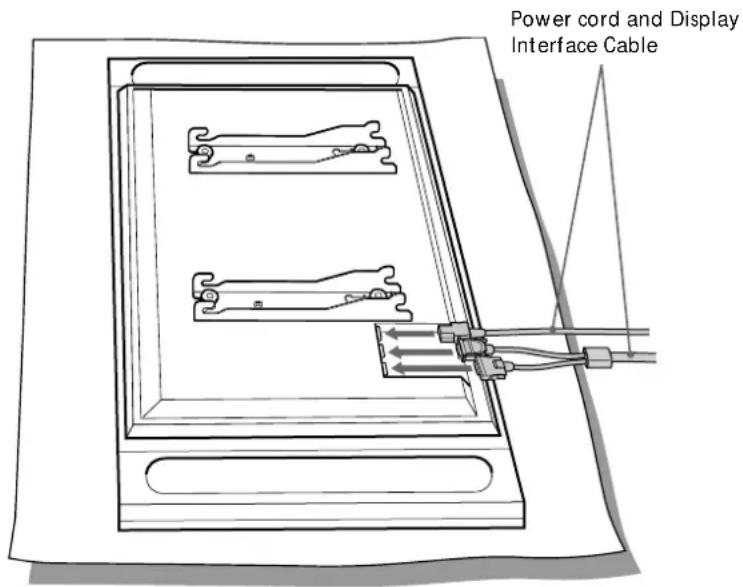
Fasten the Display Interface Cable and the Power Cord to the wall, etc. When you route the cable and the cord in the wall, bore a 50~mm diameter hole in the wall as shown in the diagram in the left.
2
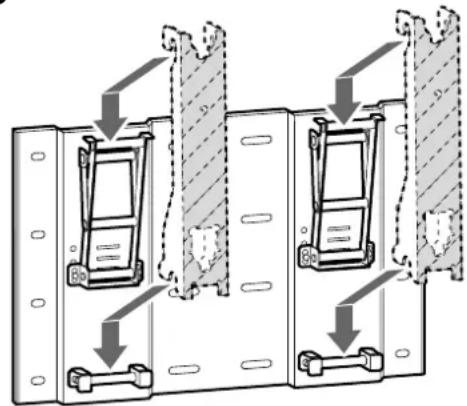
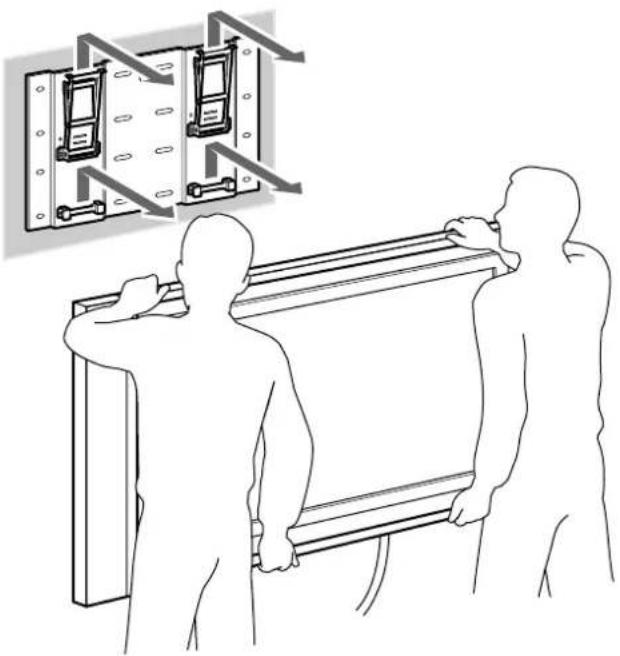
Install the Display Unit on the Plate Unit.
Hold the Display Unit and bring it close to the Plate Unit so as to align the lower hooks of the Mounting Hook Units with the lowest support shafts near the bottom of the Plate Unit.
Hitch the upper and lower hooks of the two Mounting Hook Units onto the four support shafts of the Plate Unit all at the same time as shown in the diagram on the left.
Confirm the eight hooks are firmly hooked on the four shafts on the Plate Unit.
Firmly tighten the securing screws on the right and the left with a long shaft Phillips screwdriver.
4
1
Unplug the Power Cord from the wall outlet.
2
Loosen the securing screws on the right and left until they will not turn any more.
3
Be sure that two or more persons hold the Display Unit and slide it upward to remove the Display Unit.
WARNING
- Be sure that two or more persons hold the Display Unit when carrying it.
- Be careful not to allow the cords and cables to get hung up when removing the Display Unit.
- Be careful not to hurt your hands or fingers when removing the Display Unit.
Specifications
Unit: mm
Weight: 8.0kg
Design and specifications are subject to change without notice.


51
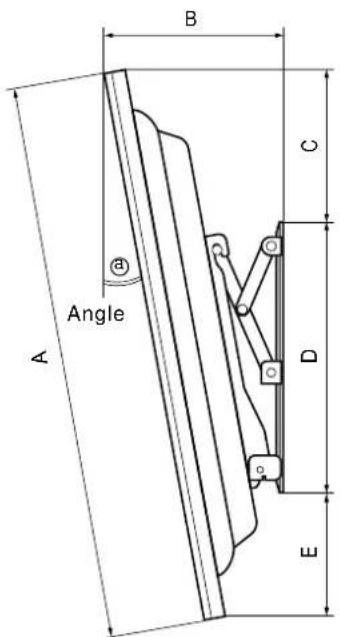
KE-42MR1 Unit: mm
| Angle Dimensions | ||||
| @A | B | C | D | E |
| 0° 720 | 160 | 173 | 400 | 147 |
| 5° 720 | 207 | 162 | 400 | 156 |
| 10° 720 | 253 | 148 | 400 | 164 |
| 15° 720 | 297 | 130 | 400 | 172 |
| 20° 720 | 339 | 108 | 400 | 178 |
KE-50MR1 Unit: mm
| Angle Dimensions | ||||
| @A | B | C | D | E |
| 0° 856 | 166 307 400 149 | |||
| 5° 856 | 225 296 400 160 | |||
| 10° 856 | 283 280 400 169 | |||
| 15° 856 | 338 260 400 177 | |||
| 20° 856 | 391 235 400 183 | |||
Hinweis an Kunden
Specifications: Flat panel Colour Television (KE-42MR1/KE-50MR1)
Om sakerhet
Enhet: mm
Vikt: 8,0 kg