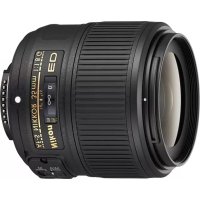
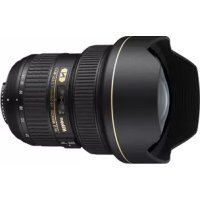
Nikkor AFS DX Micro NIKKOR 40mm f2.8G - Camera lens NIKON - Free user manual and instructions
Find the device manual for free Nikkor AFS DX Micro NIKKOR 40mm f2.8G NIKON in PDF.
| Product type | AF-S DX Micro NIKKOR 40mm f/2.8G Lens |
| Brand | Nikon |
| Model | Nikkor AFS DX Micro NIKKOR 40mm f2.8G |
| Compatibility | Nikon DX-format digital SLR cameras (e.g., D300, D7000) |
| Focal length | 40mm (60mm equivalent in 35mm format) |
| Maximum aperture | f/2.8 |
| Minimum aperture | f/22 |
| Optical construction | 9 elements in 7 groups |
| Angle of view | 38°50' |
| Minimum focus distance | 0.163m (1:1 reproduction ratio) |
| Diaphragm blades | 7 (rounded) |
| Focusing | Autofocus with SWM motor, with manual priority (M/A) and manual |
| Filter diameter | 52mm |
| Dimensions (diameter × length) | 68.5mm × 64.5mm |
| Weight | 235g |
| Supplied accessories | LC-52 front cap, LF-4 rear cap, HB-61 lens hood, CL-0915 case |
| Maintenance | Blower brush, soft cloth, ethanol or lens cleaner; avoid organic solvents |
| Safety precautions | Do not disassemble, do not look at the sun, keep out of reach of children, avoid flammable gases |
| Repairability | Only to an authorized Nikon service center |
| General information | G-type lens, built-in microprocessor, F-mount; recycling compliant (Europe, Canada) |
Frequently Asked Questions - Nikkor AFS DX Micro NIKKOR 40mm f2.8G NIKON
User questions about Nikkor AFS DX Micro NIKKOR 40mm f2.8G NIKON
0 question about this device. Answer the ones you know or ask your own.
Ask a new question about this device
Download the instructions for your Camera lens in PDF format for free! Find your manual Nikkor AFS DX Micro NIKKOR 40mm f2.8G - NIKON and take your electronic device back in hand. On this page are published all the documents necessary for the use of your device. Nikkor AFS DX Micro NIKKOR 40mm f2.8G by NIKON.
USER MANUAL Nikkor AFS DX Micro NIKKOR 40mm f2.8G NIKON
AF-S DX Micro NIKKOR 40mm f/2.8G
使用說明書
User's Manual
Benutzerhandbuch
PykoBoDCTBO NOIb3OBaTeJIa
Gebruikshandleiding
Manual do utiliser
Manual do usuario
Manuale d'uso
Eyxepidio odnyiwxnpnoc
Návod k obsslze
レンズのF値は無限遠之称被写体の像の明さを表いたします。撮影倍率を上て撮影すると像の明さはF値よ減少お願い。そのときの実質のな明さを有効F値(実効F値)と Respiratory and the decrease of the decrease of the decrease of the decrease of the decrease of the decrease of the decrease of the decrease of the decrease of the decrease of the decrease of the decrease of the decrease of the decrease of the decrease of the decrease of the decrease of the decrease of the decrease of the decrease of the decrease of the decrease of the decrease of the decrease of the decrease of the decrease of the decrease of the decrease of the decrease of the decrease of the decrease of the decrease of the decrease of the decrease of
■有効F値の変化(P.172の圖)
This is the best way to show how the camera works. 100% of the time, you can see the camera in the center of the room.
力メラの内藏itra使用時のご注意
- Do not disassemble. Touching the internal parts of the camera or lens could result in injury. In the event of malfunction, the product should be repaired only by a qualified technician. Should the product break open as the result of a fall or other accident, remove the camera battery and/or disconnect the AC adapter and then take the product to a Nikon-authorized service center for inspection.
- Turn the camera off immediately in the event of malfunction. Should you notice smoke or an unusual smell coming from the equipment, immediately unplug the AC adapter and remove the camera battery, taking care to avoid burns. Continued operation could result in fire or injury. After removing the battery, take the equipment to a Nikonauthorized service center for inspection.
- Do not use in the presence of flammable gas. Operating electronic equipment in the presence of flammable gas could result in explosion or fire.
- Do not look at the sun through the lens or the camera viewfinder. Viewing the sun or other bright light source through the lens or viewfinder could cause permanent visual impairment.
- Keep out of reach of children. Failure to observe this precaution could result in injury.
-
Observe the following precautions when handling the lens and camera:
-
Keep the lens and camera dry. Failure to observe this precaution could result in fire or electric shock.
- Do not handle the lens or camera with wet hands. Failure to observe this precaution could result in electric shock.
- Keep the sun well out of the frame when shooting backlit subjects. Sunlight focused into the camera when the sun is in or close to the frame could cause a fire.
-
If the lens will not be used for an extended period, attach the front and rear lens caps and store the lens out of direct sunlight. If left in direct sunlight, the lens could focus the sun's rays onto flammable objects, causing fire.
-
Do not carry tripods with a lens or camera attached. You could trip or accidentally strike others, resulting in injury.
- Do not leave the lens where it will be exposed to extremely high temperatures, such as in an enclosed automobile or in direct sunlight. Failure to observe this precaution could adversely affect the lens' internal parts, causing fire.
Notice for Customers in Canada
CANICES-3B/NMB-3B
Thank you for your purchase of an AF-S DX Micro NIKKOR 40mm f/2.8G lens. Before using this product, please carefully read both these instructions and the camera manual.
En
Note: DX lenses are for use only with DX-format digital single-lens reflex cameras such as the D7000 or D300 series. The angle of view of a lens on a DX-format camera is equivalent to that of a lens with a focal length about 1.5 × longer mounted on a 35 mm format camera.
Parts of the Lens
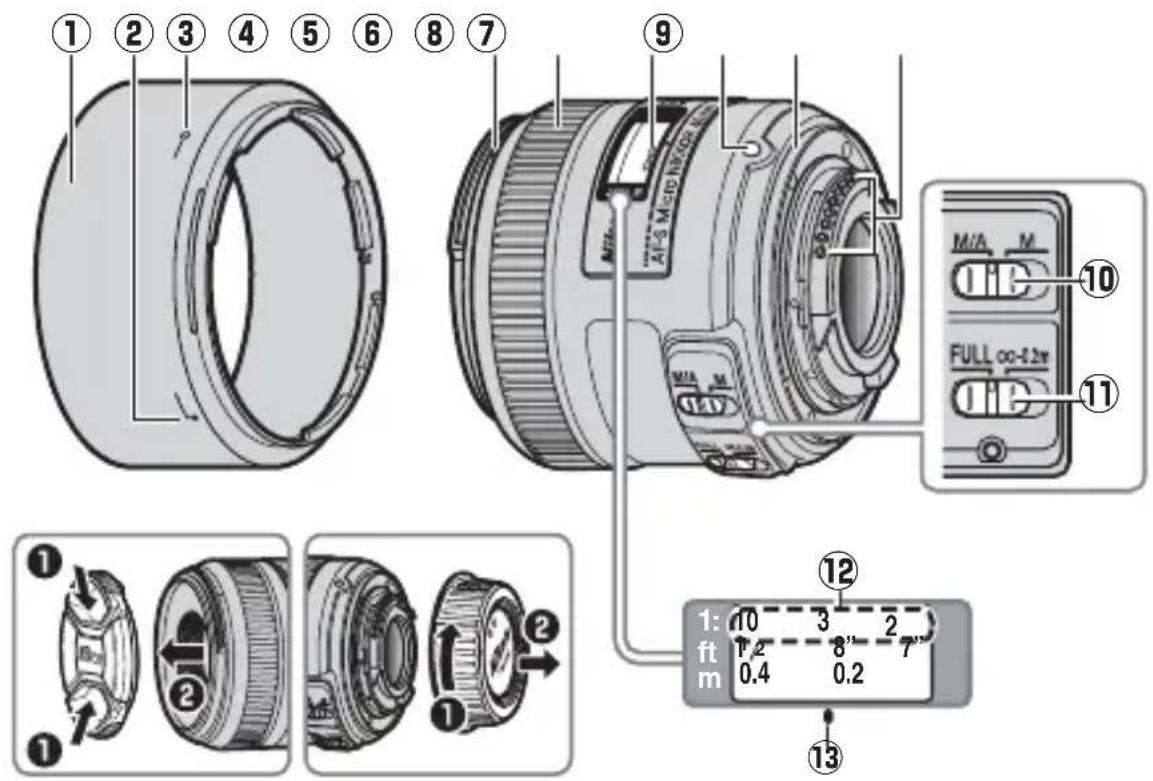
① Lens hood. 17
⑧ Rubber lens-mount gasket. 18
Lens hood alignment
CPU contacts 18
mark 17
10 Focus-mode switch. 15
3 Lens hood lock mark. 17
11 Focus limit switch. 15
(4) Lens hood mounting
12 Reproduction ratio indicator. 16
mark 17
13 Focus distance mark 16
(5) Focus ring. 15
(6) Focus distance indicator
Lens mounting mark.....14

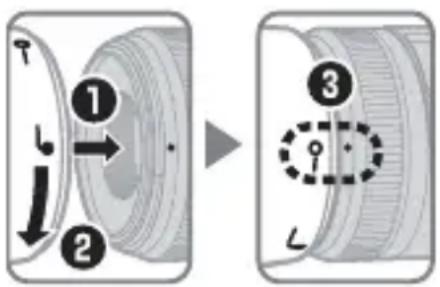
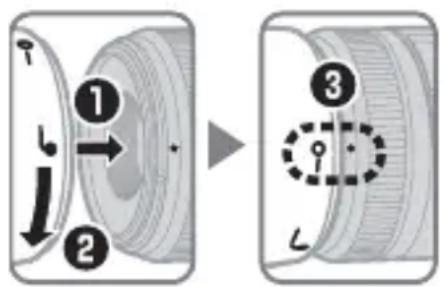
■Attaching and Removing the Lens Attaching the Lens
1 Turn the camera off and remove the camera body cap.
2 Remove the rear lens cap.
3 Attach the lens.
Keeping the lens mounting mark aligned with the mounting mark on the camera body, position the lens in the camera's bayonet mount and then rotate the lens counter-clockwise until it clicks into place with the lens mounting mark at the top.
Removing the Lens
1 Turn the camera off.
2 Remove the lens.
To remove the lens, press the lens release button while turning the lens clockwise.
■Focus
Supported focus modes are shown in the following table (for information on camera focus modes, see the camera manual).
| Camera focus mode | Lens focus mode | |
| M/A M | ||
| AF | Autofocus with manual override | Manual focus with electronic rangefinder |
| MF Manual | focus with electronic rangefinder | |
M/A (Autofocus with Manual Override)
To focus using autofocus with manual override (M/A):
1 Slide the lens focus-mode switch to M/A.
2 Focus.
If desired, autofocus can be over-ridden by rotating the lens focus ring while the shutter-release button is pressed halfway (or, if the camera is equipped with an AF-ON button, while the AF-ON button is pressed). To refocus using autofocus, press the shutter-release button halfway or press the AF-ON button again.
The Focus Limit Switch
This switch determines the focus distance limits for autofocus.
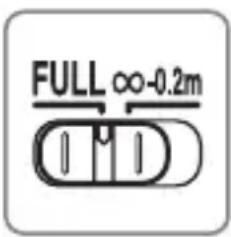
FULL: Select this option for subjects that may be closer than 0.2m (0.7 ft).
- 0.2 ~m : If your subject will always be at distance of at least 0.2 ~m (0.7 ft), select this option for faster focusing.
Aperture
Aperture is adjusted using camera controls. If the camera is in exposure mode A or M, aperture will automatically be adjusted by up to 1.2 stops to maintain the same effective f-number at different focus distances.
Depth of Field
If the camera offers depth-of-field preview (stop down), depth of field can also be previewed in the viewfinder.

■Reproduction Ratio
The reproduction ratio is the ratio of the apparent size of an object to its true size. If, for example, the image on the image sensor is one-third of actual size, the reproduction ratio is 1:3 . If desired, the reproduction ratio can be selected using the reproduction ratio indicator.
Example: Using the Reproduction Ratio Indicator
To shoot at a reproduction ratio of 1:3, select manual focus and rotate the focus ring until the focus distance mark aligns with the number "3" in the reproduction ratio indicator, then move the camera forward or back until the subject is in focus.
Close ups and Reproduction Work
To prevent blur caused by camera shake, mount the camera on a tripod and use a cable release or remote cord. Close ups are generally associated with extremely shallow field depths; for greater depths of field, stop down the lens, choose longer exposure times, and position the camera so that the focal plane is parallel to the portion of the subject you wish to photograph. When using a lens hood, be careful that the hood does not touch the subject.
■Exposure Factor
The lens f-number indicates the brightness of the subject at a focus distance of infinity; higher reproduction ratios result in reduced subject brightness. The actual brightness is referred to as the "effective f-number", and the amount that exposure compensation has to be raised to account for the loss in brightness as the "exposure factor".
Changes to the Effective f-number
With this lens, the higher the reproduction ratio (the shorter the focus distance), the darker the image that falls on the image sensor and the higher the effective f-number (see the figure on page 172). The camera automatically compensates for this effect when metering exposure or adjusting flash output using TTL flash control, and shows the adjusted value for aperture in the control panel and viewfinder displays.
■Built-in Flash Units
When using the built-in flash on cameras equipped with a built-in flash unit, shoot at ranges of 0.6m (2 ft) or more and remove the lens hood to prevent vignetting (shadows created where the end of the lens obscures the built-in flash).
The Lens Hood
The lens hoods protect the lens and block stray light that would otherwise cause flare or ghosting.
Align the lens hood lock mark (-) with the lens hood mounting mark () on the lens (3).
When attaching or removing the hood, hold it near the symbol on its base and avoid gripping it too tightly.
Vignetting may occur if the hood is not correctly attached.
The hood can be reversed and mounted on the lens when not in use. When the hood is reversed, it can be attached and removed by rotating it while holding it near the lock mark (-O) .
En
Lens Care
- Do not pick up or hold the lens or camera using only the lens hood.
- Keep the CPU contacts clean.
- Should the rubber lens-mount gasket be damaged, cease use immediately and take the lens to a Nikon-authorized service center for repair.
- Use a blower to remove dust and lint from the lens surfaces. To remove smudges and fingerprints, apply a small amount of ethanol or lens cleaner to a soft, clean cotton cloth or lens-cleaning tissue and clean from the center outwards using a circular motion, taking care not to leave smears or touch the glass with your fingers.
- Never use organic solvents such as paint thinner or benzene to clean the lens.
- The lens hood or NC filters can be used to protect the front lens element.
- Attach the front and rear caps before placing the lens in its flexible pouch.
- If the lens will not be used for an extended period, store it in a cool, dry location to prevent mold and rust. Do not store in direct sunlight or with naphtha or camphor moth balls.
- Keep the lens dry. Rusting of the internal mechanism can cause irreparable damage.
- Leaving the lens in extremely hot locations could damage or warp parts made from reinforced plastic.
Supplied Accessories
- 52 mm snap-on Front Lens Cap LC-52
Rear Lens Cap LF-4
Bayonet Hood HB-61 - Flexible Lens Pouch CL-0915
Compatible Accessories
- 52 mm screw-on filters
Specifications
En
| Type Type G AF-S DX | Micro NIKKOR lens with built-in CPU and F mount |
| Focal length 40 mm | |
| Maximum aperture f/2.8 | |
| Lens construction 9 elements in 7 groups | |
| Angle of view | 38° 50' |
| Reproduction ratio indicator | ∞ to 1:1 |
| Distance information Output to camera | |
| Focusing Autofocus controlled by Silent Wave Motor with separate focus ring for manual focus | |
| Focus distance indicator | 0.163 m to infinity (∞) |
| Minimum focus distance | 0.163 m/0.53 ft from focal plane (1:1) |
| Diaphragm blades 7 (rounded diaphragm opening) | |
| Diaphragm Fully automatic | |
| Aperture range f/2.8 to f/22 | |
| Metering Full aperture | |
| Focus limit switch | Two positions: FULL (∞-0.163 m) and ∞-0.2 m |
| Filter-attachment size | 52 mm (P=0.75 mm) |
| Dimensions | Approx. 68.5 mm diameter × 64.5 mm (distance from camera lens mount flange) |
| Weight | Approx. 235 g/8.3 oz |
Nikon reserves the right to change the specifications of the hardware described in this manual at any time and without prior notice.
Für ihre Sicherheit
De
SICHERHEITSHINWEISE
KpaTHocTb m3MeHeHnE 3KcNo3mnn
Yncno f o6beKtBv yKa3bIbaeT Ha rpkocTB o6beKta Ha pacctOHHn OKycnpOBKn Do 6eCKoHeuHocT; 60lee BbICOKne Mac7a6bl daHT MeHb7yIO rpkocTB o6beKta. OaKTnueckaerpKOCTb Ha3bIBaetcra «3ofoKTHBbIM YncnOM f», a BeJIuHa, KOTOpyIO KoppeKzna 3KcNo3nUdONJxHa DOCTnHy, pRnHMaBO BHNMaHne NOTepIO B rPKOCTN, Ha3bIBaETcRA «KpaTHOCTbIO N3MeHeHnRA KcNo3nUzN».
Whenever you want to use a flash, you should use the following instructions.
- When you want to use a flash, use the following instructions:
- Do not use a flash in conjunction with other equipment.
- Do not use a flash in conjunction with other equipment in the same way as in previous examples.
- Do not use a flash in conjunction with other equipment in the same way as in previous examples.
- If you want to use a flash, use the following instructions:
- Do not use a flash in conjunction with other equipment.
- Do not use a flash in conjunction with other equipment in the same way as in previous examples.
- If you want to use a flash, use the following instructions:
- Do not use a flash in conjunction with other equipment.
- Do not use a flash in conjunction with other equipment in the same way as in previous examples.
Pára-sol da Objectiva
Ranst Hndn Rnst to hohh oHre Aonn HsT hHt HsHt Ht Ht Ht Ht Ht Ht Ht Ht Ht Ht Ht Ht Ht Ht Ht Ht Ht Ht Ht Ht Ht Ht Ht Ht Ht Ht Ht Ht Ht Ht Ht Ht Ht Ht Ht Ht Ht Ht Ht Ht Ht Ht Ht Ht Ht Ht Ht Ht Ht Ht
Lefs Hrds qnK k(一O)t Rn's of Lefs Hrds 3
馀德図未歴者,賊之。
Kr
— f-number displayed by camera at infinity
-
-
- f-number displayed by camera at minimum focus distance
-
-
Maximum f-number (f/36) varies according to the s
Table assumes exposure increment is 1/3 EV.
■Notices for Customers in Europe
This symbol indicates that electrical and electronic equipment is to be collected separately.
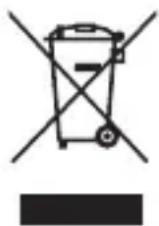
The following apply only to users in European countries:
- This product is designated for separate collection at an appropriate collection point. Do not dispose of as household waste.
- Separate collection and recycling helps conserve natural resources and prevent negative consequences for human health and the environment that might result from incorrect disposal.
- For more information, contact the retailer or the local authorities in charge of waste management.
De
No reproduction in any form of this manual, in whole or in part (except for brief quotation in critical articles or reviews), may be made without written authorization from NIKON CORPORATION.
© 2011 Nikon Corporation
7MAA80K6-06 △