
4531 GA - Electric saw SKIL - Free user manual and instructions
Find the device manual for free 4531 GA SKIL in PDF.
| Product type | Electric jigsaw |
| Brand | Skil |
| Model | 4531 GA |
| Power supply | Mains (230 V, 50/60 Hz) |
| Absorbed power | 650 W (estimated) |
| Blade stroke | Variable, 0–3000 strokes/min |
| Bevel capacity | 0° to 45° |
| Blade shank type | T and U (universal) |
| Orbital action | 4 positions (0 = precision cut, 3 = fast cut) |
| Lighting | Integrated LED light |
| Dust blower | Yes, switchable |
| Dust extractor adapter | Yes, included |
| Switch lock | For continuous operation |
| Speed adjustment | Electronic dial |
| Weight | 2.2 kg (estimated) |
| Sound pressure level | 82 dB(A) |
| Sound power level | 93 dB(A) |
| Vibration (wood) | 5.5 m/s² |
| Vibration (metal) | 5.6 m/s² |
| Double insulation | Yes (class II) |
| Professional use | No, domestic use |
| Compatible materials | Wood, plastics, metal, ceramics, rubber |
| Maintenance | Clean ventilation slots, check lever tightness |
| Warranty | According to Skil conditions (see www.skil.com) |
Frequently Asked Questions - 4531 GA SKIL
User questions about 4531 GA SKIL
0 question about this device. Answer the ones you know or ask your own.
Ask a new question about this device
Download the instructions for your Electric saw in PDF format for free! Find your manual 4531 GA - SKIL and take your electronic device back in hand. On this page are published all the documents necessary for the use of your device. 4531 GA by SKIL.
USER MANUAL 4531 GA SKIL
- This tool is intended for making cut-throughs and cut-outs in wood, plastic, metal, ceramic plates and rubber, and is suitable for straight and curved cuts with metre angles to 45^
- This tool is not intended for professional use
- Read and save this instruction manual ③
TECHNICAL DATA①
TOOLELEMENTS ②
A Switch for on/off and speed control
B Button for switch locking
C Wheel for adjusting sawing speed
D Switch for dust blowing
E Vacuum cleaner adapter
F Lever for selecting sawing mode
G Ventilation slots
H Blade clamp
J LED-light
K Set screw
L Lock screw
M Lever for adjusting footplate
SAFETY
GENERAL POWER TOOL SAFETY WARNINGS
WARNING Read all safety warnings, instructions, illustrations and specifications provided with this power tool. Failure to follow all instructions listed below may result in electric shock, fire and/or serious injury.
Save all warnings and instructions for future reference.
The term "power tool" in the warnings refers to your mains-operated (corded) power tool or battery-operated (cordless) power tool.
1) WORK AREA SAFETY
2) ELECTRICAL SAFETY
a) Keep work area clean and well lit. Cluttered or dark areas invite accidents.
b) Do not operate power tools in explosive atmospheres, such as in the presence of flammable liquids, gases or dust. Power tools create sparks which may ignite the dust or fumes.
c) Keep children and bystanders away while operating a power tool. Distractions can cause you to lose control.
a) Power tool plugs must match the outlet. Never modify the plug in any way. Do not use any adapter plugs with earthed (grounded) power tools. Unmodified plugs and matching outlets will reduce risk of electric shock.
b) Avoid body contact with earthed or grounded surfaces such as pipes, radiators, ranges and refrigerators. There is an increased risk of electric shock if your body is earthed or grounded.
3) PERSONAL SAFETY
4) POWER TOOL USE AND CARE
c) Do not expose power tools to rain or wet conditions. Water entering a power tool will increase the risk of electric shock.
d) Do not abuse the cord. Never use the cord for carrying, pulling or unplugging the power tool. Keep cord away from heat, oil, sharp edges or moving parts. Damaged or entangled cords increase the risk of electric shock.
e) When operating a power tool outdoors, use an extension cord suitable for outdoor use. Use of a cord suitable for outdoor use reduces the risk of electric shock.
f) If operating a power tool in a damp location is unavoidable, use a residual current device (RCD) protected supply. Use of an RCD reduces the risk of electric shock.
a) Stay alert, watch what you are doing and use common sense when operating a power tool. Do not use a power tool while you are tired or under the influence of drugs, alcohol or medication. A moment of inattention while operating power tools may result in serious personal injury.
b) Use personal protective equipment. Always wear eye protection. Protective equipment such as a dust mask, non-skid safety shoes, hard hat, or hearing protection used for appropriate conditions will reduce personal injuries.
c) Prevent unintentional starting. Ensure the switch is in the off-position before connecting to power source and/or battery pack, picking up or carrying the tool. Carrying power tools with your finger on the switch or energising power tools that have the switch on invites accidents.
d) Remove any adjusting key or wrench before turning the power tool on. A wrench or a key left attached to a rotating part of the power tool may result in personal injury.
e) Do not overreach. Keep proper footing and balance at all times. This enables better control of the power tool in unexpected situations.
f) Dress properly. Do not wear loose clothing or jewellery. Keep your hair and clothing away from moving parts. Loose clothes, jewellery or long hair can be caught in moving parts.
g) If devices are provided for the connection of dust extraction and collection facilities, ensure these are connected and properly used. Use of dust collection can reduce dust-related hazards.
h) Do not let familiarity gained from frequent use of tools allow you to become complacent and ignore tool safety principles. A careless action can cause severe injury within a fraction of a second.
a) Do not force the power tool. Use the correct power tool for your application. The correct power tool will do the job better and safer at the rate for which it was designed.
b) Do not use the power tool if the switch does not turn it on and off. Any power tool that cannot be controlled with the switch is dangerous and must be repaired.
c) Disconnect the plug from the power source and/ or remove the battery pack, if detachable, from
the power tool before making any adjustments, changing accessories, or storing power tools. Such preventive safety measures reduce the risk of starting the power tool accidentally.
d) Store idle power tools out of the reach of children and do not allow persons unfamiliar with the power tool or these instructions to operate the power tool. Power tools are dangerous in the hands of untrained users.
e) Maintain power tools and accessories. Check for misalignment or binding of moving parts, breakage of parts and any other condition that may affect the power tool's operation. If damaged, have the power tool repaired before use. Many accidents are caused by poorly maintained power tools.
f) Keep cutting tools sharp and clean. Properly maintained cutting tools with sharp cutting edges are less likely to bind and are easier to control.
g) Use the power tool, accessories and tool bits etc., in accordance with these instructions, taking into account the working conditions and the work to be performed. Use of the power tool for operations different from those intended could result in a hazardous situation.
h) Keep handles and grasping surfaces dry, clean and free from oil and grease. Slippery handles and grasping surfaces do not allow for safe handling and control of the tool in unexpected situations.
5) SERVICE
a) Have your power tool serviced by a qualified repair person using only identical replacement parts. This will ensure that the safety of the power tool is maintained.
SAFETY INSTRUCTIONS FOR JIG SAWS
- Hold the power tool by insulated gripping surfaces, when performing an operation where the cutting accessory may contact hidden wiring or its own cord (cutting accessory contacting a "live" wire may make exposed metal parts of the power tool "live" and could give the operator an electric shock)
- Use clamps or another practical way to secure and support the workpiece to a stable platform (holding the workpiece by hand or against your body leaves it unstable and may lead to loss of control)
GENERAL
- Always check that the supply voltage is the same as the voltage indicated on the nameplate of the tool
- Do not work materials containing asbestos (asbestos is considered carcinogenic)
- This tool should not be used by people under the age of 16 years
- The noise level when working can exceed 85 dB(A); wear ear protection
- Wear protective goggles when working with materials which produce chips
- Dust from material such as paint containing lead, some wood species, minerals and metal may be harmful (contact with or inhalation of the dust may cause allergic reactions and/or respiratory diseases to the operator or bystanders); wear a dust mask and work with a dust extraction device when connectable
- Certain kinds of dust are classified as carcinogenic (such as oak and beech dust) especially in conjunction with additives for wood conditioning; wear a dust
mask and work with a dust extraction device when connectable
- Follow the dust-related national requirements for the materials you want to work with
- Use completely unrolled and safe extension cords with a capacity of 16 Amps (U.K. 13 Amps)
- Always disconnect plug from power source before making any adjustment or changing any accessory BEFORE USE
- Remove all obstacles on top of as well as underneath the cutting path before you start cutting
- Avoid damage that can be caused by screws, nails and other elements in your workpiece; remove them before you start working
DURING USE
- Always keep the cord away from moving parts of the tool; direct the cord to the rear, away from the tool
- If the cord is damaged or cut through while working, do not touch the cord, but immediately disconnect the plug
- Never use the tool when the cord is damaged; it must be replaced by a specially prepared cord available through the service organization.
- In case of electrical or mechanical malfunction, immediately switch off the tool and disconnect the plug
- Keep hands away from the saw blade while the tool is in use
ACCESSIONS
- SKIL can assure flawless functioning of the tool only when original accessories are used
- Do not use a saw blade which is cracked, deformed or dull
AFTER USE
- When you put away the tool, switch off the motor and ensure that all moving parts have come to a complete standstill
EXPLANATION OF SYMBOLS ON TOOL
③ Read the instruction manual before use
Double insulation (no earth wire required)
Do not dispose of electric tools and batteries together with household waste material
WHEN CONNECTING NEW 3-PIN PLUG (U.K. ONLY):
- Do not connect the blue (= neutral) or brown (= live) wire in the cord of this tool to the earth terminal of the plug
- If for any reason the old plug is cut off the cord of this tool, it must be disposed of safely and not left unattended
USE
- On/off ⑥
- Switch locking for continuous use ⑦
- Changing saw blades ⑧
! insert blade to full depth with teeth facing forward ⑨
-tool accepts most commonly available T-shank and U-shank blades
- Sawing at 45^ 10
- Adjusting sawing speed to material used ①
- if the tool does not run with wheel C in position 1, select a higher sawing speed and lower the sawing speed while the tool runs
Dust suction 12
-connect vacuum cleaner adapter E to foot
-connect vacuum cleaner hose to vacuum cleaner adapter E
I do not use vacuum cleaner when cutting metal
LED-light J 13

-LED-light J automatically lights on when activating switch A
- Switch for dust blowing D ⑭
- Selecting sawing mode 15
Use lever F ② for adjusting the orbital action from accurate cutting (= 0) to fast cutting (= 3)
-1 setting ("0") for accurate cutting in all materials, straight + curved
-3 settings for fast cutting in different materials, straight cuts only
1 = metal
2= plastic
3 = hard wood
! always select “0” when sawing splinter-sensitive material
- Operating the tool
-before switching on the tool, ensure that front end of footplate rests flat on the workpiece
-hold tool firmly with both hands, so you will have full control of the tool at all times
! while working, always hold the tool at the greycoloured grip area(s) 16
-ensure that complete surface of footplate rests firmly on the workpiece
! ensure that the blade has come to a complete standstill, before you lift the tool from the workpiece
-keep ventilation slots G ② uncovered
APPLICATION ADVICE
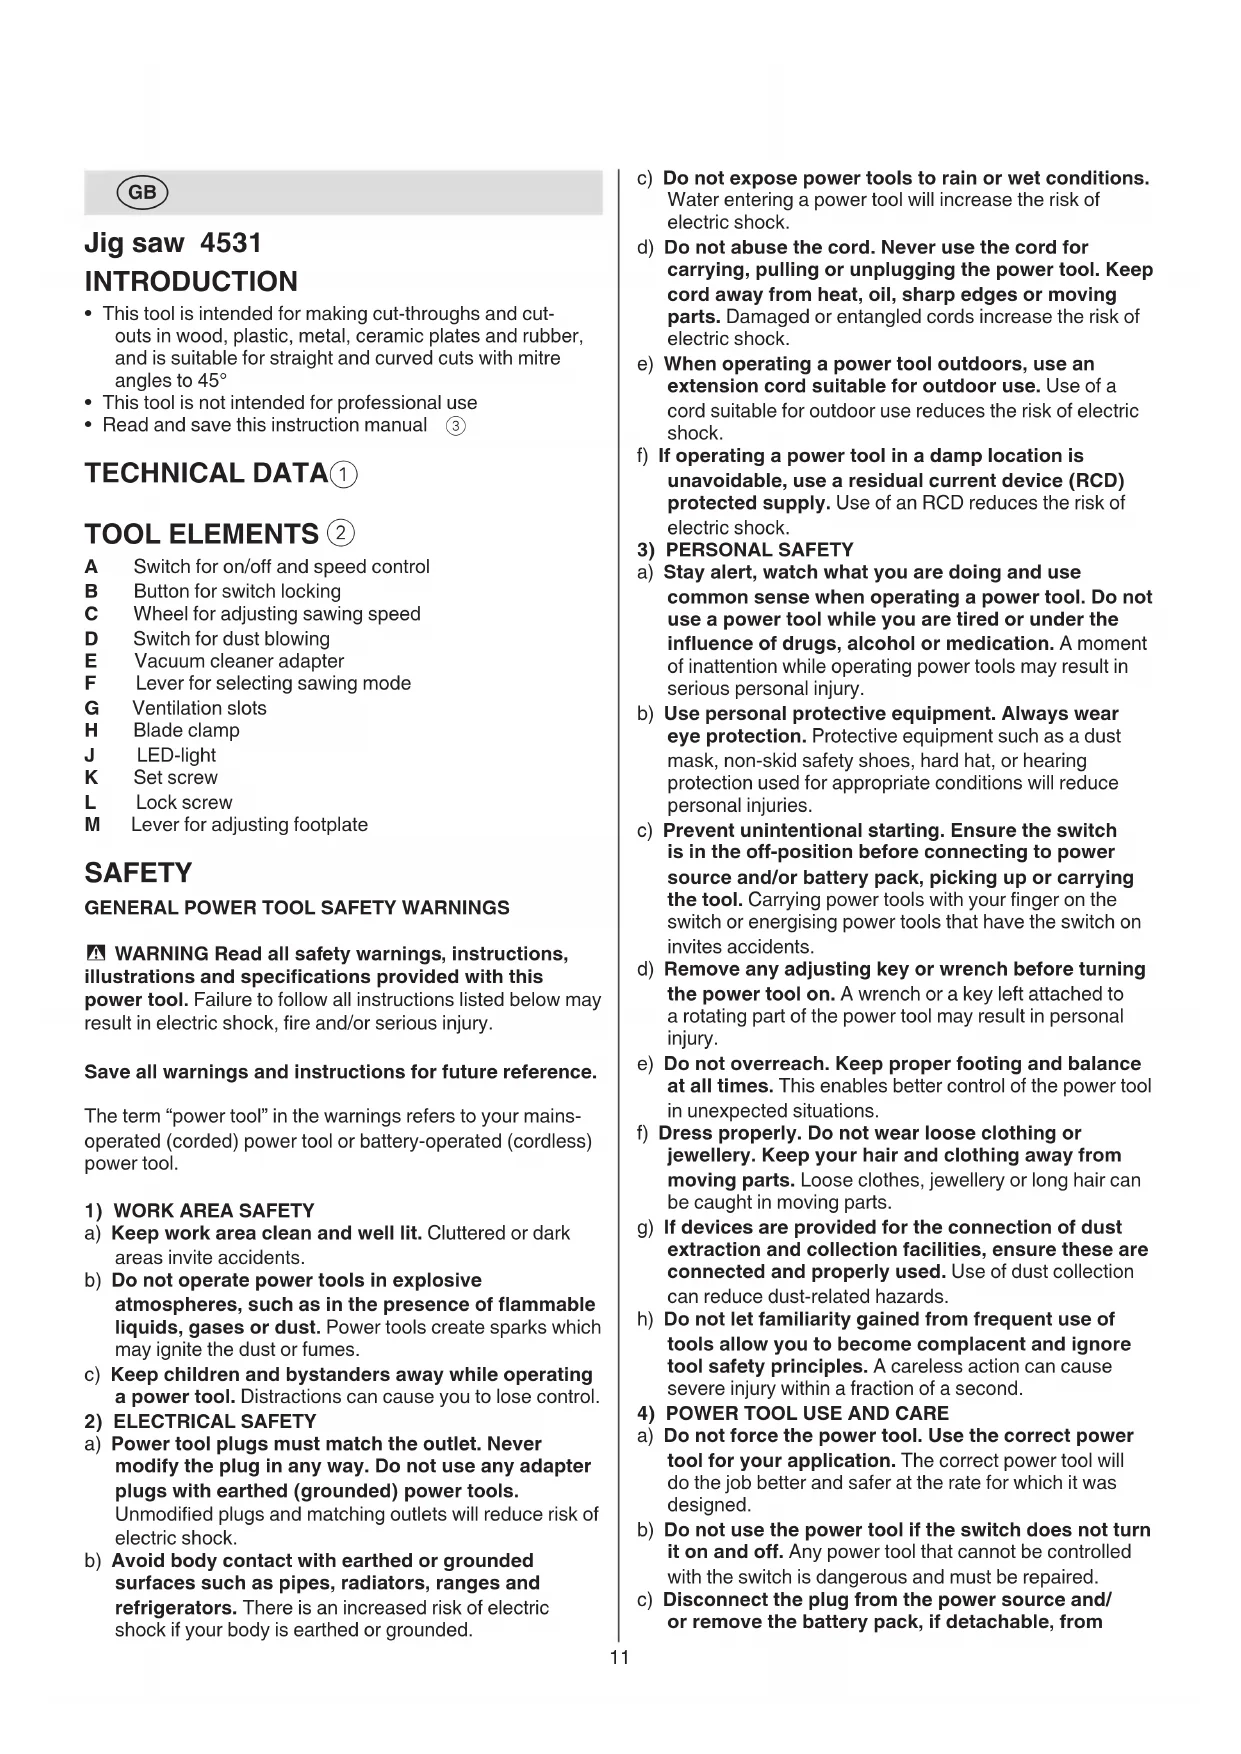
Use the appropriate saw blades
! tool accepts most commonly available T-shank and U-shank blades
- When cutting metals, lubricate saw blade regularly with oil
- For an accurate straight cut, guide tool with footplate along the edge of a straight piece of wood (18)
- Pre-drill a hole before making cut-outs 19
- Splinter-free cutting
-cover cutting-line with several layers of wide tape before cutting
-always face the good side of the workpiece down
For more information see www.skil.com
MAINTENANCE / SERVICE
- This tool is not intended for professional use
Always keep tool and cord clean (especially ventilation slots G ②)
! disconnect the plug before cleaning
If lever M loosens during use, set the tightness of lever M 20
-place lever M in middle position
- loosen lock screw L with PH2 screw driver counter clockwise
-tighten set screw K finger tight with Allen key 4mm counter clockwise
! set screw K uses left hand thread
-tighten lock screw L with PH2 screw driver clockwise -tighten lever M
- If the tool should fail despite the care taken in
manufacturing and testing procedures, repair should
be carried out by an after-sales service centre for SKIL power tools
- send the tool undismantled together with proof of purchase to your dealer or the nearest SKIL service station (addresses as well as the service diagram of the tool are listed on www.skil.com)
- Be aware that damage due to overload or improper
handling of the tool will be excluded from the warranty (for the SKIL warranty conditions see www.skil.com or ask your dealer)
ENVIRONMENT
- Do not dispose of electric tools, batteries, accessories and packaging together with household waste material (only for EU countries)
-in observance of European Directive 2012/19/EC on waste of electric and electronic equipment and its implementation in accordance with national law, electric tools that have reached the end of their life must be collected separately and returned to an environmentally compatible recycling facility
-symbol ⑤ will remind you of this when the need for disposing occurs
NOISE / VIBRATION
-
Measured in accordance with EN 62841 the sound pressure level of this tool is 82.0dB(A) and the sound power level 93.0dB(A) (uncertainty K = 5dB ), and the vibration (triax vector sum; uncertainty K = 1.5m/s^2 ) cutting board 5.5m/s^2
*cutting sheet metal 5.6 m/s² -
The vibration emission level has been measured in accordance with a standardised test given in EN 62841; it may be used to compare one tool with another and as a preliminary assessment of exposure to vibration when using the tool for the applications mentioned
-
using the tool for different applications, or with different or poorly maintained accessories, may significantly increase the exposure level
the times when the tool is switched off or when it is running but not actually doing the job, may significantly reduce the exposure level
! protect yourself against the effects of vibration by maintaining the tool and its accessories, keeping your hands warm, and organizing your work patterns
F
Scie sauteuse 4531
INTRODUCTION
WAARSCHUWING Lees alle
1 = metaal
2= plastic
3 = hard hout
1) SIKKERHET PÅ ARBEIDSPLASSEN
VEDLIKEHOLD / SERVICE
B coCTaB 3KcNJIyatauHbIX DOkUMeHTOB, npeDyCMOTpeHHbIX I3rOToBnTeIeM IJI pOdyKuIN, MOrTy BXoIDtB HAcTOnJUeepyKOBoIDCTBO N O 3KcNJIyatauIN, a TaHKe npNJIOJKeHIn.
HOpMaIIN OIOITBepKJdeHNN COOTBeTCTBNI COepeHHNTC B PnloKeHN.
CpOK cny6bI n3dJIIM
Cpok cnjx6bln3denncoCTabTaeT 7 neT. He
peKOMeHdyETcK 3KcNlyaTaunn No nCTeueHnn 5 let XpaHeHnC DaTbI N3rTOBLeHnE 6e3 PpeBaPntelHo npOBepKn (DaTy N3rTOBLeHn CM. Ha 3TNKeTHe).
Ipeuehenb Kpntnuecknx OTHa3OB uOnnbOchBie Deictbnr nepcoHaJau nn noNb30BaTeJI
- He INCNOJIb3OBAbT C NOBpeHJdeHHo pyKoTHoN IIN NOBpeHJdeHHbIM 3aUHTbIM KOHXOM
-HeHcNoJIb3OBAbTpNIOBbIeHNDbIMa HENOCpeCDtBeHHoN3KOpNyCaN3dEINIA - He nCNoJIb3OBAbT c nepe6nTbIM IIN OOrIeHHbIM 3JIeKTpNueckm Ka6eJem
- He INCNoJIb3OBAtB Ha OTHpbITOM IpOCTpaHCTBE BO BpeMn DOxJn (B paCnblIReMoN BOe)
- He BkIIOuTaB pRi nonaHaHn BObI B KOpNc
-HeHCNOJb3OBA TbPnCNJbHOMNCKpeHHN - He INCNOJb3OBAbT pN IONBJIeHIN CINbHOI Bn6paun
Kpntepnn ppeelbhbix coctoHn
- nepetepnIN NOBpeKdEHN 3JeKtpueckn Ka6eNb
- NOBpeKJdeH Kopnyc H3dJIINr
Tn n nepnoaHocb texnueckoro 06cnykuaHna PeKomeHdyetcOuHCTNtB HnCTpymeHT OT nbIn noCJIe KaJDoRo NcNoIb3OBaHna.
XpaHHeHne
- Heo6xOJIMO XpaHnTb BCyXOM MeCTe
-HEO6XoJMO XpaHnTb BdaJI N OTCOHTNIOB NOBblIeHHbIX TempeaTyp n BO3deIcTBnCOLHeHbIX Lyuei - npxpaheHn Heo6xoDmO n36eRaTb pe3Koro nepenada Tempepatyp
-xpaHHeHne 6e3 ynaKOBKn He DonyckaeTcR
IIOpO6HbIe Tpe6oBaHnK YcNoBnM XpaHeHnCMOTpnte B FOCT 15150 (YcNoBne 1)
TpaHcnpTnpoBbA
KateropnueChn He donyckaeTcnaDeHne N IIObIe MexaHueCKe B03deJCTBnHa ypaKOBky npi TpaHCnpTIpOBKe
- npn pa3rpy3ke/nporpy3ke He donyckaetcnaolb3oBaHne IIO6O BnDa TexHKn, pa60TaIOueiNo npnHcyny 3aKmHa yNaKOBKn
- noDpO6HbIe Tpe6oBaHnK yCIOBnAM TpaHCnOpTnOpBKn CmOTpnte B FOCT 15150 (YcIOBne 5)
BHIMAHNE!
B clyuae BO3HKnHOBeHn nepe6oB pa6ote 3JeHTponHCTpyMeHa BCJeCDTBne NOHoro nn yactNCHoro npeKpaeeHn 3Heprocha6HexeHn nn NOBpeHdEHHn cENn ynpabLeHHn 3Heprocha6HexeHHm yctahOBHTe BbIKIOUaTeIb B noLOXHe Hn, y6eINBwncb, YTO OH He 3a6loHNPobAH (pni erO hAIuHH) n OTKIOUHTe CeTeByo BuHy OT pO3ETHn IIN OTcoEDHNTE CbEMhbl aKKyMylTOp (3TNM npedOTBpaaaetcHekOHtPOJIpyEmbl NOBtOPhbl 3aNyCH)
BBEDEHNE
3TOT HCTpymEn npedHa3HaueH nIy Bblpe3aHnO TBepcN I OcyuEcTBHeH NpOnnlaB DpeBeCnHe,IIaCTMaCCe, MeTaJIe, KepamNueckoI pInTke n pe3HEn MOKeT IcNoB30BaTbCra Iy Bblpe3aHnI NO npAmoi INI KpINBOJ LHNHIOd yrLOM 45°
JaHHbI INHCTpyMeHT He NOxOaHT Ira IpomblHeHHoro HcNoJIb3OBaHHa
-ПочNTaHTe И coXpaHnTe c dAnHoN nHCTpyKcne3
TEXHnueCHe DAHHbIE 1
CTPAHA N3ΓOTOBJEHIN
CdeIaHO B KHTae
DETAJIHHCTPYMEHTA2
A Hypok-BbIKIOHateJIb BkI/BbIKn peyIaTOp cKopoCTN
B KhoNka dIa 3aHpaHn BbIKIOuTeJIa
C KoiénckoДЯpergylnipOBaHnCKOpOCTNIIJIeHN
D IpeKJIIOHATeB dIy ydaJIeHnI nbIIN
E AanTep nIeocca
F PbIur IyBbIbopa peHmApnIeHn
G BeHTnJIaUHOHHbIe OTBepCTH
H DepeKaTeJIe3BnI
J CBeTOBOHINHINKaTOp
K YCTaHOBOUHbI BnHT
L ΦHKCNPYUOUIBHNTP
M PbyaHOK dIypeRyIINPOBKN onOpHOI nlaCTnHi
BE30NACHOCTb
OBUHNEYHA3AHNIOTEXHNKEE3ONACHOCTN OB-PAUENC3JEKTPOHNCHTPMENTAMN
BHHMAHNE! CneJeT O3HaOMNtbcr CO BcEMn npabHnIaMn TexHHN 6e3OanacHOCTn, HNCTpyHcIaMn, NLIIOCTpaunm H TexHHueChHM DaHHbIMn, CODepHauuMnC8 B npHnaRaembIX K 3Tomy 3JIeKTPoHnCtpyMeHTy MaTePnaJax. Heco6IoJeHne HHepepeUcJIeHHbIX INCTpyHKnB I NOHOM O6beMe MOKeT IOBLeYb IopaHeHne 3JIeKTPuYeCHM TOKOM, POHAp N/INn cepBe3HyTO TaBMy.
CoxpaHnTe 3TN HnCTpyKuN n yHa3aHn dJa 6yduoero hcnolb3ObaHH.
NcnoB3OBAHHO B HAcToAUX INCHpyKUHX yKa3AHJX
HOHTNE "3JIeKTPOINHCTpymENT"pacnpoctpaHReTcHa
3JIeKTPOINHCTpymENT C NITaHEm OT cETn (C Ka6JIem
NITaHnO rT 3JIeKTPoCetn) n Ha aKKyMylrTophBn
3JIeKTPOINHCTpymENT (6e3 Ka6EJa NITaHnO rT
3JIeKTPOCetn).
1) B3ONACHOCTb PA6OYERO MECTA
a) Co6IIOJaTe YnCTOTy H NOIDepHnBaHTe HaJIeHaUO OCBueeHHoCTb Ha pa6oem MeCTe. BeCnpAOK Ha pa6oem MeCTe IIN erO IIIOXoe OCBeueHHe MOrT pINBecTn K HeCuaCTHbIM ClyuAaM.
b) He И спльзуITEс сеHTponHCTpyMeHToM BO B3pbIBOONaCHOcpe, T.e. B HENOCpeDCTBeHHoB 6n3OCTN OT JERHOBOcPNaMeHryUxxCn HndKoCTeR, ra3OB nIN nbIn. B npoccepe pa60Tb I eKTPOnHCTpyMeHT nCKpIT n NCKpbl MOryT BOCPNaMeHHTb Ra3bl NIN nbIn.
c) Пи pa6ote c 3JeHTponHCTpyMeHToM He donychaTe DeTei nIIN NOCTOPoHHx Ha BaWe pa6ooye MeTo. OTBJIeueHne BaWero BHMaHn MOJHe IpiBecTn K IOTepe KOHTpOJa Had pa6ToH 3JIeKTPOHNCTpyMeHtA.
2) ΘJEKTPNUECKA B3ONACHOCTb
a) 3JIeHTPOHCTPymeHTa DOJHKHa COOTBcTcBOBaTb po3eTke 3JIeHTPOcETn. He BHOcTe HNKaHX n3MeHeH N KOHcTpyKuH BOHn. He HCNoJIb3yIte aAANTOpbl DnA 3JIeHTPOHCTPymeHTa C 3aUHTbIM 3a3EmLeHem. 3aBOdCKHe 3JIeTceMbHbIe BUNIKn I COOTBeTCTByIOUne IM CeTeBblpe PO3eTKn CyUcEChBHo CHNkaOT BepoTHOcTB 3JIeHTPOwoka.
b) N36eraIte MexaHnueChNX HOHTaKTOB C TaHIMN 3a3eMJIeHHbIMN NOBepXHOCTaMNI, KaH Tpy6oPBOOdbI, CNCTeMbI OTONJIeHHN, PJIHTbI IN XOJODINbHHNK. Ipiu CoPpIKoCHOBENH YuJIOBeKa C 3a3eMJIeHHbIMN IpEJaMeTaMNI BO BpeMpa60tBI INHCTpyMeHToM BepoTHOCTb 3JIeKTPoWoka CyUeCTBeHNO Bo3paCTaET.
c) 06epeaIte 3JIeKtpOnHCTpyMeHT OT BO3dEiCTBnI DOHJa N BlaRn. IonoaHaNHe BObbl B 3JIeKTPOnHCTpyMeHT NOBbIaEeT BepoAHTHOCTb 3JIeKtpUeCKOrO yDapa.
d) NcnoJb3yIte Ka6eJIb cTpOro No Ha3HaueHIO. He donycKaETcra TnHyTb n nepeDburatb 3JeHTponHCTpyMeNT 3a Ka6eJIb nn HcNoJb3OBaTb Ka6eJIb Ia BbITraHbAHnBnIKn n3 PO3EtN. O6epeaTe Ka6eJIb IHCTpyMeNTa OT BO3DeIcTBn BBICOHx TemnepaTyp, Macla, OCTpbIX KpOMOH nn DBrHcyuxxCaCTeN 3JeHTponHCTpyMeNTa. NOBpeKdEHHbI nn CnyTaHHbI Ka6eJIb NOBbIuaeT BO3MOXHOCTb 3JeKTpuYeCKrO yDapa.
e) Pnp pa6oTe Ha yInce HcNoJIb3yIte Ye dIINHITeJIb, npedHa3HaueHHbI dIpa6OtBI BHE NOMEeHn. IcnoJIb3OBAHHe TaKOrO ydIINHTeJIa CHNkaET BepoarTHOCTb 3JIeKTPnuechKO Yoapa.
f) EcIn HeBO3MOHHO H36EHaTB npHMHeHHA 3JIeHTPOINHCTpyMeHNTa B cBIPOM NOMEueHHN, TO yCTaHaBnBaIte yCTpOINCTBO 3aUNtBI OT yTeHN B 3emLIO. IcNoJIb3OBAHne yCTpOINCTBa 3aUNtBI OT yTeKN B 3eMlIO CHINKaET pNCK 3JIeKTPnueCKORo nopaKeHHN.
3)JIYHARBE3ONACHOCTb
a) BydTe BHNMaTeIbHbI, cIeIte 3a TeM, yTo Bbl DeIaeTe N BblOnIIaIe pa6Oy 06dymaHNo. He nolb3yInTeCb 3JeKTHPOINCTpyMeHTOM, ecN HBy UcTALn HaxoINTEcb NOB 03deNCTBHeM TpaHHBUN3aTOPOB, aIKOROJIaHm MeINHCnX npenapaTOB. CekHyndHa Notepa KOHcEHTpauIN B pa6Ote C 3JeKTHPOINCTpyMeHTOM MOKeT pPBeCTN K cepbe3HbIM TpaBMam.
b) NcnoJb3yIte cpeCTBa HnHnBnDyaJIbHO 3aunTbI. 3aunTHIe OCHN O6ra3aTeJIbHbI. CpeCTBa INHdINbUdYalbHOH 3aunTbI, TaHne KaK IpoTnBOJIteBOI peCnnpaTOP, HeCKOJIb3aJua 3aunTHaI O6yBb, JIeM-KACKa, CpeCTBa 3aunTbI opraHOB Clyxa npImeHIOITcR B COOTBeTCTByIOUx YcIOBnM pa60TbI 06CToTaeJIbCTBA X MInHMn3HpyIOT BO3MOJHoCTb IOnyuHeHr TpaBM.
c) PpeodTbpaaIte HnpeDHaMepeHHoe BkHIOueHne 3JeHTPOHNCTpymeHTa. Npeep NoDHJIIOueHem 3JeHTPOHNCTpymeHTa K 3JeHTPOINHTAHNO H/NI H aHHyMylAToP y6eINTecB BBHIOueHOM COCTOHN 3JeKTPOHNCTpymeHTa. EcnBbl npn TpaHCnOpTnpOBKe 3JeKTPoHNCTpymeHTa DePKHe NaIeU Ha BbIKIOuATEle NII BKNIOueHHbI 3JeKTPoHNCTpymeNT NOHKIOUaTe K CETN NTaHn, TO
3TO MOXET PnBecTN K HeCacTHOMy ClyaIO.
d)Bo n36eHahne TpaBM nepeB bHLIOyeHNEM 3JeHTPOHHCTpyMeHTa ydaJIte peryIINPOBOOHyBI Hn raeHbI KIIIOH N3 BpaauoUeCraactN 3JeHTPOHHCTpyMeHTa.
e) He nepeoceHbAte CBON BO3MOHocTn. TBePcToIte Ha Horax n ydepHbAte paBHOBecne. B TaKOM NIOJXeHN BBi CMOXeTe LyuWe KOHTpOJInpoBaTb 3JIeKTPoINHCTpyMeHT B HEOJNdaHHbIX CNTyaunx.
f) IcnoIb3yIte noxOaIyU paOuyU OeHdy. He naeBaIte cbo6oHyU OeHdy U yKpaSeHnA. DepeHnte BOLOcbl N OeJMy BdaNt O DBNHyuxxCaTEn. Cbo6oHaY OeJDa, yKpaSeHnI Nn DInHHbIe BOLOcbl IerHO MOrYT nonactb B dBNHyuHeCra Actn 3JIeKtpOnHCTpyMeHTa.
g) Pn HnHn nnBJeOcacbBaiox n nbIe6bOpHbIX npncno6beHn y6eHntecb B TOM, qTO OHN NOCoEHNHeHbI NcNoJIb3yOTcna HeNaUm 06pa3oM. PnpMeHHe NpIeOTcoa MoKeT CHN3HTb ONaCHOCTN, CO3DaBaEMbIe PbJIbIO.
h) XopoOoee 3HaHne 3JeHTpOHnCtpymeHTOB, NOJyueHHoe B pe3yIbTaTe YacTOrO HX NCNoJIb3OBAHnH, He DOnJHNO npNBODITb K CamoyBepeHHocTH n NrHOpnpOBaHHo TexHNK 6e3ONachOCTn O6paUeHHN C 3JeHTpOHnCtpymeHTaMn. OdHO He6peJHoe DeiCTBnE 3a DOnIO ceKHyIb MoXET pNBecTn K cepBe3HbIM TpaBMam.
4) 3KCNJYATAUNI NYXOD 3A 3JEKTPONHCTPYMEHTOM
a) He neperpyhaTe 3JeHTponHCTpymeHT. NcnoIb3yIte TOT 3JeHTponHCTpymeHT, KOTOpbi npedHa3NaueH dJa daHHo pa6Otbl. C NOxOJaUM 3JeKTPOINHCTpymeHTOM Bbl BblONHITpe pa6Oty JyUwe nHaedeKHei, IcNoJIb3yR BeCb dHaana3OH erO BO3MOXHOCTeI.
b) He ИсноьзуITE 3ЛeHTponHCTpyMeHT C HeHcnpaBHBIM BbIKIIOUaTeJIem.ИHCTpyMeHT C HeHcnpaBHBIM BbIKIIOUaTeJIem ONaCEH IN IOДLEJHIT peMOHTy.
c) Do Haayana HanaHn 3JeHTponHCTpyMeHTa, 3aMeHbI npHaJLeHHOCTe nnn ppeKpaueHna pa60tbl OTHIOuAte WTeNCelbHyU BnHy OT PO3ETN Cetn nn BbInbTe, ecnn 3TO BO3MOXHO, ankyMylrTop. DaHHa Mepa npedocToPOKHOCTn npedOTBpauaet CnyauHoe BkJIIOUeHne 3JeKTponHCTpyMeHTa.
d) XpaHHTe HeHCNoB3yEmbI 3JeHTPOHHCTpymeHT B HeOCTynHom DnA DeTeN MeCTe N He NO3BOJHrte HcNOb3OBaTb erO LnUcAm, He yMeIOuHM C NmM O6paUaTbcN HnN He O3HaKOMJIeHHbIM C HHCTpyKUnE N O3HCnLyatauNN. 3JeHTPOHHCTpymeHTbI ppeDCTabJIaOT c6oB ONaCHOCTb B pyKax HEONbITbIX POJIb3OBaTeJIeN.
e) TuaTeNbHO yXaHnBaIte 3a 3JeKtpOnHcTpymeHTOM n npHaJdJIeHHocTm. IpOBepaIte 6e3ynpueHocTbФyHKnIO NOBnHbIX qAcTei, IerHoCTb Hx XoJa, cIeNoCTHOcTB BceX qAcTei N OTCytCTBne IOBpeHKeHn, HOtOpbie MOrYr HeratNBHO CHa3aTbcH a pa6ote HcHcTpymeHTa. PnO bHApUHeHn NOBpeHKeHn CdaIte HcHcTpymeHT B pemOH. BoIbWoE YNcIIO HeCuaCTbIX ClyuAeB CBra3aHO C HeyDoBJeTBOpNTeJIbHbIM YXODOM 3a 3JeKtpOnHcTpymeHTOM.
5) CEPBnCHOE OBCJyHINBAHNE
f) PeKyuIe qaCTn HNCTpymEHTa Heo6xOJHMO NOdepKHBaTb B 3aToUeHHOM NcHCTOM COCTOAHm. PnHaJIeHaIeM yXoJe 3a peKyuIIMn PnHaJIeHXHOCTMa C OCTpbIMN KpOMkAm OHpeKe 3aKJIINHBAIoTcR INHCTpyMeHT JyUwe NODaETcR KOHTPOJIIO.
g) NcnoJb3yIte 3JIeKTPoHnCTpyMeHT, npHnAdJeHHocTH, 6HTbI H T.D. B COOTBEcTBH C DaHHbIMN IHCTpyKUHM, HCxOJa H3 ocObeHHocTe yCIOBn H xapaHTepa BblONHeMo pa60TbI. NcNoJIb3OBAHHe 3JIeKTPoHnCTpyMeHTa He IIO Ha3HaueHnIO MOHeT pPbEChn K ONaCHbIM NOCJIeDCTBnM.
h) DepeKHTe pyHn I NOBepxHOCTn 3axBaTa cyXIMn H NCTbIMN, CLENTe YTO6bI Ha HNX YTO6bI Ha HNX He 6blIO XNDHOHN KOHCNCTeHTHO mca3Kn. ChOJIb3KHe pyHn I NOBepxHOCTn 3axBaTa npenrTCTByOT 6e3oNaChOMy obaeHIO C INHCTpyMeHTOM n He DaIOT HaJeHX KOHTPOJNPOBaTb erO B HenpeDbIDeHHbIX CNTyaUAX.
a) NpepaBaiTe 3JeKtpOnHCTpymeHT Ha cepBnchoe 06cIyHHBaHHe TOIbKO KBAJIHΦNUPOBaHHOMy nepcoHaLy, HcNoJIb3yIOUeMy TOIbKO NOJINHHbIE 3aNaChbIe YAcTn. 3To 06ecneHT COxpaHeHne 6e3OJaCHocTH 3JeKtpOnHCTpymeHTa.
YHA3AHNIO BE3ONACHOCTNДЯ PABOTbIC JIO63HOM
- Pn BbINOJIHeHnn pa60T, npn HOToPbIX pa6OuH INHcTpMeHT MoHET 3aJeTb ChpblTyIO 3JeHTponpoBDHy Hn CO6CTBHeHHbI CeTeBOH Ka6eIb, depKHTe 3JeHTponHcTpMeHT 3a H3OINPOBaHHbIe pyHN (KOHTaKT C HaxoJSeIcN IOd HApRJaHHeHem IPOBOkOIM MOKeT 3apKaTb MTeAJIInueckHe Yactn 3JeKTponHcTpMeHTa N PnIBOnTb K yDapy 3JeKTpUeCKHM TOKOM)
IcnoIb3yIte cTpy6uHbI nIIN dpYrO yO6hBi cnocob IJI HpeIeHHN 3dEHH K npOHyo IIaTΦOpMe Iero NpOdeHHN (ecJn depKaTb I3dJIneB B pyKax IJI INPnIKHMaTb K TeJy, OHO 6yJeT HeIOCTaTOUHO 3aΦHKCpOBAHO, YTO MOKeT pINBecTn K NOTepe KOHTPOJI)
OBUEE
- 063aTeIbHo y6eIITecb, qTo HapJxHeHne nHTAHn COOTBcTCTByET HApJxHeHIO, yKa3aHHOMy Ha hIpMeHHOM wTemIe INCHTpymeHTa
He 6b6a6b6a8e MaTePnaBlc CopeHnem ac6ecTa (ac6ecT cHTaetcKaHeporeHom) - INHCTpymEnT HeIb3a HcNoIb3OBaTb IINzam B BO3paCTe do 16 JeT
IocKoJbKy ypoBeHb wyMa npn pa6Ote daHHoro HcHTpyMeHtAmoKeTnpeBbIaTaB80dB(A)BCerda HcNoJIb3yIte 3auHTy dJa ywei - Ppnpabote C xpynHmN paaccbIyHaTbIMMaTePnaJamaM Bcerda HocHTe 3aunTHbIe OUKN
Пьыл OT TAKHx MaTePnaIbO, KaK CBINHcOBOcoepKaaJn Kpacka, HeKOTOpBie NopOdbI DepeBa, MInHepaJIbI n MeTaN, MoKeT 6bITb BpeHa (KOHTaKT C TaKoI PbIbIO HIIe ee BdIxAHne MOKeT CTaTB PnUHHoI BO3NtKHOBeHnY y OnePaTopa IIN HaXODaIuXxCra PaDOM IINc aIIeprnueChnx peakun n/nn pecnnpaTophbx 3a60JeBaHn); NaDeBaIte pecnPapToP np paBoTaIte
C nbileydaIaIIOuIM yCTpOiCTBOM npn BHLIOUeHHN HhCTpyMeHTa
HeKOTOpbIe BnDbl nbIIN KJIaCCNfHcNpyHTcKa KaHcEporeHHbIe (HaNPmep,dyobBaI IN 6yKOBa IpbIb),OCo6eHHBO CooTeAHN C DoabKaMn DnK OHINIOHPOBaHHa NpeBecHHb; HaNBeBaHTe pecnnapTo np pa60TaIte c nbIeYdaIauOuIm yCTpOInCTBOM nPn BKNIOUeHN HNCTpyMeNTa
CneIyIe npHrTbIM B BaWei CtpaHe Tpe6oBaHnM/ HOpMaTHBAM OTHOCHTeJIbHO PbIJN DnTg TEX MaTePnaIOB, C KOTOpbIMn Bbl CObupaTeEc pa6oTaTb
- IcnoIb3yIte nolHOCTbIO pa3MOTaHHbIe 6e3ONaChbIe ydINHITeJI, paccHTaHHbIe Ha TOK He MeHee 16 A
Ipeed perylnpoBko Hn CMeHoi npHaJeHHoTe O6a3aTeBHO BbInbTe BnHy n3 ceTeBOi po3eTHN
NEPED NcNoJb3OBAHHEM
- PpeKdJe Cem npucTynHb K pe3Ke, ydaJIte BCE npenrTcBnHa TpaekTopne pe3aHn I NOd Hei
I36eRaTe NOBpeKdEHN, KOTOpbIE MOryT 6bITb BbI3BaHbI BnHTaMn, rBO3dAmN INpOChIM NJIeMeHTaMn, HaxoJrUIMNCB O6pa6aTbIBaEMOM ppeMeTe; nepei Haayalom pa6oTb Ix HyKHO ydaIITb
BO BPEM IHCNOJIb3OBAHNA
CneIte 3a Tem, yTo6bI cTeBOH uHyp He HaxOuINcra pAOM C DnNHyUIMMNC DeTaJIaMNI HNCTpyMeHTa; HxKHO Bcerda HaNPaBIArTB 3JeKTPnueckn IuHyp K 3aHHeu Yactn HNCTpyMeHTa, NCHIOUaERo 3aXBaT INHCTpyMeHTOM
-Пи NOBpeKdEHNn Hn pa3pe3aHn CeTeBOrO shypa BO BpeMpa6oTbI He npKacaiTecb K Hemy, N HemeJHeHO BbIHbTe BnIKy n3 po3eTKn
HnKOrda He noJIb3yITeCb nHCTpyMeHTOM c NOBpeXdEHbIM Ka6eJEM NITaHINr; eO Heo6xOaHMO 3aMeHNb CneuaJIbHbIM Ka6eJEM NITaHINr, 06paTnBUnncB B cepBnCHyIO oPraHn3aUHO.
BcnyaeIIO6O3JIeKtpueeckoINMEXaHueeckoHNcnpaBHocTnHEMeJeHHO BbIKIOHTe INCTpyMeHT NBBHtBe BNkkyN3p03ETKN
- PnnoB3OBaHnn HNcTpymeHTOM depKHTe pyKn noJaIbwe OT peHyux DeTalei
PUNHADJIENHEHOCTN
SKIL obecneuBaet HaedKHypo pa60Tu INcTpymeHTa TOLbKO pnp HcNoJIb3OBAHn COOTBeTCTByIOx npncnoc6JeHn
He nCnoIb3yIte DeΦopMnpoBaHHbIe, TynIe nnIKN/ DnCKH N.T.I. INnnKINDnCKn C TpeuHaMu
NOCJI NCIOJIb3OBAHNA
- IpeaTeK aK IOIOHHT b HcTpyMeHT, BbIKIIOHTe DBNrTaTeNb uY6eINTEcB b TOM, YTO BCE dBnKyuNecra DeTaJIN NOJIHOCTbIO OCTaHOBNJInCb
IORCHEHNE K YCJIOBhbIM OBO3HAUHnM HA HNCTPYMEHTE
③Перд ИСпОЛьЗОВАнЕМ OЗHAКOMБТECБ CpyKOBODCTBOM NO 3КПЛУАТAUIN
④ДВонагиЗОЛЯЦА (3a3eMЯкИ npOBOD He Tpe6yETc)
⑤ He BbIKnIbIbAaTe 3JIeKTpOuHCTpyMeHT N 6aTapeN BmecTe C 6bITOBbIM MycOpOM
NcNoJIb3OBAHHe
BbIJI 6
BIOKINPOBbBA BIKHouaTeIg IpOIOJIHHTeJIbHOI NCIOJIb3OBAHN ⑦
3aMeHaNoJToEHnI 8
!BCTaBbTe NOIOTHO yOpA (3y6bA DOJIHHbI 6bITb HnpaBHeHb Bnepe) ⑨
-ДЯ INHCTpyMeNTa npIrOAnHbI 6OJIbUHNHCTBO TINOB INIOK C -06pa3HbIM NII U-O6pa3HbIM XBOCTOBHKOM
CBeTOBOn HnDnKaTOp J 13
-CBetoIOHbI INHdkaTOp JBKIOUaETcABTOMaTHueckn pR bKIOUeHEN BbIKIOUaTeJI A
- IpepeKIOUOATEJIbIy ydaJIeHnI nbIJN D 14
Bb60peKIma nIeHn 15
HcnoJIb3yIte pIbIar F ②IyBbIbOpapeKIMaOT MeIeHHoro aKKypaTHoro npOnnla (= 0) do 6bICTporo (= 3)
-1 peHHM ("0")ДЯ aKHypaTHOrO npOnnla no lo6omMy MaTePnaIy, npAmbIX + KpNbIX paCnIOB
-3 peKnma dIa 6bIcTpoe3Kn no pa3JIuHbIM MaTePnaIam,ToIbKO npRbIX pa3pe3OB
1=MeTaJIJI
2=πλactNK
3=TbepeBbI npoDbI DepeBa
!npa6oTe HaIerHo paacnIauOeMcMaTePnaJe BbIbpaTte“0"
- IcnoIb3OBAHHe INHCTpyMeHaTa
-NepeB BKIOUeHEm INHCTpymEHTa y6eINTEcb B TOM, YTO NepeHN KHeu IaIbYCTaHOBIn HIOTHO Ha 06pa6aTbIBaEMyIO NOBepXHOCTb
-DepKHTe INHCTpyMeHT HaJeEHHO DByM pyKaMn, YTO6bl IMETb NOCToHHbI N IOLHbIKOHToPJIb
! BO Bpempa60bl, BcerdaepKHTe HnCTpyMeH 3a Mecta npabHbHoro XbaTa, KOtOpbie 0603HaueHb cepbIM UBeTOM
-yeNTecbB TOM,TO BcnoBepxHocTbIaNbHaedEHHO ONIPAETcHa paoboyIO NOBepxHOCTb
I nepey ydaenHem HnctpymeHa c 6o6pa6aTb1BaemOn NOBepxHocTH y6eHTecb B N0H0N OCTAHOBHe NOI
-cOePKeHTe BEHTNJIaHIOHHbIe OTBepCTnG② He 3aKpbITbIMN
COBETbI NO HcNoJIb3OBAHnIO
- IcnoJb3yIte COOTBETCTBYIOUne nnJIKN 17
!ДЯИНСТРУМЕТАnpиROДнБI6ОЛьшИНСТВOTINOBПИLOHcT-06pa3HbIMИNUN-O6pa3HbIMXBOCTOBUHKOM
- Pn pa6oTe c MeTaIaMn peYyIpaHcMa3bBaNTe NIIKN MaCJOM
ДяakKypaTHbIXpacnIOBno nprMoJINHHNBeDHTe HCTpyMeH TdoJIb Kpa nprMOrO DepeBraHHoro OTe3a 18
IpeBbipe3aHHecKBO3HbIXOTBepCTnI npEdbapntelbHO npocBepJIte OTBepCTne dpelbIO 19
- PpOnnIb63 paCzepenJIeHnIa
-HaHJIeIte HeCKoJIbHO CIOE B IINPOKoi JIeHTbI HaJIINHIO pa3pe3a
-BCerda peKbTe NO npOTUBOJIOJHOH (TbJIbHO) CTOpOHe MaTePnAla
- Pódpóbo Hee Ha caIte www.skil.com
TEXO6CJYHKINBAHNE/CEPBNC
JaHbI INHCTpyMeHT He IOxOJNT dIa IpOMblJIeHHORIOcnoJIb3OBaHnIa
Bcerda coepKHTe HNCTpyMeHNT ero shyp B qnctote (ocobehHO BeHTINLAUONHHbIe OTBepCTNA G ②)!pepeq uNCTKO INCHPTpMeHTa BblbTe BNHy n3 po3eTKN
Ecn pbyaKoM npectaHET depKaTbC B xOe3KcNpyatau,OTperylnpyte ypoBeHb er0 3aTAAHN M 20
-ycTaHOBnTe pbHkoM M CpeDHee noJIOKeHne
-OTNCTnTeФHKCpUOuN BnHT L OTBepTKoH PH2 npOTNB YacOBO CTpeJIKN
-3aTAHNTe yCTaHOBOHbI BnHT K KIOUOM- WECTINrpaHHNKOM 4 MM IPOTNB YACOBN CTpeJKN C YCNIIEM 3aTAAKK N6E KIOHa
!pe3b6a yctahOBOuHOro BNHTa K - JEBa
-3aTAHNTeΦHKCnpyUcN BnHT LOTBepTKoH PH2 no YacOB0CTpeJIKN
-3aTAnHepebUarM
EcnHCTpyMeHT,HeCMOTpHa TuaTeIbHbIe MeToDbI H3ROTOBLeHnH NcNbITaHnB, BbIeT H3 CTPOA, TO peMOHT CJIeDyET IPOU3BOIDnTB CNJAMn ABTOPIN3OBaHHoCepBnCHOn MaCTepCKOn DnIg 3JIeKTPOnHCTpyMeHTOB fnpMbI SKIL
-OTnpaBbTe Hepa3o6paHbI INhCTpyMeHT CO CBnDeTeJIbCTBOM NOKyNkBaWcMy DInIepy NIN B 6LNaJMyIO CTAnuIO O6CnyKnbAHnI PhpMbI SKIL (aDpeca I cxema ObcnyKnbAHnI INhCTpyMeHTa npNBedeHbIBBe6caIte www.skil.com)
- PpHmTe K CBeDeHNIO, YTO NOBpeKJdeHn BcJIeDCTBHe nepeRpy3KN Hn Hn HeaJaIeKaIeero ObpaJeHH C nHCTpyMeHTOM He 6ydy TBHIOueHb I RapaHTNIO (ycNoBnra rapaHTn SKIL cm. Ha caIte www.skil.com nnn y3HaIteY dIIePa B BaIeM perNoHE)
OXPAHA OKPYHKAIOUeN CPeIbI
He BbIKNbIbAaTe 3JeKTPoHnHCTpyMeHT,6aTapeN, npHaJaleKHOCTu yNaHOBHy BmecTe C 6bITOBbIM Mycopom (ToJIbKO dJa cTpaH EC)
-BO HcnoJHHeHne EBpOeNcKo dHpeKTHBbl 2012/19/ EC o6 yTnIIN3aunn OTCnyHNbWero cBoi cpoK 3JIeKTPnueCHoro n 3JIeKTPoHNO 06OpyIDOBaHn I B COOTBeTCTBnC DeIcTBYIOUIM 3aHOHOdaTeJIbCTBOM, yTnIIN3aunn 3JIeKTPoHnCTpyMeHTOB npOn3BODnTCr OTdJIbHo OT dpYnX OTxOoOB Ha npEApnTnx, COOTBeTCTBvIOUINx YCIOBnM 3KOJIoRnueCHoN 6e3ONaCHOCTn
-3HaOK ⑤ HanomHIT Bam o6 3TOM, KOrda NoBHTc HEO6XoDMOCt b CdaTb 3JeKTPoHhCTpyMeHT Ha yTnIIN3aunIO
UYM/BNBPaIy
Corlacho H3MepenB M COOTBeTCTBn C EN 62841 ypoBHe 3ByKOBOI DaBJIeHNr 3TOI INCTpyMeHTa coCTaBJIeT 82,0 D(A), ypoBHe 3ByKOBo MOUHOCTN -93,0D(A)(nOrpeuHocTb K = 5D), a Bn6paunr * (BeKTopHa cymMa nO Tpem Ocram; nOrpeuHocTb K = 1,5 m/c²)
*pacnInBaHne dockn 5,5 M/c²
*pacnINBaHne JInCTOBOro MetaJIa 5,6 M/c²
- UpoBHeH Bn6paunn 6bl n3MepeH B COOTBeTCTBn CO CTaHdApTn3nPoBaHHbIM nCbItaHneM, CoepKaUIMcB EN 62841; daHnaXapaKTePncTnka MoKeT nCNoJb3OBAtbcraI cpaBHeHn ODoHOro IHCTpyMeHTa C dpyrM, a TaKHe IJa IpeDbapnteJIbHOI OueHKn BO3DeiNCTBnB N6paunn pnn nCNoJb3OBaHn DaHHoro IHCTpyMeHTa Dny kA3aHHbIX ueJe
-ри Испόльбзовани Инстумента в дугх целяхИИСДугимИ/HeICnPaBHBIM BCNOMOraTeIbHbIMINписпособленияуpoBEHB Bo3dIeIcTBnB BIBpaCmIMMOJKeT 3HaHTeJIbHO NOBbIuTaBcR
-B NepnoDbI, KOrda HNCTpyMeHT OTKIOUeH NIN ΦyHKcNoHNPyeT 6e3 PaKTNUeCKoR O BbINOJIHeHn pa60TbI, yPOBeH BO3DeiCTBnB IVbpaun MoKeT 3HaHTeJbHO CHNkaTbCra
!3aunuaitece6oTBO3deHCTBnBn6paun,noepHHBaHnCTpyMeHTeroBCPOMOratelhIe npncnoc6leHnBNCpabHomcoCTOAHN,noepHHBa pyHn BTeJIe,a TaHHe npabHbHO orpaHH3OByra CBOpa6ouH npoecc
UA
EeHTpHnI IO63nK
4531
BCTyn
LcienhtpymeHT npn3haeHm dIb Bnpi3aHHo TBopib Ta BNKOHAAH NpOnniB y DepeBnHi, INaCTmaci, MeTani, KepamHII pNTci Ta rmyi; MOKe BnKOpNCTOBvBaTHCb DnBnpi3aHHNo npraMti Ta nId KyTom 45^
LcIiHCTpyMeHT He npuaTHn IINr npomncIOBOB0 BHKOPNCtAHN
- PpOHTaIe i 36epexiTb IcIhCTpyKciIO 3 eKcnIyatauii ③
TEXHIYDAHI ①
EJIEMHTN IHCTPYMEHTA ②
A BmHKaH DJIb Bn/BNH Ta peryIOBaHH WBNKoCTI
B KhoNka 6JIOkyBaHHBbMnKaHa
C KoIeO dIy peRyIIOBaHHH WbNkOcTI po3nIIIOBaHH
D BmNKaay dIy BNKnNy NnIy
E AanTep nIIOOCy
F Baikilb Bn60py peKmmy po3nIIOBaHHa
G BeHTnIauiHi OTBOpN
H 3aTnckayJe3a nnKn
J CbiTIOIDHn iHdIkaTop
K PeryIIOBaJIbHnI rBnHT
L BLoKyBaJIbHn IBTIHT
M BaJIb IaIpepyIIOBaHHN NOKOB3HIO
BE3NEKA
3AΓΑЛbHI BKA3IBKN 3 TEXHIK N B63NEH NIOBOДЖEHHH 3 EJIERTPOIHCTPYMENTAMN
NONEPEDHEHHYBaHNO BnBcIb 3an06iHni 3axoHa Ta iIOCTpaui, a TAOH npOHTaIe Bha3IBH TaTexHi yMOB, uO BXoAITb B KOMnIeHT NOCTABH NcBOrO eEKeTPOIHCTpyMeHTy. HeDoTPMaHH HnKHepeJIeHnx Bka3iBOK y NobHOMy o6c3i MoHe CnpuHHTu ypaHexHH eEKeTpHuHM cTpyMOM, noHexKy Ta / a6o cepNo3Hy TpaBMy.
Dó6pe 36epiraTe Ha MaI6yTHe ci nonepeJHHeHHa Bka3iBKn.
ПиД NOHЯТТМ "eLEKТponpILAД"ВЦХ NONepeДннЯ MaETbCSHa yBa3i eLEKTPponpILAД, со пацIOЕ BiD МepeXI (3 eLEKTPOKa6eIeM) a60 BiD aKymЛaTropHOI 6aTapeI (6e3 eLEKTPOKa6eJIu).
1) B63NEHA HA PO6OyOMY MICUJ
2) EJIeHTPNUHA B63NEHA
a) PpmaTe cBoe po6oYe Mice B YnCTOTi Ta np6paTe Noro. Be3naI a6o noraHe ocBITJIeHnHa p6OChy Micci MoKHTb Pn3BODHTn Do HeuacHnx BnJaKiB.
b) He npaioTe 3 npnaIadom y cepeOboNsi, de icHyc He6e3neHa Bn6yH BhacIIOH npncTyHocTi ropoux piin, ra3iB a6o nny. EneKtponpuaM MOHYt bnpoJHbATn ickpn, BiJ RAHX MoHe 3aImMaTnCn nn a6o napn.
c)Пдчac npaObaHH3 npHJaOM He niDnycHaTe Do po6oYoro Micza dite Ta iHxN IIOeB. BmOKeTe BtpaHTn KOHTpOJIb NaI npHJaOM,ЯKIo BaWa yBaRa 6yde BiDbepHyTa.
a) 7TeNceIb npnnay noBHeH nacyBaTH Do po3eTHn. He do3BoJraTbcra 0o-He6ydb MInrTa B wTeNceJI. Dnra po6Otn 3 npnlaadamn, 0o MaOTb 3axnche 3a3emJeHH, He BnKOpNCTOByte aAdanTepn. BnKOpNCTaHH opriHaJIbHO r 7TeNceJI Ta HaJIeHHo' po3eTK 3MeHwE pniHK ydApy eJEnKTPnuHm CTpyMOM.
b) YHnHaTe KOHTaHTy YaCTe Tla i3 3a3emLeHMn NOBepxHAMn, Hn HAp., Tpy6amn, 6atapeMn ONaJIeHHa, NeYAmn Ta XOJIoNJIbHNKaMn. KOni BaWe TiIO 3a3eMJIeHe, icHyE 36IbWeHa He6e3neHa ydApy eJeKTPnHm CTPymOM.
c) 3axuatae npnad BiD douy Ta BOIOrn. IonaaHnBODIN B eIeKtpoiHCTpyMeHT 36ilbUye pn3NK yIapy eIeKTPnHMM CTPymOM.
d) He BnKOpncToByTe Ka6eJIb dIa nepeHeceHH npHauy, niDiBiWsyBaHHa 6o BHTaRyBaHHa WTeNcEJIa 3 po3EtH. 3axuaiTe Ka6eJIb BiJ HApH, oIII, roCTpIX KpaIB Ta DeTalei npHaLy, zo pyXaOTbcra. NowKOHeHn a60 3akpyeHn Ka6eJIb 36IbWye pnsIK ydpay eJeKTPnuHm CTpyMOM.
e)ДЯ 3OBHiwix po6IT o6OB'3KOBO BnHOpNCTOByTe Nlle TaHNI NOOBHyBaU, IO DOnyuSeHNI DIA 3OBHiwix po6IT. BnKOpNCTaHHI NOOBHyBaUa, IIO pO3paXOBaHNI Ha 3OBHiwIpo6OTN, 3MeHUe pN3NK ydApY eJIeKTpUHIM CTpyMOM.
f) RaHIO He MoKHa 3anO6irTH BnKOpncTaHHIO eNeKtponpnaNy y BOJorOMy cepeoBnu,
BnKOpncToByIe npncptpi 3axncty BiD BtOKy B 3emlIO. BnKOpncTaHHa 3pncptpo 3axncty BiD BtOKy B 3emlIO 3MeHwye pN3NK ydapy eJeKtpnHm CTpyMOM.
3) B63NEHAJIIODEI
a) Bydte yBaHHMn, cIidkyTe 3a Tm, 10 Bn po6nte, Ta po3cydlnBO NOBdTecn iD yac po6otn 3 eIeHTponpnaDom. He KopncTyTecn npnaDom, RaIO Bu CTomJIeH a6o 3haxOHTecn iD dieH HApHOTnHIB, CnHPTHx HanoiB a6o liK. MItb HeyBaXHoCTi pni KopncTyBaHHi npnaDom MoHe np3BOHTn Do cepNo3HNx TpaBM.
b) BdraTe oc6ncte 3axnche cnopJHeHH Ta o6OB'aHBO BdraTe 3axnChi OkyIaRn. BdraHHoc6nCTOro 3axnCHoro cnopJHeHH, RaHap., -B 3aJeKHOCTi BiD BuNy po6iT - 3axnCHOI MaCKN, CneuB3yTT, 10 He KOB3aeTbcr, KaChn a6o HabyuHNKiB,3MeHwye pn3nck TpaBM.
c) YHHaTe HeHaBMnCHOrO BMHaHH. NepH HmHaTH eEeKTPoPnHApB eEeHTpOMepEny a60 BCTPOMJrA hMyIaTOpHy 6aTaPeU, 6paN Ioro BpyHn a6o nepeHoCHTn, BneBHITbcR B TOMy, zo eEeKTPoPnHAd BmKHyTn. TpMaHH naJIbca Ha BmHKaYi nD ac nepeHeceHH eEeKTPoPnHa dy a60 BCTPOMJHnB pO3eTKy yBIMKHyTORo npHaMy MoHe np3BOuNTn DO TpaBM.
d) Ipeep TmM, HBMHaTH npHnlaD, npn6epiB HalaorodHyBaIbHi IHcTpymeHTn Ta raHOBn KIOU. 3HaxoJKeHHaHaIraOHyBaIbHO rHcTpymeHTa a60 KIOUca B DeTaJI, 10 o6eptaETbcr, MoKe npn3BOdHTn Do TpaBM.
e) He nepeoiciHoiTe ce6e. 36epiraTe ctiHe nolooHenHa Ta 3aBHN 36epiraTe pIBHObary. Lcdo3BOJntb Bam kpaue 36epirATn KOHTpoJIb HaI npNJaOM y HecnoiBaHx CNTyauiX.
f) BdraTe npdaTnOJr. He BdraTe npocToPi OaT Ta npKpacn. He ndTabJe ToBolocn OaTdo Detale, yo pyxaotbc. IpocToPi OJaTa, npKpacn Ta DObre BOLOcc MoKyb nonadTu B deTani, 0o pyxaOTbc.
g) RaHIO icHye MOHINBicTB MOHTyBaTHn HNOBIDcMOHTyBaJIbHI a6o NIIOyoNBoIBOaJIbHI npHCTpoI, nepeKoHaIteC, 0o6 BOHN 6yIn Do6pe NiD'EDnHi Ta npaBnIbHO BkOpNCTOByBaInc. BnkOpNCtAHnra NIOBIDcMOHTyBaJIbHO rnpCTpO MoKe 3MeHUnTI He6e3IeKN, 3ymOBJIeHI nIOM.
h) Do6pe 3HaHH eJIeKtpoiHcTpymeHTiB, OTPMaHe B pe3yIbTaTI qACTORO iX BHKOpNCaHH, He NOBUNHO npn3BOdHTN DO CAMOBneBHeHOci I rHOpYBaHH npnHcnnIB TexHInu 6e3NeHN. Heo6epeKa dI Ma MoKe B OOnHy MHTb pN3BeCTN DO BaKHO TpaBMN.
4) INPABINbHE NOBOJXEHHRA TAKOPNCTYBAHH EJEKTPONPNIAADAMN
a) He nepeBaHTaHyTe npHaad. BnKOpncToByte TaHn npHaad, 0c cneuaIbHo np3HaueHn dIy peBHOi po6OTn. 3 npdaTHm npHaIaOM Bn 3 MeHsIM pN3HKOM OTpMaTe Kpaui pe3yIbTaTHpo6OTn, RaIoo 6ydeTe npauOBaTH B 3a3HaueHomy diaNa3OHi notyXHocTi.
b) He KopnctyTecr npnaJOM 3 NOWHKeHMMBmHKaem. PpnaIa, RaNHe MOxHa yBIMKHyTu a6o BmKHyTu, e He6e3neuHm i NOro Tpe6a BiDpemOHTyBaTu.
c) PepeTm, an peryIIOBaTn 0o-He6ydb Ha
npnlaDi,miHAn npnlaAa a6o XOBaTH npnlaad, BHTARHITb wTenCeIb i3 po3eTK Ta/a6o BHTARHITb anymyIaTOpy 6aTapeIO, RHO BOHa 3HimaCTCBc. Li nonepeDxyBaIbHI 3axOHi 3TexHIn 6e3neK 3MeHsuTo b pN3IK HeHaBMnCHOrO 3aynCky npnlaAdy.
d) 36epiraTe eIeHTpnpnlaHn, IaHmN Bn came He KopncTyTecb, daJIeHO bID dITEr. He Do3BOJnTe HOpncTyBaTHcE IeHTpnpnlaADom Oco6am, 0o He 3HaIOMi 3 NOro pO6ToIO a6o He YHTaIN ci Bha3IBH.N y pa3I 3acTOcyBaHHra HeDCBIDueHMMn Oco6amn npnaHn HecyTB c6bi He6e3neKy.
e) CtapaHNO dOrJaTe 3a eJenKtpoHcTpyMeHTamn i npHaJaM. IpeBipTe, uO6 pyXomi detani npHa dy 6e3dorAHNO npauOBAJI Ta He 3aIaJIH, He 6yJIi NOJAMAHmN a60 HactIbHN NOWKOJHeHMn, Uo6 ue MORIO BnLIHyTN Ha FynHcIOhyBaHn npHa dy. NOnHOJHcIeTani Tpe6a BiDpemOHtBuATn BAETOpH3OBAHi MaJCTepHI, nepu HIX HmM MoHHa 3HOBy KOpNCTyBaTncr. BeIIka KIlbKicTb HeueacHX BnJaIKIB cnpUHHeTBcI rOraHIM DoTJADOM 3a eJeKTPOpPiJaAMn.
f) Tpmaite pi3aIbHI iHCTpymeHTn do6pe HaroctpeHMn Ta b uHcTOTi. CtapaHHo dOgJIHyTI pi3aIbHI iHCTpymeHTn 3 roCTpIM p3aIbHM KpaEM MeHwe 3aCTpAIOB Ta ix IerWe BECTn.
g) BnhopncToByTe eIeHTponpnaJn, npnaJdAndo Hnx,po6oui hCTpyMeHTn T.i. BiNobiIdNo do cHx Bha3iBOh. Bepitb Do yBarn npu cboMy yMOBN po60Tu Ta CneunphiBy BnHOyBaHOi po6OTn. BnKopncTahHReEeKTPponpnaJdiB Dnla po6IT, dJa RnX BOHN He nepeD6aueHi, MoHe npn3BoJNTn Do He6e3neuHx cnTyaui.
h) TpmaTe pyKoTHn i nobexHi 3axBaTy cyxHm i HCTHMn, cIiHyJte, 06 Ha Hx He 6yIo OJIbN a6o rctoro maTnla. CIn3bKi pyKoTHn i nobepXhi 3axBaTy yHEMOxJIINBIIIOHTb 6e3neUHe NOBOJKeHHa 3 eJeKToiHCTpyMeHTOM Ta IHO RO KOHTPOIIOBAHHa B HeOuyBaHnx CNTyaIqJx.
5) CEPBIC
a) BiDaaBae Cbi npHa ha peMOHT IiWe KBaJIiΦIKOBaHm φaxiBzAM Ta IiWe 3 BnKOpHCTaHHM opriHaIbHnx 3aNtH. Lc3a6e3neuTb 6e3neuHicTb npHaNy Ha IOBnYac.
BHA3IBH NIO B63NEUДЛЯ ELEKTPUHNX IIO63INHIB
- Pnpo6oTax, KOJI np6oOuH iNCTpymeHT MoJHe 3aueHHTn 3axOBaHy eJeKTPoPpOBOdHy a6o BlaChn uHyp HNBLeHHa, TpMaIte eJeKTPoIHcTpymeHT 3a i3OJIboBahi pyKoTHN (3aueHHeHH pnoBOKn, IIO 3hAxOHTbcra NiD HanpyroU, MoJHe 3apJxMyBaTu TaKoX i MeTaJIeBi qACTHnE JeKTPoIHcTpymeHTa Ta npH3BOHTn Do ydApy eJeKTPuHm CTPymOM)
3actocobyte 3aTnckai a6o iHwi 3ac06n fikcaqii Ta onopn Bnp6y ha cta6ilbhi nlatfopmi (3aTnckanHHBnpo6y pykamn a6o 3 npntncKaHHM Do Tila po6ntb Noro HeCTa6ilbHM Ta MOKe pnp3BecTN DO BtpaTH KOHTPOJIIO 3a IHCTpymEHTOM)
3AΓΑJIbHE
- Ipeepo60toIO nepeBipTe BiINOBiHicThb CTPymy B Mepekei 3CTpymOM, No3HaueHi Ha iHcTpymentI
He 06po6nJaTe MaTepiAhn, zoMiCTb ac6eCT (ac6eCT BBAJHaEtbcr KaHuepeoReHHm)
Ley iHCTpyMeHT He MOxHa BnKOpNCTOByBaTH Oco6aM BiKOM do 16 pOKIB
PIBEh ymy npn po60ti moKe nepeBnuBaTu 85 d(b)(a); BHKOpHCTOBuYTe HaBuWNIKI
Пд уасpo60TN3KpIXKHM Ta po3cnHacTHM MaTepeiaIamN O6OB'ra3HOBO OJaRaTe 3axnChi OkyIapn
Пил ВIDТахи MaTePiaJIb,Я CBINHcOBoYTpMHyUOa phap6a,ДякI npOdi DepeBa,MIhepaIIM MeTAl, MOHe 6yTu WkIdIINBIM (HOHTaKT i3 TaKIM NIIOM a6o Myo BdIXaHHaMOKe CTaTI pInuHIO BHNKHeHHa B OnepaTopa a6o ocio,Io nepe6yBaIOt b nopyu,aleprinHex peakui i/a6o pecnPipatopnix 3axBOpIOBaHb);HaJaTaIe pecnipatop i npaOHTe 3 NNIOBuaJIOUChm npCtpoem NiJ YabIMHHeHH IHCTpyMeNTa
-Дяки Видни плу класифінгься КанцерoreнHi (Hарнлад, Дубови дабуни пи), особиво B солуевни зобавкампдя Коницювань Depeвни; Надагаite pecnipaTopi npaioite 3 ПИLOВДАЛЯQUМnpictpoem nID qac yBIMHHH INCTpymehTa
CiyTe iHCTpyiMa nO po6oTi 3 MaTepiAAMn, npOdyuOCHMn nn
BnKOpNCToByuTe NOBHCtIO pO3rOpHeHn shHyp nooBxUyBaHa, kN MOKe BHTPmMyBaTN HaBaHTaXeHHB 16 Amnep
- Ipeep peryIIOBaHHa 603amHIO npHaJaO 06OB'3HOBO BnIMiTb BNHy i3 ciTboOoi PO3eTHN IPEED BHKOPNUCTAHHAM
- Iepu hix noatn po3nnIOBaHH, BuaTb Bci nepeukoyn Ha nobexhi Ta nid liHicio po3nnIy
He donyckaIte nookdKeHb, kMoKHyTb HaHeCTn shpyuN, cBaxi iHsi elemEnTHBaWOMBy Bnp6y; Bndalitb ix neped noatkom po60TH
ПД YAC BKNOPNCTAHHA
He Do3B0JNeIe Hhpy KINBLeHnCTNkATNC3 pyXOMMm YactINHAMn IHCTpymeHTy; 3aBKnBnBnKaJaAnTe Whyp 3a 3aHbIO YactINHOIO IHCTpymeHTy
- JHKUO HHP NOUKOJKeHn a6o npopizAHn npn p60tI, He DToTopKaInTeCn DO HbOrO i HeraHNO BNTTgHITb NOrO 3 po3eTKN
KateropnH0 3abOpOHReTbcra KOpNCTyBaTnciahtpyMeHTOM npn noWKoJKeHHeJeKTPnuHOrO shypa;3amiHa Ha analorUHn NiIroTOBLeHH uHyp nobHHa npOBouNTncr opraHisaueo 3 o6cnyroBybAHn.
- y pa3i eIeKtpnHoi a6o MexaHiHoi HecnpaBHOcti, HeraHIO BiIKIIIOHTe IHCTpymEt I BIMKHITb 3 pO3eTHI
TpmaTe pyKn noaJI BiD nIKN KOni iHCTpyMeHT npauoe
AHCECYAPN
SKIL rapaHTye HaniHy po6Oy IHCTpyMeHTa TIlbKn npn BHKOpNCtAHHi BiINOBiHOro npnla
He BnKOpHcTObyIe Tyni, DeOpMoBaHi Ta NolAmHi
NICJI BHKOPUCTAHH
KoJIN Bn 3aHInHnI np60Ty 3 iHCTpyMeHTOM, BmMHiTb MOTop i nepekoHaNTEcra, 1O BcI pyXomi YactHHIOBHICTU 3yHnHnJIncr
IORCHEHHA DO yMOBHX IO3HAQOH HA IHCTPYMEHTI
③Перед ВИКОРИСТАНДМ почитугкцio i3 3aCTOCYBaHHA
④ NpOdiHa i3oJaui (3a3eMJIIOUoyn npoBi d He nOTpi6eH)
⑤ He BHKnJaTe eJKeTpoHCTpyMeHT Ta 6aTapei pa3om 3i 3BnuaHm CMITTRM
BUNKOPNCTAHRA
BKN/BnK ⑥
BIOKYBaHHBIMNKaHaIraTpNbAloipo60Tu ⑦
3amHa nIOK 8
! yctpomitb nHny Ha nobHy rH6nHy 3y6aMn HanpaBLeHMn Bnepe
-Дянсгимпдхогьбьшicьлshank ta U-shank
- Po3nnIIOBaHHH NkYToM 45° 10
Bn6ip wBnKoCTi po3nHOBaHH BIDNObIDHO do BnKOpNCTOBaHOro MaTepiany ⑪ -rKIO IHcTpymeHT He npaOe, KOJI MEXaHIcM C BCtAHOBHeHO y nOLOXeHHN 1, BN6epITb BnUy WBnDHiCTb po3nnHOBaHHI 3MeHHTe WBNdHiCTb y npoecci p60TN IHcTpymeHTa
ПИЛOBЛOBЛЮВАнHA 12
BnKOpncTaHHIHcTpymeHTy
-NepeyMnKaHHm IHCTpyMeHTy nepeKoHaNTecbB TOMy, uO nepeJH YAcTHHa ONOpu UJIbHO CTNKAeTbc3 06pO6JIbOBAHOIO NOBepxHeIO
-ТримапгЕ ИСТРУМЕТ ДВОМ рУКAMN,ТAKИМ YИHOM BИБуDEтЕ МАП NIOВНЙ KOHTPOLь Hад IHCtPyMeHToM BECb Yac
! nié yac po60tN, 3aBHN TpHMaIte iHCTpyMeHT 3a
yactHH 3axBaTy ciporo KOJbOpy
-πepekoHaITeCb, ΜΟ BcN NOBepxHr ONOpn HadiHo cnpaεTbcra Ha po6oyu NOBepxHIO
! nepeBnDaleHnHm IHcTpymEnTy 3 o6pO6JIbHaOHIO NBepxHi nepeKoHaItecB, 10 nnHa ocTaToUHO 3ynnnna
-TpMaIe BeHTnlaJHi OTbOpN G ② He3aKpTmM
NOPADNI NO BHKOPNCAHIO
BnKOpncToByTe BiDnOBiHi nIJIKN ⑦
I nhtpymeHTa iJxOaTb 6iNbwiCtB J3 T-shank ta U-shank
PiJyac pi3KmMetanib peryIepHO 3MaUyTe NnIky MacJOM
-Длпрмогорponину BeDiIb iNCTpyMeHT y3doBн краio
npamoro depeB'haro BiDpi3y 18
IpeepBnpi3aHHaHacp3HNxOTbOpib nonepeHbo npocBepdntb OTbip dpnJem 19
-Прпнл 6e3 tricok
-нaklenTe DekiNbKa wapib wHpOKoi cTpiKn Ha liHiO
po3pi3y
-ЗавдNi piKTe no npOTnIeXHOMy (TInbHOMy) 6oCi
mATEpiaNy
-ДИВИТБСА ДОДАТКOBУ iHФОмацю Ha caитiti www.skil.com
DOrIaIOBcIyROByBAHHA
LeyinctpymeHT He npdaTHn dIpyPOMNCIOBOrO BHKOpNCTaHH
3aBxIu TpImaTe IHcTpMeHT Ta IHO WHyp B YHCTOTi (ocO6JIbBO BEHTnJIaJHi OTBOpN G ②)!pepeq uCtHOIO IHcTpMeHTy Heo6XiIdHo po3'edHaTH wTeNCelbHn po3'IM
-Якwoпдчacpo60nBaKilbMnocla6HoeTbcra, BCTaHOBIb ⅢIbHicTB BaKeJIIO M ② -nepeBeDiB BaKInb M B cepedhe noLoKeHHa-ocla6Te 6lokyBaIbHNrBnHT L 3a donomoroBnKpyTKn PH2 npOTn rOHHNKoBOi CTpiKn -3aTARHITb peryIOBaIbHNrBnHT K ⅢIbHo pyuHm 3ycIIJAM 3a donomoroTO WeCTnrgaHHO HIOUa 4MM npOTn rOHHNKoBOi CTpiKn !peryIOBaIbHNrBnHT K Mae IIBO6iHy Hapi3Hy -3aTARHITb 6lokyBaIbHNrBnHT L 3a donomoroBnKpyTKn PH2 3a roHHNKoBOIO CTpiKIO -3aTARHITb BaKInb M
-Якшо He3BaKaIOH Na peTeIbHy TexHOrorIOBnROTOBHeHHI npeBipHN IHCTpyMeHT BCE-TaHn BnIe3 naHy, noro pemOH Tdo3BOJAEbCBAKHOyBaTHnLIneB aABTOPaOBaHHi cepBicHi MaNcTepHI dJe eJIeKTPoPpHaIb SKIL-HaIIiHTb Hepo3i6paHn IHCTpyMeHT pa3OM 3doHa3OM KynibI do BaWoro DnIepa a6o do Ha6bnKUO Yoentpy o6cLyroByBaHHa SKIL (aApceH, a TaKOH diarpama o6cLyroByBaHHn npncTpoH, noaOTbcHa caTI www.skil.com)
Bizbmitbdo BIDOMa, 0yHKoHKeHHBHaCIIOK nepeBaHTaKeHH a6o HeHaJIeKHO NOBOdKeHH 3 IHCTpyMeHtOM He 6ydyTB BKIOUeHi B rapaHTiO (ymOBn rapaHTi SKIL dN. Ha caTI www.skil.com a6o doBidaaTEcB DInepa y Baowomy periohi)
OXOPOHA HABKOLINHbOI CEPEdN
He BnKnJaIte eJeKToHcTpymeHT,6aTapei, npHaJdJIeXHoCTi Ta yNaKOBHy pa3om 3i 3BnuAHHM cmITrM (TilbKn dIra KpaIH EC)
-BiINOBiINO do EBPoneNcBHOI DnpeKTHBN 2012/19/EC
OIOyTuHl3aQII CTAPNX eJeKTPnHnx TA eJeKTPoHNHX
PnHnAdIB, B 3aJIeXHoCTi 3 MlCeBnM 3aKOHODaBCTBOM,
eJeKTPoIHCTpyMeHT, RaNn nepe6yBaB B EKcnLyataQII
NOBHeH 6ByuYTuHl3OBaHn OkpEmo, 6e3neHnM dJa
HaBKnIuHbOro CepeOBOuHa 7JxOM
-MaIIOHOK 5 HaRaDae Bam npO ue
WYM/BIBPAZI
3a Bmipam BiinobiHNO do EN 62841 pBeHb 3BykoBoro TnCHy cboI nCTpyMeHTy CtaHOBIOE 82,0 d5(A) ta pBeHb NotyKHOCTI 3Byky dopIBHOe
1) B3ONACHOCT HA PABOTHOTO MRCTO
a) Nopdbpkaite pa60HTOc n Macto u HnopeJeHo. E3npaBbT HnH HeoCTaTbHOTOCBeTJIeHne MOrTa cNOMOrHaT 3a Bb3HNKbaHeTo HaTpudoba 3IIOJNYka.
b) He pa6oTe c eJeKtpOnHcTpymeHa B cpea C NOBnWeHa OnaCHOCT OT Bb3HNKBaHe Ha EHCnIO3N, B 6JIn3OCT Do JeCHO3aIaNIMn TeUHOCTn, Ra3OBe Hn npaxoo6pa3Hn MaTePnaI. I0 BpeMe Ha pa6oTa B eJeKtpOnHcTpymeHTte Ce OTdJIeT NcKpN, KOnTO
MOraT Da Bb3nJaMeHr IpaXoo6pa3HN MaTePnaJIN nn Napu.
c)ДрьнтdeuaистанчнлпаHa 6e3oNaCHO pa3ctOarHne,doKaTo pa6OTnTe c eIeKTPoHHCTpyMeHTa.AKO BHNMaHHeTO Bn 6bDe OTKIOHeHO,MOKeJa 3aγy6NTe KOHTpOJa Ha d eJIeKTPoHHCTpyMeHTa.
2) B30NACHOCT INPNA PABOTA C EJEHTPNUECHN TOK
a) ⅢeNcEJIbT Ha eIeKTpOINHCTpyMeHTa TpA6Ba da e NODXODJU 3a NOJ3BAHJRA KOHTAHT. B HnKaHbB cIyuaH He ce dOnycha N3MeHJHe Ha KOHCTpyKUHTa Ha uenCeJa. Korato pa6oTHTe CbC 3aHyJeH eIeKtpOypeH, He n3NoJ3BaJTe aAnTepn 3a uenCeJa. PON3BaHeTO Ha opuRHaJIH N IeNCEJIu N KOHTaKTIn HaMaJIra Ba pUcKa OT Bb3HNKBaHe Ha TOKOB yIap.
b) N36aRbaTe DoNnpa Ha TaIIOTo Bn Do 3a3eMeHn TeJa, HAnp. Tpb6n, OTOnJIteJHn ypei, Neu n XlaAINHnCu. Horato TaIIOTo Bn e 3a3eMeHo, pncbT OT Bb3HNKBaHe Ha ToKOB yap e No-ToJAM.
c) PpeNa3BaIte eIeKtpOnHCTpymEnta cn OT bXn H Blara. IpoHNKBaHeTo Ha BOda B eIeKtpOnHCTpymEnta NOBnAba onaCHOCTTa OT TOKOB ynap.
d) He n3noJ3BaIte 3axpaHbauJn Ka6eJ 3a ceJn, 3a KOHTo ToJ He e npedBnJdeH, HAp. 3a da HocHTe eJeHTpOuHcTpymEHTa 3a Ka6eJn Jn Da n3BaJnte UenCeJa OT HOHTaKtA. IpeJna3BaIte Ka6eJa OT HarpBaHe, OmacJIraBaHe, DOnnp Do OCTpn Pb6Obe HnDo NODBHHN 3BeHa Ha MaunHn. IOBpeDeHN nn YcyKaHn Ka6eJn YBEJIuYabAT PnCKa OT Bb3HNKBaHe Ha TOKOB yJap.
e) Horato pa60tnte c eIeHTponHCTpyMeHT HaBbH, n3noJ3BaIte cAmO yIbJIHnTeJIHn Ka6eJI, npedHa3HaueHn 3a pa6oTa Ha OTHpHTo. H3noJ3BaHeTO Ha yIbJIHnTeJI, npedHa3HaueH 3a pa6oTa Ha OTKpHTo, HamaJIra Ba PnCKa OT Bb3HNKBaHe Ha ToKOB yIap.
f) Aho ce HaIara n3noJI3BaHeTo Ha eIeHTpOuHcTpymEHTa BbB BlaJHa cpeDa, n3noJI3BaIte npedna3eH npekbcBaay 3a yTeHH TOKOB. N3noJI3BaHTo Ha npedna3eH npekbcBaay 3a yTeHH TOKOB HamaJIyBa OaCHOCTTa OT Bb3HNKBaHe Ha TOKOB yIap.
3) B630NACEH HAHIN HA PABOTA
a)БbTe KOHcHTpnpaHn, cIeTe BHNMaTeJHo DeIcTBnTa CN I NOCTbNBAite NpeDna3JIHBO n pa3ymHO. He n3NoI3BaIte eJeKTPoHHcTpyMeHTa, KOrato CTe yMOpEHn HIn NOB BlnAHHeTo Ha HApKOTuHn BeIeCTBa, aNHOxOJ HIn yNoiBaun leHapcTbA. EINMH p3ceHaoc Tpi pa60Ta c eJeKTPoHHcTpmye MT OHe Da Ima 3a IocLedCTBne N3HJIIOHTeJIHO TeKKn HapaHraBaHn.
b) Pa6oTeTe c npEtna3BaIo pa6oTHO 6JIeHIO n BnHarc npEtna3Hn OuHla. HocHeTo Ha noDxOJaU 3a IOn3BaHnI eJeKTPoINHCTpyMeHT N3BbPwBaHaTa DeHocT LInHn npEtna3Hn CpeDCTBa, KaTO dNxTaTeHa MaCKa, 3dpaBN PIIbTHO3aTBOpEH OByBn Cbc CTa6HJEnr paiΦep, 3aunTHa KAcKa Nnn WymO3aIywnTeH (aHTnfoHn), HamaJIra Ba PnCKa OT Bb3HNkBaHe Ha TpyDoBa 3IOnOlyka.
c) N368BaTe onaChocTtA OT BKNIOUbaHe Ha eJELKTPoHnCTpyMeHTa No HeBHNMaHne. IpeiN
Da BKNIOHTe 3aXpaHbAaTa MpeHa
Hn Da NoCTaBNTe AymyIaTOPHaTae 6aTePnR,
ce yBepBAte, Ye NcKOBnT npehcbau e B
NoLOXHeNn3KIOUeHO. Ako, KOrato Hocnte
eJeKTPoINHCTpyMeHTa, DbprHtE PtbcTa CN Bbpxy
nyCKOBn PpeKbCBaay, Hn aHO NOdaBaTe 3axpaHbAoo
HaNPeXHeH Ha eJeKTPoINHCTpyMeHTa, KOraTO e
BKnIOueH, CbIeCTByBa ONaCHOCT OT Bb3HNKBaHe Ha
TrpyOba 3JIoNOlyka.
d) Ппени да включпе eilektponHCTpymehTa, ce ybepeBaIte, Ye cTe OTcTpaHnO T Hero BCnH NOMOuHN HNCTpyMeHTn IraeHuN KJIouOBe. Помошен ИНСТPyMeHT, 3a6paBEN Ha BbptTAnO ce 3BeHo, MOnke dЯ пчнн ТраBMn.
e) He haundehBaIte Bb3MOXHOCTHcN. Pa6oTeB Cta6nJIHO NOLOHEHHe Ha TAIOTO N BbB BCEHMOMeHT NOIDbPHaIte paBHOBecHe. TaKa Iue MoKeTeJa KOHTpOIIpaTe eJeKTPoHNCTpyMeHtA No-Do6pe NNo-6e3OnaCHO, Ako Bb3NHKe HeoayKaBaHa cHTyaunr.
f) Pa6oTeTe c noxOaHIO o6JeHIO. He pa6oTeTe C HInpOKn Dpexn HIn yKpaSeHn. DpbHTe Kocata n Dpexnte cn Ha 6e3OanCHO pa3CTOAHne OT DBNKeUc Nce 3BeHa. WInpOKnTe Dpexn, yKpaSeHnTa, dblrnte KOCu MOrat Da 6bDaT 3axBaHaTu n YBLeueHn OT BbPTaun Ce 3BeHa.
g) AHO e Bb3MOJHo N3NoJ3BaHeTo Ha BbHJHa acnnpaunOHHa cncTeMa, ce yBepraBaIte, Ye TRe BkIoUeHa HcynKUnOHpa N3npaBHO. N3noJ3BaHeTo Ha acnnpaunOHHa cncTeMa HaMaJIraBa pNcKOBeTe, DbJIkaUeCe Ha OTdJIaTa ce npn pa6Ota npax.
h) Do6poTo No3HaBaHe Ha eIeHTpOHnHCTpyMeHTa BCJeDCTBHe Ha YecTa pa6Ota C Hero He e NOBOd 3a HamaJIbAHe Ha BHMaHHeTo N Ipene6perBaHe Ha MepHnte 3a 6e3oNaChOcT. EJHO HeBHMaTeJIHO DeIcTBHe MoKe Da IpeDIn3BnKa TeKKn HapaHbAHn CaMO 3a YaCTN O TceKYHDaTa.
4) BHIMATEJIHO OTHOWEHNE K\bM EJEKTPOHCHTPMEHTN
a) He npetobapbaTe eJeHTponHCTpyMeHTa. H3noI3BaIte eJeHTponHCTpyMeHTnte camo cbo6pa3Ho TxHOTo npedHa3HaueHHe. Ie pa6oTnte no-dOpe nNo-6e3OnaCHO, KOrATO h3noJI3BaTe NOxOJaIIeJeHTponHCTpyMeHT B 3aJaDeHn O T npON3BOIDNTeJI DaIaN3OH Ha HATOBapBaHe.
b) He n3noJ3BaIte eJeKTPoHnCTpymeHT, uHnTo nycHO npEhbcBaue e NobpeDeH. EJeKTPoHnCTpymeHT, KOHTo He MoKe Da 6bJe N3KIOUcBAH N BKNIOUcBAH NO npEaBnIeHnO T pON3BOdnteJIra NaHH, e ONaCeH n Tpr6Ba Da 6bJe peMOHTnpaH.
c) Ipei Da n3BbPWBate KaHbTo n da e DeHocTn NO eJeKTPoHnCTpyMeHTa, HAnp. HAcTpOuBaHe, CmHa Ha pa6OteHnHCTpyMeHT, KaKTo N KOrato T npH6npaTe, n3HIOUbaIte qEnCeLa OT KOHTaTa, Pecn. n3BaJdaIte 6aTePnraTa, aKe E Bb3MOHHo. Ta3n MpaRkA npEmaxBa onaCHocTTa OT 3aDeNCTBaHe Ha eJeKTPoHnCTpyMeHTa No HeBHImaHne.
d) CbXpaHbAaTe eIeKtpoHnCTpyMeHTte Ha MeTa, HbTeTo He Morat Da 6bDat DOCTNRHaTHo OT Deca. He donychaiTe Te Da 6bDat N3NoJ3BaHNOT Nua, KOHTO He ca 3an03HaTHc HauHHa Ha pa6ota c Tax n He ca npoueHn Te3n IHCTpyKcHn. Korato ca B pbuTeHa HEONITHn NOTpe6nteJI, eIeKtpoHnCTpyMeHTte
MORAT Da 6bDat N3HIOUOTeJIHO ONaCHN.
e) Iopdbpkaite do6pe eIeKTPoHHCTpyMeHTte cn ancecoapnte HM. PIOBepraite daHn IOBHNHTe 3BeHa fYHKUONHPaT 6e3yKOpHO, daHn He 3aKNHBaT, daHn HMa cHyNeHn Hn NOBpeDeHn DeTaHn, KOHTO HApuwaBAT Hn H3MeHr T cyHKNTte Ha eIeKTPoHHCTpyMeHTa. PpeHn Da n3NoJ3BaTe eIeKTPoHHCTpyMeHTa, ce NOrpNHKeTe NOBpeDEHtete TaHn Da 6bDat peMOHTnpAHN. Mhoro ot TpyDoBHte 3IonoLyKn Ce dblKaT ha HeIo6pe IopdbpaHn eIeKTPoHHCTpyMeHTn UypeHn.
f) PoiDbPnaIte peHcHTpyMeHTBnHar ndo6pe 3aToeHN uNCTN. Do6pe noDbpKaHnTe peKeu INcTpyMeHTC oCTPN p6oBe OKa3BaT NO-MAJIKO CbnpOTNBLeHne N Ce BOJr TNo-JeHO.
g) Използвашие салгштейнсхуменчы, ддлншелнишп рисноблени, paбоншtenинсхуменчы и.T.H.,сьобразинсхуменчы на понь Bodиел.С DeiHocTN n npoцEDpyn, eBentyaIIHO npedncaHH OT pa3lnuHn HopMaTHBHN DOKUMeHTN.ИллванTo Ha caleKTPoHCTpMEnTH 3a pa3lnuHNo OT ppeDbUdEHTne OT ppon3BoDHTeJI npINIOJHEN NOBIMaBA OnaCHOCTTa OT Bb3HnKBaHe Ha TpydoBN 3ILOJNYH.
h) NpOaBpHaHte DpbHHNTE n pbHOXBaTHNTE cyxH, HCTn HcEOMacJIeHN. XJIb3raBHTe DpbKKn I pkoXbaTK He No3BOJRAbT 6e3oNaChHaTa pa60Ta I do6poTo KOHTPOIIPAHe Ha eJeKTpOHcTpyMeHTa Pn Bb3NHKBaHe Ha HeoayKaBaHa cITyaUria.
5) NODbPxAHE
a) DonycKaIe peMOHTbT Ha eJelKtpOnHCTpyMeHTte Bn Da ce H3BbPbBa cAmO OT KBaJIHΦuPaHH CneuaJIHCTN i Camo C n3NoJ3BaHeTo Ha opRnHaIIHpe3epBHN qACTn. ITo TOni NaHcH Ce rapaHTnpa CbXpaHraBe Ha 6e30NaCHocTTa Ha eJelKtpOnHCTpyMeHTa.
YKA3AHN 3A BE3OПАСHA PABOTA 3A ПРОБДЕНТРИОH
Korato H3NbJIHABaTe DeHOCTH, npn HOnto pa60THNt INcTpymeHT MoHe Da nonaHHe Ha cKpTN IOd NOBbpxHOCTTa pNOBOHNu NOD HanpeHHeHne Hn Da 3aceHr He 3axpaHbAunHa Ka6eI, BHHMaBaTe Da DOINpate eJeKTPoHNcTpymeHTa CAMO Do H3OJHpAHnte PbKoXBaTHN (Pn KoHTaKT C npOBoHNk IOd HappeHHeHne To Ce npedaba Ha MetaJIHNTe DeTaNHa EJeKTPoHNcTpymeHTa N TOBa MOHe Da PpeDn3BnKa TOKOB ynap)
- I3noI3BaIte 3aTgAun npncnOc6JeHnn npaKTHueH naHH 3a oBe3oNaCBAHe n 3aKpeNbaH na O6pa6oTBaHn DeTaJI KbM CtaBnHa OCHOBA (IbprKaHeTO Ha 6pa6oTBaHn DeTaJI C pbKa nn OnpAH Do TAnTo rnpaBN HeCTa6uJeH MoKe da DOBeDe Do 3ary6a Ha KOHTpoJ)
OBUH
-ПпсдИВКЛHOUBaHeHaИнСТурмЕТаВКоNTаКТаce yBepeTe,ЧeМpeЖОВToHaIпeЖeHneOTROВApЯHa HAnpeXeHNeTO,O6O3HauEHoHaФиРMeHaTaTaeJIkaHa INHCTpymEHTa
He 06pa6oTbaIte a36ecToCbDbpHauMATEpHaI (a36ecTbTe KaHcepeoreHen)
MaunHaTa He Tp6Ba Da ce n3noJ3Ba OT Iina noi 16 roDHH
- Pn pa60Ta HnBTo Ha 乌Ma MoKe Da HaDbHn85 dB(A); Hocete aHTtnΦoHn
HoroTo pa6oTHe C MaTePnaHn,OTdJIaN CTpyKHN, Hocete 3auHTH OuHa - PpaxbT OT HANKOMATEPNAH, KATO HANPIMep CbDbpxaQ OLOBO 608, HANKO BNDOBe DbPBeCNHa, MNHePAH N MeTALMOKe Da 6bDe BpeDeH (KoHTaKT NIN BnWBAHe Ha TaKbB npax MOrAT Da pnpuHrT aIepnUHN peAChN N/In pecnnapToPHN 3a6OJIbaHn HA ONEpApota Nn CTOnuTe Ha6n3O Nua); H3NoJ3BaIte npOTHBONpAXOBa MACH N pa6oTeC acnnpHpauo npaxTa yCTpoiCTBO, KOrato TAKOBa MoKe Da 6bDe CBbp3aHo
-Опразделени ВИДиBE npax ca KlaacnФицранн KaTO KapuzHOREHN (KaTO npax OT b6 n 6yK) OcObeHo KOraTo ca KOMbHnPaHn CdoabKn 3a noOpobraHe Ha cBCTOReHNeTO Ha dbpBeCInHaTata; n3NoJ3BaIte npOTNBONpaxOBa Macha n pa6oTe c acnnpupaIo npaxTa yCTpoiCTBO, KOraTO TAKOBa MoKe da 6bDe CBbp3aHO
CneBaTe DeHnHpaHnte No BDC n3NcBHaHn OTHOCHOaPaSeHoCTTa 3a MaTePnaHnte, KOHT HeJaTe da o6pa6oTBate - Ⅲπολ3BaTe HαntbIHo pa3BHTn Αo6e3oNaceHpa3KIOHHTeJIc KanaμTet 16 A
- Pnpn n3BbPwBaHTo Ha KaHbTo n da 6HnO HAcTpoNHa nn CmHa Ha npHaJNeHHoCT BnHaRn n3BaKaJaTe igeNceLa OT KOHTaHa eJeKtp03axpaHbAHeTO
PPEH NOTPeba
- PIpemaxheTe BCnHKn npenrTCTBnBbpxy NOBbpxHOCTTa, a Cbso N IOd NbTn Ha pR3aHe, npeDn da 3anOuHHeTe pr3aHTo
- 1368raBaiTe NOBpeHn, KOHTo MOraT Da 6bDaT npuHHEnH OT BnHTOBe, rBO3eN u DpyrMaTHn eIeMeHTn B o6pa6OTBaHnA DeTaJ; OTCpaHeTe rN npEi Da 3anOHTe pa6Ota
Pn yNITPEBA
BnHaHOr OTBeKdAaTe 3axpaHbAsrT Ka6eI daney OT DnHexuTe Ce 3BeHa Ha eJEnKtpOnHCTpyMeHTa; npexBbPJIeTe Ka6eJa OT3aI, daJeYOT eJEnKtpOnHCTpyMeHTa
Ako Ka6eIbT ce NOBpeHnI cpeKe no Bpeme Ha pa6oTa, He ro DOKOCBaIte, BeDHaHa n3HIOUcTe UenCeJa, HNKOra He n3NoJ3BaIte INHCTpyMeHTa C nobpeDen Ka6eI
Hikora He n3noJ3BaIte HNCTpyMeHTa, aKo Ka6eJIbTe NOBpeDeH; ToI Tp8Ba Da 6bJe 3aMeHeH CbC CneuaJIHO NODrTOBeH Ka6eI, HAIuHeH Ipe3 cepBn3HaTApraHn3aun.
BcnyaHa eJektpnuecka nnMexaHnHa He3npabHocT, n3HIOUte He3a6abHO anapaTa n npekbcheTe KOHTaKTA c eJektpnueckaTa MpeKa
Horato eIeKToHCTpyMeHTbT pa6OTn, na3eTe pbuTe cN OT peKeaTa IeHTa
AHCECOAPH
SKILMOHe da ocnrgyn6e3abapnHa pa6oTa Ha eIeKtpOnHCTpyMeHTa cmo aKOce H3noJ3BaT opunHnHn DoNbHnTeHN npncnocO6leHHA
He n3no3BaItepeXeuaJeHTaKoTo e HanykaHa, deΦopMnpaHa nn 3aTbNeHa
CNEI PABOTA
-Ппетдра ппбере Инстумента,ИЗклочerte MOTopaи ce уberpeTe,чЕ BCNUKNДВИКЕЦи ce YacTn ca npeyctaHOBUNIДВИКЕHNTo
OBRCHEHNE HA CIMBOJNTE IO INHCTPYMEHTA
③Ппсдуnotpe6a npooyTe pblkoBODCTBOTOCyka3AHN
④ДВОИнЗОЛАЦЯ(He ce n3nCkBa Ka6eJ 3a 3a3eMRAVe)
⑤ He n3XbPJIte eIeKtpOpyPeIte I 6aTeepn 3aeHNO c 6HTOBN O TnaDbU
YNOTPEBA
BkIIOUBaHe/H3KIOUBaHe 6
3actonopraBaHe Ha BkIIOUbaunn CnycbK 3a HenpeKbChata pa60Ta
- CMRAHa Ha octpneTaTa ⑧
!BhapaTe OCTpneTo Do MaHcMmaJHa DbIbOoHnCa HacOeHN Happe3b6u
-elenktpoHHcTpymeHTa pa6OTn c Hau-lipopoKo
pa3npoctpaehHtTe TnBBe JeHTc T-06pa3Ha N
U-6pa3Ha onaoka
- P3aHe noBbbl 45° ⑩
-
Peryunipane Ha ckopocTTa Ha p3aHe B 3aBNCMOCT OT MaTePnAna ⑪
-
npu ycIobne,Ye HnCTpyMeHTbT He pa6oTH, KOraTo MaxOBnKbT C ce Hamipa B No3nUra 1, N36epTe NO BnCoka ckopocT Ha p3aHe, 3a Da 3aDeiCTBaTe IHCTpyMeHTa I HAmaJIeTe OTHOBO, DOKaTO IHCTpyMeHTbT E B DeIcTBne
-IMcMyKBaHeHa npaxa 12
-cBbPKeTe aAnTepa 3a npaxocmykaHa E KbM DOnHaTa YacT
-CBbPKeTe MapKya Ha npaxocMyKaHaTa KbMaanTepa 3a npaxocMyKaHa E
! He n3noJ3BaIe npaxocmykaHhata, HORATOpeKeTe MetaI
CBeToOnOHa CBeTInHaJ 13
-CBeToOnIOHaTJ lamna J aBTOMaTHUHO CBETBa npn aKTHBnpuHc HnpeBkJIIOuBaTeJI A
KIOUO3a06dyXbaHeHa pa6oTHaTaNOBbpxHOCTD 14
- 136bpaHe Ha peKIM Ha p3aHe ⑤
H3noI3BaIte IocT F ②3a HarglacHe Ha op6ntaHTo DeICTBne OT npeu3Ho p3aHe (= 0) do 6bp3o p3aHe (= 3)
-1 KOMNJIeKT ("0") 3a ToUHO pR3aHe Ha BcKaKBN MaTePnAIn, npaBn + n3BHTn pa3pe3n
-3 KOMIIeKTa 3a 6bp30 pI3aHe Ha pa3JIuHIMaTePnAIn, cAmO IpaBn pa3pe3n
1=Metan
2=πnactmaca
3 = TBbρdo dBρBO
!BnHaHn n36bpaIte “0”, KOraTo peHTe nOdaTINBn Ha pa3uenBaHe MaTePnaJIn
- Pa6Ota c HcTpymeHa
-πpei Da BKNIOHTe eJIeKTPoINHCTpyMeHTa, ce yBepTe, Ye npEHNHa KpaI Ha ONOPHaT a NlaCTnHa e IerHaI Do6pe Bbpxy 06pa6O7BaHnA DeTaII
-ДрьжTe eNEKTPOnHCTpyMeHTa 3dpaBO C DBeTe p'be, Taka Ye NO BcRAKO BpeMe Da NMaTe PbIeH KOHTpoJI Bbpxy Hero
! no Bpeme Ha pa60ta, BnHaHn DpBxTe ypea 3a ouBeteHaTa(HTe) B CnBO 30Ha(n) 3a Xbaaane
-ⅢAATA NOBbpxHOCT Ha ONOPHaTa NlaCTnHa Tpr6Ba DaJIeHHIbTHO Bbpyo6pa6oTBaHnJeTaHl
I npedn da BdnrheTe HNcTpymeHTa OT detaJa ce ybepeTe,pepeKeuNTdNcE B nBleH noKo
-OCTABYTe BEHTNlaUaHNOHHnTe OTBOpn G② HENOKPNTN
YKA3AHN3A PABOTA
-ⅢπoJ3BaIte nOxOJyI pEkeIJIeHTN ⑦
! eIeHTpOHHCTpyMeHtpa60Tu c Hau-WhpOKo pa3npoctpaHeHnTe TUNBE JeHTu C T-06pa3Ha U-06pa3Ha onaWka
- Pn pr3aHe Ha MeTaN Cma3BaNte peDobHO peKeuata Ta JeHTa C MaUNHNO Maclo
3a noCTnrahe Ha Toeyen paB pa3pe3 HnpaBlaBaTte eJETPOHHCTpyMeHTa COnOpHaTa PIACTnHa No p6a Ha npabo napye dbpBO 18
-Прддпа павиTe порези,прдварптелно пpoбиTe OTBOP 19
- P3aHe 6e3 pa3eIbAe
-Ппсдп рязан eнкрnte Линьт ha pa3pe3a c HANKO CIOA SHPOKA JENIIHа JENTa
-ⅡIeBata cTpaHa Ha o6pa6oTBaHnJaTeaJn BnHaTn TpIbBa Da coUHaDoy
3a noBee uHΦopMaun BnKTe www.skil.com
IODAPbJHHA/CEPBn3
To3n HNCTpymEnHe e npedHa3NaueH 3a npoPecnoHaHa yNoTpe6a
Iopnbpkae BnHaHneJeHTponHCTpyMeHTa n 3axpaHbauuKa6eJyHCTN (ocObeHO BeHTnlaUOHHTe oTBOpn G ②)
!npen nouchBaHe n3KIOueTe 电ceLa
AkoIocTbT Mcpea3xla6nNoBpeMeHaynoTpe6a, HactpoTe cTeHAtOCTTa HaJocTaM
-IOCTaBeTe IocTa M B cpeHa IO3nua
-pa3xla6eTe onopnHn 6oT L c PH2 oTbeptHa o6paTHo H a yaocBHNKOBaTa CTrpeJka
-CTerHete CTOnOpHnBnHT KpbHcO cIeToPamEn KInou 4mm o6paTHo Ha yacOBnKOBaTa CTepeHa
!cTOnOpHnrt BnHT KecIЯBa pe36a
-CTerHHeTe onOpHn6 6oT L c PH2 oTBepTKa no nocKa Ha YacOBHnKOBaTa CTrpeJIka
-3aTeHHeTe JIOCTyeTo M
AkoBbnpekn npeun3HOTnpoHN3BOcTBO N BHIMaTeJHO 3NNTBaHe Bb3HNIKHe NOBpeJa, INCHTpymEnta Da ce 3aHece 3a peMOHT B OTOpUN3IpaH cepBu3 3a eJIeKTPoHHCTpymEnTH Ha SKIL
3aHecTe HNCTpymeHTa B Hepa3rno6eH Bn 3aeHcO CdoKa3aTeJICTBO 3a NOKyIkaTa My B TbPROBCHN O6eHT,OTKbTeTO CTe rO 3aKyniIN,INB Hn-6n3KN cepBN3 Ha SKIL (aDpeCInTe, KaTOn I CXemata 3a cepBN3HO 06cJyKbaHe Ha eJeKTPoHnCTpymeHTa, MOKeTe Da HamePnTe Ha aDpec WwW.skil.com)
- ImaTe npedBnD, ye nobpeDa npopaI npetobapBaHe nn He npabuHNO MaHnyuPapaC nHcTpymeHTa 6bDaT n3KluOeHN OT rapaHua (3a ycNoBnaTa Ha rapaHuaTA ot SKIL BnK Ha nHTepHET aDpec: www.skil.com nn nonntaTe Baunr DnIbP)
ОПАЗВАЕ HA OKOLHATA CРEDA
He n3xbpnaTe eJeKtpoypeNte,6aTePnnpncnoc6bIeHnTa nOnaHOBHTe 3aeDHO C 6ntOBnOTnabu (cAmO 3a cTpaHn OT EC)
-cb6pa3Ho DnpeKTHBaTa Ha EC 2012/19/EG oTHocHo n3HOceHN eEeKTPnuecKn n eEeKTPoHn ypeN n OTPa3BAHeTO n B HauNoHaHTo 3aKOHoDaTeIcTBO n3HOceHNTE eEeKTPoypeN cJeBa Da ce cb6npaT OTdJIHO n da Ce npedAbaT 3a peuKnIpaHe cnopeN n3NCKBaHnraTa 3a ONa3BaHe Ha OKoHaTa CpeDa
-3a TOBa yKa3Ba CnMbOJbT⑤ TORaba KOraTO Tp6Ba Da 6bDat yHmOKeHH
UYM/BNBPACIN
- I3mepeHO B cboTBcTcBnE C EN 62841, HNBOTo HA 3ByKOBOTo HAIraHe Ha TO3n INHCTpyMeHT e 82,0 dB(A), a HNBOTo HA 3ByKOBaTa MOuHOCT 93,0 dB(A) (HeonpeJeIeHOCT K = 5 dB), n Bu6paunrTa * (TpnaKcnlaHa BeKTopHa cyMa; HeonpeJeIeHOCT K = 1,5m / s^2)
TECHNINIAI DUOMENYS ①
PRIETAISO ELEMENTAI②
A Jungiklis jjungimui/ijungimui ir greiciui valdyti
B Jungiklio fiksatorius
C Pjovimo judesi daznio reguliavimo ratukas
D Pjuvenu nuputimo itaiso jungiklis
E Dulkiu nusiurbimo atvamzdj
F Svirtis pjovimo rezimui pasirinkti
G Ventiliacines angos
H Geleztés spaustuvas
J Šviesos diodas
K Nustatyivarzta
L Uzfiksuoti varztai
M Svirtis slankiosios atramos reguliavimui
SAUGA
BENDRIEJI ELEKTRINIJ I RANKIJA SAUGOS ISPEJIMAI
1) B3BEOHCT HA PABOTHOTO MECTO
a) OdpkyBajTe ro BaWeTo pa6oTHO MeCTO uHypeNo. HeypeDen HnT TeMeH pa6oTeH npocTo mKe Da npEdu3BnKaat He3roDn.
b) HemojTe da pa6oTHe co ypeOTo BO cpeHnHa BO Koja mHa onaCHOCT OJ eHCnIIO3nJa, BO Koja mHa 3anaJIINB TeuHOCTn, racOBn n IpaunHa. EneKtpnHnte aIaNt npOn3BeyBaat NcKpn KOn MoHaTa da 3anaIaT npaUnHa nn Napea.
c) 3a Bpeme Ha ynoTpe6aTa Ha eJeKTHpuHnO t anaT, Deuata N ocTaHaTHTe Iua dPKeTe r n oDaIeHy O
MeTOHaPe pa6oTHe. ODbpaKaHBe, 6n MoKeIe Da n3ry6nte KOHTpOJa Bp3 ypeDTo.
2) EJEKTPNUHA CNYPHOCT
a) YtHKaM Opa Da oOroBapa Ha npHkyoHOT. HnKaHO He cMee da ce npBaT n3MeHn Ha wTeKePOT. He KOpNCteTe aanTpEpcn WTeHep 3aeDHO co ypeoT KOJ e 3aWHTTHO 3a3emjeH. He npomeHeT uTeKepn I COoDBeTHn npKlyoUcI rHaMaLyBaat pN3IKOT od eJeKTPuHEn ydap.
b) N36erHyBaJTe DoHnHa TeNoTo Co 3a3emJeHN NOBpUHH, KaHO uTo Ce cEeKn, PaNjaTOpH, PepHn HΦPnKHePN. NocTo 3roJIeMeHa onaCHOCT Od CTpyeh yDap, DOKoJIky BaWeTo TeNo e 3a3emJeHo.
c) Yybajte ro ypeodot nodaileky oddoHN Bnara. IpoDnpaheTo Ha BOA Bo eJeKtpuHnOT ypeJ ja 3roIeMyBa onaCHOCTa OD cTpyen ynap.
d) He 3IoynoTpe6yBajTe ro npHnlyHnOt ha6eI 3a Hoche, 6ceHe Ha ypeoT nIi 3a I3BneHyBaHe Ha uTeHepOT od mpeHHoT npHnyoH. CyBajTe ro Ka6eIot nOdaJeH oD TOJIInHa, Maclo, OCTpn pa6obu nn DeIOBHTe Ha anapaToT KOI CE DBHXaT. OStTeEHn nII 3anIeTKaHN Ka6IJa 3roJeMyBaat onacHOCTa OD CTpyeH yap.
e) Kora ro ynotpe6yBATE noHaCyT haDbop, KopncTeTe npodolHHe Ka6e Ke cooDBeTeH 3a ynotpe6a Ha OTbOpEn npocToP. PnpMeHaTa Ha npoDJIKeH Ka6e CooDBeTeH 3a pa6Ota Ha OTbOpEn npocToP ja HamaIyBa onacHOCTa Od ctpyeH ydp.
f)doHJHy He MoHe da Ce H36ErHe pa6Ota co eJeHTPNuHNOT aIaT BO BlaHHa cpeHnHa, HopNCTeTe npEHNHyBa 3a CtpyJHa 3auTHTa Pn TExNCHn npo6lemn. YnoTppe6aTa Ha npeKNHyBaOT 3a CtpyJHa 3aHTNTa Pn TExNCHn Pp6lemn rHaMaIyBa pN3HOT od eJeHTpnueH yap.
3)JIINHHA3ALHTNTA
a) BnndeTe BnHMaTeJIHn, BHImaBajTe wTo npaBnte n NoCTanyBaJTe BnHMaTeJIHo DoJeHa pa6OTnte co eIeHTpHnHOT aIaT. He pa6OTete co ypeoT DOKOLHy cTe yMOPHN IIN NOd JeCTBO Ha dpora, anHOxOI IIN JekOBn. EdeH MOMeHT Ha HeBHnMaHHe npN yNtpe6aTa MoKe da DoBeE do CENO3Hn NOBpeiN.
b) Hocete ja IInuHaTa 3aWHTnTa onpema n cekoraw Hocete 3aWHTnO uNla.HoceBeTo Ha IInuHaTa 3aWTnTa ONpema, KaHO uTO e MacKaTa 3a npauHa, 6e36eHocHaTa OJIeKa KoJa He Ce JINrA, 3aWHTteH IJIEM INI WHTnK 3a CIny, 3aBnCHO OD BnDT N npImeHaTa Ha eJKeTpruHnOT aIaT, Ja HamaLyBa OnaCHOCTa OJ NOBpeDa.
c) N36erHyBaJTe HeBHNMaTeIHO BkLyUyBaHe 3a BpeMe Ha pa6oTata. OcnrgypajTe ce npeknHyBaOT Da 6nKe BO "OFF" no3njuJa nped da ro cTabnte WTeKepOT Bo npHnyOHT. OOKoJIky To Hocnte eJeKtpuHnOT aIat Co npCTOT Ha npeknHyBaOT IInrTo npKluyBaTe anapaTOT KoJ e npHKyuEn CO HaNojyBaHe Ha cTpyja, MoKe Da npedn3BnKaTe He3roDi.
d) PpeBnkyBaHe Ha ypeoT, TprHete rHa aIaTne 3a nOdecyBaHe Hn KnyOT 3a HABpTyBaHe. AlaTOT Hn KnyOT KoJ ce Haora BO BpTInBnO T DeI Ha ypeoT, MOKe Da npEdu3BnKa He3roDa.
e) He r n pneuhybajte cBOnte cnocO6HOCTN. 3aB3emete cnrypeH n CTaBnJIeH CTAB N BO CEKOJ MOMENT ODPHybajte pamHOTeHa. Ha Toj HauHH MOxHeTe IIOo6po Da ro HOHTpOInpaTe ypeDTo BO
HeOueKyuBaHn CNTyaUIN.
f) Hocete cooDBetHa 6nleHa. He hocete shpoHa 6nleHa nn n Hnnt. Kocata n anHtata Tpeba da 6nDat noaIeKy od noBHHNte deIOBn. Unpokata 6nleKa, hAKHTOT nIN dOJIrata KOCA MOHe da ce 3aKaUaT 3a NOBHNTE DeIOBn.
g)ДOKOLNYMOHeJaCEMOHTnpaATHnpaBn3a BwmyHyBaBeNΦaKaBe npaunHa, npoBepete DaJIncBbIyueHnДaJIH MoHaT NcPabHO Da CE KOpHCTa.ПрMuHaTaHaOBe HApBaN ja HamaJyBa onaChocTaOD npaunHaTa.
h) He do3BOyBajTe nCHcYbTO CTeKHATO CO yeCTa ynotpe6a Ha aIaHTe Da Be HnPaBn CnOKoJH N da rHnrOpnpate 6e36eHochnTe npHHcHn PnH HerOBOTO KOpncTeHe. HeBnMaTeJHo DnKHeBe MoKe da npedn3BnKa cepno3Hn NobpeN BO JeI od ceHynda.
4) BHIMATEJIHA YNOTPEBAI PAHYBAHE CO EJEHTPNUHNTE AJATN
a) He ro npeonTepeTyBajTe ypeDo. Ipn BaWata pa6ota KopncTeTe ro npedBnDeHnot eJeKtpuye H aIat 3a Taa ynoTpe6a. Co cooDBeTHNO tJeKtpuye H aIat Ke pa6OTne noObo nIOcNpypHO BO HaBeDeHaTa _YHKUHOHJa o6laCT.
b) He Kopnctete eIeKtpnueH anat qJ npKeHHyBa e HencnpabEn. EeKtpnHnot aJat Koj noBeKe He MoKe Da ce BknyBa n NcKlyuBa e onaceH mOpa da ce nonpaBn.
c) Nchnyte ro eIeHTprHnot aalot od ctpya n/nnn 3BaTe ro KOMnIeTOT co 6aTePnH, ao ce oDJeLyBa, nped da npabnte HeKaHBn npHaOyBaHa, MeHyBaTe DOnoJIHnTeJHa onpeMa Hn Da ro ChJaInpaTe eIeHTprHnot aat. Co OBne MEPnHa BHNMaTeHnOCT Ke ce n36erHe HEBHMaTeJHOTO BKNyBaHe Ha ypeDToT.
d) Tprhete ro ekeTpnuHnot aHaT KoJ He ro HOpNCTnTe oD Donnpot Ha decaTa. He donyutajte pa6ota co ypeoT ha Iuca kon He ce 3ano3HaeHc co Hero nn KOn Ro Hemaat npOHTaHO OBA yNaTCTBO. EKeKtpnuHnte aIaTn ce onachn DOKOLky Co HNB pa6oTa HENCKUChn Iuca.
e) OdpKyBaJTe ro eIeHTpNHyNot aIaT n DOIOJIHNTeJIHaTa ONPema. HmajTe KOHTpOla OKOly TOa DaJI N DBINHeKHTe DeIOBn Ha ypeDoT pa6Otat 6ecnpekOpHo n DaII He ce 3aIabeHN, DaII DeIOBte Ce cHpWeH nIb OWTeEH Do Taa MepHa wTo He MoKe Da ce 0e36eHn FyHKUHOHpAbe Ha ypeDTo. IpeD npHMeHATA, OBHe OWTeEH DeIOBn Tpe6a Da ce nonpaBat. PpNUHa 3a MHOry He3roDi e looO ODpKyBaHNo tJeKTPuYeH aIaT.
f) AataTe 3a ceHe oDpyBaJte rN octpn uHCTn. BHIMATEIHO ODPKByAHnte aIaTN 3a ceHe be cO OCTPN OHTPNI NOMALNY Ke ce 3aIabyBaAT n CO HNB pa6oTaTa Ke 6nDe noLecha.
g) EJHeHTpHnHOT aHaT, np6Op, pa60THn aHaTH nTH., Tpe6a Da rH KopNCTHc Cnpoe Obne yNaTCTBa, n Ha Naun Hoj e Onnuah 3a COoBETnO Tn Ha ypei. Pn Toa, Zemete rH npEbnD pa60HTte ycNoBn Hpa6oTaTa Hoja ce hBpUyBa. YnoTpe6aTa Ha eJeKTPnHNTe aHaTN 3a DpyrN uei KOn He ce PpeBnDeHN, MoKe Da npEn3BnKa ONaCHn CInTuaUN.
h) PaKHTe n NOBpHnHnTe 3a dpHebe ODPHyBaJte rN cyBn, qHCTn H Hen3MaCTeHN. PaKHTe n NOBpHnHnTe 3a dpHebe wTO ce IIN3raat He OBO3MOyBaAT
6e36eHNO paKyBaHBe n KOHTpOJa Ha aIaTOT BO HeooyekyBaHN CNTyaun.
5)CEPBNCIPAHe
a) EJENTPNHNO t anat cepBnchpajTe ro haj KBAJIHΦNkYBaHO JIuce KOe KOpNCTn cAmO NDeHTNHN pe3epBHN DEJOBn. Co Oba ce 06e36eDyBa 6e36eNo oDPKHyBaHe Ha eJENTPNHNO aHaT.
YIATCTBO 3A BE3EДHA PABOTA CO YEOHATA IINIA
-Држete ro aIaNATOT 3a H3OJIHpAHNTe NOBpHNNH 3a 3aФaKaHBe KORA n3BpWbATE pa6To npn Koja wTO dONOLHHTeJIHATA ONPema 3a ceYebe MOKe da doJTe BO KOHTaHT CO COHPNEHNTe HNt Nn Co Ka6ENoT (ako DOONIHHTeJIHATA ONPema 3a ceYebe DoJaT BO KOHTaKT CO HNt NaOD HAnOH MOKe Da rN eJeKtpnHnIpaat MeTaJIHNTe DeIOBn Ha aIaNATOT n da npedIN3BnKaaT eJeKtpuYyap Ha onepaTopoT)
- Hopnctete cteraun nIIN dpyr npaHTuHen hauHn 3a da ro o6e36eHnte u NOTnpTe napyeTo 3a pa6oTa ha cta6nHa nIATOpMa (napyeTo 3a pa6oTa e HecTa6nHO aKO rO dpHNte npayeto co paka nIIN notpEno Ha TeIoTO CO ITO MOKe da ja 3ary6nte KOHTpoJaTa)
ONWTH
Cekoraw npobepybajTe HanoHOT da e nCT co Ohoj KoJ e Ha3HaueHnIIOUkata Ha aIaTOT
He 06pa60TyBajTe HHHaHOB MaTeepnJaH HoJ CoOpHN a36ecT (a36ecTOT BaHK 3a npEINsBnkyBauch paK)
- Oboj aIaT He Tpe6a Da ro KopncTaT Iuua nop 16 roDHH
HIBOTO Ha 6yUaBa IOneKa pa6oTnTe MoKe Ja H3HeCyBa noBeKe od 85 dB(A); Hocete 3aWtTa 3a yuInTe
HoceteOuHaKora pa6oTeCo MaTepuJaIu ITO CO3daBaaT CTpyroTHH
- PpaunHaTa OJ MaTepnJaI KAKO 6oJa Koja CoDPKn OLOBO, HeKOn BnDoBN DpBO, MInHepaNIM MetaJI, MoKe Da 6nDE WTeTHa 3a 3dpabjeto (KOHTaKTOT CO npaunHaTa NIN HeJ3HNO To BnWyBaHbe MOKe Da WpeDn3BnKa aIepnn N/nn 6OJeCTn Ha nnHnTe oprAHn 3a OHOJ KOJ pa60TN co aIaNtOT nIN lyreTO BO 6JIn3nHa); Hocete MacHa 3a npaunHa n pa60TeTe co npaBOcMHaJIHn DOKOLKy MoHeTe Da rN NOBP3eTe
- Hekon BINOHa Ha npaunHa ce KaHeporeHn (KaKo Ha npimep npaunHaTa oD da6 nIi 6yHa), OcObeHO 3aeNHO co aINTNBu 3a OpKByBaHe Ha dpBOTo; HocTe MacHa 3a npaunHa n pa6oTe co npabocMyaJIHn DOKOJHy MoHHe Ta rN NOBp3eTe
CneTe Tn npoueDpynte Ha BaWata 3emja 3a npaunHaTkoja ce jabyBa KaHO pe3yIaT Od MaTepnJaJIte Co kon pa6OTHe
IpoOnJHeHOT Ka6eN KOj T O KopnCTHTe, Mopa Da 6nDe Cocema ODMOTAH N 6e36eH, CO KanaNTET o16 A
- 06e36eTe ce anaTOT da e nchnyeH od ctpya nped da BpWnte 6nlo KaHBO noDecyBaHe nn 3ameHa Ha np6opot
PEDA yNOTPEBA
- PpeIaNoHHeTe CoceYeBe,OTCTpaHHeTe rN CHTe npueKn Ha N IOd MeCtOTO KaDe ceYeTe
I36erHyBajTe OwTeTyBaHa oU TpaOBN, wajKn I pyrnpedmetn BO MeCTOTo Kaede pa60THe; TprHete r nped Da noHete co pa60Ta
BO TEKOT HA YNOTPEBATA
- Ka6eIOT cekoraw dpkeTe ro nodaJeKy od deNoBHTe Ha aIaTOT KOn ce DnHkAT; Ka6eIOT dpKeTe Ro Ha 3aHaTa
CTpHa,Ha CToPaHa OaJatOT
Ako Ka6eIOT ce OwTeTH NnI npceye 3a BpeMe Ha pa6oTata, BeDnaH uNckJyUte Ro H He rO donnpajTe
Hikorau He KopncTeTe ro aIaTOT Kora Ka6eIOT e OwTeTeH; ToJ Mopa Da ce 3aMeHN Co CneuJaHNOndroTBEN Ka6eI DoCTaEN npEly opraHn3auJaTa Ha ycLyrN.
Bo cnyaj da dojde do eJeKtpnueHnn MexaHnKn dfeKT, BeHaaw nCnHyte Te aIaNtN nCnHyte T Od npNKJyOKOT
-Држete ng paçete noДаileky od ceynBOTO kora pa60ntte co eJektpuhen anat
PINBOP
SKILMOHeJa npn3Hae rapaHcunja cAmOdoKoJky e KopncTeH opuHaIen np6op
He Kopnctete ceuBO wTO e HanyKHato, deΦopMnpaHO nn TaTO
NO YNOTPEBA
Kora ke ja 3abpwnte pa6oTaTc co aIaTOT, ncknyte ro MOTOPOT IN npOBepTe daHn cHTe NOdBHNn DeIOBn ce 3actaHaTH
OBJACHYBAHcE3A CHMBOJNTe 3A AJIATOT
③ Ппсд унотpe6а почитajte ro npupaЧнкOT 3a ynoTpe6a
④ДBojHaи30Jaunja(HeeNotpe6Ha3a3EmHaKnua)
⑤ He ce ocnofoybajTe od eJeKTHuHn aHaTn 6aTePNB ODOMaunHnot OTnA
YNOTPEBA
BkIyHeo/IVckIyHeo 6
- BIoKnpaHBe Ha npEKNHyBaHOT 3a nocTojaHa ynotpe6a
- PpomeHa Ha ceuBoto 8! yΦpIeTe ro ceuBOTO do noHa dla6oHnHa co3aunTe CBPTehn HaHa nped 9
-anaTOT n npnphiKa NOBeKeTo DOCTaHn CeHJla CO KpaK O TINOT T N TINOT U
DyueheHa45cteneH 10
- MecTeHe Ha 6p3nHaTa Ha CeYeBe Bo 3aBnCHocT Od MaTePnJaIOT uTo CE KOpNCTn ⑪ -ako aIaNtOT He pa60n Co TpkaiIeTO C BO nO3nju1, H36epTe nOroJIema 6p3nHa Ha CeYeBe n NIOleKa HamaJyBaJte ja 6p3nHaTa DoNeKa pa60n aIaNtOT
BumkyBaBe npaunHa 12
-Поврзeteадалтета павOCmyкалka E Ha nanyata -Поврзete roцевOTO за чистенco павOCmyкалka E
! He HopncTeTe npaBocmyHaJIkata Hora ceyeMetaJ
JIED-CBETNIKNJ 13
-CnjaJIuHkataLEDJaBTOMaTCHcBETHyBaKoraKece aHTNBupa npeknHybaOT A
-П配电ИивачзOTпрашьачOT 14
- N360p Ha BnOTo Ha CeYeHe 15
YnOtnpe6yBajTe ro HnBToF ②3a noDecyBaHe Ha Hacokata Ha ceeHe oI npEun3Ho ceeHe (= 0) do 6p3o ceeHe (= 3)
-1 no3njuja (0^ ) 3a npeun3no ceheHa cnte MaTepnajn, npabOJIHHNcHn n oJ aroJ
-3 no3njuja 3a 6p3o cehebe BO pa3nHn MaTePnJaH, camo npabOlnHncn3 settings for fast cutting in different materials, straight cuts only
1=metan
2=πλaCTnka
3 = Tbpdo dpBO
!cekoraawn36pePeTe“0”npnceeheHa yBCTBNTeHNMaTepnjaJH
- Pa6ota co aanaTOT
-прд д Г Внлуне MOTOPOT npOBepeTe dani npedHnot DeJHa pa6oTHaTaNLOUa e NOCTaBeH paMHO ha pa6oTHOTO MeCTO
-UCBpTO DpKeTe ja MaunHaTa co DeBeTe paue 3a da HMaTe NocToJaHO CELOCha KOHTpola Bp3 Hea
!doena pa6oTnTe,ceHOraw dpHeTe ro anaTOT 3a MeCTOTO (MeCTATA) Hoe (HON) ce O3HaueHn CO cnBa 6oja
-уberpeTe ce DeKa ZeHaTaNobPunHa Ha pa6oTHaTa NNouaLeKuBPCToHa pa6oTHOTMeCTO
!nped da ro noDnHete eEnktpnHNOt anat OMeCTOTo kade ce pa6oTn, npOBepTe daHne DojdeHo do ueIoocen npeKHH ha pa6oTata HaceuNoto
-OTBOPHTe 3a nahe G ② dpKeTe rno TBOpEHN
COBETN3AIIPIMEHA
KopncTeTe COoBcTHn ceHJa ⑦
I aIaTOT r npHpaKa NOBeKeTo DoCTaHn ceHna co Kpak OJ Tnnot T n Tnnot U
Kora ceyeTe metaI CTaBeTe CeuBO noMaKaHo Co MacNo
3a Koe 6nlo npceu3Ho npabo cehe, nocTaBeTe ro aIaTOT co pa6oTHata nIooua NOTppeHa Ha BOdInka (Ha np.napue npabo dpBO) 18
- PpeI Da InceyeTe OTBOP HanpaBeTe dynka 19
- Ceehe 6e3 noTkpweHn pa6oBn -npekpijTe ja IHHjata Ha ceyeHeTo co NOBeKeCIOJH NIN WIPOKN JIeHTN nped Da noHTe Co ceyeHeTo -IInceto Ha MaTePnJaIOT e CBPTeHO HADOly Ha pa60THOTO MecTO
3a noBeKe INΦopMaunn BnTe Ha www.skil.com
OДРЖУBAHБ/CEPBИСЧАПЕ
- Oboj aIaT He e HameHET 3a npofoecnoHaHa ynoTpe6a
AanatOTnKa6eIOTceKoraaJa ce OdpHyBaat YnCTN (oco6eHO OTBOPHTe 3a JaedeHe G ②)
!nped nHcTeHe n3BaTeTe ro anaTOT O npnKnyOHO
AkoIocToMceOna6abn3aBpeMeHaynoTpe6ata, noctabeTe ro 3aterhybaHeto HaIOCTOT M
-NotabeTe ro loctot M Bo cpeHa no3njuja
-pa3na6aBeTe ja 3aBpTKaTa 3a 3aKnIyBaHbE L wpaФцreP-6pojaq PH2 Ha IeBO
-3aTeHHeTe ja nenepyTkata Ha 3aBpTkata K ubpcTo co kIy-6poja Aien 4 mm Ha nebo
! nocTaBeTe ja 3aBpTHaTa K co nomou Ha JIeBnot HABOJ
-3aterheJe 3aBpTkata 3a 3aHnyBaHe L co wpaqunrep PH2 Ha neBO
-πpuiBpcte ja paKaTa M
-ДOKOLNYалатOTинрajВHIMaTeJHOTo pa6Ote№и KOHTpOla HeKOraU OTKaKe,NonpaBkata Mopa da ja Ja n3BpShn HeKoj OBlaacteH SKIL cepBnc 3a eJeKtpuHn aIaTn
-BO Cnyaj Ha npimeM6a, HcnpaTeTe ro aIaToT
Hepachlonen, 3aeJNo CO cMeTKONOTBpdaTa, Do
BaJnOT npOdau HJIH Haj6JIncknOT SKIL cepBnc
(aJpeCHTe ce HabeDeHn Ha www.skil.com)
- Имajte npedBnД да OwTeTyBaHbeTo HacTaHaTo 3apaInpeONTObApYBaHbe IIN HeNPaBnIHO paKyBaHc co aIaTOT ja OTpPra rapaHunjata (BnDETe Ha www.skil.com IIN npaJajre ro npoDaBaHT 3a yCIOBNTe Ha rapaHUnjata Ha SKIL)
3AHTNTA HA JHBOTHATA CPEINHA
He ce ocno6oodybajte od eJeKTHuHN aIaTn, 6aTeepH, ypeH nHn amBaIaNk a npEky HNBHO pPnaBe BO domaunHOTo ry6pe (cAmO 3a 3emjnte Ha EY)
-cnopeE BpOncKaTa DnpeKTHBa 2012/19/EC 3a OCIO6OyBaHe OeIeKTPnuHa N eIeKTPoHcKa ONPema HneJHa HmJIeMeHTaunJa BO COrlaChoc T CO HaOnHaJIHHe 3aKOH, eIeKTPuHHe aJat KON TO DOCTINHaJIe KpaJOT Ha CBOJOT JINBOTeH BEM Mopa Da 6NdAT CObpaHn Noc6BHO Ja 6NdAT BpaTeH N BO COODBeTeH ObjEHT 3a peUHInpaHbe
-CIM60JOT 5 Ke Be NOTcETyBa Ha OBA KOra Ke DojDe BpeMe aIaTOT da ro φpJInte
БУСАВА / ВИБРAUПИ
- I3mpeHo BO corlaacHocT co EN 62841, HNBOTo Ha 3ByeH npntncK Ha OBaa aataKa e 82,0 dB(A) HNBOTo Ha 3ByuHa MoHocT 93,0 dB(A) (HeCnrypHocT K = 5 dB), H Bn6paunjata * (TpnaKc BeKTOpHa cyMa; HeCnrypHocT K = 1.5m / s^2)
*ceuehe Ha Ta6la 5,5 M/c²
*ceyeheHaIIOHcMaTea5,6M/c²
HnBOTo Ha emHTnpaHe Ha Bn6paun Koe e HabeDeHo Ha 3aDHNO7 DeJ HA OBA yNaTCTBO e N3MepeHO BO corlaCHOCT CO tAndapmN3npaHNO7 TcT DaJeH BO EN 62841; MoKe Da ce KopnCTn 3a Da ce CnopeEn eJeH aIat Co Dpyr, I KaKo npBnHa OceHka 3a N3IOKeHOCTa Ha Bn6paun Kora Ce KopnCTn aIaTOT 3a CNOMEHaTITe npimEni
-KOpNCTeHbTo Ha aIaTOT 3a pa3HN pIpmMeHn, IIN CO pa3JIuHn IIN HEnpaBUNHO CyBaH N DeIOBn, MOKe Da IOBeDe Do 3HaJajHO 3roJeMyBaHe Ha HNBOTO Ha I3IOKeHOCT
-KORA aIaTOT e NCKlyueH INI KORA aIaTOT e BKNlyueH HO He BpShn HeKaKBa pa6Ota, MoKe Da doJde 3HaHTeJIHO HamaLyBaHe Ha HbOTO a N3IOKeHOCT ! 3aHTTeCe oD eΦeHTte Ha Bn6paunTe Ipeky ODPKyBaHe Ha aJaTOT n HerOBnTe DeNoBn, ODPKyBaBe Ha TOnJIHHaTa BO BaUnTe paue, n OprAHn3HpAbe Ha BaWaTa pa6Ota
AL
Sharre sege 4531
HYRJE
Kjo pajisje ehte projektuar per kryerjen e prerjeve tejpertej dhe te carave n dru, plastike, metal, plaka ceramike dhe gome, dhe ehte pershtatshme per prerje t drejta dhe me hark me kende me klape 45^
Kjo vegel nuk ehte projektuar per perdorim profesonal
- Lexoni dhe ruani kete manua t e perdorimit ③
TÉ DHÉNAT TEKNIKE ①
ELEMENTETVEGEL ②
A Celesi per ndezie/fikje dhe kontrli i shpeitesisie
B Butoni per bllokimin e celèsit
C Rota per tere regulluar shpejtesine e sharres
D Celesi per fryrjen e pluhurit
E Pershtatesi fsheses me korrent
F Leva per zgjedhjen e modalitet te sharrimit
G Te carateajrosjes
H Kapesja elames
J Drita LED
K Vidè
L Vide bllokimi
M Leve perrregullimin epllakes
SIGURIA
PARALAJMERIME TEPERGJITHSHME TEGSIGURISE PPER PAJISJET ELEKTRIKE
PARALAJMERIM: Lexoni t gjitha paralajmerimet, udhezimet, ilustrimet dhe specifikimet e dhena me ketemjet pune. Mosrespektimi i te gjitha udhezimeve te renditurame poshte mund te rezultojene goditje elektrike, zjarr dhe/ose demtime te renda.
Thithja e pluhurave ⑫
-lidhni adaptorin e fshesës me korrent E me këmben
-lidhni tubine fsheses me korrent me adaptorin e
fsheses me korrent E
! mos pērdorni njē fshese mē korrent kur prisni
metale
Drita LED J ⑬
-Drita LED J ndizet automatikisht kur aktivonzijelesin A
- Celesi per fryrjen e pluhurit D 14
Zgjedhja e modalitet te sharrimit 15
Pérdorni levén F ② per t é rregullar veprimin orbital nga prerja me saktësi (= 0) deri te prerja e shpejë (= 3)
-1 percaktim ("0") pér prerje tê sakta né tê gjitha
material, tê drejta + tê harkuara
-3 pécaktime pé prerje tè shpejte nè materiaile tè ndryshme, vetém prerje tè drejta
= r
1
-
s y 00 j 5 s4 a b
Jol's 1234567890123456789012345678901234567890123456789012345678901234567890123456789012345678901234567890123456789
n
1.
- a h( 5g)
y
!a
Looos Jols
G 4
-4.5<2g>
sL sLa
W 10
UgLwLygTgLwLy
i5jLgog0J
sLgjyJ 10
g 451 451 451 451 451 451 451 451
11
19
Lg 14 15
a
www.skil.com
Laa-1g/5g
Gggi gai jy
中
1p
S_ OBC = 12 · CD · BC = 12 × CD × 5
Lw gaaac a 10 PHg L Lol
gla 2
wL
iis o0oLeaiw 3j yogjj jK aaiii
Cw Cw Lw GLo 4c cGg PH T g L L J L J
中
S APQ = S AOB + S_ OBC
a a 1
SKIL g jgjgljg jg jg jg jg jg jg jg jg jg jg
gP
1j 1s00000000000000000000000000000000000000000000000000000000
a 1000
0aii j
aagw jao g 00s jgolg Ljgog Lao aLg LLaas
jie1g0sloLg 2
aellb0jLaiolaj
()-j0j4JLg)aLg
UgLwLyIaTgJyTgLwLylaJyIyJy
S OBC = S COD + S BOC - S BOC
① a≥0.80 a≥0.80≤a≤
1
cawwLsCw1 CgOgjgjll 4gJlaj
JLJLJ,0jJALsAe gaggOg jSLSoJcCgogosy
1150s
1J Lg j g aaiis aaii i 50 Jj! daa yj s jy j j j j j j j j
jolc:00s sLo 5g jLgJ gJ J
aogw 1
()
y
yduu 1jies jg yk
(2) S_1 = 12 · CD · CM = 12 × CD × CM = 14
j0eJwJLgJgJgJgJgJgJgJgJg
JLg 100000000000000000000000000000000000000000
iiS 5ol
a1 = 2,an + 1 = 2 - anan + 1
oLaiw g aJiLwq JdA gia jao ayis oie
Jg g 1, Lg w u g u g u u u u u u u u u u u u u u u u u u u u u u u u u u u uu
.
()
ggi jgi ggi ggi ggi Lcjl
gdu j 1j gj j j j j
(20
()
LcIy wio 8i jllj jie jies Ls iis ooiu J Lwio
a#olaljy jilgolgjgolgj
Jolal Jolai jaiy jaiy jaiy jaiy jaiy jaiy
*21p0
[ = \frac{1}{2}\left\lbrack {{\left( 2xy\right) }^{2} - {\left( x + y\right) }^{2}}\right\rbrack ]
!
FA
EaH 100
4020
J 1 1 1 1 1 1 1 1 1 1 1 1 1 1 1 1 1 1 1 1 1 1 1 1 1 1 1 1 1 1 1 1 1 1 1 1 1 1 1
①
1
jgJis gagol/sjg yA 0iis Jia jol B
gJ≤aJcJw aJbJcJgJ≤JJJ C
D
E
S≤a|c|L|c|p
G
H
DEL J
a-bi c K
| A | L | U | J | L | S | S | S | S | S | S | S | S | S | S | S | S | S | S | S | S | S | S | S | S | S | S | S | S | S | S | S | S | S | S | S | S | S | S | S | S | S | S | S | S | S | S | S | S | S | S | S | S | S | S | ||||||||||||||||||||||||||||||||||||||||||||||||||||||||||||||||||||||||||||||||||||||||||||||||||||||||||||||||||||||||||||||||||||||||||||||||||||||||||||||||||||||||||||||||||||||||||||||||||||||||||||||||||||||||||||||||||||||||||||||||||||||||||||||||||||||||||||||||||||||||||||||||||||||||||||||||||||||||||||||||||||||||||||||||||||||||||||||||||||||||||||||||||||||||||||||||||||||||||||||||||||||||||||||||||||||||||||||||||||||||||||||||||||||||||||||||||||||||||||||||||||||||||||||||||||||||||||||||||||||||||||||||||||||||||||||||||||||||||||||||||||||||||||||||||||||||||||||||||||||||||||||||||||||||||||||||||||||||||||||||||||||||||||||||||||||||||||||||||||||||||||||||||||||||||||||||||||||||||||||||||||||||||||||||||||||||||||||||||||||||||||||||||||||||||||||||||||||||||||||||||||||||||||||||||||||||||||||||||||||||||||||||||||||||||||||||||||||||||||||||||||||||||||||
| 9 | plau | g | g | g | g | g | g | g | g | g | g | g | g | g | g | g | g | g | g | g | g | g | g | g | g | g | g | g | g | g | g | g | g | g | g | g | g | g | g | g | g | g | g | g | g | g | g | g | g | g | g | f | - | |||||||||||||||||||||||||||||||||||||||||||||||||||||||||||||||||||||||||||||||||||||||||||||||||||||||||||||||||||||||||||||||||||||||||||||||||||||||||||||||||||||||||||||||||||||||||||||||||||||||||||||||||||||||||||||||||||||||||||||||||||||||||||||||||||||||||||||||||||||||||||||||||||||||||||||||||||||||||||||||||||||||||||||||||||||||||||||||||||||||||||||||||||||||||||||||||||||||||||||||||||||||||||||||||||||||||||||||||||||||||||||||||||||||||||||||||||||||||||||||||||||||||||||||||||||||||||||||||||||||||||||||||||||||||||||||||||||||||||||||||||||||||||||||||||||||||||||||||||||||||||||||||||||||||||||||||||||||||||||||||||||||||||||||||||||||||||||||||||||||||||||||||||||||||||||||||||||||||||||||||||||||||||||||||||||||||||||||||||||||||||||||||||||||||||||||||||||||||||||||||||||||||||||||||||||||||||||||||||||||||||||||||||||||||||||||||||||||||||||||||||||||||||||||
| 10 | g | g | g | g | g | g | g | g | g | g | g | g | g | g | g | g | g | g | g | g | g | g | g | g | g | g | g | g | g | g | g | g | g | g | g | g | g | g | g | g | g | g | g | g | g | g | g | g | g | S | - | |||||||||||||||||||||||||||||||||||||||||||||||||||||||||||||||||||||||||||||||||||||||||||||||||||||||||||||||||||||||||||||||||||||||||||||||||||||||||||||||||||||||||||||||||||||||||||||||||||||||||||||||||||||||||||||||||||||||||||||||||||||||||||||||||||||||||||||||||||||||||||||||||||||||||||||||||||||||||||||||||||||||||||||||||||||||||||||||||||||||||||||||||||||||||||||||||||||||||||||||||||||||||||||||||||||||||||||||||||||||||||||||||||||||||||||||||||||||||||||||||||||||||||||||||||||||||||||||||||||||||||||||||||||||||||||||||||||||||||||||||||||||||||||||||||||||||||||||||||||||||||||||||||||||||||||||||||||||||||||||||||||||||||||||||||||||||||||||||||||||||||||||||||||||||||||||||||||||||||||||||||||||||||||||||||||||||||||||||||||||||||||||||||||||||||||||||||||||||||||||||||||||||||||||||||||||||||||||||||||||||||||||||||||||||||||||||||||||||||||||||||||||||||||||||
| 11 | a | a | a | a | a | a | a | a | a | a | a | a | a | a | a | a | a | a | a | a | a | a | a | a | a | a | a | a | a | a | a | a | a | a | a | a | a | a | a | a | a | a | a | a | a | a | a | a | a | a | S | - | ||||||||||||||||||||||||||||||||||||||||||||||||||||||||||||||||||||||||||||||||||||||||||||||||||||||||||||||||||||||||||||||||||||||||||||||||||||||||||||||||||||||||||||||||||||||||||||||||||||||||||||||||||||||||||||||||||||||||||||||||||||||||||||||||||||||||||||||||||||||||||||||||||||||||||||||||||||||||||||||||||||||||||||||||||||||||||||||||||||||||||||||||||||||||||||||||||||||||||||||||||||||||||||||||||||||||||||||||||||||||||||||||||||||||||||||||||||||||||||||||||||||||||||||||||||||||||||||||||||||||||||||||||||||||||||||||||||||||||||||||||||||||||||||||||||||||||||||||||||||||||||||||||||||||||||||||||||||||||||||||||||||||||||||||||||||||||||||||||||||||||||||||||||||||||||||||||||||||||||||||||||||||||||||||||||||||||||||||||||||||||||||||||||||||||||||||||||||||||||||||||||||||||||||||||||||||||||||||||||||||||||||||||||||||||||||||||||||||||||||||||||||||||||||||
| 12 | a | a | a | a | a | a | a | a | a | a | a | a | a | a | a | a | a | a | a | a | a | a | a | a | a | a | a | a | a | a | a | a | a | a | a | a | a | a | a | a | a | a | a | a | a | a | a | a | a | b S | - | |||||||||||||||||||||||||||||||||||||||||||||||||||||||||||||||||||||||||||||||||||||||||||||||||||||||||||||||||||||||||||||||||||||||||||||||||||||||||||||||||||||||||||||||||||||||||||||||||||||||||||||||||||||||||||||||||||||||||||||||||||||||||||||||||||||||||||||||||||||||||||||||||||||||||||||||||||||||||||||||||||||||||||||||||||||||||||||||||||||||||||||||||||||||||||||||||||||||||||||||||||||||||||||||||||||||||||||||||||||||||||||||||||||||||||||||||||||||||||||||||||||||||||||||||||||||||||||||||||||||||||||||||||||||||||||||||||||||||||||||||||||||||||||||||||||||||||||||||||||||||||||||||||||||||||||||||||||||||||||||||||||||||||||||||||||||||||||||||||||||||||||||||||||||||||||||||||||||||||||||||||||||||||||||||||||||||||||||||||||||||||||||||||||||||||||||||||||||||||||||||||||||||||||||||||||||||||||||||||||||||||||||||||||||||||||||||||||||||||||||||||||||||||||||||
| 13 | e | e | e | e | e | e | e | e | e | e | e | e | e | e | e | e | e | e | e | e | e | e | e | e | e | e | e | e | e | e | e | e | e | e | e | e | e | e | e | e | e | e | e | e | e | e | e S | - | ||||||||||||||||||||||||||||||||||||||||||||||||||||||||||||||||||||||||||||||||||||||||||||||||||||||||||||||||||||||||||||||||||||||||||||||||||||||||||||||||||||||||||||||||||||||||||||||||||||||||||||||||||||||||||||||||||||||||||||||||||||||||||||||||||||||||||||||||||||||||||||||||||||||||||||||||||||||||||||||||||||||||||||||||||||||||||||||||||||||||||||||||||||||||||||||||||||||||||||||||||||||||||||||||||||||||||||||||||||||||||||||||||||||||||||||||||||||||||||||||||||||||||||||||||||||||||||||||||||||||||||||||||||||||||||||||||||||||||||||||||||||||||||||||||||||||||||||||||||||||||||||||||||||||||||||||||||||||||||||||||||||||||||||||||||||||||||||||||||||||||||||||||||||||||||||||||||||||||||||||||||||||||||||||||||||||||||||||||||||||||||||||||||||||||||||||||||||||||||||||||||||||||||||||||||||||||||||||||||||||||||||||||||||||||||||||||||||||||||||||||||||||||||||||||||
| 14 | a | a | a | a | a | a | a | a | a | a | a | a | a | a | a | a | a | a | a | a | a | a | a | a | a | a | a | a | a | a | a | a | a | a | a | a | a | a | a | a | a | a S | - | |||||||||||||||||||||||||||||||||||||||||||||||||||||||||||||||||||||||||||||||||||||||||||||||||||||||||||||||||||||||||||||||||||||||||||||||||||||||||||||||||||||||||||||||||||||||||||||||||||||||||||||||||||||||||||||||||||||||||||||||||||||||||||||||||||||||||||||||||||||||||||||||||||||||||||||||||||||||||||||||||||||||||||||||||||||||||||||||||||||||||||||||||||||||||||||||||||||||||||||||||||||||||||||||||||||||||||||||||||||||||||||||||||||||||||||||||||||||||||||||||||||||||||||||||||||||||||||||||||||||||||||||||||||||||||||||||||||||||||||||||||||||||||||||||||||||||||||||||||||||||||||||||||||||||||||||||||||||||||||||||||||||||||||||||||||||||||||||||||||||||||||||||||||||||||||||||||||||||||||||||||||||||||||||||||||||||||||||||||||||||||||||||||||||||||||||||||||||||||||||||||||||||||||||||||||||||||||||||||||||||||||||||||||||||||||||||||||||||||||||||||||||||||||||||||||||||
| 15 | a a a a a a a a a a a a a a a a a a a a a a a a a a a a a a a a a a a a a a a a a a a a a a a a a a a | c c c c c c c c c c c c c c c c c c c c c c c c c c c c c c c c c c c c c c c c c c c c c c c c c c c | c c c c c c c c c c c c c c c c c c c c c c c c c c c c c c c c c c c c c c c c c c c c c c c c c C D E F G H I J K L M N O P Q R S T U V W X Y Z A B C D E F G H I J K L M N O P Q R S T U V W X Y Z A B C D E F G H I J K L M N O P Q R S T U V W X Y O P Q R S T U V W X Y O P Q R S T U V W X Y O P Q R S T U V W X Y O P Q R S T U V W X Y O P Q R S U V W X Y O P Q R S U V W X Y O P Q R S U V W X Y O P Q R S U V W X Y O P Q R S U V W X Y O P Q R s t u v w x y z # | 16 | 17 | 18 | 19 | 20 | 21 | 22 | 23 | 24 | 25 | 26 | 27 | 28 | 29 | 30 | 31 | 32 | 33 | 34 | 35 | 36 | 37 | 38 | 39 | 40 | 41 | 42 | 43 | 44 | 45 | 46 | 47 | 48 | 49 | 50 | 51 | 52 | 53 | 54 | 55 | 56 | 57 | 58 | 59 | 60 | 61 | 62 | 63 | 64 | 65 | 66 | 67 | 68 | 69 | 70 | 71 | 72 | 73 | 74 | 75 | 76 | 77 | 78 | 79 | 80 | 81 | 82 | 83 | 84 | 85 | 86 | 87 | 88 | 89 | 90 | 91 | 92 | 93 | 94 | 95 | 96 | 97 | 98 | 99 | 100 | 101 | 102 | 103 | 104 | 105 | 106 | 107 | 108 | 109 | 110 | 111 | 112 | 113 | 114 | 115 | 116 | 117 | 118 | 119 | 120 | 121 | 122 | 123 | 124 | 125 | 126 | 127 | 128 | 129 | 130 | 131 | 132 | 133 | 134 | 135 | 136 | 137 | 138 | 139 | 140 | 141 | 142 | 143 | 144 | 145 | 146 | 147 | 148 | 149 | 150 | 151 | 152 | 153 | 154 | 155 | 156 | 157 | 158 | 159 | 160 | 161 | 162 | 163 | 164 | 165 | 166 | 167 | 168 | 169 | 170 | 171 | 172 | 173 | 174 | 175 | 176 | 177 | 178 | 179 | 180 | 181 | 182 | 183 | 184 | 185 | 186 | 187 | 188 | 189 | 190 | 191 | 192 | 193 | 194 | 195 | 196 | 197 | 198 | 199 | 200 | 201 | 202 | 203 | 204 | 205 | 206 | 207 | 208 | 209 | 210 | 211 | 212 | 213 | 214 | 215 | 216 | 217 | 218 | 219 | 220 | 221 | 222 | 223 | 224 | 225 | 226 | 227 | 228 | 229 | 230 | 231 | 232 | 233 | 234 | 235 | 236 | 237 | 238 | 239 | 240 | 241 | 242 | 243 | 244 | 245 | 246 | 247 | 248 | 249 | 250 | 251 | 252 | 253 | 254 | 255 | 256 | 257 | 258 | 259 | 260 | 261 | 262 | 263 | 264 | 265 | 266 | 267 | 268 | 269 | 270 | 271 | 272 | 273 | 274 | 275 | 276 | 277 | 278 | 279 | 280 | 281 | 282 | 283 | 284 | 285 | 286 | 287 | 288 | 289 | 290 | 291 | 292 | 293 | 294 | 295 | 296 | 297 | 298 | 299 | 300 | 301 | 302 | 303 | 304 | 305 | 306 | 307 | 308 | 309 | 310 | 311 | 312 | 313 | 314 | 315 | 316 | 317 | 318 | 319 | 320 | 321 | 322 | 323 | 324 | 325 | 326 | 327 | 328 | 329 | 330 | 331 | 332 | 333 | 334 | 335 | 336 | 337 | 338 | 339 | 340 | 341 | 342 | 343 | 344 | 345 | 346 | 347 | 348 | 349 | 350 | 351 | 352 | 353 | 354 | 355 | 356 | 357 | 358 | 359 | 360 | 361 | 362 | 363 | 364 | 365 | 366 | 367 | 368 | 369 | 370 | 371 | 372 | 373 | 374 | 375 | 376 | 377 | 378 | 379 | 380 | 381 | 382 | 383 | 384 | 385 | 386 | 387 | 388 | 389 | 390 | 391 | 392 | 393 | 394 | 395 | 396 | 397 | 398 | 399 | 400 | 401 | 402 | 403 | 404 | 405 | 406 | 407 | 408 | 409 | 410 | 411 | 412 | 413 | 414 | 415 | 416 | 417 | 418 | 419 | 420 | 421 | 422 | 423 | 424 | 425 | 426 | 427 | 428 | 429 | 430 | 431 | 432 | 433 | 434 | 435 | 436 | 437 | 438 | 439 | 440 | 441 | 442 | 443 | 444 | 445 | 446 | 447 | 448 | 449 | 450 | 451 | 452 | 453 | 454 | 455 | 456 | 457 | 458 | 459 | 460 | 461 | 462 | 463 | 464 | 465 | 466 | 467 | 468 | 469 | 470 | 471 | 472 | 473 | 474 | 475 | 476 | 477 | 478 | 479 | 480 | 481 | 482 | 483 | 484 | 485 | 486 | 487 | 488 | 489 | 490 | 491 | 492 | 493 | 494 | 495 | 496 | 497 | 498 | 499 | 500 | 501 | 502 | 503 | 504 | 505 | 506 | 507 | 508 | 509 | 510 | 511 | 512 | 513 | 514 | 515 | 516 | 517 | 518 | 519 | 520 | 521 | 522 | 523 | 524 | 525 | 526 | 527 | 528 | 529 | 530 | 531 | 532 | 533 | 534 | 535 | 536 | 537 | 538 | 539 | 540 | 541 | 542 | 543 | 544 | 545 | 546 | 547 | 548 | 549 | 550 | 551 | 552 | 553 | 554 | 555 | 556 | 557 | 558 | 559 | 560 | 561 | 562 | 563 | 564 | 565 | 566 | 567 | 568 | 569 | 570 | 571 | 572 | 573 | 574 | 575 | 576 | 577 | 578 | 579 | 580 | 581 | 582 | 583 | 584 | 585 | 586 | 587 | 588 | 589 | 590 | 591 | 592 | 593 | 594 | 595 | 596 | 597 | 598 | 599 | 600 | 601 | 602 | 603 | 604 | 605 | 606 | 607 | 608 | 609 | 610 | 611 | 612 | 613 | 614 | 615 | 616 | 617 | 618 | 619 | 620 | 621 | 622 | 623 | 624 | 625 | 626 | 627 | 628 | 629 | 630 | 631 | 632 | 633 | 634 | 635 | 636 | 637 | 638 | 639 | 640 | 641 | 642 | 643 | 644 | 645 | 646 | 647 | 648 | 649 | 650 | 651 | 652 | 653 | 654 | 655 | 656 | 657 | 658 | 659 | 660 | 661 | 662 | 663 | 664 | 665 | 666 | 667 | 668 | 669 | 670 | 671 | 672 | 673 | 674 | 675 | 676 | 677 | 678 | 679 | 680 | 681 | 682 | 683 | 684 | 685 | 686 | 687 | 688 | 689 | 690 | 691 | 692 | 693 | 694 | 695 | 696 | 697 | 698 | 699 | 700 | 701 | 702 | 703 | 704 | 705 | 706 | 707 | 708 | 709 | 710 | 711 | 712 | 713 | 714 | 715 | 716 | 717 | 718 | 719 | 720 | 721 | 722 | 723 | 724 | 725 | 726 | 727 | 728 | 729 | 730 | 731 | 732 | 733 | 734 | 735 | 736 | 737 | 738 | 739 | 740 | 741 | 742 | 743 | 744 | 745 | 746 | 747 | 748 | 749 | 750 | 751 | 752 | 753 | 754 | 755 | 756 | 757 | 758 | 759 | 760 | 761 | 762 | 763 | 764 | 765 | 766 | 767 | 768 | 769 | 770 | 771 | 772 | 773 | 774 | 775 | 776 | 777 | 778 | 779 | 780 | 781 | 782 | 783 | 784 | 785 | 786 | 787 | 788 | 789 | 790 | 791 | 792 | 793 | 794 | 795 | 796 | 797 | 798 | 799 | 800 | 801 | 802 | 803 | 804 | 805 | 806 | 807 | 808 | 809 | 810 | 811 | 812 | 813 | 814 | 815 | 816 | 817 | 818 | 819 | 820 | 821 | 822 | 823 | 824 | 825 | 826 | 827 | 828 | 829 | 830 | 831 | 832 | 833 | 834 | 835 | 836 | 837 | 838 | 839 | 840 | 841 | 842 | 843 | 844 | 845 | 846 | 847 | 848 | 849 | 850 | 851 | 852 | 853 | 854 | 855 | 856 | 857 | 858 | 859 | 860 | 861 | 862 | 863 | 864 | 865 | 866 | 867 | 868 | 869 | 870 | 871 | 872 | 873 | 874 | 875 | 876 | 877 | 878 | 879 | 880 | 881 | 882 | 883 | 884 | 885 | 886 | 887 | 888 | 889 | 890 | 891 | 892 | 893 | 894 | 895 | 896 | 897 | 898 | 899 | 900 | 901 | 902 | 903 | 904 | 905 | 906 | 907 | 908 | 909 | 910 | 911 | 912 | 913 | 914 | 915 | 916 | 917 | 918 | 919 | 920 | 921 | 922 | 923 | 924 | 925 | 926 | 927 | 928 | 929 | 930 | 931 | 932 | 933 | 934 | 935 | 936 | 937 | 938 | 939 | 940 | 941 | 942 | 943 | 944 | 945 | 946 | 947 | 948 | 949 | 950 | 951 | 952 | 953 | 954 | 955 | 956 | 957 | 958 | 959 | 960 |
cIaill gba yuie aolb aoLwll cIa
L 10000000000000000000000000000000000000000000000000000
J 1
P
·
olc loglo
a1 = 2,a2 = - 4
·oLo
( a + b) = 0
p l 及
·Lg
·
a 111111111111111111111111111111
·
1000000000000000000000000000000000000000000000000000000000
4k + 1 0( mod D)
aL aSgSeo 1y
(aolubel)
·
1
1
ghai
·
:Laill Jaua aegs aag Lai Jao jil ae bai
p1
L L
a1 = 2.5, a2 = - 52
J
fJg
a.2021 a.2020 J5s no 2120
gai 1jui jgi jgl gglgglg
01281p1
山
·
gog gaa Jc gaa Juaa Jai paaa
phss
15 15
01381 1c0g2g2g2g2g
1 1 LxLx1 Lx
()
aJ111111111111111111111111 0
p12
1 JzJ 1
aJyS110oal jao aS,LulgaiL
Lioic Lai jy JIgaiWu ad Lai yqui Li bs pasi (C
Jaaa Jlae Jaae aee
JILgS11Loaall Joo
1 1
a aagll ciao paae i 1. aaii jao aagll ciao poa
aLg≤llllooalj
Jolal 1
Jie: 11051111111111111111111111111
1yj 1y j 1y j 1y j 1y j 1y j 1y j 1y j 1y j 1y j 1y j 1y j 1y j 1y j 1y j 1y j 1y j 1y j 1y j 1y j 1y j 1y j 1y j 1y j 1y j 1y j 1y
aJgSll oell pliciwi ic 01 g aIblloljgacaggsglg
a#
aLglls
aalaaalw!g/gggsaasawj wlll
Jaaannn aagg
1111 1
1Lw yj (zJyJI JAL aJIJI g) Lw plxsiwiw (gJyJI JIL aJIJI JAL
JooLoo
J 1
aeg gagg jllg jaiy jbi y aag aag aag aag aag
Jc a 100
.
Jaiwi Lioic 1c ool 2o aeg Jlalbclg lde
a
1
J 1
aIgSJI gaiyIgJIoJoo JgJoo
a aalg aagaae
a. a|y-gS|Looall Jos
g 1111111111111111111
LgS Lioic a, gSll closall jbs sly clwghs
1aLgSlllloallljIy.aaaybglgJb08Jc aLySLLB
aLgSlll 1slo
aill Jod JSLJlssiWjw 2. JSLI plssiWfocLw pae qie (
1
a 1111111111111111
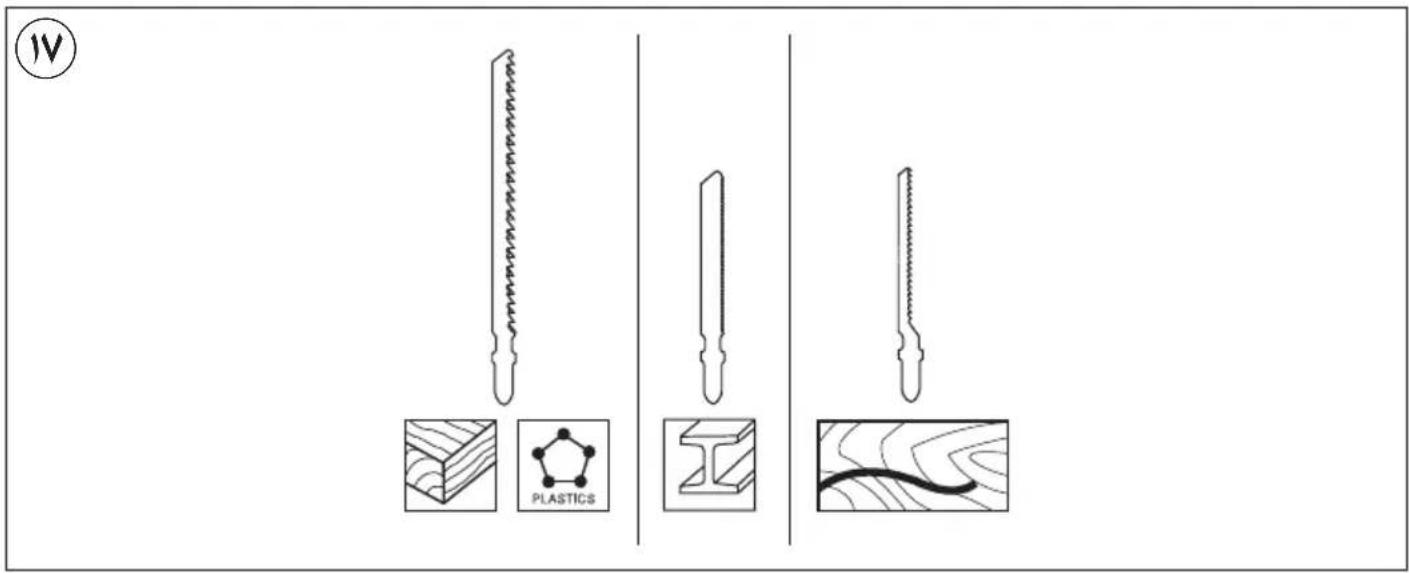
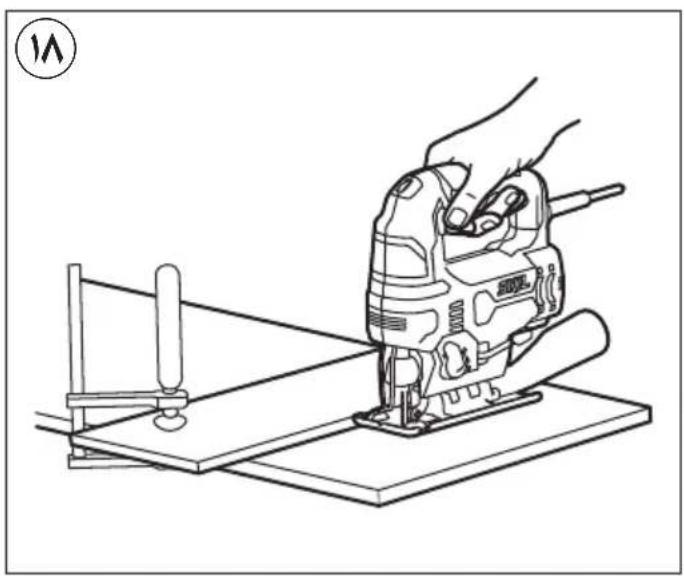
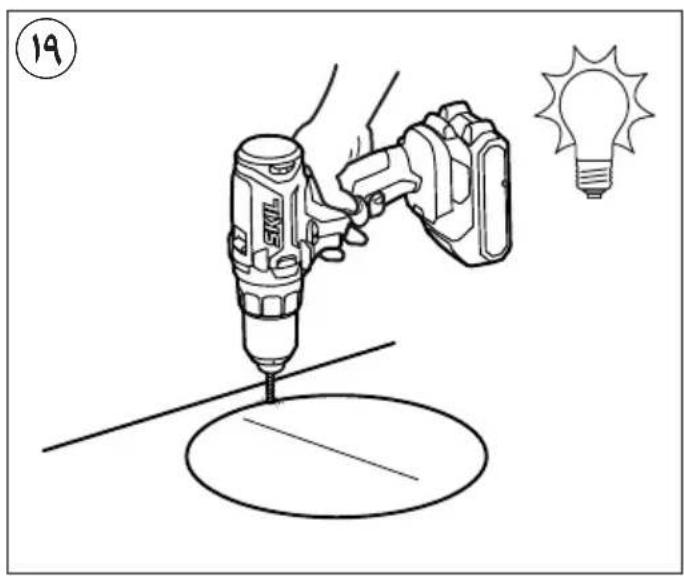
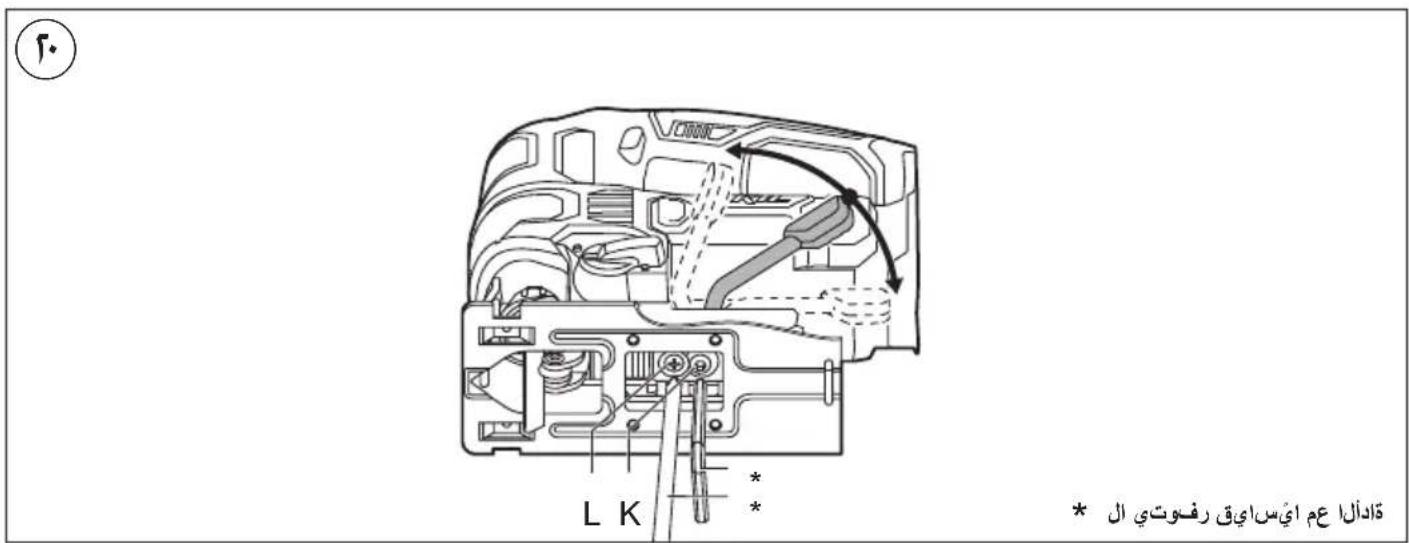

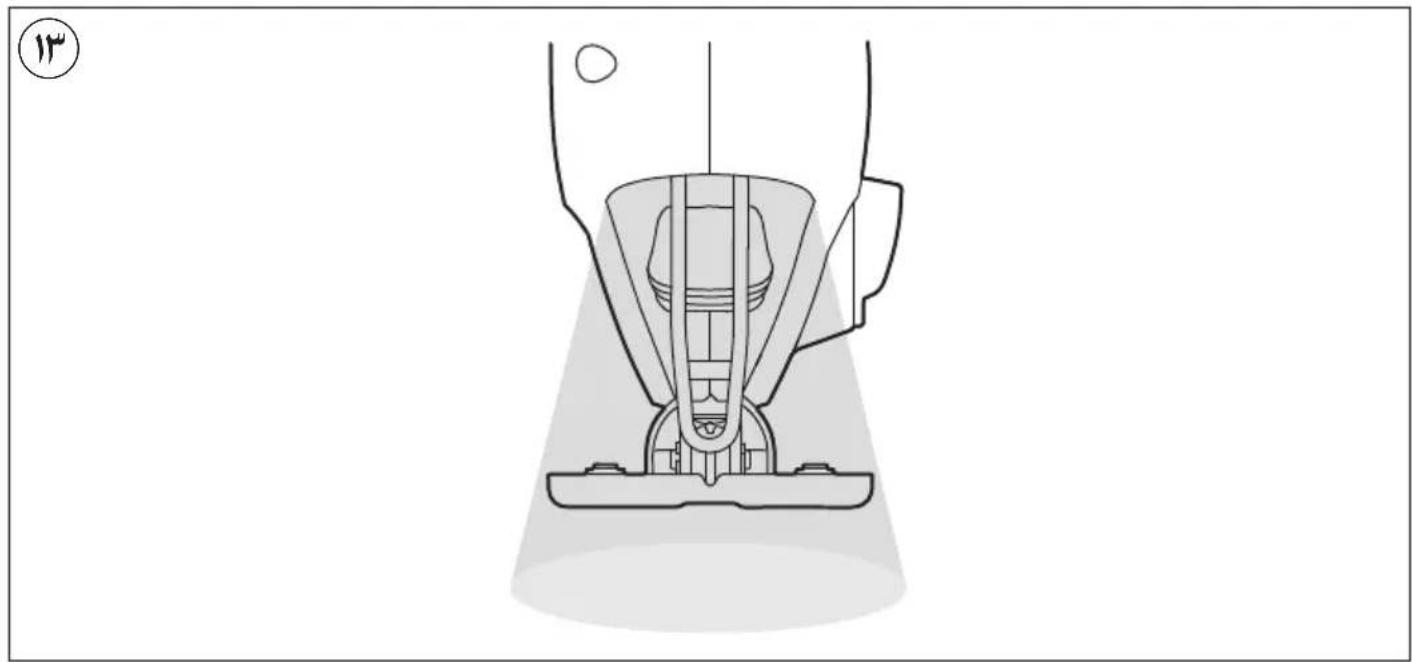
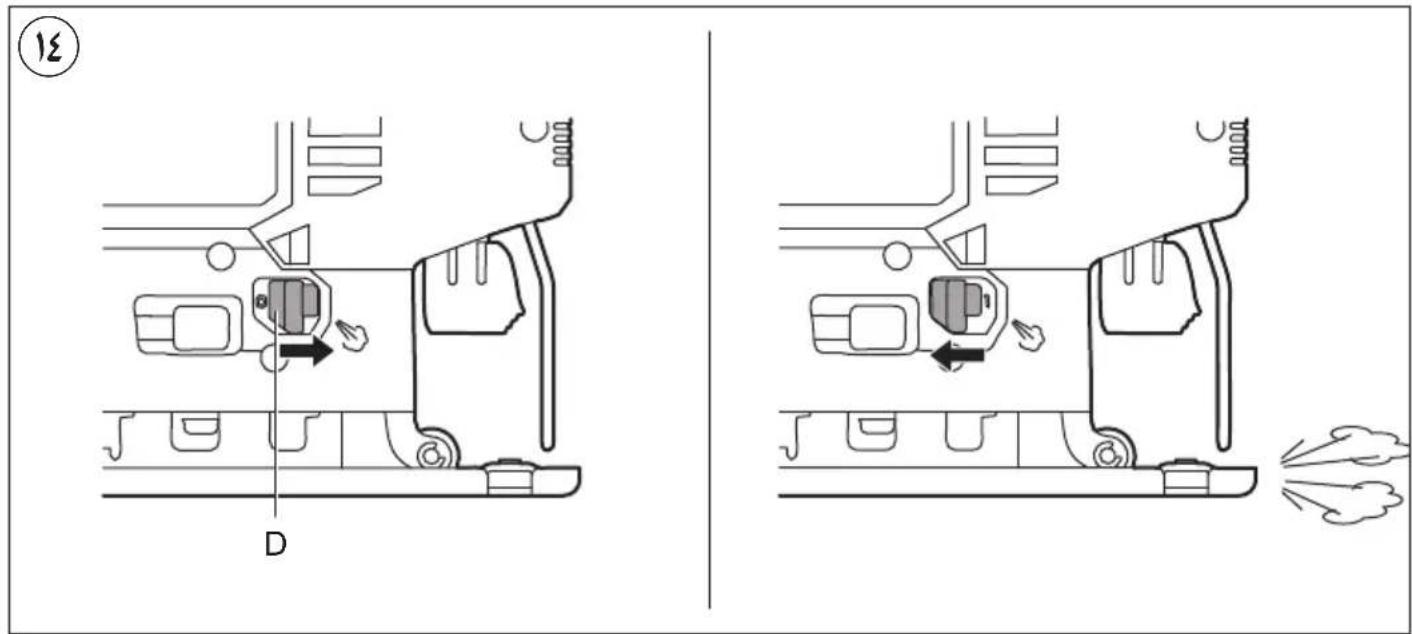
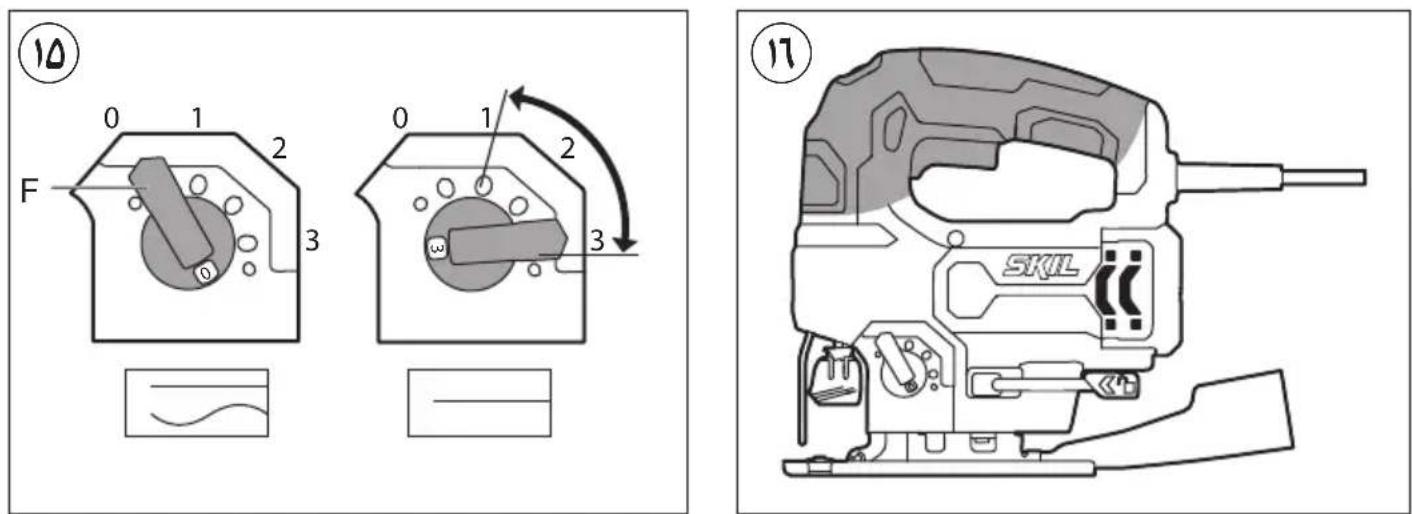
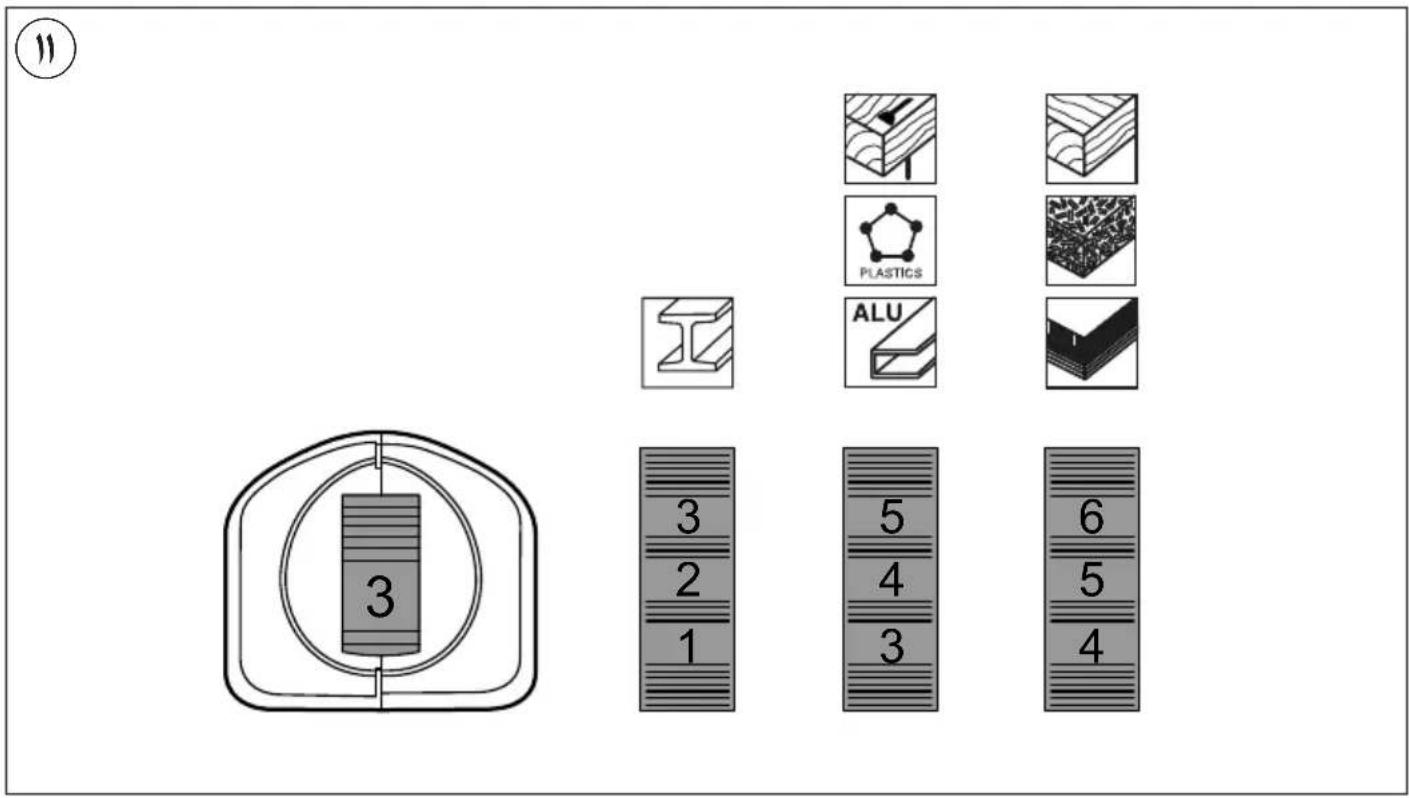
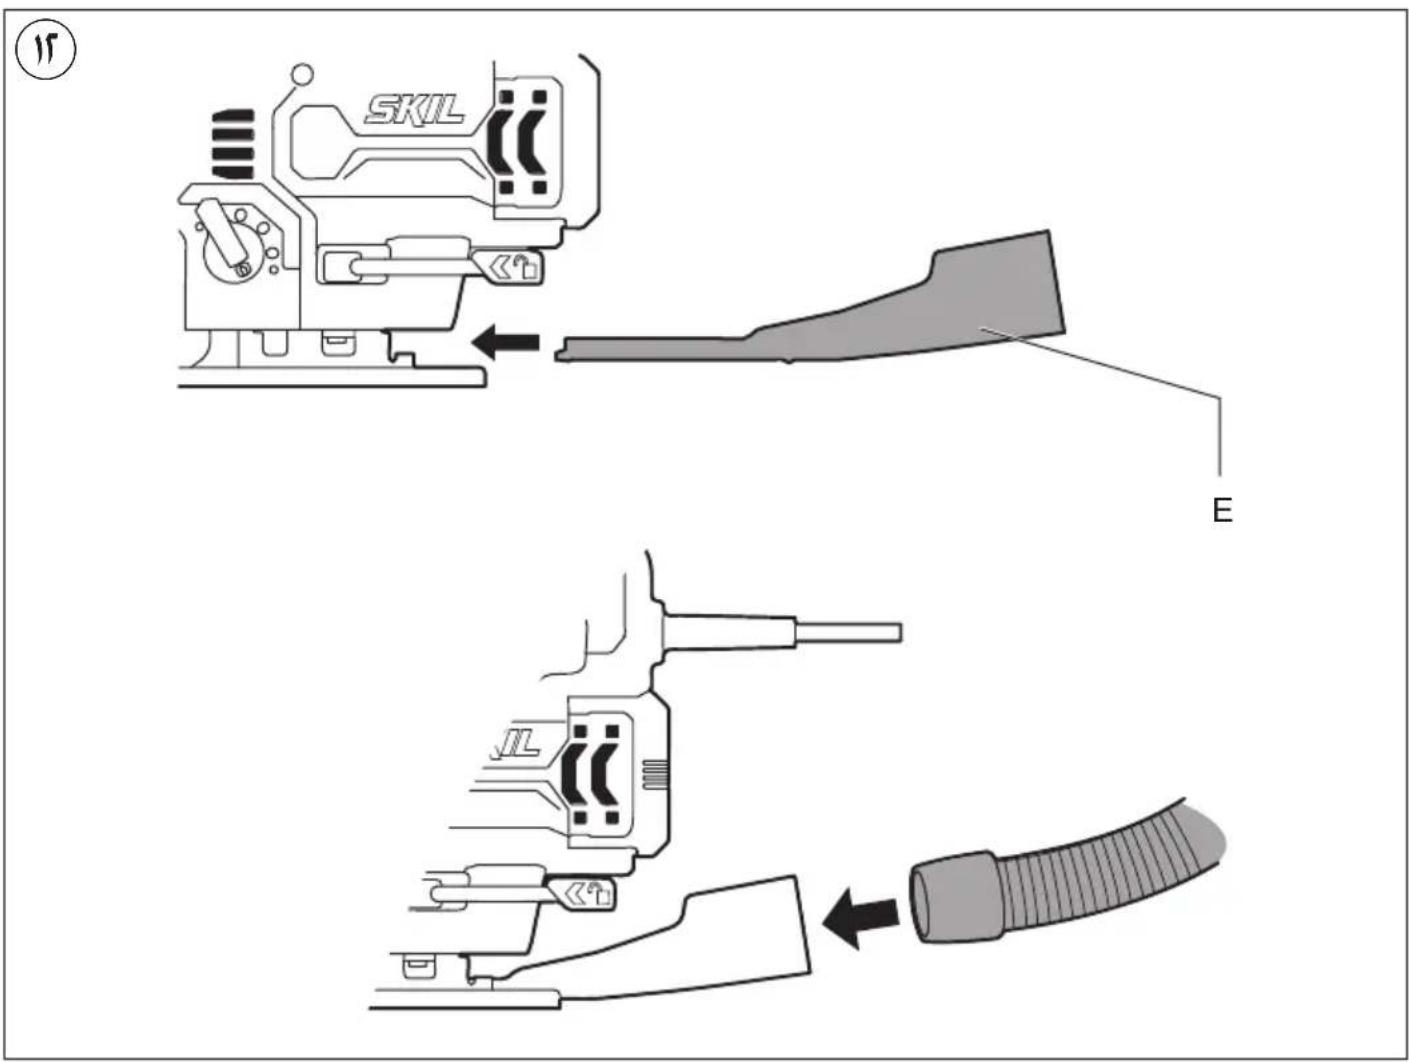
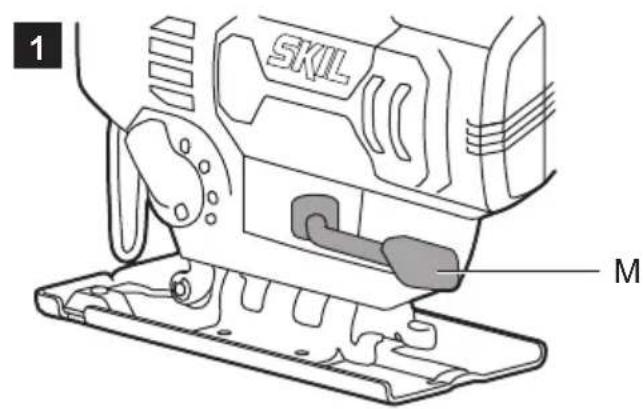
1
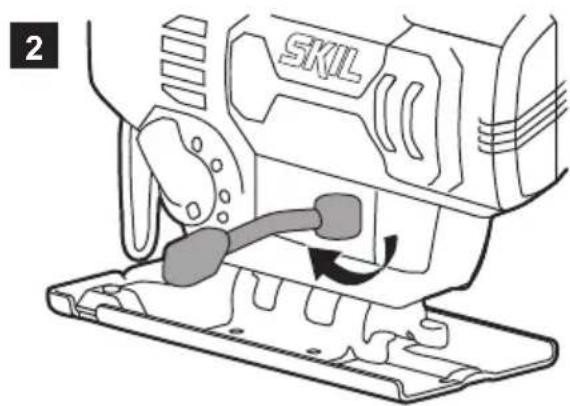
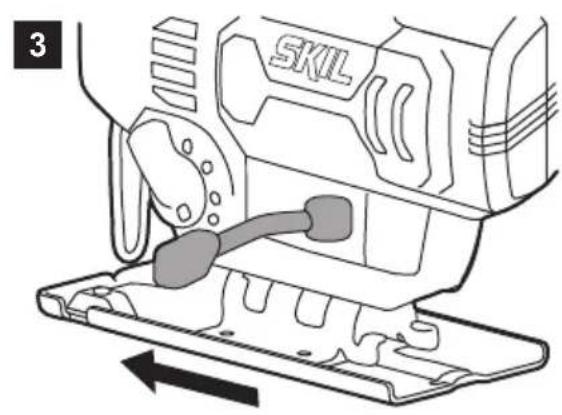
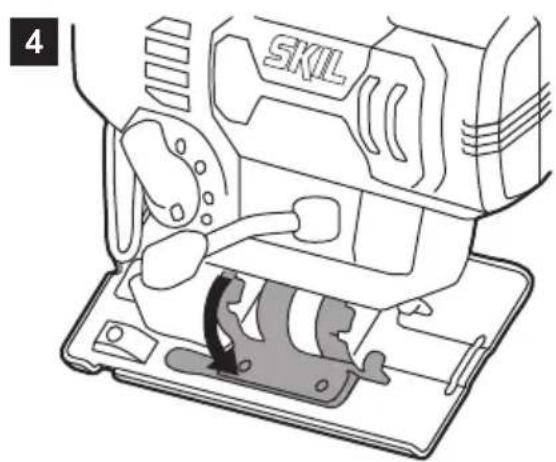
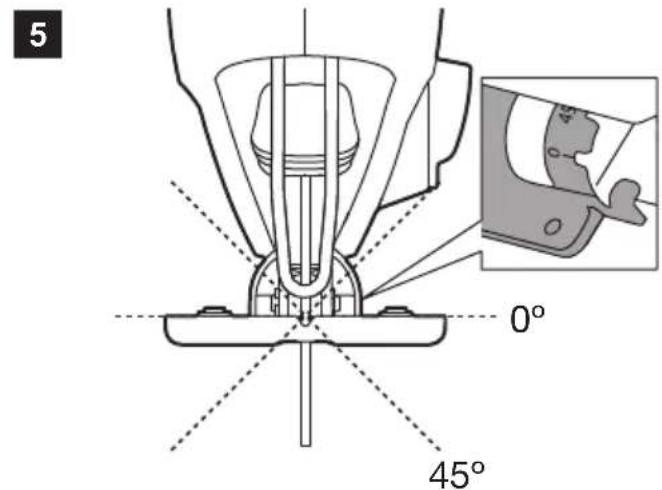
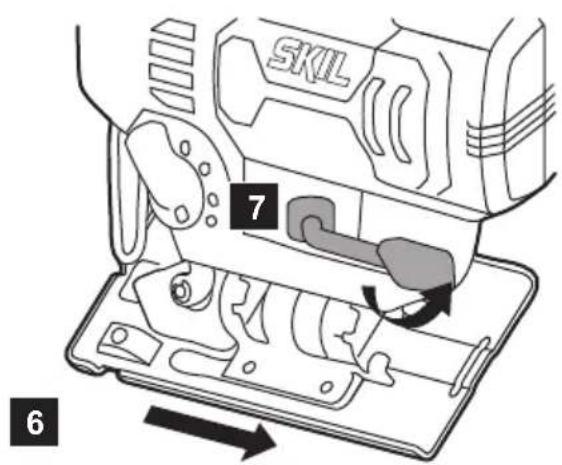
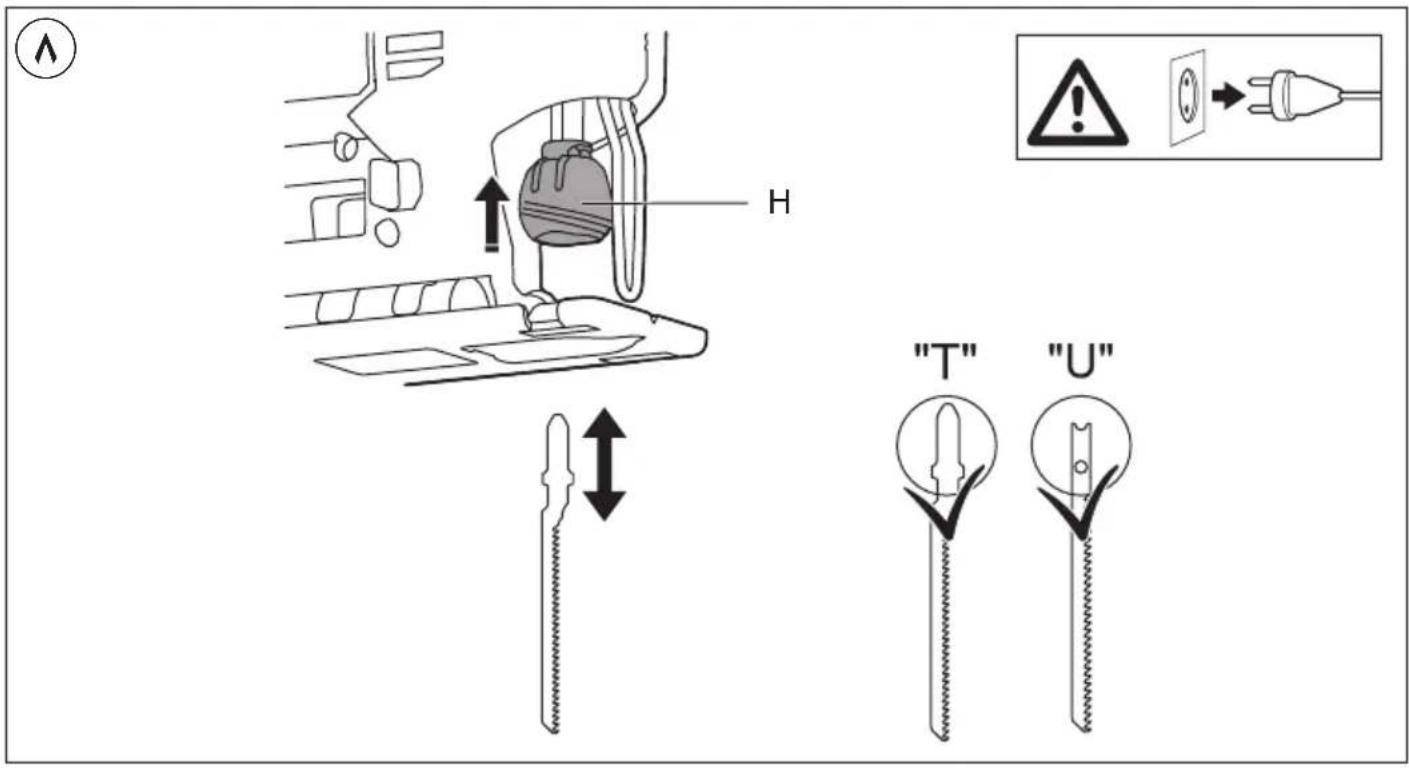
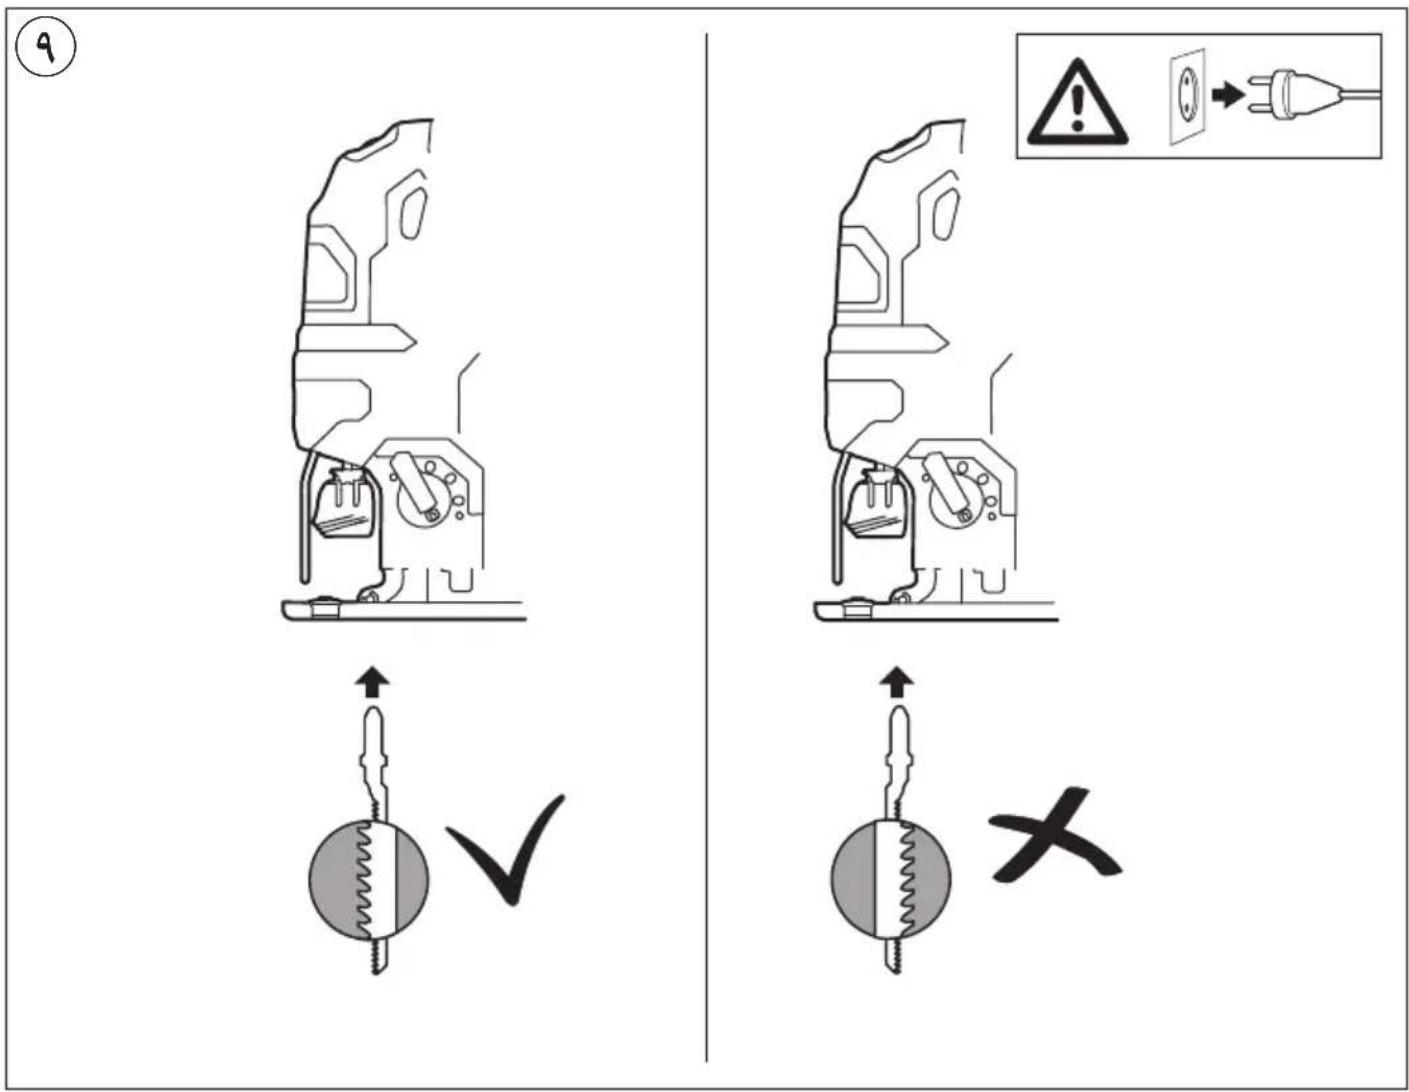
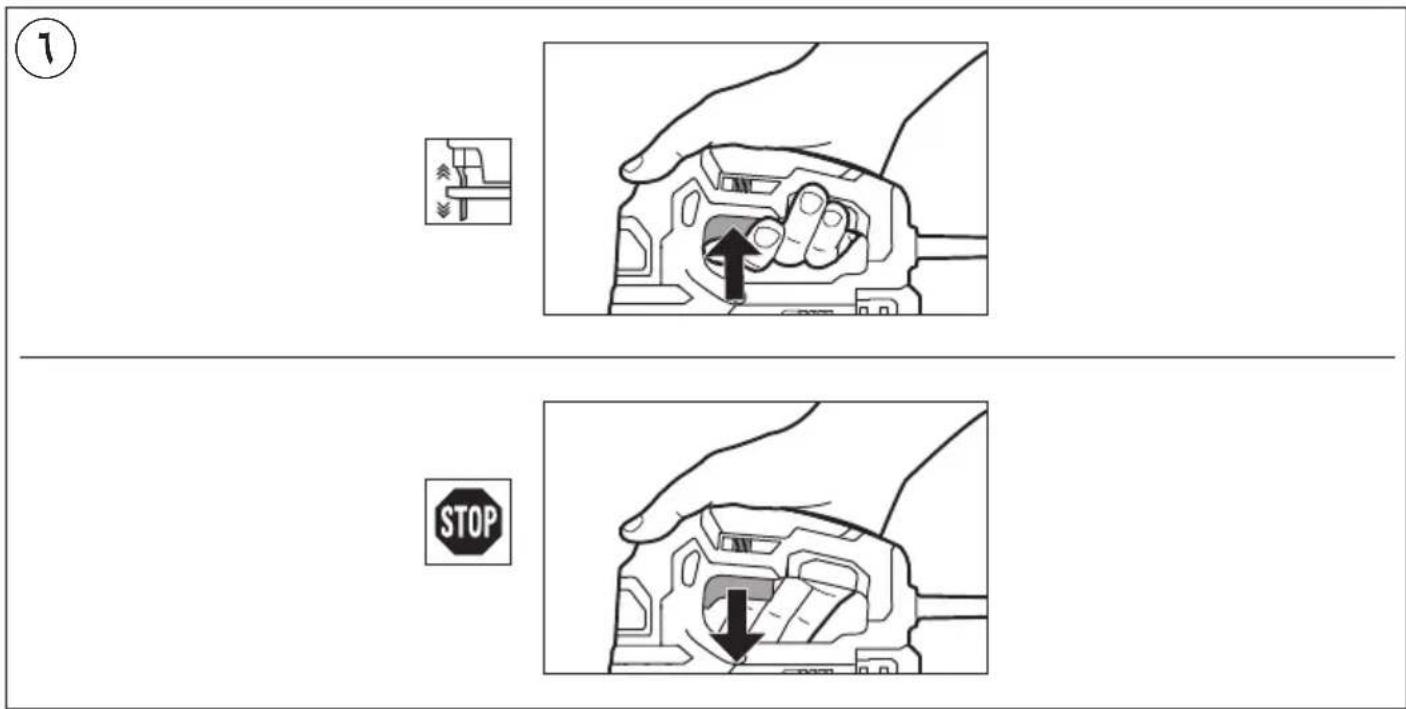
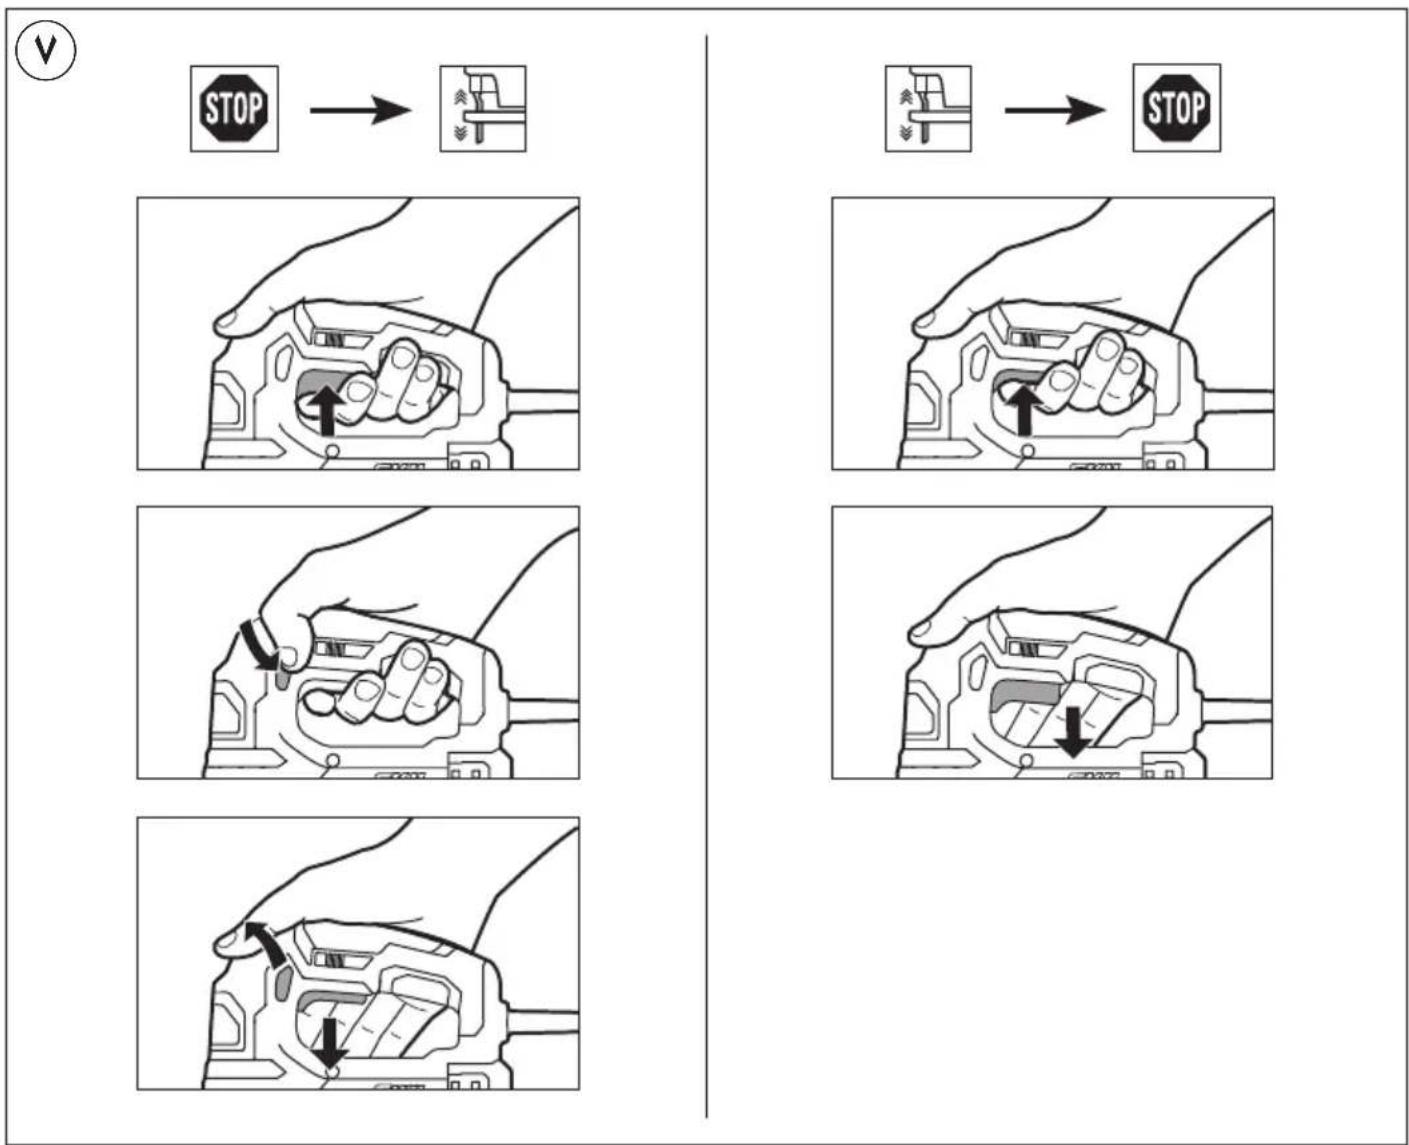
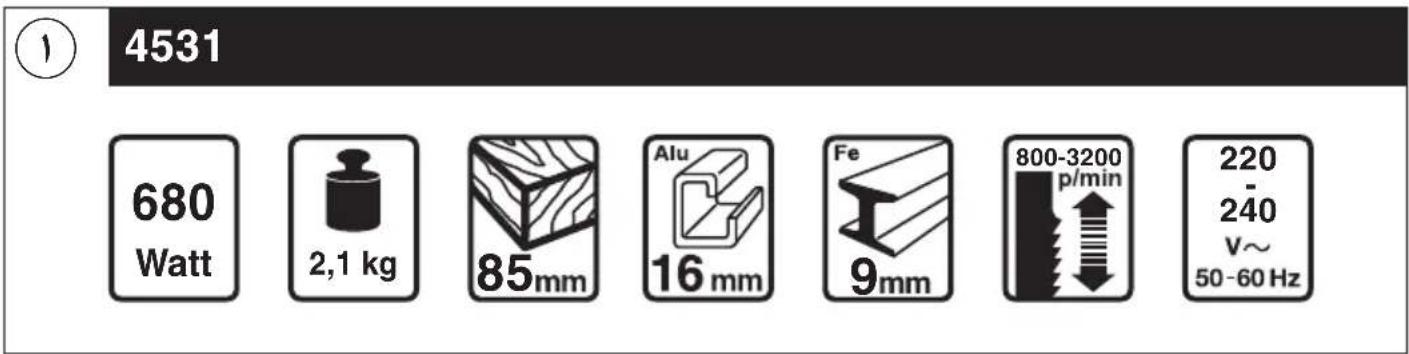
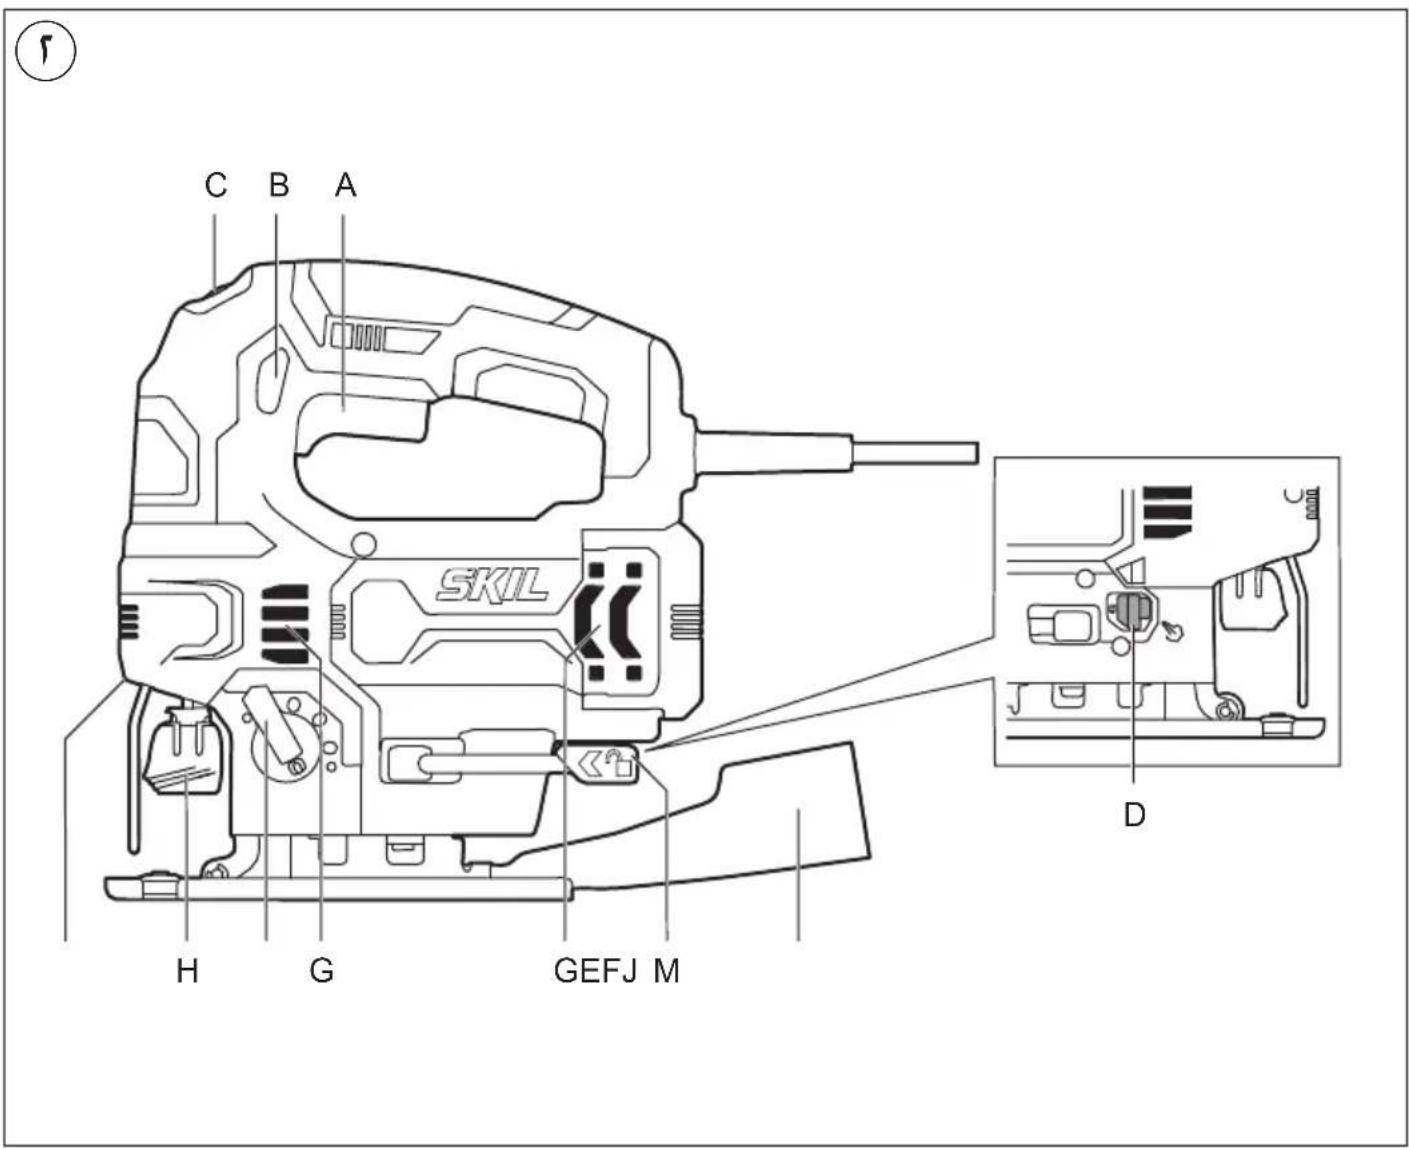
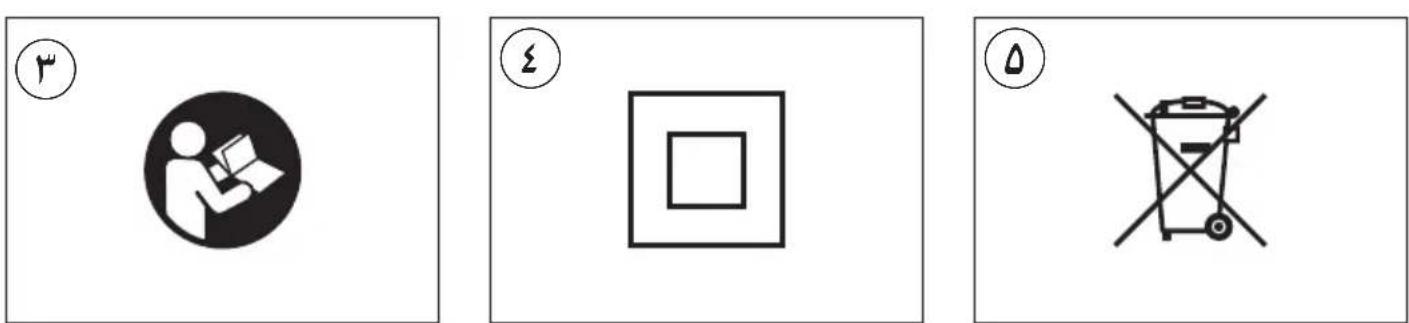
4531
JL
FA


- TECHNICAL DATA①
- TOOLELEMENTS ②
- SAFETY
- GENERAL POWER TOOL SAFETY WARNINGS
- Save all warnings and instructions for future reference.
- 1) WORK AREA SAFETY
- 2) ELECTRICAL SAFETY
- 3) PERSONAL SAFETY
- 4) POWER TOOL USE AND CARE
- SAFETY INSTRUCTIONS FOR JIG SAWS
- GENERAL
- DURING USE
- ACCESSIONS
- AFTER USE
- EXPLANATION OF SYMBOLS ON TOOL
- USE
- APPLICATION ADVICE
- MAINTENANCE / SERVICE
- ENVIRONMENT
- NOISE / VIBRATION
- F
- Scie sauteuse 4531
- INTRODUCTION
- WAARSCHUWING Lees alle
- VEDLIKEHOLD / SERVICE
- Ipeuehenb Kpntnuecknx OTHa3OB uOnnbOchBie Deictbnr nepcoHaJau nn noNb30BaTeJI
- Kpntepnn ppeelbhbix coctoHn
- XpaHHeHne
- TpaHcnpTnpoBbA
- BHIMAHNE!
- BBEDEHNE
- TEXHnueCHe DAHHbIE 1
- CTPAHA N3ΓOTOBJEHIN
- DETAJIHHCTPYMEHTA2
- BE30NACHOCTb
- 1) B3ONACHOCTb PA6OYERO MECTA
- 2) ΘJEKTPNUECKA B3ONACHOCTb
- 5) CEPBnCHOE OBCJyHINBAHNE
- YHA3AHNIO BE3ONACHOCTNДЯ PABOTbIC JIO63HOM
- OBUEE
- NEPED NcNoJb3OBAHHEM
- BO BPEM IHCNOJIb3OBAHNA
- PUNHADJIENHEHOCTN
- NOCJI NCIOJIb3OBAHNA
- IORCHEHNE K YCJIOBhbIM OBO3HAUHnM HA HNCTPYMEHTE
- NcNoJIb3OBAHHe
- COBETbI NO HcNoJIb3OBAHnIO
- TEXO6CJYHKINBAHNE/CEPBNC
- OXPAHA OKPYHKAIOUeN CPeIbI
- UYM/BNBPaIy
- EeHTpHnI IO63nK
- BCTyn
- TEXHIYDAHI ①
- EJIEMHTN IHCTPYMEHTA ②
- BE3NEKA
- 3AΓΑЛbHI BKA3IBKN 3 TEXHIK N B63NEH NIOBOДЖEHHH 3 EJIERTPOIHCTPYMENTAMN
- Dó6pe 36epiraTe Ha MaI6yTHe ci nonepeJHHeHHa Bka3iBKn.
- 1) B63NEHA HA PO6OyOMY MICUJ
- 2) EJIeHTPNUHA B63NEHA
- BHA3IBH NIO B63NEUДЛЯ ELEKTPUHNX IIO63INHIB
- 3AΓΑJIbHE
- ПД YAC BKNOPNCTAHHA
- AHCECYAPN
- NICJI BHKOPUCTAHH
- IORCHEHHA DO yMOBHX IO3HAQOH HA IHCTPYMEHTI
- BUNKOPNCTAHRA
- NOPADNI NO BHKOPNCAHIO
- DOrIaIOBcIyROByBAHHA
- OXOPOHA HABKOLINHbOI CEPEdN
- WYM/BIBPAZI
- YKA3AHN 3A BE3OПАСHA PABOTA 3A ПРОБДЕНТРИОH
- OBUH
- PPEH NOTPeba
- Pn yNITPEBA
- AHCECOAPH
- CNEI PABOTA
- OBRCHEHNE HA CIMBOJNTE IO INHCTPYMEHTA
- YNOTPEBA
- YKA3AHN3A PABOTA
- IODAPbJHHA/CEPBn3
- ОПАЗВАЕ HA OKOLHATA CРEDA
- UYM/BNBPACIN
- TECHNINIAI DUOMENYS ①
- PRIETAISO ELEMENTAI②
- SAUGA
- BENDRIEJI ELEKTRINIJ I RANKIJA SAUGOS ISPEJIMAI
- 2) EJEKTPNUHA CNYPHOCT
- 5)CEPBNCIPAHe
- YIATCTBO 3A BE3EДHA PABOTA CO YEOHATA IINIA
- ONWTH
- PEDA yNOTPEBA
- BO TEKOT HA YNOTPEBATA
- PINBOP
- NO YNOTPEBA
- OBJACHYBAHcE3A CHMBOJNTe 3A AJIATOT
- COBETN3AIIPIMEHA
- OДРЖУBAHБ/CEPBИСЧАПЕ
- 3AHTNTA HA JHBOTHATA CPEINHA
- БУСАВА / ВИБРAUПИ
- AL
- Sharre sege 4531
- HYRJE
- TÉ DHÉNAT TEKNIKE ①
- ELEMENTETVEGEL ②
- SIGURIA
- PARALAJMERIME TEPERGJITHSHME TEGSIGURISE PPER PAJISJET ELEKTRIKE
- sL sLa
- Laa-1g/5g
- EaH 100
Brand : SKIL
Model : 4531 GA
Category : Electric saw