
1450 - Electric saw SKIL - Free user manual and instructions
Find the device manual for free 1450 SKIL in PDF.

| Product Type | Electric Jigsaw |
| Brand | SKIL |
| Model | 1450 |
| Power | 500 W |
| Power Supply | 230 V, 50 Hz |
| Variable Speed | Yes, 500 - 3000 strokes/min |
| Blade Stroke | 20 mm |
| Compatible Materials | Wood, plasterboard, plexiglass, plastic, soft wall tiles |
| Weight | 2.0 kg |
| Dimensions (L x W x H) | 250 x 80 x 200 mm |
| Blade Type | T-shank blade, interchangeable |
| Orbital Action | Yes, 4 positions |
| Dust Blower | Yes, integrated |
| Handle | Ergonomic with rubber coating |
| Safety | Trigger lock, blade guard |
| Maintenance | Clean ventilation slots with a dry cloth |
| Spare Parts | Replacement blades available |
| Repairability | Repairability index 7.0/10 |
Frequently Asked Questions - 1450 SKIL
User questions about 1450 SKIL
0 question about this device. Answer the ones you know or ask your own.
Ask a new question about this device
Download the instructions for your Electric saw in PDF format for free! Find your manual 1450 - SKIL and take your electronic device back in hand. On this page are published all the documents necessary for the use of your device. 1450 by SKIL.
USER MANUAL 1450 SKIL
PROFESSIONAL POWER TOOLS

natural_image
3D rendering of a SKIL MASTERS industrial device with no visible text or symbols on the body itself
GB ORIGINAL INSTRUCTIONS 8
F NOTICE ORIGINALE 12
(D) ORIGINALBETRIEBSANLEITUNG 16
NL ORIGINELE GEBRUIKSAANWIJZING 21
(S) BRUKSANVISNING I ORIGINAL 25
(DK) ORIGINAL BRUGSANVISNING 29
N ORIGINAL BRUKSANVISNING 33
FIN ALKUPERÄISET OHJEET 37
E MANUAL ORIGINAL 41
P MANUAL ORIGINAL 46
(I) ISTRUZIONI ORIGINALI 50
(H) EREDETI HASZNÁLATI UTASÍTÁS 55
CZ PÜVODNÍM NÁVODEM K POUŽÍVÁNÍ 59
TR ORİJINAL İŞLETME TALİMATI 63
PL INSTRUKCJA ORYGINALNA 67
RU ПОДЛИННИК РУКОВОДСТВА
ПО ЭКСПЛУАТАЦИИ
natural_image
Technical line drawing of a mechanical clamp or lever with two cylindrical components and a labeled component 'T' (no text or symbols beyond label)

③

4


5

⑦
natural_image
Line drawing of a curved device handle with a labeled component 'F' (no text or symbols beyond label)| 8 | MAX.↓ | 2610950521 | 2610942614 | |
 | 22 mm | + | - | 5-6 |
 | 22 mm | + | - | 5-6 |
 | 22 mm | + | - | 3-6 |
 | 22 mm | + | - | 2-3 |
 | 22 mm | + | - | 1-2 |
 | 2 mm | + | - | 5-6 |
 | 18 mm | + | - | 5-6 |
 | 5 mm | - | + | 5-6 |
⑨
10
11
natural_image
Technical line drawing of a robotic arm gripping a mechanical component, with no visible text or symbols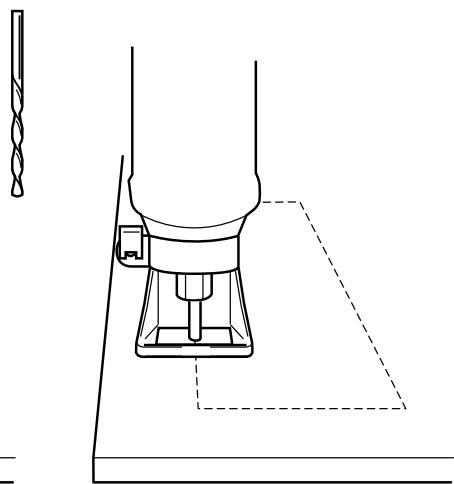
natural_image
Technical line drawing of a mechanical tool with a drill bit and base plate (no text or symbols)12
natural_image
Simple line drawing of a hand using a tool to apply a screw on a flat surface (no text or symbols)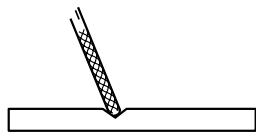
natural_image
Simple line drawing of a tool interacting with a surface (no text or symbols)
natural_image
Abstract geometric pattern with black and white squares arranged in a grid (no text or symbols)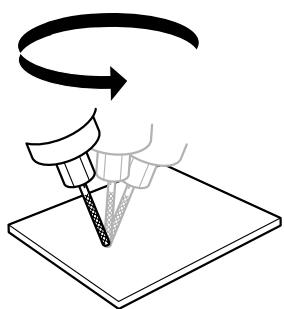
natural_image
Illustration of a hand using a tool to mark a surface with an arrow indicating rotation (no text or symbols)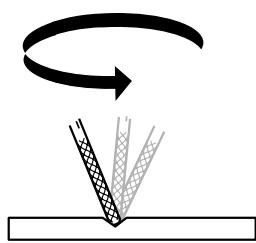
natural_image
Diagram showing a curved arrow rotating above a textured surface with patterned lines (no text or symbols)
natural_image
Pure mechanical diagram showing a spring and tool interacting with a horizontal bar (no text or symbols)13

natural_image
Illustration of a SKIL MASTERS industrial device with no visible text or symbols on the body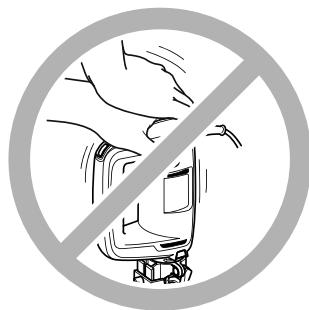
natural_image
Prohibition sign showing a hand using a scooter to stop the wheel (no text or symbols)14
natural_image
Technical line drawing of a mechanical assembly with rollers, gears, and a housing (no text or symbols)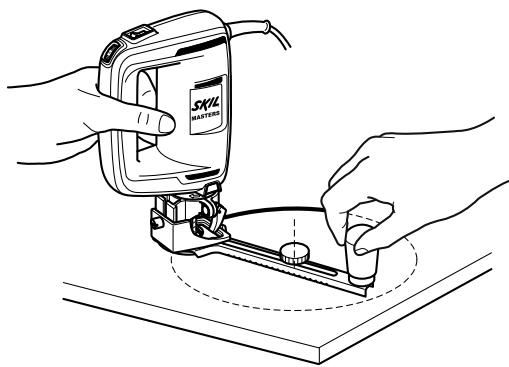
natural_image
Line drawing of hands operating a SKYL MATHLET tool on a workbench (no text or symbols)15

natural_image
Simple line drawing of a container with an 'X' symbol and a circle inside, no text or labels present.GB
Spiral saw
1450
INTRODUCTION
- This tool is intended for cutting gypsum, wood, plexiglass, plastics and soft wall tiles
- Read and save this instruction manual ③
TECHNICAL SPECIFICATIONS ①
TOOL ELEMENTS ②
A Spindle-lock button
B Collet nut
C Wrench
D Collet
E On/off switch
F Speed selection wheel
G Locking lever
H Depth adjustment accessory
J Tool collar
K Adjustment screw
L Depth gauge
M Dust suction accessory
N Adjustment knobs
P Extension for vacuum cleaner
Q Multi-functional bit (5)
R Ventilation slots
S Tile bit
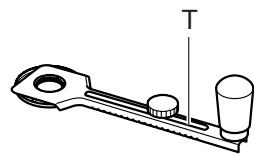
T Circular guide
SAFETY
GENERAL SAFETY INSTRUCTIONS
A WARNING! Read all safety warnings and all instructions. Failure to follow the warnings and instructions may result in electric shock, fire and/or serious injury. Save all warnings and instructions for future reference. The term “power tool” in the warnings refers to your mains-operated (corded) power tool or battery-operated (cordless) power tool.
1) WORK AREA SAFETY
a) Keep work area clean and well lit.
Cluttered or dark areas invite accidents.
b) Do not operate power tools in explosive atmospheres, such as in the presence of flammable liquids, gases or dust. Power tools create sparks which may ignite the dust or fumes.
c) Keep children and bystanders away while operating a power tool. Distractions can cause you to lose control.
2) ELECTRICAL SAFETY
a) Power tool plugs must match the outlet. Never modify the plug in any way. Do not use any adapter plugs with earthed (grounded) power tools. Unmodified plugs and matching outlets will reduce risk of electric shock.
b) Avoid body contact with earthed or grounded surfaces such as pipes, radiators, ranges and refrigerators. There is an increased risk of electric shock if your body is earthed or grounded.
c) Do not expose power tools to rain or wet conditions. Water entering a power tool will increase the risk of electric shock.
d) Do not abuse the cord. Never use the cord for carrying, pulling or unplugging the power tool. Keep cord away from heat, oil, sharp edges or moving parts. Damaged or entangled cords increase the risk of electric shock.
e) When operating a power tool outdoors, use an extension cord suitable for outdoor use. Use of a cord suitable for outdoor use reduces the risk of electric shock.
f) If operating a power tool in a damp location is unavoidable, use an earth leakage circuit breaker. Use of an earth leakage circuit breaker reduces the risk of electric shock.
3) PERSONAL SAFETY
a) Stay alert, watch what you are doing and use common sense when operating a power tool. Do not use a power tool while you are tired or under the influence of drugs, alcohol or medication. A moment of inattention while operating power tools may result in serious personal injury.
b) Use personal protective equipment. Always wear eye protection. Protective equipment such as dust mask, non-skid safety shoes, hard hat, or hearing protection used for appropriate conditions will reduce personal injuries.
c) Prevent unintentional starting. Ensure the switch is in the off-position before connecting to power source and/or battery pack, picking up or carrying the tool. Carrying power tools with your finger on the switch or energising power tools that have the switch on invites accidents.
d) Remove any adjusting key or wrench before turning the power tool on. A wrench or a key left attached to a rotating part of the power tool may result in personal injury.
e) Do not overreach. Keep proper footing and balance at all times. This enables better control of the power tool in unexpected situations.
f) Dress properly. Do not wear loose clothing or jewellery. Keep your hair, clothing and gloves away from moving parts. Loose clothes, jewellery or long hair can be caught in moving parts.
g) If devices are provided for the connection of dust extraction and collection facilities, ensure these are connected and properly used. Use of dust collection can reduce dust-related hazards.
4) POWER TOOL USE AND CARE
a) Do not force the power tool. Use the correct power tool for your application. The correct power tool will do the job better and safer at the rate for which it was designed.
b) Do not use the power tool if the switch does not turn it on and off. Any power tool that cannot be controlled with the switch is dangerous and must be repaired.
c) Disconnect the plug from the power source and/or the battery pack from the power tool before making any adjustments, changing accessories, or storing power tools. Such preventive safety measures reduce the risk of starting the power tool accidentally.
d) Store idle power tools out of the reach of children and do not allow persons unfamiliar with the power tool or these instructions to operate the power tool. Power tools are dangerous in the hands of untrained users.
e) Maintain power tools. Check for misalignment or binding of moving parts, breakage of parts and any other condition that may affect the power tool's operation. If damaged, have the power tool repaired before use. Many accidents are caused by poorly maintained power tools.
f) Keep cutting tools sharp and clean.
Properly maintained cutting tools with sharp cutting edges are less likely to bind and are easier to control.
g) Use the power tool, accessories and tool bits etc., in accordance with these instructions, taking into account the working conditions and the work to be performed. Use of the power tool for operations different from those intended could result in a hazardous situation.
5) SERVICE
a) Have your power tool serviced by a qualified repair person using only identical replacement parts.
This will ensure that the safety of the power tool is maintained.
SPECIFIC SAFETY INSTRUCTIONS FOR SPIRAL SAWS
A) The outside diameter and the thickness of your accessory must be within the capacity rating of your power tool. Incorrectly sized accessories cannot be adequately guarded or controlled.
B) Wear personal protective equipment ④. Depending on application, use face shield, safety goggles or safety glasses. As appropriate, wear dust mask, hearing protectors, gloves and shop apron capable of stopping small abrasive or workpiece fragments. The eye protection must be capable of stopping flying debris generated by various operations. The dust mask or respirator must be capable of filtrating particles generated by your operation. Prolonged exposure to high intensity noise may cause hearing loss.
C) Keep bystanders a safe distance away from work area. Anyone entering the work area must wear personal protective equipment. Fragments of the workpiece or of a broken accessory may fly away and cause injury beyond the immediate area of operation.
D) Hold the power tool only by the insulated gripping surfaces when performing an operation where the cutting tool may contact hidden wiring or its own power cord. Contact with a "live" wire will also make exposed metal parts of the power tool "live" and shock the operator.
E) Position the cord clear of the spinning accessory. If you lose control, the cord may be cut or snagged and your hand or arm may be pulled into the spinning accessory.
F) Never lay the power tool down until the accessory has come to a complete stop. The spinning accessory may grab the surface and pull the power tool out of your control.
G) Do not run the power tool while carrying it at your side. Accidental contact with the spinning accessory could snag your clothing, pulling the accessory into your body.
H) Regularly clean the power tool's air vents. The motor's fan will draw the dust inside the housing and excessive accumulation of powdered metal may cause electrical hazards.
I) Do not operate the power tool near flammable materials. Sparks could ignite these materials.
GENERAL
- This tool should not be used by people under the age of 16 years
- Only use this tool for applications without the use of water
- Always disconnect plug from power source before making any adjustment or changing any accessory
- Protect accessories from impact, shock and grease
ACCESSORIES
- Only use the original accessories supplied with the tool (2610950521 & 2610942614); damage due to the use of non-original accessories will be excluded from the warranty
- SKIL can assure flawless functioning of the tool only when the correct accessories are used which can be obtained from your SKIL dealer
- Use only accessories with an allowable speed matching at least the highest no-load speed of the tool
- Do not use damaged or deformed cutting bits
- Only use sharp cutting bits
- Cutting bits become hot during use; do not touch them until they have cooled down
- Handle the sharp cutting bits with caution
- Only use cutting bits of 4 mm (5/32") ∅
OUTDOOR USE
- When used outdoors, connect the tool via a fault current (FI) circuit breaker with a triggering current of 30 mA maximum, and only use an extension cord which is intended for outdoor use and equipped with a splashproof coupling-socket
BEFORE USE
- Always check that the supply voltage is the same as the voltage indicated on the nameplate of the tool (tools with a rating of 230V or 240V can also be connected to a 220V supply)
- Do not work materials containing asbestos (asbestos is considered carcinogenic)
- Secure the workpiece (a workpiece clamped with clamping devices or in a vice is held more securely than by hand)
-
Use completely unrolled and safe extension cords with a capacity of 16 Amps (U.K. 13 Amps)
-
Dust from material such as paint containing lead, some wood species, minerals and metal may be harmful (contact with or inhalation of the dust may cause allergic reactions and/or respiratory diseases to the operator or bystanders); wear a dust mask ⑤ and work with a dust extraction device when connectable
- Certain kinds of dust are classified as carcinogenic (such as oak and beech dust) especially in conjunction with additives for wood conditioning; wear a dust mask ⑤ and work with a dust extraction device when connectable
- Follow the dust-related national requirements for the materials you want to work with
- Avoid damage that can be caused by screws, nails and other elements in your workpiece; remove them before you start working
- Use suitable detectors to find hidden utility lines or call the local utility company for assistance (contact with electric lines can lead to fire or electrical shock; damaging a gas line can result in an explosion; penetrating a water pipe will cause property damage or an electrical shock)
- Ensure that the collet size corresponds with the shaft size of the accessory
DURING USE
- If the cord is damaged or cut through while working, do not touch the cord, but immediately disconnect the plug
- Never use the tool when cord is damaged; have it replaced by a qualified person
- Keep hands away from rotating accessories
- Never use spindle lock while tool is running (damage due to improper handling will be excluded from the guarantee)
- In case of electrical or mechanical malfunction, immediately switch off the tool and disconnect the plug
AFTER USE
- After switching off the tool, never stop the rotation of the accessory by a force applied against it
- Store tool in locations where temperature will not exceed 50°C
WHEN CONNECTING NEW 3-PIN PLUG (U.K. ONLY):
- Do not connect the blue (= neutral) or brown (= live) wire in the cord of this tool to the earth terminal of the plug
- If for any reason the old plug is cut off the cord of this tool, it must be disposed of safely and not left unattended
USE
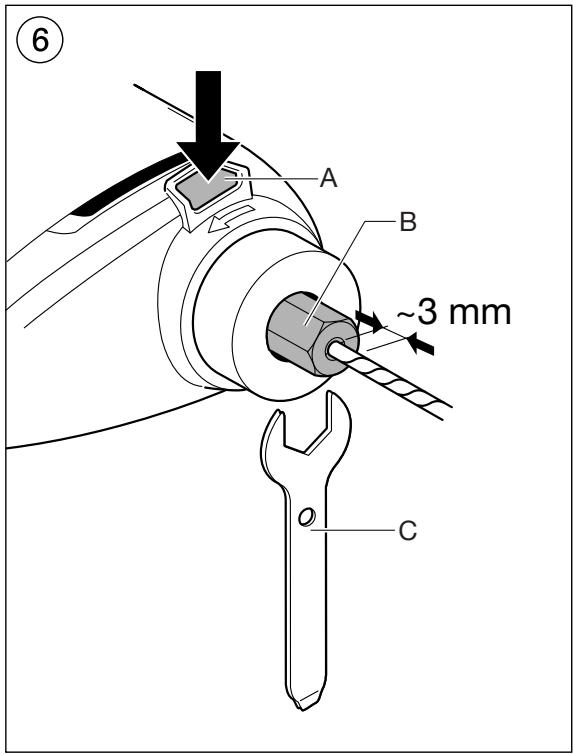
- Mounting of accessories ⑥
! switch off the tool and disconnect the plug
! ensure that collet size corresponds with shaft size of accessory
- push spindle-lock button A and hold it while you turn collet nut B by hand until the spindle lock prevents further rotation and loosen collet nut B with wrench C
! push spindle-lock button A only when tool is at a standstill
- insert required accessory in collet D (leave approximately 3 mm of the shaft exposed)
- push spindle-lock button A and hold it while you tighten collet nut B with wrench C
! avoid excessive tightening of collet nut B
! never tighten collet nut, if there is no accessory in collet; collet may be damaged
- Before using the tool
- ensure that accessory is correctly mounted and firmly tightened
- check if accessory runs freely by turning it by hand
- test-run tool for at least 30 seconds at highest no-load speed in a safe position
- stop immediately in case of considerable vibration or other defects and check tool to determine the cause
- On/off
- switch on/off the tool by pushing switch E ② in "I"/"O" position
! be aware of the sudden impact when the tool is switched on
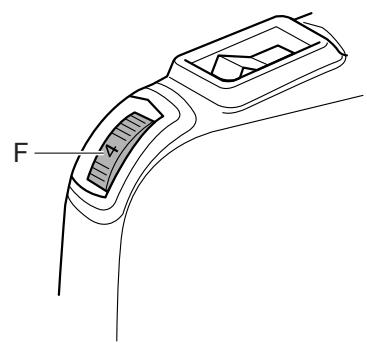
- Speed control ⑦
For optimal results on different materials
- select speed with wheel F (also while tool is running)
- use table ⑧ as reference for determining the right speed
- before starting a job, find the optimal speed by testing out on spare material
! after longer periods of working at low speed, allow the tool to cool down by running it for approximately 3 minutes at high speed with no load
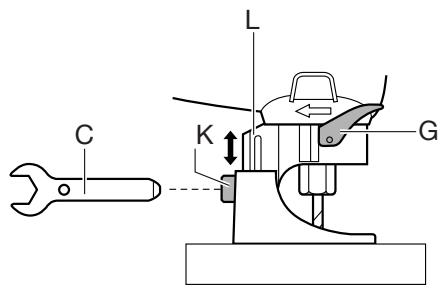
- Depth adjustment accessory ⑨
For guiding the tool along the workpiece at a pre-set cutting depth
- release lever G before mounting/removing accessory H onto/from tool collar
! lock lever G after mounting accessory H - loosen adjustment screw K counter-clockwise with wrench C as illustrated
- slide depth gauge L up or down to the desired cutting depth and tighten screw K clockwise
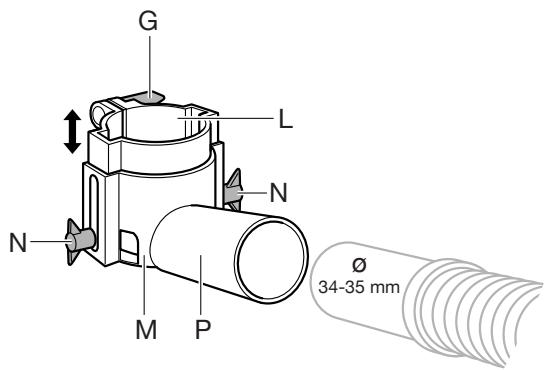
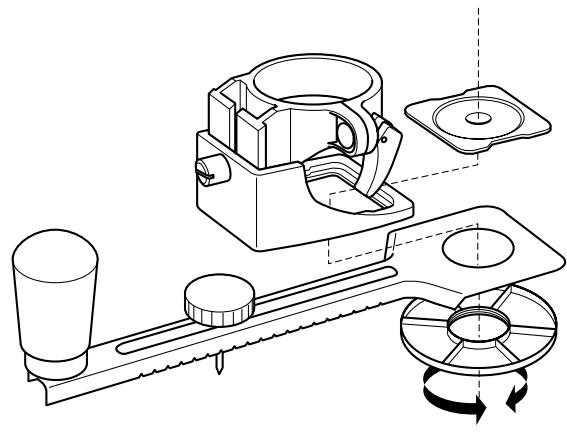
- Dust suction accessory ⑩
For combining tool guidance at a pre-set cutting depth with dust suction
- release lever G before mounting/removing accessory M onto/from tool collar
! lock lever G after mounting accessory M - loosen 2 adjustment knobs N counter-clockwise
- slide depth gauge L up or down to the desired cutting depth and tighten 2 adjustment knobs N clockwise
- connect vacuum cleaner to extension P
! never let the vacuum cleaner hose interfere with the cutting operation
- Operating the tool ⑪
- insert multi-functional bit Q
- mount depth adjustment accessory H or dust suction accessory M
- set wheel F ② to desired speed
- place the bit onto the workpiece at a 45^ angle
- switch on the tool
- slowly lower the bit into the workpiece at a 45^ angle
-
after reaching the desired cutting depth, move the tool to its normal working position again
-
continue to cut along the cutting line in a clockwise direction with the accessory base resting flat on the workpiece
- cut slowly for optimal control (fast cutting will cause excessive heat and may shorten the service life of the bit)
- after completing the cut, switch off the tool and carefully remove it from the workpiece
! always test out first on a piece of scrap material
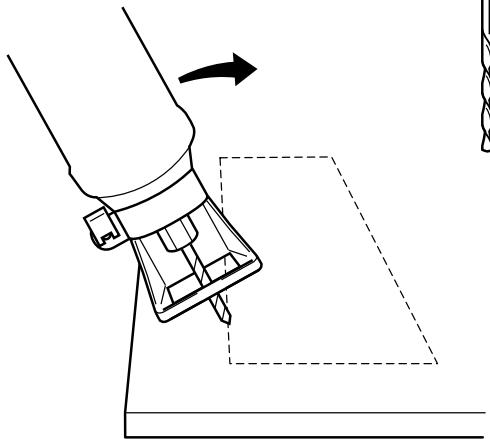
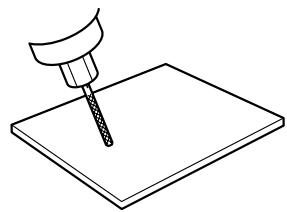
• Cutting soft wall tiles ⑫
! insert tile bit S
- create a starting-point for plunge cutting by slowly making a groove on the tile's surface at a 45^ angle
- start rotating the tool at a 45^ angle, while keeping the point of the cutting bit firmly positioned within the groove
- continue rotating the tool until the cutting bit has completely plunged through the wall tile
- move the tool to a 90° angle and guide it up and down along the desired cutting line (the up and down movement prolongs the service life of the cutting bit)
- Holding and guiding the tool ⑬
! while working, always hold the tool at the grey-coloured grip area(s)
- hold tool firmly with both hands, so you will have full control of the tool at all times
- keep ventilation slots R ② uncovered
- do not apply too much pressure on the tool (excessive pressure will cause excessive heat and may shorten the service life of the accessory)
APPLICATION ADVICE
- For making circular cut-outs use circular guide T ⑭
- When cutting a hole in a vertical surface, start and end your cut at the top, so that the scrap part will not drop onto the rotating bit
MAINTENANCE / SERVICE
- Always keep tool and cord clean (especially the ventilation slots R ②)
! do not attempt to clean ventilation slots by inserting pointed objects through openings
! disconnect the plug before cleaning
- Always clean depth adjustment accessory H ② and dust suction accessory M ② after use
- If the tool should fail despite the care taken in manufacturing and testing procedures, repair should be carried out by an after-sales service centre for SKIL power tools
- send the tool undismantled together with proof of purchase to your dealer or the nearest SKIL service station (addresses as well as the service diagram of the tool are listed on www.skilmasters.com)
ENVIRONMENT
- Do not dispose of electric tools, accessories and packaging together with household waste material (only for EU countries)
- in observance of European Directive 2002/96/EC on waste of electric and electronic equipment and its implementation in accordance with national law, electric tools that have reached the end of their life must be collected separately and returned to an environmentally compatible recycling facility
- symbol ⑮ will remind you of this when the need for disposing occurs
CE DECLARATION OF CONFORMITY
- We declare under our sole responsibility that this product is in conformity with the following standards or standardized documents: EN 60 745, EN 55 014, in accordance with the provisions of the directives 2006/95/EC, 2004/108/EC, 98/37/EC (until Dec. 28, 2009), 2006/42/EC (from Dec. 29, 2009 on)
• Technical file at: SKIL Europe BV (PT-SEU/PJE), 4825 BD Breda, NL
CE
09 SKIL Europe BV A. v.d. Kloot

NOISE/VIBRATION
- Measured in accordance with EN 60 745 the sound pressure level of this tool is 88 dB(A) and the sound power level 99 dB(A) (standard deviation: 3 dB), and the vibration 3.0 m/s ^2 (hand-arm method; uncertainty K = 1.5 m/s ^2 )
-
The vibration emission level has been measured in accordance with a standardised test given in EN 60 745; it may be used to compare one tool with another and as a preliminary assessment of exposure to vibration when using the tool for the applications mentioned
-
using the tool for different applications, or with different or poorly maintained accessories, may significantly increase the exposure level
- the times when the tool is switched off or when it is running but not actually doing the job, may significantly reduce the exposure level
! protect yourself against the effects of vibration by maintaining the tool and its accessories, keeping your hands warm, and organizing your work patterns

Perceuse
1450
INTRODUCTION

- GB
- Spiral saw
- INTRODUCTION
- TECHNICAL SPECIFICATIONS ①
- TOOL ELEMENTS ②
- SAFETY
- GENERAL SAFETY INSTRUCTIONS
- SPECIFIC SAFETY INSTRUCTIONS FOR SPIRAL SAWS
- GENERAL
- ACCESSORIES
- OUTDOOR USE
- BEFORE USE
- DURING USE
- AFTER USE
- USE
- APPLICATION ADVICE
- MAINTENANCE / SERVICE
- ENVIRONMENT
- CE DECLARATION OF CONFORMITY
- NOISE/VIBRATION
- Perceuse
Brand : SKIL
Model : 1450
Category : Electric saw