SC 2 Deluxe EasyFix Premium - Steam cleaner Kärcher - Free user manual and instructions
Find the device manual for free SC 2 Deluxe EasyFix Premium Kärcher in PDF.
| Product type | Steam cleaner |
| Brand | Kärcher |
| Model | SC 2 Deluxe EasyFix Premium |
| Dimensions (L x W x H) | 304 x 231 x 287 mm |
| Weight (without accessories) | 2.7 kg |
| Power supply | 220-240 V ~ 50-60 Hz |
| Heating power | 1500 W |
| Maximum operating pressure | 0.32 MPa |
| Heating time | 6.5 minutes |
| Continuous steam output | 40 g/min |
| Maximum steam burst | 100 g/min |
| Boiler capacity | 1.0 L |
| Protection class | I |
| Protection type | IPX4 |
| Included accessories | Steam hose, steam handle, jet nozzle, round brushes (small and large), Power nozzle, hand tool, floor nozzle, microfiber cloths (1+2), extension tubes (2), accessory bag |
| Main functions | Steam cleaning without detergent, adjustable steam output (3 positions), child safety lock, automatic shut-off in case of overheating |
| Safety | Pressure regulator, safety closure with valve, safety thermostat, child safety lock on steam selector |
| Maintenance and cleaning | Descaling recommended according to water hardness (every 25 to 55 fills), rinse boiler every 10 fills, machine wash cloths at 60°C max |
| Spare parts and repairability | Original accessories and spare parts available at www.karcher.com, authorized after-sales service |
| Warranty | According to country conditions, material or manufacturing defects covered (see purchase invoice) |
Frequently Asked Questions - SC 2 Deluxe EasyFix Premium Kärcher
User questions about SC 2 Deluxe EasyFix Premium Kärcher
0 question about this device. Answer the ones you know or ask your own.
Ask a new question about this device
Download the instructions for your Steam cleaner in PDF format for free! Find your manual SC 2 Deluxe EasyFix Premium - Kärcher and take your electronic device back in hand. On this page are published all the documents necessary for the use of your device. SC 2 Deluxe EasyFix Premium by Kärcher.
USER MANUAL SC 2 Deluxe EasyFix Premium Kärcher
Environmental protection 10
Accessories and spare parts 10
Scope of delivery 10
Warranty. 10
Safety devices 10
Description of the unit 10
Installation 11
Operation 11
Important application instructions. 12
How to use the Accessories 12
Care and service 13
Troubleshooting guide 13
Technical data 13
General notes

Read these original operating instructions and the enclosed safety instructions before using the device for the first time.
Act in accordance with them.
Keep both books for future reference or for future owners.
Intended use
Only use the appliance in private households. The appliance is intended for cleaning with steam and can be used with appropriate accessories as described in these operating instructions. Detergents are not required. Observe the safety instructions.
Environmental protection

The packing materials can be recycled. Please dispose of packaging in accordance with the environmental regulations.

Electrical and electronic appliances contain valuable, recyclable materials and often components such as batteries, rechargeable batteries or oil, which - if handled or disposed of incorrectly - can
pose a potential threat to human health and the environment. However, these components are required for the correct operation of the appliance. Appliances marked by this symbol are not allowed to be disposed of together with the household rubbish.
Notes on the content materials (REACH)
Current information on content materials can be found at: www.kaercher.com/REACH
Accessories and spare parts
Only use original accessories and original spare parts. They ensure that the appliance will run fault-free and safely.
Information on accessories and spare parts can be found at www.kaercher.com.
Scope of delivery
The scope of delivery for the appliance is shown on the packaging. Check the contents for completeness when unpacking. If any accessories are missing or in the event of any shipping damage, please notify your dealer.
Warranty
The warranty conditions issued by our relevant sales company apply in all countries. We shall remedy possible malfunctions on your appliance within the warranty period free of cost, provided that a material or manufacturing defect is the cause. In a warranty case, please contact your dealer (with the purchase receipt) or the next authorised customer service site.
(See overleaf for the address)
Safety devices
CAUTION
Missing or modified safety devices
Safety devices are provided for your own protection. Never modify or bypass safety devices.
Symbols on the appliance
(according to type of appliance)
| Risk of burns, surface of appliance be- comes hot during operation | |
| Risk of scalding from steam | |
| Read operating instructions |
Pressure controller
The pressure controller keeps the pressure in the steam boiler as constant as possible during operation. The heating is switched off when the maximum operating pressure is reached in the steam boiler and is activated if there is a pressure drop in the steam boiler as a result of a steam removal.
Safety lock
The safety lock seals the steam boiler from the steam pressure present. If the pressure regulator is defective and overpressure occurs in the steam boiler, an pressure relief valve opens in the safety lock and steam leaks out through the lock.
Prior to restarting the appliance, contact the responsible KÄRCHER Customer Service.
Safety thermostat
The safety thermostat prevents the device from overheating. If the pressure controller fails and the device overheats, then the safety thermostat switches the device off. To reset the safety thermostat, contact the responsible KÄRCHER Customer Service.
Description of the unit
The maximum amount of equipment is described in these operating instructions. Depending on the model used, there are differences in the scope of delivery (see packaging).
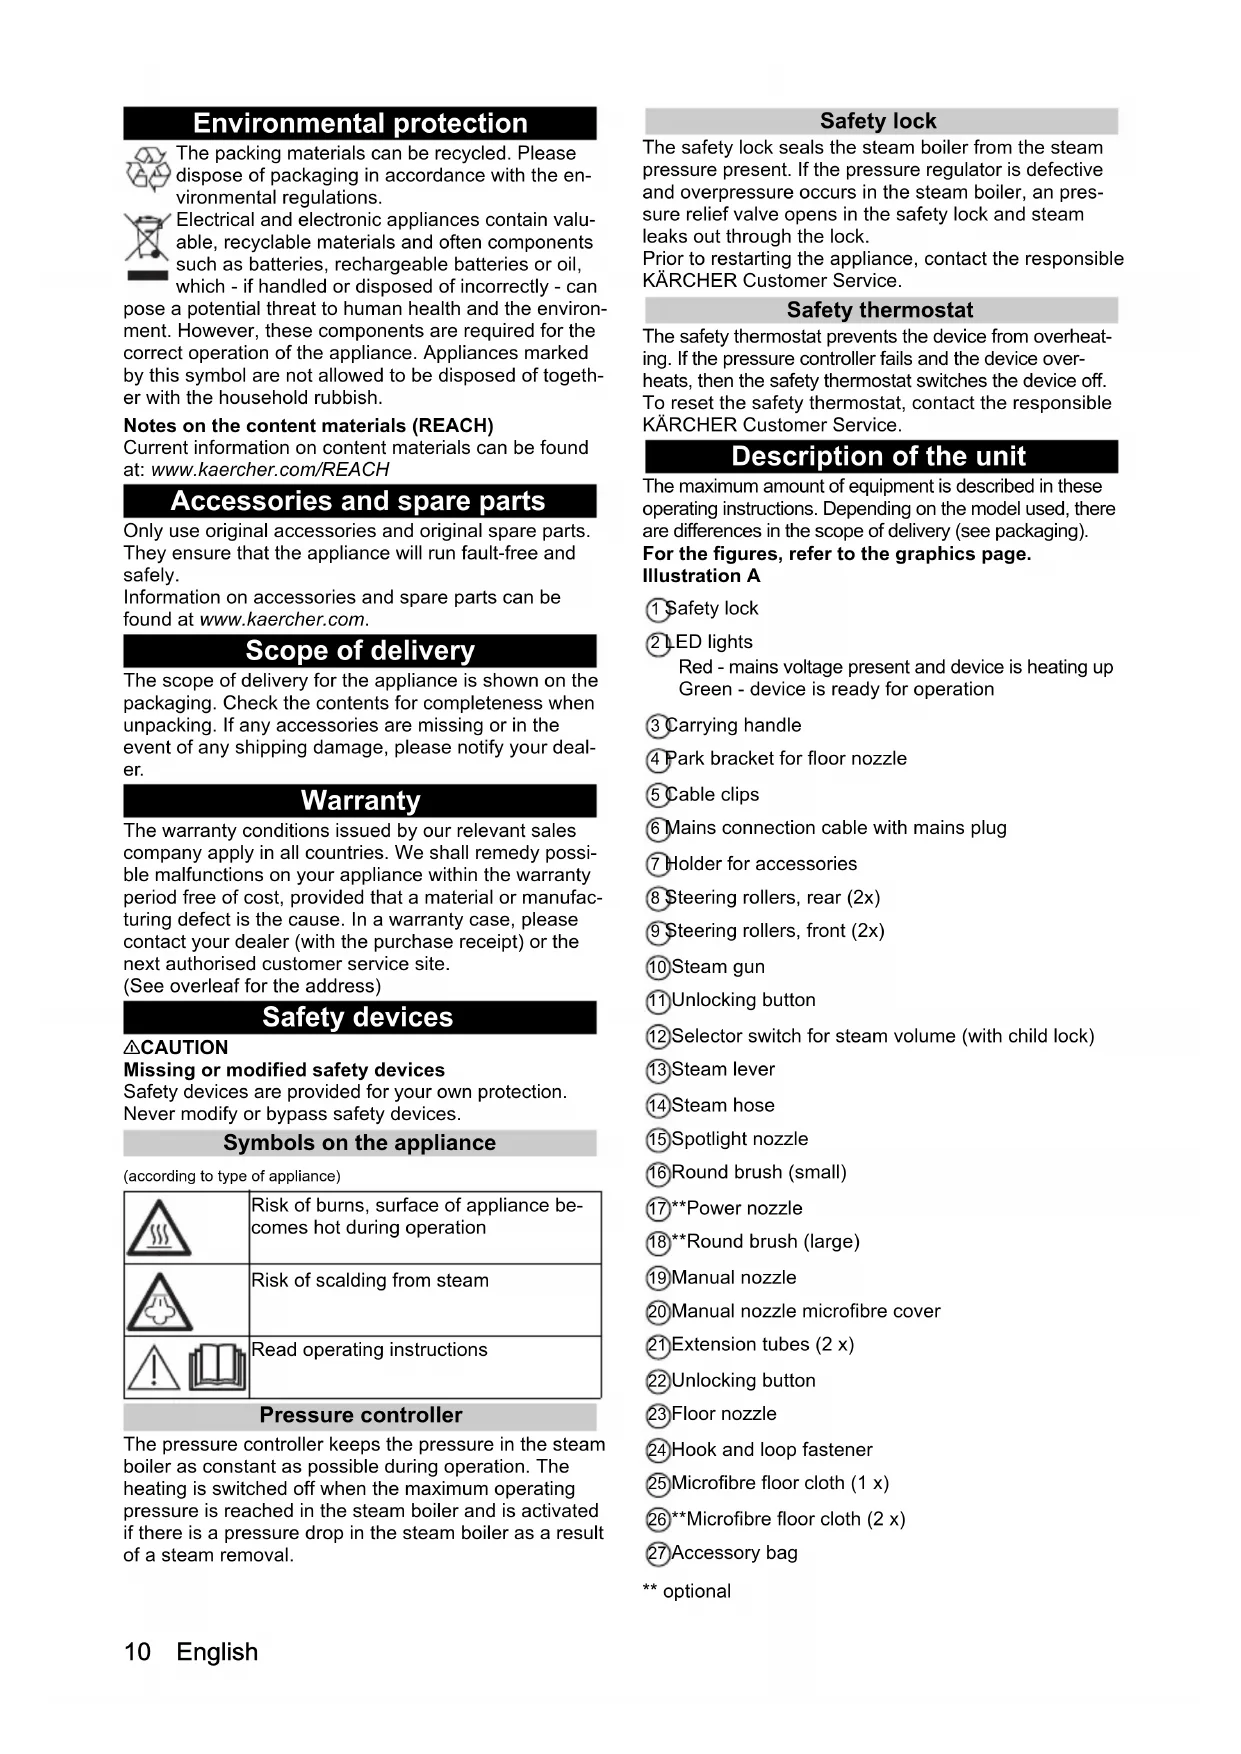
For the figures, refer to the graphics page. Illustration A
1 Safety lock
② LED lights
Red - mains voltage present and device is heating up Green - device is ready for operation
③ Carrying handle
4 Park bracket for floor nozzle
5 Cable clips
6Mains connection cable with mains plug
7Holder for accessories
⑧ Steering rollers, rear (2x)
9 Steering rollers, front (2x)
⑩ Steam gun
1Unlocking button
12Selector switch for steam volume (with child lock)
③ Steam lever
14Steam hose
⑤Spotlight nozzle
16 Round brush (small)
17Power nozzle
18Round brush (large)
19Manual nozzle
20 Manual nozzle microfibre cover
2 Extension tubes (2 x)
22)Unlocking button
23Floor nozzle
24 Hook and loop fastener
25 Microfibre floor cloth (1 x)
26**Microfibre floor cloth (2 x)
27Accessory bag
** optional
Installation
Installing accessories
- Push the open end of the accessory onto the steam gun so that the unlocking button on the steam gun engages.
Illustration G
- Push the open end of the accessory onto the spotlight nozzle.
Illustration H
- Connect the extension tubes with the steam gun.
a Push the first extension tube onto the steam gun so that the unlocking button on the steam gun engages.
The connection pipe is connected.
b Push the second extension tube onto the first extension tube.
The connection pipes are connected.
Illustration I
- Push the accessory and / or the floor nozzle onto the free end of the extension tube.
Illustration J
The accessory is connected.
Disconnecting accessories
- Set the selector switch for the steam volume to the rear.
The steam lever is locked.
- Push the unlocking button and pull the parts apart.
Operation
Filling water
Note
Warm water reduces the heating-up time.
Note
Descaling the steam boiler is not required if commercially available distilled water is used.
- Unscrew the safety lock.
Illustration B
- Drain the water completely out of the steam boiler.
Illustration P
- Fill a maximum of 1 I distilled water or tap water into the steam boiler.
Illustration B
- Insert the safety lock.
Illustration C
Switching on the device
-
Place the device on a firm surface.
-
Insert the mains plug into a socket.
Illustration D
The LED light is lit in red.
- When the LED light lights up green, the device is ready for operation.
Illustration E
- Press the steam lever.
Illustration F
Steam leaks out.
Regulating the steam volume
The expelled steam volume is regulated using the selector switch for steam volume. The selector switch has 3 positions:
| Maximum steam volume | |
| Reduced steam volume | |
| No steam - child lock Note In this position, the steam lever cannot be operated. |
- Set the selector switch for the steam volume to required steam volume.
- Press the steam lever.
- Before starting cleaning, point the steam gun at a cloth until steam is expelled evenly.
Refilling water
If the steam volume is reduced during work or if no more steam volume comes out, the water will have to be refilled.
- Switch the device off; see Chapter Switch off the appliance.
- Unscrew the safety lock.
- Fill a maximum of 1 litre distilled water or tap water into the steam boiler.
- Insert the safety lock.
- Insert the mains plug into a socket.
- Wait until the LED light has changed from red to green.
The device is ready for use.
Switch off the appliance
- Pull the mains plug out of the socket.
- Press the steam lever until no more steam flows out. Illustration M
The steam boiler is depressurised.
- Set the child lock (selector switch for steam volume)
to the rear.
The steam lever is locked.
Rinsing out the steam boiler
Rinse the appliance's steam boiler after max. every tenth boiler fill.
- Switch the appliance off, see Chapter Switch off the appliance.
- Allow the appliance to cool down.
- Disconnect the accessory.
- Fill the steam boiler with water and swing it around vigorously. Lime residue which has been deposited on the bottom of the steam boiler will be released as a result.
- Drain the water completely out of the steam boiler. Illustration P
Storing the device
- Hang the floor nozzle in the park bracket. Illustration N
- Wind the steam hose and mains connection around the carrying handle or device and/or insert the steam gun in the ground floor nozzle.
Illustration O
- Insert the extension tube in the large accessory holder or allow to dry and put in the accessory bag. Illustration O
- Allow the rest of the accessories to dry and then store in the accessory bag.
Illustration O - Store the device in a dry location that is protected from frost.
Important application instructions
Cleaning the floor areas
We recommend sweeping the floor or vacuum cleaning it before using the appliance. In this way the floor will be cleared of dirt and loose particles before the wet cleaning.
Freshening up textiles
Prior to using the appliance, always check the compatibility of the textiles at a concealed point: Steam down the textile, allow it to dry and then check it for any change in colour or shape.
Cleaning coated or painted surfaces
ATTENTION
Damaged surfaces
Steam can loosen wax, furniture polish, plastic coatings or paint and edge band from edges.
Do not direct the steam at glued laminated edges as the edge band may loosen.
Do not use the appliance for cleaning unsealed wood or parquet floors.
Do not use the appliance for cleaning painted or plastic coated surfaces such as kitchen or living room furniture, doors or parquet.
- To clean these surfaces, steam a cloth briefly and use it to wipe over the surfaces.
Glass cleaner
ATTENTION
Glass breakages and damaged surfaces
Steam can damage sealed points of the window frame and, at low outside temperatures, lead to tension on the surface of window panes and hence to glass breakages. Do not direct the steam at sealed points on the window frame.
At low outside temperatures, heat up the window panes by gently steaming the full surface of the glass.
- Clean the window area with a manual nozzle and cover. To remove the water, use a squeezegee or wipe the surfaces dry.
How to use the Accessories
Steam gun
The steam gun can be used for the following applications without accessories:
- For removing slight creases from the hanging clothing items: Steam the clothing item from a distance of 10 - 20cm .
- For wiping damp dust: Steam a cloth briefly and use it to wipe over the furniture.
Spotlight nozzle
The spotlight nozzle is suitable for cleaning areas, joins fittings, drains, sinks, WCs, blinds or radiators that are difficult to access. The closer the spotlight nozzle is to the soiled area, the greater the cleaning efficiency will be as the temperature and steam volume are at their highest at the nozzle opening. Larger lime deposits can be treated before steam cleaning with a suitable deter
gent. Allow the detergent to soak in for approx. 5 minutes and then steam it off
- Slide the spotlight nozzle onto the steam gun. Illustration G
Round brush (small)
The small round brush is used for cleaning stubborn dirt. Stubborn dirt can be removed more easily by brushing.
ATTENTION
Damaged surfaces
The brush may scratch sensitive surfaces. It is not suitable for cleaning sensitive surfaces.
- Fit the round brush to the spotlight nozzle. Illustration H
Round brush (large)
The large round brush is suitable for cleaning large rounded surfaces, e.g. wash basin, shower tray, bath tub, kitchen sink.
ATTENTION
Damaged surfaces
The brush may scratch sensitive surfaces. It is not suitable for cleaning sensitive surfaces.
- Fit the large round brush to the spotlight nozzle. Illustration H
Power nozzle
The power nozzle is used for cleaning stubborn dirt, blowing down corners, joins etc.
- Install the power nozzle onto the spotlight nozzle according to the round brush.
Illustration H
Manual nozzle
The manual nozzle is used for cleaning small areas that can be washed down, shower cubicles and mirrors.
- Push the manual nozzle onto the steam gun according to the spotlight nozzle.
Illustration G
- Pull the cover over the manual nozzle.
Floor nozzle
The floor nozzle is used for cleaning washable wall and floor coverings e.g. stone floors, tiles and PVC floors.
ATTENTION
Damage due to build-up of steam
Heat and moisture can lead to damage.
Check the heat resistance and steam effect on an inconspicuous area using a minimal volume of steam prior to use.
Note
Detergent residue or care emulsions on the surface to be cleaned can lead to streaks, which will disappear however once these have been used several times.
We recommend sweeping the floor or vacuum cleaning it before using the appliance. In this way the floor will be cleared of dirt and loose particles before the wet cleaning commences. Work slowly on surfaces that are heavily soiled so that the steam can impact longer.
-
Connect the extension tubes with the steam gun. Illustration I
-
Push the floor nozzle onto the extension tube. Illustration J
-
Fasten the floor cleaning cloth to the floor nozzle. a Place the floor cleaning cloth with the hook and loop fastener strips pointing upwards on the floor.
b Place the floor nozzle onto the floor cleaning cloth, applying slight pressure. Illustration K
The floor cleaning cloth will stick to the floor nozzle of its own accord due to the hook and loop fastener.
Removing the floor cleaning cloth
- Place one foot on the bottom corner of the floor cleaning cloth and lift the floor nozzle up.
Illustration K
Note
Initially, the floor cleaning cloth's hook and loop fastener strip is very strong and cannot be removed from the floor nozzle easily. After the floor cleaning cloth has been used several times and washed, it is easier to remove from the floor nozzle and it has reached the optimum adhesion.
Parking the floor nozzle
- Hang the floor nozzle in the park bracket during breaks in work.
Illustration N
Care and service
Descaling the steam boiler
Note
Descaling the steam boiler is not required if commercially available distilled water is used.
Note
Since the lime becomes caked on the appliance, we recommend descaling the appliance as specified in the table (KF=boiler fillings) based on the number of times the steam boiler is filled.
| Hardness range °dH | mmol/l KF | |||
| I soft 0 | -7 0-1.3 55 | |||
| II Medium | um 7-14 1.3-2 | 5 45 | ||
| III | Hard | 14-21 | 2.5-3.8 | 35 |
| IV | Very hard | >21 >3.8 25 | ||
Note
Your water board or municipal utilities authority can provide information on hardness of tap water.
ATTENTION
Damaged surfaces
The descaler may corrode sensitive surfaces.
Fill and empty the appliance carefully.
- Switch off the appliance, see Chapter .
- Allow the appliance to cool down.
- Unscrew the safety lock.
- Drain the water completely out of the steam boiler.
Illustration P
ATTENTION
Appliance damage due to descaler
An unsuitable descaler and incorrect dosing of the descaler may damage the appliance.
Only use KÄRCHER descaler.
Use 2 dosing units of the descaler for 1.0I of water.
5. Apply descaler solution to the descaler according to the details.
6. Fill the descaler solution into the steam boiler. Do not seal the steam boiler.
7. Allow the descaler solution to take effect for approx. 8 hours.
8. Drain descaler solution completely out of the steam boiler.
9. Repeat the descending process if necessary.
10. Rinse the steam boiler 2-3 times with cold water in order to drain all the descaler solution residue.
11. Drain the water completely out of the steam boiler. Illustration P
Care of accessories
(Accessories - depending on scope of delivery)
Note
The floor cleaning cloth and the cover for the manual nozzle have been washed beforehand and can be used immediately for working with the appliance. The micro fibre cloths are not suitable for dryer.
Note
When washing the cloths, observe the instructions on the washing tag. Do not use any liquid softeners as this will affect the ability of the cloths to pick up dirt.
- Wash the floor cleaning cloths and covers at a max. temperature of 60^ in the washing machine.
Troubleshooting guide
Malfunctions often have simple causes that you can remedy yourself using the following overview. When in doubt, or in the case of malfunctions not mentioned here, please contact your authorised Customer Service.
△WARNING
Risk of electric shock and burns
Trying to eliminate faults while the appliance is connected to the mains or has not yet cooled down is always dangerous.
Remove the mains plug.
Allow the appliance to cool down.
The steam boiler is scaled.
- Descale the steam boiler
No steam
No water in the steam boiler
- Refill water, see Chapter Refilling water.
The steam lever cannot be pressed
The steam lever is locked with the child lock.
- Set the child lock (selector switch for steam volume) to the front.
The steam lever is released.
High water egress
The steam boiler is too full.
- Press the steam gun until a little water comes out.
Technical data
Electrical connection
| Voltage | V 220-240 |
| Phase | ~ 1 |
| Frequency | Hz 50-60 |
| Protection class | IPX4 |
| Protection class | I |
Performance data
| Heating capacity | W 1500 | |
| Maximum operating pressure MPa | 0.32 | |
| Heating-up time | Minutes | 6.5 |
| Continuous steaming | g/min | 40 |
| Maximum steam blast | g/min | 100 |
Filling quantity
| Steam boiler | I | 1.0 |
| Dimensions and weights | ||
| Weight (without accessories) | kg | 2.7 |
| Length | mm | 304 |
| Width | mm | 231 |
| Height | mm | 287 |
Subject to technical modifications.
Contenu
Remarques generales 14
Limpar as superficies pavementadas
(alt after apparattype)
CIN IN PnIraeMbIMN yKa3aHnMn NTO TexHKe 6e3O NaCHOCTN. DeICTBOBaTb B COOTBETCTBN C HmN.
CoxpaHb 6o6 bpouOpbln daIbHeuero noIb30BaHHa nn dnn cneDyUoero BnaJeBua.
IcnoJIb3OBAHHe NO Ha3HaueHnIO
YcTpoIcTBOp npEHa3HaueHo TOnbKO IINNcNoB3OBaHnB DOMaWHem Xo3JNCtBE. YcTpoIcTBOp npEHa3HaueHO IINOuHCTKN NApOM NMOKeT NcNOb3OBaTbcN C NOxODaUMN PpHADnEXKHOCTaMn B COOTBETCTBNN C ONnCaHnEM B DaHHo INCHtpyKUnn No 3KcNpyataun. MoUoune cpeDCTBa He Tpe6yHtC. Heo6XoDMo Co6NIODaTb yKa3AHnN IO TexHnke 6e3OnaCHOCTN.
3aunTa OkpyXaOuSei cpebl

YnakoobHbI MaTePnaJIbI NOJaIOCTBTOpUHOHnepepa6oTKe.YnakOBky Heo6xOJIMO yTNJIN3npoBaTb 6e yuep6a dIg OKpykaIouei cpebl.

3NeKtpueckne n 3eKtpoHHbI ycTpoNCTBa qa-CTO cOePkAT ceHHbI MaTePnAbl, nproHbI dIy BTOpUHOn nepepa6OTKn, n 3aacTyO TaKne KOMNoHEThbl, kak 6aTapei, aKKymJrTObpbl JIN
MaCIO, KOToPbIe npHnepaBnIbHOM o6paueHm nn HeHaIeXaIeey TynI3auIN npEcdTaNJIOT noteHunAInbHyOOnachocTb IIN 3DopOBBy n EKoONrN. TeM HeMeHee, daHHbIe KOMNoHEtbl Heo6xoIMMbI dIN pAbNbHO pa60tby yCTpoiCTBa. YcTpoiCTBa, o6o3haeHhIe 3TNm CmBOJIoM, 3anpeJeHO yTynIm3uPoBaTb BMeCTe C6bITobBMn OTxOdAmN.
Yka3aHnno nHrpdeNeHTam (REACH)
(B 3aBNCIMOCTN OT TINa ycTPOIcTBA)
PnIOCTOHHOM NcNOJIb3OBaHNN CTaHdapTHoN DeCTNJINPOBaHHO BODy ydaJeHne HAKINN n3 napOBorpe3epByapa He Tpe6yeTc.
- OTBHHTb npedoxpaHnteIbHyIO npo6ky.
PncyHOK B
-
BbIINrB BcIO BOy n3 npoBOrO pe3epByapa. PncyHOK P
-
3aIITb B napoBOn pe3epByap He 6Oonee 1 n DnTINIIpOBaHHo Nn BOJOpBOJHO BODbl.
PncyHOB
- BBePhyTb npeOxpaHnTeJbHy npo6Ky.
PncyHOK C
Bknouenne yctpoicTba
1.YcTaHOBtB yCTpOJCTBO Ha npOuHoe OCHOBaHne.
2.BCTaBtB cTeBOI wTeKeB pO3eTKy.
PncyHOK D
CBeToIOoHnA NoCDcBETKa CBeTNTcKpachbIM CBeTOM.
- KaK ToIbKO CBeToIDNoDHaN NOcCBeTKa HaUHeT CBeTHTbCRA 3eJIeHbIM CBeTOM, yCTpOJCTBO rOTOBOKpa-6ote.
PncyHok E
- Haxatb pbiur noaun napa.
PucyHOK F
BbixoJnt nap.
PerynipoBka KOnIueCTBa napa
C nomoubI nepekHouaTeJI KOnUeCTBa npa BblonJnHareTc peYnnpOBka NOpBaemoro KOnUeCTBa npa. NepeKNoTuatEn b Meet 3 noNoKeHn:
EcnBbPempaObIkoJIueCTBO npa CNKkaETcNnnap6oBwe He BbIXoNT, Tpe6yeTcDOJNTb BOy.
- BbIKHNoHTb yCTpOInCTBO, CM. Tnaby BbIKJIIOueHne yCTpOInCTBa.
- OTBHHTb npedoxpaHnteIbHyIO npo6ky.
- 3aIITbBnapoBOpe3epByapHe6Oonee1nDcTINIIpOBaHHoN NIN BOOnpoBOJHOBobl.
- BvBepHyb npedoxpaHnteIbHyu npo6ky.
- BCTaBnTb ceTeBOu wTeKepe Bpo3eTkY.
6.ПОДЖДТь,пOKA CBET CBETOДNOHо ПОCBETКСМЕНТССКРACHOROHA3eJIeHbI.N.YcTPOИCTBOROTOBOKINCOЛьЗOBAHIO.
BbIKIOUeHHe ycTpoiCTBa
- N3Bneyb cTeBOI wTekep n3 po3eTKN.
- Haximatb pbIar noIaHn npa, noka He npekpaTITcBbIXoN npa.
PncyHok M
IapOBo pe3epByap haoDntcB 6e3HaOpHOM coCTOHH.
3.YctaHOBntb 3aunTy OT deTei (nepeKIOuATeIb KOJnueCTBa npa) B 3aDHee NonoKeHne. Pbyar noDaun npa 3a6NoKpObaH.
Ppombbka napoBoro pe3epByapa
PomBaT npoBOn pe3epByap yctpoNCTBa He pexe, chm nocJe kaxdoro 10-ro 3anoJHHeHnpe3epByapa.
- BbIKHouHTb yCTpoiCtBO ,cM. rnaBy BbIKHoueHne yCTpoiCtBa.
2.Даы усторьуocыtibt. - OToeINHnTb npHaJnEKeHocTb.
- NapobOn pe3epByap 3aONHnTb BOOn n CnIbHo no6oNTaTb. 3To Heo6xOIMo dIra NoHNrTaocTaKOB HAKIN, OCEBUnx Ha dHO napobOro pe3epByapa.
- BbIINrB BcIO BOy n3 npoBOrO pe3epByapa. PucyHOK P
Xpaehne yctpOcTba
1.Повс捜надкдя поа в napковоче крпльен.
Pисунok N
2. NapoBoi uHaHn n ceTeBoi Ka6eBb 6MoTaTb BOKpyr pyuKn uNn yCTpoNCTBa n/uNn BCTaBtB napoBoI NICTOET B HacaNk dy noJa.
PucyHok O
- YdHnHtBhIe Tpy6Kn BCTaBntb B 60JIbWOn depKataN DnI npHaJNeXHOCTeu INI npocyUHTb NOMecTnB Cymky dIra npHaJNeXHOCTei.
PucyHok O
Pap cnoc6eH OTCnAaBb BOC, Me6eIbHyo NOnITpy, NOINMepeHbIe NOKpbITnI IN Kpacky I OKNeKy Ha KpOMKax.
He HanpaBJIaTb nap Ha CKJeeHHbIe KpOMKn, T.K. 3TO MOKTe npVBecTI KOTCOeINHeHIO OKJeKN.
He nCnoJIb3OBAbTy cTpoIcTBO dIaONCTKHe JIAKINPOBaHHbIX DepeBAAHbIX N NapKeTHbIX NOJIOB.
He nCnoJb3OBAt b yCTpoIcTBO dnn OunchKn OkpaWeHbIX nIN NMeIOUx INaCTIKOBoe NOKpbITne NOBepXHOCTe, HapPIMep KxOHHO J XnIOI Me6eN, DBepe I napKeTa.
1.Дяоусткн taknx NOBepxHocTe CneDyET KopoTko 6ba6oTaTb napom TpIky n npotepeT b eO NOBepxHOCTb.
OuNTka CTeKJa
BHIMAHNE
Boi cTeKna n nobpeXeHna NOBepXHOCTb
Iap MoKet NOBpeiNb IaKnPOBaHHbIe yAcCTKn OKOH HON paMbI, a npHn3KNX BHeuHNX TEMpePaTyPax CTaTb npUHHO BO3HKnHOBeHNAHpJKeH N HA NOBepxHOCTN OKOHbIX CTeKOJI INx pa3pySeHIn.
He HanpaBnptb ctpyIO npa Ha NaKIpOBaHHbIe yUacTKN OKOHHO paMbI.
Пи ИиЗкИX BHeшнIX TemпepаТурах CпeДуеТ HarpeTb OKOHьIe CTeКЛa, KopoТКо 6раБOTab NapOM BCIO NOBepxHOCTb CTeKЛa.
OuHCTb OKHO NOMOUIPOyHnHaCaKnI yExna.ДЯydaJIeHINBODBI BOCNOJIb3OBaTcB ODOcroHOM INN BbITEpeTB NOBepXHOCTn HAcYxo.
IcnoJIb3OBAHHe npHaJdJIeXHOCTeI
Papoboi nictoJeT
IapOBoN NnCTOJET MOXHO NcONb3OBaTb 6e3 npHaI- neKHOCTe B CneDyUOuNX CnyaX:
- YctpaHHeHne He6oJIbIuX CknaIOK Ha BnCraIuN npEeMeTax OeJdbI: o6pa6aTbIBaTb npEeMet OeJdbI napOM c pacctOHHra 10-20 cm.
Bnaeknay y60pa nbln: kopoTko 6pa6oTaTb npom caIpTeKy nIpoTepeTb eO Me6eJIb.
ToeueHoe cTpyHoe conJIO
ToueHoe cTpyHoe cOnIIO npedHa3NaeHO dIg OuNCTK TpyNDoOCTyNHbIX MecT, CTbIKOB, CMEcNTeJIe, CTOKOB, paKOBUN, yHNaT3OB, XaJIOn3n IpaJNaTOpOB. Yem 6bnjKe ToueHoe cTpyHoe cOnIO K 3aqr3HeHHOMy MeCTy, TEM BblIE 3000EKTINBHOCTb OChTKn. 3TO oByCNOBJIeHO TEM, YTO Tempepatya IN KOJIInCeTBO npapa MaKcIMaJIbHbI B MeCTe BbIXOda n3 CONJa. CINbHbI e N3BeCTKObIe OTLOKeHHa NepeD OChTko NapOM MOxHO 6paboTaTB NOxODAqM UcHCTaUM CpeDCTBOM. Bpemr BO3deIcTBnIyNCTraIeO cpeDCTBa - OKJIO 5 MNHT, Iocne Yero 6pbAoTaNapOM.
- HauBHyb ToueHoe cTpyHoe conNo Ha napOBn NICTOJET.
PucyHok G
Kpyrnaa zetka (mana)
MaJAR KpyrIa JTeK a NOxOoN T dny ydaJeHn cToiKnx 3arpa3HeHn. Obpa6Oka IeTKo N03BOJareT IerYe OUnIaTb NOBepXHOCTn OT cToiKnx 3arpa3HeHn.
BHIMAHNE
NoBpeKdeHHbIe nobepxHocTn
UeTKa MoKet Iouapanatb YyBCTBNTIbHbIe NOBepXHOCTN.
OHa He noDxOuNT dIa OUHCTKn UyBCTBHTeJIbHbIX NOBepxHOcTei.
1.CMOHTNIOBAtb MaIyU KpyrJyU OeTky Ha ToueHOM CTpyHOM CONNE.
PncyHok H
Kpyrnaa zetka (6oJbwa)
Bolbwa Kpyra Ta KpeHa3Hauha Da OunCTK Bolbux OkpyrIbIX NOBepxHocTe, HAnpImep yMbI- BaIbHNKOB, DyWeBbIX, BaHH, KyXOHbIX MOEK.
BHIMAHNE
NoBpeXeHbIe nobEpxHOctn
UeTKa MoKet nOuapanatb YyBCTBNTIbHbIe NOBepxHOCTN.
OHa He IIOxOuNT Ia OUHCTKn YyBCTBnteJIbHbIX IO-BepXHOCTeN.
1.CMOHTnpoBaTb 6oNbSlyo Kpyrnyu UeTKy Ha ToueHOM CTpyHOM CONJIe.
PucyHok H
Moohoe conno
MoUHaI 1eTka NOxOHT JnryydaJeHnA CToKnx 3a- rpa3HeHn, npOyBKn yrNoB, CTbIKOB n T.D.
- CMOHTIPOBaTb MoUHyO UeTKy aHaJIOnHNO KpyIIOJ UeTKE Ha ToUeyHOM CTpyHOM CONNe.
PncyHok H
Puyhna HacaKa
PyuHa Ha cAaKa IpeHa3NaueHa dIy OunCTKn He6oJIb- uX MoUxxCra NobepxHocTei, dyWeBbIX Ka6HH 3epKaJ.
- HAdBnHyTb pyHny HacaIky B COOTBeTCTBm C To-ueyHbIM CTpyHbIM CONlOM Ha napOBn NnCTOJeT. PucyHok G
- Hade TB chexon Ha pyHyio HacaIky.
HacaKaIJa nola
HacaKa Dnna nola npedHa3NaeHa dna OuNCTkn MoOxncra NOKpbTNI CTEN I NOla, HAnpMep KameHHbIX noNoB, Kepamuecko PNTKN INOKpbTNI 1NBX.
BHIMAHNE
IobpeKdHnN 3-3a Bo3deNCTBnna npa
Bbicokar TemnepaTypa n BnaXHocTb Moryr npnbecTu K nobpexdeHnM.
Ipei npimHeHnem Heo6xoJIMO npOBepuTb TepMoCTOIOKcTB N BO3JeCTBne npa B MaJIO3aMeTHOM MeCTe C MHNMaJIbHbIM KOJIYeCTBOM npa.
PpimueaHne
OCTaTKI YNCTAUX CpeCDTB N MTyBcN I DnYxOHa Ha OUYIaEMoN NOBepXHOCTN npu O6pa6OTKe napOM MOyT CTaTb PpUHNOI NOBJIeHn pa3BOIOB, KOtOpBle OJHaKo INChE3HyT NOCNE HECKOJIbKnX II pPIMHeHIn.
Ipeep npimehenem ycTpoNCTBa mbl pekomehnyem noDMecTN nIN nponblneocntb non. Bnaorapr 3tomy nONyke DO BnaxHOn OHCTKn Byed TOCBO60kDen OT 3a- rpr3HeHH n Mycopa. YTo6bl nap mor doJIbwe BO3dienCTBOBaTb Ha CNJbHO 3arpr3HeHHbIe NOBepxHocTn, pa- 6oTaTB DOCTATOuHO MeJeHNO.
- CoeHnHTb yIINHnTeNbHbIe Tpy6Kn c napOBbIM nCTOJETOM.
PucyHok I
- HacaKy dIy nOla HaDbHHTb Ha yDInHHTeIbHyTOpy6ky.
PncyHOKJ
- 3akpenntb TkaHb dIy MbITb y noJa Ha HacaKe dIy noJa.
a YIOKHTb TKAHb IIN MaTbI NOHa HONJIeHTAMN-JINyUkAMN BBePx.
b C He3HaHTeJIbHbIM ycINHe m npKaTb HacaKy DnA NOJa K TKAHN DnA MbITb NOJa.
PcyHOKK
BnaorapkpenHnM-nnykamTKaHbI MaTbnoJa cama 3aKpeNTcHa HacaKe INa noJa.
Chrtne canfetkn dna noa
- NocTaNtB OndHy Hory Ha 3bYOK cAnΦeTKn dIa NOJa I NOHrTaB Hacdky dIra NOJa.
PncyHok K
PpmeaHne
Chayana NeHTa-Nnnyka caIpeTkn IJRA nona eue OeyHb KpenkA n caipeTKy TjKeJeO CHrTB C HacadKn. Pocne MHOROKpArTHo NcNOJIb3OBaHNr u CTnpKn caipeTkn OHa JERKO CHIMaETcR C HacAdKn I DOCTnraet ONtMaJIbHOr yCINNr CKpenJIeHNr.
PomeeHne Hacdkn dnona Ha xpaHeHne
1.BoBpemneppebOBBa6oTe yctaHaBnBaTbHaCakkyIINaB NapkoBOHoe KpeJIeHne.
PncyHOK N
YxOД n TeXnueckoe 06cnyxnbAHne
YdaJIeHne Haknnn n3 napOBoro pe3epByapa
PpimueaHne
PnIOCToHHOM NcNoJIb3OBAHnn CTaHdapTHoN DeCTNJINPOBaHHO BODI ydaJIeHHe HAKINN n3 napOBorpe3epByapa He Tpe6yeTc.
Примеане
C yueTom 6bpa30BaHnHaKnHn B ycTpoiCTBe peKOMeH dyETcYdaJIaTb HKnIb NO DOCTNKeHn Yka3aHHoro B Ta6JIuCe KOJIuYeCTBa 3aONHeHn NapOBOro pe3epByapa (3P = 3aONHeHne pe3epByapa).
- TkaHb IJIyMbITbIIOJaIuYexJIbI CTnpaTb B MaunHe npi TemnepaType He Bblwe 60^
POMOUIpHHeNCppaBHOCTX
3aactyIO HecnpabHocTN NMeIOT npocTbe IpnunHbI, NOtOMy C NOMOUBIO CneIyUoJero 063opa IN MOxHO yCTpaHHTcAMOCTOReBHO.B cnyuae comHeHHN uIN BO3HNKHOBeHHN He ONiCAHHbIX 3decb HecnpabHocTe CNeNyET O6paAATBCB B yNOJIHOMOeHHyIO Cnyk6y cepBnCHORO 06CnyXnBaHHN.
△PENDyINPEXDEHNE
Onachoctb ydapa TOKOM n nonyuhenra oxoroB
YcTpaHbHeNCnPabHocTHNaNOKlnOueHHOM K3JneKTPnuecko CETn INI pa3OrpeTOM yCtpoNCTBE ONaCHO.
BbIHyTbcTeBoi wTeKepe.
DaTb yctpoiCTBy OCTbITb.
B napobom pe3epByape 6pa3oBaJacb haknbl.
- YdaHnTb HAKINb n3 npoBOrO pe3epByapa.
Her napa
B napobom pe3epByape oTcyTCTBye T B0da
- DOnITb BOy, CM. rNaBy Do6aBJeHne BOJI.
HeBo3MoXHo HaxKaTb pbIar noDaun npa
PbIar noa npa 3a6JoknpoBaH 3aunTo OT dTei.
- YctahOBtB 3aunuty OT dTeen (nepeKJIouaTeIb KOJIInueCTBa napa) B nepeDHee noJoxKeHne.
PbIur noIaun npap a36IOKIpOBAH.
3NaHTeIbHbI BbI6poc BObl
IapoboB pe3epByap nepenolnHeN.
BkIIOuHaTb napOBn nCToJET Do tex np, noka cTa-HeT BblXOHTb MeHbWe BObl.
TexHnueckne XapaKTepeNCTnKN
3neKtpnueckoe noKnHoueHne
Klacc 3aunTbI
www.kaercher.com/REACH
AkyaHa HOpMaun OTHoCHO CbCTaBn BeueCTBa MoKeTe Da HamepuTe Tk: www.kaercher.com/REACH
Akkcecoapn npe3epBn qactn
N3noJ3BaIte cmo opnHaJIHn akcecoap n opnHaJIH pe3epBHN qactn, NO TO3n HaIN HCnpyBaTe 6e3onacHata n 6e3npo6nemHa ekcnloataaHa ype- da.
Hhopmaun OTHOCHO akcecoapn npeepBn qactn 1e HamepuTe Tk: www.kaercher.com.
06XBaT Ha DoCTaBka
OxbatbHa doctabkata Ha ypea e n3o6pa3eH Bbpxy onakobkata. Pn pa3oNAKObaHe npOBepTe cbDbpka-heTo 3a qyIOCT. Pn nnCBAuN akcecoapn nnPnp TpaHCnOpTHN uETN, MoJN, o6bphete Ce KbM Baunn dIcTpn6byTop.
TapaHcua
BbB BcKa IbPxaba ca BaIINHn IN3daJeHNe OT Haunr OToPn3npaH DnCTpn6yTop rapaHcuOHn ycIOBn.
EbeHTyaJIHn NOBpeIHa Bauny ypeI ueOTcTpaHIM B pAMKInTe Ha rapaHcuOHHHcspok 6e3nIaTHO, aKO ce Ka- cae 3a deΦeKT B MaTePnaIte NIN npOn3BOcTBeH DeΦeKT. B cIyauH Na IpeJraBaHae Ha npabo Ha rapaH- quA, ce Obphete KbMa Bauny dNCTpN6yTop INN KbM Hau-6n3KNr OToPi3npaH cepBn3, KATO npeDcTaBnTE KacOBaTa 6eJekKa.
(Adpec,Bk.3aHaTa cTpaHa)
PpeDn3Hn yctpOncTBA
△PENEIa3JIINBOCT
IinncBaunn npomeHn npedna3Hn ycTpoNCTBA
Pnpedna3HnTe yctpoNCTBa cnlykata 3a Baawata 3aunnta.
Hnkora He npomeHnTe nnn npene6perbaite npedna3- Hn ycTpoNCTBa.
CnmboJIbBpxyypeda
(CnopeTuna ypei)
PapoctpyHnT KOTeI e OcBO6oHeH OT HnIraHaTeO.
- HactpoTe 3aunTaTa 3a Deca (npeKbcBau 3a n36op Ha KOJIueCTBOTo npapa) Ha3aI.
JIoCTbT 3a npape6JIOKUnpaH.
N3nJaKBaHe Ha npoctpyHnKoTeJ
N3nKaBaiTe npoctpyHnHa ypeHa Hau-KbcHo CneBcKo 10. nJIHeHe Ha KOTena.
1.ИЗклioчeteуpeа,ВЖ.rnaBaИЗклioчBaHeHa ype-da.
2. Octabete ypeda da ce oxlaan.
3.Демонтуарейпразнаджхочтta.
4. HanbHHeTe napoctpyHnna KOTe n BODa n ro HAnKNoHete CnHNO. NTo3n HauHH ce pa3TbaprT ocTaTbUHTe OT BapOBuK, OCTaHaNn NO NOda Ha napoctpyHnna KOTeJ.
5.ИЗнел Te HANbIHO BOdATo OT napoctpyHnKOTeJI.ФИгура P
CbXpaHHe Ha ypeDa
- 3aKaYeTe NIOOBaTa IIO3a B Hocaya 3a napKupaHe.
ФИгура N - HabnTe npoctpyHnHa Mapkyu MPeKOBn3axpaHbau Ka6eI OKOIO dpbXkKaTa 3a HocHe,peCn. OKoJIo ypeDa I/INn NOCTaBeTe npoctpyHnN INCTOnET B NODobTa DIO3a.
Φnrypa O
- NocTabeTe yIbJNKeTIHnTe Tp6n B rOJIemna IbPka 3a npHaADJIeXHOCTn INn rN OCTaBeTe Da n3-CbXHaT n nIOCTaBeB YaHTaTa 3a npHaADJIeXHOCTn.
Φnrypa O
- Octabete octaHaInTe npHaJnEeXHoCTn Da n3cbxHAT n CneT TOBa Tn npIbepTe B YaHTaTa 3a npHaJnEeXHOCTn.
Фигура O
5.CbxpahraBte ypeHa hCyxo n 3auNTeHO OT 3amPb3BaHe MRCTO.
BaxHn yka3aHnna 3a ynoTpe6a
NouctBaHe Ha noobn noBbpxHOCTn
IpenopbVbame npedn n3noJ3BaHe Ha ypeDa noDbT da ce n3MeTe nn Da ce nouchn C npaxocmykauKa. Taka Oue npedn BJIaXHOTO NOUcTBaHe NoDbT Ce OCBO6Kdaba OT MpbCOTnN CBO6OHN YacTuN.
OcbexkaBaHe Ha TeKCTnI
Ipei trpTahe cypea BnHaH npOBepBaHte yCTOuHBOCCTT Ha TEKCTNJHHe TBKaHn Ha CKPnTO McTo: O6NeIe TeKCTNJHata TBKaH c npapa, ocTaBeTe da n3cbxHe i Cnei TObA npOBepTe 3a npOMEH B CBeta nnΦopMaTa.
Поунстване на NOВьрхHOCTи C NOKpNTne JINI JAKUPaHи NOBьрхHOCTN
BHIMAHNE
IobpeHn noBbpxHOCTN
Iapata MoKe da pa3TBOpN BOCbK, Me6eHnJaK, n3-kyCTBeHn NOKPITNVn60n, KaKTo UJENMIOTO, CKOeTO ca 3aJIeNEHn Me6eHNHTe KaHTObE.
He hacooyaIte npata KbM IeeneH Me6eHN KaHTOBe, TbKATOJIeINIOTo,C KOeTO ca 3aIeNEH,MOKe Da ce pa3TBOpN.
He n3noJ3BaIte ypeJa 3a noUcTbaHe Ha naKnpaHn DbPBeHN noOBe nn NapKeT.
He n3noJ3BaIte ypeDa 3a noUcTbaHe Ha JnakpAHn INn CHa6DeHn C N3KycTBeHO NOKpNTne NOBbPxHocTn, KaTO HApN. KyXHeHcKn I CtaHn Me6eHN, BpaTn INn napKeT.
- 3a nouCTbaHTo Ha Te3n NOBbpxHOCTn O6NeIe 3a KpaTko eHa KaPna C npapa nN36bpuWeTe NOBbpxHOCTnTe C HeR.
NouctBaHe Ha CTbKJIO
BHIMAHNE
CynBaHe Ha CtbKnOTo NIOBpeDeH NOBbpxHOCTN
Iapata Moke da nobpei 3aneyataHn Mecta no npo3opeuHaTa pAMKa I npn HnCKN BbHsHn TemnepaTpyn Da DOBeDe NO HAppeKeHn NO NobbpXHOCTTa Ha npo3opeuHTo CTbKnO, a C TOBa N Do CuynBaHe Ha CTbKnTO. He hacoUbaTe npaTa KbM 3aneyataHn Mecta no npo3opeuHaTa pAMKa.
Пи НИСКИ ВБИSHИ Temператури 3агряВаITE npOSTpeuHOTO CTbKNo, KaTO ЛЕКО obЛиВaTe Cnapa UЯлATA NOBbpxHOCT Ha CTbKNOTO.
3nOJ3BaHe Ha npHaJdJIeXHoCTNTe
NapoctpyuH nuctoJET
PapocpyHnT NCToIe MoKe Da ce n3noJI3Ba 6e3 npHaadJeXHOCT 3a CneHNTe oBlaCTn Ha yNoTpe6a:
3a otctpaHraBe Ha IeKn TbHKn OT 3aKaHeHn DpeXn: O6neIte c npapa 3aKaHeHaTa dpexa ot pa3cToHne 10-20 cm.
3a n36bpcbahe Ha BnaJxen npax: O6neIte 3a kpaTko eDHa KbpNa C npapa Nn36bpuTe Me6eInte C HeA.
ToUKoBa cTpyHa IIO3a
ToKOBaTcpyHaIHO3eNoDxOJaHa 3a NoCTBaHe To Ha TpydHIO OocBnH MeCTa,ФyH,apMaTyPi,KaHaJIn,ymBaHnHi,TOAneTHN,UOpN nnPaDnATOpN. KOnKOTo NO-6JIIn3o e ToCKoBA tCTpyHa IHO3a Do 3aMbpcEHOTo MrcTo,TOKOBa PO-BvCOK e eΦeKTbT OT NoCHCTBaHETo,TbKATO TempepaTyPAu N KOINueCTBOTo HA napata Ca Hau-BvCOKn Ha n3XoDa Ha DHO3aTa. Ppei NouchTaBe Cnapa CNHnTe BapOBuKOBu OTnaHnra MORat Da 6bDat TpeTnpAHn C NoDxOJaN NoCHCTBaU npenapat. Octabe NouchBaunr npenapat da noDeiCTBa OKOLO 5 MNHyTN n CneT TOBa n3nyChete npa.
- NocTaBete ToUkOBaTc CtpuHa DIO3a Ha napocTpyn Hnra nCTOJET.
Фигра G
Kpbrrna yetka (MaJika)
Maikata KpbIa YetKa e NdoXoJa 3a NoHCTBaHe Ha ynopNTu 3AmbpcBaHn. YnopNTe 3AmbpcBaHn MORaT Da ce OTCpaHraBt NO-JeCHO Upe3 N3HTKbaHe.
BHIMAHNE
IobpeHn noBbpxHOCTN
YeTkata MoKe Da HaIpaKcA YyBCTBNTeHn NOBbpxHOCTN.
He e noxoxa 3a noHCTBaHe Ha yBCTBNTIN NOBbpxHOCTN.
- MoHTnpaIte MaKata KaPbrgna YeTka Ha ToUkoBaTa cTpyHa dIO3a.
Hnrypa H
Kpbrrna qetka (ronma)
Tolmata KpbIa YeTKa e NODxOJa 3a noNCTBaHe Ha TOnemn 3ao6JIeHn NOBbPxHOCTn, HAp. yMNBALHnL, DywoE, BAHN, KxHHeHCK MNBKN.
BHIMAHHE
NoBpeHn nobbpxHOCTn
YeTKaTa MoKe Da HaIpaKc YaBCTBnTeJIH NOBbpxHOCTN.
He e noxoxa 3a noCTBaHe Ha yBCTBnHn NOBbpxHOCTN.
- MoHTpaIte roJMaTa KpbIJa YeTka Ha ToKOBaTa CTpyHa IIO3a.
Фигура H
CnloBaI03a
CnnoBataIIO3a e NOxOJa 3a NoUcTbaHe Ha ynpntn 3ambpcaBaHna, npOdyXbaHe Ha bJIn, fyn T.H.
- MoHTpaIte CnIOBaTa DIO3a aHAnOriuHNO Ha KpbIraTAt HeTka Bbpxy ToKOBaTa CTpyHa DIO3a.
Фигура H
PbUHaIIO3a
PbHaTaeIIO3a e IOxOJa7a 3a NOUcTBaHe Ha MaKn Mneu Ce NOBbPxHocTN, dyu Ka6uHn n OrpeDana.
- NocTabeTe pUHaTa IIO3a aHAnOrnHyHO Ha ToKOBaTa CtpyHa IIO3a Ha napocTpYHnI NCTOJeT.
Furypa G
2.ИЗтелете nOKPиВалоTo BbPxy pbHataДIO3a.
IopOBA IIO3a
IOnOBaTa IIO3a e NOJXOJa7a 3a NOUcTBaHe Ha Mneu Cc CTeHHN INoOBn HAcTnIKn, HAp. KaMeHHn NoDoBe, NIOChN nIODoB oT PVC.
BHIMAHNE
IobpeN BCJeDCTBnE Ha Bb3DeiCtBnETo Ha npaTa
CunHa TOnJIiHa n OBnaxKHe MoRaT Da IOBeaT Do NOBpeN.
PpeynynoTpe6ata npOBepraBaIte yctOnuBOCTTa Ha cnJHa TOnnHa Hb3DeiCTBneTO Ha napaTa Ha He3aBeJeXmMo MRCTo C MaNKo KOnuYeCTBO napa.
Yka3aHne
OCTaTbU OTO NocCTBaun npenapatn nnn noDsbpka- u emyncn, HauuHn Bbpx NOBbpxHOCTTA, KORTO ue CE NOcTBA, pni NoCtBaHe Cnpa MOrat da DoBe-dat DO netHa, KOITo N3e3BaT pni MHorokpaTHo npNJooKeHne.
IpenopbUbaMe npden n3noJ3BaHe Ha ypeDa noDbT da ce n3MeTe nn da ce noocnC npaxocmykaJa. Taka Ooie npden BJIaXHOTo NOcHCTBaHe noDbT ce ocB6oxkDaBA OT MPbcOTn N CBO6OHN YactuN.CnilHO 3AmbpceHHTe NOBbPxHOCTn O6pa6OToBaIte 6abHO, 3a Da Bb3-DeiectBa napata No-DbJIro BpeMe.
1.CbpxKeTe yDblnKntEnHnTe Tpb6n c npoctpynnna nCTOJET.
- NocTaBete nooBaTa IIO3a Ha yIbJIxKInTeINHaTa Tpb-6a.
nrgpaJ
- 3akpenete KbpnaTa 3a noD KbM noObaTa IIO3a.
a NocTaBeTe KbPnata 3a noD cbc 3aenBaunTe JENTH Harope Bbpxy noJa.
bC JIeK HATnCK NocTaBete NOIOBaTa IIO3a Bbpxy KbpNaTa 3a NoI.
ФигураК
BnaoradapeHne Ha 3akpenBaHeTo C IeneHKn KbpNaTa 3a NOD npnEnBa aBTOMaTNUHO KbM NOOBaTaIIO3a.
CbaIaHe Ha KbpNaTa 3a noD
1.Пoctabete edHHnKpaK Bbpxy nlaHkata 3a o6ClykBaHe c KpaK Ha KbPnata 3a noi nOBdHrTeNoIOBaTa dO3a Harope.
ФиграК
Yka3aHne
B haayano To deiocbneTo Ha IeneHkata Ha Kbpnata 3a NOe Bce OSe MHoro CInHO N BepoTHO Tg Uc ce OTdEa TpyDHO OT NIOBaTa DIO3a. CneI HeKoJI-KOKpatha yNtpe6a n CneI N3npaHe Ha Kbpnata 3a NOd NocJeHaTa MOKe Da ce OTdEa JieCHO OT NIOBaTa DIO3a N e NocTINrHaHa ONTMaJHata aXe3n.
NapKpaHeHaNoObAIO3a
1.ПипpeксваеHa pa6oTa 3aKaчete ПОДВаТАДюзв HOCауЗа 3a napKИраHe.
Φnrgyna N
PnXa n oDpBxKa
IobpeHnHa ypeHa OT cpeCTBO 3a NOuNCtBaHe Ha BapOBnka
HenoXoJIO cpeIcTBO 3a noUcTbAne Ha BapOBnKa, KaTO n HEnpaBnHOTo Do3npaHe Ha CpeIcTBO 3a No-NCtBaHe Ha BapOBnKa MoKe Da nobpeDn ypeDa.
I3noJI3BaIte cAmO cpeIcTBOTo 3a NOUncTbaHe Ha BaPobuK Ha KARCHER.
I3non3BaIte 2 Do3n OT CpeIcTBOTo 3a noUcTbaHe Ha BapOBuKa 3a 1,0 I BOJa.
5. Пплагаite pa3TBopa 3a почиствае Ha BapOBnka cblacHO yka3aHnraTa, Дадени Вьрху cpeДСТВОТо Ha noчиствае Ha BapOBnka.
- Cunete B napoctpyHnRA KOTeI pa3TBop 3a no- uCTBaHe Ha BapOBuKa. He 3aTbapraTe napoctpyHnRA KOTeI.
- Octabete pa3TBopa 3a nouchTbaHe Ha BapOBnka da noJeCTBa OKoNo 8 Yaca.
8.ИЗнeTe HanbЛHo pa3TbOpa 3a nouHcTbaHe Ha BaPobuKa oT napocTpMyHnKOTeI. - Пи Heo6xOДMоCT NOВTOpeTe npoUeCa Ha noYnCTBaHe Ha BapOBuKa.
10.Изпнakнete napoctpуня кOTeI 2-3 nbTn cbc CTy- DeHa BOda,3a Da OTCpaHInTe BCuKN OCTaTBUN OT pa3TBopa 3a NOUcTbAHe Ha BapOBnKa.
11.ИЗлеле HanbIHo BOdATo OT napoctpyHnKOTeJ. ΦИгура P
TpNk3a npHaIeXHocHTne
(πριNaIπεχHOCη - B 3aBnCmOCT OT KOMπJIeKTa Ha DoCTaBkata) Yka3aHne
Kbpnata 3a noi nokpmbanoto ca npedbapnteJHO 3npaHn mOrat BeHara da 6bDat n3noJ3BaHn 3a pa6oTa cypeda. Mkpcp6bphnte KbpHn He ca noDxOraa 3a cyuene B cyuINHn.
Yka3aHne
3a n3npaHTo Ha Kbpnte Cb6IIOdaBaiTe yka3aHnraTa BbyxeytkeTa 3a npaHe. He n3noI3BaIte OMeKOTnTe, 3a da MoKe Kbpnte Da noEmat Do6pe MpbCOTnTa.
- NpeTe Kbpnte 3a noi nokpmbanata B nepaH npu MaKcImaHa TeMnepaTypa 60^
HOMOu npn HEn3npaBHOCTN
Mhoro yecTo npuHHnte 3a NOBpeDa ca eIementapHn C NOMOHTA Ha cIeHNthe Yka3aHnma MoKe cAmn Da rN OTCTpAHnte. Ako He cTe CNrpyHn nn NobpeDInTe He ca ONNCAH TYK, ObPHeTe Ce KbM OTOpN3npaHnca cepBn3.
△PDEyPEXDEHNE
OnachocT OT TOKOB yap n u3rapaHe
IOKaTO ypeBt e Cbbp3aH ceneKtpueckaTa MpeKa HnO OSe He Ce e OxnaDn, OTCTpaHraBaHeTo Ha Heu3- npabHOCTn e OnaCHO.
I3dbpnaTe 1epeHa.
Octabete ypeda da ce oxlaan.
NapoctpyHnT KOTeI cBdRpKa BapOBnK.
- NocTbaHe Ha BapOBnKa B napoctpyHnKoTeJ.
JincaHa napa
JInca Hb Boda B NapoctpyHnra KOTen
- DoneiTe B0a, Bk. rnaBa IOnbNaBe c B0a.
IocTbT 3a npapaTe He MoXe Da ce BKnIOUHy
IoctbT 3a npatae nnKcapn cbc 3auNTata 3a deua.
HactpoTe 3aunTaTa 3a Deca (npekbcBau 3a n36op Ha KOJIueCTBOTo npapa) Hnpei. IocTb 3a npapa e De6noknapa.
Bucoko n3nyckaHe Ha Boda
NapoctpyHnT KoteI e npenJIHeH.
- HatnckaTe napoctpyHnI nIcToJeT, DOKaTO 3ano-ue He da n3JIn3a No-MaIKO BOJa.
TexHnueckn daHHN
Enektpnuecko Cbbp3BaHe
| Hanse ~ 1 | ||
| Чеб耗费 | Hz | 50-60 |
| Тип зашита | IPX4 | |
| Клас зашита | I | |
dAHn 3a MOUHOCTa
| HarpeBaTeJIHa MoUHOCr | W | 1500 |
Uldised juhised. 106
Siftotstarbeline kasutamine 106
Keskkonnakaitse 106
www.kaercher.com/REACH
Tarvikute monteerimine
- Lükake tarviku lahtine ots aurupustolile, kuni aurupustoli lahtilukustusklahv fikseerub.
Joonis G
Oxopoha doBknilna 119
Ppniladra ta 3anachi detani 119
KOMnIeKT NOCTaBKn 119
TapaHTia 119
3anobixhi npncTpoi 119
Onc npucpo 120
MOnTakx 120
Eknpnyataia 120
BaxnBi BkazIBKUoDo BkOpncTaHHa 121
3actocybaHHOchaueHH. 122
Dorna Ta texhuihe o6cnyroByaHHra 122
IOnomoraBpa3i HecnpaBHOCTe. 123
TexhiHi xapaKTepeNCTnKn 123
3araJIbHI Bka3IBKN


Ipeed nepwnm BnKOpncTahHnmpntpo 03HaNoMNTncb 3 ciEo opnrHaJIbHOIO IHCTpyKciEo 3 ekCnlyatau Ta
Bka3iBkamn 3 Texhikn 6e3neKn, 0o DoaIoTbcra. IjrtN BiINOBiIDHO DO HNX.
36epiratn obndi 6poowpy nla noaIbwo BnKopnCTaHH a6o Iy HAcTyHOrO Bnachka.
BnKOpncTaHHa 3a npu3HaueHHaM
Pnpctpi npn3haeHm tiIbKn dIa 3acTocyBaHHB DoMaunhboMy roCnoapCTBi. Pnpctpi npn3haeHm dIpyuieHH naopoIO IMOKe BkOpncTOByBatncb i3 npndATHM npnilaam, y nopAky, onNCAHOMy B ciinHCTpyKcii3 ekcnnyataui. MnnHi 3aco6n He notpi6hi. CnId doTpmyBaTNC bKa3iBOK i3 TexHki 6e3neKn.
Oxopoha doBkijlln

Nakybanbhi MaTepiJn npuaTHI do BTOpHHoi nepepo6Kn. YnakOBky Heo6xIDHO yTNJI3yBatn 6e3 wKOOn dJa DOBkInJr.

EneKtpuHi Ta eNeKtpoHHi npncTpoi HaayactiWe MicTb ciHHi MaTepiAJI, Aki npndaTHI Do BtOpnHOI nepepo6Kn, Ta KOMnoHEHTN, Taki JK batapei, akymyIaTOpu Nm MacTuNo, kiy pa3i HnPaBnB-
HOro NOBODKeHHra 3 HmM a60 He npabnIbHoI yTuJIi3aui MoKyTB CTBOpHTN NOTEuINHy He6e3NeKy dIra 3DopOBJ IIOHNr Ta DOBkIJII. OHaK CI KOMNoHEHTN Heo6XiHi IJa HaneXHOI EKnLIyatauI II pncTpoI. PncTpoI, no- 3NaueHcI cIM CmBOJLOm, 3a6OpOHcTBcRyTuJIi3yBaTN pa3OM i3 No6yTOBm CmITTM.
Bka3iBkn 0oO KO mnoHeHtB (REACH)
AKTyajbHi BiIDOMOCTI npo KOMNHOHTn HabeJeHHa caTti: www.kaearcher.com/REACH
PpnaT Ta 3anachi deTani
CnD BnKOpNCToBbATN JIWE opRiHaJIbHe npuJaTa opRiHaJIbHi 3aNaChi YacTINH, TOMy IIO came BOHN rapaHTyOt b6e3neuHy Ta 6e3nepe6iHy ekcnnyatauio npncrpo.
InΦopMaúiŋ ΣΩO npɪnʌdɪŋ Ta 3aɪaʊnX yæctɪn MICTNtBcR Ha caiTi www.kaercher.com.
KOMNJIeKT NOCTaBKn
Komnnektaia npncptpo 3a3haeHa Ha ynakobci. Nid cac po3nakybaHH npncptpo nepeBipuTu KOMnlekTaIIO. Y pa3i Hectaip npnaAra a6o ykoJKeHb, OTPMAHnx Niac TpaHCnOpTyBaHH, cnD nobIDomTu npO ce ToproBeJIbHi opraH3aui, kna npda ana pncptpi.
TapaHTia
YkoXHi KpaHII dIOTb BiINOBiHI rapaHTiHi yMOBn, BCTaHOBNeH IyOBHOBAxHeHOO oprAH3aJIeIO 36Ty Ha- lo npodyKuB B ci KpaHl. MoKInbi HecnpabHocTi npuNady npotraRom rapaTihoro CTpOKy MNU cyBaEMo 6e3-KoUToBHO, RaIO npuHa HecnpabHocTI NOnRAe B DeΦeKTax MaTePiAnB aBO BnPo6HNoMv 6paky. Y pa3i BNHNKHeHHa PteTeH3I nPoTARom rapaTihoro CTpOKy npoxAHH 3BepTaTncA, MaOuN pnpco6i YeK npo NOKynKy, Do ToproBeNbHOI oprAHAaJI, IO npOdaNa npOdyKT, a0o Do Na6bnKQoi yNOBHOBAxHeHOI cnykbn cepBicHO ro 6cIyROByBaHH.
(Adpecn nB. Ha 3Bopoti)
3an06iXHi npncTpoi
△OBEPEKHO
BiDcyTHi a6o 3mHeHi 3aNo6ixHn npncTrooi
3anobixhnpncptpo npn3HaueHdBaaworo 3axncty.
3a6bOpHReTbcra 3miHOBaTu 3anobixhi npncptoi nn HexTyBaTu HmN.
CnmboHnHa npncTpoi
(3aJIexHo BiI TnI npIcItroI)
YcTaHOBJIeHHI npJaIaIaI
- BiikpnitkiHeCb npnlaDra BCTaHOBHTn Ha napOBn niCToNET i HacyBaTN, DOKN KONKa po36NokyBAHHa napOBOro nictoTeHa 3aΦiKcyetbcr. ManIOHOK G
- BiikpnTkiHeuB npnAaB BCTaHOBtHa fOp-cyHky 3 TOKOBm CTpyMeHem. ManIOHok H
- 3'εДнати подовжувальни Трубки 3 napobим nicтолелом.
a HacyBaTn 1-y noOBoKyBaJIbHy Tpy6ky Ha napOBuN niCToJET, DOKN KONKa po36NoKyBaHHra napOBoro niCToJETA He 3aΦikCyεTbcR.
3'εнувалыну trpy6ky niД'энHo.
b HacyHyTu 2-ny noOobKyBaIbHy ty6ky Ha 1-y noDObKyBaIbHy Ty6ky.3'edHyBaIbHi ty6kn iD'edHaHo.
MaJIuHOKI
4.ПипадяТa/a6o HacakyДЯ NiIbIOnBCTaHOBuTNHaBIniHeCbNoObKByaBbHoTpy6Kn.
MaHIOHOKJ
Pnnaan nie'ednaHo.
Bi'edHaHH npnna
1.Перемпakу кькостi napи nepebectu y 3aHne noJoxKeHHa.
Baxijb noadiy napri 3a6nokobaho.
2. HatncHytn KNONky po36JIOkyBaHHra Ta po3'EDHaTn detani.
Ekcnnyatacia
HaJIbAHHa BODn
Bka3iBka
BukopncTaanHra Tenno BoDn Do3BONRe cKOpOTTu TpNBAiictb HarpiBaHHra.
Bka3iBka
Y pa3i NoctiHoro BnKOpNCTaHHra 3BnuaHoi DnCTuJbOBAHOI BOIN BnDaJIaTn HAKIN i3 napoBOr o pe3epByapa He notpi6Ho.
- BiikpyTtN 3an06jxHy npo6ky.
MaJIHOHOKB
2.Повсглг STINTO BODY 3 napOBORO pe3epByapa. ManIOHOK P
3. 3aIITn B napOBni pe3epByap He 6ilbwe 1 nItpy DnCTNJIbOBAHOI YN BOIDONPOBIDHOI BOIN. ManIOHOK B
4.3akpytntn 3an06jxHy npo6ky.
MaJIHOHOK C
YBIMKHeHH npncToPO
- NocTaNtN npncptni Ha miCy noBepxHIO.
- BctabTn wTeNceJIbHy BNkY bpo3eKy.
MaJIHOHOKD
CbitIOJIOHe NiDCBiuYBaHHc BITNTbcr YepBOHm CBITNOM.
3.ЯктлбксCBITIOJIOHe NiICBIVBaHHNoHc CBITnTcra 3eJIeHmCBIITLOM,piNCTpIM MOXHa BUKOpNCTOByBATN.
MaJIHOHOK E
- Hatncchytn Baxjin noaip nap.
MaJIHOHOKF
Почhev Виховпту па.
PerylIOBaHHKINbKOcTI nap
3a donomoro npemnkaa kibkocti nap nperynoeTb ckiibkictbnap,ka nodaetbc. Iepemnkau mae
3 noJoxeHHa:
IorT TaTexHicHe 06cnyroByBaHHa
BudaneHHaKnny 3 napoBoro pe3epByapy
Bka3iBka
Y pa3i NoctiHoro BnKOpNCTaHHra 3BnuaHoi DnCTuJbOBAHOI BOIN BnDaJIaTn HAKIN i3 napoBOr o pe3epByapa He notpi6Ho.
Bka3iBka
Ocklbny npictpoi BiKnaadaeTbca HaKn, Mn peKoMeHyEmo nicn neBHOi KInbKOcTI 3anOBHeH napOBoro pe3epByapa (3P = 3anOBHeHHpe3epByapa), kK 3a3Ha-yeHo B Ta6nui, BnuJaTn HaKn i3 npictpo.
| ДIANAZH JOK-CTKOSTI | °dH MMOLь/л 3Р | |||
| I | M' | Я K | a | 0 |
| II cepe | Дня 7-14 1,3-2,5 45 | |||
| III | Жорстka | 14-21 2,5-3 | 8 35 | |
| IV | Дужешор-СТКА | >21 | >3,8 | 25 |
Bka3iBka
Otpnmatn DoBikny npo TBepdicTb BOonpoBIOHOI BOIN MoXHa y BOHorocnoapcbKOMy BiOMCTBi a6o B Micknx KOMyHaJIbHnx cnjxkbax.
YBAGA
PonkoDxeni nobepxhi
P034Hn DnBnDnEHHHaKnny MoKe 3pyHyBaTn ChyTnBi NoBepxHi.
HANOBHOBaT Ta cnoPoxHHoBAt npncTpi o6epeXHO.
- BmKHyTn npncTpri, nB. rnaBy.
2.Дати писсю oxJOHOHTN. - Biikpytntn 3ano6ixHy npo6ky.
4.Повсглг STINи BOу 3 napOBOro peepByapa. ManIOHOK P
YBAGA
NoikokxeHH npncptpo 3acobm IJI BuaJeHHn HAKny
BukopncTaHHn HnnpdaTHoro 3ac06y dnn BuaJeHHn HaKunny, a TAKoX NOro HnnpaBnIbHe Do3yBaHHN MoKyTb npn3BOuNTn DO NOuKOJKeHHN pncTpOIO.
BnKOpNCToBvBaTn BnKnHouHo 3acI6 dIaBuaJIeHHaKIny KARCHER.
Iodabatn 2do3aTopn 3ac06y Ha 1,0 n BOnn.
- Po3yH 3ac06y dIy BndaJIeHH HaKuny BnKOpncToBbATn 3rIdHO 3 iHcTpyKciEo Ha ynaKobci 3ac06y.
- 3aHTn po3Hn 3acO6y dIy BuaJIeHHHaKIny B napOBn pe3epByap. He 3akpNBaTn napOBn pe3epByap.
- 3aHnHTn po3uH 3ac06y dIy BuaaneHHaKaHn y npu6Jn3Ho Ha 8 roDnH.
8.Повпсгюзин розин засобу дя вдаленн ha-Knpy 3 napoboro pe3epbyapa.
9.3a Heo6xidnoCTi noBtOpTn npOeDpy BuaJeHHa HakuNy.
10.Дичia6o trnqu npomntnpaobn pe3epbyap xoIIOHOIO BOIOO,IO6 BuaJIHTN Bci 3aIIuKn PO3Hy 3acO6y dIra BuaJAEHHH HAKINy.
11.ПовсichtуЗпити Вody 3 napoboro pezeрByapa. Maniohok P
Dorla3a npnaandM
Baxilnoaipn6iIbweHeHaTnCKaetbcra
Baxijb noaui nap 3a6JIOKOBaHn 3axucTOM BiD iTei.
3axnt BiD iTei (nepeMnKau KInbKocTi napi) nepeBecTu y nepdHe noNoKeHHra.
BaxiNb npoadu npnpo36IOKOBaHn.
Bennkni Bnxid BoDn
Iapobn pe3epByap HADTO NOBNI.
- Hatnckatn Ha napobni nicToJe TOTn, nokn He niJe TPOXN BODn.
Texhiuhi xapaKtepncTnkn
KypblfblbH CnnaTtAmacbl 125
Ophaty 125
PaiandaHny. 125
KoIdaHyf aphaHafMaHb3dbie cKepeTynp. 126
KoHdbipMaJapdbI KOndAny 126
KyTim XeHe TexHnKaIbIK Kbl3MeT KepeTy 127
Akaaynap Ke3iHderi KEMK 128
TexHnKaJIbIK MaFlyMaTTap 128
XaJIbI HycKaynap

KypbInfbHbAnfaw pet kondaH6ac 6ypbH,ocblnainaHnyxehiHderi TynHcyckaHyckaylbIK neh6epinre
Kayinci3dk KekhiHderi HcyaynapdbI Okbin WbIfbHbI3.
Onapra cai apekeTeihi3.
Eki KITANSHAHbI Da epi kapa nai dalaHy Hemece KeNeci neci yuih caTan KOblHbI3.
BiybIMbIH KypambIHdafti 3aTTap TpyaIb COHfbl ManiMeTep TeMeHderi MeKeHka BoiBHa KaJXeTI: www.kaercher.com/REACH
KepeK-kaPak XaHe KocalKbI 6eJWeKTeP
TeK TynHcyKaIbI KepeK-kaPak HeMece KocaIKbl 6eJWeKeTepDi naJaAnaHaBbI3, ce6eBi on KypaJIbIH Kayinci3 XHe anaTcbI 3 Kymblc icTeYiHe KeninDik 6oJaBl.
Kepek-kaapakTap MeH Kocankb6eJWeKTeP TpyaBb aknapaT www.kaercher.com Be6-caTbHda KoJxetimdi.
Xetki3jinim XnHafbbl
BnBIMbHJ KETK3IIm JNHaFbOpaybiTbH yCTIHDe KepcTeINReH. BynBIMdbOpaybiTuH bIFapraHda JNHaKTbIH TOJIbIKTbIFbIH TeKcepi WbIFbHb3.KepeKJapaTAP KETICnerEH Hemece TacbMaJdAy Ke3iHde 3aKbIMdap TUREH XaFaJa, dInepin3re xa6aplacbHb3.
KeninaiK
Ope nnde kepriniikti dinctpn6bhotnap 6epren Keniinik
wapTtapbl kondaHbnaDb. BybIMda matepnaIdbk
Hemece eHdiipictik akaynap aHbIKtanFaH kafdaIa,
bIKTMnAanakaynapdbk eNinik Mep3imi iHHe aKbcB3
XeHneM3. Keninik Mep3imHe Hapa3bIbIKTapbHb3
6oIca, 6yibMbcl catKaH cayda MekeMeciH He mece
XaKBHaIaBfEkinETTI Kb3Met KepCey OPhbHa
Ty6ipteKt KepeTin xa6apJacbHb3.
(MeKeHkaBbApTkblKaBbIHda bepiIreH)
OHyI KepceTINREH TYP KecTeciHne WpHaH.
Keke caHdapdbH MaBbHacbl KeNecidepoanaDbI:
Mbizanbl:30190
3 Hnpinre Xblbl
0 0HdpinreH facbpb
1 EHdpinreH OHXbINdbIK
9 ΘHdpinreH aibihbH ekihw caHbI
0 ΘHdpipireh aibHbH 6piHwa caHb
COhBIMeH 6yI MbIcAnda 30190 KoDbI
09/(2)013 eHdipinre H KyHin 6iDipei.
KopraHbIC KypaJI-Ka6DbIKTapbl
△ABAIJIAHbI3
KoK Hemece e3reptiIrrn KopraHbIC KypaJI- Ka6DbIKTapbl
Koprahbc Kpybfbicbi ci3iH Kayinci3irihre apHanfah. Koprahbc Kpybfbicbi eWkaaH e3reptnhi3 Hemece axkbpataHaB13.
BmybIMdaftb6enrinep
(ByBIM Tpyihe 6aJNaHbICTbl)
KypblfblhbiH cnuattamacbl
OcbHyckayIbIKTa MaKcMaJNbI KOMNneKTAaJraJaIaI KpybnfB CnataTaNah.Ynire Kapa JekTi3iIm KOMNneKTAaJraCbIHda aHbipMaWbIbIKTap 60ana (KaTamaHbI KapaHbI3).
CypeTepdi cypeTepi 6ap 6eTTeh KapaHbI3 CypeT A
1CaKaTaHdbIpFbIi KaKaNaK
2 KapbiknodtbI Jemniuke Kbl3bl - Kypblrfa KepHey 6epinei de, on Kb13a 6actaibl Xacbl - Kypblfbl Kymblicka daibH
3KbIJIbIbITyfa apHaIraH can
4EdeH KOHdbipMacbiHTypaKaKoIO TkblBbI
⑤Ka6eBnbi ycTaBbIu
6 Keninik wTekepi 6ap xeniik 6aHaNbHbICTbipfbiW ka6enb
⑦Kypamdac6eNikTeP TyTkbluBb
8ApTkbl6ypbblMaIbI DOHraKaJwIaIap (2x)
9AnbHrb6ypbImaIbdoHaRanakwanaP(2x)
10 By tanahwacbi
1KynbintanuBifapyTymecci
12 By meIueepiH aybICTbIPbIN-KOCKblu (6anaapdaH KopfaHbICneH)
13 By teriri
14 By 6epyre apHaIraH wIaHr
15HykTeNik Wymek
16AnhrenekwTeK(kiuKeHTa)
17**Typ6o KOHdbipMa
18Dehreilek wetke (yIKeH)
19KoHdbIpMa-TeTka
20KoHdbipMa-ueTKara apHaIraH MmKpoTaJIuBkTbIMaIIbIK
21¥3apTKbI W TyTikTepe(2 daHa)
2 KyIbInTaH WbIFapy Tymecci
23EeH Ta3anayra apHaHFaH KOHdbipMa
24 Tokbima iInMeK
25MnKpoTaIaBikTaH XacaIraH eEn Wy6eperi (1 daHa)
26MnKpoTaJIuBikTaH JkacanFaH eDeH uY6eperi (2 DaHa)
27 KypaI-caimahra apHaIraH cEmKe
**KocbIMua
Ophaty
KoHdbIipfbIJaapdbIMOHTaXkDy
- Kypamda6eiktepiHb6oc yuBbH 6y nuctonetin H KynnbH aWy Tymeci Xa6bInFaHwa 6y nctonetine 6ypan caBbHb3. Cypet G
- KOHdbipMaHBiH aWbIK WeTih HYKTeJIk Wymekke Knir3iHj3. Cypet H
- 3yapTkbiu TyikTepei6y TanaHwacbIme6aHaHbICTbipbIb3.
a Bipihui.¥3aptkbiu tyti 6y nntoTeiH KyinbH aWy TyMeci Xa6blnFaHwa 6y nctoTine 6ypan caJIbH3. BaNaHbIcTbIPfBiU tyik kAnFaHfaH.
b EkiHwi. ¥3apTKbiW TYtIKti 6ipiHwi ¥3apTKbiW TYtIKke KNIri3iHi3. BainaHbICTbIPfBiW TYtIKTeP XAnraHraH. Cypert I
- Kypamac 6enirih/eneh KOHdbipMacbIH y3apTkbiu TYtIKTH 6oc yubHa KNr3iHi3. Cypet J KOHdbipMa kAnfahFaH.
KoHdbipMaHbI axbIpaTbIbI3
- By meJIiuepi aybIcTbIpbIN-KOCKblITbI apTKbl KaJIbInKa KOJIbIHbI3. By tetiri KJIbINTanFaH.
2.БнokтаншыгapyТуМecinбасьIN,6eIWeKTepiH axbipaTbHbl3.
Paindanahy
Cy Kyubihb3
HycKay
blcTbik cy Kbl3y yaKbItbH KbICkapTaabI.
HycKay
CaTbIbIMda 6ap nCTnJneHReh cydbI TypaKTbI naJaIahcaHb3, 6y reHepaTopbIHAn KaKTbIXOIObl kaxet etnei.
- CaKaTHdbipfbl W KaKNaKTbI 6ypan aWbHbI3. Cyper B
- By rehepatopbIHan 6ykiJ cydbI afb13bHb13. Cypert P
- By ka3aHbHa MaKc. 1 NITp DnCTnIeHreH Hemece K6blp cyblH KynblHbI3. Cypet B
- CaKaThaDbipfblI KaKNaKTbI 6ypan Xa6bHbI3 CypTeC
WahcopfbIwTbIKocy
- KypblfblHb TypaKbTb Tipeke opHaanactbipbHb3.
2.Keiinik wTekepi 3neKtp po3etkacbHa KocbHbI3. Cypert D KapbIKNoID Kb13bl TycnEHN XaHbIn Typ. - KapbIKnIOJ Xacbl TycneH KaHraH Me3eTTe KpbIINFbl XyMbicka DaNbIH. Cypert E
4.By Tetirih 6acbHbl3. Cypet F By wymekeTeH Wbira
By mənsepiH petrey
BepiTeIH 6y MeIwepi 6y MeIwepi aybictbipbnKockbi KemerimH petteJIe.i. AybictbipIn-KockbiUHTbIH3 KaIIbIbap:
| мак.бу мениерi | |
| темендетіпген 6у мениерi | |
| 6у жok-балалардан корваIC Hускay Бул калынсы by memiai басьmarан Ку解脱 соланы. |
- Aybictbipbin-KockbiWtbl KaJanaH 6y MenwepiHe ophaTbIhbl3.
- By TetiriH 6acbHb3.
- Ta3anay andbHda 6y nctoTeIH wSybepeke 6aftTan, 6y Teric sbHfapblMaBihwa KyTiH3.
CyblTONTbipHb13
Kymbic Ke3iHne Hemece 6y 6oJMaFaH Ke3e 6y Meupeia a3aica, cybl ToTbipy KaKeT.
- KypblfbiHbEwipy, 6eimdi kapaHb3: KypblfbiHbEwipy.
2.CaKaTaHdbipfbIkwKaKaNaKtbI6ypanawbHbI3. - By ka3aHbHa MaKc. 1 NHTp DnCTnIeHre HEmecE Ky6bIp cybIH KynbHbI3.
4.CaKaTHDbIpBbIi KaKaNaKTbI 6ypan KaabHbI3
5.Kejinik wTekepi 3neKtp po3eTkacbHa KocBihb3. - KapbIKnIOoTbIH Tyci Kbl3bnDaH XacBlnFa aybICKaHbIH KyTIH3. KypbInrbl naaIanaHyra daBbH.
KypbInfbHbl eWipy
- Xeiniik wTekepi 3neKtp po3etkacbHaH WbIrapbin aJIbIHbl3.
- By IbIrapbinybIH TOKtaTnaBbHwa, 6y Teirih 6acbl TpybHb3.
Cyper M
By rehepaTopbI KbICbIM yCTIHde emec.
- Bananapdah KopraHbic ayibctbipbn-KockblwBn (6y MeIwepih ayibctbipbn-KockblwTb) apTkbl KaIbInKa KOIBHb3. By Tetiri KynbINTanraH.
By reHepaTopbIn kyy
Ka3aHdbI ap 10 TOnTbIPraHHaH KeiH KypblfblHbH,6y Ka3aHbIH XybHbI3.
- KypblfnbHbI eWipy, 6eImdi kapaHbI3: KypblfnbHbI eWipy.
- KypblfblHbCybtlhbi3
- KoHdbipMaapabiaxkbipaTbIbI3.
4.By rehepaTObIH cyMeH ToITbIPbIN, KaTbI WaiKaHbI3. ByN by reHepaTObIHbIH actbHa eKTI WerIHdJIepDIn KabATTaYbHa eKeNedi. - By rehepaTopbIHan 6ykin cydbI afb13bHb13. Cypert P
KypbInfbHbI caTayra 6yJAY
- EdeH KOHdbipMacbIH TypaKa KOIO TYTKblbHa CaJIbIHbl3. Cypet N
- By 6epy K6bpiweri MeH Keinik KaebnbI TyKaHbI Hemece KypblfBhl aHaNdbipa OpaHb3 KeHe/ Hemece 6y nictoletih eedeheri cantamara opHaTbIHb3. Cypet O
- 3apTbIuTyKaHbI yKpeH KpaJI-caIMHaIap YCTaftbIbHaOpHaTbIHbI HeMece OHbIH Ke6yIH
Kytin, COcbH Kypan-caMHaapra apHaIraH CEMKere CanbHb3. Cypet O
- KaIraH KypaJI-caMHaNdapDbI KeNTipin, OApdbI da KypaJI-caMHaNdapFa apHaJIraH cEMKere caNbIHbI3. CypTeO
- KypbIINFbIHbI Kypfak XeHe a3dah KopranraH opbIHFa CaKTaHbI3.
KoIdaHyra apHaIraH MaHbI3dbl eckeptyneP
EdeH 6eTIn Ta3apTy
KypblfblbKOJdaHy aIbIHda eEHHH 6eTih
waHcOpfbwneh copyfa Hemece cbInbpyra KeHec
6epinei. OcbnaWbINFaJdbTa3apTydAn 6ypbl
eHnac neh 6etEn 3attapDaH Ta3apTblaBl.
MaTaHbI JkaHaPry
KypbIbnHbI naJdaJaan6ac 6bpHb 6ypkeyni Jepde MaTaMeH yInecimdiirn Apkaan TeKcepH3:MaTaHbI 6ymen eHden, KeTpiH3, cocBt TycHHemece niiimH h e3repreHH TeKcepH3.
Kenka6aTTbI Hemece JaKaTaNFaH 6eTTepi Ta3apTy
HA3AP AYdAPbIHbl
3aKbIMdaIraH 6eTTeP
By 6anaayb3dbi, xnaha3 naibH, nnaCTNK Xa6bHapdbi Hemece wETtepiHH 6oaybI MeH XancbipMacbH epirin Xi6epe anaDbI.
BydBiKeJIMDenIeH WeTTEpiHe 6afttAmhbl3, XancbIpMacbi KaTnapNaHyb MyMkiH.
KypaJIbI KoprAImaHaH aFaW HemeCe napKeT eDeHepDi Ta3apTyra KonDaHa6aHbI3.
KypbfnbHb6oanfAH Hemece nactnKnneXa6bnFaH 6eTepdi, acy Hemece yinha3bH, ecikTepei Hemece napkeTT Ta3anayfa KondaH6aHb3.
- Ocbi 6etTepdi Ta3apTy yuiH, Matahbi 6ymeH Kbicka yaKbIT eHdien, OHbIMeH 6etIH cyptHi3.
ÖnHeKti Ta3apTy.
HA3AP AYdAPbIHbl
HHeKTHcbHybXaHe6eTTIH3aKbIMdaNybl
By Tepe3e KaTaybHbH XANcbpblfAH 6oNikTePiH 3aKbIMdaybXHe CbPT TemnepaTypacbI Temeh 6oNFAH Ke3De Tepe3e aHeri 6etine Kyy TycyHe Akenyi, HtNkeciHde OHbH cbHybl MymkiH.
BybI Tepe3e JkaTaybHbH KancaBipbIraH 6JIikTepiHe 6aftTaMaHbI3.
AnHeKTH6yKiI6EtIH GymeH MyKnT JKeHJI eHJe apKblbl anHeKTePdi cbipt TemnepaTypacbl TemeH 6oJFaH Ke3De Kbi3DbipbHbI3.
Tepe3eH6eTih KOHdbipma-uekameh Ta3anan, MKNpotaIbUbIKka apHaJIfah aIbIH6aIbMaJbIKtB ta3apTBiHbI. CyblKOIO yuH, anDaydbI naJaIaNbHbI3 Hemece 6eTih KypraTbn KentipiH3
KoHdbipMaIapDbI KOIdaHy
By tananwacbi
By nictoletin MbHa kafdaanapda Kypamdac 6eiktepci3 naDanahyra 6onaBbI:
Inihin typrah KIMderi XeHIN KbIPtCTapDbI KOHO yuiH: KmDi 6yMeH 10-20 cm KaWbIKTBkTah eHneHi3.
- WanhbblbnfaMHeH XOHO yin: MaNbIKtB6yme HKeHIN eHdEN, OHbIMeH XnHa3dbCyptHi3.
Hyktenik wymek
HyKTeNIk WymeKeNeh KInB H KOJI XeTeTIH aIMaKTapDbI, TiriCtep, fHTINHTep, cyarap, WYHfbINwa, 8XeTXaHa, XaHIO3n Hemece paNaTOPnapDbI Ta3aNAyra 6OJaDbI. HyKTeNIk WymeK NaCTaHFaH Jepre JxakbIH 6OJFaH caBih, Ta3apTy ecepj KOFapbI 6OJaBIs, ce6ebi WymeKTeH 6bIKKaH Ke3deri TempepaTypa MeH 6y MAnWepi Eh KOFapbI. KaTbI kEerIHdinepih 6ymeH Ta3apTy anDbIHda Caikec KeNETIH JyFbIW KypamMeH eHdeyre 6OJaDbI. KyfbIW KypaJIdbI WaAMMeH 5 MNHYepeKeT etyRe KaNbbpBIn, 6ymeH eHDeHi3.
1.HyKTeJIik WymekTi 6y TanaHwacbHa bICbpHbI3.
Cyper G
Dohrenek wotke (kiwkehtan)
KiukeHTaIeHreIek WcTeK KaTbI KipDi KeTipy ywiH Kbi3MeT KepCteI. IeTKa apKbJIbI eCKI NaCTapDbI KOIO OHai.
HA3AP AYdAPbIHbl
3aKbIMdaIraH 6eTep
UeKa Kymcak 6etTepdi cbl3bn Tactaybl MymkiH.
KymcaK 6etepi Ta3apTyfa apHaJMaFaH.
- KiUKeHTaI DeHReJIeK WTeKHeI HYKeTJI To3aHdaTy KOHbIPMacbHa OPhaTbIHbI3.
Cyper H
Dehrenek wTeK (yIKeH)
YnkeH deHreIeK WtKe HfblIwA, ce6e3ri Ka6nHaCbl, BaHbA, ac yN Kyftlb CnKtbl YnkeH deHreIeK
6eTkeJnepdiTa3aIayfKaonaiNb6oyni Ta6bnaIbI.
HA3AP AYdAPbIHbl
3aKbIMdaIraH 6eTTeP
UETka Jxymcak 6etTepdi cbl3bn TactaybIMMkiH.
KymcaK 6eTepi Ta3apTyfa apHaMaFaH.
- YIkeH DeHreNeK WeTKeHi HYKTeJI To3aHdaTy KOHdbIPMacbHaOpHaTbHbI3.
Cyper H
Ta3apTydbi kakcapTyfa apHaIraH KOHdbipMa
KaKapTbIJaHaTa3apTyra apHAnraH KOHdbIpMa ecki nactbTa3anayra, 6ybiWtapDbI, TiricTepeJi XeHe T.6. Ta3anayFa Keenedi.
- KaKapTbIJIFaH Ta3aTpYfa apHaIFaH KOHDbIpMaHbI DeHReJIeK ⅢeTKaHbIH OPhbHa HyKTeJIiK WymeKke KnI3iHi3.
Cyper H
KoHdbipMa-uetka
KoHdbipMa-ueTkamEn WafbH KybIaTbH 6eTTepi, dyu Ka6HaHaapbH KHe aHaHbTa3anayra 60ana.
- Kolmeh Jxmbic icTeiH KOHdbipMaHbI 6y nictoNetiHderi caikec HkyteJI To3aHdAty KOHdbipMacbHa KaRi3iH3.
Cyper G
2.MaJIbIKTbIMNKpoTaJIuBikKa 6ekitih3.
EeH Ta3anayra apHaIraH KOHdbipMa
EeHre apHaIraH KOHdbIpMaMeH TAc eEHeDep, PnNTka XHe PBX eEHeDep CnKtB JyblaTbH Ka6bipra XHe eEH KAsbHdapbH Ta3aJayfa 60JaBl.
HA3AP AYdAPbIHbl
Бумен eHdeyden 6oJraH 3aKbIMap.
KorapbI TemnepaTypa MeH bINFaIbIK 3aKbIMdApFa eKeJyI MymKiH.
Painanany andbihda 6ydbih kblnyf Ta Teimdiir MeH acepiH biinbeiH Jepde 6ydbH a3 Mneupeimeh Tekcepiny3.
HycKay
Ta3apTbIaTbH 6eTteri Ta3apTkbl W KypanJaapDbH Hemece KyTIM KepCTyRe apHaJFaH 3MyJbcNJaapDbH
KaIbIbI 6yMeH Ta3AnaFaH Ke3De K0JaKTap naJa
6onybHa eKeJyI MymKIn, on KaITa eHderen Ke3De
KOJIbIaDbI.
KpyblfblbKOJdaHy aIdbIHda eHHH6eTIH
waHCOPfbwneh copyfa Hemece cbInbipyFA KeHec
6epinei. OcblaaWbaBnFaIbTa3apTydah 6ypblH
eHn lac nen 6teH 3aTtapDaH ta3apTbJaDb. KaTTbI
naCTAHan XepJIepDe 6ydbIH y3ak epeket etyi ywiH
MKNRTXMBicICTeHi3.
1.丫3apTKbIu TYtIKTepe 6y TanaHwacbImeH 6aINaHbICTbIbIbI3.
Cyper I
- EneHre apHaHanKoHdbipMaHbI y3apTkblTytIKKe Knri3iHi3.
Cyper J
- EdeHre apHaHaH KOHbIpMaRa MaJNbIKTb6eKtiHi3. a EdeHre apHaHaRah MaJNbIKTb eDeHre Xa6bicaTbIH KOnaKTapbIH KOFapbl KapaTbIN KObIHbI3.
bEHeRe apHaJIraH KOHdbIpMaHbI MaJIbIKKa KObIIN, JKeHiJI KbIcBiHbI3.
Cyper K
EeHre apHaIraH MaJIbIK eJeHre apHaIraH KOHdbIpMaRa 3diriInen 6ekitinei.
EdeHre apHaIraH MaIbIKTbI aIbIHbI3
1.AaKa apHaIraH cyeyiUke eDeHre apHaIraH MaJIbIKtbl KOnBIn, eDeHre apHaIraH KOHDbIpMaHbl KOrapbl KeTepiH3.
Cyper K
HycKay
EH 6acbHda eHe re apHaIraH wSybepeKTIh 6eKITne Tacnacbi aJI keTKinikTI TypDe KaKcbI yCTanaDbI Xe He eEN KOHdbIpMacbIHah apeH axbpaTbINaDbI. Ken pet KOndaHraH xHe xyFaH coH, wSybepe eEe H KOHdbIpMacbIHah KaKcbI weWineDi, oHTaJIbI 6eKITy KywIne Kon KeTkiinreH.
EeH KOHbipMacbH TypaKa KIO
- Kymbictafty 3iNicTepe Ke3iHne eEeH KOHdbipMacbIH TypaKa K0O TyTkblBHa KOBbHbI3.
Cyper N
Kytim XaHe TexHnKaJIbIK KbI3MeT Kepcety
By Ka3aHbIHdaFbI KaKTbI Ta3aJAY
Hycay
CaTbINbIMda 6ap nCTnINdeHReh cydbI TypaKTbI naDanaHcaHb3, 6y reHepaTopbIHAn KaKTbIXOHObl KaKeTeTneDi.
Hyckay
Kypanra ek WeriHinepi KHHanaTbHbIKTaH, 6y rehepaTOpBihn ToIy MeIWepeiHe Kapai KeCTeKe pTeiReHde KypanDb Ta3apTyFa KeHec 6epem3 (KF = 6y rehepaTOpBihn ToIybl).
| kaTbIbIK ayKbIMbl | °dH (немic kaTbIbIK rpaDycbl) | MMOJIb/л KF | (6y reHepaTo pbH toJIbIpy) | |
| Жумсak 0-7 0-1,3 55 | ||||
| I opTaша 7-14 1,3-2,5 | 5 45 | |||
| II kaTbI 14-21 | 1 2,5-3,8 35 | |||
| V оTe KaTbI | >21 | >3,8 25 | ||
Hyckay
Cy wapyaawbblbf6ackapMacbi Hemece MyHnunanTETep cy Kvbpi CybHbH KaTbJbIbITypaJIbaknapat 6epei.
HA3AP AYdAPbIHbl
3aKbIMdAnfah6eTep
KaTbepiKiwTePdiH ceImTan 6eTke kepi acep etyi MYMKIH.
KypblfblHbTOJtbypyxhe6ocatyXymbictapbH MykIrTOpblHaHbI3.
- KypblfblHb eWipiH3, 6eJImdi KaapHaB3:
- KypblnfbHbI cyblTbHb3.
- CaKaTaHdbipfbIkw KaKnakTbI 6ypan awbHbI3.
- By rehepaTopbIHan 6yKIN cydbI afbI3bIHbI3. Cypert P
HA3AP AYdAPbIHbl
AcnantbH KaKTbI KOIora apHaJIraH KypaJImeH 3aKbIMdAJIybl
KaTbI KOIOFA cAeKec KeNMeTIH KypaI MeH OHbI KaTe MEnIepey KpybIfBiHbI 3aKbIMdaybl MyMKIH. KARCHER KaTbI KOIOFA apHaJIFaH KypaJIbIH RaHa KOnJaHBiHbI3.
1,0 n cyra kaKtbl KeTipyre apHaIraH KypaIbIH 2 MenwepeJey 6ipJIirH naIdaIaNbIHbI3.
5. KaKtbl KIOfA apHaJIrFaH KypaIbbl KaTamaDaFbI HcKayIbIKKa CnIEc KOJaHaBbIb3.
6. KaKtbl KxOJFA apHaIraH KypanDbI 6y reHepaTOpbIHKaYbIHb3. By reHepaTOpbIH KannahbI3.
7. KaKbI KIOFA apHaJIrH KypaNDbIH epITiHicIH 8 caFaTka KaIbIpbIHbI3.
8. KaKbI KOIOFA apHaNFaH Kypan epiTHiDicIH 6y reHepaTOPbIHah TOJIbIFbIMeH afbl3bHbI3.
9. KaKer 6oIca npOeDypaHbI kaTanaHbI3.
10. KaTbI KIOra apHaJIraH epiITiHiH 6apIbIK KaIdbIbIH KOIO yWIn, 6y reHepaToPbIH 2-3 pet CaIKbIH CymeH KybIbI3.
11. By rehepaTopbIHAn 6yKIN cydbI arbl3bIHbI3. Cypert P
TOnbIMdayuBnapfkyTIm KepceTy
Akaynap Ke3iHderi KEmek
AkaayapdbHce6entepi KEN XaFdaJa KeJeci 10nydb naDanahy apkblbE3diirHeH KOHOFA 6ONaTbHd a kapaanbIM 6OJaDb. KydkTeP 6OJa Hemece OcbI Jepde Kepcetimereh akaynap 6oNraH Ke3De, pyKcat etinreH cepBnctIK opTaIbIKKa xa6apnaCbHb3.
ECKEPTY
KyikTepeKayni KHe 3JKeTp TOrbIHAn KaPaKaT any KpyIInfbl Kyat Ke3iHe KocbIny Ke3De Hemece CybImaHaK3De,akaynapdbI KOIO Kayinti.
Xenjinik wtekepi po3etkaadn bifapbn anbHb3.
KypblfblHbCyblTbHb3.
By rehepaTopbikakneh kabbnfah.
By rehehaTopbH KaKaTaH Ta3apTbHbI3.
By xok
By rhehepatopbIHda cy kok
Cymeh TOnTbipbHb3,6enimKapaHb3:Cybl TOITbipbHb3.
By teiri 6acblmaaibl
By tetiri 6anaapandah KoprahbicneH KyblntanraH.
- BaanapdAn KopraHbic aybictbpBn-KockblWBIn (6y MeIwepiH aybictbpBn-KockblWTbl) aJIbIHbI KaJIbINKa KOBIHbI3. By tetiri KynbINTAH WbIFapBlnFaH.
Cy WbifbHbX Kofapbl
By Ka3aHbI TbIM TOJbI.
CydbH a3 MeIwepi WbIKKaHaFa deIH 6y TanaHuaCbH 6acbl TpybHb3.
TexHnKaIbIK MaFJyMaTTap
3neKtp KeniciHe Kocy
Kephey B 220-240
a3a 1
Knijik T50-60
KopraHbIC Klaacbl IPX4
Kopray KnacbI
XyMbIc cNaTApbl
Xbiny KyaTbi BT 1500
MaKcImaIbI KMbIC KbIcMbI MNa 0,32
Kb3y yaKbITbl MNHyTTa 6,5 p
Y3dkci3 6ypan xi6ityr/MnH 40
MaKcImaIbI 6y mnyIbci r/MnH 100
CbIMDbIbIK
By rehepaTopbI 1,0
EJWEMepi MeH caJMaFbl
Canmaft (TOnbIMdayuBnapcb3) Kr 2,7
Y3bIHdbIfbl MM 304
EHi MM 231
Bniktiri MM 287
Texnkaibek3repictepyKcatetinreH.
Jd
e 1
.
ggl aol jolll
o o
y
a
JgJgJg
JUUL
12 × 12
1
clll JJaJLssuJgabil clll JJaJLssu
jgljjbdo jde
JlalbIaL> aLwogj0g jllg
111 (jlaaas jj) Jabla aLg aLg g
120 121
clu Jle
- 5 S Joo Joo
aaiJl
aawwlll wllw yolw gololw wllw wllw wllw wllw wllw wllw wllw wllw wllw wllw wllw wllw wllw wllw wllw wllw wllw wllw wllw wllw wllw wllw wllw wllw wllw wllw wllw wllw wllw wllw wllw wllw wllw wll
Haolai!o
jLgS Cio
Jn Jnnnnnnnnnnnnnnnnnnnnnnnnnnnnnnnnnnnnnnnnnnnnnnnnnnnnnnnnnnnnnnnnnnnnnnnnnnnnnnnnnnnnnnnnnnnnnnnnnnnnnnnnnnnnnnnnnnnnnnnnnnnnnnnnnnnnnnnnnnnnnnnnnnnnnnnnnn
aiee e aee aee aee aee aee aee 1
J 1
HaLia!
591. Cio
aIall o aalh bssll 1000 g 000000000000000000000000000000000000000000000
wuuu uuljuiuua 5g1.
J
a. 品 品 . 0gG
sall aaiall lclalll 2.
iO
2wog o0a08oaijol waoa08g:abjlljz
- 电
aai jia aio
gol gol gol gol gol gol gol gol gol gol gol gol gol gol
www.kaercher.com/REACH
Jg jg 1
aaiy jll gagg aal y aolll clall piai
g j 1000000000000000000000000000000000000000000000000000000
4a
pulwJl sO
g>2g>9 no sI.ogll JgJgll pss g>0 g aas i aia 1aai all> .g.giic ogll Uggtg. g|jla| jai lac n c jti al
Jalal
gsswll swh gzznnnnaaalbghw algs Jy Sswy 1e Iba 29 1111111111111111
o0 1000000000000000000000000000000000000000000000000000000000000000000
Laioe oLac aoojgo g jgog
(aolal aolal lglgll)

THANK YOU!
MERCI! DANKE! iGRACIAS!

Register your product and benefit from many advantages.
www.kaercher.com/welcome ★★★★★

Rate your product and tell us your opinion.
www.kaercher.com/dealersearch
71364 Winnenden (Germany)
Tel.: +49 7195 14-0
Fax: +49 7195 14-2212