
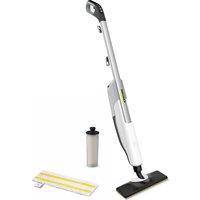
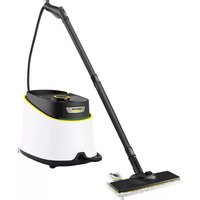
SC 2 Deluxe EasyFix Premium - Steam cleaner Kärcher - Free user manual and instructions
Find the device manual for free SC 2 Deluxe EasyFix Premium Kärcher in PDF.
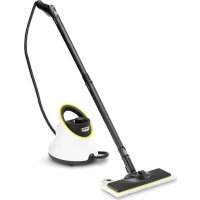



| Product type | Steam cleaner |
| Brand | Kärcher |
| Model | SC 2 Deluxe EasyFix Premium |
| Dimensions (L x W x H) | 304 x 231 x 287 mm |
| Weight (without accessories) | 2.7 kg |
| Power supply | 220-240 V ~ 50-60 Hz |
| Heating power | 1500 W |
| Maximum operating pressure | 0.32 MPa |
| Heating time | 6.5 minutes |
| Continuous steam output | 40 g/min |
| Maximum steam burst | 100 g/min |
| Boiler capacity | 1.0 L |
| Protection class | I |
| Protection type | IPX4 |
| Included accessories | Steam hose, steam handle, jet nozzle, round brushes (small and large), Power nozzle, hand tool, floor nozzle, microfiber cloths (1+2), extension tubes (2), accessory bag |
| Main functions | Steam cleaning without detergent, adjustable steam output (3 positions), child safety lock, automatic shut-off in case of overheating |
| Safety | Pressure regulator, safety closure with valve, safety thermostat, child safety lock on steam selector |
| Maintenance and cleaning | Descaling recommended according to water hardness (every 25 to 55 fills), rinse boiler every 10 fills, machine wash cloths at 60°C max |
| Spare parts and repairability | Original accessories and spare parts available at www.karcher.com, authorized after-sales service |
| Warranty | According to country conditions, material or manufacturing defects covered (see purchase invoice) |
Frequently Asked Questions - SC 2 Deluxe EasyFix Premium Kärcher
User questions about SC 2 Deluxe EasyFix Premium Kärcher
0 question about this device. Answer the ones you know or ask your own.
Ask a new question about this device
Download the instructions for your Steam cleaner in PDF format for free! Find your manual SC 2 Deluxe EasyFix Premium - Kärcher and take your electronic device back in hand. On this page are published all the documents necessary for the use of your device. SC 2 Deluxe EasyFix Premium by Kärcher.
USER MANUAL SC 2 Deluxe EasyFix Premium Kärcher
Environmental protection 10
Accessories and spare parts 10
Scope of delivery 10
Warranty 10
Safety devices 10
Description of the unit 10
Installation 11
Operation 11
Important application instructions 12
How to use the accessories 12
Care and service 13
Troubleshooting guide 13
Technical data 13
General notes

Read these original operating instructions and the enclosed safety instructions before using the device for the first time.
Act in accordance with them.
Keep both books for future reference or for future owners.
Intended use
Only use the appliance in private households. The appliance is intended for cleaning with steam and can be used with appropriate accessories as described in these operating instructions. Detergents are not required. Observe the safety instructions.
Environmental protection

The packing materials can be recycled. Please dispose of packaging in accordance with the environmental regulations.

Electrical and electronic appliances contain valuable, recyclable materials and often components such as batteries, rechargeable batteries or oil, which - if handled or disposed of incorrectly - can
pose a potential threat to human health and the environment. However, these components are required for the correct operation of the appliance. Appliances marked by this symbol are not allowed to be disposed of together with the household rubbish.
Notes on the content materials (REACH)
Current information on content materials can be found at: www.kaercher.com/REACH
Accessories and spare parts
Only use original accessories and original spare parts. They ensure that the appliance will run fault-free and safely.
Information on accessories and spare parts can be found at www.kaercher.com.
Scope of delivery
The scope of delivery for the appliance is shown on the packaging. Check the contents for completeness when unpacking. If any accessories are missing or in the event of any shipping damage, please notify your dealer.
Warranty
The warranty conditions issued by our relevant sales company apply in all countries. We shall remedy possible malfunctions on your appliance within the warranty period free of cost, provided that a material or manufacturing defect is the cause. In a warranty case, please contact your dealer (with the purchase receipt) or the next authorised customer service site.
(See overleaf for the address)
Safety devices
CAUTION
Missing or modified safety devices
Safety devices are provided for your own protection. Never modify or bypass safety devices.
Symbols on the appliance
(according to type of appliance)
| Risk of burns, surface of appliance be- comes hot during operation | |
| Risk of scalding from steam | |
| Read operating instructions |
Pressure controller
The pressure controller keeps the pressure in the steam boiler as constant as possible during operation. The heating is switched off when the maximum operating pressure is reached in the steam boiler and is activated if there is a pressure drop in the steam boiler as a result of a steam removal.
Safety lock
The safety lock seals the steam boiler from the steam pressure present. If the pressure regulator is defective and overpressure occurs in the steam boiler, an pressure relief valve opens in the safety lock and steam leaks out through the lock.
Prior to restarting the appliance, contact the responsible KÄRCHER Customer Service.
Safety thermostat
The safety thermostat prevents the device from overheating. If the pressure controller fails and the device overheats, then the safety thermostat switches the device off. To reset the safety thermostat, contact the responsible KÄRCHER Customer Service.
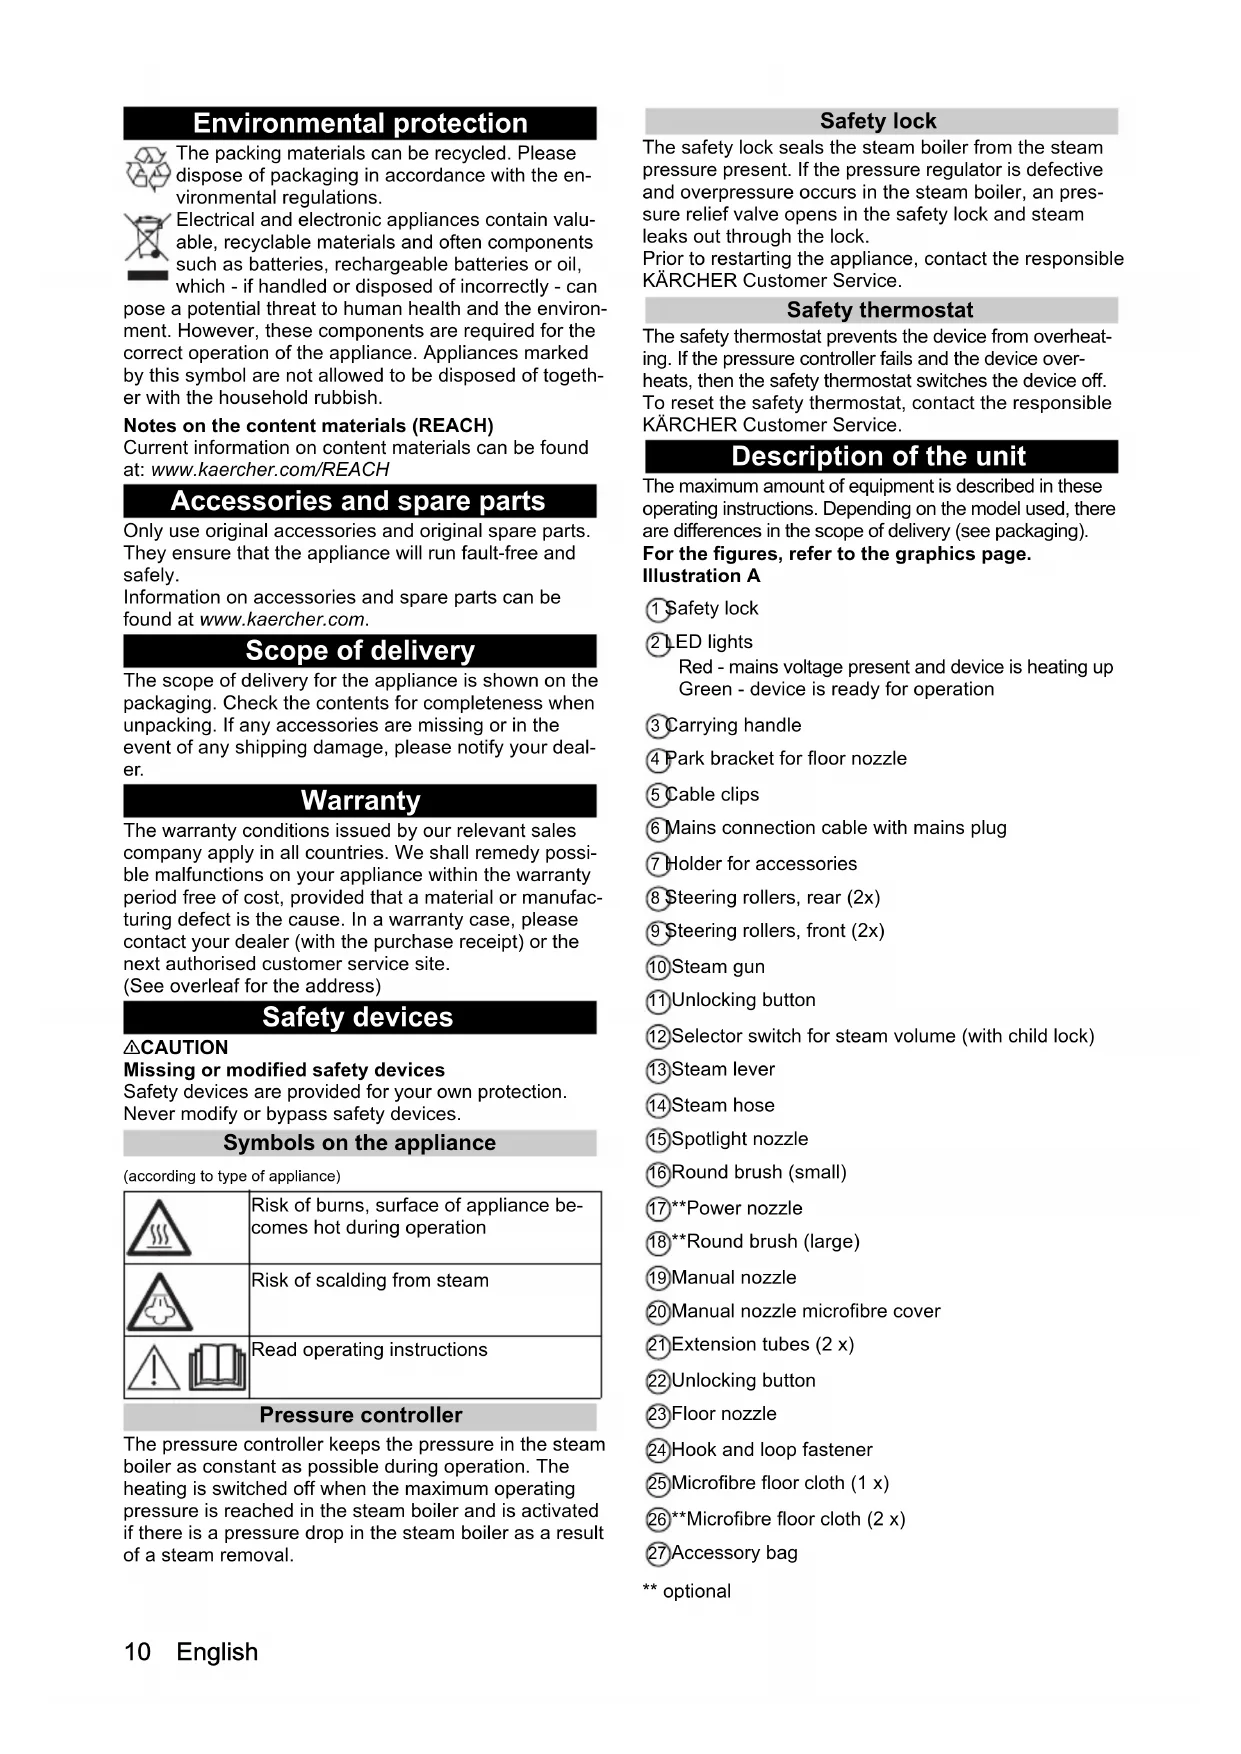
Description of the unit
The maximum amount of equipment is described in these operating instructions. Depending on the model used, there are differences in the scope of delivery (see packaging).
For the figures, refer to the graphics page. Illustration A
1 Safety lock ② LED lights
Red - mains voltage present and device is heating up Green - device is ready for operation ③ Carrying handle 4 Park bracket for floor nozzle 5 Cable clips 6 Mains connection cable with mains plug 7 Holder for accessories ⑧ Steering rollers, rear (2x) 9 Steering rollers, front (2x) ⑩ Steam gun 1 Unlocking button 12 Selector switch for steam volume (with child lock) ③ Steam lever 14 Steam hose ⑤ Spotlight nozzle 16 Round brush (small) 17 Power nozzle 18 Round brush (large) 19 Manual nozzle 20 Manual nozzle microfibre cover 2 Extension tubes (2 x) 22 Unlocking button 23 Floor nozzle 24 Hook and loop fastener 25 Microfibre floor cloth (1 x) 26 Microfibre floor cloth (2 x) 27 Accessory bag
** optional
Installation
Installing accessories
- Push the open end of the accessory onto the steam gun so that the unlocking button on the steam gun engages.
Illustration G
- Push the open end of the accessory onto the spotlight nozzle.
Illustration H
- Connect the extension tubes with the steam gun.
a Push the first extension tube onto the steam gun so that the unlocking button on the steam gun engages.
The connection pipe is connected.
b Push the second extension tube onto the first extension tube.
The connection pipes are connected.
Illustration I
- Push the accessory and/or the floor nozzle onto the free end of the extension tube.
Illustration J
The accessory is connected.
Disconnecting accessories
- Set the selector switch for the steam volume to the rear.
The steam lever is locked.
- Push the unlocking button and pull the parts apart.
Operation
Filling water
Note
Warm water reduces the heating-up time.
Note
Descaling the steam boiler is not required if commercially available distilled water is used.
- Unscrew the safety lock.
Illustration B
- Drain the water completely out of the steam boiler.
Illustration P
- Fill a maximum of 1 I distilled water or tap water into the steam boiler.
Illustration B
- Insert the safety lock.
Illustration C
Switching on the device
- Place the device on a firm surface.
- Insert the mains plug into a socket.
Illustration D
The LED light is lit in red.
- When the LED light lights up green, the device is ready for operation.
Illustration E
- Press the steam lever.
Illustration F
Steam leaks out.
Regulating the steam volume
The expelled steam volume is regulated using the selector switch for steam volume. The selector switch has 3 positions:
| Maximum steam volume | |
| Reduced steam volume | |
| No steam - child lock Note In this position, the steam lever cannot be operated. |
- Set the selector switch for the steam volume to required steam volume.
- Press the steam lever.
- Before starting cleaning, point the steam gun at a cloth until steam is expelled evenly.
Refilling water
If the steam volume is reduced during work or if no more steam volume comes out, the water will have to be refilled.
- Switch the device off; see Chapter Switch off the appliance.
- Unscrew the safety lock.
- Fill a maximum of 1 litre distilled water or tap water into the steam boiler.
- Insert the safety lock.
- Insert the mains plug into a socket.
- Wait until the LED light has changed from red to green.
The device is ready for use.
Switch off the appliance.
- Pull the mains plug out of the socket.
- Press the steam lever until no more steam flows out. Illustration M
The steam boiler is depressurised.
- Set the child lock (selector switch for steam volume)
to the rear.
The steam lever is locked.
Rinsing out the steam boiler
Rinse the appliance's steam boiler after max. every tenth boiler fill.
- Switch the appliance off, see Chapter Switch off the appliance.
- Allow the appliance to cool down.
- Disconnect the accessory.
- Fill the steam boiler with water and swing it around vigorously. Lime residue which has been deposited on the bottom of the steam boiler will be released as a result.
- Drain the water completely out of the steam boiler. Illustration P
Storing the device
- Hang the floor nozzle in the park bracket. Illustration N
- Wind the steam hose and mains connection around the carrying handle or device and/or insert the steam gun in the ground floor nozzle.
Illustration O
- Insert the extension tube in the large accessory holder or allow to dry and put in the accessory bag. Illustration O
- Allow the rest of the accessories to dry and then store in the accessory bag. Illustration O
- Store the device in a dry location that is protected from frost.
Important application instructions
Cleaning the floor areas
We recommend sweeping the floor or vacuum cleaning it before using the appliance. In this way the floor will be cleared of dirt and loose particles before the wet cleaning.
Freshening up textiles
Prior to using the appliance, always check the compatibility of the textiles at a concealed point: Steam down the textile, allow it to dry and then check it for any change in colour or shape.
Cleaning coated or painted surfaces
ATTENTION
Damaged surfaces
Steam can loosen wax, furniture polish, plastic coatings or paint and edge band from edges.
Do not direct the steam at glued laminated edges as the edge band may loosen.
Do not use the appliance for cleaning unsealed wood or parquet floors.
Do not use the appliance for cleaning painted or plastic coated surfaces such as kitchen or living room furniture, doors or parquet.
- To clean these surfaces, steam a cloth briefly and use it to wipe over the surfaces.
Glass cleaner
ATTENTION
Glass breakages and damaged surfaces
Steam can damage sealed points of the window frame and, at low outside temperatures, lead to tension on the surface of window panes and hence to glass breakages. Do not direct the steam at sealed points on the window frame.
At low outside temperatures, heat up the window panes by gently steaming the full surface of the glass.
- Clean the window area with a manual nozzle and cover. To remove the water, use a squeezegee or wipe the surfaces dry.
How to use the Accessories
Steam gun
The steam gun can be used for the following applications without accessories:
- For removing slight creases from hanging clothing items: Steam the clothing item from a distance of 10-20 cm.
- For wiping damp dust: Steam a cloth briefly and use it to wipe over the furniture.
Spotlight nozzle
The spotlight nozzle is suitable for cleaning areas, joins, fittings, drains, sinks, WCs, blinds, or radiators that are difficult to access. The closer the spotlight nozzle is to the soiled area, the greater the cleaning efficiency will be as the temperature and steam volume are at their highest at the nozzle opening. Larger lime deposits can be treated before steam cleaning with a suitable detergent.
Allow the detergent to soak in for approx. 5 minutes and then steam it off.
- Slide the spotlight nozzle onto the steam gun. Illustration G.
Round brush (small)
The small round brush is used for cleaning stubborn dirt. Stubborn dirt can be removed more easily by brushing.
ATTENTION
Damaged surfaces
The brush may scratch sensitive surfaces. It is not suitable for cleaning sensitive surfaces.
- Fit the round brush to the spotlight nozzle. Illustration H
Round brush (large)
The large round brush is suitable for cleaning large rounded surfaces, e.g. wash basin, shower tray, bath tub, kitchen sink.
ATTENTION
Damaged surfaces
The brush may scratch sensitive surfaces. It is not suitable for cleaning sensitive surfaces.
- Fit the large round brush to the spotlight nozzle. Illustration H
Power nozzle
The power nozzle is used for cleaning stubborn dirt, blowing down corners, joins etc.
- Install the power nozzle onto the spotlight nozzle according to the round brush.
Illustration H
Manual nozzle
The manual nozzle is used for cleaning small areas that can be washed down, shower cubicles and mirrors.
- Push the manual nozzle onto the steam gun according to the spotlight nozzle.
Illustration G
- Pull the cover over the manual nozzle.
Floor nozzle
The floor nozzle is used for cleaning washable wall and floor coverings, e.g., stone floors, tiles, and PVC floors.
ATTENTION
Damage due to build-up of steam
Heat and moisture can lead to damage.
Check the heat resistance and steam effect on an inconspicuous area using a minimal volume of steam prior to use.
Note
Detergent residue or care emulsions on the surface to be cleaned can lead to streaks, which will disappear however once these have been used several times.
We recommend sweeping the floor or vacuum cleaning it before using the appliance. In this way the floor will be cleared of dirt and loose particles before the wet cleaning commences. Work slowly on surfaces that are heavily soiled so that the steam can impact longer.
- Connect the extension tubes with the steam gun. Illustration I
- Push the floor nozzle onto the extension tube. Illustration J
- Fasten the floor cleaning cloth to the floor nozzle. a Place the floor cleaning cloth with the hook and loop fastener strips pointing upwards on the floor.
b. Place the floor nozzle onto the floor cleaning cloth, applying slight pressure. Illustration K
The floor cleaning cloth will stick to the floor nozzle of its own accord due to the hook and loop fastener.
Removing the floor cleaning cloth
- Place one foot on the bottom corner of the floor cleaning cloth and lift the floor nozzle up.
Illustration K
Note
Initially, the floor cleaning cloth's hook and loop fastener strip is very strong and cannot be removed from the floor nozzle easily. After the floor cleaning cloth has been used several times and washed, it is easier to remove from the floor nozzle and it has reached the optimum adhesion.
Parking the floor nozzle
- Hang the floor nozzle in the park bracket during breaks in work.
Illustration N
Care and service
Descaling the steam boiler
Note
Descaling the steam boiler is not required if commercially available distilled water is used.
Note
Since the lime becomes caked on the appliance, we recommend descaling the appliance as specified in the table (KF=boiler fillings) based on the number of times the steam boiler is filled.
| Hardness range °dH | mmol/l KF | |||
| I soft 0 | -7 0-1.3 55 | |||
| II Medium | um 7-14 1.3-2 | 5 45 | ||
| III | Hard | 14-21 | 2.5-3.8 | 35 |
| IV | Very hard | >21 >3.8 25 | ||
Note
Your water board or municipal utilities authority can provide information on hardness of tap water.
ATTENTION
Damaged surfaces
The descaler may corrode sensitive surfaces.
Fill and empty the appliance carefully.
- Switch off the appliance, see Chapter .
- Allow the appliance to cool down.
- Unscrew the safety lock.
- Drain the water completely out of the steam boiler.
Illustration P
ATTENTION
Appliance damage due to descaler
An unsuitable descaler and incorrect dosing of the descaler may damage the appliance. Only use KÄRCHER descaler. Use 2 dosing units of the descaler for 1.0 l of water. 5. Apply descaler solution to the descaler according to the details. 6. Fill the descaler solution into the steam boiler. Do not seal the steam boiler. 7. Allow the descaler solution to take effect for approx. 8 hours. 8. Drain descaler solution completely out of the steam boiler. 9. Repeat the descaling process if necessary. 10. Rinse the steam boiler 2-3 times with cold water in order to drain all the descaler solution residue. 11. Drain the water completely out of the steam boiler. Illustration P
Care of accessories
(Accessories - depending on scope of delivery)
Note
The floor cleaning cloth and the cover for the manual nozzle have been washed beforehand and can be used immediately for working with the appliance. The micro fibre cloths are not suitable for dryer.
Note
When washing the cloths, observe the instructions on the washing tag. Do not use any liquid softeners as this will affect the ability of the cloths to pick up dirt.
- Wash the floor cleaning cloths and covers at a max. temperature of 60 °C in the washing machine.
Troubleshooting guide
Malfunctions often have simple causes that you can remedy yourself using the following overview. When in doubt, or in the case of malfunctions not mentioned here, please contact your authorised Customer Service.
△WARNING
Risk of electric shock and burns
Trying to eliminate faults while the appliance is connected to the mains or has not yet cooled down is always dangerous.
Remove the mains plug.
Allow the appliance to cool down.
The steam boiler is scaled.
- Descale the steam boiler.
No steam.
No water in the steam boiler - Refill water, see Chapter Refilling water.
The steam lever cannot be pressed.
The steam lever is locked with the child lock.
- Set the child lock (selector switch for steam volume) to the front.
The steam lever is released.
High water egress.
The steam boiler is too full.
- Press the steam gun until a little water comes out.
Technical data
Electrical connection
| Voltage | V 220-240 |
| Phase | ~ 1 |
| Frequency | Hz 50-60 |
| Protection class | IPX4 |
| Protection class | I |
Performance data
| Heating capacity | W 1500 | |
| Maximum operating pressure MPa | 0.32 | |
| Heating-up time | Minutes | 6.5 |
| Continuous steaming | g/min | 40 |
| Maximum steam blast | g/min | 100 |
Filling quantity
| Steam boiler | I | 1.0 |
| Dimensions and weights | ||
| Weight (without accessories) | kg | 2.7 |
| Length | mm | 304 |
| Width | mm | 231 |
| Height | mm | 287 |
Subject to technical modifications.
Contents
General notes 14
Clean paved surfaces
(alt after apparattype)
Follow the safety instructions. Act accordingly.
Keep the brochure for future use or for the next owner.
Intended use
The device is intended for household use only. The device is intended for steam cleaning and can be used with the accessories described in this instruction manual. No detergents are required. Safety instructions must be observed.
Environmental protection

Packaging materials are recyclable. Dispose of packaging without harming the environment.

Electrical and electronic devices often contain valuable materials, components for recycling, and often such components as batteries, accumulators for
oil, which, if handled improperly or disposed of incorrectly, pose a potential hazard to health and the environment. Nevertheless, these components are necessary for the proper functioning of the device. Devices marked with this symbol must not be disposed of with household waste.
Information for end users (REACH)
(depending on device type)
When using standard distilled water, removal of scale from the steam reservoir is not required.
- Unscrew the safety cap.
Figure B
- Pour all the water out of the steam reservoir. Figure P
- Fill the steam reservoir with no more than 1 liter of distilled or demineralized water.
Figure
- Screw the safety cap back on.
Figure C
Turning on the device
1. Place the device on a stable surface. 2. Insert the power plug into the socket.
Figure D
The indicator light will illuminate in red.
- As soon as the indicator light turns green, the device is ready for use.
Figure E
- Steam output valve.
Figure F
Steam outlet.
Adjusting the amount of steam
Using the steam quantity switch, the amount of steam supplied is adjusted. The switch has 3 positions:
If the amount of steam is reduced, the steam does not come out, and it is necessary to add water.
- Turn off the device, see the chapter Turning off the device.
- Unscrew the fuse.
- Fill the steam boiler with no more than 1 liter of distilled or tap water.
- Screw the fuse back in.
- Insert the power plug into the socket. 6. Wait until the indicator light turns from red to green. The device is ready for use.
Turning off the device
- Remove the power plug from the socket.
- Press the steam lever until the steam stops coming out.
The steam reservoir is in a safe condition.
3. Set the child safety lock (quantity switch) to the rear position. The steam supply is blocked.
Cleaning the steam reservoir
Rinse the steam reservoir at least once after every 10 fillings.
- Switch off the device (see chapter "Switching off the device"). 2. Allow the device to cool down.
- Detach the accessories.
- Fill the steam reservoir with water and shake it vigorously. This is necessary to remove limescale deposits that have settled on the bottom of the steam reservoir.
- Pour out all the water from the steam reservoir. Figure P
Storage of the device
1. Wind the power cord around the handle or the device and/or insert the steam nozzle into the parking bracket. Figure N 2. The steam hose and the power cord can be wrapped around the handle or the device and/or the steam nozzle can be inserted into the parking bracket.
Figure O
- Insert the accessory tubes into the large holder for accessories or place them in the drying rack to dry.
Figure O
The steam can damage varnish, furniture polish, polymer coatings, paint, and wallpaper on edges.
Do not direct steam at glued edges, as this may cause the adhesive to loosen.
Do not use the appliance on varnished wooden or parquet floors.
Do not use the appliance for cleaning painted or plastic-coated surfaces, such as kitchen or bathroom furniture, doors, or parquet.
1. For such surfaces, briefly wipe with a damp cloth and then dry the surface.
Cleaning glass
CAUTION
Glass breakage and surface damage
Steam can damage varnished areas of window frames, and at low outside temperatures, it can cause cracks and breakage of window glass.
Do not direct the steam jet directly at varnished areas of the window frame.
At low outside temperatures, heat the window glass by briefly steaming the entire glass surface.
Clean the window with a microfiber cloth. To remove water, use a squeegee to wipe the surface dry.
Using the accessories
Steam nozzle
The steam nozzle can be used without accessories in the following cases:
- Removing small wrinkles on hanging items: treat the item with steam from a distance of 10-20 cm. For quick dusting: briefly steam a cloth and wipe the furniture with it.
Precise jet nozzle
The precise jet nozzle is designed for cleaning hard-to-reach places, joints, mixers, drains, sinks, toilets, and radiators. The closer the precise jet nozzle is to the contaminated area, the higher the cleaning efficiency. This is because the temperature and amount of steam are maximum at the point of exit from the nozzle. Strong limescale deposits can be treated with a suitable cleaning agent before steam cleaning. The exposure time of the cleaning agent is about 5 minutes, after which it is rinsed with steam.
- Screw the precise jet nozzle onto the steam pistol.
Figure G
Round brush (small)
The small round brush is suitable for removing stubborn dirt. The treatment allows you to easily clean surfaces from stubborn dirt.
CAUTION
Sensitive surfaces
The brush may scratch sensitive surfaces.
It is not suitable for cleaning sensitive surfaces.
1. Mount the small round brush onto the precise jet nozzle.
Figure H
Round brush (large)
The large round brush is intended for cleaning large round surfaces, such as washbasins, showers, bathtubs, and kitchen sinks.
CAUTION
Surfaces supérieures
La brosse peut endommager les surfaces sensibles.
Elle ne convient pas pour le nettoyage des surfaces sensibles.
1. Monter la grande brosse ronde sur le jet à haute pression.
Figure H
Buse haute pression
La brosse haute pression convient pour éliminer les saletés tenaces, le nettoyage des coins, des joints, etc.
- Monter la brosse haute pression de la même manière que la grande brosse sur le jet à haute pression.
Figure H
Buse rotative
La buse rotative est destinée au nettoyage de petites surfaces, des cabines de douche et des miroirs.
- Enfiler la buse rotative sur le pistolet à jet à haute pression conformément à la figure G.
- Pousser la buse sur la buse rotative.
Buse de sol
La buse de sol est destinée au nettoyage des sols et des revêtements de sol, par exemple les sols en pierre, les carreaux de céramique et les revêtements de sol.
Effects of steam
High temperature and humidity can cause damage.
Before using, it is necessary to check the heat resistance and the effect of steam in an inconspicuous place with a minimal amount of steam.
Note
Residues of cleaning agents and dirt on the surface being treated with steam can become the cause of stains, which, however, will disappear after a few applications.
Before using the device, we recommend placing a cloth for cleaning on the floor. Thanks to this cloth, the floor will be freed from dirt and debris after wet cleaning. To allow the steam to act longer on heavily soiled surfaces, work slowly enough.
- Connect the extension hoses to the steam iron.
Figure 1
- Slide the floor cloth onto the extension hose.
Figure 2
- Attach the floor cloth to the floor nozzle.
a Lay the cloth for cleaning the floor with the Velcro fasteners facing up. b With slight pressure, press the floor nozzle onto the cloth for cleaning the floor.
Figure 3
Thanks to the Velcro fasteners, the floor cloth is attached to the floor nozzle by itself.
Chart of canfetkn and noa
- NocTaNtB OndHy Hory Ha 3bYOK cAnΦeTKn dIa NOJa I NOHrTaB Hacdky dIra NOJa.
PncyHok K
PpmeaHne
Chayana NeHTa-Nnnyka caIpeTkn IJRA nona eue OeyHb KpenkA n caipeTKy TjKeJeO CHrTB C HacadKn. Pocne MHOROKpArTHo NcNOJIb3OBaHNr u CTnpKn caipeTkn OHa JERKO CHIMaETcR C HacAdKn I DOCTnraet ONtMaJIbHOr yCINNr CKpenJIeHNr.
PomeeHne Hacdkn dnona Ha xpaHeHne
1.BoBpemneppebOBBa6oTe yctaHaBnBaTbHaCakkyIINaB NapkoBOHoe KpeJIeHne.
PncyHOK N
YxOД n TeXnueckoe 06cnyxnbAHne
YdaJIeHne Haknnn n3 napOBoro pe3epByapa
PpimueaHne
PnIOCToHHOM NcNoJIb3OBAHnn CTaHdapTHoN DeCTNJINPOBaHHO BODI ydaJIeHHe HAKINN n3 napOBorpe3epByapa He Tpe6yeTc.
Примеане
C yueTom 6bpa30BaHnHaKnHn B ycTpoiCTBe peKOMeH dyETcYdaJIaTb HKnIb NO DOCTNKeHn Yka3aHHoro B Ta6JIuCe KOJIuYeCTBa 3aONHeHn NapOBOro pe3epByapa (3P = 3aONHeHne pe3epByapa).
- TkaHb IJIyMbITbIIOJaIuYexJIbI CTnpaTb B MaunHe npi TemnepaType He Bblwe 60°C
Most malfunctions have simple causes, so with the help of the following troubleshooting guide you can fix them yourself. In case of doubt or if malfunctions not described here occur, contact an authorized customer service department.
APPENDIX
Danger of electric shock and burns
Troubleshooting on a device connected to the electrical mains or while the device is heating up is dangerous.
Pull the plug out of the socket.
Let the device cool down.
Scale has formed in the steam reservoir.
- Remove the scale from the steam reservoir.
No steam
There is no water in the steam reservoir - add water, see chapter on adding water.
The steam lever cannot be pressed
The steam lever is locked by the child safety lock.
- Set the child safety lock (steam quantity switch) to the front position.
The steam lever is locked.
3NaHTeIbHbI BbI6poc BObl
IapoboB pe3epByap nepenolnHeN.
BkIIOuHaTb napOBn nCToJET Do tex np, noka cTa-HeT BblXOHTb MeHbWe BObl.
TexHnueckne XapaKTepeNCTnKN
3neKtpnueckoe noKnHoueHne Klacc 3aunTbI
www.kaercher.com/REACH
AkyaHa HOpMaun OTHOCHO CbCTaBn BeueCTBa MoKeTe Da HamepuTe Tk: www.kaercher.com/REACH
Akkcecoapn npe3epBn qactn
N3noJ3BaIte cmo opnHaJIHn akcecoap n opnHaJIH pe3epBHN qactn, NO TO3n HaIN HCnpyBaTe 6e3onacHata n 6e3npo6nemHa ekcnloataaHa ype- da.
Hhopmaun OTHOCHO akcecoapn npeepBn qactn 1e HamepuTe Tk: www.kaercher.com.
06XBaT Ha DoCTaBka
OxbatbHa doctabkata Ha ypea e n3o6pa3eH Bbpxy onakobkata. Pn pa3oNAKObaHe npOBepTe cbDbpka-heTo 3a qyIOCT. Pn nnCBAuN akcecoapn nnPnp TpaHCnOpTHN uETN, MoJN, o6bphete Ce KbM Baunn dIcTpn6byTop.
TapaHcua
BbB BcKa IbPxaba ca BaIINHn IN3daJeHNe OT Haunr OToPn3npaH DnCTpn6yTop rapaHcuOHn ycIOBn.
EbeHTyaJIHn NOBpeIHa Bauny ypeI ueOTcTpaHIM B pAMKInTe Ha rapaHcuOHHHcspok 6e3nIaTHO, aKO ce Ka- cae 3a deΦeKT B MaTePnaIte NIN npOn3BOcTBeH DeΦeKT. B cIyauH Na IpeJraBaHae Ha npabo Ha rapaH- quA, ce Obphete KbMa Bauny dNCTpN6yTop INN KbM Hau-6n3KNr OToPi3npaH cepBn3, KATO npeDcTaBnTE KacOBaTa 6eJekKa.
(Adpec, Bk.3aHaTa cTpaHa)
PpeDn3Hn yctpOncTBA
△PENEIa3JIINBOCT
IinncBaunn npomeHn npedna3Hn ycTpoNCTBA Pnpedna3HnTe yctpoNCTBa cnlykata 3a Baawata 3aunnta. Hnkora He npomeHnTe nnn npene6perbaite npedna3- Hn ycTpoNCTBa.
CnmboJIbBpxyypeda
(CnopeTuna ypei)
PapoctpyHnT KOTeI e OcBO6oHeH OT HnIraHaTeO.
- HactpoTe 3aunTaTa 3a Deca (npeKbcBau 3a n36op Ha KOJIueCTBOTo npapa) Ha3aI.
JIoCTbT 3a npape6JIOKUnpaH.
N3nJaKBaHe Ha npoctpyHnKoTeJ
N3nKaBaiTe npoctpyHnHa ypeHa Hau-KbcHo CneBcKo 10. nJIHeHe Ha KOTena.
1.ИЗклioчeteуреа,ВЖ.rnaBaИЗклioчBaHeHa ype-da. 2. Octabete ypeda da ce oxlaan. 3.Демонтуарейпразнаджхочтta. 4. HanbHHeTe napoctpyHnna KOTe n BODa n ro HAnKNoHete CnHNO. NTo3n HauHH ce pa3TbaprT ocTaTbUHTe OT BapOBuK, OCTaHaNn NO NOda Ha napoctpyHnna KOTeJ. 5.ИЗнел Te HANbIHO BOdATo OT napoctpyHnKOTeJI.ФИгура P
CbXpaHHe Ha ypeDa
- 3aKaYeTe NIOOBaTa IIO3a B Hocaya 3a napKupaHe. ФИгура N
- HabnTe npoctpyHnHa Mapkyu MPeKOBn3axpaHbau Ka6eI OKOIO dpbXkKaTa 3a HocHe,peCn. OKoJIo ypeDa I/INn NOCTaBeTe npoctpyHnN INCTOnET B NODobTa DIO3a.
Figure O
- Place the accessories in the washing machine for cleaning, then leave them to dry and put them back in place for cleaning.
Figure O
- Leave the remaining accessories to dry, and then put them back in place for cleaning.
Figure O
5. Store the device dry and protected from freezing.
Important usage instructions
Cleaning the surface
Before using the device, remove dust or clean it with a vacuum cleaner. This way, before wet cleaning, the device will be freed from dust and loose particles.
Drying textiles
Before using the device, check the colorfastness of the textile fabrics on a hidden spot: dampen the textile fabric with a cloth, leave it to dry, and then check for changes in color or shape.
Cleaning surfaces with coating or lacquered surfaces
ATTENTION
Damaged surfaces
The device may dissolve wax, furniture polish, synthetic coatings, or varnish, as well as the painted edges of furniture.
Do not direct the steam jet at furniture, upholstery, or surfaces that can be dissolved by it.
Do not use the appliance for cleaning painted wooden surfaces or parquet.
Do not use the appliance for cleaning lacquered or artificially coated surfaces, such as kitchen and living room furniture, doors, or parquet.
- For cleaning these surfaces, briefly wipe them with a damp cloth and then dry them with a soft cloth.
Cleaning the glass
WARNING
Breaking of the glass due to thermal stress
The steam jet can damage sealed areas around the window frame and, at low outside temperatures, can cause stress on the glass surface, leading to glass breakage. Do not direct the steam jet at sealed areas around the window frame.
At low outside temperatures, warm up the window glass by gently spraying the entire glass surface with steam.
Using the accessories
Steam nozzle
The steam nozzle can be used without accessories for the following areas of use:
To remove light wrinkles from hanging garments: Briefly steam the hanging garment from a distance of 10-20 cm. To remove fresh dust: Briefly wipe the furniture with a soft cloth and then dry it.
Spot nozzle
The spot nozzle is necessary for cleaning hard-to-reach areas, such as joints, radiators, channels, sinks, toilets, blinds, or radiators. The closer the steam jet is to the surface being cleaned, the more effective the cleaning, as the temperature and amount of steam are highest at the nozzle outlet. Before cleaning, remove any loose dirt with a suitable cleaning agent. Leave the cleaning agent to act for about 5 minutes, then rinse it off.
- Install the brush on the spray gun nozzle.
Figure G
Brush (small)
The small brush is suitable for cleaning stubborn stains. Stubborn stains can be removed more easily by brushing.
CAUTION
Damaged surfaces
The brush can scratch sensitive surfaces.
It is not suitable for cleaning sensitive surfaces.
- Mount the small brush on the spray gun nozzle.
Figure H
Brush (large)
The large brush is suitable for cleaning large dirty surfaces, e.g., washbasins, bathtubs, showers, kitchen sinks.
CAUTION
Damaged surfaces
The brush can scratch sensitive surfaces.
It is used for cleaning sensitive surfaces.
- Mount the head nozzle onto the jet pipe.
Figure H
Foam nozzle
The foam nozzle is suitable for cleaning stubborn dirt, unclogging drains, etc.
- Mount the foam nozzle onto the jet pipe in the same way as the head nozzle.
Figure H
Dirt blaster nozzle
The dirt blaster nozzle is suitable for cleaning heavily soiled surfaces, such as masonry and paving.
- Mount the dirt blaster nozzle onto the jet pipe in the same way as the jet pipe nozzle.
Figure G
2. Remove the cover from the dirt blaster nozzle.
Head nozzle
The head nozzle is suitable for cleaning surfaces with stubborn dirt, e.g. stone floors, PVC floors.
CAUTION
The appliance must be connected to the gas supply in accordance with the regulations.
The gas pressure and the burner nozzles must be adjusted to the gas type.
Before use, check the stability of the gas pressure and the gas supply connection on an independent surface with a small amount of gas.
Instruction
The remaining parts of the appliance or the burner and the nozzle, placed on the surface that is not being used, can be heated during use and may cause burns if touched repeatedly.
Before using the device, it is recommended to clean or replace the nozzle. This way, before the wet cleaning, the device is freed from dirt and loose particles. Heavily soiled surfaces should be cleaned thoroughly so that the gas effect lasts longer.
1. Insert the burner rings into the burner base.
- Place the burner cap on the burner ring.
Ignition
- Secure the burner ring to the burner cap.
a. Place the burner ring with the locking tabs facing up on the burner base.
b. With light pressure, place the burner cap on the burner ring.
Figure K
Thanks to the locking with the tabs, the burner ring attaches automatically to the burner cap.
Removal of the burner ring
1. Place the appliance on the service surface with the hook of the boiler for the steam ironing function.
Figure K
Note
At the beginning of the use of the boiler, the steam may be very strong and it may be difficult to detach from the iron. After a few uses and after the boiler has been rinsed, the iron can be detached easily and the optimal adhesion is achieved.
Parking position
1. Press the parking button to lock the iron in the parking position.
Figure N
Rinse and care
Damage to the appliance from descaling agent
Improper descaling agent, as well as incorrect dosing of the descaling agent, can damage the appliance. Use only the KARCHER descaling agent. Use 2 doses of the descaling agent for 1.0 l of water. 5. Add the descaling solution according to the instructions given on the descaling agent.
- Pour the descaling solution into the steam boiler. Do not close the steam boiler.
- Leave the descaling solution to act for about 8 hours. 8. Pour out the descaling solution completely from the steam boiler.
- If necessary, repeat the descaling process. 10. Rinse the steam boiler 2-3 times with distilled water to remove any remaining descaling solution. 11. Pour out the water completely from the steam boiler. Figure P
Accessories
(Accessories - depending on the scope of delivery) Note
The cover must be pre-installed before the device can be used for work. The screws are not suitable for drying in a dryer.
Instruction
For installing the cover, follow the instructions in the manual. Do not use force, so that the cover can grip the surface well.
- Install the cover for the surface at a maximum temperature of 60°C
Help in case of malfunction
Many common causes of damage are elementary, and with the help of the following instructions you can fix them yourself. If you are not confident or the damage is not described here, contact the authorized service.
WARNING
Danger of electric shock and fire
While the device is connected to the electrical grid and has not cooled down, troubleshooting is dangerous.
Unplug the device.
Let the device cool down.
Disconnect the steam hose.
- Placing the hose in the steam generator.
Steam
Water in the steam generator
- DoneiTe B0a, Bk. rnaBa IOnbNaBe c B0a.
The device must not be switched on.
The device for the sprayer with protection for children. Set the protection for children (preset for selection of the amount of spray) before. The sprayer is child-proof.
High water output
The steam gun is blocked.
- Press the steam gun trigger until no more water comes out.
Technical data
Electrical connection
| Hanse ~ 1 | ||
| Чеб耗费 | Hz | 50-60 |
| Тип зашита | IPX4 | |
| Клас зашита | I | |
Power data
| HarpeBaTeJIHa MoUHOCr | W | 1500 |
General instructions. 106
Intended use 106
Environmental protection 106
www.kaercher.com/REACH
Mounting accessories
- Push the open end of the accessory onto the steam gun until the release button on the steam gun locks into place.
Figure G
Safety instructions 119
Delivery set 119
Scope of delivery 119
Warranty 119
Safety devices 119
Device description 120
Installation 120
Operation 120
Important usage guidelines 121
Application of the equipment 122
Maintenance and technical service 122
Troubleshooting 123
Technical specifications 123
General guidelines


Before using the device, please read the original operating instructions and the safety instructions, and follow them accordingly.
Keep the original instructions for future use or for the next owner.
Intended use
The device is intended only for household use. The device can be used with the accessories described in the operating instructions. No other tools are required. Follow the safety instructions.
Environmental protection
Packaging materials are recyclable. Please dispose of packaging in an environmentally friendly manner.

Electrical and electronic devices contain valuable recyclable materials and components such as batteries, accumulators, and plastics. Improper disposal or incorrect recycling can pose a potential hazard to health and the environment. However, these components are necessary for the reliable operation of the device. Devices marked with this symbol must not be disposed of with household waste.

Information on components (REACH)
Current information on components is available at: www.kaercher.com/REACH
Accessories and spare parts
Only use original accessories and original spare parts, as they guarantee safe and trouble-free operation of the device.
Information on accessories and spare parts can be found at www.kaercher.com.
Scope of delivery
The device connection is indicated on the packaging. Before using the device, check the completeness. In case of missing parts or damage received during transportation, please report this to the trade organization where the device was purchased.
Warranty
All countries have established warranty conditions in accordance with the legislation of the country of purchase. In case of device malfunction during the warranty period, we will repair it free of charge if the malfunction is due to material defects or manufacturing defects. In case of claims during the warranty period, please contact the trade organization that sold the product or the authorized service center for servicing.
(Addresses are on the back)
Safety devices
CAUTION
Missing or modified safety devices
Safety devices are intended for protection.
It is forbidden to modify safety devices or disable them.
Symbol devices
(Depending on the device type)
Installation of the device
- Open the device and install it on the steam iron and press until the steam iron release button is fixed. Figure B
- Open the device and install it on the steam iron with a steam flow. Figure H
- Connect the extension tubes to the steam iron.
Attach the 1st extension tube to the steam gun until the steam gun release button is not fixed.
The extension tube is removed. Attach the 2nd extension tube to the 1st extension tube. The extension tubes are connected.
Manipulator
4. To install or remove the extension tubes, press the release button.
Manipulator
The nozzle is connected.
Connecting the nozzle
1. Move the steam quantity switch to the closed position. The steam supply is blocked. 2. Press the release button and disconnect the parts.
Operation
Filling with water
Instruction
Using hot water allows you to reduce the heating time.
Instruction
In case of frequent use of ordinary tap water, descaling the steam boiler is not necessary.
- Unscrew the safety cap.
2. Open the steam valve of the steam reservoir. Figure 3. Fill the steam reservoir with no more than 1 liter of distilled or drinking water. Figure 4. Close the drain plug.
Figure C
Device activation
- Place the device on a flat surface.
- Insert the power plug into the socket.
Figure D
The indicator light will light up red.
3. When the indicator light turns green, the device is ready for use.
Figure E
- Press the steam button.
Figure F
Steam will be released.
Steam quantity adjustment
Using the steam quantity regulator, the amount of steam supplied is adjusted. The regulator has
3 noJoxeHHa:
IorT TaTexHicHe 06cnyroByBaHHa
BudaneHHaKnny 3 napoBoro pe3epByapy
Bka3iBka
Y pa3i NoctiHoro BnKOpNCTaHHra 3BnuaHoi DnCTuJbOBAHOI BOIN BnDaJIaTn HAKIN i3 napoBOr o pe3epByapa He notpi6Ho.
Bka3iBka
Ocklbny npictpoi BiKnaadaeTbca HaKn, Mn peKoMeHyEmo nicn neBHOi KInbKOcTI 3anOBHeH napOBoro pe3epByapa (3P = 3anOBHeHHpe3epByapa), kK 3a3-na-yeHo B Ta6nui, BnuJaTn HaKn i3 npictpo.
| ДIANAZH JOK-CTKOSTI | °dH MMOLь/л 3Р | |||
| I | M' | Я K | a | 0 |
| II cepe | Дня 7-14 1,3-2,5 45 | |||
| III | Жорстka | 14-21 2,5-3 | 8 35 | |
| IV | Дужешор-СТКА | >21 | >3,8 | 25 |
Bka3iBka
Otpnmatn DoBikny npo TBepdicTb BOonpoBIOHOI BOIN MoXHa y BOHorocnoapcbKOMy BiOMCTBi a6o B Micknx KOMyHaJIbHnx cnjxkbax.
YBAGA
PonkoDxeni nobepxhi
P034nH DnBnDnEHHHaKnny MoKe 3pyHyBaTn ChyTnBi NoBepxHi.
HANOBHOBaT Ta cnoPoxHHoBAt npncTpi o6epeXHO.
- BmKHyTn npncTpri, nB. rnaBy. 2.Дати писсю oxJOHOHTN.
- Biikpytntn 3ano6ixHy npo6ky. 4.Повсглг STINи BOу 3 napOBOro peepByapa. ManIOHOK P
NoikokxeHH npncptpo 3acobm IJI BuaJeHHn HAKny
Using the device for removing scale, as well as its incorrect dosage, can lead to damage to the device.
Use only KARCHER brand descaling agent.
Add 1.0 liters of water to the dosing container.
- Use the descaling solution according to the instructions on the product packaging.
- Pour the descaling solution into the steam boiler. Do not close the steam boiler.
- Leave the descaling solution in the boiler for about 8 hours. 8. Completely drain the descaling solution from the steam boiler. 9. If necessary, repeat the descaling procedure. 10. Rinse the boiler thoroughly with clean water to remove all residues of the descaling solution. 11. Completely drain the water from the steam boiler. Figure P
Accessories
Important: The device is under pressure.
The steam valve is blocked by a child safety lock. Disengage the child safety lock (steam quantity switch) to the front position.
The steam valve is blocked.
Large water outlet
Steam boiler is too full. - Press the steam pistol until a little water comes out.
Technical specifications
KypblfblbH CnnaTtAmacbl 125
Ophaty 125
PaiandaHny. 125
KoIdaHyf aphaHafMaHb3dbie cKepeTynp. 126
KoHdbipMaJapdbI KOndAny 126
KyTim XeHe TexHnKaIbIK Kbl3MeT KepeTy 127
Akaaynap Ke3iHderi KEMK 128
TexHnKaJIbIK MaFlyMaTTap 128
XaJIbI HycKaynap

KypbInfbHbAnfaw pet kondaH6ac 6ypbH,ocblnainaHnyxehiHderi TynHcyckaHyckaylbIK neh6epinre
Kayinci3dk KekhiHderi HcyaynapdbI Okbin WbIfbIbI3.
Onapra cai apeKeTeihi3.
Eki KITANSHAHbI Da epi kapa nai dalaHy Hemece KeNeci neci yuih caTan KOblHbI3.
BiybIMbIH KypambIHdafti 3aTTap TpyaIb COHfbl ManiMeTep TeMeHderi MeKeHka BoiBHa KaJXeTI: www.kaercher.com/REACH
KepeK-kaPak XaHe KocalKbI 6eJWeKTeP
The need for care and maintenance of the device is described below, and you should contact a service center if it is damaged or if you have any questions.
The necessary accessories and spare parts can be found on the website www.kaercher.com.
Safety instructions
Read the safety instructions before using the device. If the device is used improperly, the manufacturer is not liable for any damage. If the device is damaged or if there are any malfunctions, contact a service center.
Intended use
Use the device only for its intended purpose as described in these instructions. If the device is used for any other purpose, the manufacturer is not liable for any damage. If you have any questions about the intended use, contact a service center.
(As specified by the manufacturer)
Use the device only as described in these instructions.
The following accessories are available:
Nozzle: 30190
3. Insert the plug
0. Turn on the device
1. Turn off the device
9. Turn on the device again
0. Turn off the device again
COhBIMeH 6yI MbIcAnda 30190 KoDbI
09/(2)013 eHdipinre H KyHin 6iDipei.
KopraHbIC KypaJI-Ka6DbIKTapbl
△ABAIJIAHbI3
KoK Hemece e3reptiIrrn KopraHbIC KypaJI- Ka6DbIKTapbl
Koprahbc Kpybfbicbi ci3iH Kayinci3irihre apHanfah. Koprahbc Kpybfbicbi eWkaaH e3reptnhi3 Hemece axkbpataHaB13.
BmybIMdaftb6enrinep
(ByBIM Tpyihe 6aJNaHbICTbl)
KypblfblhbiH cnuattamacbl
OcbHyckayIbIKTa MaKcMaJNbI KOMNneKTAaJraJaIaI KpybnfB CnataTaNah.Ynire Kapa JekTi3iIm KOMNneKTAaJraCbIHda aHbipMaWbIbIKTap 60ana (KaTamaHbI KapaHbI3).
CypeTepdi cypeTepi 6ap 6eTTeh KapaHbI3 CypeT A
1CaKaTaHdbIpFbIi KaKaNaK 2 KapbiknodtbI Jemniuke Kbl3bl - Kypblrfa KepHey 6epinei de, on Kb13a 6actaibi Xacbl - Kypblfbl Kymblicka daibH 3KbIJIbIbITyfa apHaIraH can 4EdeH KOHdbipMacbiHTypaKaKoIO TkblBbI ⑤Ka6eBnbi ycTaBbIu 6 Keninik wTekepi 6ap xeniik 6aHaNbHbICTbipFbiW ka6enb ⑦Kypamdac6eNikTeP TyTkbluBb 8ApTkbl6ypbImaIbI DOHraKaJwIaIap (2x) 9AnbHrb6ypbImaIbdoHaRanakwanaP(2x) 10 By tanahwacbi 1KynbintanuBifapyTymecci 12 By meIueepiH aybICTbIPbIN-KOCKblu (6anaapdaH KopfaHbICneH) 13 By teriri 14 By 6epyre apHaIraH wIaHr 15HykTeNik Wymek 16AnhrenekwTeK(kiuKeHTa) 17**Typ6o KOHdbipMa 18 Dehreilek wetke (yIKeH) 19KoHdbIpMa-TeTka 20KoHdbIpMa-ueTKara apHaIraH MmKpoTaJIuBkTbIMaIIbIK 21¥3apTKbI W TyTikTepe(2 daHa) 2 KyIbInTaH WbIFapy Tymecci 23EeH Ta3anayra apHaHFaH KOHdbipMa 24 Tokbima iInMeK 25MnKpoTaIaBikTaH XacaIraH eEn Wy6eperi (1 daHa) 26 MnKpoTaJIuBikTaH JkacanFaH eDeH uY6eperi (2 DaHa) 27 KypaI-caimahra apHaIraH cEmKe **KocbIMua
Ophaty
KoHdbIipfbIJaapdbIMOHTaXkDy
- Kypamda6eiktepiHb6oc yuBbH 6y nuctonetin H KynnbH aWy Tymeci Xa6bInFaHwa 6y nctonetine 6ypan caBbHb3. Cypet G
- KOHdbipMaHBiH aWbIK WeTih HYKTeJIk Wymekke Knir3iHj3. Cypet H
- 3yapTkbiu TyikTepei6y TanaHwacbIme6aHaHbICTbipbIb3.
a Bipihui.¥3aptkbiu tyti 6y nntoTeiH KyinbH aWy TyMeci Xa6blnFaHwa 6y nctoTine 6ypan caJIbH3. BaNaHbIcTbIPfBiU tyik kAnFaHfaH. b EkiHwi. ¥3apTKbiW TYtIKti 6ipiHwi ¥3apTKbiW TYtIKke KNIri3iHi3. BainaHbICTbIPfBiW TYtIKTeP XAnraHraH. Cypert I
- Kypamac 6enirih/eneh KOHdbipMacbIH y3apTkbiu TYtIKTH 6oc yubHa KNr3iHi3. Cypet J KOHdbipMa kAnfahFaH.
KoHdbipMaHbI axbIpaTbIbI3
- By meJIiuepi aybIcTbIpbIN-KOCKblITbI apTKbl KaJIbInKa KOJIbIHbI3. By tetiri KJIbINTanFaH. 2.БнokтаншыгapyТуМecinбасьIN,6eIWeKTepiH axbIpaTbIHbI3.
Paindanahy
Cy KyubihbI3
HycKay
blcTbik cy Kbl3y yaKbItbH KbICkapTaabI.
HycKay
CaTbIbIMda 6ap nCTnJleHReh cydbI TypaKTbI naJaIahcaHb3, 6y reHepaTopbIHAn KaKTbIXOIObl kaxet etnei.
- CaKaTHdbipfbl W KaKNaKTbI 6ypan aWbIHbI3. Cyper B
- By rehepatopbIHan 6ykiJ cydbI afbI3bHbI3. Cypert P
- By ka3aHbHa MaKc. 1 NITp DnCTnIeHreH Hemece K6blp cyblH KynblHbI3. Cypet B
- CaKaThaDbipfblI KaKNaKTbI 6ypan Xa6bHbI3 CypTeC
WahcopfbIwTbIKocy
- KypblfblHb TypaKbTb Tipeke opHaanactbipbHb3. 2.Keiinik wTekepi 3neKtp po3etkacbHa KocbHbI3. Cypert D KapbIKNoID Kb13bl TycnEHN XaHbIn Typ.
- KapbIKnIOJ Xacbl TycneH KaHraH Me3eTTe KpbIINFbl XyMbicka DaNbIH. Cypert E 4.By Tetirih 6acbHbl3. Cypet F By wymekeTeH Wbira
By mənsepiH petrey
BepiTeIH 6y MeIwepi 6y MeIwepi aybictbipbnKockbi KemerimH petteJIe.i. AybictbipIn-KockbiUHTbIH3 KaIIbIbap:
| мак.бу мениерi | |
| темендетіпген 6у мениерi | |
| 6у жok-балалардан корваIC Hускay Бул калынсы by memiai басьmarан Ку解脱 соланы. |
- Aybictbipbin-KockbiWtbl KaJanaH 6y MenwepiHe ophaTbIhbl3.
- By TetiriH 6acbHb3.
- Ta3anay andbHda 6y nctoTeIH wSybepeke 6aftTan, 6y Teric sbHfapblMaBihwa KyTiH3.
CyblTONTbipHb13
Kymbic Ke3iHne Hemece 6y 6oJMaFaH Ke3e 6y Meupeia a3aica, cybl ToTbipy KaKeT.
- KypblfbiHbEwipy, 6eimdi kapaHb3: KypblfbiHbEwipy. 2.CaKaTaHdbipfbIkwKaKaNaKtbI6ypanawbHbI3.
- By ka3aHbHa MaKc. 1 NHTp DnCTnIeHre HEmecE Ky6bIp cybIH KynbHbI3. 4.CaKaTHDbIpBbIi KaKaNaKTbI 6ypan KaabHbI3 5.Kejinik wTekepi 3neKtp po3eTkacbHa KocBihb3.
- KapbIKnIOoTbIH Tyci KbIZbIH XacBlnFa aybICKaHbIH KyTIH3. KypbInrbl naaIanaHyra daBbH.
KypbInfbHbl eWipy
- Connect the generator to the electrical outlet.
- When connecting, make sure the plug is fully inserted.
Figure M
These generators are designed for outdoor use.
- Keep the generator away from flammable materials (this includes flammable liquids). Do not use it indoors.
To turn off the generator
After every 10 hours of operation, check the oil level.
- To check the oil, follow these steps: Check the oil.
- Oil level
- Confirm the level. 4. If the generator is tilted, the oil may spill. This is normal for the generator's design.
- Do not operate the generator with wet hands. Figure P
To store the generator
- Place the generator on a flat, stable surface. Figure N
- If the generator will not be used for a long time, or if it will be stored, drain the fuel or add a fuel stabilizer. Figure O
- Secure the generator with straps or tie-downs to prevent it from moving.
Kytin, COcbH Kypan-caMHaapra apHaIraH CEMKere CanbHb3. Cypet O
- KaIraH KypaJI-caMHaNdapDbI KeNTipin, OApdbI da KypaJI-caMHaNdapFa apHaJIraH cEMKere caNbIHbI3. CypTeO
- KypbIINFbIHbI Kypfak XeHe a3dah KopranraH opbIHFa CaKTaHbI3.
KoIdaHyra apHaIraH MaHbI3dbl eckeptyneP
EdeH 6eTIn Ta3apTy
KypblfblbKOJdaHy aIbIHda eEHHH 6eTih waHcOpfbwneh copyfa Hemece cbInbpyra KeHec 6epinei. OcbnaWbINFaJdbTa3apTydAn 6ypbl eHnac neh 6etEn 3attapDaH Ta3apTblaBl.
MaTaHbI JkaHaPry
KypbIbnHbI naJdaJaan6ac 6bpHb 6ypkeyni Jepde MaTaMeH yInecimdiirn Apkaan TeKcepH3:MaTaHbI 6ymen eHden, KeTpiH3, cocBt TycHHemece niiimH h e3reppeHH TeKcepH3.
Kenka6aTTbI Hemece JaKaTaNFaH 6eTTepi Ta3apTy
HA3AP AYdAPbIHbl
3aKbIMdaIraH 6eTTeP
By 6anaayb3dbi, xnaha3 naibH, nnaCTNK Xa6bHapdbi Hemece wETtepiHH 6oaybI MeH XancbipMacbH epirin Xi6epe anaDbI.
BydBiKeJIMDenIeH WeTTEpiHe 6afttAmhbl3, XancbIpMacbi KaTnapNaHyb MyMkiH.
KypaJIbI KoprAImaHaH aFaW HemeCe napKeT eDeHepDi Ta3apTyra KonDaHa6aHbI3.
KypbfnbHb6oanfAH Hemece nactnKnneXa6bnFaH 6eTepdi, acy Hemece yinha3bH, ecikTepei Hemece napkeTT Ta3anayfa KondaH6aHb3.
- Open the door carefully, wipe the glass with a dry cloth, then wipe it with a damp cloth.
Open the door.
ATTENTION
Do not open the door when the indicator is on.
If the door is opened when the temperature inside is high, the glass may crack due to the temperature difference. Do not open the door in such cases.
Do not touch the glass panels of the door.
Do not open the door when the temperature inside is high, as the glass may crack due to the temperature difference.
Clean the door glass with a soft cloth and mild detergent. Do not use abrasive cleaners or sharp objects. For stubborn dirt, use a damp cloth or a glass cleaner.
Cleaning the glass
This section
This section provides instructions for the following situations:
For cleaning the glass: Wipe with a soft cloth and warm water. For stubborn dirt, use a mild detergent and then wipe with a damp cloth.
Replacing the lamp
The lamp can be replaced with a new one of the same type and wattage. Before replacing, ensure the appliance is unplugged and cooled down. The lamp may be hot after use. Use a dry cloth to handle the lamp and avoid touching it with bare hands. Wait at least 5 minutes after turning off the appliance before replacing the lamp.
1. Remove the lamp cover.
Figure G
Small hole (for hanging)
The hanging hole is used to hang the device on a wall. The label is applied if the device is used outdoors.
CAUTION
Closed cover
It is possible to open the cover by pressing the latch.
The cover is not intended for removal.
- For hanging, you must attach the hook to the wall.
Figure H
Large hole (for hanging)
The large hanging hole is used to hang the device on a nail, screw, or similar. The large hole
is suitable for hanging on a table.
CAUTION
Closed cover
It is possible to open the cover by pressing the latch.
Do not use for gambling.
- Do not use the device for gambling purposes.
Figure H
Gambling confirmation
Gambling confirmation is intended for gambling, old parts, spare parts, etc.
- Use the gambling confirmation to check the device's operation.
Figure H
Confirmation brush
The confirmation brush is used to clean the device, these cabinets are not for gambling.
- For further use, refer to the gambling confirmation in this manual.
Figure G
2. Do not use the device as a microswitch.
Gambling confirmation
The gambling confirmation is used with the device, the printer and the PC to control the device and to gamble.
ATTENTION
Close the lid slowly.
It is possible to insert at other temperatures and humidity levels.
When operating, keep the device and its accessories away from water and do not expose them to moisture.
Instruction
For devices intended for use with accessories or parts not listed in the manual,
When cleaning with a cloth, it is possible that the cloth may become dirty; wash it after each use.
Do not use solvents or abrasive cleaners when cleaning. Before cleaning, remove the plug from the socket and wait for the device to cool down. For stubborn stains, use a mild detergent.
1. Start the device with the power switch.
Figure 1
- Insert the power cord into the device's power socket.
Figure 2
- Connect the power cord to the device. Then, connect the plug to the wall socket.
After connecting the power cord to the device, press the power switch.
Figure 3
The device's power indicator will light up when the power is connected.
1. Before connecting the device, make sure the device is turned off, and the device's confirmation is removed.
Figure K
Instruction
At the beginning, before connecting the device, securely fasten the device with the confirmation to prevent it from being accidentally disconnected. After prolonged use and wear, if the device and its confirmation show signs of damage, replace them with new ones.
Device confirmation type
- When operating, always keep the device confirmation type in place.
Figure N
Maintenance and technical service
This section describes the device's malfunctions.
Instruction
If there are any issues with the device's operation, contact the generator's manufacturer.
Instruction
When replacing worn parts, refer to the generator's current output to determine the appropriate replacement (KF = this generator's output).
| kaTbIbIK ayKbIMbl | °dH (немic kaTbIbIK rpaDycbl) | MMOJIb/л KF | (6y reHepaTo pbH toJIbIpy) | |
| Жумсak 0-7 0-1,3 55 | ||||
| I opTaша 7-14 1,3-2,5 | 5 45 | |||
| II kaTbI 14-21 | 1 2,5-3,8 35 | |||
| V оTe KaTbI | >21 | >3,8 25 | ||
Instruction
This device is intended for use with clean water only.
ATTENTION
Safety instructions
It is possible to use the device for other purposes only with the written consent of the manufacturer.
Follow the instructions for use and maintenance.
- Before using the device, note the following:
- Do not use the device with dirty water.
- Do not use the device with flammable liquids.
- Do not use the device with salt water. See page P
ATTENTION
Using the device with a detergent tank
It is possible to use the device with a detergent tank and to dose the detergent. KARCHER recommends using only original detergents.
1. Fill the detergent tank with 1.0 l of water. 5. Use the detergent tank with the appropriate detergent. 6. Do not use the device with the detergent tank. Do not use the device. 7. Leave the detergent tank to soak for 8 hours. 8. Do not use the device with the detergent tank. 9. Repeat the procedure if necessary. 10. To remove all detergent from the tank, rinse the device 2-3 times with clean water. 11. Do not use the device with salt water. See page P
Maintenance and care
Help with malfunctions
If the device is used for a long time, it may become hot and cause burns. If the device becomes hot during use, contact the service organization.
EXPERTS
When using the device, do not place it on an unstable surface or in water, as it may fall and cause damage.
Do not insert foreign objects into the socket.
Do not immerse in water.
Do not cover the generator.
Do not place the generator in a hot place.
Do not
Do not put water in the generator.
Fill with water, do not overfill: Fill with water.
This device is for indoor use.
This device is protected against splashing water.
- Protect against splashing water - do not immerse (this device is splash-proof). Do not immerse this device in water.
Water outlet
This kettle is full.
The device is designed for use with a pipe base.
Technical specifications
Electrical connection
Connection to 220-240
Phase ~1
Frequency 50-60
Protection class IPX4
Protection class
Humidity sensors
Heating power 1500 W
Maximum power consumption 0.32 kW
Water flow rate 6.5 l/min
Noise level 40 dB(A)
Maximum noise level 100 dB(A)
Weight
By rehepaTopbI 1,0
EJWEMepi MeH caJMaFbl
Canmaft (TOnbIMdayuBnapcb3) Kr 2,7
Y3bIHdbIfbl MM 304
EHi MM 231
Bniktiri MM 287
Texnkaibek3repictepyKcatetinreH.
Jd
e 1
.
ggl aol jolll
o o
y
a
JgJgJg
JUUL
12 × 12
1
clll JJaJLssuJgabil clll JJaJLssu
jgljjbdo jde
JlalbIaL> aLwogj0g jllg
111 (jlaaas jj) Jabla aLg aLg g
120 121
clu Jle
- 5 S Joo Joo
aaiJl
aawwlll wllw yolw gololw wllw wllw wllw wllw wllw wllw wllw wllw wllw wllw wllw wllw wllw wllw wllw wllw wllw wllw wllw wllw wllw wllw wllw wllw wllw wllw wllw wllw wllw wllw wllw wllw wllw wll
Haolai!o
jLgS Cio
Jn Jnnnnnnnnnnnnnnnnnnnnnnnnnnnnnnnnnnnnnnnnnnnnnnnnnnnnnnnnnnnnnnnnnnnnnnnnnnnnnnnnnnnnnnnnnnnnnnnnnnnnnnnnnnnnnnnnnnnnnnnnnnnnnnnnnnnnnnnnnnnnnnnnnnnnnnnnnn
www.kaercher.com/REACH

THANK YOU!
MERCI! DANKE! iGRACIAS!

Register your product and benefit from many advantages.
www.kaercher.com/welcome ★★★★★

Rate your product and tell us your opinion.
www.kaercher.com/dealersearch
71364 Winnenden (Germany)
Tel.: +49 7195 14-0
Fax: +49 7195 14-2212

- GENERAL NOTES
- INTENDED USE
- ENVIRONMENTAL PROTECTION
- NOTES ON THE CONTENT MATERIALS (REACH)
- ACCESSORIES AND SPARE PARTS
- SCOPE OF DELIVERY
- WARRANTY
- SAFETY DEVICES
- CAUTION
- SYMBOLS ON THE APPLIANCE
- PRESSURE CONTROLLER
- SAFETY LOCK
- SAFETY THERMOSTAT
- DESCRIPTION OF THE UNIT
- FOR THE FIGURES, REFER TO THE GRAPHICS PAGE. ILLUSTRATION A
- INSTALLATION
- INSTALLING ACCESSORIES
- DISCONNECTING ACCESSORIES
- OPERATION
- FILLING WATER
- NOTE
- SWITCHING ON THE DEVICE
- REGULATING THE STEAM VOLUME
- REFILLING WATER
- SWITCH OFF THE APPLIANCE
- RINSING OUT THE STEAM BOILER
- STORING THE DEVICE
- IMPORTANT APPLICATION INSTRUCTIONS
- CLEANING THE FLOOR AREAS
- FRESHENING UP TEXTILES
- CLEANING COATED OR PAINTED SURFACES
- ATTENTION
- DAMAGED SURFACES
- GLASS CLEANER
- GLASS BREAKAGES AND DAMAGED SURFACES
- HOW TO USE THE ACCESSORIES
- STEAM GUN
- SPOTLIGHT NOZZLE
- ROUND BRUSH (SMALL)
- ROUND BRUSH (LARGE)
- POWER NOZZLE
- MANUAL NOZZLE
- FLOOR NOZZLE
- DAMAGE DUE TO BUILD-UP OF STEAM
- REMOVING THE FLOOR CLEANING CLOTH
- ILLUSTRATION K
- PARKING THE FLOOR NOZZLE
- ILLUSTRATION N
- CARE AND SERVICE
- DESCALING THE STEAM BOILER
- ILLUSTRATION P
- APPLIANCE DAMAGE DUE TO DESCALER
- CARE OF ACCESSORIES
- TROUBLESHOOTING GUIDE
- △WARNING
- RISK OF ELECTRIC SHOCK AND BURNS
- NO STEAM
- THE STEAM LEVER CANNOT BE PRESSED
- HIGH WATER EGRESS
- TECHNICAL DATA
- CONTENTS
- CLEAN PAVED SURFACES
- INFORMATION FOR END USERS (REACH)
- FIGURE B
- FIGURE
- FIGURE C
- TURNING ON THE DEVICE
- FIGURE D
- FIGURE E
- FIGURE F
- ADJUSTING THE AMOUNT OF STEAM
- TURNING OFF THE DEVICE
- CLEANING THE STEAM RESERVOIR
- STORAGE OF THE DEVICE
- FIGURE O
- CLEANING GLASS
- GLASS BREAKAGE AND SURFACE DAMAGE
- USING THE ACCESSORIES
- STEAM NOZZLE
- PRECISE JET NOZZLE
- FIGURE G
- SENSITIVE SURFACES
- FIGURE H
- SURFACES SUPÉRIEURES
- BUSE HAUTE PRESSION
- BUSE ROTATIVE
- BUSE DE SOL
- EFFECTS OF STEAM
- CHART OF CANFETKN AND NOA
- PNCYHOK K
- PPMEAHNE
- POMEEHNE HACDKN DNONA HA XPAHEHNE
- YXOД N TEXNUECKOE 06CNYXNBAHNE
- YDAJIEHNE HAKNNN N3 NAPOBORO PE3EPBYAPA
- PPIMUEAHNE
- ПРИМЕАНЕ
- APPENDIX
- DANGER OF ELECTRIC SHOCK AND BURNS
- NAHTEIBHBI BBI6POC BOBL
- TEXHNUECKNE XAPAKTEPENCTNKN
- AKKCECOAPN NPE3EPBN QACTN
- XBAT HA DOCTABKA
- TAPAHCUA
- PPEDN3HN YCTPONCTBA
- △PENEIA3JIINBOCT
- CNMBOJIBBPXYYPEDA
- N3NJAKBAHE HA NPOCTPYHNKOTEJ
- CBXPAHHE HA YPEDA
- IMPORTANT USAGE INSTRUCTIONS
- CLEANING THE SURFACE
- DRYING TEXTILES
- CLEANING SURFACES WITH COATING OR LACQUERED SURFACES
- CLEANING THE GLASS
- WARNING
- BREAKING OF THE GLASS DUE TO THERMAL STRESS
- SPOT NOZZLE
- BRUSH (SMALL)
- BRUSH (LARGE)
- FOAM NOZZLE
- DIRT BLASTER NOZZLE
- HEAD NOZZLE
- INSTRUCTION
- IGNITION
- REMOVAL OF THE BURNER RING
- FIGURE K
- PARKING POSITION
- RINSE AND CARE
- ACCESSORIES
- HELP IN CASE OF MALFUNCTION
- DANGER OF ELECTRIC SHOCK AND FIRE
- STEAM
- THE DEVICE MUST NOT BE SWITCHED ON
- HIGH WATER OUTPUT
- MOUNTING ACCESSORIES
- GENERAL GUIDELINES
- THE DEVICE IS INTENDED ONLY FOR HOUSEHOLD USE. THE DEVICE CAN BE USED WITH THE ACCESSORIES DESCRIBED IN THE OPERATING INSTRUCTIONS. NO OTHER TOOLS ARE REQUIRED. FOLLOW THE SAFETY INSTRUCTIONS
- PACKAGING MATERIALS ARE RECYCLABLE. PLEASE DISPOSE OF PACKAGING IN AN ENVIRONMENTALLY FRIENDLY MANNER
- INFORMATION ON ACCESSORIES AND SPARE PARTS CAN BE FOUND AT WWW.KAERCHER.COM
- SYMBOL DEVICES
- INSTALLATION OF THE DEVICE
- MANIPULATOR
- CONNECTING THE NOZZLE
- FILLING WITH WATER
- DEVICE ACTIVATION
- STEAM QUANTITY ADJUSTMENT
- IORT TATEXHICHE 06CNYROBYBAHHA
- BUDANEHHAKNNY 3 NAPOBORO PE3EPBYAPY
- BKA3IBKA
- YBAGA
- PONKODXENI NOBEPXHI
- NOIKOKXEHH NPNCPTPO 3ACOBM IJI BUAJEHHN HAKNY
- IMPORTANT: THE DEVICE IS UNDER PRESSURE
- LARGE WATER OUTLET
- TECHNICAL SPECIFICATIONS
- XAJIBI HYCKAYNAP
- KEPEK-KAPAK XAHE KOCALKBI 6EJWEKTEP
- SAFETY INSTRUCTIONS
- KOPRAHBIC KYPAJI-KA6DBIKTAPBL
- △ABAIJIAHBI
- BMYBIMDAFTB6ENRINEP
- KYPBLFBLHBIH CNUATTAMACBL
- CYPETEPDI CYPETEPI 6AP 6ETTEH KAPAHBI3 CYPET A
- OPHATY
- KOHDBIIPFBIJAAPDBIMOHTAXKDY
- KOHDBIPMAHBI AXBIPATBIBI
- PAINDANAHY
- CY KYUBIHBI
- HYCKAY
- WAHCOPFBIWTBIKOCY
- BY MƏNSEPIH PETREY
- CYBLTONTBIPHB
- KYPBINFBHBL EWIPY
- FIGURE M
- TO TURN OFF THE GENERATOR
- TO STORE THE GENERATOR
- KOIDAHYRA APHAIRAH MAHBI3DBL ECKEPTYNEP
- EDEH 6ETIN TA3APTY
- MATAHBI JKAHAPRY
- KENKA6ATTBI HEMECE JAKATANFAH 6ETTEPI TA3APTY
- HA3AP AYDAPBIHBL
- AKBIMDAIRAH 6ETTEP
- OPEN THE DOOR
- DO NOT OPEN THE DOOR WHEN THE INDICATOR IS ON
- THIS SECTION
- REPLACING THE LAMP
- SMALL HOLE (FOR HANGING)
- CLOSED COVER
- LARGE HOLE (FOR HANGING)
- GAMBLING CONFIRMATION
- CONFIRMATION BRUSH
- CLOSE THE LID SLOWLY
- DEVICE CONFIRMATION TYPE
- FIGURE N
- MAINTENANCE AND TECHNICAL SERVICE
- THIS SECTION DESCRIBES THE DEVICE'S MALFUNCTIONS
- USING THE DEVICE WITH A DETERGENT TANK
- MAINTENANCE AND CARE
- HELP WITH MALFUNCTIONS
- EXPERTS
- DO NOT
- THIS DEVICE IS FOR INDOOR USE
- WATER OUTLET
- ELECTRICAL CONNECTION
- HUMIDITY SENSORS
- WEIGHT
- EJWEMEPI MEH CAJMAFBL
- JD
- AAIJL
- JLGS CIO
- THANK YOU
- MERCI! DANKE! IGRACIAS
Brand : Kärcher
Model : SC 2 Deluxe EasyFix Premium
Category : Steam cleaner