SC 3 Upright EasyFix - Steam cleaner Kärcher - Free user manual and instructions
Find the device manual for free SC 3 Upright EasyFix Kärcher in PDF.
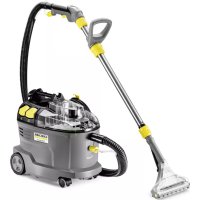
| Product Type | Steam mop |
| Brand | Kärcher |
| Model | SC 3 Upright EasyFix |
| Usage | Cleaning hard floors (tile, stone, PVC, laminate, sealed parquet) and refreshing carpets |
| Heating Power | 1600 W |
| Voltage / Frequency | 220-240 V ~ 50-60 Hz |
| Protection Class | I |
| Protection Type | IPX4 |
| Heat-up Time | 30 seconds |
| Continuous Steam Output | 40 g/min |
| Water Tank Capacity | 0.5 L |
| Weight (without accessories) | 3.1 kg |
| Dimensions (L x W x H) | 314 x 207 x 1185 mm |
| Steam Modes | 3: Wood (low), Carpet (medium), Tile/Stone (high) |
| Descaling Cartridge | Integrated, replaceable – saturation indicator light |
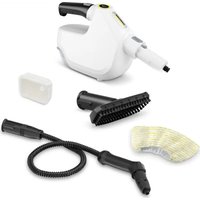
| Included Accessories | Floor nozzle, microfibre cloth (1 piece), carpet glider |
| Optional Accessories | Abrasive cloth, additional microfibre cloth |
| Cloth Maintenance | Machine wash at 60 °C max, without fabric softener |
| Safety | Safety valve, thermal fuse, non-slip handle, automatic pump shutdown if cartridge saturated |
| Water Hardness Adjustment | Yes (via RESET button) – 4 levels (I to IV) |
| Warranty | According to country conditions – contact Kärcher after-sales service |
Frequently Asked Questions - SC 3 Upright EasyFix Kärcher
User questions about SC 3 Upright EasyFix Kärcher
0 question about this device. Answer the ones you know or ask your own.
Ask a new question about this device
Download the instructions for your Steam cleaner in PDF format for free! Find your manual SC 3 Upright EasyFix - Kärcher and take your electronic device back in hand. On this page are published all the documents necessary for the use of your device. SC 3 Upright EasyFix by Kärcher.
USER MANUAL SC 3 Upright EasyFix Kärcher
| General notes | 11 |
| Intended use | 11 |
| Environmental protection | 11 |
| Accessories and spare parts | 11 |
| Scope of delivery | 11 |
| Warranty | 11 |
| Safety devices | 11 |
| Device description | 12 |
| Initial Start-Up | 12 |
| Installation | 12 |
| Operation | 12 |
| Important application instructions | 14 |
| How to use the Accessories | 14 |
| Care and service | 15 |
| Troubleshooting guide | 17 |
| Technical data | 17 |
General notes

Read these original operating instructions and the enclosed safety instructions before using the device for the first
time. Proceed accordingly.
Keep both books for future reference or for future owners.
Intended use
Use the device only in private households for cleaning level hard floors (e.g. stone floors, tiles, PVC floors and sealed wooden floors such as parquet and laminate) that can withstand the high temperature, pressure and moisture of the device. Do not clean water-sensitive floor coverings such as untreated cork floors (the moisture could penetrate and damage the floor). With the carpet glider fitted, the device can be used for freshening short-pile carpets, runners etc. Detergents are not required.
Environmental protection

The packing materials can be recycled. Please dispose of packaging in accordance with the environmental regulations.

Electrical and electronic devices contain valuable, recyclable materials and often components such as batteries, rechargeable batteries or oil, which - if handled or disposed of incorrectly - can be a potential danger to human health and the environment. However, these components are required for correct operation of the device. Devices marked by symbol are not allowed to be disposed of together with the household rubbish.
Notes on the content materials (REACH)
Current information on content materials can be found at: www.kaercher.de/REACH
Accessories and spare parts
Only use original accessories and original spare parts. They ensure that the appliance will run fault-free and safely.
Information on accessories and spare parts can be found at www.kaercher.com.
Scope of delivery
The scope of delivery for the appliance is shown on the packaging. Check the contents for completeness when unpacking. If any accessories are missing or in the event of any shipping damage, please notify your dealer.
Warranty
The warranty conditions issued by our sales company responsible apply in all countries. We shall remedy possible malfunctions on your device within the warranty period free of cost, provided that a material or manufacturing defect is the cause. In a warranty case, please contact your dealer (with the purchase receipt) or the next authorised customer service site. (See overleaf for the address)
Safety devices
CAUTION
Missing or modified safety devices
Safety devices are provided for your own protection. Never modify or bypass safety devices.
Symbols on the device
(according to type of appliance)
| Risk of burns, surface of appliance becomes hot during operation | |
| Risk of scalding from steam | |
| Read operating instructions |
Safety valve
In the case of excessively high pressure in the event of a fault, a safety valve relieves the pressure into the atmosphere.
Fuse
The fuse prevents the device from overheating. If the device overheats, the fuse disconnects the device from the power supply.
Before re-commissioning the device, contact the responsible KARCHER Customer Service.
Device description
The maximum amount of equipment is described in these operating instructions. Depending on the model used, there are differences in the scope of delivery (see packaging).
For the illustrations, refer to the graphics page. Illustration A
1Button/switchoarea
② Switch - Off
3 Switch - On
4Indicator light (red) - replace decalcification cartridge.
RESET button -set water hardness -confirmation after cartridge replacement
6LED operating indicator Flashing red - mains voltage present and device is heating up Green - device is ready for operation
⑦Display for steam stage setting
8Button for steam stage setting
9 Steam stage 1 - Wood
10 Steam stage 2 - Carpet
(1) Steam stage 3 - Tiles/Stone
12 Handle
(13)Wall anti-slip handle
Steam lever
15 Cable hook with cable fastener
Decalcification cartridge
Filling hole for water
Water reservoir with reservoir cover and carrying handle
19Mains connection cable with mains plug
20 Unlocking button for floor nozzle
21 Floor nozzle
22 Hook and loop fastener
23 Microfibre floor cloth (1 x)
(24) Microfibre floor cloth (2 x)
25** Abrasive floor cloth (1 x)
26 Carpet glider
optional
Initial Start-Up
ATTENTION
Device damage due to calcification
The decalcification cartridge only works properly if you adjust the device to the local water hardness before operating it for the first time.
Set the device to the local water hardness.
Set the device to the current water hardness before using it in an area with a different water hardness (e.g. after a move)
-
Insert the decalcification cartridge into the water reservoir and press it firmly into place. Illustration F
-
Set the water hardness, see chapter Setting the water hardness.
Note
When steaming for the first time after removing and reinserting the decalcification cartridge, the steam jet may be weak or irregular, and individual drops of water may be expelled. The device requires a short running-in period in which the decalcification cartridge fills with water. The steam volume that is expelled increases constantly until the maximum steam volume has been reached after approx. 30 seconds.
Note
Please note that here it is set to steam stage 3 (tiles/ stone), since the running-in period will otherwise be extended.
Installation
Installing the handle bar
- Hold the basic device.
- Fit the handle bar all the way to the end stop into the basic device until it audibly latches into place. The handle bar must sit tightly in the device. Illustration B
Installing the floor nozzle
- Hold the device by the handle.
- Connect the lower section of the basic unit to the floor nozzle until it audibly latches into place. Illustration C
Operation
Unwinding the power cord
WARNING
Risk of electric shock
If the power cable is not completely unwound, the danger exists of you straining and damaging the mains cable by overestimating the range of the cable. Always completely unwind the power cable.
Note
The lower cable holder can be rotated by 360^ for removing the cable. The upper cable hook cannot be rotated.
- Turn the lower cable holder upwards.
- Completely remove the power cable from the cable hook.
- Fasten the cable in the fastener of the upper or lower cable hook to prevent it from being run over during cleaning work.
Illustration J
Filling water
The water reservoir can be filled at any time.
ATTENTION
Material damage through open reservoir cover or incorrectly seated or loose water reservoir
Liquid can escape and damage the floor covering if the reservoir cover is not correctly closed or the water reservoir is not correctly inserted into the device.
Take care to ensure that the reservoir cover is securely closed and the water reservoir is seated tightly in the device when the water reservoir is full.
ATTENTION
Damage to the device
Unsuitable water can block the nozzles.
Do not use condensation from the clothes dryer for filling.
Do not use collected rain water for filling.
Do not use cleaning agents or other additives (e.g. scents) for filling.
Note
The decalcification cartridge must be installed in the water reservoir when filling the water reservoir.
Filling the water reservoir directly on the device
- Hold the device.
- Open the water reservoir cover and fill the water reservoir with max. 0.5L tap water, directly at the device.
Illustration G
- Close the reservoir cover.
Removing the water reservoir for filling
- Hold the device.
- Turn the lower cable hook upwards.
- Pull the water reservoir vertically upwards by the handle.
- Open the water reservoir cover and fill the water reservoir with max. 0.5L tap water.
Illustration H
- Close the water reservoir cover.
- Insert the water reservoir and press downwards until it locks into place.
Switching on the device
ATTENTION
Device and material damage due to tipping over
The device can fall over and be damaged if inadequately secured during work breaks or storage. Liquid can also leak out and damage the floor covering in the process.
Position the device with the floor nozzle on a solid base, or the handle with the wall anti-slip protection in a vertical position on a solid wall.
ATTENTION
Device damage due to incorrectly set water hardness
The decalcification cartridge only works properly if the device is adjusted to the local water hardness. The device may calcify if the water hardness is set incorrectly. Adjust the device to the local water hardness before first operation, see chapter Setting the water hardness.
Note
When steaming for the first time after removing and reinserting the decalcification cartridge, the steam jet may be weak or irregular, and individual drops of water may be expelled. The device requires a short running-in period in which the decalcification cartridge fills with water. The steam volume that is expelled increases constantly until the maximum steam volume has been reached after approx. 30 seconds.
Note
Please note that here it is set to steam stage 3 (tiles/ stone), since the running-in period will otherwise be extended.
- Place the device on a firm surface.
Illustration I
- Insert the mains plug into a socket.
Illustration K
- Press the On switch.
Illustration L
- The LED operating indicator flashes red.
Illustration M
- The LED operating indicator lights up constant by green after approx. 30 seconds.
Illustration N
The device is ready for use.
Regulating the steam volume
The steam volume setting depends on the surface to be cleaned.
- Press the button with the direction arrows on the handle repeatedly until the desired steam stage is selected.
Illustration P
3 different steam stages are available:
| Tiles/stone - maximum steam stage | |
| Carpet - medium steam stage | |
| Wood - minimum steam stage |
Note
The maximum steam stage (Tiles/stone) is always selected when the device is switched on.
- Press the steam lever after setting the steam volume.
Illustration O
Refilling water
Note
The water level can be seen through the transparent fresh water tank.
When topping up the water, the decalcification cartridge remains secured in the device.
- Open the water reservoir cover and fill the water reservoir with max. 0.5L tap water, directly at the device.
Illustration G or
- Remove the water reservoir, open the water reservoir cover and fill the water reservoir with max. 0.5L tap water, see chapter Filling water.
Illustration H
Interrupting operation
ATTENTION
See the chapter Storing the device to prevent material damage during longer work breaks.
In order to save energy, we recommend that you switch off the device for breaks in operation of longer than 20 minutes.
- Press the OFF switch.
Illustration S
Switching off the device
- Press the OFF switch.
Illustration S
The device is switched off.
- Pull the mains plug out of the socket.
Illustration T
ATTENTION
Device damage due to water putrefaction
The water in the reservoir may putrefy if the device is not put into operation for more than 2 months.
Drain the water reservoir before longer breaks in operation.
- Drain the water reservoir.
Illustration U
Storing the device
ATTENTION
The floor covering can be damaged by moisture remaining on the floor cleaning cloth or floor nozzle/device after cleaning.
Remove the floor cleaning cloth/carpet glider and dry the floor nozzle/the device after finishing the floor cleaning work.
Do not place or store the device on heat-sensitive surfaces.
- Remove the floor cleaning cloth or floor cleaning cloth and carpet glider, see the chapter Floor nozzle and carpet glider.
Illustration D Illustration E
-
Remove moisture from the floor nozzle/device.
-
Wind the power cable around the upper and lower cable hooks.
Illustration V
- Store the device in vertical position on a solid base or on the wall.
Illustration I
- Store the device in a dry location that is protected from frost.
Important application instructions
Cleaning the floor areas
We recommend sweeping the floor or vacuum cleaning it before using the appliance. In this way the floor will be
cleared of dirt and loose particles before the wet cleaning.
Cleaning coated or painted surfaces
ATTENTION
Damaged surfaces
Steam can loosen wax, furniture polish, plastic coatings or paint and edge band from edges.
Do not direct the steam at glued laminated edges as the edge band may loosen.
Do not use the device for cleaning unsealed wood or parquet floors.
Do not use the device for cleaning painted or plastic coated surfaces such as kitchen or living room furniture, doors or parquet.
How to use the Accessories
Floor nozzle
The floor nozzle is suitable for cleaning washable floor coverings, e.g. stone floors, tiles and PVC floors, and also sealed wooden floors such as parquet and laminate.
ATTENTION
Damage due to steam effect
Heat and the effects of steam can lead to damage.
Check the heat resistance and steam effect on an inconspicuous area using a minimal volume of steam prior to use.
Steam clean sealed wooden floors using the correct, preset steam level, and do not remain in the same position on the floor for too long.
Note
Detergent residue or care emulsions on the surface to be cleaned can lead to streaks during steam cleaning, which will disappear however once these have been used several times.
CAUTION
Beware of burns to your feet
The floor nozzle/floor cleaning cloth heats up during steaming.
Hot water may drip out when pulling off the floor cloth.
Only operate or remove the floor nozzle/floor cleaning cloth with suitable footwear.
- Fasten the floor cleaning cloth to the floor nozzle. a Place the floor cleaning cloth with the hook and loop fastener pointing upwards on the floor.
b Place the floor nozzle onto the floor cleaning cloth, applying slight pressure.
Illustration D
The floor cleaning cloth will stick to the floor nozzle of its own accord due to the hook and loop fastener.
Micro fibre cloth
The microfibre floor cloth is suitable for cleaning stone floors and PVC floors, and also sealed wooden floors such as parquet and laminate. The microfibre floor cloth is also suitable for freshening carpets when used in conjunction with the carpet glider.
Abrasive floor cloth
The abrasive floor cloth is suitable for cleaning insensitive surfaces such as tiles or stone.
ATTENTION
Damage to floor coverings
The abrasive floor cloth can damage sensitive floor coverings and surfaces.
Do not use the abrasive floor cloth for cleaning wooden surfaces.
Do not use the abrasive cloth with the carpet glider.
Removing the floor cleaning cloth
- Place one foot on the bottom corner of the floor cleaning cloth and lift the floor nozzle up.
Illustration D
Note
Initially, the floor cleaning cloth's hook and loop fastener strip is very strong and cannot be removed from the floor nozzle easily. After the floor cleaning cloth has been used several times and washed, it is easier to remove from the floor nozzle and it has reached the optimum adhesion.
Removing the floor nozzle from the basic device
ATTENTION
Material damage due to an unstable device
Removing the floor nozzle makes the device unstable and it can tip over and damage the device and floor covering.
Do not remove the floor nozzle from the basic device after installation.
Remove the floor nozzle only when sending the device for servicing.
- Press the OFF switch
Illustration S
- Pull the mains plug out of the socket.
Illustration T
- Empty the water reservoir.
Illustration U
-
Hold the device by the handle.
-
Actuate the unlocking button on the floor nozzle.
-
The floor nozzle releases from the device and can be removed.
Illustration W
- Store the device safely in a horizontal position.
Carpet glider
The carpet glider is used for freshening up carpets.
ATTENTION
Beware of damaging the carpet glider and carpet
Contamination on the carpet glider, as well as heat and moisture penetration, can result in the carpet being damaged.
Use the carpet glider only with a microfibre floor cloth on the floor nozzle.
Steam clean using only the correct steam stage when using the carpet glider (see the display indicator on the handle, carpet floor covering symbol - medium steam stage).
Prior to the application, also check the heat resistance and impact of steam on the carpet at an insignificant spot using the smallest steam volume.
Observe the cleaning instructions from the carpet manufacturer.
Prior to using the carpet glider, make sure that the carpet has been vacuumed and that stains have been removed.
Prior to use and following operating pauses, remove any possible water accumulation (condensate) in the device by evaporating the condensate into a drain (without floor cleaning cloth / with accessories).
In order to prevent too much moistening and to avoid the risk of damage due to temperature effects, do not direct the steam continuously onto one spot (maximum 5 seconds).
Do not use the carpet glider on deep-pile carpets.
Fastening the carpet glider to the floor nozzle
-
For fastening the floor cleaning cloth to the floor nozzle, please refer to chapter Floor nozzle. Illustration D
-
Using light pressure, allow the floor nozzle to slide into the carpet glider and engage there.
Illustration E
- Start cleaning the carpet.
Removing the carpet glider from the floor nozzle
CAUTION
Beware of burns to your feet
The carpet glider can heat up during the steaming process.
Do not operate or remove the carpet glider bare-footed or using open sandals.
Only operate or remove the carpet glider using suitable footwear.
-
Press the strap on the carpet glider downwards using your toecap.
-
Lift the floor nozzle upwards.
Illustration E
Care and service
Draining the water reservoir
ATTENTION
Device damage due to water putrefaction
If the device is not put into operation for more than 2 months, the water in the reservoir may putrefy.
Drain the water reservoir before breaks in operation.
- Press the OFF switch.
The device is switched off.
- Pull the mains plug out of the socket.
- Remove the reservoir cover.
- Drain the water reservoir.
The cartridge can remain the water reservoir.
Illustration U
Replacing the decalcification cartridge
ATTENTION
Device damage and shortened service life
If the replacement intervals (indicator light) for the decalcification cartridge are not observed, there is a risk of device damage and the service life of the device may be shortened.
Observe the replacement intervals (indicator light).
Note
The replacement intervals depends on the local water hardness. Areas with hard water (e.g. III/IV) have a higher replacement interval than areas with soft water (e.g. I/II).
Indicator lamp at end of the run time
The "decalcification cartridge indicator light" indicates when the decalcification cartridge has to be replaced:
- The indicator light flashes 2 hours before the runtime expires.
Illustration R
- The indicator light flashes more quickly 1 hour before the run time expires.
- The indicator light and the LED strip on the device light up when the run time of the decalcification cartridge has expired. The floor covering symbols on the handle do not light up. The pump switches off automatically (no water steam) to prevent damage to the device.
Inserting the decalcification cartridge
ATTENTION
Device damage
There is a risk of damage to the device if the used decalcification cartridge is re-used.
Work carefully in order to prevent mixing up the cartridges.
Installation information
When steaming for the first time after removing and reinserting the decalcification cartridge, the steam jet may be weak or irregular, and individual drops of water may be expelled. The device requires a short running-in period in which the decalcification cartridge fills with water. The steam volume that is expelled increases constantly until the maximum steam volume has been reached after approx. 30 seconds.
Note
Removing the water reservoir makes it easier to remove and install the decalcification cartridge.
- Press the OFF switch.
The device is switched off. - Remove the reservoir cover.
- Remove the decalcification cartridge.
- Insert the new decalcification cartridge and press it firmly into place.
- Press the On switch.
The device is switched on.
- Press and hold the RESET button for 4 seconds. The "replace decalcification cartridge" indicator light goes out and the run time for the decalcification cartridge starts again.
Illustration Q
- Allow the device to heat up.
- Press and hold the steam lever for approximately 30 seconds to vent the decalcification cartridge.
Setting the water hardness
ATTENTION
Device damage due to calcification
Without a decalcification cartridge, the device may cal-cify if the water hardness is set incorrectly.
Always work with a decalcification cartridge.
Set the device to the local water hardness.
Set the device to the current water hardness before using it in an area with a different water hardness (e.g. after a move).
Note
Your water board or municipal utilities authority can provide information on hardness of tap water.
The water hardness is set using the RESET button. The water hardness setting is stored until a new setting (e.g. after a move) is made. The device is set to the highest water hardness (level IV) in the factory. The device indicates the set water hardness with flash pulses.
Water hardness levels and flash pulses
| Hardness range | °dH mm | ol/l Number of flash pulses | Interval between flash pulses | |
| I Soft | 0-7 0-1 | .3 1x 4 s | seconds | |
| II Medium | 7-14 | 1.3-2.5 | 2x | |
| III Hard | 14-21 | 2.5-3.8 | 3x | |
| IV Very hard | >21 >3.8 | 4x | ||
Note
The anti-calcification effect of the decalcification cartridge is activated as soon as the reservoir is filled with water and the device is put into operation. Lime in the water is absorbed by the granulate in the decalcification cartridge. Additional descaling is not required.
Note
The granulate in the cartridge can discolour on contact with water due to the mineral content in the water, which is no cause for concern and has no negative effects on the device, cleaning work or the functionality of the cartridge.
Note
Do not pause for longer than 15 seconds when setting as the device will otherwise be set automatically to the last selected water hardness or the highest water hardness set during initial start-up.
- Connect the mains plug.
- Make sure that the device is switched off.
- Hold the RESET button pressed and switch on the device.
Illustration Q
After approximately 2 seconds, the indicator light flashes and signals the current water hardness setting with the number of pulses.
- Release the RESET key.
The device is set to water hardness level IV at the factory and the indicator light therefore flashes 4 times in succession.
- You can cycle between the different water hardness levels by pressing the RESET button repeatedly until the desired water hardness level is reached.
- Once the desired water hardness level has been reached, press and hold the RESET button for 3 seconds to store the selected water hardness level. The indicator light for the water hardness lights up to confirm saving.
Care of accessories
(Accessories - depending on scope of delivery)
Note
The micro fibre cloths are not suitable for dryer.
Note
Observe the instructions on the washing tag when washing the cloths. Do not use any liquid softeners as this will affect the ability of the cloths to pick up dirt.
- Wash the floor cleaning cloths in a washing machine at a max. temperature of 60^ .
Removing the handle
ATTENTION
Device damage
The handle components can be damaged by repeated removal.
Do not remove the handle from the basic unit once it has been assembled.
The handle may only be removed from the basic device if the device is sent out for service purposes.
Troubleshooting guide
Malfunctions often have simple causes that you can remedy yourself using the following overview. When in doubt, or in the case of malfunctions not mentioned here, please contact your authorised Customer Service.
WARNING
Risk of electric shock and burns
Trying to eliminate faults while the appliance is connected to the mains or has not yet cooled down is always dangerous.
Remove the mains plug.
Allow the appliance to cool down.
No steam / little steam although there is water in the reservoir
The decalcification cartridge has not been inserted or has been inserted incorrectly.
- Fit the decalcification cartridge and/or check that the decalcification cartridge sits tightly in the reservoir and press in again if necessary.
The decalcification cartridge has been removed when filling with water and/or a new decalcification cartridge has been fitted
Always leave the decalcification cartridge in the water reservoir when filling with water.
- Press and hold the steam lever constantly. The full steam output is reached after approximately 30 seconds.
The red "Replace decalcification cartridge" indicator light flashes but the device still functions correctly
Run time of the decalcification cartridge ends soon.
- Fit a new decalcification cartridge, see chapter Replacing the decalcification cartridge.
No steam despite sufficient water in the reservoir, the indicator light and LED operating indicator on the device light up continuously red, the floor covering symbols on the handle do not light up
Run time for the decalcification cartridge has expired
- Fit a new decalcification cartridge, see chapter Replacing the decalcification cartridge.
- If a new decalcification cartridge has already been fitted and this fault still occurs, the RESET button has probably not been pressed after replacing the decalcification cartridge. Press and hold the RESET button for 4 seconds after inserting the decalcification cartridge, see chapter Replacing the decalcification cartridge.
Technical data
| Electrical connection | ||
| Voltage | V | 220-240 |
| Phase ~ 1 | ||
| Frequency Hz 50-60 | ||
| Degree of protection IPX4 | ||
| Protection class I | ||
| Device performance data | ||
| Heating capacity W 1600 | ||
| Heating-up time Seconds 30 | ||
| Continuous steaming | g/min | 40 |
| Filling quantity | ||
| Water reservoir | I | 0,5 |
| Dimensions and weights | ||
| Weight (without accessories) | kg | 3,1 |
| Length | mm | 314 |
| Width | mm | 207 |
| Height | mm | 1185 |
Subject to technical modifications.
Contenu
Limpar as superficies pavementadas
(alt after maskintype)
Abraziva drana gridai
Abraziva drana gridai ir piemerocta noturigu gridas segumu, piemeram, flizu un akmens tiriisanai.
JEVERIBAI
- Pustiti taster RESET.
Ure'daj se prema fabričkim podesavanjima nalazi na stepenu tvrdoce vode IV, što znači da indicator treperi 4 puta zaredom.
- Višestrukim pritiskom na taster RESET menjate razlčite stepene tvrdoce vode sve dok se ne dostigneŽeljeni stepen tvrdoce vode.
- Ako je dostignut zejeni stepen tvrdoce vode, taster RESET drzati stalno pritisnutim 3 sekunde da biste memorisali izabrane stepene tvrdoce vode. Indikator tvrdoce vode treperi, cime je potvrdeno memorisanje.
Nega pribora
EuapoAoynon akpooud aetou
- KpatnoTe Otaeepa Tn ouokean aTn xEipoaBn.
- Suvdeote OTo KAtw Hepoc Tou Baikou mXavnauToTO akpofoio dantedou mExpi va kouptwoeI.
Eikovc
Aειουργία
Kaawio pEuMaToC
IIPOEIAOIOIHEN
Znua otic emipaviecs
O atoic mtopei va atokolnosei kepi, loutpo einnwv, ouvtke c tioatpwoeis, xpwma kai nepiertpkn taivia a to akues.
Mn otpeErov atuo naw oso kAaIneves aKec diOni mtopei va anokolntheta n KcAaIneyn taivia.
MnV xonoiopoioite TN ouokevun yia tov kaogapioo u n OTeyavwv daneww v ano npaké.
MnV xpoiopoioieTe n oukeun yia Tov kaOapiaoAooutpapiouevwv n eTveDobuEvw vtnipaveiwv otWc . Einnla kouicav, npctc n napke.
Xpnon twv gaptnmuTowV
Akpouoio dαπéδou
To akpoqio daTeBou evEikvutai yia tov kaTApioo daTeBov TPO TLeovTai, T.x. TEPiva dAnEda, PAKiOa kai PVC, KaWc kai oteyavotoinmuva Euliva daTEda oTWC napke kai laminate.
PPOOxH
⑥ CBeToIOHbI INHdkaToppeKIMpa60TbI PybcpyuOuI KpacbI — cTeBoe HAnpJxHeNepucytCTByET, yCTpoiCTBO HarpeBaetc3eneHbI—ycTPOiCTBO rTOBO K NcNoB3oBAHIO
7 HndkaTop konuuecTba napa
8 Khonka HactpoiKoJInuecTba npa
(9)KoInueCTBOnapa1-ndepeBo
10 KOnnueCTBO npapa 2-KOBep
1) KonuuecBo npa 3 -nntka/kameHb
(12)PykoRTka
3aunTaOTnpocKaIb3bIBAHnpykoRTK
14 Pbyar nodaunapa
15 Ka6eIbHbI KpIOK cΦIKcTOpOM Ka6eIa
KaptpnDxN DnAaunTbI OT HaKnH
(17) OTeBepTne IJIa 3aJIbKn BOIbI
EMKOCbIy BOdbIC KpbUkoN pyKoN nepeHoCKN
(19) Cetebo Ka6enb co wTeNCeHbHOB BNkoH
20 Khonka pa36noknpobkn hacaKn dna nona
(21) Hacaika nona
(22)CoeHHeHne-InnyuKa
23 Canfepka nna noa n3 MmKpOo6pb(1wT)
(24) ** CanfeKa dIa nIa I3 MmKpOΦn6pbI (2 Wt.)
25 **A6pa3nBna caIeTeKa dna nona (1 wt.)
NepBbI BBOd B 3KcNJIyataCuIO
BHIMAHHE
NoepexdeHue ycmpoucmea u3-3a 06pa3o8aHua Hakuu
Onmumabha paboma kapmpudka dna 3auumbl om Hakuu oecneueaemc monbko e mom cnyae, ecnu neped 1-mpumeheuem ycmpoucmeo hacmpoeHo Ha Xecmkocmb nokalbho 60dbI.
Hacmpoumb ycmpoucmeo Ha JecmKocmb MecmHO 80dbI.
Ipepeucnoj3o8aHuemycmpoucmeaepzuohe c dpyeoJxecmkocmbEObbl (HaNPmep, nocne nepeee3da) hacmpoumb e0 ha akmyanbHyio xecmkocmbEObbl
- YctaHOBntb KaptpnJx Jnla3aunTbI OT HAKINNB EMKoCTb Dnra BObl n npKaTb dnn Kcaunn.
PncyHok F
- Hactpontb JecTKocTb BObl, CM. rnaBy Hacmpouka JecmKocMu BObl.
PpumeyaHue
Ipu 1- ou o6pa6omke napom nocne u38eneHua u noemopho ycmaHOKu KapmpduXa dner 3auumbl om hakunu npoo6pa3oaeHue moxem 6bim cna6bIM unu hepahomepHbIM, Moaym ebicymnab kannu eobbl. Ycmpoucmby nompe6yemc HEmHOz epemHu dny 3anONHeHura KapmpduXa bOoU. Objem bixOdaezo npaa nocmoHHo yeenuuhaemc u docmu2aem MAKcumaNbHOz 3HaueHua npub. ueep 30 ckynd.
PpumeyaHue
O6pammbEhMaHue Ha mo, ymo ycmaHOeHa cmynehnapoo6pa3o8aHua 3 (nnumka/kamehb), nockonbky e npomueHom cnyae epem obkamku 6ydem donbwe.
MoHTax
YcTaHOBka pyKoTKn
- YdepxnBaTb 6a30OBe yctpoNCTBO.
- Bctabntb pykoarky do ynopa B 6a30OBe yctpoiCTBO DO fNKcaun CO CblIIMbIM UeJHKOM. Pykoarka dOJIKH a npOHO cndetb By cTPOiCTBE.
PncyHOB
YcTaHOBka HacaKdIgnoJa
1.Дерхаь устpoCTBO3a pyKoTky.
2. CoeINHITb HNKHIOU qaTb yCTpoIcTBa C hacaKoI DnI NOA DO QHKCaUN CO CNbIHUMBIM UeJIyKOM.
PncyHOK C
3KcnJnyatauia
Pa3MaTbIbAHne cTeBOrO ka6eJra
△PENDyUNPEXDEHNE
OnachocmbnopaxKeHmOKOM
Ecnu cemeoou kabel pa3moman He nonHocmbio, mo npu HnnpaunbHOU ouenke ducmauuu cyuecmeyem onachocmb hamxeknua u nopekdehura kabel numahur.
Bce2da pa3mambamb Kaben numaHua nonHocmbio.
PpumeyaHue
Iydo6mea Chmua Kaenn HuxHui depxamenb noopauueaemcHa 360^ .BepxHui KaenbHbi Kpok He noopauueaemc.
-
NObepHyb HnKnn DepeKaTeJIb Ka6eIa BBePx.
-
ChrbcTeBOKa6eNbNONHOCTbOcKa6eJbHOro KPOKa.
- 3aKpeNTb Ka6eB B cKcatope BepxHero nI HxHero Kpoka, yTo6bl OH He MeuJn BO BpeM y6opKn.
PucyHOK J
3aINBka BODbl
EMKOCbI BODBI MOXHO HANOHTB B JIO60MOMENT.
BHIMAHHE
MamepuaBHyuep6 u3-3a He3akpbimou Kpbiu unu Ha3akpenHHOeMKoCmU d8 bOdbI
Ecnu Kpbuwa 3akpbima HennomHo UUNeMKocmb dno 60bbl ycmahoeHa e ycmpoucmeo HnpaBunbHO, XudKocmb Moxem bimeu u nopeumb HanonbHoe nokpbimue.
Cneodumb 3a mem, ymo6bl Kpbliuka HanoNHeHHoeyKocmu 6bina 3akpbima nnomHO u emKocmb dno80b1 6bina hadexkho 3akpenna.
BHIMAHNE
PoepeKeHua ycmpoucmea
Ppu uCnoIb3o8aHu 8OdbI HecOoMeemcmyoue20 Kaecmea MoXem npou3oUm 3acopeHue conen. He 3anueamb KoHdeHcauOHHy oody u3 cyuunbHO MaunHbl.
He 3aJueamb c6paHHyIO doxKdeSyIO body.
He 3aueamb MOUue cpedcmea unu dpyue do6aeku (hanpumep, apomamu3amopby).
PpumeyaHue
Ppu HanoHenu emKocmu dna eodbe Heu doJxen Haxodumbckapmpudk dna 3auumb om Hakuu.
HenocpeDCTBeHHoe HANOJIHeHne EMKoCTn IIN BOdbI Ha yCtpoICTBe
1.Держать учрочТВ.
2. OTKpbItb KpbIuKy HnHaJIITb B EMKoCTb, He CHImaee c ycTpOInCTBa, MaKc. 0,5 n BOJOnpOBODHOI BObl.
PncyHok G
- 3aKpbTb EMKOCTb KpbIiKoN.
CHTNE eMKoCTn Dn BODbl c ceIbH HanoJIHeHn
1.ДерхаTyCToPoiCTBO.
2. NObepHyTb HxHnKa6eBbHbIKpOK BBePx.
3. Notaryt b emKoCTb IJIa BOdbI BepTnKaJIbHO BBepx.
4. OTKpbItb KpbIuKy nHaJIITb MaKc. 0,5 N BOONPOBOHOBObl.
PucyHok H
- 3aKpbTb eMKoCTb KpbIuKoI.
- YCTAHOBINTb EMKOCTB JINBAOJI HA yCTPOIcTBO HADABNTb Ha Hee D0ΦNKcaUN.
BknoueHne yctpoCtBa
BHIMAHHE
Poepekehue ycmpoucmea u umyuacemea u3-3a onpokudbaHua
Hedocmamouhag fuKcauura ycmpoucmae eo epemneppbiea e paBome uUxpanenmu moXem npueecmu K eo nadeHuO u nopeXdeHuO. TaKke npu 3omOB3MOXHa ymeKa JukkocMu, Umo npueedem KnoepexdeHuO HanoIbHO2o NOKpbimur.
Cmaumb npubop c hacadkou dnona cnedyem ha npouhoe ochoeaue unnpucnohmyb pykoamy C 3auumou om npockaib3bieaHue e eepmuKaNbHOM nonoKeHuK npouHOcmeHe.
BHIMAHNE
NopekdeHue ycmpoucmea u3-3a HnpaBbHou Hacmpouku XecmKocmu bOdbI
Onmumabha paoba kapmpudka dna 3auumbo om
HaKunu oecneueuaemc moIbko e cnyae hacmpouku
ycmpoucmba Ha JecmKocmb MecmHO bOdbI. Ppu
HenpaunbHou Hacmpouke JecmKocmu bOdbI e
ycmpoucmbe MoJem o6pa3oambcra Hakunb.
Hacmpoumb ycmpoucmbe nped 1-
bIM uCnOB3oBaHuEM Ha JecmKocmb MecmHO bOdbI,
cm.2aay Hacmpouka JecmKocmu bOdbI.
PpumeyaHue
Ipu 1- u obpa6omke napom nocne u3eneueHua u noBmopHou ycmahOBku KapmuOka dny 3auumbl om hakunu npaoo6pa3o8aHue moKem 6bim cna6bIM unu Hepa8HomepHbIM, Moaym ebicymnab Kannu e0db. Ycmpoucmy nompe6yemca HEmHOzo epemHu dny 3anoJHeHura KapmuOka e0doU. Obem bixODAe2o npaa nocmoHHo yBeenuuBaemc u docmuzaem MaKcumaNbHO2 3NaueHua npu6bn. uepe3 30 cekyHD.
PpumeyaHue
O6pammbEhMaHue Ha mo, ymo ycmaHOeHa cmynehnnapo0bpa3oBaHua 3 (nnumka/kamehb), nockonbky e npomueHom cnyuae epemr o6kamku 6ydem donbwe.
- YcTaHOBt b yCTpoIcTBO Ha npOuHoe OCHOBaHne. PucyHok I
- BCTaBnTb WTeNceJbHyIO BUNKy B po3eTKy. PncyHOK K
- HaaTb BbIKIouaTeIb «BKn.». PucyHOK L
- HauHnae MTMaTb KpaChbI CBToIOHOHbIMnHdNKaTOPpeKIma pa6oTbI.PucyHok M
- Yepe3 30 cekyHd 3aropaeTcra H roptn nocToHHo 3eHehB CBeTOIOHOHb INHdkaTop peKIma pa60tbl.
Pcyhok N
YCTPOINCTBO IOTOBOKNCSIOJIb3OBAHNIU.
PerynipoBka konNuecTba napa
Tpe6yemoe KOJIInueCTBO napa 3aBnCIT OT CBOIcTB OUYIaEMoNIOBepxHocTN.
Haximatb KhoNky C 306paXeHNEM CTpeNOK HpykoTKe Do Tex Nop, Noka He 6yJeT BbIbpaHO KeJaemoe KOJIuYeCTBO napa.
PncyHOK P
DocyHb3 pa3hIx ypoBHa KOJnueCTBa npa:
NoepexdeHHbIe noepxHocmu
Pap cnocoben omcnaueambb ock, MebeIbHyo nonumpy, nonumepHbIe nokpbimu uNu Kpacky u OkneKy Ha KpOMkax.
He Hanpaenbnap Ha cKneeHHbIe KpOMku, m.K. 3mo MOKem npueecmu K omcoedunehuO Okneku.
He ucnolb3oeamb ycmpoucmeo dnn ouucmku HeNaKupo8aHHbix depeeHHbix u napKeMHbIX noNo6.
He ucnonb3oebam ycmpoucmeo dna ouucmku OkpaewHHbIX unu umeouux nnacmuKoe noKpbimue noeepxHocmeu, Hanpumep kxyOHou u Kunou Mebenu, deepeu u napkema.
IcnoIb3OBAHHe npHaadJeXHoCTeI
HacaKa nn noJa
HacaKaIgNoI npEHa3HaueHa IJn OUcTKn MOUxxCra HAnOBHBix NOKpbITN, HApIMep KAmEHbIX NOJOB, KepAMUeCKO nnTKn, HAnOBHBix NOKpBTNI 3 PBX, a TaKke JaKIpOBAHHbIX DepeBAAHbIX HAnOJIbHBIX NOKpbITN, HApIMep napKeTa n lamHaHaTa.
BHIMAHNE
PoepekeHua3-3a 603deucmeu npa
Bbicokamemnepamypu np moym 6b138amb noepexdeHua.
Ipepe npumehuem Heo6xodumo npoeepumb mepmocmoukocmb u 03deucmeue npa e mano3amemHom Mecm, uCnOJIb3O6a8 MUHMaJIbHOe KOJIuYeCM8O npa.
Iy oucmu npom naupo8aHHbix depe8HHbIX nokpbimu uonb3oamb monbko cneuaJIbHO npedycmoppeHHbI ypo8eHb MouHocMu npa U He 3adepXusambcra cnukom doJao Ha odHom Mecme.
PpumeyaHue
Ocmamku yucmuaux cpedcmu 3mylbcu Ha ouuamaou noeepxnopu o6pa6omke napom Moaym cmamb npuunohn noaenehura pa8odob, komopbue uche3nym nocne HeckoIbKux npumehuui.
OCTOPOXHO
Oxosu cmonbi
Bo epem obpabomku napom hacaKa u canfemka dna nona haapebaomcra.
Ipu omcoeduheuu canfemku dna nona moxem ebimekamb 2opraa boda.
Ucnonb3o8ambu cHumamb hacaKy/caqemky dna nona monbk e noxdxodaeu obyu.
- PnikpenTb canfety Iy nona Ha HacaKy.
a YnOxNtbc aIcpeKy dIy nOla Ha nOI neHTamnIINnykamn BBePX.
b C He3HaHTeJIbHbIM ycHnEM npKaTb HacaKy K canpeTke dna noJa.
PncyHok D
BnaorapnKpennnHnM-nynyKam caneTka nna noIcama 3akpenTcHa HacaKe.
CaIpeTka Dnna noJa n3 MmKpOoΦn6pbI
CanfetkaIgnoIgnoMnKpOoN6pbI NOxOuNT IJy ONUCTKN HAnOBHBIX NOKpbITNI3 KAMH, KepamUeCKoI pIITKn, PBX, a TaKke JApKnPOBaHHbIX DepeBAAHbIX NOKpbITNIgNoIa, HApPIMe NapKeTa I NaMInHaT. TaKke CaJIeFETKa IgnoIgnoMnKpOoN6pbI B COUeTAHIN CO CKOJIb3AIIeH HAcAIOK DnI KOBPOB NOxOuNT IJr OCBExKeHry KOBoPb.
A6pa3nBna caIpeTka nna noJa
A6pa3nBna caIpTeKa Ira nIpaI npEHa3HaueHa Ira OuNCTKN TBepbIX HAnOJIbHbIX NOKpbITNI 3 NNITKN KAMHJ.
BHIMAHHE
NoepexdeHue HanoJIbHozo nokpbimua
A6pa3ueHajcAnfemka dna nola moKem noBepedumb neko noBepexdaemble HaponbHbIe NOKpbIMu u noBepxHocmu.
He ucnolb3oeamb abpa3ueHyo canfemky dna oucmu depeeHHbIX noepxHocmeu.
He uonb30aamb abpa3ueHyo canfemky Bmecme co ckonb3aueu Hacadko dno Koepoe.
Chrtne canfetkn dna nona
- NocTaBnTb OndHy Hory Ha 3bYok caIΦeTKn dnona n noDnHrTb Hacdky dnona.
PucyhoK D
PpumeyaHue
Chayana lehma-nunyka canfemku dna nona eue ouehkpenka u canfemky mxeNo cHarmc hacaKu. Nocme MHO2OKpamHO2o uCnOb3ObaHua u cmupku canfemku OHa ne2ko Chumaemc c HacaKu u docmuaem onmumalbHO2 ycunur cKpeJIenHu.
OToCoeINHeHHe HacaIkn IJnNoJa OTo 6a3oBoro yCTpOInCTBa
BHIMAHHE
MamepuaIbHbI yuep6 u3-3a Heycmouueocmu ycmpoucmea
Ppu chmou hacadke dny nona ycmpoucmeo cmaohobumc heycmouuebIM, moKem ynacmb u nopeedumbcra unu nopeedumb HanoIbHOe nokpbimue. Nocne ycmaHOeku 6onbwe He cHUMAMB hacadky dny nona c 6ba08020 ycmpoucmea.
Chumamb hacaky dna noJa pa3pewaemc moIbKO npu omnpaeky ycmpoucmea e cepec.
- HaxaTb BblKnIouaTeJIb «BblKn.I.» PucyHOK S
2.ИЗВЕЧ bTeNCEJIbHyIO BUNIky n3 pO3eTKN.PucyHOK T - BbIINb BOy n3 EMKoCTn. PcyHOK U
4.Дерхаь устpoитбо 3a pykOЯТКy. - Haxatb KhoNky pa36nKOpOBKn HacaKn dna noJa.
- HacaKa InnI nona OTCoeDnHeHa OT yCTpoNCTBa mOKet 6bITb ydaJIeHa.
PucyHok W
7.ПОJOXINb yCTpoIcTBO B rOpN3OHTaJIbHOM ПОJOXeHnB HAnExKHOe MeCTo XpaHeHnY.
CkOBpoB
CkONb3aJa HacaKa npEHa3HaueHa dIra ocBexKeHn KaOBPOB.
BHIMAHNE
NopekdeHua Koepa u cKoJIb3raueu HacaDu
3aap3HeHua cKoJIb3raue Hacadku, a maKxpe bICOKa meMnepamypu enaxHoCmb Mozym npueecmu K noepexdeHu Koepa.
IcnoB308ambckOJIb3auyIO HacaKy monbKO Bmecme c canemKou u3 Mukpofo6pbHa HacaKe dna nona.
PpuucnoIb3oehuCKoNb3aueHuHacadku dnaKoepoe bInonHnarmy6bpky monbKO c coomaeemcmeyouum KOnuuecmBOM npapcM.UHdukauuHa pykoarnke, cumboHanlonbHO20 NOKpbIMUR «Koep» — cpedhee KOnuuecmBo npap).
Ipepe npumehuem Heo6xodmo npoeepumb cmoukocmb Koepa K bicokoJ memnepamype u eo3eucmebu npom E mano3amHom Mecme C MUHUMaJIbHbIM KOJIUuecMbOM npap.
Cobam ykaaHua no oucme om uzomoeumen koepa.
Y6eumbc8, ymo Koep neped npumeHenemCKoJIb3aueu hacaKu dner Koepa Ouauen om nbIu u nameH.
Ipepe npumehenuem u nocne nepepbieoe e paobome ydaunmb bvinapuebaHuem 8 kanau3auu (6e3 canfemku dnona/c npuaadnexKnocmbu) ckoueuyocb oody (kOHdeHcam) u3 ycmpoucmea.
He hanaenb nap nocmnoHHO 0dy moky (He 6oonee 5 cekyho) eo u36ekaue u36bimoho2o 03deucmeu bnau u pucka noepexdHuur u3-3a ebicokou memnepamypbl.
He ucnolb3oebamb coknb3auyu hacaoydna koepoHa Koepax C ebICOKUM BOPCOM.
3akpenneHne cKoJIb3aIeHacAdKn dIa KOBPOB Ha HacaKe dIpa NOla
- 3akpenneHne caJIeTkn IJn noJa Ha HacaIke IJn noJa cm.B rnaBe HacaKa dJa nOJa. PucyHok D
- BBeCTn HacaIky IJRA NOJa C JERKIM HaxNMOM B CKoJIb3aIyU HacaIky IJRA KOBPOB Do QIKCaUN. PucyHOK E
- Ппстунш Кочик Ковр.
ChrTne cKoJIb3aUeHacaIKn IJN KOBPOB C HacaIKnIJa NOJa
OCTOPOXHO
Okou cmonbl
CkOB3aHaHacaKa dJa Koepa MoKem HaapeaBc npu npodyeke napom.
He ucnonb3o8ambu He cHumamcbckonb3auyu Hacaikdy dnn Koepa bocukom unu o omkpblmoi obyeu. UcnoIb3o8ambu Chumamcbckonb3auyu Hacaikdy dnn Koepa monbko nodxodaeu obyeu.
YcTaHObKa KapTpndJa 3aunTbI OT HAKINN
BHIMAHHE
NopekdeHue ycmpoucma
Ipu noemopho ycmahOke ompabomahHO20
kapmuDka dna 3auumbl om hakunu moKem
o3Huknmyb noepexdeHue ycmpoucmea.
He donyckamb nepenymbiahanurkapmuDkeu
Hhcmpykuua no Mohmaxy
Ipu 1- u obpa6omke napom nocne u3euehenu u noemopHO ycmaHOKU KapmuOxda n3auumbl om hakunu zehepaua npapa moKem 6bimb cnaob unu hepabHomepHO u mOy m bicmynamb kannu o0bl. Ycmpoucmey nompe6yEmc HEMHOZo Epmenu dna 3anonHeu KapmuOxbaodou. KOnuuecmoe nodabaemoo npapa nocmoHH yeenuuBaemc, u npublu3umelhNo yepez 30 cekHynd nodaya docmuzaem Makcumyma.
PpumueaHue
Kapmpuok dna 3auumb om hakunu ydo6hee u3eekamb u ycmaHaenueamb npu cHramou emkocmu dna b0bbl.
NopekdeHue ycmpoucma
Yacmoe cHmue pyKoamku moKem npubecmu K nopekdeHuO ee 3neMeHMOE.
Iocne c6opku He chumamb pykoamy c 6a3o802o ycmpoucmea.
Chumamby pykormky c 6a3o8020 ycmpoucmba pa3peuEHO mIoBko 8 mom cnlyae, ecnu ycmpoucmeo omnpaebemcr 6 cepuc.
HOMOUII HENCINPABHOCTX
3aactyIO HeIcnpabHocTn IMeIoT npocTbe IpnuHbI, PO3OMy C NOMOUsbIO cNeIyUoero 0630pa IX MOxHO ycTaHnTB caMocToTeNbHO. B cnyae comHeHnIu BO3NkHOBeHnI He ONiCaHHbIX 3deCb HeICnpabHocTe N cIeNyET o6paatbCBy yNoJHMOueHHyIO cNyK6y cepBnCHoro 06cnyKuBaHnI.
△PENDYNPEKDEHNE
Onachocmb ydapa mokom u nonyuehura oxo206
YcmpaHmB HeucnpaBHoMu Ha NodKnUeHHom K 3JIeKmpueecko cemu unu pa3o2epom Ycmpoucmeo onaCHO.
BbHymb cemeo u mekep.
damb ycmpoucmey ocmbim.
HeT/MaNo npa, HecMOTpHa DoCTaToHoe KOJIInueCTBO BOdBi B EMKoCTn
OTcyTCTByET INH HEnpaBnJIbHO yCTaHOBNeH KApTpNIX DnA3aUNTBI OT HAKNIN.
- YctaHOBtB KapTpNJx Dnla 3aunTbI OT HaKINn n/ HJN npOBepTb,HaJeXHo JN yCTaHOBHeh KapTpNJx Dnla 3aunTbI OT HaKINn B EMKoCTn, pni Heo6xoDmOCTn eue pa3 HaJaBtB Ha Hero.
KaptpnJdk J3aunTbI OT HAKINN 6bln N3BneH npn HANOJIHeHH EMKOCTN BODo, n/Inn 6bln YcTaHOBJeH HOBbIK KaptpnJdk J3aunTbI OT HAKINN
3aekdu noeHicmpo3Momyama Ka6eb JxueHnHa.
Bka3ieka
3HimaouKa6enb,HuxhiMpumau Ka6enIO MoXHa Noepmamu Ha 360^ .Bepxhiu 2aOK dJa Ka6enIO He Noepmaebcra.
- NObepHyTn HnXhHi TpMaH Ka6eIIO Bropy.
- NOBHICTHO 3HRTMepexeBn Ka6JIb 3raUka.
- 3akpinntKa6enb y kpinneHHi BepxHbOro HnKhbOro raykIB, nO6 nIac npn6pHaHHe Haixatn Ha HbOro npncTpoem.
MaJIHOHOKJ
HaJIbAHHa BODn
BakIIN BODN MOXHa HAnOBHOBaTn B 6yNb-RAKn YBAFA
MamepiIbHa wKoda yepe3 He3akpmy Kpuuky a6o HehadiuHy fikcaio 6aka
Kpuwka 6aka HnnpabunbHo 3aunHeHa a6o 6ak dna eodu HnnpabunbHO cmaeneHu y npucmpiu, ue moKe npu3eecmu do eunueaHnreodu 3 npucmpo ma nowkodxehn niDnozu.
Iicna HanoBHeHn 6aka dna bodu nompiHo 3a8Kdu uInbHo 3akpuamu Kpuuky ma nepeepmu HanexHy fikcaqio 6aka y npucmpoi.
YBATA
NowkodkeHH npucmpoH
BukopucmaHHa 60u HeHaJIeXHOI JKOcm MoKe npu3eeMu do 3acMueHHa fOpcyHOK.
He 3anuamu KOHdeHcauiHy body i3 cyuunbHOI Maunu.
He 3aunuamu 3i6paHy doooy body.
He doabaamu y body MuuHi 3acobu yu ihuui doabaku (Hanpuknad, apomamuzamopu).
Bka3ieka
Iid yac 3aunueaHnB oodu 6ak y Hbomy Mae 3haxodumuck KapmuDx dn 3axucmy iD hakuNy.
HaOBHeHHa Ka DnB BoN 6e3nocepHbO Ha npncTpoi
- YtpmmyBaTu npctpii.
- BiKpnTu KpnuKy 6aka Ta 3aNtTu B 6ak Dnra BOuN 6e3nocepEnbO Ha npucTrooi He 6iNbwe 0,5 n BOonpoBIOHOI BOuN. ManHOK G
- 3aKpntn KpuuKy 6aka.
3Himannn6aka JnBn 3 MeTOHO HANOBHeHH
- UtpmMyBaTu npucTpii.
- NObepHyTu HnXhHi rauok dIy Ka6enIO Bropy.
- TOnTnHyTu 6ak DnA BoDn 3a pyuKy BepTuKaIbHO Bropy.
- BiKpnTn KpnuKy 6aka Ta 3aNtB HbOro He 6iNbwe 0,5 n BODonpoBiHOI BOIN. ManIOHOK H
- 3akpnTn KpnsKy 6aka.
- Bctabntn 6ak nna BOn Ta HATNCHTn Ha HbOro BHn3 Do fikcaii
YBIMKHeHH npncToPOU
YBAGA
Nowokdkenn npucmpo u MaHa uepe3 nepekuadn
Iid yac nepepu e pobomi a6o nid yac 36epiaaHn Hedocmamhbo cmiuke nooxeHH npucmpoMOKe npu3ecmu do u02o naiHH ma nowkodkeHH. Taokx MOxJIuee bumikahn piDuHu i hAcLiIOK ubo2O nowkodkeHH ndno2o02o nokpumma.
Ppucpii i3 hacaKOIO dIy nioou nompi6Ho ecmaHOeOaMu Ha mepdiu noepxHi, a pykoamky i3 3axucmOM iD KO3aHHn nompi6H O eepmuKaHOM y nonoxehHI onupamu Ha cmHy.
YBAΓA
Nowkodxehn npucmpo uee3 HnpaunbHe cmaHOeHnKOpcmKocmi bdu
Onmumabha poboma kapmpudka dna 3axucmy eid hakuny 3abe3neueyembcn nuwe y pa3i hanaumybaHH npucmpoio ha kopmcikmb micceoi oodu. Y pa3i He npaaunbHO20 hanaumybaHHKopcMKocmi oodu e npucmpoiMoKe ymeopumucra HAKUN.
Hanaumyamnpucmpi neped 1- um3acmocybaHHa hokpmkicmb Micueoeoi bodu, due. anaay Hanaumyehn meepdocmi bodu.
Bka3i8ka
Iid yac nepwoi obo6ku npoio nicra 3HimaHHa ma
noemopnozo bcmaHOeHNHa KapmuDka dna 3axucmy
eid hakuny buxid napu moke bymu cna6kum u
hepiHOMipHM ma moKymb bucmyamu kpanni bodu.
Ppucmii nompe6ye deKaU cac dna 3anoHeHHa
kapmuDka bodoIO. Kinbkicmb napu, 0o nodaembcra,
nocmiHo 36inbwyEmcbcr, i npubn3Ho uepe3
30 cekyhd noda a doce2ae mAKcummy.
Bka3ieka
Yea2a! Ppu uby ecmahoeNo cmyniH napu 3 (nnumka/kamihb), ockinbku 6 ihuomy bunaeky qac cnpaoboyeahnha 36ilbuyembcra.
- NocTabuTn npucpii Ha miCy nuBepxHIO. ManHOK I
- BcTaBnTn WTeNceBHy BUnIky B po3eTkY. ManIOHOK K
- HaTnCHyTN BmMnKaU «YBIMK.». ManIOHOK L
- CbiTIOIOHn iHnKaTop po6Ooro cTHy nOHe 6IIMATu HePBOHM.
MaJIHOK M
- Pπu6πu3Ho uepe3 30 cekyHd cbiTIOiOHN iHdkaTOp po6oYoro cTaHy nOHe noCTiHNO CBIITUC 3eJIeHIM.
ManIOHOK N
Pnpctpi roTOBNIo BVKOpNCtAHN.
PerynIOBaHHKilbKoCTi nap
KinbkiCTb nap nperynoeTbcra BIDNOBIOHO OOnuBaHOI NOBepxhi.
- Hatnckatn KhoNk 3i cTpiKamn Ha pykoarU,doKn He 6ynde Bn6paHo nOtpi6Hn pBeHb noTyXHOcti napu.
MaJIPOHOK P
Ha Bn6ip doctynho 3 pi3Hnx pIBH noTyXhOCTi nap:
He 3aunu amu u He 3epiam npucmpi Ha yumnueux noepxHx.
- 3нгт raчikу дя пдоги за Heo6xIDHocTi po3rnaKBya KJIMIB (nVB. rnaBv «HaCaJa dЯпдоги ta po3rnaKBya KJIMIB)).
MaJIHOK D
MaJIHOHOK E
- Bndaunntu Bonory 3 hacaikn dny niinor / npnctropo.
- Hamotatn Ka6eB JxNBHeHHa HxHHi i BepxHi raKn dIg Ka6eIIO. ManHOK V
- 36epiratni npicpti y BepTKaJIbHOMy noIOxehHi Ha TBepdi nobepxhi a6o 6iIra CTIN. ManIOHOK I
- 36epiratn npncptpi y cyxomy micui, 3axueneHomy BID MOp03y.
BaxnBi Bka3iBkn 0do BnKOpncTaHHa
OuHennnnoBepxhi nIIOI
Mn pekomehnye mo nepei BnKOpncTahHm npncptpoo Oocnttn niDnory BiHKOM a6o nnococom. Ce Do3BOJNTb BnDaIHTn 3 Hei 6pyd i BInbHi qacTkne peoBnH uoOuNueHHn napoio.
OuHHeHnOBepxohb i3 JaKoOpap6oBm a6o IHsIM NOKpTTaM
YBATA
Noukoδxeni noeepxhi
Iapa moxe po3uHmU bick, Me6neey nonimypy, cunmemuHi nokpumma ma fap6u, a makox HaKaNeiKu Ha Kpomkax.
He Hanpaenmu npay Ha 3akneehi Kpomku, ocknbku ce MoKe npu3eecmu do nowkodkeHHaKneOk.
He bukopucmooyamu npucpii dno ouuueHHa Hennakobahux depee'hux a6o napkemhux nio2.
He eukopucmoeyam npucpii dny ouuueHH naepxohb i3 nakoapabosum abo cunmemuHUM nokpummam, HanpuKnaed Me6nie dny Kxyohb i eimaneh, daepeu abo napkemy.
3actocybaHHOchaueHH
HacaKa dnniJnIor
HacaKaIJI niJnOri npu3HaueHa Ia OUYeHHa NiIOROBnx NOKpTTiB, 0o MInOTbcra (HanpiKnaI, KAM'HOI niJnOri, kaxLiIB i niJnOrn 3 PBX, a TAKOX TaKNX NOKpTnx NaKOM DepeB'Anx NiJnOr, Jk NapKeT i NaMiHaT).
YBAGA
NowkodKeHHaHacniodK enJusy napu
Bucoka memnepamypama di npu moxymb npuzodumdo nowkodkeh.
Ipeed bukopucmaHn mcnnepeipumu
mepmocmiKicmb i cmiKicmb do napu Ha
manonomimhi diJnui, 3acmocyaeau MiImaBHy
kInbKiCmb napu.
Ipeod obo6ko npoio naKoBaHux deee'raHux nidno2 nompi6ho 3adamu pieeHb nomyXnocmi napu dna depeea ma He 3ampumyeam npucmpiu dyke do82o Ha odHomy Micui..
Bka3ieka
3aunuku MuuH2o 3ac06y a6o emyIbciHi 3ac06u dna dozny Ha noBepxHi, zo ouuzaembcra, nid vac ouuueHH npoIO moXymb npu38odmu do ymbopeHH po38odib, kki, bim, 3hukaomb nicna baamopao3o0o eukopucmaHH.
OSEPEXHO
Oniku Hie
Hacadka dna niozo / aanipka dna niozo u nd ac obo6ku npoIO Haepieaembc.
Iio yac 3HimaHHaHupku dna niozu moke kanamu zapya boda.
BukopucmoByamu u 3himamu hacaKy dny iidnoou / 2aHhipky dny iidnoou nuue y npudamhomy 6ymmi.
- 3akpinntrahipky nla nla ngnHa hacadci dna nidnon.
a Poklaactn raHupky dny niDnOrn Ha niDnory 3acti6kamn Bropy.
b NocTaBn HacaKy Ia nIaIor Ha raHicpky, 3nerka npntncakouu.
MaJIHOHOK D
Tanipka nna ninncama 3aikcyetbca Ha hacaui 3abnkn 3actiokam.
FaHupka dna nIiJnOrn 3 Mikpophi6pn
TaNchipka dnniNnOri 3Mikpophi6pn npni3HaueHa dno OunneHHKa'maHnx, kaxenbHnx i PBX-niDnor, a TAKOX TaKnx NOKpHTNX JAKOM DepeB'HNx NiDnor, k NapKeT i NaMiHaT. Kpim Toro, rAnchipka dnniNnOri 3Mikpophi6pn npndaTHa dnn OCBIXeHHa KNJIMIB (pa30m i3 po3rJaXyBaYem KNJIMIB).
A6pa3nBHa raHcyipKa Iny niJIorN
A6pa3nBHa raHupka dIy nIiNOr npn3HaueHa dIy OuHSeHH HeHyTINBnx IiNOrOBNX NOKpNTtIB, TAKNX KaxJI a6o KaMihb.
YBAGA
NowkodkeHHn iDnoo8ux nokpummie
A6pa3u8Ha 2aHupka dna niozu moke nowkodxyeam u ymnu bi niozoei nokpumma i hwi noepxhi.
He eukopucmoeyamu abpa3u8ny aunipky dna niozo u nouuueHHa depee'raHux noepxohb.
He eukopucmoeyamu a6pa3ue8ny 2aHvipky pa3om i3 po3jaadxyeayem KUumie.
3HimAHHa raHypikn dna nDnorn
- NocTabuHry Ha 3nOk raHcipKn IJI niJnOrn i nIHNr HacaKdy IJI niJNOrn. ManHOK D
Bka3ieka
Cnoamky 3acmi6ka-Junyka 2aHupku dny iidnozu ue dyke miha i 2aHupky baxko 3nmu 3 hacaKu. Picna 6aamopaofoe oukopucmaHHma npaHHra aHupku BOHa neko 3Himaembc 3 hacaKu i dozaeonmumabHo0 3ycuunckpinnHeHH.
3HATTA HacaKn DnI niDnOr 36a3OBor npncToPO
YBACA
Mamepiabha wkoda eHacniidok HecmiKocmi npucmpo
3Hämma hacadku ŋЯ nIDnozu po6um bnoJoxeHH npucmpoio Hecmukm, yHacniDOK yOzo biH moKe enactmu i nowkodumca cam a60 nowkodmu nokpummna ndnozu.
Picna MoHmaxy hacaeku dna niozu ii 6inbwe He cnid 3himamu 3 6a3o8020 npucmpoio.
3Himamu HacaKy dny iidnozu moxHa Jnue 8 momy pa3i, kkuo npucpiu hadcunaembcra Ha cepsiche o6cny2oeyeaHHa.
- HatnchTyN BmNKaU «BmK.». MaJIHOHOK S
- BntaHryTuIeTceJIbHy BuNKy 3 po3eTKn. ManIOHOK T
- Cnpoxhnt6ak dny BODn. MaHIOHOK U
- YtpmByBaTn npicptpi 3a pykoRTy.
- Hatachnyk HONky po36IokyBaHHa HacaKn dna nida norni.
- HacaKaIa NiIaNOrn BiE'EdHaETbcra BiI npIcTpoIO, nicra yoro ii MoXHa 6yde 3HrTu. ManIOHOK W
- 36epiraTn npncptpiy HaidiHOMy Micci B NOIOKeHHI nekaun.
PozrnaJkyBaay KInnMIB
3a donomoro1o po3rnaJkyBaHa KINIMIB MOXHa NOKpaUyBaTn 3OBHIuHII BURnI D KNIMIB.
YBAGA
NoikokxeHHKunuma ma po3naJxyaKaunumie
3a6pydHnHpo32naadKy8aKa KUnMie, a makoEucoka memnepamypa ma HacuyeHicmb BoNo2oMOxymb npu3Becmu do NowkoJehn KaIuma.
Po3aJadKy8au Kunumie Bukopucmoeyamu nuwe 3 aHupkoIO dna iDno2u 3 Mikpofo6pu Ha Hacadui dna niDno2u.
Y pa3i eukopucmaHnHa po3aNaadKyea KaNumie ebupamu BukNIOuHO eIDnoBIDHu pieeHb nomyXHocmi napu (duus. ducnneu dna iDukaui Ha pykOaMci, cumBoi nidno2o0o nokpumma «Kunm» — cepedHi pibHb nomyXHocmi napu).
Kpim mozo, neped KopucmyaHnram cnid nepeeipummu mepmocmiikcmb kunuma i ennue Ha hbozo bonozu Ha manonomimHIi dinHui 3 haMeHHo KInbkiCmIO napu. Dompumyamucb iHcmpykui i3 uueHHa Habeehux eupo6hukom kunuma.
Ipekeohamuc, zo neped eukopumannm po3aadkyea kunumie kunum 6yno ouuueho 3a donomoo1o nucocca u 6yno eudaneho nJrmu.
Ipepe uekopucmaHHm i nicnnepepe8 ecknyamaui cnid wnnxom bunapoeyeaehn euadanmu y 3nue (6e3 aahipku dna ndnou / i3 doamkoobum obahdannm) moKnuei ckynuenh eoou (KoHdehcam) y npucmpoi.
He hanaenmu npy npomzom mpueanzo yacy ha othe micue (he dooeue 5 cekyho), uo6 yhukhymu cuIbHO2O 380JoxKeHHa u pu3uKy nowkodKeHHa nd iEIO bucokoimmemepamypu.
He eukopucmoeyamu po32naedkyeaq kunumie ha kunmax i3 bucokum bopcom.
KpinJIeHnpo3rnaJxvBaayKaNIMiBHa Hacaui Ia nIipnOu
- 3akpinntrahipy dny niIIOHa hacaui dny nIINOR, nIB. rnaBy Hacadka dny niDnozu. ManIOHOK D
- JIeKIM HaTnCKaHHaM BBecTu i 3aΦiKCyBaTu HacaIky dny niIIOr n Po3rJaXyBauch KInmib. ManIOHok E
- Po3nooyatn OuyiueHHKJIMMa.
3HIMAHHPO3rJaXyBaayKaKINMIB3HaCAdKnDnpiNOrn
△OSEPEXHO
Oniku Hie
Iio qac o6p6ku npoio po32naadxyea KUImie MoKe HaepiBaumc.
He bukopucmooyamu u He 3himamu po3anadkyauchuumie 6ocohix abo y biodkpumux cahdanx.
Bukopucmo8yamu u 3himamu po3anaJxyea KUImie luwe y npudamHomy 8symmi.
- Hockom B3yTTHaTnCHyTN BnH3 Ha φikcaTop po3rJaXyBaYa KJNIMIB.
2.Пингинадкдяпдогn. ManIOHOK E
DornaTatexHicHe 06cnyroByBaHHa
CnopoxHeHHa6ky DnA BOn
YBAGA
NowkodkeHH npucmppo uepe3acmi bodu
Ku npucpiu He ukopucmoeybca noha 2 Micuie, eoda y bau Moke 3incyeamuc.
Ipepepeamuypobomi cnopoxhumu bak dna eodu.
- Hatnchutyu BmMkau «BmK.》,PnCTpiu BmKHeHO.
- BntraHryTuIteNceJbHy BuNKy 3 po3eTKn.
- 3HATN KpUkky 6aka.
4.Cnpoxn6ak DnB0n.
Pn Cbomy KaptpnK MoKe 3aJnWatncB 6aKy
DnB0n.
MaJIOHOKU
3amHa KapTpndka JIJI 3axncty BiJ HauNny
YBAGA
NowokxHn npucmpo i ckopoeyn cmpky cnxy6u
Hedompumannihinmepeaniezamiu(iHoukaia KOHmpoIbHOJ lamno4ku)kapmuOka dny3axucmy eid HAKUNyMOKe npu3BecMu do nowkodxeHHn npucmpoMa ckopoyehnOcmpoky cnx6bu npucmpoio.
Dompumyeamucb impeeanie 3amiHu (iHdukaia KOHmpoIbHOI namnoquKU).
Bka3ieka
Impeanu 3amiu 3anexiamb iD jokpmkocmi Micueoio oodu. B peiaohax i3 kopcmikcmo bodu (Hapuknad, III/IV) Binbu mpueanu impean 3amiu, Hix e paiohax 3 M'koO eodoo (Hapuknad, I/II).
IHHkaia KOHTpObHOJ lamnB pa3i 3aBepueHHa cacy po60ty
Ipo Heo6xHicTh 3amHn KapTpndka Dn8 3axncty BiD HAKUNy CnHaJI3ye KOHTpObnha JAmna KaTprndka TAKUM YNHOM:
3a 2 roDHHo 3akHcHHeH yacy po60Tu KOHTPObHa NaMna noUHae 6nMaTn.
MaJIHOHOK R
3a 1 roDnHy do 3akHcHHeH yacy po60tn KOHTpoJIbHa lamna 6IImae Yactiwe.
Kolnyacpo6toNkaptpnDkaDna3axnctyBid HAKNY 3aKiHyeHO,KoHTpOlbHa lamna nocTioHO CBiITbCRAePBOHm,AKICBtIOJIOHa CTrpuKa Ha npncTpoi.CmbOI NOKpTTIB iINrHnHa pykoarHe cBITbCra.HAcOC BmNAKaETBCa ABTomatnuHO (HemaepnoaInapu),063anobirn NOWKoDKeHHIO npncTPOIO.
YcTaHOBJIeHHaKapTpIaKa IaIra3axNCTy BiD HAKIny
YBAGA
NowkodkeHH npucmpoH
Y pasi noemophozo ecmahoeennehry iidnpaueoehazo
kapmuoka dna 3axucmy iid hakuny moke euhukhymu
nowkodxehnra pucmppo.
He donyckamu nepennymyeaHHa Kapmpudxie.
Bka3ieka uodo ecmaHOeJehn
Iid yac nepuoi obo6ku npoio nicna 3Himnna ma noemopno2o ecmahoeenHa Kapmpduka dna 3axumy biHakuny buxid napu moke bymu cna6kum qu HepieHomipHum ma moxymb bucmyanmu kpanni bodu.
Ppucmpiu nompe6yec deaKu yac dna 3ano8HenHn Kaempudka bodo. Kinbkicmb napu, uo nodaembcra, nocmiuho 3bInbuyembc, i npubnu3Ho uepe3
30 cekyhd noda a doceaae MaKcumMy.
Bka3ieka
3Hymma 6aka dna eodu noneueyec 3Hymma ma Ecmahoeennehna Kapmpudka dna 3axucmy biD hakuny.
- HaTnchTyN BmMkau «BmK.». Pnucptpi BmMKHeHO.
- 3HATN KpUkky 6aka.
- 3HЯТи KapTpIaJxДЯ 3axIcTy BiД HAcNpy.
-
BcTaBnTn HOBn KApTpNIXJ3aXnCTy BiD HAKIny Ta HATNCHTn Ha HbOrO DJIa MiUHOi IKcauii.
-
HATNUCHyTN BUMMkau «YbIMK.». Pnucpii yBIMKHeHO.
- Hatncchytn KhoNky RESET Ta ytpmmyBaTu 4 cekyHn. KoHTpObnHa lamna «3amHa KapTpndJa dna 3axncty BiD hakiny» rache i po3noHnHaetbcra HOBn BiDnik po6oYoro Yacy KapTpndJa.
MaJIHOHOKQ
- DAtn npucpoHarpitncra.
8.ДЯВидалЕннЯ NOBITРЯ 3 KapTpRuДжа HaTnCHyTN BaxiNb NODaYI napTa yTPmUyBaTu NOrO B HATnCHyTomу NOLOKeHHI 6JIN3bKO 30 cekyHd.
HaJauTyBaHHaTBePdoCTi BoHn
YBATA
NookdKeHH npucmpoU yepe3 ymeopeHHnakuny
EeukopucmaHnKampuOka dna 3axucmy eid HakuNy ma y paazi HenpaenbHOzo HanaumyeaHn Jocpmkocmi bodu e npucmpoi moxe ymeopumucn HakuI.
3aekdu npauoeamu 3 Kapmpudxem dna 3axucmy eid HakuNy.
Hanaumyamu npucmpiu Ha kopcmkicmb Micueeo i bodu.
Ipeed eukopucmaHnnpcmpo 8 pezioHi 3 iHoo JokcKicMIO bOu (HaPukNad, nicna nepei3dy) Hanaumyeamu uOzo Ha zuo JocpmKicMb oOu.
Bka3ieka
Ompumamu doeiokny npo meepicmb eodonpoeioho i oodu moxha y eodozocnoapcbkomy biodomcmei a6o E MicbkuX KOMyHaJIbHuX cnKy6ax.
TBePicTB BoHn HanaTuBOyEbC3a Donomorok KhoNk RESET. HanaTuBaHHra TBePioCTi BoHn 36epiraEcBcA DO TORO Yacy, KOJn 6yDyTB noTpbiHi HOBI HanaTuBaHHra (HapnKnla, nicna nepeii3dy). Pnpctpi yCTaHOJIIOEcBcBAPO6HnKOM Ha HauBnIcM CTyniHb TBePioCTi BoHn (CTynIHb IV). Pnpctpi BiO6paKaE HanaTuBOAhY TBePicTB BoHn MInOTINBIMn IMnyIbcamn.
CTynehi TBepdocti BOu Ta MroTJIbI imnybcn
- RaHuyipKn DnI niDnOr npaTu npaBHi MaunHn 3a Tempepatyn He Bnue 60°C.
3HATyPKoRTK
YBACA
NowkodkeHH npucmpoH
Yacme 3HimHaMoKe npu38oDumu do NowkoJxHHa KOMNoHeHmie pyKoRmku.
Iicna 36upaHnHe 3Himamu pyKoamky 6a3o802 npucmpoio.
3Himamu pykoamy 3 6a3o02o npucmpo do3eonmcbc nwe 8 momy pazi, kkuo npucmpiu hadcunaemcbc na cepeiche obcnyoeyeaHH.
Дономora B pa3i HecnpaBHOcTei
HecnpabHocti yacto Maotb npocTy npuHy,ky MOxHa ycHyTu cAmocTlHO 3a DOnOMoroIO IHCTpyKci, HabeDeHnx HnXHe. 3a HaABHOcti cyMHBiB a60 B pa3i HeHa3BaHnx HecnpabHocTe cnId 3BePtaTncsdo ABTOP3ObaHOcpeBicHOcnyk6n.
△NONEPEDXEHN
He6e3neka ypaxeHH eJekmpuHUM cmpymom i ompumahn onikie
Ioku npucmpiu nio'dhaHui do enekmpuHoi mepexi a6o ue He oxonoHy, npucmynamu do ycunen Hecnpaehocme Hebe3neHNO.
BuHmu wmeIcEnbHy 8unKy.
Amu npucmpoio oxonohymu.
Hema/3amano napn He3BaxaOnuHa DocTaTHIO kInbKiCTb BOnu B 6aui DnBOn
BiCyTHi a6o HnnpaBnIbHO BCTaHOBJIeHNI KApTpNIX DJIra 3axNCtY BiD HAKINy.
BCTaBnTn KApTpNdk DnA 3axncty BiD Hakiny i (a60) nepeBipuTn, YH NaiHNo 3aΦikCoBaHn KApTpNdk y 6aky, i 3a Heo6xidHocTi ue pa3 aΦikCyBatn Ioro.
KaptpnJx Dn3axNCTy BiHnKy 6ynr 3HrTO nIac 3aJIbAHnBBoDn, i (a6o) 6yno BCTabNeHO HOBn KAPtpnJx Dn3axNCTy BiHnKy.
He BnMaTn KapTpIaXJ nn 3axNCTy BiHakiny 3 6aka Ira BoDnPiacno Hano HANOBHeHH.
- Hatncnytn n doBro ytpmByBaTn Baxkijnb noaqui napu.
Yepe3 30 cekyHd 6yde docraHyta makcmaJbHa notyXhictb napu.
Iapa BiCyTHa, He3BaKaIOH Ha DoCTaTHO KInbKiCTb BOIN B 6aKy, a TAKoK KOHTpONbHa NaMa i CBITIoIOHy hINkAToP PO6Oro CTaHy Ha npICrpoI NoCTiHO CBiTbCRA YepBOHm, a CMB0JN NOKPTTIB NiDnOr H a pyKoRtci He CBITATCB.
Yac po6oTn kaTpndja dna 3axncty BiD Hakiny cnJIiBaC
BCTaBtH NOBn KApTpNdk JIg 3axncTy BiD HAKUNy, INB. IJIaby 3amHa KapmpuOka dIg 3axucmy biD HAKUNy.
- RaKuo HOBn KApTpDnJ nn 3axnCTy BiD HAKnny BKe BCTaBHeO, aIe NOMInKa He 3HnKaC, IMOBipHO, nicra 3amHn KapTpDka He 6yNo HATnCHyTO KHONky RESET. Picna BCTaHOBnEHn KaTpDka dna 3axnCTy BiD HAKnny HATnCHytn i npToTrom 4 cekHyd ytpmByatn KHONky RESET, niv. rnaBy 3amHa Kapmpudka dnn 3axucmy biD HAKuny.
TexhihixapakTepeNCTnKIN
EneKtpnue niknoueHna
| Hашира | V |
| Фаза ~ 1 | |
| Частota Hz 50-60 | |
| Стуниь засcentу IPX4 | |
| Клас засcentу I |
Po6oqi xapaKTepeNCTnKn npncTpoI
- Wamameh 30 cekyHdTan KeiH KyaTbH KapbIK DIOITbl INHINKaTOPbI TypaKTBJ Xacbl TycneH KaHaDbI.
Cyper N
KypbblbnaiDanaHyra daaBH.
By menweepin peTey
BydmbH MmweepiH peTey Ta3aJHaTaBH 6eTke 6aJNaHbICTbl.
Kaketti 6y deHrei TaHdAnFaHwa TyTkada KepcTeiInReh 6aBt KepcTeKinepi 6ap TyMeWikTi Ke pet 6acblb3.
Cyper P
3 typi 6y deHre i6ap:
| Taktai/Tac-JxorapbIbydehreIi |
| Kilalem-opTa bydehreIi |
| AfaaI-eHtemeHribydehreIi |
Hycay
KypbIINHbIKOCKaHHaH KeiH, apdaubim eH KOrapbl6y deHeeui (nnumanap / mac) maHaanaDbI.
By mJIsepiH peTereHHHe H KeiH, 6yDbIH TTKacBH 6acblb3.
Cyper O
Cybl TOnTbipHb13
Hycay
Cy deHaeuiH kapmbiaa awbIK meJodip cy 6aBHaH Kepyze bonaabI.
Cy Kyurah Ke3de KaKmbi KuHaKaMay nampoHbI KypbInrBda 60naDbI.
- BaKaKaNaBbH aWbHbI3 XeHe cy 6aRbH anMaJ MaKc. 0,5 nHTpNi cyDbI TONTbIPbHbI3.
Cyper G
Hemece
Cyfa 6aarbH, 6ak KaKaNaFbH aWbHb3 XeHe MaKc.0,5 J cydbI TOITbIPbIHb3, «Cy ToNTbipy» 6enimH KapaHbI3.
Cyper H
XymbictbI TOKTaTy
HA3AP AYdAPbIHbI
KoHdeHcammbiH / bIrraIdbiH ece6iHeH MyNIkmiH 3aKbIMdaHybl
¥3aK kymbic y3iNici Ke3iHde Mynikmi 3aKbIMdaHybIH 6oNdbipmay ywiH, «KypblfbiHbI cakmay» 6eNilim H kappaHbI3.
3HeprnraHbI yHemdey yuH, 20 MHyTTaH acatbH y3iNc Ke3iHd KpybInfblHbI eWipin KOIObl YcbHaMbI3.
- AkkbipatKbiUHTbi Θuipy KaIINbIHa KOnbIHbI3. Cypet S
KypbInfbHbI eWipy
- AxbipatkbiuTbI ΘiPy KaanbHa KOnBih3.
Cyper S
By rehepatopbewipinreH.
- Xenjinik wtekepdi 3neKtp po3eTKacbHaH 1bifapbin aIbIHbI3.
Cyper T
HA3AP AYdAPbIHbI
KypbIrfHbIH cyobIH mypbIN KaIybiHaH 3aKbIMdaNybl
KypbIrf2 auidah apmbik kymbic icmemec, 6akmafb cy hawap bonyi MymKiH.
Y3aBpaK y3iNc Ka6bIldamac 6ypbH cy 6aaBH 6ocambHb3.
- Cy 6aɪn 6ɔcaTy.
Cyper U
KypblfblHbI caTayra 6ynay
HA3AP AYdAPbIHbl
KoHdeHcammbiH/biFraJIObIH ece6iHeh MyJikmiH 3aKbIMdaHybl
Tasaan 6onraHHaH KeuiH, eedeH MamacbiHdaftbI Hemece eedeH canimamaBcHdaftbI/kypbunfbldaftbI bUNFaI eedeH Xabihh3akbIMdaybIMyMKIH.
Taaan 6onraHHaH KeuiH, eedeMaacbIH/Kinem Xa6dbfbH anbH macmaHb3 XeHe eede CanmamacbH/ KypblrBhl KyprAmblb3.
KypbIINbHbI ce3immaI Ka6ammapra KoMaHbI3 Hemece caKaMaMaHbI3.
- EeH MaTacbIH HeMeCe eHeRe apHaJIFaH MaTaHbI XaHE KInem CbIPfBIMacbIH anbIN TAcTaHbI, «EeH canTAMacbI XaHe KInem CbIPfBIMacbI» 6enimH kapaHbI3.
CypT D
Cyper E
-
EeH Ka6aTbHaH/KypbInfBldaH bInFaIaIbIaIbIbI3.
-
KyaT Ka6eniH TeMeHri XaHe XKorapfbI Ka6enb inReKTepeHe opaHbI3.
Cyper V
- KypblfblHb KaTbI Kepe He Mece Ka6bIpFara TIK Kynde caKtahbl3.
Cyper I
- KypbIrfhbl KypraKxHe a3dAn KopfAraH opBHa caKTahbl3.
KoJdaHyra apHaIraH MaHbI3dbl eCKeptTynep
EdeH 6etIH Ta3apTy
KypbIbnHbI KOJIaHy aIbIHda eEHHiH 6eIH WaHCopfblwnenH copyra Hemece cbInbipyra KeHec
6epinei. Ocbinaa bInfaIbTa3apTyanH 6ypbH een lac nen 6TeH 3attapdaH Ta3apTbJaDbI.
KekkaattbI Hemece JnKaTaNFaH 6eTTepdi Ta3apTy
HA3AP AYdAPbIHbI
3aKbIMdaJraH 6emmep
By baaybi3dbi, xuha3 na2bH, nlaemuk ka6bHapobi Hemece wemmepiHH borybMeH kancbipmacbH epimin Kjibepe anadbl.
Eydji Kenimdeenaeh wemmepine 6aFBImmaHaB3, KaNCbIPMaCbI KamnapnaHybIMyMKIH.
Kypandbi KopraMaHa araaw Hemece napkem eedehepei ma3apmyra KondaH6aHbI3.
KypbIbnHbI 6oanFah Hemece nnacmukneH Jaa6bnraH 6emmpdi, acyu Hemece yu kuaha3bH, ecikmepdi Hemece napkemmi mazanayra kondaHaB13.
KoHdbipMaJapdbi KoJdaHy
EeH Ta3anayf a pHaIFaH KOHdbipMa
EeH canTamacbl kyybIaTbH eEe TceHiWTePiH Ta3aIayfa JapaIbI, MbIcAJIbI, Tac eEeHdep, nIITkAnap KHe IIBX eEeHepi napKeT KHe IaMnHaT CnAKTbI aRaIeEeHdepI jKanCbIpaIbI.
HA3AP AYdAPbIHbI
By əcepineH 6oIambH 3aKbImdap
Kb3y MeH 6y acepi 3aKbIMdapra anbIn KeNyi MyMKiH. NaudanaHy andbHda 6ydbH Kb3yra meImdiniiz MeH 6y acepin 6ninH6eumin Jepde 6yobn a3 MeInepeMeH meKcepiH3.
AnbH ana 6epinaen arauu dehueiMeH kancbipbnraH arauw eedepepi 6ymeH kaniMaHb3 KHe bip jepde y3ak yaKbimKaandbIpMaHb3.
Hycay
TazapmbiNambiH 6emmei ma3apmkbiu KypandapdbIH Hemece Kymim Kepcemyae apHaNFAH MyIbcuIapdbIH KaIdbIbI bYMeH ma3anaFah Ke3de Konakmap naDa 6onyibaHa eKenyi MymkiH, ON Kauma eHde2eH Ke3de KOublaaBbl.
△ABAHJIAHbI3
AaKmbiKyoi
EdeH canmamacbl/eedeH mamacbl 6yny Ke3iHDe Kbl3a0bl.
Edeh MamepuaIbIH aIbIN macmaHaDa, bICMbIK cy mAbH Kemyi MyMKIH.
Edeh canmamacbH/edeH mamacbH muicmi aK KUIMMeHa H KOndaHbHb3 XHe anbIn macmaHbI3.
- EdeHre apHaIraH KOHdbIpMaFa MaJIbIKtI b6eKITiH3.
a EdeHre apHaIraH MaJIbIKTbeEdeH Xa6bIcAtbIH KOJaKTapbIH Kofapbl KapaTbIN KOJIbIHbI3.
b EdeHre apHaJIFaH KOHdbIpMaHbI MaIIbIKKa KOIBIN, KEHJN KbICBHI3.
Cyper D
EeHre apHaIraH MaJIbIK eJeHre apHaIraH KOHdbIpMaRa 3diirHe6keiTiJIeJI.
EdeHre apHaHaH MmKpoTaIbIKtbi MaJbIK
MnKpOΦn6pDi eHem MaTacbl TAc eEHeDep, nNtKanap KAne PBX eHEnDePdi Ta3anayra, coHaN-ak napket KAne JAMnHaT CnKTBi TBfB3DaIaFah aFaW eEHNepre apHaIFaH. CoHbIMeH KaTAP, MnKpOΦn6pDi eHRe apHaIFaH MaTa KInEM cbIPrybIMeH KInEmepDi ceprity yuHIN KOaIbI.
A6pa3nBti eH MaTacbl
A6pa3nBti eHeMaTacbTaKaTaNap HemeC TaCnKtbl ce36eHIn Ka6aTAPdb Ta3anayra XapaNbl.
HA3AP AYdAPbIHbl
EdehKa6bHdapBHB3aKbIMdaHybl
A6pa3uemi eedeH mamacbI H3ik eedeH kabIHapbIH hemec 6emmpiH 3aKbIMdaybl MyMkiH.
Arau 6emmepih ma3anay yuih abpauemi edH mamacbiH KOlaHaHaB13.
A6pa3uemi mamaHbI KInem Ka6dbfbImeH bipze naaDaHa6aHb13.
EdeHre apHaIraH MaIbIKTbI aJIbIHbI3
- AaKa apHaIraH cyNeyiWke eDeHre apHaIraH MaINbIKTb KoIBIn, eDeHre apHaIraH KOHdbIpMaHbI KOrapbKTepePi3.
Cyper D
Hycay
EH bacihda eedehe aphanraH wybepekmH bekimne macnacbl ani kemkinikmi mypde kaKcbI ycmanadbl XHe eed H KOHbIPmacbiHaH aepaXkbipambladbl. Kpn pem kondaHraH xe He xyraH coH, wSybepe edH KOHbIPmacbiHaH KaKcbI weuineDi, OHmaJIb6ekimy KywIne Kon keMkiinaeH.
Eden cantamacbH Heri3ri KypblrfaH Wblfapblb13
HA3AP AYdAPbIHbl
KypbIrfbHbIMypaKaCbI3ObfBHa 6aunhaicmbi Mynikke KeinmpipinaeH 3ana
Edeh canmamacbH anbH macmarHa, Kypblrbl mypaKcb3 60bn H Kanadbl, Ka6bcBn KaNYbl MYMKIH XHe Kypblrbl MeH eedeHdi 3aKbIMdaybl MYMKH.
OphamKaHHaH KeuiH eDeH canImaMaCbIH Hei3zI KypblfbldaH wbIFapMaHbI3.
KypbIINfbiHbIKbI3Mem Kepcemy yuiiXi6epzeh Ke3de raha eedeH canmaMacbiH aJIbHI3.
-
- ΘιργΚΟκχιλυH 6αςχινιδε3 Cyper S
-
Keninik wtekepi anektp po3etkacbHaH wblrapbn anblhbl3.
Cyper T
- Cy 6aBbH 6ocatbHbI3.
Cyper U
-
KypblfnbHbI TyTkara 6ekitih3.
-
Eenne cantamacbHdafb6ocaty TuMecin 6abHb3.
-
EeH canTamaCbI Kypblfblan HweiJedi XHe anbHaBbl.
Cyper W
- KypblfblHbXkATkaH KyiHde Kayinci3 Xepde caKTaHbI3.
Kinem Tecemenepihe apHaJFaH KOHdbipMa
Kinemre aphaIraH KOHdbIpMa apkblbI KInemdi KaHaanayra 6oIaBl.
HA3AP AYdAPbIHbI
Kinemae apHaJIraH KOHObIpMa MeH KINEMdezi 3aKbIMdap
Kinemze aphanraf KOnHbIpMaadarbl NaCMAHynap, coHaau-ak Jxorapbl meMnepamypa MeH dbIMkbInra KaHbIy KInEMHH 3aKbIMdaHybHa eKeNyI MymKiH. Kinem cbprmbacbl mek edeH canmamacbHdarbl MUKpoubp edeH mamcBImeH naDanaHbHbI3. Kinem Xa6dbfbH KOJaHaR Ke3de, muicmi by deHeeuH raha ma3anah3 (mymkara aphanrah ducnneudi, edeHae aphanraH KInem KInemOpmaa by deHeeuH kapaH3).
Orah koca naudanaH6ac 6ypbH, kinemHH Kepih6eumin Hkepihe 6ydbH a3 menwepeMeH xorapbl Memnpamypara XaHe 6ydbH acepihe mypaKmbnBfBH meKcepiHi3.
Kinem eHopiyuicihin maapmy xehiHdezi HcyaynapbIH opbiHdaHbI3.
Kinemze aphanfah KOHdbipMaHBI NaDanaHy anDbIHda
KINEMHH waHcnpfbuWneH ma3anaHaFbHa XeHe
bIKmuman daKapdbH KemipinaeHihe Ke3 KEmKi3iH3.
NaudanaHy andbihda kHe JxmbicmaIy3inimeh Keuih arambH myb6ara (wSybepeK KOHbipMacbi3/ KOMnoHeHmmpMeH) 6ynay apkbIbIK ypbIITbIda XuHaBn KaIybl MyMKIH cyob1 (KOHDcammbl) KOUbHbI3.
Korapb memnepamypa acepiHeh kammbl bInrandaH6aybXaHe 3aKbIMdaMAYbI ywiH,6y aRbIHbH y3ak yaKbim 6oUb6ip opbIHra 6arbmmamahbi3 (eHKe6i 5cekyd).
Kinem mazanayra aphaHaH 6uiK mykmi KineMeae aphanraH KOHdbipMaHbI KOJdaH6aHbI3.
Kijemre apHaJraH KOHdbIpMaHbI eJeHre apHaJraH KOHdbIpMara 6eKiTy
- WsybepeK KOHdbipMaHbI eHeRe apHaJIraH KOHdbipMaRa 6eKiTy, MbHa 6eJIIMdi KapaHbI3 EdeH ma3aJayra apHaJIraH KOHdbIpMa. Cypet D
-
KInemre apHaJIraH KOHdbIpMaHbI eHeHre apHaJIraH KOHdbIpMaRa cbPT etKeHWe XeHIN 6acBn KOHdbIpBbHbI3. Cypet E
-
KInemDi ta3anaydbI 6acTaHbI3.
Kinemre apHaJraH KOHdbIpMaHbI eedeHre apHaJraH KOHdbIpMaHaH any
△ABAHJAHbI3
AaKmbiH KyoI
Bymeh eHdey Ke3iHde KInemae apHaIraH KOHbIpMa Kammbi Kb3ybl MYMKIH.
By uemkacbIme HanaH aK HeMece auBik aAkkuiMde ewkaawah Kymbic icmemeh3 kHe anMaHbI3.
By zemkacbImen meK cukec kenemih aKKuimde Kymbic icmehi3 XHe anbHbI3.
- Kinemre aphanraH KOHdbipMaHbIH TiIuecin 6TeHKe TymcbIfbImeH TeMeH 6acblb3.
- EdeHre apHaIraH KOHdbIpMaHbI Kofapbl KeTepeiH3. CypE
Kytim XeHe TexHnKaIbIK KbI3MeT Kepcety
Cy 6ariH 6ocaty
HA3AP AYdAPbIHbI
KypbIrfHbIH cyobIH mypbIn KanybiHaH 3aKbIMdanybl
KypbInf2 audah acmam yaKbimka kondaHbImmaumBH
bonca, 6akmafb cydbn 6y3bnin bacmaybi MYMKIH.
KypbInfHb naudanaHydarby 3aK ynicmepdeh 6ypbH,
6akmi bocambn KOKepek.
- AxbipatkbuTb Ewipy KaNbHa KOnbHbI3. By rehepatopb eupinreH.
- Keni Ka6einih ToKtaH aXbipaTbHbI3.
- BaKaKaNaFbH anbIn TactaHbI3.
- bIbIcTbI 6OcaTbIHbI3. Kaptnixk 6yJI Ke3e cy 6arbHa KaIa 6epei. Cypet U
KaKtbl XnHaKtay naTpoHbIn aybICtbipy
HA3AP AYdAPbIHbI
KypbIrfbHb3aKbIMday XHe Kbl3Mem Kepcemy Mep3imHbKbICapmbInybl
KaMbI KuHaKmay nampoHbI aybcmbipy apanblkmapbIH caKmamay (bacapy wAmbl
uHoukaucsb) KypbIITfbIH3aKbIMdaybIXeHe KbImMeM Kepcemy Mep3iMH KbICkapmybMyMKiH.
Abyicmbipy apaJIbIKmapbIH (bacapy wambl uHdukaucracb) caKmaHbI3.
Hyckay
Ayicmbipy apanbikmapc cydbH jepziniKmi KepMekmieihe 6aunahbcmb60anaBc. CyihbH my3bl Kne aumakmapda (Mbic., III/IV) ayicmbipy apanbikmapcbyckymcaak aumakmapra (Mbic., I/II) KaparaHda Kbickapak60anaBc.
KymbictaayKaTaHaN Ke3deri HnDnKaTOp
KaKTbIXINHaKtay naTpoHbIH aybICTbpy KaKeTTiri TypaJIb KaKTbIXINHaKtay naTpoHbIHbIH bAckapy WAmbl Keneci TcicImen xa6apnaIbI:
- Мерзиминаяктунын 2 carat 6урьн бackару
- Уамы КыплылбтAN 6actaДы.
- Cyper R
XyMbC yaKbITbIHbIH aKcangbIeBbH eckepTy wamapbi eJdekaJa XbldAmbipak XblJIbIKTaIbI.
KaTah Ta3apTyra apHaIrah KapTpJxJH JxMblc yaBtB TaycbIraH 60nca, KpybIfblHbH eCKepTy 7aMbI MeH JapbIKDnOITbI INHdNkATOpdbH ayKbIMbl yHemi KbI3bl Tycke 60raJa. TyTKaDaFbEeHdiK taHbIap XaHbain. KpybIFbIHb3AkbIMdaNyBH 6oIbIpMaYiwH copfbl ABTomaTTbI TypDe oWeDi (cy 6byI xok).
KaKtbl XnHaKrTay naTpoHbIn OPhaTy
HA3AP AYdApbIHbI
KypbfnfbHb3aKbIMdayKayni
Bpybnaaahbnrah KaKmbi XuHaKa may nampohbOphamy KypblfBiHb 3aKbImdayb MyMkiH.
Pampohdaapbbyaybcmbipbn anmay ywiH,abauan JyMbIC icmeHi3.
1-de. KaKMah ma3apmyra apHaHrah Kapmpudjdi
anMacmbipin, anMacmbipraHHan KeuiH bynay, 6y
cypemi akwbn Hemece mpaKmbi eMeC bonybIMyMKIH
XHe JKeke cy mamubnapbi arbin Kemyi MymkIH.
KaMbl XuHaKmay nampoHbCyMeH
monmbipmMaBihwa, KpybIbHb a3 yaKbImKa
kbldpbin any kepek. BydbHb epinae Hmeuepi 30
cekyhdman coH en Kofarpbi MaHHe KemneuiHwe,
YHemi Kebeue bepeidi.
Hycay
Cyfa 6a2bH anbim macmay apkblbl, KaKmaH ma3apmyra aphanran KApmpudkiH anbim macman, aybcmbipyra 6oJadbl.
- AxbipatkbwTbI ΘiPy KaIInbHa KoBbHbI3. By rehepatopbI ewiipinreH.
- BaKaKaNaFbH anbH TaTaHbI3.
- KaTbIXHaKaTay NaTpoHbIH anbIbI3.
- KaHa KaKaTaH Ta3apTyFa apHaJfA H KapTpNdkiH CaJIbIHbI KHe OJ OPhbHa TYCKeHue 6acbHbI3.
- AkbipatkbiWtBi Kocy KaJIbHa KoJIbHbI3. By reHepaTopbi KocblJFaH.
- RESET Tymecin 4 cekyHd 6oynbHa 6acbin Tpyblb13.
KaKTbI JnHaKdTay natoPohbIH aybICTbipydbI bAckpy
waMbI eWeDi, natoPohDbI aybICTbipy Mep3IMiHiH
XaHa ece6i 6actanaDbI.
Cyper Q
- KypblfBbHbH, Kbl3dbpblybiHa MymkiHik 6epiH3.
- KaTbI XINHaKTay NaTPOHbIHaH ayAHb I WbIFapy yWIn, 6y TetiriH wAMAmEH WAM. 30 cekyHd 6oNbHa 6acbin TypblHbI3.
Cydbin KePMeKTirih opHaTy
HA3AP AYdAPbIHbI
KaCce6e6iHeH KypblrBihbH 3aKbIMdaNybi
KaKmbiXuHaKmaynapoHbIcabHb6araHKeHe KypblfbiDa cydbIH dypbIC emec KepeMekmiOphamblraH XaFdaUda KaKmbH XuHaKmaNybl MYMKIH. pdaubIM meK KaKmbI XuHaKmaynapoHbImeHXyMbic icmeH3.KypblfbiHbCydbIH kepaNikmi KepeMekmieHe ophambl3.KypblfbiHbCydbIH KepeMekmi 032ewe aumakma naudanaHbac 6ypbIH (MbIC., Kewkeh coH), andbIMeH KypblfbiHb CydbIH caueKC KepeMekmieHe ophamblb3.
Hycay
Cy wapyaawbblbf6ackapMacbi HeMece
Myhuunanumemmp cy Kybpbc cybHbIH
kammblbfmypanbI aknapam bepedi.
Cydbn KepMeKTiriH petTey RESET TymecinIH
KemerimEn kyy3ere acbpbnaDbI Cydbn KepMeKTiriH
petTey kana petTey (MbIC, KeWydeH KeiH) kyy3ere
acbplmaibHsa caKaTaN TpaDbI. 3ayBTTa
Kypblfbae en Kofapfbl cydbH KepMeKTiri (IV deHreI)
opHaTbnaDbI. OPhaTbNFAH cydbH KepMeKTiri
Kypblfda NmnybCTIK kBynbblbKtayMeH KepCetineDi
Cydbn KepMeKTik DeHreI MeH NmnylbctIK
KblbblkTay
Akaynap Ke3iHderi KomeK
AkaynapbHc6benTepi KENKaFdaNdaKeNeciWoNydbI naDanaHy apKbInbI e3diinHe NKOfA 6oNaTBHaJ kapanaBIM 6oNAdI. KydkTeP 6oNca Hemece ocbl Jepde KepCetinmereH akaynap 6oRan Ke3e, pyKcat etirreH cepBnctik optanbIKka xaabapnacbIHb3.
ECKEPTY
KyuiKmep Kayni XHe 3Jekmp moBHaH Jkapakam any
KypbIINfBI Kyam Ke3iHe KocBIny Ke3de Hemece CybIMaraH K3De, akaynapdbI KOIO kayinmi.
Kenilik umekepdi po3emkadaH wibfapbn anbihb13. KypblnfbHbCymbihb13.
Bakteri cydbin XeTKiNkTi MeIwepine KapaMaCTaH 6ydbin KOKTBIFb/KeTKiNkci3 Mlnepi
KaTbI JnHaKtay NaTPOHbI OPhTaBImMafaH Hemece DypbIC OPhTaBImMafaH.
KaKaTah KoprayFa apHaHaFah KapTpIaXdi opHaTaHbI3 XaHe/Hemece KaKaTH KoprayFa apHaHaFah KapTpIaX 6aKaTa 6epiK 6ekitirreHH TeKcepiH3, KaKet 6oJFaH KaFaDaJa OHb KaNaTaHaH 6acbHbI3.
KaTah Koprayra apHaHFaH KapTpNiKcYdbI ToTbIpY Ke3iHne KoBInFaH KHe / Hemece KaHa KaKTaH Koprayra apHaHFaH KapTpNKi CaBihFaH
ToNTbIpy Ke3iHdKeKaTah Kopfayra apHaIraH KapTpUdkdi YHemi cy 6aBbHa KaNDbipbIbI3.
By teririH y3ikci 6acynb etin ycTaHBi3.
Wam. 30 cekyHdTan Kein 6ydbH eH XOFapfb
ehimdiniirHe kon xetki3inei.
«KaKTah KOPfayra apHaHrFaH KapTpndxin
aybIcTbIpY》Kbl3bln ecekpTy WAmbl
XbIbIbIKTaIbI, aHTnece Kypblfbl dypbc XyMbic icTei
Kybipda natpoHdbaybcbipy Mep3iMaKaTanaDbI.
- KaHa KaKTah Kopfayfa apHaJIraH KapTpIaXdi aybICTbIPbIb3,6eImiH kappaHb3 KaKmbi XuHaKaMay nampoHbIH aybICMbipy.
Baktafb cydbih XeTkiikci 60nybHa kapaMaactah 6y xok, cohImeH kaTap KypblfHbH eceptTy waMBe H KyaTbIH KApbiKnOHTbl INHdkaTopbl YHeMI Kb3bl JKaHbIN TypaDbI, TyTkdaftbI eDeHre apHanraH KaNaK 6enrici KaH6aNbl
KaTbJxHaKtay naTPOhIN naIdaIaHy mep3iMaKaTajFaH
- KaHa KaKTaH KoprAyFa apHaJIraH KapTpIaJxDi opHaTy, 6eImiH kapaHbI3 KaKmbI KuHaKaMay nampoHbIH aybIcMbIpy.
ErepKaHa KaTah Koprayra apHaIra H KapTpIaKi
eJaekaaH KipictipIreH 6onca XeHe aKayIbIK
OpBn Anca, KaTah Koprayra apHaIraH KapTpIaH
aybcIbIpaHnH KeHH KAJIbIHKA KEITIPy
Tymeiri 6acblMaFAn 6OlybIMMkiH. KaTah
Koprayra apHaIra H KapTpIaXIn eHI3reHHeN KeHH
KAJIbIHKA KEITIPY TymeWirH 4 cekHyd 6acbln,
6enimDi KaPab3 KaKmbI KuHaKmay nampohBih
aybcMbpy.
TexHnKaJIbIK MaFJyMaTTap
IopepaHa ypeda npadu Henpaeunno Hacmpoeha mebpodcm Ha boda
Pampohzm 3a omcmpaHReaeHa KaMneH KaMbK
fynkuohupa onmumalno caMo aKO ypebme
adannmuan KBM mbpdocmma Ha eodama Ha
MaCmomo. Ppu HnpaBunHo Hacmpoeha mbpdocm
Ha eodama no ypeda moKe da ce obp3yea eapobuk.
Ppedu 1-ma ynompe6a adannmuaume ypeda KbM
mepdocmma Ha eodama Ha Mcmomo, ek. znaea.
Hacmpouka Ha mbpdocmma Ha eodama.
Yka3aHue
Ipu 1-mo u3nyckaHe Ha npa cne d c6aTne u noBmopHO nocmaeHa Ha nampoHa 3a omcmpaHbAHe Ha KOMnEe KaMbK U3nyckaHemO Ha npa Moze da e cnafo unu HepaHomepHo u Moze da u3mekam edunuHu bOHDu KaNK. YpeBm ce hyxdae om Kpamko epeme 3a cpa6omBaHe, e pamKume Ha Koemo nampoHbM 3a omcmpaHraeaHe Ha KomnEe KaMbK ce NbHNu C Boda. IV3nu3auomo KonuuecMeo npa nocmenHc ce yeenuuaea, dokamo cneD okono 30 cekyHdu ce nocmuhe MaKcumannHomo konuuecmeo npa.
yKa3aHue
Mon, umaime npedud, ye npu moea e hacmpoeHa cmeneH ha npapa 3 (nnoqu/kaMbK), mbu kamo e npomueeH cnyuau epememo 3a cpa6omeane ce ybnaea.
- NocTaBete ypeDa Bbpxy ycToHnBa OCHOBa. Urypal
- BkIIOUeTe ⅢeNcEaB KOHTaKTa. ΦIrypa K
- HattncheTe npeKbcbaVa BkI.
Hnrypa L - CBeToDIOHaTa paBoTHa INHdkauN pyIcnpa B cepBeno.
Φnrypa M
5.CneOk.30cekyHnCBeToOnHaTa pa6oTHa HNdkauuCBETBaB3eJeHO 3a NOCToRHHO. NypaN YpeBbT e B rotOBHOCT 3a ekcnloataua.
Perylnpahe KOJnueCTBOTO Ha npaTa
HacpoKaTa Ha koJnueCTBTo Ha napaTe ce onpeDenr cnopeD NOBbPxHocTtA, KOrTo e Ce nouCTBa.
- HatnckaIte 6byToHInTe c n3o6pa3eHN CTpeKN 3a nocoka Ha pBkoXbTaKaTa DoTOraba, DokaTo ce n36bepe JeenaHaTa CTenEH Ha npapa.
ΦnrgpaP
Ha pa3noJIOxKeHne ca 3 pa3JIuHn cTeNeHn Ha napa:
| ПLOЧКИ/KaMbK - Мakсималha CTepeн Ha napa |
| КИПМ - Средна CTepeн Ha napa |
| ДърВесиHA - Най-NИСKa CTepeн Ha napa |
yKa3aHue
CneE kIIOUeHa Hya peda eunha2e aKmueupaHa MaKcumAnHama cmeneH Ha napa (nloouku/Kambk).
CneHaCTpoKa Ha KOINueCTBOTo Ha napata
HaTnCHeTe NoCTa 3a napa.
Фигура O
ДоиВане Ha BODa
yKa3aHue
Hueomo ha eodama moxe da ce ha6niodaa npes nolynp03paHHue pe3epeoap 3a yucma eoda.
Ipu donueaHe Ha boda nampoHb m 3a omcmpaHahe Ha KomJen KaMbK ocmaBa uKcupaH e ypeda.
- Otbopete kanaka Ha pe3epBoapa n HanbIhTepe3epBoapa 3a BOda dIupeKTHo Ha ypeDa c MaKC.0,5 I BOda ot BOdonpoBOda.
Φnrgypa G
CbaTe pe3epBoapa 3a BOJa,OTBopTe KaNaka Ha pe3epBoapa Iro HAnbJIHeTe C MaKc.0,5I BOJa OT BOOnpOBOJa,BX.INaBa HAnBaHe Ha BOJa.
Phirypa H
PpeKbcBaHe Ha pa6oTaTa
BHIMAHNE
MamepuaHn uemu nopadu KOhdeH3/8na2a
3a da He eb3nukam MamepuanHu zemu npu npodbIkumenHO npeKbc6aeHn paobomama,ek. 2naea CbxpanHe Hn ypda.
3a da ce nectn eheprna, npenopbYbame npn nay3n B pa6oTata, no-npOdbIbnKnteHn OT 20 MNHyTu, ypeBbT da ce n3KnIOUba.
- Hatuchete npeKbcBaay 3kn.
Φnrgya S
N3KJIIOUcBaHe Ha ypeDa
- HatncheTe npeKbcBaay N3kn.
ФигураS
YpeIbTe n3KJIIOueH.
2.ИЗвадешеньсяа OT KOHTaKaTа.
Фигура T
BHIMAHNE
Ioppeu Ha ypea nopadu myxlaeane Ha boda
Ako ypeb'm He ce u3non38a no-0bI2o om 2 Meceua, eodama e pe3ep6oapa moke da myxna.
Ipedu npodbukemenu nay3u 8 pa6omama u3npa3eaume pe3ep8oapa 3a 8oda.
- Ⅲnpa3HeTe pe3epBoapa 3a Boda.
U
CbxaheHneHa ypeda
BHIMAHNE
MamepuanHu emu npadu kondeh3/6naa
Cneo nucmbaHemno HauuHa meHocm no Kbpnama 3a noD, pecn. nodoBama dio3a/ypeda moKe da nOepdu nodoBama Hacmulka.
Cnepepbomume no noucmeane ceaune Kbpama 3a nod/npucmaekama 3a kunmu u nodcyuaeume npdoema dio3a/ypeda.
He ocmabraume ypeda ebypxy uecmbumenu noooe.
- Cbane Kbpnata 3a noi, pecn. Kbpnata 3a noi npictabkata 3a KJIMN, Bx. rnaB IoOBA IIO3a npictabka 3a KINIMN.
Dnrypa D
Фигура E
- OTeTpaHHeTe TeuHOCTTa OT noIObAta IHO3a/ypeJa.
- Habnite eIeKtpuueckna Ka6eJ OKoNo DoJIHaTa n ropHaTa Kyka 3a Ka6eJa.
Φnrypa V - CbXpaHbAaTe ypeDa nocTaBeH BbB BeptnKaIHo nOIOKeHne Bbpxy yCToOnuBa OCHOBA, pecn. cTeHa. Phrypa I
- CbxpahraBaiTe ypeHa Ha cyxo n 3aunTeHo oT 3ampb3BaHe MRCTO.
BaxHH yka3aHnna 3a ynoTpe6a
NouchTaBHe Ha IIOOBN NOBbpxHOCTn
IpenopbUBAme npen n3non3BaHe Ha ypea noBt da ce n3MeTe nn Da ce noocnC npaxocmykaKa. Taka Ooie npen BnaXHOTo NOuCTBaHe NOBt Ce OCbo6oxdaBa OT MPcOTnN CBO6OHN YactnN.
Iopepu Ha ypeda u HamaJIeH cpoK Ha ekcnnoamaua
Hecna3aHaHemHa uHmepeanume 3a cMaHa (UndukaucuHa KOHmpOnHa lamna) Ha nampoHa 3a omcmpaHaeHa KOMJIeK KambK MoKe da dooeede do noepedu Ha ypeda u HamaJraBeHa eknloamauOHHua cPOK Ha ypeda. Cna3aUme uHmepeanume 3a cMaHa (UndukaucuHa KOHmpOnHa lamna).
yKa3aHue
Hmpeanme 3a cmha 3abucm om mebpdocma Ha eodama ha mcmomo. Obnacmume c mebpda oda (Hanp.II/IV) umam no-uecm unhepean 3a cmha om obnacmume c no-Meka eoda (Hanp.I/II).
HdkauHa KOHTponHaTJaamnB KpaHa BpeMeTo Ha pa6ota
Hnkaa3a Heo6xOIMata cmHa Ha natoHa 3a OTcpanhaHe Ha KOTJeH kAmbK ce noka3Ba No CneHNHaunH ype3 "KoHTponHa JAmna - NaTPOH 3a OTcpanhaHe Ha KOTJeH kAmbK":
2 Yaca npedn n3TuHaHe Ha BpeMeTo 3a pa6oTa KOHTPOJHaTaNAMNa Mura.
Furpa R
1 yac npedn n3TuHaHe Ha BpeMeTo 3a pa6oTa KOHTPOJHaTaNAMNa Mna 3HaunTeHNO No-6bP30.
AkoBpeMeTo 3a pa6Ota Ha naTPOHa 3a OTcPahraBaHe Ha KOTJIeH KaMbK e N3TEKNO, KOHTPOJIHaTApAMnA, KaKTO IN CBeTOINOHDHaTAp HeTA Ha ypeDa CBETI NOCToRHHo B YepBeHo. CmMBONITE 3a NoIOBa HAcTNkA Ha pBKOXBAtKaTa HE CBeTAT. POMnata ce n3KnIOuBA aBTOMaTNUHO (HrMa BOHa npa), 3a Da ce n36BerHe NobpeHa Ha ypeDa.
NoctabRHe Ha natpoH 3a OTcTpaHraBe Ha KOTneH KaMbK
BHIMAHHE
PoepeaHa ypea
YpebmoKe da ce noepdu npadu noemophomo nocmaeHa u3Hocehua nampoh 3a omcmpaHae Ha KOMnEH KAMbK.
Pabomeme eHumamEnHo, 3a da He oBbpkame nampohume.
Yka3aHue 3a MOHmaxx
Ipu 1-mo u3nyckahe Ha npa cne dceanhe u noemopno noocmaeHa nampoHa 3a omcmpaHaeHa KOMnEe KaBk U3nyckaHemo Ha npa Moze da e cnaO unu HepaBHomepHo u Moke da u3meKam edunuHu EoDn KaNK. Ypedb m ce hyxdae om Kpamko epeme 3a cpa6omeaHe, b pamkume Ha Koemo npamponbM 3a omcmpaHaeHa KOMnEe KaBk Ce nnhu C oDa. N3nu3auomo KOuuecmBo npa nocmeneho ce yeenuuaba, dokamo cne d Okono 30 cekyHDc neocmuhe MaKcumannHomo KOuuecmBo npa.
Yka3aHue
CbeHemno ha pe3epeoapa 3a boda ynechraea u3eakdaHemo u nocmaeaHemo omhoHa nampoha 3a omcmpaHaeBaHe Ha KomIeH KaMbK.
- Hatnche Te npekcbcaya N3KJI. YpeBt e n3KJIIOUeH.
- CbaTe KaNaka Ha pe3epBoapa.
- CbaTe NaTpoHa 3a OTcTaHraBaHe Ha KOTneH KaMbK.
- NocTabete HOB natoh 3a OCTpaHbahe Ha KOTJIEN KAMbK ITO HATNCHETe, DOKATO CE qNKcnpa Do6pe.
- Hatnche Te npekcbcaya Bkn. YpeBt E BkIIOueH.
- HatncheTe 3aIpbKTe 6yToHa RESET 3a 4 cekyn. KOHTpOHaHaTamaMna "CmHa Ha naTpOHa 3a OTCTpaHbAHe Ha KOTJIeH KaMbK" n3rAcBa IN BpeMeTO 3a pa6Ota Ha naTpOHa 3anOuBa Da Teue OTHaJaIO. Hnrypa Q
- Octabete ypeda da 3arpee.
- 3aπpθxTe IocTa 3a npa HATnCHaT OK. 30 ckyHn, 3a Da ce o6e3Bb3dyuIN nATPOhT 3a OTCTpaHraBaHe Ha KOTJIe KaMbK.
HacTpoIka Ha TBbPdoCTTa Ha BODaTa
BHIMAHNE
IopepaHa ypea npadu o6pa3yeahe Ha gapouk
Bé3 nocmaeH nampon 3a omcmpaHReaHe Ha KomnEH KAMbK U npu HnnpasunHo HacmpoHa mEBpdoCm Ha eodama no ypeda moKe da ce o6pa3yea bapouk.
Pabomeme bua c nampo 3a omcmpahe he KaMJIeH KAMbK.
Hacmpoume ypeda KbM mBpdocma Ha bodaHa Mmcmomo.
Ipedu ynpompe6a 830ha c dpya mebpdocm Ha eodama (hanp. cneipemecmeane), hacmpoume ypeda KbM akmyanHama mebpdocm Ha eodama.
yKa3aHue
Cnyk6a Bodochabdebahe uu obuHama daam unhopmaue omnocho mebpocmna ha eodama om eodopoeodhama mpeka.
TbpbocCTTa Ha BODaTa Ce HAcTpoiBa OT 6yToHa RESET.HAcTpoiKaTa Ha TBbpOCTTa Ha BODaTa ce 3ana3Ba,doKATO He 6bde HAnpaBeHa HOBA HAcTpoiKa (Hanp. cIeI npemecTbaHe).Fa6pnuHO ypeBt e HAcTpoEH 3a Hau-BnCOKaTa TBbpOCT Ha BODaTa (CTenE IV).YpeBt NOKa3Ba HAcTpoEHATA TBbpOCT Ha BODaTa C MMnyLcN Ha MInaHe.
CTeENHa TBpOCT Ha BODaTn IMNynCn Ha MiraHe
| Ниво на ТВьрдост | °dH mm | ol/1 Бpoi | Импунсан на Миганe | Иntерва- на Импунсан- е на Миганe | |
| I Me | ka 0-7 | 0-1,3 1x | 4 seкундii | ||
| II | сpeдиha | 7-14 | 1,3-2,5 | 2x | |
| III T | ьрда | 14-21 2,5 | -3,8 3x | ||
| IV | MHoro ТВьрда | >21 >3,8 | 4x | ||
yKa3aHue
Deucmbuemo npomue bapobuk Ha nampoHa 3a omcmpahrahe Ha KomJIeH KAmbK ce akmuupa, uOM pe3epboapm ce HanbInu C boda u ypebdm ce nyche E ektnloamauzr. Bapobukm, KoMo ce cbdbpka b8e boda, ce noema om apaHyla m e nampoHa 3a omcmpahrahe Ha KomJIeH KAmbK. Taka He e HxJHO donblHumeNo noucmbaHe Ha bapobuka.
yKa3aHue
CneoKohmKc oda apaHnamb m nampoHa moKe da npomenu cema cu, moea 3aeucu om cbdpxkaHemu Ho Muhepanu bE bodama.Toea oueemrahe e 6e3 3naHue u Hma ompuamelno eb3deucmeue bpxy ypea,paobumne no nowucmbane unu hauHa Ha fynkuOHupaHe Ha npampoHa 3a omcmpaHraBe Ha KOMTeh KaMbK.
YKa3aHue
No epeme Ha hacmpoikama He npaeme npekcbaanu, no-0bnau om 15 ckyhdu, mbu kamo e npomuehen cnyaau ypebmt ue 6bde hacmpoeh aemomamuHHO Ha nocneHo u3paHama mBpdocm Ha bodama, pecn. npu nbpceohauHNO nyckaHe 8 ekcnloamaun -Ha hau-eucokama mBpdocm Ha bodama.
- Bkniouye tce enceja.
- YBepeTe ce, ye ypeBt e n3KJIIOueH.
- 3aApbXkTe 6yToHa RESET HaTnchat N BKnIOUeTe ypeDa.
ΦnrgypaQ
CneI OK.2 cekyHnKoHTpOHaTamaMna mra nCnHnAIn3npa C6poR Ha NmnyncTe TKeUaTa HAcTPOKa Ha TBbpOCTTa Ha BOData.
- OtnycheTe 6yToHa RESET.
CnopeIa6pHnHaTnHaCTpoNka ypeIbT Ce HAMnpa B CTeNEH Ha TBpDOCT Ha BOdAra IV, 3aTOBa KOHTPOJHATA JAmMa Mrra 4 NtINIOcJIeOBoTeJIHO.
PnK3a npHaJnxHocntte
a + 2 = 11, + = 11,
Jds dddd
gale 1uUul Uuuu uuuu uuuu uuuu uuuu uuuu uuuu uuuu uuuu uuuu uuuu uuuu uuuu uuuu uuuu uuuu uuuu uuuu uuuu uuuu uuuu uuuu uuuu uuuu uuuu uuuu uuuu uuuu uuuu uuuu uuuu uuuu uuuu uuuu uUU
.0a
2019 aolal joeill
00gS,12y jgljlll4s, j000jlgz//la/1b
UULUIJc
a/1jw/
Ug12uJge2//u
270 u
山
JkJgSj gJgJgKll alljI aagb jy pJ
= x - 2x < 0
gjll ieg jzjjl gk>laa aai kll allj aagb
S 与 OO BC
gglalJolal alljlaaogbgs
oJ uksj allj aagb
.
JaaWbLb
Jg>30.15
"ullll jlaoglr Jdawil"eljaoJgssJiaog
JkJgJlJosuUg
aJ 1
mu
Jzjbl.
Jullill alljaiogb
aUuUgUJzUgUgUgUgUgUgUgUgUgUgUgUgUgUgUgUgUgUgUgUgUgUgUgUgUgUgUgUgUgUgUgUgUgUgUgUgUgUgUgUgUgUgUgUgUgUgUgUgUgUgU
LED JdJy aJg JgssJgJg
auiUulbcjgoJguaUg jauuJka>Ul uUuJgJI
J
aill ajjiaagbbrjul jglj
m
Jzj1
Jullill alljaiogb
102
1J 1J 1J 1J 1J 1J 1J
jJ JcRESET allj a
RESET baiol oslc jj lc baoi
j 4 0wJwSll Jl aagb
julil/ailj/aiogb
12a//cl/ juc lc jge// buo
Sj jge//p/2iui//j//cl//scu buo p//y
.(sull Jai se liio)jlo juc l/aiaio
clogla// 1gj a/11 gj/11 gj/11 o11 / j11
JGua// c0a a> JG> aJU//
.RESET baiall osl| jz qjcb cclll wsc a> zb u
2y liu) djz bao clj> Ljzao clll wsc laio jy
a> rjcl jceiaall jq no sbogao jzgl. (nKsw
abogaaill cll Jwsc a> rjz jzgl. (IV a> dr) cll Jwsl
.
Jagogll arjwl qjcb nC
Jagogll arjwl glal Jwsc a>
30 1jJrJrJrJrJrJrJrJrJrJrJrJrJrJrJrJrJrJrJrJrJrJrJrJrJrJrJrJrJrJrJrJrJrJrJrJrJrJrJrJrJr
aljaiagb jcglgell
cll jwoc a>ds laio
4
JlqIJI
JUc buo9 JUsll allj Aogb jus pOcb cS
Jzll cluLk 12j bbs Jau clll
Julll allj Aogb jpAizwI IaJs JaI
aJ 2.
a>la≥0
.3
a>la0gU
jaoall no jqJl Jauol 4.
auii aagg jj 15 biaol 5.
.6aJg jglj 6
a2 > a1 时
alw po all> jol Jsw jgj 7.
sssss
Jssss
4
slllgl sllllpiaj jio
Sagjgblg 0.1u// aigwll lgl slw/ pia
Jg21
U/UL aagaaa/UL aaiaio 2g>90 U/SLaW/psio poXuui U
auii 100g
Sgmo pIxwU, bao cibull o 5uul po IxuW uic
= 1.211
aaiis alia ssw lc slw/ pio po w
aJU a9 jc b2wll psio cuu
aag Jaaill jbl aJUll aog Jc aJUauu 1.
.
a>la|0gD
2.
LgJgJz
a0 < | a0| < a_1
3.
auiu aeg no slssllpsie g
4.97
p10/
yulusuuluo
Ljg josdall sccs1/ aebg sljwU
gui So
L 111
Jewlll 1.
JcI JJI aooJI UaoggJrJ 2.
a4 > a5 > a6 > a7 > a_8 > ·s
aIg aie
cllljj
4
olaljai aui jglc
olll jzj jSoy jy jy1 jg1/1 p113
1
p/2uulUJgbllglglal1j
.11 1
.
aJ 2.
13.
Jlalllp|daw
aioUlaog9
LJwELALlALIaJrUl aIbI aIbIaIaIaIaIaIaIaIaIa
aIgIbUlgIgUIPVC
aJgglgAsJlJiaJwJgJL aIbJal aJss
4
Jll
Jrnnnne nnnnne nnne nnnnne nnnnne nnnnne nnnnne nnnnne nnnnne nnnnne nnnnne nnnnne nnnnne nnnnne nnnnne nnnnne nnnnne nnnnne nnnnne nnnnne nnnnne nnnnne nnnnne nnnnne nnnnne nnnnne nnnnne nnnnne nnnnee
ao glao oJdall no gao zll lpcuuiuU U
Jc Jbll no aas Jbl pJzwl Jll no JLdl jlg aig zull
log210 5g 8090
Lueu wjg/la/ba/aa/lu/lu/lu
jol jll jss lalbo po 1g laaog2a//jlls
gagallmuajlcalalgb
s
gauu// 1c aiguaia / aIzuaia / ayie / 1gog / laiaia/ w/g
gogoo gki /jbi/ lcbuill sic s j / kai aai bai /
SiaI IaIuU U go JgJgU U
a. g. 1
p2a//p(g)
JU/101uW/uc uuuu uU aauu/u aauu/U a@g
auiiiau jao ic oJluI eai I,blau J
111111111111111111111111111
wliol
1.aJUa
aJeI JAAU
aJU
b.auiUaui
a|la|oogD
gUJiaauiuagaijLalgaauiua
JUULI aoo
JU Ua Jua Gg JU Ua aJua
aJgBulJg aJIPVC aJb
aJU Ua a 1 lo. a uuul g Jg Jg JJJ J
aeio go bUjUl jwll uJl s aWlio uUl aq
.
aiuui aiojui aiaiio
awwJU 1u uuuuauuuaa
j>U|g|bU|J j0
4
U 1
g/1u0jU 1aBcJ, uU/ jSsJauuU aU
.awlu//2awu/1
auiu//jaw/u auiu/aiu//auiu//auiu/puiu
Jzull poio go auiu/ aiaua/ puiu U
aiojUl a2wao gls
- Cao gJr
JU
D
sJ
0g 12 g9 a u/14 a2a aag 5g 6g 8g 9g 10
JaeuU 12. Joo aui Ua aillj/ jai
auiuul aaii juiuau uuaa uucuui
- w/12, w/1w/1jge// 0 a/1u/1a/9 g/1
a0x//joljglg2//Jw/ pU loic U//aw/ U a9 g L
1.
a|la|o8S
Jusill alac 2b9
| ### | ### |
| ### | ### |
| ### | ### |
| ### | ### |
| ### | ### |
| ### | ### |
| ### | ### |
| ### | ### |
| ### | ### |
| ### | ### |
| ### | ### |
| ### | ### |
| ### | ### |
| ### | ### |
| ### | ### |
| ### | ### |
| ### | ### |
| ### | ### ### |
#
J 1
S APQ = S AQP + S_ PQQ
S ACD = S COD + S_ BDO
Jia 15 J5
JILS JILS JILS JILS JILS JILS JILS JILS JILS
1
Jol5 Jc 11 / 15 23 dc 1w/0
J
JIS121/0jla3001 JI 11 JIL11 cio o131/
.0j1111111111111
JJI JJIJIJIJIJIJIJIJIJIJIJIJIJIJIJIJIJIJIJIJIJIJIJIJIJIJIJIJIJIJIJIJIJIJIJIJIJIJIJIJIJIJIJIJIJIJIJIJIJIJIJIJIJIJIJIJIJIJIJIJIJIJIJIJIJIJIJIJIJIJIJIJIJIJIJIJIJIJIJIJIJIJIJIJIJIJIJIJIJIJIJIJIJIJIJIJIJIJIJIJIJ
JILI JILI JILI JILI JILI 2
Jg JgJgJgJgJgJgJgJgJgJgJgJgJgJgJgJgJgJgJgJgJgJgJgJgJgJgJgJgJgJgJgJgJgJgJgJgJgJgJgJgJgJgJgJgJgJgJgJgJg
aIJIaIeJrJxicaleU
J a>la| o
clllj
sglslaljfo
4
pS>1p2c9g10jx110b6e1e pS>1p2c0g>00slo
all
y j 10j 100 k y j 100 c b,c jlc p0k/ p0
J,laal,aa,aa,laa Jlaa/ll,clla
JUULIJIJIJIJIJIJIJIJIJIJIJIJIJIJIJIJIJIJIJIJIJIJIJIJIJIJIJIJIJIJIJIJIJIJIJIJIJIJIJIJIJIJIJIJIJIJIJIJIJIJIJIJIJIJIJIJIJIJIJIJIJIJIJIJIJIJIJIJIJIJIJIJIJIJIJIJIJIJIJIJIJIJIJIJIJIJIJIJIJIJIJIJIJIJIJIJIJIJIJIJIJ
glccgccc
jLGEH_1
4
14 × 20 = 5600
sllpilw/
wla//
ylll cfo o c yll lcll pui U
aiaai/1jlaolUolpo
..(Lio 1020/1) Sj/ aio/190 g/ iaiu 190 s/ liu U
sWj
jull/1d/1/ aagb jla/1/ sla/1/ jso
all
jglj ojwlo cll jJ sJo
j_L > 1 即 1 < j ≤ 2
Register your product and benefit from many advantages.
www.kaercher.com/welcome ★★★★★

Rate your product and tell us your opinion.
www.kaercher.com/dealersearch
Alfred Kärcher SE & Co. KG
Alfred-Karcher-Str. 28-40
71364 Winnenden (Germany)

2-2-SC-A5-GS