
POWX1341 - Multitools PowerPlus - Free user manual and instructions
Find the device manual for free POWX1341 PowerPlus in PDF.
| Product type | Rotary multi-tool (multi-function tools) |
| Brand | PowerPlus |
| Model | POWX1341 |
| Power supply | 220-240 V / 50 Hz |
| Power | 200 W |
| No-load speed | 10 000 - 40 000 min⁻¹ |
| Sound pressure level (LpA) | 82 dB(A) |
| Sound power level (LwA) | 93 dB(A) |
| Vibrations (aw) | 3,5 m/s² (K=1,5 m/s²) |
| Warranty | 36 months |
| Weight (approx.) | Approx. 1.2 kg |
| Main functions | Drilling, routing, engraving, polishing, cutting, grinding, sanding (wood, metal, plastic, stone) |
| Electrical safety | Double insulation (Class II) |
| Included accessories | LED ring, telescopic arm, flexible tube, fixing bracket, tile drilling guide, additional handle, hex key |
| Maintenance | Clean the ventilation slots with a soft cloth; avoid solvents |
Frequently Asked Questions - POWX1341 PowerPlus
User questions about POWX1341 PowerPlus
0 question about this device. Answer the ones you know or ask your own.
Ask a new question about this device
Download the instructions for your Multitools in PDF format for free! Find your manual POWX1341 - PowerPlus and take your electronic device back in hand. On this page are published all the documents necessary for the use of your device. POWX1341 by PowerPlus.
USER MANUAL POWX1341 PowerPlus
2 BESCHRIJVING (FIG. A)
24/08/2022, Lier - Belgium
24/08/2022, Lier - Belgium
1 INTENDED USE 3
2 DESCRIPTION (FIG A) 3
3 PACKAGE CONTENT LIST 3
4 SYMBOLS 4
5 GENERAL POWER TOOL SAFETY WARNINGS. 4
5.1 Work area 4
5.2 Electrical safety 4
5.3 Personal safety 5
5.4 Power tool use and care 5
5.5 Service 5
6 SPECIFIC SAFETY WARNINGS. 5
6.1 Additional safety instructions 6
7 ASSEMBLY 7
7.1 Changing the attachment tools (Fig. 1 & 2)
7.2 Auxiliary handle (Fig. 3, 4 & 5). 7
7.3 Attaching small tools directly to the multitool.. 7
7.4 Accessories 7
7.4.1 Grinding bits.. 7
7.4.2 Grinding points 7
7.4.3 Sander 8
7.4.4 Grinding stone 8
7.4.5 Polishing discs 8
7.4.6 Cutting disc 8
7.4.7 Orbital sander 8
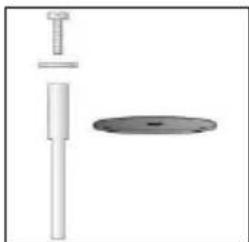
7.5 Special holder for stone drilling / milling (Fig. 6, 7, 8, 9, 10 & 11)
7.6 Vice with support an flexible shaft (Fig. 12, 13, 14, 15, 16 & 17)
8 OPERATION 9
8.1 On/off switch 9
8.2 Setting the speed (Fig. 18) 9
8.3 LED light (Fig. 19) 9
9 CLEANING AND MAINTENANCE 10
9.1 Cleaning 10
10 TECHNICAL DATA 10
11 NOISE 10
12 SERVICE DEPARTMENT 10
13 STORAGE 10
14 WARRANTY 11
15 ENVIRONMENT 11
16 DECLARATION OF CONFORMITY 12
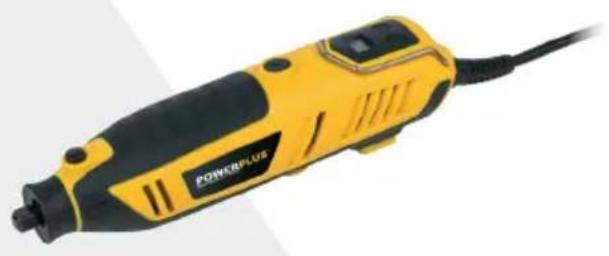
ROTARY MULTITOOL 200W POWX1341
1 INTENDED USE
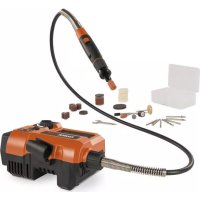
Your multi tool has been designed for drilling, routing, engraving, polishing, cutting, grinding and sanding of wood, metal, plastics and stone. Not suitable for professional use.

WARNING! Read this manual and general safety instructions carefully before using the appliance, for your own safety. Your power tool should only be passed on together with these instructions.
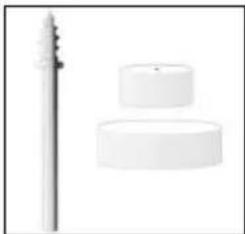
2 DESCRIPTION (FIG A)
- Power cord
- Hook
- Switch button
- Access to carbon brush
- Locking button
- LED button
-
LED ring
-
Collet chuck
- Adjustment button
- LCD
- Collet
- Spanner
- Flexible drive shaft
- Auxiliary handle
3 PACKAGE CONTENT LIST
- Remove all packing materials
- Remove remaining packaging and transit supports (if existing)
- Check the completeness of the packing content
- Check the appliance, the power cord, the power plug and all accessories for transportation damages.
- Keep the packaging materials as far as possible till the end of the warranty period. Disposet it into your local waste disposal system afterwards.

WARNING Packing materials are no toys! Children must not play with plastic bags! Danger of suffocation!
1 multi tool + accessories
1 LED ring
1 telescopic arm
1 flexible tube
1 table clamp
1 tile drill guide
1 auxiliary handle
1 instruction manual
1 hex key

When parts are missing or damaged, please contact your dealer.
4 SYMBOLS
In this manual and/or on the machine the following symbols are used:
| ! | Denotes risk of personal injury or damage to the tool. | Read manual before use | |
| CE | In accordance with essential requirements of the European directive(s) | "Class II - The machine is double insulated; Earthing wire is therefore not necessary | |
| Mandatory use of eye protection. | Wear gloves |
5 GENERAL POWER TOOL SAFETY WARNINGS
Read all safety warnings and all instructions. Failure to follow all warnings and instructions may result in electric shock, fire and/or serious injury. Save all warnings and instructions for future reference. The term "power tool" in the warnings refers to your mains operated (cored) power tool or battery operated (cordless) power tool.
5.1 Work area
- Keep work area clean and well lit. Cluttered and dark areas invite accidents.
- Do not operate power tools in explosive atmospheres, such as in the presence of flammable liquids, gases or dust. Power tools create sparks which may ignite the dust or fumes.
- Keep children and bystanders away while operating a power tool. Distractions can cause you to lose control.
5.2 Electrical safety

Always check that the power supply corresponds to the voltage on the rating plate.
- Power tool plugs must match the outlet. Never modify the plug in any way. Do not use any adapter plugs with earthed (grounded) power tools. Unmodified plugs and matching outlets will reduce risk of electric shock.
- Avoid body contact with earthed or grounded surfaces such as pipes, radiators, ranges and refrigerators. There is an increased risk of electric shock if your body is earthed or grounded.
- Do not expose power tools to rain or wet conditions. Water entering a power tool will increase the risk of electric shock.
- Do not abuse the cord. Never use the cord for carrying, pulling or unplugging the power tool. Keep cord away from heat, oil, sharp edges or moving parts. Damaged or entangled cords increase the risk of electric shock.
- When operating a power tool outdoors, use an extension cord suitable for outdoor use. Use of a cord suitable for outdoor use reduces the risk of electric shock.
- If operating a power tool in a damp location is unavoidable, use a residual current device (RCD) protected supply. Use of an RCD reduces the risk of electric shock.
5.3 Personal safety
- Stay alert, watch what you are doing and use common sense when operating a power tool. Do not use a power tool while you are tired or under the influence of drugs, alcohol or medication. A moment of inattention while operating power tools may result in serious personal injury.
- Use safety equipment. Always wear eye protection. Safety equipment such as dust mask, non-skid safety shoes, hard hat, or hearing protection used whenever conditions require will reduce personal injuries.
- Avoid accidental starting. Ensure the switch is in the off position before plugging in. Carrying power tools with your finger on the switch or plugging in power tools that have the switch on invites accidents.
- Remove any adjusting key or wrench before turning the power tool on. A wrench or a key left attached to a rotating part of the power tool may result in personal injury.
- Do not overreach. Keep proper footing and balance at all times. This enables better control of the power tool in unexpected situations.
- Dress properly. Do not wear loose clothing or jewellery. Keep your hair, clothing and gloves away from moving parts. Loose clothes, jewellery or long hair can be caught in moving parts.
- If devices are provided for the connection of dust extraction and collection facilities, ensure these are connected and properly used. Use of these devices can reduce dust related hazards.
5.4 Power tool use and care
- Do not force the power tool. Use the correct power tool for your application. The correct power tool will do the job better and safer at the rate for which it was designed.
- Do not use the power tool if the switch does not turn it on and off. Any power tool that cannot be controlled with the switch is dangerous and must be repaired.
- Disconnect the plug from the power source before making any adjustments, changing accessories, or storing power tools. Such preventive safety measures reduce the risk of starting the power tool accidentally.
- Store idle power tools out of the reach of children and do not allow persons unfamiliar with the power tool or these instructions to operate the power tool. Power tools are dangerous in the hands of untrained users.
- Maintain power tools. Check for misalignment or sticking of moving parts, breakage of parts and any other condition that may affect the power tool's operation. If damaged, have the power tool repaired before use. Many accidents are caused by poorly maintained power tools.
- Keep cutting tools sharp and clean. Properly maintained cutting tools with sharp cutting edges are less likely to stick and are easier to control.
- Use the power tool, accessories and tool bits etc., in accordance with these instructions and in the manner intended for the particular type of power tool, taking into account the working conditions and the work to be performed. Use of the power tool for operations different from intended could lead to a hazardous situation.
5.5 Service
- Have your power tool serviced by a qualified repair person using only identical replacement parts. This will ensure that the safety of the power tool is maintained.
6 SPECIFIC SAFETY WARNINGS
- Check that the maximum speed indicated on the grinding disc corresponds to the maximum speed of the machine. The speed of the machine must not exceed the value on the grinding disc.
- Make sure that the dimensions of the grinding disc correspond to the specifications of the machine.
POWX1341 EN
- Make sure that the grinding disc has been mounted and fastened properly. Do not use reducing rings or adapters to make the grinding disc fit properly.
- Treat and store grinding discs in conformance with the supplier's instructions.
- Do not use the machine for grinding workpieces with a maximum thickness exceeding the maximum grinding depth of the grinding disc.
- Do not use grinding discs for deburring.
- When grinding discs have to be mounted on the thread of the spindle, make sure that the spindle has sufficient thread. Make sure that the spindle is sufficiently protected and does not touch the grinding surface.
- Before use, inspect the grinding disc for any damage. Do not use grinding discs which are cracked, ripped or otherwise damaged.
- Before use, let the machine run idle for 30 seconds.
- Immediately switch off the machine in case of abnormal vibrations or occurrence of another defect. Carefully inspect the machine and grinding disc before switching the machine on again.
- Make sure that sparks do not put people into danger or that they contact highly flammable substances.
- Make sure that the workpiece is sufficiently supported or clamped. Keep your hands away from the surface to be cut.
- Always wear safety goggles and hearing protection. If desired or required also use another kind of protection like for example an apron or helmet.
- Ensure that mounted wheels and points are fitted in accordance with the manufacturer's instructions.
- Ensure that blotters are used when they are provided with the bonded abrasive product and when they are required.
- If a guard is supplied with the tool never use the tool without such a guard.
- For tools intended to be fitted with threaded hole wheel, ensure that the thread in the wheel is long enough to accept the spindle length.
- Ensure that ventilation openings are kept clear when working in dusty conditions. If it should become necessary to clear dust, first disconnect the tool from the mains supply (use non-metallic objects) and avoid damaging internal parts.
- Though poor conditions of the electrical mains, shortly voltage drops can appear when starting the equipment. This can influence other equipment (eq. blinking of a lamp). If the mains-impedance Zmax < 0.348 Ohm, such disturbances are not expected. (In case of need, you may contact your local supply authority for further information.
6.1 Additional safety instructions

Do not use the tool on light metal with a magnesium content exceeding 80% , as this type of metal is flammable.

The work head may continue rotating after the tool is turned off.
On the upper side of the tool there is a spindle-lock button. Do not press the spindle-lock button while the tool is running.
- Make sure that the accessories used are suitable for the maximum speed stated in the technical data.
- Make sure that the accessories are mounted according to the instructions.
- Only use accessories and adapters supplied by the manufacturer.
-
Make sure that sparks cannot hit any persons or set flammable materials alight.
-
Always wear safety goggles, hearing protection and if necessary other protective means, such as working gloves, hard hat, etc.
7 ASSEMBLY

Before mounting an accessory, always unplug the tool.
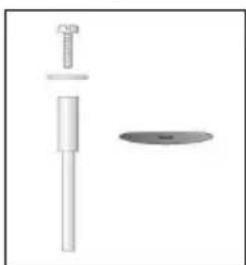
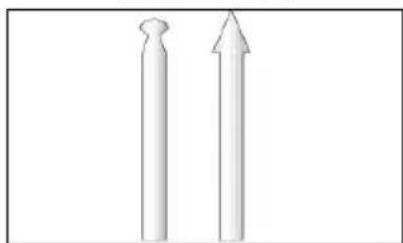
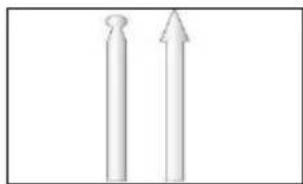
7.1 Changing the attachment tools (Fig. 1 & 2)
The small accessory attachments such as the grinding stones or cutting discs may be attached directly to the multi tool.
If required, these tools may also be attach to the flexible drive shaft.
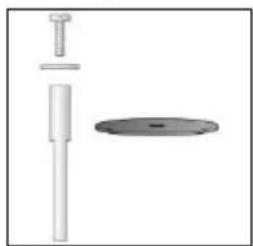
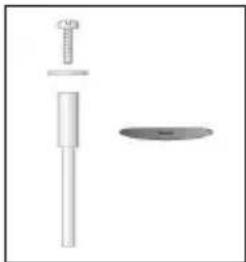
7.2 Auxiliary handle (Fig. 3, 4 & 5)
- Remove the ring by turning it anticlockwise.
- Mount the auxiliary handle on the thread, and fix it with the additional (smaller) ring by turning the ring clockwise.
7.3 Attaching small tools directly to the multitool.
- Turn the collet chuck grip slightly while holding down the locking button until the button engages.
Never press down on the locking button while the tool is running.
If the collet chuck grip cannot be loosened by hand, use the small spanner.
-
Change the attachment tool. Always tighten attachment tools as much as possible. Shafts which extend out from the collet will cause wobbling.
-
Tighten the collet chuck grip. To replace the collet chuck, remove the collet chuck grip and replace the chuck.
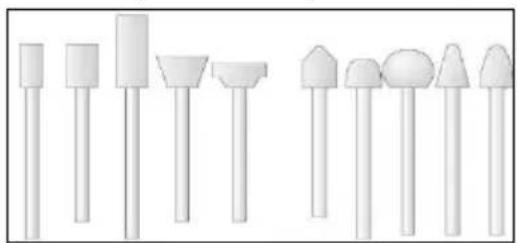
7.4 Accessories
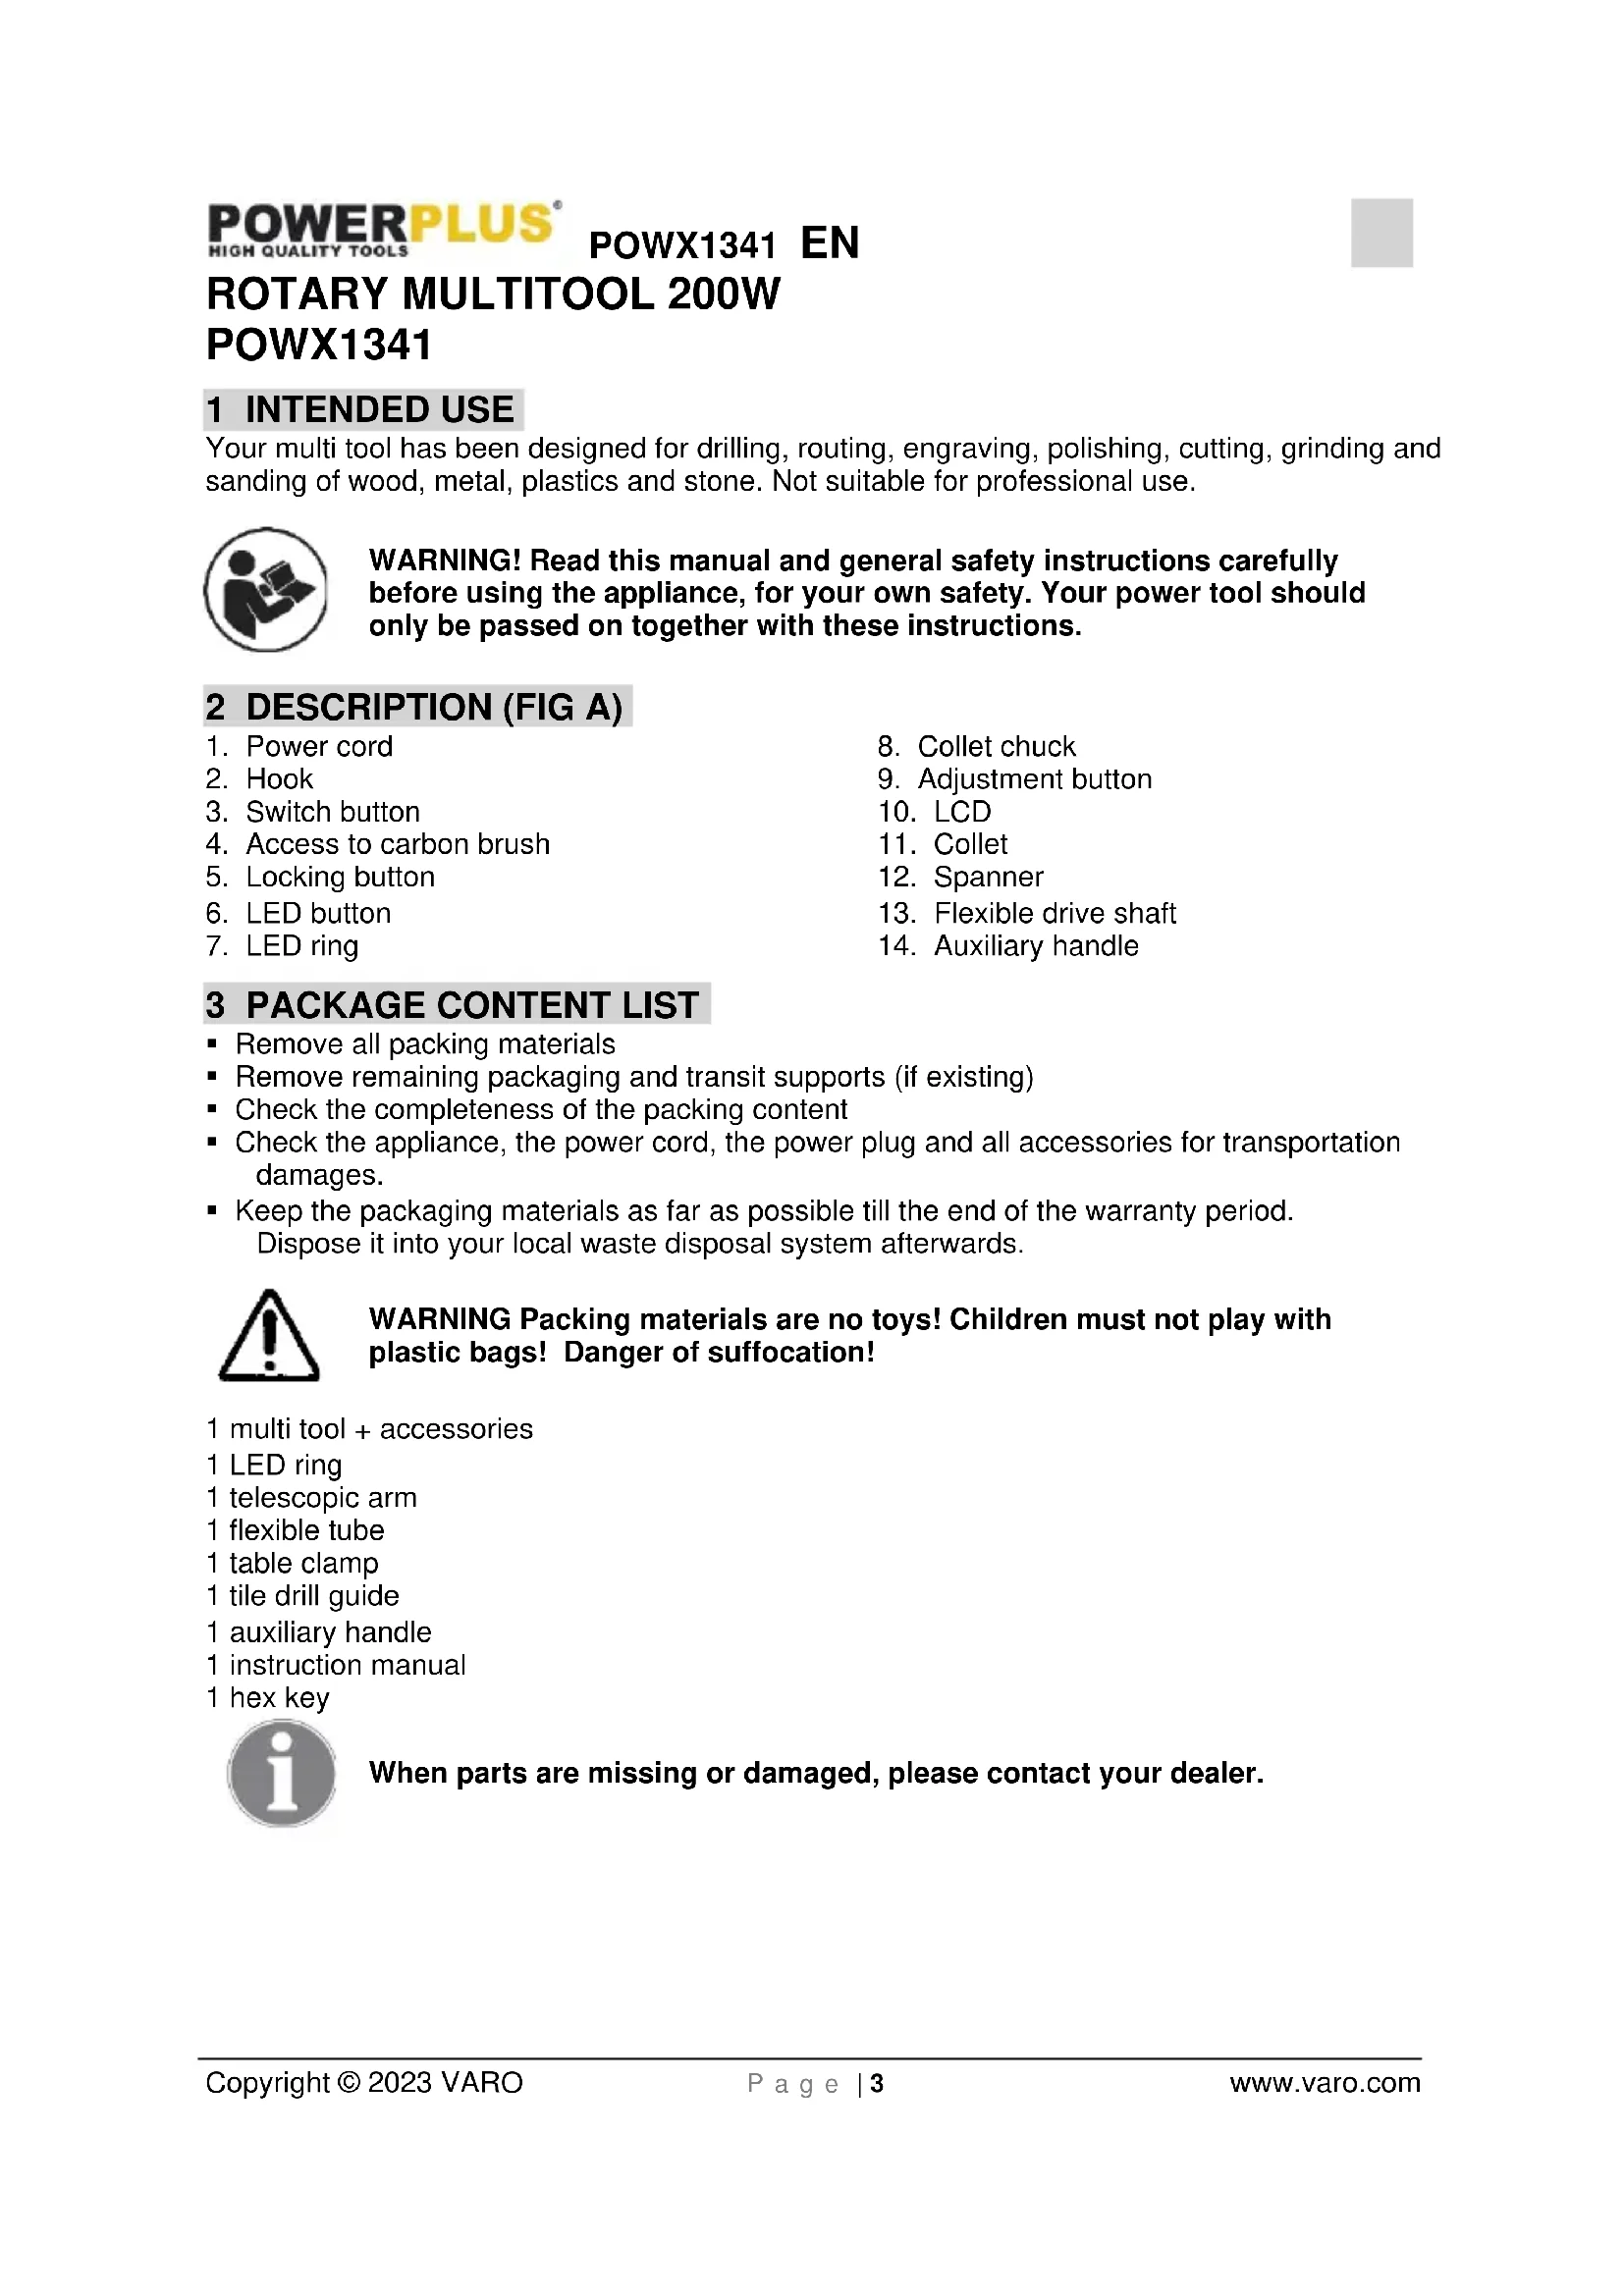
7.4.1 Grinding bits
- Use: sharpening, deburring, rust removal, shaping.
Tip: Clean and shape the grinding bits with the honing stone.
7.4.2 Grinding points
- Use: For fine engraving of various materials.
Tip: Work on metals at a low speed and process as if it were hardwood.
Plastics must be processed at low speeds because of their tendency to melt during processing. - Operating multi tool at a higher speed will lessen vibration.
7.4.3 Sander
- Use: sanding, smoothing and shaping wood and fiberglass.
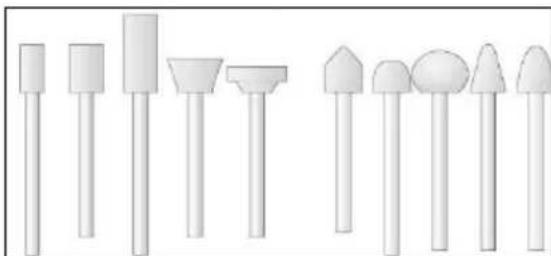
7.4.4 Grinding stone

- Use: Cleaning and shaping grinding stones
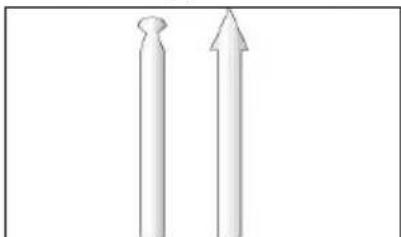
7.4.5 Polishing discs

- Use: Polishing metals and grinding stones.
- Attention: Only polish with the sides of the disc. The head of the stone will leave scratches on the work piece.
7.4.6 Cutting disc

Use: Cutting or slitting bolts, screws, sheet metal, thin wood and plastic.
- Use: Sanding, smoothing and shaping wood and fiberglass.
7.4.7 Orbital sander
7.5 Special holder for stone drilling / milling (Fig. 6, 7, 8, 9, 10 & 11)
- Remove the ring by turning it anticlockwise.
- Insert the drill or the milling piece (not included).
-
Screw the milling piece on the machine.
-
The working depth of the accessory can be set by unscrewing the wing nut. Move the milling piece forward and backward in order to determine the desired setting. Then fix the wing nut again.
- When the scale of the milling piece has been set to 20 and the tip of the drill or milling piece protrudes exactly 20mm out of the special holder, the scale can be used for setting the correct working depth.
- If starting in the middle of the work piece is required (hole or groove as a starting point), place the machine with the milling piece inclined to the working piece, so that the tip of the piece is directed to the starting point. Then switch the machine on, direct it to the work piece and tilt it slowly, until the machine is pointing vertically to the working piece.
7.6 Vice with support an flexible shaft (Fig. 12, 13, 14, 15, 16 & 17)
- Having mounted the vice with support on a work bench, the multi tool can be hanged up by means of the bracket on the handle.
- The flexible shaft enables the modified machine to reach places which cannot be accessed with the standard version of the multi tool.
- Mount the support as shown in the picture. The height of the tripod can be adjusted by means of the telescopic tube. Fix the desired position by turning the tube.
- Remove the ring from the multi tool and store it in a safe place.
Pull out the internal drive shaft of the flexible shaft and insert it into the collet chuck. - Push the coupler of the flexible shaft over the thread of the multi tool.
- Insert a metal bar (for instance the hex key) through the opening at the end of the flexible shaft, and turn the drill head slowly, until the hole in the housing aligns with the shaft of the drill head, and the hex key can be inserted. The drill head is then blocked.
- Mount a collet chuck in the drill head in the same manner as with the multi tool.
- Then mount the required accessory in the same manner as with the multi tool.
8 OPERATION
8.1 On/off switch

Always check that the power supply corresponds to the voltage on the rating plate.
- Turning on: Turn the power button to position I.
- Turning off: Turn the power button to position O.
8.2 Setting the speed (Fig. 18)
- The multi tool speed is continuously adjustable. Always start from the lowest speed and then increase the speed to the desired level.
- “+” denotes the higher speed
“-” denotes the lower speed
8.3 LED light (Fig. 19)
- If you work in dark condition and want see clearly the work area ,please turn on the LED
- To use the LED function, please remove the ring on the machine and replace by the LED ring.
- Push the LED button (6), the LED is on.
9 CLEANING AND MAINTENANCE

Attention! Before performing any work on the equipment, pull the power plug.
9.1 Cleaning
- Keep the ventilation slots of the machine clean to prevent overheating of the engine.
- Regularly clean the machine housing with a soft cloth, preferably after each use.
- Keep the ventilation slots free from dust and dirt.
- If the dirt does not come off use a soft cloth moistened with soapy water.

Never use solvents such as petrol, alcohol, ammonia water, etc. These solvents may damage the plastic parts.
10 TECHNICAL DATA
| Voltage / frequency | 220-240 V / 50 Hz |
| Power input | 200 W |
| No load speed | 10.000 – 40.000 min-1 |
11 NOISE
Noise emission values measured according to relevant standard. (K = 3)
| Acoustic pressure level LpA | 82 dB(A) |
| Acoustic power level LwA | 93 dB(A) |

ATTENTION! Wear hearing protection when sound pressure is over 85 dB(A).
aw (Vibration)
3.5 m/s²
K = 1.5m / s^2
12 SERVICE DEPARTMENT
- Damaged switches must be replaced by our after-sales service department.
- If the connecting cable (or mains plug) is damaged, it must be replaced by a particular connecting cable which is available from our service department. Replacement of the connecting cable must only be carried out by our service department (see last page) or by a qualified person (qualified electrician).
13 STORAGE
- Thoroughly clean the whole machine and its accessories.
- Store it out of the reach of children, in a stable and secure position, in a cool and dry place, avoid too high and too low temperatures.
- Protect it from exposure to direct sunlight. Keep it in the dark, if possible.
- Don't keep it in plastic bags to avoid humidity build-up.
14 WARRANTY
This product is warranted for a 36-month period effective from the date of purchase by the first user.
- This warranty covers all material or production flaws excluding : batteries, chargers, defective parts subject to normal wear & tear such as bearings, brushes, cables, and plugs, or accessories such as drills, drill bits, saw blades, etc. ; damage or defects resulting from maltreatment, accidents or alterations; nor the cost of transportation.
- Damage and/or defects resulting from inappropriate use also do not fall under the warranty provisions.
We also disclaim all liability for any bodily injury resulting from inappropriate use of the tool.
- Repairs may only be carried out by an authorised customer service centre for Powerplus tools.
- You can always obtain more information at the number 00 32 3 292 92 90.
- Any transportation costs shall always be borne by the customer, unless agreed otherwise in writing.
- At the same time, no claim can be made on the warranty if the damage of the device is the result of negligent maintenance or overload.
- Definitely excluded from the warranty is damage resulting from fluid permeation, excessive dust penetration, intentional damage (on purpose or by gross carelessness), inappropriate usage (use for purposes for which the device is not suitable), incompetent usage (e.g. not following the instructions given in the manual), inexpert assembly, lightning strike, erroneous net voltage. This list is not exhaustive.
- Acceptance of claims under warranty can never lead to the prolongation of the warranty period nor commencement of a new warranty period in case of a device replacement.
Devices or parts which are replaced under the warranty therefore remain the property of Varo NV.
- We reserve the right to reject a claim whenever the purchase cannot be verified or when it is clear that the product has not been properly maintained. (Clean ventilation slots, carbon brushes serviced regularly, etc.).
- Your purchase receipt must be kept as proof of date of purchase.
- Your appliance must be returned undismantled to your dealer in an acceptably clean state, (in its original blow-moulded case if applicable to the unit), accompanied by proof of purchase.
15 ENVIRONMENT
Should your appliance need replacement after extended use, do not discard it with the household rubbish but dispose of it in an environmentally safe way. Waste produced by electrical machine items should not be handled like normal household rubbish. Please recycle where recycle facilities exist. Check with your Local Authority or retailer for recycling advice.
VARO N.V. - Vic. Van Rompuy N.V. Joseph Van Instraat 9 - BE2500 Lier - BELGIUM, declares that,
product: Rotary multitool
trade mark: POWERplus
model:POWX1341
is in conformity with the essential requirements and other relevant provisions of the applicable European Directives, based on the application of European harmonized standards. Any unauthorized modification of the apparatus voids this declaration.
European Directives (including, if applicable, their amending directives):
2011/65/EU
2006/42/EC
2014/30/EU
European harmonized standards (including, if applicable, their amendments):
EN60745-1:2009
EN60745-2-23:2013
EN55014-1:2017
EN55014-2:2015
EN IEC 61000-3-2:2019
EN61000-3-3:2013
Keeper of the Technical Documentation: Philippe Vankerkhove, VARO - Vic. Van Rompuy N.V.
The undersigned acts on behalf of the company CEO,

Philippe Vankerkhove
Regulatory Affairs - Compliance Manager
24/08/2022, Lier - Belgium
POWX1341 DE
24/08/2022, Lier - Belgium
8.1 Interruftore On/off

Regulatory Affairs - Compliance Manager
24/08/2022, Lier - Belgium
8.1 Interruptor ligar/desligar (on/off)

Verifique sempre se a corrente électrique principal corresponde à voltagem na placá de caracteristicas.
9 LIMPEZA E MANUTENÇA

24/08/2022, Lier - Belgium
1 TILTENKT BRUK 3
2 BESKRIVELSE (FIG. A) 3
3 PAKKENS INNHOLD 3
4 SYMBOLFORKLARING 4
5 GENERELLE SIKKERHETSADVARSLER 4
5.1Arbeidsplassen 4
5.2 Elektrisk sikkerhet 4
5.3 Personsikkerhet 5
5.4 Vær noyaktig og omhyggelig nár du omgås elektroverktoy 5
5.5 Service 5
6 SPESIELLE SIKKERHETSADVARSLER 5
6.1 Ytterlige sikkerhetsinstruktner 6
7 MONTERING 7
7.1 Bytting av tilbehor (Fig. 1 & 2)
7.2 Hjelpehandtak (Fig. 3, 4 & 5)
7.3 Feste sma verktoy direkte til multiverktoyet. 7
7.4 Tilbehør 7
7.4.1 Slipedeler 7
7.4.2 Slipemeisler 7
7.4.3 Slipemaskin 7
7.4.4 Slipestein 8
7.4.5 Slipestein 8
7.4.6 Skjaereskiver 8
7.4.7 Slipemaskin. 8
7.5 Spesialholder for steinboring/fresing (Fig. 6, 7, 8, 9, 10 & 11).
7.6 Tvinge med stotte og fleksibelt skaat (Fig. 12, 13, 14, 15, 16 & 17)
8 BRUK 9
8.1 Pa /av-knapp 9
8.2 Hastighetsinnstilling (Fig. 18) 9
8.3 LED-lys (Fig. 19)
9 RENGJØRING OG VEDLIKEHOLD 9
9.1 Rengjoring 9
10 TEKNISK DATA 10
11 STOY 10
12 SERVICEAVDELING 10
13 OPPBEVARING 10
14 GARANTI 11
15 MILJ0 11
16 SAMSVARSERKLÄERING 12
ROTERENDE MULTIVERKTØY 200W POWX1341
1 TILTENKT BRUK
9 RENGJØRING OG VEDLIKEHOLD

Bruk参加会议, but he was not able to speak. "I'm sorry," he said, and his voice turned into a low voice. "It's my son," he said, and his voice turned into a high voice.
10 TEKNISK DATA
| Spenning / frekvens | 220-240 V / 50 Hz |
| Effekt | 200 W |
| Turtall uten belastning | 10.000 – 40.000 min-1 |
11 STØY
24/08/2022, Lier - Belgium
1 TILSIGTET BRUG 3
2 BESKRIVELSE (FIG. A) 3
3 MEDFOLGENDE INDHOLD 3
4 SYMBOLER 4
5 ALMINDELIGE SIKKERHEDSANVISNINGER FOR EL-VAERKTJ4
24/08/2022, Lier - Belgium
1 AVSEDD ANVÄNDNING 3
2 BESKRIVNING (FIG. A) 3
3 FÖRPACKNINGSINNEHÄLL 3
4 SYMBOLER 4
5 ALLMÄNNA SÄKERHETSANVISNINGAR FÖR ELEKTRISKA VERKTYG
24/08/2022, Lier - Belgium
24/08/2022, Lier - Belgium
1 ROTACIONI MULTIFUNKCIONALNI ALAT 3
2 IEPIRPAΦH (EIK. A) 3
3 AISTA INPEIXOMENQN YYKEYAIAE 3
4 SYMBOA 4
5 TENIKE ΠPOEIAOIOIHSEIEA ΣΦAΛEIA Σ I A TA HAEKTPIKA EPIAΛEIA 4
5.1 Xwpos epyaiaac 4
5.2 HLeKtpiKi aOeAaia 4
5.3 Atoiikr aovapaaia 5
5.4 Xpnoj kai qpovtida wv nAekptikwv epyaaleiwv 5
5.5 6
6 EIAKEOADHIEAΦAΛEIA
6.1 Poo0eTcS o8nyieC aovaaiaC yia
7 SYNAPMOAOH
7.1 Aaayn wv ouvseouwv aesouap (Eik. 1 kai 2)
7.2 Bon0nriKn 1aBn (Eik.3,4kai 5) 8
7.3 i a c p a i o 8
7.4 8
7.4.1 Mutec troxioa
7.4.2 8
7.4.3 TpIeio 8
7.4.4 9
7.4.5 9
7.4.6 1aKoS KOTnS 9
7.4.7 TpIeio youoTacr 9
7.5 Eiokn unofoxni yia diatpno/laiotpiipno n e πeira (Eik. 6, 7, 8, 9, 10 ka1 11) ...9
7.6 Meykeyn otnpiN kai eukamrto afoa (Eik. 12, 13, 14, 15, 16 ka1 17)....10
8 AEITOYPIA 10
8.1 10
8.2 Puroiion rauchntrae (Eik. 18) 10
8.3 Evskikxia (Eik. 19) 10
9 KAOAPIEMOZ KAI SYNTHPHSH 11
9.1 Ka0aipio6s 11
10 TEXNIKA XAPAKTHPIETIKA 11
11 OOPYBOs 11
12 TMHMA EeyHPETHEH
13 ANOOHKEYEH 11
14 ERTYHSEH 12
15 INEPIBAAON 12
16 HΛΩΣH ΣYMMOPΦΩΣH
ROTACIONI MULTIFUNKCIONALNI ALAT 200W POWX1341
1 ROTACIONI MULTIFUNKCIONALNI ALAT
To oic ivai oxeioevo yia diatpnon, okaiaoua, xapaegn, yuaioqa, ktonkai i a v o n fulou, mtaalou, paaotikou kai tepac. AkataaINO yia eTTayeeLmuAtikn xpnoN.

IPOEIAOIOIHsH! Tn Dikn Oac aopaleia, diaaote TpooeKtka auto To EYxepidio kai TIG YEVIKcS obnyieC aopaleiaC TPIV xpnoiopoTNOETe To mXavna. Av dwoTE TO nLEKTpiKO epyaleio e allo xpnotn, 0a TpTeIva dwoTEmu KAI autcTIG oynieC.
2 ΠΕΡΑΦH (EIK. A)
- Kaλωδio ρεύματος
- Aykiotpo
- KoupiδiakóTTn λειτoupyiaç
- Póσβaσn στις ψήκτρες ἀνθρακα
- Kouπi αφαλιοης
- Koupié EvdeiktiknLuxviae
-
Δακτύλιος LED
-
Took
- Kouπi puθμiong
- Oθovn uypw kpuotαλωv
- Koλapo
- Eukamtoos agovas odynon
- Bonθητικήλαβή
24/08/2022, Lier - Belgium
1 NAMJENA 3
2 OPIS (SLIKA A) 3
3 POPIS SADRZAJA PAKETA 3
4 SIMBOLI 4
5 OPÇA UPOZORENJA O SIGURNOSTI RUKOVANJA
ELEKTRICNIM ALATIMA 4
5.1 Radno mesto 4
5.2 Elektricna sigurnost 4
5.3 Osobna sigurnost 5
5.4 Uporaba i odrzavanje elektricnog alata 5
5.5 Servis 6
6 ODREDENE SIGURNOSNE NAPOMENE 6
6.1 Dodatne sigurnosne upute 6
7 MONTAZA 7
7.1 Promjena alatnih nastavaka (sika 1 i 2)
7.2 Pomoćna ručka (slike 3, 4 i 5)
7.3 Postavljanje alata neposredno na visenamjenski alat.. 7
7.4 Pribor 7
7.4.1 Nastavci za bruşenje 7
7.4.2 Brusni siljci 8
7.4.3 Brusna traka 8
7.4.4 Brusni kamen 8
7.4.5 Ploce za poliranje 8
7.4.6 Reznaploca8
7.4.7 Orbitalna brusilica 9
7.5 Specijalni drzač za bušenje / glodanje kamera (slike 6, 7, 8, 9, 10 i 11)
7.6 Skripac osloncem i elastično vratilo (slike 12, 13, 14, 15, 16 i 17)
8 KORISTENJE 9
8.1 Sklopka za uključivanje/isključivanje 9
8.2 Podesavanje brzine (sika 18) 10
8.3 LED svjetlo (slika 19) 10
9 CiScENJE I ODRZAVANJE 10
9.1 Cijscenje 10
10 TEHNICKI PODACI 10
11 BUKA 10
12 SERVIS 10
13 SKLADIsTeNJE 11
14 JAMSTVO 11
15 OKOLIS 11
16 IZJAVA O SUKLADNOSTI 12
ROTACIJSKI VIŠENAMJENSKI ALAT 200W POWX1341
1 NAMJENA
Višenamjenski alat predviden je za buşenje, usmjerivanje, graviranje, poliranje, rezanje, bruşenje i bruşenjeDRVeta, metala, plastike i kamena. Nije prikladno za profesionalnu uporabu.

UPOZORENJE! Prije uporabe alata, a radi vase vlastite sigurnosti pažljivo procitajte ovaj prisucnik i opce upute o sigurnosti. Ove upute cine sastavni dio opreme elektricnog alata, pa i u slučaju prodaje drugom vlasniku.
2 OPIS (SLIKA A)
- Kabel za napajanje
- Kuka
- Gumb sklopke
- Pristup ugljenim Četkicama
- Gumb za zakljucavanje
- Gumb LED
-
LED prsten
-
Glava stezne cahure
- Gumb za podesavanje
- LCD
- Stezna Čahura
- Ključ za zatezanje
- Elasticno pogonsko vratilo
- Pomoćna ručka
3 POPIS SADRŽAJA PAKETA
24/08/2022, Lier - Belgium
1 NAMENJENA UPOTREBA 3
2 OPIS (SL. 1) 3
3 SPISAK SADRZAJA PAKOVANJA 3
4 SIMBOLI 4
5 OPŠTA BEZBEDNOSNA UPUTSTVA ZA ELEKTRICNE ALATE...4
5.1 Radna oblast 4
5.2 Elektricna bezbednost 4
5.3 Lična bezbednost. 5
5.4 Korischenje i odrzavanje elektrichog alata 5
5.5 Servisiranje 5
6 POSEBNA BEZBEDNOSNA UPUTSTVA 6
6.1 Dodatna bezbednosna uputstva 6
7 MONTAZA 7
7.1 Menjanje nastavka (SI. 1 & 2)
7.2 Pomońrukohvat (Sl. 3, 4 & 5)
7.3 Montiranje malih alata direktno na multifunkcionalnu alatku. 7
7.4 Dodatni pribor 7
7.4.1 Nastavci za bruşenje 7
7.4.2 Siljci za bruşenje 7
7.4.3 Nastavak s brusnim papirom 8
7.4.4 Kamen za bruşenje 8
7.4.5 Diskovi za poliranje 8
7.4.6 Disk za sechenie 8
7.4.7 Vibración brusilica 8
7.5 Specijalan drzač za bušenje / glodanje kamera (Sl. 6, 7, 8, 9, 10 & 11)
7.6 Stega sa osloncem i fleksibilnim telom (Sl. 12, 13, 14, 15, 16 & 17)
8 RUKOVANJE 9
8.1 Prekidač za uključivanje/isključivanje 9
8.2 Podesavanje brzine (Sl. 18) 9
8.3 LED lampica (SI. 19) 9
9 CIscENJE I ODRZAVANJE 10
9.1 Cijscenje 10
10 TEHNICKI PODACI 10
11 BUKA 10
12 SERVISNO ODELJENJE 10
13 ODLAGANJE 10
14 GARANCIJA 11
15 ZIVOTNA SREDINA 11
16 IZJAVA O USKLADENOSTI 12
ROTACIONI MULTIFUNKCIONALNI ALAT 200W POWX1341
1 NAMENJENA UPOTREBA
6 POSEBNA BEZBEDNOSNA UPUTSTVA
24/08/2022, Lier - Belgium
1 ZAMYSLENEPOUZITI 3
2 POPIS (OBR. A) 3
3 SEZNAM OBSAHU BALENI 3
4 SYMBOLY 4
5 OBECNÁ BEZPEČNOSTNI UPOZORNÉNÍ PRO ELEKTRICKÉ NASTROJE 4
6.1 DALŠI BEZPEČNOSTNI POKNY

24/08/2022, Lier - Belgium
1 ZAMYSLANEPOUZITIE 3
2 POPIS (OBR. A) 3
3 OBSAH BALENIA 3
4 SYMBOLY 4
5 VŠEOBECNÉ BEZPECNOSTNÉ VAROVANIA PRE ELEKTRICKÉ NÁRADIE 4
24/08/2022, Lier - Belgium
1 UTILIZARE PREVÄZUTÄ 3
2 DESCRIERE (FIG. 1) 3
3 CONTINUTUL PACHETULUI 3
4 SIMBOLURI 4
5 AVERTISMENTE GENERALE DE SIGURANÀ PRIVIND APARATUL ELECTRIC 4
5.1 Zona de lucru 4
5.2 Siguranta electrica 4
5.3 Siguranta personala 5
5.4 Folosirea 山 intretnerea aparatului electric.. 5
5.5 Service 6
6 INSTRUCTION SPECIFICE DE SIGURANTA. 6
6.1 Instruetioni suplimentare de siguranta 6
7 MONTAREA 7
7.1 Schimbarea pieselor ataate (Fig. 1 & 2)
7.2 Manerul auxiliar (Fig. 3, 4 & 5)
7.3 Atasarea sculelor mici direct la scula multifunctionala.. 7
7.4 Accesorii 7
7.4.1 Varfuri abrazive 7
7.4.2 Freze 7
7.4.3 Maśina de silefuit cu glaspapir 8
7.4.4 Piatra abraziva 8
7.4.5 Discurile de polisare 8
7.4.6 Discul de taiere 8
7.4.7 Slefuitorul cu vibratii 8
7.5 Suport special pentru găurirea / frezarea pietrei (Fig. 6, 7, 8, 9, 10 & 11)
7.6 Menghina cu suport pentru ax flexibil (Fig. 12, 13, 14, 15, 16 & 17)
8 FUNCTIONARE 9
8.1 Intrerupatiorul de pornire/oprine 9
8.2 Reglarea vitezei (Fig. 18) 9
8.3 Lumină LED (Fig. 19) 10
9 CURATAREA I INTREINEREA 10
9.1 Curatarea 10
10 DATE TEHNICE 10
11 ZGOMOT 10
12 DEPARTMENTUL DE SERVICE. 10
13 DEPOZITAREA 10
14 GARANTIE 11
15 MEDIU 11
16 DECLARATIE DE CONFORMITATE 12
UNEALTÄ MULTIFUNCTIONALÄ ROTATIVA 200W POWX1341
1 UTILIZARE PREVÄZUTÄ
24/08/2022, Lier - Belgium
24/08/2022, Lier - Belgium
1 NcPOnb3OBAHNE NO HA3HauEHNIO 3
2 OINCAHNE (PNC.A) 3
3 CODEPJKMOE YNAKOBKN 3
4 yCIOBhIE OBO3HAUHnA 4
5 OБцЯ ИНСТРУКЦЯ NO TEXHиKE 6E3ОПАСHOCTN ПРИ
PABOTE C 3ЛЕКТPOINHCTPYMEHTOM 4
5.1 Pa6oyee mecm0 4
5.2 3JIeKmpo6e3OpacnOcmb... 4
5.3 Lluyna 6e3oNaChocmb 5
5.4 3Kcnnyamaaua u yxod 3a 3JeKmpouHcmpyMeHMom 5
5.5 6
6 OCObIe YKA3AHnI NO TEXHnke Bc3OpAChOCTn 6
6.1 OonoHumeIbHbe uHcmpykuu no mexHuke 6e3onacHocmu.. 7
7 C6OPKA 8
7.1 CmHa npuHaadneXHocmeu (Puc. 1 u 2)
7.2 BcnoMoZamEnbHa pykoMa (Puc. 3, 4 u 5) 8
7.3 KpenneHue He6oIbux npuHaonHexnOeH enocpecmeeHHo K MHO20oYHKUOHaJIbHOMy uHcmpymHmy.. 8
7.4 PpuHaadJexKnocmu 8
7.4.1 8
7.4.2 3aoCTpeHHbIe fpe3bl 8
7.4.3 Haxdan 9
7.4.4 ⅢnfoBaJIbHbI KaMeHb....9
7.4.5 IopnpoBaIbHbIe nckn 9
7.4.6 OTe3HoiIuCK 9
7.4.7 Tapenbatai bI uHIOBaBbHbIKpyr 9
7.5 CneuaIbHbI depXamEnb dner ceepeHua uu pfpe3epoHaHa KaMHa (Puc. 6, 7, 8, 9, 10 u 11)
7.6 Tucku c onopou dna u6ko 0 ana (Puc. 12, 13, 14, 15, 16 u 17) 10
8 3KcPJIyATAUa. 10
8.1 Bbiklouamenb Bk/Byk.. 10
8.2 Hacmpouka ckopocmu (Puc. 18) 10
8.3 CeemoduodHbI uHdukamop (Puc. 19) 11
9 甲CTKAIOBcJIyKINBAHNE 11
9.1 Yucmka 11
10 TEXHnueCKNE DAHHbIE 11
11 Wym 11
12 OTDEI OBCJYKBAHNA 11
13 XPAHEHNE 12
14 TAPAHTIN 12
15 OKpykaIOJIaCPEIa 13
16 DEKJIAPAUJIO COOTBETCTBUN 13
BPAUATEJIbHbIMMHOROΦYHKUHOHAJIbHbIMNHCTPYMEHT 200BTPOWX1341
1 NcNoJIb3OBAHNE IO HA3HauEHNIO
BaW MHOFOyHKUHOHaJIbHbI INHCTpyMeHT npEDHa3HaueH dIa CBepJeHn, ppe3epOBaHn, rpaBnPOBKn, pOInpOBaHn, pe3Kn, IJINΦOBaHn 3aYNCTk HaxdakOM DepeBa, MetaIIa, PnaCTNka n KamH. He npEHa3HaueH dIa KOMMepueeCKOrO NcNoJIb3OBaHn.

ПЕДУПЕХДЕНЕ! Дя Baшей Лунов 6e3ОнacHOCТ NцаTeьно O3HaKOMbTEcB C ДaHHbIM pyKOBoDCTBOM И OБцИМуKa3aHЯМN NO texHnke 6e3O纳acHocTипepeД TeM,Κak npicTyuNTb K pa6Ote c INHcTpymeHTOM. Прп пepeDAче 3TORO 3ЛeКТрчeCKOTO INHcTpymeHTa Дя ПОЛьЗOBaHЯ ДPyrIM Лицam 66aTeьно ПрluoxKe T daHHbIe INHcTpYkuU.
2 ONICAHNE (PNC.A)
- Ka6eJb nHTaHn
- Kpnook
- Khonka BbIKJouateJIy NtAHn
4.Доctун К угльнвIM УETКAM - Khonka 6noknpOBKn
- Khonka cBeToIOIOOB
-
Konyco co cBeToNDaMn
-
LaHroBbI NaTPOH
- Khonka perynipobkn
- JKK-nHnKaTOp
- LaHra
- Raeyhny KIIOH
- Inbkn npBNOHO Bn
- BcnoMOraTeJIbHaŋ pyKoRtKa
3 COIDEPXXHMOE YNAKOBKN
- YdaJInte BCE ynaKOBOHyIe MaTePnAbI.
- YdaJInte ocTaKn ynaKOBKn I TpaHCnOpTnpOBOUHbIe KpeJIeHn (ecJIIN OHN eCTb).
- PpOBepbTe nonHOTy KOMnneKta NoCTaBKn.
IpoBepbTe INHCTpyMeHT, CINOBOaKa6JIb, UTeNCEJIb N Bce npHaJNeKHOCTn Ha IpeMET NOBpeKdEHN Pn TpaHCnOpTIpOBKe.
XpaHnTe ynaKOBOHbIe MaTePnAJIbI NO BO3MOxHOCTN Do nCTeueHnraPaHTnHOrO cPOKa. Iocne 3Toro n36aBbTEcB OT HIX, nCnoJb3yR MeCTHyIO CnCTeMy yTNIN3aUNn 6bITOBbIX OTXODOB.

PPEyPPEXDEHNE: YnakoBOuHbIe MaTePnaJIbI - 3TO He nrgpyuKn! He NO3BOJnTe DeTAM HrpaTb C PnactNKOBbIMn NaKeTaM! Ectb OnaChOCTb ydyueHn!
1 MHOOrOΦyHKUHOHaJIbHbI INHCTpyMeHT + npHaJdJIeXHOCTH
1KoJIbO CO CBeToIOnOdaMn
1 Teleckonnueckna TaHra
1r6kaTpy6ka
1 HACTOJIbHbI 3aJxIM
1 HanpaBnaIooa InC BcepIeHnKepaMuecko nnTkn
1 BCNOMORAteNbHa pyKoRTKa
1pykoBOCTBO NO 3KcnnyatauIN
1JeeTnIpaHbIraeHbIKIOU

Ecnn deTann OTCyTCTByOT nnn noBpeXdHbI, o6paNTeCb K CBOemy dInlepy.
4 yCJIOBHBIE O6O3HAUEHNIA
B daHOM pyKOoDCTBe n/Inn Ha cAmO MaunHe NCNoJIb3yIOTc CJeNyIOuNe CMBOJbl:
- Y6eIInTeScb, yTO nCNoJIb3yEmbIe npHnAIIeXHOCTN NOxOJrT IJa MaKcImaJIbHOI CKOpOCTN, Yka3aHHoB TExHnueCKIN DaHHbIX.
y6eHntecb, yTO npHaIeXHOCTn yCTaHOBHeHb B COOTBETCTBUN C IHCTpyKUJAMN.
IcnoB3yTe TOnbKO npHaJnEJXHocTn I nepeXoDnK, NOCTaBnEMBie N3rTOBNTeJIem HHTpyMeHTa.
He donyckaIte nonaDaHnI NcKp Ha IIOe IIN BOCnJaMaHReMbI MaTePnAbl.
Bcerda HaneBaTe 3aunTHbIe OUYK, cpeCTBa 3aunTbI opraHOB clyxa I, npn Heo6xOIMOCrN, dpyrne cpeCTBa 3aunTbI, TAKNE KAK pa6oyne nepuATKn, WJEM N T. D.

Ipepe yctaHOBKO npHaJXKHOCTN Bcerda BBHMaTe uTeNCbHyIO BNJKy n3 pO3eTKN.
7.1 Cmeha npuHaednHexHocmeu (Puc. 1 u 2)
He6oJIbIe npHaIeXHocT, TaKne KaK IJInOboaIbHbIe KAMH NIN peJxUne DNCKN MOryT 6bITb IIpncoeINHeHbI HeNOCpeIcTBeHHO K MHOroOyHKUHOHaJIbHOMy INCTpyMeHTy
Pn Heo6xOJIMOCTN, 3TN nPiHaIeXHocTm MoXHO npuCoEINHrB K rN6KOMy npuBOdHOMy Bany.
7.2 BcnoMoZaMeIbHa pyKoMaKa (Puc. 3, 4 u 5)
CHIMMTE KOJIbUO, NOBepHyB eRo npOTNB YacOBON CTpeIKN.
3akpyTte BCNOMORAteIbHyO pykoTky Ha pe3b6y I 3aФNKcpyTe DOnONHtJIbHOe (MeHbUee) KOJIbQIO, NOBepHyB KOJIbQIO NO YacOBoi CTpeJIke.
7.3 KpenneHue He6oJIbIux npuHaJNeKHeOHeNocpeCmBeHHo MHO2OfoYHKUOHaJIbHOMy UHcmpymHmy.
- CnIerka noBepHnTe uahroBbI naTPOH, ydepKuBaJ KHONky 6JOKnPoBKn, noka KHonKa He 3aueJIKNHeTcR.
He haxmuTe KhONkY 6IOKIpOBKn npn pa6OtaUoIe mHCTpyMeHTe.
Ecnu zahrobn natpoH HeBO3MOXHO ocna6ntb pyko, nCnoJb3yIte He6oJbIoN raeyhbl KJIIOU.
- CmeHnte npHaJneXHOCTb. 3aTgBaIte npHaJnEXHOCTb DO MaKcMaJIbHO BO3MOxHO CTeneHN. HacAdKn, KOtOpBle BbICTyaIOT n3 ZaHrN, 6yDyT Bbl3iBaTb Bn6paUHO.
- 3aTAHNTe cAHROBbI NaTPOH. YTo6bI 3aMeHnTB cAHROBbI NaTPOH, CHIMNTE cAHROBbI NaTPOH n 3aMeHnTe UaHry.
7.4 PpuHaadneKHoocmu
7.4.1 WlndoBaJIbHbIe HacaIaN

- PpimHeHne: 3aToUka, ChrTne 3ayceHueB, ydaJeHne pXaBHyHbI, npoФиIpOBAHne.
CObET:YnCTNTbN npaBnTb ⅢIINΦOBaJIbHbIe HacaI K XOHINHOBAJIbHbIM 6pyckOM.
7.4.2 3aocTppeHHbIe fpe3bl
-Прииме HeHHe:ДЯTOHKOI rpaBnpoBkn pa3JIuHbIX MaTePnaJIOB.
Cobet: Pa6oTaB Ha MeTaNJax npN Hn3KoNCKOpOCTn N 06pa6aTbIBaTB INX KAK TBepDoe DepeBO.
- Пл actинс седует образаывать пи НИКИХ
СКОРOCТЯ N3-3a INX CKNIOHNOCTN K
pacплавлению пи образOTKE.
Ipn60one BbICOKOc CKOPoCTM MHOFOyHKUHOHaJIbHbINHCTpyMeHT 6yDet MeHbSe BN6pnpoBaTb.
7.4.3 Haxdk

- PpimHeHne: 3aUncTka, crIaNXBaHne n npOoHnpOBaHne depeBa n cTeKnonlaCTnKa.
7.4.4 ⅢnfoBaIbHbI KameHb
- PpimHeHne: OucntKa n npoФnIIpObaHne WnnpOBAJIbHbIX KAMHe
7.4.5 NopnpoBaNbHbIe nckn
- PpimHeHne: noInpoBaHne MeTaIIOB uJINFOBaHne kAMHei.
BHHMaHHe: NOInpOBAb TOJbKO TOPaMn DnCKa. TOnOBKa KAMHr MOXeT OCTaBnTb UapanHbHa 3arOTobKe.
7.4.6 OTPe3Hoi DnCK
- PpimHeHne: nonepueHna HnnpoDobHa pe3Ka 6oJTOB, BnHTOB, NcCTOBOro MeTaNla, TOHKoI dpeBecuHbI nPiactka.
7.4.7 TapelbTaBn WJNFOBaJIbHbI Kpyr

- PpimHeHne: 3aunCTka, crnaXnBaHne n npoOpnupOBaHne depeBa n cTeKnonnactika.
7.5 CneuaJIbHbI depKamEnb dIa ceepeHua Uu pe3epo8aHua KaMHa (Puc. 6, 7, 8, 9, 10 u 11)
CHNMMTe KOJIbIcO, NOBepHyB erO npOTNB yacOBn CTpeJIKN.
BCTaBbTe CBePn nn ppe3y (He noka3aHa Ha pucyHke).
3akpyTnte CbepeHnHa MaunHe.
Pa6oyuIgIy6nHy npHnAdIeJXHOCTM MOxHO HAcTPOHTb pN OTKpyUBAHN 6apaUKOBOI raIK. CmeaaiTe CBepno nHnΦpe3y Bnpeed n Ha3aD, YTO6bl ONpeJeNTb HyKHyIO HAcTPOUY. 3aTEM CHOBA 3aФNKcPnyTe 6apaUKOByIO raIKy.
Korda shkaana cbepna nnn fpe3bHa hactpoena Ha 20, a hakoheuHK cbepna nn fpe3bBbICTynaet ToHn Ha 20 MM n3 CneuaJIbHO repKaTeJr, TO sKaJy MoKHONCNOJIb3OBaTb dIra HactpoKN npabNJbHO pa6Oe Iy6INbI.
- Ecni Tpe6yetcna Hauatb obpa6otky B cepeDInHe 3aROTBKn (OTBepCTne nn KaHaBka B KaueCTBe HauaJIbHOJ TOUKN), NOMECTNe INHCTpyMeHT CO fpe3oN NOd HAKIOHOM K 3aROTOBKe, TAK YTObI HakoHeuHK CBepNa IIN fpe3bl 6bln HAnpaBnEHN K HaauJIbHOJ TOUKe. 3aTeM BKNIOHNTe INHCTpyMeHT, HAnpaBbTe erO Ha 3aROTOBKY MEdJeHHO HAKIOHNTe, NOKa INHCTpyMeHT He 6byEt HAnpaBJIeH BepTKaJIbHO Ha 3aROTOBKY.
7.6 Tucku c onopoou dna eua6ko0e bana (Puc. 12, 13, 14, 15, 16 u 17)
10 TEXHnueCKNE DAHHbIE
HanpxeHne /yacToTa
220-240B/50T
BxOДнай moUHOCtB
200 Bt
CkopoocbHa xoJIoCTOMxOyD
10.000-40.000o6/MnH
11 WYM
3HaueHn ypoBn IyMa, n3MepeHbIe corNaCHO COOTBeTCTByIOUeMy cTaHapTy. (K=3)
YpOBeHb 3ByKOBOrO daBJIeHHa LpA
82 1B(A)
YpOBeHb 3ByKOBoMOnuHocTn LwA
93 έ(B(A)

BHIMAHHE! HadeBaTe cpeCTBa 3aunTbI opraHOB clyxa, ecn 3BykoBoe daBHeHne npebblaaet 85 d5 (A).
aw(Bu6paun):
3.5 M/c²
K=1,5M/c²
12 OTDEJIOBCJIYXINBAHNA
3aMeHa NOBpeKdEHHbIX BbIKIIOUaTeJeI DOJIXHa BbINONHrTbcR B HaWeM cHTpe NocJenpoDaJxHOro 06cJyKnBaHn.
- Ecnn cnnoBoi Ka6eB (n nn wTeCenb) nobpeXdeH, erO cneDyET 3aMeHHTb aHaNoIHybIM cnIOBbIM Ka6eJem, KOToPbI NOCTaBnEeTcra HaWM OTeJOM 06cLyKuBaHna. 3aMeHa cnIOBOrO Ka6eJIa DOJIxHa IPOIN3BOIDNTCB TOnbKO HaWM OTDeJOM 06cLyKuBaHna (CM. NocJeHNIO CTpaHnUy) n nn KBaJIuΦnIupOBaHHbIM CNEuaNICTOM (3JeKTpIKOM).
13 XPAHEHNE
TuaTeNbHO ONUCTHTe BECb HNCTPyMeHt N eO OCHACTKV.
XpaHnTe HnCTpyMeHT BHe DoCTyNa DnA DeTeN, B yCTOnuHBOM N 6e3OnaCHOM NOJIOKeHN, B IPOxHaDHom N CyXOM MecTe, N36eRaTc CJNUKOM BBICOKNX N CJIINUKOM Hn3KNX TEMnepaTyp.
3aunuane ero ot BO3eueTBn npAmbix cOnHeuHbIX lyuei. XpaHnte ero B TEMHO MecTe, eCNB03MOXHO.
He XpaHInTe eTo B NOn3TuJIeHOBbIX MeuKax BO N36ExKaHne HAKOpJIeHnB BJaXHOCTN.
14「APAHTIN
B COOTBeTcBUN C 3aKoHOdaTeNbHbIMn Tpe6oBaHnA M, daHHbI npOdyKT o6ecneuHaetcRAPaHTneH ha cPOK 36 MeCAeB, nCCHcIeMbI C DaTbI npNo6peTeHnI nepBBIM NOKVNaTeJIeM.
-Данная rapаHTЯ paCnpoCTpaHЯETcHa BCe DeΦeKtBi MaTePnaIOB I npOIm3BOJcTBA, Ho OHa He BKJIIOUaET DeΦeKTHbIe DeTaII, NOBBePraEMbIe eCTeCTBeHHOMy N3HOCy, TAKHe KaK NOdUnHnIKu, ΜεTKI, Ka6EIN uTEnceJIbHbIe BUNIK, INI npHAdJIeXHOCr, TaKHe Ka CBePNa, 6NTbI WypynOBepTa, INIbHbIe NOnOTHa I T. D.; NOBpeXJeHn IIN DeΦeKtBi, BO3HnKaIOUe BCJeDCTBHe HEnADJIeXaUeOobpaUeHn, HecuaCTbIX CnyAeB INN BHeCEHn I3MeHeHn B KOHCTPVkUHO, a TAKKe He BKJIIOUaET TpaHCnOpTbIe paCXObl.
IIOBpeKdEHHn H/nnn DeΦeKtbl, Bo3HnKaIOUne BCJeCDTBnHEnpaBnHbHOJ 3KcNpyaTcuN, TaKKe He NOpnaHaHT NOD rapaHTnHbIe O6ra3aTeNbCTBa.
MbTaKKe OTKa3bBaEMcR O T BceX 68a3aTeJIbCTB B OTHoUeHn IIO6bIX TeNEChbIX NOBpeXDeHn, BO3HnKAIOUX BCJeCDTBHe HnPaBUNbHO 3KcNpyaTauu INHCTpyMeHTa.
PemOH MT MoKET BbINONHARbC TOnbKO B aBtOpN3OBAHHOM UeHTpe 06cJyXnBaHnnoKynatene HCTpyMeHTOB Powerplus.
- IOnOHnTeJIbHyIO INHΦopMaIIO BbI BcERda MoKTe NOpUHTb NO TeneoHy 00 32 3 292 92 90.
Bce TpaHcnpTHbIe pacxOdbI NOKpbIBaHTcN OKyNaTeIeM,ecn He corIacOBaHO uHOe B INCbMeHHoΦOpMe.
BmecTe c Tem, He MoXeT 6bIb IpeDbYBJeHO HnKaKoI ppeTeH3nNo rapaHTn, ecnn NOBpeXdEHe yCTpOcTBa YBnETCra pe3yIbTaTOM He6peXHOrO OScnyXuBaHnN nn neperpy3Kn.
OnpeJeHNO NCKIHOaTcN 3 rapaHTN NOBpeXdHne BCNECTBn pnoHKOBHe HIKKOCTN, CINbHORO 3aNbJIeHnN, npeHaMepeHHORo NOBpeXdHnN (HapOCHNO IIN No rpy60n He6peXhoCTn), HeHaJIeXaUero NCNoJb3OBaHnN (NCNoJb3OBaHne dIa CEnei, dIyKOTOpbIX yCTPOINCTBO He npeHa3HaueHo), HEkOMnTeHTHO NCNoJb3OBaHnN (HaNP., npeHe6peXeHnN IHCTpyKzmaMn, npNBeDeHHbIMN B pyKOBoDCTBe), c6OpKn HecNeuaJIInCTOM, ydaP aMOHN, NOKJIuOeHnK CETN C HECOOTBETCTBYIOUM HApRjKeHnEM. DaHHbI CNOCK He ABJAETCN CHepNbIBaOUsM.
- IpnHrTne npTeH3n no rapaHTn He YBJIeTCs OCHOBaHNem dIy npOJIeHnra pArAHTnHO rpeNoDa nJIn Ha3HaueHnRA HOBO rapaHTnHO rpeNoa B cJIyuae 3aMeHb VCTPOINCTBa.
YcTpoIcTBa HnN DeTaHn, 3ameHeHHbIe No rapaHTn, OCTaOTc Co6CTBeHHOCTbIO KOMNaHnVaroNV.
MbI coXpaHЯEM 3a co6oI npaBO OTka3aTb B yOBoNTBopeHn IpeTeH3n BO BCExCnyaJx, KOrJa He MoKeT 6bITb NOITBepKdEh PAKT NOKyIKN, INI KOrJa OueBnDHO, YTO 3aN3deIeHem He npON3BOIDNCHaJIeJaxuIN yXoJ. (OChCTKa BeHTnJIauNoHHbIX OTBepCTn, peryJrAHOE O6ClyKJBAHHe VToNbHbIX UETOK n T.I.).
- IIOITBePKeHn DaTbI NOKyNk CneJeYeXpaHHTb YeK.
BaWe yCTpoiCTBO CNeIeYET BO3BpaUaTb NOCTABuNky B Hepa3o6paHOM BVHe, B npHemJEMO YnCTOM COCTOHN (B OpINHaJIbHO INPOTNUBOyApHOYNAKOBKe, ecNJ TAKOBa IMeJIacb), pnpIOXINB DOKyMeHT O NOKyIKe.
15 OKPYKAIIOUJAR CPEDA
EcnBawHCTpyMeHT Tpe6yET 3aMeHb I NocIe DInTeNbHO NcNoJb3OBAHn, He Bbl6paCbBaIte erO BmecTe C DomauHm Mycopom, a NcNoJb3yIte 3KoJorNuYeCKn 6e3Opachb cnoc06 dIra erO yTINn3aun.
C OTXoAMN 3JIeKTPnuecknx npn6opOB HeJIb3n NOCTynaTb, KaK C O6blHbIMN DOMaUHMN OTXoAMN. N03a6ObTeCb 06 yTnIIN3aUNn TAM, rDe dIy 3TOr o cTb COOTBETCTByIOUHe yCTaHOBKn. PpOKOHcyIbTIpyuTECb y MeCThIx OprAHOB BJaCTn IIN y pOdaBua O BO3MOxHOCHTn yTnIIN3aUNn.
16 DEKJIAPAUZI O COOTBETCTBNI

Vario
VARO N.V. -Vic.Van Rompuy N.V. Joseph Van Instraat 9 - BE2500 Lier - BEBY, HACTOUIM 3aBnEET, YTO
PnoyKT: BPAUATEJbHbIM MHOROΦYHKLIOHAJBbI INHCTPYMENT
Mapka: POWERplus
Mоделы: POWX1341
COOTBETCTBYET OCHOBHbIM Tpe6oBaHnM IN DpyrM peJeBaHTbIM NIOJOKeHNM npIMeHMbIX
DInpeKTHB Ebponeckoro Co103a, kacaioxcxra Ebponecknx rapMOHN3uPoBAHHbx
CTaHdapTOB. IIO6a HecaHKUHOHPOBaHHa nepeDeJka annapaTa DeJaet daHHyIO
DEKnapaTNU HeDenCTBNTelbHoH.
Ebponeckne DnpeKTHBbI (BKIOUaA, ecn npIMeHIMO, dIpeKTNBbl C BHeCEHHbIMN nonpaBkam):
2011/65/EU
2006/42/EC
2014/30/EU
Ebponeckne rapMOH3npoBaHHbIe cTaHdApTbI (BkJIoua, ecn npImeHMo, nx nonpaBKn)
EN60745-1:2009
EN60745-2-23:2013
EN55014-1:2017
EN55014-2:2015
EN IEC 61000-3-2 : 2019
EN61000-3-3:2013
ДержателlexhneyecckoДOKуMeNTaUn:ФИЛINВанkepxOB(Philippe Vankerkhove),VARO - Vic.Van Rompuy N.V.
HxKeNoDnncabwnc daeCTbyeT OT mEnH NcnoNHTeNbHO DnpeKTopa KOMnaHN,

Philippe Vankerkhove
OTdHn HopMOKoHTpOJa -MeHeJxep no BOnpocam corIacobAHm
24/08/2022, Lier - Belgium
1 IPEdHA3HauEHNHe HA yIOTPEbATA 3
2 OINCAHNE (ΦNΓ. A) 3
3 CnncbK HA CbIbPjAHNETo HA ONAKOBKATA. 3
4 CnMBOJIH 4
5OBuINPENEYUNPEKDEHNA B3OANACHOCT PNI 3NOJ3BAHE HA EJEKTPOHCHTPMEHTN
5.1 Pa6omHa 30Ha.. 4
5.2 EneKmpo6e3oJnacHocm 4
5.3 JIuHa 6e3oNaChocm 5
5.4 13non3eahe u apuxu 3a enekmpouHcmpymehma.. 5
5.5 Cepu3Ho o6cnykeane 6
6 CNEUΦNHyNHCHTPYKcH 3A B3OpACHOCT.6
6.1 0nblHumenuu uHcmpykuu 3a 6e2onachocm
7 MOHTAKK 7
7.1 CmHa Ha 3aKpeneHua UHcmpymeHm (fue. 1 u 2)
7.2 CnomaaamenHa pkoexamka (pu3, 4 u 5)
7.3 3aKpeBaHe Ha MaJIku UHcmpymeHmu dupekmHO KbM MyJmufoHKcuOHaHHua UHcmpymeHm
7.4 Ppucnoocobnue 8
7.4.1 8
7.4.2 8
7.4.3 Ipiucnoo6neHne 3a nacbKOcTpyHa o6pa6Oka 8
7.4.4 8
7.4.5 POnpaun DnckOBe 9
7.4.6 Pexkniick 9
7.4.7Писноблелпе 3а opбитална песькоструна obpa6oТka...9
7.5 Cneuaen dbpka3a npo6ueaHe/phi308aHe Ha KaMbK (pue. 6, 7, 8, 9, 10 u 11)
7.6 Cmra c onopa ebypxy ekea ean (pu2. 12, 13, 14, 15, 16 u 17)
8 PA6OTA 10
8.1 Knoy On / off (Bkn./m3kn) 10
8.2 HaempoeBaHe Ha ckopocmma (phi. 18) 10
8.3 Ceemoduooho oceemnneue (phi. 19) 10
9 NOuchTBAHE I NOIDPbXKA 10
9.1 Nocmeane 10
10 TEXHnueCKn DAHHN 11
11 Wym 11
12 OTDEJI 3A CEPBUN3HO OBCJNUKBAHE HA KJINEHTN 11
13 CbXPAHEHNE: 11
14 TAPAHUN 12
15 OKOJIHACPEDA 12
16 DEKJIAPAUJRA 3A CbOTBETCTBNE 13
POTAUHOHEM MYJITINHCTPYMEHT 200BTPOWX1341
1 ПЕДHA3HAUECHNE HA YNOTPEBATA
Baunr MytnuHkUHOHaen HnCTpyMeHT e npedHa3NaeH 3a npo6bHaHe, npoHnHo n3p83BaHe, rpaBpuHe, noIpuHe, p3aHe, uJaΦaHe i necbKoctpyHa o6pa60Ka Ha DbpBO, metan, nIactmaca n Kambk. HenodxOda 3a npocecnoHaHa ynotpe6a.

IpeynpeXeHne! Ipei Da n3noJ3BaTe nHcTpymEnTa, npoYeTeBHNMaTeJIHO TOBa pBkoBOdCTBO n O6uHTe nHcTpkyKcNn 3a 6e3OnaChOcT,3apaN BaWata Co6CTBeHa cnHypNoCT. BawnT eJeKTPoHnCtpyMeNTPra6Ba Da ce IpeDaBa Ha dpyr cAmO 3aeDHO C HactToaUte nHcTpkyKcNn.
2 ONICAHNE (ФИг.А)
- 3axpaHbau Ka6eI
- Kyka
- ByToH 3a npBkNIOUbaHe
4.ДocTbNdoKap6oHOBaTaYeTKa
5.Блokupa6byTOH - ByToH 3a CBeToIDNoDHOto OCBETNEHHe
-
CBeToIONoEn npbCTeH
-
LaHROB naTPOHHNK
- Perynpa 6yToH
- LCD
- LaHra
- Rauehen KJIIOH
- _bBkA npINBOeH BaI
- CnomaraTeHa pboKoXbaTka
3 CnncbK HA CbIbPjXAHNETO HA ONAKOBKATA
- OtctpaHete BCnKOnaKOBbHyMaTePnaI.
OTCTpaHete octaHaNTe ONaKOBbUHN bPemeHHN NOCTaBKN (aKO nMa TaKnBa).
PpOBepeTe daHn naKeTbT cbDbpxKa BCNUK KOMNoHEHTN. - IpoBepTe dann ypeDbT, 3axpaHbAunrKa6en, uencelbT n akcecoapnte He ca 6n nnOBpeDeHn np TpaHcnpTuPaHe.
- Na3ete onakOBbHnTe MaTePnAn NoTn Do KpaHa rapaHcNoHHn nepnoD. CneTobn3XbPJeTe B nyHKT 3a cb6npaHe Ha OTnaDbuN.

BHIMAHHE! OnakOBbYHnTe MaTePnaHn He ca nrgpaKn! He no3BOJBaTHe Ha deca da nrgpA rC hainloHOBn Top6uKn! Pnck ot 3aDywaBaHe!
1MyIHTyHKUHOHaJIeH INHCTpymeHT + npncnoc6JIeHnA
1CBETOIOIOEN npbCTeH
1 TeIeCKOnuHOpamO
1rBkBaTpb6a
1 cTgra 3a Maca
1 BODa3a npo6nBaHe Ha nIOUKN
1 cnomaraTeJHa pboKoXbaTka
1pbkoBOIDCTBO C INHCTpyKcnn
1 JIeCTOrpAmEH RaueH KJIIOU

B cnya, ye hakoun qactn Iuncbat nIu ca noBpeHn, CBbpxKeTe ce C MeCTHnA DnCTpN6yTop.
4 CUMBOJI
B HacToaHnHaPbUHNK N/INN BbPxMy MaunHaTa ca n3NoJ3BaHn CJIeDHHTe CmBOJN:
|  | Указва onасноct OT Tравма пли поvereда на Инструмени. |  | Прedeи дa използва te MaшинаТа, поче тete ръководстбото. |
|  | В съответерst绛е с OСНовнITE ИЗИСКВАнЯ на Еврone�ски Директун. |  | Клас II - Машина та с двоюна ИЗОЛаця; поради TOВа 3аземпелен проводанк He e Heобховим. |
|  | Задьжinteелна улотреба на пroduдаим средаства за очimits. |  | Hocete 3ацитни ръковици |
5OBuINIpeDyIPeXJDeHn3ABe3OpAChOCTPnN3IOJ3BAHE HA EJEKTPoHCTPYMeHTN
IpoueTe TE BCnKn npdeynpejxdeHna 3a 6e3oNaChOCT n HNCTpyKuH. Hecna3BaHeTO m MoKe Da npuHHn eNeKtpnueckn ydap, noXap n/nn cepno3HO HapaHbAHe. 3ana3eTE BCnKn npdeynpejxdHn n HNCTpyKuH 3a 6bJeun cnpabKn. TepmHbT ,eNeKtpOnHCTpyMeHT" B npdeynpejxdHnTa ce OTHacr 3a BaHn 3axpaHbAn OT Mpekata (c Ka6en) n nn 3a pa6oteu Ha 6aTePn (6e3 Ka6en) eNeKtpOnHCTpyMeHT.
5.1 Pa6omHa 30Ha
Pa6oTHata 30Ha Tp8Ba Da 6bDe YnCTa N Do6pe OCBeteHa. HenoDpeHnTe n HeOCBteHn 30Hn Ca IpeDnOCTabKa 3a HnCnDEHTn.
He pa6oTe c eNeKtpOnHCTpyMeHTu BbB B3pNUBOONaCHA aTMoccepa, HApPIMep B 6n3OcTdo 3anJIMn TeUHOCTn, ra3OBe nn npax. EJeKtpOnHCTpyMeHTnte Cb3daBat nCKpn, KOnTO MORAT da 3anaTn npax nn napute.
He donyckaTe npncbCTBne Ha deua nJIn cTpaHnHn Iuca, KOraTo pa6oTnte C eIeKtpOnHcTpymeHT. Pa3ceBaNHeTO MOKe da Bn Hakapa da 3aRy6nte KOHTpOJI Bbpxy HERO.
5.2 EneKmpo6e3onacHocm

Bunarn npoBepaBaiTe daHn 3axpaHbAooTo HanpeXeHne CbOTBeTCTBaHa HapexeHneTO, nocOueHO Bbpxy Ta6ekkata C HOMHaJIHN CTOnHOCTN.
- Κeçηte Ha ekeptponHctpymeHTne Tp6Ba Da cboTBcTbAT Ha KOHTa. Hkora He npomehnye ɛencela no HkaKbB NaunH. He n3no3BaIe HnKaBn ɛenceni- npexoHNci CbC 3a3eMeHnte ekeptponHctpymeHTn. ɛencelnte, Ha KOnTo He ca npaBeHn PpomeH, i CboTBcTbAaNTe NM KOHTaTIe HaMaJIaT OnaCHOCTTa OT ekeTpueckn ydap.
- 1368raTe TeeneH KOHTc CbC 3a3eMeHN NOBbpxHOCTN, KaTO Tpb6n, paDnATOpN, CTnIaxn XnaIINHn. 3a3eMaBaHeTo Ha BaWeTo TAno BOOn Do No-BnCOK pNCK OT eNEKTpUneckyUdap.
He n3naarTe eNeKtpOnHCTpymeHTn Ha IbXn He rO octaBnTe B MOKpa cpeJa.Ako Be neKtpOnHCTpymeHTa BJe3e BOda, TAre yBeJInu pNcKa OT eNeKtpnueeKn ynap.
He nobpejdaIte n He 3noynoTpe6BaIte c Ka6eJa. Hnkora He ro n3noJ3BaIte 3a npehacraHe, IbpnaHe nnu n3BaJdaHe ot KOHTaKta Ha eJeKtpOnHCTpyMeH. Na3eTe Ka6eJa OT TOnnHa, MacNo, OCTpn Pb6Obe nn DnBnKeUc Ce yAcTu. NObpeDeHrte nn OnIteHn Ka6eJIy YBeJIuYabat PnCKa OTe JeKTPnueckn yIap.
Korato pa6oTnte c eIeKtpOnHCTpyMeHT HABbH, I3NoJ3BaNTe yDbJnxTeJeH Ka6eJ, NOxOJaU 3a yNtpe6a Ha OTKpnto. I3NoJ3BaHeTo Ha TaKbB Ka6eJn HamaJIraBa pNcKa OT eIeKtpnueckn ydap.
Ako n3noJ3BaHeTo Ha eJekTpo IHCTpymeHTn BbB BJaXHa cpea e Heu36exHo, n3noJ3BaIte 3axpaHbaU n3ToUHc C ndpepeHuaHa 3aunTa (RCD). N3noJ3BaHeTo Ha RCD hAmajBa pNcKa OT eJekTpueckn ydap.
5.3 JIuHa 6e3oNaChocm
-БьдeTe HaUpeK, BHMaBaIte KaKBO npaBHTe N3N0n3BaIte 3dpaBnCn pa3ym, KOraTo pa6OTte c eNEkTPOHcTpymEn. He n3NoJ3BaIte eNEkTPOHcTpymEnTa, KOraTO cTe yMOpEHn IIN CTe NOd BnJHHeTO Ha HApKOTuHb BeIecCTBa, anKoxoN IIN JekapCTBa. MomenthTo HeBHMaHne npi pa6Ota C eNEkTPOHcTpymEn TMOke Da DoBeDe Do cepno3Ha TeLeCha NobpeDa.
- I3no3BaIte npedna3HO obopydBaHe. BnHar n3no3BaIte npedna3Hn cpeIcTBa 3a ouHTe. IpeIpa3HTo obopydBaHe, HapPIMep, Macka 3a npax, HenJIb3raUnc ce 3aunTHN obyBkn, Kacka IIIN 3aUnTHN cpeCDTa 3a yUnTe, IN3no3BAHO npn CbOTBEHTHe ycIOBnJ, Ue HamaJIH HapaHbAHHaT.
I36aRbAte cnyaHTo nycKaHe B DeiCTBne. IpeDn Da BKIOUHTe HNCTpyMeHTa B KOHTAKTa, ce yBepTe, ye KIOuTbE B N3KIOUeHO NOLOXeHne. HocHeTO Ha eJIeKTPoIHcTpyMeHTn C npbCT Bbpxv KIOUa 3a BKIOUbaHE NIN BKIOUBAHeTO IM B KOHTAKTa npN KIOUy B NOLOXeHne BKIOUeHO Cb3DaBa IpeDnOCTaBKN 3a INHCJDeHTN.
IpeHn da BkHouHte eEnKtpOHcTpymeHTa,OTCTpaHeTe BCNUK peRyNipOBbUHNnn RaeyHn KJIOOBe. FaeueH nn Dpyr KJIIOU, OCTaBEN 3aKaueH KbM BbpTua ce cact Ha enEeKTPoINHcTpymeHTa,MOKe Da DOBede Do HapaHraBaHe.
He ce npceraIte npekaneHo hanaJeue. BbB BCEKN MOMENT cToTc3paBO CTbnnHa KpaKaTa cn n na3eTe paBHOBeCne. ToBa ue BN PO3BOJN da NMaTe NO-dO6bp KOHTpON Hd eNEKTPoINHCTpyMeNTa B HeouaKBaHN CInTuaUN.
- ObneyeTe ce noDxoJra. He HocTe WnpOKn dpexn, HnTo 6kKyTa. DpbKTe Kocata, dpexnte n pbKaBnUte cn daJeY ot eJNEKTponHCTpyMeHTa. WnpokTe dpexn, 6kKyTata nn Dblrata Koca, MOrat Da ce 3anIeTAT B DBNKeuNTe ce yactn.
Ako ca npedoctaben yctpoiCTBa 3a Cbbp3BaHeTo Ha npncnocobneHna ynaBnHe n Cb6npaHe Ha npax, ybepeTe ce, ye Te ca Cbbp3aHn H ce n3noJ3Bat npabnHIO. N3noJ3BaHeTo Ha te3n ycTPOiCTBa MoKe Da HamaHn onacHOCTte, Cbbp3aHn c npaxa
5.4 N3non3ehe u 2puku 3a eNeKmpouHcmpyMeHa
He oukaBaiTe oT eJekTpOHCTpyMeHTa NOBeue,OTKOJIKOTO ToI MOKe Da N3BbPNI.
N3noJ3BaIe npabUNHnE JekTpOHCTpyMeHT 3a CbOTBEHTO pINIOXeHne.
PiabUNHnT eJekTpOHCTpyMeHT ige CBpNI pa6oTaT aNo-dO6pe nNo-6e3OnaCHO, pni
ycNOBnTA, 3a KOnTO e KOHCTpyIPAH.
He n3no3BaIte eJektpoHnCTpyMeHTa, aKo KJIIOyBt 3a BKNIOUbaHe uN3KNIIOUbaHe He pa6OTn. EJektpoHnCTpyMeHT cbc cyuNeH KJIIOUe onaceH Tp8Ba da 6bDe peMOHTnpaH.
- I3KJIIOUHBAIte UeNCEa OTKaT, npei Da HAcTpOuBaTe, da CMeHrTe npHaADJeXHOCTn HIn Da np6upate eNeKTpOHcTpyMeHTn. NDoobHn npedna3HN MepKn 3a 6e30NaCHOCT HaMaJIbBAT PnCKa OT cIyuaHNO NyCKaHe Ha eNEKTPOHcTpyMeHTa.
CbxpaHraBaTe eNeKtpOnHCTpyMeHTe, KOTo He ce n3NoJ3BaT, daJeY OT DoCTbNa Ha Deua Hne N03BONRAite Ha INuca, He3aNo3HaTN C eNeKtpOnHCTpyMeHTn IIn HaCTOaIte INHCTpyKUIN Da pa6OT T c INHCTpyMeHTa. ENeKtpOnHCTpyMeHTe ca OnachN B pBuTe Ha Heo6yHeH Notpe6nteJI.
Iopdpbxxka.IpOBepaBaiTe 3a pa3eHTnpaHe nn 3aJxHa He nDbXeUnte ce aactn, chyPbaHe Ha yactn nn npTo CbCToHne, KoETo MoKe Da OKaKe BnnaHne Bbpxy pa60tata Ha eNektpoHnCTpyMeHTa. Ako eNektpoHnCTpyMeHTbT Ce NOBpeNi, Toi Tpr6Ba da 6bJe pemOHtnpaH. MHorO INHnDeHTn ca npEdn3BnKaHN OT HeNo6pe NODbPkaHN eNekTPoHnCTpyMeHTn.
IopdbpxaTe pexeunTe nHctpymeHTn OCTpn u ncttn. IpaBnHO noDbpxaHnte pexeun HcTpyMeHTn C oCTpn pexeun p6oBe e NO-MaJIko BepoTHO da ce 3akneTt Ce KOHTPOINpAT No-JeCHO.
I3no3BaTe MexaHn3npaHn HNCTpyMeHT, PpHaJLeXHOCTnTE, CmHeMITE pe3u N T.H. B CbOTBeTCTBnE C Te3n INHCTpyKcnn I NO HaunHa, PpeBnDeH 3a CbOTBeTHn Bn MEXaHn3npaH INHCTpyMeHT, KATO IMATE PpeBnD pa60THnTe ycNoBn I pa6oTaT, KOrTO Tp6Ba Da ce n3BbPun. I3no3BaHeTo Ha MexaHn3npaHn INHCTpyMeHT 3a OepaCIn, pa3JInuHOn OT Te3N, 3a KONTO e PpeHa3HaueH, MOKe Da DoBeDe Do OnaCha CNTyaCnI.
5.5 Cepu3Ho 06cnykeaHe
Ocnyperte cepBn3HO 6cIyXbaHe Ha Baunnae IeKtpOnHCTpyMeHT cAmo OT KBaIINΦnUpaH TexNk, KOITnI3NoJ3Ba cAmo CtAndapTHn pe3epBn Yactn. TOba Ue rapaHTnpa NODbPkaHTo Ha 3aDblNkTeJIHNTe CTAHdApTn 3a 6e3onacHOCT.
6 CNEUΦuHn HNCTPyKuM 3A BE3ONACHOCT
- IpoBepTe daH MAKcMajHaTa ckOpoc, yka3aHa Bbpxy UINFOOBuHNr DNCK, CbOTBetCTBa Ha MAKcMajHaTa CKOpocT Ha MaunHaTa. CKOpocTTa Ha MaunHaTa He Tp6Ba Da npeBnUba Ta3n Ha UINFOOBuHNr DNCK.
YbepTe ce, Ye pa3MePte Ha 7nOOByHnA DnCK CbOTBcTBA T Ha CneuKaunTe Ha MaunHaTa. - YBepete ce, Ye 7JINIOOBbUHnT dNCK e npabUNHO MOHTnpaH n 3akpehen. PnMOHTnpaHETo My He n3NOJ3BaIte peDyKTOpHN pblCTeHN nn aJaTepn.
Pa6oTeC uINIOOBuHNTe DNCKOBe Hn CbXpaHraBte B CbOTBeTCTBne C nHCTpyKUnTe Ha npOn3BOdnteJI.
He n3non3BaIte MaunHata 3a WnfoBaHe Ha Detaiu, YraTo MaKcMaJHa De6JIHa npBnUba MAKcMaJHaT a De6eJHa 3a WnfoBaHe Ha WnfoBBuHra DNCK.
He n3non3BaIte ⅢnHOBbYHInTe DnCKOBe 3a NOuHCTBaHc Ha MyCTaUNe" Ha DeTaNIN.
Korato shnfoBbHNTe dNCKOBe Tp6Ba da ce MOHTnpaT ha pe36aTa Ha BaNa, npOBepTe daJIIN DblJxHnHa Ta e DoCTaTbUHa. YBepeTe ce, Ye BaJIbTe do6pe 3aunTeH n He DOKOCBa shnfoBbHnTa nobbpXHOCT.
Ipeyn ynoTpe6a nperrnadaTe uNFOBbHnA nck 3a noBpeu. He n3non3BaIte UINFOBbUHN DnCKOBe, KOInTo ca HanyKaHN, CuyneHN nn NobpeDeH no dpyr HaunH.
Ipei Da 3anoHe Ta, octaBeTe MaunHaTa Da pa6oTu Ha npa3eH XoD B npoDbJxKeHne Ha 30 cekyHn.
B cnuyaHa anOpMaHn Bn6paunu Hn HacbnaHe Ha npy r deekeT n3KnioyeTe MaunHata He3a6abHo. PpOBepTe BHmATEJHO MaunHata NnOobhny DnCK npedn Da Ra BKIOUHTe OTHBO. - YBepete Ce, Ye NCKPnte He 3aCTpaWabT Xopata N Ye HE BJIIN3aT B KOHTaKT C JIeCHO 3anaJIMN BeueCTBa.
-
Ybepete ce, ye 6paobTBaHnT deTain e dope noDpRn H nn 3akpehen. DpbkTe pBcTe cn daJeve ot nobbpxHOCTTa, kOTo ue ce 6paobTba.
Bunharu Hocete npedna3Hn OUna n npedna3Hn cpeCTBa 3a yUnte. Ako kejnaete uHne Heo6xOdmo, n3noJ3BaIte n dpyr BnD 3aUnTa, HanpImep npecTnka uNn UJem.
YBepete ce, ye IINIOOBvHNTe rnaBn TOcKn Ca MOHTnpaHn B CbOTBeTCTBNE C HCTpyKUnTe Ha npOn3BOdnteJI.
YBepete ce, ye KOrato 3aeDHO C npOdyKTITE CbC 3aIeENeH abpa3uBEH cNoi ca npedocTabeHN IOJIOXKIN KOrato Te ca Heo6xOdMn, Te ce n3noj3BaT.
Ako c nHCTpyMeHTa e npedeOCTaBeH 3aUHTHO npncnOC6NeHHe , HNKora He n3IOJI3BaIte nHCTpyMeHTa 6e3 Hero. -
Ipn nHctpymeHTn, npdHa3HaueHn 3a MOHTnpaHe B rnaBa c pe36oBaH OTBOp, ce yBepTe, ye pe3bata B rnaBaTa e DocTaBHy Oblra, 3a da NOeMe DblxHnHaTa Ha BaJa.
- Pn pa6oTa B yCJIOBnHa 3aIpaWHeOCT ce yBepTe, ye BEHTnlaQHOHHte OTBOPn Ca HcTn. Ako Bb3HnKHe Heo6XoDMocT OT NOuHCTBaHe Ha npax, nbpBO n3KnIOUeTe HHCTpyMeHTa OT KOHTaKTa (n3NoI3BaIe HeMeTaIHN ppeMTe) n ppeDOrbPaTeTe NOBpeXdaHETo Ha BbTpEShHtE YactN.
Ako eIeKtpnueckata Mpeka E B looCbCTOHaHne, no BpeMe Ha cTapTnpaHTo Ha obOpyDbaHeto MoKe Da BB3HNkHe KpaTKOTpaEH cnaH a HAnpEKeHHe. ToBa MoKe da NobInae BbpxOcTaHaNoTO obOpyDbaHe (HaPmEp, npMnRbAe Ha lamnTe). Ako ImPeHaHcBt Ha MpeKaTa Zmax < 0 348 oMa, taKBa HApUWeHn Hma Da ce noluyat. (Ako e Heo6xOdmo, MoKeTe Da ce CbPkeTe C MeCTHnTe OpraHn3aun 3a eIeKTPoCHa6DaBaHe 3a dOnbJIHnTeJHa INΦopMaun).
6.1 DonbHumenu Hcmpkyuu 3a 6e3onacHocm

He n3non3BaIte HNCTpyMeHTa 3a JeKN MeTaN, YNeTO CbDbPkaHne Ha MarHe3n, npEbnuaba 80 %, TbN KATO TO3N TIN MeTaN ca 3anaJIMN.

Pa6oTHaTa rnaBa moKe da npOdbJnx BbPteHeTo cn cJIeD kaTO nHcTpymeHTbTe n3KJIIOueH.
OT rohpata ctpaHa Ha HnHcTpymeHa e pa3noJIOKeH 6yToH 3a 3akJIIOUbaHe Ha uHHdela. He HatnckaIte To3n 6yToH, Dokato HnHcTpymeHTbT pa60Tu.
- YBepeTe ce, Ye I3NoI3BaHInTe npICnOCo6JIeHnra Ca NOxOJaU 3a MaKcIMaJIHaTa CKOPoCT, NocOHeHa B TexHnueCKInTe DaHHN.
YBepeTe ce, Ye npncnocO6JIeHnraTa ca MOHTnpaHn CnopeD INHCTpyKcInTe. - I3noJI3BaIte cAmO npCnOcO6JIeHnI npExoHNuI, npEOCTaBEHnOT npON3BODITJIa.
YBepTe Ce,Ye NCKPte He MOraT Da nonaHaT Bbpxy Xopa nn da 3anaT Bb3nnaMeHmM MaTePnAn.
BnHaHn HocTe npedna3Hn Ounna, npedna3Hn cpeCTBa 3a yuHnte, a npn Heo6xoJIMOCT n3PON3BaYTe NdpyIn npedna3Hn cpeCTBa - pa6OTHn pbkauu, TBbpda waKna T.H.
7 MOHTAK

BnHaHn n3KJIIOUBaIte HNCTpyMeHTa OT KOHTaKTa IpeDn MOHTnpaHe Ha npncnoc6JeHne.
7.1 CmHa Ha 3aKpeHn uHcmpymeHm (fua. 1 u 2)
Maiknte npncocobneHn kaTo uNFOBbHn KpbroBe nI nppeu nn pckoe MoaT da ce 3akpenr dnpkTHO KbM MyTTuYHKUHOHaHHn IHCTpymeHT.
Ako e Heo6xOIMo Te Morat Da ce NoCTaBrt Ha rBKBaBn npIBODeH BaJI.
7.2 CnomaaemenHa pbkoXamka (pu. 3, 4 u 5)
- OtctpaHHe npbCTeHa KaTo rO 3aBbPTnTe 06paTHo Ha YacOBHnKa.
MoHTnpaTe cNoMaTaTeJHaTa pKoXBaTkA Bbpxy pe36aTa nЯ qNKcnpaTe C DonbHnTeJHHra (No-MaBk) npbCTeH KaTO 3aBbPTNTe npbCTeHa NO YacOBHnka..
7.3 3aKpeneBaHe Ha MaJIku UHcmpymeHmu dupekmHO KbM MyJmuftyuHaHua uHcmpymeHm
- 3aBbPTe Te IeKo PbKOxBaTkata Ha NaTPOHa Ha cHaTgAta, KaTO IbPxNte HaTnCHaT 6nOKupaun 6yToH, DOKATO ToI ce 3aJeCTBa.
Hnkora He HatackaTe 6bnokpaun8byToH,doKato nHctpyMeHTbT pa6OTn.
Ako He MoxkeTe da pa3xna6nte pbkoxbaTkata Ha natoHa Ha cHaRaTa Ha pbKa, 3noJ3BaTe MaBk raeueH KIOU.
-
CmeHete 3akpehenn HNCTpymEn. BnHa n 3aTraIe 3akpenenHe INHCTpyMeHTn Do MaKcHymM. BaIOBe, KOnto CTbpyat OT ZaHRata, Ie DOBeDaT Do "6neHe".
-
3aterhepe pkoxbkata Ha natoHa Ha zahrata. 3a da cmeHnte natoHa Ha zahrata, ro CBAIte H 3ameHete C HOB.
7.4 Ppucnoo6nue
7.4.1 WJnΦOBbUH HaKpaHnU
Ynotpe6a: 3aToUbaHe, nouCTBaHe Ha "MycTaU",OTcTpaHraBaHe Ha pBxJa, npocnnpaHe.
CbBET:NoHCTeTe nOΦopMeTe HApauHHuNTe 3a WnHΦoBaHe Upe3 XOHnHr KAMbK.
7.4.2 WnIOOBbUH nIaBn
- YnOtpe6a: 3aФINHO rpaBnpaHe Ha pa3NHyH MaTePnaJI.
CbBet:O6pa6oTbaIeMeTaHHTeDeTaIINc HnCKaCKopoCT Taka, KATO Ye JN Ca OT TBbpDO DbpBO.
-Пл actmacobte DeaTn Tp6Ba Da 6bDaT o6pa6oTbaHn Pn HnCKn CkOPOCTN, NopaDN CKIOHHOCTTa NM KbMa pa3ToJBAHe NO BpeMe Ha o6pa6OTkata.
Pa6oTaTc MyIITnOyHKUHOHaHINH INHCTpyMeHT npi NOBnCOKa CKOPoCT ige HamaII Bn6paunnte.
7.4.3 Pnucno6beHne 3a nacbKoctpyHa o6pa6oKa

- Ynotpe6a: PЯськoctpунHa obpa60tka, n3rJaXdaHe n npoФилupaHe Ha nbpBO n CtbKneHn BnaKha.
7.4.4 WnnnoobueHkambk

- YnOtnpe6a:ПочntBaHe n 3aToUbaHe Ha IJIINΦOBbYHInTe DnCKOBe.
7.4.5 Полирази дисковe

- YnOTope6a: POnIpaHe Ha MeTaJ N ShINΦOBbUH KAmbHn.
BHHMaHHe: POnIpaIte cAmO cbc CtpaHnHInTe NOBbpxHOCTn Ha DnCKa. YeJIHata YacT ige OCTaBn DpackOTnHn Bbpyo6pa6oTBaHn DeTaJl.
7.4.6 Pexeu nnck
- YnoTpe6a: HanpeuHo nIIN HaIbXHo pa3p3BaHe Ha 6oITOBe, BnHTOBe, MeTaIIH NICTOBe, TbHKN DbPBEHn IIN PnactMacOBn DeTaN.
7.4.7 Pnpncno6bneHne 3a op6ntanHa necbkoctpyHa o6pa6oTka
- YnOTope6a: NecbKocTpynHa o6pa6oTKa, n3rJaXdaHe npOoHInpHa He Ha DbPBO n CtbKJEn H BnaKHa.
7.5 CneuaneH _bp_ka 3a npo6ueaHe/pe30eHa Ha KaMbK (pu2.6,7,8,9,10 u 11)
- OtctpaHHe npbCTeHa KaTo rO 3aBbPTnTe o6paTHo Ha yacOBHnKa.
BmbkHeTe CBpeINoTo INn Fpe3OBnHaKpaHnK (He e BKnHoueH).
3aBnHTeTeΦpe3OBnHaKpaHnBbpxyMaunHaTa.
-Дьлбочинота Ha pa6oTa Ha akcecoapa MoKe Да ьдe HacTpoEHa Ype3 OTBnHTBaHe Ha KpUyataTa raiKa. ПрЕмстete Фпe3OBЯ HakpaHnK HanpeДи Ha3aД, 3aД onpeJenTe JekHaHaTa HacTpoiKa. Cnen ToBa ФнКчрТe КрUnyataTa raiKa OTHOBO.
Korato ckaNaTa Ha 0pe3OBnHaKpaHnK e HAcTpoHa Ha 20 N BbpxbT Ha CBpeINoTo nNn 0pe3OBnHaKpaHnK ce n3daBa C ToUHO 20 mm OT CneuaHnJaBpKau, cKaNaTa MoKe Da 6bDe n3POn3BaHa 3a HAcTPOKa Ha npaBnHaTa Dbl6OuHa Ha pa6ota.
Ako e Heo6xOIMO CTapTnpaHe B CpeDaTa Ha 3arOTbKaTa (OTBOP Nn KaHaJ KATO CTAPTOBa ToK), NOCTaBeTe MaunHaTa C ppe3OBn HAkpaHnK HAKNoHEHO KbM 3arOTbKaTa, Taka Ye BbPxbT Ha HApauHnKa Da e HAcOeH KbM CTapTOBaTa ToKca. CJeToBA BKnIOyete MaunHaTa, HAcOye Ta KbM 3arOTbKaTa n RaHKnOHeTe 6abHo, DOKaTo MaunHaTa Ce HAcOu BEpTKaJIHO KbM 3arOTbKaTa.
7.6 Cmraa c onopa e bpy 2eKaae en (pu. 12, 13, 14, 15, 16 u 17)
Cne MoHTnpaHe Ha cTgRaTa C onopa Bbpxy pa6THaMa cMa MyTnФyHKUHOHaJIHNrHCTpyMeHT MOKe Da 6bIe OKaueH C NOMOuTa Ha KOH3OJaTa Ha DkoXBaTKaTa.
- TbBkABnT BAl N03BOJRA Ba MoDInΦnIupaHaTa MaUHnA Da IOCTnIg MeCTa, KONTO Ca HeIOCTbNH CbC CTahdAPTHata BEPCnHa MyJTnΦyHKUHOHAHn HHTpymEHT.
MoHTnpaTe onopata, KaKTo e noka3aHo Ha fHrypata. BucOuHaTa Ha TpuHOxHnKa MoKe Da 6bDe perynpaHa c NOMoTu Ha TeJeCKOnuHaTa Tpb6a. FHKCupaTe JeJaHaTa No3nqur Ype3 3abptAne Ha Tpb6ata.
OTCTpaHete npbCTeHa OT MHOFOyHKUOHaJIHHa INHCTpyMeHT I TO CbXpaHete Ha 6e30nacHO MRCTO.
- ⅢdþpnaIe BbTpEshHn3aBnKBaU BaI Ha TbBkABy BaI ITO BmBkHETe BcaHROBnI naTPOHHK.
- 136yTaIe CbeHInHeJIa Ha IbBkABnBaI Bbpxy pe36aTaHa MyIITnФyHKUHOHaJIHHa HICTpymENT.
BmbkheMeTaHaTa HnnpMep 3a WeCTOTEHN KJIIOU) npe3 OTbOpBa KpaHa KaRa Ha TbBkABn BAn I 3aBbptTeI npOBuAaata Ta BaBA 6abHO, DOKaTO OTBOpBT B KopnyCa Ce NpOpaBn C BaJa Ha npOBuAaata Ta BaBA n WeCTOCHeHHrT KJIIOU MoKe da 6bDe BmkbHAT. PpOBuAaata Ta TaBA c ToBa e 6nokupaHa.
MoHTnpaTe LcaHOBnI NaTPOHHK B npo6Naata rnaBa NO cbuHaH NaH KaTo npM My6TuФyHKUHOHaHnI NHCTpyMeHT.
CneToBa MOHTnpaIte Heo6xOIMnA kCeCoap no CbunHaUN KaTO npM MyTnФyHKUHOHnHn HNCTpyMeHT.
8 PABOTA
8.1 Knioq On / off (Bkn./M3kn)

Bunhar npOBepaBaiTe daHn HApEKeHneTo Ha eJekTpueckaTa MpeKa CbOTBeTCTBa Ha NocOyeHOTO B Ta6eJIkata C HomHaJIHHTe DaHHN Ha yCTpoIcTBOTO.
BknuBaHe:3aBbptete6yToHa 3a 3axpaHbAHeTo Do noloxeHne I.
- 13KIIIOUBAHe:3aBbPTeTe 6yToHa 3a 3axpaHbAHeto IIO NOIOKeHne O.
8.2 HacmpoueaHe Ha ckopocmma (phi. 18)
- CkopoctTa Ha MyItnuHkyHKUHOHaHNHa HNCTpymeHT MoKe Da 6bJe peRyInpaHa HenpeKbcHato. BnHarn 3aNoYBaIte pa6Ota Ha Ha-NHcKaTa CkopoCt N CneI TOBa YBeHHaBaIte Do KeJaHOTo HnBO.
“+”ob03haaba no-BnCoka ckopocT.
“-”06o3HaayabaNo-HnCKaCKopoCt.
8.3 CeemoduodHo oceemneHue (fua. 19)
Ako pa6oHTne Ha TbMHO H NCKaTe Da BnKdaTe RaCHO pa6oTHaTa 3OHa, MoJRA BKIOUcTe CBETOINOHOTOCBETJIeHHe.
3a da n3no3BaTe CBeToNDnOHaTa yHKuM, MoJ, OTCpaHeTe npbCTeHa Ha MaunHata Iro 3ameHeTe Cbc CBeToNDnHn npbCTeH.
HaTnchTe 6yToHa 3a OCBeTneHHeTo (6), CBeToOnOuInTe Ce BKNIOuBaT.
24/08/2022, Lier - Belgium
1 PAREDZETAIS LIETOJUMS 3
2 APRAKSTS (A. ATT.) 3
3 IEPAKOJUMA SATURA SARAKSTS. 3
4 APZIMEJUMI 4
5 VISPARIIGDarBARIKA DROsIBAS BRIDINAJUMI 4
5.1 Darba vieta 4
5.2 Elektrodrosiba 4
5.3 Personala drošiba 5
5.4 Darbarika lietošana unapkopsana 5
5.5 Apkopes serviss.. 5
6 SPECIFISKIDROsIBASNORADIJUMI 6
6.1 Papildu drosibas instrukcijas 6
7 MONTAZA 7
7.1 Piestiprinamo uzgalu maina (1. & 2. att.) 7
7.2 Papildu rokturis (3., 4. & 5. att.) 7
7.3 Maza izmera uzgalu piestiprinasana tieSi pie slipmasinas.) 7
7.4 Piederumi 7
7.4.1 Slipeshanas uzgali 7
7.4.2 Smaili slipuzgali 7
7.4.3 Smilsu slipeesanuzgalis 8
7.4.4 Galoda 8
7.4.5 Puleşanas ripas 8
7.4.6 Griezeyripa 8
7.4.7 Smilsu slipripipa. 8
7.5 Ipa's turetajs akmens urbsanai / frezeshanai (6., 7., 8., 9., 10. & 11. att.) 8
7.6 Vitrne ar atbalstu un elastigu varpstu (12., 13., 14., 15., 16. & 17. att.) 9
8 LIETOSANA 9
8.1 lesl./izsl.sledzis 9
8.2 Atruma iestafisana (18. att.) 9
8.3 LED gaismas (19. att.) 9
9 TIRISHANA UN KOPŠANA 10
9.1 Tirišana 10
10 TEHNISKIE DATI 10
11 TROKSNIS 10
12 SERVISA NODALA 10
13 UZGLABASANA 10
14 GARANTIJA 11
15 VIDE 11
16 ATBILSTIBAS DEKLARACIJA 12
ROTEJOSAIS MULTIRIKS 200W
POWX1341
1 PAREDZÉTAIS LIETOJUMS
Jusu gala slipmasina ir paredzeta koka, metala, plastmasas un akmens urbsanai, frezeisanai, gravesanai, pulesanai, griesanai, apvileesanai un slipesanai. Ta nav paredzeta profesionalai lietoisanai.

BRIDINAJUMS! Pims lietojat ieri, drošibas nolukos rupigi izlasiet so rokasgramatu un visparigas drošibas instrukcijas. Darbariku drikst nodot citam lietotajam tikai kopar sininstrukcijam.
2 APRAKSTS (A. ATT.)
- Elektribas kabelis
- Akis
- leslagsanas poga
- Piekluve ogles sukai
- Blokësanas poga
- LED poga
-
LED gredzens
-
Cangas spilpatrona
- Reguleşanas poga
- LCD
- Canga
- Uzgriežnu atslēga
- Lokana dzenosā varpsta
- Papildu rokturis
3 IEPAKOJUMA SATURA SARAKSTS
Regulatory Affairs - Compliance Manager
24/08/2022, Lier - Belgium
1 KAVANDATAV KASUTUSALA 3
2 KIRJELDUS (JOONIS A) 3
3 PAKENDI SISU 3
4 SYMBOLS 4
5 ÜLDISED HOIATUSED JA OHUTUSJUHISED 4
5.1 Tooppikond 4
5.2 Elektriohutus 4
5.3 Oht inimstele 5
5.4 Elektritööristade kasutamine ja hooldamine 5
5.5 Teenindus 5
6 SPETSIIFILINE OHUTUSTEAVE 5
6.1 Täiendav ohutusteave 6
7 KOKKUPANEK 7
7.1 Lisatarvikute vahetamine (joonis 1 & 2)
7.2 Lisakaeptide (joon. 3, 4 ja 5)
7.3 Väikeste tarvikute kinnitamine otse universaaltöriista kulge... 7
7.4 Lisatarvikud 7
7.4.1 Lihvkivid 7
7.4.2 Graveerimisterad.. 7
7.4.3 Lihvpea 8
7.4.4 Hoonimiskivi. 8
7.4.5 Poleerimiskettad 8
7.4.6 Liokeketas 8
7.4.7 Lihvketas. 8
7.5 Erihoidik kivi puurimiseks/freesimiseks (joon. 6, 7, 8, 9, 10 ja 11)
7.6 Toega kruustangid ja painuv vars (joon. 12, 13, 14, 15, 16 ja 17)
8 KAsITSEMINE 9
8.1 Seadmeluliti 9
8.2 Kiiruse reguleerimine (joonis 18) 9
8.3 LED-lamp (joonis 19) 9
9 PUHASTAMINE JA HOOLDUS 9
9.1 Puhastamine 9
10 TEHNILISED ANDMED 10
11 MURA 10
12 TEENINDUSOSAKOND 10
13 HOIUSTAMINE 10
14 GARANTII 11
15 KESKKOND 11
16 VASTAVUSDEKLARATSIOON 12
POWERPLUSPOWX1341 ETUNIVERSAALTÖÖRlIST 200WPOWX1341
1 KAVANDATAV KASUTUSALA
In this manual and/or on the machine the following symbols are used:
| ! | Denotes risk of personal injury or damage to the tool. | Read manual before use | |
| CE | In accordance with essential requirements of the European directive(s) | "Class II - The machine is double insulated; Earthing wire is therefore not necessary | |
| Mandatory use of eye protection. | Wear gloves |
5 ÜLDISED HOIATUSED JA OHUTUSJUHISED
Toode: UNIVERSAALTOÖRlIST
Philippe Vankerkhove
Regulatory Affairs - Compliance Manager
24/08/2022, Lier - Belgium
Vario
WWW.VARO.COM
DESIGNED AND MARKETED BY VARO
Copyright by varo
VARO - VIC. VAN ROMPUY nv
JOSEPH VAN INSTRAAT 9 - 2500 LIER - BELGIUM


- BESCHRIJVING (FIG. A)
- ROTARY MULTITOOL 200W POWX1341
- INTENDED USE
- DESCRIPTION (FIG A)
- PACKAGE CONTENT LIST
- SYMBOLS
- GENERAL POWER TOOL SAFETY WARNINGS
- Work area
- Electrical safety
- Always check that the power supply corresponds to the voltage on the rating plate.
- Personal safety
- Power tool use and care
- Service
- SPECIFIC SAFETY WARNINGS
- POWX1341 EN
- Additional safety instructions
- ASSEMBLY
- Changing the attachment tools (Fig. 1 & 2)
- Auxiliary handle (Fig. 3, 4 & 5)
- Attaching small tools directly to the multitool.
- Accessories
- Grinding bits
- Grinding points
- Sander
- Grinding stone
- Polishing discs
- Cutting disc
- Orbital sander
- Special holder for stone drilling / milling (Fig. 6, 7, 8, 9, 10 & 11)
- Vice with support an flexible shaft (Fig. 12, 13, 14, 15, 16 & 17)
- OPERATION
- On/off switch
- Setting the speed (Fig. 18)
- LED light (Fig. 19)
- CLEANING AND MAINTENANCE
- Cleaning
- TECHNICAL DATA
- NOISE
- SERVICE DEPARTMENT
- STORAGE
- WARRANTY
- ENVIRONMENT
- POWX1341 DE
- Interruftore On/off
- Interruptor ligar/desligar (on/off)
- LIMPEZA E MANUTENÇA
- ROTERENDE MULTIVERKTØY 200W POWX1341
- TILTENKT BRUK
- RENGJØRING OG VEDLIKEHOLD
- Bruk参加会议, but he was not able to speak. "I'm sorry," he said, and his voice turned into a low voice. "It's my son," he said, and his voice turned into a high voice.
- TEKNISK DATA
- STØY
- ALMINDELIGE SIKKERHEDSANVISNINGER FOR EL-VAERKTJ4
- ROTACIONI MULTIFUNKCIONALNI ALAT 200W POWX1341
- ROTACIONI MULTIFUNKCIONALNI ALAT
- ΠΕΡΑΦH (EIK. A)
- ROTACIJSKI VIŠENAMJENSKI ALAT 200W POWX1341
- NAMJENA
- OPIS (SLIKA A)
- POPIS SADRŽAJA PAKETA
- NAMENJENA UPOTREBA
- POSEBNA BEZBEDNOSNA UPUTSTVA
- DALŠI BEZPEČNOSTNI POKNY
- UNEALTÄ MULTIFUNCTIONALÄ ROTATIVA 200W POWX1341
- UTILIZARE PREVÄZUTÄ
- BPAUATEJIbHbIMMHOROΦYHKUHOHAJIbHbIMNHCTPYMEHT 200BTPOWX1341
- NcNoJIb3OBAHNE IO HA3HauEHNIO
- ONICAHNE (PNC.A)
- COIDEPXXHMOE YNAKOBKN
- yCJIOBHBIE O6O3HAUEHNIA
- Cmeha npuHaednHexHocmeu (Puc. 1 u 2)
- BcnoMoZaMeIbHa pyKoMaKa (Puc. 3, 4 u 5)
- KpenneHue He6oJIbIux npuHaJNeKHeOHeNocpeCmBeHHo MHO2OfoYHKUOHaJIbHOMy UHcmpymHmy.
- PpuHaadneKHoocmu
- WlndoBaJIbHbIe HacaIaN
- 3aocTppeHHbIe fpe3bl
- Haxdk
- ⅢnfoBaIbHbI KameHb
- NopnpoBaNbHbIe nckn
- OTPe3Hoi DnCK
- TapelbTaBn WJNFOBaJIbHbI Kpyr
- CneuaJIbHbI depKamEnb dIa ceepeHua Uu pe3epo8aHua KaMHa (Puc. 6, 7, 8, 9, 10 u 11)
- Tucku c onopoou dna eua6ko0e bana (Puc. 12, 13, 14, 15, 16 u 17)
- TEXHnueCKNE DAHHbIE
- WYM
- BHIMAHHE! HadeBaTe cpeCTBa 3aunTbI opraHOB clyxa, ecn 3BykoBoe daBHeHne npebblaaet 85 d5 (A).
- OTDEJIOBCJIYXINBAHNA
- XPAHEHNE
- 14「APAHTIN
- OKPYKAIIOUJAR CPEDA
- DEKJIAPAUZI O COOTBETCTBNI
- POTAUHOHEM MYJITINHCTPYMEHT 200BTPOWX1341
- ПЕДHA3HAUECHNE HA YNOTPEBATA
- ONICAHNE (ФИг.А)
- CnncbK HA CbIbPjXAHNETO HA ONAKOBKATA
- CUMBOJI
- 5OBuINIpeDyIPeXJDeHn3ABe3OpAChOCTPnN3IOJ3BAHE HA EJEKTPoHCTPYMeHTN
- Pa6omHa 30Ha
- EneKmpo6e3onacHocm
- Bunarn npoBepaBaiTe daHn 3axpaHbAooTo HanpeXeHne CbOTBeTCTBaHa HapexeHneTO, nocOueHO Bbpxy Ta6ekkata C HOMHaJIHN CTOnHOCTN.
- JIuHa 6e3oNaChocm
- N3non3ehe u 2puku 3a eNeKmpouHcmpyMeHa
- Cepu3Ho 06cnykeaHe
- CNEUΦuHn HNCTPyKuM 3A BE3ONACHOCT
- DonbHumenu Hcmpkyuu 3a 6e3onacHocm
- MOHTAK
- CmHa Ha 3aKpeHn uHcmpymeHm (fua. 1 u 2)
- CnomaaemenHa pbkoXamka (pu. 3, 4 u 5)
- 3aKpeneBaHe Ha MaJIku UHcmpymeHmu dupekmHO KbM MyJmuftyuHaHua uHcmpymeHm
- Ppucnoo6nue
- WJnΦOBbUH HaKpaHnU
- WnIOOBbUH nIaBn
- Pnucno6beHne 3a nacbKoctpyHa o6pa6oKa
- WnnnoobueHkambk
- Полирази дисковe
- Pexeu nnck
- Pnpncno6bneHne 3a op6ntanHa necbkoctpyHa o6pa6oTka
- CneuaneH _bp_ka 3a npo6ueaHe/pe30eHa Ha KaMbK (pu2.6,7,8,9,10 u 11)
- Cmraa c onopa e bpy 2eKaae en (pu. 12, 13, 14, 15, 16 u 17)
- PABOTA
- Knioq On / off (Bkn./M3kn)
- HacmpoueaHe Ha ckopocmma (phi. 18)
- CeemoduodHo oceemneHue (fua. 19)
- ROTEJOSAIS MULTIRIKS 200W
- POWX1341
- PAREDZÉTAIS LIETOJUMS
- APRAKSTS (A. ATT.)
- IEPAKOJUMA SATURA SARAKSTS
- POWERPLUSPOWX1341 ETUNIVERSAALTÖÖRlIST 200WPOWX1341
- KAVANDATAV KASUTUSALA
- ÜLDISED HOIATUSED JA OHUTUSJUHISED
- Vario
Brand : PowerPlus
Model : POWX1341
Category : Multitools