
POWEG8050 - Multitools PowerPlus - Free user manual and instructions
Find the device manual for free POWEG8050 PowerPlus in PDF.

| Product type | 4-in-1 multi-tool (hedge trimmer, chainsaw, brush cutter, grass trimmer) |
| Brand | PowerPlus |
| Model | POWEG8050 |
| Engine | 42.7 cc, 1.25 kW, 2-stroke, air-cooled |
| Fuel | Mixed fuel 40:1 (unleaded gasoline + 2-stroke oil) |
| Fuel tank capacity | 0.85 L |
| Hedge trimmer - Blade length | 430 mm |
| Hedge trimmer - Cutting width | 23 mm |
| Chainsaw - Cutting length | 250 mm |
| Brush cutter - Cutting width | 255 mm (3-tooth blade) |
| Grass trimmer - Cutting width | 400 mm (nylon line 2.4 mm, 4 m) |
| Shaft type | Straight, diameter 26 mm, length 840 mm |
| Handle | D-handle with barrier bar |
| Sound pressure level | 96 dB(A) |
| Guaranteed sound power level | 114 dB(A) |
| Vibrations (Aw) | 5.9 m/s² (k=1.5) |
| Main functions | Cutting grass, brush, hedges; pruning branches; short mowing; trimming at ground level |
| Maintenance and cleaning | Clean after each use; check air filter every 25h; lubricate gears every 20h; sharpen chain if necessary |
| Safety | Transport harness with quick release; protective shield; emergency stop; anti-start safety |
| Spare parts and repairability | Use genuine PowerPlus parts; repairs by authorized service; possible replacement of chain, guide, spark plug |
| Warranty | 24 months from purchase date |
| Package contents | Engine unit, accessories (hedge trimmer, chainsaw, brush cutter, grass trimmer), harness, assembly tools, manual |
Frequently Asked Questions - POWEG8050 PowerPlus
User questions about POWEG8050 PowerPlus
0 question about this device. Answer the ones you know or ask your own.
Ask a new question about this device
Download the instructions for your Multitools in PDF format for free! Find your manual POWEG8050 - PowerPlus and take your electronic device back in hand. On this page are published all the documents necessary for the use of your device. POWEG8050 by PowerPlus.
USER MANUAL POWEG8050 PowerPlus
natural_image
Product lineup of three different power tools: a push tool, a manual pusher, and a power jack (no text or symbols visible)
NL NEDERLANDS VERTAALDE VERSIE VAN DE ORIGINELE HANDLEIDING
FR FRANÇAIS TRADUCTION DU MODE D'EMPLOI D'ORIGINE
EN ENGLISH ORIGINAL INSTRUCTION MANUAL
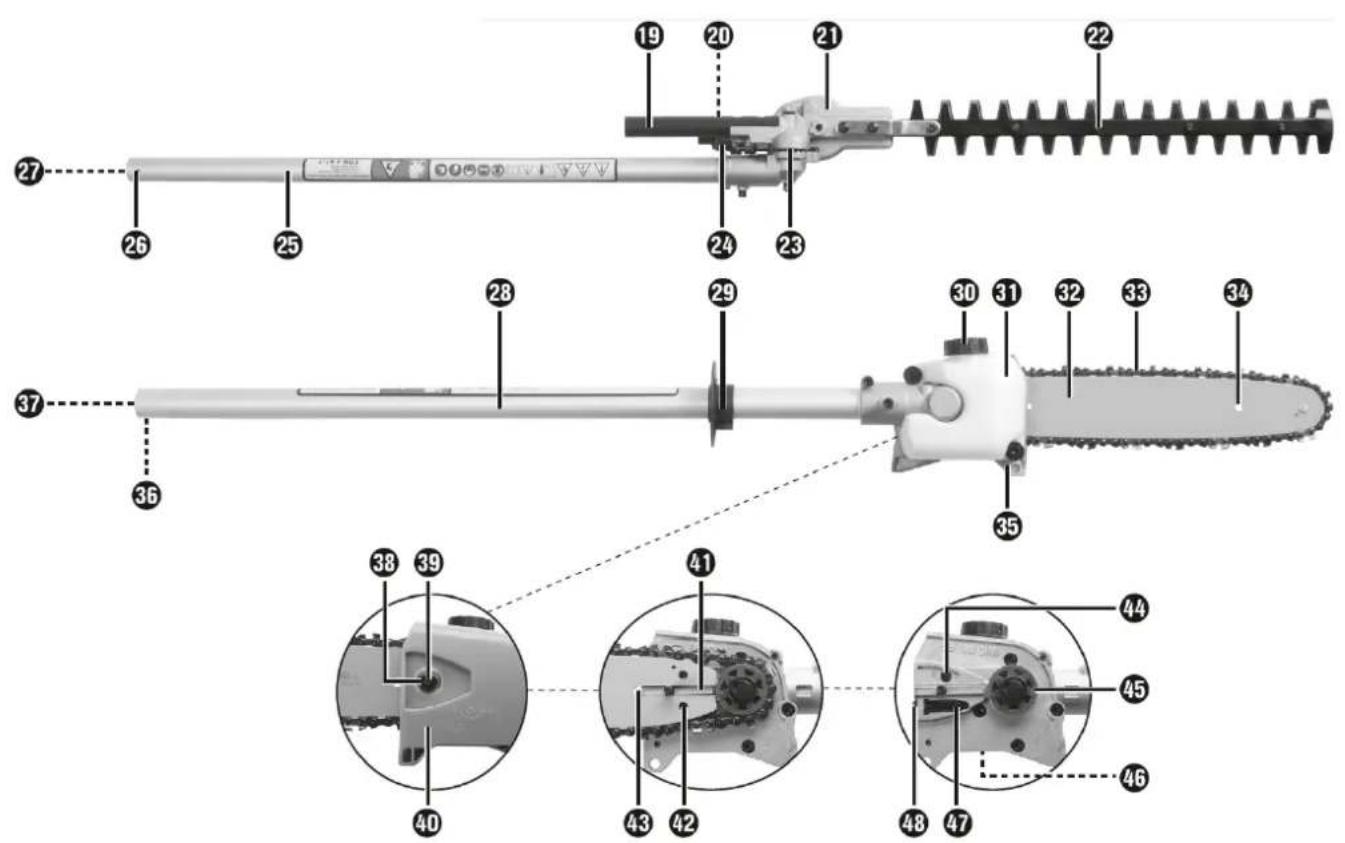

Fig. 1A
natural_image
Diagram showing three mechanical clamping or cutting tools with arrows indicating motion (no text or symbols)Fig. 1B
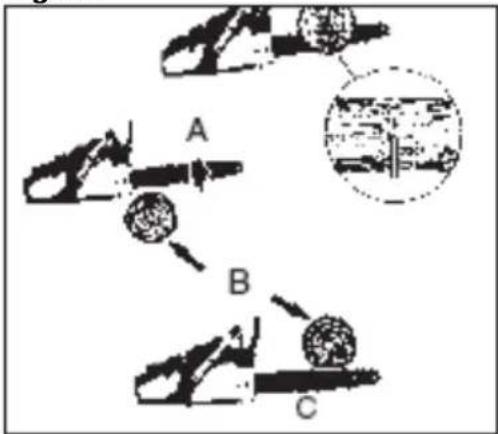
Fig. 2

natural_image
Line drawing of a person using a tool to lift or lift an object (no text or symbols)Fig. 3

natural_image
Three-panel sequence showing a hand using a lock mechanism to adjust the key and handle (no text or symbols visible)Fig. 4

natural_image
Person using a manual tool on a robotic arm, no visible text or symbolsFig. 5A

natural_image
Mechanical assembly diagram showing a lever mechanism with labeled parts (1, 2) and directional arrows indicating motion (no text or symbols beyond labels)
natural_image
Mechanical tool with red and blue component, no visible text or symbols

natural_image
Close-up of a hand holding a metal tool with blue arrows indicating motion or movement, labeled 'Fig. 5C' (no text on the tool itself)Fig. 6

Fig. 7A - F

natural_image
Close-up of a mechanical component with a magnified view showing internal structure (no text or symbols visible)
natural_image
Close-up of a mechanical component with directional arrows and a labeled section (B), no readable text or symbols present.
natural_image
Close-up of a mechanical component with a circular feature and directional arrows, labeled 'C' and '65' (no readable text or symbols beyond labels)
natural_image
Close-up of a mechanical component with a circular feature and directional arrows, no visible text or symbols
natural_image
Close-up of a mechanical component with a spiral mechanism and directional arrows (no text or symbols)
Fig. 8
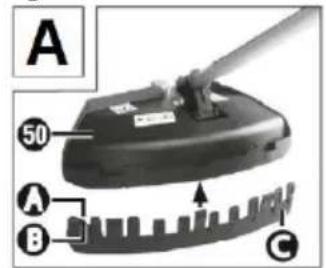


Fig. 9A - F

natural_image
Person wearing a checkered shirt and safety harness, holding a small object (no visible text or symbols)
natural_image
Person wearing a checkered shirt with black straps and a directional arrow (no text or symbols)
natural_image
Person wearing a full-body safety harness and checkered shirt, hands on hips (no visible text or symbols)
natural_image
Person wearing a full-body safety harness and checkered shirt, holding a black belt (no text or symbols visible)
natural_image
Close-up of a mechanical assembly with labeled parts (e and E), no readable text or symbols beyond labels
Fig. 10A

natural_image
Illustration of two workers spraying water on a grassy field, no text or symbols presentFig. 10B

natural_image
Diagram of a mechanical tool interacting with a circular component, showing motion arrows (no text or symbols)Fig. 10C

natural_image
Technical line drawing of a mechanical device with rotating components, set against a textured background (no text or symbols)Fig. 10d
natural_image
Diagram of a robotic arm operating on a platform with a downward arrow indicating force or movement (no text or symbols present)Fig. 11

natural_image
Technical diagram of a mechanical device with a rotating wheel and curved base (no text or symbols)Fig. 12

natural_image
Illustration of a person using a power shoveling machine to cut through a corrugated material (no text or symbols)
natural_image
Illustration of a person using a rope to lift a wall, with arrows indicating direction (no text or symbols)
Fig. 13

natural_image
Diagram showing a tool interacting with a mechanical component, no text or symbols presentFig. 14

Fig. 15

Fig. 16


16 PROBLEEMOPLOSSING....25
16.1 Motorblok 25
16.2 Kettingzaag 25
16.3 Heggenschaar....25
17 ONDERHOUDSINTERVALLEN 26
17.1 Kettingzaag 26
17.2 Heggenschaar....26
18 GARANTIE....27
19 MILIEU 27
20 CONFORMITEITSVERKLARING....28
POWERPLUS POWEG8050 NL
MULTITOOL TUIN 4-IN-1 - 42,7CC
POWEG8050
1 BEOOGD GEBRUIK
2 BESCHRIJVING (FIG. A)
Motorblok
16 PROBLEEMOPLOSSING
16.1 Motorblok
30/09/21, Lier - Belgium
POWERPLUS POWEG8050 FR
A = tension
B = objets solides
C = poussée
20 DÉCLARATION DE CONFORMITÉ


VARO – Vic. Van Rompuy N.V. - joseph van instraat 9 - be2500 lier - Belgique, déclare que :
Appareil : MULTI-OUTIL DE JARDIN 4-EN-1 - 42,7 cm³
Marque : POWERplus
Modèle : POWEG8050
30/09/21, Lier - Belgium
POWERPLUS POWEG8050 EN
1 INTENDED USE....4
2 DESCRIPTION (FIG. A)......4
3 PACKAGE CONTENT LIST ....5
4 SYMBOLS....5
5 GENERAL SAFETY WARNINGS....7
5.1 Work area 7
5.2 Personal safety 8
5.3 Engine tool use and care....8
5.4 Service....8
6 ADDITIONAL SAFETY INSTRUCTIONS......8
6.1 Hedge trimmers....8
6.2 Chain saw....9
6.2.1 Kickback safety precautions....10
6.3 Brush cutter....11
6.4 Trimmer 11
7 SAFETY WARNINGS GASOLINE ....12
8 BEFORE USE 12
8.1 Attaching the round handle (Fig. 2)....12
8.2 Fitting the quick release mechanism (Fig. 3)....13
8.3 Fixing/attaching the carrying harness (Fig. 4)....13
8.4 Assembling the hedge trimmer (Fig. 5)....13
8.5 Removing the hedge trimmer....13
8.6 Swivelling the hedge trimmer....13
8.7 Fitting the guide bar and chain (Fig. 6)....14
8.8 Removing the saw chain 14
8.9 Tightening and checking the saw chain....14
8.10 Lubrication 14
8.11 Sharpening the saw chain.... 15
8.12 Fitting/ removing the blade guard.... 15
8.13 Installing / replacing the cutting blade (Fig. 7A-F)....15
8.14 Spool attachment Fig.8C 16
POWERPLUS POWEG8050 EN
8.15 Putting on the carrying harness.... 16
8.16 Setting the cutting height....17
8.17 Fuel and oil....17
8.18 Fuel mix table....17
9 USE 17
9.1 Using the machine 17
9.1.1 Cold starting: 17
9.1.2 Hot starting....18
9.1.3 Stopping....18
9.2 General working instructions....18
9.2.1 Extending the cutting filament 18
9.2.2 Various cutting methods....18
9.2.2.1 Trimming/mowing (3-section cutting blade or trimmer) 18
9.2.2.2 Low trimming (with trimmer)....19
9.2.2.3 Short mowing (with trimmer)....19
9.2.2.4 Cutting against trees/fences/foundations (with trimmer) 19
9.2.3 Jamming....19
9.3 Prevent kickback....19
9.4 Working with the hedge trimmer....19
9.4.1 Cutting techniques (Fig. 12a - 12b - 12c)....19
9.5 Working with chain saw....19
9.5.1 Sawing techniques....19
9.6 Working safely 20
10 TRANSPORT 20
11 CLEANING....20
11.1 Cleaning the engine unit....20
11.2 Cleaning the chain saw....20
11.3 Cleaning the hedge trimmer....20
11.4 Cleaning the trimmer and brush cutter attachment....20
12 ROUTINE MAINTENANCE....21
12.1 Air filter....21
12.2 Spark plug maintenance....21
POWERPLUS POWEG8050 EN
12.3 Grinding the protective guard blade....21
12.4 Adjusting the carburettor 21
12.5 Adjusting the throttle cable....21
12.6 Lubricating the gears....21
13 STORAGE AND TRANSPORTATION 21
13.1 Storing the appliance....22
13.2 Start-up after storage....22
13.3 Transporting....22
14 TECHNICAL DATA....23
15 NOISE....24
16 TROUBLESHOOTING 24
16.1 Engine unit 24
16.2 Chain saw....24
16.3 Hedge trimmer....24
17 MAINTENANCE INTERVALS....25
17.1 Chain saw....25
17.2 Hedge trimmer....25
18 WARRANTY....26
19 ENVIRONMENT 26
20 DECLARATION OF CONFORMITY 27
POWERPLUS POWEG8050 EN
GARDEN MULTITOOL 4-IN-1 42.7CC
POWEG8050
1 INTENDED USE
This appliance is designed for the following applications:
- Brush cutter (when fitted with metal circular blade): The brush cutter is intended to cut weed and climbing plants. Do not use it for other purposes, never use it for cutting wood. Never cut objects with a diameter exceeding 13 mm.
- Grass trimmer (when fitted with nylon line cutting head): The grass trimmer is intended for trimming grass. Do not use it for other purposes.
- Hedge trimmer (when fitted with reciprocating blade): The trimmer is intended to be used for trimming hedges and bushes with diameter not more than 24 mm.
- Chain saw: this appliance is intended for trimming branches in trees.
Do not use this appliance for other purpose than those described in this manual. Not suitable for professional use.

WARNING! Read this manual and general safety instructions carefully before using the appliance, for your own safety. Your tool should only be passed on together with these instructions.
2 DESCRIPTION (FIG. A)
Engine unit
-
Round handle (5a Rubber ring +5b Pin)
-
Safety lock-out
- On/off switch
- Carrying lug
- 4x fixing bolts (with snap ring, washer and nut)
- Barrier bar
- Cover
- Screw grip
- Safety lever
- Shaft
- Throttle control
- Spark plug connector
- Choke lever
- Starter pull cord
- Fuel tank
- Filler cap
- Fuel pump (primer)
- Air filter housing cover
Hedge trimmer attachment
- Handle
- Lock / release
- Transmission case
- Cutter bar
- Base plate (hedge shears)
- Control lever
- Front shaft (hedge trimmer)
- Locking hole
- Drive shaft
Chain saw attachment
- Front shaft
- Safety ring
- Oil filler cap
- Oil tank
- Blade
- saw chain
- Grinder support
- Stop
- Locking hole
- Drive shaft
- Nut
- Thread
- Sprocket cover
- Bar guide
- Bar hole
- Guide rail
- Oil dispenser
- Chain sprocket
- Oil adjusting screw
- Chain tensioner pin
- Chain tensioner screw
Trimmer / brush cutter attachment - 4x bolts with snap ring, washer and nut)
- Blade guard
- 3-section cutting blade
- Trimmer with spool
- Front shaft (trimmer/3-section cutting blade)
- Locking hole
POWERPLUS POWEG8050 EN
- Drive shaft
Accessories t
-
Carrying harness
-
Protective cover - hedge trimmer
-
Protective cover - Chain saw
-
Oil/petrol mixing canister
-
M4 Allen key
-
M5 Allen key
-
SW 8/10 open-ended spanner
-
Spark plug wrench/flat-blade screwdriver
-
M10 nut (left-hand thread)
-
Pressure plate cover
-
Pressure plate
-
Drive plate
-
Extension attachment
3 PACKAGE CONTENT LIST
■ Remove all packing materials
■ Remove remaining packaging and transit supports (if existing)
- Check the completeness of the packing content
- Check the appliance, the power cord, the power plug and all accessories for transportation damages.
- Keep the packaging materials as far as possible till the end of the warranty period. Dispose it into your local waste disposal system afterwards.

WARNING Packing materials are no toys! Children must not play with plastic bags! Danger of suffocation!
1x Motor unit
1x Hedge trimmer attachment
1x Pole pruner attachment
1x Trimmer/cutting blade attachment
1x Handle with barrier bar
1x Trimmer with cutting filament
1x 3-section cutting blade
1x Carrying harness
1x Protective cover for chain
1x Protective cover for blade
1x Oil/petrol mixing canister
1x M4 Allen key
1x M5 Allen key
1x Spark plug wrench/flat-blade screwdriver
1x SW 8/10 open-ended spanner
1x Operating manual

When parts are missing or damaged, please contact your dealer.
4 SYMBOLS
In this manual and/or on the machine the following symbols are used:
 | Warning! Read the operating instructions before use! |  | Attention! Risk of injury due to running blades! |
 | Wear protective gloves! |  | Keep a safe distance away! |
 | Wear Safety shoes! |  | Protect the appliance from rain and moisture! |
 | Wear Ear protection! |  | Attention! Left-hand thread |
 | Wear a hard hat! |  | Beware of flung objects! |
 | Wear protective goggles! |  | Beware of kickback! |
  | Important, hot parts. Keep a safe distance away! |  | Caution! Risk of injury from rotating cutting blade! Keep hands and feet away! |
 | 1.Switch on the appliance |   | Attention – petrol is highly flammable! Explosion hazard! Do not spill fuel! |
 | 2.Fill fuel pump (primer) |  | Turn the appliance off and disconnect the spark plug before performing any maintenance work! |
 | 3.Pull the choke lever |  | Attention! Risk of suffocation! |
 | 4.Pull the starter pull cord |  | Caution! Poisonous CO vapors! Do not use the appliance in confined spaces! |
 | Pull the choke lever. |  | Warning! Do not use circular saw blades for the cutting blade function |
 | Press the fuel pump (primer) 6x |  | Add a little grease after every 20hours of operation. |
 | Mixing ration: 40 parts petrol to 1 part oil |   | A distance of 15 metres must be maintained between the machine and third parties! |
 | Petrol: Ron 95 / RON 98 |  | The cutting tool continues running after it is turned off (cutting blade / cutting filament) |
 | 2-stroke motor oil: ISO-L-EGD |  | Fire, naked flames and smoking are prohibited! |
 | Risk of fatal electrical shock! Keep at least 10 m away from overhead power lines! |  | Attention! Falling objects. Especially when cutting above head height. |
5 GENERAL SAFETY WARNINGS

Read all safety warnings and all instructions. Failure to follow all warnings and instructions may result in electric shock, fire and/or serious injury. Save all warnings and instructions for future reference.
5.1 Work area
- Keep work area clean and well lit. Cluttered and dark areas invite accidents.
- Do not operate tools in explosive atmospheres, such as in the presence of flammable liquids, gases or dust. Tools create sparks which may ignite the dust or fumes.
- Keep children and bystanders away while operating a tool. Distractions can cause you to lose control.
POWERPLUS POWEG8050 EN
5.2 Personal safety
- Stay alert, watch what you are doing and use common sense when operating a tool. Do not use a tool while you are tired or under the influence of drugs, alcohol or medication. A moment of inattention while operating tools may result in serious personal injury.
- Use safety equipment. Always wear eye protection. Safety equipment such as dust mask, non-skid safety shoes, hard hat, or hearing protection used whenever conditions require will reduce personal injuries.
- Avoid accidental starting. Ensure the switch is in the off position before plugging in. Carrying tools with your finger on the switch or plugging in tools that have the switch on invites accidents.
- Remove any adjusting key or wrench before turning the tool on. A wrench or a key left attached to a rotating part of the tool may result in personal injury.
- Do not overreach. Keep proper footing and balance at all times. This enables better control of the tool in unexpected situations.
- Dress properly. Do not wear loose clothing or jewellery. Keep your hair, clothing and gloves away from moving parts. Loose clothes, jewellery or long hair can be caught in moving parts.
- If devices are provided for the connection of dust extraction and collection facilities, ensure these are connected and properly used. Use of these devices can reduce dust related hazards.
5.3 Engine tool use and care
- Use the correct tool for your application. The correct tool will do the job better and safer at the rate for which it was designed.
- Store idle tools out of the reach of children and do not allow persons unfamiliar with the tool or these instructions to operate the tool. The tools are dangerous in the hands of untrained users.
- Maintain tools. Check for misalignment or sticking of moving parts, breakage of parts and any other condition that may affect the tool's operation. If damaged, have the tool repaired before use. Many accidents are caused by poorly maintained tools.
- Keep cutting tools sharp and clean. Properly maintained cutting tools with sharp cutting edges are less likely to stick and are easier to control.
- Use the tool, accessories and tool bits etc., in accordance with these instructions and in the manner intended for the particular type of tool, taking into account the working conditions and the work to be performed. Use of the tool for operations different from intended could lead to a hazardous situation.
5.4 Service
- Have your tool serviced by a qualified person using only identical replacement parts. This will ensure that the safety of the tool is maintained.
6 ADDITIONAL SAFETY INSTRUCTIONS
6.1 Hedge trimmers
- Do not operate in a hazardous location. Such areas include where there is a risk of explosion of petrol fumes, leaking gas or explosive dust.
- Do not operate in a confined area. Exhaust gases, smoke or fumes could reach dangerous concentrations.
- Protect your tool. This hedge trimmer is NOT WEATHERPROOF and should not be exposed to direct sunlight, high ambient temperature and damp, wet or high humidity conditions.
- Do not smoke while refuelling. This is potentially dangerous as it may ignite the fuel and cause an explosion.
POWERPLUS POWEG8050 EN
Take care not to spill fuel. When refuelling the hedge trimmer ensure that the motor has been switched off. Prevent the spilling of fuel as this may also ignite with the hot motor. Never refuel whilst the engine running.
- Be careful where you store the hedge trimmer. Store the hedge trimmer in a dry area away from flammable liquids.
- Keep your distance. The hedge trimmer emits exhaust fumes. Ensure bystanders keep a safe distance.
- Ensure you use oil-mix fuel. Ensure that you mix 40 parts unleaded fuel to 1 part 2-stroke oil. If not, the engine will overheat and cause damage to your hedge trimmer.
6.2 Chain saw
- DO NOT operate a chain saw with one hand! Serious injury to the operator, helpers, bystanders, or any combination of these persons may result from one-handed operation. A chain saw is intended for two-handed use.
- DO NOT operate a chain saw when you are fatigued, under the influence of drugs, alcohol or medication.
- Use safety footwear, snug-fitting clothing, protective gloves, and eye, hearing and head protection devices.
- Use caution when handling fuel. To avoid fire, move the chain saw at least 10 feet (3 m) from the fuelling point before starting the engine.
- DO NOT allow other persons to be near when starting or cutting with the chain saw. Keep bystanders and animals out of the work area.
- DO NOT start cutting until you have a clear work area, secure footing, and a planned retreat path from the falling tree.
- Keep all parts of your body away from the saw chain when the engine is running.
■ Before you start the engine, make sure that the saw chain is not contacting anything. - Carry the chain saw with the engine stopped, the guide bar and saw chain to the rear, and the muffler away from your body.
- DO NOT operate a chain saw that is damaged, improperly adjusted, or not completely and securely assembled. Be sure that the saw chain stops moving when the throttle control trigger is released.
- Shut off the engine before setting the chain saw down.
- Use extreme caution when cutting small size brush and saplings because slender material may catch the saw chain and be whipped toward you or pull you off balance.
- When cutting a limb that is under tension, be alert for spring back so that you will not be struck when the tension in the wood fibres is released.
- Keep the handles dry, clean, and free of oil or fuel mixture.
- Operate the chain saw only in well-ventilated areas.
- DO NOT operate a chain saw in a tree unless you have been specifically trained to do so.
- All chain saw service, other than the items listed in the user manual safety and maintenance instructions, should be performed by competent chain saw service personnel.
- When transporting your chain saw, use the appropriate guide bar scabbard.
- DO NOT operate your chain saw near or around flammable liquids or gases whether in or out of doors. An explosion and/or fire may result.
- Do not fill fuel tank, oil tank or lubricate when the engine is running.
- USE THE RIGHT TOOL: Cut wood only. Do not use the chain saw for purposes for which it was not intended. For example, do not use the chain saw for cutting plastic, masonry, or non-building materials.
- The first time user should have practical instruction in the use of chainsaw and the protective equipment from an experienced operator.
- Do not attempt to hold the saw with one hand only. You cannot control reactive forces and you may lose control of the saw, which can result in the skating or bouncing of the bar and chain along the limb or log.
POWERPLUS POWEG8050 EN
- Never run the chainsaw indoors. Your chainsaw produces poisonous exhaust as soon as the combustible engine is started, which may be colourless and odourless. To use this product can generate dust, mists and fumes containing chemicals known to cause reproductive harm. Be aware of harmful dust, mist (such as saw dust or oil mist from chain lubrication) and protect yourself properly.
- Wear gloves and keep your hand warm. Prolonged use of chainsaws exposing the operator to vibrations may produce whitefinger disease. In order to reduce the risk of whitefinger disease, please wear gloves and keep your hand warm. If any of the whitefinger symptoms appear, seek medical advice immediately.
- Drive in the spiked bumper of the chainsaw directly behind the intended hinge and pivot the saw around this point. The spiked bumper rolls against the trunk.
- Only chain, guide bar and spark plug can be replaced by the user himself. Always make sure you replace with correct material as stated in the specifications of the manual.
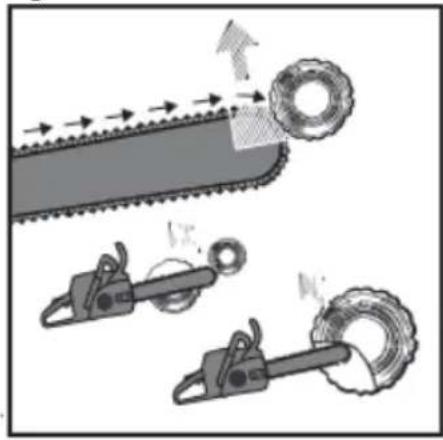
6.2.1 Kickback safety precautions

KICKBACK may occur when the NOSE or TIP of the guide bar touches an object, or when wood closes in and pinches the saw chain in the cut.
Tip contact in some cases may cause a lightning-fast reverse reaction, kicking the guide bar up and back toward the operator.
PINCHING the saw chain along the BOTTOM of the guide bar may PULL the saw forward away from the operator.
PINCHING the saw chain along the TOP of the guide bar may PUSH the guide bar rapidly back toward the operator.
Any of these reactions may cause you to lose control of the saw, which could result in serious personal injury.
- With a basic understanding of kickback, you can reduce or eliminate the element of surprise. Sudden surprise contributes to accidents.
- Keep a good firm grip on the saw with both hands, the right hand on the rear handle, and the left hand on the front handle, when the engine is running. Use a firm grip with thumbs and fingers encircling the chain saw handles. A firm grip will help you reduce kickback and maintain control of the saw. Don't let go.
- Make sure that the area in which you are cutting is free from obstructions. Do not let the nose of the guide bar contact a log, branch, or any other obstruction which could be hit while you are operating the saw.
- Cut at high engine speeds.
■ Do not overreach or cut above shoulder height. - Follow manufacturer's sharpening and maintenance instructions for the saw chain.
- Only use replacement bars and chains specified by the manufacturer or the equivalent.

NOTE: Low-kickback saw chain is chain that has met the kickback performance.

WARNING: Kickback can lead to dangerous loss of control of the chain saw and result in serious or fatal injury to the saw operator or to anyone standing close by. Always be alert. Rotational kickback and pinch-kickback are major chain saw operational dangers and the leading cause of most accidents.
POWERPLUS POWEG8050 EN
Beware of:
■ Rotational kickback (Fig. 1a)
A = kickback path
B = kickback reaction zone
- The push (pinch kickback) and pull reactions a = pull (Fig. 1b)
B = solid objects
C = push
6.3 Brush cutter
- BLADE CAN RECOIL VIOLENTLY FROM MATERIAL IT CANNOT CUT – Blade can cause you to lose arms or legs. Keep people and animals 30 feet (10 meters) away in all directions. If blade contacts foreign objects during operation, turn off engine and allow blade to come to a halt. Then check blade for damage. Always discard blade if it is warped or cracked.
- BLADE CATAPULTS OBJECTS THROUGH AIR - You can be blinded or injured. Wear eye, face, and leg protection. Always clear work area of any foreign objects before using blade. Keep people and animals 10 metres away in all directions.
- BLADE COASTS AFTER THROTTLE IS RELEASED - A coasting blade can injure you or bystanders. Before servicing the blade, always turn off engine, and be sure coasting blade has stopped.
- WARNING DO NOT USE ANY OTHER FUEL than that recommended in your manual. Always follow instructions in the Fuel and Lubrication section of this manual. Never use petrol unless it is properly mixed with 2-cycle engine lubricant. Permanent damage to engine will result, voiding manufacturer's warranty.
- DO NOT USE ANY OTHER CUTTING ATTACHMENT. Only use our replacement parts and accessories, which are designed specifically to enhance the performance and maximize the safe operation of our products. Failure to do so may cause poor performance and possible injury. Use only the stringhead supplied with this product. Do not use any other cutting attachment. Use of such attachments will void your factory warranty and may result in serious bodily injury.
6.4 Trimmer
- Grass trimmers must not be used by children or untrained persons.
■ Wear stout shoes or boots to protect your feet.
■ Wear long trousers to protect your legs.
- Check the appliance before use. If it is damaged, it must not be used.
- If the unit is damaged, have the damage repaired by an authorized repair agent.
- Do not use the appliance in the presence of children and/or animals.
- Only use the appliance in daylight or with good lighting.
- Never use the appliance without the guard in place.
■ Before using the appliance, remove sticks, stones, wire and other obstacles from the surface on which you intend to work.
- Only use the appliance in an upright position, with the cutting line pointing to the ground. Never switch on the appliance in another position.
■ Always keep your hands and feet away from the cutting line.
- Avoid touching the cutting line.
■ Before putting the appliance down, switch it off and wait for the cutting line to come to a complete standstill. Never attempt to bring the cutting line to a standstill yourself.

Beware. After switching off the appliance it continues to rotate for a short time.
- Only use the type of cutting line recommended by the manufacturer. Never use a metal cutting line or fishing line.
POWERPLUS POWEG8050 EN
■ After use, always store the appliance safely and out of the reach of children.
- Do not cut against hard objects. This could cause injury or damage the trimmer.
- Do not use the trimmer to cut grass which is not in contact with the ground, for example, do not cut grass which is on walls or rocks etc.
7 SAFETY WARNINGS GASOLINE

WARNING: Use extra care in handling fuels. They are flammable and the vapours are explosive. The following points must be observed.
■ Use only an approved container.
- Never remove the fuel cap or add fuel with the power source running. Allow engine exhaust components to cool before refuelling.
- Do not smoke.
■ Never refuel the machine indoors.
- Never store the machine or fuel containers inside, where is an open flame, such as a water heater.
- If fuel is spilled, do not attempt to start the power source, but move the machine away from the area of spillage before starting.
■ Always replace and securely tighten the fuel cap after refuelling.
■ If the tank is drained, this should be done outdoors.
8 BEFORE USE

WARNING! Never use a machine with faulty safety equipment. The machine's safety equipment must be checked and maintained as described in this section. If your machine fails any of these checks contact your service agent to get it repaired.

Always wear non-slip footwear and appropriate safety clothing such as protective gloves, a hard hat, a protective mask and safety goggles as well as hearing protection.

Check the area in which the appliance is to be used and remove any objects that may be caught and slung away.

Before use and after dropping or other impacts, always visually inspect the appliance to check whether the cutting tool, mounting bolts and the entire cutting unit are damaged. Worn or damaged cutting tools and mounting bolts must be replaced.

Always carry out a visual inspection before use to check whether the cutting tools are worn or damaged. To prevent imbalance, worn or damaged cutting tools and mounting bolts should be replaced only as complete sets.
8.1 Attaching the round handle (Fig. 2)
- Start by fitting the rubber ring (5a) on the shaft (10).
- Attach the barrier bar (6) onto the rubber ring (5a) from below.
- The pin (5b) of the barrier bar (6) must be pushed into one of the two holes of the shaft (10) to lock into place.
■ Push the round handle (5) onto the rubber ring (5a) provided on the shaft (8).
POWERPLUS POWEG8050 EN
- Insert the 4 mounting bolts (4) from above through the round handle (5) and fix them onto the barrier bar (6) with the 4 nuts.
■ Tighten the bolts (4).
8.2 Fitting the quick release mechanism (Fig. 3)
- Hook in the carabiner (E) and secure it with the red strap (F) on the quick release mechanism. (Fig. 3c - 3e)
- Pull on the red strap if you have to release the appliance quickly.
8.3 Fixing/attaching the carrying harness (Fig. 4)

WARNING! When using the machine it must always be hooked securely to the harness. Otherwise you will be unable to control the brush cutter safely and this can result in injury to yourself or others. Never use a harness with a defective quick release.
- Hook the carrying harness (56) into the carrying lug (3).
- Adjust the length of the carrying harness (56) to your size so that the carrying lug (3) is at hip height when hooked in place.
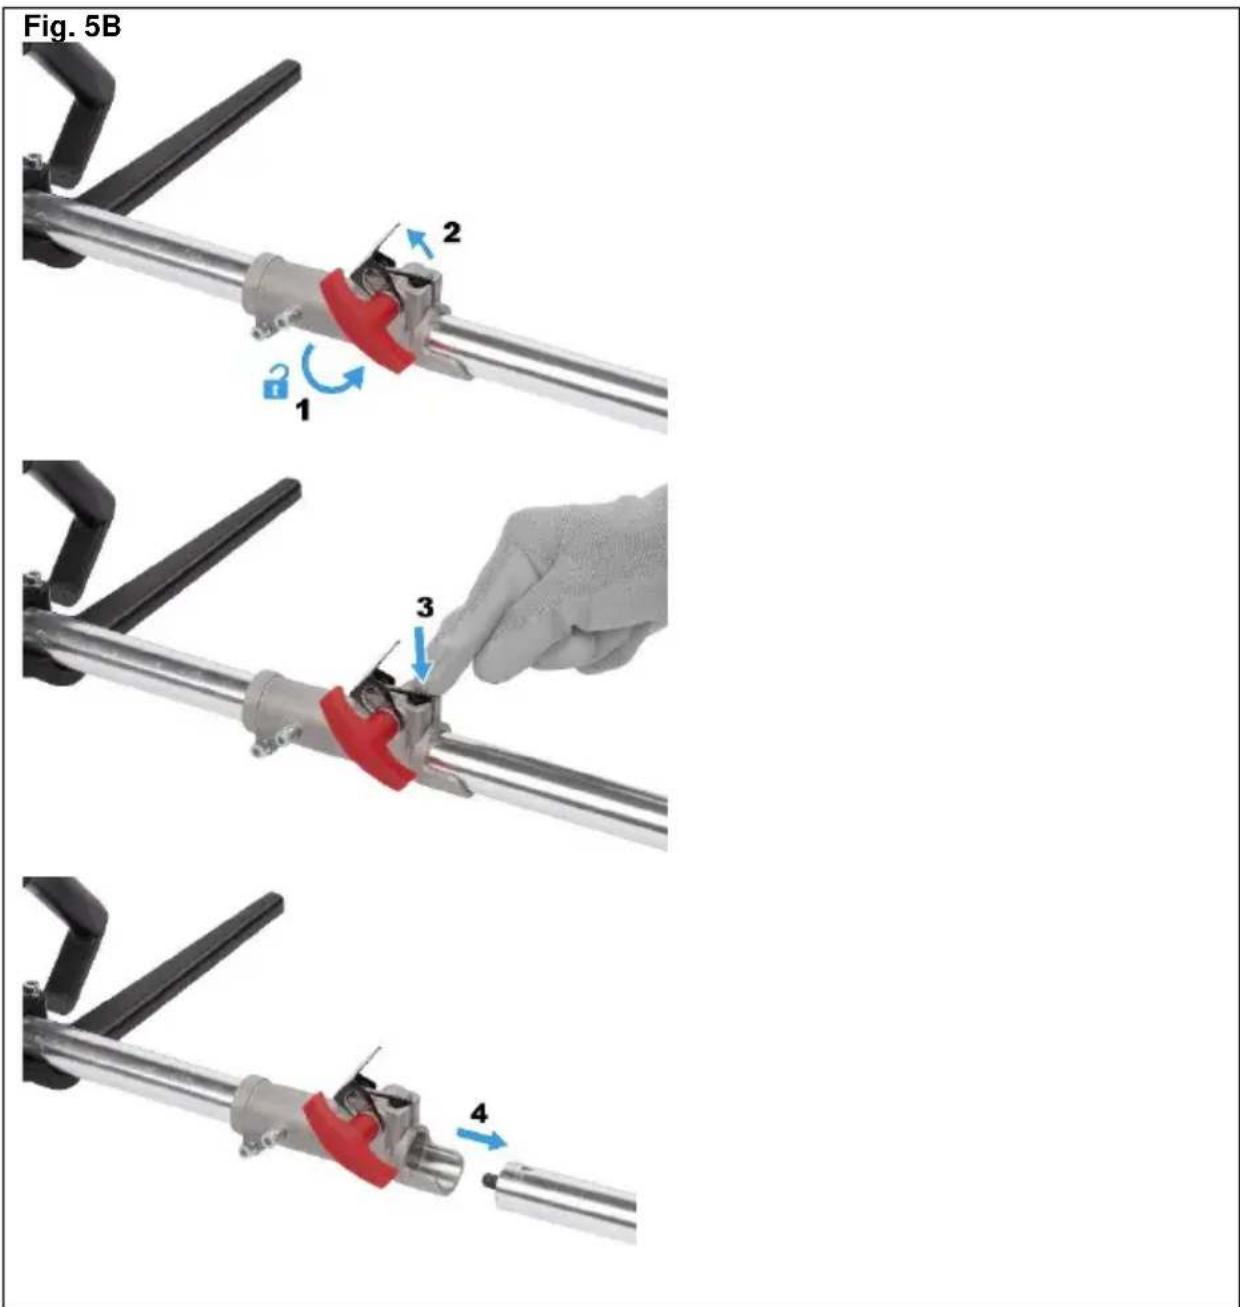
8.4 Assembling the hedge trimmer (Fig. 5)
■ Start by undoing the screw grip (8) on the shaft (10) of the engine unit.
- Push the front shaft (25) of the hedge trimmer onto the shaft (10) of the motor unit, turn left/light and keep pushing the front shaft until the safety lever (9) clicks into the locking hole.
- Press the cover (7) that protects the safety lever 9 downwards and hold it down.
■ Tighten the screw grip (8).

Note: assembly of chain saw / trimmer / brush cutter / extension attachment (68) is carried out in the same order
8.5 Removing the hedge trimmer
■ Undo the screw grip (8).
Release the safety lever (9) by pressing and pull the front shaft (25) on the hedge trimmer out of the shaft (10) on the motor unit.

Note: removal of chain saw / trimmer / brush cutter / extension attachment (68) is carried out in the same order
8.6 Swivelling the hedge trimmer
- Press both lock /release lever (20) and control lever (24) and swivel the hedge trimmer into the desired position/ angle
- Allow the control lever (24) to click into the recess in the base plate (hedge trimmer) (23).
POWERPLUS POWEG8050 EN
8.7 Fitting the guide bar and chain (Fig. 6)

Warning! Wear protective gloves! There is a danger of injury from the sharp cutting teeth!

Note: pay close attention to the running direction of the saw chain (33) on the bar (30) and at the base plate.
Depending on wear, the bar (30) can be turned.
- Undo the nut (38) using the open-ended spanner (62).
- Remove the sprocket cover (40).
- Lay the saw chain (33) over the blade (32) starting at the tip.
■ Now fit the bar (32) and saw chain (33). - Lay the saw chain (33) over the chain sprocket.
- Lay the guide rail (43) over the bar guide (41), while inserting the chain tensioner pin (47) in the blade hole (42, lay the saw chain (33) over the chain sprocket (45).
■ Now you can tighten the saw chain (33). - Replace the sprocket cover (40) and tighten the nut (38) gently.
8.8 Removing the saw chain
You may have to loosen the saw chain (33) to remove the blade (32) and the saw chain (33) (see section "Tightening and checking the saw chain"). Follow these instructions in reverse order.
8.9 Tightening and checking the saw chain

WARNING! Wear protective gloves! There is a danger of injury from the sharp cutting teeth.
- Turn the chain-tensioner screw (48) in a clockwise direction using the flat-blade screwdriver (63) to increase the tension.
- )The saw chain (33) must lie against the underside of the blade. Check whether the saw chain (33) can be drawn by hand over the blade (32).

Caution: a new saw chain stretches, requiring adjustment after as few as 5 cuts. This is normal with a new chain, and the interval between future adjustments will lengthen quickly.

Caution: if saw chain is too loose or too tight, the sprocket, bar, chain, and crankshaft bearings will wear more rapidly.
8.10 Lubrication
■ Remove the oil filler cap (30).
- Fill the oil tank (31) with approx. 100 ml of organic chain oil.
- The chain lubrication can be increased or decreased using the oil adjusting screw 46 .
- Press and then turn the oil adjusting screw 46 clockwise to increase the chain lubrication.
- Press and then turn the oil adjusting screw 46 anticlockwise to decrease the chain lubrication.
POWERPLUS POWEG8050 EN

WARNING! Never work without chain lubrication! If the saw chain runs dry, the cutting equipment may become irreparably damaged in a short time. Always check chain lubrication and oil level in the tank before starting work.
Note :Use only saw chain oil. Preferably biodegradable. Do not use waste oil, motor oil, etc.
Note: While working, check whether the chain lubrication is working correctly.
8.11 Sharpening the saw chain
You can have your saw chain sharpened fast and correctly by specialist dealers, from whom you can also obtain chain sharpening equipment to enable you to sharpen the chain yourself. Please follow the corresponding operating instructions.
Take care of your tools. Keep your tools sharp and clean to enable you to work well and safely. Follow the maintenance regulations and the instructions for changing tools
8.12 Fitting/ removing the blade guard
When working with the 3-section cutting blade, the blade guard (50) must be fitted. Fold the metal sheet of the front shaft (53) down slightly. The blade guard (50) is positioned under the metal sheet and the shaft (53) mounting arm. The blade guard (50) is now attached to the front shaft (53) with 2 screws (49). Use the supplied Allen key 60
| Cutting equipment | Protective equipment |
| 3-section cutting blade (51) | Blade guard (50) |
| Trimmer with cutting filament(52) | Blade guard (50) + cutting filament protective guard © |
Warning! do not use any other cutting equipment apart from that which is supplied with the product. The use of any other cutting equipment or protective equipment is deemed to be improper and carries a significant risk of accidents.
8.13 Installing / replacing the cutting blade (Fig. 7A-F)
- Fit/remove the 3-section cutting blade (51) as shown in Figures 7a–7f.
Find the hole in the drive plate (67), align it with the opposite hole and block it with the supplied Allen key (61). - Place the 3-section cutting blade (51) on the drive plate (67) (see Fig. 7b).
- Fit the pressure plate (66) over the thread on the splined shaft (see Fig. 7b).
- Fit the pressure plate cover (65) (see Fig. 7d).
- Now tighten the nut (64) with the spark plug wrench (63) (see Fig. 7f).
- The 3-section cutting blade (51) is fitted with a plastic cover on delivery. This must be removed before use and refitted during periods when not in use.
■ The plastic cover can now be removed.

CAUTION! Left-hand thread!
CAUTION! Sharp edges, wear protective gloves
- Fit the cutting filament protective guard (C) on the protective guard (50).
- The cutting filament protective guard (C) must be fitted when working with the cutting filament. The cutting filament protective guard (C) (pre-fitted on delivery) is fitted as shown in Figure 8a.
POWERPLUS POWEG8050 EN
- Ensure that the cutting filament protective guard (C) is correctly clicked into place. There is a blade (C) on the inside of the cutting filament protective guard (A). This is covered with a safety cover (B) (see Fig. 8a.).
- Remove the safety cover (B) before starting work and replace it after finishing work.

CAUTION! Sharp edges, wear protective gloves
- To remove the cutting filament protective guard (C) from the protective guard (50), take a tool, such as a screwdriver, to carefully remove the three mounting pins.

CAUTION! risk of injury!
8.14 Spool attachment Fig.8C

WARNING! To prevent an accidental start that could cause serious personal injury, always disconnect the engine spark plug lead cap from the spark plug when assembling parts.

WARNING! Never install, remove or adjust any attachments while power head is running. Failure to stop the engine can cause serious personal injury.
- Rotate the mounting disc (67) slowly to align the hole in the mounting disc to the hole in the head assembly (61).
- Lock the mounting disc firmly using the screwdriver provided by aligning and insert through the two holes.
- With the mounting disc locked, screw the spool onto the gearbox in a clockwise direction until it cannot rotate any further.
- Remove the screwdriver from the safety guard.
8.15 Putting on the carrying harness

Note: the following adjustments can be made to make sure that you can work without becoming fatigued. The settings may vary depending on your body size.

Before starting to work, adjust the carrying harness to suit your body size.

Balance the appliance with the fitted cutting tool so that the cutting tool swings just over the ground without the need to move the appliance with your hands.
- Put on the carrying harness and close the claps so that they can click into place (Fig. 9a).
- Pull on the belt, to position the carrying harness centrally on your body and adjust the upper body size.
- To tight the two shoulder straps, pull on the two shoulder straps (Fig. 9b).
- To ensure to the correct position of the appliance on the carrying harness, pull the belt (fig. 9D)
- Hook in the carabiner (E) and secure it with the red strap F on the quick release mechanism (see Figures 3c–3e).
POWERPLUS POWEG8050 EN
- Now take the appliance and hang it, as shown in Figure 9e-9f, so that the carrying lug (3) clicks into the carabiner (E). The carrying lug (3) can also be moved by loosening the screw (G) and sliding it to achieve the optimum orientation of the appliance.
8.16 Setting the cutting height
- Put on the carrying harness and hook in the appliance.
- Use the various belt straps on the carrying harness to adjust the optimum working and cutting position.
- Perform a few circular movements without starting the engine in order to find the ideal shoulder strap length (Fig. 10A).
- The carrying harness is equipped with a quick release mechanism. Pull on the red strap if you have to release the appliance quickly (Fig. 9f).

Caution: Always use the carrying harness when working with the device. Put on the carrying harness as soon as you have started the engine and it is ticking over. Turn off the engine before removing the carrying harness.
8.17 Fuel and oil
- Only use a mixture of unleaded petrol and special 2-stroke engine oil. Mix the fuel mixture in accordance with the fuel mix table.
- Add the respective correct amounts of unleaded petrol and 2-stroke oil to the supplied oil/petrol mixing canister (59) (see "Fuel mix table"). Then shake the canister well.
8.18 Fuel mix table
■ Mixing process: 40 parts petrol to 1 part oil
| Petrol | 2-stroke oil |
| 0.5Litre | 12.5ml |
9 USE

Caution! Please pay attention to the statutory provisions in the relevant noise protection regulations.
Before starting the appliance, always check that:
■ The fuel system is not leaking.
- The protective equipment and cutting equipment is complete and in perfect working order.
- All screw connections are firmly tightened.
- All moving parts can move smoothly and freely.
9.1 Using the machine
9.1.1 Cold starting:

CAUTION! Never allow the starter pull cord to whip back This could cause damage.
- Fill the fuel tank (see also the section "Fuel and oil").
- Press the primer 6 times.
- Switch the on/off switch to "I".
- Pull the choke lever into position "close".
- Hold the appliance firmly and pull out the starter pull cord to the point of first resistance. Now pull hard on the starter pull cord. The appliance starts.
If the engine does not start, repeat steps 4–5.
POWERPLUS POWEG8050 EN
As soon as the engine is running, press the choke lever into position "open".
- If the engine does not start after several attempts, read the "Troubleshooting guide" section.

CAUTION! Always pull the starter pull cord (14) straight out. Hold the handle of the starter pull cord (14) firmly when the starter pull cord retracts. Do not allow the starter pull cord (14) to whip back.
NOTE: At very high ambient temperatures it is possible that even a cold engine has to be started without using the choke!
9.1.2 Hot starting
(The appliance has been turned off for less than 15–20 minutes)
- Switch the on/off switch (2) to "I".
- The choke lever (13) does not need to be pulled out to start a warm motor.
- Hold the appliance firmly and pull out the starter pull cord 14 to the point of first resistance. Now pull hard on the starter pull cord (14). The appliance should start after 1–2 pulls. If the appliance still hasn't started after 6 pulls, repeat steps 1–7 under "Starting when the engine is cold".
9.1.3 Stopping
Emergency stop sequence
If you need to stop the appliance immediately, switch the on/off switch (2) to "0".
Normal sequence
Release the throttle lever (11) and wait until the engine has slowed down to its idling speed.
Then switch the on/off switch 2 to "0".

CAUTION! The 3-section cutting blade must be stationary when the engine is idling. If the 3-section cutting blade is rotating adjust the carburettor!
9.2 General working instructions
Before using the appliance, practice all working techniques (see Figs. 10a–10c) with the engine stopped.
9.2.1 Extending the cutting filament
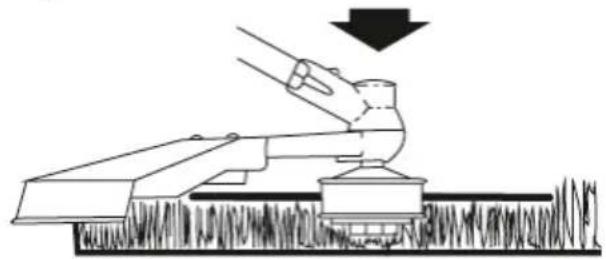
To lengthen the cutting filament, rev the engine to full throttle and tap the trimmer (52) on the ground. The filament extends automatically. The knife (A) on the cutting filament protective guard (C) cuts the thread to the permissible length (see Fig. 10d).

CAUTION! Grass/weed residues can get caught under the protective guard (50).
- Remove the remains using a scraper or similar item when the engine is switched off.
9.2.2 Various cutting methods
9.2.2.1 Trimming/mowing (3-section cutting blade or trimmer)
- Swing the appliance in a scything motion (see Fig. 10a).
- Hold the cutting tool parallel to the ground and set the desired cutting height.
POWERPLUS POWEG8050 EN
9.2.2.2 Low trimming (with trimmer)
- Hold the appliance with a slight incline to the ground (see Fig. 10b). Always cut away from your body. Never pull the appliance towards you.
9.2.2.3 Short mowing (with trimmer)
- Short mowing removes all the vegetation right down to the ground. Angle the trimmer 30° to the right. Set the handle to the desired position (see Fig. 10c).
9.2.2.4 Cutting against trees/fences/foundations (with trimmer)

NOTE: The filament will wear or fray quickly if it comes into contact with trees, rocks, walls or foundations. The filament will break off if it strikes fence mesh.

CAUTION! Do not use the appliance to remove any objects from footpaths, etc.! The appliance is powerful and can fling small stones or other objects (15) metres or more and may cause injuries or damage to cars, houses and windows.
9.2.3 Jamming
Immediately turn off the engine if the cutting tool becomes blocked. Remove all grass and scrub from the appliance before restarting the appliance.
9.3 Prevent kickback
When working with the cutting blade there is a risk of kickback if the blade strikes against solid obstacles (tree trunks, branches, tree stumps, rocks or similar). This will result in the cutting tool being catapulted back against the direction of rotation. This can lead to the loss of control of the appliance. Do not use the cutting blasé near fences, metal posts, boundary stones or foundations. To cut low density shrubs, position the appliance. (Fig. 11)
9.4 Working with the hedge trimmer
9.4.1 Cutting techniques (Fig. 12a - 12b - 12c)
- The double-sided cutter bar allows cutting in both directions or by using swinging movements from one side to the other.
- For a vertical cut, move the hedge trimmer evenly forwards or up and down in an arc.
- For a horizontal cut, move the hedge trimmer in a scything motion along the edge of the hedge so that cut branches fall to the ground.

NOTE: Remove thicker branches with a branch cutter.
9.5 Working with chain saw
9.5.1 Sawing techniques

Warning! Always pay attention to the falling clippings.
Warning! Be aware of the danger of branches swinging back.
Note: Place the stop (35) on the branch. This will help you work more safely and quietly. Sawing off small branches (Fig. 13)
POWERPLUS POWEG8050 EN
■ Saw small branches ( 0-8 cm) from the top down.
Sawing of larger branches (Fig. 14)
- When sawing larger branches (Ø8-25 cm), first make a relief cut (A). A relief cut also prevents peeling of the bark on the main trunk.
■ Saw from the top (B) to the bottom (A).
Saw in sections (Fig. 15)
Trim long or thick branches before you make the final cut.
9.6 Working safely
- Keep the appliance, cutting mechanism and the chain guard in good condition to prevent injury.
- If the appliance had been dropped, check for significant damage or defects.
- Observe the specified working angle max. 60^ ± 10^ to ensure safe working (Fig. 16)
- Do not use the appliance while standing on a ladder or with unsteady footing.
- Do not be tempted into making a poorly considered cut. You could endanger yourself and others.
- Children should be supervised to ensure that they do not play with the appliance.
- Change your working position regularly. Using the appliance for a long time can lead to vibration-related circulation disorders of the hands. You can extend the usage duration by using appropriate gloves or by taking regular breaks. Note that any personal predisposition to poor blood circulation, low external temperatures or large gripping forces can reduce the usage period.
10 TRANSPORT
■ Use the protective guards (57), (58) when transporting the appliance.
- Ensure that the appliance cannot switch on during transport.
11 CLEANING
11.1 Cleaning the engine unit

Note: clean the appliance thoroughly after every use.
- Always switch off the appliance before cleaning and the disconnected the spark plug connector (12).
- Clean the appliance regularly with a damp cloth and a mild detergent. Make sure that no water can penetrate into the interior of the appliance.
11.2 Cleaning the chain saw
The chain saw must be cleaned of saw dust at regular intervals.
■ Remove the sprocket cover (40).
■ Remove the saw chain (33) from the bar (32) and clean the guide rail (43).
- Keep the saw chain (33) sharp and check the tension, check the oil level and the oil supply.
11.3 Cleaning the hedge trimmer
- Check the hedge trimmer for loose screws on the cutter bar (22) and tighten these if necessary.
■ Remove stuck cuttings.
■ Maintain the cutter bar (22) using an oil spray or an oil can.
11.4 Cleaning the trimmer and brush cutter attachment
■ Remove stuck cuttings.
- Keep the cutting blade (51) sharp to facilitate your work.
12 ROUTINE MAINTENANCE
12.1 Air filter
Contaminated air filters reduce the engine performance due to low air supply to the carburettor. Regular inspection is essential. The air filter I must be inspected after every 25 hours of operation and cleaned if necessary. The air filter must be checked more frequently if the air is dusty.
■ Remove the cover of the air filter housing (18).
■ Remove the air filter I.
- Clean the air filter I by tapping or blowing it out (with compressed air).
■ Assembly takes place in the reverse order.

CAUTION! Never clean the air filter with petrol or flammable solvents.
12.2 Spark plug maintenance
■ Pull off the spark plug connector (12).
- Unscrew the spark plug using the spark plug wrench supplied (63).
- Assembly takes place in the reverse order.
Electrode gap = 0.6 mm (distance between the electrodes between which the ignition spark is generated). Check the spark plug for contamination after the first 10 hours of operation and clean it with a copper wire brush if required. Afterwards, service the spark plug after every 50 hours of operation.
12.3 Grinding the protective guard blade
The blade A (see Fig. 8a) can become blunt over time. If you find this to be the case, undo the 2 screws that hold the blade A onto the cutting filament protective guard (C). Clamp the blade (A) in a vice. Grind the blade with a sharpening stone (A) and make sure you maintain the angle of the cutting edge.
12.4 Adjusting the carburettor
Remove the cover of the air filter housing (18).
12.5 Adjusting the throttle cable
If the appliance no longer reaches maximum speed after a while and all other causes as described in the "Troubleshooting" section have been ruled out, this may mean that the throttle cable needs to be adjusted. To adjust the throttle cable, screw in the screw (H) or the adjusting screw (H1) as well as the lock nut (H2) correctly (see Fig. 17).
12.6 Lubricating the gears
- Add liquid gear grease after every 20 hours of operation (approx. 10 g) to lubricate the angle gear.
- To do this, undo the screw (D) (see Fig. 8c) to press the gear grease into the gear housing.
■ After filling the gearbox, close the lubrication hole with the screw (D).
■ After filling the gearbox, close the lubrication hole with the screw (D).
13 STORAGE AND TRANSPORTATION
- Store the appliance in a safe location.
- Store the appliance and accessories in a safe location which is protected against naked flames and sources of heat/sparks, such as gas-powered water heaters, dryers, oil stoves or mobile heaters, etc.
- Ensure that the protective guard (50), the trimmer (52) and the engine are free of cutting residue when storing.
- The plastic cover for the 3-section cutting blade (51) must be refitted for transport and storage.
POWERPLUS POWEG8050 EN
- Always turn the appliance off before performing any maintenance work and remove the spark plug connector (12).
13.1 Storing the appliance
The appliance must be prepared for storage if it is to be stored for longer than 30 days. Otherwise the residual fuel in the carburettor will evaporate and leave a gooey sediment. This may make starting the appliance more difficult and result in expensive repair work.
- Remove the filler cap (16) to relieve any pressure in the fuel tank (15). Carefully empty the fuel tank (15).
■ To remove all fuel from the carburetor, start the engine and leave it to run until it stops. - Allow the engine to cool for about 10 minutes.
- Remove the spark plug (see section "Spark plug maintenance").
- Add 1 teaspoon of 2-stroke oil to the combustion chamber. Pull the starter pull cord (14) several times in order to wet all mechanical parts with oil. Replace the spark plug.

NOTE: Store the appliance in a dry place and away from possible ignition Sources.
13.2 Start-up after storage
- Remove the spark plug (see section "Spark plug maintenance").
- Pull the starter pull cord (14) quickly in order to remove any excess oil from the combustion chamber.
- Clean the spark plug and observe the correct electrode gap on the spark plug.
- Fill the fuel tank (15). See the section "Fuel and oil".
13.3 Transporting
- if you are planning to transport the appliance, empty the fuel tank (15) as explained in the section "Storage".
14 TECHNICAL DATA
| Engine Unit | |
| Cylinder capacity | 42.7 cc |
| Engine power | 1.25 kW |
| Clutch engagement speed | >4300 min ^-1 |
| Easy start | Yes |
| Engine type | 2 stroke air cooled cylinder |
| Fuel tank capacity | 0.85L |
| Fuel mixing ratio | 40:1 |
| Shaft ∅ | 26 mm |
| Shaft type | STRAIGHT |
| Shaft length | 840mm |
| Crank engine | Yes |
| Carburettor type | Diaphragm type |
| Spark plug type | Torch |
| Low vibration system | Yes |
| Handle type | D-HANDLE |
| Hedge trimmer | |
| Blade size | 430mm |
| Cutting width | 23mm |
| Cutting length | 400mm |
| Double action blade | Yes |
| Quick stop | Yes |
| Adjustable head | Yes |
| Chain saw | |
| Bar size | 10 inch |
| Cutting length | 250 mm |
| Chain type | Powerplus |
| Bar type | Powerplus |
| Automatic chain oiler | Yes |
| Low kickback | Yes |
| Brush cutter | |
| Cutting width | 255 mm |
| Number of teeth | 3T |
| Blade dimensions | 255 mm |
| Safety guard | Yes |
| Trimmer | |
| Cutting width | 400mm |
| thread lengthening type | TAP&GO |
| Spool ∅ | 2.4 mm |
| Spool length | 4m |
| Safety guard | Yes |
15 NOISE
Noise emission values measured according to relevant standard. (K=2.5)
Acoustic pressure level LpA 96 dB(A)
Acoustic power level LwA 114 dB(A)

ATTENTION! Wear hearing protection when sound pressure is over 85 dB(A).
aw (Vibration)
5.9 m/s²
K = 1.5 ~m / s^2
16 TROUBLESHOOTING
16.1 Engine unit
| Problem | Possible cause | Remedy |
| The engine does not start | Incorrect start-up process | Follow the instructions regarding starting |
| The engine starts but does not run at full power | Incorrect adjustment of the choke lever (13). | Set the choke lever (13) to  |
| Contaminated air filter | Clean air filter | |
| The engine does not run smoothly | Incorrect spark plug gap. | Clean the spark plug and adjust the spark plug gap or replace the spark plug |
| Soot deposits or wetness on the spark plug | Incorrect carburettor adjustment | Clean spark plug or replace it with a new spark plug. |
16.2 Chain saw
| Motor is running, saw chain (33) does not move | |
| Chain saw attachment is not connected properly to the engine unit. | Check assembly |
| No progress | |
| Saw chain (33) dry/over heating or is sagging | Top up the oil or regrind, replace or tighten the saw chain (31) |
16.3 Hedge trimmer
| Motor is running, blades do not move | |
| Hedge trimmer attachment is not connected properly to the engine unit. | Check assembly |
POWERPLUS POWEG8050 EN
17 MAINTENANCE INTERVALS
17.1 Chain saw
The figures given here are based on normal operating conditions. In the event of more difficult conditions, such as strong dust generation and longer daily operating hours, the given intervals are to be reduced correspondingly.
| Appliance part | Action | Before starting work | Weekly | In the event of faults | In the event of damage | As required |
| Lubricating the chain | Check | X | ||||
| Check saw chain (33) | And pay attention to the sharpness | X | ||||
| Check chain tension | X | |||||
| sharpen | X | |||||
| Check guide rail (43) | (wear, damage) | X | ||||
| Clean and turn | X | X | ||||
| Deburr | X | |||||
| Replace | X | X | ||||
| Check sprocket (45) | X | |||||
| Replace | X |
17.2 Hedge trimmer
The figures given are based on normal operating conditions. In the event of more difficult conditions, such as strong dust generation and longer daily operating hours, the given intervals are to be reduced correspondingly.
| Appliance part | Action | Before starting work | After completion of work | As required |
| Cutting blades | visual inspection | X | ||
| clean | X | X |
18 WARRANTY
- This product is warranted for a 24-month period effective from the date of purchase by the first user.
- This warranty covers all material or production flaws excluding : batteries, chargers, defective parts subject to normal wear & tear such as bearings, brushes, cables, and plugs, or accessories such as drills, drill bits, saw blades, etc. ; damage or defects resulting from maltreatment, accidents or alterations; nor the cost of transportation.
- Damage and/or defects resulting from inappropriate use also do not fall under the warranty provisions.
- We also disclaim all liability for any bodily injury resulting from inappropriate use of the tool.
- Repairs may only be carried out by an authorised customer service centre for Powerplus tools.
- You can always obtain more information at the number 00 32 3 292 92 90.
- Any transportation costs shall always be borne by the customer, unless agreed otherwise in writing.
- At the same time, no claim can be made on the warranty if the damage of the device is the result of negligent maintenance or overload.
- Definitely excluded from the warranty is damage resulting from fluid permeation, excessive dust penetration, intentional damage (on purpose or by gross carelessness), inappropriate usage (use for purposes for which the device is not suitable), incompetent usage (e.g. not following the instructions given in the manual), inexpert assembly, lightning strike, erroneous net voltage. This list is not exhaustive.
- Acceptance of claims under warranty can never lead to the prolongation of the warranty period nor commencement of a new warranty period in case of a device replacement.
- Devices or parts which are replaced under the warranty therefore remain the property of Varo NV.
- We reserve the right to reject a claim whenever the purchase cannot be verified or when it is clear that the product has not been properly maintained. (Clean ventilation slots, carbon brushes serviced regularly, etc.).
- Your purchase receipt must be kept as proof of date of purchase.
- Your appliance must be returned undismantled to your dealer in an acceptably clean state, (in its original blow-moulded case if applicable to the unit), accompanied by proof of purchase.
19 ENVIRONMENT
Should your appliance need replacement after extended use, do not dispose of it with the household refuse, but in an environmentally safe way.
Please dispose of used motor oil in a manner that protects the environment. We suggest you take it in a sealed container to your local service station for recycling. Do not throw it into the refuse or pour it on the ground.
VARO – VIC. VAN ROMPUY N.V. - Joseph Van Instraat 9 - BE2500 Lier - BELGIUM, declares that,
product: GARDEN MULTITOOL 4-IN-1 42.7cc
trade mark: POWERplus
model: POWEG8050
is in conformity with the essential requirements and other relevant provisions of the applicable European Directives, based on the application of European harmonized standards. Any unauthorized modification of the apparatus voids this declaration.
European Directives (including, if applicable, their amendments up to the date of signature):
2014/30/EU
2000/14/EC Annex V LwA
Measured 106dB(A)
Guaranteed 114dB(A)
European harmonized standards (including, if applicable, their amendments up to the date of signature):
EN ISO 10517 : 2019
EN ISO 11680-1 : 2011
EN ISO 11806-1 : 2011
EN ISO 14982 : 2009
Keeper of the Technical Documentation: Philippe Vankerkhove, VARO – Vic. Van Rompuy N.V.
The undersigned acts on behalf of the company CEO,

Philippe Vankerkhove
Regulatory Affairs – Compliance Manager
30/09/21, Lier - Belgium
POWERPLUS POWEG8050 DE
9.1.3 Motor stoppen....20
natural_image
Simple line drawing of a rounded rectangular shape with a small mark on the top right corner (no text or symbols)Philippe Vankerkhove
30/09/21, Lier - Belgium
POWERPLUS POWEG8050 ES
1 USO PREVISTO......4
| Appliance part | Action | Before starting work | After completion of work | As required |
| Cutting blades | visual inspection | X | ||
| clean | X | X |
POWERPLUS POWEG8050 ES
18 GARANTÍA
1 USO PREVISTO......4
2 DESCRIZIONE (FIG. A)......4
3 DISTINTA DEI COMPONENTI....5
4 SIMBOLI....5
5 NORME GENERALI DI SICUREZZA 8
9.2.3 Inceppamento....20
Regulatory Affairs – Compliance Manager
30/09/21, Lier - Belgium
POWERPLUS POWEG8050 PT
12.6 Lubrificar as engrenagens....23
12.6 Lubrificar as engrenagens
30/09/21, Lier - Belgium
POWERPLUS POWEG8050 NO
1 TILTENKT BRUK....4
2 BESKRIVELSE (FIG. A) 4
3 PAKKENS INNHOLD....5
4 SYMBOLFORKLARING ....5
5 GENERELLE SIKKERHETSADVARSLER....7
8.18 Blandetabell for drivstoff....17
9 BRUK 17
9.2.3 Tilstopping....19
9.3 Forhindre tilbakeslag....19
12 RUTINEMESSIG VEDLIKEHOLD 21
12.1 Luftfilter 21
17 VEDLIKEHOLDSINTERVALLER 25
17.1 Motorsag....25
17.2 Hekktrimmer....25
18 GARANTI 26
19 MILJ∅....26
20 SAMSVARSERKLÆRING....27
POWERPLUS POWEG8050 NO
LONG REACH 4-I-1 KOMBI: KRATTKUTTER, GRESSTRIMMER, HEKKTRIMMER, MOTORSAG - 42,7CC
POWEG8050
1 TILTENKT BRUK
12 RUTINEMESSIG VEDLIKEHOLD
12.1 Luftfilter
17 VEDLIKEHOLDSINTERVALLER
17.1 Motorsag
natural_image
Simple hand-drawn outline of an irregular shape with no text or symbolsPhilippe Vankerkhove
Regulatoriske saker – Samsvarsleder
30/09/21, Lier - Belgia
POWERPLUS POWEG8050 DA
1 TILSIGTET BRUG....4
2 BESKRIVELSE (FIG. A) 4
3 MEDF∅LGENDE INDHOLD 5
4 SYMBOLER....5
5 ALMINDELIGE SIKKERHEDSANVISNINGER FOR VÆRKT∅J ..7
9.2.3 Blocarea....20
Внимание!
Опасност от
нараняване в
резултат на
движещи се
ножове!
30/09/21, Lier - Belgium

natural_image
Collection of various metal tool holders and tools, including a pusher, shifter, and bracket (no text or symbols visible)varo
WWW.VARO.COM
DESIGNED AND MARKETED BY VARO
©copyright by varo
VARO - VIC. VAN ROMPUY nv
JOSEPH VAN INSTRAAT 9 - 2500 LIER - BELGIUM
OFFICES:


- POWERPLUS POWEG8050 NL
- MULTITOOL TUIN 4-IN-1 - 42,7CC
- POWEG8050
- BEOOGD GEBRUIK
- BESCHRIJVING (FIG. A)
- Motorblok
- PROBLEEMOPLOSSING
- POWERPLUS POWEG8050 FR
- DÉCLARATION DE CONFORMITÉ
- POWERPLUS POWEG8050 EN
- GARDEN MULTITOOL 4-IN-1 42.7CC
- INTENDED USE
- WARNING! Read this manual and general safety instructions carefully before using the appliance, for your own safety. Your tool should only be passed on together with these instructions.
- DESCRIPTION (FIG. A)
- PACKAGE CONTENT LIST
- WARNING Packing materials are no toys! Children must not play with plastic bags! Danger of suffocation!
- When parts are missing or damaged, please contact your dealer.
- SYMBOLS
- GENERAL SAFETY WARNINGS
- Work area
- Personal safety
- Engine tool use and care
- Service
- ADDITIONAL SAFETY INSTRUCTIONS
- Hedge trimmers
- Chain saw
- Kickback safety precautions
- Beware of:
- Brush cutter
- Trimmer
- Beware. After switching off the appliance it continues to rotate for a short time.
- SAFETY WARNINGS GASOLINE
- BEFORE USE
- Attaching the round handle (Fig. 2)
- Fitting the quick release mechanism (Fig. 3)
- Fixing/attaching the carrying harness (Fig. 4)
- Assembling the hedge trimmer (Fig. 5)
- Removing the hedge trimmer
- Swivelling the hedge trimmer
- Fitting the guide bar and chain (Fig. 6)
- Removing the saw chain
- Tightening and checking the saw chain
- Lubrication
- Sharpening the saw chain
- Fitting/ removing the blade guard
- Installing / replacing the cutting blade (Fig. 7A-F)
- CAUTION! Left-hand thread!
- CAUTION! Sharp edges, wear protective gloves
- CAUTION! risk of injury!
- Spool attachment Fig.8C
- Putting on the carrying harness
- Setting the cutting height
- Fuel and oil
- Fuel mix table
- USE
- Using the machine
- Hot starting
- Stopping
- Emergency stop sequence
- Normal sequence
- General working instructions
- Extending the cutting filament
- Various cutting methods
- Trimming/mowing (3-section cutting blade or trimmer)
- Low trimming (with trimmer)
- Short mowing (with trimmer)
- Cutting against trees/fences/foundations (with trimmer)
- Jamming
- Prevent kickback
- Working with the hedge trimmer
- Working with chain saw
- Working safely
- TRANSPORT
- CLEANING
- Cleaning the engine unit
- Note: clean the appliance thoroughly after every use.
- Cleaning the chain saw
- Cleaning the hedge trimmer
- Cleaning the trimmer and brush cutter attachment
- ROUTINE MAINTENANCE
- Air filter
- CAUTION! Never clean the air filter with petrol or flammable solvents.
- Spark plug maintenance
- Grinding the protective guard blade
- Adjusting the carburettor
- Adjusting the throttle cable
- Lubricating the gears
- STORAGE AND TRANSPORTATION
- Storing the appliance
- Start-up after storage
- Transporting
- NOISE
- TROUBLESHOOTING
- MAINTENANCE INTERVALS
- Chain saw
- Hedge trimmer
- WARRANTY
- ENVIRONMENT
- POWERPLUS POWEG8050 DE
- POWERPLUS POWEG8050 ES
- GARANTÍA
- POWERPLUS POWEG8050 PT
- Lubrificar as engrenagens
- POWERPLUS POWEG8050 NO
- LONG REACH 4-I-1 KOMBI: KRATTKUTTER, GRESSTRIMMER, HEKKTRIMMER, MOTORSAG - 42,7CC
- TILTENKT BRUK
- RUTINEMESSIG VEDLIKEHOLD
- Luftfilter
- VEDLIKEHOLDSINTERVALLER
- Motorsag
- POWERPLUS POWEG8050 DA
Brand : PowerPlus
Model : POWEG8050
Category : Multitools