
NT 611 Eco - Vacuum Cleaner Kärcher - Free user manual and instructions
Find the device manual for free NT 611 Eco Kärcher in PDF.
| Product Type | Wet and Dry Vacuum |
| Brand | Kärcher |
| Model | NT 611 Eco |
| Dimensions (L x W x H) | 570 x 430 x 860 mm |
| Weight | 23.0 kg |
| Mains Voltage | 230 V |
| Frequency | 50 Hz |
| Max Power (EU) | 2350 W |
| Total Power | 2000 W |
| Rated Power | 1200 W |
| Discharge Pump Power | 800 W |
| Tank Capacity | 55 litres |
| Maximum Liquid Fill | 42 litres |
| Maximum Air Flow | 56 l/s |
| Maximum Vacuum Pressure | 23.5 kPa (235 mbar) |
| Protection Type | IPX4 |
| Protection Class | I |
| Power Cable Length | 10 m (H07RN-F 3x1.5 mm²) |
| Sound Pressure Level (LpA) | 63 dB(A) |
| Hand-Arm Vibration | < 2.5 m/s² |
| Application | Professional (craftsmen, retailers) |
| Main Functions | Wet/dry suction, integrated discharge pump, automatic float shut-off |
| Maintenance and Cleaning | Filter cleaning via handle, float cleaning, filter replacement |
| Included Accessories | Floor nozzle, suction hose, flexible hose, cable holder |
| Warranty | According to distributor's terms, free repair for material or manufacturing defects |
Frequently Asked Questions - NT 611 Eco Kärcher
User questions about NT 611 Eco Kärcher
0 question about this device. Answer the ones you know or ask your own.
Ask a new question about this device
Download the instructions for your Vacuum Cleaner in PDF format for free! Find your manual NT 611 Eco - Kärcher and take your electronic device back in hand. On this page are published all the documents necessary for the use of your device. NT 611 Eco by Kärcher.
USER MANUAL NT 611 Eco Kärcher
natural_image
Line drawing of a vacuum cleaner with handle and wheels (no text or symbols)Deutsch 7
English 14
Français 21
Italiano 28
Nederlands 35
Español 42
Português 49
Dansk 56
Norsk 63
Svenska 70
Suomi 77
Ελληνικά 84
Türkçe 92
Русский 99
Magyar 107
Čeština 114
Slovenščina 121
Polski 128
Românește 135
Slovenčina 142
Hrvatski 149
Srpski 156
Български 163
Eesti 170
Latviešu 177
Lietuviškai 184
Українська 191
Register and win! www.kaercher.com
natural_image
Geometric diagram showing a right-angled triangle with a shaded interior (no text or symbols)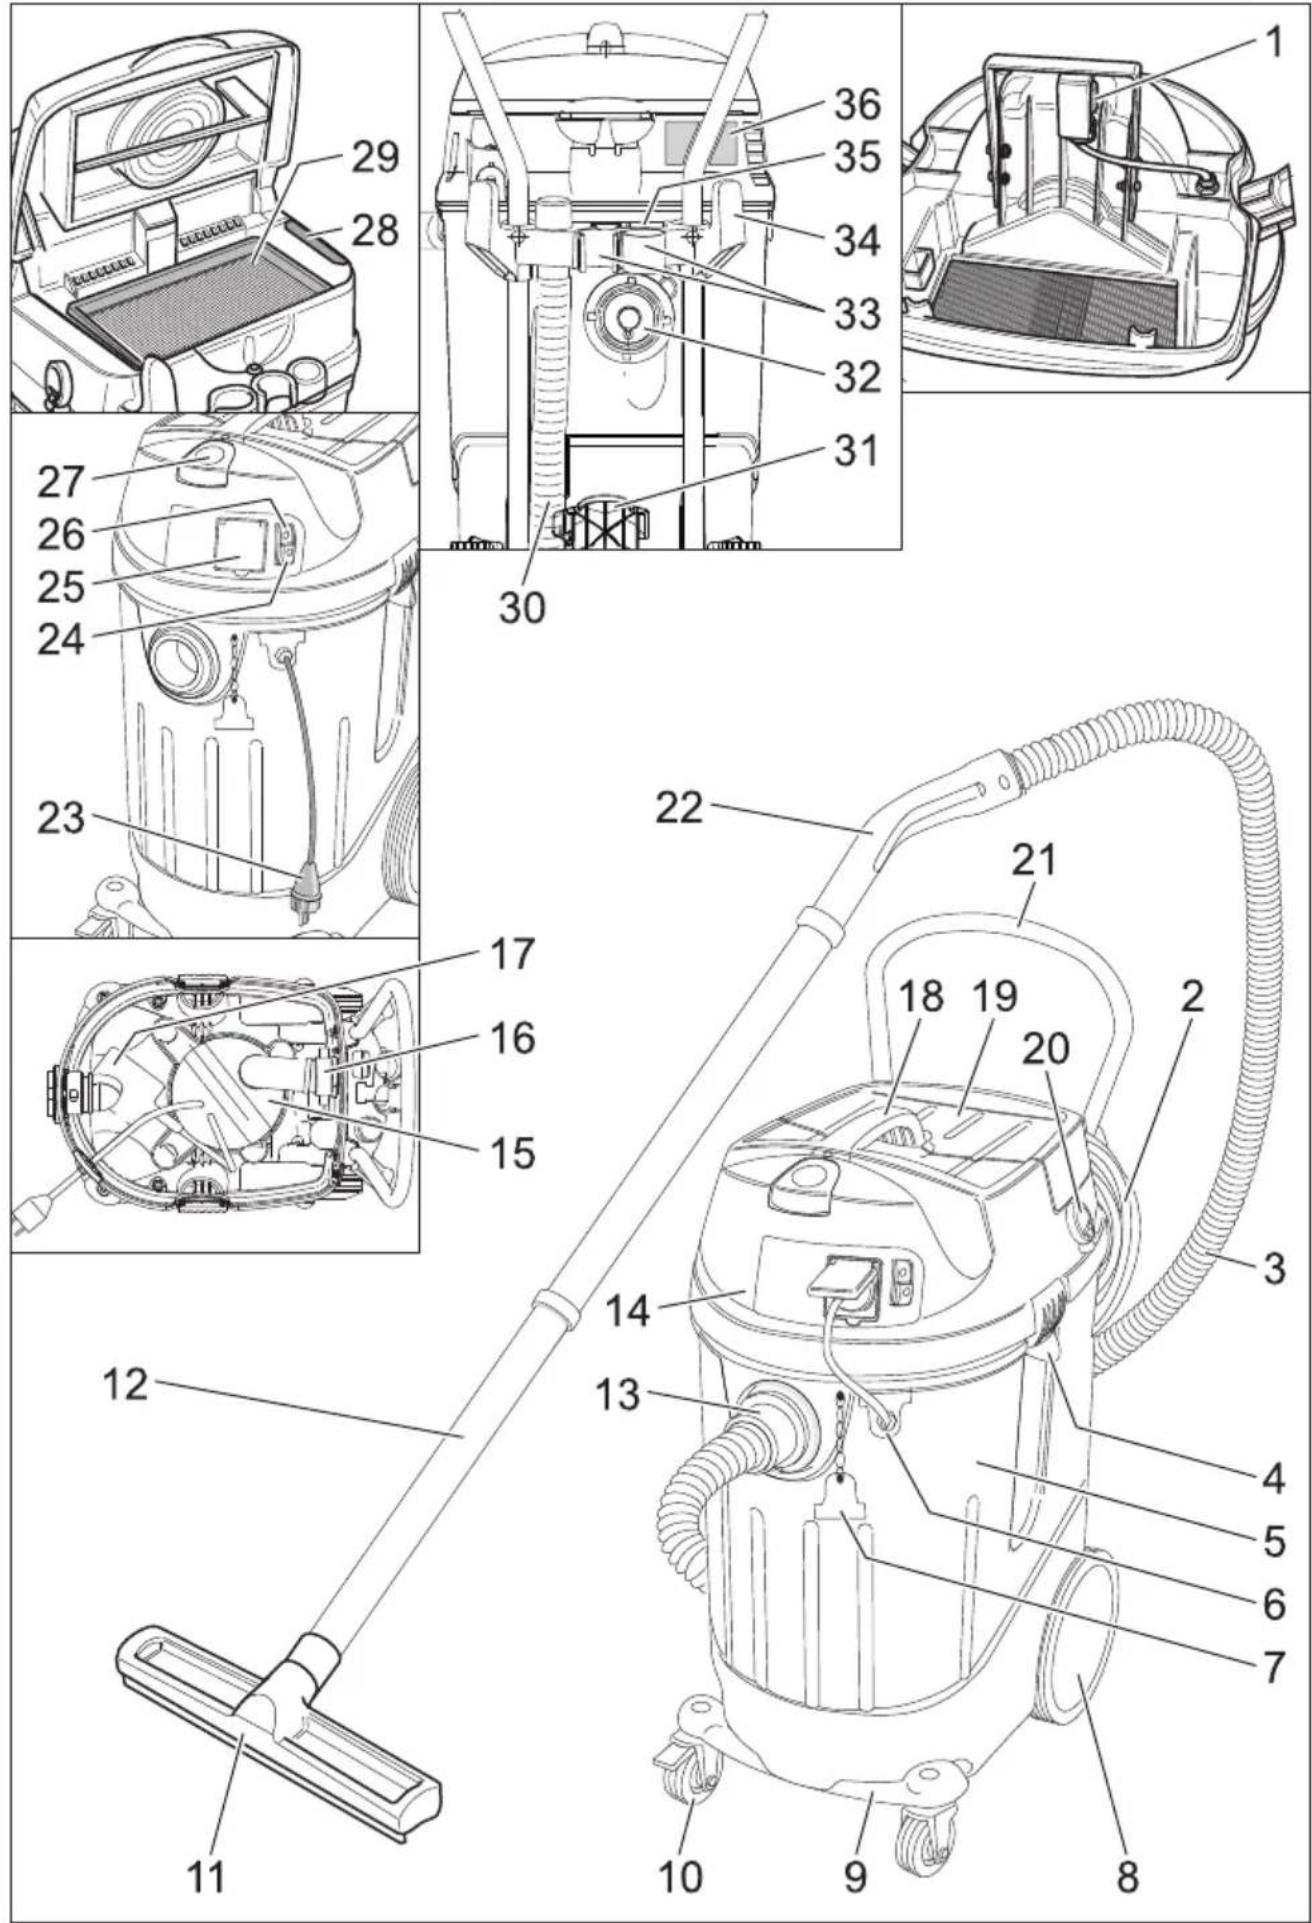
text_image
Technical diagram of a vacuum cleaner with numbered parts for identification and assembly reference.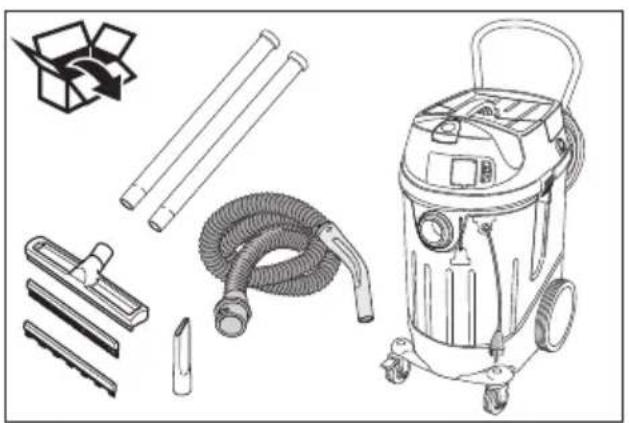
natural_image
Line drawing of a vacuum cleaner with various components including tubes, hoses, and a spray can (no text or labels)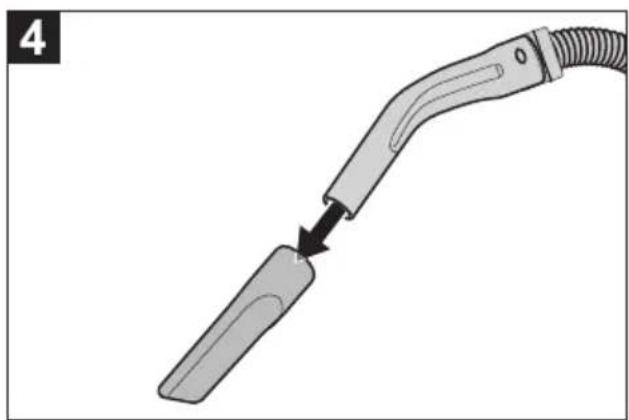
natural_image
Diagram of a medical or laboratory device with a curved tube and attached rod, showing a force or movement (no text or symbols present)
text_image
1 2 1 1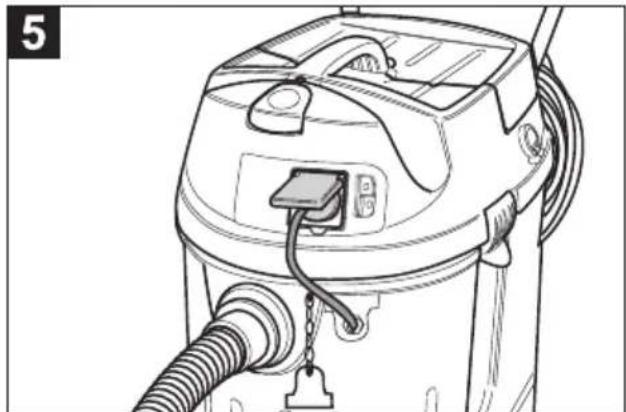
natural_image
Line drawing of a vacuum cleaner with attached tubing and connector (no text or symbols)
text_image
2 1 2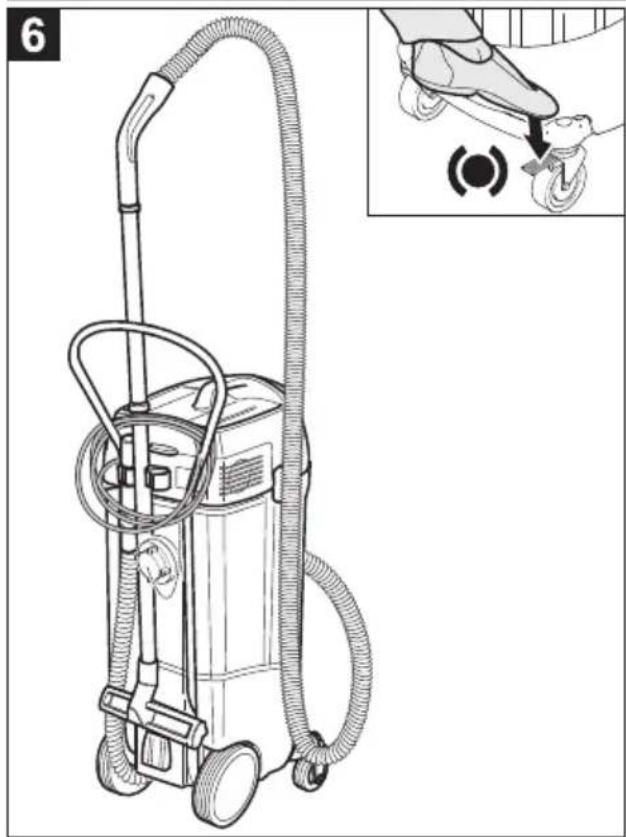
text_image
6 (●)
text_image
3 2x "Click"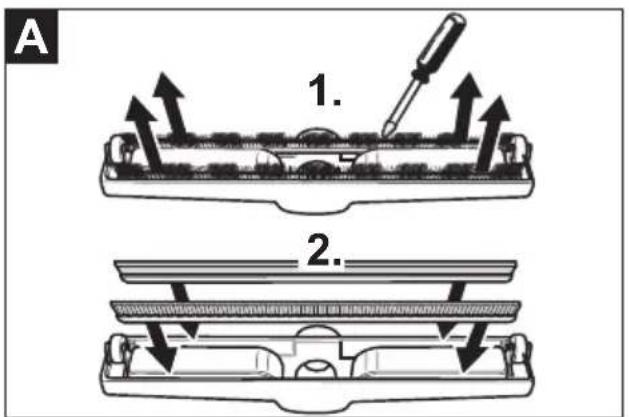
text_image
A 1. 2.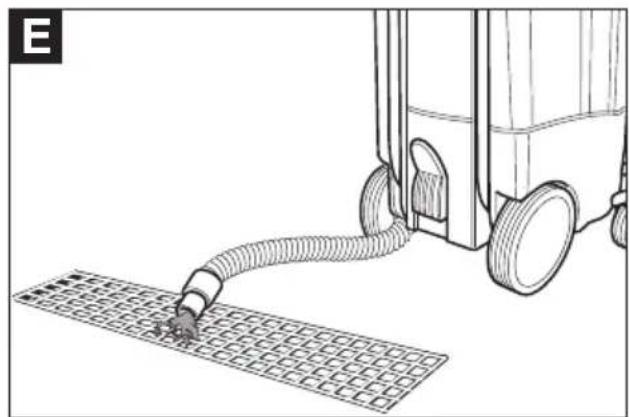
natural_image
Line drawing of a robotic vacuum cleaner connecting a grid-patterned sensor to a car (no text or symbols)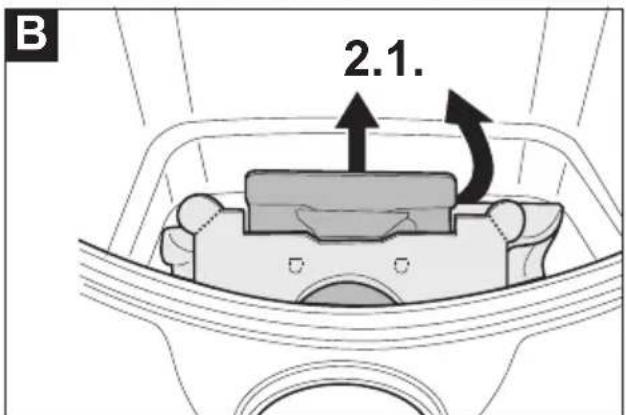
text_image
B 2.1.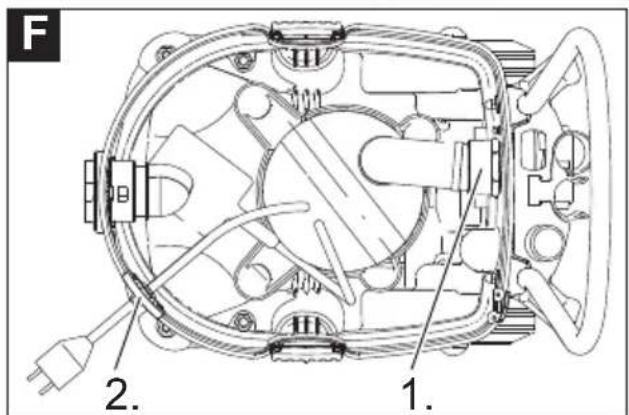
text_image
F 1. 2.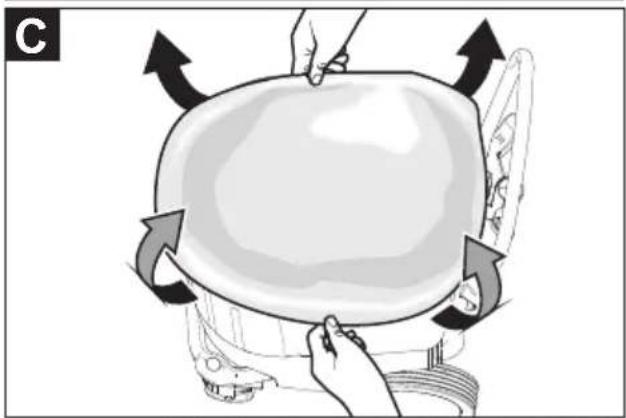
natural_image
Illustration of hands holding a large object with arrows indicating rotation or movement (no text or symbols)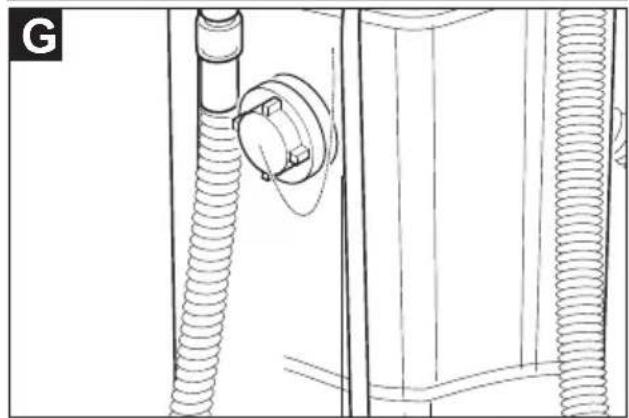
natural_image
Technical line drawing of a mechanical assembly with coiled springs and a flanged component (no text or symbols)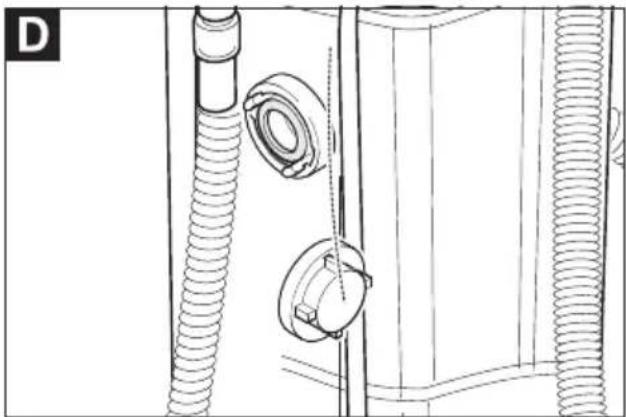
natural_image
Technical line drawing of a mechanical assembly with coiled springs and a bolted component (no text or symbols)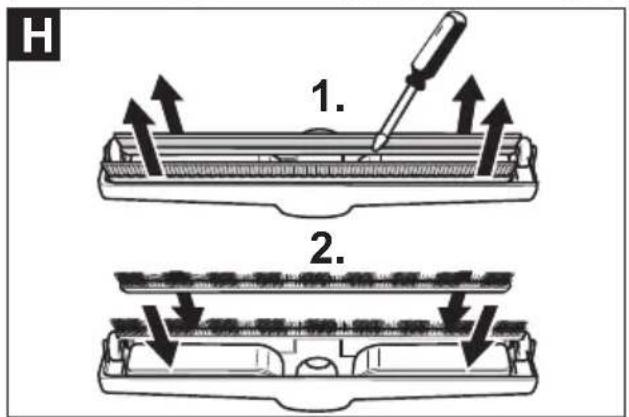
text_image
H 1. 2.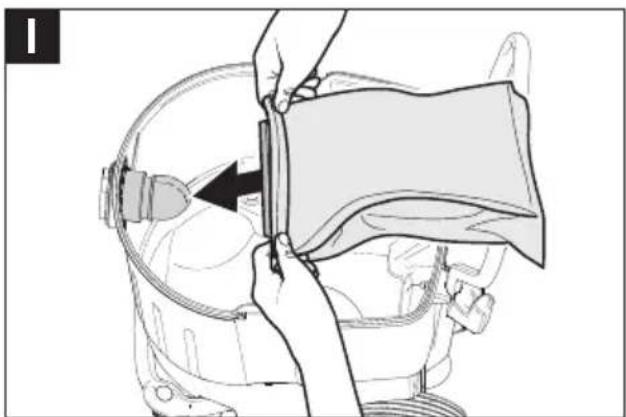
natural_image
Line drawing of a person adjusting a device with a belt, no text or symbols present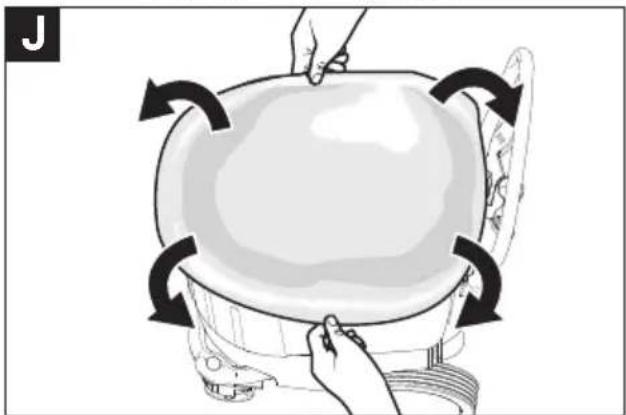
natural_image
Illustration of hands performing a circular motion exercise on a mechanical device (no text or symbols)
text_image
K
71364 Winnenden (Germany)
Tel.: +49 7195 14-0
Fax: +49 7195 14-2212
Winnenden, 2010/07/14
Technische Daten
Please read and comply with these original instructions prior
to the initial operation of your appliance and store them for later use or subsequent owners.
– Before first start-up it is definitely necessary to read the safety indications Nr. 5.956-249!
- The non-compliance of the operating and safety instructions may lead to damages of the appliance and to dangers for the operator and other persons.
– In case of transport damage inform vendor immediately
Contents
Environmental protection .. EN ...1
Symbols in the operating instructions ..... EN ...1
Proper use ..... EN ...1
Device elements..... EN...2
Start up..... EN...2
Operation....EN...4
Transport....EN...4
Storage..... EN...4
Maintenance and care .... EN ...4
Troubleshooting ..... EN ...4
Warranty..... EN...5
Accessories and Spare Parts EN . . .5
EC Declaration of Conformity EN . . .6
Technical specifications ... EN ...7
Environmental protection
The packaging material can be recycled. Please do not throw the packaging material into household waste; please send it for recycling.
Old appliances contain valuable materials that can be recycled; these should be sent for recycling. Batteries, oil, and similar substances must not enter the environment. Please dispose of your old appliances using appropriate collection systems.
Notes about the ingredients (REACH)
You will find current information about the ingredients at:
www.kaercher.com/REACH
Symbols in the operating instructions
⚠️Danger
Immediate danger that can cause severe injury or even death.
⚠ Warning
Possible hazardous situation that could lead to severe injury or even death.
Caution
Possible hazardous situation that could lead to mild injury to persons or damage to property.
Proper use
⚠ Warning
The appliance is not suitable for vacuuming dust which endangers health.
- This vacuum cleaner is intended for the continuous disposal of large volumes of liquid (flood damage, vacuuming containers, basins or tanks, etc.), as well as for the wet and dry cleaning of floor or wall surfaces.
- This appliance is suited for the commercial use, e.g. for handymen and commercial businesses.
Device elements Start u
1 Float
2 Power cord
3 Suction hose
4 Suction head lock
5 Dirt receptacle
6 Cable holder of the disposal pump
7 Lock plate
8 Wheel
9 Steering roller bow
10 Steering roller
11 Floor nozzle
12 Suction tube
13 Suction support
14 Suction head
15 Disposal pump
16 Acorn nut of the disposal pump
17 Float switch of the disposal pump
18 Carrying handle
19 Filter cover
20 Handle for filter cleaning
21 Push handle
22 Bender
23 Mains plug of the disposal pump
24 Switch "Disposal pump OFF"
25 Socket
26 Switch "Disposal pump ON"
27 Main switch
28 Exhaust filter
29 Coarse dirt filter/flat fold filter
30 Drain hose
31 Floor nozzle holder
32 Locking cap (GEKA-C coupling)
33 Holder for suction pipes
34 Cable hook
35 Holder for crevice nozzle
36 Nameplate
- It is recommended that you connect this device to a socket that has a 30 mA protection switch against wrong currents.
The appliance allows 3 operating modes:
1 Wet vacuuming with disposal pump
2 Wet vacuuming without disposal pump
3 Dry vacuum cleaning
Wet vacuum cleaning
Note: You can wet vacuum if the disposal pump is turned off or has been removed.
Removal of disposal pump, see dry vacuuming.
Inserting the rubber lips
Illustration A
→ Remove the brush strips.
→ Install the rubber lips.
Note: The structured side of the rubber lips must point outwards.
Remove the paper filter bag/fleece filter bag
Illustration B
→ Release and remove the suction head.
→ Pull the paper filter bag/fleece filter bag towards the rear.
→ Insert and lock the suction head.
- To vacuum wet dirt, first remove the paper or fleece filter bag.
Remove the membrane filter.
Illustration C
→ Release and remove the suction head.
→ Remove the membrane filter.
→ Insert and lock the suction head.
- To suck wet dirt, always remove the membrane filter.
Coarse dirt filter installation
→ Open filter door.
→ Take out the flat folded filter.
→ Install the coarse dirt filter.
→ Close the filter door, it must lock into place.
Connection of disposal pump
Illustration D
→ Remove the locking cap (GEKA-C coupling).
→ Connect the disposal hose (nominal width 3/4" or larger).
Drain off dirt water
Illustration E
→ Drain off dirty water through the drainage hose.
General
Caution
The coarse dirt filter must never be removed during vacuuming.
– Wet vacuuming without disposal pump: It is recommended to use a special filter bag (wet) (see Filter systems).
- If the maximum liquid level is reached the appliance will turn off automatically.
- After the wet vacuuming: Clean the floater, container and the disposal pump if necessary, using a damp rag and dry them.
Dry vacuum cleaning
Caution
Prior to dry vacuuming: Remove the disposal pump and install the flat fold filter.
Note: You must use a flat fold filter during dry vacuuming.
General
Caution
The flat pleated filter must always be in place while vacuuming.
- To vacuum fine dust, you can also use an additional paper filter bag, a fleece filter bag or a membrane filter.
Removal of the disposal pump
→ Unplug the mains plug of the disposal pump.
→ Release and remove the suction head.
Illustration F
→ Unscrew the acorn nut of the disposal pump.
→ Remove the cable holder of the disposal pump and replace it with a locking cap.
→ Remove the disposal pump and the plastic insert from the container.
Illustration G
→ Install the locking cap instead of the disposal hose.
→ Insert and lock the suction head.
Installation of flat fold filter
Note: The flat fold filter is not included in the delivery.
→ Open filter door.
→ Take out the coarse dirt filter.
→ Install the flat fold filter.
→ Close the filter door, it must lock into place.
Install the brush strip
Illustration H
→ Remove the rubber lips.
→ Install the brush strip.
Installing the paper filter bag/fleece filter bag
Note: A paper filter bag or a fleece filter bag is not included in the delivery.
Illustration
→ Release and remove the suction head.
→ Place the paper or fleece filter bag.
→ Insert and lock the suction head.
Install membrane filter
Note: A membrane filter is not included in the delivery.
Note: If you work without the paper filter bag or fleece filter bag, you must use a membrane filter to protect the suction head.
Illustration J
→ Release and remove the suction head.
→ Pull the membrane filter over the container edge.
→ Insert and lock the suction head.
Clip connection
Illustration K
The suction hose is equipped with a clip system. All C-40/C-DN-40 accessories can be connected.
Operation
⚠️Danger
Risk of injury and damage! The socket outlet is intended only for the direct connection of the disposal pump. Any other use of the socket outlet is not permitted.
Turning on the Appliance
→ Plug in the mains plug of the appliance.
→ Switch on the appliance at the main switch.
→ Continuously dispose of large volumes of liquid: Switch on the disposal pump.
Disposal or cleaning operation
→ Continuously dispose of liquids or clean.
Filter dedusting
While vacuuming, clean the flat-fold filter at regular intervals.
→ Pull the handle of the filter clean-off out several times and reinsert it.
Turn off the appliance
→ Shut off the disposal pump if necessary.
→ Switch off the appliance at the main switch.
→ Unplug the mains plug of the appliance.
After each operation
→ Filter dedusting: Pull the handle out several times and reinsert it.
→ Empty the container.
→ Vacuum and wipe the appliance inside and outside with a damp cloth.
Storing the Appliance
→ Wrap the mains connection cable around the hooks on the slider.
→ Wind the suction hose around the sliding bow.
→ Place the appliance in a dry room and secure it from unauthorized use.
Transport
Caution
Risk of injury and damage! Observe the weight of the appliance when you transport it.
→ Remove the suction pipe with the floor nozzle from the holder. Hold the appliance at the handle and at the suction pipe to transport it.
→ When transporting in vehicles, secure the appliance according to the guidelines from slipping and tipping over.
Storage
Caution
Risk of injury and damage! Note the weight of the appliance in case of storage.
This appliance must only be stored in interior rooms.
Maintenance and care
⚠️Danger
First pull out the plug from the mains before carrying out any tasks on the machine.
Replacing the coarse dirt filter/ flat-fold filter or the exhaust filter
→ Open filter door.
→ Replace the coarse dirt filter/flat-fold filter or the exhaust filter.
→ Close the filter door, it must lock into place.
Cleaning the floater
→ Release and remove the suction head.
→ Clean the floater with a moist cloth.
→ Insert and lock the suction head.
Troubleshooting
⚠️Danger
First pull out the plug from the mains before carrying out any tasks on the machine.
Suction turbine does not run
→ Check the receptacle and the fuse of the power supply.
→ Check the power cable and the power plug of the device.
→ Turn on the appliance.
→ Check the swimmer.
Suction turbine turns off
→ Switch on the disposal pump.
Suction capacity decreases
→ Remove obstructions from the suction nozzle, suction tube, suction hose, or coarse dirt filter/flat-fold filter.
→ Filter dedusting: Pull the handle out several times and reinsert it.
→ Replace the paper or fleece filter bag.
→ Ensure the filter cover properly locks into place.
→ Clean or replace the membrane filter under running water.
→ Replace the flat pleated filter.
→ Check drain pipe for leaks.
→ Check for proper installation of the flat pleated filter.
→ Check the proper installation of the coarse dirt filter.
Dust escapes during dry vacuuming
→ Install the flat fold filter.
→ Check for proper installation of the flat pleated filter.
→ Replace the flat pleated filter.
Disposal pump is not running
→ Check the socket of the appliance.
→ Free the stuck floater switch in the container.
→ Release the stuck pump impeller in the pump.
Disposal pump does not produce much volume
→ Route the disposal hose without kinks.
→ Check the disposal hose for obstructions.
Warranty
The warranty terms published by the relevant sales company are applicable in each country. We will repair potential failures of your appliance within the warranty period free of charge, provided that such failure is caused by faulty material or defects in manufacturing. In the event of a warranty claim please contact your dealer or the nearest authorized Customer Service centre. Please submit the proof of purchase.
Accessories and Spare Parts
- Only use accessories and spare parts which have been approved by the manufacturer. The exclusive use of original accessories and original spare parts ensures that the appliance can be operated safely and trouble free.
- At the end of the operating instructions you will find a selected list of spare parts that are often required.
- For additional information about spare parts, please go to the Service section at www.kaercher.com.
EC Declaration of Conformity
We hereby declare that the machine described below complies with the relevant basic safety and health requirements of the EU Directives, both in its basic design and construction as well as in the version put into circulation by us. This declaration shall cease to be valid if the machine is modified without our prior approval.
Product: Wet and dry vacuum cleaner
Type: 1.146-xxx
Relevant EU Directives
2006/42/EC (+2009/127/EC)
2004/108/EC
Applied harmonized standards
EN 55014-1: 2006 + A1: 2009
EN 55014-2: 1997 + A2: 2008
EN 60335-1
EN 60335-2-69
EN 61000-3-2: 2006 + A2: 2009
EN 61000-3-3: 2008
EN 62233: 2008
Applied national standards
5.957-602
The undersigned act on behalf and under the power of attorney of the company management.

CEO
Head of Approbation
Authorised Documentation Representative S. Reiser
71364 Winnenden (Germany)
Phone: +49 7195 14-0
Fax: +49 7195 14-2212
Winnenden, 2010/07/14
Technical specifications
| NT 611 Eco K | ||
| Mains voltage V 230 | ||
| Frequency Hz 1~50 | ||
| Max. performance W EU: 2350 | ||
| W CH: 2300 | ||
| Power (tot.) W 2000 | ||
| Rated power W 1200 | ||
| Capacity of the disposal pump W 800 | ||
| Container capacity I 55 | ||
| Filling quantity (liquid) I 42 | ||
| Air volume (max.) I/s 56 | ||
| Negative pressure (max.) kPa (mbar) 23,5 (235) | ||
| Type of protection | -- IPX4 | |
| Protective class | -- I | |
| Suction hose connection (C-DN/C-ID) | mm | 40 |
| Length x width x height | mm | 570 x 430 x 860 |
| Typical operating weight | kg | 23,0 |
| Max. ambient temperature | °C | +40 |
| Values determined to EN 60335-2-69 | ||
| Sound pressure level L_pA | dB(A) | 63 |
| Uncertainty K_pA | dB(A) | 1 |
| Hand-arm vibration value | m/ s^2 | <2,5 |
| Uncertainty K | m/ s^2 | 0,2 |
| Power cord | H07RN-F 3x1,5 mm ^2 | |
| Part no.: | Cable length | |
| EU | 6.649-413.0 | 10 m |
| CH | 6.649-254.0 | 10 m |
Entreposage.....FR...4
Entretien et maintenance .. FR . . .5
Assistance en cas de panne FR . . .5
Garantie .... FR ... 6
www.kaercher.com/REACH
2006/42/CE (+2009/127/CE)
2004/108/CE
71364 Winnenden (Germany)
Winnenden, 2010/07/14
www.kaercher.com/REACH
2006/42/CE (+2009/127/CE)
2004/108/CE
71364 Winnenden (Germany)
Tel.: +49 7195 14-0
Fax: +49 7195 14-2212
Winnenden, 2010/07/14
Dati tecnici
www.kaercher.com/REACH
71364 Winnenden (Germany)
Tel.: +49 7195 14-0
Fax: +49 7195 14-2212
Winnenden, 2010/07/14
Technische gegevens
www.kaercher.com/REACH
27 Interruptor principal
28 Filtro de escape de aire
2006/42/CE (+2009/127/CE)
2004/108/CE
71364 Winnenden (Germany)
Tfno.: +49 7195 14-0
Fax: +49 7195 14-2212
Winnenden, 2010/07/14
Datos técnicos
www.kaercher.com/REACH
2006/42/CE (+2009/127/CE)
2004/108/CE
71364 Winnenden (Germany)
Tel.: +49 7195 14-0
Fax: +49 7195 14-2212
Winnenden, 2010/07/14
Dados técnicos
Opbevaring. DA . . 4
www.kaercher.com/REACH
2006/42/EF (+2009/127/EF)
2004/108/EF
71364 Winnenden (Germany)
Tlf.: +49 7195 14-0
Fax: +49 7195 14-2212
Winnenden, 2010/07/14
Tekniske data
www.kaercher.com/REACH
Symboler i bruksanvisningen
⚠️Fare
For en umiddelbar truende fare som kan føre til store personskader eller til død.
Advarsel
Fjerne papirfilterpose/fleece-filterpose
Figur B
Montere papirfilterpose/fleece-filterpose
Merk: Papirfilterpose eller fleece-filterpose er ikke del av leveransen.
Figur 1
→ Avlås og ta av sugehodet.
→ Sett på papir- eller fleece-filterpose.
→ Sett på sugehodet og lås det.
Montere membranfilter
2006/42/EF (+2009/127/EF)
2004/108/EF
71364 Winnenden (Germany)
Tlf: +49 7195 14-0
Winnenden, 2010/07/14
Tekniske data
Montera in membranfilter
71364 Winnenden (Germany)
Tel.: +49 7195 14-0
Fax: +49 7195 14-2212
Winnenden, 2010/07/14
Tekniska data
www.kaercher.com/REACH
71364 Winnenden (Germany)
Puh.: +49 7195 14-0
Winnenden, 2010/07/14
Tekniset tiedot
71364 Winnenden (Germany)
Tηλ.: +49 7195 14-0
Φαξ: +49 7195 14-2212
Winnenden, 2010/07/14
www.kaercher.com/REACH
71364 Winnenden (Germany)
Tel.: +49 7195 14-0
Winnenden, 2010/07/14
Teknik Bilgiler
www.kaercher.com/REACH

S. Reiser
Head of Approbation
71364 Winnenden (Germany)
Тел.: +49 7195 14-0
Факс: +49 7195 14-2212
Winnenden, 2010/07/14
Технические данные
www.kaercher.com/REACH
71364 Winnenden (Germany)
Tel.: +49 7195 14-0
Fax: +49 7195 14-2212
Winnenden, 2010/07/14
Műszaki adatok
www.kaercher.com/REACH
2006/42/ES (+2009/127/ES)
2004/108/ES
71364 Winnenden (Germany)
Tel.: +49 7195 14-0
Fax: +49 7195 14-2212
Winnenden, 2010/07/14
Technické údaje
2006/42/ES (+2009/127/ES)
2004/108/ES
71364 Winnenden (Germany)
Tel.: +49 7195 14-0
Winnenden, 2010/07/14
Tehnični podatki
www.kaercher.com/REACH
2006/42/WE (+2009/127/WE)
2004/108/WE
71364 Winnenden (Germany)
tel.: +49 7195 14-0
faks: +49 7195 14-2212
Winnenden, 2010/07/14
Dane techniczne
www.kaercher.com/REACH
Directive EG respectate:
2006/42/CE (+2009/127/CE)
2004/108/CE
Norme armonizate utilize:
EN 55014-1: 2006 + A1: 2009
EN 55014-2: 1997 + A2: 2008
EN 60335-1
EN 60335-2-69
EN 61000-3-2: 2006 + A2: 2009
EN 61000-3-3: 2008
EN 62233: 2008
S. Reiser
Head of Approbation
71364 Winnenden (Germany)
Tel.: +49 7195 14-0
Fax: +49 7195 14-2212
Winnenden, 2010/07/14
Date tehnice
www.kaercher.com/REACH
2006/42/ES (+2009/127/ES)
2004/108/ES
Uplatňované harmonizované normy:
EN 55014-1: 2006 + A1: 2009
EN 55014-2: 1997 + A2: 2008
EN 60335-1
EN 60335-2-69
EN 61000-3-2: 2006 + A2: 2009
EN 61000-3-3: 2008
EN 62233: 2008
71364 Winnenden (Germany)
Tel: +49 7195 14-0
Fax: +49 7195 14-2212
Winnenden, 2010/07/14
Technické údaje
Transport.... HR...4
Skladištenje ..... HR .. 4
Njega i održavanje ..... HR ... 4
www.kaercher.com/REACH
Simboli u uputama za rad
⚠️ Opasnost
2006/42/EZ (+2009/127/EZ)
2004/108/EZ
71364 Winnenden (Germany)
Tel.: +49 7195 14-0
Winnenden, 2010/07/14
Tehnički podaci
| NT 611 Eco K | ||
| Napon el. mreže V 230 | ||
| Frekvencija Hz 1~50 | ||
| Maks. snaga W EU: 2350 | ||
| W CH: 2300 | ||
| Ukupna snaga W 2000 | ||
| Nazivna snaga W 1200 | ||
| Snaga pumpe za otpadnu vodu W 800 | ||
| Zapremnina spremnika I 55 | ||
| Količina punjenja tekućine I 42 | ||
| Maks. protok zraka I/s 56 | ||
| Maks. podtlak kPa (mbar) 23,5 (235) | ||
| Zaštita | -- IPX4 | |
| Klasa zaštite -- I | ||
| Priključak usisnog crijeva (C-DN/C-ID) | mm | 40 |
| Duljina x širina x visina | mm | 570 x 430 x 860 |
| Tipična radna težina | kg | 23,0 |
| Maks. okolna temperatura °C +40 | ||
| Utvrdene vrijednosti prema EN 60335-2-69 | ||
| Razina zvučnog tlaka L_pA | dB(A) | 63 |
| Nepouzdanost K_pA | dB(A) | 1 |
| Vrijednost vibracije na ruci | m/ s^2 | <2,5 |
| Nepouzdanost K | m/ s^2 | 0,2 |
| Strujni kabel | H07RN-F 3x1,5 mm2 | |
| Br. dijela | Duljina kabela | |
| EU | 6.649-413.0 | 10 m |
| CH | 6.649-254.0 | 10 m |
Pre prve upotrebe Vašeg uređaja pročitajte ove originalno
www.kaercher.com/REACH
Simboli u uputstvu za rad
⚠️ Opasnost
Ukazuje na neposredno preteću opasnost koja dovodi do teških telesnih povreda ili smrti.
⚠ Upozorenje
Ukazuje na eventualno opasnu situaciju koja može dovesti do teških telesnih povreda ili smrti.
Oprez
Ukazuje na eventualno opasnu situaciju koja može dovesti do lakših telesnih povreda ili izazvati materijalnu štetu.
Namensko korišćenje
⚠ Upozorenje
2006/42/EZ (+2009/127/EZ)
2004/108/EZ
71364 Winnenden (Germany)
Tel.: +49 7195 14-0
Winnenden, 2010/07/14
Tehnički podaci
| NT 611 Eco K | ||
| Napon el. mreže V 230 | ||
| Frekvencija Hz 1~50 | ||
| Maks. snaga W EU: 2350 | ||
| W CH: 2300 | ||
| Ukupna snaga W 2000 | ||
| Nominalna snaga W 1200 | ||
| Snaga pumpe za otpadnu vodu W 800 | ||
| Zapremina posude I 55 | ||
| Količina punjenja tečnosti I 42 | ||
| Maks. protok vazduha I/s 56 | ||
| Maks. podpritisak kPa (mbar) 23,5 (235) | ||
| Stepen zaštite -- IPX4 | ||
| Klasa zaštite -- I | ||
| Priključak usisnog creva (C-DN/C-ID) | mm | 40 |
| Dužina x širina x visina | mm | 570 x 430 x 860 |
| Tipična radna težina | kg | 23,0 |
| Maks. temperatura okoline | °C | +40 |
| Izračunate vrednosti prema EN 60335-2-69 | ||
| Nivo zvučnog pritiska L_pA | dB(A) | 63 |
| Nepouzdanost K_pA | dB(A) | 1 |
| Vrednost vibracije na ruci | m/ s^2 | <2,5 |
| Nepouzdanost K | m/ s^2 | 0,2 |
| Strujni kabl | H07RN-F 3x1,5 mm ^2 | |
| Br. dela | Dužina kabla | |
| EU | 6.649-413.0 | 10 m |
| CH | 6.649-254.0 | 10 m |
www.kaercher.com/REACH
71364 Winnenden (Germany)
Тел.: +49 7195 14-0
Факс: +49 7195 14-2212
Winnenden, 2010/07/14
Технически данни
www.kaercher.com/REACH
71364 Winnenden (Germany)
Tel: +49 7195 14-0
Winnenden, 2010/07/14
Tehnilised andmed
www.kaercher.com/REACH
71364 Winnenden (Germany)
Tālr.: +49 7195 14-0
Fakss: +49 7195 14-2212
Winnenden, 2010/07/14
Tehniskie dati
www.kaercher.com/REACH
32 Gaubtelis (GEKA-C sankaba)
71364 Winnenden (Germany)
Tel.: +49 7195 14-0
Faksas: +49 7195 14-2212
Winnenden, 2010/07/14
Techniniai duomenys
S. Reiser
Head of Approbation
71364 Winnenden (Germany)
Тел.: +49 7195 14-0
Факс: +49 7195 14-2212
Winnenden, 2010/07/14
text_image
Exploded view diagram of a vacuum cleaner with detailed component labels and part numbersAE Karcher FZE, P.O. Box 17416, Jebel Ali Free Zone (South), Dubai, United Arab Emirates,
+971 4 886-1177, www.kaercher.com
AR Kärcher S.A., Urugguay 2887 (1646) San Fernando, Pcia. de Buenos Aires
+54-11 4506 3343, www.karcher.com.ar
AT Alfred Kärcher Ges.m.b.H., Lichtblaustraße 7, 1220 Wien,
+43-1-25060-0, www.kaercher.at
AU Kärcher Pty. Ltd., 40 Koornang Road, Scoresby VIC 3179, Victoria,
+61-3-9765-2300, www.karcher.com.au
BE Kärcher N.V., Industrieweg 12, 2320 Hoogstraten,
+32-3-340 07 11, www.karcher.be
CA Kärcher Canada Inc., 6535 Millcreek Road, Unit 67, Mississauga, ON, L5N 2M2,
+1-905-672-8233, www.karcher.ca
CH Kärcher AG, Industriestrasse, 8108 Dällikon, Kärcher SA, Croix du Péage, 1029 Villars-Ste-Croix,
0844 850 864, www.kaercher.ch
CN Kärcher (Shanghai) Cleaning Systems, Co., Ltd., Part F, 2nd Floor, Building 17, No. 33, XI YA Road, Waigaogiao Free Trade, Pudong, Shanghai, 200131
+86-21 5076 8018, www.karcher.cn
CZ Kärcher spol. s r.o., Modletice c.p. 141, CZ-251 01 Ricany,
+420/323/606 014, www.kaercher.cz
GB Kärcher (U.K.) Ltd., Kärcher House, Beaumont Road, Banbury, Oxon OX16 1TB,
+44-1295-752-000, www.karcher.co.uk
GR Kärcher Cleaning Systems A.E., 31-33, Nikitara str. & Konstantinoupoleos str., 136 71 Aharnes,
+30-210-2316-153, www.karcher.gr
HK Kärcher Limited, Unit 10, 17/F., Apec Plaza, 49 Hoi Yuen Road, Kwun Tong, Kowloon,
++(852)-2357-5863, www.karcher.com.hk
HU Kärcher Hungaria KFT, Tormásrét ut 2., (Vendelpark), 2051 Biatorbagy,
+36-23-530-64-0, www.kaercher.hu
I Kärcher S.p.A., Via A. Vespucci 19, 21013 Gallarate (VA),
+39-848-998877, www.karcher.it
IE Kärcher Limited (Ireland), C1 Centrepoint Business Park, Oak Road, Dublin 12,
(01) 409 7777, www.kaercher.ie
JP Kärcher (Japan) Co., Ltd., Irene Kärcher Building, No. 2, Matsusaka-Daira 3-chome, Taiwa-cho, Kurokawa-gun, Miyagi 981-3408,
+81-22-344-3140, www.karcher.co.jp
KR Karcher (Korea) Co. Ltd., 162 Gukhoe-daero, (872-2 Sinjeong-Dong), Seoul, Korea
02-322 6588, A/S. 1544-6577, www.karcher.co.kr
LV Karcher SIA, Mārupes nov., Mārupe, Kārla Ulmaṇa gatve 101, Rīga, LV-1046
+371-67 80 87 07
MX Karcher México, SA de CV, Av. Gustavo Baz No. 29-C, Col. Naucalpan Centro, Naucalpan, Edo. de México, C.P. 53000 México,
+52-55-5357-04-28, www.karcher.com.mx
MY Karcher Cleaning Systems Sdn. Bhd., 71 & 73 Jalan TPK 2/8, Taman Perindustrian Kinrara, Seksyen 2, 47100 Puchong, Selangor Darul Ehsan, Malaysia, +603 8073 3000, www.karcher.com.my
NL Kärcher B.V., Postbus 474, 4870 AL Etten-Leur,
0900-33 666 33, www.karcher.nl
NO Kärcher AS, Stanseveien 31, 0976 Oslo, Norway,
+47 815 20 600, www.karcher.no
NZ Karcher Limited, 12 Ron Driver Place, East Tamaki, Auckland, New Zealand,
+64 (9) 274-4603, www.karcher.co.nz
PL Kärcher Sp. z o.o., Ul. Stawowa 140, 31-346 Kraków,
+48-12-6397-222, www.karcher.pl
RO Karcher Romania srl, Sos. Odaii 439, Sector 1, RO-013606 BUKAREST,
+40 37 2709001, www.kaercher.ro
SGP Karcher South East Asia Pte. Ltd., 5 Toh Guan Road East, #01-00 Freight Links Express Distripark, Singapore 608831,
+65-6897-1811, www.karcher.com.sg
SK Kärcher Slovakia, s.r.o., Beniakova 2, SK-94901 NITRA,
+421 37 6555 798, www.kaercher.sk
TR Kärcher Servis Ticaret A.S., Mahmutbey Mahallesi İstoç, Petrol Plaza C-Blok Kat: 2-3, Bağcılar, 34218 Istanbul
+90-212-659-43 69, www.karcher.com.tr
TW Karcher Limited, 7/F, No. 66, Jhongijheng Rd., Sinjhuang City, Taipei County 24243, Taiwan,
USA To locate your local dealer please visit our web site at http://www.karchercommercial.com or call us at 888.805.9852
ZA Kärcher (Pty) Ltd., 144 Kuschke Street, Meadowdale, Edenvale, 1614,
+27-11-574-5360, www.karcher.co.za


