
TSM1035 - Saw Ferm - Free user manual and instructions
Find the device manual for free TSM1035 Ferm in PDF.
| Product type | Table saw |
| Brand | Ferm |
| Model | TSM1035 |
| Supply voltage | 220-240 V~, 50 Hz |
| Power consumption | 1500 W |
| No-load speed | 5000 rpm |
| Blade dimensions | Diameter 210 mm, bore 30 mm, thickness 2.8 mm |
| Number of teeth | 24 |
| Max. cutting height at 90° | 70 mm |
| Max. cutting height at 45° | 45 mm |
| Table dimensions | 676 x 500 mm |
| Weight | 14.5 kg |
| Sound pressure level | 99.6 dB(A) |
| Sound power level | 112.6 dB(A) |
| Insulation class | Double insulation (Class II) |
| Safety | Protective guard, riving knife, overload switch, anti-restart protection |
| Included accessories | Parallel guide, mitre gauge, table extensions, push stick, wrenches, assembly kit |
| Dust extraction | Vacuum cleaner connection (diameter not specified) |
| Maintenance | Regular cleaning with damp cloth, no solvents; check and sharpen blade; replace brushes if necessary |
| Compatible materials | Hard and soft wood, free from foreign objects (nails, screws); do not use for metal or stone |
Frequently Asked Questions - TSM1035 Ferm
User questions about TSM1035 Ferm
0 question about this device. Answer the ones you know or ask your own.
Ask a new question about this device
Download the instructions for your Saw in PDF format for free! Find your manual TSM1035 - Ferm and take your electronic device back in hand. On this page are published all the documents necessary for the use of your device. TSM1035 by Ferm.
USER MANUAL TSM1035 Ferm
Thank you for buying this Ferm product.
By doing so you now have an excellent product, delivered by one of Europe's leading suppliers. All products delivered to you by Ferm are manufactured according to the highest standards of performance and safety. As part of our philosophy we also provide an excellent customer service, backed by our comprehensive warranty. We hope you will enjoy using this product for many years to come.
The numbers in the following text refer to the pictures on page 2 - 6.

Read the operating instructions carefully before using this device. Familiarise yourself with its functions and basic operation. Service the device as per the instructions to ensure that it always functions properly. The operating instructions and the accompanying documentation must be kept in the vicinity of the device.
Contents
- Technical specifications
2.Safetyinstructions - Assemblyinstructions
- Operation
5.Maintenance
1. TECHNICAL SPECIFICATIONS
Voltage 220-240V~
Frequency 50 Hz
Power input 1500W
No load speed 5000/min
Saw blade dimensions 210 × 30 × 2.8 mm
Number of teeth T24
Max.workpiece height 90^70mm
Max.workpiece height 45^45mm
Thickness of the riving knife 2.0mm
Blade body thickness 1.8 mm
Measurements of bench (max) 676× 500mm
Weight 14.5 kg
Lpa (sound pressure level) 99.6 dB(A) K=3dB
Lwa (sound power level) 112.6 dB(A) K=3dB
Product information
Fig. A
- Saw table with two rulers
2A. Parallel guide
2B. Guide extension
2C. Wing nuts - Extensions (2 pcs)
- Dust extraction
- Guard
- Mitre guide
- Push stick
- On/off switch
- 2 in 1 adjustment handle
- Locking knob
- Electric plug
- Rulers sawblade angel
- Extension support (4 pcs)
- Wrenches (2 pcs)
- Legs (4 pcs)
- Long bolts with nuts (8 pcs)
- Small bolts with nuts for extensions (8 pcs)
- Dust extraction connection
- Sawblade guard knob
- Riving knife
- Saw table inlay
22A. Cross strut long (2 pcs)
22B. Cross strut short (2 pcs) - Rubber feet (4 pcs)
- Additional legs (2 pcs)
- Small bolts with nuts for cross strut (16 pcs)
- Small bolts with nuts for additional legs (4 pcs)
- Connection vacuum cleaner
- Fixing screw
- Carriage-type bolts with nuts
- Holder clips
Check first whether or not the delivery has been damaged by transport and/or whether all the parts are present.
2. SAFETY INSTRUCTIONS
Explanation of symbols

Denotes risk of personal injury, loss of life or damage to the tool in case of non-observation of the instructions in this manual.

Indicates the presence of an electrical voltage.

Immediately unplug the plug from the mains electricity in the case that the cord gets damaged and during maintenance.
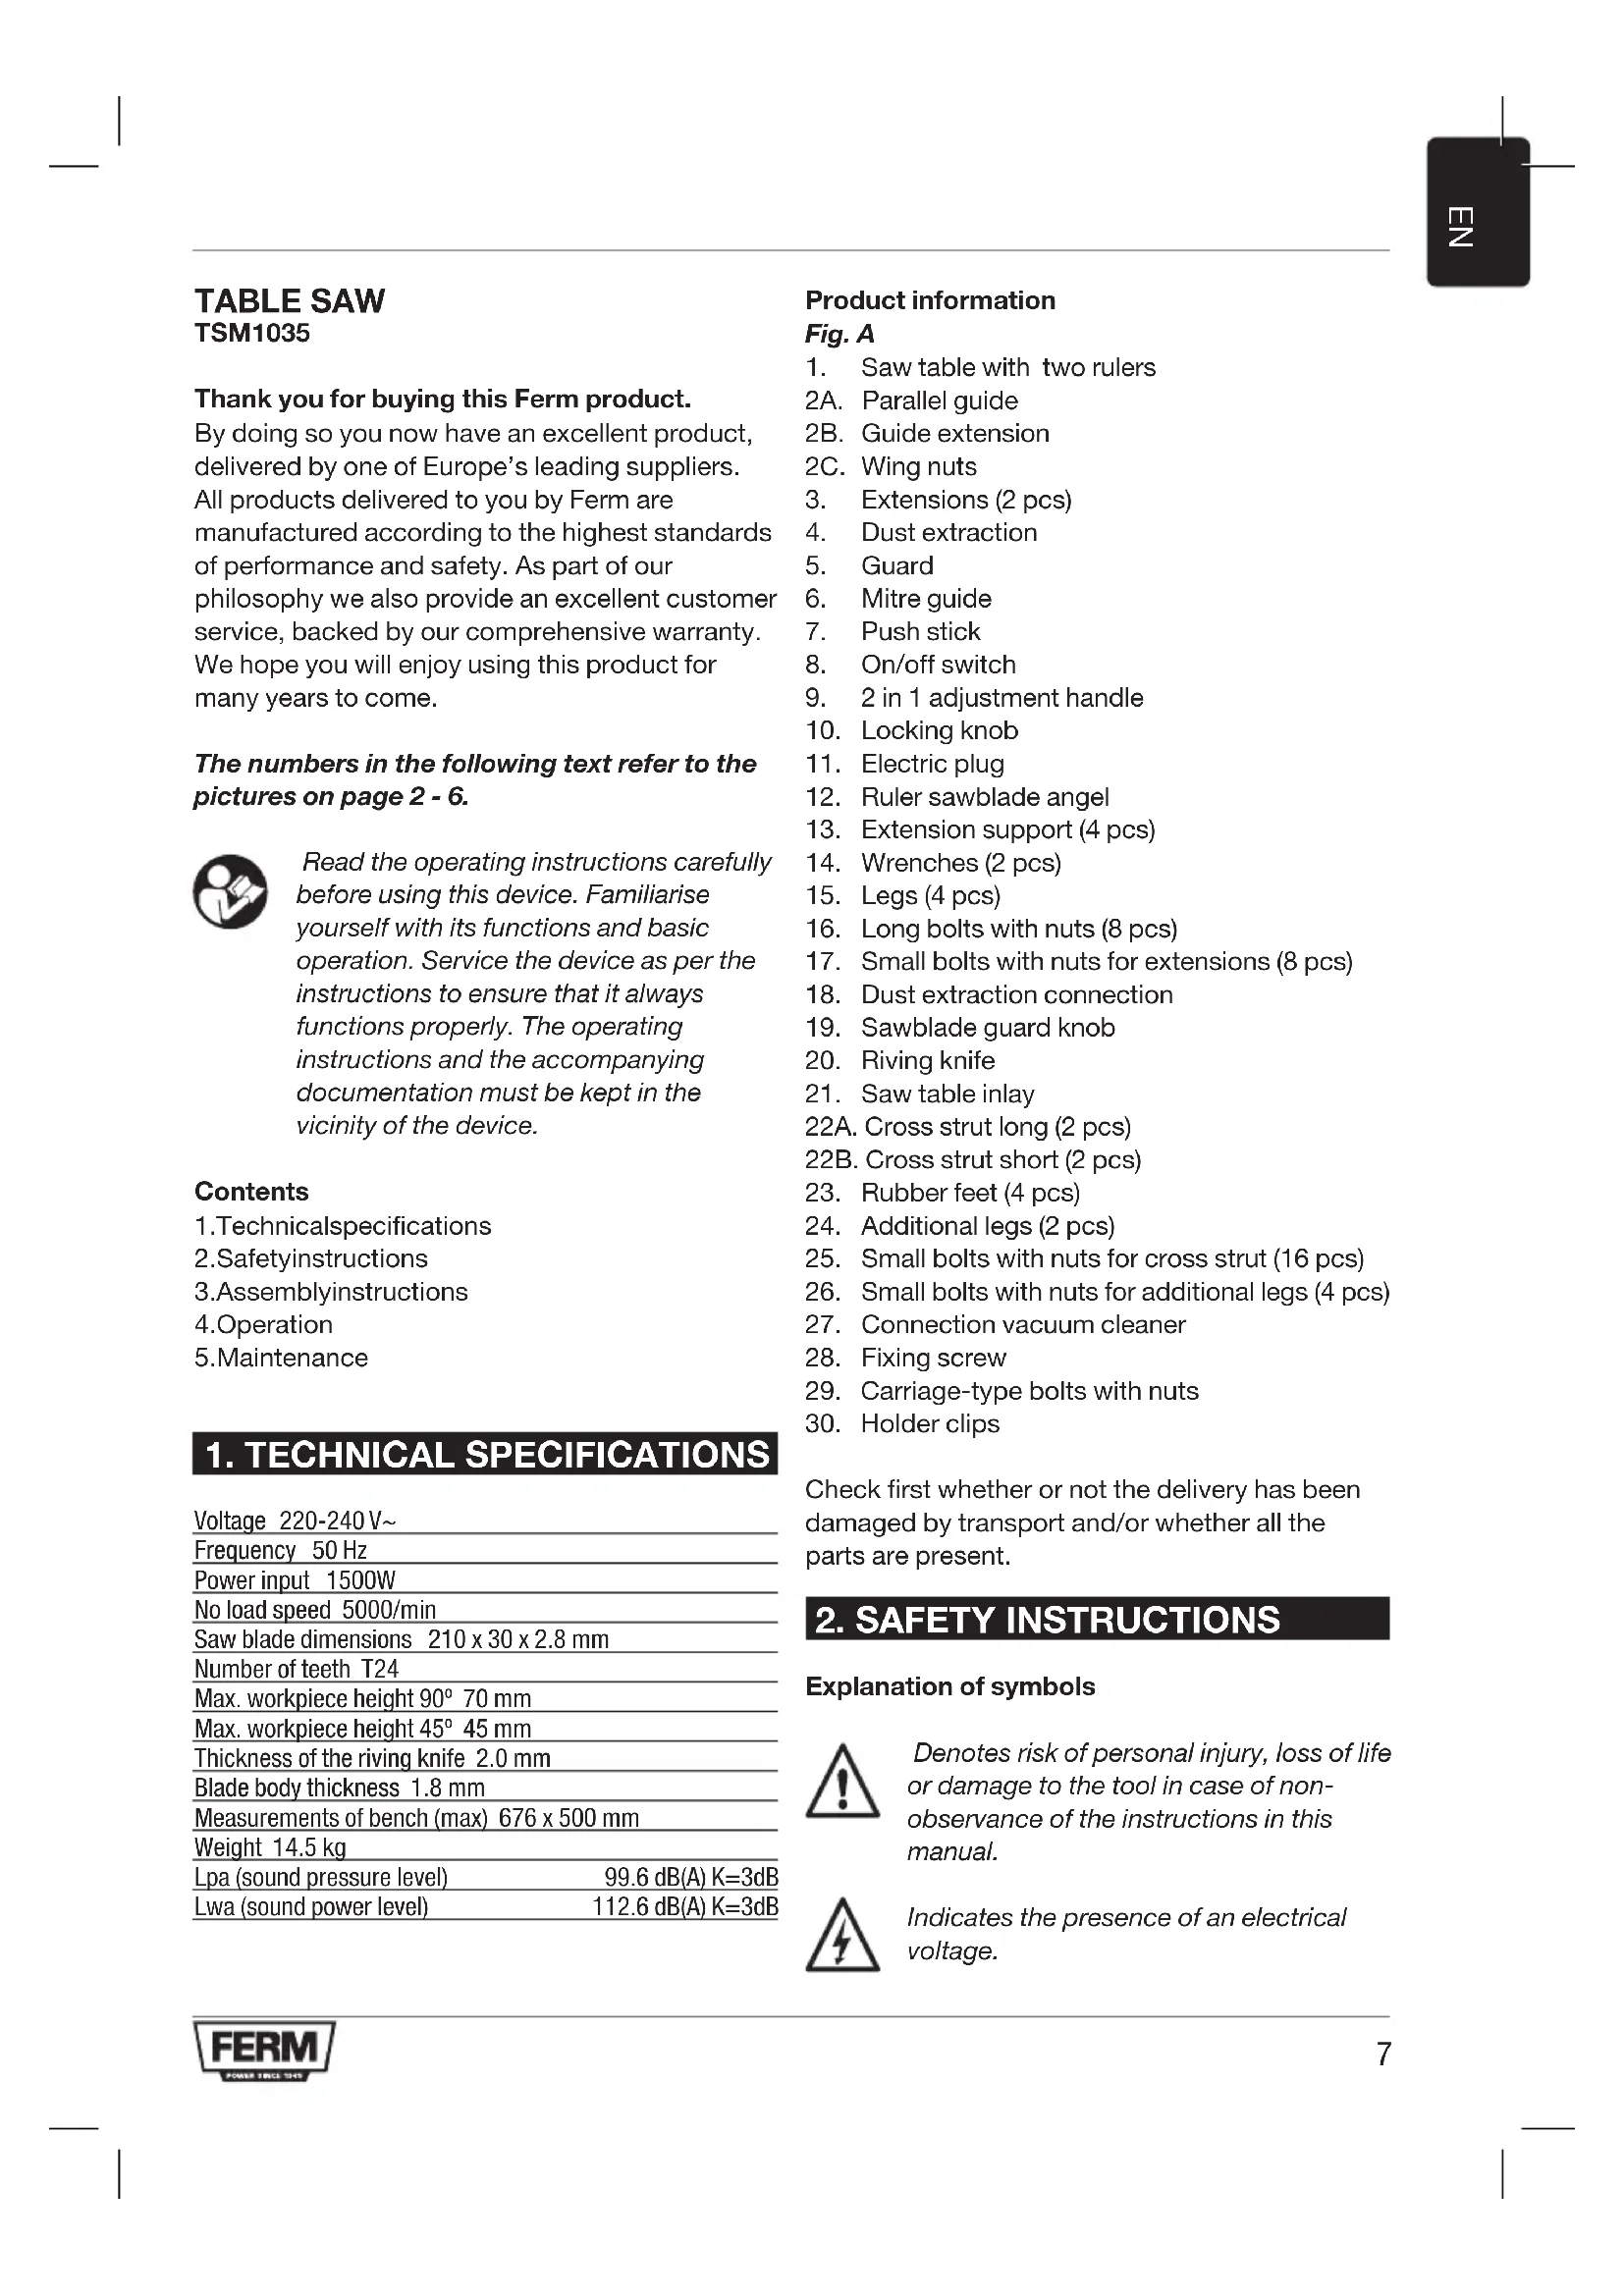
Keep bystanders away.
Always wear eye protection!
Wear hearing protection.


Wear a dust mask.

Danger Area! Keep hands far away from the cutting area while the machine is running. Danger of injury when coming in contact with the saw blade.

Class II machine - Double insulation - You don't need any earthed plug.
Material to be processed
This powertool is intended as a stationary machine for making straight lengthways and crossways cuts in hard and soft wood free from foreign bodies such as nails, screws and mortar.
ATTENTION! When using electric tools to protect against electric shock, injury and fire the following basic safety measures must be observed.
Make sure to read all of these instructions before you use this power tool, keep the safety booklet and preserve it well for later reference.
-
Always keep your workplace clean and tidy.
-
An untidy workplace can lead to unwanted accidents.
-
Consider environmental influences.
-
Do not expose the power tool to rain.
- Do not use the power tool in a damp or wet environment.
- Make sure that your working space has sufficient lighting.
-
Do not use the power tool in areas where there is a fire or explosive hazard.
-
To protect yourself from an electric shock.
-
Avoid body contact with grounded parts
(e.g. pipes, radiators, electric stoves, refrigerators etc.).
-
Keep other people away
-
Keep other people away especially children, do not let them touch your power tool or cable and keep the children away from your working area.
-
Store the unused power tools safely.
-
Unused power tools should be locked up or stored in a place that is dry and out of reach of children.
-
Do not overload your power tool.
-
You work better and safer in the specified power range.
-
Use the correct power tool.
-
Do not use low-power machines for heavy work
-
Do not use the power tool for purposes that they are not intended for. For example you cannot cut tree limbs or a log of wood using a hand saw.
-
Wear suitable clothing.
-
Do not wear loose clothing or jewelry; they can be caught in the moving parts.
- When working outdoors non-skid footwear is recommended.
-
For long hair, wear a hairnet.
-
Use protective equipment.
-
Wear protective goggles
-
When doing work that generates dust, use a breathing mask.
-
Connect the vacuum device
-
If connection to the vacuum and catcher are available then you know that these are connected and properly used.
-
Do not use the cable for purposes that it is not intended for.
-
Do not use the cable to the connector to pull it out of the socket. Protect the cable from heat, oil and sharp edges.
-
Secure the power tool.
-
Use clamps or a vice to hold the power tool. It is safer than holding it with your hand.
-
Avoid an abnormal posture.
It ensures stability and keeps you balanced at all times. -
Keep and maintain tools with care.
-
Keep the cutting tools sharp and clean, this ensures that you work better and that it is as safe as possible.
-
Follow the lubricating and tool changing instructions.
- Check the connection cable of the power tool regularly and let a qualified expert repair any damages.
- Check the extension cables regularly and replace them if they are damaged.
-
Keep the handles clean, dry and free of grease and oil.
-
Unplug the power tool from the power outlet.
-
When you are not using the power tool, when you conduct maintenance and when you change your tools such as blades, drills and cutters.
-
Do not leave the key inside the tool.
- Before switching it on, make sure that keys and setup tools have been cleared
- Avoid unintentionally switching the power tool on.
- Verify that while connecting the plug into the socket that the power is off.
- Use the extension cables while outdoors.
- When using the power tool outdoors make sure to use the appropriate and approved labeled extension cable.
Additional safety instructions
- When using the saw blades with hard metal teeth (Carbon tipped) it is advisable to use blades with a negative or slightly positive cutting angle. Do not use any saw blades with deeply cut teeth. They can grip the protective cap.
- Attention: First carefully assemble all the parts before starting work. Follow the procedure as indicated.
- If you are not familiar with using such a machine, you would be better to be informed first by a professional, an instructor or by a technician.
- Always clamp or press the workpiece firmly against the saw guide, before you carry out the process. The use of all possible clamping setups is preferable to using your hands.
- Important: If you are holding the workpiece by hand for the process to be carried out, keep a minimum distance of 100mm from the saw blade.
- Always press the workpiece against the bench.
-
Keep the saw blade sharp and check regularly whether it rotates freely without abnormal vibrations. Replace the saw blade if necessary.
-
Allow the machine to rotate freely until it reaches the maximum number of revolutions, before you start the process.
- Maintain the air inlets at the back and the bottom of the bench saw machine and electric motor for a longer machine life. Dust piles must be removed.
- Always lock the different degree set-ups before you start processing.
- Only buy suitable saw blades with a number of revolutions of at least 6000 revolutions per minute.
- Only use the correct saw blade. Too small or too big saw blades are extremely dangerous.
- Regularly inspect the saw blade for any faults. Replace the saw blade if necessary.
- Grease the new saw blade and clean the flanges before you assemble the new blade. Then assemble the blade in the correct direction and pull the flanges firmly using the central bolt.
- Only use original flanges. All other types are not suitable.
- Never work without the protective cap of the saw blade.
- The moving part of the protective cap must also remain assembled.
- Never grease the saw blade while it is rotating.
- Always keep your hands removed from the track of the saw blades.
- Never pick up the workpiece by grasping with your hands along or behind the saw blade.
- Ensure that the workpiece never touches the saw blade before the machine has been switched on.
- Never process metal or stone sorts with this machine.
- Use support aids in order to support long workpieces.
- Never use the machine in a dangerous environment, where inflammable gases or fluids are present.
- Never leave the machine unattended without first disconnecting it from the mains voltage.
- If you hear abnormal noises, try to trace them or take the machine to a recognized fitter, or repair company.
- If a part is broken or damaged, replace it or repair it immediately.
-
Never stand in the track of the saw blade but stand to the left or the right of the saw bench.
-
Your hands must likewise be placed next to the track of the saw blade.
-
Always use the push stick instead of your hands to push the wood through the saw.
-
Always place the wood at the front of the saw bench and then push it further back.
-
For mitring only the adjustable guide must be used and the fence must be removed.
-
Never use the fence as a linear measure for cutting off beams.
-
If the saw blade is locked: first switch off the machine before you attend to the fault.
-
Avoid workpieces hitting back in your direction by taking the following measures:
Always use sharp saw blades.
- Do not saw too small workpieces.
- Never release the workpiece before it has been completely pushed through the saw.
- Always adjust the guide parallel to the saw blade.
- Never remove the saw protection.
- Before you continue sawing, ensure that you are standing firmly and that your hands are in the required position.
- Never use thinners to clean the machine. Only use a damp cloth for cleaning.
- Do not use saw blades which are damaged or deformed.
- Replace table insert when worn.
- Only use saw blades specified by the manufacturer that are intended for working with wood or similar materials according to EN847-1.
- Take care that the selection of the saw blade depends on the material to be cut.
- Connect tabelsaws to a dust-collecting device when sawing.
- Use and correct adjustment of the riving knife
- Use and correct adjustment of the upper saw blade guard.
- Take care when slotting.
Make sure, when changing the saw blade, the blade width is not smaller and the main blade thickness of the saw blade is not greater than the thickness of the riving knife.
Wear personal protective equipment, these could include:
- Hearing protection to reduce the risk of hearing loss
Eye protection
- Inhale respiratory protection to reduce the risk of harmful dust
- Gloves when handling the blades and rough materials (recommendation, saw blades, are whenever practicable, carried in a container)

Warning! Do not use HSS blades.
- Insert the push stick in its holder when not in use.
- Use a push stick or a push block to guide the workpiece.

Warning! Do not use the saw for rebating or grooving.
- Only use saw blades, whose maximum speed is at least the speed indicated on the saw and is suitable for the material to be cut.
- During the transport, the upper part of the saw blade has to be covered, by the guard.
Switch off the machine immediately when you discover:
A defective mains plug or mains lead.
A defective switch.
Overheating of the machine.
Smoke or odeur caused by scorched insulation.
Electrical safety
When using electric machines always observe the safety regulations applicable in your country to reduce the risk of fire, electric shock and personal injury. Read the following safety instructions and also the enclosed safety instructions.

Always check that the power supply corresponds to the voltage on the rating plate.
Replacing cables or plugs
Immediately throw away old cables or plugs when they have been replaced by new ones. It is dangerous to insert the plug of a loose cable in the wall outlet.
Using extension cables
- As a supply for this machine always use an unloaded line and/or an extension cable with
conductors of at least 1,5mm^2 and protected with a 16 A fuse. Be sure that this extension cable is not longer than 20 metres.
- This machine can be switched to the single-phase network (230-240 V/50 Hz). If you are in doubt about the earth of the electricity provisions, consult an electrician first.
Power supply
- The motor is fitted with an overload switch. If the table saw overloads, the overload switch switches the equipment off automatically to protect the table saw from overheating. If the overload switch triggers, switch off the table saw using the ON/OFF switch (8) and wait until the table saw cools down. Then press the ON/OFF switch (8) and restart the table saw.
3. ASSEMBLY INSTRUCTIONS
Assembly of the undercarriage Fig A4

First assemble all parts before firmly tightening all bolts.
- Put the machine upside down. Put a piece of cardboard underneath, so you don't damage the subsurface.
- Mount the legs (15) (4 pcs) with one extension support (13) (4 pcs) per leg on the four corners of the body, use longer bolts (16) with nuts (2 pcs per leg) (Fig.B1)
Make sure the extension supports (13) are mounted in the same way as shown in Fig.B1 - Mount Cross strut long (22A) (2 pcs) between the legs on the front and back side of the machine. Use small bolts (25) with nuts (8 pcs)
- Mount Cross strut short (22B) (2 pcs) between the legs on both sides of the machine. Use small bolts (25) with nuts (8 pcs).
- Place the rubber feet (23) (4 pcs)
- Mount the additional legs (24) (2 pcs) on the backside of the machine, use small bolts (26) with nuts (4 pcs)
Assembly of the extensions
Fig B1, Machine is still upside down
-
Mount the extensions (3) (2 pcs) to the table, use small bolts (17) with nuts (4 pcs).
-
Mount the extensions support (13) to the exten sions (3), use small bolts (17) with nuts (4 pcs)
- Turn the machine back on its feet. Make sure the extensions are levelled with the table, by using the slots in the extensions supports.
Assembly of the riving knife
Fig A4, C
- Remove the inlay (21) from the table, by using a screwdriver (Fig.G1).
- Loosen the fixing screw (28)(Fig.C1)
- Raise the riving knife until the depth between the saw table and the upper edge of the riving knife equals approx. 110mm (Fig.C2)
- The distance between the riving knife and the toothed rim of the saw blade must be between 3 and 5mm (Fig.C3).
- The tip of the riving knife shall not be lower than 5mm from the tooth peak, as shown in Fig.C3.
Attachment of the guard Fig C4
- Turn sawblade completely upwards (instructions for height adjustment see chapter 4)
- Pull the knob (19) of the guard (5) and place it over the riving knife (20) while pulling the knob
- Release the knob and make sure the pin slides in the hole
- Secure the guard by tightening the knob
Assembly of the dust extraction
Fig. D
- Assemble dust extraction like shown on Fig.D.
- Attach the vacuum cleaner to the vacuum cleaner connection (27)(Fig.D)
Attachment of the parallel guide Fig E
- Attach the parallel guide (2A) on the right side off the saw blade on the table.
- Lock the guide down by pushing down the handle (Fig.E)
Attachment of the parralel guide holder Fig.1
The parallel guide can be stored using the holder clips (30). Mount the holder clips (30) using carriage-type bolts with nuts (29). The holders can be mounted as shown in Fig 11 or as shown in Fig 12.
Attachment of the litre guide
Fig A1
- Slide the guide in the slot of the table at the left side of the sawblade Fig.A1
Assemble or change the saw blade
Fig G

First remove the plug from the mains before the saw blade is assembled or replaced.

The arrow marked on the saw blade, which indicates the direction of rotation, must point in the same direction as the arrow marked on the machine, the saw blade teeth must point downwards on the front of the saw.
- Remove the inlay (21) from the table, by using a screwdriver. Fig.G1
- Turn the saw blade completely upwards. (Instructions for height adjustment see chapter 4)
- Loosen the nut with the wrenches (14) (Fig.G2)
- Remove the nut and the outside flange from the sawblade axle. (Fig.G3)
- Slide the old saw blade over the saw blade axle and put on a new saw blade.
- Put the outside flange back on add the nut.
- Tighten the nut by using the wrenches.
- Put the inlay back in the table and tighten the screw.
4. OPERATION
Switching on/off
Fig A1 (8)
- Press the switch into position '1' to put your machine into operation.
- To switch off the machine the same switch needs to be pressed to position '0'
Always keep the mains cable away from moving parts.
Using the 2 in 1 handle, Adjust the angle and height of the saw blade
Fig A2
Using the height adjustment
- Turn the handle (9) clockwise to raise the sawblade
-
Turn the handle counter clockwise to lower the sawblade
-
Make sure the saw blade is always approximately 2mm higher than the total thickness of the material to be sawn.
Using the angle adjustment
Fig G4
- Slightly loosen the knob(10)
- Press the handle(9) towards the machine and turn counter clockwise to adjust the sawblade in its angle.
- Fasten the knob(10)
Using the parallel guide
Fig A1,E,J1,J2
The parallel guide (2A) is equipped with a guide extension (2B). The guide extension can be used in two different ways, depending on the thickness of the wood.
For thicker wood, the guide extension (2B) should be mounted as shown in figure J1.
For thinner wood, the guide extension (2B) should be mounted as shown in figure J2.
- Unlock the guide down by pushing the handle upwards (Fig.E)
- Slightly loosen the wing nuts (2C)
- Remove the guide extension (2B) from the parallel guide (2A) by sliding it away from the parallel guide
- Turn the guide extension to the desired position and slide it back onto the parallel guide
- Tighten the wing nuts (2C)
Working instructions
There are two types of sawing methods:
Lengthwise sawing (Fig.H1)
Sawing the workpiece in the length of the wood grain
Cross-cutting or cutting off, use the mitre guide (Fig.H2)
Sawing off the workpiece crosswise

For both sawing methods one of the fences must be used. Therefor never saw without a fence!
Attention! Before you start sawing, first check the following:
- Is the saw blade secured?
- Are all the locking handles secured?
-
Is the fence parallel to the saw blade?
-
Is the protective cap working properly?
- Are you wearing safety goggles?
- Is the saw blade not rubbing against anything?

It is absolutely necessary to take these points into consideration before you start work!
Lengthwise sawing
- Secure the fence to the correct measuring position and remove the cut-off guide from the bench carriage.
- Press the wood lightly towards the bench and let it glide against the cut-off fence.

Remain at least 3cm from the front of the saw blade before you switch on the motor. The side of the wood which is against the fence must be completely straight. Keep your hands at least 10cm away from the saw track to be followed.
- Switch on the motor and wait until the saw blade has reached the maximum number of revolutions before you start sawing.
While you press the wood against the bench and the fence, you can carefully push the wood through the saw blade without forcing it. - Never pull the workpiece backwards. If necessary, switch off the motor first without altering the position of the workpiece.
Lengthwise sawing with a (vertical) litre
This method is practically the same, except that the saw blade is placed at the angle required.

With this type of method the fence may only be along the righthand side of the sawblade.
Lengthwise sawing of narrow workpieces

Assume that this process is extremely dangerous.
Take all the necessary safety measures and continually push the workpiece through (until behind the saw blade) using a push stick instead of by hand.
Crosswise sawing
- Remove the fence and apply the cross-cut fence in the righthand carriage.
- Adjust the height of the saw blade (see lengthwise sawing).
- Press the workpiece against the cross-cut fence and keep at least 2,5 cm distance from the front of the saw blade.
- Switch on the motor and wait until the maximum number of revolutions has been reached.
- Press the workpiece against the fence and the bench. Carefully push the wood through the saw blade. Continue until behind the saw blade. Then switch off the motor and keep this position until the saw blade has stopped completely before you remove the wood.
- Never pull the wood back. If necessary, switch the motor off and keep the position until the saw blade has stopped completely.
Crosswise sawing with a vertical metre
This method is practically the same, except that the saw blade is placed in the angle required.

Only place the cross-cut fence on the righthand side of the saw blade. Never saw too small pieces of wood. Never use your hands to carry out difficult operations.
Crosswise sawing with a horizontal metre
With this method the cross-cut fence must be secured at the angle required. Keep the workpiece pressed firmly against the cross-cut fence and the bench before you start cutting off.
5. MAINTENANCE

Make sure that the machine is not live when carrying out maintenance work on the motor.
These machines have been designed to operate over a long period of time with a minimum of maintenance. Continuous satisfactory operation depends upon proper machine care and regular cleaning.
Transporting the table saw
Before transporting the bench saw, the following steps must be carried out:
Pull the mains plug
- Turn the hand-wheel (9) (Fig. A2) in anticlockwise direction, lower the blade as much as possible
- Remove all accessories that cannot be mounted firmly to the power tool
If possible, place unused saw blades in an enclosed container for transport
- Wind the mains cable and bind it
- For lifting or transport, carry the main table (1) (Fig.A1)

The bench saw should always be carried by two persons in order to avoid back injuries.
Malfunctions
In the case that the machine is not functioning properly, we give a number of possible causes and appropriate solutions below.
1. The motor does not start
The plug is not in the mains.
- The cable has been interrupted.
- The carbon brushes are worn out. Replace the carbon brushes or consult your dealer.
2. The workpieces is jamming against the riving knife during processing
The saw blade must be aligned (Fig. G).
3. The saw cut is not smooth (frayed)
- The saw blade must be sharpened.
- The saw blade has been assembled back-to-front.
- The saw blade has become coated with resin or sawdust.
- The saw blade is not suitable for this process.
4. The workpiece is touching the back of the saw blade and is jumping out
- The riving knife must be aligned (Fig. G).
The fence is not being used. - The saw blade is thicker than the riving knife or the riving knife is not being used
-
The saw blade must be sharpened.
-
The workpiece has not been kept in its place until after sawing.
- The tension button of the cross-cut fence is loose.
5. The height and/or litre handle is blocked
- Sawdust and dust must be removed.
6. The motor has difficulty reaching the maximum number of revolutions
- The extension cable is too thin and/or too long.
The mains voltage is lower than 230-240 V.
7. The machine is vibrating
The machine has not been fastened onto the workbench.
The frame is not level with the floor.
- The saw blade has been damaged.
8. The electromotor runs unevenly
- The carbon brushes are worn out. Replace the carbon brushes or consult your dealer.
Cleaning
Keep the ventilation slots of the machine clean to prevent overheating of the motor. Regularly clean the machine housing with a soft cloth, preferably after each use. Keep the ventilation slots free from dust and dirt. If the dirt does not come off use a soft cloth moistened with soapy water. Never use solvents such as petrol, alcohol, ammonia water, etc. These solvents may damage the plastic parts.
Lubrication
The machine requires no additional lubrication.
Faults
Should a fault occur, e.g. after wear of a part, please contact your local Ferm dealer. In the back of this manual you find an exploded view showing the parts that can be ordered.
ENVIRONMENT

Damaged and/or disposed of electrical or electronic devices must be dropped off at recycling stations intended for that purpose.
Only for EC countries
Do not dispose of power tools into domestic waste. According to the European Guideline 2012/19/EU for Waste Electrical and Electronic Equipment and its implementation into national right, power tools that are no longer usable must be collected separately and disposed of in an environmentally friendly way.
WARRANTY
Read the warranty conditions on the separately supplied warranty card.
The product and the user manual are subject to change. Specifications can be changed without further notice.
TISCHKREISSAGETSM1035
Crosswise sawing with a vertical metre
danneggiare i componenti in plastica. moistened with soapy water. Never use solvents such as petrol, alcohol, ammonia water, etc. These solvents may damage the plastic parts.
Lubrificazione
Pokyny pro obsluhu pily
Paxockopou Aenidac 1.8 mm
Aiaotaoeis Tou TAYKOU (ev.) 676 x 500 mm
Bapoc 14.5 kg
Lpa (σταθμn nxπtiknc triεgnc) 99.6 dB(A) K=3dB
Lpa (σáθμn nxπtikns ioxuoc) 112.6 dB(A) K=3dB
Pnpoopiec yia to Ppoiov
Eik.A
- Mn xpnoiouoieTe to kaawdo yia m npoBaaTnOeves Xpnoeic.
Mn xnpoiopoioite To kaawio Tou qic yia va TpaBATE To pic aTNO TV Ppica. PpoataeEte To kawio aTO eepoTNTa, Aia Kai aixunpec akuec.
12. Στερεωνετε καλά το έλεκτρικό εργαλείο.
Xpnoioutoinote aphiKtnpec n meyyevn yia tn ouykpatnon tou nAektpikoEpyaaleiou.Auto eivai aopaaolepto aTO TO VA TO Kpatate ME TA xepia oac.
13. Anoepuyete n qouikc otaoei tou wuatoC.
- 'Etoi EgaopaaIaIe Tnavta OtaOepoTna Kaia KaI noppotria.
14. Diatnpieit Kai ouvtnpite Ta epyaiae a E npooxh.
- Diatnpeite ta koTTiKa epyaia aixmu Ka KaBap, yia va eaoaipaietai ot i Aitoupyoov kaIutepa kai ivai ooo to duvatov TIO aOpaH.
TnpieTe TcOdbnyEc AInavonC kai aAayns epyaaleiwv.
EeYxTe TAKIKA TO KAawio OuvoNGTou nAektpiKOU Epyaieou KAI aVaOteTe OE EKTaiDEuEv OIdIO TeXVIKO VA ETIOKEuaZEI TUXOV Znmuic.
EeYxETaTAKIkaKaAOWbiaETEKtaoNcKai avTKaOHTATEaavexouvUTTOOTEiquiEs.
- Diatnpéite Tc λaβες καθαρες, στεγνες και απαλλayμενες απο γρασα και λάδι.
- He ro kopncTe Te Ka6enot 3a uei 3a kon nCTnOT He e npdeBnDeH.
He ro KopncTe Ka6eIOT 3a n3BnekyBaHb e Ha npNKnyOKOT oD npNKnyHnUcata. 3aHTte ro Ka6eIOT oD TOnnHa, MacNo n octpn pa6oBn.
- Ocnypete ja eJektpnHaT aIaTka.
KopncTeTe cTEn nnn MeHreMe 3a da ja ja dpXnTe eNeKtpnHaTa anatka.Taka e no6e36eNo OTKoNky da ja dpXnTe co paKaTa.
13.ИЗБЕЧУВAJTE a6HOPMaJIHO dPKeHe Ha TeNTo.
CoToa cekoraI ce ocunrgyBa cta6nHocT npamHOTeXa.
-
BHHMaTeJIHo UyBaJTe N OOpKByBaJte rnaIaTKeIe.
-
OndpybajTe rnaIaTnTe 3a ceYeHe ocTp n IyCTn co Toa ce ocNryBa noo6pa n no6e36eHa pa6ota.
- NoyuBajTe ngyata 3a noMaKyBaHe n MeHyBaBe Ha anaTkata.
- PeioBHO npOBepyBaJTe ro Ka6eNoT 3a noBp3yBaHe Ha eNeKtpnHaTa aNaTkA ndoKoJIky DojIe Do OwTeYBaHa o6e36eTe HCTnte Da 6uDAt OTcPaHEnO ndpaHa Ha KBaINΦnkyBaH ekCnept.
- PeIDOBHO npOBepyBajTe rnpOJONKHNTE Ka6JIu 3aMeHeTe rN nCTnTe DOKOJky ce OWTetAT.
-
OπρχyBaβte rι paκιTe ηιεινι, cyνι n 6e3 octaTOU Μd Mactι MAcNo.
-
OtnoBp3eTe ja eNeKtpnHaTa anaTkata od npNKnyHncaTa 3a eNeKtpnHa eHepnja.
Kora He ja KopnCTnte eNeKtpnHaTa aNaTka, Kora n3BpUyBaTe OndpxyBaHe N Kora BpUnTe 3aMeHa Ha CeuJaTata, 6ypnTe n cKaunTe.
16. He ro ctabajte klyot Bhatpe BO aatakata.
- Ппд да ja вклунite, осигурete Deka
Клуне n anatknite 3a noctabyBaHbe ce
OTCTpaHETN COODBETHO
17.ИЗБЕHRHyBajTe HeHamephO BKnyuBaHbE Ha aJanaTkata.
- Odoeka ro noctabvate npnknyokot BO npnknyuHncaTa npobepTe daHn anaTkata e nckluyeha.
- Kora cTe Ha OTBopeHo KOpNCTeTe rN npOdoJxHnTe Ka6Jn.
Kora Ha OTbOpeHo ja KOpIcTNe eJIeKTpNHaTa aIaTka, OcnIpyeTe ZeKa KOpIcTNe COoDBeTeH npOdoJIkeH Ka6eN KoJ e oBeIeXaH KaO oDo6peH.
DOnoJIHnTeJIHn 6e36eIHOCHN yIaTCTBa
- Kora ng KopnCTte JNCTOBITE 3a nla co TBpDn MetaHn 3anu (oBnoKeHH co jarpePO), ce npenopayBa da KopnCTte CeHna co HeraTINBEH mAn MAnky N03NTHBEN aOJ Ha ceyebe.He KopnCTte JNCTOBNIa nla co dIabokn 3anu 3a ceyebe. IcTne MoKAT Da ro 3apataT 3awTNTHNOT KaNAK
- BhIMaHHe: PpeI da 3anOHTe co pa6ota, HajnpBO BHMATEJIHO CKIONTe IIN CITE DEIOBn. CneTe ja npouedypata kako wTo e ykaxaHo.
3.ДOKOLky He cTe 3aO3HaeHc KOpNCteHbe Ha BaKbMaunHa, Hajdo6po Ke 6uJe HajnpBo Da ce HΦopMnpaTe OJ npocepcnoHaJIeU, INHCTpyKTop IIN TeHNHap. - PpeI da ro n3BpWnte npoecot, cekoraI npuBpctyBaJTe IINu CbPcTO npNTnckajTe ro pa60THNt DeI KOH BOdNHT Ha NIIaTa. Ce npETNoHTa KOpNCteHe Ha NoCTaBKn 3a npuCBpCTyBaHBe BO ODHoc HA KOpNCteHeTo Ha BaWnte paue.
- Baxho: OOKony ro dpxnte pa6oTHnoT deI co paueTe BO TEKOT Ha npocot Koj Tpe6a da ce n3BpHn, ODPxyBajTe MmHmAlHo pactoJHne od 100 mm od NnctOT 3a nnata.
- Cekoraш питуckajte ro pa6oTHnoT deN KOH KJynata.
- OdpjyBajTe ro octap JnCTOT 3a nIInata n peIOBHO npOBepyBajTe dAnu nCTata potnpa cNo6Ondo 6e3 HnKaBn a6HOpMaIIHn Bn6paunn. DOKONky e notpe6Ho, 3ameHeTe ro JnCTOT 3a nIInata.
- Ппд д ро злочне прсocot,do3BoJeTe MaunHata cnobodno da potnpa ce doNeka He ro DOCTnIHe MAKCIMAMHNOT 6poj Ha BPteHa.
-
3a noDOnr pa6oTeH Bek Ha MaunHaTa, OdpKyBaJTe rN Bo3dUwHInTe DoBODi KOn ce Hao'aaT Ha 3aHnOT DeI N Ha DOnHnOT DeI od Knynata Ha MaunHaTa 3a ceueBe, KaKo n eJeKtpuHnOT MOTop. KyOBnTe oI npaUnHa Mopa da ce OTCTpaHyBaat.
10.прддаа3anoyheTe co6pa6oTka,cekoraw 3aknyybajte rnoocTabknte 3a pa3nueH ctenen. -
EДИНСТВЕНО КУNYВAJTE COODBETHи JINCTOBи 3a ПИЛа co 6poj Ha BpTe№ OД HajMaNky 6.000 BpTe№ BO MInHyTa.
- KopncTeTe eINHCTBeHO npabuIneH Jnct 3a nna. PpemHory mAnTe nIn npemHory roJeMeTne JnCTOBn 3a nJa ce NCKJyUHTeJIHO onaChn.
- PeIOBHO npOBepyBajTe ro JnCTOT 3a nnata 3a KaKBN 6nIO HeNCnPabHocTn. OOKIky e Notpe6Ho, 3ameHeTe ro JnCTOT 3a nnlata.
14.ПоДмачкajte ro HOBnot nIcT 3a nIIa n IcCnCTeTe rO obOnTe ppeI da ro cKnOnnTe HOBOTO ceHJIIO. IToTa, cKnONeTe ro ceHInOTo BO TOueH npaBeu n UBrpCTO NOBLeueTe rN obOnTe co KOpNCteHe Ha ueHTpaJHaTa 3aBPTka. - EdnHCTBeHO KOpNCTeTe OpnHaJIHN o6oN. Cnte octaHaTn TInOBn He ce COOdBETHn.
- HnKorau He pa6oTe 6e3 3aHTNTHNO T KAnak OJ JnCTOT 3a Nnata.
17.ПОДВИЖНNotДлДо 3aWTHTHNOT KAnak NCTO Taka Tpe6a Da ocTaHe CKlonenH. - Hikorai He ro noMaKyBajTe JnCTOT 3a nnata dokeka potpa.
- CekoraawpkeTe rnpaete nodaJeky ondaTeKaTaHa JnCTOT 3a nnata.
- HnKoraw He ro noDnrajTe pa6oTHnoT den 3rpanuYbajKn ro co paueTe doJx nn nO3aIn JNCTOT 3a Nnata.
- Ocnypete Deka pa60THNOT den HNKoraH He ro donnpa JnCTOT 3a nnata nped da 6nde BKnyeHa MaunHaTa.
- Hikorai He o6pa6oTyBajTe MeTAn IJIN TINOBN Ha KaMeH CO Obaa MaunHa.
- KopncTeTe nomarana 3a notnpa npu pa6oTehe co doJn pa6OTHN deJOBn.
- HnKoraw He ja KopncTeMaunHaTa BO onaHa cpeiHa, OndHocHO KaDe ce npCytHn 3anaJIbN racOBu NII TeHOCHTN.
- HnKorau He ja ocTabajTe MaunHaTa 6e3 Ha3Op DOKOJIky NCTaTa He e NCKnyeHa OD rJaBHNOT DOBOd Ha eNeKTpUHa eHeprJa.
26.ДOKOLky cnyuHHeTe a6HOpMaHn 3Byu, oBnTe ce da rYtBpDnte uN OdHeceTe ja MaunHaTa KOH OBnacteH MOHTep Nn DpyuTBO 3a nonpaBaK.
27.ДOKOLKY OndpeH e pacnnaH nIOn OwTeTeH, BeHaA 3aMeHeTe nI IN nonpaBeTe ro nCTNOT. -
Hikoraw He ctojTe Ha natekata OJ NICTOT 3a nnata, Tyky 3actaHybajTe OJ NeBaTa IIN OJ Dechata CtpaHa Ha Knynata Ha nnata.
-
Baunite paue Tpe6a da 6nDaT noctabeHn do natekata Ha nCTOT 3a nnata.
- Cekoraш kopncTeTe ro Typkaoyt HamecTo BaWnte paue 3a da ro TypHete npBoto Hn3 nNnata.
- CekoraawoctabybajTe roDpBTo npedKnynataHa nnata, a noToa TypHete ro Ha3aI.
- 3a HAOJIXHO TOUHO CEeHe MOPa eINHCTBeHO Da ce KOpHCTn PpInarOJDINBNO T BOINu MOPa da Ce OTCTpaHN OpradaTata.
- Hnkoraaw He ja KopncTeTe orpaata KaKo JInHeapHa Mepka 3a ceYeBe Ha rpei.
34.ДOKOLKY JNCTOT 3a ПИNTa e 6nOKnpaH: HajnpBO ncknyeTe ja MaUNHaTAppe da ce obundete da ja nonpaBInTe HeNCnPabBHOCTa.
35.ИЗБЕНУBAЛТЕ OTСКOKHYBAJIБЕ Ha3aД Ha pa6OTHNTe DeNoBn BO Baw npabeu co npe3emaHe Ha CNeДиTe МеркIn:
Cekozau kopucmeme ocmpu nucmoa 3a nuna.
He ceyeme npemnoay manu paobomhu deNoBu.
Hukozau He zo omnyumajme pa6omhuom deI dodeka ucmuom ueNocho He nomuhe H3 nunama.
- Cekosau npuna2ooyeajme zo boduom napaneHNO 60 oDnoc Ha nucmom 3a nulama.
Hukozau He ja omcmpaHyaeajme 3awumama od nunama.
- Ппд д пюдддддддддддддддддддддддддддддддддддддддддддддддддддддддддддддддддддддддддддддддддддддддддддддддддддд徳аatt noTpe6hata no3nuija.
- Hnkoraa He ja uncTeMaunHaTa co pa3peDyBaUn. 3a uncTeHe KopucTee eINHCTBeHO BnaXHo PnATHO.
- He KopructeTe JnctOBN 3a nnla kon ce ouTeHn nn deopmnpaHn.
- 3aMeHeTe ja BnOuKaTa 3a Maca Kora Ke ce nCTPOUIN.
- KopncTeTe eDInHCTBeHO JnCTOBN 3a nnJa KOn ce CneuΦnUpaHn Od CTpaHa Ha npou3BvByaOHT KOI CE ppeDbUdeHN 3a pa6oTeHe co DpBO Hn CnUHn MaTePnJaNN corNaCHO co EN847-1.
- Bhimabajte 36paHnOT JnCT 3a Nnna da 6nne HameHeT 3a MaTePnJaNoT KoJ Tpe6a Da ce Ceye.
- Kora ceyeTe NOBp3eTe ja cToNHaTa NIIa KOH ypeI 3a co6npaHe Ha npaunHa.
- Kopnctete ToUHO npnilaIogyBaHbe 3a HOxKOT 3a ceuehe
- KopnicTeToUHNo npunaOyBaHbe 3a rOpHnOt UTNTHNK Ha JIcTOT 3a NInata.
- BhIMabajte Kora rN noCTaByBaTe deJIOBNTe BO JEXMHTata.
Kora ro meHyBaTe JnCTOT 3a nnIata, ocnIpyeTe WnpHATA Ha CeuNtO Da He 6nDe nomana n De6eHHATA Ha rnaBHO To CeuNIO OJ NCTOT 3a nnIata He 6nDe noroIema od Je6eHHATA Ha HOKOT 3a ceueHe.
Hocete JnHa onpema 3a 3aHTtTa, nCTata MoKe Da BknyBa:
3aunTa 3a cnyx 3a da ce HamaHn pN3IKOT Od 3ary6a Ha cnyxOT
3aHTnta 3aOuN
3aHTnTa 3a DnIeHBe 3a Da ce HamaII pI3IKOT OD BnIyBaHBe Ha ITeTHa npaunHa
PaKaBnCuKoRa ce pa6Otn co ceuJa n rpy6n MaTePnJaIi (npenopaka, Kora e npaKTnUHo, JInCTOBITE 3a nnIata da ce Hocat BO KOHTeJHeP)

Ipeynpeyeahe! He Kopucmeme HSS ceuna.
Kora He ro Kopucntne TypkaoyT, NoctabeTe ro BO DpkaoyT.
KopncTeTe Tpykau nnnape 3a Tpykahe 3a Da ro BOINTE pa60THOTOpapue.

Ipeynpeyeahe! He ja Kopucmemenuama 3a npabehe omeopu unuxne6oeu.
KopncTeTe eHINCTBeHO NICTOBN 3a NNnA yJa MaKcImaHa 6p3Ha e HajMaIky 6p3HaTkoja e yKaKaHa Ha NNnTa n e COoDbTeH 3a MaTepnjAnOT KoJ Tpe6a da ce ceye.
Bo TeKOT Ha TpaHcnpTOT, rOpHnOT DeI OJ IInCTOT 3a NIIATA Tpe6a da 6nDE nOKpneH OJ WITNTHNKOT.
BénaHncknyeTe ja MaunHaTa dOKoNky oTKpneTe:
- DepeKTeH npKJyOK 3a rnaBeH DOBOHa eJektpnHa eHepnJa nIi cnpoBOnHK Od rnaBHNO T DOBO Ha eJektpnHa eHepnJa.
- DepekeTeH npeknHyBaU.
-Перреваные машинна. - YaI INI MInPc NpeDn3BnKaH Od 3aropeHa n3OJaJa.
EneKtpuHa 6e36eHocT
Kora KopnCTNe eJekTpUH MaunHc cekoraw BHMabajTe Ha 6e36eHocHTe npOnnc KOn ce npImeHybaat Bo Baata 3emja co ueI da ro HamaJIte pN3IKOT od noXap, cTpyen ydap n IuHa nobpea. IpouNTajTe rCneHNTE 6e36eHocHn yNaTCTBa, kako N npInoXeHnte 6e36eHocHn yNaTCTBa.

Cekozau npoeepyeajme dau HanojybaHemo co eNekmpuHama eHepeuja e cooedeemHo co HanoHom Ha nnoyama co HOMuHaHnUpedHocmu.
3aMeHyBaHbE Ha Ka6IIN IIN npKnyoU
BéndaHΦpIeTe rntCapHTe Ka6n n npKnyoCuN Kora nCTnte Ke 6nDaT 3aMeHeTu co HOBn. OnaCHO e da Ce BmETHyBa npKnyOk od pa3Ja6aBeH Ka6eB O Bo sHaHata npKnyHnua.
KopncTeHe Ha npOdoJxHn Ka6JN
3a o6e36eYBaHBe HanojyBaHbe co eIeKtpnHa eHeprJa 3a OBaa MaunHa ceKOraW KopncTeTe HeoTTOBapeH Ka6eN n/nnn npOdoJxhen Ka6eN co npOBOdHnU Ond HajMaJky 1,5 mm2 n 3aHTTa co ocNrypByau od 16 A. Ocnyperte Deka OBOJ npOdoJxhen Ka6eN He e noDoJr od 20 MeTpN.
Obaa MaunHa MoKe Da 6nnde BknyeHa KOH eHnofoa3Ha MpeXa (230-240 V/50 Hz). IOKoJky He cTe cnrypHb BO 3a3emjyBaHeTo Ha eNEKtpnHaTa INcTanaJha, HajnpBO KOHCytnpajTe ce co eNEKtpnAp.
HanojyBaHe co eIekTpnuHa eHepnja
- Motopot e onpeMeH co npeKHyBaU 3a ONTOBAPyBaIe. IOKOJIky cTOnHaT a KpyKHa NIIa ce npeONTOBApN, npeKHyBaOT 3a npeONTOBAPyBaIbe aBTOMaTcKn ja NCKNyUBya ONpemaT a 3a da ja 3aWTtIn cToHNata KpyKHa NIIa od ONTOBAPyBaIbe. IOKOJIky ce aKTINbnpa npeKHyBaOT 3a npeONTOBAPyBaIbe, NCKnyTe ja cToJHaTa KpyKHa NIIa co KopncTeIbe Ha npeKHyBaOT ON/OFF (BKJYUN/INCKJNU) (8) i noeKaJte doKe Ka ne 3na dn cToJHaT a KpyKHa NIIa. Notoa, npITnchete Ha npeKHyBaOT ON/OFF (BKJNU/NCKJNU) (8) i npeCTapTyBaJte ja cToJHaT a KpyKHa NIIa.
3. YNATCTBA 3A CKJIOIyBAHbE
CocTab Ha noDbo3jeTo
Cnuka A4

Ip8o cocmae me zu cume denobu nped uepcmo da 2u 3ameheme cume 3aepmku.
- CBpTeTe ja MaunHaTa Haonaky, NoCTaBeTe napYe KapToH ODo3DoJa 3a Da He ja OWTeTIne NOBpUnHaTa.
MoHTnpajTe rHo3eTe (15) (4 napuNb a) co no eHa nOtnpa 3a npoDOnkBya u (13) (4 napuNb a) Ha eHa Hora Ha YetnpitE Kounb a od TeIto N KopcTeTe rN DOnrte 3aBPTKn (16) co NaBpTKn (2 napuNb a Ha eHa Hora) (Cnka B1)
Ocnypete neka notnpnte 3a npoDOnKyBaHTe (13) ce MOHTnpaHn KaKo StTo e nokaxaHO Ha Cnka B1 - MoNTnpaJTe ro HanpeHnOt doJIr amOpTn3ep (22A) (2 napuNb)a) nomery Ho3eTe Ha npedHaTa n 3aHaTa cTpaHa Ha MaunHaTa. KopncTeTe Mann 3aBpTkN (25) co HabpTkN (8 napuNb).
- MoHTnpajTe ro HanpeHnOT kpaTOK amOpTN3ep (22B) (2 napuHa) NOMeIy Ho3eTe Ha Dbete cTpaHn Ha MaunHaTa. KopncTeTe mani 3aBPKn (25) co HApTkn (8 napuHa).
- NocTaBete Tn rymeHInTe NoDIOuKn 3a Ho3e (23) (4 napuHa)
- MoHTnpajTe rN dOnoJIHnTeJHnTe Ho3e (24) (2 napuNb) Ha 3aHaTa cTpaHa oM aUHaTa n KopncTeTe rN KpaTknte 3aBpTk (26) co HApTkn (4 napuNb)
CoCTaB Ha ekTeH3nnte
Cnuka B1, MauuHama ywme e cepmeha Haonaky
- MoHTnpajTe rN npOdoJIkyBaunTe (3) (2 napuHa) Ha macata n KopncTe rN kpaTKeTe 3aBpTk (17) co HApTkn (4 napuHa).
- MoNTnpaJTe rN noTnpnTe 3a npoDoJIyBaUHTe (13)Ha npoDoJIyBaUHTe (3) n KopncTeTe rN kpaTknte 3aBpTKn (17) co HApBpTKn (4 napuHba)
CbpTe ja MaunHaTa Ha3aHa Hej3HHTe H03e. Co KopncTeHe Ha OTBOpNTe BO NOTNOPHTe 3a npoJxkyBaHTe, OCHypTe DeKa npoJxkyBaHTe ce nopamHETn co macata.
CknonyBaHe Ha HOxO3a ceYeBe
Cnuka A4, C
Co KopncTeHe Ha WpaФuRep,OTcTpaHete ja BNoPkata (21) od macata (Cnka G1).
Pa3na6abeTe ro upafoT 3a fncnpahe (28) (Cnka C1)
-Подигajte ro HOKOT 3a ceehe DoidekaДпабочинata nomery cToJHATA kpyxHa nIinaI rOpHnOt pa6 od HOKOT 3a ceeHe HedoCTrHHe np6bNkHo 110 mm (Clnka C2)
- PactojaHneTo nomery HOxOT 3a ceuehe n o6paoyco 3aunOJnCTOT 3a mopa da n3hecyba nomery 3u5 mm (Cnka C3).
BpBOT od HOXOT 3a ceyehe He cMee da 6nde noHn3OK oD 5 mm od BpBOT Ha 3a6eOTo, kako To e nokaxaHO Ha Cnka C3
PnkaayBahe Ha wHTHnikOT
Cnuka C4
- LcIeNoCHo CBpTeTe ro JnCTOT 3a nnlaTa HArope (3a yNaTCTBa 3a npNlaRoDyBaHBe Ha BucnHa BuINnnorlaBe 4)
-ПовачеTe ro koncheTo (19) od wTNTHNKOT (5)иdoNeka ro BnecheTe koncheTo noCTaBeTe ro wTNTHNKOT NaH HOKOT 3a ceYeHe (20) - Ocno6oTeTo KOnHeTo n ocInrypeTe DeKa KJIINOT BJIeRyBa BO OTBOPOT
- PnucBpCTeTe ro uTHTHnKOT CO 3aTeRhyBaHe Ha KOnHeTo
CocTaByBaHBe Ha ekCTpaKTOpOT Ha npaunHa Cnka D
- CknoneTe ro oJBOoT 3a n3BnEkyBaHBe Ha npaunHa kako wTo e nokKaHo Ha Cnka D
- PnkaTe npabocmykaKoH noBp3yBaHe 3a ypeD 3a BwmykyBaHe (27) (Cnka D)
PnkayBaHe Ha npaJIeHNoT BoDnU Cnka E
- Pnikaute ro napaJIeHnOt BoDnU (2A) Ha deChata cTpaHa oJ IncTOT 3a IIIna Ha MacaTa.
3aKnyeTe ro BOIDHOT CO npNTnCKaHe Ha paKaTa (Cnka E)
PnkayBahe Ha dpkaOT Ha napaJIHNOB ONDU
Ckua I
NapaJIeJIHnOT BOINu MoKe Da ce CyBa KOpIcTejKn rKInHOBnTe Ha dpXaOTo (30).MoHTnpajTe rKInHOBnTe Ha dpXaOTo (30) Co NOMoU Ha 3aBPTKn CO HABpTKn Co Ma3Ha TnaBa (29).DpXaUte MoKe
da ce MOHTnpaAT KaKo ITo e npKKaHaHO Ha CkUca 11 nnn KaKo ITo e npKkaHa HO CaKuca 12.
PnkaUyBaHBe Ha HAdOJXHNOr BOINu 3a ToHOCeHe
Cnuka A1
-Пи3HeTe ro BOДИЧOT BO OTBOPOT OД MacaTa HaJIeBaTa cTpaHa OД ЛСТОТ 3a ПИla CInka A1
CknonyBaHe nnn 3aMeHa Ha JnCTOT 3a nnna Cnka G

Ipeo npucmanume kon 3ameha unu cnnonybahe Ha nucmom 3a nunama, Hajnpoe omnoepeme 20 npuknyokom od 2naehomo hanojyahe co
eIekmpuHa eHepzua.

Cmpenkama koja e 03haueHa Ha Iucmom 3a nunama, koja 2o ykaxyba npaeuom Ha pomupahe, mopa da nokayea eo um npaeu kaoko u
cmpeIkama Koja e 03haYeHa Ha
Maushama, a nak 3aunume od nucmom
3a nulama mopa da budam cepmenu
HadoNY ha npedHuom den od nulama.
Co KopncTeHe Ha wpaФuInRep, OTCpaHete ja BnOuKaTa (21) od macata. Cnka G1
- Leciocho CBpTeTe ro Harope IncToT 3a nnaTata. (3a yNaTCTBa 3a npnlaOdyBaHe Ha BucnHa BUnn noIbJe 4)
Pa3na6aBeTe ja HABPTkata co KnyueBNTe (14) (Cnka G2)
- OTeTpaHeTe ja HAbrTkataи HaBbOpeuHnOt 06oD oD ockata 3a NInCTOT 3a Nnna. (Cnka G3)
- ΜιπεHETe rO HOBnOT JIcT 3a ΜΙΝΑ έρεKy OCKaTa 3a JIcT 3a ΜΙΝΑ έNCTaBete HOB JIcT 3a ΜΙΝΑ.
- NOBTOPHO NOCTaBeTe rHaIbOpeuHnOt o6oN nOcTaBeTe ja HApTkata.
- PnucBpCTeTe ja HABPTKaTa co KOpncTeHe Ha KnyeBnTe.
- NobtopHo BpaTeJa Ha3aBbNoiKaTa Bo Macata N pniucpctete ro wpafoT.
4. PAKYBAIbe
BknyyBaHbe/ncknyyBaHbe
Cnuka A1 (8)
3a da ja BknyuHTe MaunHaTa, npNTnCHTe rnpkeKHyBaHOT BO nO3nJua ,1".
3a da ja ncknyuTe MaunHaTa, NCTNt npeknHyBaTpe6a Da ro npntnche Bo no3njuja ,0"
- Cekoraawdpxkete ng ka6nnte od rnaBHOto HanojyBaHe co eNeKtpnHa eHeprJa nOdaJeKy oNIOBnXKnTe DeNoBn.
Co KopncTeHe Ha 2 Bo 1 paKaTa, npnArOpeTe ro aroJOT n BucnHaT ha JnCTOT 3a nnPaTa CnuKa A2
KopncTeHe Ha noDecyBaHbeto 3a BnHa
CbpTeTe ja paKaTa (9) BO npaBeu Ha CTpeJIKNte OD YacOBHnKOT 3a Da rnoNirHeTe JNCTOT 3a NnJaTa
CbpTeJe ja paKaTa BO npaBeu cnpoTnBEH Ha cTppeKIne OJ YacOBHNKOT 3a Da ro CNYWNTte JNCTOT 3a Nnata
Ocnypete Te Ieka Nnctot 3a nnatae cekoraaw npnbnxho 2 mm nobncoko od BkyHaTa de6eHnHa Ha MaTepnjanoT KoJ Tpe6a da ce ceye.
KopncTeHe Ha noDecyBaHbeto 3a aron Cnka G4
Maiky pa3na6abeTe ro konueTo (10)
- PnTnCHTe ja paKaTa (9) KOH MaunHaTa n CBpTe je BA npaBeu cnpOTnbEn Ha CTpeKnTe OD YacOBnKOT 3a Da r pnilarOInTe JNCTOT 3a NnIATA BO HerOBnT aRoj.
- PnucBpcteTe ro konueTo (10)
KopncTeHe Ha npaJIeHbOBDnU
CkuaA1,E,J1,J2
IapaJIHnOT BOnu (2A) e onpeMeH co ekTeH3nJa 3a BoJeHe (2B). Eksenzijata Ha BOOnOH MOKe Da ce KopnCTn Ha Dba pa3NnHn NaHH, BO 3aBnCHOCT Od De6eHNHaTa Ha dpBOTo.
3a noide6eNo npBO, ekTeH3njaTa Ha BOAnOT (2B) Tpe6a da ce MOHTnpa kako ITO e npKkKaHo Ha cKnua J1.
3a noTeHko DpBO, ekTeH3nJaTa Ha BOdUyOT (2B) Tpe6a Da ce MOHTnpa KaKo ITO e npKaKaHaHO Ha cKnua J2.
- OTKnyteTo BOINHOT CO npNTnCKaHe Ha paKaTa Harope (Cknua E)
MaKy ona6abete rHn HABPTKITc co Kpuiua (2C) - N3BaIeTe ja ekTeH3nJaTa Ha BOInuOT (2B) od npaJIeHNIOr BOINU (2A) co JIn3raIbe od npaJIeHNIOr BOINU
- Cbptete ja ekcteH3njaTHa BOuHOT BO
CaKaHaTa N03nUja I JIn3HeTe r Ho Ha3aKoH npaIeHNHOINu
- Cterhete Hn Habptknte co KpnJua (2C)
YnataTb3a pa6oTebe
IocjoaT DbTa TnHa Ha MeToOn 3a CeHeBe:
-Должинско ceuehe(СинkaH1)
Ceehe Ha paobHom npue no donkunama Ha mekmypama Ha dpomo
- HanpeyuHcceHe nn OTceKyBaHc co KopncTeHe Ha HaidonxHnOT BODn 3a ToHc ceHe (Cnka H2)
HaepuHo omcekyBaHe ha paobHom o npue

I 3a dbama Memodu Ha ceyehe Mopa da ce kopucmu edHa od oepadume. 3amoa, Hukozau He epueme ceyebe 6e3 oepada!
BHHMaHHe! PpeIa 3anoHeTe co ceYeBe, HajnpBO npOBepeTe ro cneHTo:
1.Даи e npuBpTeH JnCTOT 3a nIATA?
2.Даи ce npuBpcteH paKnte 3a 3aknyBaHe?
3.Даи e orpaata napaenH noctaba HOB ODHOC Ha JnCTOT 3a Nnata?
4.Дали cooBETHOФункунова 3aHTNTHNtKanak?
5.Даин HOCHTe 3aHTTN OUHa?
6.ДалллнстOT3aПиNTaTe cTpneOD HekoJdEN?

AnconymHO e Heonxodho da 2u 3ememe npedbuO oeue moku nped da 3anoHeme co pa6oma!
DolxHcOceHe
- Pnucbcte ja orpaata cnopeid tohata no3nuija Ha mepebe n OTcpanhe BoHOT 3a OTcekyBaHe oN HocayOT Ha Knynata.
Iecho npitncheTe ro dpBOTo KOH Knynata n Do3BoNeTe da ce Nn3He KOH OrpaData 3a OTcekyBaHe.

Ipe da 20 eknyume Momopom 3adpxeme hajmaJky 3 cm pacmojaHue od nped nucmom 3a nunama.
CmpaHama Ha dpBOMO koja ce HAOHaHacnpomu oepadama mopa da 6ude cocema npae. Dpxeme zu paeme Hajmanky 10 cm nodaNeky od namekama Ha nunama koja ke ce cneDu.
Bknyte ro MOTOPI NOyekajTe Odoeka INCOT Ha PnIATA He Ro DOCTURHE MAKcIMaHnO7 6poj Ha BpTeBa nped da 3anOCHETe CO ceyebe.
- Dojeka ro dpxkete npntncHaTo dpBOTO KOH Knynata n orpaata, BHIMATEIHO TpyheTe ro dpBOTO HN3 NICTOT 3a NNATA 6e3 HacnHNO da ro Typkate.
HikoraHrO BneyeHa3aJpa6oTHoT npae. DOKoIky e nOTpe6Ho, HajnpBO ncknyte ro MOTOpOT 6e3 da ja MeHyBaTe no3nuijata Ha pa6oTHoT npae.
1. MoToPoT He cTapTyBa
- PππκηγοκόT He e πρικηγεν ΚΚΟ ΣπαβΗΟΤΟ
HanojyBa№ co eNEKtpuHa eHeprɪja.
-П配电инатекаблOT. - NcpoeHn ce jarnepeoHnTe yeTKnKn. 3aMeHeTe n jarnepeoHnTe yeTKnKn n KOHCyItpajTe ce co BaHnot OBnacteH 3aCTaNHk.
2. Pa6oTHnTe napHbace 3aIaNabyBaat BO HOKOT 3a CeueHe Bo TeKOT Ha 06pa6oTKaTa
- Jnctot 3a nnaT a Mopa da 6nnde nopamHet (Cnka G).
3. CeueheTo Ha nIIaTa He e Ma3Ho (nCTpOseHNo pa6oBNTe)
-ПистOTзапинала морадабид ecтap.
- IncToT 3a nIInata 6nI cKJoneH Od Ha3aD KOH anpei.
-ПиСТOT3aПиIATAe nOKpIeH co cMOna nIIN CTpyROTINH.
-ПистOT 3a плanta He e cooDBeTeH 3a OBOJ npouec.
4. Pa6oTHOTo napYe ro donnpa 3aHNoT deJ Od NcCTOT 3a NNlata N cKoka Harope
- HoKOT 3a ceYeBe Mopa Da 6nIe nOpamHET (CInka G).
He ce kopnstn orpada.
- NICTOT 3a NINATA e NODe6eON OTKoJky HOxO3a CeYeHe IIN He Ce KOpNCTu HOxO3a CeYeHe
- JnctOT 3a nnaT a Mopa da 6nde ocTap.
Pa60THoTnapHe He e 3aDpxKaHO BO HrObaTaNo3uJa Do 3aBpSuBaHb Ha CeYeBeTo.
- KonyuTo 3a 3aTeHryBaHe Ha orpaDaTa 3a HnpeHo ceYebe e pa3Ja6aBeHo.
5. BucnHaTa n/nn paKaTa 3a HadoJxHnOT BOINu 3a TOUHO ceYeBe e 6NoKupaHa
- CtpyrotnHnte n npaunHaTa Mopa da ce otCTpaHyBaat.
6. MoTOpOT HMa NToEuKOTn Da rO DoCTurHe MaKcHMaJIHHoT 6poj Ha BpTeHa
- PpOdoJxHnOT Ka6e n e npemHory TeHOK n/nnnpemHory doJIr.
- Hanohot Ha IaBHOTo HanojyBaHe co eNeKtpnHa eHepnja e noman od 230-240 V.
7. Maunha Ta Bn6pnpa
MaunHaTa He e npuBpcTeHa Ha pa6oTHata KJyna.
- PamkaTa He e npamHeTa co nOToT.
- JnctOT 3a nnatae oWTeTeH.
8. Enektpomotop pa60tn hepamHomepho
- NcpoeHc ce jarnepeoHnTe yeTKnKn. 3aMeHeTe rJarnepeoHnTe yeTKnKn IN KOHCyIHTnpajTe ce co Baunot OBnacteH 3aCTaNHnK.
UncTebe
Odpjybajte rN uCTn OTbOpTe 3a BeHTnlaCnja 3a da cnpeunTe nperepeBaHe Ha MOTOPOT. PeobHO uCTeTe ro KyKnUteTo Ha MaunHaTa co MEKO Pnatho, NO MOxHocT No cekoJa ynotpe6a. OTCpaHybajte ja npauHaTa n HeuNCTOTnTE oD OTbOpTe 3a BeHTnlaCnjuJa. DOKOLky HeuNCTOTnTE He MoKAT Da ce OTcPaHaT, KopNCTeTe MeKO Pnatho HatoNEHo CO BODa n canyH. HnkoraW He KOpNCTeTe pactBOpByaH KAKo, 6eH3nH, aIKoxON, BODa Co aMOHnjaKTH. Obne pactBOpByaHu MoKAT Da rN OwTeTa TnactuHInTe DeNoBn.
NoMaKyBaHe
3a MaunHaTa He e nOTpe6Ho dOnoHHTeHNO pMaKyBaHe.
HencnpabNocTu
Dokonky dojde do HeucnpaBHOCT, Ha npimep no a6ehe Ha odpehen den, Be moHime KOHTAKTupajTe ro Baunot lokaJen OBnacteh 3acTAnHK 3a npou3BOOn OD Ferm. Ha 3aHNOT DeN OBOJ npuPAHnK MoKeTe da npohajTe DeTaNEN nperneHa deNoBN BO KoJ ce npkKaHn DeNoBNTe KOn MOXaT da ce Hapayaat.
OKOJIINHA

Depekmu u/uni ompneHu eekmuu uu enekmpoHcu anapamu mpe6a da ce cobupaam Ha coodeemu Iokauu 3a peuknupahe.
Cama 3a 3emjno EY
He n denohnpajte anatnte BO domaueh otna. CnopeE Bponckoto YnataCTBO 2012/19/EU 3a OTnadHa eNektpnuHa n eNektpoHcKa onpema H erOBaTa NMneMeHTauija BO HaunOHnHOT npabo, eNektpuHnTe aJAtn KOn BeKe He ce ynotpe6nBm MopaaT da ce co6npaat OndenHO n da ce oTcPaHyBaAT Ha ekolowKn HaunH.
TAPAHUNJA
TapaHTHnTE yCIOBnTE ce daJeHN BO nOce6Ha rapaHTHa KapTuKa.
Ipon3BODOT n yNaTCTBOTO ce npedMeT ha npomeha. KapakTePncTnKe Te MoKaT da ce npomeHaT 6e3 HaTaMoUHo N3BeCTyBaHe.
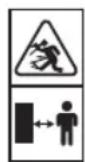
Spare parts list
TSM1035
| Article no. Description | Position no. | |
| 410634 Workblade 1 | ||
| 410635 Scale for workblade (2pcs) 2 | ||
| 410636 Workblade inlay 4 | ||
| 410637 Mitre guide compleet 6 + 7 + 23...33 | ||
| 410638 2 in 1 Adjustment handle 9 + 25 + 100...107 + 114 + 115 | ||
| 410639 Parallel guide Complete 13 + 16 + 19 | ||
| 410640 Guard complete 15 + 34...39 + 41 + 148 + 149 + 152 | ||
| 410641 Floorstand Complete 17 + 97 + 125 + 142...146 | ||
| 410642 Bearing 607 47 | ||
| 410643 Motor housing 47 + 49 + 51 + 61 | ||
| 410644 Stator 48 | ||
| 410645 rotor complete 50 | ||
| 410646 Bearing 6000 | 52 | |
| 410647 Carbon brush holder set (2pcs) 56 | ||
| 410648 Carbon brush set (2pcs) 57 | ||
| 410649 Bevel gear | 64 | |
| 410650 Bearing 687 | 69 | |
| 410651 bearing 6001 | 75 | |
| 410652 Flange set (2pcs) | 86 + 88 | |
| 410653 Flange screw | 89 | |
| 410654 Dust hose | 91 | |
| 410655 Push stick | 116 | |
| 410656 Switch for table saw | 121 | |
| 410657 Table + angle scale | 127 + 135 | |
| 410658 | Tooth Orbit | 131 |
| 410659 Workblade extension (2pcs) | 151 | |
| 410660 Over-load protection 157 |
Exploded view
CE
DECLARATION OF CONFORMITY TSM1035 - TABLE SAW
(EN) We declare under our sole responsibility that this product is in conformity with directive 2011/65/EU of the European parliament and of the council of 8 June on the restriction of the use of certain hazardous substances in electrical and electronic equipment is in conformity and accordance with the following standards and regulations:
(DE) Der Hersteller erklart eigenverantwortlich, dass这点 Produkt der Direktive 2011/65/EU des Europäischen Parlaments und des Rats vom 8. Juni 2011 über die Einschränkung der Anwendung von bestimmten gefährlichen Stoffen in elektrischen und elektronischen Geräten entspricht. den folgenden Standards und Vorschriften entspricht:
(NL) Wij verwklaren onder unsere volledige verantwoordelijkheid dat dit product voldoet aan de conform Richtlijn 2011/65/EU van het Europees Parlement en de Raad van 8 Juni 2011 betreffende beperking van het gebruik van bepaalde gevaarlijke stoffen in elektrische en elektronische apparatusuur en in overeenstem ming is met de volgende standaarden en reguleringen:
(FR) Nous déclarons sous notre seule responsabilité que ce produit est conforme aux standards et directives suivants: est conforme à la Directive 2011/65/EU du Parlement Européen et du Conseil du 8 juin 2011 concernant la limitation d'usage de certaines substances dangereuses dans l'équipment électrique etlectronique.
(ES) Declaramos bajo esta exclusiva responsabilidad que este producto cumple con las siguientes nommas y estandares de funcionalemento: se enquirytra conforme con la Directiva 2011/65/UE del Parliamento Europeo y del Consejo de 8 de junio de 2011 sobre la restricción del uso de determinadas sustancias peligrosas en los equipos electricos y electrónicos.
(PT) Declaramos por esta total responsabilià-de que este produits est em conformidade e cumpe as normes e regulamentacoes que se seguem: está em conformidade com a Directa 2011/65/EU do Parliamento Europeu e com o Conselho de 8 de Junho de 2011 no que respeita a restricao de Utilização de determinadas substancias perigosas existentes em equipamento eletrico e electrônicos.
(II) Dichiariamo, sulla la nostra responsabilità, che"Thise prodotto è conforme alle normativè e ai regolamenti segunti: è conforme alla Direttiva 2011/65/UE del Parliamente Europeo e del Consiglio dell'8 giugno 2011 sulla limitazione dell'uso di determinate sostanze pericolose nelle apparecchaturie elettriche ed elettroniche.
(SV) Vi garanterarpegetansvatattendaproduktuppflyerochfoljerfoljende standarder och bestammelser:uppflyer direktiv 2011/65/EU frane Europeiska parliamentet och EG-radet fran den 8 Juni om begrungsningen av anvandning av fariga subslanser i elektrisk och elektronisk ultrasling.
(FI) Vakuutamme yksinomaan omalla vastaullamme, etta tamu tuote tayttaa seuraaval standardit ja sädöskset: tayttä Europan parliamentin ja neuvoston 8. kesakuta 2011 pāvatyn direktivin 2011/65/EU vaatumukset koskien vaarallisten aineiden kāytön rajaftlusta sahkö- ja elektronisissa laittessa.
(NO) Vi erklærer und vart eget ansvar at dette prodktet er i samsvar med folgende standarder og regler: er i samsvar med EU-directivet 2011/65/EU fra Europa-parliamentet et Europa-radet, pr. 8 Juni 2011, om begrensning i brumen av visse farlige stoffer i elektrisk og elektronisk ulstyr.
(DA) Vierklaerer under eget ansvar, at dette produit i overensstammelse med folgende standarder og bestemmelser: er i overensstammelse med direktiv 2011/65/EU fra Europa-Farmentet og Rådet af 8. Juni 2011 om begraesning af anvendelsen af visse flirige stoffeler i elektrisk og elektronisk udstry.
(HU) Felelossegugn teljes tudataban kijelentjuk, hogy ez a termek teljes mertekben megfeel az alabbi szabvanyoknak es eliorasoknak: je v souladu se smernici 2011/65/EU Evropskho parlamentu a Rady EU ze dne 8. cerva 2011, ktera se tykə amozeni pouziti urcitych nebepeznych latek v elektrickych a elektronickych zaifizencich.
(CS) Na naši vlastni zodpovédnost prohlássujeme, ze je tento vyrobek v souladus následujici im standardy a normami: Je v sulade s normou 2011/65/EU Europskeho parlementu a Rady z 8. Juna 2011 týkajúcej sa obmedzenia použivania určitych nebepezćnéch látok v elektrikkom a elektronickom vybaveni.
(SK) Vyhlasujeme na našu vyhradnú zodpovednost, Že tento vyrobok je v zhode a suliade s nasledujuci normami a predisipimi: Ve juliade s normou 2011/65/EU Europske ho parlementu a Rady z 8. juna 2011 tykajucej sa obmedzenia použivania určitych nebezepečnéch látok v elektrikkom a elektronickom vybaveni.
(SL) S polno odgovomostoj izjavljamo, da je ta izdelek v skladu in da odgovarja naslednjinjim standardom terpredpisom: je v skladu z direktvo 2011/65/EU Evropskega paraImenta in Sveta zed 8. juni 2011 o omejevanju uporabe dolocenih nevarinh snovi v elektrichi in elektronski opremi.
(PL) Deklarujemy na wlasna odpwiedzialnosc, ze ten produkt spelhia wymogi zawarte w nastepuljacych nomach i przypesachat: jest zgodny z Dyrektywa 2011/65/UE Para mentu Europejskiego i Rady z dnia 8 czenwca 2011 r. w sprawie ograniczenia stosowania niedtorych niebepezcznych substantci w sprzeci elektrycznym i elektronicznym.
(LT) Prisiimdami visa alsakomybe deklaruojame, kad sis gaminyi atlinka zemiaiu paminetus standarus arba nuostatus: atitinka 2011 m. birzeilo 8 d. Europos Parliamento ir Tarybos direktyva 2011/65/EB del tam tikru pavojingu medziag naudojmo elektros ir elektronineje jrangoe apribojo.
(LV) Ir abtilostoa Eiropas Parlamenta un Padomes 2011. gada 8. junja Direktivai 2011/65/ ES par dazu bistamu vielu izmantoanas ierobezoanu elektriskas un elektroniskas lekartas.
(ET) Aogalvojam ar visu atbildfu, ka isis produits ir saskana un abilst sekojsiem standartiem un nolikumim: ir atblossta Eiropas Parliamenta un Padomes 2011. gada 8. junija Direktivai 2011/65/ES par da zu bistamu vii izmantoisanas ierobezoisanu elektriskas un elektroniskas iekartas.
(RO) Declaram prin aceasta cu raspunderea deplina că produsul acesta este in conformitate cu urmatoarele standarde sau directive: este in conformitate cu Directa 2011/65/UE a Parliamentului Europeano si a Consiliulii din 8 unie 2011 cu privire la interizcerea utilizari anumitor substante periculoase la echipamentele electrice si electronec.
(HR) Izjavljumemo pod vlastitom odgovomLsu da je strojem ukladan sa slijedešim standardima ill standardiziranim dokumentima i u skladu za odredbama: usklaDENa Direktivom 2011/65/EU europskog parlamenta i vije zaDanom 8. lipna 2011. oograničenju koristeniya odredenih opashn tvaru e elektrčnoj i elektronickoj opremi.
(SRL)Pod punom odgovornoscu izjavljemu de ja usaglasen sa sledecim standardima ili normama: usaglasen sa direktivom 2011/65/EU Evropskog parlamenta i Saveta od 8.juna.2011. godine za restruktciju upotrebe odredenih opasnih materija u elektricnoj i elektrskoj opremi.
(RU) PIOcBcOHO TBcETCBHeHObTb 3aBnREm,TO DAHHOE H3eHHe COOTBeCTCBYeT CneJyIOuM CTanIapTAM N HOPMAM. COOTBeCTCBYeT Tpe6oBAHnIM IINPEKTHNB1 2011/65/EU EBponeKcOro NapnAmEHTa N cOBETA O8 IIOHr 2011 r. no ORaHnEHnIO KcNOnb3oBAHOM ONpeJeHbX OAnChbX BEEcCTB 3JIeKTPHECKOM nIKeTKPOHOM 06OpOBAHIM
(UK) Ha cboo bnachy biinnoi daanbHt6 3aBnREMo, 0do anae 6bnadnaHHI bIDNOBae HACTYINHM CTANDAPTM I HOPMATBAM: 3aDOBNBHE BMMOT DInpeKTHNB 2011/65/ CC Cbponehckoro NaplanemHTy Ta PaNBI 8 cepBn 2011 pOky HA o6MeKeHHH BMKOPCTAHN DEAHX NHe63neuHnx peoBH IN B ENEKTPNHOMY TA eNEKTPHOHOMY 6bnADnHHI.
EL) Anuoue utuubva otto npoiov autro uupwwei kai tneitouc napakau Kavoviaouc kai npotua: ouuoppvvea me ty Oynbi 2011/65/EE tou Eupwraikou Kavobouaioukai Tou Uusboulou ntc Boviou 2011 yoi Tnv piooio nxc xonns opiaevuv etikivuvuvuvov oue ae kekipko kai kekpovko eonmaq.
EN62841-1, EN62841-3-1, EN55014-1, EN55014-2, EN61000-3-2, EN61000-3-3, IEC 62321
2006/42/EC, 2014/30/EU, 2011/65/EU, 2012/19/EU
Zwolle, 01-12-2017
H.G.FRosberg CEO FERM B.V.
FERM B.V. - Lingenstraat 6 - 8028 PM - Zwolle - The Netherlands


- Thank you for buying this Ferm product.
- The numbers in the following text refer to the pictures on page 2 - 6.
- Contents
- TECHNICAL SPECIFICATIONS
- Product information
- Fig. A
- SAFETY INSTRUCTIONS
- Explanation of symbols
- Material to be processed
- Additional safety instructions
- Switch off the machine immediately when you discover:
- Electrical safety
- Replacing cables or plugs
- Using extension cables
- Power supply
- ASSEMBLY INSTRUCTIONS
- Assembly of the undercarriage Fig A4
- Assembly of the extensions
- Fig B1, Machine is still upside down
- Assembly of the riving knife
- Fig A4, C
- Attachment of the guard Fig C4
- Assembly of the dust extraction
- Fig. D
- Attachment of the parallel guide Fig E
- Attachment of the parralel guide holder Fig.1
- Attachment of the litre guide
- Fig A1
- Assemble or change the saw blade
- Fig G
- OPERATION
- Switching on/off
- Fig A1 (8)
- Using the 2 in 1 handle, Adjust the angle and height of the saw blade
- Fig A2
- Using the height adjustment
- Using the angle adjustment
- Fig G4
- Using the parallel guide
- Fig A1,E,J1,J2
- Working instructions
- Attention! Before you start sawing, first check the following:
- Lengthwise sawing
- Lengthwise sawing with a (vertical) litre
- Lengthwise sawing of narrow workpieces
- Crosswise sawing
- Crosswise sawing with a vertical metre
- Crosswise sawing with a horizontal metre
- MAINTENANCE
- Transporting the table saw
- Malfunctions
- The motor does not start
- The workpieces is jamming against the riving knife during processing
- The saw cut is not smooth (frayed)
- The workpiece is touching the back of the saw blade and is jumping out
- The height and/or litre handle is blocked
- The motor has difficulty reaching the maximum number of revolutions
- The machine is vibrating
- The electromotor runs unevenly
- Cleaning
- Lubrication
- Faults
- ENVIRONMENT
- Only for EC countries
- WARRANTY
- TISCHKREISSAGETSM1035
- Lubrificazione
- Pokyny pro obsluhu pily
- Pnpoopiec yia to Ppoiov
- Eik.A
- DOnoJIHnTeJIHn 6e36eIHOCHN yIaTCTBa
- BénaHncknyeTe ja MaunHaTa dOKoNky oTKpneTe:
- EneKtpuHa 6e36eHocT
- 3aMeHyBaHbE Ha Ka6IIN IIN npKnyoU
- KopncTeHe Ha npOdoJxHn Ka6JN
- HanojyBaHe co eIekTpnuHa eHepnja
- YNATCTBA 3A CKJIOIyBAHbE
- CocTab Ha noDbo3jeTo
- CoCTaB Ha ekTeH3nnte
- Cnuka B1, MauuHama ywme e cepmeha Haonaky
- CknonyBaHe Ha HOxO3a ceYeBe
- Cnuka A4, C
- PnkaayBahe Ha wHTHnikOT
- Cnuka C4
- CocTaByBaHBe Ha ekCTpaKTOpOT Ha npaunHa Cnka D
- PnkayBaHe Ha npaJIeHNoT BoDnU Cnka E
- PnkayBahe Ha dpkaOT Ha napaJIHNOB ONDU
- Ckua I
- PnkaUyBaHBe Ha HAdOJXHNOr BOINu 3a ToHOCeHe
- Cnuka A1
- CknonyBaHe nnn 3aMeHa Ha JnCTOT 3a nnna Cnka G
- PAKYBAIbe
- BknyyBaHbe/ncknyyBaHbe
- Cnuka A1 (8)
- Co KopncTeHe Ha 2 Bo 1 paKaTa, npnArOpeTe ro aroJOT n BucnHaT ha JnCTOT 3a nnPaTa CnuKa A2
- KopncTeHe Ha noDecyBaHbeto 3a BnHa
- KopncTeHe Ha noDecyBaHbeto 3a aron Cnka G4
- KopncTeHe Ha npaJIeHbOBDnU
- CkuaA1,E,J1,J2
- YnataTb3a pa6oTebe
- DolxHcOceHe
- MoToPoT He cTapTyBa
- Pa6oTHnTe napHbace 3aIaNabyBaat BO HOKOT 3a CeueHe Bo TeKOT Ha 06pa6oTKaTa
- CeueheTo Ha nIIaTa He e Ma3Ho (nCTpOseHNo pa6oBNTe)
- Pa6oTHOTo napYe ro donnpa 3aHNoT deJ Od NcCTOT 3a NNlata N cKoka Harope
- BucnHaTa n/nn paKaTa 3a HadoJxHnOT BOINu 3a TOUHO ceYeBe e 6NoKupaHa
- MoTOpOT HMa NToEuKOTn Da rO DoCTurHe MaKcHMaJIHHoT 6poj Ha BpTeHa
- Maunha Ta Bn6pnpa
- Enektpomotop pa60tn hepamHomepho
- UncTebe
- NoMaKyBaHe
- HencnpabNocTu
- OKOJIINHA
- Cama 3a 3emjno EY
- TAPAHUNJA
- Spare parts list
- CE
- DECLARATION OF CONFORMITY TSM1035 - TABLE SAW
Brand : Ferm
Model : TSM1035
Category : Saw