
SSM1005 - Saw Ferm - Free user manual and instructions
Find the device manual for free SSM1005 Ferm in PDF.


| Product type | Circular saw |
| Brand | Ferm |
| Model | SSM1005 |
| Dimensions (L x W x H) | 500 x 300 x 300 mm |
| Weight | 5 kg |
| Power supply | 230 V ~ 50 Hz |
| Power consumption | 1500 W |
| Blade diameter | 184 mm |
| Max cutting depth (90°) | 65 mm |
| Max cutting depth (45°) | 45 mm |
| No-load speed | 5000 rpm |
| Main functions | Straight cut, bevel cut up to 45°, laser guide |
| Safety | Blade brake, protective guard, safety switch |
| Maintenance and cleaning | Clean ventilation slots, check brushes, replace blade if worn |
| Spare parts and repairability | Replacement blades, carbon brushes, drive belt available |
| General information | Supplied with saw blade, blade wrench, parallel guide, dust bag |
Frequently Asked Questions - SSM1005 Ferm
User questions about SSM1005 Ferm
0 question about this device. Answer the ones you know or ask your own.
Ask a new question about this device
Download the instructions for your Saw in PDF format for free! Find your manual SSM1005 - Ferm and take your electronic device back in hand. On this page are published all the documents necessary for the use of your device. SSM1005 by Ferm.
USER MANUAL SSM1005 Ferm
natural_image
Industrial machine with black handle and blue base, no visible text or symbolsSSM1005
EN Original instructions 04
DE Übersetzung der Originalbetriebsanleitung 10
NL Vertaling van de oorspronkelijke gebruiksaanwijzing 16
FR Traduction de la notice originale 22
ES Traducción del manual original 28
PT Tradução do manual original 34
IT Traduzione delle istruzioni originali 40
SV Översättning av bruksanvisning i original 46
FI Alkuperäisten ohjeiden käännös 51
NO Oversatt fra orginal veiledning 56
DA Oversættelse af den originale brugsanvisning 61

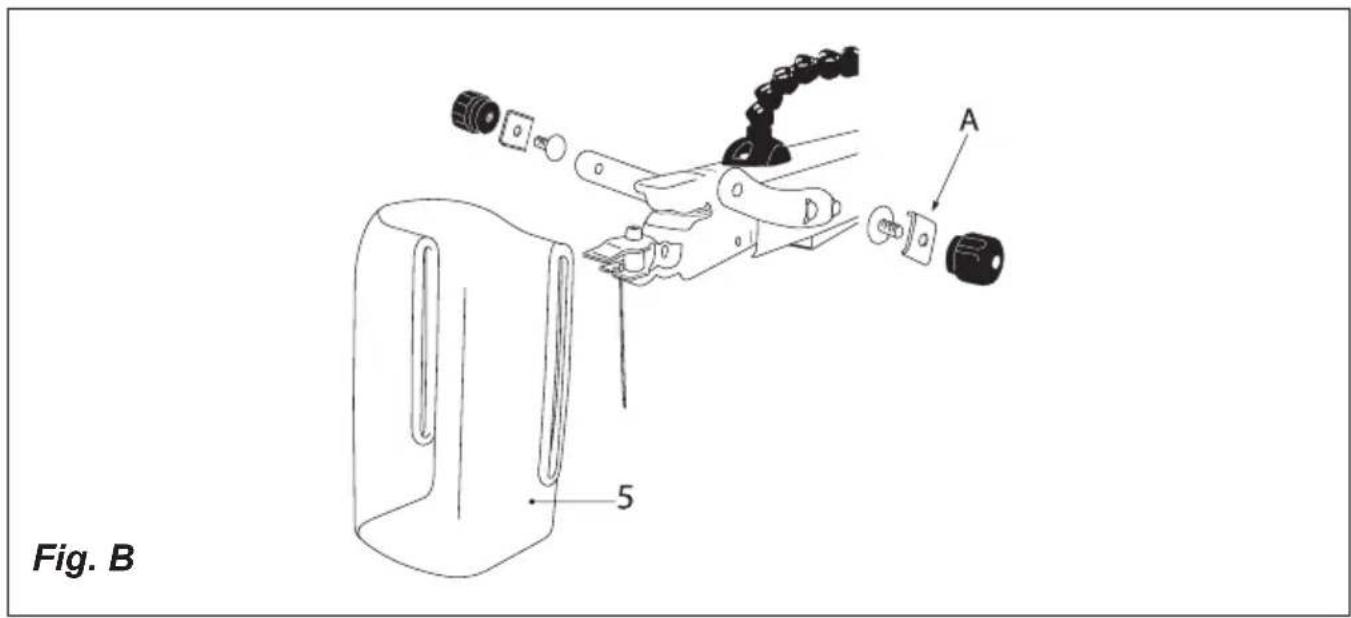
Fig. C

natural_image
Technical line drawing of a mechanical device with labeled component (3), no readable text or symbols presentFig. D
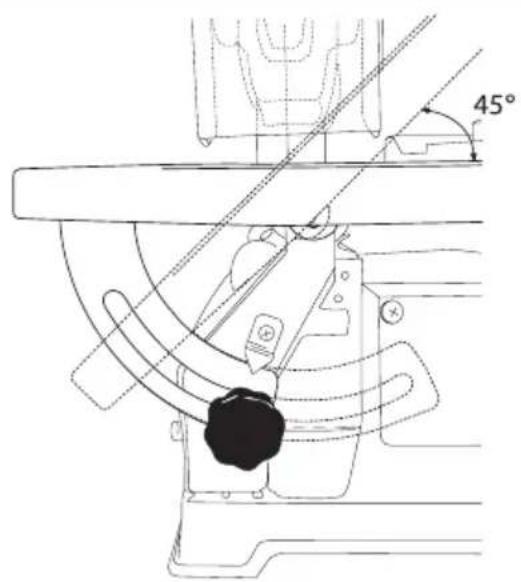
Fig. E
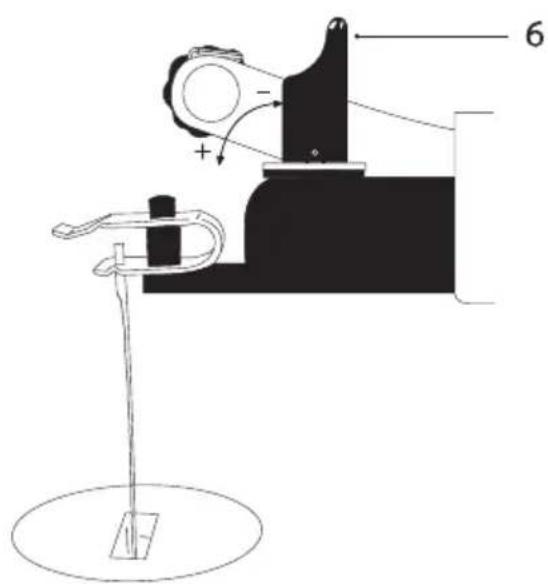
Fig. F

natural_image
Mechanical assembly diagram showing a lever mechanism and two parallel strips with rotational arrows (no text or symbols)
natural_image
Technical line drawing of a mechanical assembly with no visible text or symbols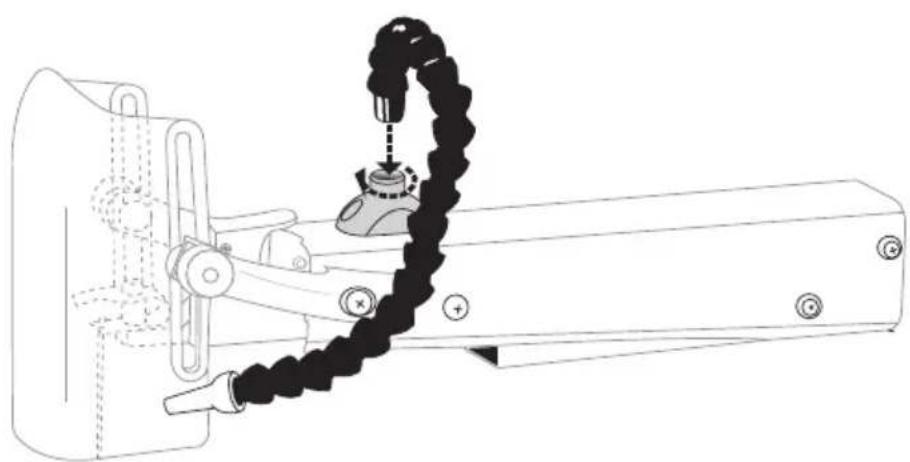
natural_image
Technical line drawing of a mechanical assembly with a coiled black component and a curved wire (no text or symbols)Fig. H
The numbers in the following text refer to the picture on page 2-3

Carefully read this manual before using the machine. Make sure that you know how the machine functions and how to operate it. Maintain the machine in accordance with the instructions to make sure it functions properly. Keep this manual and the enclosed documentation with the machine.
Introduction
This scroll saw is great for making toys, puzzles, games, fretwork and jewelry. Because of its cutting capacity it is a handy do-it-yourself tool. It cuts wood up to 40 mm thick as well as plastics and non-ferrous metals.
Contents
- Machine data
- Safety instruction
- Installing accessoires
- Operation
- Maintenance
1. MACHINE DATA
Technical data
Voltage 230 V\~ Frequency 50 Hz Power consumption 90 W Speed count w/o load/min 1440/min. Max saw depth 90° 40 mm Max saw depth 45° 10 mm Weight 12.5 kg Lpa (sound pressure) w/load 73 dB(A) Lpa (sound pressure) w/o load 86 dB(A)
Contents of the package
1 Scroll saw
1 Protective cover
2 Screw for installing the protective cover
10 Saw blades
2 Adapters for universal saw blades
2 Allen key
1 Dust blow pipe
3 Rubber feet
3 Screws with nuts and rings for installing the rubber feet
1 Cross guide
1 Operating manual
1 Safety instructions
1 Guarantee card
Check the machine, loose parts and accessories for transport damage.
Features
Fig.A
- On/off switch
- Locking nut
- Cross guide
- Saw blade holder
- Protective cover
- Spanner
- Dust blow pipe
- Rubber feet
2. SAFETY INSTRUCTIONS
Explanation of the symbols

Denotes risk of personal injury, loss of life or damage to the tool in case of non-observance of the instructions in this manual.

Denotes risk of electric shock.

Wear ear and eye protection
Specific safety instructions
- Wear safety goggles and a dust mask.
• This scroll saw machine is for indoor use only. - Ensure that the teeth of the saw point downwards prior to using the machine.
- If teeth of the saw blade are missing or are damaged, then the saw blade must be replaced immediately.
- Use the scroll saw machine on a stable and flat surface.
- Never exert pressure on the sides of the saw blade because it may break.
- Check wooden work pieces for possible protruding nails etc. and remove these.
- Do not touch the sawing surface with your hands.
- Never leave the sawing machine unattended while it is running.
- Do not remove any wood debris etc, in the vicinity of the saw with your hands while it is running. Turn the machine off before removing the wood debris.
Immediately switch off the machine when
- Interruption in the mains plug, mains lead or mains lead damage.
- Defect switch.
- Smoke or stench of scorched isolation.
Electrical safety
When using electric machines always observe the safety regulations applicable in your country to reduce the risk of fire, electric shock and personal injury. Read the following safety instructions and also the enclosed safety instructions.

Always check that the power supply corresponds to the voltage on the rating plate.
Mains connection
Only use earthed sockets with earthing wire connected per the regulations.
Replacing the mains connection cable
The mains connection cable may only be replaced by a special cable in a specialised workshop.
Replacing cables or plugs
Dispose of old cables or plugs immediately after replacing them. It is dangerous to connect the plug of a loose cable to a wall socket.
Using extension cables
Only use an approved extension cable, corresponding to the machine power use. The wires must have a minimum cross section of 1.5 mm^2 . If the cable is on a reel, it must be fully paid out.
3. INSTALLING ACCESSORIES

Always disconnect the machine from the main power supply before carrying out any maintenance work
Installing the protective cover
Fig.B
- Before commissioning the machine, the protective cover (5) must be installed.
- Insert the screw from the inside left, then affix the washer and the safety ring from the right side. The safety ring (A) may be left out optionally.
- Screw the knurled nut in tight.
Installing the cross guide
Fig.C
The cross guide (3) allows material to be bevelled, and can be simultaneously used to support the material as it is fed through the saw.
Mounting the rubber feet
Fig. G
The enclosed rubber feet contribute to a steady position of the scroll saw on your worktable
- Place the rubber foot on its place
- Connect the rubber foot with help of the enclosed bolt, ring and nut
- Tighten the nut with a wrench
Sawdust blower
Fig. H
The sawdust blower keeps the workpiece clean for more accurate scroll cuts. For best results, always direct air flow from the blower tube at blade and workpiece. To adjust, simply bend to desired position.
Installation
- Place the sawdust blower on the hole on top of the machine
- Turn the blow pipe clockwise into the hole
4. OPERATION

Always observe the safety instructions and obey the relevant regulations.
Start - Push the green ON-switch to start the machine
Stop - Push the red OFF-switch to stop the machine
Tilting the table
Fig.D
The scroll saw table can be tilted through 45^ . To do so:
- Lock the locking arm underneath the table.
- Manually tilt the table until the desired angle has been reached (see the graduated scale on the machine).
• Retighten the locking arm.
Adapters for universal saw blades
Fig. F
The enclosed adapters should only be used with universal (= without pins on the end) saw blades
- Unscrew the Allen screws on the adapter counterclockwise
- Slide the universal saw into the gap between the Allen screws
- Tighten the Allen screws clockwise so the saw is clamped
• Install the saw blade (see INSTALLING THE SAW BLADE)
Installing the saw blade
Fig.E

Always disconnect the machine from the main power supply before carrying out any maintenance work

Use universal saw blades from any better DIY shop or machine shop.
- Select the correct blade for the kind of wood to be cut.
- Push the spanner upwards. (6).
- Push the saw blade through the slot, with the teeth pointing downwards. Make sure that the bolt of the saw blade (or saw-blade adapter) slides into the lower saw blade holder.
- Pull the saw blade up, so that the upper bolt (or saw-blade adapter) slides into the upper holder.
- Tighten the tensioner button until the saw blade has the required tension.
- Remove all tools and other objects from the saw table. Activate the current and allow the saw blade to run before starting to saw. The saw blade should run quietly.
Removing the saw blade

Always disconnect the machine from the mains before carrying out any maintenance work.
- Loosen the spanner until the spring is slack.
- Carefully push down the upper saw-blade holder and slightly lift the blade in order to facilitate its removal.
- Allow the blade to drop down slightly and push it forward, in order to loosen it from the lower holder.
Basic scroll saw operations and tips
- There is a learning curve for each person who wants to use this saw. During that period of time it is expected that some blades will break until you learn how to use the saw and receive the greatest benefit from the blades.
- Blades wear faster when:
• cutting plywood, which is very abrasive;
- when sawing wood which is thicker than the blade stroke;
- when sawing hardwood;
- when side pressure is placed on the blade
- The saw blade saws only during the downward stroke.
- Using both hands, slowly and with minimum pressure push the workpiece across the table towards the saw blade. This will prevent the blade from breaking or twisting.
- For optimal results, the saw blade must be sharp.
- Use the proper saw blade. The selection of the saw-blade depends on the thickness of the wood and the cut you would like to achieve. Keep the following in mind as a general rule: The thinner and harder the wood, the finer the teeth of the saw blade. Use a small blade to saw sharp curves.
5. MAINTENANCE

Always disconnect the machine from the mains before carrying out any maintenance work.
The machine is designed to function faultlessly for a long period and with a minimum of maintenance.
Extend its lifespan by regularly cleaning the machine and treating it correctly.
Cleaning
Regularly clean the machine with a soft cloth, preferably after each use. Keep the ventilator slot free of dust and other deposits. Remove any tenacious deposits with a soft cloth moistened with soap. Do not use solvents (petrol, alcohol, ammonia, etc.) as they will damage the plastic parts.
Lubrication
The machine does not need lubricating.
Faults
If a fault arises (due to e.g. element wear), contact the service address listed on the warranty card.
Environment
To prevent damage during transport, the appliance is delivered in a solid packaging which consists largely of reusable material. Therefore please make use of options for recycling the packaging.

Damaged and/or disposed of electrical or electronic devices must be dropped off at recycling stations intended for that purpose.
Warranty
Read the warranty conditions on the separately supplied warranty card.
DEKUPIERSÄGEMASCHINE FFZ-400R
SERRA TICO TICO FFZ-400R


- SSM1005
- The numbers in the following text refer to the picture on page 2-3
- Introduction
- Contents
- MACHINE DATA
- Technical data
- Contents of the package
- Features
- Fig.A
- SAFETY INSTRUCTIONS
- Explanation of the symbols
- Specific safety instructions
- Electrical safety
- Mains connection
- Replacing the mains connection cable
- Replacing cables or plugs
- Using extension cables
- INSTALLING ACCESSORIES
- Installing the protective cover
- Fig.B
- Installing the cross guide
- Fig.C
- Mounting the rubber feet
- Fig. G
- Sawdust blower
- Fig. H
- Installation
- OPERATION
- Tilting the table
- Fig.D
- Adapters for universal saw blades
- Fig. F
- Installing the saw blade
- Fig.E
- Removing the saw blade
- Basic scroll saw operations and tips
- MAINTENANCE
- Cleaning
- Lubrication
- Faults
- Environment
- Warranty
- DEKUPIERSÄGEMASCHINE FFZ-400R
- SERRA TICO TICO FFZ-400R
Brand : Ferm
Model : SSM1005
Category : Saw