Explore - Smartphone LAND ROVER - Free user manual and instructions
Find the device manual for free Explore LAND ROVER in PDF.
| Technical Specifications | 5.0-inch screen, 1080 x 1920 pixels resolution, octa-core processor, 4 GB RAM, 64 GB internal storage, expandable via microSD. |
|---|---|
| Usage | Designed for outdoor use, water and dust resistant (IP68 standard), 4000 mAh battery offering extended autonomy. |
| Maintenance and Repair | Repair possible by authorized centers, spare parts available, operating system update via OTA. |
| Security | Advanced security features including fingerprint unlocking and data encryption. |
| General Information | Compatible with 4G networks, built-in GPS, preinstalled navigation apps, 2-year warranty. |
Frequently Asked Questions - Explore LAND ROVER
User questions about Explore LAND ROVER
0 question about this device. Answer the ones you know or ask your own.
Ask a new question about this device
Download the instructions for your Smartphone in PDF format for free! Find your manual Explore - LAND ROVER and take your electronic device back in hand. On this page are published all the documents necessary for the use of your device. Explore by LAND ROVER.
USER MANUAL Explore LAND ROVER
natural_image
Large outdoor mural featuring a man with a bearded face and a hiker in a blue jacket, set against a snowy forest background (no text or symbols)LAND ROVER EXPLORE: THE OUTDOOR PHONE USER MANUAL
landroverexplore.com
CONTENTS
ENGLISH 3
ČEŠTINA 40
DANSK 78
DEUTSCH 116
EESTI 154
ESPAÑOL 192
FRANÇAIS 230
ITALIANO 268
LATVIEŠU VALODA 306
LIETUVIŲ KALBA 344
NEDERLANDS 382
NORSK 420
POLSKI 458
PORTUGUÊS 496
SLOVENČINA 534
SLOVENŠČINA 572
SUOMI 610
SVENSKA 648
ΕΛΛΗΝΙΚΑ 686
قی برعلا 724
PLEASE READ BEFORE FIRST USE
SAFETY PRECAUTIONS
- Please read this manual and the recommended safety precautions carefully to ensure the correct use of this device.
- Despite it's durable nature; avoid hitting, throwing, crushing, puncturing or bending the Explore.
- If used in salt water, rinse the device afterwards to avoid salt corrosion.
- Do not attempt to disassemble the device or its accessories. Only qualified personnel can service or repair it.
- Do not switch on the device in a circumstance where the use of mobile phones is prohibited, or in a situation where the device may cause interference or danger.
- Do not use the device whilst driving.
- Switch off the device near medical apparatus and follow the rules or regulations regarding mobile phone use in hospitals and health care facilities.
- Switch off the device or activate aeroplane mode when situated in an aircraft, as it may cause interference to the vessel's control equipment.
- Switch off the device near high-precision electronic devices as it may affect their performance.
- Do not place the device or its accessories in containers with a strong electromagnetic field.
- Do not put magnetic storage media near the device. Radiation from the device may erase the information stored on them.
- Do not use the device in an environment with flammable gas, such as a gas station.
- Do not place the device anywhere with high temperatures.
- Keep the device and its accessories away from young children.
- Do not allow children to use the device without guidance.
- Only use approved batteries and chargers to avoid the risk of explosion.
- Observe any laws or regulations on the use of wireless devices. Respect others' privacy and legal rights when using the wireless device.
- For medical implant patients (heart, joints, etc), keep the device 15cm away from the implant and, during a phone call, keep the device positioned on the opposite side of the implant.
- Strictly follow the relevant instructions of this manual while using the USB power cable, otherwise it may cause damage to your device or PC.
LEGAL NOTICE
Land Rover Workmark and Land Rover Oval Logo as well as corporate and product identity used herein, are trademarks of Jaguar Land Rover Limited and may not be used without permission.
Bullitt Group Ltd is a licensee of Jaguar Land Rover Limited.
No part of this document may be reproduced or transmitted in any form or by any means without prior written consent of Bullitt Mobile Ltd. or Jaguar Land Rover Limited.
The product described in this manual may include copyrighted software and possible licensors. Customers shall not in any manner reproduce, distribute, modify, decompile, disassemble, decrypt, extract, reverse engineer, lease, assign, or sublicense the said software or hardware, unless such restrictions are prohibited by applicable laws or such actions are approved by respective copyright holders under licenses.
The Bluetooth ^® word mark and logos are registered trademarks owned by the Bluetooth SIG, Inc. and any use of such marks by Bullitt Group is under license. All other third-party trademarks and trade names are those of their respective owners.
Wi-Fi ^® is a registered trademark of Wi-Fi Alliance ^® .
Android and Google and other marks are trademarks of Google LLC.
NOTICE
Some features of the product and its accessories described herein rely on the software installed, capacities and settings of local network, and may not be activated or may be limited by local network operators or network service providers. Therefore, the descriptions in this manual may not exactly match the purchased product or its accessories.
The manufacturer reserves the right to change or modify any information or specifications contained in this manual without prior notice or obligation.
The manufacturer is not responsible for the legitimacy and quality of any products that you upload or download through this device including text, pictures, music, movies, and non-built-in software with copyright protection. Any consequences arising from the installation or usage of the preceding products on this device is accountable to you.
NO WARRANTY
The contents of this manual are provided "as is". Except as required by applicable laws, no warranties of any kind, either express or implied, including but not limited to, the implied warranties of merchantability and fitness for a particular purpose, are made in relation to the accuracy, reliability or contents of this manual.
To the maximum extent permitted by applicable law, in no case shall the manufacturer be liable for any special, incidental, indirect, or consequential damages, or lost profits, business, revenue, data, goodwill or anticipated savings.
IMPORT AND EXPORT REGULATIONS
Customers shall comply with all applicable export or import laws and regulations and will obtain all necessary governmental permits and licenses in order to export, re-export or import the product mentioned in this manual including the software and technical data therein.
CONTENTS
PLEASE READ BEFORE FIRST USE 2
LEGAL NOTICE 3
NOTICE 3
NO WARRANTY 3
IMPORT AND EXPORT REGULATIONS 3
WELCOME TO LAND ROVER EXPLORE: THE OUTDOOR PHONE 6
DESIGNED FOR THE OUTDOORS 6
SOFTWARE UNIQUE TO THE EXPLORE 7
THE EXPLORE AT A GLANCE 8
KEY FUNCTIONS 8
GETTING STARTED 9
CHARGING THE BATTERY 9
BATTERY PACKS 10
POWERING YOUR DEVICE ON/OFF 11
TOUCHSCREEN 11
DISPLAY 12
ENABLING NIGHT AND GLOVE MODES 13
HOME SCREEN APPS AND WIDGETS 14
FOLDERS 15
WALLPAPERS 15
USING AIRPLANE MODE 15
MAKING A PHONE CALL 16
CONTACTS 17
USING THE ON-SCREEN KEYBOARD 18
WI-FI ^® 19
SMS AND MMS 19
BLUETOOTH® 20
TAKING PHOTOS AND RECORDING VIDEOS 21
ENJOYING MUSIC 24
SYNCHRONISING INFORMATION 25
MANAGING ACCOUNTS 25
REMOVING AN ACCOUNT 26
USING OTHER APPLICATIONS 26
PERSONALISING THE DISPLAY 28
RINGTONES 29
SETTING PHONE SERVICES 29
PROTECTING YOUR DEVICE 30
MANAGING APPLICATIONS 30
RESETTING THE DEVICE 31
VIEWING THE REGULATORY E-LABEL 31
APPENDIX
ADVENTURE PACK DECLARATION OF CONFORMITY 36
LAND ROVER EXPLORE DECLARATION OF CONFORMITY 37
31

natural_image
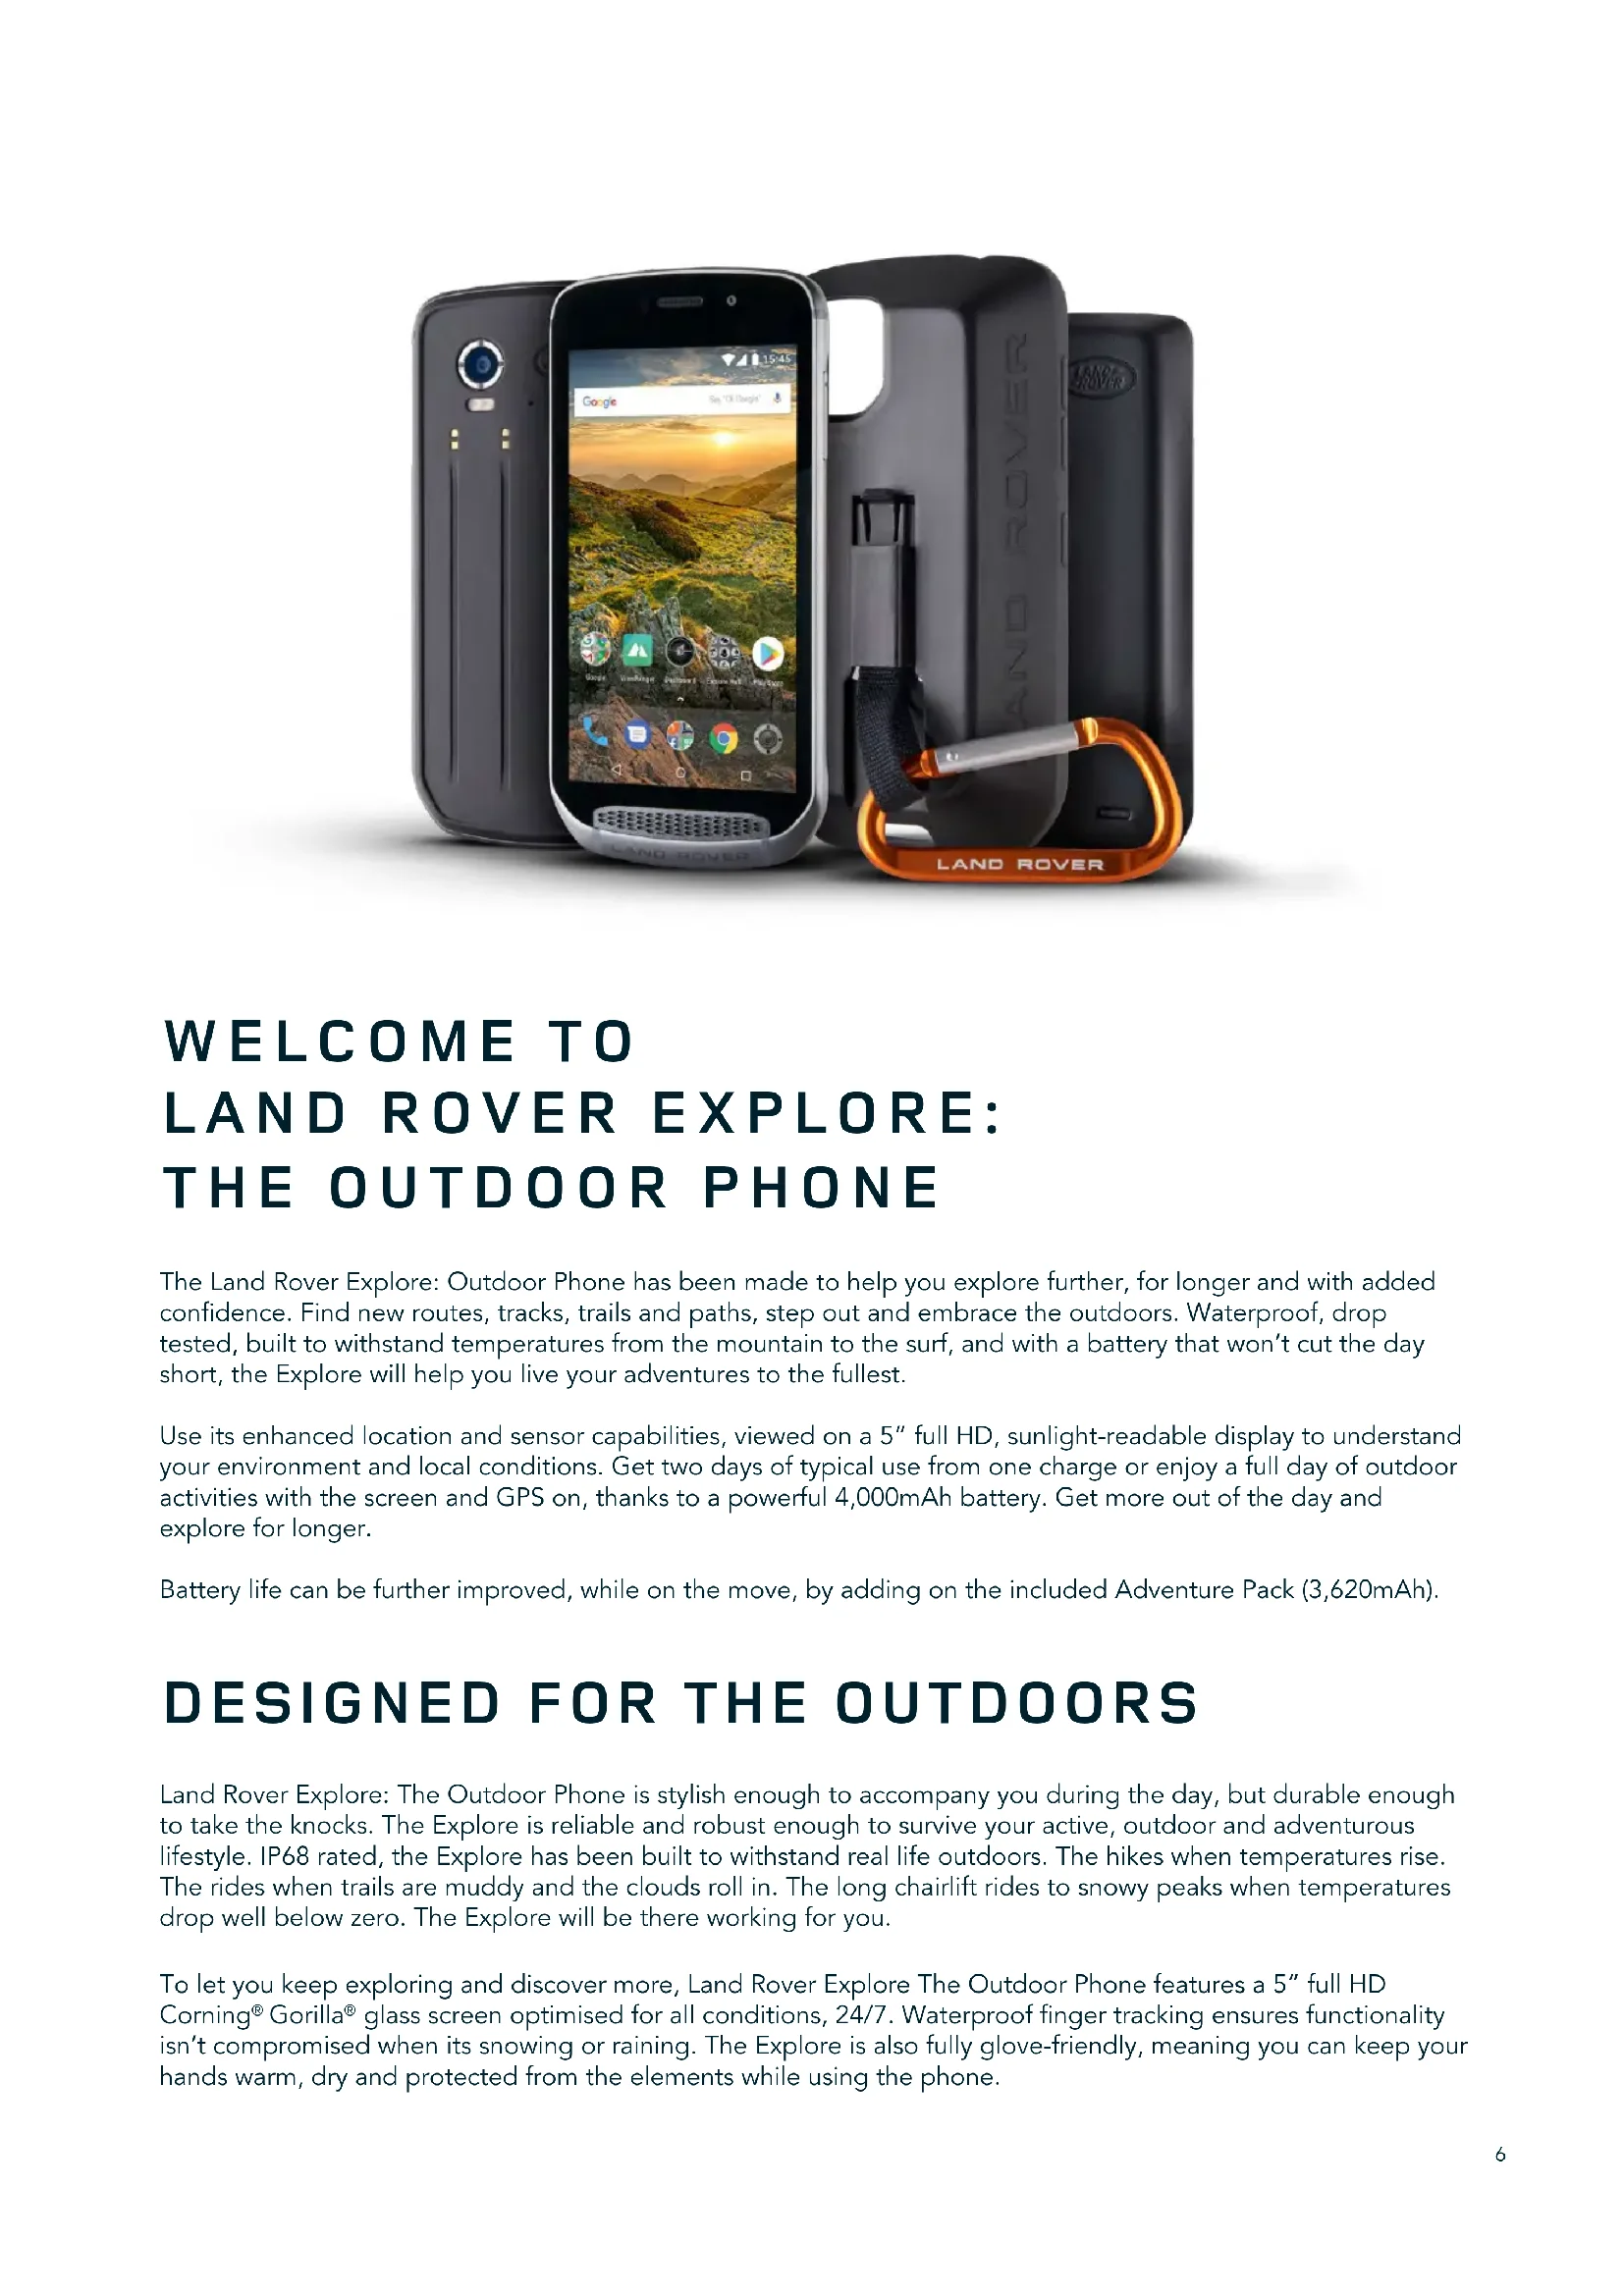
Black land rover phone with open screen displaying landscape at sunset, alongside a black land rover device (no visible text or symbols on device body)WELCOME TO LAND ROVER EXPLORE: THE OUTDOOR PHONE
The Land Rover Explore: Outdoor Phone has been made to help you explore further, for longer and with added confidence. Find new routes, tracks, trails and paths, step out and embrace the outdoors. Waterproof, drop tested, built to withstand temperatures from the mountain to the surf, and with a battery that won't cut the day short, the Explore will help you live your adventures to the fullest.
Use its enhanced location and sensor capabilities, viewed on a 5" full HD, sunlight-readable display to understand your environment and local conditions. Get two days of typical use from one charge or enjoy a full day of outdoor activities with the screen and GPS on, thanks to a powerful 4,000mAh battery. Get more out of the day and explore for longer.
Battery life can be further improved, while on the move, by adding on the included Adventure Pack (3,620mAh).
DESIGNED FOR THE OUTDOORS
Land Rover Explore: The Outdoor Phone is stylish enough to accompany you during the day, but durable enough to take the knocks. The Explore is reliable and robust enough to survive your active, outdoor and adventurous lifestyle. IP68 rated, the Explore has been built to withstand real life outdoors. The hikes when temperatures rise. The rides when trails are muddy and the clouds roll in. The long chairlift rides to snowy peaks when temperatures drop well below zero. The Explore will be there working for you.
To let you keep exploring and discover more, Land Rover Explore The Outdoor Phone features a 5" full HD Corning® Gorilla® glass screen optimised for all conditions, 24/7. Waterproof finger tracking ensures functionality isn't compromised when its snowing or raining. The Explore is also fully glove-friendly, meaning you can keep your hands warm, dry and protected from the elements while using the phone.
PACKS
Extend the core functionality of the Explore with a range of unique add-on packs. Developed to suit any situation, they give you more of what matters most; battery, connectivity, detailed maps and the ability to securely attach the phone to your bike or bag. Each pack can be attached to the back of Explore while on the go, to enhance any adventure and let you go further, and stay out longer. The included Adventure Pack gives you better connectivity with a powerful GPS patch antenna and additional battery to nearly double your battery life. Access to detailed premium topographic mapping with Skyline augmented reality courtesy of the ViewRanger app is automatically available to enhance your understanding of your environment. You'll also get a case to keep your outdoor phone safe and carabiner to attach it to your bag or jacket for easy viewing.
Other packs available include a large 4,370mAh additional battery and a universal bike mount, all designed to help you live your adventures to the fullest.
WHAT IS IN THE BOX
- Device - Pin Tool
- Adventure Pack - Carabiner
- Quick Start Guide - Protective Case
- USB power cable and charging power adapter - Factory fitted screen protector already on the device
SOFTWARE UNIQUE TO THE EXPLORE
DASHBOARD
Dashboard, unique to the Land Rover Explore, brings together relevant information about current conditions right to your fingertips – whether that's information from the Explore's sensors or weather data from our partner World Weather Online.
Always only one touch away, Dashboard helps you plan your adventure and plan the kit you may need, as well as keep an eye on the weather as your journey progresses. Find more information on page 27.
VIEWRANGER
ViewRanger is the world number one smartphone mapping app and it got that position by offering the widest range of maps (for over 24 countries) and having a huge range of routes for you to download and use to explore the outdoors (over 200,000 currently). Equally important, ViewRanger premium mapping gives you the detail you need when off road. The ViewRanger app comes pre-installed on the Land Rover Explore. Find more information on page 27.
NIGHT MODE
Land Rover Explore integrates a 'Night' red-light filter that helps reduce the time it takes for your eyes to adjust from the glare of a bright smart-phone display, to good natural night vision in dark or poorly lit environments. Find more information on page 14.
THE EXPLORE HUB
A curated app discovery portal featuring a catalogue of apps handpicked and tested by the Explore team. It includes a range of titles to help you uncover a host of different outdoor activities. Explore Hub is available from the home screen.
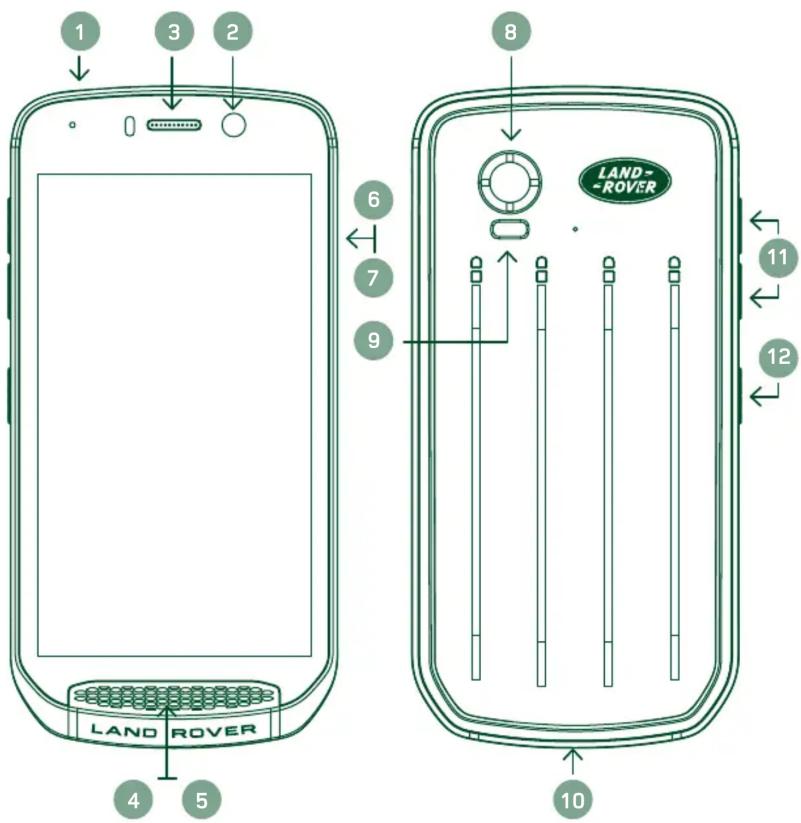
THE EXPLORE AT A GLANCE
text_image
1 2 3 4 5 LAND ROVER 6 7 8 LAND- ROVER 9 10 11 12- Headset Jack
- 8MP Front Camera
- Earpiece
- Microphones
- Speaker
- SIM Card Slot
- microSD ^TM Card Slot
- 16MP Rear Camera
- Flash
- USB Port
- Volume Up/Down Key
- Power Key
KEY FUNCTIONS
POWER KEY
- Press and hold to turn on the device.
- Press and hold to open the phone Options Menu.
- Press to lock or wake the screen when the device in idle.
HOME BUTTON
- O Found along the bottom of the screen, in the centre. Press at any time to display the Home Screen.
- Hold down the Home button to use the Google Voice Search™ service.
RECENT APPS BUTTON
- ☐ Found bottom right of the screen. Press at any time to open recently used apps.
BACK BUTTON
- ◀ Found bottom left of the screen. Press to go back to the previous screen.
- Press to close the on-screen keyboard.
VOLUME UP/DOWN KEY
- Press the top Volume Up key to increase the volume, or the bottom Volume Down key to decrease the volume of the call, ringtone, media or alarm.
- To take a screenshot, press both Power and Volume Down keys simultaneously.
- When in the Camera app press either the Volume up/down keys to take photos.
GETTING STARTED
text_image
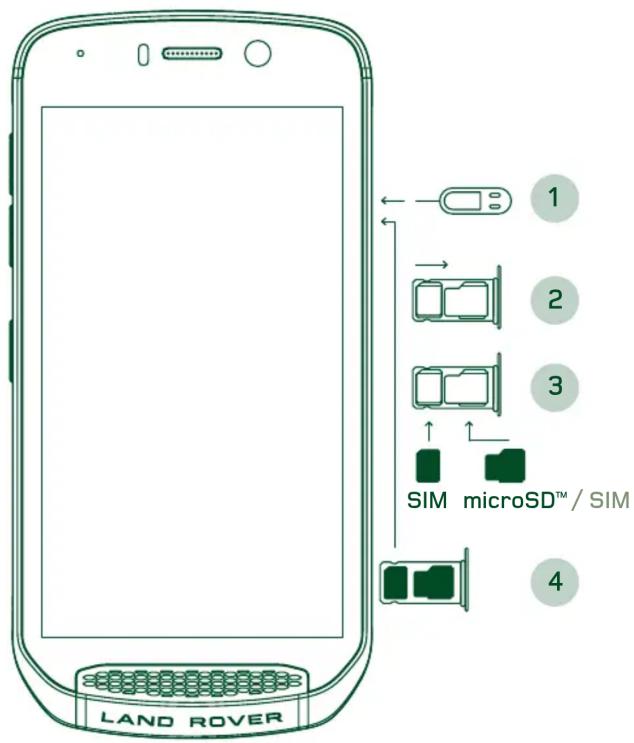
LAND ROVER 1 2 3 SIM microSD™ / SIM 4INSTALLING A NANO SIM CARD
- Place your device on a flat surface with the display facing upwards. Using the pin tool provided, gently press the pin into the hole of the SIM door to release the spring.
- Pull out the tray, make a note of which way around the tray came out.
- Put the Nano SIM card in the SIM tray as indicated on the tray guide with gold pins facing downwards.
- Re-insert the tray the same way it was taken out.
NOTE
- Ensure the SIM card is fixed securely in the SIM tray.
- Push the SIM tray until it is fully inserted in the slot.
- To remove the Nano SIM card, use the pin tool provided. Gently push the pin into the hole of the SIM door to release the spring. Pull the tray out.
- Remove the nano SIM card.
- Your device can accept 2 Nano SIM's or 1 Nano SIM + microSD ^TM card (variant dependant).
INSTALLING A MEMORY CARD
- Place your device on a flat surface with the display facing upwards. Use the pin provided to open the side door.
- As shown in the diagram above, insert a microSD card into the memory card slot with gold pins facing upwards.
NOTE
- Push the memory card down gently until you hear a locking sound.
- To remove the microSD card, press against the edge of the memory card and release it.
- Do not force the microSD card as this could damage the memory card and slot.
REGISTERING YOUR LAND ROVER EXPLORE
Register your new Land Rover phone to become part of the Land Rover #ExploreMore community for the latest news, updates and offers.
- Tap the green Register app icon, found on the home page.
- Follow the on screen instructions.
CHARGING THE BATTERY
Charge the battery before using your device for the first time.
- Connect the USB power cable to the charging power adaptor.
-
Connect the USB power cable to your Land Rover Explore.
-
Plug the charger into the appropriate AC mains socket. A battery icon will appear, indicating the device is nowcharging.
- When the green light shows on the indication LED, your device is fully charged. First, unplug the USB cable from the device, then unplug the charger from the mains socket.
NOTE
- Only use Land Rover approved chargers and cables. Unapproved equipment may cause damage to the device or cause batteries to explode.
- Be careful not to use excessive force when connecting the USB cable and be aware of the correct orientation of the plug.
- Damage can be caused by attempting to insert the connector incorrectly. Attempting to insert the connector incorrectly may cause damage that will not be covered by the warranty.
BATTERY PACKS
The phone and packs are held together by magnets which allow the two to separate when dropped. Using magnets was a design choice as it can avoid permanent damage that can occur from fixed attachments.
IMPORTANT INFORMATION REGARDING FUTURE USE OF BATTERY
If the battery is completely exhausted, your device may not power on immediately after charging starts. Before attempting to turn it on, allow the battery to charge for a few minutes. The on-screen charge animation may not be displayed during this period.
When the battery power level is low, your device displays an alert and a red light appears in the LED indicator. When the battery power is almost exhausted, your device will power off automatically.
NOTE
- The time required to charge the battery depends on the environmental temperature and the age of the battery.
CHARGING THE PHONE THROUGH AN ATTACHED PACK
The phone and the additional Adventure / battery packs can be charged together or separately.
To charge a pack and your phone together, attach the pack and plug the charging adaptor into the pack and not the phone. The phone and the pack will be charged simultaneously until both are fully charged.
If the pack is attached to your phone and you plug the adaptor into the phone instead of the pack, only the phone will be fully charged. The pack will remain uncharged.
Packs can be charged separately from the phone. The LED indicator light will flash red while charging and will turn green when charging is complete. It is not recommended to leave the battery plugged in after charging is complete.
PACK LED COLOUR AND STATUS INDICATORS
The packs LED indicator light will flash red while charging and will turn green when charging is complete. The packs LED colours indicate the current charge status of the pack itself.
| Green | 100-70% | Red | 40-10% |
| Amber | 70-40% | Flashing | Red <10% |
NOTE
- Some applications allow you to customise the colour of the Explore LED (found in the top right corner on the front of the device) This will not affect the pack LED colours above.
GETTING THE MOST FROM YOUR PACKS
To make the most efficient use of the pack, fully charge both the phone and the pack and start your adventure with the pack attached. The pack battery will drain first until fully empty before the Explore phone's internal battery takes over.
POWERING YOUR DEVICE ON/OFF
POWER ON
- Press and hold the Power key. When you turn on your device, a welcome screen will be appear. Firstly, select your preferred language and then tap GET STARTED to continue with the set-up process.
NOTE
- If personal identification number (PIN) protection is enabled on your SIM Card, you will be asked to enter your PIN before the Welcome screen is displayed.
-AWi-Fi ^® or Data connection is required. You can skip set-up and complete it at another time. A Google account is required to use some of the Google services on this Android ^™ device.
POWERING OFF
- Press and hold the Power key to open the device Options menu.
- Tap Power off.
TOUCHSCREEN
TOUCHSCREEN ACTIONS
- Tap: Use your finger tip to select an item, confirm a selection, or start an application on the screen.
- Tap and hold: Tap an item with your finger tip and continue to press down until the screen responds. For example, to open the options menu for the active screen, tap the screen and hold down until the menu appears.
- Swipe: Move your finger across the screen either vertically or horizontally. For example, swipe left or right to switch between pictures.
- Drag: If you want to move an item, tap and hold it with your finger tip. Now drag the item to any part of thescreen.
HOME SCREEN
The Home Screen is the starting point for accessing your device's features. It displays application icons, widgets, shortcuts and more. It can be customised with different wallpapers and can be adjusted to display your preferred items.
- On the home screen, the launcher icon is a small white upward-facing arrow ^, located in the middle of the screen and slightly above the bottom row of icons. Swipe up over this icon to view and launch all installed applications/apps).
NOTE
- A long press on an empty space on the Home Screen will launch the shortcut to wallpapers, widgets and settings.
LOCKING AND UNLOCKING THE SCREEN
LOCKING THE SCREEN
- If your device is turned on, press the Power key to lock the screen. You can still receive messages and calls, even if the screen is locked.
- If the device is left undisturbed for a certain period, the screen will lock automatically. You can adjust the length of this period in settings.
UNLOCKING THE SCREEN
- Press the Power key to wake up the screen. Then, drag the lock icon upwards to unlock the screen. You may have to enter your pattern or PIN code if pre-set.
- To launch the Camera app directly from the locked screen, drag the camera icon upwards.
- To launch the Google Voice Search ^™ service (also known as 'OK Google') directly from the locked screen, drag the mic icon upwards.
NOTE
- If you have set up a screen lock, there will be a prompt to unlock the screen. For details, refer to “Protecting the device with a screen lock” on “Protecting your Device With A Screen Lock” on page 31.
DISPLAY
DISPLAY LAYOUT
NOTIFICATIONS AND STATUS INFORMATION
The Status bar appears at the top of every screen. This displays notification icons, such as missed call or received messages (on the left) and phone status icons, such as battery status (on the right), in addition to the current time.

text_image
Screenshot of a digital status bar with icons for chat, navigation, and timer, showing time 11:16Notifications Icons Status Icons
STATUS ICONS
| 4G | Connected to 4G mobile network No mobile network signal | ||
| LTE | Connected to LTE mobile network | Vibrate mode | |
| 3G | Connected to 3G mobile network | Location is found | |
| G | Connected to GPRS mobile network | Battery indicator, battery is full | |
| E | Connected to EDGE mobile network | Battery is charging | |
| H | Connected to HSDPA mobile network | FM radio is turned on | |
| H+ | Connected to HSPA+ mobile network | Aeroplane mode | |
| R | Roaming | Connected to a Wi-Fi network | |
| Mobile network signal strength Connected to a Bluetooth device | |||
| NFC is enabled | Alarm is set |
NOTIFICATIONS ICONS
| New email message Missed call | |||
| New text message Speakerphone is activated | |||
| Upcoming event Phone microphone is muted | |||
| A screenshot is captured Downloading data | |||
| Data is syncing Headphones are connected | |||
| Problem with sign-in or sync |
NOTIFICATION PANEL
Your device will launch a notification when you receive new messages, have a missed call, if there is an upcoming event and more. Open the notification panel to view your notifications.
OPENING THE NOTIFICATION PANEL
- When a new notification icon appears on the notification bar, swipe down from the top of the screen to drag open and expand the full notification panel. You can do this whether the phone is locked or unlocked.
- From a locked screen, you can double tap a notification message to open it.
- If you want to close a notification (without viewing it), simply press and hold the notification and drag it to the left/right of the screen.
COLLAPSE THE NOTIFICATION PANEL
- To close the notification panel, slide the bottom of the panel upwards.
ENABLING NIGHT AND GLOVE MODES
TURN ON NIGHT MODE
There are two different Night mode options to choose from:
Option One - Night Mode, when you need to go into night mode immediately.
-
Unlock the screen and swipe down from the top of the screen twice to fully expand the Notification panel.
-
TapNight once to activate Red Mode.
-
Tap again to activate Orange Mode
Option Two - Night Light, to set timed night modes:
- Unlock the screen and swipe down from the top of the screen once to expand the Notification panel.
2.TapSettings ✿ in the top right hand corner.
-
Scroll down and tap Night Light.
-
From this menu, you can create a schedule for when it should be activated or turn it on manually by tapping the switch to the right (On). Tap again to turn it off.
TURN ON GLOVE MODE
To enable your screen for use when wearing gloves, enable Glove Mode:
- Unlock the screen and swipe down from the top of the screen once to expand the Notification panel.
2.TapSettings ✿ in the top right hand corner. - Scroll down and tap Display Settings.
- Tap Glove Mode to switch it on . Tap again to turn it off.
HOME SCREEN APPS AND WIDGETS
ADDING A NEW HOME SCREEN ITEM
- From the Home screen, swipe the small upward-facing arrow in an upward motion. Press and hold the application you would like to add to your home screen.
- Drag the application icon up to the Home screen. There must be enough space for the icon to fit on the current Home screen panel. If the first page is full, pull the icon to the right of the screen and onto the next page.
MOVING A HOME SCREEN ITEM
- Tap and hold an application icon on the Home screen until the icon enlarges.
- Without lifting your finger, drag the icon to the desired position on the screen, and then release it.
REMOVING A HOME SCREEN ITEM
- Tap and hold an application icon on the Home screen until the icon enlarges.
- Without lifting your finger, drag the item to the 'Remove' title at the top and then release it.
WIDGETS
A widget lets you preview or use an application. Widgets can be placed on your Home screen as icons or preview windows. Several widgets are installed by default on device and you can download additional widgets from the Google Play ^™ store.
ADDING A WIDGET
- Tap and hold the Home screen.
- Tap widgets to show available widgets.
- Drag your desired widget to the Home screen.
REMOVING A WIDGET
- Tap and hold the widget icon on the Home screen until the icon enlarges.
- Without lifting your finger, drag the item to Remove, then release it.
FOLDERS
CREATING A FOLDER
Drag the application icon or shortcut and release it on top of other applications.
RENAMING A FOLDER
- Tap a folder to open it.
- Enter a name for the new folder in the title bar.
- Then press the Back button ◀.
WALLPAPERS
CHANGING THE WALLPAPER
- Tap and hold anywhere on the Home screen but not over an app icon.
- TapWallpapers.
- Scroll through the available options.
- Tap your favourite image, then press Set Wallpaper.
- You can now choose whether to set it as the Lock Screen wallpaper, the Home Screen wallpaper or both.
TRANSFERRING MEDIA TO AND FROM YOUR DEVICE
Transfer your favourite music and pictures between your device and PC in the Media Device MTP mode.
- Firstly, connect your device to a PC with the USB power cable.
- Then open the notification panel and tap the USB connection options. Tap transfer files to activate the MTP mode.
- Your device should be displayed as a removable device displaying the phone's internal storage. If a memory card is inserted, the microSD card will also be visible. Copy the desired files onto the device.
NOTE
- If you are using an Apple ^ iMac ^ , the drivers must be downloaded from:
http://www.android.com/filetransfer/
USING AIRPLANE MODE
Some locations may require you to switch off data connections. Instead of turning off your device, you can set it to Airplane mode.
- Press Power key.
- Swipe down from the top to open the Notifications panel.
- Swipe right to left to access the second page of options. Tap Airplane mode. The icon will turn white to indicate it is activated.
- Or, using the Settings menu, you can select the More menu and slide the Airplane mode switch to the right .
MAKING A PHONE CALL
There are several ways to place a phone call:
- Either, dial a number into the keypad.
- Or, select a number from your contacts list, a Web page, or from a document that contains a phone number.
NOTE
- When you're on a phone call, incoming phone calls can either be answered or sent to your voicemail.
- You can also set up conference calls with several participants.
MAKING A PHONE CALL WITH THE KEYPAD
- From the Home screen, tap . Then tap to display the keypad.
- Dial a phone number by tapping the numeric keys.
- After you enter the number, or select the contact, tap .
Tip: Your device supports the SmartDial function. As you type a number into the keypad, the SmartDial function automatically searches through your contact list and lists predictions for a contact that matches the number. You can close the keypad to view more possible matches.
MAKING A PHONE CALL FROM CONTACTS
- From the Home screen, swipe the small upward-facing arrow ^ in an upward motion. Select Contacts to display the contact list. From the keypad, tap the tap to display the contact list.
- In the list, select a contact.
- Tap the phone number to call the contact.
MAKING A PHONE CALL FROM THE CALL LOG
- From the Home screen, swipe the small upward-facing arrow ^ in an upward motion. Go to 📞 and then Ⓤ. The Call Log displays the latest calls you have made and received.
- Select a contact from the list and tap to make a call.
ANSWERING AND REJECTING A PHONE CALL
When you receive a phone call, unless it is withheld, the incoming call screen will show the caller ID.
- To answer a call, tap and drag it to the right .
- To reject the call, tap and drag it to the left.
- To reject the call and instead send a message directly to the caller, tap and drag it to upwards. Then select one of the available template message options, or tap Write Your Own to compose a personal message.
NOTE
- When you tap, it will disappear from the screen.
ENDING A PHONE CALL
During a phone call, tap to hang up.
MAKING A CONFERENCE CALL
In the conference calling feature, you can set up a call with multiple participants.
- To initiate a conference call, dial the number of the first participant and tap to make the call.
- During your call with the first participant, tap > Add call and enter the phone number of the next participant.
- Tap, or select a contact from the Call Log or Contacts. The first call will be automatically placed on hold.
- Once the additional call has been connected, tap > Merge calls.
- To add more people, tap and repeat steps 2 to 4.
- To end the conference call and disconnect everyone, tap 📞
NOTE
- Contact your network operator to find out if your device's subscription supports conference calls and how many participants can be added.
SWITCHING BETWEEN PHONE CALLS
If you receive an incoming call during a current phone call, it is possible to switch between the two calls.
- When both calls are in progress, tap the contact's name or phone number in the lower left corner of the screen.
- Your current call will be placed on hold and you will be connected to the other call.
CONTACTS
The Contacts application allows you to save and manage information about your contacts.
OPENING AND VIEWING YOUR CONTACTS
To open the Contacts application and view all of your loaded contacts, do the following:
-
From the Home screen, swipe the small upward-facing arrow ^ in an upward motion. Select Contacts
-
Tap ALL.

NOTE
- Your contacts will be displayed alphabetically in a scrolling list.
COPYING CONTACTS
You can copy your contacts saved in your Google account or from the SIM card, internal storage, or memory card.
- In the contacts list, tap : followed by Import/Export.
- Do one of the following:
TO IMPORT CONTACTS SAVED IN A GOOGLE ACCOUNT
- Select the personal account and tap Next.
- Specify where to import the contacts and tap Next.
- Then select the desired contact(s) and tap OK.
TO IMPORT CONTACTS FROM THE SIM CARD
- Tap USIM and tap Next.
- Specify where to import the contacts to and tap Next.
- Then select the desired contact(s) and tap OK.
TO IMPORT CONTACTS FROM THE INTERNAL STORAGE OR MEMORY CARD
- Tap Internal shared storage or SD card.
- Specify where to import the contacts and tap Next.
NOTE
- If there is more than one vCard file, there will be options to either import one vCard file, multiple vCard files, or all vCard files.
ADDING A CONTACT
- In the contacts list, tap to add a new contact.
- Once information is added tap add new contact to save the contact information.
ADDING A CONTACT TO YOUR FAVOURITES
- Touch the contact you want to add to Favourites.
2.Touch ☆ on the top left corner, and the icon turns solid white (★
DELETING A CONTACT
- In your Contacts list, tap the contact you want to delete.
2.Tap : > Delete. - Tap Delete again to confirm.
USING THE ON-SCREEN KEYBOARD
DISPLAYING THE KEYBOARD PANEL
Some applications open the keyboard automatically. In others, tap a text field to open the keyboard. Press the Back button <hide the keyboard.
USING THE LANDSCAPE KEYBOARD
If you find it difficult to use the keyboard in portrait orientation, simply turn the device sideways. The screen will now display the keyboard in landscape orientation, providing you with a wider keyboard layout.
CUSTOMISING YOUR KEYBOARD SETTINGS
- From the Home screen, swipe the small upward-facing arrow in an upward motion. Select Settings, then Languages & Input.

-
You can either:
-
Tap the Virtual keyboard to configure the keyboard settings.
- Or, tap Physical keyboard to keep the virtual keyboard on-screen. This mode will also show available keyboard shortcuts.
WI-FI®
Access to wireless access points (hotspots) is required to use Wi-Fi on your device.
TURNING ON WI-FI AND CONNECTING TO A WIRELESS NETWORK
- From the Home screen, swipe the small upward-facing arrow in an upward motion. Select Settings

- In Wireless and Networks, tap Wi-Fi and set it to On. Choose A Wi-Fi network to connect to.
- If you select an open network, the device will connect automatically. If you're attempting to connect to a secured network for the first time, you must enter the password, then tap Connect.
If you connect to a secured wireless network that you have already used, you will not be prompted to enter the password again unless you reset your mobile phone to it's default settings.
NOTE
- You will not have to re-enter the password for a secured network if you have connected to it before, unless the device has been reset to its default settings or if the Wi-Fi password has been changed.
- Obstacles blocking the Wi-Fi signal will reduce its strength.
Tip: On the Wi-Fi settings screen, tap Add network to add a new Wi-Fi network.
SMS AND MMS
OPENING MESSAGING
To open the application, do one of the following:
-Tap on the Home screen.
- From the Home screen, swipe the small upward-facing arrow ^ in an upward motion. Select
CREATING AND SENDING A TEXT MESSAGE
You can create a new text message, or open an ongoing message thread.
- Tap + to create a new text or multimedia message. If you want to open an existing message thread simply tap it.
- Enter a phone number into the Type name or number field or tap 📋 to add a phone number from the Contacts list. When you type the SmartDial will attempt to match it with the devices contacts. Either tap a suggested recipient or continue to type.
- Tap the text box to compose your message. If you press the Back button whilst composing a message, it will save as a draft on the message list. Tap the message to resume.
- When your message is ready to send, tap ▶.
NOTE
- As you view and send additional messages, a message thread is created.
CREATING AND SENDING A MULTIMEDIA MESSAGE
- On the messaging screen, tap .
- Enter a phone number into the Type name or number field or tap + to add a phone number from the Contactslist.
- Tap the text box to compose your message.
- Tap : > Add subject to add the message subject.
- Once you've entered the subject, the device will be in multimedia message mode.
- Tap and select the type of media file you want to attach to the message.
- Once you are done, tap ▶.
OPENING AND REPLYING TO A MESSAGE
- In the message list, tap a text or multimedia message thread to open it.
- Tap the text box to compose a message.
- Once finished, tap ▶.
CUSTOMISING THE MESSAGE SETTINGS
In the message list, tap : > Settings to customise your message settings. Specify the default SMS application:
- Text Message (SMS): Configure the text message settings.
- Request delivery report: Check the check box to request a delivery report for each message you send.
- Manage SIM card messages: Messages stored on the SIM card.
- Edit quick text: Edit the message template.
- SMS Service Centre: Specify the phone number of the SMS Service Centre.
- SMS storage location: Specify where to store the text message.
MULTIMEDIA MESSAGE (MMS) CONFIGURE THE MULTIMEDIA MESSAGE SETTINGS
- Group messaging: Check the box to use MMS and send a single message when there are multiple recipients.
- Request delivery report: Check the box to request a delivery report for message you send.
- Request read reports: Check the box to request a read report for each message you send.
-
Send read reports: Check the box to send a read report if this is requested by the MMS sender.
-
Auto-retrieve: Check the box to automatically retrieve messages.
- Roaming auto-retrieve: Check the box to automatically retrieve messages while roaming.
- Size Limit: Set the MMS maximum limit per conversation.
NOTIFICATIONS CONFIGURE THE NOTIFICATION SETTINGS
- Message notifications: Check the check box to display a new message notification on the status bar.
- Mute: Temporarily block the SMS or MMS.
- Sound: Set a ringtone for new messages.
- Vibrate: Check the check box to enable your device to vibrate when receiving new messages.
- Popup notification: Check the check box to display a popup for push notifications.
GENERAL CONFIGURE THE GENERAL MESSAGE SETTINGS
- Message font size: Specify the message font size.
- Delete old messages: Check the box to delete your old messages when limits are reached.
- Text message limit: Set the text message maximum limit per conversation.
- Multimedia message limit: Set the MMS maximum limit per conversation.
- Cell broadcast: Set the MMS maximum limit per conversation.
- Enable WAP PUSH: Check the box to enable you to receive service messages.
BLUETOOTH®
Your Land Rover Explore has Bluetooth. It can create a wireless connection with other Bluetooth devices, so you can share files with your friends, talk hands-free with a Bluetooth headset, or even transfer photos from your device to a PC.
If you are using Bluetooth, remember to stay within 10 meters of the Bluetooth device you want to connect to. Be aware that obstacles like walls or other electronic equipment may interfere with the Bluetooth connection.
TURNING ON BLUETOOTH
- From the Home screen, swipe the small upward-facing arrow in an upward motion. Select Settings .
- In Wireless & networks, tap Bluetooth and set it to On
When Bluetooth is on, the Bluetooth icon will appear in the notification bar.
PAIRING AND CONNECTING A BLUETOOTH DEVICE
Common uses for Bluetooth are:
- Using a hands-free Bluetooth device.
- Using a mono or stereo Bluetooth headset.
- Controlling what plays through the Bluetooth headset remotely.
Before you use Bluetooth, you need to pair your device with another Bluetooth device as follows:
- Ensure that the Bluetooth function on your device is enabled.
- The Land Rover Explore will then search for Bluetooth devices in range (or touch : > Refresh).
- Tap the device you want to pair with.
- Follow the on-screen instructions to complete the connection.
NOTE
Once a partnership has been created, you will no longer have to enter a password if you connect to that Bluetooth device again.
SENDING FILES VIA BLUETOOTH
With Bluetooth, you can share pictures, videos, or music files with family and friends. To send files via Bluetooth:
- Tap the file you want to send.
- Tap < > Bluetooth, and then select a paired device.
DISCONNECTING OR UNPAIRING A BLUETOOTH DEVICE
- From the Home screen, swipe the small upward-facing arrow in an upward motion. Select Settings.
- In Wireless and Networks, tap Bluetooth.
- On the connected device option, tap 🙏 and then tap Forget to confirm the disconnection.

TAKING PHOTOS AND RECORDING VIDEOS
You can use your Land Rover Explore to shoot and share pictures and videos. Some the great features include shooting in RAW, giving you absolute control of your photos in post-production, and capture video at 4K. The camera has Face Detection capabilities, as well as Auto Scene Selection options, helping capture great photos of your friends out and about with you.
OPENING YOUR CAMERA
It's quick and easy to open the camera using one of the following methods:
-Tap on the Home screen.
- From the Home screen, swipe the small upward-facing arrow in an upward motion. Select Camera .
- Quick press the power key twice, even from a locked screen, to launch the Camera app.
CLOSING YOUR CAMERA
- Press the Back or Home button to close the camera.
TAKING A PHOTO
- From the Home screen, swipe the small upward-facing arrow in an upward motion. Select Camera . By default, it opens in Camera mode.
- Compose your photo within the photo capture screen before capturing the image. Select the round shutter icon ⚙, along the bottom of the screen (along the side if held in landscape), to take a photo.
Tip:
- You can also control the camera underwater, or when using gloves by using the either the Volume Up/Down buttons when the Camera app is open.
- Capture up to 99 shots in sequence. Simply hold down the shutter icon 📋 to capture multiple shots at once. The counter along the bottom will count the shots as they are being captured.
NOTE
- Tap the screen to focus on a specific area.
- Pinch with two fingers to zoom in/out of the subject.
- T ap ⚙ to change the camera settings such as select a scene mode, set a self-timer, adjust the white balance, adjust the image properties, adjust the anti-flicker or set the ISO speed.
PRESET SCENE MODES
- You can select individual Scene Modes which are preset to take the best shot in a variety of conditions. Tap and then Scene Mode, tap the one you wish to use:

NightTheatreCandlelight
SunsetBeachLandscape
PartySnow
PortraitFireworks
SportsNightPortrait
- Access Panoramic mode, for those wide open landscape shots. Select this from the A icon in the top left hand corner.
- Tap HDR from the main camera screen to enable High Dynamic Range. This is ideal for scenes with extreme light contrast like a bright window in a dark room.
MANUAL SETTINGS
- You can manually select ISO from 100 to 1600, or leave it in Auto mode, giving great control over light levels. Access this by tapping ⚙ and then ⚙roll to the bottom and select ISO. A lower number (i.e. 100) will allow for more light to be captured. A higher number (i.e. 1600) allows for less light to be captured.
- You can manually change the exposure compensation from -3 to +3 and tweak the white balance from seven different settings. Access this by tapping and then Exposure. 0 will do nothing. -1 and -2 will remove light from scenes that are too bright. +1 and +2 will add light to the scene.
- White balance can help balance the colours in a scene lit by artificial lighting. Access this by tapping ⚙ and then White Balance.
VIEWING PHOTOS
To view your photos, tap the round thumbnail of the latest captured photo in the bottom right corner.
NOTE
- To go back to Camera view, press the Back button ◀ or swipe to the right until the capture screen appears a gain.
EDIT AND SHARE PHOTOS
As you browse through your photos, the following options will become available:
- Tunelmage ≡ Tap and edit your photos with the wide range of options available.
- Share Tap to share your photos through various applications available on the device.
- Delete Tap to delete the photos you don't want.
- View Information ⓘ Tap to view the image information.
SHOOTING A VIDEO
- From the Home screen, swipe the small upward-facing arrow ^ in an upward motion. Select Camera 📷.
2.Simpletap and recording will start automatically.
-
Whilst you're recording, do one of the following:
-
Pinch to zoom in/out on the subject.
- Tap Ⓐ to pause the recording. When paused, the icon will appear as Ⓞ. To resume, tap it again.
- T ap ■ to stop recording.
VIEWING YOUR VIDEOS
To view a video after recording, tap the thumbnail of the latest recorded video at the bottom left of the screen.
Tap ▶ to play your video.
NOTE
-Tap 📋 to view all your photos and videos.
TAKING A PANORAMIC PHOTO
- From the Home screen, swipe the small upward-facing arrow in an upward motion. Select Camera .
- Enter the Modes menu by tapping the icon 'A' on the top left of the screen and select Panorama.
- Tap to start taking the photo.
- Choose the direction you want to capture. Then slowly move your device towards your desired direction.
- When the shooting guide reaches the end point, the shooting will end.
Tip: To cancel the shooting, simply tap X.
USING PHOTOS
The Photos application automatically searches for pictures and videos saved to your device or memory card. Select the album/folder and play as a slideshow, or select items to share with other applications.
OPENING PHOTOS
From the Home screen, swipe the small upward-facing arrow in an upward motion. Select to open the application. The Google Photos application categorises pictures and videos by storage location and categorises these files in folders. Tap a folder to view your pictures or videos inside.
VIEWING A PHOTO
- In Photos, tap a folder to view the photos inside.
- Tap the picture to view it in full-screen mode. When you view a picture in full-screen mode, flick the picture left or right to view the previous or next picture.
- To zoom in on the image, pinch two fingers apart from each other at the location of the screen where you want to zoom in. In zoom mode, swipe your finger up or down and left or right.
Tip: The picture viewer supports the automatic rotation function. When you rotate the device, the picture will adjust itself to the rotation.
CROPPING A PICTURE IN PHOTOS
- When viewing the picture you want to crop, tap tune .
- Then tap Crop/Rotate and use the cropping tool to select the portion of the picture to crop.
- Drag the image around, from the inside of the cropping box, to move it.
- Drag an edge or a corner of the cropping box to resize the image.
- Tap Done and then Save to save your cropped picture.
- Tap Reset to discard your changes and start over or tap Back to Discard.
ENJOYING MUSIC
Music files can be transferred from a PC onto your Land Rover Explore so you can listen to music wherever you are.
- Connect your device to a computer using the USB power cable supplied.
- On the PC, navigate to the USB drive and open it.
- Create a folder in the root directory of your device, (for example, Music).
- Copy your music from the PC to the new folder.
- To safely remove your device from the PC, wait until the music has finished copying, then eject the drive as required by your PC's operating system.
NOTE:
- You may get water in the headphone jack which can cause the inner contacts to behave as if headphones are c onnected when they are not. If this happens, simply flick the water out, leave it to dry out for 20 minutes. If you dropped it in salt water, rinse off with clean water first before setting aside to dry.
LISTENING TO FM RADIO
You can listen to FM radio stations in the FM Radio application.
TUNING THE FM RADIO
- From the Home screen, swipe the small upward-facing arrow in an upward motion. Select FM Radio Plug in the earphones to the audio jack.

Choose from the following options:
- To select a radio station, tap and wait for the scan to complete. Tap the one you wish to listen to.
- To manually tune into a frequency, tap the side arrows. < >
- To add the current radio station to your Favourites list, tap ☆.
- To mute the FM radio, tap ■. Then to resume.
- To play out of the speaker, tap, then Speaker.
- To turn off the radio, simply disconnect your headset.
To start recording the radio:
-Tap, then Start Recording.
- To stop recording the radio, tap Stop Recording. Discard or Save the file.
SYNCHRONISING INFORMATION
Some applications (for example, Gmail™ webmail service) on your Land Rover Explore provide access to the same information that you can add, view, and edit on a PC. If you add, change, or delete information in any of these applications on the PC, the updated information will also appear on your device. This is made possible through over-the-air data synchronisation; however the process will not interfere with the device. When your device is synchronising, a data synchronisation icon will be shown in the notification bar ↩.
MANAGING ACCOUNTS
Contacts, email, and other information on your device can be synchronised with multiple Google accounts or other accounts, depending on the applications you have installed. For example, adding a personal Google account can ensure that your personal email, contacts, and calendar entries are always available. You can also add a work account so that your work-related emails, contacts and calendar entries are kept separate.
ADDING AN ACCOUNT
- From the Home screen, swipe the small upward-facing arrow ^ in an upward motion. Select Settings
- Scroll down to Accounts > Add account. The screen will display the synchronisation settings and a list of your current accounts.
- Tap Add Account to add a new account.
- Follow the on-screen instructions to enter information about your account. Most accounts require a username and password, but the details depend on the kind of account and the configuration of the service it is connecting to.
- When you are finished, your account will be added to the list in the Accounts settings screen.
NOTE
- In some cases, account details may need to be obtained from your network administrator support. For example, you may need to know the account's domain or server address.
REMOVING AN ACCOUNT
An account can be removed and all information associated with it removed from your device, including email, contacts, settings, and so on. Some accounts however, cannot be removed, such as the first account you signed into on your device. If you attempt to remove certain accounts, be aware that all the personal information associated with it will be deleted.
- On the Accounts settings screen, tap the account type.
- Tap the account you want to delete.
- Tap : > Remove account.
- Tap Remove account to confirm.
CUSTOMISING ACCOUNT SYNCHRONISATION
Background data use and synchronisation options can be configured for all the applications on your device. You can also configure the kind of data synchronised for each account. Some applications, such as Contacts and Gmail, can synchronise data from multiple applications. Synchronising is two-directional for some accounts and changes made to the information on your device are made to the copy of that information on the web. Some accounts support only one-way synchronisation and the information on your device is read-only.
CHANGING AN ACCOUNT'S SYNCHRONISATION SETTINGS
- On the Accounts settings screen, tap the account type.
- Tap an account to change its synchronisation settings. The data and synchronisation screen will open, displaying a list of information that the account can synchronise.
- To enable certain items to sync, slide the respective data switch to the right. To disable the data from syncing automatically, slide the respective data switch to the left.
USING OTHER APPLICATIONS
USING THE DASHBOARD APP

Dashboard, a unique app to the Explore phone, brings together data from sensors along with data from the worlds weather providers. Combined, the data helps you plan your adventure and plan the kit you may need, as well as keep an eye on the weather and track the stats as your journey progresses.
- The Dashboard widget can stay on top of any application you're running, so you can access the data without needing to change apps.
- You can create individual dashboards for each of your activities. Tap the 'insert pic of the profile' icon to see the Dashboards you have created and select the one you want.
- Create a new Dashboard by tapping the 'create new profile' option. Then either chose an activity, or choose 'from scratch' to start from a blank sheet.
- Add a new widget to any of your Dashboards but pressing the + icon and selecting from the "tools" list or the 'weather list'. Widgets that require location info can be set to 'current' location, or a fixed location and you can have more than one of any widget.
An overview of the widgets available:
- SOS flashlight widget turns the flash into a Morse code signal. Just point the back of your phone in the direction of where you want the signal to go.
- Share location allows you to send your latitude/longitude, in the form of a mapping link, to any of your contacts. The emergency version allows you to pre-store a mobile phone number, and with one touch send that person your location.
- Barometric Altitude offers a more reliable altitude calculation than GPS, however, to ensure accuracy you should recalibrate on a regular basis. To do this, press the widget, tap the pencil icon to edit.
- The compass widget gives you quick access to your bearing to make sure you are on track.
- Forecast gives you a three day forecast from any location. You can select your 'current' location or another fixed location.
USING VIEWRANGER
To find a new route or trail to follow:
- Press the two signs icon ⏻ on the top left of the nav bar. You'll be offered a list of routes and you can view more info on each of the routes by pressing on them.
- Pick the one you want and select 'download route'. If you want to filter the choices you can use the 'insert activities icon' button to select by activities and the icons to the right to select difficulty and length.
- When you're ready, press 'start route' to begin your journey.
USING THE CALENDAR
Use Calendar to create and manage events, meetings, and appointments. Depending on the synchronisation settings, the calendar on the device remains synchronised with the calendar on the web.
OPENING THE CALENDAR
- From the Home screen, swipe the small upward-facing arrow ^ in an upward motion. Select Calendar 31. Tap ☐ display the various view and settings options.
CREATING AN EVENT
- On any calendar view, tap + , to start adding an event.
- Enter the event title, location, time, dates and add the contacts you wish to invite.
-
If it is a day-long event, slide the All-day switch to the right.
-
Custom set the event colour to be more visible in your calendar, and add any notes or attachments.
- After you have entered all the information for your event, tap Save.
SETTING AN EVENT REMINDER
- On app calendar view, tap an event to view its details.
- Tap to start editing the event.
- Tap the reminder section to set a reminder for your event.
- Tap Save to save your modifications.
NOTE
- Tap No Notification to delete the reminder for your event.
OPENING AND USING THE ALARM
You can set a new alarm or modify an existing alarm.
- From the Home screen, swipe the small upward-facing arrow ^ in an upward motion. Select the Clock.
- Tap the top left tab, labelled Alarm. On the alarm list screen tap to add an alarm.
-
To set your alarm, do the following:
-
Set the hour and minutes by navigating around the dial and tap OK.
- To set repeat mode, check the Repeat check box. Tap one or more weekdays.
- To set a ringtone, tap 🔒 and select an option.
- If you want your device to vibrate when the alarm sounds, tap the Vibrate check box.
- To add an alarm label, tap Label. Enter the label, then tap OK.
NOTE
- By default, the alarm is automatically activated. You can deactivate an alarm without erasing it by tapping the slider on the right of the listed alarm.
OPENING AND USING THE CALCULATOR
Your Land Rover Explore is equipped with a calculator that has both a standard and advanced mode.
- From the Home screen, swipe the small upward-facing arrow ^ in an upward motion. Select the Calculator
- Turn the device into landscape mode to access the advanced calculator mode. Ensure the Auto-rotate is enabled (see Setting The Display).
SETTING THE DATE AND TIME
When you first turn on your device, there is an option to update the date and time automatically, by using the time provided by your network.
To manually adjust the date and time settings, do the following:
- On the Settings screen, tap Date & Time.
- Set the Automatic date & time setting to Off.
- Tap the Automatic time zone switch to off, it will turn grey
- Tap Set date. Then type the date and tap OK when the configuration is complete.
- Tap Set time. On the set time screen, tap the hour or minute field and navigate around the dial to set the time. Tap OK when the configuration is complete.
-
Tap Select time zone, and then select your time zone from the list.
-
Enable or disable the Use 24-hour format function to switch between 24-hour format and 12-hour format.
NOTE
- You cannot set the date, time, and time zone manually if you are using the automatic option.
PERSONALISING THE DISPLAY
- On the Settings screen, tap Display and Brightness level.
- Drag the slider left to make the screen darker, or right to make it brighter.
- When you lift your finger off the slider, your settings will be saved automatically.
ADAPTIVE BRIGHTNESS
To automatically fit your screen's brightness to the light around you, use Adaptive brightness. Tap ⚙ (Settings) then Display. Slide the Adaptive brightness switch to the right. You can still adjust your brightness level while Adaptive brightness is on.
AUTO-ROTATE SCREEN
You can enable/disable your display from automatically rotating when you turn your device between landscape and portrait. Swipe down from the top of the screen to pull open the Notification Menu. Swipe down again to expand it further. Third row down and in the middle, tap the Auto-rotate icon.

Auto rotation is enabled

Locked to Portrait
If your device is idle for a period, the screen will turn off to save battery power. You can set a longer or shorter idle time by doing the following:
- Tap ⚙ (Settings) from the top of the Notifications Menu, tap Display, then Sleep.
- Select the duration you want your screen to be illuminated for before it turns off.
RINGTONES
SETTING DEVICE RINGTONE OR TURNING ON SILENT MODE
- Press and hold the Power key. In the pop up menu, tap one of the following options:
Notifications sound is on.
Notifications sound is off (Silent Mode).
Set to vibrate only.
ADJUSTING THE RINGTONE VOLUME
You can adjust the ringtone volume from the Home screen or from any application (except during a call, when you are playing music or watching videos). Press the Volume up/down keys, on the left side of the phone, to adjust the ringtone volume to your desired level. The ringtone volume can also be adjusted on the Settings screen.
- Tap ⚙ (Settings) from the top of the Notifications Menu, tap Sound.
- In Ring volume, drag the slider left to make the volume quieter and right to make it louder.
CHANGING THE RINGTONE
- Tap (Settings) from the top of the Notifications Menu, tap Sound.
- Tap Phone ringtone.
- Choose whether to import this file from either your File Commander app or from the default Media Storage.
- Select your desired ringtone. A preview of the ringtone will play when you select it.
5.TapOK.
SETTING THE DEVICE TO VIBRATE FOR INCOMING CALLS
- Press and hold the Power key. In the pop up menu, tap to set to vibrate only.
- Alternately, tap ⚙ (Settings) from the top of the Notifications Menu, tap Sound. Slide the Also vibrate for calls switch to the right ⚙.
NOTE
- This can also be enabled by the Volume down key. Press it until the volume is at its lowest.
SETTING PHONE SERVICES
TURNING ON/OFF DATA ROAMING
- Tap ⚙ (Settings) from the top of the Notifications Menu, tap More, then Cellular Networks.
- Slide the Data roaming switch to the right ☐. Tap again to turn it off.
NOTE
- Remember that accessing data services while roaming may incur considerable additional charges. Check with your network service provider about data roaming fees.
DISABLE OR RESTRICT DATA SERVICE
- To save on the amount of data your apps and phone consume, tap (Settings) from the top of the Notifications Menu.
- Tap Data Usage and then Data Saver.
- Slide the switch to On .
You can also set a data usage warning when your apps and phone reach a defined limit.
- To set the data warning limit your apps and phone consume, tap ⚙ (Settings) from the top of the Notifications Menu.
- Tap Data Usage and then the Usage heading (in green).
- Set the limit and tap OK.
PROTECTING YOUR DEVICE
PROTECTING YOUR DEVICE WITH A SCREEN LOCK
To keep the data on your Land Rover Explore more secure you can use a screen lock method.
- Tap ⚙ (Settings) from the top of the Notifications Menu, tap Security > Screen Lock.
-
Select one of the available screen lock methods to unlock your device:
-
Swipe: Swipe the lock icon to unlock the screen.
- Pattern: Trace the correct unlock pattern to unlock the screen.
- PIN: Enter a PIN number to unlock the screen.
-
Password: Enter a password to unlock the screen.
-
Follow the on-screen instructions to complete your chosen screen lock method.
MANAGING APPLICATIONS
VIEWING AN INSTALLED APPLICATION (APP)
- On the Settings screen, tap Apps.
- In the applications list, you can do any of the following:
- Tap to configure apps settings.
-Tap > Show system to display system apps.
-Tap : > Reset app preferences > Reset apps to reset apps preferences to their default settings.
- Tap an application to view its details directly.
REMOVING AN INSTALLED APPLICATION
- Tap (Settings) from the top of the Notification Menu, tap Apps.
- Tap an application and then tap Uninstall > OK to remove the application from your device.
NOTE
- Some applications cannot be uninstalled.
RESETTING THE DEVICE
BACKING UP PERSONAL SETTINGS
Your personal settings can be backed up to Google servers with a Google account. If you replace your device, the backed-up settings will be transferred onto a new device the first time it is signed into from a Google account.
- Tap ⚙ (Settings) from the top of the Notifications Menu, tap Backup & Reset.
- Tap Back up my data. Then tap the Back up my data switch to the right
RESTORING FACTORY DATA
If you restore the factory data, your device will reset to the settings that were configured at the factory. All of your
personal data from the internal device storage, including account information, the system and application settings, and any downloaded applications will be erased. Resetting your device does not erase any system software updates that have been downloaded or any files on a microSD card, such as music or photos.
- Tap ⚙ (Settings) from the top of the Notifications Menu, tap Backup & Reset > Factory data reset.
- When prompted, tap Reset phone, and then tap Erase Everything. Your device will reset its settings to the original factory settings, and then restart.
HARDWARE RESET
This device has an internal battery and therefore you cannot reset the hardware by simply removing the battery. If you need to reset the hardware, please follow the steps listed below. Please note that you may have to reset the hardware if your device isn't charging when it's plugged into a wall socket.
- Press and hold the Volume up and Power keys until your device powers down. After your device is reset, it will restart automatically.
VIEWING THE REGULATORY E-LABEL
To view the regulatory information on this device, do the following:
- From the Home screen, swipe the small upward-facing arrow ^ in an upward motion. Select Settings
- On the Settings screen, tap About Phone > Regulatory Labels.
- The most recent e-label will be displayed on screen.
APPENDIX
WARNINGS AND PRECAUTIONS
This section contains important information pertaining to the operating instructions of your device. It also contains information about how to use the device safely. Read this information carefully before using your device.
INGRESS PROTECTION - WATERPROOF
You may get water in the headphone jack which can cause the inner contacts to behave as if headphones are connected when they are not. If this happens, simply flick the water out, leave it to dry out for 20 minutes. If you dropped it in salt water, rinse off with clean water first before setting aside to dry.
ELECTRONIC DEVICE
Power off your device if using the device is prohibited. Do not use the device when using the device causes danger or interference with electronic devices.
MEDICAL DEVICE
Follow rules and regulations set forth by hospitals and health care facilities. Do not use your device when using the device is prohibited.
Pacemaker manufacturers recommend that a minimum distance of 15 cm be maintained between a device and a pacemaker to prevent potential interference with the pacemaker. If you are using a pacemaker, use the device on the opposite side of the pacemaker and do not carry the device in your front pocket.
POTENTIALLY EXPLOSIVE ATMOSPHERE
Power off your device in any area with a potentially explosive atmosphere, and comply with all signs and instructions. Areas that may have potentially explosive atmospheres include the areas where you would normally be advised to turn off your vehicle engine. Triggering of sparks in such areas could cause an explosion or a fire, resulting in bodily injuries or even deaths. Do not power on your device at refuelling points such as service stations. Comply with restrictions on the use of radio equipment in fuel depots, storage, and distribution areas, and chemical plants. In addition, adhere to restrictions in areas where blasting operations are in progress. Before using the device, watch out for areas that have potentially explosive atmospheres that are often, but not always, clearly marked. Such locations include areas below the deck on boats, chemical transfer or storage facilities, and areas where the air contains chemicals or particles such as grain, dust, or metal powders. Ask the manufacturers of vehicles using liquefied petroleum gas (such as propane or butane) whether this device can be safely used in their vicinity.
TRAFFIC SECURITY
- Observe local laws and regulations while using the device. In addition, if using the device while driving a vehicle, comply with the following guidelines.
- Concentrate on driving. Your first responsibility is to drive safely.
- Do not talk on the device while driving. Use hands-free accessories.
- When you have to make or answer a call, park the vehicle at the road side before using your device.
- RF signals may affect electronic systems of motor vehicles. For more information, consult the vehicle manufacturer.
- In a motor vehicle, do not place the device over the air bag or in the air bag deployment area. Otherwise, the device may hurt you owing to the strong force when the air bag inflates.
- Do not use your device while flying in an aircraft. Power off your device before boarding an aircraft.
- Using wireless devices in an aircraft may cause danger to the operation of the aircraft and disrupt the wireless telephone network. It may also be considered illegal.
OPERATING ENVIRONMENT
- Do not use or charge the device in dusty, damp, and dirty places or places with magnetic fields. Otherwise, it may result in a malfunction of the circuit.
- The device complies with the RF specifications when the device is used near your ear or at a distance of 0.5 cm from your body. Ensure that the device accessories such as a device case and a device holster are not composed of metal components. Keep your device 0.5 cm away from your body to meet the requirement earlier mentioned.
- On a stormy day with thunder, do not use your device when it is being charged, to prevent any danger caused by lightning.
- When you are on a call, do not touch the antenna. Touching the antenna affects the call quality and results in increase in power consumption. As a result, the talk time and the standby time are reduced.
- While using the device, observe the local laws and regulations, and respect others' privacy and legal rights.
- Keep the ambient temperature between 0^ C and 40^ C while the device is being charged. Keep the ambient temperature between -25^ C to 50^ C for using the device powered by a battery.
PREVENTION OF HEARING DAMAGE
Using a headset at high volume can damage your hearing. To reduce the risk of damage to hearing, lower the headset volume to a safe and comfortable level.
SAFETY OF CHILDREN
Comply with all precautions with regard to children's safety. Letting a child play with your device or its accessories, which may include parts that can be detached from the device, may be dangerous, as it may present a choking hazard. Ensure that small children are kept away from the device and accessories.
ACCESSORIES
Choose only batteries, chargers, and accessories approved for use with this model by the device manufacturer. The use of any other type of charger or accessory may invalidate any warranty for the device, may be in violation of local rules or laws, and may be dangerous. Please contact your dealer for information about the availability of approved batteries, chargers, and accessories in your area.
BATTERY AND CHARGER
- Unplug the charger from the electrical plug and the device when not in use.
- Adapter shall be installed near the equipment and shall be easily accessible.
- The plug considered as disconnect device of adapter.
- The battery can be charged and discharged hundreds of times before it eventually wears out.
- Use the AC power supply defined in the specifications of the charger. An improper power voltage may cause a fire or a malfunction of the charger.
- If battery electrolyte leaks out, ensure that the electrolyte does not touch your skin and eyes. When the electrolyte touches your skin or splashes into your eyes, wash your eyes with clean water immediately and consult a doctor.
- If there is a case of battery deformation, colour change, or abnormal heating while you charge, to stop using the device immediately. Otherwise, it may lead to battery leakage, overheating, explosion, or fire.
- If the power cable is damaged (for example, the cord is exposed or broken), or the plug loosens, stop using the cable at once. Otherwise, it may lead to an electric shock, a short circuit of the charger, or a fire.
- Do not dispose of device in fire as they may explode. Batteries may also explode if damaged.
- Do not modify or re-manufacture, attempt to insert foreign objects into the device, immerse or expose to water or other liquids, expose to fire, explosion or other hazard.
- Avoid dropping the device. If the device is dropped, especially on a hard surface, and the user suspects damage, take it to a qualified service centre for inspection.
- Improper use may result in a fire, explosion or other hazard.
- Promptly dispose of used devices in accordance with local regulations.
- The device should only be connected to products that bear the USB-IF logo or have completed the USB-IF compliance program.
- Output rating of charger DC 5V 2A.
CAUTION – RISK OF EXPLOSION IF BATTERY IS REPLACED BY AN INCORRECT TYPE. DISPOSE OF USED BATTERIES ACCORDING TO THE INSTRUCTIONS.
CLEANING AND MAINTENANCE
- The charger is not water-resistant. Keep it dry. Protect the charger from water or vapour. Do not touch the charger with wet hands, otherwise it may lead to a short circuit, a malfunction of the device and an electric shock to the user.
- Do not place your device and charger in places where they can get damaged because of collision. Otherwise, it may lead to battery leakage, device malfunction, overheating, fire, or explosion.
- Do not place magnetic storage media such as magnetic cards and floppy disks near the device. Radiation from the device may erase the information stored on them.
- Do not leave your device and charger in a place with an extreme high or low temperature. Otherwise, they may not function properly and may lead to a fire or an explosion. When the temperature is lower than 0^ C, performance of the battery is affected.
- Do not place sharp metal objects such as pins near the earpiece. The earpiece may attract these objects and hurt you when you are using the device.
- Before you clean or maintain the device, power off the device and disconnect it from the charger.
- Do not use any chemical detergent, powder, or other chemical agents (such as alcohol and benzene) to clean the device and the charger. Otherwise, parts of the device may be damaged or a fire can be caused. You can clean the device with soft antistatic cloth.
- Do not dismantle the device or accessories. Otherwise, the warranty on the device and accessories is invalid and the manufacturer is not liable to pay for the damage.
- If the device screen is broken by colliding with hard objects, do not touch or try to remove the broken part. In this case, stop using the device immediately, and then contact an authorized service centre.
PREVENTION OF HEARING LOSS

To prevent possible hearing damage, do not listen at high volume levels for long periods.
CE SAR COMPLIANCE
This device meets the EU requirements on the limitation of exposure of the general public to electromagnetic fields by way of health protection.
The limits are part of extensive recommendations for the protection of the general public. These recommendations have been developed and checked by independent scientific organizations through regular and thorough evaluations of scientific studies. The unit of measurement for the European Council's recommended limit for mobile devices is the "Specific Absorption Rate" (SAR), and the SAR limit is 2.0 W/kg averaged over 10 grams of tissue. It meets the requirements of the International Commission on Non-Ionizing Radiation Protection (ICNICP).
For body worn operation, this device has been tested and meets the ICNIRP exposure guidelines and the European Standard EN 62311 and EN 62209-2, for use with dedicated accessories. Use of other accessories which contain metals may not ensure compliance with ICNIRP exposure guidelines.
SAR is measured with the device at a separation of 0.5 cm to the body, while transmitting at the highest certified output power level in all frequency bands of the mobile device. The distance of 0.5cm which shall be kept between body and device.
The highest reported SAR values under the CE regulatory for the phone are list below:
Head SAR 0423 W/kg
Body SAR 1.476 W/kg
SPECTRUM AND POWER
| Spectrum Power | |
| GSM 900 33.00 dBm | |
| GSM 1800 30.00 dBm | |
| WCDMA B1 23.00 dBm | |
| WCDMA B5 23.50 dBm | |
| WCDMA B8 23.50 dBm | |
| LTE B1 23.50 dBm | |
| LTE B3 23.00 dBm | |
| LTE B7 24.00 dBm | |
| LTE B8 24.00 dBm | |
| LTE B20 24.00 dBm | |
| WIFI 2.4G 14.00 dBm | |
| WIFI 5G Band1 14.00 dBm band2 14.00 dBm | |
| Band 3 14.00dBm | |
| EDR 8.00 dBm | |
| BLE 0.5 dBm | |
| NFC | -5.39 dBu/A/m at 10m |
EU COMPLIANCE STATEMENT
This device is restricted to indoor use only when operating in the 5150 to 5350 MHz frequency range. Restrictions or Requirements in:
Belgium (BE), Bulgaria (BG), Czech Republic (CZ), Denmark (DK), Germany (DE), Estonia (EE), Ireland (IE), Greece (EL), Spain (ES), France (FR), Croatia (HR), Italy(IT), Cyprus (CY), Latvia (LV), Lithuania (LT), Luxembourg (LU), Hungary (HU), Malta (MT), Netherlands (NL), Austria (AT), Poland (PL), Portugal (PT), Romania (RO), Slovenia
(SI), Slovakia (SK), Finland (FI), Sweden (SE), United Kingdom (UK), Switzerland (CH), Norway (NO), Iceland (IS), Liechtenstein (LI) and Turkey (TR).
EU REGULATORY CONFORMANCE
Hereby, the manufacturer declares that this device is compliant with the essential requirements and other relevant provisions of Directive 2014/53/EU. For the declaration of conformity, visit the website:
www.landroverexplore.com/support
DISPOSAL AND RECYCLING INFORMATION
This symbol on the device (and any included batteries) indicates that they should not be disposed of as normal household garbage. Do not dispose of your device or batteries as unsorted municipal waste. The device (and any batteries) should be handed over to a certified collection point for recycling or proper disposal at the end of their life.
For more detailed information about the recycling of the device or batteries, contact your local city office, the household waste disposal service, or the retail store where you purchased this device. The disposal of this device is subject to the Waste from Electrical and Electronic Equipment (WEEE) directive of the European Union. The reason for separating WEEE and batteries from other waste is to minimize the potential environmental impacts on human health of any hazardous substances that may be present.
REDUCTION OF HAZARDOUS SUBSTANCES
This device is compliant with the EU Registration, Evaluation, Authorization and Restriction of Chemicals (REACH) Regulation (Regulation No 1907/2006/EC of the European Parliament and of the Council) and the EU Restriction of Hazardous Substances (RoHS) Directive (Directive 2011/65/EU of the European Parliament and of the Council).
ADVENTURE PACK
DECLARATION OF CONFORMITY
MANUFACTURER
Name Bullitt Mobile Limited
Address One Valpy, Valpy Street, Reading, Berkshire, England RG1 1AR
EQUIPMENT
Model ADV01
Description Adventure Pack
Supplied Accessories and Components Carabiner, Protective Case, USB Cable
We, Bullitt Mobile Limited, declare the product has been tested with international standards and found in conformity with the EMCD 2014/30/EU and LVD 2014/35/EU.
According to the following standards of the EMCD 2014/30/EU
1. Electromagnetic compatibility
Applied Standard(s)
- EN 55032 2015/AC2016
- EN 55035 2017
- EN 61000-3-2 2014
- EN 61000-3-3 2013
According to the following standards of the LVD 2014/35/EU
1. Safety
Applied Standard(s)
-EN60950-12006+A112009+A12010+A122011+A22013
Signed for and on behalf of Bullitt Mobile Limited
Place One Valpy, Valpy Street, Reading, Berkshire, England RG1 1AR, Date March 26, 2018
Name Wayne Huang
Function Director of ODM Management
Signature

LAND ROVER EXPLORE DECLARATION OF CONFORMITY
MANUFACTURER
Name
Bullitt Mobile Limited
Address
One Valpy, Valpy Street, Reading, Berkshire, England RG1 1AR
RADIO EQUIPMENT
Model
Explore
Description
Smartphone
Software Version
Dual SIM radio version LTE_D0105121.0_Explore
Software version
Single SIM radio version LTE_S0105121.0_Explore
Supplied Accessories and Components
USB cable, Adapter, Battery, Earphone, Module, Carabiner,
Protective Case
We, Bullitt Mobile Limited, declare under our sole responsibility that the product described above is in conformity with the relevant Union harmonization legislations.
RE Directive (2014/53/EU)
The following harmonized standards and/or other relevant standards have been applied.
1. Health and Safety (Article 3.1(a) of the RE Directive)
-EN 623112008
- EN 505662017, EN 62209-22010
- EN 50360 2017/EN 62209-1 2016
-EN 60950-12006/A112009+A12010+A122011+A22013
-EN50332-12013/EN 50332-22013
2. Electromagnetic compatibility (Article 3.1 (b) of the RE Directive)
- Draft ETSI EN 301 489-1 V2.2.0,
- Final Draft ETSI EN 301 489-3 V2.1.1
- Draft ETSI EN 301 489-17 V3.2.0
- Draft ETSI EN 301 489-19 V2.1.0
- Draft ETSI EN 301 489-52 V1.1.0
- EN 55032 2015/AC2016
- EN 55035 2017
- EN 61000-3-2 2014
- EN 61000-3-3 2013
3. Radio frequency spectrum usage (Article 3.2 of the RE Directive)
- ETSI EN 301 908-1 V11.1.1, ETSI EN 301 908-2 V11.1.2, ETSI EN 301 908-13 V11.1.2
- ETSI EN 300 328 V2.1.1
- ETSI EN 301 893 V2.1.1
- ETSI EN 301 511 V12.5.1
- ETSI EN 303 413 V1.1.1
- Final Draft ETSI EN 303 345 V1.1.7
- ETSI EN 300 330 V2.1.1
The notified body (Name CETECOM GMBH, ID 0680) performed the conformity assessment according to Annex III of the RE Directive and issued the EU-type examination certificate (Ref. No. M18-0447-01-TEC).
Signed for and on behalf of Bullitt Mobile Limited
Place One Valpy, Valpy Street, Reading, Berkshire, England RG1 1AR, Date March 19, 2018
Name Wayne Huang
Function Director of ODM Management
Signature


natural_image
Hiker in blue jacket walking past a large man's face in a snowy forest (no text or symbols visible)LAND ROVER EXPLORE: OUTDOOROVÝ TELEFON UŽIVATELSKÁ PŘÍRUČKA
landroverexplore.com
PŘEČTĚTE SI PŘED PRVNÍM POUŽITÍM
BEZPEČNOSTNÍ OPATŘENÍ
APLIKACE NA VÝCHOZÍ OBRAZOVCE A WIDGETY 14
SLOŽKY 15
TAPETY 15
POUŽITÍ REŽIMU V LETADLE 16
PROVEDENÍ TELEFONNÍHO HOVORU 16
KONTAKTY 17
POUŽÍVÁNÍ KLÁVESNICE NA OBRAZOVCE 19
WI-FI ^® 19
SMS A MMS 19
BLUETOOTH® 21
FOTOGRAFOVÁNÍ A NAHRÁVÁNÍ VIDEO 22
POSLECH HUDBY 25
SYNCHRONIZACE INFORMACÍ 25
SPRÁVA ÚČTŮ 26
ODEBRÁNÍ ÚČTU 26
PRÁCE S OSTATNÍMI APLIKACEMI 27
natural_image
Black land rover phone with open screen displaying landscape and app icons, next to a handbag labeled 'LAND ROVER' (no readable text on device body)VÍTÁ VÁS LAND ROVER EXPLORE: OUTDOOROVÝ TELEFON
text_image
Mobile status bar with icons for chat, navigation, and timer showing 11:16APLIKACE NA VÝCHOZÍ OBRAZOVCE A WIDGETY
PŘIDÁNÍ NOVÉ POLOŽKY NA VÝCHOZÍ OBRAZOVKU
NASTAVENÍ JASU DISPLEJE
Adresa One Valpy, Valpy Street, Reading, Berkshire, Anglie RG1 1AR
ZAŘÍZENÍ
Model ADV01
Adresa One Valpy, Valpy Street, Reading, Berkshire, Anglie RG1 1AR
RÁDIOVÉ ZAŘÍZENÍ
Model Explore
natural_image
Hiker in blue jacket walking past a large man's face in a snowy forest (no text or symbols visible)LAND ROVER EXPLORE: DEN UDEND∅RS TELEFON BRUGERVEJLEDNING
landroverexplore.com
LÆS VENLIGST F∅R F∅RSTE BRUG
SIKKERHEDSFORANSTALTNINGER
APPS OG WIDGETS TIL STARTSKÆRM 14
MAPPER 15
BAGGRUNDE 15
BRUG AF FLYTILSTAND 16
FORETAGELSE AF ET TELEFONOPKALD 16
KONTAKTER 17
BRUG AF SKÆRMTASTATURET 19
WI-FI ^® 19
SMS OG MMS 19
BLUETOOTH ^® 21
FOTOGRAFERING OG VIDEOOPTAGELSE 22
ADVENTURE PACK KONFORMITETSERKLÆRING 37
LAND ROVER EXPLORE KONFORMITETSERKLÆRING 38

natural_image
Black land rover phone with open screen displaying landscape and app icons, next to a handbag labeled 'LAND ROVER' (no readable text on device body)VELKOMMEN TIL LAND ROVER EXPLORE: DEN UDEND∅RS TELEFON
text_image
Mobile status bar with icons for messaging, alarm, phone, and timer showing 11:16Notifikationsikoner Statusikoner
STATUSIKONER
APPS OG WIDGETS TIL STARTSKÆRM
TILF∅JELSE AF ET NYT ELEMENT TIL STARTSKÆRMEN
AFSLUTNING AF TELEFONOPKALD
ADMINISTRATION AF KONTI
- Tryk for at konfigurere indstillinger for apps.
-Trykpå > Vis system for at få vist systemapps.
-Trykpå : > Nulstil app-præferencer > Nulstil apps for at nulstille apps-præferencer til deres standardindstillinger.
- Tryk på en app for at se dens detaljer direkte.
FJERNELSE AF EN INSTALLERET APP
POTENTIEL EKSPLOSIONSFARLIG ATMOSFÆRE
ADVENTURE PACK KONFORMITETSERKLÆRING
PRODUCENT
Navn Bullitt Mobile Limited
Adresse One Valpy, Valpy Street, Reading, Berkshire, England RG1 1AR
UDSTYR
Model ADV01
Beskrivelse Adventure Pack
Sted One Valpy, Valpy Street, Reading, Berkshire, England RG1 1AR, Dato: 26. marts 2018
Navn Wayne Huang
Funktion Director of ODM Management
Underskrift

LAND ROVER EXPLORE KONFORMITETSERKLÆRING
PRODUCENT
Navn Bullitt Mobile Limited
Adresse One Valpy, Valpy Street, Reading, Berkshire, England RG1 1AR
RADIOUDSTYR
Model
Explore
Beskrivelse
Smartphone
Softwareversion Radioversion med dobbelt simkort LTE_D0105121.0_Explore
Softwareversion Radioversion med enkelt simkort LTE_S0105121.0_Explore
Sted One Valpy, Valpy Street, Reading, Berkshire, England RG1 1AR, Dato: 19. marts 2018
Navn Wayne Huang
Funktion Director of ODM Management
Underskrift


natural_image
Hiker in blue jacket walking past a large man's face in a snowy forest (no text or symbols visible)LAND ROVER EXPLORE: DAS OUTDOOR-HANDY BEDIENUNGSANLEITUNG
landroverexplore.com
VOR DEM ERSTEN GEBRAUCH LESEN
natural_image
Black land rover phone with open screen displaying landscape and app icons, next to a handbag labeled 'LAND ROVER' (no readable text on device body)WILLKOMMEN BEI LAND ROVER EXPLORE: DAS OUTDOOR-HANDY
ELEKTRONISCHES GERÄT
Anschrift One Valpy, Valpy Street, Reading, Berkshire, England RG1 1AR
GERÄT
Modell ADV01
Anschrift One Valpy, Valpy Street, Reading, Berkshire, England RG1 1AR
FUNKANLAGEN
Modell
Explore
Beschreibung
Smartphone
Softwareversion Dual SIM radio version LTE_D0105121.0_Explore
Softwareversion
Single SIM radio version LTE_S0105121.0_Explore
natural_image
Hiker in blue jacket walking past a large man's face in a snowy forest (no text or symbols visible)LAND ROVER EXPLORE: VÄLITELEFON KASUTUSJUHEND
landroverexplore.com
PALUN LUGEGE ENNE ESMAKORDSET KASUTAMIST
OHUTUSNÕUDED
natural_image
Black land rover phone with open screen displaying landscape and app icons, next to a handbag labeled 'LAND ROVER' (no readable text on device body)TERE TULEMAST KASUTAMA LAND ROVER EXPLORE'I: VÄLITELEFONI
text_image
Mobile status bar with icons for chat, navigation, and timer showing 11:16MEEDIA EDASTAMINE SEADMESSE JA SELLEST VÄLJA
Nimi Bullitt Mobile Limited
Aadress One Valpy, Valpy Street, Reading, Berkshire, England RG1 1AR
SEADE
Mudel ADV01
Kirjeldus Adventure Pack
Nimi Bullitt Mobile Limited
Aadress One Valpy, Valpy Street, Reading, Berkshire, England RG1 1AR
RAADIOSEADE
Mudel
Explore
Kirjeldus
Nutitelefon
natural_image
Hiker in blue jacket walking past a large man's face in a snowy forest (no text or symbols visible)LAND ROVER EXPLORE: EL TELÉFONO PARA VIVIR AL AIRE LIBRE MANUAL DEL USUARIO
landroverexplore.com
LEA ESTE MANUAL ANTES DEL PRIMER USO
natural_image
Black land rover phone with open screen displaying landscape at sunset, alongside a handbag labeled 'LAND ROVER' (no visible text on device body beyond branding)BIENVENIDO AL LAND ROVER EXPLORE: EL TELÉFONO PARA VIVIR AL AIRE LIBRE
text_image
Mobile status bar with icons for messaging, navigation, and timer showing 11:16One Valpy, Valpy Street, Reading, Berkshire, Inglaterra RG1 1AR
EQUIPO DE RADIO
Modelo
Explore
Descripción
Smartphone
natural_image
Hiker in blue jacket walking past a large man's face in a snowy forest (no text or symbols visible)LAND ROVER EXPLORE : LE TÉLÉPHONE D'EXTÉRIEUR MANUEL DE L'UTILISATEUR
landroverexplore.com
MISE SOUS TENSION DU DISPOSITIF MARCHE/ARRÊT
DE VOTRE TÉLÉPHONE 11
ÉCRAN TACTILE 11
ÉCRAN 12
ACTIVER LES MODES NUIT ET GANTS 14
APPLICATION ÉCRAN D'ACCUEIL ET WIDGETS 14
DOSSIERS 15
FONDS D'ÉCRAN 15
UTILISER LE MODE AVION 16
PASSER UN APPEL TÉLÉPHONIQUE 16
CONTACTS 17
PACK AVENTURE DÉCLARATION DE CONFORMITÉ 37
LAND ROVER EXPLORE DÉCLARATION DE CONFORMITÉ 38
29
32

natural_image
Black land rover phone with open screen displaying landscape at sunset, alongside a black land rover device (no visible text or symbols on device body)BIENVENUE DANS LAND ROVER EXPLORE : LE TÉLÉPHONE D'EXTÉRIEUR
APPLICATION ÉCRAN D'ACCUEIL ET WIDGETS
AJOUTER UN NOUVEL ÉLÉMENT DANS L'ÉCRAN D'ACCUEIL
GÉRER LES APPLICATIONS
AFFICHER UNE APPLICATION INSTALLÉE
PACK AVENTURE DÉCLARATION DE CONFORMITÉ
FABRICANT DU VÉHICULE
Nom Bullitt Mobile Limited
Adresse One Valpy, Valpy Street, Reading, Berkshire, England RG1 1AR
ÉQUIPEMENT
Modèle ADV01
Description Pack aventure
Accessoires et composants fournis Mousqueton, étui de protection, câble USB
Lieu One Valpy, Valpy Street, Reading, Berkshire, England RG1 1AR, date : 26 mars 2018
Nom Wayne Huang
Adresse One Valpy, Valpy Street, Reading, Berkshire, England RG1 1AR
ÉQUIPEMENT RADIO
Modèle Explore
Description Smartphone
Version du logiciel Dual SIM radio version LTE_D0105121.0_Explore
Version du logiciel Version de radio Single SIM LTE_S0105121.0_Explore
Lieu One Valpy, Valpy Street, Reading, Berkshire, England RG1 1AR, date : 19 mars 2018
Nom Wayne Huang
natural_image
Hiker in blue jacket walking past a large man's face in a snowy forest (no text or symbols visible)LAND ROVER EXPLORE: IL TELEFONO PER ESTERNI MANUALE DELL'UTENTE
landroverexplore.com
SI PREGA DI LEGGERE PRIMA DELL'USO
PRECAUZIONI PER LA SICUREZZA
GESTIONE DEGLI ACCOUNT 26
natural_image
Black land rover phone with open screen displaying landscape at sunset, alongside a handbag labeled 'LAND ROVER' (no visible text on device body beyond branding)BENVENUTI SUL LAND ROVER EXPLORE: IL TELEFONO PER ESTERNI
SBLOCCO DELLO SCHERMO
text_image
Mobile status bar with icons for phone, navigation, and time display showing 11:16ACCENSIONE DEL BLUETOOTH
GESTIONE DEGLI ACCOUNT
AGGIUNGERE UN ACCOUNT
Corpo SAR 1,476 W/kg
SPETTRO E POTENZA
| Spettro Potenza | |
| GSM 900 33,00 dBm | |
| GSM 1800 30,00 dBm | |
| WCDMA B1 23,00 dBm | |
| WCDMA B5 23,50 dBm | |
| WCDMA B8 23,50 dBm | |
| LTE B1 23,50 dBm | |
| LTE B3 23,00 dBm | |
| LTE B7 24,00 dBm | |
| LTE B8 24,00 dBm | |
| LTE B20 24,00 dBm | |
| WIFI 2.4G 14,00 dBm | |
| WI-FI 5G Band1 14,00 dBm band2 14,00 dBm | |
| Band 3 14,00dBm | |
| EDR 8,00 dBm | |
| BLE 0,5 dBm | |
| NFC | -5,39 dBu/A/m a 10 m |
CONFORMITÀ NORMATIVA UE
Indirizzo One Valpy, Valpy Street, Reading, Berkshire, Inghilterra RG1 1AR
DOTAZIONE
Modello ADV01
Indirizzo One Valpy, Valpy Street, Reading, Berkshire, Inghilterra RG1 1AR
natural_image
Hiker in blue jacket walking past a large man's face in a snowy forest (no text or symbols visible)LAND ROVER EXPLORE: ĀRA AKTIVITĀŠU TĀLRUNIS. LIETOTĀJA ROKASGRĀMATA
landroverexplore.com
LÜDZU, IZLASIET, PIRMS SÄKAT LIETOT IERİCI
PIESARDZĪBAS PASĀKUMI
natural_image
Black land rover phone with open screen displaying landscape at sunset, alongside a black land rover device (no visible text or symbols on device body)IEPAZĪSTIETIES LAND ROVER EXPLORE: ĀRA AKTIVITĀŠU TĀLRUNIS.
text_image
Mobile status bar with icons for chat, navigation, and battery timePaziņojumu ikonas Statusa ikonas
STATUSAIKONAS
Adrese One Valpy, Valpy Street, Reading, Berkshire, England RG1 1AR
IEKÄRTA
Modelis ADV01
Bullitt Mobile Limited
Adrese
One Valpy, Valpy Street, Reading, Berkshire, England RG1 1AR
RADIOIEKÄRTA
Modelis
Explore
Apraksts
Viedtālrunis
natural_image
Hiker in blue jacket walking past a large man's face in a snowy forest (no text or symbols visible)„LAND ROVER EXPLORE”: LAUKE NAUDOTI SKIRTAS TELEFONAS NAUDOTOJO VADOVAS
landroverexplore.com
PERSKAITYKITE PRIEŠ NAUDODAMI PIRMA KARTA
SAUGOS IR ATSARGUMO PRIEMONĖS
natural_image
Black land rover phone with open screen displaying landscape and app icons, next to a handbag labeled 'LAND ROVER' (no readable text on device body)SVEIKI! ČIA „LAND ROVER EXPLORE”: LAUKE NAUDOTI SKIRTAS TELEFONAS
ATMINTIES KORTELĖS ĮDĖJIMAS
text_image
Mobile status bar with icons for phone, refresh, and time control, showing time 11:16NUOTRAUKU ATIDARYMAS
ELEKTRONINIS JRENGINYS
natural_image
Hiker in blue jacket walking past a large man's face in a snowy forest (no text or symbols visible)LAND ROVER EXPLORE: OUTDOOR PHONE GEBRUIKERSHANDLEIDING
landroverexplore.com
DOORLEZEN VOOR EERSTE GEBRUIK
VOORZORGSMAATREGELEN
APPLICATIES BEHEREN 31
APPARAAT RESETTEN 31
natural_image
Black land rover phone with open screen displaying landscape and app icons, next to a handbag labeled 'LAND ROVER' (no readable text on device body)WELKOM BIJ LAND ROVER EXPLORE: OUTDOOR PHONE
TOETS VOLUME OMHOOG/OMLAAG
text_image
Mobile status bar with icons for chat, navigation, and timeMeldingiconen Statusiconen
STATUSICONEN
HANDSCHOENMODUS INSCHAKELEN
STARTSCHERMAPPS EN -WIDGETS
NIEUW STARTSCHERMONDERDEEL TOEVOEGEN
ACCOUNTSYNCHRONISATIE PERSONALISEREN
ELEKTRONISCH APPARAAT
Lichaam SAR 1,476 W/kg
SPECTRUM EN STROOM
| Spectrum Stroom | |
| GSM 900 33.00 dBm | |
| GSM 1800 30.00 dBm | |
| WCDMA B1 23.00 dBm | |
| WCDMA B5 23.50 dBm | |
| WCDMA B8 23.50 dBm | |
| LTE B1 23.50 dBm | |
| LTE B3 23.00 dBm | |
| LTE B7 24.00 dBm | |
| LTE B8 24.00 dBm | |
| LTE B20 24.00 dBm | |
| WIFI 2.4G 14.00 dBm | |
| WIFI 5G Band1 14.00 dBm Band2 14.00 dBm | |
| Banden 3 14.00 dBm | |
| EDR 8.00 dBm | |
| BLE 0.5 dBm | |
| NFC -5.39 dBu/A/m op 10m |
EU-CONFORMITEITSVERKLARING
AFVOER- EN RECYCLINGINFORMATIE
Naam Bullitt Mobile Limited
Adres One Valpy, Valpy Street, Reading, Berkshire, RG1 1AR, Verenigd Koninkrijk
APPARATUUR
Model ADV01
Bullitt Mobile Limited
Adres
One Valpy, Valpy Street, Reading, Berkshire, RG1 1AR,
Verenigd Koninkrijk
RADIOAPPARATUUR
Model
Explore
Beschrijving
Smartphone
Softwareversie
Dubbele simradio versie LTE_D0105121.0_Explore
Softwareversie
Enkelvoudige simradio versie LTE_S0105121.0_Explore
Meegeleverde accessoires en componenten
natural_image
Hiker in blue jacket walking past a large man's face in a snowy forest (no text or symbols visible)LAND ROVER EXPLORE: UTEND∅RSTELEFONEN BRUKERHÅNDBOK
landroverexplore.com
LES F∅R F∅RSTEGANGSBRUK
FORHOLDSREGLER
ADMINISTRERE KONTOER 26
FJERNE EN KONTO 26
BRUKE ANDRE APPLIKASJONER 27
TILPASSE SKJERMEN 29
RINGETONER 29
ANGI TELEFONTJENESTER 30
BESKYTTE ENHETEN 31
ADMINISTRERE APPLIKASJONER 31
TILBAKESTILLE ENHETEN 31
VISE E-ETIKETTEN FOR FORSKRIFTER 32
TILLEGG
EKSTREMPAKKE SAMSVARSERKLÆRING 37
LAND ROVER EXPLORE SAMSVARSERKLÆRING 38
32
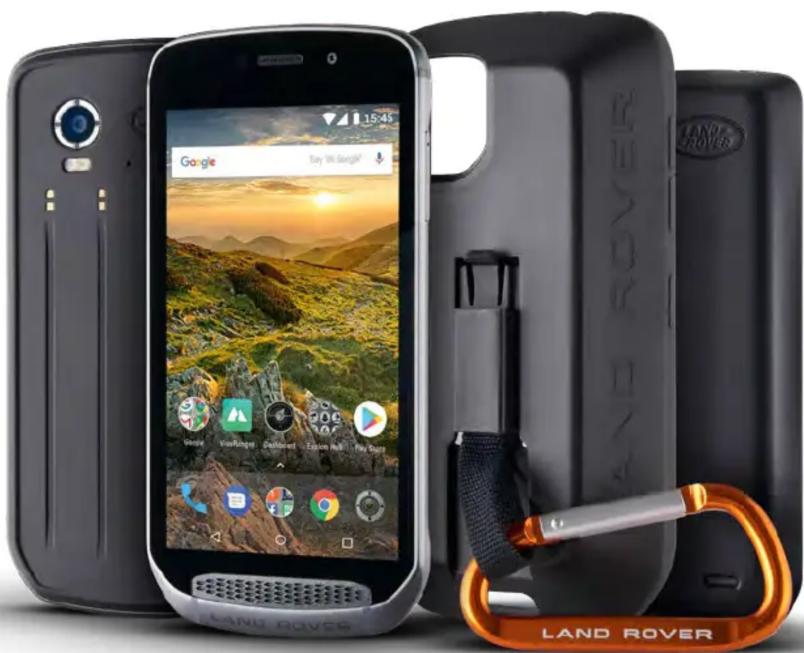
natural_image
Black land rover phone with open screen displaying landscape and app icons, next to a handbag labeled 'LAND ROVER' (no readable text on device body)VELKOMMEN TIL LAND ROVER EXPLORE: UTEND∅RSTELEFONEN
INSTALLERE ET MINNEKORT
SLIK IMPORTERER DU KONTAKTER FRA DET INTERNE MINNET ELLER ET MINNEKORT
FORHÅNDSINNSTILTE SCENEMODUSER
ADMINISTRERE KONTOER
BRUKE ANDRE APPLIKASJONER
BRUKE DASHBOARD-APPEN

ANGI EN PÅMINNELSE FOR EN HENDELSE
ADMINISTRERE APPLIKASJONER
VISE EN INSTALLERT APPLIKASJON (APP)
Adresse One Valpy, Valpy Street, Reading, Berkshire, England RG1 1AR
UTSTYR
Modell ADV01
Sted One Valpy, Valpy Street, Reading, Berkshire, England RG1 1AR. Dato: 26. mars 2018
Navn Wayne Huang
Stilling Director of ODM Management
Signatur

LAND ROVER EXPLORE SAMSVARSERKLÆRING
PRODUSENT
Navn Bullitt Mobile Limited
Adresse One Valpy, Valpy Street, Reading, Berkshire, England RG1 1AR
RADIO-UTSTYR
Modell Explore
BeskrivelseSmarttelefon
Sted One Valpy, Valpy Street, Reading, Berkshire, England RG1 1AR. Dato: 19. mars 2018
Navn Wayne Huang
Stilling Director of ODM Management
Signatur


natural_image
Hiker in blue jacket walking past a large man's face in a snowy forest (no text or symbols visible)LAND ROVER EXPLORE: TELEFON DLA OSÓB AKTYWNYCH INSTRUKCJA OBSŁUGI
landroverexplore.com
KORZYSTANIE Z INNYCH APLIKACJI 27
PERSONALIZACJA EKRANU 29
DŹWIĘKI DZWONKA 29
USTAWIANIE USŁUG W TELEFONIE 30
ZABEZPIECZENIE URZĄDZENIA 31
ZARZĄDZANIE APLIKACJAMI 31
RESETOWANIE URZĄDZENIA 31
WYŚWIETLANIE ELEKTRONICZNEJ ETYKIETY Z INFORMACJAMI
PRAWNYMI 32
DODATEK 32
ADVENTURE PACK DEKLARACJA ZGODNOŚCI 37
LAND ROVER EXPLORE DEKLARACJA ZGODNOŚCI 38

natural_image
Black land rover phone with open screen displaying landscape and app icons, next to a handbag labeled 'LAND ROVER' (no readable text on device body)WITAMY
LAND ROVER EXPLORE:
TELEFON DLA OSÓB AKTYWNYCH
text_image
Mobile status bar with icons for chat, navigation, and timer showing 11:16WŁĄCZANIE TRYBU RĘKAWICZEK
WIADOMOŚCI SMS I MMS
OTWIERANIE WIADOMOŚCI
WSTĘPNIE USTAWIONE TRYBY SCENY
NAGRYWANIE AUDYCJI Z RADIA FM
KORZYSTANIE Z INNYCH APLIKACJI
KORZYSTANIE Z APLIKACJI DASHBOARD

USUWANIE ZAINSTALOWANYCH APLIKACJI
Adres One Valpy, Valpy Street, Reading, Berkshire, Anglia RG1 1AR
URZĄDZENIE
Model ADV01
Opis Adventure Pack
Adres One Valpy, Valpy Street, Reading, Berkshire, Anglia RG1 1AR
SPRZET RADIOWY
Model Explore
Opis Smartfon
natural_image
Hiker in blue jacket walking past a large man's face in a snowy forest (no text or symbols visible)LAND ROVER EXPLORE: O TELEMÓVEL PARA EXTERIOR MANUAL DO UTILIZADOR
landroverexplore.com
APLICAÇÕES E WIDGETS DO ECRÃ INICIAL 14
PASTAS 15
PADRÕES DE FUNDO 15
REMOVER UMA CONTA 26
UTILIZAR OUTRAS APLICAÇÕES 27
PERSONALIZAR O ECRÃ 29
TONS DE TOQUE 29
DEFINIR SERVIÇOS DO TELEFONE 30
PROTEGER O DISPOSITIVO 31
GERIR APLICAÇÕES 31
REPOR O DISPOSITIVO 31
natural_image
Black land rover phone with open screen displaying landscape and app icons, next to a handbag labeled 'LAND ROVER' (no readable text on device body)BEM-VINDO AO
LAND ROVER EXPLORE:
text_image
Mobile status bar with icons for phone, navigation, and time display showing 11:16APLICAÇÕES E WIDGETS DO ECRÃ INICIAL
ADICIONAR UM NOVO ITEM DE ECRÃ INICIAL
Bullitt Mobile Limited
One Valpy, Valpy Street, Reading, Berkshire, Inglaterra RG1 1AR
natural_image
Hiker in blue jacket walking past a large man's face in a snowy forest (no text or symbols visible)LAND ROVER EXPLORE: OUTDOOROVÝ TELEFÓN POUŽÍVATELŠKÁ PRÍRUČKA
landroverexplore.com
PRED PRVÝM POUŽITÍM SI PREČÍTAJTE
POVOLENÉ REŽIMY NOC A RUKAVICE 14
APLIKÁCIE DOMOVSKEJ OBRAZOVKY A MINIAPLIKÁCIE 14
PRIEČINKY 15
TAPETY 15
POUŽÍVANIE REŽIMU LIETADLO 16
USKUTOČNENIE HOVORU 16
KONTAKTY 17
POUŽÍVANIE KLÁVESNICE NA OBRAZOVKE 19
WI-FI® 19
SMS A MMS 19
BLUETOOTH® 21
FOTOGRAFOVANIE A NAHRÁVANIE VIDEÍ 22
POČÚVANIE HUDBY 25
SYNCHRONIZÁCIA INFORMÁCIÍ 25
SPRAVOVANIE ÚČTOV 26
ODSTRÁNENIE ÚČTU 26
POUŽITIE ĎALŠÍCH APLIKÁCIÍ 27
PRISPÔSOBENIE DISPLEJA 29
ZVONENIA 29
NASTAVENIE SLUŽIEB TELEFÓNU 30
OCHRANA VÁŠHO ZARIADENIA 31
SPRÁVA APLIKÁCIÍ 31
RESETOVANIE ZARIADENIA 31
ZOBRAZENIE REGULAČNÉHO E-ŠTÍTKU 32
DODATOK
BALÍČEK ADVENTURE-VYHLÁSENIE O ZHODE 37
LAND ROVER EXPLORE VYHLÁSENIE O ZHODE 38
32

natural_image
Black land rover phone with open screen displaying landscape at sunset, alongside a black land rover device (no visible text or symbols on device body)VITAJTE NA LAND ROVER EXPLORE: OUTDOOROVÝ TELEFÓN
text_image
Mobile status bar with icons for phone, navigation, and battery, showing time 11:16POVOLENÉ REŽIMY NOC A RUKAVICE
ZAPNITE NOČNÝ REŽIM
POUŽITIE ĎALŠÍCH APLIKÁCIÍ
POUŽITIE APLIKÁCIE INFORMAČNÝ PANEL

Meno Bullitt Mobile Limited
Adresa TYP ZARIADENIA
ZARIADENIE
Model ADV01
Popis Súprava Adventure Pack
Bullitt Mobile Limited
Adresa
One Valpy, Valpy Street, Reading, Berkshire, England RG1 1AR
ZARIADENIE RÁDIA
Model
Explore
Popis
Smartfón
Verzia softvéru
Duálna SIM rádio verzia LTE_D0105121.0_Explore
Verzia softvéru
Jednotná SIM rádio verzia LTE_S0105121.0_Explore
natural_image
Hiker in blue jacket walking past a large outdoor mural of a bearded man in a snowy forest (no text or symbols visible)LAND ROVER EXPLORE: TELEFON ZA UPORABO NA PROSTEM UPORABNIŠKI PRIROČNIK
landroverexplore.com
PROSIMO, PREBERITE PRED PRVO UPORABO
VARNOSTNI UKREPI
natural_image
Black land rover phone with open screen displaying landscape at sunset, alongside a black land rover device (no visible text or symbols on device body)DOBRODOŠLI V LAND ROVER EXPLORE: TELEFON ZA UPORABO NA PROSTEM
DASHBOARD (NADZORNA PLOŠČA)
text_image
Mobile status bar with icons for messaging, navigation, and battery, showing time 11:16Ikone obvestil Ikone stanja
IKONE STANJA
UPORABA APLIKACIJE PHOTOS (FOTOGRAFIJE)
UPORABA APLIKACIJE DASHBOARD (NADZORNA PLOŠČA)

UPORABA APLIKACIJE CALENDAR (KOLEDAR)
Naslov One Valpy, Valpy Street, Reading, Berkshire, England RG1 1AR
OPREMA
Model ADV01
Opis Pustolovski paket
Naslov One Valpy, Valpy Street, Reading, Berkshire, England RG1 1AR
RADIJSKA OPREMA
Model
Explore
Opis Pametni telefon
natural_image
Hiker in blue jacket walking past a large man's face in a snowy forest (no text or symbols visible)LAND ROVER EXPLORE: ULKOILMAPUHELIN KÄYTTÖOPAS
landroverexplore.com
LUE ENNEN ENSIMMÄISTÄ KÄYTTÖKERTAA
TURVAOHJEET
natural_image
Black land rover phone with open screen displaying landscape at sunset, alongside a black land rover device (no visible text or symbols on device body)TERVETULOA LAND ROVER EXPLORERIN PARIIN: ULKOILMAPUHELIN
ILMOITUKSET JA TILATIEDOT
text_image
Screenshot of a digital status bar with icons for chat, navigation, and timer, showing time 11:16Nimi Bullitt Mobile Limited
Osoite One Valpy, Valpy Street, Reading, Berkshire, Englanti RG1 1AR
LAITE
Malli ADV01
Nimi Bullitt Mobile Limited
Osoite One Valpy, Valpy Street, Reading, Berkshire, Englanti RG1 1AR
RADIOLAITTEET
Malli Explore
Kuvaus Älypuhelin
Ohjelmistoversio Kaksois-SIM radio versio LTE_D0105121.0_Explore
natural_image
Hiker in blue jacket walking past a large man's face in a snowy forest (no text or symbols visible)LAND ROVER EXPLORE: THE OUTDOOR PHONE ANVÄNDARHANDBOK
landroverexplore.com
LÄS FÖRE FÖRSTA ANVÄNDNING
SÄKERHETSFÖRESKRIFTER
FÖRESKRIFTER OM IMPORT OCH EXPORT
FÖRESKRIFTER OM IMPORT OCH EXPORT 3
VÄLKOMMEN TILL LAND ROVER EXPLORE: THE OUTDOOR PHONE 6
DESIGNAD FÖR UTOMHUSBRUK 6
PROGRAMVARA UNIK FÖR EXPLORE 7
EXPLORE I KORTHET 8
VIKTIGA FUNKTIONER 8
KOMMA IGÅNG 9
LADDA BATTERIET 9
BATTERIPAKET 10
SLÅ PÅ/STÄNGA AV ENHETEN 11
PEKSKÄRM 11
SKÄRM 12
AKTIVERA NATT- OCH HANDSKLÄGE 14
APPAR OCH WIDGETAR PÅ STARTSKÄRMEN 14
MAPPAR 15
BAKGRUNDER 15
ANVÄNDA FLYGPLANSLÄGE 16
RINGA ETT TELEFONSAMTAL 16
KONTAKTER 17
natural_image
Black land rover phone with open screen displaying landscape and app icons, next to a handbag labeled 'LAND ROVER' (no readable text on device body)VÄLKOMMEN TILL LAND ROVER EXPLORE: THE OUTDOOR PHONE
SÄTTA I ETT MINNESKORT
LÅSA OCH LÅSA UPP SKÄRMEN
LÅSA SKÄRMEN
text_image
Mobile status bar with icons for phone, refresh, and timer next to time 11:16Meddelandeikoner Statusikoner
STATUSIKONER
SVARA PÅ OCH AVVISA ETT TELEFONSAMTAL
RINGA ETT KONFERENSSAMTAL
MEDICINTEKNISKA PRODUKTER
Adress One Valpy, Valpy Street, Reading, Berkshire, England RG1 1AR
UTRUSTNING
Modell ADV01
Plats One Valpy, Valpy Street, Reading, Berkshire, England RG1 1AR, Datum 26 mars, 2018
Namn Wayne Huang
Funktion Chef för ODM Management
Signatur

LAND ROVER EXPLORE
FÖRSÄKRAN OM ÖVERENSSTÄMMELSE
TILLVERKARE
Namn
Bullitt Mobile Limited
Adress
One Valpy, Valpy Street, Reading, Berkshire, England RG1 1AR
RADIOUTRUSTNING
Modell
Explore
Beskrivning
Smartphone
Programvaruversion
Dual SIM radio version LTE_D0105121.0_Explore
Programvaruversion
Single SIM radio version LTE_S0105121.0_Explore
Plats One Valpy, Valpy Street, Reading, Berkshire, England RG1 1AR, Datum 19 mars, 2018
Namn Wayne Huang
Funktion Chef för ODM Management
Signatur


natural_image
Hiker in blue jacket walking past a large man's face in a snowy forest (no text or symbols visible)natural_image
Black land rover phone with open screen displaying landscape and app icons, next to a handbag labeled 'LAND ROVER' (no readable text on device body)NYXTEPINH ΛΕΙΤΟΥΡΓΙΑ
text_image
Mobile status bar with icons for chat, navigation, and battery, showing time 11:16natural_image
Hiker in blue jacket walking past a large outdoor mural of a bearded man in a snowy forest (no text or symbols visible)natural_image
Black land rover smartphone with open screen displaying a scenic landscape, next to a black land rover device (no visible text or symbols on device body)مرحبا بكم في
:LAND ROVER EXPLORE
- Despite being the attention of the target for the target, it is not to be a visual attention. Therefore, the target should be considered as an important information.
ملاحظة
Bullitt Mobile Limited
RG1 1AR إنجلترا ,Berkshire ,Reading ,Valpy Street ,One Valpy
الاسم
العنوان
ADV01
hzمة المغامرة
الجهاز
الطراز
الوصف
Bullitt Mobile Limited
RG1 1AR إنجلترا ,Berkshire ,Reading ,Valpy Street ,One Valpy
العنوان
جهاز الراديو
Explore
هاتف ذكي