BPMB 850 C - Drill Meister Craft - Free user manual and instructions
Find the device manual for free BPMB 850 C Meister Craft in PDF.
| Technical Specifications | Details |
|---|---|
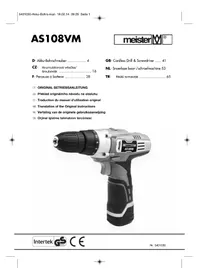
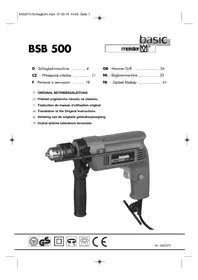
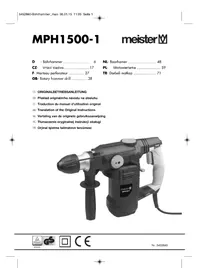
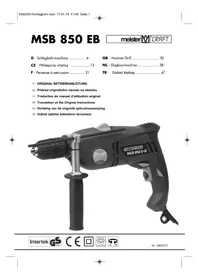
| Drill type | Hammer drill |
| Power | 850 W |
| No-load speed | 0 - 3000 rpm |
| Maximum torque | 30 Nm |
| Drilling capacity in concrete | 20 mm |
| Drilling capacity in metal | 13 mm |
| Drilling capacity in wood | 30 mm |
| Weight | 2.5 kg |
| Usage | Ideal for drilling in various materials, including wood, metal, and concrete. |
| Maintenance | Regularly clean the air filter and check the carbon brushes. |
| Safety | Use safety glasses and gloves when operating. |
| General Information | Check drill bit compatibility before use. 2-year warranty. |
Frequently Asked Questions - BPMB 850 C Meister Craft
User questions about BPMB 850 C Meister Craft
0 question about this device. Answer the ones you know or ask your own.
Ask a new question about this device
Download the instructions for your Drill in PDF format for free! Find your manual BPMB 850 C - Meister Craft and take your electronic device back in hand. On this page are published all the documents necessary for the use of your device. BPMB 850 C by Meister Craft.
USER MANUAL BPMB 850 C Meister Craft
Uymon3IbYBaHe/Bn6paun
| LPA: 94,0 dB(A), LWA: 97,0 dB(A). | |
| Tpentehnia ha pbkata/tpentehnia ha | |
| pamoto aw: | |
| npobuBaHe beToH: | |
| - Држka | 22,7 m/s2, |
| - Довлнелпна држka | 13,2 m/s2; |
| ДылбаеHe: | |
| - Држka | 17,2 m/s2, |
| - Довлнелпна држka | 9,9 m/s2. |
3 - Детайни
I3BaXdaHe Ha HnHCTpyMeHTa
IpeMeCTe IpnIbpxkaaata Btynka (1a) Ha3aN N3BaJeTe INHcTpymeHTa.
PerynpaTe DonbHnTeHaTa pkoxbatka (5) (pnr. 2)
Pa3xaabeTe pbkoxbatkata qpe3 3aBbptaHe hAnrBO n peYnnpaTe B ydo6Ho cTpaHnUHO noJoxKeHne 3a pa6ota qpe3 npemecTBaHe OKOIO OCTa Ha cbpeINoTo. NIKCpuAte pbkoxbtkaTa qpe3 3aBbptaHe HndcHo.
MOnTnpaIteH Na HAcTpOInTe orpaHnHTeJI Ha IbIbOuHnHaTa (2) (ФИг.4)
Pa3xna6eTe DonbHnHTenHaTa pkoxbatka n BkapaTe npabaT aact Ha orpaHnHTeHa Dbl6OuHaTa B OTbopa n C NOMoTu Ha NoCTaBeHOTo CBpeIIO perynpaTe Ha XeHaHaTa Ibl6OuHa Ha npobuBaHe. OTHOB OHKcapaTe pkoxbatkaT a.
8 - Eksploatazaia
BkIIOUBaHe/m3KIOUBaHe
HanpexeHneTo Ha eIeKtpo3axpaHbaHeTo Tp6Ba Da CbBnada C daHHnte Bbpxy Fa6pnHaTa Ta6eNka Ha MaunHaTa.
BkIIOUbaHe: HaTnCHeTe 6yToHa 3a BKJIIOUbaHe/IN3KJIIOUba He (3).
- N3KJIIOUBAHe: OTnycHete 6yToHa 3a BKJIIOUBAHe/NI3KJIIOUBA He (3).
PpeBknOuBaHe MeJdy yapHo npo6nBaHe, Dbl6aHe, npo6nBaHe
I36epeTe NOxOJa KaMbHaaHa KaIoua 3a ydapHnMexaHn3bM (4) n KIoua 3a I36op (5) cbrnaCHO qnr.3. HanpaBeTe HactpoKaTa, Korato MaunHaTa e cnpaHa.
9 - HauHH ha pa6ota (Фиг. 3)
A:ПробиBaHe 6e3 yДарЕ mExaHn3bM, HApPIMeP Ma3nIka, Ra3o6eTOH
B: Ydapno npo6nBaHe B 6eToH, KaMbK n 3ndapna
C:Дьлбае He 6e3 BbpTЯц aФункиВ 3nIapn nnn 3a CBaJIHe Ha nIOUkN


BHIMAHNE! Hukora He pa6oTeTe C MaunHaTa BbB BbpTtua 1yHKnIc n cnoCTaBeHo dJeTo!
Heo6xoDmNt ynap 3a ynapHo npObBaHcB KaMbK ce Cb3daBa OT nHeBMatUeH yapEn MexaHn3bM.To3n eJeKTPoNHeBMatUeH npuHcnp CBdEiCTBa 3a BnCoka ydapHa eJactuHocT npa60Ta 6e3 OTKaT.3a pa3nka ot ydapHaTa 6opMaunHa npo6NBHaTa MouHocT He 3aBNCn OT npNTnCKaUOT HaJIraHe.
BHIMAHHE! 3aTOBa no-BnCOKOTO npTnCKaio HaJraHe He NOBnwaPa bOThata MouHocT!
Yka3aHne
C noDxOJa aAnTeP (He e BKnIoueH B oBema Ha doCTaBka) nATPOHHNKbT CbC
3b6eH BeHeu MoKe Da Ce CBbpXe C MaunHaTa 3a pa6Ota C KOHBENUHOHn CBpeJa. Cna3BaITe CbOTBeTHNe DaHHn Ha npON3BOIDTeJIa 3a PpHaDJIeKHOCTNe.
10-TexHnuecko 6cbnyKbaHe n ONa3BaHe Ha OKoJHaTa cpeDa
BHIMAHNE!N3dbpnaTe 电encena!
Почиствашие Корпуca на машина тамо с влaxна Кьрna - He Използайт eразворпени! След Това посушete Добpe. Пдьхайт Виаги чсту вентлиацнонITE пореши на машина. Виаги достаъчно смаazon. След pa60а с рpoьжinte Лноct Okono 5 уаса ра3Вьртete Калачкata (7) c Фланцевя Кюч (8) и пobерete дали ce вжда достаъчно смаЗka. Пожда с обигновера Mhorогфункционална гpec ot Tьрrobckараз Мржа с Temпepатура на кипене наd 390 °C.
BHIMAHNE! Hen3no3Baemnte eJektpnueckn n akymyIaTOPHn ypeu Da He Ce N3XBpJrT C 6ntOBtE OTnaDbu! Te Tpr6Ba Da ce cb6npat
OTdEJIHO CbIaCHO
DInpeKTHBa 2001/96/EG 3a CTapNTe eJekTpueckn
yPeDN I Da ce NODlaRaT
Ha npaBnHOb
peuKNIPAHe, KOeTo He
BpeDN Ha OKoJHaTa CpeDa

Moln, npedabaTe HrOdHnTe 3a noHaTaTbSha ynotpe6a eJekTpOypeN Ha MeCTHnCb6npateHen NyHKT. ToHN yKa3aHnIe nOlyuHTe npn BaWeTo o6unHcKO ynpabLeHne. Am6aJaXbT da ce OTcTpaHraBa
COPTupaH NOOTdEJHO B 3aBucmOCT OT MaTePnaja CbOTBeTHo Ha MeCTHnte pa3npoe6n!
11 - Yukazan 3a cepBn3a
CbxpaHbAte MaunHaTa, pbKOBOdCTBOTO 3a 06cnyKBaHe n eBENTyaHnTe npHaadJeKHOCTN B opuHaJHATA onakOBka. IToTO3n HauHH BuHaIe Bn 6bDat noD pbKa UHaIata DOkymeHTaun N Yaactn.
Meisterbasic-eneKtpoypeIte noHTn He ce HxkdaT OT TexHuecko 06cnyXbaHe,3a NOuNCtBaHe Ha Kopnyca e DOCTaTBHa BnaXHa Kbpna. EneKtpoypeIte HNKora Da He ce NotanT BbB BOda. DOnbHntEnHyKa3aHnCe CbDbpxaT B pbKOBOdCTBOTO 3a O6cnyXbaHe.
Meisterbasic-eneKtpoypeDnte ca NOIOXeHn Ha cTpor KaueCTBeH KOHTpOJ. AKO BbIpeKn TOBa Bb3HNKHe DepeKT, MoJr, n3npaTeTe eNEKtpoypeHa aApeca Ha Haun cepBn3.PemOHbT ige ce n3BbpHn He3abABHO.
K paTko onncaHne Ha Hen3npaBHOCTTaCKbCBA BpemTo 3a TbpceHe HaDepekTa n 3a peMOHT. Ppe3 rapaHcNoHHn CpOK n3npaTeTe 3aeNHO cypeDa rapaHcNoHHaTa My KapTa n NOKyNaTeHNHaTa PaKTypa.
K orato ce kacae 3a peMOHT n3BbH rapaHcunra, Tp8Ba da 3aInatte Bb3HNKHAnTE peMOHTn pa3XoDn.
BAJHO! OTBapHHeTo Ha ypeDa BOINdo 3ary6BaHe Ha npaBOTO Ha rapaHcua!
BAJXHO!N3pnuHo Bn o6pbzame BHMaHHe Ha TOBa,Ye CbIJaCHO
3aKoHa 3a OTROBOPHOCCTTa Ha IpnON3BOIDNTeJIITE He HOCIM OTROBOPHOCT 3a BpeDN, pPnUHHEN OTHaHUNTE ypeDN BCNEcDCTBne Ha HEKOMNTeHTEH peMOHT nIN HEN3NOJ3BaHe Ha HauNTe OPnTnHaJIHN nIN DOnyCKaHN OT Hac pe3epBHN YactN, KaKTo N B CInuay KOrATO peMOHTbT He e n3BbpWeH B cepBn3 Ha MEISTER-WERKZEUGE nIN ABTOPn3npaH OT Hac cNeuaJIncT. CbIoTO ce OTHACr 3a n3NoJ3BaHnTe pPnHaJdJIeXHoCTN.
3a npedotbpaTbaHe Ha TpaHCnOpTHn 电TupeBbT da ce onaKoBa Hndexdno nIa da ce NOn3Ba opunHaHaHaTa My onaKOBka.
CbIo n CneI n3TuHaHe Ha rapaHcNoHHn Cpok Cme Ha BaWe pa3noJoxKeHne I ue N3bHm npi n3roHN 3a Bac pa3HocKn eBeHTyaJIHo HanaRaun Ce peMOHTn Ha Meisterbasic-ypeDnte.

Enclenchement/Coupure
Operating instructions & safety hints

To prevent injury, always read the operating instructions before use and pass them on to any future owners of the tool. Keep with the tool.
Contents
| Page | Page | ||
| 1 - Scope of delivery | 41 | 7 - Installation and setting | 44 |
| 2 - Technical information | 41 | 8 - Operation | 45 |
| 3 - Components | 41 | 9 - Mode of operation | 45 |
| 4 - Correct use | 42 | 10 - Maintenance and environmental | |
| 5 - General safety instructions | 42 | protection | 46 |
| 6 - Safety instructions relating specifically to the equipment | 44 | 11 - Service instructions | 46 |
1 - Scope of delivery
1 Rotary Hammer
1 Depth stop
1 Additional handle
1 Flange key
- Operating Instructions
Guarantee
2 - Technical information
Technical data
| Power supply 230 V~/50 Hz | |
| Rated power requirement 850 W | |
| Idle speed n | 0 = 800 min-1 |
| Impact rate (without load) 3600 min | -1 |
| Max. drill diameter | |
| - for concrete/stone/granite 26 mm | |
| Weight 4,0 kg | |
| Mains cable 180 cm | |
Noise emission/vibration
| LPA: 94,0 dB(A), LWA: 97,0 dB(A). | |
| Hand/arm vibrations aw: | |
| DRILL in cement: | |
| - handle 22,7 m/s | 2, |
| - additional handle 13,2 m/s | 2, |
| CHISEL: | |
| - handle 17,2 m/s | 2, |
| - additional handle 9,9 m/s | 2. |
3 - Components
| 1 Drill chuck |
| 1a Retaining sleeve |
| 2 Depth stop |
| 3 On/Off switch |
| 4 On/Off switch for hammer operation |
| 5 Selector switch DRILL/CHISEL |
| 6 Additional handle |
| 7 Gear grease filling hole |
| 8 Flange key |
Technical changes reserved.
4 - Correct use
This rotary hammer is suitable for drilling and hammer-drilling concrete, stone, masonry and light chiselling work around the house. Use only suitable accessories (note manufacturer's instructions). All other applications are expressly excluded. Drill chuck suitable for tools according to the SDS+ system.
The machine is intended only for use in the household.
5 - General safety instructions for handling power tools

WARNING! Read all safety warnings and all instructions.
Failure to follow the warnings and instructions may result in electric shock, fire and/or serious injury.
Save all warnings and instructions for future reference.
The term "power tool" in the warnings refers to your mains operated (corded) power tool or battery-operated (cordless) power tool.
Work area
- Keep work area clean and well lit. Cluttered and dark areas invite accidents.
- Do not operate power tools in explosive atmospheres, such as in the presence of flammable liquids, gases or dust. Power tools create sparks which may ignite the dust or fumes.
- Keep children and bystanders away while operating a power tool.
Distractions can cause you to lose control.
Electrical Safety
- Power tool plugs must match the outlet. Never modify the plug in any way. Do not use any adapter plugs with earthed (grounded) power tools. Unmodified plugs and matching outlets will reduce risk of electric shock.
- Avoid body contact with earthed or grounded surfaces, such as pipes, radiators, ranges and refrigerators. There is an increased risk of electric shock if your body is earthed or grounded.
- Do not expose power tools to rain or wet conditions. Water entering a power tool will increase the risk of electric shock.
- Do not abuse the cord. Never use the cord for carrying, pulling or unplugging the power tool. Keep cord away from heat, oil, sharp edges or moving parts. Damaged or entangled cords increase the risk of electric shock.
- When operating a power tool outdoors, use an extension cord suitable for outdoor use. Use of a cord suitable for outdoor use reduces the risk of electric shock.
Personal safety
- Stay alert, watch what you are doing and use common sense when operating a power tool. Do not use a power tool while you are tired or under the influence of drugs, alcohol or medication. A moment of inattention while operating power
tools may result in serious personal injury.
- Use personal protective equipment. Always wear eye protection.
Protective equipment such as dust masks, non-skid safety shoes, hard hat, or hearing protection used for appropriate conditions will reduce personal injuries. - Prevent unintentional starting. Ensure the switch is in the off-position before connecting to power source and/or battery pack, picking up or carrying the tool. Carrying power tools with your finger on the switch or energising power tools that have the switch on invites accidents.
- Remove any adjusting key or wrench before turning the power tool on. A wrench or a key left attached to a rotating part of the power tool may result in personal injury.
- Do not overreach. Keep proper footing and balance at all times.
This enables better control of the power tool in unexpected situations.
- Dress properly. Do not wear loose clothing or jewellery. Keep your hair, clothing and gloves away from moving parts. Loose clothes, jewellery or long hair can be caught in moving parts.
- Keep handles dry, clean and free from oil and grease. Slippery handles do not allow for safe handling and control of the tool in unexpected situations.
- If devices are provided for the connection of dust extraction and collection facilities, ensure these are connected and properly used.
Use of these devices can reduce dust related hazards.
Power tool use and care
- Do not force the power tool. Use the correct power tool for your application. The correct power tool will do the job better and safer at the rate for which it was designed.
- Do not use the power tool if the switch does not turn it on and off.
Any power tool that cannot be controlled with the switch is dangerous and must be repaired.
- Disconnect the plug from the power source before making any adjustments, changing accessories, or storing power tools. Such preventive safety measures reduce the risk of starting the power tool accidentally.
- Store idle power tools out of the reach of children and do not allow persons unfamiliar with the power tool or these instructions to operate the power tool. Power tools are dangerous in the hands of untrained users.
- Maintain power tools. Check for misalignment or binding of moving parts, breakage of parts and any other condition that may affect the power tool's operation. If damaged, have the power tool repaired before use. Many accidents are caused by poorly maintained power tools.
- Keep cutting tools sharp and clean.
Properly maintained cutting tools with sharp cutting edges are less likely to bind and are easier to control.
- Use the power tool, accessories and tool bits etc. in accordance with these instructions, taking into account the working conditions and the work to be performed. Use of the power tool for operations different from those intended could result in a hazardous situation.
Service
- Have your power tool serviced by a qualified repair person using only identical replacement parts. This will ensure that the safety of the power tool is maintained.
6 - Safety instructions relating specifically to the equipment

- Wear suitable ear protectors.
- Use the machine for its intended purposes only.
- When the machine is in operation, grasp it with both hands and take a firm stance.
- Power sockets for use out of doors must be fitted with residual-current safety switches.
- Never remove chippings or debris when the machine is running.
- Before drilling in a wall, ensure that there are no electricity wires, water or gas pipes under the surface.
-
Secure small workpieces to ensure that they are not entrained by the drill.
-
Remove the power plug before working on the machine, during all intervals in work, and when the machine is not in use.
- Always keep the power cable well away from the drilling zone.
- T urn switch to OFF before plugging into power supply.
Always use the machine with the additional grip. - Do not allow persons under 16 years of age to use the machine.
- Observe general safety instructions for handling power tools!
- T o avoid hazards, damaged power leads must be replaced by the manufacturer or his customer service representative.
7 - Installation and setting
Inserting bit

WARNING! Pull out mains plug.

Hold drill so that chuck (1) points upwards. Lightly grease bit shank, insert into chuck and turn
until it engages. Slide retaining bush down as far as the stop - the bit will slip into the locating shaft. Release the retaining bush, which must return to its initial position.
Removing bit
Slide back retaining sleeve (1a) and remove the bit.
Adjusting additional handle (5) (Fig. 2)
Twist handle anticlockwise and set it to a suitable side working position by turning it about the drilling axis. Twist handle clockwise to lock.
Fitting and setting depth stop (2) (Fig. 4)
Release additional handle. Insert the straight portion of the depth stop into the hole and, using the inserted drill bit as a guide, set to the desired drilling depth. Lock handle.
8 - Operation
Switching On and Off
The power supply voltage must comply with the data on the power tool rating plate.
- S tart: Press On-Off switch (3).
- S top: Release On-Off switch (3).
Change-over: hammer-drilling, chiselling,drilling
Select a suitable setting combination with hammer on/off switch (4) and selector switch (5) as shown in Figure 3. When setting, ensure that the machine is not running. The impact rate can be steplessly adjusted by shifting between the two symbols.
9 - Mode of operation (Fig. 3)
Working with the hammer drill (Fig. 3)
A: Spot-drilling without hammer action, e.g. rendering, gas concrete
B: Hammer-drilling concrete, stone and masonry
C: Chiselling without rotary action in masonry or to detach slabs.


WARNING! Never operate the power tool with rotary action when the chisel is inserted!
A pneumatic hammer mechanism generates the required impact for hammer-drilling stone. This electropneumatic principle produces a highly elastic impact effect and a recoilless operation. Unlike on the percussion drill, the drilling performance does not depend upon the pressure applied.
WARNING! A higher pressure will therefore not increase drilling performance!
Note
With a suitable adapter (not included in the delivery) a key-type drill chuck for
working with conventional drill bits can be attached to the power tool. Follow the manufacturer's instructions for using accessories.
10 - Maintenance and environmental protection

WARNING! Pull out mains plug.
Use only a damp cloth to clean the power tool housing. Do not use solvents! Then dry off carefully! Always keep the power tool air vents clean and free of obstructions. Ensure that the gear system is adequately lubricated. After approx. 5 hours operating time unscrew the sealing cap (7) with the flange key (10) and check whether sufficient grease can be seen. If necessary, top up with grease supplied with the power tool. Use commercially available multi-purpose grease with a boiling point of over 390^ .
CAUTION! Electrical and battery operated units that no longer work should not be disposed of in the household waste! They are to be
collected separately, in accordance with the 2001/96/EC directive for the disposal of electrical and electronic waste, and sent for proper and environmentally-friendly recycling.

Please discard power tools no longer usable at a local collection point. Collection and disposal of packaging materials separately by types complying with local rules and regulations. For details, please contact your municipal authority concerned.
11 - Service instructions
- Store the machine, operating instructions and where necessary the accessories in the original packaging. In this way you will always have all the information and parts ready to hand.
- Meisterbasic devices are to a large extent maintenancefree, a damp cloth being sufficient to clean the casing. Do not drop electrical machines in water. Please note additional hints given in the operating instructions.
- Meisterbasic devices are subject to stringent quality control. If however a functional fault should occur, send the device to our servicing address. The repairs will be carried out in a short time.
- A brief description of the defect speeds up the faulttracing and repair time. If within the guarantee period, please enclose the guarantee document and the proof of purchase.
- In so far as a repair under guarantee is not concerned, we will charge the repair costs to your account.
Pleases NOTE! Opening of the device invalidates the guarantee claim.
IMPORTANT! We point out expressly that in accordance with the Product Liability Act we do not take responsibility for any damage caused by our appliances, in so much that said damage is caused by improper repair, or original parts or parts released by us not being used when parts are changed, or repairs not being conducted by MEISTER-WERKZEUG,
Customer Service or an authorised specialist! The same applies analogously to the accessories used.
-
P ack the device well or use the original packaging in order to avoid transit damage.
-
E ven after the expiry of the guarantee period, we would like to help you and carry out any repairs at a favourable price.

Odyicxipioou& unodxiic aqpaiaac

Tia Tnv anopuyn KivduvWv Tpaumatouo diaaZcTe Tc obnyiec xepiouou npiv ano kae evapx n eitoupyiaac kai e npintwn npaxwnpanctnc mnxavnc npoc tpita npoowna Tc npabidetek kai autc. duaoote paqi me tn mnxavn.
περιεχόμενα
2ελiδa
1-Poounθeuvoc 48
2-Texvikec nI npofoipie 48
3-Kataaekεuaotika Tμnμata 48
4-Kavovikxpnon ouφwva Tov npoopio 49
5- i c unoδεiεεic aσφaλεiaç 49
- in beton/steen/graniet 26 mm
Gewicht 4,0 kg
Tpe6yembI yadAp dJa ydapHoro CBepHeB B KaMeHb BbINOJIHaET PHEBMATUeCKn ydapHbIM MExaHN3M. 3TOt 3JeKTPoPHeBMATUeCKn npHcNn DeICTBn pe3yIbTnpyeT BbICOKyO 3NaCTuHOCt b yda n NCKIOUcaET o6paTHbIe ydapHbIE ToJcu. B IPOTNBOONOJOxHOCTb ydapHOJ dpEN MOUHOCTb CBePHeHr He 3aBNCIT OT YCINNA pnxkma.
BHIMAHHE! YcHnne npnxmab 3TOM cnyae He NOBbIwaet pa6ooyu npou3BOaNTeJIbHOCTb!
Yka3aHne
C NOMOsbIO NOxOJaIero aanTepa (He BXoNT B 06bEM NOCTaBKn) IMeETcBO3MOXHOCTb NODKJIIOUeHnCBepINbHO rno natoHa 3y6aTOrO BeHcaДЯ pa6OT C yCNOBbIMn CBepnAmn HaMaunHe.ДЯ 3TOrO CneJyET yuHTbIBaTbCOOTBeTCTByOUsNE DaHHbIE NOPnPnHaIeXHOCTAM I3ROTOBtTeJI.
10-Texo6cnyxnbHne n 3aunTa OkpykaIoUeI cpebl
BHIMAHNE!OTcoeHnHTb wTeKkep oT po3eTKn.
Kopnyc Maunhbl npotepeb BnaXho Tpnnko. He nCnoJb3OBaTb pactBopnte! B 3akIouheHne Hacyxo npotepeb. NocToHHo CneINTb 3a TeM, YTObI BEHTnIauHOHbIe UeJI MauHNbI 6blN B uCTOM COCTOHN. O6paTtB BHImaHne Ha To, YTObI nepeDaayu IMeJa DOCTaTOHoe KOJIueCTBO Cma3Kn. PocNe OK.5YacOB 3KcnIpyaTaUN OTKpyTtB fHaHceBbIM KIOUcEM (8) KOJINaQK (7) IN POKOHTPoINPOBaTb Cma3Ky. Dna Cma3KN NCNoJb3OBaTb CTaHdAPTHyO CMA3KY C TOUYKIN KIneHn 60Je 390°C.
BHIMAHNE! OTCnyxmbne CBOe 3JeKtpnpnbopbl aKKymyIaTOPbIe np6Opbl HeIb3A BbIbpaCbIBaTb BMeCTe C 6bITOBbIM Mycopom. Cornacho DnpeKTnBe 2001/96/EC 06 3JeKtpnuecknx n 3JeKtpoHHbIX OTXoJax Hx CNeDyET CObnapTaB OTdJIbHO I NOdBepraTb PpoPeCCNoHaJIbHOJ, 3KOJOrnueckn 6eONaChOH yTNIIN3aUHN.

Ioxayncta cdaabaTe HnnpuroHbIe 3JeKtpoPn6OpbIB MeCTHbIe CnyXbI bNo c6opy yTnJIy. YnaKOBOHyBIMaTePnA paccOptnPOBaTb N yTnIN3nPOBaTb corNaCHO MeCTHbIM npednncAHm. Pndpo6HOCTn CneMyET OnpocTb B aDMNHcTpaun Okpyra.
11 - Yka3aHnNo cepBnCy
Xp aHnTe npnbop, INHCTpyKcIIO NO 3KcNlyaTaunn n npn Heo6xoDmocTn TaKxne npHaJnxHoCTn B opnHaBHOyakOBKe. TaKm 0bpa3OM Bbl NIO6oe BpeMa pacnojaraete HOpmauee n YactMn.
- Pnp6opbMeisterbasic, B OCHOBHOM, He Tpe6yOT TexxOda, IINr YnCTKn KOpnyca DOCTaTOHbIaXHOro IIaTka. 3JekTppon6opb HnKOrda He norgykaTb BVODy. DOnONHITeJIbHbIe yKa3aHn CM.NHCTpyKuIO NO 3KcNpyataun.
- Pnp6opb Meisterbasic noJnexat cTporomy KOHTpOIO KaueCTBa. Ecnn, OHaKO, HeCMOTpa Ha 3TO, NOBNTcH DepeKT, OTnpaBbTe np6Op B aDpec Hauen cepBnCHOn cnjX6bl. Mbl HeMeJeHHo BblONHM peMOHT.
K paTkoe onncaHne depekTa cokpaaaet Bpemn noncKa n peMOHTa. Pnp dEnCTbYIOUeR rapaHTnn npINOxNte K npBOpy rapaHTnHOe CBNDTeJIbCTBO N KBNTaHcNIO O NOKynke.
- EcIn peYb NIdET He O rapaHTnHOM pEmoHTe, To Ha CTOnMOCTb pEmoHTa Mbl BbICTaBIM ChET.
BAKHO! BCKpbItne np6opaBleyET npeKpaueHnepaHTNHBIX 6o3aTeNbCTB!
BAXHO! Mbl HaCTOaTeNbHO
obpaaaem Bawe BnHaMaHne Ha
TO, YTO MbI Ha OCHOBaHm 3aKoHa No
OTBETCTBeHHocTn 3a npOdyKTbI He
OTBeyaem 3a Bbl3BaHHbIe HauIMM
npi6opamu yep6bl,ecn OH
Bbl3BaHbI HeKBaIINΦuNpOBaHHbIM
peMOHTOM nJN eCNI npn 3aMeHe
3aNacteH He npImeHAnc b HauN
OpnHbHbIe 3aNactn HIn COOTB.
DOnyueHbIe HAMn 3anactn N ecNI
peMOHT He BblONHJIsc FInpMoN
MEISTER-WERKZEUGE HauIMN
cepBncHbIMn Cnyx6amn IIN
aBTopn3nPoBaHHbIMn CneuaJIncTaMn!
CoOTBetCTByIOUee RbIaETc TaKKe
DeIcTBNTeJIbHbIM dJI INCNOJIb3YeMbIX
PpHaADJeKHOCTeN.
-ДяпpeДOTВрашени NOВрждени npTpaHcnpTupOBKe, np6op XOPOwO yNAKOBAt b NIN NCNoJIb3OBaTb opRnHaJIbHyO yNAKOBY.
T aKxe n Iocne nCTeueHnra cpoKa rapaHTmMbI HaxoDnMCB BaWem acnpaXeHNn BBIOJNHm Heo6xOdMbI peMOHT no np6opam Meisterbasic npn Hn3KO CTOn.

EasyManual