
IKB64431XB - Cooker AEG - Free user manual and instructions
Find the device manual for free IKB64431XB AEG in PDF.
| Product type | Built-in induction hob |
| Brand | AEG |
| Model | IKB64431XB |
| PNC number | 949 597 314 00 |
| Power supply | 220-240 V / 400 V 2N, 50-60 Hz |
| Total power | 7.35 kW |
| Number of cooking zones | 4 |
| Front left zone | 21.0 cm / 2300 W (PowerBoost 3700 W) |
| Rear left zone | 18.0 cm / 1800 W (PowerBoost 2800 W) |
| Front right zone | 14.5 cm / 1400 W (PowerBoost 2500 W) |
| Rear right zone | 18.0 cm / 1800 W (PowerBoost 2800 W) |
| Main functions | PowerBoost, Automatic start, Pause, Lock, Child safety, Timer (Countdown, CountUp, Timer), Hob²Hood, Automatic cut-off, Power management |
| Residual heat indicator | OptiHeat Control (3 levels) |
| Safety | Pan detection, automatic cut-off, lock, child safety, hot surface protection |
| Cleaning | Specific cleaner for ceramic glass, special scraper for stubborn dirt |
| Repairability | Original spare parts available, authorized after-sales service |
| Additional information | Made in Germany, compatible with Hob²Hood hood, energy consumption 180.2 Wh/kg |
Frequently Asked Questions - IKB64431XB AEG
User questions about IKB64431XB AEG
0 question about this device. Answer the ones you know or ask your own.
Ask a new question about this device
Download the instructions for your Cooker in PDF format for free! Find your manual IKB64431XB - AEG and take your electronic device back in hand. On this page are published all the documents necessary for the use of your device. IKB64431XB by AEG.
USER MANUAL IKB64431XB AEG
SQ Udhezimet per perdorim 2
BG PbKOBOIDCTBO 3a
ynotpe6a 20
HR Upute za uporabu 39
CS Navod k pouziti 56
DA Brugsanvisining 74
NL Gebruiksaanwijizing 91
EN User Manual 110
ET Kasutusjuhend 128
FI Kayttoohje 145
FR Notice d'utilisation 162
DE Benutzerinformation 181
EL Odyiecs Xpnoans 201
HU Hasznalati utmutató 221
LV Lietosanas instrukcija 239
LT Naudojimo instrukcija 256
MK YnataCTBO 3a paKyBaHe 274
NO Bruksanvising 293
RS YnyTcBO 3a ynoTpe6y 310
SK Navod na použivanie 329
SL Navodila za uporabo 347
SV Bruksanvising 364
USER
MANUAL
PER REZULTATE TÉ SHKÉLQYERA
2.5 Service (Sherbimi)
1.2 OchoBHa 6e3oNaCHOCT
BHIMAHNE: YpeIbT n HeROBNTe DoCTbHn YacTn Ce HaropeuBaT nO BpeMe Ha yNoTpe6a. Tp6Ba Da ce BHIMaBa n Da Ce N36raB a DOKOCBaHe Ha HarpeBaTeJInte.
BHIMAHNE: PbpxeHe c Ma3HnHa nIi OJNo, 6e3 HaJ3Op, MoKe Da e OnaCHO n Da npEiN3BnKa noXap.
- HNKOfA He ce onntBaIte da 3aracnte noxap c Boda, a n3KnUoyete ypeDa n Cnei TOBa nOKpInTe PnAmbKa Hanp. c KapanK nII NOrHeynOpHo OdeJIo.
- ПЕДУПЕЖДЕНЕ: Урет He Тразва за e 3axpaHbaH
Чрз Вьншно певкючвацу устpoистBO KaTO TaIMep Или
Да e CBbp3aH KbM eI. Bepnra, KOrTO NOCTOARHHO CE BKJI. ИИЗКЛ. OT yCTPOIcTBO.
- ПРЕДУПЕЖДЕНЕ: Роцьт на rotве не ТразБа за 6бдп Наблюдах. Кратугл.Tроцс на rotве не ТразБа за 6бдп Наблюдах посторнho.
BHIMAHHE: Onacnoct ot nojap: He cbyxpanyBaIte npedmetn Bbpxy rotBapckn Inot. - MeTaJIHn IpeIeMTeN KaTo HOxOBe, BnJIuIcN, JbJxUcN i KaIaIcN, He TpI6Ba Da ce NoCTaBraT BbPxy rOTB. PLOT, TbI KaTO MoRaT Da ce 3aRpeT.
He n3noJ3BaIte ypeDa, npeDi da ro IHCTaIIpaTe BbB BrpaDeHaTa KOHcTpyKzna.
He nouchte ypea c napounctayka.
Clej ynoTpe6a, n3KIOUcTe rOTB. ILOT OT KIOU 3a ynpabIeHne i He pa3uNTaIte Ha cyHKnraTa 3a lokaJIIN3npaHe Ha cBDOBe.
Ako cTBKIOkepaMnHaTa / cTBKJIeHaTa NOBbpxHocTe HanykaHa, n3KJIooTe ypeDa n rO n3KJIooTe OT eJeKTPnuCeckaT aMpexa. B clyuaaye ypeDbT e CBbp3aH dIpeKTHo KbM eJeKTPnuCeckaT aMpexa C NOMOuTa Ha CbeINHTeJHa KyTna, npemaxHeTe ppeDn3nteJra, 3a da n3KJIooHTe ypeDa ot eJeKTPnuCeckaT aMpexa. B npotNBeH clyuaa Ce cBbPxTe C OToPn3npaHnA cepBn3eH ueHTbp.
Ako 3axpaHbauT Ka6e e nobpeDeH, TOn Tp8Ba Da ce CMeHN OT npON3BOIDNTeJIa, OTOPI3nPAH cepBn3 nIII Jnca CbC CXoDHa KBAJIINΦNkAuzna, 3a Da ce n36erHe onaCHOCT.
BHIMAHHE:ИЗползваite само пpeДиNTeIN 3a KOTLOHn pa3pa6OteHn OT npOn3BOIDNTeJI yNOMeHaTn OT HeRoВ ИнсТуКцInTe 3a yNOTpe6a, nIi NpeДиNTeJI 3a KOTLOHn BrpaDeHn B ypeDA.ИЗпOL3BaHeTo Ha HENODXODIuПпЕДиA3NTeIN MoKe DA DoBede Do 3ЛОПОЛУКИ.
2. INHCTPYKUN 3A BE3OJACHOCT
2.1 MoHTax

BHIMAHHE!
Camo KBaJIINΦnIupaHO IInCe MoKe Da N3BbPm MOHTaxKa Ha ypeDa.

BHIMAHHE!
OnachocOT HapaHbHe nIN NOBpeHa Ha ypeHa.
MaxHeTe BCnOnaKOBKn.
He montpaTne Hn He n3noJ3BaITe NOBpeDeH ypeI.
CneIbAaTe HNCTpyKcHnTe 3a IHCTaJInpaHe, npJIIOKeHN KbM ypeJa.
- Tp6Ba Da cna3BaTe MInHmAlHOTO pa3CToHnE Do dpyrN ypeDn n ycTpoiCTBa.
BnHaBn BnHmBaIte, KOraTo MeCTnte ypeDa, Tb' KaTo e TeKbK. BnHaR n3NoJ3BaIte IpeJa3Hn PbKaBnCn n 3aTBopeHn O6yBKn.
- YnIbTHeTe cpr3aHITe NOBbpxHOCTN C yIbTHHTeJ, 3a Da npeDoTbpaTHe N3dyBaHe nopadi Bnara.
- Празаьтейдолнотачсну урета опара и влara.
He montpaTte ypea 6n3o do Bpata nn noi np03opeu. Taka ue npedOTbPaTne naDAneto Ha ropeun rotBapckn cboBe OT ypea, KoraTo ce OTbOpn Bpata nn np03opeuT.
Bcekn ypei nMa oxnackaun BENTINaTOPn Ha DbHOTO.
Ako ypeBt e MOHTnpaH NaJ YekMeJKeTo:
-He cKlaIpaIte MaIKNI napYeHcau IINxapTNIKN, KOITOMorAT da 6bdaT BCMykaHn I Da HapaHrT OXIAJDAUITE BENTUNaTOPN IIN Da IOBpejrO XIAJDAUaTaCnCTema. -Pa3eTe DnCTaHcNry OT MHNmym 2 cm MeJdy DbHOTo Ha ypeDa IN cKlaIpaHNTe YactN B YeKeMeJxKeTO.
- OTeTpaHeTe BcKaKbN pa3dJIaIuI NaHeI, MOHTnpaHn B WkaFa noI ypeIa.
2.2 Cbbp3BaHe KbMeJeekTpueckaTa Mpeka

BHIMAHHE!
Pnck OT noxap nJIN TOKOB yIap.
- BcnuK en. Bp3Kn Tpr6Ba da ce HnpaBt OT KBaHnΦnupaH eNeKTpoTeXnK.
- YpeT Tp8Ba Da e 3a3eMeH.
- Праздзаи3BbPшITEДeИCTBHe,уВepTe ce,чуypedt e n3KIOUChEOT eJIeKTPo3axpaHBAHeTO.
- YBepete ce, Ye napametpnte Ha TabeIkaTc TexHnueckn DaHHn Ca CbBMecTUMC eEKeTpueckNte DaHHN Ha 3axpaHbAaata Mpexa.
- YBepete ce, ye ypeDbTe eHcTaInpaH npabuIHO. Xna6abuN HnepabunHn eNeKtpnueckn KaBeJIuIuIeIeCJI (aKO ca HaJIuUH) MoT a DOBeaT Do npeharpaBaHe Ha KJIemITE.
-Използваite npabuileн ka6eJ 3a3axpaHbAHeto.
He no3BOJbAaTe eJeKtpuYecknte Ka6en Da ce npenlntat. - YBepete ce, ye e MOHTnpaHa 3aunTa OT TOKOB yIap.
- 3akpenete ka6ena c npitraa cacko6a npotNB onbBaHe.
-
YBepete ce, che Ka6eIbT 3a eNeKtpo3axpaHbAHeTo n Ieencena (aKO e HAnuyeH) He ce DoKocBaT do HaropeueHn ypei nn ropeu n CbdoBe 3a roTBeHe, KOraTO BKNIOHTe ypeDa B 6n3KnTe KOHTaKTn.
He n3noI3BaIte pa3KnOHTeINnIaIaIaTepn C MHORo BXOIOBe.
He noBpeKdaiTe 3axpaHbauiue (aKe eHaIyuH) n 3axpaHbauiKa6eJ. Cbpxte ce c Haun oToPn3npaH cepBn3eH ueHTbp iNn eNeKTpoTeXnK 3a cmHaT a Ha NoBpeDeH 3axpaHbaui Ka6eJ.
3aunataOTOKOByapHa ropeuinte IN30npanH yactn Tp6Ba da 6bde 3aTeHaTaNtKaBb HauHHye Da He MOKe Da ce OTCTpaHn 6e3 nHCTpyMeHTN.
CbpxkeTKeBaEla 3a 3axpaHBAHeTo KbM KOHTaKTA eINHCTBeHO B KpaHa INCTaIauIra. YBepTe ce, ye IeIcEJIbT 3a 3axpaHBAHe e DOCTbneH CNeI INCTaIIpaHETo. -
Ako KOHTaKTbTe pa3Xla6eH, He CBbp3BaIte 3axpaHBaIu IeIceI.
He n3dbpBbAte 3axpaHbAunKa6eI,3a da n3kIouTe ypeDa.BnHarn n3dbpBbAte uencela Ha 3axpaHbAheTo. - I3noJI3BaIte cAmO npaBnHn ycTpoiCTBa 3a n3OJaun: npeJna3HN npekbcBaun Ha mpejka, npedna3nteJN (npeJna3NTeJNTe OT BnHTOB TnT Tp8Ba Da ce n3BaJrT OT facyHrata), N3KJIIOUbATEJIN KOHTaKTOpN 3a yTeUka Ha 3a3EmBAHeTo.
- EJIeKTPnueckaTaNHCTaNaCuaN Tp6Ba da NMa H3OJnpaUo yCTpoiCTBO, KoTo Bn N03B0JRAb Da N3KlIOuHTe UpeDa OT eI. MpeXkata Pn BCNUK N OJIIOcN. I3OJnpaUoTO yCTpoiCTBO Tp6Ba Da e C ShnPnHa Ha OTBapRHe Ha KOHTaKTa MNHMym 3 MM.
2.3 Ynotpe6a

BHUMAHNE!
PnCK OT HapaHbAHe, n3rapHnI IN TOKOB yDap.
MaxheTe BCnUKN ONAKOBKn, eTNKeTNI 3aunTHOTo FOJNO (aKO nMa) npedn PbPbata ynoTppe6a.
To3n ypei e npedHa3haueH cmo 3a domaSHA ynoTpe6a.
- He npomehnye npedHa3HaueHneTo Ha ypeda.
- YBepete ce, Ye BENTINaIauIOHHnTe OTBOpH He ca 6IokupaHn.
He octabraye ypea 6e3 na30p,dokaTo pa6oTn.
CneI BcKa ynoTppe6a n3KIOUyBaITe 3OHATA 3a rotBeHe.
He pa3uTae Ha dTeKTopa 3a TuraHn.
He nocTabaIte npnbopn nn Kanau OT TnraHn I TeHJKePN Bbpxy 30HnTe 3a rotBeHe. Morat da ce HaropeuT.
He n3noI3BaIte ypeDa c MOKpn Pbue nIaKo e B KOHTaKT C BOda.
- He n3noJ3BaIte ypeJa KaTo pa6oTHa NOBbpxHOCT uIN 3a cbxpaHeHne.
- Ako NOBbpxHocCTTa Ha ypeDa e HanykaHa, He3a6abHo n3KIOUcTe ypeDa OT Uencela. 3a Da ce npedOTbpaTn TOKOB ydap.
-ПOTpe6nteJIcпeINcMeKbPТр6BaДa cna3BAtДиCTaHцЯН-МaNko30cmOT INdYkuOHHaTa30Ha3arotBeHe,Korato ypeDbTpa6OTn.
Korato noctabraye xpaHa B ropeo oJno, MoKe Da npbcka.

BHIMAHHE!
OnachocT OT noXap nIeKcNNo3nA
- Haropeшени Te Ma3HHH nIi MacNo MOraT Da npedn3BnKAT Bb3PnAmEHNMI napi. DpbkTe PnAmbCHTe IIN HAropeehenTe ppeMeTN daJeY OT Ma3HHH nIi MaCNO, KOrato RotBNTe C TAX.
- Napte, KOnto ce ocbooxkaBaT OT MHOrO HArOpEuHcHTo MaCNo, MORaT da npUHHr cNoHTaHHo 3anaIbAhe.
- I3noI3BaHOTo MacNo, KOeTO cbDbpXa XpaHnteJIH N OCTaTbU, MoKe Da npuHH NoXap Pn NO-HNCKN Tempeatypn, OTKoJIKOTO MaclOTO, I3NOJ3BaHO PbPbNr PtBt.
He nocTaBnTe 3anaNTeHn MaTePnAnu nn npEaMeTn, KOnto ca HanoEHn CbC 3anaNTeHn MaTePnAnu, B ypeDa, B 6n3OCT Do Hero nn Bbpxy Hero.

BHIMAHNE!
OnachocT OT nobpeDa Bypeda.
He octaBraIte ropeu ngTbapckn cbdoBe Bbpxy KOHTpOJHOTo Ta6no.
He noctabraye ropeu kanaKaHa TuraH Bbpxy CTbkneHaTa NOBbpxHOCT Ha NIOta.
He octTaBnTe TeuHocT Ta B rOToBapcknte CbdoBe Da n3BpHnblHO.
He no3B0JBaIe Bbpxy ypeJa da naat npedMeTn nn roTBapcKn cbdoBe. NobbpxHocTTa moKe da ce nobpeNi.
HeakTbupaTe 3OHnTe 3a rotBeHe npi npa3HN rotBapCKn CbdoBE nIIN aKO HMa rotBapCKn CbdoBE.
He noctabaTe anymnHneBO oJIno Bbpxy ypeJa.
CbdoBe 3a roTBHe OT yHyH, anyMHn nn C NOBpeDeHO DbHo, MOrat da HApackat CTbKnoto/CTbkKnokepamKkata. BnHarN NOBdnraTe Te3n npEdmetn Harope, Korato Tp6Ba Da rN npemecnte No NIOUaTa 3a roTBHe.
To3n ypeE npedHa3NaueH cMo 3a roTBeHe. Toi He Tp8Ba Da 6bJe H3NoJ3BaH 3a HnKaBn DpyrN CEIn, HanpIMep OTOpJIeHne Ha NOMEuHnA.
How to install your AEG Induction Hob - Worktop installation
4.ОПИСАНЕHAУРEDA
4.1 Pa3noJoxeHne Ha noBbpxHOCTTa 3a rotBeHe
1 INHykUHOHHa 3OHa 3a rotBeHe
2 KoHTpOJIeH naHEn
4.2 OΦopMJIeHne Ha KOMaHdHOTo Ta6I0

I3noJ3BaIte cEH3OpHnTe noJeTa, 3a da pa6oTnte c ypeJa. Ioka3aHnra Ta Ha dinCnpe, INdNkAToPnte n 3ByKOBnTe CNHaJI N oKa3BAt KOn φyHKuN pa6OTr.
Ta3nФyHKcIgIpeDToBpaTbAHeBOJHO n3NoJ3BaHeHaJIOTA.
3a Da BKNIOHTe cyHKUraTa: aKTHBnpaTne nnota c He 3aDaBaIte HactpoiKa 3a HarpBaHe. DOKOCHTe 3a 4 cekyHn. CBETBa. DeakTNbPaTne nloTa C
3a Da n3KIOUHTe cyHKUJTA:
aKTbIpaIte pIoTa c He 3aDaBaIte
HAcTpoJa 3a HaIpaHe. DOKoCHTe a 4
ceKyHdN. CBETBa. DeakTbIpaIte pIoTa c
①.
3a da OTMeHnTe yHKnraTc amo 3a eHH nepnoHa rotBeHe: BkIOUte nIOTa c ①. CBETBa. DOKOCHeTe 3a 4 ceKHyDn. HAcTpOte CTeneHTa Ha HarpBaHe B paMKnte Ha 10 ceKHyDn. MoXeTe da paBOTte C nIOTA. Korato N3KnIOuHtE nIOTa c ①pyHKnraTa OTHOBo 3aNoUBA da paBOTn.
5.10 OffSound Control (ДeakTNBupaHe n aKTNBupaHe Ha 3ByuTe)
I3KIOUeTe IIOuata. OOKocheTe 3 ceKHyI. EkaHbT Ce BkJIIOUba Nn3rAcBa. HATNCHeTe a 3 cekyHNI. nN niCBEThe. DOKOcheTe OT TaIMepa, 3a da n36epete eDHO OT CNEHNTE:
-Bynte ca n3KIOueHn
-ByuIte ca BKIOUeHn
3a da notbvpTe n36op yakaTe DOKaTO KOTNoHbT Ce DeakTNBnpa ABTomTuYeCKN.
KoratoФункцятayecyctaHOBeHa3aBne MOKeTe Da YuBaTe 3ByuNTe,camo Korato:
- HAtncheTe ①
-TaMep ce NOHIXN
-TaMep 3a o6paTHo 6poEne ce NOnnKIn
Cnaarate Heo Bbpxy KomaHnHOTo Ta6no.
5.11 YnpaBneHne Ha MoUHocTta
30HnTe 3a rotBeHe ca rpynpaHn cnopeMecToNoJoxeHneTo n 6pOHa pa3nTe BnOyata. BuxTe nIOCTpaunra.
BcKaΦa3aIMMaMaKcImaJIeH eNekTpueckn Tobap ot 3700 W.
-Функиятpa3npedeЯ MOUHOCTTa MEXKdy 3OHTe 3a TOTBeHe, CBbp3aHN KbM CbuaT aΦa3a.
-Функцята ceakTNbupa, KOrato 6uT eNeKtpnueckn TOBap Ha 30Hnte 3a rotBeHe, CBp3aHn KbM eHa φa3a, HAdBnN 3700 W.
-Функцятpa3npedeЯ MOUHOCTTa MEXy 3OHHTe 3a rOTBeHe, CBbp3aHn KbMeHa pa3a.
- EkpanbT 3a perylnpae Ha TemnepaTypaHa HamaJeHnte 30Hc ce peDyBa Mekdy N36paHaTa HacTpOka Ha TOJIInHaTa HamaJeHaTa TOnJIHHa HAcTpOka. Cnei n3BecTHo BpeMe ekpanbT 3a perylnpae Ha TemnepaTypaHa HamaJeHnte 30Hc OCTaBa Ha HamaJeHaTa TOnJIHHa HAcTpOka.
5.12 Hob²Hood
ToBa e MoeRha aBTOMaTHUHa yHKuY, CBbP3BaUa PnOta KbM CneUaJIeH abcOp6aTOp. KaKTo PnOta, Taka n abcOp6aTOpbT pa3nOlaRaT c KOMyHNKaTOp c HΦpauepeBEN cnHaN. CkOpocTTa Ha BeHTnIaTopa ce ONpeJEn aBTOMaTHUHO, Bb3 OCHOBa Ha HAcTPOhKaTa Ha peXIMa N TempePaTypata Ha Na- ropeuNte roTBapCKn cbIOBe bBypx PnOta. CbIo TaKa moXeTe da ynpabIbBaTe BEHTnIaTopa n pBuHo, OT nloYata.

Ipi noBueTe oAbcop6aTopn
DnCTaHcNoHHaTa cnCTema e
DeakTbVbpaHa nO
noPa3bupaHe. AKTbVbpaIte y,
npeN da n3noJ3BaTe
fYHKuYra. 3a nobYe
INΦopMaqua BnxTe
pbKOBODCTBOTO 3a yNtpe6a Ha
abcop6aTopa.
ABTomatnHOn ynpabJIeHne Ha yHKunTa
3a da ynpabnBaTe cyHKnraTa
aBTOMaTHUHO, 3aJaIte aBTOMaTHNHa
peKIM Ha H1-H6. KotNoHa pa6pHHe
3aJaDen Ha H5.Kanaka pearnpa, KOraTo
ynpabnBaTe kOtNoHa. IIOuata
aBTOMaTnUH O pa3No3HaBa TemnepaTypaTa Ha rotBapcknte CbdoBe n peRyInpa CKOpocTTa Ha BeHTnlaTopa.
ABTOMaTHNpEXHM
UymoBeTe ca HopMaJIHn He Noka3BaT Hen3npaBHOCT.
6.3 Öko Timer (Икономунец Таймер)
3a da neCTnTe eHeprna, HArpeBaTeJIaT Ha 30HaTa 3a rotBeHe ce DeakTNBnpa npeNi
CnHaJa Ha TaMepa 3a OT6pOraBaHe Ha OCTaBaUTo BpeMe. Pa3nKaTa BbB BpeMeTo 3a pa6To 3aBnCn OT CTeNEHTa Ha HarpBaHe N BpeMeTpaEHeTO Ha rotBeHeTo.
6.4Приимеризаразлочни начни 3a rotBeHe
Bpb3kaTatemxdy cTeeneHa Ha HarpBaHe n KOHCymaqraTa Ha eHepnHa 30HaTa He e JInHeHa. Korato yBeIuHTe cTeenHa Ha HarpBaHe, Ta He e npOpCnOHaJHa Ha yBeJIuHaBaHTo Ha KOHCymaqraTa Ha eHepn. Toba O3HaUbA, Ye 3oHaTa 3a rotBeHe cbc CpeHa cTeEN Ha HarpBaHe N3NoJ3Ba No-MaIKO OT NIOOBnHaTa OT CBOrTa eHepn.

IaHHnTe B cIeDbaaata Ta6nca ca opneHTnpOBbHn.
AcnnapaTopbT Ha KapTuHkaTa e camo npimepen.

Дргдиctанционн КоHTpoInpaHуpeДиMOratДа 6лokиратсигнад. He ИЗПОЛЗВайтЯкINВуpeДиВ 6лИЗОCTdoПLOЧATA,ДOKATO Hob²Hood e Bкlnюун.
A6cop6aTopn 3a roTBeHe cФункцЯ Hob²Hood
3a da Hamepnte nblnata rama
abcop6atopn, KOtO pa60Tc Ta3n
fynkun, obphte ce KbM haun
notpe6ntencky e6caNT. AEG
abcp6atopbT, KOtO pa60n c Ta3n
ФункцяТрЯбВаДаСьдьржаСИМВОЛa
7. Глижам поочиства themselves

BHIMAHNE!
Bx. rnaBa "Be3oNaCHocT".
7.1 O6ua HΦopMaζη
-Поочтваи Te Плота спед BCякaynoTpe6a.
BnHaHn n3noJ3BaIe roTbapcKn cboBe C NOUInCTeHO DbHO.
- HαnpackBaHnI NII TbMn IeTHa No NOBbpxHOCTTa He BnIaRr Bbpxy ΦyHKUOHNpaHeTo Ha Nlota.
- Ⅲπολ3BaIte cneuaJIeH NOUcTBaI npenapaT, npedHa3NaueH 3a NOBbpxHOCTTa Ha Nlota.
- I3noJI3BaIte cneuHa CTbprJaKa 3a CTbKJIO.
7.2 NocTbaHe Ha nloaTa
- OtctpaHbAaTe He3a6abHbO: pa3ToneHa nIactMaca, nIacTMacoBO fONIO, 3axap IxpaHa cbc 3axap, B IpOTIBeH cIyuaI 3AmbpcBaHTo MOKe Da NOBpeDN IIoUata. BnIMaBaIte Da He ce I3rOpnte. I3NON3BaIte CneuHaHaTa CTbprJka Ha CTbKIOkepAMNuHaTa NOBbPxHOCT NOc OCTbp bIbn I nnB3raIte OcTpneTO NOBbpxHOCTTA.
- OTeTpaHeTe, KOrato nNoyatae DOCTaTBuHO n3cTHnHaJa: CJIeDiOT BapOBnK, BOda, NtHa OT Ma3HnHa, NbCKaBN MetaJInueckn Obe3CBeTЯBaHn. NocntBaIte nloyata c BnaXHa KbPna mAnko NouchTaBau npenapat. CJeD
NouHCTBaHe NoCcyWeTe NNoyata C MeKa Kbpna.
-ПремaxHeTe 6ЯckaВи MeTaJIHnДpacKOTINH:ИЗПОЛЗВаИТе pa3TBOP OT
BODa N OcET N NOChTeTe CTbKHeHaTa IOBbPxHOCT C MOKbp NapcaI.
8. OTCTPAHRAHE HA HEN3ПРABHOCTN

BHUMAHNE!
Bx. rnaBa "Be3oNaCHocT".
8.1 KaK da noctbnte, ako...
| ПюбLEM Вьзможна р�чина Остраимвае | ||
| He можete за akтувирате ини об相关信息 c плota. | Плотьт He e с蜱рзан Кьм[elektro-3ххсановно ини e с蜱рзан He- правлино. | Пюberета дani плотьt e с蜱рзанправлино Кьm[elektro03ххсановно. |
| Пюдпалителяг e nizgoren. Y趟ete ce, чe пюдпалителяг e пи- чната 3a Heu3npabHocTTA. Ако пюд- палителяг пюдьжавада ИЗ grap, с蜱ржete ce c калфицеран[elek- trotexнik. | ||
| He насточьате stelenента на на- граване на 10 секун. | Вклочete плот otноу и заиме stelenentа на наgreяване на по-mалко ot 10 секун. | |
| Дokосни стve 2 плп поеве сени- зорни полеса[eновкеMuENHO. | Дokochete сamo[eEDNo сенизорно none. | |
| Пayз работи. Викто „Всядnevна уnotpe6a". | ||
| Върху komандно таблно вoda плп e покрино с пьскri Ma3NiHa. | Почистete komандно таблno. | |
| Пюозвучава звков сигнади плотьт се ИЗлочь. Korato плотьт се Deakтвира, пюзвучава звков сигнад. | Поставли стve He soо Вьрху[eDNo плп поеве сенизорно полеса. | Maxhete п dedmetа ot сенизорно пolyte. |
| Плоча се Deakтвира. Пюставли стve He soо Вьрху сенизор- ното пole ① | Maxhete п dedmetа ot сенизорно пolyte. | |
| Инданатов за остая тьчна то- плина не се Вклочь. | Знatable за о transitец He e ropeши, за- шOTO e била Вклочewsaco сamo за кразков breme плс сенизорьt e по- в体现在. | Сььржete се с ульномошен сени- зени. Як Зоната за ratotvehe e paobotnilа doctatbvyho дылго, за da ce haropeeи. |
| Hob' Hood He paBOTи. Покрпли стve komандно таблно. OTстраимete п dedmetа ot komандно tablo. | ||
| Изеньота Многу Висок сыd, ков- TO sbokupa сигнада. | Изеньота РО-Mальк сыd, сmedete Зоната на ratotvehe плувая вд. плота рьчho. | |
| Авtomатically наgreяване He pa- бOTи. | Зоната e ropeши. Oставete зоната за ИЗстиные дocta- Тьчho. | |
PpO6IeM Bb3MOxHa npuHnA OToTpaHbAHe
| 3аадада ha e haï-Bисokata cstenen Ha harpääbahe. | Hаь-bисokata ctenen ha harpääbahe Има сыца та мошноct kaоункци- ta. |
| Hасторікata 3a толпіна пpe- ВКПЮЧВа мexду дve НИВа. | Улравлие Ha мошноctта работи. Вижte „Всекидnevha уnotpe6a". |
| Сенисторіпілета ce haro- цяват. | Готьарсят сбд e пекалену ro- лам有很大 сбтавил Тьрд Блиzo do полета за улравлие. |
| Наяма 3ык, когато дOKOCВATE сенисторіпілета на tabлOTO. | ЗвуцITE ca DeakTNBIPAHn. АкTNBIPaite 3bUZITE. Вижte „Всекидnevha уnotpe6a". |
| LCBETBA. | ЗашITA 3a Deça有很大 3aklnouvahe paobtN. |
| FCBETBA. | Наяма сьдове вьрху зонATA. Пocstabete rotьарскь bьрху з- нота за ГOTBEHE. |
| Готьарсят сьд e неюхожи. Изпалзайтп одхожиrotьарскь сьдове. Вижte „П repорьк и сь玮- Ти". | |
| Диамetьрт Ha дьНОТо Ha rotьар- сьд e пекалено мальк за 30- нота за ГOTBEHE. | Изпалзайт OTьарскь сьдове с покюяп рasmeper. Вижte „Тexни- чески данн". |
| Eи се поява чисо. | Ha плota有很大 гешиka. ДeakTNBIPaite плOTA и ro akTNB- paite OTHOBO спд 30 сekунд. Ако Ese поява OTHOBO, Изкльчete пл- ta ot секунд сьржete плOT- Спд 30 секунд сьржete плOT- нов. Ак пообlemьт подьЖи, ce OБьрпente КьМ упьномошен серВ- Зен сеHTbp. |
| Може да чуete постаян 3ы- ков сигнел. | Еlektprucecka tа вьзka e Изпьлнe- на неравилно. |
8.2 Ako He OTKpNBaTe peWeHne...
Ako He Moxete Da Hamepnte peweHne Ha npo6Iema camn, o6bphete ce KbM TbproBeca cn nnn KbM yNtHOMOueh cepBn3eH ueHTbp. Cbo6uTe daHHnte ot Ta6eJkata c daHN. Cbo6uTe TpuicpeHn Ka 3a CTbkNOkepaMKaTa (Toi ce Hamnpa B bIbna Ha CTbkJIeHaTa NOBbpxHOCT) i Cbo6uHeHneTO 3a rpeKka,
koeto ce noBBA. YbepTe ce, ye ynpabnBaTe KOToHbT npabnHo.B npotuBeH clyaH, nocseHneTo Ha cepBn3Hna CneuaJnCT nHnHa npoDaBaHa Hma da 6bde 6e3nPaTHO, cbso npe3 rapaHNoHHra cpoK. B rapaHNoHHata KNxka ige HamePte yka3aHn OTHOCO cepBn3Hna CEHTbp n rapaHNoHHnTe ycNoBnA.
9. TEXHnueCKn DAHHN
9.1 TaBeJka c TexHnueckn daHHN
MoenIKB64431XB PNC 949 597 314 00
Tun 61 B4A 00 AA 220 - 240 V / 400 V 2N 50 - 60 Hz
Hnyk7.35kW Ppon3BedeHO BepMaHn
CepneH Homep 7.35 kW
AEG

9.2 CneunfkaunHa 30HnTe 3a rotBeHe
| 3она 3a rotвено Мошноct (при МakсималнаTO- Плинна Настойka) [W] | PowerBoost [W] PowerBoost мak- симална пpo- Дьлжигелноct [min] | Диаметьр на ro- ТВарскп сьд [mm] |
| Прedingулива 2300 3700 10 125 - 210 | ||
| Задна лява 1800 2800 10 145 - 180 | ||
| Прedingулива 1400 2500 4 125 - 145 | ||
| Задна дясан 1800 2800 10 145 - 180 |
MoUHOCCTTa Ha 3OHnTE 3a rotBeHe MoKe da ce OTKIOHOBA B MaIKu rpaHnCn OT DaHHnTe B Ta6nCata. TЯ 3aBnCn OT MaTePnAna n pa3MepnTe Ha rotBapCKnTE cbDoBe.
3a onTumalnpe3yIITaTN npn rotBeHe n3noJ3BaIte roTbapcKn CbIOBE, He no- rOJIemN OT dNaMeTbpa B Ta6nUcaTa.
10. EHEPΓΙΝΗ ΕΦΕKTΥΒΗΟCT
IeHTnΦkauaHaMoJeI KB64431XB
How to install your AEG Induction Hob - Worktop installation

4. OPIS PROIZVODA
5. SVAKODNEVNA UPORABA

UPOZORENJE!
How to install your AEG Induction Hob - Worktop installation

4. POPIS SPOTREBICE
How to install your AEG Induction Hob - Worktop installation

4.PRODUKTBESKRIVELSE
6.2 Lyden under drift
Hvis du kan hore:
Identification of model IKB64431XB
Thank you for choosing this AEG product. We have created it to give you impeccable performance for many years, with innovative technologies that help make life simpler – features you might not find on ordinary appliances. Please spend a few minutes reading to get the very best from it.
Visit our website to:

Get usage advice, brochures, trouble shooter, service and repair information: www.aeg.com/support

Register your product for better service: www.registeraeg.com

Buy Accessories, Consumables and Original spare parts for your appliance: www.aeg.com/shop
CUSTOMER CARE AND SERVICE
Always use original spare parts.
When contacting our Authorised Service Centre, ensure that you have the following data available: Model, PNC, Serial Number.
The information can be found on the rating plate.
Warning / Caution-Safety information
1 General information and tips
Environmental information
Subject to change without notice.
CONTENTS
1.SAFETY INFORMATION. 110
2.SAFETYINSTRUCTIONS 112
3. INSTALLATION 114
4.PRODUCT DESCRIPTION. 116
5.DAILYUSE 117
6. HINTS AND TIPS 121
7.CARE AND CLEANING 123
8.TROUBLESHOOTING 124
9. TECHNICAL DATA 125
10. ENERGY EFFICIENCY 126
1. SAFETY INFORMATION
Before the installation and use of the appliance, carefully read the supplied instructions. The manufacturer is not responsible for any injuries or damage that are the result of incorrect installation or usage. Always keep the instructions in a safe and accessible location for future reference.
1.1 Children and vulnerable people safety
- This appliance can be used by children aged from 8 years and above and persons with reduced physical, sensory or mental capabilities or lack of experience and knowledge if they have been given supervision or instruction concerning the use of the appliance in a safe way and understand the hazards involved.
- Children between 3 and 8 years of age and persons with very extensive and complex disabilities shall be kept away from the appliance unless continuously supervised.
- Children of less than 3 years of age should be kept away from the appliance unless continuously supervised.
- Do not let children play with the appliance.
- Keep all packaging away from children and dispose of it appropriately.
- WARNING: Keep children and pets away from the appliance when it operates or when it cools down. Accessible parts become hot during use.
- If the appliance has a child safety device, it should be activated.
- Children shall not carry out cleaning and user maintenance of the appliance without supervision.
1.2 General Safety
- WARNING: The appliance and its accessible parts become hot during use. Care should be taken to avoid touching heating elements.
- WARNING: Unattended cooking on a hob with fat or oil can be dangerous and may result in fire.
- NEVER try to extinguish a fire with water, but switch off the appliance and then cover flame e.g. with a lid or a fire blanket.
-
CAUTION: The appliance must not be supplied through an external switching device, such as a timer, or connected to a circuit that is regularly switched on and off by a utility.
-
CAUTION: The cooking process has to be supervised. A short term cooking process has to be supervised continuously.
- WARNING: Danger of fire: Do not store items on the cooking surfaces.
- Metallic objects such as knives, forks, spoons and lids should not be placed on the hob surface since they can get hot.
- Do not use the appliance before installing it in the built-in structure.
- Do not use a steam cleaner to clean the appliance.
- After use, switch off the hob element by its control and do not rely on the pan detector.
- If the glass ceramic surface / glass surface is cracked, switch off the appliance and unplug it from the mains. In case the appliance is connected to the mains directly using junction box, remove the fuse to disconnect the appliance from power supply. In either case contact the Authorised Service Centre.
- If the supply cord is damaged, it must be replaced by the manufacturer, an authorized Service or similarly qualified persons in order to avoid a hazard.
- WARNING: Use only hob guards designed by the manufacturer of the cooking appliance or indicated by the manufacturer of the appliance in the instructions for use as suitable or hob guards incorporated in the appliance. The use of inappropriate guards can cause accidents.
2. SAFETY INSTRUCTIONS
2.1 Installation

WARNING!
Only a qualified person must install this appliance.

WARNING!
Risk of injury or damage to the appliance.
-
Remove all the packaging.
-
Do not install or use a damaged appliance.
- Follow the installation instructions supplied with the appliance.
- Keep the minimum distance from other appliances and units.
Always take care when moving the appliance as it is heavy. Always use safety gloves and enclosed footwear. -
Seal the cut surfaces with a sealant to prevent moisture from causing swelling.
-
Protect the bottom of the appliance from steam and moisture.
- Do not install the appliance next to a door or under a window. This prevents hot cookware from falling from the appliance when the door or the window is opened.
Each appliance has cooling fans on the bottom. -
If the appliance is installed above a drawer:
-
Do not store any small pieces or sheets of paper that could be pulled in, as they can damage the cooling fans or impair the cooling system.
- Keep a distance of minimum 2 cm between the bottom of the appliance and parts stored in the drawer.
- Remove any separator panels installed in the cabinet below the appliance.
2.2 Electrical Connection

WARNING!
Risk of fire and electric shock.
- All electrical connections should be made by a qualified electrician.
- The appliance must be earthed.
- Before carrying out any operation makesure that the appliance is disconnectedfrom the power supply.
- Make sure that the parameters on the rating plate are compatible with the electrical ratings of the mains power supply.
- Make sure the appliance is installed correctly. Loose and incorrect electricity mains cable or plug (if applicable) can make the terminal become too hot.
- Use the correct electricity mains cable.
- Do not let the electricity mains cable tangle.
- Make sure that a shock protection is installed.
- Use the strain relief clamp on the cable.
- Make sure the mains cable or plug (if applicable) does not touch the hot appliance or hot cookware, when you connect the appliance to the near sockets.
- Do not use multi-plug adapters and extension cables.
- Make sure not to cause damage to the mains plug (if applicable) or to the mains cable. Contact our Authorised Service
Centre or an electrician to change a damaged mains cable.
- The shock protection of live and insulated parts must be fastened in such a way that it cannot be removed without tools.
- Connect the mains plug to the mains socket only at the end of the installation. Make sure that there is access to the mains plug after the installation.
- If the mains socket is loose, do not connect the mains plug.
- Do not pull the mains cable to disconnect the appliance. Always pull the mains plug.
- Use only correct isolation devices: line protecting cut-outs, fuses (screw type fuses removed from the holder), earth leakage trips and contactors.
- The electrical installation must have an isolation device which lets you disconnect the appliance from the mains at all poles. The isolation device must have a contact opening width of minimum 3 mm.
2.3 Use

WARNING!
Risk of injury, burns and electric shock.
- Remove all the packaging, labelling and protective film (if applicable) before first use.
- This appliance is for household use only.
- Do not change the specification of this appliance.
- Make sure that the ventilation openings are not blocked.
- Do not let the appliance stay unattended during operation.
- Set the cooking zone to "off" after each use.
- Do not rely on the pan detector.
- Do not put cutlery or saucepan lids on the cooking zones. They can become hot.
- Do not operate the appliance with wet hands or when it has contact with water.
- Do not use the appliance as a work surface or as a storage surface.
- If the surface of the appliance is cracked, disconnect immediately the appliance from the power supply. This to prevent an electrical shock.
- Users with a pacemaker must keep a distance of minimum 30~cm from the
induction cooking zones when the appliance is in operation.
- When you place food into hot oil, it may splash.

WARNING!
Risk of fire and explosion
- Fats and oil when heated can release flammable vapours. Keep flames or heated objects away from fats and oils when you cook with them.
The vapours that very hot oil releases can cause spontaneous combustion.
Used oil, that can contain food remnants, can cause fire at a lower temperature than oil used for the first time. - Do not put flammable products or items that are wet with flammable products in, near or on the appliance.

WARNING!
Risk of damage to the appliance.
- Do not keep hot cookware on the control panel.
- Do not put a hot pan cover on the glass surface of the hob.
- Do not let cookware boil dry.
- Be careful not to let objects or cookware fall on the appliance. The surface can be damaged.
- Do not activate the cooking zones with empty cookware or without cookware.
- Do not put aluminium foil on the appliance.
- Cookware made of cast iron, aluminium or with a damaged bottom can cause scratches on the glass / glass ceramic. Always lift these objects up when you have to move them on the cooking surface.
- This appliance is for cooking purposes only. It must not be used for other purposes, for example room heating.
3. INSTALLATION

WARNING!
Refer to Safety chapters.
2.4 Care and cleaning
- Clean the appliance regularly to prevent the deterioration of the surface material.
- Switch off the appliance and let it cool down before cleaning.
- Do not use water spray and steam to clean the appliance.
- Clean the appliance with a moist soft cloth. Use only neutral detergents. Do not use abrasive products, abrasive cleaning pads, solvents or metal objects.
2.5 Service
To repair the appliance contact the Authorised Service Centre. Use original spare parts only.
- Concerning the lamp(s) inside this product and spare part lamps sold separately: These lamps are intended to withstand extreme physical conditions in household appliances, such as temperature, vibration, humidity, or are intended to signal information about the operational status of the appliance. They are not intended to be used in other applications and are not suitable for household room illumination.
2.6 Disposal

WARNING!
Risk of injury or suffocation.
- Contact your municipal authority for information on how to discard the appliance correctly.
- Disconnect the appliance from the mains supply.
- Cut off the mains electrical cable close to the appliance and dispose of it.
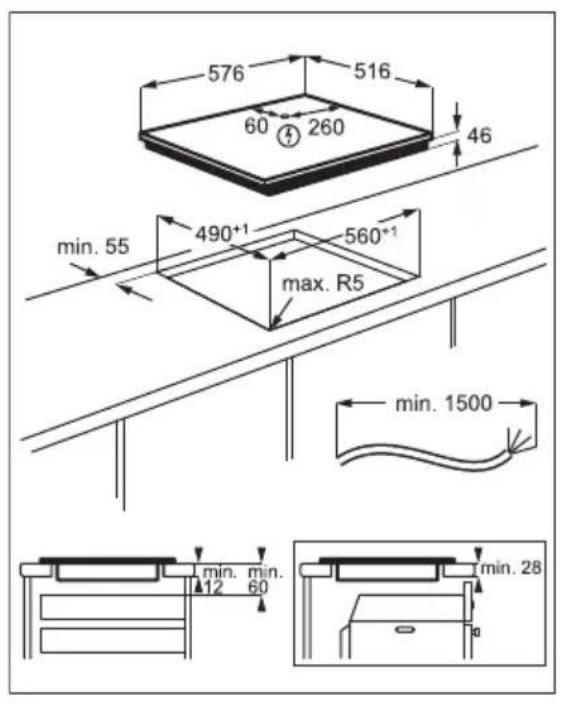
3.1 Before the installation
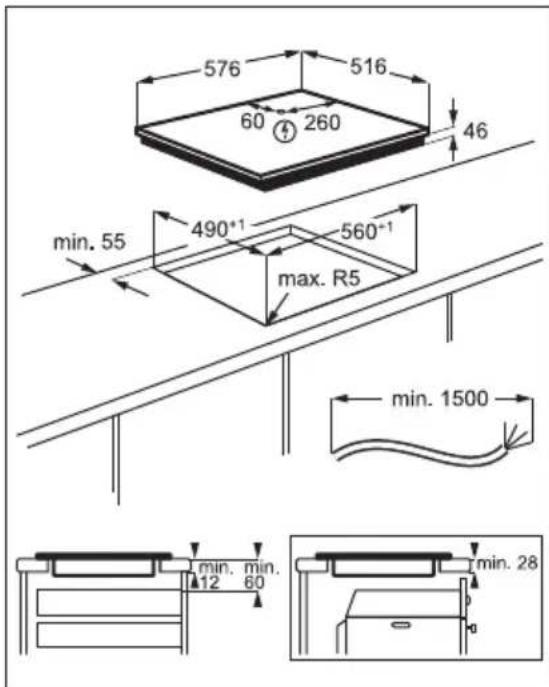
Before you install the hob, write down the information below from the rating plate. The rating plate is on the bottom of the hob.
Serial number
3.2 Built-in hobs
Only use the built-in hobs after you assemble the hob into correct built-in units and work surfaces that align to the standards.
3.3 Connection cable
The hob is supplied with a connection cable.
To replace the damaged mains cable, use the cable type: H05V2V2-F which withstands a temperature of 90^ or higher. Speak to your local Service Centre.
3.4 Assembly
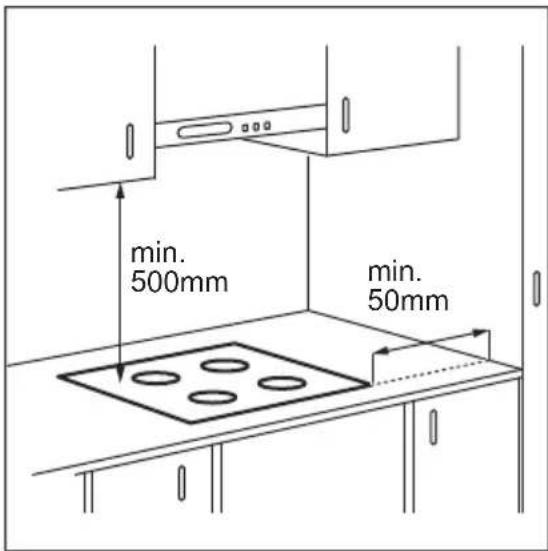
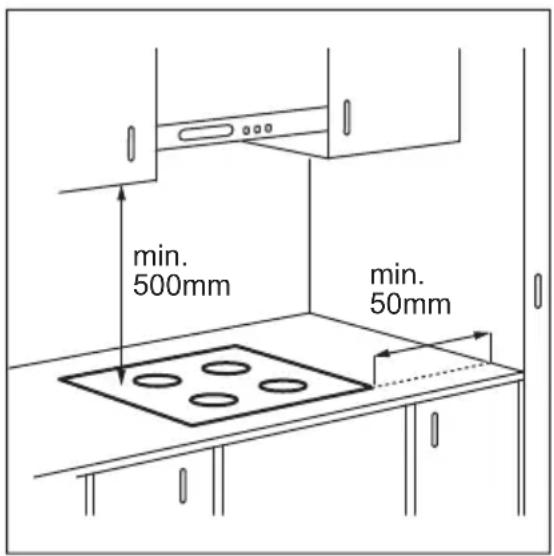
If you install the hob under a hood, please see the installation instructions of the hood for the minimum distance between the appliances.
If the appliance is installed above a drawer, the hob ventilation can warm up the items stored in the drawer during the cooking process.

YouTube
www.youtube.com/electrolux www.youtube.com/aeg
How to install your AEG
Induction Hob - Worktop installation

4. PRODUCT DESCRIPTION
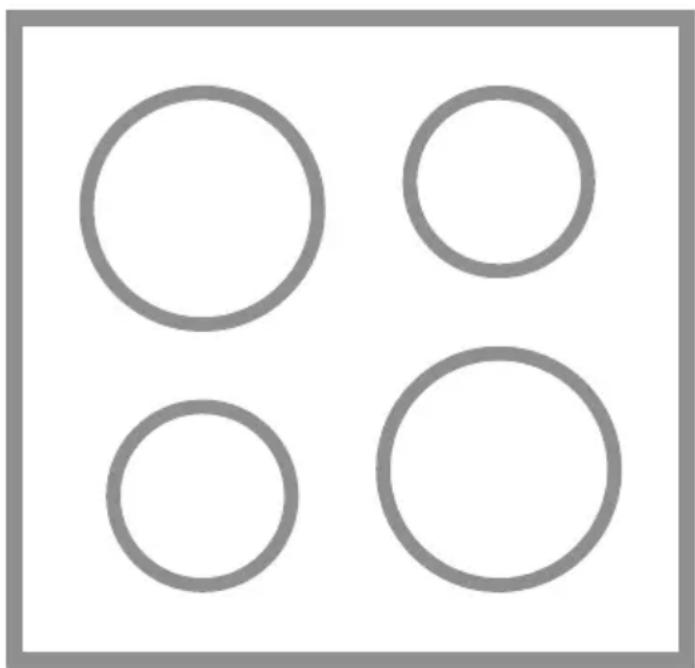
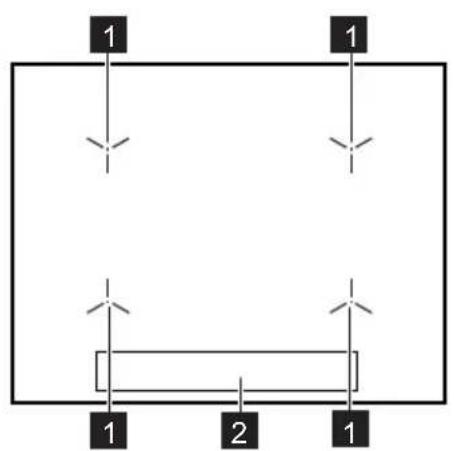
4.1 Cooking surface layout
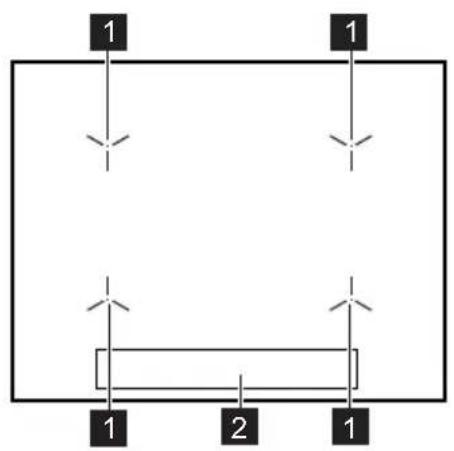
1 Induction cooking zone
2 Control panel
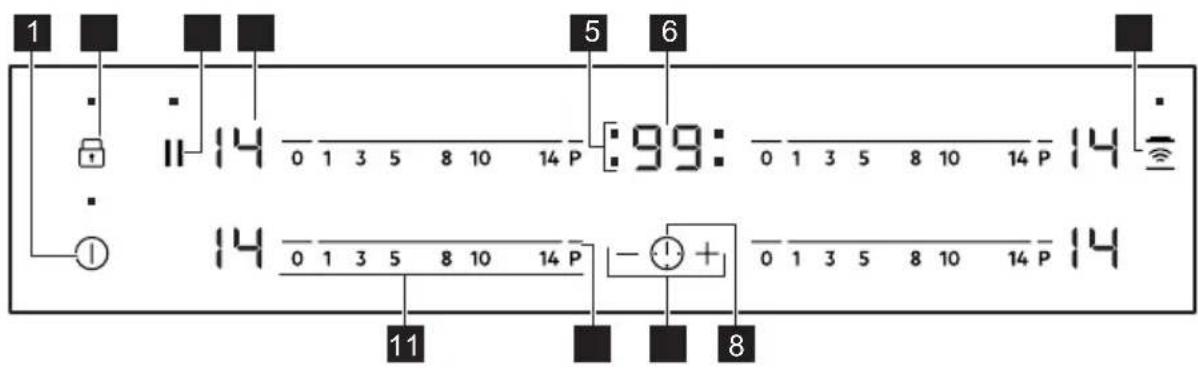
4.2 Control panel layout

Use the sensor fields to operate the appliance. The displays, indicators and sounds tell which functions operate.
| Sensor field | Function Comment | |
| 1 | ① | ON / OFF To activate and deactivate the hob. |
| 2 | Lock / Child Safety Device To lock / unlock the control panel. | |
| 3 | || | Pause To activate and deactivate the function. |
| 4 | - Heat setting display To show the heat setting. | |
| 5 | - Timer indicators of cooking zones To show for which zone you set the time. | |
| 6 | - Timer display To show the time in minutes. | |
| 7 | Hob2Hood To activate and deactivate the manual mode of the function. | |
| 8 | ① | - To select the cooking zone. |
| 9 | +/- | - To increase or decrease the time. |
| 10 | P | PowerBoost To activate the function. |
| 11 | - Control bar To set a heat setting. | |
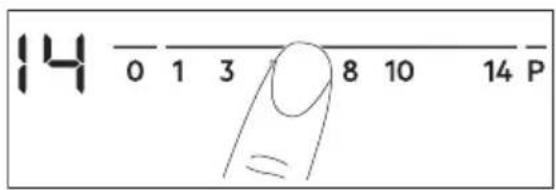
4.3 Heat setting displays
| Display Description | |
| 0 | The cooking zone is deactivated. |
| 1-14 | The cooking zone operates. |
| u | Pause operates. |
| A | Automatic Heat Up operates. |
| P | PowerBoost operates. |
| E+ digit | There is a malfunction. |
| / Z | OptiHeat Control (3 step Residual heat indicator): continue cooking / keep warm / residual heat. |
| L | Lock / Child Safety Device operates. |
| F | Incorrect or too small cookware or no cookware on the cooking zone. |
| - | Automatic Switch Off operates. |
4.4 OptiHeat Control (3 step Residual heat indicator)

WARNING!

There is a risk of
burns from residual heat.
The indicators show the level of the residual heat for the cooking zones you are currently
using. The indicators may also come on for the neighbouring cooking zones even if you are not using them.
The induction cooking zones produce the heat necessary for the cooking process directly in the bottom of the cookware. The glass ceramic is heated by the heat of the cookware.
5. DAILY USE

WARNING!
Refer to Safety chapters.
5.1 Activating and deactivating
Touch for 1 second to activate or deactivate the hob.
5.2 Automatic Switch Off
The function deactivates the hob automatically if:
- all cooking zones are deactivated,
- you do not set the heat setting after you activate the hob.
- you spill something or put something on the control panel for more than 10 seconds (a pan, a cloth, etc.). An acoustic signal sounds and the hob deactivates. Remove the object or clean the control panel.
- the hob gets too hot (e.g. when a saucepan boils dry). Let the cooking zone cool down before you use the hob again.
- you use incorrect cookware. The symbol comes on and the cooking zone deactivates automatically after 2 minutes.
- you do not deactivate a cooking zone or change the heat setting. After some time comes on and the hob deactivates.
The relation between the heat setting and the time after which the hob deactivates:
| Heat setting The hob deactivates after | |
| u, 1 - 3 | 6 hours |
| 4 - 7 5 hours | |
| 8 - 9 4 hours | |
| 10 - 14 1.5 hour | |
5.3 The heat setting
To set or change the heat setting:
Touch the control bar at the correct heat setting or move your finger along the control bar until you reach the correct heat setting.
5.4 Automatic Heat Up
Activate this function to get a desired heat setting in a shorter time. When it is on, the zone operates on the highest setting in the beginning and then continues to cook at the desired heating setting.
To activate the function the cooking zone must be cold.
To activate the function for a cooking zone: touch P (P comes on). Immediately touch a desired heat setting. After 3 seconds R comes on.
To deactivate the function: change the heat setting.
5.5 PowerBoost
This function makes more power available to the induction cooking zones. The function can be activated for the induction cooking zone only for a limited period of time. After this time the induction cooking zone automatically sets back to the highest heat setting.
Refer to "Technical data" chapter.
To activate the function for a cooking zone: touch P comes on.
To deactivate the function: change the heat setting.
5.6 Timer
- Count Down Timer
You can use this function to set the length of a single cooking session.
First set the heat setting for the cooking zone, then set the function.
To set the cooking zone: touch repeatedly until the indicator of a cooking zone appears.
To activate the function: touch + of the timer to set the time (00 - 99 minutes). When the indicator of the cooking zone starts to flash, the time counts down.
To see the remaining time: touch to set the cooking zone. The indicator of the cooking zone starts to flash. The display shows the remaining time.
To change the time: touch to set the cooking zone. Touch or
To deactivate the function: touch to set the cooking zone and then touch The remaining time counts down to 00. The indicator of the cooking zone disappears.

When the countdown ends, an acoustic signal sounds and 00 flashes. The cooking zone deactivates.
To stop the sound: touch
- CountUp Timer You can use this function to monitor how long the cooking zone operates.
To set the cooking zone: touch repeatedly until the indicator of a cooking zone appears.
To activate the function: touch of the timer. UP appears. When the indicator of the cooking zone starts to flash, the time counts up. The display switches between UP and the counted time (in minutes).
To see how long the cooking zone operates: touch to set the cooking zone. The indicator of the cooking zone starts to flash. The display shows how long the zone operates.
To deactivate the function: touch and then touch or . The indicator of the cooking zone disappears.
- Minute Minder You can use this function when the hob is activated and the cooking zones do not operate. The heat setting display shows
To activate the function: touch and then touch or of the timer to set the time. When the time finishes, an acoustic signal sounds and 00 flashes.
To stop the sound: touch

The function has no effect on the operation of the cooking zones.
5.7 Pause
This function sets all cooking zones that operate to the lowest heat setting.
When the function operates, all other symbols on the control panels are locked. The function does not stop the timer functions.
Touch to activate the function. comes on. The heat setting is lowered to 1.
To deactivate the function, touch The previous heat setting comes on.
5.8 Lock
You can lock the control panel while cooking zones operate. It prevents an accidental change of the heat setting.
Set the heat setting first.
To activate the function: touch L comes on for 4 seconds. The Timer stays on.
To deactivate the function: touch. The previous heat setting comes on.

When you deactivate the hob, you also deactivate this function.
5.9 Child Safety Device
This function prevents an accidental operation of the hob.
To activate the function: activate the hob with Do not set any heat setting. Touch for 4 seconds. comes on. Deactivate the hob with
To deactivate the function: activate the hob with ① do not set any heat setting. Touch for 4 seconds. ② comes on. Deactivate the hob with ①
To override the function for only one cooking time: activate the hob with ① L comes on. Touch for 4 seconds. Set the heat setting in 10 seconds. You can operate the hob. When you deactivate the hob with the function operates again.
5.10 OffSound Control (Deactivating and activating the sounds)
Deactivate the hob. Touch for 3 seconds. The display comes on and goes out. Touch for 3 seconds. Dares on. Touch of the timer to choose one of the following:
- the sounds are off
- the sounds are on
To confirm your selection wait until the hob deactivates automatically.
When the function is set to you can hear the sounds only when:
·you touch ①
- Minute Minder comes down
- Count Down Timer comes down
- you put something on the control panel.
5.11 Power management
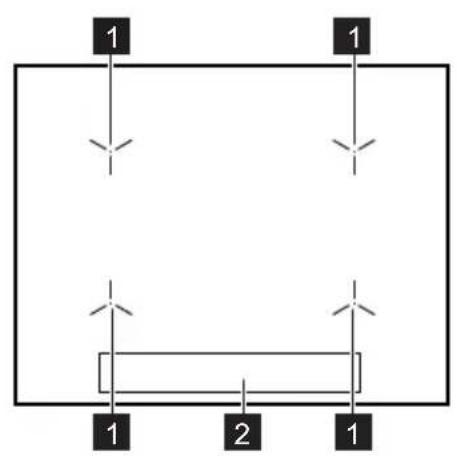
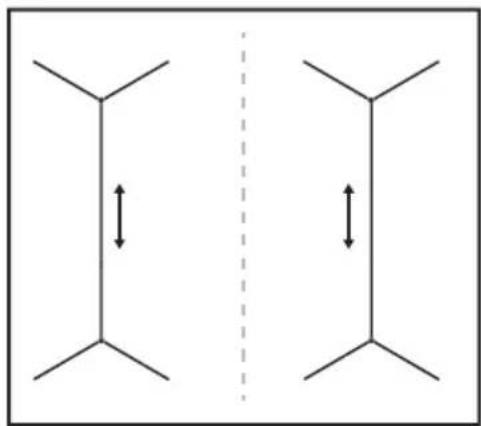
- Cooking zones are grouped according to the location and number of the phases in the hob. See the illustration.
Each phase has a maximum electricity loading of 3700 W.
The function divides the power between cooking zones connected to the same phase.
The function activates when the total electricity loading of the cooking zones connected to a single phase exceeds 3700 W.
The function decreases the power to the other cooking zones connected to the same phase. - The heat setting display of the reduced zones alternates between the chosen heat setting and the reduced heat setting. After some time the heat setting display of the reduced zones stays on the reduced heat setting.
5.12 Hob²Hood
It is an advanced automatic function which connects the hob to a special hood. Both the hob and the hood have an infrared signal communicator. Speed of the fan is defined automatically on basis of mode setting and temperature of the hottest cookware on the hob. You can also operate the fan from the hob manually.
i For most of the hoods the remote system is originally deactivated. Activate it before you use the function. For more information refer to hood user manual.
Operating the function automatically To operate the function automatically set the automatic mode to H1-H6. The hob is originally set to H5. The hood reacts whenever you operate the hob. The hob recognizes temperature of the cookware automatically and adjusts the speed of the fan.
Automatic modes
| Automat- ic light | Boiling1) | Frying2) | |
| Mode H0 Off Off Off | |||
| Mode H1 On Off Off | |||
| Mode On Fan speed | Fan speed | ||
| H2 3) | 1 | 1 | |
| Mode H3 On Off Fan speed | 1 | ||
| Mode H4 On Fan speed | Fan speed | ||
| 1 | 1 | ||
| Automat- ic light | Boiling1) | Frying2) | |
| Mode H5 On Fan speed | 1 | Fan speed 2 | |
| Mode H6 On Fan speed | 2 | Fan speed 3 | |
1) The hob detects the boiling process and activates fan speed in accordance with automatic mode.
2) The hob detects the frying process and activates fan speed in accordance with automatic mode.
3) This mode activates the fan and the light and does not rely on the temperature.
Changing the automatic mode
- Deactivate the appliance.
- Touch for 3 seconds. The display comes on and goes off.
- Touch for 3 seconds.
- Touch a few times until comes on.
- Touch of the Timer to select an automatic mode.
To operate the hood directly on the hood panel deactivate the automatic mode of the function.
When you finish cooking and deactivate the hob, the hood fan may still operate for a certain period of time. After that time the system deactivates the fan automatically and prevents you from accidental activation of the fan for the next 30 seconds.
6. HINTS AND TIPS

WARNING!
Refer to Safety chapters.
6.1 Cookware

For induction cooking zones a strong electro-magnetic field creates the heat in the cookware very quickly.
Operating the fan speed manually
You can also operate the function manually. To do that touch when the hob is active. This deactivates automatic operation of the function and allows you to change the fan speed manually. When you press you raise the fan speed by one. When you reach an intensive level and press again you will set fan speed to 0 which deactivates the hood fan. To start the fan again with fan speed 1 touch

To activate automatic operation of the function, deactivate the hob and activate it again.
Activating the light
You can set the hob to activate the light automatically whenever you activate the hob. To do so set the automatic mode to H1-H6.

The light on the hood deactivates 2 minutes after deactivating the hob.
Use the induction cooking zones with suitable cookware.
- The bottom of the cookware must be as thick and flat as possible.
- Ensure pan bases are clean and dry before placing on the hob surface.
- In order to avoid scratches, do not slide on rub the pot across the ceramic glass.
Cookware material
- correct: cast iron, steel, enamelled steel, stainless steel, multi-layer bottom (with a correct marking from a manufacturer).
not correct: aluminium, copper, brass, glass, ceramic, porcelain.
Cookware is suitable for an induction hob if:
- water boils very quickly on a zone set to the highest heat setting.
- a magnet pulls on to the bottom of the cookware.
Cookware dimensions
- Induction cooking zones adapt to the dimension of the bottom of the cookware automatically.
- The cooking zone efficiency is related to the diameter of the cookware. The cookware with a diameter smaller than the minimum receives only a part of the power generated by the cooking zone.

Refer to "Technical data".
6.2 The noises during operation
If you can hear:
- crack noise: cookware is made of different materials (a sandwich construction).
whistle sound: you use a cooking zone with a high power level and the cookware
is made of different materials (a sandwich construction).
- humming: you use a high power level.
- clicking: electric switching occurs.
- hissing, buzzing: the fan operates.
The noises are normal and do not indicate any malfunction.
6.3 Öko Timer (Eco Timer)
To save energy, the heater of the cooking zone deactivates before the count down timer sounds. The difference in the operation time depends on the heat setting level and the length of the cooking operation.
6.4 Examples of cooking applications
The correlation between the heat setting of a zone and its consumption of power is not linear. When you increase the heat setting, it is not proportional to the increase of the consumption of power. It means that a cooking zone with the medium heat setting uses less than a half of its power.

The data in the table is for guidance only.
| Heat setting Use to: Time | Hints (min) | |
| u-1 | Keep cooked food warm. as neces-sary | Put a lid on the cookware. |
| 1 - 3 Hollandaise sauce, melt: butter, choco-late, gelatine. | 5 - 25 Mix from time to time. | |
| 1 - 3 Solidify: fluffy omelettes, baked eggs. 10 - 40 Cook with a lid on. | ||
| 3 - 5 Simmer rice and milkbased dishes,heat up ready-cooked meals. | 25 - 50 Add at least twice as much liquid as rice, mix milk dishes halfway through the procedure. | |
| 5 - 7 Steam vegetables, fish, meat. 20 - 45 Add a couple of tablespoons of liquid. | ||
| 7 - 9 Steam potatoes. 20 - 60 Use max. 1/4 l of water for 750 g of po-tatoes. | ||
| 7 - 9 Cook larger quantities of food, stews and soups. | 60 - 150 Up to 3 l of liquid plus ingredients. | |
| Heat setting Use to: Time | Hints | |
| (min) | ||
| 9 - 12 Gentle fry: escalope, veal cordon bleu, cutlets, rissoles, sausages, liver, roux, eggs, pancakes, doughnuts. | as nécess- sary | Turn halfway through. |
| 12 - 13 Heavy fry, hash browns, loin steaks, steaks. | 5 - 15 Turn halfway through. | |
| 14 Boil water, cook pasta, sear meat (goulash, pot roast), deep-fry chips. | ||
| P | Boil large quantities of water. PowerBoost is activated. | |
6.5 Hints and Tips for Hob²Hood
When you operate the hob with the function:
- Protect the hood panel from direct sunlight.
- Do not spot halogen light on the hood panel.
- Do not cover the hob control panel.
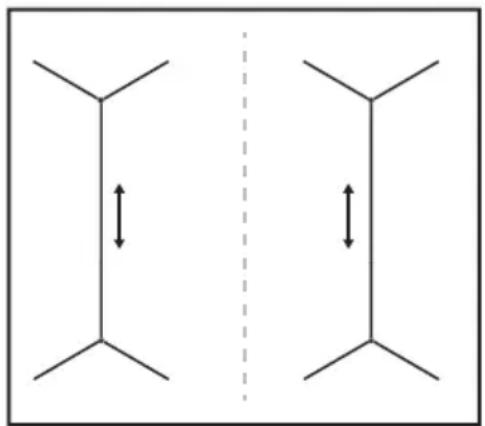
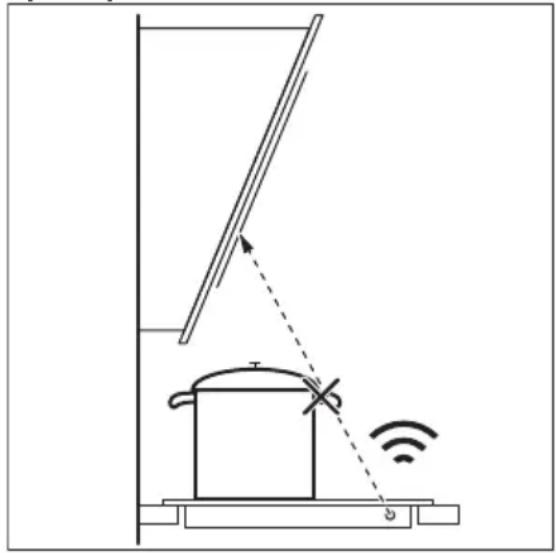
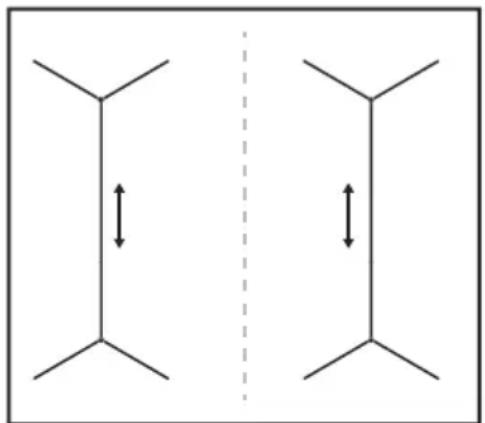
- Do not interrupt the signal between the hob and the hood (e.g. with the hand, a cookware handle or a tall pot). See the picture.
The hood in the picture is only exemplary.
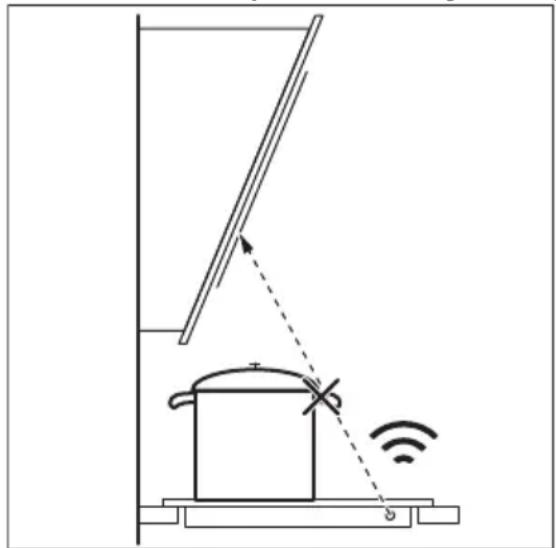
Other remotely controlled appliances may block the signal. Do not use any such appliances near to the hob while Hob²Hood is on.
Cooker hoods with the Hob²Hood function
To find the full range of cooker hoods which work with this function refer to our consumer website. The AEG cooker hoods that work with this function must have the symbol .
7. CARE AND CLEANING

WARNING!
Refer to Safety chapters.
7.1 General information
- Clean the hob after each use.
-
Always use cookware with a clean base.
-
Scratches or dark stains on the surface have no effect on how the hob operates.
- Use a special cleaner suitable for the surface of the hob.
- Use a special scraper for the glass.
7.2 Cleaning the hob
- Remove immediately: melted plastic, plastic foil, sugar and food with sugar, otherwise, the dirt can cause damage to the hob. Take care to avoid burns. Use a special hob scraper on the glass surface at an acute angle and move the blade on the surface.
- Remove when the hob is sufficiently cool: limescale rings, water rings, fat
stains, shiny metallic discoloration. Clean the hob with a moist cloth and a non-abrasive detergent. After cleaning, wipe the hob dry with a soft cloth.
- Remove shiny metallic discoloration: use a solution of water with vinegar and clean the glass surface with a cloth.
8. TROUBLESHOOTING

WARNING!
Refer to Safety chapters.
8.1 What to do if...
| Problem Possible cause Remedy | ||
| You cannot activate or operate the hob. | The hob is not connected to an elec- trical supply or it is connected incor- rectly. | Check if the hob is correctly connected to the electrical supply. |
| The fuse is blown. Make sure that the fuse is the cause of | the malfunction. If the fuse is blown again and again, contact a qualified electrician. | |
| You do not set the heat setting for 10 seconds. | Activate the hob again and set the heat setting in less than 10 seconds. | |
| You touched 2 or more sensor fields at the same time. | Touch only one sensor field. | |
| Pause operates. Refer to "Daily use". | ||
| There is water or fat stains on the control panel. | Clean the control panel. | |
| An acoustic signal sounds and the hob deactivates. An acoustic signal sounds when the hob is deactivated. | You put something on one or more sensor fields. | Remove the object from the sensor fields. |
| The hob deactivates. You put something on the sensor field ① | Remove the object from the sensor field. | |
| Residual heat indicator does not come on. | The zone is not hot because it oper- ated only for a short time or the sen- sor is damaged. | If the zone operated sufficiently long to be hot, speak to an Authorised Service Centre. |
| Hob²Hood does not work. You covered the control panel. Remove the object from the control panel. | ||
| You use a very tall pot which blocks the signal. | Use a smaller pot, change the cooking zone or operate the hood manually. | |
Problem Possible cause Remedy
| Automatic Heat Up does not op- erate. | The zone is hot. Let the zone become sufficiently cool. | |
| The highest heat setting is set. The highest heat setting has the same power as the function. | ||
| The heat setting changes be- tween two levels. | Power management operates. Refer to "Daily use". | |
| The sensor fields become hot. The cookware is too large or you put it too near to the controls. | Put large cookware on the rear zones, if possible. | |
| There is no sound when you touch the panel sensor fields. | The sounds are deactivated. Activate the sounds. Refer to "Daily use". | |
| L comes on. | Child Safety Device or Lock oper- ates. | Refer to "Daily use". |
| F comes on. | There is no cookware on the zone. Put cookware on the zone. | |
| The cookware is unsuitable. Use suitable cookware. Refer to "Hints and tips". | ||
| The diameter of the bottom of the cookware is too small for the zone. | Use cookware with correct dimen- sions. Refer to "Technical data". | |
| E and a number come on. | There is an error in the hob. Deactivate the hob and activate it again after 30 seconds. If E comes on again, disconnect the hob from the electrical supply. After 30 seconds, connect the hob again. If the problem continues, speak to an Authorised Service Centre. | |
| You can hear a constant beep noise. | The electrical connection is incor- rect. | Disconnect the hob from the electrical supply. Ask a qualified electrician to check the installation. |
8.2 If you cannot find a solution...
If you cannot find a solution to the problem yourself, contact your dealer or an Authorised Service Centre. Give the data from the rating plate. Give also three digit letter code for the glass ceramic (it is in the corner of the glass surface) and an error
message that comes on. Make sure, you operated the hob correctly. If not the servicing by a service technician or dealer will not be free of charge, also during the warranty period. The instructions about the Service Centre and conditions of guarantee are in the guarantee booklet.
9. TECHNICAL DATA
9.1 Rating plate
Model IKB64431XB PNC 949 597 314 00
Typ 61 B4A 00 AA 220 - 240 V / 400 V 2N 50 - 60 Hz
Induction 7.35 kW Made in Germany
Ser.Nr. 7.35 kW
AEG

9.2 Cooking zones specification
| Cooking zone Nominal power (maximum heat setting) [W] | PowerBoost [W] PowerBoost maximum dura- tion [min] | Cookware diamie- ter [mm] |
| Left front 2300 3700 10 125 - 210 | ||
| Left rear 1800 2800 10 145 - 180 | ||
| Right front 1400 2500 4 125 - 145 | ||
| Right rear 1800 2800 10 145 - 180 |
The power of the cooking zones can be different in some small range from the data in the table. It changes with the material and dimensions of the cookware.
For optimal cooking results use cookware no larger than the diameter in the table.
10. ENERGY EFFICIENCY
10.1 Product information according to EU 66/2014 valid for EU market only
Model identification IKB64431XB
| Type of hob Built-In Hob | ||
| Number of cooking zones 4 | ||
| Heating technology Induction | ||
| Diameter of circular cooking zones (Ø) Left front | 21.0 cm | |
| Left rear | 18.0 cm | |
| Right front | 14.5 cm | |
| Right rear | 18.0 cm | |
| Energy consumption per cooking zone (EC electric cooking) | Left front | 178.4 Wh / kg |
| Left rear | 174.4 Wh / kg | |
| Right front | 183.2 Wh / kg | |
| Right rear | 184.9 Wh / kg | |
| Energy consumption of the hob (EC electric hob) 180.2 Wh / kg | ||
EN 60350-2 - Household electric cooking appliances - Part 2: Hobs - Methods for measuring performance
10.2 Energy saving
You can save energy during everyday cooking if you follow below hints.
-
When you heat up water, use only the amount you need.
-
If it is possible, always put the lids on the cookware.
- Before you activate the cooking zone put the cookware on it.
- Put the smaller cookware on the smaller cooking zones.
- Put the cookware directly in the centre of the cooking zone.
- Use the residual heat to keep the food warm or to melt it.
11. ENVIRONMENTAL CONCERNS
Recycle materials with the symbol Put the packaging in relevant containers to recycle it. Help protect the environment and human health by recycling waste of electrical and electronic appliances. Do not dispose of
appliances marked with the symbol with the household waste. Return the product to your local recycling facility or contact your municipal office.
PARIMATE TULEMUSTE SAAVUTAMISEKS
How to install your AEG Induction Hob - Worktop installation
4. TUOTEKUVAUS
4.1 Keittoalueet
Sous reserve de modifications.
TABLE DES MATIÈRES
- INFORMATIONS DE SECURITE 162
- CONSIGNES DE SECURITE 165
- INSTALLATION 167
4.DESCRIPTION DE L'APPAREIL 168 - UTILISATION QUOTIDIENNE 170
- CONSEILS 174
- ENTRETIEN ET NETTOYAGE 176
- DEPANNAGE 177
9.CARACTERISTIQUES TECHNIQUES 179 - RENDEMENT ENERGÉTIQUE 179
1. INFORMATIONS DE SECURITE
How to install your AEG Induction Hob - Worktop installation
4. DESCRIPTION DE L'APPAREIL
How to install your AEG
Induction Hob - Worktop installation

How to install your AEG Induction Hob - Worktop installation

4. GAMINIO APRASYMAS
4.1 Maisto gaminimo pavirsiu iśděstymas

1 Indukciné kaitvieté
2 Valdymo skydelis
4.2 Valdymo skydelio iśděstymas
IpoIN3BOIDNTeIOT He cHOCN OndROBOPHOCT 3a HappaBeHa
NOBpeDa nIi NtTeTa KOn Ce pe3yIITaT Ha He npabnHa MOHTaJa nIi yNoTppe6a. CekoraawuYbajTe rN yNaTCTBaTa Ha cnrgpHo n 6e36eDnO MeCTo 3a noDoUHeJHa yNoTppe6a.
1.1 Be36eHocT Ha Deca N paHnBn Iuca
Oboj anapat mojat da ro kopnstat deca had 8 roDNHn Iuza co HamaJIeHN qn3nUKN, CETINHn IINI MeHTaJHn CnoC6HOCTN IINI JIua 6e3 NCKyCTBO n 3HaEHe DOKOJky TOa ro npaBAT NOd Ha3Op IINI NM 6nIe DaJeHn yNaTCTBa KaKo 6e36eJHo da ro yNoTpe6yBaat anapaTOT n rnpa3bupaat onacHOCTnte Nobp3aHn CO Hero.
Anapatot He cmee da 6nde Bo doofaT ha deca mey 3 n 8 roiunha BO3pact n Iuca co MHory obemhn i cnloxehn npuekn BO pa3bojOT OCBEN aKO He ce eoNTOJAHn HAD3Op.
Anapatot He cmee da 6nde Bo dooata Ha deca nomann od 3 roHNIOCBEN aKO He ce eoI NOCTOJAH HAD3Op.
-Дeца He cmeat da irpaat co anapatot.
Држete ja ambaJaXaTа поалeky od Deca n Фрпerte ja COODBETHO.
- ПРЕДУПЕДУBAHBЕ: Дожete Гдецаи MИЛЕнчиьаразноалеку od anapatOT kORA"Toj paBOTи Или кORA ce Лади. ДостаннITE DeJIOBи можеда CTaHaT Jжшкп 3a Врeme Ha ynotpe6aTa.
- Ako anapatot nma ypei 3a 3aHTnTa Ha deca, Tpe6a da Bknyu.
-ДeцаТ He Tpe6a Дa ГЧИстаТ ИПп Дa Г OДдржУВаТ anapatOT 6e3 NaДЗОр.
1.2 Onstata 6e36eHocT
- ПРЕДУПЕДУBAHBE: AnapatOTи HeROBNTe Дocтанн DeIOBn Ce BxeHTyBaAT 3a BpeMe Ha ynoTpe6ata. Tpe6a Da Ce BHMaBa Дa He Ce DoNIPAAT rpejaHTe.
- ПЕДУПЕДУBAHBЕ: ГовьеTo Ha NOВршиHa 3a Говье co MacT Или MacNo 6e3 NaДЗО можеда 6иde onacHo n da DoBede do noЖар.
- HNKOfAù He rachete oran co Bóda, Tyky ncknyeTe ro anapatot, a noToa nokpijTe ro pIaMeHot, Ha np. co Kaapan Co cneuJalHo npOTnBnoJxapHo Ke6e.
BHIMAHNE: Anapatot He cMee da 6nde doctaBeH npeky NaBOpEWeH ypei 3a npeKInHyBaHbe, KaKO Ha npimep Tajmep iIIN da 6nde NOBp3aH Ha cTpyja Kora ce racn I paIINoCTOJaHO CO NOMoH Ha ypei.
BHIMAHNE: Ppoecot Ha rotBeHe Mopa Da BnDe HndrJeDyBaH. KpatKITE npoecn Ha rotBeHe Mopa Da 6nDat noctoJHo HndrJeDyBaHn.
- ПРЕДУПЕДУBAИБЕ: Onacnot od oran: He vyвajteпраздmetи на поршинITE 3a Гтbe№.
- MetaJIHnTe npeIMeTn, KaKO IJTO Ce HOKeBn, BNJbUShKn, NaIXuN KanauN, He Tpe6a Da ce OCTaBaat Ha NOBpShHaTa 3a rotBeHbe 6nJeKn MoKe Da ce BxEHTaT.
He KopncTeTe ro anapatOT nped da ro MOHTnpate BO BrpaDeHaTa KOHcTpyKunja.
He KopnicTe He nCTaH a napea 3a YnCTeHbe Ha anapatOT.
- ПО корисьeto, Исклучete ja ринглata Ha NOВршинатa 3a rotbebe п配电у cooDBeTHata KOHTpOla n He NOTnnpajTe ce Ha ypeodot 3a OTKprBaHbe TeHupe.
Ako ctaKIO-KepaMnUkata / ctaKJeHaTa NOBpUnHa e HanyKHata, ncknyute ro anapatOT 3a da ja n36eHete MOxHocTa od ctpyeH ydap Bo cnyaj anapatOT da e NOBp3aH co wTekepot CO pa3BOdHa Kytna, n3BaTe je cnojkaT a da ro ncknylnte anapatOT od ctpya. Bo cekoJ clyuj kONTAKTnpajTe ro OblaCTeHnot cepBnC.
-Дokолку КабелOT 3a HabojyBaHe ce OwTeTn, Tpe6a da ce 3amEno OD CTpaHa Ha npOn3BODnteIOT, OBnacteH cepBnCeH npeTCTaBnK nIi CnUHcKBaJInФnKyBaHn IInca 3a Da ce n36erHe onaCHOCT.
- ПЕДУПЕДУBAHBE: Корис-teе само 3aштпици 3a поча 3a rotbebe HanpaBEN OД CTpaHa Na npON3BOДNTeJOT Ha anapatOT 3a rotbebe ИлОне кОп Сс HabeDEHn BO yNATCTBaTа 3a KOPис-tebe KaKO nOroДи Ил 3aштпици 3a поча 3a rotbebe кОп сe DeI OД сamnot anapat.Корис-teTo Ha HecoODBeTHN 3aштпици 3a NOВPsInHa 3a rotbebe можеда прEDIN3BnKa He3roDa.
2.БE3БЕДHOCHI YIATCTBA
2.1 MoHTaKa

PPEyPENEYBAHbE!
Anapatot Mopa da ro MOHTupa camo KBaInnKyBaHO JINCe.

PPEyPENEYBAHbE!
Pn3nk od noBpeDa nnn OwTeTyBaHbe Ha anapatOT.
-Извашие щацелаамбалда.
- Hemojte da MOHTnPate HnTu da KopnCTnte OwTeTeH anapaT.
CneTe rHnHCTpyKunTe 3a MOHTnpaBe daenco anapatot.
OdpKyBajTe MHHImaHa OdaJeueHocOd npynte anapatn n deIOBn.
- Cekoraш BHMAbjTe Kora ro npehecybaTe anapatot 3aToa wTo e TeKok. Cekoraш HocTe 3aWTHTn paKaBnU n npInoJxHeHte o6yBkn.
3aueeneTe r3aceeHnte NOBpunHn CO 3aNTiBauch 3a da cnpeHTe BlaRaTa da npedN3BnKa HaDnHyBaHe.
3aHTTeTo rDHOTo Ha anapaTOT oI napea I Bnara.
He ro mONTupajte anapaTOT BO 6n3nHa BaPATA nn noi npo3opeu. Ha OBOJ NaHKe cnpeHTe HeKoJ Xekok caI 3a RotBeHe da naHne od anapaTOT Kora BpaTaTA nn npo3opeoT ce OTBOpEH.
- Cekoj anapat mMa BENTUNaTOPn 3a NaJeHBe Ha dHOTO.
Ako anapaToTe uHCTaInpaH Hnd oNOKata:
-He yubajte MaII npedmetn IINI INCTOBxapTna KOI MOKAT da 6uadT BOBneueHn 3aToa UTO MOKe Da T OHTeTaBENTHaTOPnTe 3a NaDeHBe IINI Da rO OHTeTaT CnCTeMOT 3a IaJeHbe.
- UybajTe pactojaHne od MmHmym 2 cm nomery konye To Ha anapatot n DeIOBITE KOI CE yBaAT BO fNOkata.
-Изва对接е бино koj pa3денивач на плочи моHTиразан BO плakapot по anapatOT.
2.2 Nobp3yBaHe co cTpyja

PPEyPENEYBAHbE!
Pn3nk oJ noXap n cTpyeH yDap.
- Cekoe NOBp3yBaHBe co cTpyja Tpe6a da 6nnde HappaBEno Od KBAJIINΦNkYBaH eNeKTPnUap.
AnapaTOMopa da 6nnde 3a3emjeH. - PpeI da ce n3BeyBaat KaKbN 6nIo pa60Tu, npOBepTe dann anapatoT e NCKnyueH oD CTpyja.
-Проверете дади памeTpnte Ha ПLOчКаТСо спсиФИКaци СЕ КOMнATиБиЛНСо eЛeКТРЧИнATA MOKHOC На МpeЖАТаHa eЛeKТРЧИн eHeprNiJa. - Поберете дали anapatOT e npabunHo mOnTupan.лабви HecooDbTeH Ka6eJ 3a ctpya nnn npNKnyuok (ako e npimehnBO)MOKeДа npdeN3Bnka nperpeBaHe Ha TepMNHaNoT.
KopncTeTe cooBteH Ka6eJ 3a cTpyja.
He octabajte ng ka6nnte da ce 3anneTkaaT.
-Провере Дали e монтурана 3аштntata od CTpyeн удap.
KopncTeKeMa 3a DaTo ocno6oJnte Ka6enOT OHaON. - Праверета дд Кбелота Stpyа плпрклуокот (ak e npimehнво) ro Догира ТОПЛNot anapat Ил TOnINTe caOBN 3a rOTBeHbe KORA ro NOBp3yBaTe anapatOT co WTEkePn BO 6n3nHa.
He Kopnctete aanTepn co nobKe npKnyoU n npOJxHn Ka6n.
-NotpydeTe ce da He ro oWtTeNTe npNKnyOKOT 3a cTpyja (ako e npIMeHJINBO) nnn Ka6enot 3a cTpyja. KOnTaKtnpajTe ro hAnnot ObnacteH cepBnCeH ueHTap nn eJeKtpuap 3a da ro CMeHnTe OWTeTEHnOT Ka6en.
3aHTnTaOeJekTpueH yap Ha aKTHBHTe N 30JIpaHTe DeIOBN MOpa Da ce NOBp3e Ha TaKOB HauIN ITO HeMa Da MoKe Da ce N3BaIbN 6e3 aNaTKn. - Поврете го пиклуокот за стура сшт ekрот на крают od монтада.Tповеретдалп риклуокот за стура有很大псrtanen NO MOHTnpaHbeto.
-Дokonkyшт ekpoTeЯ6ab,He npKnyBajTe ro npKnyOkOT 3a cTpyja.
He BneyeTe ro Ka6eNoT 3a da ro ncknyuHte anapatot od ctpya.CekoraW noBlekyBaJte ro npNKnyUOKOT 3a ctpya.
KopncTeCe mo COoDBeTHn ypei 3a n0launja: 3aHTTNn PpeKNHyBaHn Ha nnHjA, OcnrypyBaHn (ocnrypyBaHn Ha
BpTeHe N3BaDeHn Od DpXkaOT), 3a3eMjyBaHBe N KOHTaKTOpN.
- EneKtpnHaTaNHCTaJauNJaMopaDaNMa H3OJaUncN ypeD KOJ wTO BN OBO3MOxyBa DaTo NCKnyuTe anapaTOT od npNKJyuOKOT 3a cTpjuo OD CITE NOJOBN. H3OJaUncKnOT ypeD Mopa Da NMa KOHTaKTeh OTBOP CO WnpHa OD HajmaJIky 3 MM.
2.3 Ynotpe6a

PPEyPENEYBAHbE!
IocToOn onaChOCT OJ NOBpeJa, n3ropeHnCn nn CTpyeH yDap.
- OtcpaheTe ja ueJa aMbaJaxa, etnkeTata n 3aHTnHata foJna (ako e npImeHnBO) nped npBaTa ynotpe6a.
- Oboj anapat e camo 3a DomaSHA ynoTpe6a.
He meHyBaJTe rH cneuΦnKaunTe Ha OBOj anapat. - IorpiXeTe ce OTBOpnte 3a BEHTnlaucnaJa da He 6nDat 6nokupaHn.
He octabajte ro anapatot 6e3 ha30pdokeka pa6oTu. - Пoctabybajte ja ринглata ha
"нcknyeHo" (off) no cekoja ynoTpe6a.
He notnpajte ce Ha dTeKTopoT 3a TeHepnHa.
He ctabajte npnbop 3a jaede he nnn kanaun od teHepnha ha pnhrtne. Tne MOxke da ctaHaT XeIKN.
He pakyBajte co anapaTc co BnaXn paue nn Kora Toj mKaKHTaKT CO BOda.
He ynoTpe6yBajTe ro anapatot kaKo pa60THa NOBpHnHa IIN KAKO npocToP 3a CKnaInpaHbe. - Ako NOBpHnHaTa Ha anapaToT e nCnyKaHa, BeDHaU NCKJyYeTe ro anapaToT od cTpjuTa. Oba Ke cnpeu n ctpyeH yap.
Kopncnnte co nejcmejkep Mopa da ce dpkata Ha pactojaHne od MNHMym 30 cm od INdYKTNBHTe pHHrN Kora anapaTOT pa6otn.
Kora ctabate xpaHa BO XeUko MacNo, MoKe Da npcka.

PPEyPENEYBAHbE!
OnachocT oJ nojap n 13ropeHn
- Пи загваье, мachOTиTe n MacNoTo MoKaT Da ИСPyUТаT 3anaJIbN napen.
Ipxte ro orhot nnn 3arpeaHnTe IpedmETn noaneky od machOTnTe N Macnata Kora rotBNTe CO HNB.
- Papeata wTo ja nCnywTa macNoTo KOeUTo e MHORY JKeUko MoKe da npedn3Bvka cNoHTaHo 3anaJyBaHe.
- IcKOpNCTeHOTo MacNo KOe MoKe Da COdpxN OCTaTOU N OXpaHa, MOKe Da npeDn3BnKa Noxap Ha NOHnCKa TemnepaTpyo OD MaCNoTO WTo Ce KOpNCTn 3a npB NaT.
He cTabajTe 3anaJINBn npOn3BOJn nn ppeMeTn HATOJIeHn CO 3anaJINBn CpeIcTBa BO,6JIncKy Do,IIIn Ha anapatOT.

PPEyPENEYBAHbE!
OnachocT od owtetybahe Ha anapaTOT.
He cybajTe Jeku KaIOBn 3a roTBeHbe Ha KOHTpOHaTa Ta6na.
He ro cTaBajTe kanaKOT Ha XeUka TaBa Bp3 CtaKJIeHaTa NOBpUHa Ha IIOuA-Ta 3a rotBeHbe.
He octaBajTe caIOBnTe 3a roTBeHbe Da BpjuT Ha cyBO.
BHHMabajTe npedMeTte nIi caIOBtTe 3a rotBeHe da He naHaT Ha anapatOT. MoKe Da ce OWTeTN NOBpHnHaTa.
He BknyyBajTe r npHrIte co npa3n caOBN 3a roTBeHe e nn 6e3 caOBN 3a roTBeHe.
He ctabajte anymHymMcka foJna Ha anapaTOT.
- CaIOBInTe 3a roTBeHbe HAnpaBEno OJ NneHO JeIe3O, anyMnHym nIIc CO OWTeTeHO dHO MoXe Da IpeDn3BnKa rpe6HaTHn Ha cTaKnoto / cTaKIOkepAMnKaT. Obne IpeDmEtN cekOraKpeBaJTe rN Kora Tpe6a da rN npemecTyBaTe Ha NoBpUnHaTa 3a roTBeHbe.
- Oboj anapaTe hamehet cmo 3a roTbeHe. He cMee da ce Kopnctn 3a dpyrH hameH, Ha npImep 3a 3arpeBaHbE Ha npocToPn.
2.4 Hera n yncTeHbe
- PeIDOBHO YIcTeTe ro anapaTOT 3a da cnpeuHte OWTetyBaHbe Ha NOBpUHCKNOT MaTePnJaJ.
- Ncknyte ro anapaTOT n octaBeTe ro da ce OJAnI nped YnCTeHbETo.
He KopinCTe BoDen Cnpej napea 3a YnCTeHb Ha anapaTOT.
- YnCTeTe ro anapatot co Meka, BnaXHa Kpna. KopncTeTe camo HeytpaJIHn DeTepreHTn. He KopncTeTe abpa3NBn npOn3BOJn, abpa3NBn cyHrepn 3a YnCTeHe, pactBOpyBaun IIN MeTaJIHn PpeDmEtN.
2.5 CepBncnpaHbe
3a da ro nonpaBnte anapatot, KOHTaKTnpajTe co ObnaCTeHnot cepBnceH ueHTap. KopncTe caMo opuHaJIHn pe3epBHi JeIOBn.
Bo Ondoc Ha CBetnIte Bo BHaTpeWHOCTa Ha OBOj npOn3BOJ n pe3epBHTe CBetnKu wTO ce npOdaBaat nOce6Ho:Obue CBetnKu ce npEbnDeHn Da n3dpxat ekCTpeMHn cN3nckyCNOBn BO anapaTte 3a DomaknHCTBO,KAKO wTO
ce TempepaTpa, Bn6paun, BnaXHOCT nIc ce npedBndeHn 3a daBaHe cngHaJI 3a pa6oTHata coctoj6a Ha anapatot. Tne He ce npedBndeHn Da ce KopncTaT 3a dpyn HameHn He Ce nOrOdHn 3a OCBeTnyBaHe IpocToPn BO DoMOT.
2.6 PacxoodyBaHbe
I PEPDyPDEyBAHbE! Pn3nk od noBpea nnn 3aDySuYBaHe.
- KoHTaKTIpajTe co ONUtHcKaTa Bnact 3a da Do6neTe INΦopMaun 3a npaBnHOp paCXoYBaHe Ha anapaTOT.
- Ncknyte ro anapaTOT od npNKnyOKOT 3a ctpyja.
- I3BaTe ro eNeKTpnuHnot ka6eI 6ncky do anapaToT n φpneTe ro.
3. MOHTAXKA

PPEyPENEYBAHbE!
Bnnde Bo norglabjata 3a 3aunTua n cnrypHocT.
3.1 Празд монтада
IpeD da ja MOHTnpaTe NOBpUHHaTa 3a roTBeHe, HAnuWeTe rN INHOpMaunTe nOdoNy Od PLOkata 3a CneuNOKaUN. IIOyKaTc co CneuCnKauCn Ce Haora Ha dHOTo OD KyKnUTeTO Ha anapaTOT.
Cepinckn 6poj (S.N.)
3.2 Brpaedn nloyn 3a roTBeHe
KopncTeTe r anapatnte wTo ce BrpaDyBaat camo aKO ce npetXoJHO BrpaDeHn BO COOdBETHN eJeMeHTn 3a BrpaDyBaHe n BO pa6OTn NOBpUHH NcNoJHyBaAT cTaHdapNTe.
3.3 Ka6eI 3a noBp3yBaHbe
- Повшинота 3a roTbeHe ce nCnopayBa co Ka6eI 3a cTpyja.
3a da ro 3aMeHnte OwTeTeHnot npNKJyHnK 3a cTpyja, KopncTeTe BnHa ka6en: H05V2V2-F koj n3dpKyBa Tempepatya od 90^ nIIN NOBcoka. O6paTeTe ce BO IOKaHnOT cepBnCeH ueHTap.
3.4 CkIonyBaHbe
Ako ja MOHTnpaTe NOBpUHHaTa 3a roTBeHe neoJ acnnpaTOP, Be MoJIme Da rN BnDnte yNaTCTBaTA 3a MOHTnpaHbHe Ha acnnpaTOPT 3a MInHMaHHTO pAcTojaHne Mery anapatnte.
Ako anapaTOT e MOHTnpaH Na dФnOKaTa, BeHTnlauJaTa Ha NOBpUHaTa 3a rotBeHe MoKe Da Tn 3aToPnI NpeDMeTnte KOn Ce UyBaat BoΦnOKaTa 3a BpeMe Ha npOecot Ha rotBeHe.
YouTube www.youtube.com/electrolux www.youtube.com/aeg
How to install your AEG Induction Hob - Worktop installation
4.ОПИС HA ПОН3ВОДOT
4.1 PacnopeHa noBpHnHaTa 3a roTBeHe

1 NndykuNcKa pHrJa
2 KOnTpOJa nNoya
4.2 PacnopeHa KOHTponHa Ta6na

PaKyBaJte co anapaTOT co nomoi Ha ceH3OpcknTe noiNb. EkpaHnTe, noka3aTeJIte n 3ByuIte nokaxyBaat kon yHKun pa6oTaT.
6.1 CaIOBn 3a roTBeHbe

Kaj HnykncKe pHrnn ce CO3JaBa CNJHO eJEKTpOMaHReTHO NOJe KOe CO3JaBa TOJIINHa BO caOBnTe 3a rotBeHe MHOry 6p30.
KopHCTe Tn HNdykTNBHNTe pHHrHc COOdBETHn caIOBN 3a rOTBeHe.
- HOTO Ha caIOBHTe 3a roTBeHe Tpe6a da e IITo EMOXHO NODe6eNo I NopamHo.
OchrypeTe ce IeKa IHOTo Ha Tabata e HCTO IN CyBO IIpeIa ja CTABNTe Ha IOBPIHHaTa 3a rotBeHe.
3a da ce H36eHrAT rpe6HaTHHH, He IIN3rajTe ja HIn He TpNJte ja TaBaTa Bp3 KepaMHKOTO CTAKJIO.
MaTepuJaI 3a caIOBn 3a rotBeHbE
- NOROdHO: JHeHO JeJIe3O, YeJHK, eMajIIPAH YeJHK, YeJHK IITo He 'procyBa, NOBeKeecIoJHO dHO (O3HaueHo KaKO NOrOJHO OJ pON3BOIDTeIOT).
- HenorodHn: aIyMHHyM, 6aKap, 6poH3a, CtaKIO, KepaMHKa, NOpueHaH.
CaIOBnTe 3a rotBeHbe ce noroHN 3a HNDyKcNcKaTa NOBpUnHa 3a rotBeHbe aKO:
BOdTa BpHe MHOry 6p30 Ha pHrJa IOCTaBeHa Ha HajBnCOkA Ta NOCTaBka 3a jaUNHa HA TOJIINHaTa.
- MaHHeTOT Ce IpiBJIeKyBa Ha IHHOT Ho CaIOT 3a TOTBeIbe.
ДиMuH3nHa caObnte 3a rotBeHbe
- INДуКИСКНTe pINHJIH aBTOMaTCKH ce IIpHcIIOcO6yBaat Ha dHMeH3HHTe Ha IHOTo Ha caIOT.
- EФнкаCHOCTa Ha pIHrIaTa e IOBp3aHa co JInjameTapOT Ha caIOT 3a TOTBeHbe. CaIOT 3a TOTBeHbe CO IOMaJI JInjameTap KOJITTO e IOMaJI OД MHHMaJIHHOT Do6NBA
cAmO DeI OJ eHeprijata KoJaTu ja NcnyuTa pIHrnaT.

BnTe Bo,TexHnUKN noaTouN
6.2 3ByuBo TeKOT Ha pa6oTaTa
Ako cnywate:
3ByK Ha NyKaHe: caIOT 3a rotBeHbe e HAnpaBEN OJ pa3JIuHH MaTePnjaJI (ceHNDbNcKOHCTpyKcNja).
3ByK Ha CBnPKaHBe: ja KOpNCHTe pHHnIata Ha rOleMa jaUnHa n caIOBnTe 3a rotBeHBe ce HApBaEHn Od pa3NnHm MaTepnjAln (ceHNDbuKoHCTpykUna).
- SyHeHBe: KOpNCTnTe BnCOKO eHepReTCKO HnBO.
KNIKAHe: ce nojaByBa eJIeKTpNuHO npedpnyBaHe.
- NnWTeHe, 6pmYeHe: BeHTnNaTOpOT pa60Tu.
3ByuTe ce HopMaHn He ce 3HaK 3a HeucnpaBHOCT.
6.3 Öko Timer (Eko Tajmep)
3a 3aCyByBaHbHe Ha eHeprJna, rpejaOT 3a pInrIata ce nckIyUba nped Da ce orLnacn nporpaMaTOpOT 3a O6bojYBaHbe. Pa3NIkata BO BpEMeTO Ha pa6Ota 3aBnCn OD HNBOTO Ha NOCTaBeHaTo TOnJIHa N DoJIxHaTa Ha rotBeHbETo.
How to install your AEG Induction Hob - Worktop installation

4. PRODUKTBESKRIVELSE
6.3 Öko Timer (Eco-timer)
How to install your AEG Induction Hob - Worktop installation
4.ОПИС ПОНЗВОДА
4.1 Wema noBpunHe 3a KyBaHbe

1 INHyKUHOHa 3OHa 3a KyBaHBe
2 KomaHdHa Ta6na
IorneJaTe oJeBak ,TexHnUKN noDaun
Ja 6nCTe aKTHBnpaJIH cyHKunjy 3a 30Hy 3a KyBaHe:doIupHnTe PnojabByje ce
Да 6исте DeakTNBnpanu Функuniу: npomehnte cTepeH TOnINote.
5.6 Tajmep
Tajmep 3a od6pojabaBpeMeHa OBom yHKnijom moKeTe da noDecnte dYkHnhy TrajaBa jeIHe cecnJe KyBaHa HajnPne noDecnte cTeEN ToPnOte 3a 30Hy 3a KyBaBe, a 3aTIM noDecnte yHKnjuy.
Ja 6nCTe noDecnHn 3OHy 3a KyBaHbe.
doNpHnTe BnIe NyTa DOK ce He noJabN
HHdkaTOp 3OHa 3a KyBaHbe.
Да 6исте akTNBnpanN Функunjy: Дднгп Te Tajmepa Да 6исте поеслп Врeme (00 - 99 MInHyTa). Када ИнданКаTOp 3Оне 3a КУВаНe NOчнedge TpeNepn, NOчнБe OdбpojabаНe ВрemeHa.
Ja 6nCTe BnDJIIN npeocTaIO BpeMe:doIrpHInTe Ja 6nCTe IOnecNIIN 3OHy 3a KyBaHe. INdNKaTOp 3OHe 3a KyBaHe nouHBe
da Tpeepn. Dncnnej noka3yje npeoctaNo BpeMe.
Da 6nCTe npomeHnBpeMe: OoNpHnTe Da 6nCTe nOecnHn 3OHy 3a KyBaHbe. DoNPHTe nn
Da 6nCTe DeakTNBnpanuФyHKunjy:
DOnnHnTe Da 6nCTe NoadcnN 30Hy 3a
KyBaHe a 3aTm DoOnnHnTe .IpeocTaNo
BpeMe OndpojaBa ce yHa3aD do 00.
INdkaTop 3OHe 3a KyBaHe Hectaje.

KaI ce 06pojaBaHe 3aBpHn, orlaAbaCe 3ByHn CnHaJn 00 Tpeepn. 3OHa 3a KyBaHe ce deakTbnpa.
Ja 6ncte 3ayctabnn 3ByuHn CnHaJ: DOpnpHnte
- CountUp Timer Ynotpe6nte Oby φункцииу 3a Вршени Had30pa Дужине уnotpe6е 3оне КУВаьа.
Ja 6nCTe nOecnJH 30Hy 3a KyBaHbe.
DOINHPHTe BnIe NyTa OOK ce He nojABN
HHdNKaTOP 30Ha 3a KyBaHbe.
Да 6исте akTNBnралуфункuniy: ДоинпгТajmepa. ce nojabByje. Кадиндikatop 3OHe 3a KyBaHbe NOUHe da TpepeNi, nouHbe od6pojaBaHbe BpeMeHa. Ha dinCpIeJy ce Han3MeHnUHO npK43yje UP n Od6poJaHO BpeMe (y MInHyTIma).
Ja 6nCTe BnDJIH KOnIko Dyro 3OHa 3a KyBaIbe paN:doINpHInTe Da 6nCTe NOpecNIu 3OHy 3a KyBaIbe. INdIKaTOp 3OHe 3a KyBaIbe noUHBe da TpeNepn. Iucnpej Noka3yJe KOJIKO Dyro 3OHa paN.
Ja 6ncte DeaKTHBnpaHn FyHKunjy:doNpHInTe a 3aTmM DoNpHInTe nn. Hdkatop 30He 3a KyBaHe Hectaje.
Tajmep Moxe Ta KOpNCTnTe OBy cyHKnjy KaJa je nOua 3a KyBaHe aKTHBnPaHa N 30He 3a KyBaHe He paJe. DInCnpej cTeNeHa TOnnote noka3yje
Ja 6ncte aKTHBnpanuФyHKunjy: 3aTmdoNpHnTe Tajmepa da 6ncte noDecnBpeMe. Ka
BpeMe nCTeKHe,OrnaaBaBa ce 3ByHn CnHaJI n 00 Tpeepn.
Ja 6ncte 3ayctabnn 3ByuHn cnHan: DOpHnTe

Oba yHKunja He yTnue Ha pa30Ha 3a KyBaHe.
5.7 Nay3a
Функида пебацуке се зоне за Куваьеkoje cy укъухе на Нajнхи CTeпенТОПЛOTE.
KaJa je cyHKuJa y Toky, CBN octaHn Cm60JI Na KOMaHdHm Ta6JaMa Cy 3aKbUaHn.
Oba yHKunja He 3ayctabJb a yHKnjuy Tajmepa.
IodnHTe I Da 6nCTe aKTNBpaJn OBy cyHKunjy.
ce nojabbyje.ipoewaBahe cTepeHa TOnlote nada Ha 1.
Дабисте DeakTNBnpanuФункunjy,doHnTe I.ПалncpeTxAODnCTeENTOIOTE.
5.8 KoHTpoJHa 6paBa
Mokete Da 3aKbUyate KomaHdHy Ta6ny DOK 30He 3a KyBaBe paJe. To cnpeuaba CnyajHy npomeHy noDeueHOr cTeeneHa TOnlote.
PpBO noDecnte cTeen ToJnToe.
Ja 6nCTe aKTHBnpaJIn
ФункиюДоднрнTe ce naHn Ha 4 cekynde. Tajmep octaje yKbvyeh.
Ja 6ncte DeaekTbnpaJIn
Функию:Додирнite .претхоно побшенистен тонnotе ce ykbuyye.

KaJa DeaKTbNpuTe NIOuy 3a KyBaHbe, TakoHe DeaKTbNpuTe N OBy cyHKnjuy.
5.9 Ypehaj 3a 6e36eHocT deue
Oba cyHKnja cnpeYaba cnuyajHo Kopuunhebe nloye 3a KyBaHe.
5.11 YnpaBbaBe notpoohbom
3OHe 3a KyBaIbe cy rpynncane npema Iokaunu n 6pojy pa3a y nloyn 3a kyBaIbe. NOrIeJaTe nIyctpaunjy.
Cbaka 0a3a HMa MaKcMaHNo eNekTpnuHo onTepeheHe oD 3700 W.
-ФункиJA pa3deJbye chary n3MeHy 30Ha 3a KyBaIbe NOBe3aHnx Ha nCTy fo3y.
-Функида ce akTNBupa KaDa yKyПHo eNeКТрИно ONTepeHbe 30Ha 3a KyBa№NoBE3aHnx ca nojeDnHaChHom fao3oM npemaUn 3700 W.
-ФункиJA CmaHByje Chary Dpyrnx 3OHa 3a KyBaHbe NOBe3aHnX Ha nCTy pa3y.
- ПодшаBAbe TOnJIote peDyKOBaHx 3OHa
HAn3MeHnUHO ce npIka3yje 3a n3a6paHo
N 3a CMaHBeHO POneShaBABe TOJIOte.
Посе ИЗВecHOr BpeMeHa, npIka3
POneShaBABaTOJIOte peDyKOBaHx 3OHa
OCTaje Ha peDyKOBaHOM POneShaBAbY
TOnJIOTE.
5.12 Hob²Hood
Obo je HanpeHa ayTomatcKa cyHKunja KoJa
noBe3yje nIooy 3a KyBaHbe ca odpeJehnM
acnnpaTopom. N nIooua 3a KyBaHbe n
acnnpaTop mAjy KOMyHnKaTOp ca
HHpaPBeHm CnHaJom. Bp3nHa
BentnlaTopa ce dePhiHnIe ayTomaTcKn Ha
OCHOBy nOdeWabaHbapeKIma n
TemnepaType HajToonnjer nocyHa Ha nIooun
3a KyBaHbe. BeHTnlaTOp moKeTe KopnCTtN
ca nIoue 3a KyBaHbe pyuHo.

KoB BeHnHe acnnpaTopa je DaJbHcN CnCTeM NOpda3yMeBaHO DeaKTnBupan. AKTnBupajTe ra npe Hero wTo KOpNCtnte Oby yHKnjy.BuWe HΦopMaunja NotpaxKe y npRpyHnky 3a KOpncnke acnnpaTopa.
AyTomatcko Kopnshene yHKunje
3a ayTomatcko Kopnshene yhknjne
nodecnte aytomatckn pekm Ha H1-H6.
IIOUa 3a KyBaHe je npBoNTHo noDeWeHa
Ha H5.AcnpaTop pearyje cBakn nyt KaDa
KOpNCHTe NIOuy 3a KyBaHBe. IIOUa 3a KyBaHBe ayTomatcKn IpeNo3Haje TemNepaTpy nocyha n NOdeuaba 6p3nHy BeHTnIaTopa.
Aytomatckn pekmm
| Aутomat- | СКО | Къuyaаь | Пржень |
| e1) | e2) | ||
| Льевe | |||
| РекIM H0 Искъuyaedo Искъuyaedo Искъuyaedo | |||
| РекIM H1 Yкъuyaedo Искъuyaedo | |||
| РекIM H2 3) | Yкъuyaedo БрзINA | БрзINA | |
| ВECHТILAto- pa 1 | ВECHТILAto- pa 1 | ||
| РекIM H3 Yкъuyaedo Искъuyaedo БрзINA | |||
| ВECHТILAto- pa 1 | |||
| PekIM H4 Yкъuyaedo БрзINA | ВECHТILAto- pa 1 | БрзINA | |
| PekIM H5 Yкъuyaedo БрзINA | ВECHТILAto- pa 1 | БрзINA | |
| ВECHТILAto- pa 2 | |||
| PekIM H6 Yкъuyaedo БрзINA | ВECHТILAto- pa 2 | БрзINA | |
| ВECHТILAto- pa 3 | |||
1)Плоча 3a Куваье DeTeKTyje npoцec Kычава И akTиВира 6рЗИнУ BeHTnIaTopa y cknaDy ca ayTomatckIM peЖIMOM.
2)Плоча за КуВаье ДeteКтyle поцес пжевы
и akТиВира 6рЗИнHy BeHTиЛaTopa y CкlaДу ca
ayTomaTCKIM peЖIMOM.
3) Obai peXIM aKTINBnpa BeHTnJaTOp n CBETIO n He 3aBnCn OD TemnepaType.
PpomeHa ayTomatckor peKIma
- DeaktnBupajte ypehaj.
2.ДоингпTe 3cekyHne.Ducnpej ce yKbvyje a 3aTm NCKbvyje.
3.Доингnte 3cekyHne.
4.ДоингпTe HekoJnKo nyTa DoK ce He yKbyyH
5.Доингnte +Ha Tajmepy da 6ncte n3a6paJn ayTomatcKn peKIM.

Да 6исте користи acnnpaTop dInpeKTHO n3HaI nIOue ca acnnpaTOPOM, DeakTNbupajTe ayTomatckn peKIMФyHKUne.

KaJa 3aBpHInTe ca KyBaHbEm n DeaKTINBnPaTe PIOUy 3a KyBaHbe, BeHTnlaTOp y acnnpaTOpy HacTabJa Da paN oDpeJHeO BpeMe. HAcON TOr BpeMeHa, CNCTeM DeaKTINBnPa BeHTnlaTOp ayTomatcKn i CnPeeYab ClyuajHo aKTINBnPaBe y HapeDHnx 30 cekyni.
PyuHNo nOeShaBaHe 6p3nHe BeHTnlaTopa
OByФyHKUjmy MoKe Da da KOpNCHTe n pyuHo.Дa 6nCTe To ypaDnHn,doDnPHnTe KaJa je IIOua 3a KyBaHbe aKTHBHa.Ha Taj HaunH ce DeakTNBnpa ayTomatcKn paI dФyHKUJe N Bama ce Do3BOJbAbaPyH0 MeBaHe 6p3nHe BeHTnIaTopa.Kada npITncHETe NOBeHaBaTe 6p3nHy BEHTnIaTopa 3a jeDaH.Kada doCTnHte INHTeH3NBAH HNB O I NOHO pNTncHeTe
nodecnheTe 6p3nHy BeHTnIaTopa Ha 0 yme ce DeakTNBnpa BeHTnIaTOp y acnnpaTopy. Da 6ncTe nHOBO nOKpeHyn BeHTnIaTOp Ha 6p3HH 1,doDnPHnTe

ДабистеakTNBnpannyayTomatcKn padФункиjee,deakTNBnpajTeПLOUу3a KyBaHbeI NOHOBO je akTNBnpajTe.
AKTNBupahe cBeTJIa
Плочу 3a КУВаье можete Да поеспгда ayTomatСКИ АКТИВира CBETЛО CBAKИ ПУТ KaДа AkTиВираTe ПLOчу 3a КУВаьe.Да 6ист Te to урадии, NOCTaВиTe ayTomatСКИ ржIM Ha H1-H6.

CBeTNo Ha acnnpaTopy ce DeakTNBnpa 2 MInHyTa HAKOH DeakTNBnpaHa b a NIOue 3a KyBaHbe.
6. KOPINCHN CABETN

yN03OPEHbE!
IornejaTe norgnabba o 6e36eHocTn.
6.1 Nocyhe 3a KyBaHbe

KoI INdYkuOHx 3OHa 3a KyBaHe jaKO eNEkTpOMarHeTHo NOBe BeOMa 6p30 pa3Bnja TOnNToTy y nocyhy 3a KyBaHe.
Kopuncte nocyhe koje odroBapa INduknoHm 3oHaMa 3a KyBaIbe.
-Дно посуна 3a КуВа№ мopa Да 6уде Deбени n paBHO wTo je BИше мoryн.
- Ппс Hero StTo nx CTaBnTe Ha NOBpunHy nIOue 3a KyBaHbe, yBepnTe ce da cy DoIbe cTpaHne Nocya YnCTe n CyBe.
-ДабистпзберлгогрбOTин, He Byцnte И He TprьajTe nocуд npeko ctaKIOkepamKe. Matepnjan nocyha 3a KyBaHbe
- ncpaBHO: JINBEHO rBOxHe, YeJHK, emajnpanH yEnK, HephajyHn YenK, nocye ca BnueCIOJHm dHOM (ca odroBapajyHOM 03HaKOM npOn3BoJa).
- HencpaBHO: anyMHHjym, 6akap, MecnHr, cTakNo, KepaMnKa, nopceJanaH.
Nocyhe je noroJHO 3a INduknoHy nIooy 3a KyBaHbe aKO:
BODa 6p3o npOKbUya Ha 30Hn 3a KyBaHbe KOJ Koje je Tempepatypa noeHa Ha Hajjaue.
- MarHETДрЖи Дно nocyuDE.
ДиMuH3nje nocyha 3a KyBaHbe
-Индукино He 30He 3a KyBaHbe ce ayTomatcKn npnilarohabajy dImeH3njaMa dHa nocyha 3a KyBaHbe.
- EФикасoc3OHe 3a KyBaHbe 3aBnCn Ond npeHHka nocyha 3a KyBaHbe. Nocyhe 3a KyBaHbe YInjN je npeHHK MaHbN Od MInHMaJIHor npIMa cMo Deo eHeprJNe KoJy reHepnIe 3OHa 3a KyBaHbe.

IorneJaTe oJeBaK ,TexHnUKN noaun
How to install your AEG Induction Hob - Worktop installation
4. POPIS VYROBKU
How to install your AEG Induction Hob - Worktop installation
