
Sicomatic - Saucepan WMF - Free user manual and instructions
Find the device manual for free Sicomatic WMF in PDF.
Frequently Asked Questions - Sicomatic WMF
User questions about Sicomatic WMF
0 question about this device. Answer the ones you know or ask your own.
Ask a new question about this device
Download the instructions for your Saucepan in PDF format for free! Find your manual Sicomatic - WMF and take your electronic device back in hand. On this page are published all the documents necessary for the use of your device. Sicomatic by WMF.
USER MANUAL Sicomatic WMF
1 | The benefits of your new Somatic® t-plus at a glance 4-5
2 Important safety instructions 6-8
2.1 Using the pot as intended and keeping it safe 6
2.2 Cooking safely with the Sicomatic® t-plus 8
3 Before using for the first time 9
4 Details of the Somatic ^念 t-plus 10
5 The 5 safety features of your Somatic® t-plus 11-12
6 Before each use 12-14
7 Cooking with the Sicomatic® t-plus 15-22
7.1 Filling the cooker 15
7.2 Closing the cooker 17
7.3 Using the three cooking levels 17
7.4 Cooking safely with the hot cooker 18
7.5 Setting the cooking level, ventilating and parboiling 19
7.6 Cooking 19
7.7 Releasing steam/cooling down 20
7.8 Opening the Sicomatic t-plus 21
7.8 Opening the Sicomatic t-plus 21
8 Cooking with the Sicomatic® t-plus accessories 23
8.1 Note the cooking instructions 23
8.2 Cooking in a perforated insert (accessory) 23
8.3 Cooking in a non-perforated insert (accessory) 23
8.4 Cooking in the bottom of the pot (meat) 23
9 Sterilising, preserving and juicing with the Somatic® t-plus 24-27
9.1 Note the cooking instructions 24
9.2 Sterilising 24
9.3 Preserving 25
9.4 Juicing 26
10 | Maintaining and cleaning 27 - 28
10.1 Cleaning the cooker 27
10.2 Cleaning the lid and operating valve 27
10.3 Storing 28
11 Maintenance 29
12 | Easy troubleshooting 30-35
13 Tips: Cooking with the Somatict 念 t-plus / cooking time tables 36-45
13.1 Soups and stews 36
13.2 Vegetables 37
13.3 Meat 39
13.4 Fish 42
13.5 Side dishes, fruits and desserts 43
13.6 Cooking a menu / tower cooking 44
13.7 Frozen food and whole foods 45
14 | Somatic® t-plus accessories 46
15 | Somatic® t-plus spare parts 47
16 Warranty 48
17 | Sicomomatic® declarations of conformity 49
17.1 EC declaration of conformity 49
17.2 Declarations of conformity for commodities that come into contact with food 49
1 | The benefits of your new Sicomatic® t-plus at a glance
1. A revolution in easy handling
All the technology is in the ergonomic handle: From closing the cooker to setting the cooking level and releasing the steam. All functions can be operated with one hand - a simple press of the thumb is all it needs.
2. Unbeatable safety
Maximum safety provided by several independent safety mechanisms. The cooker cannot be opened unintentionally when pressurised. Heat-insulated synthetic pot handles with flame protection.
3. Unique, maintenance-free 3-fold safety valve system
State-of-the-art valve technology assures safe and healthy cooking. Steam is released gently and evenly.
4. Hermetic system
The hermetic system consists of the transparent operating valve and the sealed pressure indicator system. The hermetic system prevents unnecessary steam release. You therefore require less cooking water – and the Sicomatic® is quicker and more energy-efficient when heating and simmering. The fully hermetically sealed cooking method prevents loss of aroma and preserves valuable vitamins and minerals.
5. Three cooking levels with automatic temperature control
Level 0 - Cooking without pressure. Normal cooking without any pressure. More water and energy-efficient than conventional cooking.
Level I - Gentle cooking level. For steaming and stewing food with short cooking times, e.g. fish and vegetables. The temperature is automatically limited to approx. 109^ (0.4 bar = 40 kPa).
level II - Fast cooking level. For cooking and stewing foods which require longer cooking times, e.g. meat and stews. The temperature is automatically limited to approx. 119^ (0.9 bar = 90 kPa).
6. Easy cleaning
For easy cleaning, the maintenance-free transparent operating valve does not need to be removed or taken apart. Simply rinse with running water.
7. Large and clearly visible pressure indicator
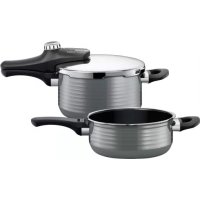
8. Future-focused - Attractive design, optimum ergonomics and a variety of materials to suit all requirements
Silargan: Non-porous closed surface. Nickel-free. Made in Germany.
Stainless steel: Also suitable for induction hobs.
9. Many household-compatible sizes and designs Practical special inserts
Different inserts are available for use with the Somatic® t-plus to ensure the best cooking results, e.g. a perforated insert for fish and vegetables, a non-perforated insert for defrosting frozen food, juicing or preserving etc. as well as other accessories.
10. TÜV safety approval


11. 10-year supply warranty for spare parts

12. Made in Germany
2 | Important safety instructions
Read these instructions carefully before use. Before allowing individuals to use the Somatic® t-plus, they must first be familiar with the instructions for use.
Keep the instructions for use in a safe place for future reference.
Symbol legend

This symbol warns against direct dangers that may lead to serious injury (i.e. through steam and hot surfaces).

This symbol warns of potential risks that may lead to serious injury.

Non-observance of the information provided may cause problems when using your Somatic ^心 t-plus.

Cross references in these operating instructions are indicated with this symbol or in italic text.

The tip provides you with valuable information for using your Sicomatic t-plus with ease.
2.1 Using the pot as intended and keeping it safe

Using the product for its intended purpose
Only use the Sicomatic t-plus for its intended purpose when cooking food.
Never put the Sicomatic t-plus in a hot oven.
Never fry food in it using oil when it is under pressure.
Only use the Sicomatic® t-plus for sterilising in home use.
Never use the Somatic® t-plus as a steriliser in a medical environment.
The Sicomatic t-plus is not designed for the sterilisation temperature required in medical environments.
Only use Sicomatic t-plus on suitable hobs for the heating types that are listed in the instructions.
Stainless steel


Silargan


Never heat at the highest temperature when empty or leave it unattended. Observe the manufacturer's instructions.
This ensures that the cookware is not damaged through overheating, particularly on induction hobs.

Safety features to prevent dangerous situations.
Do not modify or interfere with the cooker and its safety features.
Only use the Somatic ^念 t-plus lid together with the corresponding Somatic ^念 t-plus base.
Never use the Sicomatic t-plus components with other makes.

Maintaining safety
Before each use check that the valves are not blocked.
If necessary clean the valves before using the Sicomatic ^心 t-plus.
Refer to our instructions for cleaning and care.
Do not use your Somatic ^念 t-plus if it or parts of it are damaged or deformed, or if their function does not correspond with the description in the instructions.
In the event of repairs contact your specialist dealer.
If the pot handles become loose, tighten them with a screwdriver.
Replace handles that are cracked or do not fit correctly.
Only use original Somatic ^念 t-plus spare parts.
Arrange for your Sicomatic t-plus to be checked by an authorised body at least every 10 years.
2.2 Cooking safely with the Sicomatic t-plus

Increased pressure builds up in the cooker during cooking.
Check that the cooker is securely closed.

The outer surface of the cooker can reach 130^ .
Use suitable hand protection.
During use, never touch the hot external surface of the cooker.
You must always use the handles and ensure a firm grip when moving or carrying the hot cooker.
Move the Sicomatic t-plus carefully when it is under pressure.
Be careful not to touch anybody else with the hot cooker.
Only place the hot Sicomatic t-plus on heat-resistant surfaces (never on synthetic material etc.).
Always open and close the Sicomatic® t-plus using the handles.
Never leave the Sicomatic t-plus unattended when in use.
During use, keep children away from the Somatic t-plus.

Hot steam is released at the lid.
Never touch the steam.
→ Always keep your hands, head and body out of the danger zone above the centre of the lid and the safety slot on the rim of the lid.

Never overfill the cooker.
Overfilling the cooker can cause hot food to leak out through the operating valve.
Fill the cooker to a maximum of 2/3 of its nominal content.
Fill the cooker to a maximum of half of its nominal content if you are cooking foods that overly swell or froth, such as soups, pulses, stews, stocks, giblets and pasta.

Never use force to open the cooker.
The cooker opens easily when depressurised.
Do not make any modifications to the safety mechanisms.

Hot food can cause bubbles to form and it can spurt out explosively when opening the cooker, even if the steam has already been released.
Therefore, always shake the cooker gently before you open it to prevent burns and scalds caused by the hot contents spurting out from the cooker.

Do not insert hot meat that you have cooked with the skin on (e.g. beef tongue).
Allow the meat to cool beforehand.
In doing so the skin that has expanded under pressure subsides and you can prevent burns caused by hot fluid spurting out.
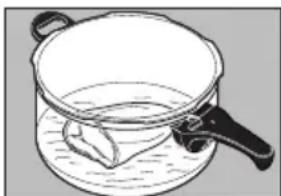
3 | Before using for the first time
Remove all stickers and tags.
Fill the cooker 2/3 with water and add 2-3 tablespoons of vinegar.
Leave the lid off and boil the vinegar water in the cooker for approx. 5-10 minutes.
Then rinse all parts thoroughly by hand.
Dry the cookware thoroughly.

There may be a noise when using on induction hobs. This is due to technical reasons and does not indicate that your hob or Sicomatic t-plus is faulty.
4 | Details of the Sicomatic® t-plus
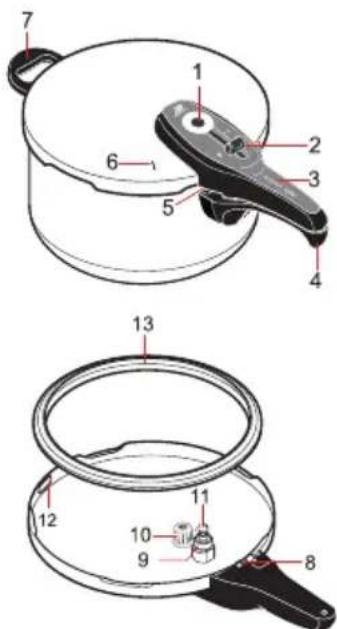
1. Pressure indicator
Clear, large with integrated residual pressure stop.
2. Slider/one-handed cooking dial
Extra large and easy-to-handle so you can comfortably set the required cooking level and open the cooker easily.
3. Lid shaft handle
with slider and pressure display.
4. Pot shaft handle
The practical safety handle with flame protection fits comfortably in your hand and prevents accidental slipping.
5. Handle marking
For correctly positioning the lid.
6. Lid marking
For correctly positioning the lid.
7. Pot side handle
With flame protection and grip hole for safe handling.
8. Spring-loaded safety bolt
The red safety bolt prevents pressure building up when the handles are not properly lined up.
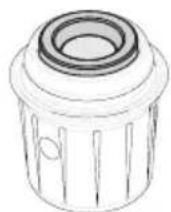
9. Aroma sealing cap
For pressure indicator with aroma sealing.
10. Transparent operating valve
Controls the pressure in accordance with the cooking level setting.
11. Overpressure valve
With integrated automatic heating feature and vacuum inhibitor.
12. Safety slot
The "emergency outlet" on the rim of the lid serves as an additional safety device.
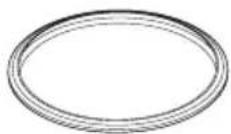
13. Lid gasket
For sealing the pot and lid.
5 | The 5 safety features of your Sicomatic® t-plus
The Sicomatic t-plus that you have purchased is a technologically advanced device. It has been designed based on decades of experience in the manufacture and development of pressure cookers.

1. Transparent operating valve
If the maximum pressure exceeds the selected cooking level, the transparent operating valve opens and the excess steam is released from the lid handle opening in the front. Any excess pressure is also automatically reduced. Please note that for functional and safety reasons, only Sicomatic® H09F transparent operating valves may be used.
2. Overpressure protection with integrated automatic cooking feature
a) Automatic cooking function
The valve can be moved when not under pressure. After parboiling the closed Somatic® t-plus, any excess food-impairing atmospheric oxygen is automatically discharged (automatic venting).
b) Function as an overpressure valve protection
The overpressure relief valve is not used during normal operation. It is only used when the transparent operating valve fails and the pressure continues to build up. Steam is then released from the discharge opening on the lid shaft handle.
3. Safety slot
The "emergency outlet" on the rim of the lid is only used as an additional safety mechanism if both the transparent operating valve and the overpressure valve fail to work. Once too much pressure builds up, the lid gasket is pushed outwards as far as possible into the safety slot so that steam can be released.
4. Residual pressure stop
The residual pressure stop integrated into the pressure indicator rises even when there is a small amount of pressure: The pressure indicator is visible. You can unlock and open the cooker only once the pressure indicator has completely retracted into the lid shaft handle. This prevents accidental opening when under pressure.
5. Locking inhibitor
If the handles are not properly aligned, the lid will not be sealed. Therefore, pressure cannot build up. In addition, the red safety bolt in the lid handle prevents pressure forming if the lid is not correctly closed and releases steam.
6 | Before each use
The Somatic® t-plus meets the requirements of the EC directive 97/23/EC. Some of the statutory prescribed safety precautions are considerably exceeded.


Warning
Check the safety mechanisms before you use your Sicomatic t-plus.
This helps to avoid dangerous situations during use.
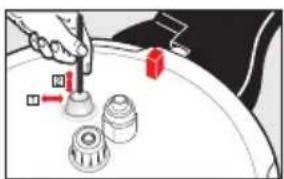
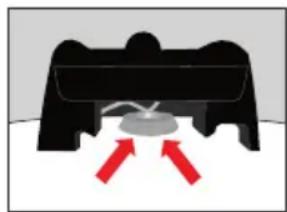
Check the aroma sealing cap
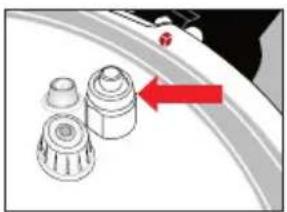
If the aroma sealing cap is not fastened correctly or is damaged, this may result in the release of hot steam or sudden evaporation. This can damage the lid shaft handle.
Check that the aroma sealing cap is fastened correctly (see fig.).
Check the aroma sealing cap for damage (tears, holes, deformation and brown discolouration).
If the aroma sealing cap is damaged, do not use the cooker.
Only use original Somatic ^忍 t-plus spare parts.
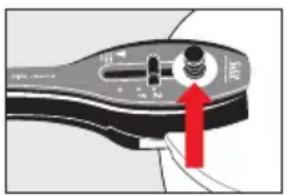
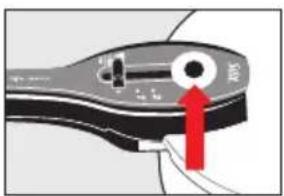
Checking the pressure indicator
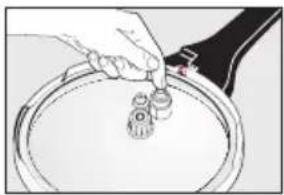
Check the pressure indicator using your finger to see if the aroma sealing cap moves.
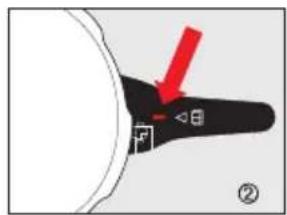
At the same time, slide the slider back to the "OPEN" position
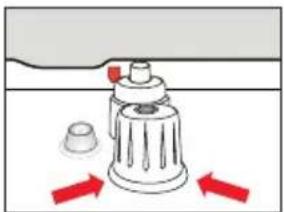
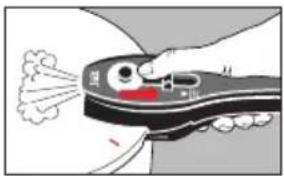
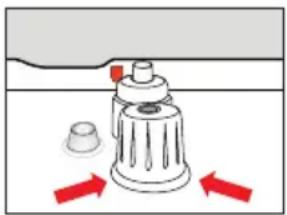
Checking the overpressure valve
If the overpressure valve is dirty or clogged, steam can suddenly be released through the safety slot.
When using on gas hobs, the released steam can extinguish the gas flame, in which case gas continues to be discharged uncontrolledly at the hob.
Check that the overpressure valve (1) moves freely.
Apply light pressure, e.g. using a wooden spatula, to check that the ball can move (2).
This prevents steam from being released unexpectedly.
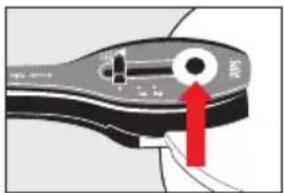
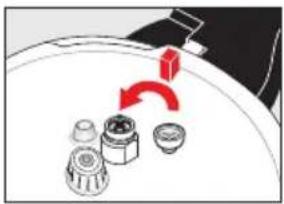
Checking the operating valve
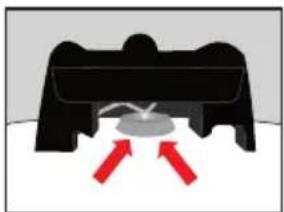
If the operating valve is dirty or clogged, the overpressure valve is activated.
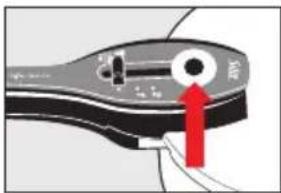
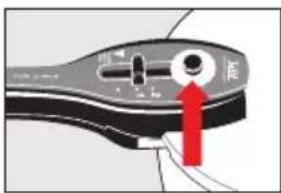
Check the operating valve for dirt and correct position. The edges of the operating valve must lie flat at the top and bottom of the lid (see figure).
Clean the operating valve if necessary. to prevent steam from being released unexpectedly from the opening on the lid shaft handle.
Check safety bolt
If the handles are not aligned correctly, the red safety bolt stops pressure building up in the cooker.
Check that the spring-loaded safety bolt can move.
To do so, press the safety bolt gently.
Checking the lid gasket
Check the lid gasket for damage.
A crack in the lid gasket may result in sudden evaporation and the release of hot steam.
Replace the lid gasket if it is hard (brown discolouration), brittle or damaged.
Replace the lid gasket after approx. 400 uses, and at the latest after 2 years.
Only use original Sicomomatic t-plus spare parts.
The Sicomatic name must feature on the lid gasket.
Check that the lid gasket is positioned on the inner rim of the lid.
This helps you to maintain the proper functioning and safety of your cooker.
Checking the handles
Check the handles for damage.
Replace damaged handles before use.
Only use original Somatic ^心 t-plus spare parts.
Make sure the handles are firmly attached to the cooker.
Carefully tighten the fastening screws.
This prevents a handle from breaking or coming loose, causing the cooker to drop, and resulting in damage and deformation.
7 | Cooking with the Sicomatic® t-plus

Maintaining the cookware and hob
Do not knock kitchen gadgets on the pouring rim. This prevents damage to the pouring rim.
Only add salt to water that is already boiling, and then stir it.
This prevents the salt from attacking the bottom of the pot.
Never slide the cookware back and forth across ceramic cooking zones.
This prevents residue between the cookware and the ceramic cooking zone from scratching the hob.

When using on a gas hob:
Make sure that the gas flame is never larger than the base of the cooker.
To prevent damaging the handles and seals.
7.1 Filling the cooker

Respect the maximum filling quantities and never overfill the cooker.
Overfilling the cooker can cause hot water, cooked food, or hot food to leak out of the operating valve.
On gas hobs, this can extinguish the gas flame and gas continues to be discharged at the hob.
Fill the cooker to a maximum of 2/3 of its nominal content.
Fill the cooker to a maximum of half of its nominal content if you are cooking foods that overly swell or froth, such as soups, pulses, stews, stocks, giblets and pasta.
This protects against burns and scalds.

Preventing damage caused by small filling amounts.
If the quantity is too small, this can cause the cooker to overheat and cause damage to the cookware and the hob.
→ Always fill with sufficient liquid to allow steam to be generated.
Make sure you use sufficient liquid, especially with viscous foods.
This prevents the pot from "boiling dry" and prevents damage to the pot and hob.
Prescribed filling quantities:
| Sicomatic® size (nominal quantity) | Minimum filling quantity for steam production | Maximum filling quantity (2/3 of the nominal quantity*) | Maximum filling quantity for foods that swell or froth a lot (1/2 of the nominal quantity*) |
| 2.5 | 1/8 | Water 1.7 | 1.3 | | |||
| 3.0 | 1/4 | Water 2.0 | 1.5 | | |||
| 4.5 | 1/4 | Water 3.0 | 2.3 | | |||
| 6.5 | 3/8 | Water 4.3 | 3.3 | | |||
- See scale on inside of pot
Pour the required amount of liquid into the bottom of the pot.
Use water, meat stock, sauce etc.
Either add the food directly or place the insert containing food into the cooker.
Choose a hob size that corresponds with the size of the pot.
Depending on the recipe, first heat up the food in the cooker and pour over the fluid before you close the cooker.

Danger
Skimming froth/ stirring when parboiling
Cook foods that are viscous or overly swell or froth (e.g. pulses and boiling meat) in the pot without a lid.
If necessary remove the froth after parboiling.
Stir the contents of the cooker.
This ensures that no hot froth can escape via the operating valve. preventing burns and scalds.
Only now may the cooker be closed.
7.2 Closing the cooker
Wipe the rim of the cooker and the lid gasket before closing.
This removes any particles that may prevent sealing.
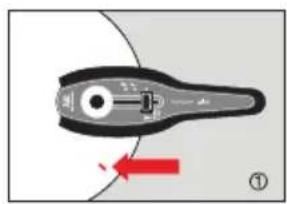
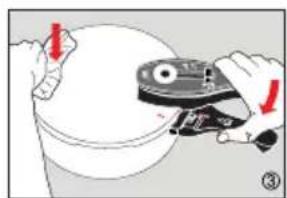
Place the lid on the cooker so that the markings on the lid (fig.1) and on the cooker shaft handle (fig.2) are positioned flush above each other.
Move the lid shaft handle to the left until it is positioned directly over the pot shaft handle (fig. 3).
→The lock makes an audible click when in place.
7.3 Using the three adjustable cooking levels
Cooking level 0 (cooking without pressure)
Your Sicomatic t-plus can also be used as an ordinary cooker. Food cooks without pressure using little water and energy. Once a little steam is released, you must turn down the power setting. If too much steam is released or the pressure indicator starts to increase slightly, this means that the power setting is too high.
Cooking level 1 (approx. 109^ / 1st white ring)
This is used to steam and stew delicate foods with a short cooking time. The food, e.g. vegetables or fish, is placed in inserts and is thus not leached out by the cooking water.
The first white ring is visible on the pressure indicator. As soon as a little steam is released, the specified cooking time begins. The position of the pressure indicator when steaming should be maintained by regulating the
power setting on the hob so that no steam is released, or only gently.
Cooking level 2 (approx. 119^ / 2nd white ring)
This is used to cook and braise meat, soup and stews for example. It also used for sterilising, preserving and juicing.
The second white ring is visible on the pressure indicator. As soon as a little steam is released, the specified cooking time begins. The position of the pressure indicator when steaming should be maintained by regulating the power setting on the hob so that no steam is released, or only gently.
7.4 Cooking safely with the hot cooker

Hot steam is released at the lid.
Never touch the steam.
→ Always keep your hands, head and body out of the danger zone above the centre of the lid and the safety slot on the rim of the lid.

The outer surface of the cooker can reach 130^ .
Use suitable hand protection.
During use, never touch the hot external surface of the cooker.
You must always use the handles and ensure a firm grip when moving or carrying the hot cooker.
Move the Sicomatic t-plus carefully.
Be careful not to touch anybody else with the hot cooker.
Only place the hot Sicomatic t-plus on heat-resistant surfaces (never on synthetic material etc.).
Always open and close the Sicomatic t-plus using the handles.
Never leave the Sicomatic t-plus unattended when in use.
During use, keep children away from the Sicomatic® t-plus.
7.5 setting the cooking level, ventilating and heating
Use the selector to set cooking level 0, cooking level 1 or cooking level 2.
Use a high power setting for heating.
Ventilation takes place automatically using the integrated automatic heating feature, therefore manual ventilation is not required when parboiling. If sufficient steam is released by the overpressure valve, the automatic heating feature turns itself off. The pressure indicator begins to rise.
7.6 Cooking
The pressure indicator rises even under low pressure. The actual operating pressure and temperature, and thus the beginning of the cooking time, are reached when a little steam is released at the set cooking level.
Cook at this position until the end of the cooking time.
To do this, adjust the power setting on the hob accordingly.
At this stage, if the power setting is too high for the Sicomatic t-plus, steam is released via the discharge opening on the lid shaft handle (in the middle of the lid), accompanied by a noise that gradually gets louder.
Turn down the power setting.
The position of the pressure indicator when steaming should be maintained by regulating the power setting on the hob so that no steam is released, or only gently.
In doing so you avoid wasting energy unnecessarily and prevent it from "boiling dry".
7.7 Releasing steam/cooling down
You must reduce the pressure in the pot before you open the Sicomatic ^※ t-plus.
Therefore turn off the power.
Remove the pot from the cooking zone.
There are three ways in which you can reduce the pressure:
a) Fast steam release

Hot steam is released at the lid.
Never touch the steam.
→ Always keep your hands, head and body out of the danger zone above the centre of the lid and the safety slot on the rim of the lid.
Particular caution is required when using the slider to quickly release steam.

When cooking soups, pulses, stews, stock, offal and pasta, the filling volume in the cooker increases due to the formation of froth.
Never release steam from the pot quickly if you are cooking frothing or pulpy foods.
Use the operating valve in this case to quickly release steam.
Allow the cooker to cool down to prevent burns and scalds.
Slowly slide the slider back until no more steam is released.
Wait until the pressure indicator has fully retracted into the lid shaft handle by itself.
b) Allowing it to cool down
Wait until the pressure indicator has fully retracted into the lid shaft handle by itself.

This method is suitable for frothing or pulpy foods. Reduce the cooking times a little as the food will continue to cook while it is cooling down.
c) Cooling down with water
Hold the cooker under cold running water until the pressure indicator retracts fully into the lid shaft handle.
Do not run the water directly onto the lid shaft handle. Make sure cold water does not enter the pot via the valve on the lid shaft handle.

Condensation forms in the pot when using this method.
It drips onto the food and can affect its colour and aroma.
Therefore only use this method in exceptional cases.
7.8
Opening the Sicomatic t-plus

Danger
Hot food can cause bubbles to form and it can spurt out explosively when opening the cooker, even if the steam has already been released.
EN
Therefore, always shake the cooker gently before you open it
to prevent burns and scalds caused by the hot contents spurting out from the cooker.

Never use force to open the cooker.
The cooker opens easily when depressurised.
Do not make any modifications to the safety mechanisms.

Do not insert hot meat that you have cooked with the skin on (e.g. beef tongue).
Allow the meat to cool beforehand.
In doing so the skin that has expanded under pressure subsides and you can prevent burns caused by hot fluid spurting out.
Make sure that the pressure indicator has fully retracted into the lid shaft handle.
→ Slowly return the slider to the "OPEN" position.
Gently shake the cooker.
Move the lid shaft handle to the right until the markings on the lid and the cooker shaft handle are aligned exactly.
Remove the lid so that the steam is released away from the body.

If the cooker is still under pressure, return the slider to the "OPEN" position to use the residual pressure stop. This prevents opening the cooker when it is under pressure.
If this occurs, move the slider towards the pressure display and back again.
In doing so this can release the residual pressure stop once the cooker is depressurised. You can then open the cooker as described.
8 | Cooking with the Sicomatic® t-plus accessories
The Somatic® t-plus is especially suitable for preparing baby foods.
8.1 Note the cooking instructions

When using a cooking accessory, you must refer to the instructions in Chapter 7. You must also read the safety information in Chapter 2 and Chapter 7.

Always fill with sufficient liquid to allow steam to be generated.
This prevents the cooker from "boiling dry". It also prevents damage to the pressure cooker and the cooking zone.
Observe the prescribed fill quantities: See table under point 7.1
8.2 Cooking in a perforated insert (accessory)
Vegetables
Fish
Preserving
- Juicing
Delicate foods
Cooking vegetables:
When cooking vegetables, place the specified minimum fill quantity directly in liquid in the bottom of the pot.
This ensures that steam forms and prevents the cooker from "boiling dry".
Add herbs and spices etc. to flavour according to your preference.
Place the perforated insert with washed vegetables into the cooker.
The insert ensures that the vegetables do not come into contact with the water, but cook in the steam instead.
Fill the cooker to max. 2/3.
to ensure there is sufficient distance from the lid, pressure indicator and valves.
8.3 Cooking in an non-perforated insert (accessory)
- Frozen food
- Side dishes, e.g. rice
- Juicing (as collect tray)
See "Cooking in a perforated insert" under point 8.2.
8.4 Cooking in the bottom of the pot (meat)
Heat the oil/fat in the Sicomatic t-plus with no lid.
Brown the meat on all sides.
Add water (according to recipe).

Slice larger pieces of meat to reduce the cooking time.
9 | Sterilising, preserving and juicing with the Sicomatic® t-plus
9.1 Note the cooking instructions

When sterilising, preserving and juicing, you must refer to the instructions in Chapter 7. You must also read the safety information in Chapter 2 and Chapter 7.

Always fill with sufficient liquid to allow steam to be generated.
This prevents the cooker from "boiling dry". It also prevents damage to the pot and the cooking zone.
Observe the prescribed fill quantities:
See table under point 7.1

Allow the pot to cool down slowly
After sterilising, preserving or juicing, never release the steam quickly from the Somatic t-plus.
Never use water to cool the cooker down.
Glass objects can shatter due to the sudden change in temperature.
Turn off the power.
Remove the cooker from the hob and allow it to cool down slowly.
Wait until the pressure indicator has fully retracted into the lid shaft handle by itself, before you open the cooker.
This protects against injuries caused by shattered glass.
9.2 sterilising

Using the product for its intended purpose
Only use the Somatic® t-plus for sterilising in home use. Do not use the Somatic® t-plus as a steriliser in a medical environment. The Somatic® t-plus is not designed for the sterilisation temperature required in medical environments.

Ensure that the parts you wish to sterilise are resistant to superheated steam up to 120^ .
The Sicomatic® t-plus is an ideal and cost-effective home steriliser as you only pay the energy costs.
Possible uses:
- Sterilisation of baby bottles, rubber suction cups and plastic seals
- Sterilisation of baby food in screw-cap jars
- Sterilisation of preserving jars (see also the following point 9.3 "Preserving")
Clean all milk and porridge residue from bottles, rubber suction cups and plastic seals.
Place the parts in the perforated insert with the openings facing downwards.
Position the parts in the insert to allow the steam to circulate around them properly.
Pour the minimum quantity of water into the base of the cooker to generate steam.
Place the perforated insert in the cooker.
Close the cooker and use the slider to set it to cooking level 2.
Use a high power setting for heating.
The sterilisation process begins once the second white ring is visible on the pressure indicator.
The sterilisation time is approx. 20 minutes.

Sterilising correctly and effectively
Make sure that the second white ring is visible throughout the entire sterilisation cycle.
You must adhere to the sterilisation time.
Allow the pot to cool down after sterilisation.
Wait until the pressure indicator has fully retracted into the lid shaft handle by itself.
Only then can you open the cooker.
9.3
Preserving

Never overfill preserving glasses
The contents expand during the preservation cycle. If a closed preserving jar contains too much filling it can burst.
Therefore fill the preserving jar up to a maximum of one finger width below the rim.
This protects against injuries caused by shattered glass.
Sterilise the preserving jars before you start the preservation cycle as described under point 9.2.
Fill the preserving jars.
Seal the jars according to the manufacturer's instructions.
Pour the minimum quantity of water for steam generation into the base of the cooker.
Place the jars on the strainer or in the perforated insert.
Close the cooker and use the slider to set it to the required cooking level.
Use a high power setting for heating.
Observe the following table for selecting the cooking level and the preservation time.
Preservation times (guidelines only):
| Preserving Cooking | level | Preservation time in min. |
| Berries 15-8 | ||
| Marmalade and jams 11-2 | ||
| Pip fruit 110 | ||
| Stone fruit 18-10 | ||
| Vegetables, neatly positioned 17 - 10 | ||
| Vegetables 220 - 25 | ||
| Meat 225 |
Allow the pot to cool down slowly after preservation.
Wait until the pressure indicator has fully retracted into the lid shaft handle by itself.
Only then can you open the cooker.
9.4 Juicing

Select the correct cooker base size and never overfill the cooker
Place two inserts in the cooker for juicing.
The Sicomatic ^ t -plus can therefore be used to juice a minimum quantity of 4.5 litres.
Overfilling the cooker can cause food to leak out through the operating valve.
Fill the top perforated insert no higher than its top edge.
This protects against burns and scalds.
Pour the minimum quantity of water for steam generation into the base of the cooker.
Add the sliced or squashed prepared fruit (add sugar if necessary) into the perforated insert.
First place the non-perforated insert in the cooker and then on top place the perforated insert containing the fruit.
Close the cooker and use the slider to set it to cooking level 2.
Use a high power setting for heating.
Observe the following table for selecting the cooking level and the preservation time.
Juicing times (guidelines only):
| Juicing Cooking | level | Juicing time in min. |
| Berries 2 12 | ||
| Stone fruit and rhubarb 2 18 | ||
| Pip fruit 2 25 | ||
| Grapes 2 25 | ||
| Tomatoes and cucumber 2 18 | ||
| Carrots 2 25 | ||
| Beetroot 2 25 - 35 |
Allow the cooker to cool down slowly.
Wait until the pressure indicator has fully retracted into the lid shaft handle by itself.
Only then can you open the cooker.
Carefully lift out the hot inserts.
Fill cleaned and heated bottles with the hot juice.
Then seal the bottles using clean bottle tops.
10 | Maintaining and cleaning
10.1 Cleaning the cooker
Use hot water and standard washing-up liquid to clean your cookware.
Soak off any food residue that is stuck to the cookware.
Do not use abrasive cleaning detergents, steel wool or the abrasive sides of sponges.
To remove stubborn food residue, boil a little water in the cooker together with powder detergent from Silit.
To remove stubborn stains use the liquid detergent from Silit.
You can also clean the cooker base and the inserts in the dishwasher.
This may result in discolouration of the synthetic handles or the Silargan® surface. However, this does not impair the function. We recommend cleaning by hand.
Dry the cookware thoroughly after cleaning.
10.2 Cleaning the lid and lid shaft handle

Danger
Never dismantle the lid handle for cleaning
Never remove the lid handle yourself, even for deep cleaning.
Only allow your Silit specialist dealer to dismantle and reattach the lid handle.

The lid may only be cleaned by hand
The valves and seals would be damaged in the dishwasher due to the high temperature and chemicals used.
For this reason, always wash the lid by hand
Remove the lid gasket.
Clean the lid gasket in warm running water or in wash water.
→ Always wash the lid by hand.
Rinse the valve and steam release openings under hot running water.
to prevent damaging the seals.
Cleaning the operating valve in the case of heavy soiling
If food leaks out via the operating valve, food residue sticks to it. This can lead to soiling and clogging. In this case, clean the operating valve thoroughly.
To do so, you must remove the operating valve.
Remove the operating valve
Press the sides of the operating valve and push the operating valve out.
Rinse the removed valve thoroughly with warm water.
Replace the operating valve
Moisten the edge of the valve opening in the lid with some detergent.
This makes it easier to replace the valve.
Place the operating valve on the lid diagonally.
Press the operating valve and turn it into the valve opening.
Finally, check that the operating valve is placed correctly by turning it.
The edges of the operating valve must lie flat at the top and bottom of the lid (see figures).
10.3 storing
Store the clean, dry Sicomatic® t-plus in a clean, dry and protected place.
Do not close the cooker. You may place the lid upside down on the cooker.
11 | Maintenance

Only use original Somatic® t-plus spare parts.
Contact your Silit dealer. This helps you to maintain the proper functioning and safety of your cooker.

Safety features to prevent dangerous situations.
Do not make any modifications to the safety mechanisms.
Refer to our instructions for cleaning and care.

Maintaining safety
Regularly check the function of the safety mechanisms.
See also Chapter 6 "Before each use"
Lid gasket
Replace the lid gasket if it is hard (brown discolouration), brittle or damaged.
Replace the lid gasket after approx. 400 uses, and at the latest after 2 years.
The Sicomatic name must feature on the lid gasket.
This helps to maintain the safety function of the lid gasket.
Replacing the aroma sealing cap
EN
If the aroma sealing cap is damaged, replace it immediately.
Replace the aroma sealing cap after approx. 400 uses, and at the latest after 2 years.
Remove the damaged aroma sealing cap.
First clean the pressure display area.
Fit the new aroma sealing cap.
Pull the rim of the aroma sealing cap completely over the attachment.
Check the rim of the aroma sealing cap. It must sit flat and securely in the groove.
Replacing the operating valve
Replace the operating valve when it is faulty.
Replace the operating valve after approx. 400 uses, and at the latest after 2 years.
Remove the faulty operating valve and replace it with the new operating valve as described in Point 10.2
Cleaning the lid and lid shaft handle.
12 | Easy troubleshooting
What do I do if...
It can be due to one of the following causes
| the lid is very difficult to close. | → Poor running quality of the lid gasket. |
| After closing, you cannot move the slider to the desired cooking level 0, 1 or 2. | → Lid and pot shaft handles are not correctly aligned. → The pressure display is lifted up and sticks out of the handle. → Handle is damaged |
| Heating takes too long | → Power setting too low. |
| Steam and droplets of water are constantly released at the lid rim when parboiling (if just a little escapes, this is irrelevant and does not indicate a malfunction). | → Foreign objects on the lid gasket, cooker rim and inner lid rim. → Lid gasket is hard, brittle or damaged. → The seal on the lid shaft handle is damaged. |
| Pressure indicator does not rise or does not rise enough | → Slider is still in initial position. → Power setting too low. → Not enough liquid to generate steam. → Lid gasket is hard, brittle or damaged. |
| Steam and droplets of water are constantly released at the pressure indicator. | → The aroma sealing cap is defective. |
Greasing the upper rim of the lid with a thin layer of domestic cooking oil
Align the lid and pot shaft handles correctly.
→Manually press the pressure indicator.
Open the lid again and check the aroma sealing cap and pressure display.
Contact your Silit dealer.
Select a higher power setting.
Open the cooker and wipe the lid gasket, cooker rim and internal lid rim.
Fit a new original Sicomatic lid gasket.
Turn the slider to the desired cooking level.
Select a higher power setting.
Open the cooker and add liquid.
Fit a new original Sicomatic lid gasket.
Fit a new original Somatic® t-plus aroma sealing cap (see Chapter 11 Maintenance).
What do I do if...
It can be due to one of the following causes
| During cooking, plumes of unwanted steam escape at the front from the lid shaft handle. | →Power setting too high. →Operating valve is soiled or clogged. →Overpressure valve is soiled. |
| During cooking, large plumes of steam suddenly escape at the front from the lid shaft handle. | →Operating valve is soiled or clogged. →Overpressure valve has been triggered. |
| Water or steam constantly escapes at the lid rim during cooking. | →Lid gasket is hard, brittle or damaged |
| Leakage, especially at cooking level 1: The slider is turned to cooking level 1 and steam is released. | →Power setting is too high. →Operating valve is soiled or clogged. →Operating valve is damaged. |
| Whistling sound during cooking. | →Aroma sealing cap is torn or damaged. |
| The handle and slider become hot. | →The seal on the lid shaft handle is damaged or brittle. →The aroma sealing cap is defective. →Aroma sealing cap is fitted incorrectly. |
Turn down the power setting.
Clean the operating valve (see Point 10.2 "Cleaning the lid and operating valve").
Clean the overpressure valve area.
Steam continues to be released despite cleaning:
Contact your Silit dealer.
Clean the operating valve (see Point 10.2 "Cleaning the lid and operating valve").
Contact your Silit dealer.
Select a higher power setting.
Try moving the slider to cooking level 2. If the steam stops, this means that the power setting was too high for cooking level 1.
Steam continues to be released despite setting to cooking level 2:
Clean the operating valve (see Point 10.2 "Cleaning the lid and operating valve").
Fit a new original Somatic ^心 t-plus operating valve (see Point 10.2 Cleaning the lid and operating valve).
Fit a new original Somaticic t-plus aroma sealing cap (see Chapter 11 "Maintenance").
Have a new original Sicomatic t-plus lid handle fitted.
Contact your Silit dealer.
Fit a new original Somatic® t-plus aroma sealing cap (see Chapter 11 "Maintenance").
Position the aroma sealing cap correctly.
The lid cannot be opened There is pressure in the cooker.
→ The residual pressure stop is jammed (e.g. with slider).
The lid can't be opened (no pressure in cooker).
The aroma sealing cap is inverted. The pressure indicator is not in the initial position.
Aroma sealing cap is damaged or deformed.
Negative pressure has occurred in the cooker when cooling down. Overpressure valve and operating valve are clogged.
Slider can't be moved to "OPEN".
The pressure indicator remains high, even though there is no more steam being released.
→ The aroma sealing cap is inverted.
→The aroma sealing cap is deformed.
Pressure indicator is jammed.
Broken spring on the pressure indicator.
The lid shaft handle is damaged.
Improper handling.
Pot shaft handle/pot side handle is loose.
→Signs of use
Pot handle/pot side handle is damaged.
Improper handling.
Release the steam or allow to cool. Never use force to open the cooker.
Release the stop by gently moving the slider back and forth.
Allow the cooker to cool down. Manually press the pressure indicator.
Allow the cooker to cool down. Manually press the pressure indicator.
Fit a new original Somatic® t-plus aroma sealing cap (see Chapter 11 "Maintenance").
Contact your Silit dealer.
Contact your Silit dealer.
Allow the cooker to cool down. Manually press the pressure indicator.
Allow the cooker to cool down. Manually press the pressure indicator.
Fit a new original Somatic® t-plus aroma sealing cap (see Chapter 11 "Maintenance").
Gently move the slider back and forth without using force.
Allow the cooker to cool down. Manually press the pressure indicator. Contact your Silit dealer.
Have a new original Sicomatic t-plus lid handle fitted.
Contact your Silit dealer.
→ Tighten the screw with a screwdriver.
Fit a new Sicomatic t-plus cooker handle.
13 | Tips: Cooking with the Sicomatic® t-plus / Cooking time tables

Proceed as per the instructions in Chapter 7. You must also read the safety information in Chapter 2 and Chapter 7.

Always fill with sufficient liquid to allow steam to be generated.
This prevents the cooker from "boiling dry". It also prevents damage to the pressure cooker and the cooking zone.
Observe the prescribed fill quantities: See table under point 7.1
13.1 Soups and stews
Ideal for soups and stews with roasted meat: If the cooking times for meat and vegetables do not differ much, the meat is browned and the vegetables are added together with the stock.
If the cooking times differ a lot, interrupt the cooking process for the meat and add the vegetables for the remaining minutes, so that everything is cooked together and finishes cooking at the same time.
Observe the following rules for soups and stews:
Parboil frothing foods such as pulses and boiling meat in the cooker without the lid and remove the froth before closing it.
After cooking, allow the cooker to cool down, see point 7.7.
Cooking time guidelines
The precise cooking times depend on the size, freshness and consistency of the food you are cooking. The energy source, e.g. induction, gas or glass ceramic, also influences the cooking times. The cooking times essentially apply for 500g . A larger amount of liquid is required than normal. Soaking is not necessary with these cooking times.
| Cooking level Cooking time in min. for stew Comments |
| White beans 2 25 Cook in 1.5 l of liquid |
| Kidney beans, dried 2 65 Cook in 1.5 l of liquid |
| Whole peas, dried 2 45 Cook in 2.0 l of liquid |
| Lentils 2 10 Cook stew with 2.5 l, purée with 1.5 l of liquid |
13.2 Vegetables
The specified cooking times are guidelines to help you quickly determine your own cooking times. Cooking times not only depend upon the quality of the food you are cooking, but also on the following:
→ The smaller you chop vegetables, the quicker they will cook.
→ The crispier or "al dente" the vegetable should be, the shorter the cooking time. We have specified the time for "al dente" and "well cooked".
→ The larger the overall quantity of food being cooked, the longer the cooking time. For "al dente" results, the quantity should not be too large, otherwise the food is "al dente" but the inside is raw. Small time differences usually have little influence.
However, with vegetables, a single minute can transform them from "al dente" to "well cooked".
The cooking time always starts when steam is first released.
The vegetables are placed in the insert for the following cooking times. The vegetables, therefore, are not in contact with the water and cannot be leached out.

In case of doubt remember: It is better to undercook, as you can always cook it some more. However if it is overcooked, you cannot make it "crunchy" again.
Cooking time guidelines: Cooking times apply for 500g
| Fresh vegetables Cooking level Cooking time in min. Comments al dente Well cooked | |||||
| Artichoke | 1 | 30 | 35 | Whole | |
| Spinach leaves 1 0.5 3.5 Leaves | |||||
| Cauliflower | 1 | 3 | 5 | Florets | |
| Cauliflower | 1 | 7 | 10 | Whole | |
| Green beans 1 7 9 - | |||||
| Broccoli | 1 | 4 | 6 | Florets | |
| Mushrooms | 1 | 1 | 3 | - | |
| Fennel | 1 | 13 | 17 | Halved | |
| Fresh peas | 1 3 | 5 | - | ||
| Fresh vegetables Cooking level Cooking time in min., al dente Well cooked | ||
| Carrots 146 Slices | ||
| Potatoes 189 Quartered | ||
| Kohlrabi 158 Sticks | ||
| Leek 124 Slices | ||
| Pepper 124 Strips | ||
| Red cabbage 179 Whole | ||
| Salsify 147 Sticks | ||
| Celery 124 Diced | ||
| White asparagus 125 Whole | ||
| Green asparagus 135 Whole | ||
| Tomatoes 124 Whole | ||
| White cabbage 110 | 13 | Cut into sixths |
| Savoy cabbage | 169 Cut into sixths | |
| Courgettes 11 | 2 Half moons | |
The following types of vegetable are suitable when cooked longer and at cooking level 2:
| Fresh vegetables | Cooking level | Cooking time in min., well cooked | Comments |
| Bavarian cabbage | 2 | 4 | - |
| Potatoes in skins | 2 | 14 | 60 - 80g /Potato |
| Red cabbage | 2 | 4 | Thin strips |
| Sauerkraut | 2 | 10 | - |
13.3 Meat
Joints are roasted in the Somatict t-plus. The necessary amount of liquid is first used for the stock.
If the pieces are too large, cut them smaller and brown them individually, then cook them on top of each other to finish cooking.
Cook boiling meat using 1-1.5 l of liquid in the bottom of the pot.
The cooking time depends on the quality, age, consistency and size of the meat.
The cooking time begins once the second white ring is visible on the pressure indicator and is based on a quantity of 500g
Important: Remove the froth from boiling meat before you close the cooker. Before you open the cooker, allow it to cool down or slowly release the steam in stages.
Cooking time guidelines: Cooking times apply for 500g
| Cooking level Cooking time in min., well cooked Comments, fried |
| Beef |
| Frying 2 30 Whole piece |
| Fillet 2 18 Whole piece |
| Coulash 2 20 Large chunks |
| Roulades 2 17 Whole piece |
| Marinated beef 2 25 Whole piece |
| Boiling meat 2 30 Whole piece |
| Veal |
| Frying 2 25 Whole piece |
| Fillet 2 14 Whole piece |
| Lamb |
| Frying 2 25 Whole piece |
| Back 2 5 Whole piece |
Cooking level Cooking time in min., well cooked Comments, fried
Pork
Belly 2 15 Whole piece
Frying 2 25 Whole piece
Knuckle of pork, fresh 230 Whole piece
Knuckle of pork, smoked 245 Whole piece
Fillet 2 17 Whole piece
Minced meat
Stuffed pepper 2 15 with insert
Meat loaf 215
Stuffed cabbages 2 15
Soup dumplings 2502cm
Chicken
Breast 28 Whole piece
Stewing hen
2 10 Whole piece
Stewing hen
2 20 Whole piece approx. 1kg
Turkey
Breast 2 20 Whole piece
Stewing hen
2 20 Whole piece approx. 1kg
Goose
Breast/stewing hen
2 30 Whole piece
Duck
Breast/stewing hen
215 Whole piece
| Cooking level Cooking time in min., well cooked Comments, fried |
| Rabitt |
| Frying 2 20 Whole piece |
| Stewing hen 2 30 Whole piece |
| Back 2 10 Whole piece |
| Deer |
| Coulash 2 15 Large chunks |
| Venison |
| Frying 2 20 Whole piece |
| Stewing hen 2 25 Whole piece |
| Back 2 20 Whole piece |
| Wild boar |
| Frying 2 35 Whole piece |
| Goulash 2 20 Large chunks |
| Stewing hen 25 Whole piece |
| Back 2 35 Whole piece |
13.4
Fish
Fish juice is very sticky. Therefore only release the steam very slowly. Once the pressure indicator has retracted into the lid shaft handle, remove the lid straight away.
Cooking time guidelines: Cooking times apply for 250g in the perforated insert
| Fish Cooking level Cooking time in min., well cooked Comments |
| Cod 1 4 Whole fillet |
| Red fish 1 4 Whole fillet |
| Pollack 1 11 in portions |
| Monk fish 1 5 Whole fillet |
| Tuna 1 10 in portions |
| Wild salmon 1 11 in portions |
| Pike perch 1 5 Whole fillet |
13.5 side dishes, fruit and desserts
Cooking time guidelines: Cooking times apply for 500g
| Side dishes Cooking level Cooking time in min. Comments | EN | ||
| Risotto | 1 | 7 | Do not release the steam, ins |
| 3 minutes afterwards with closed lid | |||
| Bread dumplings 1 7 Do not release the steam, instead soak for 12 | |||
| 12 minutes afterwards with closed lid | |||
| Pasta 2 0 When the green area II shows on the pressure indicator, remove the Somatic® t-plus from the hob. Do not release the steam, instead wait | |||
| 6 minutes before you open the cooker. | |||
| Basmati rice 1 2 1 part rice, 2 parts water, do not release the steam, instead soak for 12 minutes with closed | |||
| lid | |||
| Long grain rice | 1 10 | 1 part rice, 2 parts water | |
| Fruit, desserts | Cooking level Cooking time in min. Comments |
| Apple sauce 1 5 Cut into eighths | |
| Apple compote | 1 4 Cut into sixths |
| Apricot compote | 1 2 Cut into eighths |
| Pear compote | 1 3 Cut into eighths |
| Cherry compote | 1 2 - |
| Plum compote | 1 2 Halved |
| Rhubarb compote | 1 3 Pieces |
| Gooseberry compote | 1 3 - |
13.6 Cooking a menu / tower cooking
In the Somatic ^ -plus with inserts you can cook an entire menu comprising of different foods at the same time in one pot.
Here are a few tips
→ The total cooking time for menus is always based upon the food with the longest cooking time. The dish with the longest cooking time is inserted first. If you want to cook a roast for 25 minutes, boiled potatoes for 9 minutes and vegetables for 5 minutes, cook the roast for 16 minutes then interrupt the process and place the insert carrier over the roast, then place the perforated insert containing the potatoes on top.
After a further 4 minutes, open the Somatic t-plus and place the non-perforated insert with the vegetables on top. Cook for a further 5 minutes and the entire meal is ready.
You can reduce the cooking time for meat considerably if the meat is cut into portion-size slices. The meat then cooks in approx. 10-15 minutes, more or less the same time as rice, potatoes or vegetables, and you do not need to interrupt the cooking process.
Neither the smell nor the taste of the foods are transferred to each other. Therefore no mixed aroma is created.
Cooking time guidelines: The cooking times apply for 500g. Adjust the cooking level according to the food.
| Tip Cooking Pot base Insert Cooking Perforated Cooking Non-time in carrier time in insert time in perforated min. | |||||||
| Menu tip 1* | 17 | Beef roulades | x | 4 - 6 | Carrots | 10 | Rice |
| Menu tip 2* | 25 | Roast pork | x | 9 | Boiled potatoes | 5 | Cauliflower |
| Menu tip 3 | 11 | Pollack 250g portion sizes | x | 9 | Boiled potatoes | - | |
*For menu tips 1 and 2, minimum 6.5 l Sicomatic® t-plus base must be used
13.7 Frozen food and whole foods
Frozen food
You can thaw frozen food quickly and gently in the Sicomatic t-plus to retain vitamins, flavours and minerals. Lengthy defrosting and thawing times are reduced to minutes, however this depends on the size of the frozen food.
Here are a few more tips
→The heating times for frozen meat are a little longer and the cooking times are a little shorter than for fresh meat.
Small thin pieces of meat, such as escalopes and chops as well as goulash that were frozen as individual chunks; do not defrost them, instead brown them in hot fat and then cook as normal.
→Slightly thaw large thick pieces of meat and then brown them in hot fat or e.g. for meat stocks cook in boiling water.
If the poultry has already been gutted and split, prepare similarly to fresh poultry.
Frozen fish is either cooked in the insert at cooking level 1 or simmered briefly in hot fat in the bottom of the pot and then finish cooking with the rest of the liquid at cooking level 1.
Place the frozen vegetables in the insert. Pour the usual amount of water into the bottom of the pot to generate steam, and cook.
Whole foods
A healthy diet incorporates a variety of different grains, which usually involve many hours of soaking followed by a very long cooking time. In the Somatic® t-plus, this long cooking time can be reduced up to 2/3. Prior soaking is also no longer necessary. Another advantage of cooking whole foods in the Somatic® t-plus is that it efficiently retains the vitamins and minerals of whole grains when cooking at cooking level 1 and it also saves energy. The following rule of thumb applies to cooking grains: double the amount of liquid compared with the grain (i.e. 200ml liquid for 100g grains).
Cooking time guidelines:
Cooking times apply for 200g
Type of grain Cooking level Cooking time in min.
| Wheat | 1 | 30 |
| Rye | 1 | 20 |
| Naked barley 1 23 | ||
| Green spelt 1 15 | ||
| Spelt | 1 | 15 |
| Brown rice 1 10 | ||
| Naked oat 1 5 | ||
| Millet | 1 | 10 |
| Buckwheat | 1 | 2 |
For certain types of grain the soaking times can be 6 to 10 hours, followed by swelling times of 10 to 30 minutes.
14 | Sicomatic® t-plus accessories
Non-perforated insert, low
022cm
for 4.5 | 6.5 | Somatic*t-plus
8031.7011.01

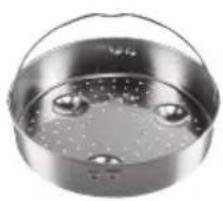
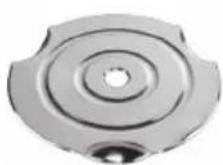
Porcelain basket
021cm
1529.4001.01
Perforated insert, low
018cm
for 2.5 I Sicomomatict-plus
8018.7011.01
022cm
for 4.5 | 6.5 | Somatic®t-plus
8032.7011.01
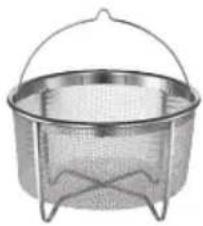
Stainless steel basket
019cm
1529.6022.01
Perforated insert, high
022cm
for 4.5 | 6.5 | Sicomatic ^m t-plus
8033.7011.01
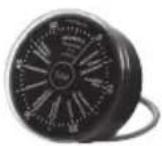
SicoControl cooking timer
0068.0035.01
Insert holder
022cm
for 4.5 | 6.5 | Sicomatic*t-plus
0066.6000.01
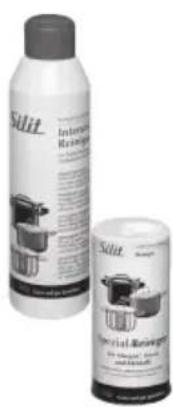
Fluid cleaning agent
0051.8888.01
Powder cleaning agent
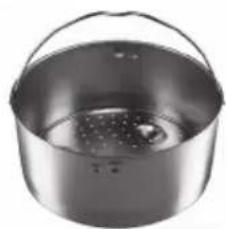
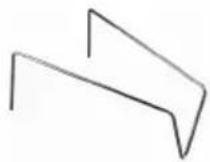
Strainer
022cm
for 4.5 | 6.5 | Somatic*t-plus
7022.6022.01
0051.0010.01
15 | Sicomatic® t-plus spare parts

Pot shaft handle
0 18 cm, for 2.5 l
9253.9002.01
22cm for 3.01
9253.9003.01
22cm for4.5-6.51
9253.9004.01
Wear parts
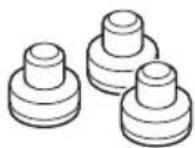
Aroma sealing cap
3 pcs.
9524.8020.01

Cooker side handle with
Flame guard (screw system)
018cm
9252.9302.01
022cm
9252.9304.01
Sicomatic lid gasket
018cm
9067.8900.01
022cm
9067.8901.01

Lid
018cm
8007.6021.11
022cm
8008.6021.11
Operating valve
H09F
9522.8802.01

Lid shaft handle, complete
9249.8902.01
16 | Warranty
Guarantee
We guarantee (provided that the cookware is used under normal, domestic conditions and for the intended use) the durability of the ceramic Silargan® surface for 30 years from the date of purchase. The lid (including components), handles, lid gasket, aroma sealing cap and chrome pouring rim are excluded from the warranty, as these parts do not have a ceramic Silargan® surface.
Under the terms of the warranty, we will exchange parts with a defective Silargan® surface for perfect parts within the warranty period. A Silargan® surface is not deemed defective if it merely exhibits normal signs of wear and tear such as cutting and scratch marks etc. which are of a purely visual nature; such signs of wear and tear are not covered by the warranty.
Provided that this model is still included in the product range, the defective part will be replaced by a part from the same model. If the model is no longer part of the Silit product range, the defective part will be replaced with a similar product within the current Silit product range.
Exclusions from the guarantee
The guarantee does not cover damage due to the following causes: Failure to observe the instructions for use and care, overheating, inappropriate or improper use, incorrect or negligent handling (e.g. cleaning with abrasive
products), any kind of forceful impact (e.g. falling onto a floor, a blow), mechanical, chemical or physical damage to the surface resulting from incorrect use, improperly performed repairs and the installation of spare parts that do not correspond with the original design.
Warranty claims
For any warranty claim, a dated proof of purchase is required. The guarantee is effective from the date of purchase.
Warranty issuer
Information on the consumer's statutory rights
The consumer's statutory rights against the seller if the purchased product was not free of defects at the time of transfer of risk (e.g. subsequent fulfilment, withdrawal, reduction and compensation) are not affected by this guarantee.
We offer a 10-year supply warranty on spare parts upon expiry of the production time.
17 | Sicomatic® declarations of conformity
17.1 EC declaration of conformity
declares that the steam pressure cookers
Sicomatic econtrol
Sicomatic t-plus
Sicomatic® classic
Biomatic ^ eco
Bio-Fadal
satisfy the following harmonised EC directives and standards:
EC guideline: 97/23/EG
Design control: Module B (EC type examination)
Production control: Module A (internal type examination)
Certifying body: TÜV Rheinland LGA Products GmbH
Tillystraße 2
90431 Nuremburg, Germany
ID0000044918
Standard: DIN EN 12778 Steam pressure cookers
DIN EN 82079-1 Creation of instruction manuals
Place and date of issue
Riedlingen - 18.05.2015
Name, position and signature of authorised person
17.2 Declarations of conformity for consumer goods that come into contact with food
These declarations of conformity are available at the following link:
Position 0 (cuisson sans pression)
Directive CE: 97/23/EG
Glass Electro ceramic
Induction
Silargan


Glass ceramic
Electro
Gas
Induction
Los tiempos largos de descongelamente se reducen a horas, except that the time spent in the laboratory is reduced to 10 minutes.
D-88499 Riedlingen, Germany
关于消费者合法权利的说明
2.1 XpnoiOnoiEte to okeuoc onwnc npoopiZetai kal puIaOaTe to e aopaaeia 6
2.2 Aopalecmuayieipema eTn xutpa Somatice t-plus 8
Glass Electro ceramic
Induction
Silargan


Glass ceramic
Electro
Induction

Glass ceramic
Electro
Cas
Induction
Silargan


Class ceramic
Electro
Gas
Induction
0 22 cm,3,0 l i ci n
9253.9003.01
022cm,4,5-6,5Icin
9253.9004.01
Asinma parcalari

Jitch to Suhi hT Sicomatic t-plus 1

i

iEepbSicomatict-plusaueoJ 1
2.1 使将用定理中,如 a 满足

图定用
Somatict-plus将图定用以如,私则
An antenatmci waetehan shangw to bwtchn.
→이려한 기무 히라이드신 Stwchit to hantn d n 10000000000000000000000000000000000000000000000000000000000000
iUyicJrIeAaJxJxJxJxJxJxJxJxJxJxJxJxJxJxJxJxJxJxJxJxJxJxJxJxJxJxJxJxJxJxJxJxJxJxJxJxJx
8.1 祖利 言語用の法の

奉之者默默,至之者默默。
2장几乎所有在的安朝,吉信都无,

增吉为,
Wilde zalm 111 in porties

Glass ceramic
Electro
Gas
Induction
silargan


Glass ceramic
Electro
Gas
Induction

Glass ceramic
Electro
Gas
Induction
Silargan


Glass ceramic
Electro
Gas
Induction
Nikoli ne segrevaje praznega lonca in nikoli ga brez nadzora na segrevaje na najvisji stopnji. Upostevejte proizvajalceva navodila za uporabo.
S tem boste prepreci i poskodbe posode zaradi pregrevanja, zlasti na indukcijskih kuhaliscih.

Varnostna oprema preprecuje nevarosti.
Lonca in njegove varnostne opreme zato ne spreminjaje ter vanju ne posegajte.
Pokrov Ionca Sicomatic t-plus uporabljaje samoskupaj s primernim spodnjim delom Sicomatic t-plus.
Sestavnih delov Ionca Sicomatic ^念 t-plus nikoli ne kombinirajte z drugimi izdelki.

Ohranjanje varnosti
Pred vsako uporabo se prepričajte, da ventili niso zamašeni.
Ventile pred uporabo lonca Sicomatic ^念 t-plus po potrebi o'cistite.
Upostevajte naša navodila za Čišćenje in ngo.
Lonca Sicomatic t-plus ne uporabljajte, ce je poskodovan ali deformiran sam lonec Sicomatic t-plus ali njegovi deli oz. njihovo delovanje ne ustreza opisu v teh navodilih za uporabo.
V primeru popravil se obrnite na pooblašcenega trgovca.
Če se je ročaj lonca razrahljal, ga privijte z izvijačem.

m = 311
Uppskumming/


- | The benefits of your new Sicomatic® t-plus at a glance
- A revolution in easy handling
- Unbeatable safety
- Unique, maintenance-free 3-fold safety valve system
- Hermetic system
- Three cooking levels with automatic temperature control
- Easy cleaning
- Large and clearly visible pressure indicator
- Future-focused - Attractive design, optimum ergonomics and a variety of materials to suit all requirements
- Many household-compatible sizes and designs Practical special inserts
- TÜV safety approval
- 10-year supply warranty for spare parts
- Made in Germany
- | Important safety instructions
- Symbol legend
- Using the pot as intended and keeping it safe
- Using the product for its intended purpose
- Stainless steel
- Silargan
- Safety features to prevent dangerous situations.
- Maintaining safety
- Cooking safely with the Sicomatic t-plus
- Never overfill the cooker.
- Never use force to open the cooker.
- Hot food can cause bubbles to form and it can spurt out explosively when opening the cooker, even if the steam has already been released.
- Do not insert hot meat that you have cooked with the skin on (e.g. beef tongue).
- | Before using for the first time
- | Details of the Sicomatic® t-plus
- Pressure indicator
- Slider/one-handed cooking dial
- Lid shaft handle
- Pot shaft handle
- Handle marking
- Lid marking
- Pot side handle
- Spring-loaded safety bolt
- Aroma sealing cap
- Transparent operating valve
- Overpressure valve
- Safety slot
- Lid gasket
- | The 5 safety features of your Sicomatic® t-plus
- Transparent operating valve
- Overpressure protection with integrated automatic cooking feature
- a) Automatic cooking function
- b) Function as an overpressure valve protection
- Safety slot
- Residual pressure stop
- Locking inhibitor
- | Before each use
- Check the safety mechanisms before you use your Sicomatic t-plus.
- Check the aroma sealing cap
- Checking the pressure indicator
- Checking the overpressure valve
- Checking the operating valve
- Check safety bolt
- Checking the lid gasket
- Checking the handles
- | Cooking with the Sicomatic® t-plus
- Maintaining the cookware and hob
- When using on a gas hob:
- Filling the cooker
- Respect the maximum filling quantities and never overfill the cooker.
- Preventing damage caused by small filling amounts.
- Skimming froth/ stirring when parboiling
- Closing the cooker
- Using the three adjustable cooking levels
- Cooking level 0 (cooking without pressure)
- Cooking level 1 (approx. 109°C / 1st white ring)
- Cooking level 2 (approx. 119°C / 2nd white ring)
- Cooking safely with the hot cooker
- Hot steam is released at the lid.
- The outer surface of the cooker can reach 130°C .
- setting the cooking level, ventilating and heating
- Cooking
- Releasing steam/cooling down
- a) Fast steam release
- When cooking soups, pulses, stews, stock, offal and pasta, the filling volume in the cooker increases due to the formation of froth.
- b) Allowing it to cool down
- c) Cooling down with water
- 7.8
- Opening the Sicomatic t-plus
- | Cooking with the Sicomatic® t-plus accessories
- Note the cooking instructions
- Always fill with sufficient liquid to allow steam to be generated.
- Cooking in a perforated insert (accessory)
- Cooking vegetables:
- Cooking in an non-perforated insert (accessory)
- Cooking in the bottom of the pot (meat)
- | Sterilising, preserving and juicing with the Sicomatic® t-plus
- Note the cooking instructions
- Allow the pot to cool down slowly
- sterilising
- Ensure that the parts you wish to sterilise are resistant to superheated steam up to 120°C .
- Possible uses:
- Sterilising correctly and effectively
- Preserving
- Never overfill preserving glasses
- Preservation times (guidelines only):
- Juicing
- Select the correct cooker base size and never overfill the cooker
- | Maintaining and cleaning
- Cleaning the cooker
- Cleaning the lid and lid shaft handle
- The lid may only be cleaned by hand
- Cleaning the operating valve in the case of heavy soiling
- Remove the operating valve
- Replace the operating valve
- storing
- | Maintenance
- Only use original Somatic® t-plus spare parts.
- Lid gasket
- Replacing the aroma sealing cap
- Replacing the operating valve
- | Easy troubleshooting
- What do I do if...
- It can be due to one of the following causes
- | Tips: Cooking with the Sicomatic® t-plus / Cooking time tables
- Soups and stews
- Observe the following rules for soups and stews:
- Cooking time guidelines
- Vegetables
- Meat
- Cooking level Cooking time in min., well cooked Comments, fried
- Pork
- Minced meat
- Chicken
- Turkey
- Goose
- Duck
- 13.4
- Fish
- side dishes, fruit and desserts
- Cooking a menu / tower cooking
- Here are a few tips
- Frozen food and whole foods
- Frozen food
- Here are a few more tips
- Whole foods
- Cooking time guidelines:
- | Sicomatic® t-plus accessories
- | Sicomatic® t-plus spare parts
- Pot shaft handle
- Wear parts
- Cooker side handle with
- Lid
- H09F
- Lid shaft handle, complete
- | Warranty
- Guarantee
- Exclusions from the guarantee
- Warranty claims
- Warranty issuer
- Information on the consumer's statutory rights
- | Sicomatic® declarations of conformity
- EC declaration of conformity
- Declarations of conformity for consumer goods that come into contact with food
- 关于消费者合法权利的说明
- Asinma parcalari
- 使将用定理中,如 a 满足
- 图定用
- An antenatmci waetehan shangw to bwtchn.
- 祖利 言語用の法の
- Varnostna oprema preprecuje nevarosti.
- Ohranjanje varnosti
- Uppskumming/
Brand : WMF
Model : Sicomatic
Category : Saucepan