ZenWiFi AX Hybrid XP4 - Network card ASUS - Free user manual and instructions
Find the device manual for free ZenWiFi AX Hybrid XP4 ASUS in PDF.
Frequently Asked Questions - ZenWiFi AX Hybrid XP4 ASUS
User questions about ZenWiFi AX Hybrid XP4 ASUS
0 question about this device. Answer the ones you know or ask your own.
Ask a new question about this device
Download the instructions for your Network card in PDF format for free! Find your manual ZenWiFi AX Hybrid XP4 - ASUS and take your electronic device back in hand. On this page are published all the documents necessary for the use of your device. ZenWiFi AX Hybrid XP4 by ASUS.
USER MANUAL ZenWiFi AX Hybrid XP4 ASUS
U17177a / First Edition / November 2020
Table of Contents
English 3
BbIrapckn. 8
Hrvatski 13
Cestina 18
Dansk 23
Nederlands 28
Eesti 33
Francais 38
Suomi. 43
Deutsch 48
Elambdaviiká 53
58
Magyar 63
Italiano 68
Lietuviu 73
Latviešu 78
Norsk. 83
Portugues 88
Polski 93
Pycckn 98
Romana 103
Espanol 108
Srpski 113
Slovenský 118
Slovensčina 123
Svenska 128
Türkce 133
yKpaIHcbka 138
143
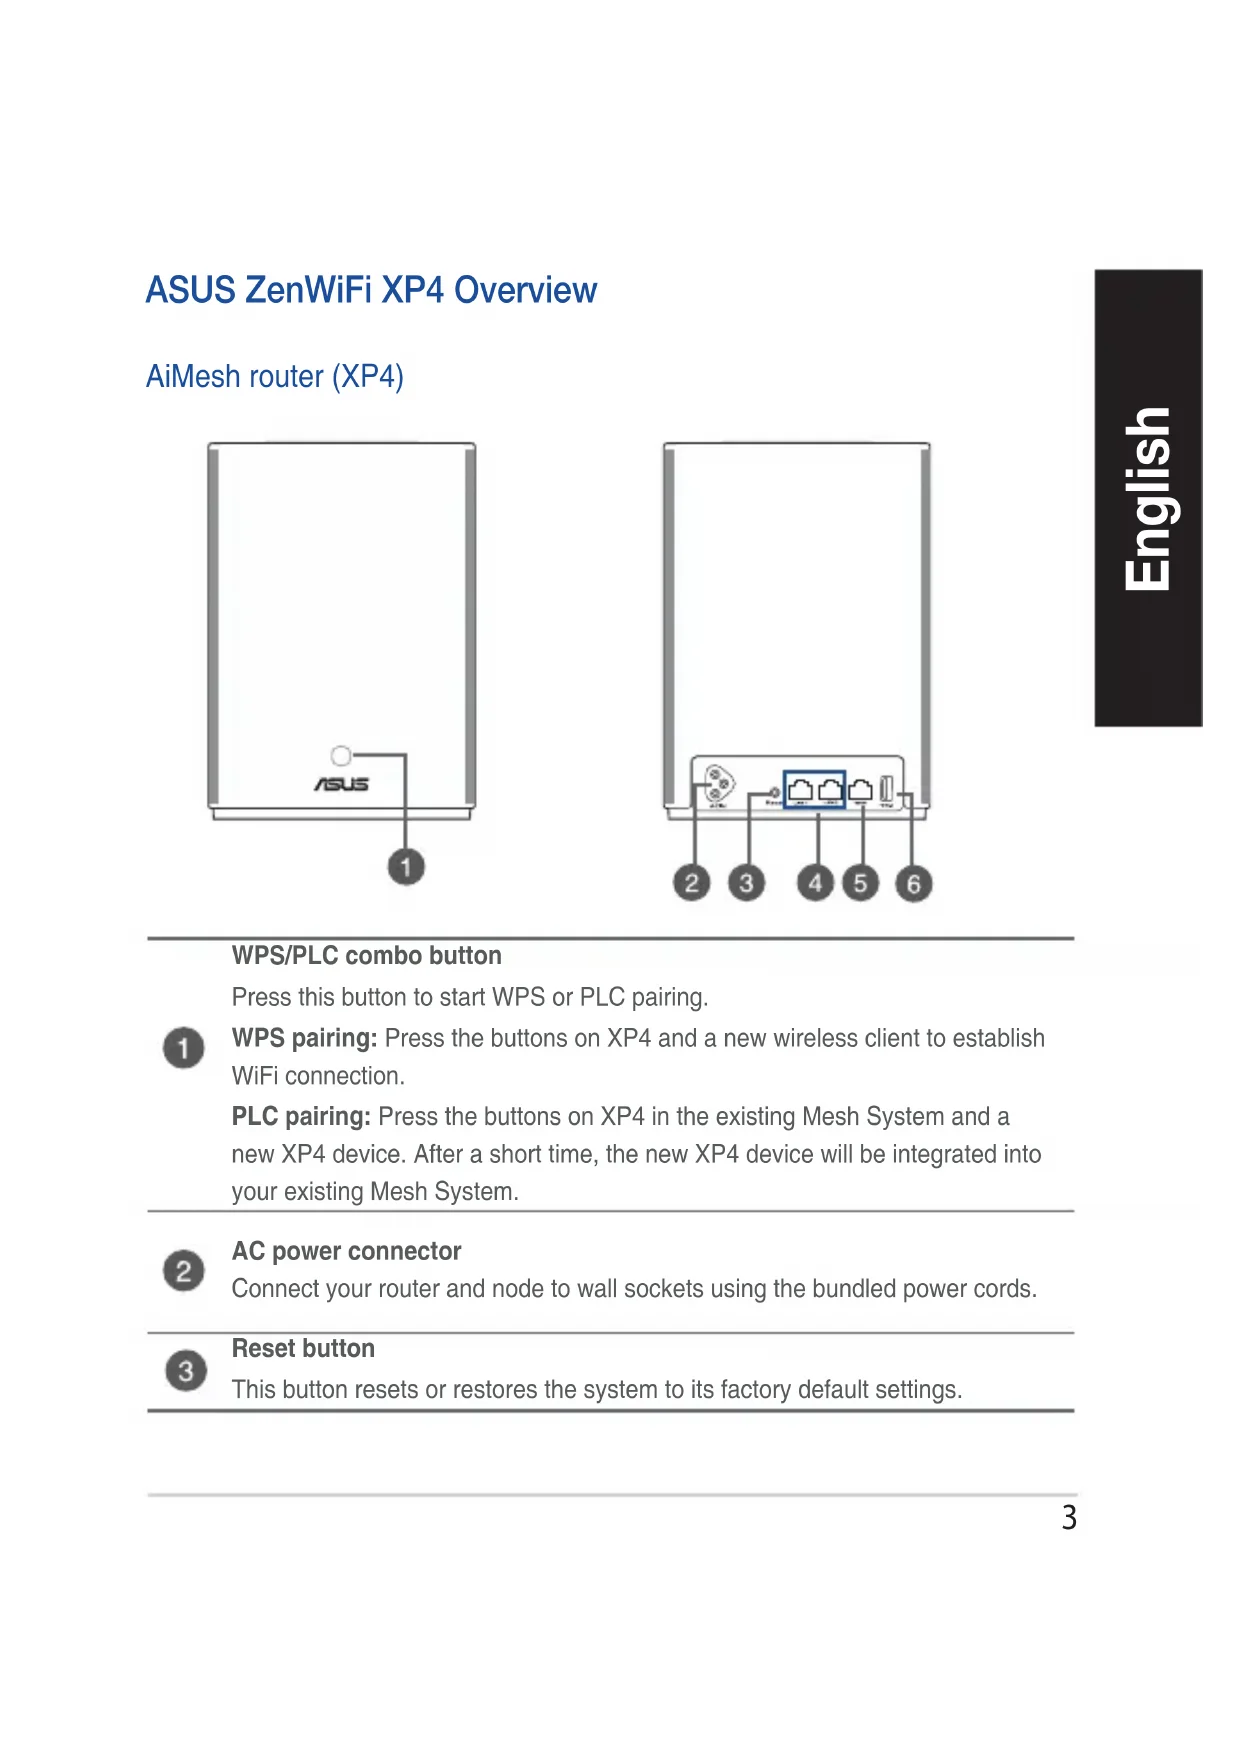
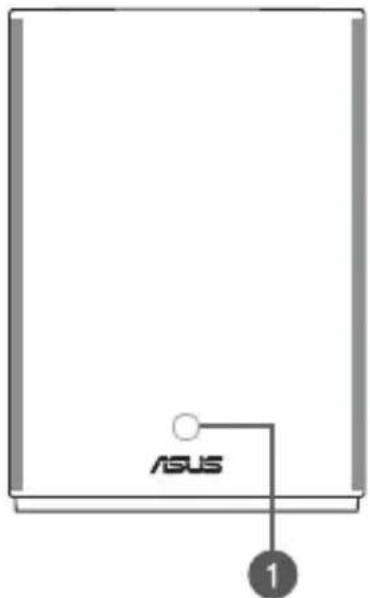
WPS/PLC combo button
Press this button to start WPS or PLC pairing.
WPS pairing: Press the buttons on XP4 and a new wireless client to establish WiFi connection.
PLC pairing: Press the buttons on XP4 in the existing Mesh System and a new XP4 device. After a short time, the new XP4 device will be integrated into your existing Mesh System.
AC power connector
Connect your router and node to wall sockets using the bundled power cords.
Reset button
This button resets or restores the system to its factory default settings.

LAN ports
Connect network cables into these ports to establish LAN connection.
WAN port
Connect a network cable into this port to establish WAN connection.

If you use XP4 as an AiMesh node, you can connect a network cable from a LAN port of an AiMesh router to its WAN port for uplink connection of Ethernet backhaul.
USB 3.1 Gen1 port
Insert a USB 3.1 Gen 1/ USB 2.0 device such as a USB disk or USB 3G/4G

modem into this port.
If you use XP4 as an AiMesh node, the USB port supports function of AiDisk and macOS backup.
Specifications
| AC Power input 100-240V AC, 50/60Hz, 1A | |||
| Operating Temperature 0~40 | °C Storage 0~70 | °C | |
| Operating Humidity 50~90% Storage | 20~90% | ||
ZenWiFi Hybrid XP4 LED indications

Solid blue
Your AiMesh router or node is ready for setup.

Solid white
Your AiMesh router or node is online and works well.

Solid amber
The signal between your AiMesh router and the node is weak.

Solid red
Your AiMesh router has no Internet connection.
Your AiMesh node is disconnected from the router.

Blinking blue
Your AiMesh router is applying new settings.

Blinking amber
Your AiMesh router or node is resetting.

Solid purple
Your AiMesh router or node is in rescue mode.

Solid green
Your AiMesh router or node is switching to another channel caused by system rebooting or radar signals detected on the current channel.
AiMesh Setup Steps
01 XP4 works as an AiMesh router by default. You can also add it to an existing AiMesh system as an AiMesh node.
- As an AiMesh router: Use a network cable to connect your modem to the WAN port of XP4. (Skip to Step 02)
- As an AiMesh node: Place the node within 3 meters of the router during the setup process. Connect your AiMesh node to the AiMesh router via the following ways:
A. WiFi Backhaul connection (Skip to Step 02).
B. Ethernet Backhaul connection: Connect an Ethernet cable from the LAN port of the AiMesh router to the WAN port of the AiMesh node.
C. Powerline Backhaul connection (Skip to Step 02).
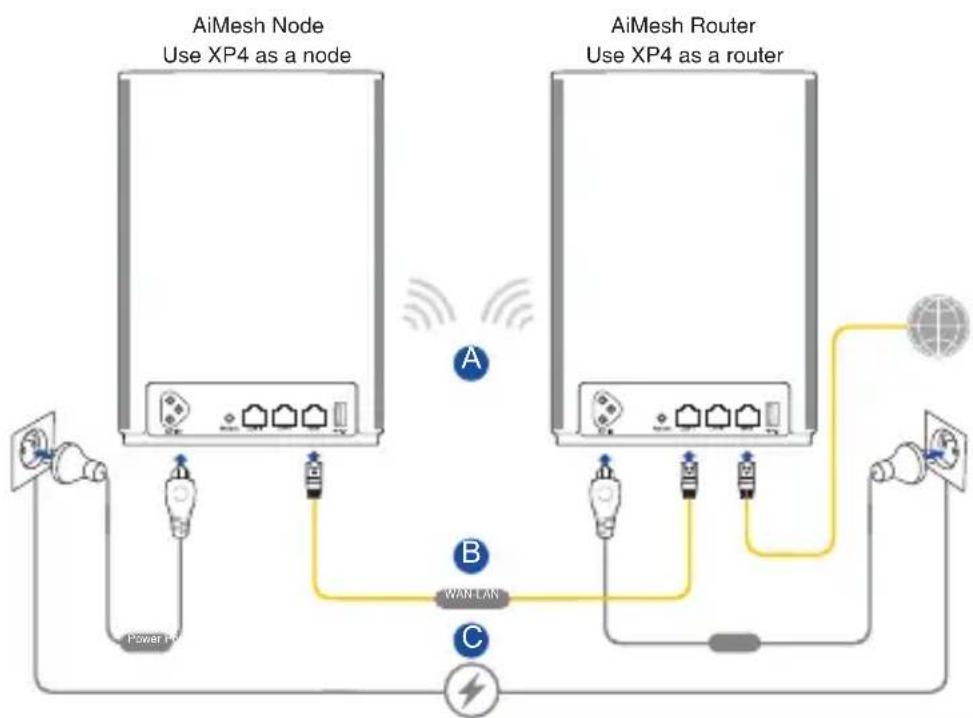
02
Connect XP4 to a wall socket using the bundled power cord.
NOTES:
- Do not use a power extension cord to avoid degrading HomePlug signal and reducing data transfer speeds.
- To minimize powerline interference, connect the power cord to a wall socket directly.
- Plug the power cord to a 3-prong outlet instead of a 2-prong one for higher data transfer speeds.
03
Wait until the LED turns solid blue indicating that the device is ready for the setup.
04
Enable Bluetooth on your phone and launch ASUS Router APP. Do either of the following and follow the onscreen instructions to finish the AiMesh setup.
- PressSet up a new network if you use XP4 as an AiMesh router; or
- Press Add AiMesh node if you use XP4 as an AiMesh node.
NOTE: To set the AiMesh router to access point mode, go to web GUI (http://router.asus.com), and go to the page Administration > Operation Mode.
O6u npereIeHa ASUS ZenWiFi XP4
AiMesh Bb3eJ (XP4)

Kom6mHnpan 6yToH WPS/PLC
HaTnchHeTe 6yToHa 3a cTapTupaHe Ha cDBoBaHe WPS nIPLC.
CABOBaHe WPS:HaTnCHte 6yToHnTe Ha XP4 n Ha HOB 6e3KnueH KIneHT,3a da yCTaHOBnTe WiFi Bpb3ka.
CdBoBaHe PLC:HaTnChTe 6yToHnTe XP4 B cbIeCTbYBaaTa Mesh System n Ha HOBO yCTpoiCTBO XP4.CleI KpaTKO BpeMe HOBOTo yCTPOiCTBO XP4 ue 6bJe INHTerpnpaHO BB Baata CbIeCTbYBaua Mesh System.
2 CbpxTe MappyTu3aTopa cn n Bb3eJa KbM CTehn KOHTaKTn C NOMOuTa Ha BKJIouHHe T E KOMNKeTAt 3axpaHbaun Ka6eJn.
3 ByToH 3a HynipaHe To3n 6yToH Hynipa HnB3CTaHOBBA CnCTeMaTa Do HeHnTe a6pnuHn HacTpoKn.

LANnoptoBe
Cbpxte mpekOBte ka6eB V Te3n nopToBe, 3a da yctahOBtE LAN Bpb3ka.
WANnopT
Cbpxte mpekoB ka6en B To3n npT, 3a da yctahOBITE WAN Bpb3ka.
Ako n3no13BaTe XP4 kaTo AiMesh Bb3en, moXeTe da cBbpxeTe mpeXOB Ka6en ot LAN nopT ha AiMesh mappyTu3aTop KbM WAN nopTa my 3a uplink Bpb3ka C Ethernet backhaul.
NopT USB 3.1 Gen 1
Bouton combiné WPS/CPL
HomePlug nnnn nn nnnnnn nn nnnn
.
7n nn nnn nn nn nn nn nn nn nn
.
y7 3 y7 y7 nn n
2
n nn nnnnnnnnnnnnnnnnnnnnnnnnnnnnnnnnnnnnnnnnnnnnnnnnnnnnnnnnnnnnnnnnnnnnnnnnnnnnnnnnnnnnnnnnnnnnnnnnnnnnnnn
Enable Bluetooth on your phone and launch ASUS Router
Tn nn nnnn nn nnnnnnnnnnnnnnnnnnnnnn. APP
AiMesh nnnn nn
(wnn nn) Set up a new network yn?
;AiMesh XP4-wnnn
n (AiMesh n qo) Add AiMesh node y
.AiMesh XP4-wnnnn
n nn nnnn nn nnnn nnnn nnnn nnnn nnnn nnnn nnnn nnnn nnnn nnnn nnnn nnnn nnnn nnnn nnnn nnnn nnnn nnnn nnnn nnnn nnnn nnnn nnnn nnnn nnnn nnnn nnnn nnnn nnnn nnnn nnnn nnnn nnnn nnnn nn
Operation < ( n) Administration (http://router.asus.com)
(ny) Mode
Pulsante combo WPS/PLC
Przycisk combo WPS/PLC
Kom6HnHPOBaHHa KhONKa WPS/PLC
Haxmte 3tu kHonky dny 3anycka copjxehn WPS nPLC.

Conpexe WPS: yctahOBKn noKIOueHna WiFi hXmTe KhoNkn Ha XP4 n HOBOM 6ecnpoBODHom KIneHTe.
CopraKeHne PLC: HaxmTe KhoNk Ha XP4 B cyueCTbUoJe cncTeMe Mesh n HOBOM yctpoiCTBe XP4. Upe3 KopotKn npomexyToK BpeMeHn HOBoe ycTPOiCTBO XP4 6yIET INTErPupOBaHO B cyueCTbUOuYIO CnCTemy Mesh.

Pa3bem nTuHn
IopKnIOuHTe poyTe np y3eK HaCTeHHbIM 3JIeKTPnueCKm PO3ETkAm C NOMOUIIO NOCTaBnEbIX B KOMNKeTc SHyPoB NITaHnI.

Khonka c6poca
3Ta KhONKa npedHa3HaueHa dIa c6pOca cnCTeMb I KaHacTpoKa m NO yMOJuaHNI.

Pa3beMBi LAN
IopKIOUeHne ceTeBbIX ycTpoiCTB.
WANnopT
IopKJIoueHne cTeBOrO ka6eIy yCTaHOBKn WAN npKJIoueHn.

EcnBbI nCnoB3yeTe XP4 B kaueCTBe y3na AiMesh, Bbl moKeTe noDknUoyTb ceTeBOI Ka6eIb ot pa3bema LAN poyepa AiMesh K pa3bemy WAN dIra BocxOJaero coeHHenry Ethernet backhaul.
Pa3bem USB 3.1 Gen1

ПодклioчиTe KэTomу поту устpoистBO USB 3.1 Gen 1/USB 2.0, habример USB Флэшдиски USB 3G/4G мodem.
Прии полььовану XP4 в kaueстve y3na AiMesh, поТ USB подерхиBaet AiDisk n Mac OS backup.
Cneunkaucna
Poyter nnn y3en AiMesh roTOB K hactpoiKe.

Tognt 6eIbIM uBeTom
Poyter n nn y3en AiMesh onnaiH n Bce xopoio.

JaHTapHbI:
Cna6bI cnHn mexny poYepom n y3nom AiMesh.

Tognt KpaChbIM CBeTOM
Poyterp AiMesh He noiknuehen K nHTepHeTy.
Baw y3en AiMesh oTKIouen ot poyTepa.

Muraet cHm
PoyTep AiMesh npImeHReT HOBbIe HaCTpoiKn.

Miraet opaHkeBbIM
BbnoJHareTc6poc poyepa nn y3na AiMesh.

Topu nypnypbIM uBeTom
PoyTepe nn y3en AiMesh haoDntcB peKIme BocCTaHOBNeHn.

TopuT3eJIeHbIM
Poyter nIy y3eAiMesh nepekIouaetcHa dpuro KaHal, BblBaHHbI nepe3arpy3koCnCTembl IIN o6HapUkeHnEm Ha TeKyuem KaHale paAnIOLOKaunOHbIX NOMex.
Buton combinat WPS/PLC
Apasati acest buton pursuant a initia associrea WPS sau PLC.
WPS/PLC combo taster
Pritisnite ovaj taster daPokrenete WPS ili PLC uparivanje.
WPS uparivanje: Pritisnite tastere na XP4 uredaju i novom bezićnom klijentu da uspostavite WiFi vezu.
PLC uparivanje: Pritisnite tastere na XP4 uredaju u postojecem meš sistemu i na novom XP4 uredaju. Nakon kratkog vremenskog期内a, novi XP4 uredaj ce biti intergisan u vaš postojeci Mesh system.
Din AiMesh-router eller-nod aterstalls.
Fast röd
Din AiMesh-router aller -nod ar i raddningslage.
Fast grön
Kom6iHOBaHa KhonKa WPS/PLC
HaTnCHiB KhoNkU, 0o6 noaTu NoeHaHHa B npay WPS a6o PLC.

Поeнньnapy WPS:HaTnckaIte KHONKn Ha npicTpoi XP4 i Ha HOBOMy 6e3dpoTObOMy KJIeHTi, 0o6 BCTaHOBNTn PidKnIOueHHaWiFi.
Поeннь napy PLC:HaTnckaIte KhoNkn Ha XP4В haBni Mesh-cntemi Ta Ha HObOMy npicptoi XP4R.3a kopoTKn yac HOBn npicctpii XP4R 6yde iHTerpoBaHO B HaBHy Mesh-cntemy.

3'€dhyBauch KInBneHn 3MInHoro cTpyMy
Плкючтб Маршуtn3aTOp i By30Jdo po3eTOK eIeKTpOmepeksi shypamn XNBJIeHЯ 3 KOMNJIeKTiB.

AD = 25,PQ = 4 - 25, CQ = 4 - 25
AiMesh 8e g jg jn
j
AiMesh jj
y
Aa
ii


AiMesh
I 01
WAN:AiMesh (02)XP4
i 3 a iMesh s AiMesh aiMesh
.(02)WiFiBackhaulJLAN EthernetBackhaulAIAiMeshWAN AiMesh (02)Powerline Backhaul

ailll dXwI pIy bll AImesh aacg AiMesh ggs
02
3b^2 - 4a = 0
Jai Cie Jaii HomePlug a! 1
a bll lal 3 3 3 3 3 3 3 3 3 3 3 3 3 3 3 3 3 3 3 3 3 3 3 3 3 3 3 3 3 3 3 3 3 3 3
.
jL jJl J 1s sU LLED
03
ASUS Router 1sblsblsblsblsblsblsblsblsblsblsblsblsblsblsblsblsblsblsblsblsblsblsblsblsblsblsblsblsblsblsblsblsblsblsblsblsblsblsblsblsblsblsblsblsblsblsblsblsblsbls
04
Jaii jai i jai i jai i jai i jai i jai i jai i jai i jai i jai i jai i jai i jai i jai i jai i jai i jai i jai i jai i jai i jai i jai i jai i jai i jai i jai i jai i jai i jai i jai i jai i jai i jai i jai i ji aiai (a) Administration (a) (b) (c) (d) (e) (f) (g) (h) (i) (j) (k) (l) (m) (n) (o) (p) (q) (r) (s) (t) (u) (v) (w) (x) (y) (z)