
MCI-1G/350-2T - Network card ASUS - Free user manual and instructions
Find the device manual for free MCI-1G/350-2T ASUS in PDF.


| Product Type | Network Interface Card |
| Model | ASUS MCI-1G/350-2T |
| Form Factor | Standard PCIe (estimated) |
| Interface | PCI Express |
| Ports | 2 x RJ-45 Gigabit Ethernet |
| Data Rate | 10/100/1000 Mbps per port |
| Standards | IEEE 802.3, 802.3u, 802.3ab |
| Duplex Mode | Full duplex and half duplex |
| Operating Temperature | 0°C to 50°C (estimated) |
| Storage Temperature | -20°C to 70°C (estimated) |
| Dimensions (approx.) | 120 mm x 80 mm x 20 mm |
| Weight | Approximately 100 g |
| Power Consumption | Typically 2-3 W (PCIe bus powered) |
| LED Indicators | Link/Activity per port |
| Supported Operating Systems | Windows, Linux, macOS (driver dependent) |
| Jumbo Frame Support | Up to 9K bytes (estimated) |
| Wake-on-LAN | Supported |
| Compliance | FCC, CE, RoHS (estimated) |
| Maintenance | Keep dry and free of dust. Use a soft cloth for cleaning. |
Frequently Asked Questions - MCI-1G/350-2T ASUS
User questions about MCI-1G/350-2T ASUS
0 question about this device. Answer the ones you know or ask your own.
Ask a new question about this device
Download the instructions for your Network card in PDF format for free! Find your manual MCI-1G/350-2T - ASUS and take your electronic device back in hand. On this page are published all the documents necessary for the use of your device. MCI-1G/350-2T by ASUS.
USER MANUAL MCI-1G/350-2T ASUS
1 Gigabit/s Ethernet card User Guide

E13848
First Edition
March 2018
Copyright © 2018 ASUSTeK COMPUTER INC. All Rights Reserved.
No part of this manual, including the products and software described in it, may be reproduced, transmitted, transcribed, stored in a retrieval system, or translated into any language in any form or by any means, except documentation kept by the purchaser for backup purposes, without the express written permission of ASUSTeK COMPUTER INC. ("ASUS").
Product warranty or service will not be extended if: (1) the product is repaired, modified or altered, unless such repair, modification of alteration is authorized in writing by ASUS; or (2) the serial number of the product is defaced or missing.
ASUS PROVIDES THIS MANUAL "AS IS" WITHOUT WARRANTY OF ANY KIND, EITHER EXPRESS OR IMPLIED, INCLUDING BUT NOT LIMITED TO THE IMPLIED WARRANTIES OR CONDITIONS OF MERCHANTABILITY OR FITNESS FOR A PARTICULAR PURPOSE. IN NO EVENT SHALL ASUS, ITS DIRECTORS, OFFICERS, EMPLOYEES OR AGENTS BE LIABLE FOR ANY INDIRECT, SPECIAL, INCIDENTAL, OR CONSEQUENTIAL DAMAGES (INCLUDING DAMAGES FOR LOSS OF PROFITS, LOSS OF BUSINESS, LOSS OF USE OR DATA, INTERRUPTION OF BUSINESS AND THE LIKE), EVEN IF ASUS HAS BEEN ADVISED OF THE POSSIBILITY OF SUCH DAMAGES ARISING FROM ANY DEFECT OR ERROR IN THIS MANUAL OR PRODUCT.
SPECIFICATIONS AND INFORMATION CONTAINED IN THIS MANUAL ARE FURNISHED FOR INFORMATIONAL USE ONLY, AND ARE SUBJECT TO CHANGE AT ANY TIME WITHOUT NOTICE, AND SHOULD NOT BE CONSTRUED AS A COMMITMENT BY ASUS. ASUS ASSUMES NO RESPONSIBILITY OR LIABILITY FOR ANY ERRORS OR INACCURACIES THAT MAY APPEAR IN THIS MANUAL, INCLUDING THE PRODUCTS AND SOFTWARE DESCRIBED IN IT.
Products and corporate names appearing in this manual may or may not be registered trademarks or copyrights of their respective companies, and are used only for identification or explanation and to the owners' benefit, without intent to infringe.
Contents
About this guide....iv
How this guide is organized....iv
Where to find more information....iv
Conventions used in this guide ...... v
Typography v
MCI-1G/350 series specifications summary ...... vi
Chapter 1: Product Introduction
1.1 Welcome! 1-2
1.2 Package contents 1-2
1.3 System requirements....1-2
1.4 Card layout 1-3
1.5 LED indications....1-4
1.6 Installing the MCI-1G/350 series Ethernet card....1-5
Chapter 2: Boot Agent Configuration
2.1 Intel(R) iSCSI Remote Boot....2-2
2.1.1 iSCSI Boot Configuration 2-3
2.1.2 iSCSI CHAP Configuration.... 2-4
2.2 Intel(R) Ethernet Flash Firmware Utility....2-5
Chapter 3: Driver Installation
3.1 Windows ® Server OS Driver Installation....3-2
3.2 Linux OS Driver Installation....3-4
Appendix
Simplified EU Declaration of Conformity...... A-2
ASUS contact information...... A-3
About this guide
This user guide contains the information you need when installing and configuring the server management board.
How this guide is organized
This guide contains the following parts:
• Chapter 1: Product Introduction
This chapter describes the MCI-1G/350 series Ethernet card features and the new technologies it supports.
• Chapter 2: Boot Agent Configuration
This chapter provides instructions on setting the Intel(R) Boot Agent XE.
• Chapter 3: Driver Installation
This chapter provides instructions for installing the Ethernet card drivers on different operating systems.
Where to find more information
Refer to the following sources for additional information and for product and software updates.
- ASUS websites
The ASUS website provides updated information on ASUS hardware and software products. Refer to the ASUS contact information.
- Optional documentation
Your product package may include optional documentation, such as warranty flyers, that may have been added by your dealer. These documents are not part of the standard package.
Conventions used in this guide
To make sure that you perform certain tasks properly, take note of the following symbols used throughout this manual.

DANGER/WARNING: Information to prevent injury to yourself when trying to complete a task.

CAUTION: Information to prevent damage to the components when trying to complete a task.

IMPORTANT: Instructions that you MUST follow to complete a task.

NOTE: Tips and additional information to help you complete a task.
Typography
Bold text Indicates a menu or an item to select.
Italics Used to emphasize a word or a phrase.
Example:
Example:
Command Means that you must type the command exactly as shown, then supply the required item or value enclosed in brackets.
Example: At the DOS prompt, type the command line: format a:
MCI-1G/350 series specifications summary
| Model Name MCI-1G/350-2T MCI-1G/350-4T | ||
| Data Rate Per Port | 10/100/1000 Mbps 10/100/1000 Mbps | |
| Ports | 2 ports 4 ports | |
| Controller | Intel I350-AM2 Intel I350-AM4 | |
| Connector | RJ45 | |
| Host Interface | PCIe 2.0 x4 | |
| Form factor | Mezzanine Card (OCP) | |
| Supported Cable Type | Category-3 or higher for 10BASE-TCategory-5 or higher for 100BASE-TXCategory-5e or higher for 1000BASE-T | |
| Features | Intel® Virtualization Technology (Intel® VT) for Connectivity (Intel® VT-c)SR-IOV (Up to 8 Virtual Functions per Port)Pre-eXecution Environment (PXE)iSCSI boot | |
* Specifications are subject to change without notice.
Product Introduction
This chapter offers the MCI-1G/350 series Ethernet card features and the new technologies it supports.
1
1.1 Welcome!
Thank you for buying an ASUS ® MCI-1G/350 series 1 Gigabit/s Ethernet card!
Before you start installing the Ethernet card, check the items in your package with the list below.
1.2 Package contents
Check your package for the following items.
| Standard Gift Box Pack | |
| ASUS MCI-1G/350 series Ethernet card | 1 |
| LED Signal Cable | 1 |
| Packing Quantity | 1 pc per carton |

If any of the above items are damaged or missing, contact your retailer.
1.3 System requirements
Before you install the MCI-1G/350 series Ethernet card, check if the system meets the following requirements:
• Server or workstation motherboard with an OCP slot.
- Supported operating systems are Windows to ASUS website for the latest updates. ® and Linux operating systems. Please refer
1.4 Card layout
Front view
MCI-1G/350-2T

MCI-1G/350-4T

- AUXLED_CON1 connector 4. Connector A (PCIe 2.0 x4 Link)
- LAN port 1 5. LAN port 3
- LAN port 2 6. LAN port 4
1.5 LED indications
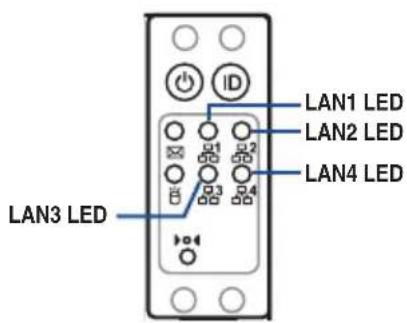
Front panel LEDs
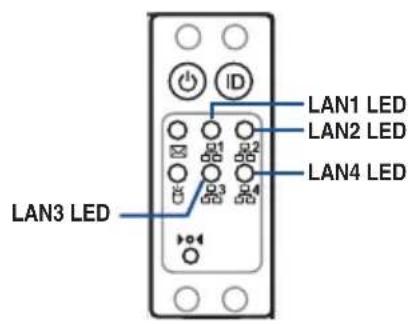

MCI-1G/350-2T
![graph TD A["Block 1"] --> B["Block 2"] C["Block 3"] --> D["Block 4"] E["Block 4"] --> F["Block 3"]](/content/2026/05/1110182/images/3ac4edb32d856caef8ff417690c93dbab675dadb900c90791b74dfc432513c2c.jpg)
MCI-1G/350-4T
| Model Name LAN | Card - Port Front I/O - LED indicator | |
| MCI-1G/350-2T | Port 1 LAN3 LED | |
| Port 2 LAN4 LED | ||
| MCI-1G/350-4T | Port 1 | LAN3 LED |
| Port 2 | ||
| Port 3 | LAN4 LED | |
| Port 4 | ||
| Activity / Link LED Speed link LED | |||
| Status Description Status Description | |||
| OFF No activity OFF 10 Mb/s link | |||
| Green Link Yellow 100 Mb/s link | |||
| Blinking Green Data activity Green 1 Gb/s link | |||
1.6 Installing the MCI-1G/350 series Ethernet card
To install a MCI-1G/350 series Ethernet card:
- Prepare the Mezzanine card.
- Connect the black end of the signal cable to the OCP_LED1 header on the motherboard.
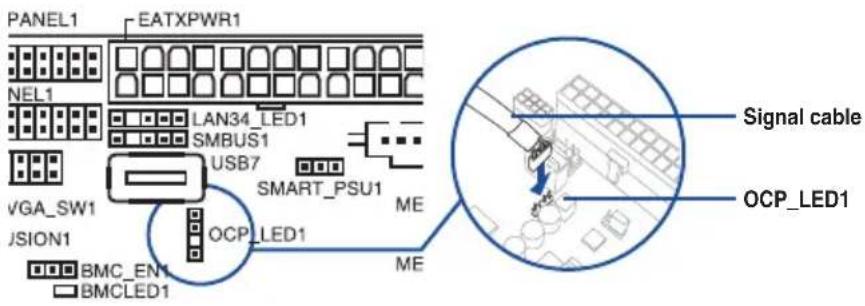
- Connect the white end of the signal cable to the AUXLED_CON1 connector on the card.

- Align and insert the screw holes of the MCI-1G/350 series Ethernet card into the stand screws, then insert the ports of the MCI-1G/350 series Ethernet card into the port slots on the server chassis as shown.
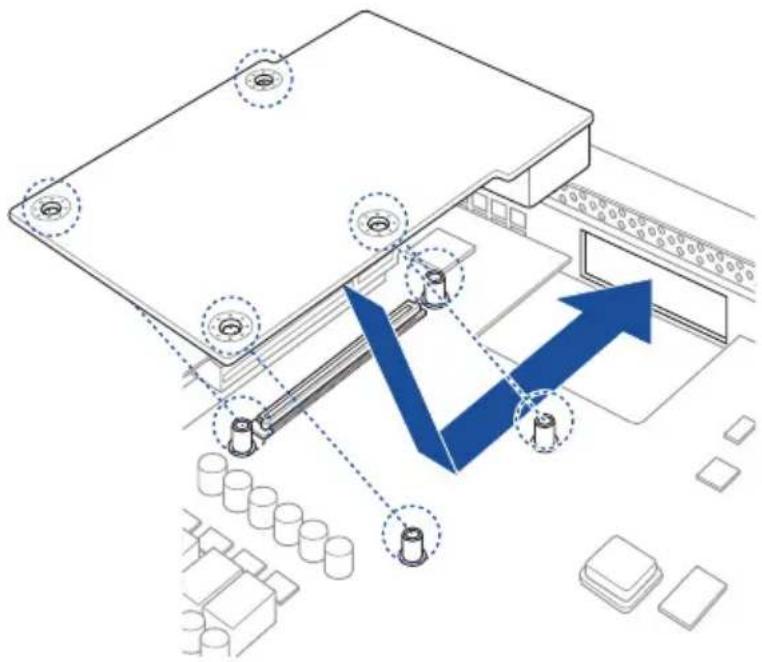
- Secure the MCI-1G/350 series Ethernet card with the four (4) bundled screws.
![graph TD A["34"] --> B["35"] B --> C["36"] C --> D["37"] D --> E["38"] E --> F["39"] F --> G["40"] G --> H["41"] H --> I["42"] I --> J["43"] J --> K["44"] K --> L["45"] L --> M["46"] M --> N["47"] N --> O["48"] O --> P["49"] P --> Q["50"] Q --> R["51"] R --> S["52"] S --> T["53"] T --> U["54"] U -->…](/content/2026/05/1110182/images/3fa4d272ce1e7e0c85ac88cedc6b7e8382921978ecc02eb722b0f067840ed908.jpg)
Boot Agent Configuration
This chapter provides instructions on setting the Intel(R) Boot Agent XE.
2
2.1 Intel(R) iSCSI Remote Boot
The Intel(R) iSCSI Remote Boot provides hardware-based Ethernet card configurations.
To start the Intel(R) iSCSI Remote Boot and access the main screen:
- Turn on the system.
- During POST, press
Intel(R) iSCSI Remote Boot version 3.0.84
Copyright(c) 2003-2014 Intel Corporation. All rights reserved.
Press ESC key to skip iSCSI boot initialization.
Press <Ctrl-D> to run setup...
- From the iSCSI Port Selection screen, use the Up/Down arrow key to select an Ethernet device to configure and press
.


- Press
to set the selected item as the primary boot priority, press
to set the selected item as the secondary boot priority, or pressto disable the selected item. -
Press to blink the LED of the selected item.
-
From the iSCSI Port Configuration screen, use the Up/Down arrow key to select an item and press
.
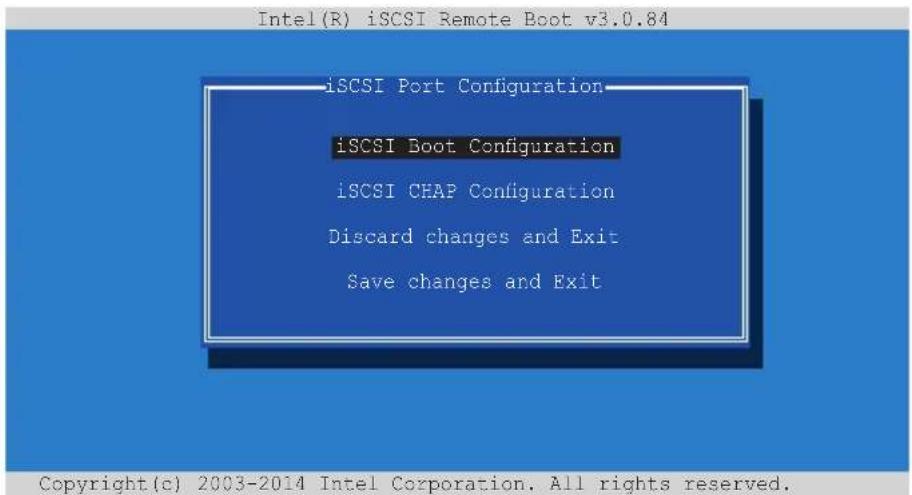
2.1.1 iSCSI Boot Configuration
![Intel(R) iSCSI Remote Boot v3.0.84 iSCSI Boot Configuration [ ] Use dynamic IP configuration (DHCP) Initiator Name: Initiator IP: 0.0.0.0 Subnet Mask: 0.0.0.0 Gateway: 0.0.0.0 VLAN ID: [ ] Use DHCP for iSCSI Target information Target Name: Target IP: 0.0.0.0 Target Port: 0.0.0.0 Boot LUN: 0.0.0.0 Pr…](/content/2026/05/1110182/images/fb30b2ea5c16823139b1fb0e91c37d53b352ea040d587b4bcf39a136c1225df7.jpg)
Use the Up/Down arrow key to select an item and press
[*] Use dynamic IP configuration (DHCP)
When Enabled [*], the iSCSI boot host software acquires the IP address from the DHCP server.
When Disabled [ ], the iSCSI boot host software acquires the static IP address. Key in the necessary parameters.
[*] Use DHCP for iSCSI Target information
When Enabled [*], the iSCSI boot host software acquires its iSCSI target parameters from the DHCP server.
When Disabled [ ], the iSCSI boot host software acquires its iSCSI target parameters via the static IP address. Key in the necessary parameters.
2.1.2 iSCSI CHAP Configuration
![Intel(R) iSCSI Remote Boot v3.0.84 iSCSI CHAP Configuration Specify the same authentication information as configured on the target. [ ] Use CHAP User Name: Target Secret: [ ] Use Mutual CHAP Initiator Secret: Minimum CHAP secret length is 12 and maximum 16. [OK] [Cancel] Copyright(c) 2003-2014 Inte…](/content/2026/05/1110182/images/78347f11d69bf5516093ee23ce7125aba14978c5ab93c8b56b2145d55c51d623.jpg)
Use the Up/Down arrow key to select an item and press
[ ] Use CHAP
When Enabled [*], the iSCSI boot host software uses CHAP authentication when connecting to the iSCSI target. Key in the necessary parameters.
When Disabled [ ], the iSCSI boot host software does not attempt to boot from the iSCSI target after successfully connecting to it. The control will then return to the system BIOS so that the next boot device may be used.
[ ] Use Mutual CHAP
When Enabled [*], the iSCSI boot host software uses a Mutual CHAP authentication when connecting to the iSCSI target. Key in the necessary parameters.
When Disabled [ ], the iSCSI boot host software does not use a Mutual CHAP authentication when connecting to the iSCSI target.
2.2 Intel(R) Ethernet Flash Firmware Utility
The Intel(R) Ethernet Flash Firmware Utility allows you to switch between PXE option ROM and iSCSI option ROM. Note that only one option ROM can be used at a time.
To install the PXE option ROM:
- Locate the BootIMG.FLB and Bootutil.exe files in the PXE folder on your SDVD.
- Copy the BootIMG.FLB and Bootutil.exe files to a bootable USB storage device.
- Enter DOS environment.

The utility must run under pure DOS environment. It cannot run in a DOS box on Windows system. You should boot from a DOS floppy without any device drivers.
- Within the DOS environment, enter the directory with the exe files.
BootIMG.FLB and Bootutil.
- Install the PXE option ROM:
bootutil -nic=1 -up=pxe+efi -quiet

All ports share the same flash.
- Restart the system.
C:\I350>bootutil -nic=1 -up=PXE+EFI -quiet
Intel(R) Ethernet Flash Firmware Utility
BootUtil version 1.5.94.2
Copyright(C) 2003-2015 Intel Corporation
Programming flash on port 1 with flash firmware image
/
Flash update successful
Port Network Address Location Series WOL Flash Firmware Version
---- ---- ---- ---- ---- ---- ---- ---- ----
1 001FC6FFFFFF1 1:00.0 Gigabit YES UEFI,PXE Enabled 1.5.78
2 001FC6FFFFFF2 1:00.1 Gigabit YES UEFI,PXE Enabled 1.5.78
3 001FC6FFFFFF3 1:00.2 Gigabit YES UEFI,PXE Enabled 1.5.78
4 001FC6FFFFFF4 1:00.3 Gigabit YES UEFI,PXE Enabled 1.5.78
5 000C6E000072 7:00.0 Gigabit YES FLASH UNknown
C:\I350>
To install the iSCSI option ROM:
- Locate the BootIMG.FLB and Bootutil.exe files in the iSCSI folder on your SDVD.
- Copy the BootIMG.FLB and Bootutil.exe files to a bootable USB storage device.
- Enter DOS environment.

The utility must run under pure DOS environment. It cannot run in a DOS box on Windows system. You should boot from a DOS floppy without any device drivers.
- Within the DOS environment, enter the directory with the BootIMG.FLB and Bootutil.exe files.
- Install the iSCSI option ROM:
bootutil -nic=1 -up=iscsi -quiet

All ports share the same flash.
- Restart the system.
C:\I350>bootutil -nic=1 -up=iscsi -quiet
Intel(R) Ethernet Flash Firmware Utility
BootUtil version 1.5.94.2
Copyright(C) 2003-2015 Intel Corporation
Programming flash on port 1 with flash firmware image
/
Flash update successful
Port Network Address Location Series WOL Flash Firmware Version
---- ---- ---- ---- ---- ---- ---- ---- ---- ----
1 001FC6FFFFFF1 1:00.0 Gigabit YES iSCSI 3.0.84
2 001FC6FFFFFF2 1:00.1 Gigabit YES iSCSI 3.0.84
3 001FC6FFFFFF3 1:00.2 Gigabit YES iSCSI 3.0.84
4 001FC6FFFFFF4 1:00.3 Gigabit YES iSCSI 3.0.84
5 000C6E000072 7:00.0 Gigabit YES FLASH UNnknown
C:\I350>
Driver Installation
This chapter provides instructions for installing the Ethernet card drivers on different operating systems.
3
3.1 Windows® Server OS Driver Installation
To update the Ethernet card driver for Windows® Server OS:
- Restart the computer, and then log on with Administrator privileges.
- Insert the Support CD to the optical drive. The Support CD automatically displays the Drivers menu if Autorun is enabled in your computer.

- If Windows automatically detects the LAN controllers and displays a New Hardware Found window, click Cancel to close this window.
-
If Autorun is NOT enabled in your computer, browse the contents of the Support CD to locate the file Setup.exe. Double-click Setup.exe to run the CD.
-
Click MCI-1G/350-2T / MCI-1G/350-4T 1GbE Network Adapter Driver, then select Install.

- The installation window appears.

- Follow the onscreen instructions to complete the installation.

3.2 Linux OS Driver Installation
To install the Ethernet card driver for Linux OS:
- Within the Linux Terminal, place the driver in root/tmp:
For Red Hat Enterprise Linux 6.9:
![root@localhost:~/Templates/LINUX File Edit View Search Terminal Help [root@localhost ~]# cd Templates/LINUX/ [root@localhost LINUX]#](/content/2026/05/1110182/images/45ba4ef90cea446ef74d02b87360350672c4084fe50d7c1c20dc914f65a618af.jpg)
For Red Hat Enterprise Linux 7.4:
![root@localhost:~/tmp/LINUX File Edit View Search Terminal Help [root@localhost -]# cd /root/tmp/LINUX/ [root@localhost LINUX]#](/content/2026/05/1110182/images/8245fcd94ca3fe2c4777c70e3eabd25f48cabd5520276613eaf0973e487bae3e.jpg)
For SUSE Linux Enterprise Server 11.3:

- Unzip the driver:
tar zxf
For Red Hat Enterprise Linux 6.9:
![[root@localhost ~]# cd Templates/ [root@localhost Templates]# cd LINUX/ [root@localhost LINUX]# tar zxf ixgbe-5.0.7.tar.gz](/content/2026/05/1110182/images/95bc9c7fe60b506a84b07dd01072da0533ab1d0215e4170f60da0039ef18be6c.jpg)
For Red Hat Enterprise Linux 7.4:
![root@localhost:~/tmp/LINUX File Edit View Search Terminal Help [root@localhost -]# cd tmp [root@localhost tmp]# cd LINUX/ [root@localhost LINUX]# tar zxf igb-5.3.5.15.tar.gz](/content/2026/05/1110182/images/f4445396a5120c15d52343010111194aa6e211044a118adab60532430c25da35.jpg)
For SUSE Linux Enterprise Server 11.3:

- Enter the folder:
cd
For Red Hat Enterprise Linux 6.9:
![[root@localhost ~]# cd Templates/ [root@localhost Templates]# cd LINUX/ [root@localhost LINUX]# tar zxf ixgbe-5.0.7.tar.gz [root@localhost LINUX]# ls ixgbe-5.0.7 ixgbe-5.0.7.tar.gz [root@localhost LINUX]# cd ixgbe-5.0.7/src [root@localhost src]#](/content/2026/05/1110182/images/e8e1699682ac6c530fd14c16ed12dd6c5c8ca00e57fe5dd381dc294f0944238c.jpg)
For Red Hat Enterprise Linux 7.4:
![[root@localhost ~]# cd tmp [root@localhost tmp]# cd LINUX/ [root@localhost LINUX]# tar zxf igb-5.3.5.15.tar.gz [root@localhost LINUX]# ls igb-5.3.5.15 igb-5.3.5.15.tar.gz [root@localhost LINUX]# cd igb-5.3.5.15/src [root@localhost src]#](/content/2026/05/1110182/images/ef8be5305b7ce08ead0dc9c2e4e31b9e45c2200a6baa4ee1112cb9eb6768977b.jpg)
For SUSE Linux Enterprise Server 11.3:
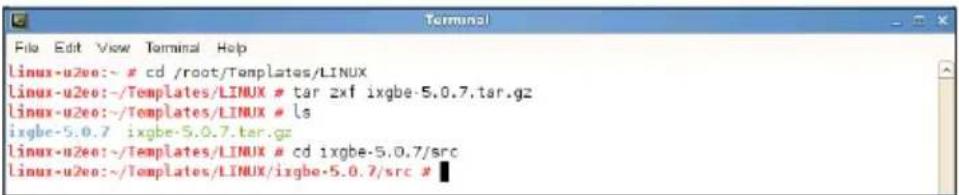
- Install the driver:
make install
For Red Hat Enterprise Linux 6.9:
![[root@localhost ~]# cd Templates/ [root@localhost Templates]# cd LINUX/ [root@localhost LINUX]# tar zxf ixgbe-5.0.7.tar.gz [root@localhost LINUX]# ls lxgbe-5.0.7 ixgbe-5.0.7.tar.gz [root@localhost LINUX]# cd ixgbe-5.0.7/src [root@localhost src]# make install\[]](/content/2026/05/1110182/images/5ea2e28e73cf31505e35065c87b80312e5f809ac45fd4367758aeaac3f311fc5.jpg)
For Red Hat Enterprise Linux 7.4:
![[root@localhost ~]# cd tmp [root@localhost tmp]# cd LINUX/ [root@localhost LINUX]# tar zxf igb-5.3.5.15.tar.gz [root@localhost LINUX]# ls igb-5.3.5.15 igb-5.3.5.15.tar.gz [root@localhost LINUX]# cd igb-5.3.5.15/src [root@localhost src]# make install](/content/2026/05/1110182/images/7b2edb5a44ea40f00fa0d611ac3c0bb22cf12c70e472e83370facd2bf487982c.jpg)
For SUSE Linux Enterprise Server 11.3:

5. Install complete:
For Red Hat Enterprise Linux 6.9:
LD [M] /root/Templates/LINUX/ixgbe-5.0.7/src/ixgbe.0
Building modules, stage 2.
MODPOST 1 modules
CC    /root/Templates/LINUX/ixgbe-5.0.7/src/ixgbe.mod.o
LD [M] /root/Templates/LINUX/ixgbe-5.0.7/src/ixgbe.ko. unsigned
NO SIGN [M] /root/Templates/LINUX/ixgbe-5.0.7/src/ixgbe.ko
make[1]: Leaving directory '/usr/src/kernels/2.6.32-573.el6.x86_64'
Copying nonpages...
Installing modules...
make[1]: Entering directory '/usr/src/kernels/2.6.32-573.el6.x86_64'
INSTALL /root/Templates/LINUX/ixgbe-5.0.7/src/ixgbe.ko
DEPMOD 2.6.32-573.el6.x86_64
make[1]: Leaving directory '/usr/src/kernels/2.6.32-573.el6.x86_64'
Running depmod...
[root@localhost src]#
For Red Hat Enterprise Linux 7.4:
root@localhost:~/tmp/LINUX/igb-5.3.5.15/src
File Edit View Search Terminal Help
CC [M] /root/tmp/LINUX/igb-5.3.5.15/src/e1000_mac.o
CC [M] /root/tmp/LINUX/igb-5.3.5.15/src/e1000_manage.o
CC [M] /root/tmp/LINUX/igb-5.3.5.15/src/e1000_nvm.o
CC [M] /root/tmp/LINUX/igb-5.3.5.15/src/igb_param.o
CC [M] /root/tmp/LINUX/igb-5.3.5.15/src/e1000_phy.o
CC [M] /root/tmp/LINUX/igb-5.3.5.15/src/igb_procfs.o
CC [M] /root/tmp/LINUX/igb-5.3.5.15/src/igb_vmdq.o
CC [M] /root/tmp/LINUX/igb-5.3.5.15/src/e1000_82575.o
CC [M] /root/tmp/LINUX/igb-5.3.5.15/src/e1000_1210.o
CC [M] /root/tmp/LINUX/igb-5.3.5.15/src/igb_debugfs.o
CC [M] /root/tmp/LINUX/igb-5.3.5.15/src/igb_ptp.o
CC [M] /root/tmp/LINUX/igb-5.3.5.15/src/kcompat.o
LD [M] /root/tmp/LINUX/igb-5.3.5.15/src/igb.o
Building modules, stage 2.
MODPOST 1 modules
CC /root/tmp/LINUX/igb-5.3.5.15/src/igb.mod.o
LD [M] /root/tmp/LINUX/igb-5.3.5.15/src/igb.ko
make[1]: Leaving directory '/usr/src/kubernetes/3.10.0-693.el7.x86_64'
Copying manpages...
Installing modules...
make[1]: Entering directory '/usr/src/kubernetes/3.10.0-693.el7.x86_64'
INSTALL /root/tmp/LINUX/igb-5.3.5.15/src/igb.ko
Can't read private key
DEPMOD 3.10.0-693.el7.x86_64
make[1]: Leaving directory '/usr/src/kubernetes/3.10.0-693.el7.x86_64'
Running depmod...
[root@localhost src]#
For SUSE Linux Enterprise Server 11.3:
LD [M] /root/Templates/LINUX/ixgbe-5.0.7/src/ixgbe.o
Building modules, stage 2.
MODPOST 1 modules
CC /root/Templates/LINUX/ixgbe-5.0.7/src/ixgbe.mod.o
LD [M] /root/Templates/LINUX/ixgbe-5.0.7/src/ixgbe.ko
make[1]: Leaving directory '/usr/src/linux-3.0.76-0.11-obj/x86_64/default'
Copying manpages...
Installing modules...
make[2]: Entering directory '/usr/src/linux-3.0.76-0.11-obj/x96_64/default'
make -C ../../linux-3.0.76-0.11 O-/usr/src/linux-3.0.76-0.11-obj/x86_64/default/. modules_install
INSTALL /root/Templates/LINUX/ixgbe-5.0.7/src/ixgbe.ko
DEPMOD 3.0.76-0.11-default
make[1]: Leaving directory '/usr/src/linux-3.0.76-0.11-obj/x96_64/default'
Running depmod...
linux-u2ee:-/Templates/LINUX/ixgbe-5.0.7/src #
- Check if the LAN card is detected:
service network restart
For Red Hat Enterprise Linux 6.9:
![[root@localhost ~]# cd Templates/ [root@localhost Templates]# cd LINUX/ [root@localhost LINUX]# tar xzf ixgbe-5.0.7.tar.gz [root@localhost LINUX]# ls ixgbe-5.0.7 ixgbe-5.0.7.tar.gz [root@localhost LINUX]# cd ixgbe-5.0.7/src [root@localhost src]# make install make[1]: Entering directory '/usr/src/ker…](/content/2026/05/1110182/images/e5a6b4835c105cf9d721f6ea6b0cd9293e025c6a0184ae94ce408fd78eaa9b69.jpg)
For Red Hat Enterprise Linux 7.4:
![[root@localhost ~]# cd tmp [root@localhost tmp]# cd LINUX/ [root@localhost LINUX]# cd igb-5.3.5.15/src [root@localhost src]# make install make[1]: Entering directory '/usr/src/kernels/3.10.0-693.el7.x86_64' Building modules, stage 2. MODPOST 1 modules make[1]: Leaving directory '/usr/src/kernels/3.1…](/content/2026/05/1110182/images/ac637bf97adf0f1b064a490132f4f508605e0140877b0ee2490d902fb458f964.jpg)
For SUSE Linux Enterprise Server 11.3:
File Edit View Terminal Help
CC [M] /root/Templates/LINUX/ixgbe-5.0.7/src/ixgbe_procfs.o
CC [M] /root/Templates/LINUX/ixgbe-5.0.7/src/ixgbe_62599.o
CC [M] /root/Templates/LINUX/ixgbe-5.0.7/src/ixgbe_82599.o
CC [M] /root/Templates/LINUX/ixgbe-5.0.7/src/ixgbe_x540.o
CC [M] /root/Templates/LINUX/ixgbe-5.0.7/src/ixgbe_x550.o
CC [M] /root/Templates/LINUX/ixgbe-5.0.7/src/ixgbe_dcb_nl.o
CC [M] /root/Templates/LINUX/ixgbe-5.0.7/src/ixgbe_debuggs.o
CC [M] /root/Templates/LINUX/ixgbe-5.0.7/src/ixgbe_fcoe.o
CC [M] /root/Templates/LINUX/ixgbe-5.0.7/src/ixgbe_ptp.o
CC [M] /root/Templates/LINUX/ixgbe-5.0.7/src/ixgbe_sysfs.o
CC [M] /root/Templates/LINUX/ixgbe-5.0.7/src/kcompat.o
LD [M] /root/Templates/LINUX/ixgbe-5.0.7/src/ixgbe.o
Building modules, stage 2.
PCOPOST 1 modules
CC /root/Templates/LINUX/ixgbe-5.0.7/src/ixgbe.mod.o
LD [M] /root/Templates/LINUX/ixgbe-5.0.7/src/ixgbe.ko
make[1]: Leaving directory '/usr/src/linux-3.0.76-0.11-obj/x86_64/default'
Copying manpages...
Installing modules...
make[1]: Entering directory '/usr/src/linux-3.0.76-0.11-obj/x86_64/default'
make -C ../../linux-3.0.76-0.11 O=/usr/src/linux-3.0.76-0.11-obj/x86_64/default/. modules_install
INSTALL /root/Templates/LINUX/ixgbe-5.0.7/src/ixgbe.ko
DEPMOD 3.0.76-0.11-default
make[1]: Leaving directory '/usr/src/linux-3.0.76-0.11-obj/x86_64/default'
Running depmod...
Linux-u2eo:~/Templates/LINUX/ixgbe-5.0.7/src # service network restart
Shutting down network interfaces:
Shutting down service network . . . . . . . . . . . . . . . . . . . . . . . . . . . . . . . . . . . . . . . . . . . . . . . . . . . . . . . .
Hint: you may set mandatory devices in /etc/sysconfig/network/config
Setting up network interfaces:
Setting up service network . . . . . . . . . . . . . . . . . . . . . . . . . . . . . . . . . . . . . . . . . . . . . . . . . . . . . . .
SuSEfirewall2: Setting up rules from /etc/sysconfig/SuSEfirewall2 ...
SuSEfirewall2: Warning: no interface active
SuSEfirewall2: batch committing...
SuSEfirewall2: Firewall rules successfully set
Linux-u2eo:~/Templates/LINUX/ixgbe-5.0.7/src #
Appendix

Simplified EU Declaration of Conformity
English ASUSTeK Computer Inc. hereby declares that this device is in compliance with the essential requirements and other relevant provisions of related Directives. Full text of EU declaration of conformity is available at: www.asus.com/support
Address 4F, No. 150, Li-Te Rd., Peitou, Taipei 112, Taiwan
Telephone +886-2-2894-3447
Fax +886-2-2890-7798
Web site https://www.asus.com/tw/
Technical Support
Telephone +886-2-2894-3447 (0800-093-456)
Online Support https://www.asus.com/support/Product/ContactUs/
Services/questionform/?lang=zh-tw
ASUSTeK COMPUTER INC. (China)
Address No. 5077, Jindu Road, Minhang District, Shanghai, China
Telephone +86-21-5442-1616
Fax +86-21-5442-0099
Web site https://www.asus.com.cn
Technical Support
Telephone +86-20-2804-7506 (400-620-6655)
Online Support https://www.asus.com/support/Product/ContactUs/
Services/questionform/?lang=zh-cn
ASUS COMPUTER INTERNATIONAL (America)
Address 800 Corporate Way, Fremont, CA 94539, USA
Fax +1-510-608-4555
Web site https://www.asus.com/us/
Technical Support
Support fax +1-812-284-0883
General support +1-812-282-2787
Online support https://www.asus.com/support/Product/ContactUs/
Services/questionform/?lang=en-us
ASUS COMPUTER GmbH (Germany and Austria)
Address Harkort Str. 21-23, 40880 Ratingen, Germany
Fax +49-2102-959911
Web site https://www.asus.com/de/
Technical Support
Telephone +49-1805-010923
Support Fax +49-2102-959911
Online support https://www.asus.com/support/Product/ContactUs/
Services/questionform/?lang=de-de
* EUR 0.14/minute from a German fixed landline; EUR 0.42/minute from a mobile phone.


- 1 GIGABIT/S ETHERNET CARD USER GUIDE
- COPYRIGHT © 2018 ASUSTEK COMPUTER INC. ALL RIGHTS RESERVED
- CONTENTS
- CHAPTER 1: PRODUCT INTRODUCTION
- CHAPTER 2: BOOT AGENT CONFIGURATION
- CHAPTER 3: DRIVER INSTALLATION
- APPENDIX
- ABOUT THIS GUIDE
- HOW THIS GUIDE IS ORGANIZED
- WHERE TO FIND MORE INFORMATION
- CONVENTIONS USED IN THIS GUIDE
- TYPOGRAPHY
- PRODUCT INTRODUCTION
- 1.1 WELCOME
- 1.2 PACKAGE CONTENTS
- 1.3 SYSTEM REQUIREMENTS
- 1.4 CARD LAYOUT
- FRONT VIEW
- 1.5 LED INDICATIONS
- FRONT PANEL LEDS
- 1.6 INSTALLING THE MCI-1G/350 SERIES ETHERNET CARD
- BOOT AGENT CONFIGURATION
- 2.1 INTEL(R) ISCSI REMOTE BOOT
- 2.1.1 ISCSI BOOT CONFIGURATION
- [*] USE DYNAMIC IP CONFIGURATION (DHCP)
- [*] USE DHCP FOR ISCSI TARGET INFORMATION
- 2.1.2 ISCSI CHAP CONFIGURATION
- [ ] USE CHAP
- [ ] USE MUTUAL CHAP
- 2.2 INTEL(R) ETHERNET FLASH FIRMWARE UTILITY
- DRIVER INSTALLATION
- 3.1 WINDOWS® SERVER OS DRIVER INSTALLATION
- 3.2 LINUX OS DRIVER INSTALLATION
- INSTALL COMPLETE
- SIMPLIFIED EU DECLARATION OF CONFORMITY
- TECHNICAL SUPPORT
- ASUSTEK COMPUTER INC. (CHINA)
- ASUS COMPUTER INTERNATIONAL (AMERICA)
- ASUS COMPUTER GMBH (GERMANY AND AUSTRIA)
Brand : ASUS
Model : MCI-1G/350-2T
Category : Network card