KFlex FHM155SI - Food Processor KENWOOD - Free user manual and instructions
Find the device manual for free KFlex FHM155SI KENWOOD in PDF.

Frequently Asked Questions - KFlex FHM155SI KENWOOD
User questions about KFlex FHM155SI KENWOOD
0 question about this device. Answer the ones you know or ask your own.
Ask a new question about this device
Download the instructions for your Food Processor in PDF format for free! Find your manual KFlex FHM155SI - KENWOOD and take your electronic device back in hand. On this page are published all the documents necessary for the use of your device. KFlex FHM155SI by KENWOOD.
USER MANUAL KFlex FHM155SI KENWOOD
- Read these instructions carefully and retain for future reference.
- Remove all packaging and any labels.
- If the cord is damaged it must, for safety reasons, be replaced by KENWOOD or an authorised KENWOOD repairer.
- The blades and plates are very sharp, handle with care.
- Do not lift or carry the processor by the handle - or the handle may break resulting in injury.
- Always remove the knife blade before pouring contents from the bowl.
- Keep hands and utensils out of the processor bowl, metal bowl and blender goblet whilst connected to the power supply.
- Switch off and unplug:
before fitting or removing parts;
when not in use;
before cleaning.
- Never use your fingers to push food down the feed tube. Always use the pusher/s supplied.
- Never fit the blade unit to the power unit without the blender goblet fitted.
- Before removing the lid from the bowl or blender from the power unit:
switch off;
o wait until the attachment/blades have completely stopped;
be careful not to unscrew the blender goblet from the blade assembly.

DO NOT process hot ingredients.
- Do not use the lid to operate the processor, always use the on/off speed control.
- This appliance will be damaged and may cause injury if the interlock mechanism is subjected to excessive force.
- Always unplug your food processor when not in use.
- Never use an unauthorised attachment.
- Never leave the appliance unattended when it is operating.
- Never use a damaged appliance. Get it checked or repaired: see 'service & customer care'.
- Never let the power unit, cord or plug get wet.
- Do not let excess cord hang over the edge of a table or worktop or touch hot surfaces.
- Do not exceed the maximum capacities stated in the recommended speed chart.
-
Children should be supervised to ensure that they do not play with the appliance.
-
This appliance shall not be used by children. Keep the appliance and its cord out of reach of children.
- Appliances can be used by persons with reduced physical, sensory or mental capabilities or lack of experience and knowledge if they have been given supervision or instruction concerning use of the appliance in a safe way and if they understand the hazards involved.
- Only use the appliance for its intended domestic use. Kenwood will not accept any liability if the appliance is subject to improper use, or failure to comply with these instructions.
- Misuse of your processor/blender can result in injury.
blender safety
DO NOT process hot ingredients.
- Always take care when handling the blade assembly and avoid touching the cutting edge of the blades when cleaning.
- Only operate the blender with the lid in place.
- Only use the goblet with the blade assembly supplied.
- Never run the blender empty.
- To ensure the long life of your blender, do not run it for longer than 60 seconds.
- Smoothie recipes - never blend frozen ingredients that have formed a solid mass during freezing, break it up before adding to the goblet.
- Never blend more than the max level - 1.6 litres (56 fl oz).
slicing/grating plates safety
- Never remove the lid until the cutting plate has completely stopped.
- Handle the cutting plates with care - they are extremely sharp.
- Do not overfill the bowl - do not exceed the maximum capacity level marked on the bowl.
before plugging in
Make sure your electricity supply is the same as the one shown on the underside of your appliance.
- This appliance conforms to EC Regulation 1935/2004 on materials and articles intended to come into contact with food.
before using for the first time
1 Remove the plastic blade covers from the knife blade. Take care the blades are very sharp. These covers should be discarded as they are to protect the blade during manufacture and transit only.
2 Wash the parts see 'care & cleaning'
key
processor
① power unit
② detachable drive shaft
③ processor bowl
(4) lid
⑤ feed tube
⑥ pushers
⑦ safety interlocks
⑧ cord storage (at back)
9 high speed light
10 speed/pulse control
⑪ low speed light
weighing function/count up timer
⑫ kg/lb button
⑬ ZERO button
14 display screen
15 weighing tray
Processor attachments
Not all the attachments listed below will be included with your food processor model. Attachments are dependent upon the model variant. For more information or to order additional attachments refer to the "service and customer care" section.
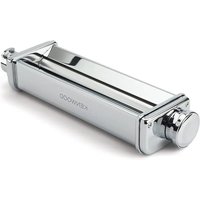
blender (if supplied)
16 blade assembly
⑦ sealing ring
goblet
filler cap
20 lid
metal mixing bowl (if supplied)
② mixing bowl lid
② mixing bowl with in-bowl drive
② dough tool
24 drive head
whisk
⑥ creamingbeater
⑦ creamingbeaterwiper
knife blade
29 max capacity disc
plate carrier
⑤ 4mm slicing plate (if supplied)
2mm slicing plate (if supplied)
③ 4mm grating plate (if supplied)
24 2mm grating plate (if supplied)
35 extra fine grating plate (if supplied)
fine julienne plate (if supplied)
⑦ French fry plate (if supplied)
citrus juicer (if supplied)
attachment storage box (if supplied)
to use your food processor
1 Fit the detachable drive shaft onto the power unit 1.
2 Then fit the bowl by placing the handle towards the right hand side and turn forward ② until it locks.
- Always fit the bowl and attachment onto the processor before adding ingredients.
3 Fit the lid ensuring the top of the drive shaft/tool locates into the centre of the lid 6.
- The processor will not operate if the bowl or lid are not fitted correctly into the interlock. Check that the feed tube and bowl handle are situated to the right hand front corner.
4 Plug in and then turn the speed control to the 'ON' position. The weighing display screen will come on and either the low speed light or high speed light will illuminate depending on which bowl/blender is fitted. If no bowl/blender fitted both speed lights will remain off.
Speed Control - manually select the required speed (refer to the recommended speed chart).
Pulse - use the pulse (P) for short bursts. The pulse will operate for as long as the control is held in position.
5 At the end of processing turn the speed control to the OFF 'O' position.
Always switch off and unplug before removing the lid.
important
- Your processor is not suitable for crushing or grinding coffee beans, or converting granulated sugar to caster sugar.
| Light Function/ Attaches | No Lights Light Flashing | |
| Low speed Metal mixing bowl and tools | • No bowl or blender fitted or interlocked to power unit. • Power unit not plugged in. • Speed control not turned to 'ON' position. | Indicates one of the following: • Lid or bowl removed or unlocked whilst speed selected. • To reset - turn to 'O', then turn to 'ON' and reselect a speed. |
| High speed Processor bowl and attachments/ tools or Blender | • Unit left plugged in for more than 30 minutes. • The power unit will not operate until the speed control is turned to 'O' position and turned back to the 'ON' position. |
weighing function/countdown timer
Your food processor is fitted with a built in weighing function to allow ingredients to be weighed straight into the bowl or blender goblet.
- The Maximum weighing capacity is 3kg . This is the total weight of all the ingredients including the weight of the bowl or goblet.
to use the weighing function
1 Always fit the bowl, detachable drive shaft and attachment or blender goblet onto the power unit before adding ingredients.
2 Plug in - the display screen will remain blank until the speed control is turned to 'ON'.
3 Turn to 'ON' the display screen will light up.
4 Press the (kg/lb) button to select either grams or ounces. The display will default to kg/g when first switched on.
- The unit weighs in 1g increments and teaspoon/tablespoon measures are recommended for weighing small quantities.
5 Check the display shows '0', if not, zero by pressing the ZERO button. Then weigh the required ingredients straight into the bowl or goblet. After the weight is displayed, press the ZERO button and the display will return to '0'. Add the next ingredients and that weight will be displayed. Repeat until all ingredients are weighed.
- To zero press the ZERO button once.
6 Fit the lid and select a speed to operate the processor.
- During operation the display screen will show the count up time.
- To swap to the weighing function, turn to the 'ON' position and whilst the timer is paused hold the kg/lb button down for 2 seconds.
- If the display is not zeroed and either the ingredients or the bowl/attachment/lid are removed the display will flash (----) to represent a minus reading. Press the ZERO button to reset.
- The weight of any additional ingredients added down the feed tube whilst the processor is running will not be shown on the display screen.
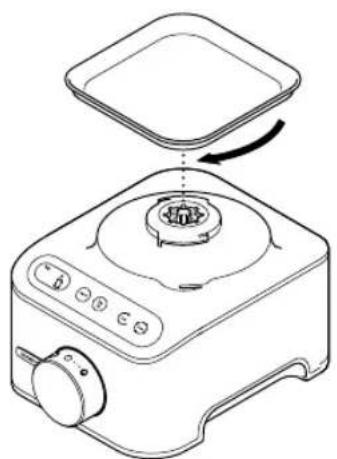
⑤ weighing tray
A removable weighing tray is supplied for weighing ingredients without the bowl or blender.
To use, place the tray on top of the power unit and turn clockwise to secure in place.
To remove just turn anticlockwise and lift off.

Count up timer
- During operation the display screen will automatically operate as a count up timer.
The timer will count up in seconds to 10 minutes and will pause whenever the speed control is turned to ON position. - To reset the timer to zero press the ZERO button. auto switch off
- The display screen will turn on whenever the speed control is in the 'ON' position, unless the auto switch off has activated.
- The auto switch off will activate if the appliance is left plugged in without operating for more than 30 minutes. To re-activate press either the ZERO button or turn the speed control off 'O' and then back to the 'ON' position.
important
- Do not overload by exceeding the maximum weighing capacity of 3kg. The display will show [o - Ld] if the weighing function is overloaded.
- Do not subject the power unit to excessive force as this may damage the weighing sensor.
Always place the processor on a dry flat surface prior to weighing. - Do not move the power unit during operation of the weighing function.
to use your blender (if supplied)
1 Fit the sealing ring ⑰ into the blade assembly ⑱ - ensuring the seal is located correctly in the grooved area.
- Leaking will occur if the seal is damaged or incorrectly fitted.
2 Hold the underside of the blade assembly 16 and insert the blades into the goblet - turn anti-clockwise until it is secure 4.
3 Put your ingredients into the goblet.
4 Fit the lid onto the goblet and turn clockwise ⑤ until it clicks. Fit the filler cap.
5 Place the blender onto the power unit by placing the handle to the right hand side and turn forward 6 until it locks.
- The blender will not operate if not fitted to the interlock correctly. Check that the handle is situated to the right hand front corner. The blender will not operate if incorrectly assembled.
6 Select a speed (refer to the recommended speed chart) or use the pulse control.
using the attachments
Refer to recommended speed chart for each attachment.
Processor bowl
② 8 knifeblade
Follow the instruction under "to use your food processor".
29 max capacity disc
1 Fit the drive shaft and bowl onto the power unit.
2 Fit the knife blade.
3 Add ingredients to be processed.
4 Fit the capacity disc over the top of the blade ensuring it sits on the ledge inside the bowl 7. Do not push down on the capacity disc.
5 Fit the lid and switch on.
slicing/grating plates ③0 - ③7
1 Fit the detachable drive shaft and processor bowl onto the power unit.
2 Select the desired plate and fit into the carrier with the cutting side uppermost.
- Locate one end of the plate under the rim and press the other end into position ⑧.
The French fry plate is not removable from the carrier.
3 Fit the lid.
4 Put the food in the feed tube.
Choose which size feed tube you want to use. The pusher contains a smaller feed tube for processing individual items or thin ingredients.
To use the small feed tube - first put the large pusher inside the feed tube.
To use the large feed tube - use both pushers together.
5 Switch on and push down evenly with the pusher - never put your fingers in the feed tube.
③8 citrus juicer
Use the citrus juicer to squeeze the juice from citrus fruits (e.g. oranges, lemons, limes and grapefruits).
cone
⑥ sieve
to use the citrus juicer
1 Fit the detachable drive shaft and processor bowl onto the power unit.
2 Fit the sieve into the bowl - ensuring the sieve handle is locked into position directly over the bowl handle
3 Place the cone over the drive shaft turning until it drops all the way down 12.
4 Cut the fruit in half. Then switch on and press the fruit onto the cone.
- The citrus juicer will not operate if the sieve is not locked correctly.
③ 9 attachment storage box
Your food processor is supplied with a storage box for your bowl attachments and plates.
1 Fit the knife blade, plates, whisk and creaming beater into the storage box when not in use 18.
2 The storage box is fitted with a safety lock - close the lid to lock. To open - push the tab in 14 and lift up the lid 15.
metal mixing bowl (21) - (27)
1 Fit the metal mixing bowl to the power unit by placing the handle towards the right hand side and turn forward 16 until it locks.
2 Fit either the whisk 25, creaming beater 26 and 27 or dough tool 23 over the bowl drive shaft.
using the whisk
1 Push the beater ⑰ securely into the drive head.
2 Fit the whisk over the In bowl drive.
3 Add the ingredients.
4 Fit the lid and switch on.
using the creaming beater
Fitting the wiper blade
- The wiper blade is supplied already fitted and should always be removed for cleaning.
1 Carefully fit the flexible wiper blade onto the tool by locating the base of the wiper blade into the slot 18 then fit one side into the groove before gently hooking the end in place 19. Repeat with the other side 20.
1 Push the creaming beater 2 securely into the drive head.
2 Fit the beater over the In bowl drive.
3 Add the ingredients.
4 Fit the lid and switch on.
using the dough tool
Fit the dough tool over the in-bowl drive.
recommended speed chart - food processor bowl
| tool/attachment | function recommended | speed | processing time (secs) | maximum capacities | hints and tips |
| Knife blade | All in one cake mixes | Max | 15-20 | 1.5kg/3lb 8oz total weight | The knife blade is the most versatile of all the attachments. The length of the processing time will determine the texture achieved. For coarser textures use the pulse control. Cut food such as meat, bread, vegetables into cubes approximately 2cm. Biscuits should be broken into pieces and added down the feed tube whilst the appliance is running. Take care not to over-process. |
| Pastry - rubbing fat into flour (use fat straight from the fridge and cut into 2cm cubes) Adding water to combine pastry ingredients | Max 10 340g/12oz flour weight | ||||
| Chopping fish and lean meat Pâtés and terrines | Pulse - Max 10-30 600g/1lb 5oz max lean beef | ||||
| Chopping vegetables Pulse 5-10 500g/1lb 2oz | |||||
| Chopping nuts Max 30-90 200g/8oz | |||||
| Pureeing soft fruit, cooked fruit and vegetables | Max 10-30 kg/2lb 4oz | ||||
| Sauces, dressing and dips | Max | 120 | 800g/1lb 12oz | ||
| Knife blade with max capacity disc | Cold soups | Start at min speed and increase to maximum | 30-60 | 1.5 litres/53 fl oz | When blending liquids in the bowl, the max capacity disc must be used with the knife blade. It prevents leaking and improves the chopping performance of the blade. Do not process hot ingredients. Do not exceed the maximum mark on the bowl. |
| Milkshakes/batters | 15-30 | 1 litre/35 fl oz | |||
| Plates - grating | Use for cheese, carrots, potatoes and foods of a similar texture. | Mid - Max | - | Do not fill above the maximum 1.5L marked on the bowl | Use fresh ingredients Do not cut food too small. Fill the width of the feed tube fairly full. This prevents the food from slipping sideways during processing. Alternatively use the small feed tube. When using the Julienne or French fry plate, place ingredients horizontally. When slicing or grating: food placed upright ⑨ comes out shorter than food placed horizontally ⑩. There will always be a small amount of waste on the plate or in the bowl after processing. Do not allow food to build up to the underside of the plate - empty regularly. |
| Plates - slicing | Use for cheese, carrots, potatoes, cabbage, cucumber, courgette, beetroot and onions. | Mid - Max | - | ||
| Plate - extra fine grating | Grates Parmesan cheese | Max | - | ||
| Plate - fine julienne | Use to cut potatoes into straws and coarse grate for rosti, stir fries and vegetable garnishes. | Max | - | ||
| Plate - French fry | Cut potatoes for thin French fries and ingredients for casseroles and dips (e.g. cucumber, apples and pear) | Max | - | ||
| Citrus Juicer | Use to squeeze the juice from citrus fruits e.g.oranges, lemons, limes and grapefruits). | Min | - | 1kg/2lb 4oz | For best results store and juice the fruit at room temperature and hand roll on a worktop before juicing. To help with juice extraction move the fruit from side to side when juicing. When juicing large quantities, empty the strainer regularly to prevent the build up of pulp and seeds. |
recommended speed chart - metal mixing bowl
| tool/attachment | function recommended | speed | processing time (mins) | maximum capacities | Hints and tips |
| Whisk Egg whites Max | Max 2 - 3 | 6 (200g) important | The whisk is not suitable for making all in one cake mixes as these mixes are too heavy and will damage it. Always use the knife blade or creaming beater.Best results are obtained when the eggs are at room temperature.Ensure the bowl and whisks are clean and free from grease before whisking. | ||
| Egg and sugar for fatless sponges Max 8 - 10 3 (150g) | |||||
| Whipping cream Mid - Max 2 - 3 125ml to 500ml/1pt | |||||
| Dough tool | Yeasted mixes | Mid - Max | 8 - 10 | 1kg/2lb 4oz total weight | Do not process for longer than 10minutes.Place the dry ingredients in the bowl and add the liquid down the feed tube whilst the appliance is running. Process until a smooth elastic ball of dough is formed. |
| White Bread Flour | 8 - 10 | 600g/1lb 5oz flour weight | |||
| Wholemeal Bread Flour | 8 - 10 | 500g/1lb 2oz flour weight | |||
| Re-knead | Max | 2 - 3 | 1 Kg/2lb 4oz total weight | ||
| Creaming beater | Creaming fat and sugar | Mid - Max | 2 - 3 | 250g/9oz fat250g/9oz sugar | For best results fat should be allowed to soften at room temperature (20°C) before creaming.The creaming beater is designed for creaming and mixing soft ingredients. Do not use with heavy recipes such as dough or hard ingredients, for example those containing fruit stones, bones or shells.Add eggs slowly to creamed mixture to incorprate.Fold in the flour using pulse or minimum speed. |
| All in one cake mix (7-8 Egg mix) | Max | 1 | 1.5Kg/3lb 8oz total weight | ||
| Fruit Cake Mix (6 Egg mix) | Max | 2 - 3 | 1.65Kg/3lb 10 oz total weight |
recommended speed chart - blender
| tool/attachment | function recommended | speed | processing time (secs) | maximum capacities | Hints and tips |
| Blender Cold liquids | and drinks Max 60 | 1.6 litres/56 fl oz | ·When making mayonnaise, put all the ingredients, except the oil, into the blender. Remove the filler cap. Then, with the appliance running, add the oil slowly through the hole in the lid. ·Thick mixtures, e.g. pâtés and dips, may need scraping down. If the mixture is difficult to process, add more liquid. ·Ice crushing - operate the pulse in short bursts until crushed to the desired consistency. ·The processing of spices is not recommended as they may damage the plastic parts. ·To blend dry ingredients - cut into pieces, remove the filler cap, then with the appliance running, drop the pieces down one by one. Keep your hand over the opening. For best results empty regularly. ·Do not use the blender as a storage container. Keep it empty before and after use. ·Never blend more than 1.6 litres/56 fl oz - less for frothy liquids like milkshakes. | ||
| Cold soups Max 30 | |||||
| Do not process hot ingredients | |||||
| Milkshake/Cold milk based mixtures Max 15 | 1 litre | ||||
| Mayonnaise Max 60 3 eggs | 150g oil | ||||
care & cleaning
Always switch off and unplug before cleaning.
- Handle the blades and cutting plates with care - they are extremely sharp.
- Some foods may discolour the plastic. This is perfectly normal and will not harm the plastic or affect the flavour of your food. Rub with a cloth dipped in vegetable oil to remove the discolouration.
power unit
- Wipe with a damp cloth, then dry. Ensure that the interlock area is clear of food debris.
- Do not immerse the power unit in water.
- Store excess cord in the storage area at the back of the power unit 22.
blender
- Care should be taken when removing the blade unit from the base.
1 Wash the goblet by hand.
2 Remove and wash the seal.
3 Do not touch the sharp blades - brush them clean using hot soapy water, then rinse thoroughly under the tap. Do not immerse the blade unit in water.
4 Leave to dry upside down.
whisk
- Detach the whisk from the drive head by gently pulling it free. Wash in warm soapy water.
- Wipe the drive head with a damp cloth, then dry. Do not immerse the drive head in water.
creaming beater
1 Always remove the flexible wiper blade from the tool before cleaning 16, 19, 20.
2 Wash the flexible wiper blade and tool in hot soapy water, then dry thoroughly.
all other parts
- Wash by hand, then dry.
- Alternatively they are dishwasher safe and can be washed in your dishwasher.
| item suitable for | dishwashing |
| main bowl, lid, pushers | ✓ |
| knife blade | ✓ |
| metal bowl and lid | ✓ |
| dough tool | ✓ |
| detachable drive shaft | ✓ |
| plates | ✓ |
| max capacity disc | ✓ |
| whisk/creaming beaterDo not immerse the drive head in water | ✓ |
| blender goblet, lid, filler cap | ✓ |
| blade unit and seal for blender | × |
| citrus juicer | ✓ |
| weighing tray | ✓ |
| storage box | × |
| spatula | ✓ |
service & customer care
- If you experience any problems with the operation of your appliance, before requesting assistance refer to the "troubleshooting guide" section in the manual or visit www.kenwoodworld.com.
- Please note that your product is covered by a warranty, which complies with all legal provisions concerning any existing warranty and consumer rights in the country where the product was purchased.
- If your Kenwood product malfunctions or you find any defects, please send it or bring it to an authorised KENWOOD Service Centre. To find up to date details of your nearest authorised KENWOOD Service centre visit www.kenwoodworld.com or the website specific to your Country.
- Designed and engineered by Kenwood in the UK.
Made in China.

IMPORTANT INFORMATION FOR CORRECT DISPOSAL OF THE PRODUCT IN ACCORDANCE WITH THE EUROPEAN DIRECTIVE ON WASTE ELECTRICAL AND ELECTRONIC EQUIPMENT (WEEE)
At the end of its working life, the product must not be disposed of as urban waste.
It must be taken to a special local authority differentiated waste collection centre or to a dealer providing this service.
Disposing of a household appliance separately avoids possible negative consequences for the environment and health deriving from inappropriate disposal and enables the constituent materials to be recovered to obtain significant savings in energy and resources. As a reminder of the need to dispose of household appliances separately, the product is marked with a crossed-out wheeled dustbin.
recipes ideas/suggestions carrot and coriander soup
use the blender
25g butter
50g onion chopped
1 clove garlic crushed
750g carrot cut into 112 cm cubes
cold chicken stock
10-15mls (2-3tsp) ground coriander
salt and pepper
1 Melt the butter in a pan, add the onion and garlic and fry until soft.
2 Place the carrot into the blender, add the onion and garlic. Add sufficient stock to reach the 1.6L level marked on the goblet. Fit the lid and filler cap.
3 Blend on maximum speed for 5 seconds for a coarse soup or longer for a finer result.
4 Transfer the mixture to a saucepan, add the coriander and seasoning and simmer the soup for 30 to 35 minutes or until cooked.
5 Adjust the seasoning as necessary and add extra liquid if required.
| troubleshooting guide | ||
| Problem Cause Solution | ||
| The processor will not operate. No Power | Speed light not lit. Bowl not fitted to power unit correctly. Bowl lid not locked on correctly. | Check processor is plugged in. Check bowl is located correctly and the handle is situated towards the right hand side. Check that the lid interlock is located correctly into the handle area. The processor will not work if the bowl and lid are fitted incorrectly. |
| Blender will not operate. Blender not locked | Checked on correctly. Blender not assembled correctly. | The blender will not operate if fitted incorrectly to the interlock. Check blade unit is fully tightened into the goblet. |
| Processor stops or slows during processing. | Overload protection operated. Processor overloaded or overheated during operation. Maximum capacity exceeded. | Switch off, unplug and allow the appliance to cool down for approximately 15 minutes. Refer to the speed chart for maximum capacities to process. |
| Weighing function (----) flashing on screen. | Either the ingredients or the bowl/attachment/lid have been removed and (- - - ) represents a minus reading. | Press the ZERO button to reset. |
| Weight changed on display screen. | Quantity weighed too small. | Use teaspoon and tablespoon measures for very small quantities. |
| Power unit moved during operation. | Do not move unit during use. Zero the display before weighing next ingredients. | |
| Processor not operating and speed light flashing. | Appliance left plugged in without operating for more than 30 minutes. Lid or bowl removed or unlocked whilst speed selected. | Press either the ZERO button or turn the speed control OFF 'O' and then back to the 'ON' position. To reset - turn to 'O', then turn to 'ON' and reselect a speed. |
| Blender leaking from blade assembly base. | Seal missing. Seal incorrectly fitted. Seal damaged. | Check seal is fitted correctly and not damaged. To obtain a replacement seal see "service & customer care". |
| Blender seal missing from blade unit when removed from packaging. | The seal is packed pre-fitted to the blade unit. | Unscrew goblet and check that seal is fitted to blade unit. To obtain a replacement seal see "service & customer care". |
| Poor performance of tools/ attachments. | Refer to hints in relevant "using the attachment" section. Check attachments are assembled correctly. | |
Nederlands
końćówka do ucierania
aalll aolll aolll aolll aolll
1
1
jll
a_i = 12
Jua:paia 0
jzbs 20
1.0 UgblcLsO sI 1200 jz pJv0
J
()
gwi Jldg C
XaJIg
JL JIJIJIJIJIJIJIJIJIJIJIJIJIJIJIJIJIJIJIJIJIJIJIJIJIJIJIJIJIJIJIJIJIJIJIJIJIJIJIJIJIJIJIJIJIJIJIJIJIJIJIJIJIJIJIJIJIJIJIJIJIJIJIJIJIJIJIJIJIJIJIJIJIJIJIJIJIJIJIJIJIJIJIJIJIJIJIJIJIJIJIJIJIJIJIJIJIJIJIJIJIJU
Kenwood

13g jlll no salll lall aagll gaoa Llogla
23i ylll lalal alalal 111111111111111111111111111111111111111
(WEEE) aagg klll g
yolai yjglal no selalil pde b jayll glll ylll ylll ylll ylll ylll ylll ylll ylll ylll ylll ylll ylll ylll ylll ylll ylll ylll ylll ylll ylll ylll ylll ylll ylll ylll ylll ylll ylll ylll ylll ylll ylll ylll y ll l l l l l l l l l l l l l l l l l l l l l l l l l l l l l l l l l l l l l l l l l l l l l l l l l l l l l l l l l l l l l l l l l l l l l l l l l l
yolai yjglal no selalil pde b jayll glll ylll ylll ylll ylll ylll ylll ylll ylll ylll ylll ylll ylll ylll ylll ylll ylll y ll
yolai yjglal no selalil pde b jayll glll ylll ylll yell Iyell Iyell Iyell Iyell Iyell Iyell Iyell Iyell Iyell Iyell Iyell Iyell Iyell Iyell Iyell Iyell Iyell Iyell Iyell Iyell Iyell Iyell Iyell Iyell Iyell Iyell Iyell Iyell Iyell Iyell Iyell Iyell Iyell Iy ell
yolai yjglal no selalil pde b jayll gill
yolai yjglal no selalil pde b jayll gill
yolai yjglal no selalil pde b jayll gill
yolai yjglal no selalil pde b jayll gill
yolai yjglal no selalil pde b jayll gill
yolai yjglal no selalil pde b jayll g
1
J 1
0a - 1
y Lai yol j 11 11 11 11 11 11 11 11 11 11 11 11 11 11
a#
Jolal lai hao gl 15 st. aay jy Jlal aah y Coo . plall L
2 1
jlll
S ACD = S COD + S DCE - S CED
Lg
a a a a a a a a a a a a a a a a a a a a a a a a a a a a a a a a
Jaws
1
37-30
aalal aalal alalal alalal alalal alalal alalal alalal
8
Jalall jssjy aaijell jaiy jaii
gall 11
LgJlJyjN jn palil
e jnnn nn nnnnnnnnnnnnnnnnnnnnnnnnnnnnnnnnnnnnnnnnnnnnnnnnnnnnnnnnnnnnnnnnnnnnnnnnnnnnnnnnnnnnnnnnnnnnnnnnnnnnnnnnnnn
i 100
pabal jy
Lalal!
100 pabll 100
-1iigall gas luea bawu yglauill plabll co jiejll
iJ 1
JgJ ③8
Jglllglal
yall
[6]
glal 3rJc pJ
ailll sglabll jg aillbngjrgall 2000
y
1 1
a a a a a a a a a a a a a
1


1 1
(g/kg g 1
aolao aolalaiu yag 1 aasll aall jssla gbi
sall sll
aall aegb puea, "0" aell jai aai ai 5i
jz jy 10
gale jzjlll 1
zLALs jssic (j) ZERO JJc
yss Jiaall jzll yocg aagaaalil 1slll
Lgall
.5dJgO (j) ZERO jzglglaal
plalal jjss sss gall
Jusuagaaeaeasieaiae aaii
Jrnnnnaa 10000000000000000000000000000000000000000000000
jullol kg/lb j
gllglj!e gssaaal jall aai 1aie
ZERO
plallll jiljnljldn lalai 1
palalall jssjss
15
j 1
1
bIJIJIJIJIJIJIJIJIJIJIJIJIJIJIJIJIJIJIJIJIJIJIJIJIJIJIJIJIJIJIJIJIJIJIJIJIJIJIJIJIJIJIJIJIJIJIJIJIJIJIJIJIJIJIJIJIJIJIJIJIJIJIJIJIJIJIJIJIJIJIJIJIJIJIJIJIJIJIJIJIJIJIJIJIJIJIJIJIJIJIJIJIJIJIJIJIJIJIJIJIJ
aann 140
a1 = 2,an + 1 = n1 + n2
4
()aLLs
a
a a a a a a a a
.
aai aai baa. aii jy
aaijglaleiwl jiee
108
pabllj j4 Joo
()()
y
Jalai 2
aLai Jui pabll jia jia g aalall gubill lai
S ACD = S COD + S_ DCE
gssgall gll jaiw lStill gssgall ll
3 gall 12011 jSgolal
jaiuulll jai aalplabil jia jao
Jaaal gao aayy yagall clll all
jgl jn jnl
y
ONJ
g g g g g g g g g g g g g g g g g g g g
jlll/llllll lle llae aell aegall gaiagall gaiia
j l iie jla/aii bllw u kji pae dIa .jklll.
alall aolll -"Speed Control " aolll
()
gill jill gill -Pulse
jgljg jlll jy jil (P)
aill laoe bai
i#yjgssy jyckssy jyckssy jyckssy
OFF
gall all j! Jj jll Jauu Lai
aLda
Jusj jgall jablpiae plabll jz
s sss
yI/1gcbwipdssuLdsAolllalld .Laai kssn gcbwip dgs yglalll
1
y
a
()
15
y^2x^2 - 92x + 8 = 0 ②
32.11 ⑧
zai 19
Ube ②
J 1 J
1211 1211 1211 1211 1211 1211 1211 1211 1211 1211 1211 1211 1211 1211 1211 1211 1211 1211 1211 12
1JdJyJzJyJallblll ②
J 23
Jd
a ②
aSll lblil 27
S木弟形 COBD = S COD + S BDO = S BOC + ②
gaaal aai j 29
cbwll Jol ③0
()p ③1
()
()
()
()
()
()
()g
()()
LgS1 Lg
alolgall gjll jdaall alolgo Jilai Jo Still
jlll lalil wlll
2004/1935
aee 1000000000000000000000000000000000000000000
y
jss jll gai bill jss jll Jaiil aiei j
aalao 1gai aiae ae oao aie
jillgaillllglal
y 1
j00r12
plooll
①
a a a a a a a a a a a a a a a a a a a a
"Laall aiee 8aoi
$$ \therefore \mathrm {d} \mathrm {d} \mathrm {d} \mathrm {d} \mathrm {d} \mathrm {d} \mathrm {d} \mathrm {d} \mathrm {d} \mathrm {d} \mathrm {d} \mathrm {d} \mathrm {d} \mathrm {d} \mathrm {d} \mathrm {d} \mathrm {d} \mathrm {d} \mathrm {d} \mathrm {d} \mathrm {d d} $$
$$ \because x _ {\mathrm {a l l}} \equiv 1, y _ {\mathrm {g}} = 0, z _ {\mathrm {a l l}} = 1 $$
$$ \therefore \text {L L} \cup \cup \cup \cup \cup \cup \cup \cup \cup \cup \cup \cup \cup \cup \cup \cup \cup \cup \cup \cup \cup \cup \cup \cup \cup \cup \cup \cup \cup \cup \cup \cup \cup \cup \cup \cup \cup \cup \cup \cup \cup \cup \cup \cup $$
$$ \left. \int_ {0} ^ {\infty} \frac {1}{x} \frac {1}{x ^ {2}} \frac {1}{x ^ {3}} \frac {1}{x ^ {4}} \frac {1}{x ^ {5}} \frac {1}{x ^ {6}} \frac {1}{x ^ {7}} \frac {1}{x ^ {8}} \frac {1}{x ^ {9}} \frac {1}{x ^ {1 0}} \right] $$
1
.
.
a
1
J 1
KENWOOD
J 1
L
1 1
a 11111111111111111111111111111
1 1
y
1
1
1
aagll Lac laa. aai jyip Jype bll
.
y
J
: (g) a l l l l l l l l l l l l l l l l l l l l l l l l l l l l l l l l l l l l l l
:
.
()On/Off
a
p 1
4.01 21211
.
1

HEAD OFFICE: Kenwood Limited, 1-3 Kenwood Business Park, New Lane, Havant, Hampshire PO9 2NH
kenwoodworld.com