DrawBar 5C - Wine cellar DOMETIC - Free user manual and instructions
Find the device manual for free DrawBar 5C DOMETIC in PDF.
| Product type | Wine cellar (aging drawer) |
| Brand | Dometic |
| Model | DrawBar 5C |
| Capacity | Up to 5 bottles (max diameter 96 mm) |
| Total volume | 15 L |
| Temperature range | +5 °C to +17 °C (5 levels: 5, 8, 11, 14, 17 °C) |
| Cooling type | Compressor |
| Refrigerant | R600a (isobutane), 10 g |
| Power supply | 220–240 V~ 50 Hz, 45 W |
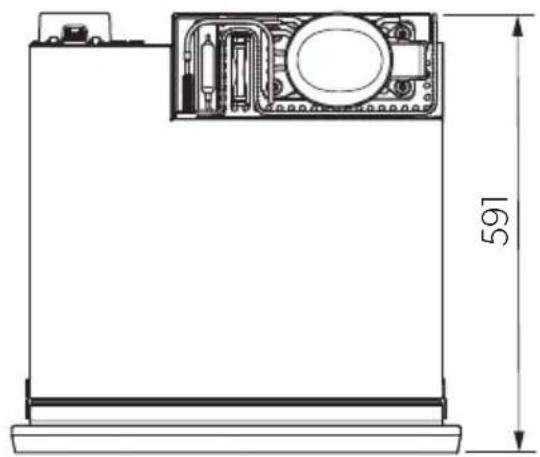
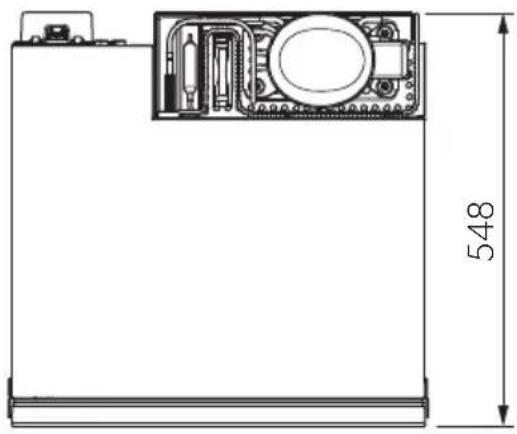
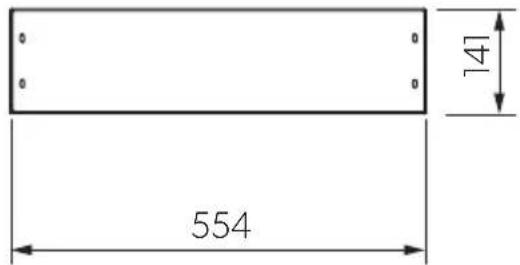
| Dimensions (W x D x H) | 597 x 591 x 141 mm |
| Weight | 17.9 kg |
| Maximum load | 10 kg |
| Climate class | N (ambient +16 °C to +32 °C) |
| Noise emissions | 45 dB(A) |
| Front panel | Glass with handle (factory mounted) |
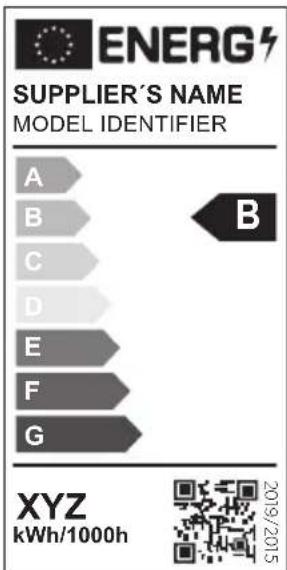
| Interior lighting | LED (energy efficiency class F) |
| Humidification tray | Yes, with sponge |
| Defrosting | Automatic |
| Special modes | Presentation (permanent lighting), Demonstration (compressor and fans off) |
| Installation | Integrated into a cabinet or under countertop |
| Delivery contents | Drawer, screws, spacers, deflector sponges, mounting plates |
| Intended use | Storage and temperature control of wine (sealed and closed bottles) |
| Maintenance | Clean with damp cloth, check water level, do not clean tray in dishwasher |
| Warranty | Legal (contact dealer or Dometic) |
Frequently Asked Questions - DrawBar 5C DOMETIC
User questions about DrawBar 5C DOMETIC
0 question about this device. Answer the ones you know or ask your own.
Ask a new question about this device
Download the instructions for your Wine cellar in PDF format for free! Find your manual DrawBar 5C - DOMETIC and take your electronic device back in hand. On this page are published all the documents necessary for the use of your device. DrawBar 5C by DOMETIC.
USER MANUAL DrawBar 5C DOMETIC
natural_image
Technical line drawing of three rectangular electronic components with mounting flanges and internal components (no text or symbols)DrawBar5S,5B,5C
EN Wine cooling drawer
Operating manual 15
DE Weinkühlschublade
© 2023 Dometic Group. The visual appearance of the contents of this manual is protected by copyright and design law. The underlying technical design and the products contained herein may be protected by design, patent or be patent pending. The trademarks mentioned in this manual belong to Dometic Sweden AB. All rights are reserved.
1
DrawBar5B DrawBar5C
natural_image
Technical line drawing of a mechanical or electronic component with no visible text or symbols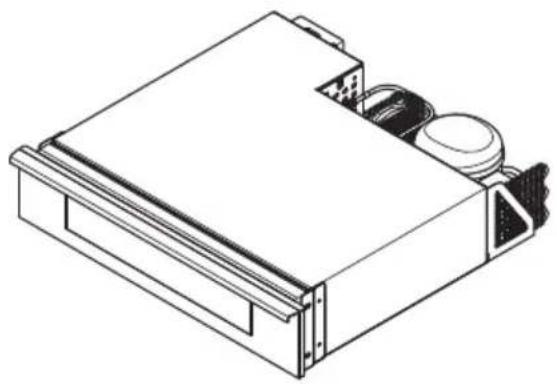
natural_image
Technical line drawing of a mechanical or electronic component with no visible text or symbols8 × ST4 × 13 mm
4×

1x

1×1×

2 mm 4 mm
1x
DrawBar5S
natural_image
Technical line drawing of a rectangular electronic device with mounting flanges and internal components (no text or symbols)12×ST4×13 mm
4×

1x

1×1×
2 mm 4 mm
1x
2
DrawBar5B, 5C
natural_image
Technical line drawing of a mechanical device with dimension标注 (no text or symbols)DrawBar5S
natural_image
Technical line drawing of a mechanical device with dimension标注 (no text or symbols)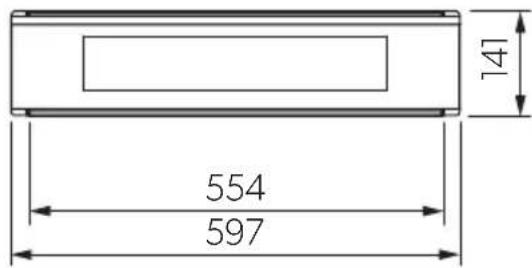
3
A
B
4
5
natural_image
Illustration of a hand cleaning a cabinet with a checkmark and eye symbol (no text or labels)6
DrawBar
5B/5C only
natural_image
Line drawing of a cabinet with a checkmark indicating a lock or latch (no text or symbols present)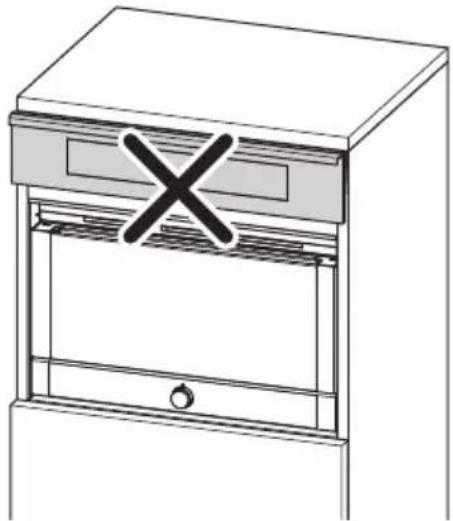
natural_image
Line drawing of a cabinet with an X mark symbol on the lid (no text or labels)7
2.
natural_image
Technical illustration of a mechanical clamp or bracket assembly (no text or symbols)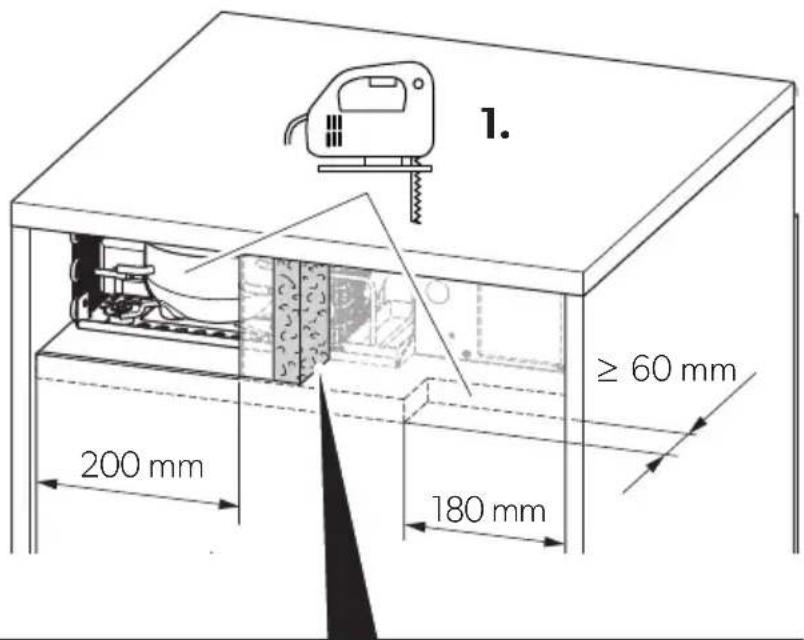
8
A
ST4×13 mm
B
ST4×13 mm
9

24

Please read these instructions carefully and follow all instructions, guidelines, and warnings included in this product manual in order to ensure that you install, use, and maintain the product properly at all times. These instructions MUST stay with this product.
By using the product, you hereby confirm that you have read all instructions, guidelines, and warnings carefully and that you understand and agree to abide by the terms and conditions as set forth herein. You agree to use this product only for the intended purpose and application and in accordance with the instructions, guidelines, and warnings as set forth in this product manual as well as in accordance with all applicable laws and regulations. A failure to read and follow the instructions and warnings set forth herein may result in an injury to yourself and others, damage to your product or damage to other property in the vicinity. This product manual, including the instructions, guidelines, and warnings, and related documentation, may be subject to changes and updates. For up-to-date product information, please visit documents.dometic.com.
Related documents

Find the installation leaflet online at
documents.dometic.com/
?object_id=81002
Contents
Explanation of symbols....15
Safety instructions .....15
Scope of delivery....17
Intended use ....17
Technical description .....17
Installation 18
Description of the device .....19
Operation....19
Troubleshooting 20
Cleaning and maintenance .....21
Warranty.... 22
Disposal 22
Technical data 23
Explanation of symbols

DANGER!
Safety instruction: Indicates a hazardous situation that, if not avoided, will result in death or serious injury.

WARNING!
Safety instruction: Indicates a hazardous situation that, if not avoided, could result in death or serious injury.

CAUTION!
Safety instruction: Indicates a hazardous situation that, if not avoided, could result in minor or moderate injury.

NOTICE!
Indicates a situation that, if not avoided, can result in property damage.

NOTE
Supplementary information for operating the product.
Safety instructions
General safety

WARNING! Failure to obey these warnings could result in death or serious injury.
Electrocution hazard
- Ensure that the wine storage appliance has been installed by a qualified technician in accordance with the Dometic installation manual.
- Do not operate the wine storage appliance if it is visibly damaged.
- If this wine storage appliance's power cable is damaged, it must be replaced by the manufacturer, service agent or a similarly qualified person in order to prevent safety hazards.
- This wine storage appliance may only be repaired by qualified personnel. Inadequate repairs may cause serious hazards.
- When positioning the wine storage appliance, ensure the supply cord is not trapped or damaged.
- Do not locate multiple portable socket-outlets or portable power supplies at the rear of the appliance.
- Plug the device to sockets that ensure proper connection especially when the device needs to be earthed.
Fire hazard
- The refrigerant in the refrigerant circuit is highly flammable. In the event of any damage to the refrigerant circuit:
- Switch off the wine storage appliance.
- Avoid naked flames and sparks.
– Air the room well.
Explosion hazard
- Do not store any explosive substances, such as spray cans with propellants, in the wine storage appliance.
Health hazard
- This wine storage appliance can be used by children aged from 8 years and above and persons with reduced physical, sensory or mental capabilities or lack of experience and knowledge if they have been given supervision or instruction concerning use of the wine storage appliance in a safe way and understand the hazards involved.
- Children shall not play with the wine storage appliance.
- Cleaning and user maintenance shall not be made by children without supervision.
• Children aged from 3 to 8 years are allowed to load and unload the wine storage appliance. - To avoid a hazard due to instability of the wine storage appliance, it must be fixed in accordance with the installation instructions.
- Keep ventilation openings, in the wine storage appliance enclosure or in the built-in structure, clear of obstruction.
- Do not use mechanical devices or other means to accelerate the defrosting process, other than those recommended by the manufacturer.
- Do not open the refrigerant circuit under any circumstances.
- Do not use electrical devices inside the wine storage appliance unless they are recommended by the manufacturer for that purpose.

CAUTION! Failure to obey these cau-tions could result in minor or moderate injury.
Risk of crushing
- Do not put your fingers into the hinge.
Health hazard
- Only closed and still sealed bottles may be stored in the appliance.

NOTICE! Damage hazard
- Check that the voltage specification on the data plate is the same as that of the power supply.
- The wine storage appliance is not suitable for storing substances which are caustic or contain solvents.
- The insulation of the cooling device contains flammable cyclopentane and requires special disposal procedures. Deliver the cooling device at the end of its life-cycle to an appropriate recycling center.
- Keep the drainage outlet clean at all times.
- Only carry the wine storage appliance upright.
Operating the wine storage appliance safely

DANGER! Failure to obey these warnings will result in death or serious injury.
Electrocution hazard
- Do not touch exposed cables with your bare hands.

CAUTION! Failure to obey these cau-tions could result in minor or moderate injury.
Electrocution hazard
- Before starting the wine storage appliance, ensure that the power supply line and the plug are dry.
Health hazard
- Make sure that you only put wine bottles in the wine storage appliance which may be chilled at the selected temperature.
- Opening the drawer for long periods can cause significant increase of the temperature in the compartments of the wine storage appliance.
- Clean regularly surfaces that can come in contact with wine bottles and accessible drainage systems.
- If the wine storage appliance is left empty for long periods:
– Switch off the wine storage appliance.
- Defrost the wine storage appliance.
– Clean and dry the wine storage appliance.
– Leave the drawer open to prevent mold developing within the wine storage appliance.

NOTICE! Damage hazard
- Do not place the wine storage appliance near naked flames or other heat sources (heaters, direct sunlight, gas ovens etc.).
- Never immerse the wine storage appliance in water.
- Protect the wine storage appliance and the cable against heat and moisture.
- Make sure that wine bottles do not touch the walls of the cooling area.
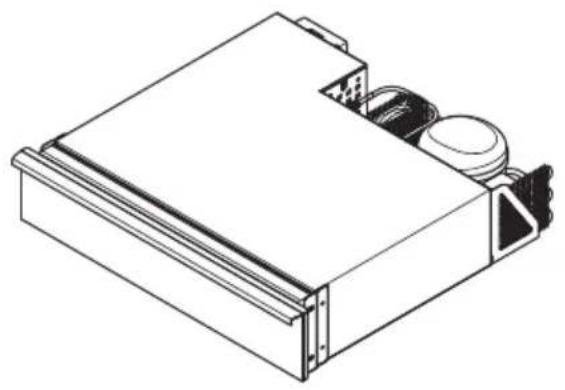
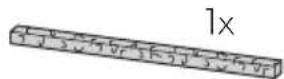
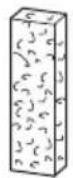
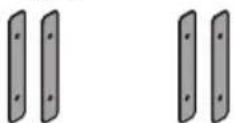
Scope of delivery
See fig. 1, page 3
| Quantity Description | ||||
| 1 Wine cooling drawer | ||||
| 12 Screw ST4 x 13 mm(DrawBar5S only) | ||||
| 8 | S | c | r | e |
| (DrawBar5B, 5C only) | ||||
| 2 | S | p | a | c |
| 2 | S | p | a | c |
| 4 | W | a | s | h |
| 1 | Baffle sponge (200 x 100 x 30 mm) | |||
| 1 | Baffle sponge (550 x 50 x 30 mm) | |||
| 2 Mounting plate | ||||
Intended use
The wine storage appliance (also referred to as wine cooling drawer) is designed for operation in enclosed buildings, such as:
- In staff kitchens in stores, offices and other work areas
• In the agricultural sector
• In hotels, motels and other accommodations
• In bed and breakfast establishments
• In catering businesses or similar wholesaler operations
The wine cooling drawer is intended for installation in a piece of cabinetry or an installation niche.
The wine cooling drawer is intended to be used exclusively for the storage and temperature control of wine. Only closed and still sealed bottles may be stored in the appliance.
The wine cooling drawer is not suitable for storing medicine or deep-freezing foodstuffs.
This product is only suitable for the intended purpose and application in accordance with these instructions.
This manual provides information that is necessary for proper installation and/or operation of the product. Poor installation and/or improper operating or maintenance will result in unsatisfactory performance and a possible failure.
The manufacturer accepts no liability for any injury or damage to the product resulting from:
- Incorrect assembly or connection, including excess voltage
- Incorrect maintenance or use of spare parts _w other than original spare parts provided by the manufacturer
- Alterations to the product without express permission from the manufacturer ^2
- Use for purposes other than those described in this manual
Dometic reserves the right to change product appearance and product specifications.
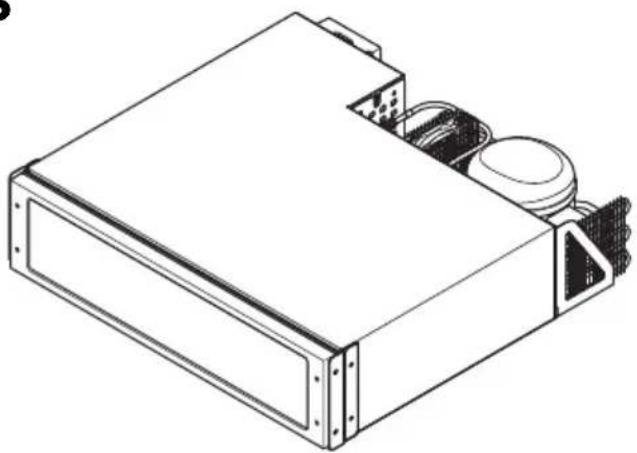
Technical description
The wine cooling drawer can cool wine or keep wine cool in a temperature range from +5 °C to +17 °C (41 °F to 63 °F).
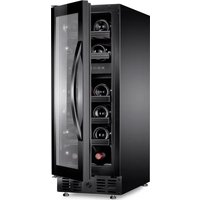
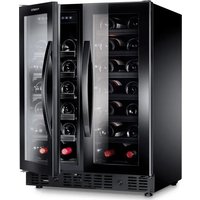
The rack is suitable for up to 5 bottles. The maximum bottle diameter is 96 mm (3.8 in).
The wine cooling drawer is a compression-type refrigerating device.
The model is factory fitted with a glass front panel and a handle.
DrawBar5S: The model is delivered without a front panel and ready to fit the kitchen cabinet front.
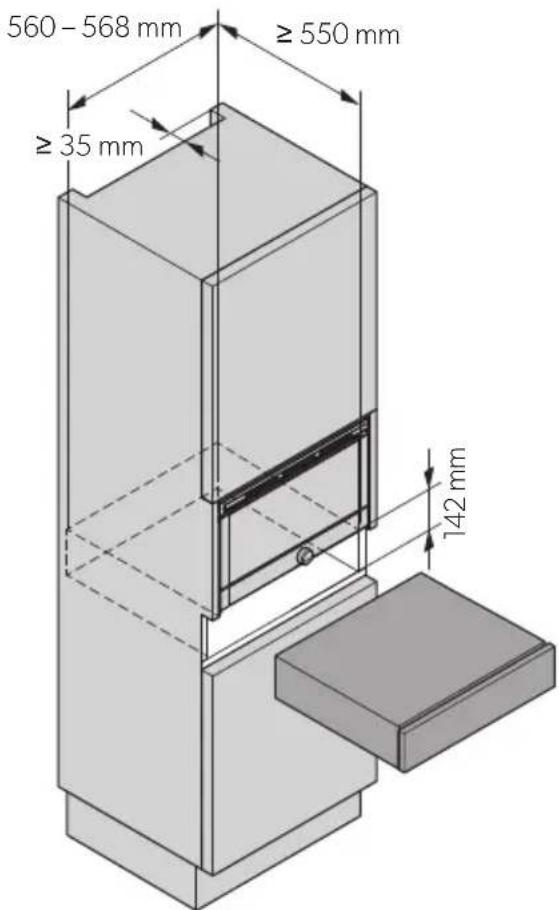
Installation
Observe the following instructions when selecting an installation location:
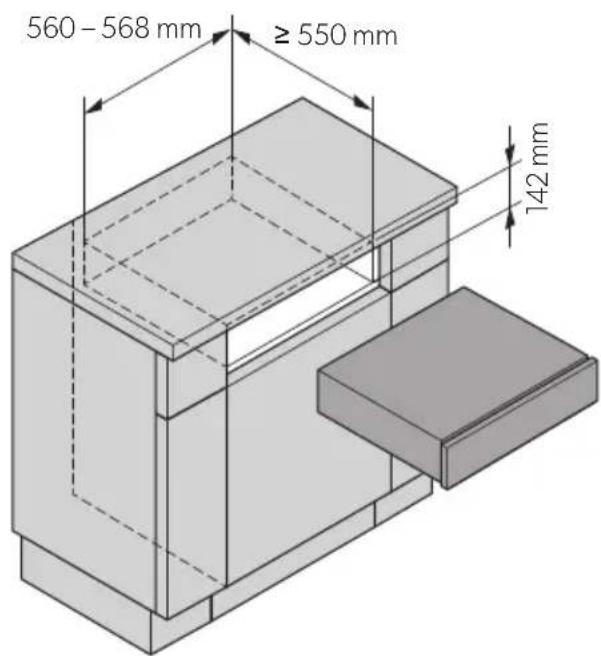
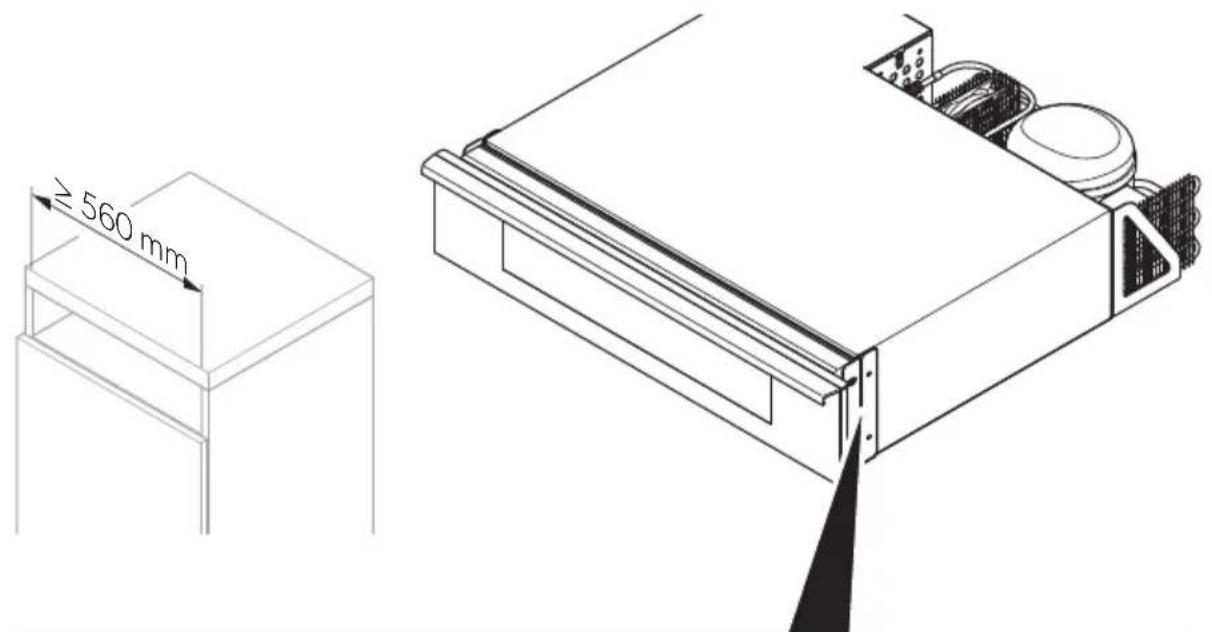
- Observe the product dimensions and the necessary installation space to ensure a proper fit (fig. 2, page 4, fig. 3, page 4).
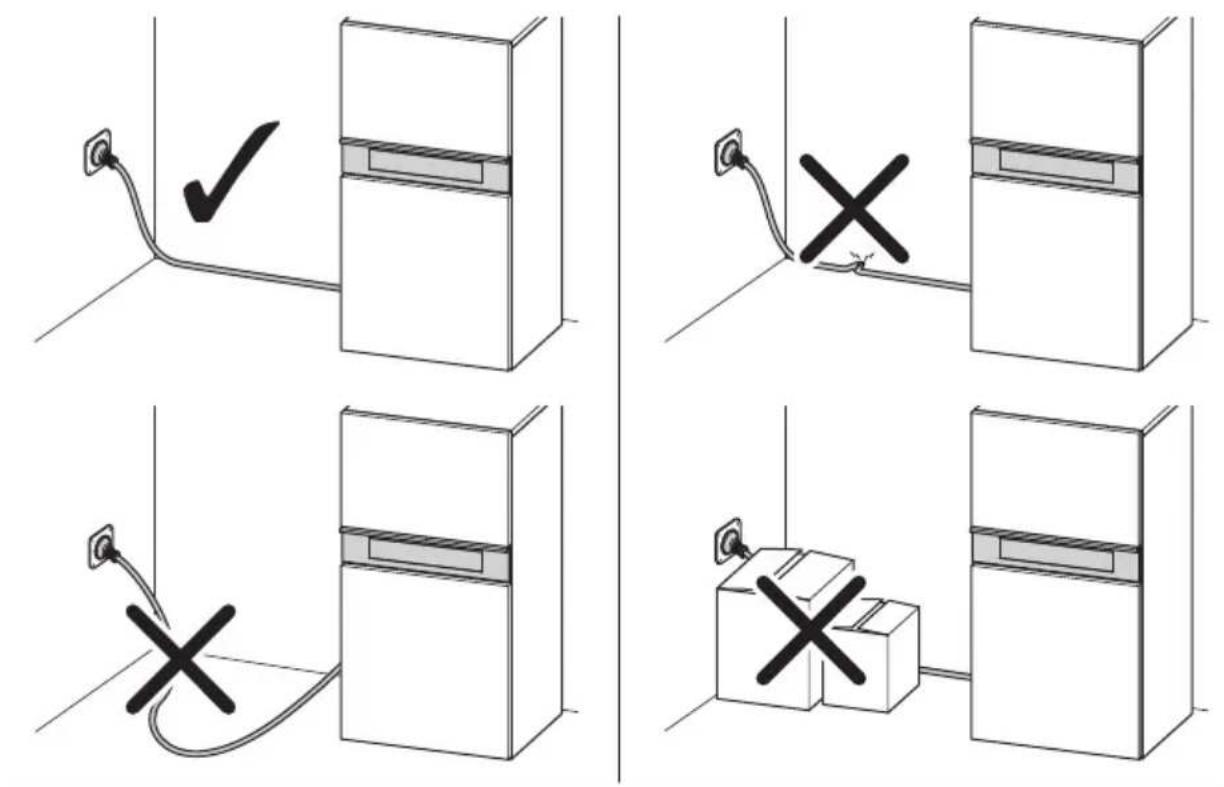
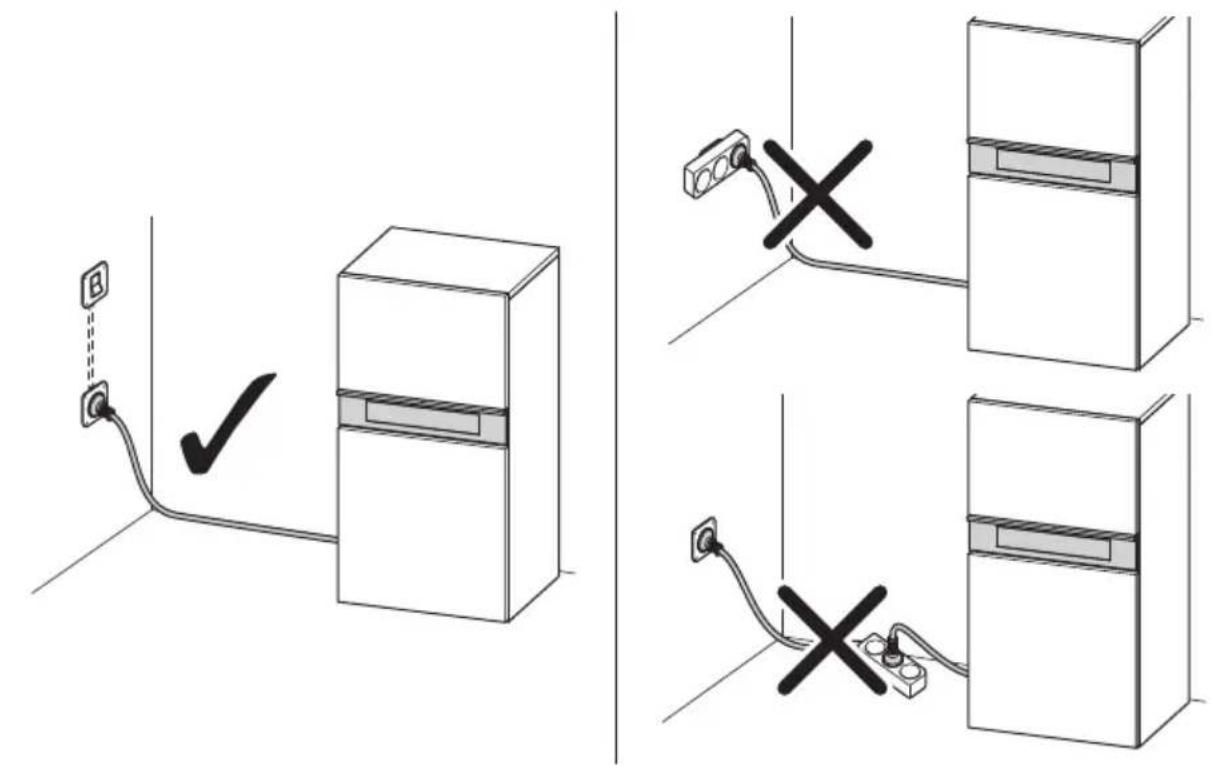
- Observe the warnings when connecting the supply cord (fig. 4, page 5).
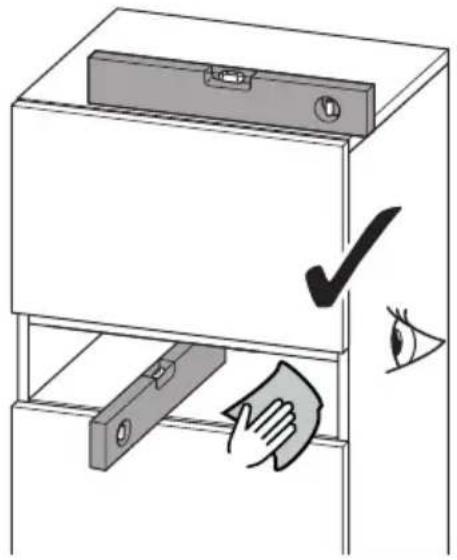
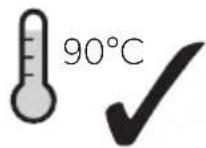
- Ensure the mounting surface is solid, level and clean (fig. 5, page 6).
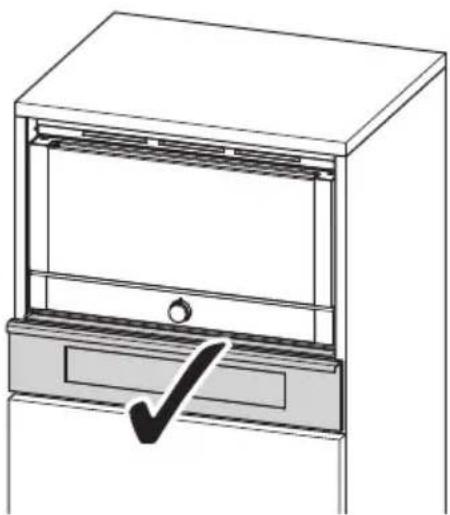
- Do not install the wine cooling drawer on top of an appliance (fig. 6, page 6).
If the wine cooling drawer is intended to be built into a high cabinet with an appliance, it can be installed underneath without the need of an interim shelf.
Preparing the cabinetry
There are two installation options for the wine cooling drawer:
- Into a high cabinet with an appliance (fig. 3A, page 4).
In this case proceed with the instructions in chapter "Open-back high cabinet with appliance" on page 18.
- Underneath a counter (fig. 3 B, page 4). In this case proceed with the instructions in chapter "Closed-back counter or cabinet" on page 18.
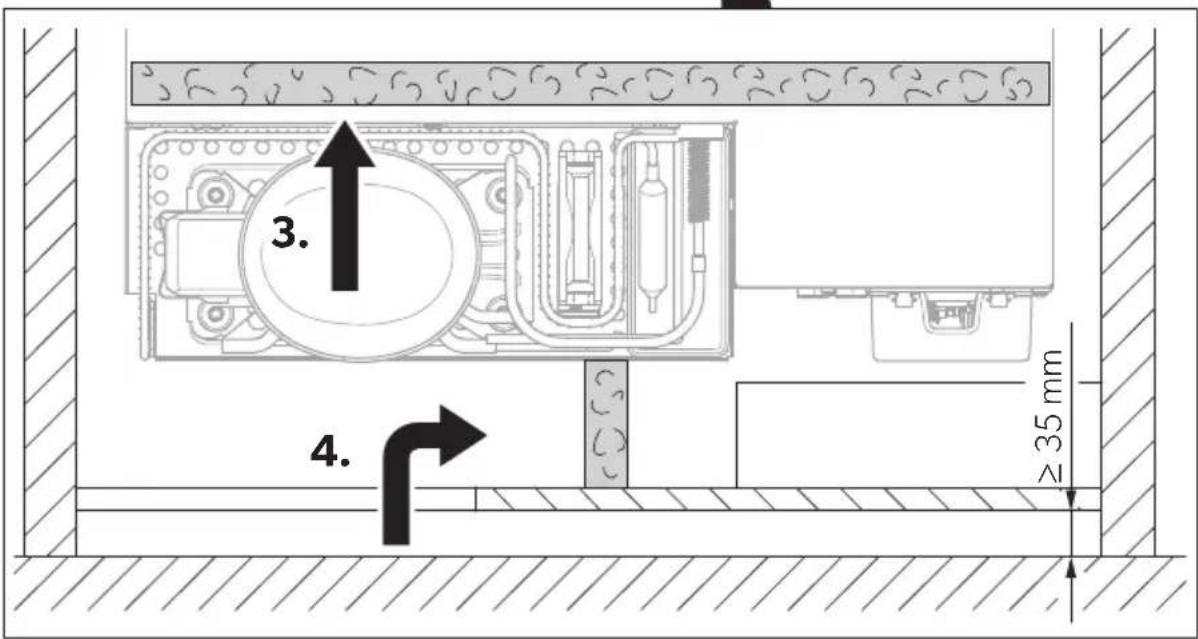
Open-back high cabinet with appliance

NOTE
If the clearance between the cabinetry and the rear wall is less than 35 mm a proper air circulation is not guaranteed and the wine cooling drawer will consume more energy.
▶ Ensure a clearance of at least 35 mm between the high cabinet and the rear wall.
Closed-back counter or cabinet
See fig. 7, page 7

NOTE
If the clearance between the cabinetry and the rear wall is less than 35 mm a proper air circulation is not guaranteed and the wine cooling drawer will consume more energy.
- Ensure a clearance of at least 35 mm between the cabinetry and the rear wall.
- Make a 60 x 180 mm cut-out in the back of the shelf.
- Make a 200 mm wide cut-out in the back wall of the cabinetry. The hight of the cut-out should be the distance between the shelf and the counter-top.
- Cut the short baffle sponge to an appropriate size to fit the gap between the fan and the back of the cabinetry.
- Insert the baffle sponge between the fan and the back of the cabinetry so that it fits tightly.
- If the clearance between the top of the wine cooling drawer and the cabinetry is larger than 10 mm, insert the long baffle sponge. Cut the baffle sponge if necessary and put it on top of the wine cooling drawer.
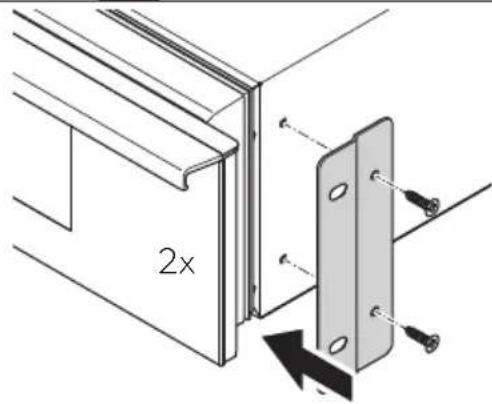
Mounting the wine cooling drawer
-
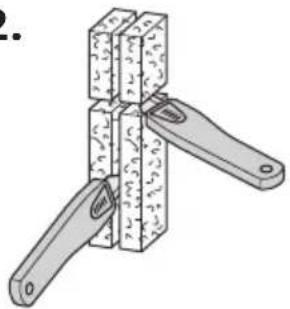
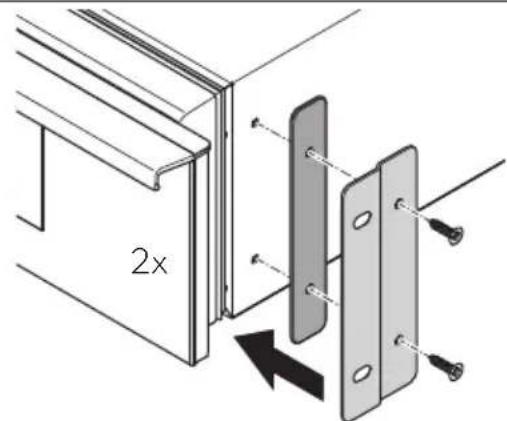
Attach the mounting plates to both sides of the product housing using the supplied screws.
If necessary, use a suitable combination of supplied spacers to ensure a proper fit (fig. 8, page 8). -
Plug in the supply cord.
-
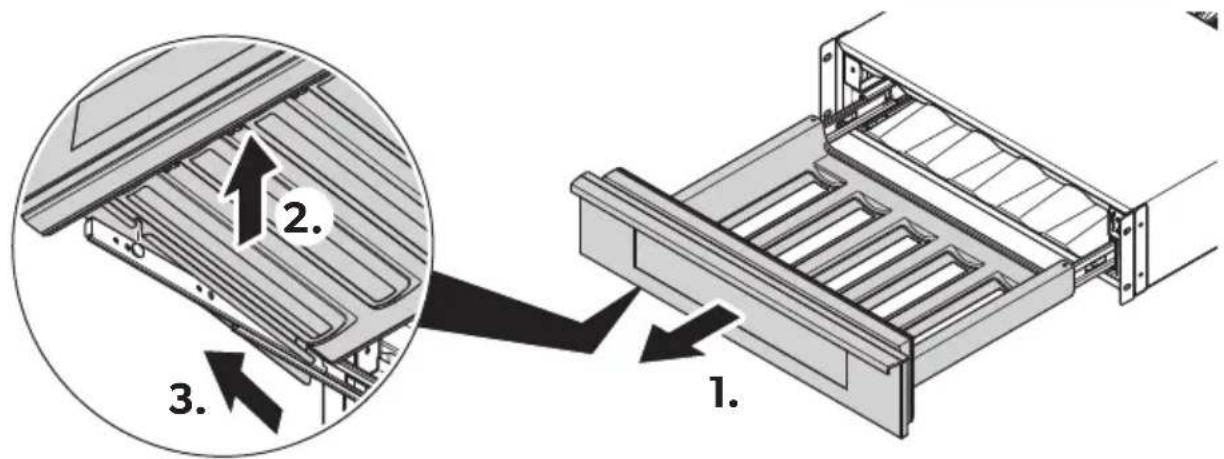
Fully pull out the drawer and lift it off the sliding rails (fig. 9, page 8).
-
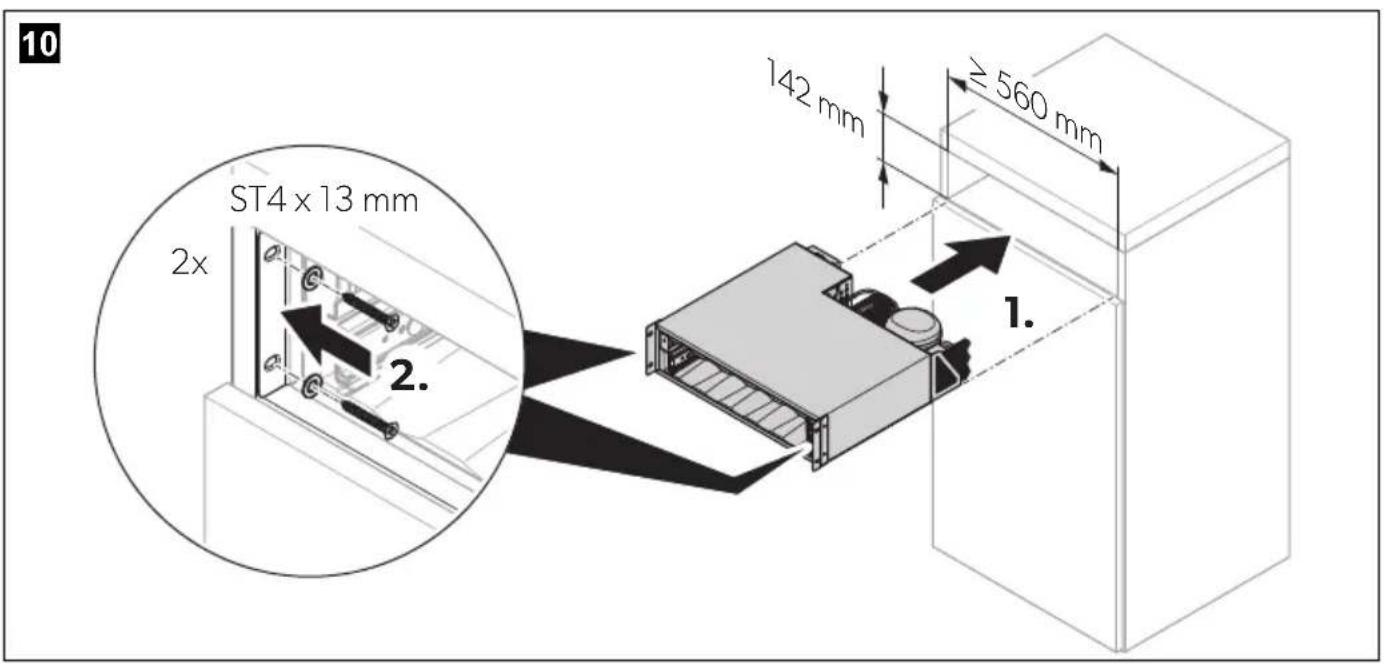
Secure the product housing to the walls of the cabinetry using the supplied screws and washers (fig. 10, page 9).
-
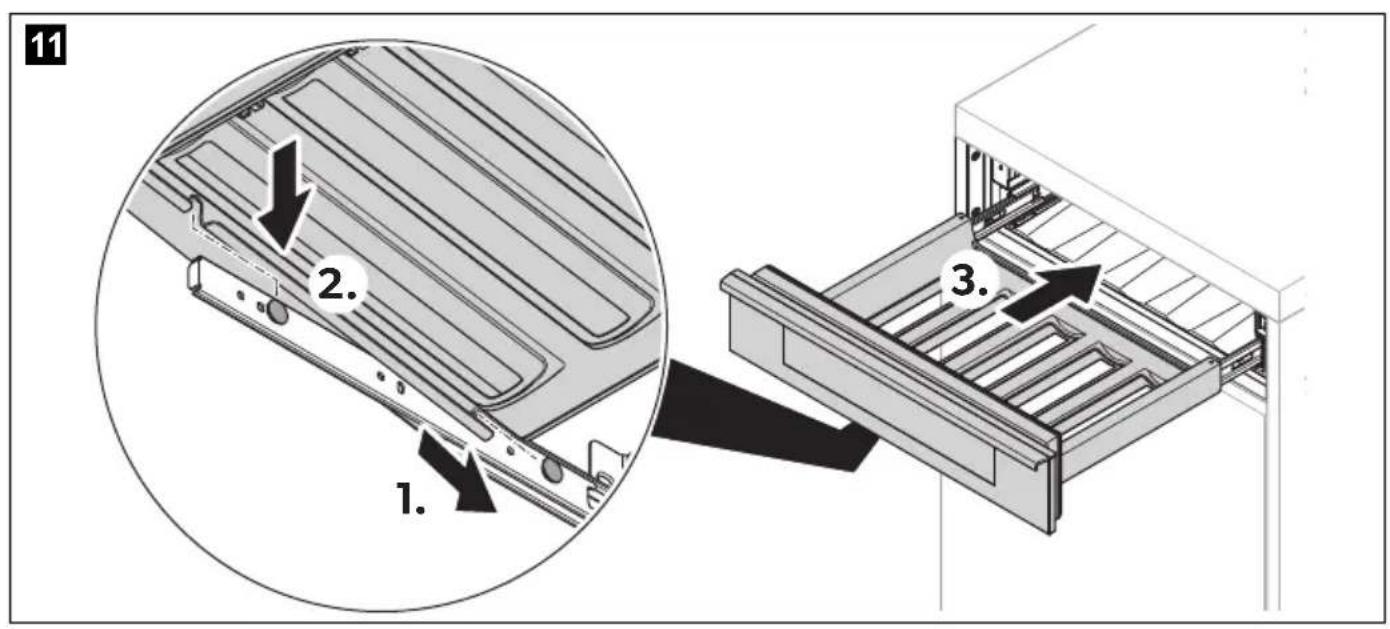
Fully extend the sliding rails and carefully place the drawer back onto the sliding rails (fig. 11, page 9).
-
Close the drawer.
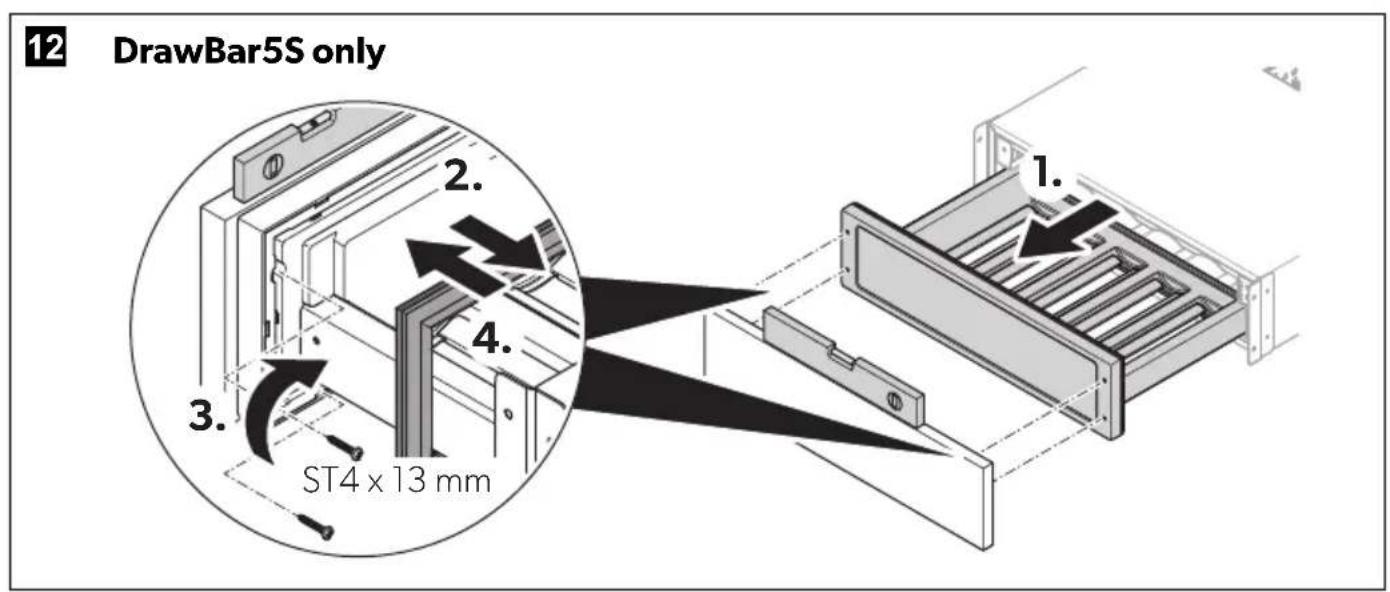
Installing the overlay panel (DrawBar5S only)
See fig. 12, page 9

NOTE
Ensure the measurements of the overlay panel are suitable for the selected installation location.
- Install the cabinet handle on the overlay panel.
- Pull out the drawer and remove the door gasket to reveal the fastening holes.
- Fasten the overlay panel to the drawer door using the supplied screws.
▶ Check for correct alignment after fastening each screw. - Reattach the door gasket and close the drawer.
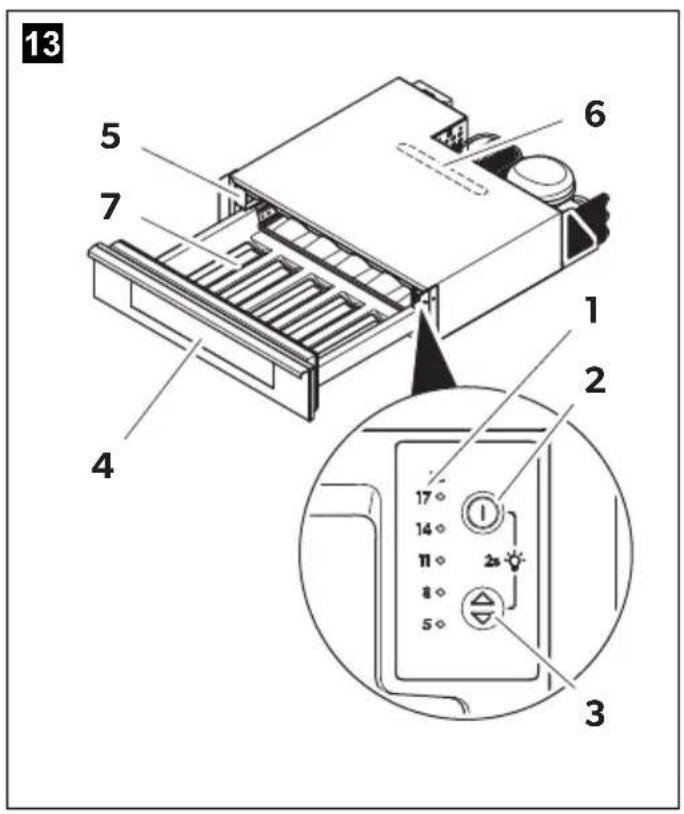
Description of the device
| No. in fig. 13, page 10 | Explanation |
| 1 Temperature indicator LEDs | |
| 2 | On/off button |
| 3 | Setting button |
| 4 Glass front panel with handle (DrawBar5B, 5C only) | |
| 5 Humidity tray | |
| 6 | In t e r i |
| 7 Rubber strips | |
Operation
Before first use
▶Clean the wine cooling drawer inside and outside for hygienic reasons (see chapter "Cleaning and maintenance" on page 21).
▶Fill the humidity tray with water at least until the sponge is completely covered (fig. 19, page 11).
Saving energy
- Only open the wine cooling drawer as often and for as long as necessary.
- Avoid unnecessarily low temperature settings.
- On a regular basis, make sure the drawer seal still fits properly.
- Clean dust and dirt from the condenser at regular intervals.
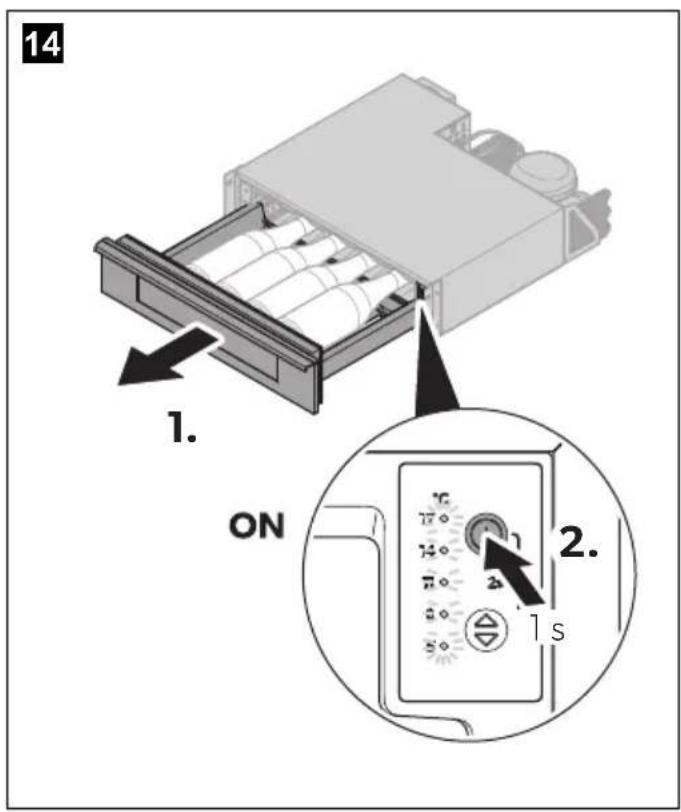
Switching on and off
▶To switch on, press the ① button once (fig. 14, page 10).
▶ To switch off, press and hold the button for at least 2 seconds (fig. 15, page 10).
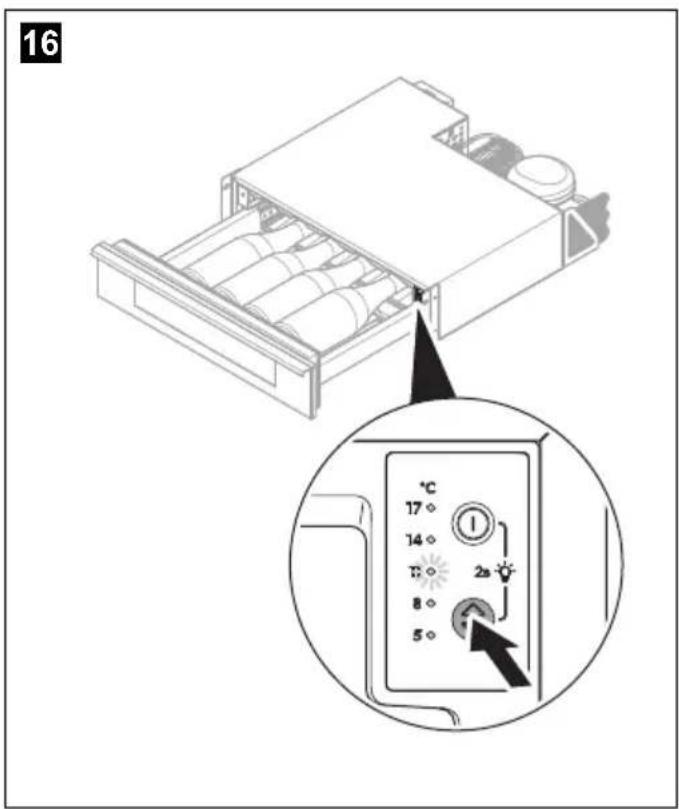
Setting the temperature
To avoid food waste, note the following:
- Keep temperature fluctuation as low as possible. Only open the wine cooling drawer as often and for as long as necessary. Store the wine bottles in such a way that the air can still circulate well.
- Adjust the temperature to the quantity and type of the wine bottles.
The wine cooling drawer is set by default to a cooling temperature of 11^ C.
▶To set the temperature, press the button repeatedly until you reach the desired temperature level (fig. 16, page 10).
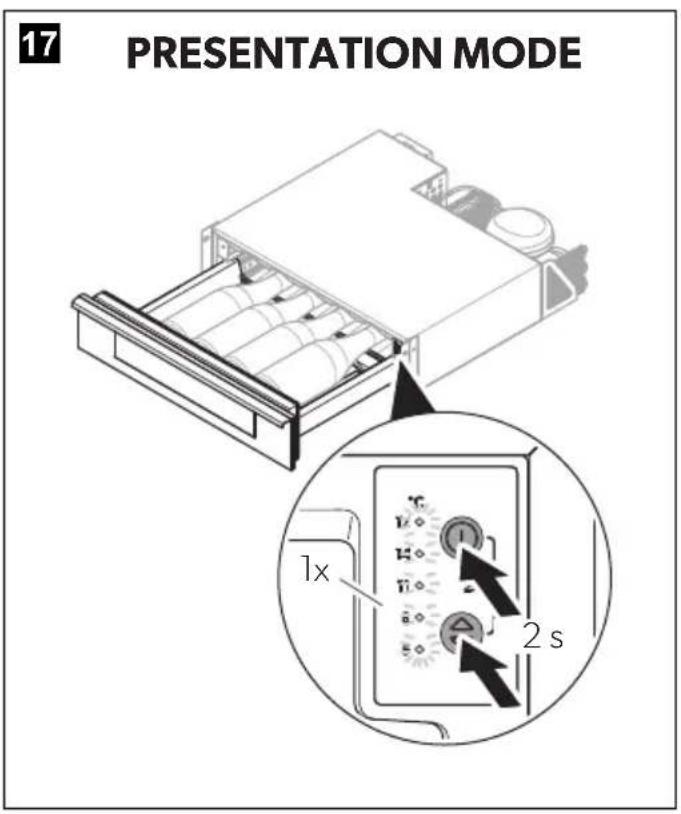
Using the presentation mode
With presentation mode activated the interior LED lamp stays on permanently.
▶To activate and deactivate the presentation mode, press simultaneously the button and the ≈ button for at least 2 seconds (fig. 17, page 11).
√ All temperature indicator LEDs flash for 1 time.
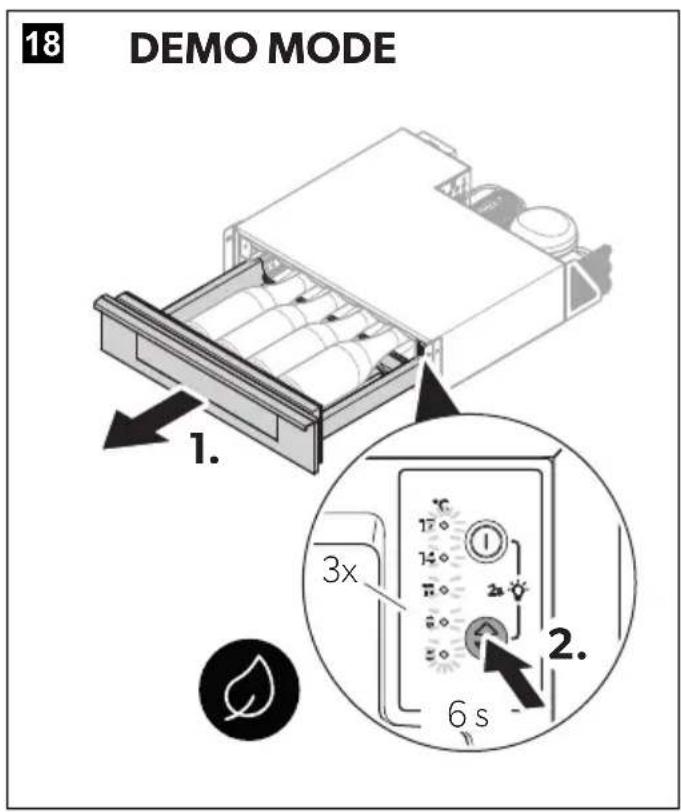
Using the demo mode
With demo mode activated the compressor and fans are switched off.
▶To activate the demo mode, press the ≈ button for at least 6 seconds (fig. 18, page 11).
√ All temperature indicator LEDs flash for 3 times.
√ The temperature indicator LEDs for 11 °C and 14 °C light up permanently.
▶To demonstrate the temperature setting function or the presentation mode, press the ≈ button once.
√ The temperature indicator LEDs for 11 °C and 14 °C turn off within 2 seconds.
√ The temperature indicator LED of the last selected temperature level lights up.
▶ To deactivate the demo mode, press the ≈ button for at least 6 seconds (fig. 18, page 11).
√ All temperature indicator LEDs flash for 3 times.
√ The temperature indicator LED of the last selected temperature level lights up.
Troubleshooting
| Fault Possible cause Suggested remedy | ||
| The device does not cool. Temperature indicator LEDs do not glow. | No voltage present in the AC voltage socket. | Try using another plug socket. |
| The device does not cool (plug is inserted). Temperature indicator LEDs glow. | The cooling element is defective. Contact authorized service agent for repair. | |
| The device does not cool (plug is inserted). Temperature indicator LEDs for 11 °C and 14 °C light up permanently. | The demo mode is activated. Switch off the demo mode (fig. 18, page 11). | |
| The interior LED lamp stays on permanently even when the wine cooling drawer is closed. | The presentation mode is activated. Switch off the presentation mode (fig. 17, page 11). | |
| The device does not cool sufficiently. Temperature indicator LEDs glow. | The cooling element is defective. Contact authorized service agent for repair. | |
| The ventilation is insufficient. Remove any obstruction or soiling from the inlet and outlet vents. | ||
| The upper temperature indicator LED flashes repeatedly for 1 time. | The temperature sensor is defective. Contact authorized service agent for repair. | |
| The upper temperature indicator LED flashes repeatedly for 3 times. | The inner fan is defective. Contact authorized service agent for repair. | |
| The upper temperature indicator LED flashes repeatedly for 4 times. | The outer fan is defective. Contact authorized service agent for repair. | |
Fault Possible cause Suggested remedy
The upper temperature indicator LED flashes repeatedly for 5 times.
The drawer is opened for too long. Close the drawer.
The drawer is not closed properly. Close the drawer properly.
The upper temperature indicator LED flashes repeatedly for 6 times.
The compressor is defective. Contact authorized service agent for repair.
Cleaning and maintenance

WARNING! Fire hazard
- The refrigerant is highly flammable. Do not open or damage the refrigerant circuit.
- The insulation of the device contains an insulating gas (see data plate). Do not damage the insulation.

NOTICE! Damage hazard
- Do not use abrasive cleaning agents or hard objects during cleaning.
- Never use hard or sharp tools to remove ice or to free frozen objects.
- Do not use any mechanical tools or any other tools to speed up the defrosting process.

NOTE Condensation on glass door
DrawBar5B, 5C only: When ambient humidity is above 65% in 25°C ambient temperature, moisture will condense on the glass door.
▶Clean the device interior and exterior regularly with a damp cloth and as soon as it becomes dirty.
▶ Wipe the wine cooling drawer dry with a cloth after cleaning.
▶ Make sure that the air inlet and outlet vents on the device are free from any dust and dirt, so that heat can be released and the device is not damaged.
▶Check the condensate drain regularly.
Clean the condensate drain when necessary. If it is blocked, the condensate collects on the bottom of the wine cooling drawer.
Checking the water level
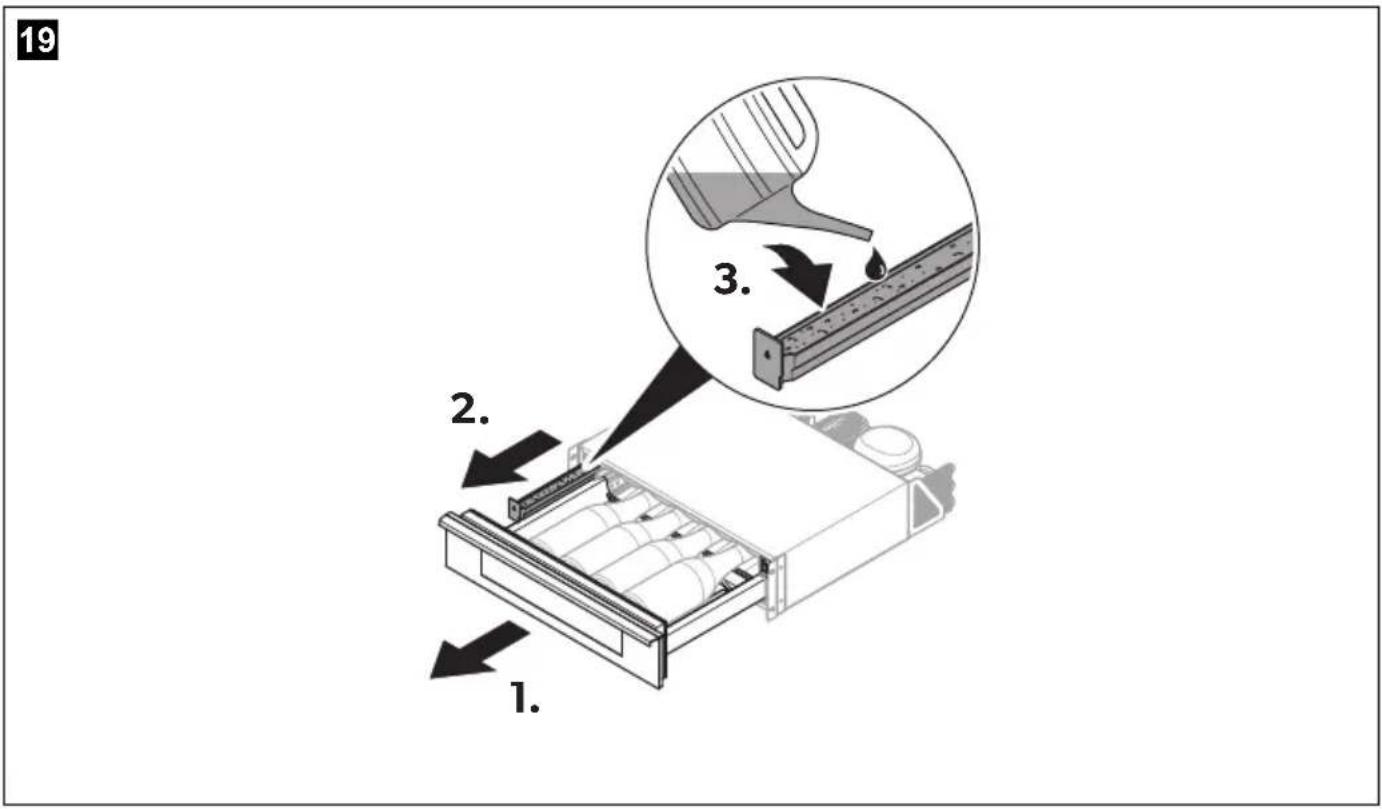
The wine cooling drawer is equipped with a humidity tray to provide extra humidity to the drawer interior.
▶Check regularly if the sponge is covered with water (fig. 19, page 11).
▶ Change the water if necessary.

NOTICE! Damage hazard
Do not clean the humidity tray in the dishwasher.
▶ Clean the humidity tray under running water only.
Refrigerant circuit
The refrigerant circuit is maintenance-free.
Defrosting
The wine cooling drawer is equipped with an automatic defrost function.
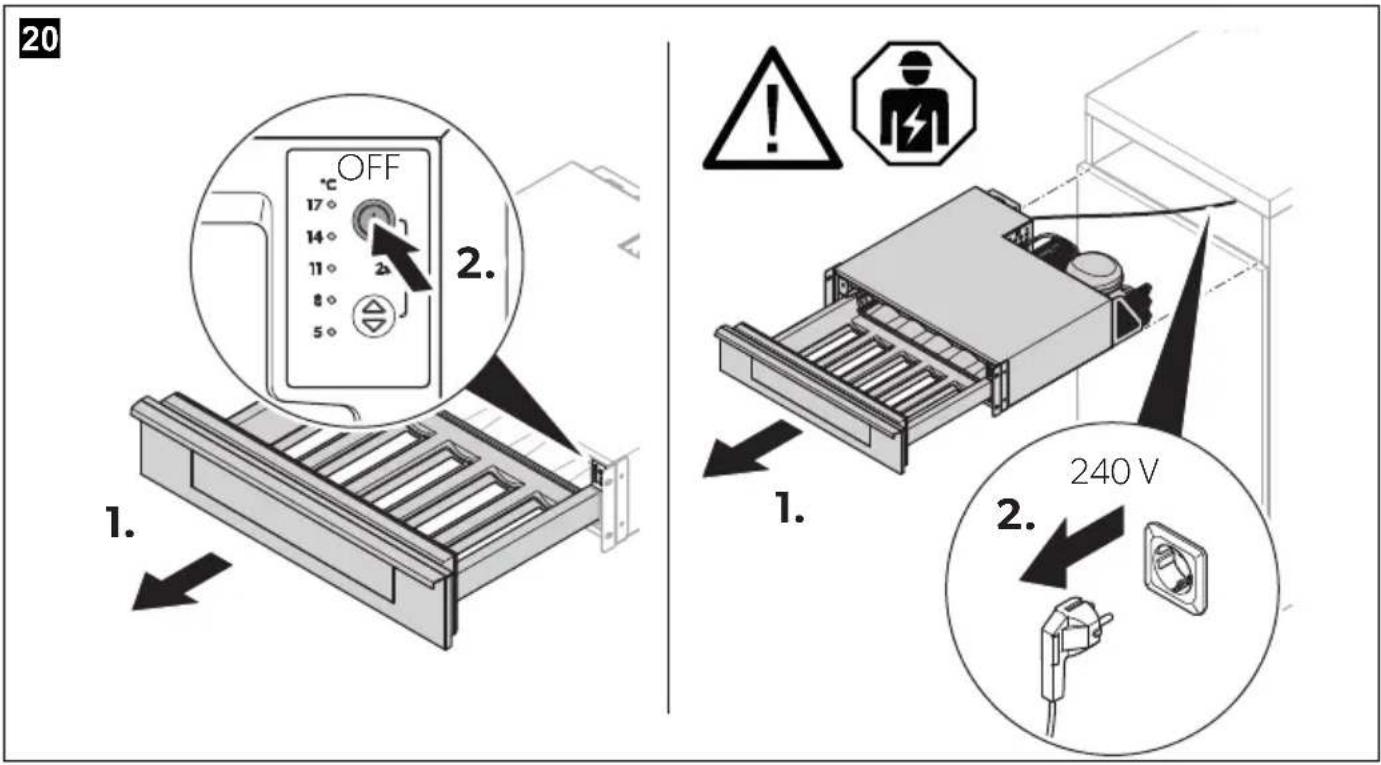
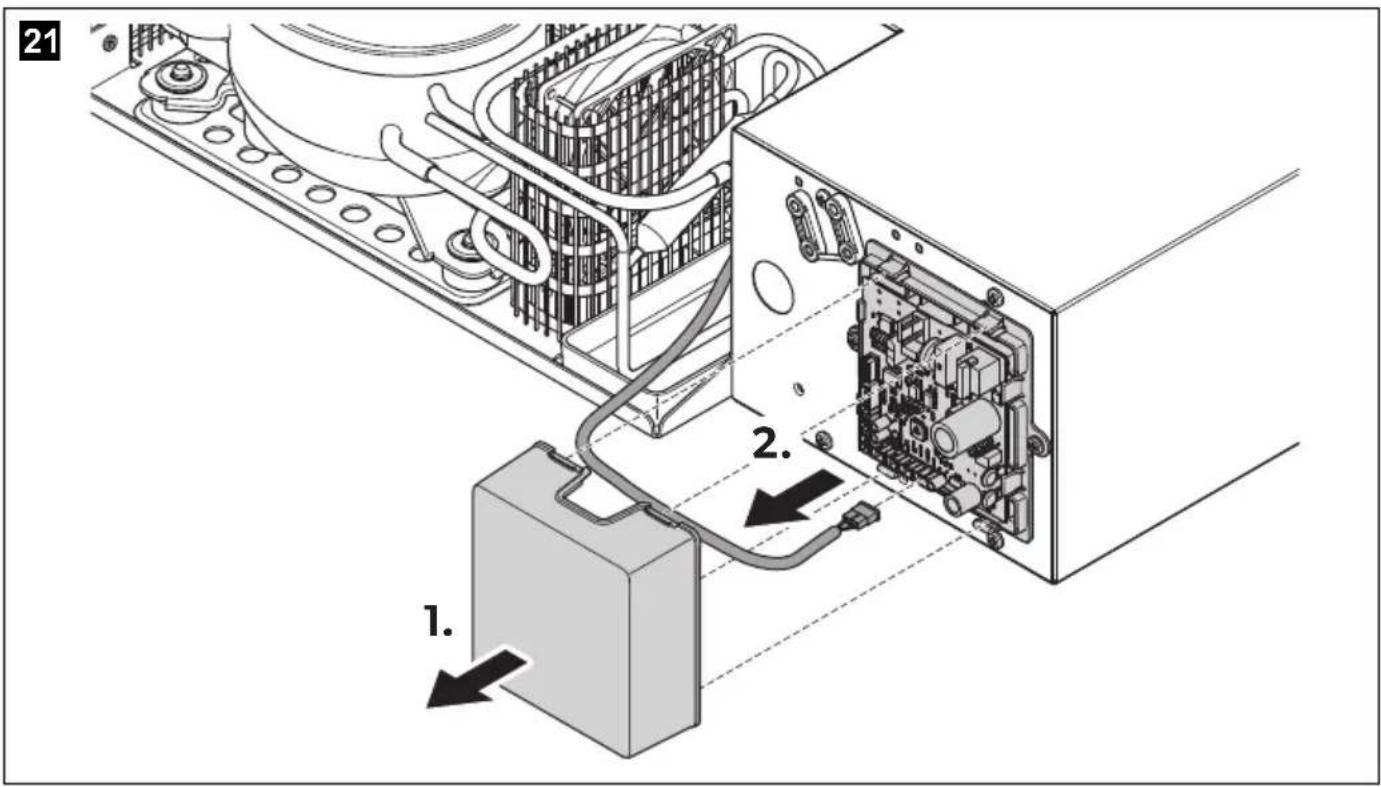
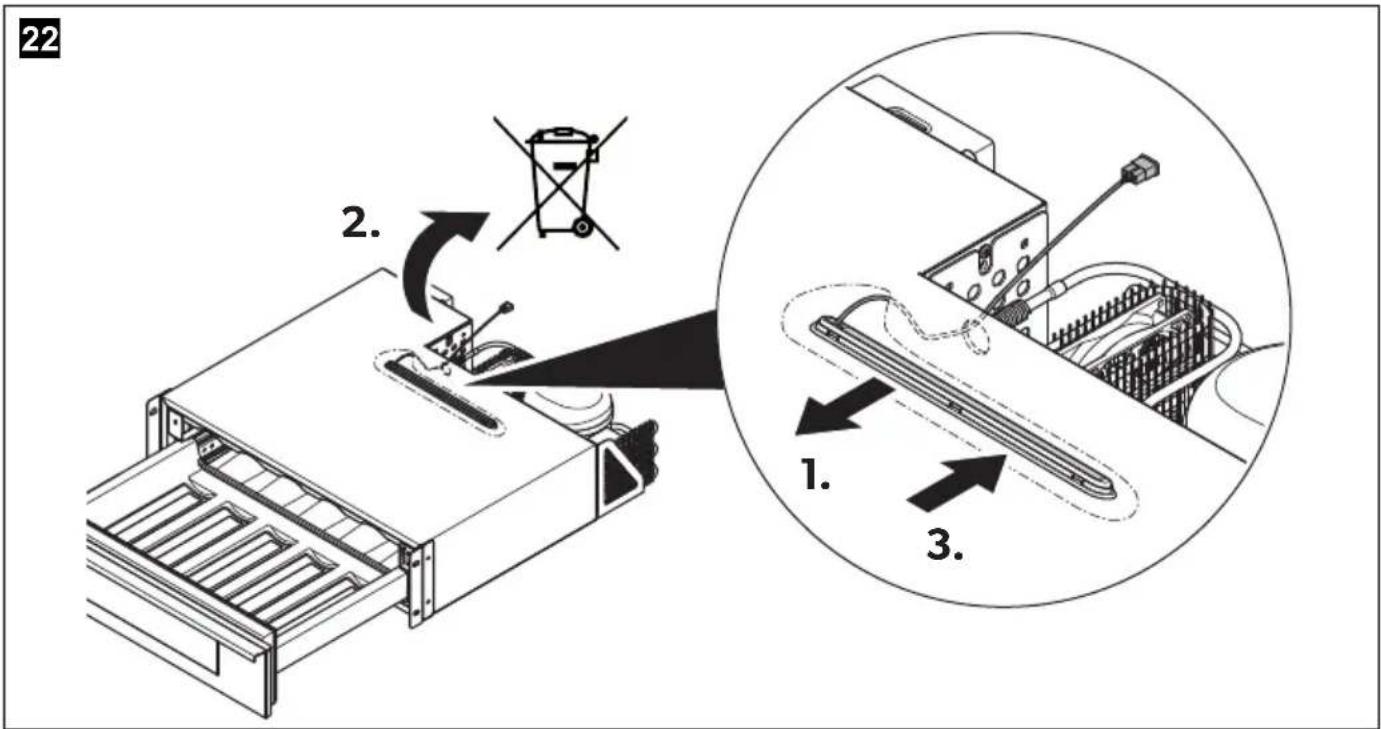
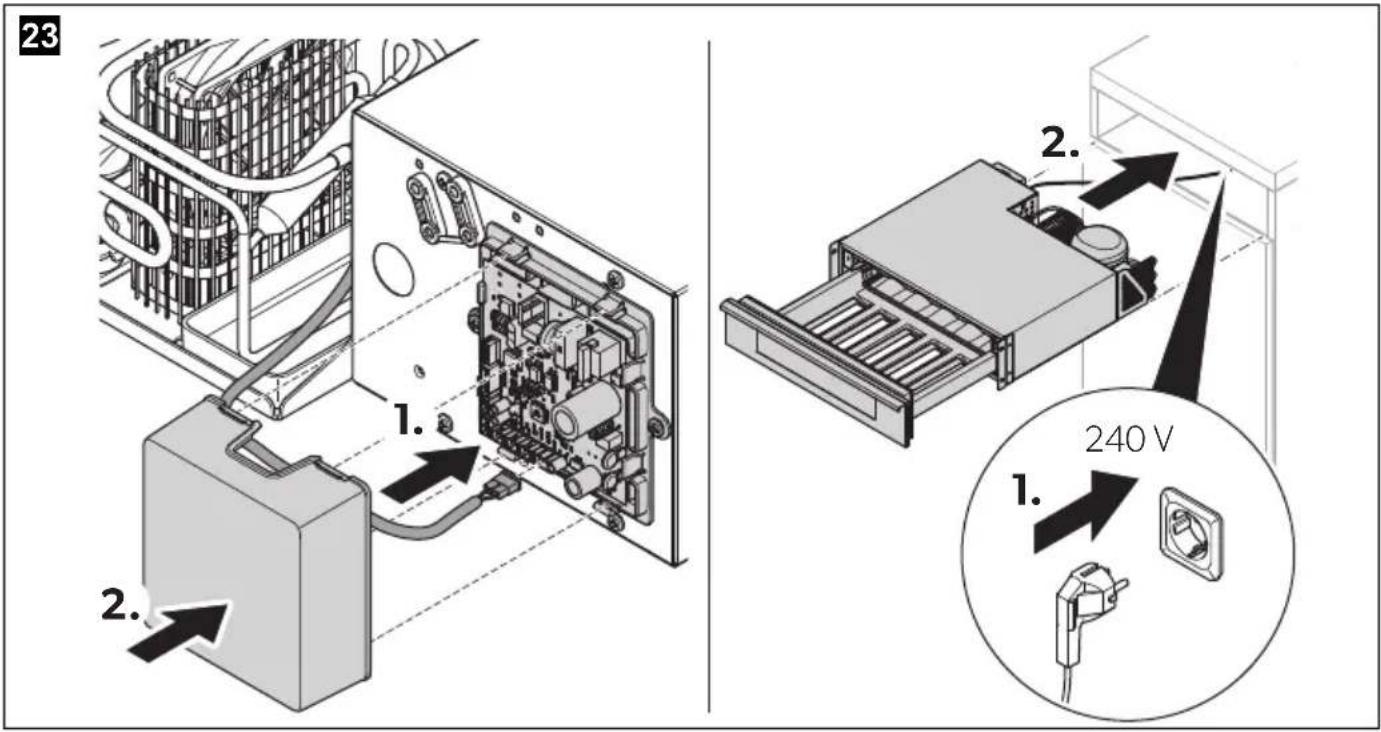
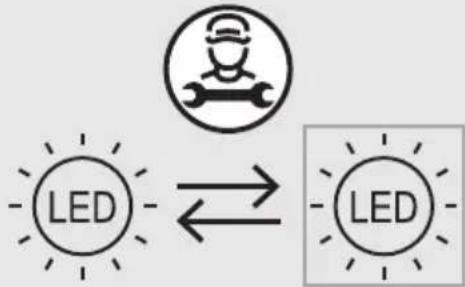
Changing the interior LED lamp

NOTICE! Damage hazard
The light source can only be replaced by the manufacturer, a service agent or similarly qualified person to avoid hazard.
flowchart
graph LR
    A["LED"] <--> B["LED"]
To change the interior LED lamp proceed as shown (fig. 20, page 12 – fig. 23, page 13).
Warranty
The statutory warranty period applies. If the product is defective, please contact your retailer or the manufacturer's branch in your country (see dometic.com/dealer).
For repair and warranty processing, please include the following documents when you send in the product:
• A copy of the receipt with purchasing date
- A reason for the claim or description of the fault Note that self-repair or non-professional repair can have safety consequences and might void the warranty.
Disposal
Recycling packaging material

Place the packaging material in the appropriate recycling waste bins wherever possible.
Recycling products with batteries, rechargeable batteries and light sources
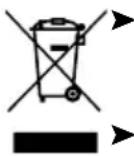
Remove any batteries, rechargeable batteries, and light sources before recycling the product.
Return defective or used batteries to your retailer or dispose of them at collection points.
Do not dispose of any batteries, rechargeable batteries, and light sources with general household waste.
If you wish to finally dispose of the product, ask your local recycling center or specialist dealer for details about how to do this in accordance with the applicable disposal regulations.
The product can be disposed free of charge.
Technical data
| DrawBar5S Draw | Bar5B DrawBar5C | ||
| Input voltage: | 220-240V~50 Hz | ||
| Rated input power: 45 W | |||
| Total volume: 15 l | |||
| Cooling capacity: | max. 17 °C (63 °F) below ambient temperatureadjustable in five steps: 5 °C, 8 °C, 11 °C, 14 °C and 17 °C(41 °F, 46 °F, 52 °F, 57 °F and 63 °F) | ||
| Climate class: N | |||
| Intended ambient temperature use: | +16 °C to +32 °C (+61 °F to +90 °F) | ||
| Noise emission: 45 dB(A) | |||
| Refrigerant: R600a | |||
| Refrigerant quantity: 10.00 g (0.02 lbs) | |||
| Dimensions W x D x H: | 554 x 548 x 141 mm(21.8 x 21.6 x 5.5 in) | 597 x 591 x 141 mm(23.5 x 23.3 x 5.5 in) | 597 x 591 x 141 mm(23.5 x 23.3 x 5.5 in) |
| Maximum internal storage load: 10.00 kg (22.05 lbs) | |||
| Weight: | 16.40 kg (36.16 lbs) | 17.20 kg (37.92 lbs) | 17.90 kg (39.46 lbs) |
| Inspection/certification: | CE UKCA | ||
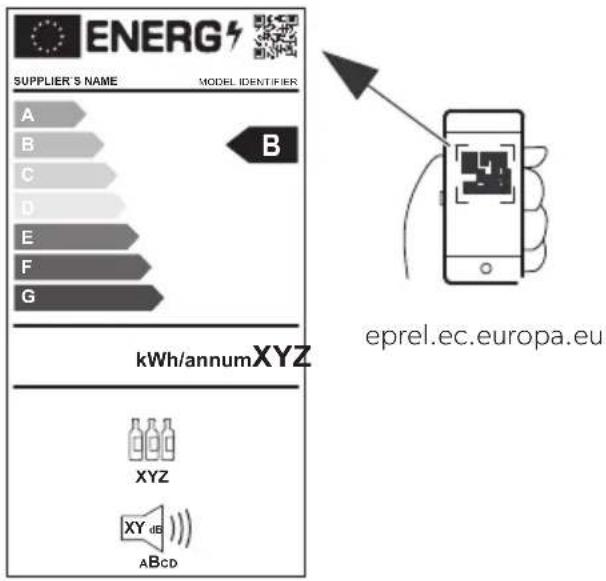
This product contains a light source of energy efficiency class F.
Further product information can be accessed via QR code on the energy label on the product or via eprel.ec.europa.eu.
flowchart
graph LR
    A["LED"] --> B["Worker Icon"]
    B --> C["LED"]
Description technique
flowchart
graph LR
    A["LED"] --> B["Robot Icon"]
    B --> C["LED"]
documents.dometic.com/?object_id=81002
Índice
WAARSCHUWING! Brandgevaar
▶Controleer regelmatig of de spons is bedekt met water (afb. 19, pagina 11).
flowchart
graph LR
    A["LED"] --> B["Worker Icon"]
    B --> C["LED"]
flowchart
graph LR
    A["LED"] --> B["Robot Icon"]
    B --> C["LED"]
flowchart
graph LR
    A["Worker Icon"] --> B["LED"]
    B --> C["Standard LED"]
documents.dometic.com/?object_id=81002
Содержание
flowchart
graph LR
    A["Worker Icon"] --> B["LED"]
    B --> C["LED"]
flowchart
graph LR
    A["LED"] --> B["Worker Icon"]
    B --> C["LED"]
flowchart
graph LR
    A["LED"] --> B["Worker Icon"]
    B --> C["LED"]
Za promjenu unutarnje LED lampice postupite na prikazani način (sl. 20, stranica 12 – sl. 23, stranica 13).
Jamstvo
Primjenjuje se zakonom propisano jamstveno razdoblje. Ako je proizvod neispravan, molimo obratite se trgovcu na malo ili podružnici proizvođača u vašoj državi (vidi dometic.com/dealer).
Za potrebe popravaka i obrade jamstva, pri slanju proizvoda priložite sljedeće dokumente:
• Presliku računa s datumom kupnje
- Razlog reklamacije ili opis kvara
dometic.com/sales-offices