
MaCave ST198D - Wine cellar DOMETIC - Free user manual and instructions
Find the device manual for free MaCave ST198D DOMETIC in PDF.

| Product Type | Wine Cellar |
| Brand | Dometic |
| Model | MaCave ST198D |
| Capacity | Up to 198 Bordeaux standard bottles |
| Temperature Zones | Two separate adjustable zones (upper: 41-55°F / 5-13°C, lower: 55-72°F / 13-22°C) |
| Temperature Range | 41°F to 72°F (5°C to 22°C) |
| Energy Efficiency Class | A+ |
| Annual Energy Consumption | 135 kWh/year |
| Climate Class | ST (ambient 61-100°F / 16-38°C) |
| Noise Emission | 46 dBA |
| Dimensions (W x D x H) | 23.4 x 24.2 x 71.3 inches (595 x 615 x 1810 mm) |
| Weight | 63 kg (approx. 139 lbs) |
| Power Supply | 115 V / 60 Hz, 15 A circuit recommended |
| Door Type | Lockable, reversible hinge (opens left or right) |
| Interior Lighting | LED with two modes: standard (on when door opens) and vitrine (constant) |
| Fan | Dynamic cooling mode (auto) and silent mode (manual) |
| Active Carbon Filter | Yes, for improved interior climate; replace annually |
| Humidity Control | Water tank on top shelf; fill to 3/4 |
| Sabbath Mode | Yes, deactivates display, lighting, and alarm for 96 hours |
| Temperature Memory | Retains settings after power loss |
| Temperature Alarm | Audible and visual warning if deviates >5°C from setpoint |
| Shelves | Reinforced storage shelves, pull-out with limit stop |
| Defrosting | Automatic |
| Maintenance | Clean interior with baking soda solution; exterior with mild detergent; keep ventilation slots clear |
| Safety | Child lock (key provided); do not use near flammable materials; keep keys away from children |
Frequently Asked Questions - MaCave ST198D DOMETIC
User questions about MaCave ST198D DOMETIC
0 question about this device. Answer the ones you know or ask your own.
Ask a new question about this device
Download the instructions for your Wine cellar in PDF format for free! Find your manual MaCave ST198D - DOMETIC and take your electronic device back in hand. On this page are published all the documents necessary for the use of your device. MaCave ST198D by DOMETIC.
USER MANUAL MaCave ST198D DOMETIC
natural_image
Diagram of a curved mechanical or fluid system with directional arrows indicating flow or movement (no text or symbols)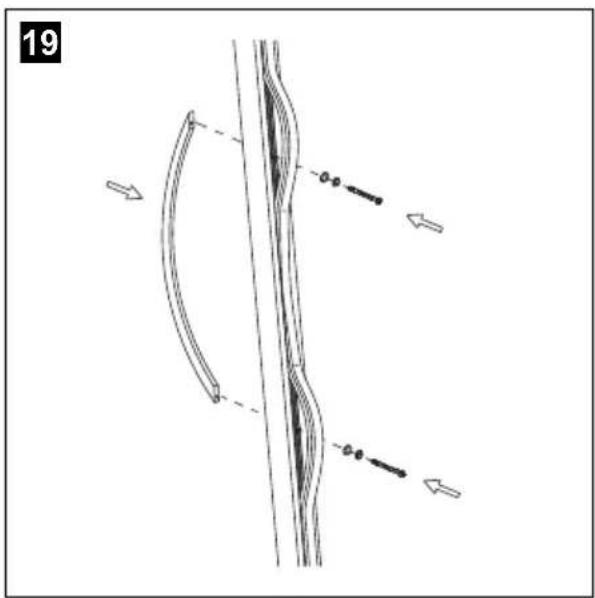
natural_image
Three technical line drawings of abacus holders arranged in trays, showing different arrangements (no text or symbols)23
S17G
A
natural_image
Front view of a multi-level refrigerator with multiple compartments (no visible text or labels)B
natural_image
Front view of a multi-tiered vertical storage unit with circular compartments and ventilation grilles (no text or symbols visible)24
A
natural_image
Technical line drawing of a multi-tiered storage unit with circular components and a vertical bar (no text or symbols)B
natural_image
Technical line drawing of a multi-tiered storage unit with circular components (no text or symbols)S24G
25
A
natural_image
Front view of a multi-level refrigerator with circular compartments (no visible text or labels)B
natural_image
Line drawing of a multi-tier refrigerator with circular compartments and ventilation grilles (no text or symbols)S46G
26
A
natural_image
Front view of a vertical rack-mounted refrigerator with multiple compartments and bottles (no visible text or labels)S118G
B
natural_image
Technical line drawing of a multi-tiered vertical storage unit with circular compartments (no text or symbols)27
ST198D
natural_image
Technical diagram of a multi-tiered storage unit with circular compartments and heat sinks (no text or symbols)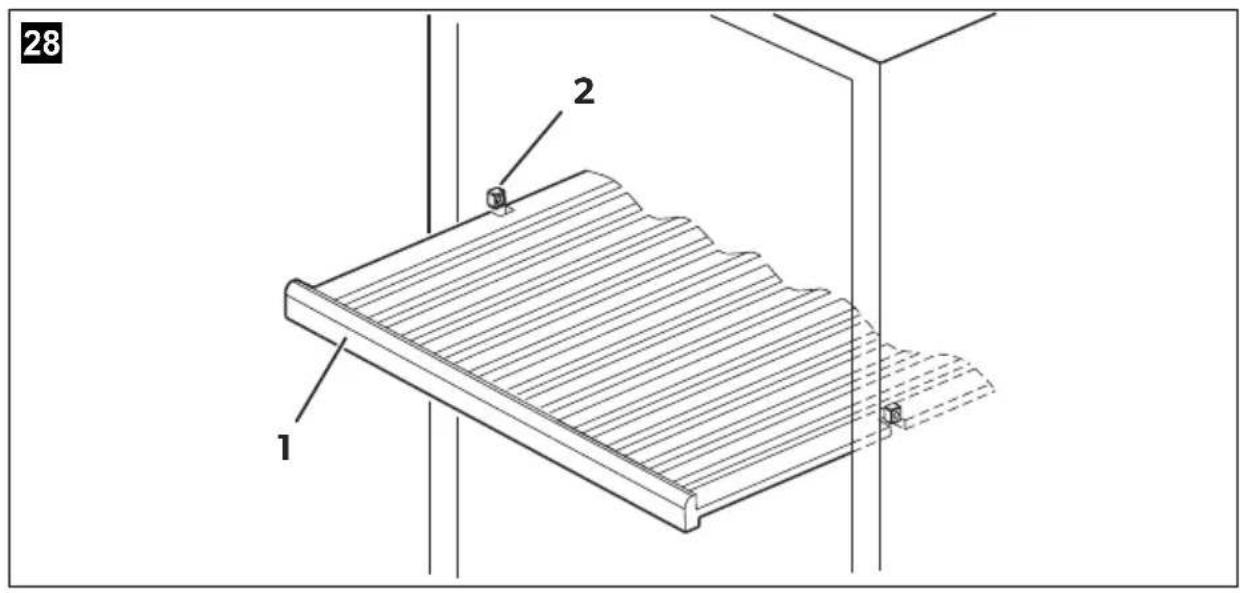
Please read this instruction manual carefully before first use, and store it in a safe place. If you pass on the product to another person, hand over this instruction manual along with it.
Contents
1 Explanation of symbols....11
2 Safety instructions....11
3 Contents of product ....13
4 Optional extras....14
5 Intended use ....14
6 Technical description ..... 15
7 Setting up and connecting the appliance .....18
8 Using the appliance ....21
9 Troubleshooting 29
10 Maintaining and cleaning the appliance . . . . . . . . . . . . . . . . . . . . . . . . . . . . . . . . . . . . . . . . . . 31
11 Guarantee....32
12 Disposal.... 32
13 Technical data.... 33
1 Explanation of symbols

WARNING!
Safety instruction: Indicates a hazardous situation that, if not avoided, could result in death or serious injury.

CAUTION!
Safety instruction: Indicates a hazardous situation that, if not avoided, could result in minor or moderate injury.

NOTICE!
Indicates a situation that, if not avoided, can result in property damage.

NOTE
Supplementary information for operating the product.
2 Safety instructions
The manufacturer accepts no liability for damage in the following cases:
• Faulty assembly or connection
- Damage to the product resulting from mechanical influences and incorrect connection voltage
• Alterations to the product without express permission from the manufacturer
• Use for purposes other than those described in the operating manual
2.1 General safety

WARNING!
- Before you start up the device for the first time, verify that the operating voltage matches the line voltage (see type plate).
- Do not operate the device if it is visibly damaged.
- This device may only be repaired by qualified personnel. Improper repairs can lead to considerable hazards.
Should your device need to be repaired, please contact customer services.
- This device can be used by children aged 8 years or over, as well as by persons with diminished physical, sensory or mental capacities or a lack of experience and/or knowledge, providing they are supervised or have been taught how to use the device safely and are aware of the resulting risks.
• Electrical devices are not toys.
Always keep the device out of the reach of children.
- Children must be supervised to ensure that they do not play with the device.
- Keep the keys out of the reach of children.
- If this device's power cord is damaged, it must be replaced by the manufacturer, customer service or a similarly qualified person in order to prevent safety hazards.
- Do not store any explosive substances, such as spray cans with propellants in the device.

CAUTION!
- Disconnect the device from the power supply – before cleaning and maintenance - if you don't use it for a longer period
- The appliance should be moved and set up by at least two people. Otherwise this could lead to back or other injuries.
- Do not place the device in direct sunlight or near any heat producing appliances (heating, stoves).

NOTICE!
• Never pull the plug out of the electrical outlet by the cord.
- Do not use accessories that have not been recommended by the manufacturer. This can lead to injury and damage to material.
2.2 Operating the device safely

WARNING!
- Never use the device in rooms where flammable materials are stored or flammable gases have built up. Sparks from the motor could ignite them.

CAUTION!
• Do not use the device with wet hands.

NOTICE!
• Only use the device in indoors, never outside.
• Never expose the device to moisture.
- Keep children and pets at a safe distance when operating the device.
- Do not place any electrical devices inside the refrigerator.
3 Contents of product
- Wine cellar
• Water tank (S17G, S24G, S46G, S118G only)
• Key (S17G, S46G, S118G, ST198D only)
• Label set (S17G, S46G, S118G, ST198D only) - Door hinge (left side)
- Operating manual
4 O p t i o n a l e
Description Ref. no.
S17G S24G S46G
Storage base 9103540117 - 9103540118
Presentation shelves (tilted) -- 9103540121
| Label set | 9103540116 – 9103540116 | |
| Active carbon filter | 9103500156 | –9103500156 |
Description Ref. no.
| S118G | ST198D | |
| Storage base 9103540119 | 9103540120 | |
| Presentation shelves (tilted) 9103540121 | - | |
| Label set | 9103540116 | 9103540116 |
| Active carbon filter | 9103500156 | 9103500156 |
| Service tray | 9103540068 | 9103540068 |
5 Intended use
The device is a wine cellar. It is only intended for storing wine.
Only bottles that are closed may be stored in the device.
6 Technical description
The wine cellar is available in five models:
• S17G:
with capacity for up to 17 Bordeaux standard bottles
• S24G:
with capacity for up to 24 Bordeaux standard bottles
• S46G:
with capacity for up to 46 Bordeaux standard bottles
• S118G: with capacity for up to 118 Bordeaux standard bottles
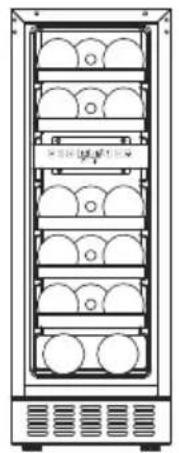
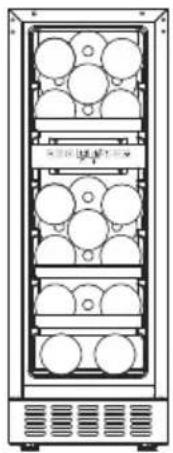
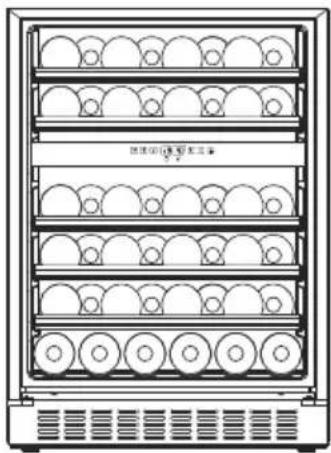
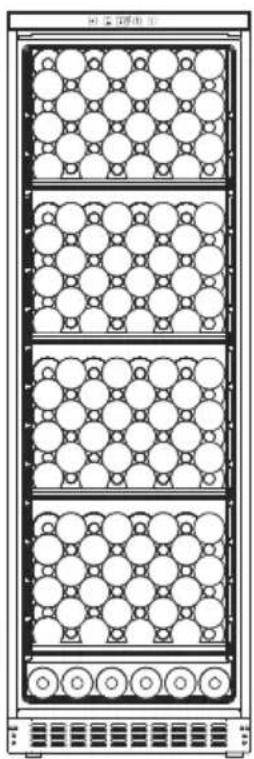
• ST198D: with capacity for up to 198 Bordeaux standard bottles
S17G, S24G, S46G and S118G: Factory fitted with shelves.
S17G, S46G and S118G: You can increase the capacity by using the optional accessory of reinforced storage shelves.
ST198D: Factory fitted with reinforced storage shelves.
You can find information on storage of bottles in chapter "Storing bottles" on page 21.
S24G has an adjustable temperature zone.
S17G, S46G, S118G and ST198D have two separate adjustable temperature zones. The temperature zones are chilled or heated automatically to reach or maintain the temperature that is set.
The temperature can be set in 1^ C or 1^ F increments using sensor buttons.
The appliance has:
- Sensor buttons: Just touch slightly to select the required function.
• automatic defrosting
• a UV impervious door - S17G, S46G, S118G and ST198D: an active carbon filter for improving the inner climate
- a fan for maintaining a constant inner climate, such as in a cellar (dynamic cooling mode)
• S17G, S46G and S118G: a lockable glass door with a reversible door hinge
S24G: glass door with a reversible door hinge
ST198D: a lockable door with a reversible door hinge
• S17G, S46G and S118G: a replaceable decorative film for the glass door
• detachable shelves for storing the bottles
- a Sabbath mode
• LED interior lighting with two operating modes
- a temperature memory function: The set temperature is also saved when the unit is switched off.
- a temperature monitor: A warning signal sounds and the temperature display flashes if the interior temperature noticeably deviates from the one set.
Overview (S17G, S46G, S118G, ST198D)
No. in
fig. 1,
Designation
page 2
1 Upper temperature zone
2 Control panel
3 Cooling area divider
4 Lower temperature zone
5 L o c k
6 Ventilation slots
7 Adjustable feet
Overview (S24G)
No. in
fig. 2,
Designation
page 2
1 Control panel
2 Cooling area
3 ST98D: Lock
4 ST98D: Ventilation slots
5 ST98D: Adjustable feet
Control elements (S17G, S46G, S118G, ST198D)
No. in
fig. 3,
page 3
Symbol Description
1 On/off switch
2 Increases the set temperature of the upper temperature zone by 1^ or 1^
3 Decreases the set temperature of the upper temperature zone by 1^ C or 1^ F
4 Display indicates the current temperature of the upper temperature zone
5 Display indicates the current temperature of the lower temperature zone
6 Increases the set temperature of the lower temperature zone by 1^ C or 1^ F
7 Decreases the set temperature of the lower temperature zone by 1^ C or 1^ F
8 Switches the interior light on or off
Control elements (S24G)
No. in
fig. 4,
page 3
Symbol Description
1 On/off switch
2 Switches the interior light on or off
3 – Display indicates the current temperature
4 Increases the set temperature of the upper temperature zone by 1^ or 1^
5 Decreases the set temperature of the upper temperature zone by 1^ C or 1^ F
7 Setting up and connecting the appliance
7.1 Notes on setting up the appliance
S17G, S46G, S118G and ST198D can be placed free-standing.
When selecting the location, observe the following instructions:
- The ambient temperature should be in accordance with the climate class mentioned for your country in the supplementary brochure. Otherwise, it is possible that the inner temperature you set cannot be reached or maintained. This could also be the case if there are extreme fluctuations in the ambient temperature.
- The appliance should stand in the coldest part of the room, away from heat sources (ovens, heating devices or radiators).
• The location must not be damp or wet. - The appliance must not be exposed to direct sunlight. This can damage the acrylic coating and lead to higher power consumption.
- The ground must be level and sufficiently stable to support the wine cellar at full capacity.
- The appliance must be sufficiently ventilated. The ventilation slots on the front of the appliance must not be obstructed.
- Note the information on the electrical connection, see chapter "Notes on the electrical connections" on page 21.
- Remove all the inner and outer packaging material before setting up.
• Make sure the appliance is level by adjusting the feet.
7.2 Notes on installing the appliance

NOTICE!
- When mounting ensure that the ventilation openings are kept free. Covered ventilation openings result in an increase of electricity consumption and can damage the device.
- When pushing the appliance into place, ensure that the mains cable does not get pinched.
S17G and S46G can be mounted into a kitchen plinth beneath the kitchen counter.
S24G, S118G and ST198D can be mounted into a kitchen cabinet.
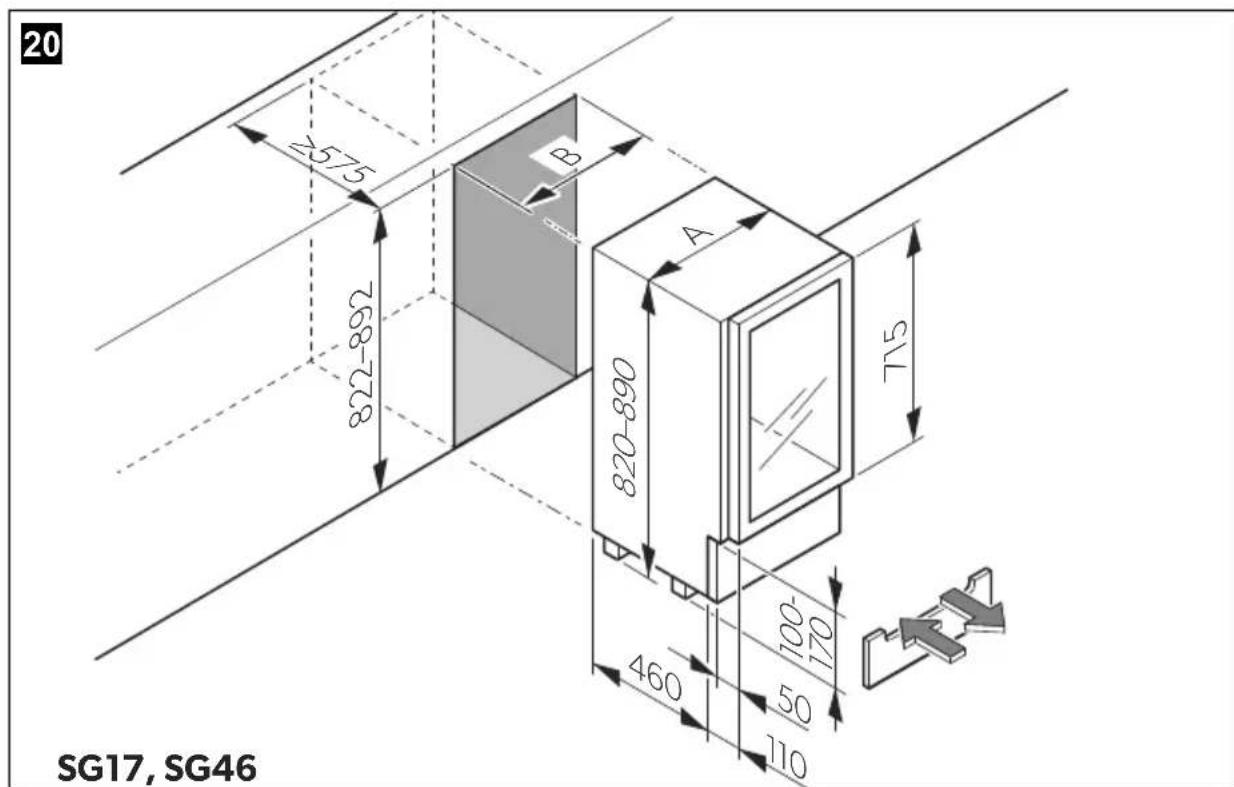
S17G and S46G installation (fig. 20, page 5)
▶Check the dimensions (in mm):
Width Depth Height
S17G 300 min. 575 822–892
S46G 600 min. 575 822–892
▶If using a plinth:
Ensure that the ventilation openings in the plinth have a cross-section of at least 300 cm^2 .
S118G and ST198D installation
▶Check the dimensions (in mm):
| Width Depth Height | ||||
| S118G | 600 | min. | 575 | 1815 |
| ST198D | 600 min. | 575 1815 | ||
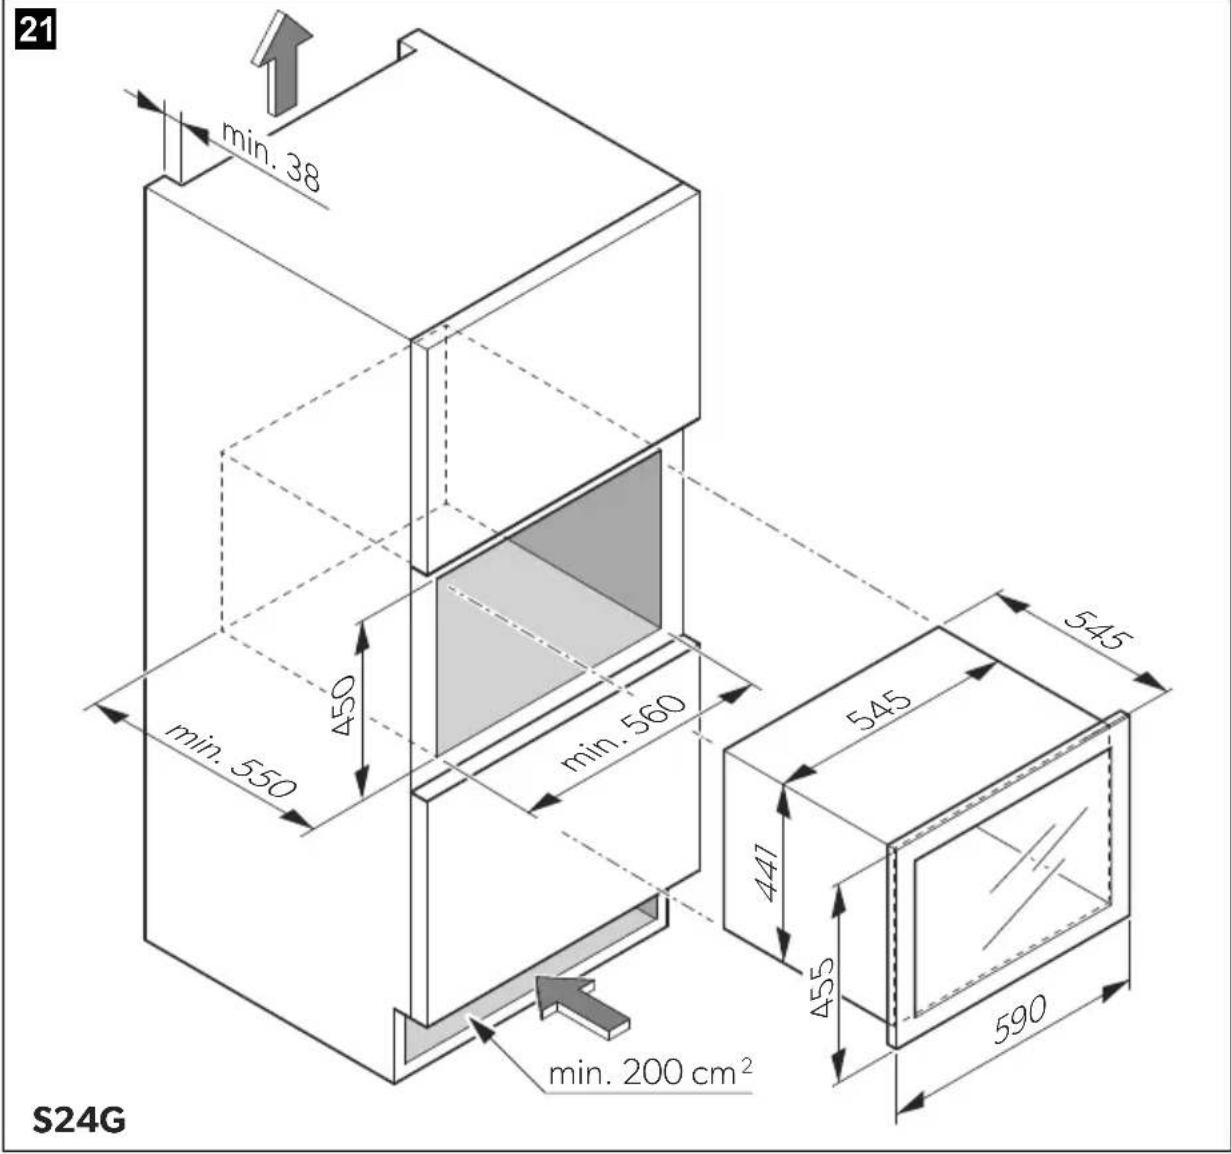
S24G installation (fig. 21, page 6)
▶ Check the dimensions (in mm):
| Width Depth Height | |||
| S24G | 560 | 550 | 450 |
• Warmed air must be dissipated via a ventilation shaft at the rear side.
• The ventilation shaft must have a cross-section of at least 200 cm^2 .
- The plastic seals included are mounted to seal right and left between the device and the kitchen unit.
7.3 Reversing the door
You can also change the hinge of the door, so that it opens to the left rather than the right.
S17G and S46G
▶ Change the door as described in fig. 5, page 3 to fig. 11, page 4.
▶ Fit the door handle on the other side as described in fig. 18, page 5 to fig. 19, page 5.
S118G
▶ Change the door as described in fig. 12, page 4 to fig. 15, page 4.
▶ Fit the door handle on the other side as described in fig. 18, page 5 to fig. 19, page 5.
ST 198D
▶ Change the door as described in fig. 12, page 4 to fig. 15, page 4. Turn the door by 180^ .
▶Move the closing solenoid to the opposite position.
S24G
▶ Change the door as described in fig. 16, page 5 to fig. 17, page 5. Turn the door by 180^ .
7.4 Notes on the electrical connections

NOTICE!
Leave the appliance to stand upright for about 2 hours after transporting, before you connect it to the power supply.
Otherwise this could cause faults in the cooling system.
Observe the following when connecting the appliance:
- Connect this appliance to a 15 A circuit.
- Check that the voltage specification on the type plate is the same as that of the power supply.
- If you are using an extension cord, it must be suitable for the values which correspond to the device, see chapter "Technical data" on page 33.
- Do not use an extension cord or a multiple power socket that can be switched off with just one switch.
- The cord must rest securely behind the appliance and not be allowed to lie or hang unprotected.
8 Using the appliance
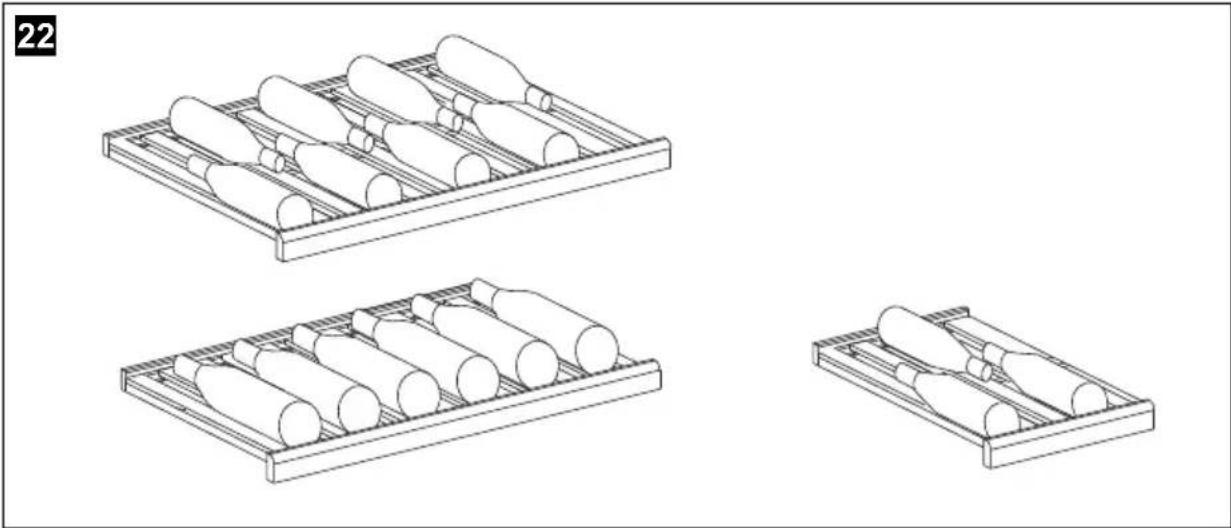
8.1 Storing bottles

NOTICE!
Be sure to use reinforced storage shelves (accessory) if you want to stack bottles.
Notes on the use
- Only store wine in wine bottles that are closed and still sealed.
• Do not overload the device.
• Fig. 22, page 6, shows you how you can store the bottles. - Do not cover the shelves with aluminium foil or any other objects, as this obstructs the air circulation.
- If the device has been empty for a long time, disconnect it from the power supply and clean it thoroughly. Leave the door open slightly to allow the air to circulate and prevent condensation, mould or odours from building up.
- After a power outage or if the appliance has been switched off, wait 3 to 5 minutes before switching on the appliance again.
The following variants are possible:
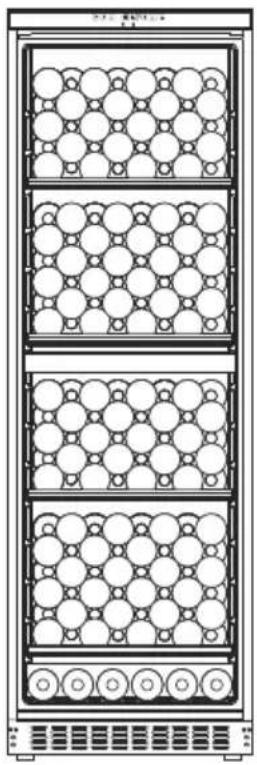
• S17G:
- with shelves (fig. 23 A, page 7)
– with storage shelves (accessory) (fig. 23 B, page 7)
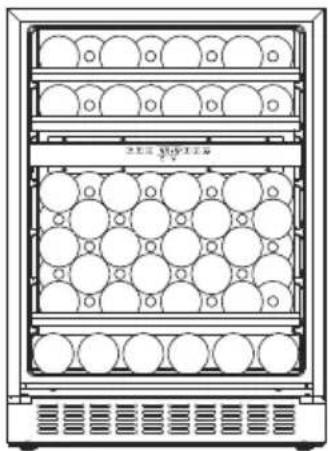
S24G:
– with 3 shelves (fig. 24A, page 7)
- with 2 storage shelves (fig. 24 B, page 7)
S46G:
- with shelves (fig. 25 A, page 7)
– with storage shelves (accessory) (fig. 25 B, page 7)
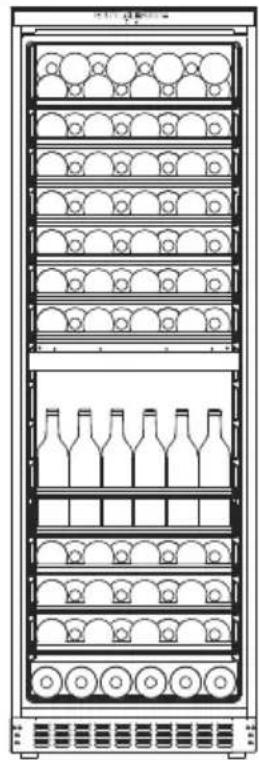
• S118G:
– with shelves (fig. 26 A, page 8)
– with storage shelves (accessory) (fig. 26 B, page 8)
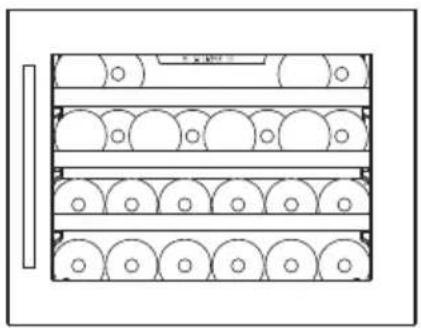
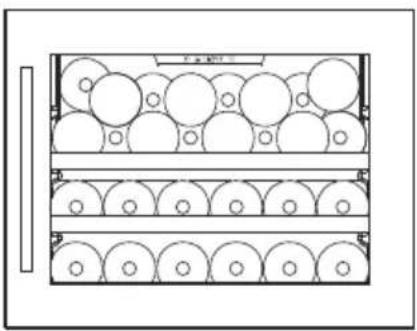
• ST198D: (fig. 27, page 8)
8.2 Energy saving tips
- Do not open the device more often than necessary.
- Do not leave the door open for longer than necessary.
- Clean dust and dirt from the condenser at regular intervals.
8.3 Using the appliance
Quick reference
| Function Press the button | |
| Switches on the appliance | >5s |
| Switches off the appliance | >5s |
| Removes the key lock | + + 5s |
| Changes the unit (°C / °F) | - >5s |
| Indicates the set temperature of the temperature zone | + or 1s |
| Increases the temperature in the temperature zone by 1 °C or 1 °F | + <1s |
| Decreases the temperature in the temperature zone by 1 °C or 1 °F | <1s |
| Switches off the fan (silent mode) | + >5s |
| Switches on the fan (dynamic cooling) | >5s |
| Switches interior light on/off | - <1s |
S118G, ST198D: Key lock
If the buttons are not touched for 2 minutes or longer, the key lock is activated automatically.
▶ To remove the key lock, press the + and buttons for at least 5 seconds.
Sets the unit (°C / °F)
You can select the temperature in Fahrenheit or Celsius.
▶To do this, press the button for 5 seconds.
√The unit is converted and the display shows the temperature in the other form.
Setting the temperature
S24G has an adjustable temperature zone. The temperature can be set between 5 °C and 22 °C (41 °F and 72 °F).
S17G, S46G, S118G and ST198G have two separate adjustable temperature zones. The temperature of each zone can be set between 5 °C and 22 °C (41 °F and 72 °F).
The lower temperature zone is ideal for storing white and red wine at 13^ C to 22^ C ( 55^ F to 72^ F).
The upper temperature zone is suitable for storing champagne and white wine at a setting of 5 °C to 13 °C (41 °F to 55 °F).

NOTE
- The temperature for the lower temperature zone must always be just as high or higher than the upper temperature zone.
- The appliance functions at its best if the difference in temperature between the two zones is at least 4 °C.
▶ Press the + or button to set the temperature.
√The display flashes while you make the setting.
√ After the temperature has been set, the display shows the current inner temperature of the particular temperature zone.

NOTE
When using the appliance for the first time or if it has not been used for a long time, the inner temperature could differ from the one you have set. The temperature display flashes as long as this is the case.
Once the set temperature has been reached, the temperature display remains lit.
Checking the set temperature
This is how to display the set temperature:
▶Press the or button briefly.
√The set temperature is shown in the display for 5 seconds. Then the display shows the current inner temperature again.

NOTE
In the event of an interruption to the power supply (power failure, switch over) the unit saves the previous temperature settings.
Temperature monitoring
A warning signal sounds and the temperature display flashes:
- if the inner temperature of a zone deviates from the set temperature by more than 5 °C.
• if the power supply has been disconnected for a long time.
• if the door has not been shut properly.
• if the door is open for more than 60 seconds.
This prevents the temperature from falling or rising unnoticed, which could affect the quality of the wine.
Once the unit has reached the set temperature, the warning signal stops and the temperature display stops flashing.
To switch off the warning signal prematurely:
▶Press the button briefly.
√The temperature display flashes until the set temperature is reached. The display is then illuminated constantly and indicates that the alarm system is active again.
Using the Sabbath mode
In this mode, the display, interior lighting and warning signal for the temperature monitor are deactivated. The refrigeration continues as usual.
To switch on the Sabbath mode:
▶Press the ⏻ and 🔍 buttons simultaneously for at least 5 seconds.
√The temperature display flashes 4 times. The Sabbath mode is activated. The Sabbath mode switches off automatically after 96 hours.
To switch off the Sabbath mode:
▶Press the ⏻ and ⚙️ buttons simultaneously for at least 5 seconds.
√The temperature display flashes 4 times. The Sabbath mode is deactivated. The display, interior lighting and warning signal for the temperature monitor are activated.
Setting the LED interior lighting
The unit has two different modes for lighting:
- Standard mode: The interior is illuminated when the door is opened.
• Vitrine mode: The interior is illuminated constantly.
To switch between standard and vitrine modes:
▶Press the 🔍 buttons briefly.
Set fan mode (Dynamic Cooling Mode/Silent Mode)
The fan is switched on (Dynamic Cooling Mode) by default to ensure a homogeneous climate in a temperature zone. The fan operates automatically to regulate the humidity and temperature. The fan can be switched off (Silent Mode) once the set temperature has been reached.
This is how to switch on the fan (Dynamic Cooling Mode):
▶Press the button for > 5 seconds.
√5 acoustic signals are emitted. The fan is switched on (Dynamic Cooling Mode).
This is how to switch off the fan (Silent Mode):
▶Press the button for > 5 seconds.
√3 acoustic signals are emitted. The fan is switched off (Silent Mode).
Cabinet shelves
The shelves can be pulled out by a third so that you can reach the wine bottles easily. The shelves have a limit stop to prevent them from being pulled out too far.
▶ Make sure that the door is fully open when you pull out the shelves on roller-bearings. Otherwise the door seal can be damaged.
Proceed as follows to remove one of the shelves from the guide rail (fig. 28, page 9):
▶ Pull out the shelf (1) exactly in the position where the recess is, just above the plastic ledge (2) on the inner side of the device.
▶Remove the shelf.
Make sure that the recesses on the shelf fit on the plastic ledges (2) when putting in the shelf.
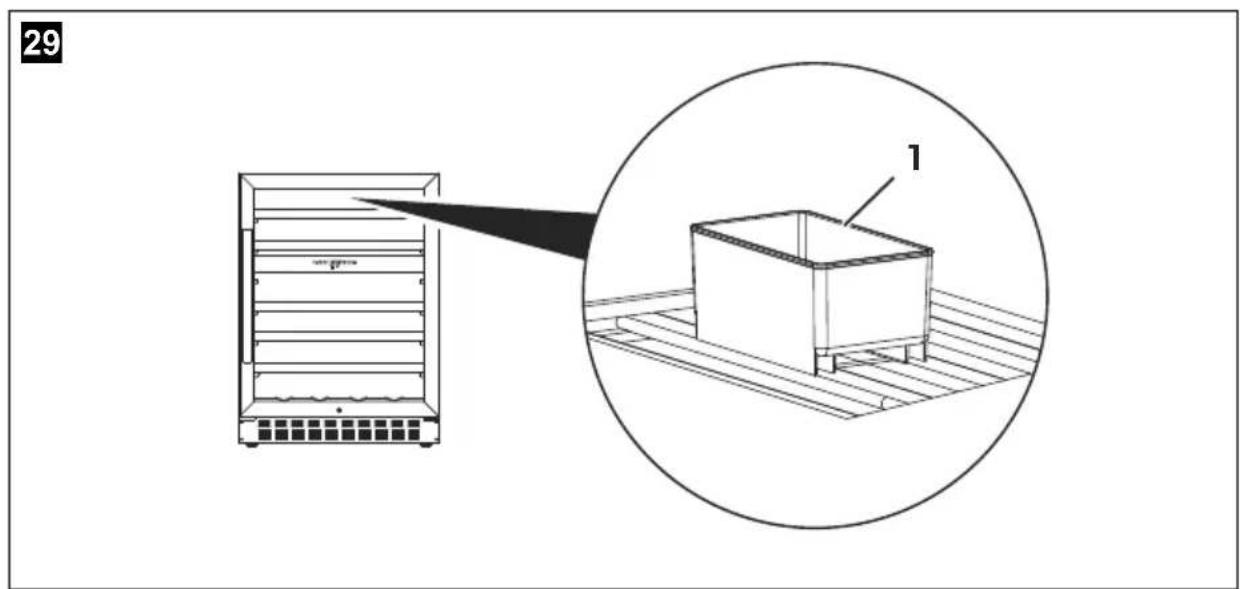
Checking the water level (humidity control)
▶ Check the level of water in the container (fig. 29 1, page 9) on the top shelf regularly.
▶ Fill the water container 34 full with water and place it on the grid on the top shelf. Make sure that the water container is securely positioned on the grid so that it cannot tip over.
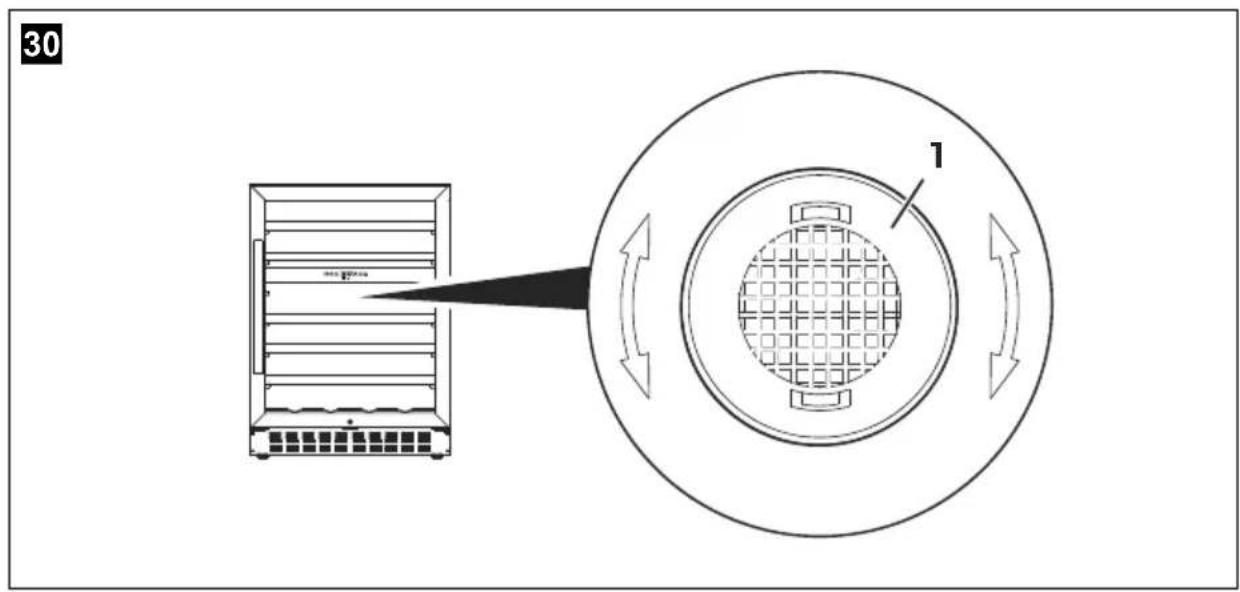
Replacing the active charcoal filter
Replace the active charcoal filter with a new one once a year.
▶ Turn the filter (fig. 30 1, page 9) 90^ clockwise or anti-clockwise and remove it.
▶Insert the new filter.
▶ Turn the filter 90^ clockwise or anti-clockwise until it clicks into position.
8.4 Procedure in the event of a power failure or if left unattended
Power failure
A short power failure will not unduly affect the inner temperature as long as you do not open the door too frequently.
If the power is off for a long time, carry out the appropriate action to protect the contents of your wine refrigerator.
Short periods of operator absence
Leave the device operating if you are absent for less than 3 weeks.
Long periods of operator absence
▶If you leave the device unused for several months, remove the contents.
▶Switch off the unit and disconnect it from the power supply.
▶Clean and dry the insides thoroughly.
Leave the door ajar to prevent odours and mould from forming.
8.5 Moving the device
▶Remove the contents.
▶Tape down all the shelves.
▶Turn the adjustable feet all the way in so that they are not damaged when moving.
▶Tape the door closed.
▶Only carry the appliance in an upright position.
Avoid tipping the appliance.
Protect the exterior with a blanket or something similar.
9 Troubleshooting
If you are unable to solve a problem yourself, get in touch with customer services (see address list overleaf)
Problem Possible cause Remedy
| Appliance does not work | Appliance is not connected to a power supply | Connect the appliance |
| Appliance is switched off Switch on the appliance | ||
| Circuit breaker or fuse has blown | Switch on circuit breaker or replace fuse | |
| Appliance is not cold enough | Temperature is not set properly | Check the set temperature |
| The ambient temperature could require a higher temperature setting | Set a higher temperature | |
| Door was opened frequently | Do not open the door more often than necessary | |
| Door was not closed properly | Close door properly | |
| Door is not hermetically-sealed | Check the door seal and clean or replace | |
| Appliance switches itself on and off | Room temperature is higher than average. | Put the appliance in a cooler place |
| The cabinet was recently replenished with new bottles | Leave the appliance to work for a while until the set temperature has been reached. | |
| Door was opened frequently | Do not open the door more often than necessary | |
| Door was not closed properly | Close door properly | |
| Door is not hermetically-sealed | Check the door seal and clean or replace | |
Problem Possible cause Remedy
| The light does not work. Appliance is not connected to a power supply | Connect the appliance | |
| Circuit breaker or fuse has blown | Switch on circuit breaker or replace fuse | |
| The light was switched off on the control panel. | Switch on the light | |
| The appliance vibrates The appliance is not properly level | Level the appliance with the adjustable feet | |
| The appliance seems to make a lot of noise | The noise is probably caused by the refrigerant, which is normal. At the end of each cycle, you will hear noises made by the flow of refrigerant.If temperature fluctuations occur, the contraction and expansion of the inner walls may cause popping and cracking noises. | |
| The appliance is not properly level | Level the appliance with the adjustable feet | |
| The door does not close properly | The appliance is not properly level | Level the appliance with the adjustable feet |
| The door hinge was changed incorrectly | Check the door hinge and reassemble correctly | |
| The door seal is dirty Clean the door seal | ||
| The shelves are not fitted correctly | Check the shelves and refit correctly | |
| LED indicates E1, E2 or E7 | The temperature sensor for the fan inside the appliance shows an error | This can only be repaired by an authorised repair centre. |
10 Maintaining and cleaning the appliance

CAUTION!
Always disconnect the plug before you clean and service the appliance.

NOTICE!
- Never clean the appliance under running water or in dishwater. Do not use abrasive cleaning agents or hard objects during cleaning as these can damage the appliance.
- Make sure that the air inlet and outlet vents on the unit are free of any dirt, so that heat from the interior can be released and the unit is not damaged.
All the shelves can be removed for optimum cleaning, see chapter "Cabinet shelves" on page 27.
▶Switch off the appliance and disconnect the plug.
▶ Wash the inside with a solution of warm water and baking powder. This should be about 2 tablespoons of baking powder to half a litre (half a quart) of water.
▶Clean the shelves with mild detergent.
▶Wipe the control panel with a slightly damp cloth.
▶Wash the outside of the device with warm water and a mild detergent. Then wipe it down with clean water and dry the surface with a cloth.
11 Guarantee
The statutory warranty period applies. If the product is defective, please contact your retailer or the manufacturer's branch in your country (see the back of the instruction manual for the addresses).
For repair and warranty processing, please include the following documents when you send in the device:
• A copy of the receipt with purchasing date
• A reason for the claim or description of the fault
12 Disposal
Place the packaging material in the appropriate recycling waste bins wherever possible.

If you wish to finally dispose of the product, ask your local recycling centre or specialist dealer for details about how to do this in accordance with the applicable disposal regulations.
13 Technical data
| S17G S24G S46G | |||
| Temperature range: | +5 °C to 22 °C (+41 °F to 72 °F) | ||
| Category: 2 | |||
| Energy efficiency class: A B A | |||
| Power consumption: 138 kWh/annum 190 kWh/annum 145 kWh/annum | |||
| Climatic class: | ST (Ambient temperature: +16 °C to 38 °C/ +61 °F to 100 °F) | ||
| Noise emission: | 45 dBA | 44 dBA | 45 dBA |
| Dimensions W x D x H in mm / in inches (including handle): | 295 x 615 x 820 / 11.6 x 24.2 x 32.3 | 590 x 608 x 455 / 23.2 x 24 x 17.9 | 595 x 615 x 820 / 23.4 x 24.2 x 32.3 |
| Capacity (Bordeaux type bottles): | 17 | 24 | 46 |
| Weight: | 29 kg | 27 kg | 50 kg |
| S118G S198G | |||
| Temperature range: | +5 °C to 22 °C (+41 °F to 72 °F) | ||
| Category: 2 | |||
| Energy efficiency class: | B | A+ | |
| Power consumption: 225 kWh/annum 135 kWh/annum | |||
| Climatic class: | ST (Ambient temperature: +16 °C to 38 °C/ +61 °F to 100 °F) | ||
| Noise emission: 46 dBA | 46 dBA | ||
| Dimensions W x D x H in mm / in inches (including handle): | 595 x 615 x 1810 / 23.4 x 24.2 x 71.3 | 595 x 615 x 1810 / 23.4 x 24.2 x 71.3 | |
| Capacity (Bordeaux type bottles): | 118 | 198 | |
| Weight: | 94 kg | 63 kg | |
You find information for the country versions in the supplementary brochure.
6 Description technique
dometic.com/sales-offices

- Contents
- Explanation of symbols
- WARNING!
- CAUTION!
- NOTICE!
- NOTE
- Safety instructions
- General safety
- • Electrical devices are not toys.
- Operating the device safely
- Contents of product
- O p t i o n a l e
- Description Ref. no.
- S17G S24G S46G
- Intended use
- Technical description
- The appliance has:
- Overview (S17G, S46G, S118G, ST198D)
- Overview (S24G)
- Control elements (S17G, S46G, S118G, ST198D)
- Control elements (S24G)
- Setting up and connecting the appliance
- Notes on setting up the appliance
- Notes on installing the appliance
- S17G and S46G installation (fig. 20, page 5)
- Width Depth Height
- S118G and ST198D installation
- S24G installation (fig. 21, page 6)
- Reversing the door
- S17G and S46G
- S118G
- ST 198D
- S24G
- Notes on the electrical connections
- Using the appliance
- Storing bottles
- Notes on the use
- • S17G:
- S24G:
- S46G:
- • S118G:
- Energy saving tips
- Using the appliance
- S118G, ST198D: Key lock
- Sets the unit (°C / °F)
- Setting the temperature
- Checking the set temperature
- Temperature monitoring
- Using the Sabbath mode
- Setting the LED interior lighting
- Set fan mode (Dynamic Cooling Mode/Silent Mode)
- Cabinet shelves
- Checking the water level (humidity control)
- Replacing the active charcoal filter
- Procedure in the event of a power failure or if left unattended
- Power failure
- Short periods of operator absence
- Long periods of operator absence
- Moving the device
- Troubleshooting
- Maintaining and cleaning the appliance
- Guarantee
- Disposal
- Technical data
- Description technique
Brand : DOMETIC
Model : MaCave ST198D
Category : Wine cellar