
KSK 6300 - Fridge MIELE - Free user manual and instructions
Find the device manual for free KSK 6300 MIELE in PDF.

Frequently Asked Questions - KSK 6300 MIELE
User questions about KSK 6300 MIELE
0 question about this device. Answer the ones you know or ask your own.
Ask a new question about this device
Download the instructions for your Fridge in PDF format for free! Find your manual KSK 6300 - MIELE and take your electronic device back in hand. On this page are published all the documents necessary for the use of your device. KSK 6300 by MIELE.
USER MANUAL KSK 6300 MIELE
KSK 6300 Side by Side Kit
Inhalt
AU/en. 3
BE/nl 8
BE/fr 13
CH/de. 18
CH/fr 23
CH/it 28
CZ/cs 33
DE/de....38
DK/da 43
EE/et 48
ES/es 53
Fl/fi. 58
FR/fr 63
GR/el 68
HU/hu 73
HR/hr 78
IT/it. 83
LV/lv 88
LT/lt 93
NL/nl 98
NO/no 103
PL/pl 108
PT/pt 113
RO/ro 118
RS/sr 123
RU/ru 128
SE/sv 133
Sl/sl 138
TR/tr....143
UK/ua. 148
HK/hk 153
You can connect any two identical models as follows using the side-by-side installation kit:
- KWT 6312 UG(S)
- KWT 6321 UG
- KWT 6322 UG
Models KWT 6312 UG(S) and KWT 6322 UG can also be connected.
Before installation
To avoid the risk of personal injury or damage to the appliance, it is essential to read these installation instructions as well as the Operating instructions for your appliance before it is installed and used for the first time.
Caution!
This appliance must be built in, otherwise it could tip up.
It is essential that all installation work is carried out by two people.
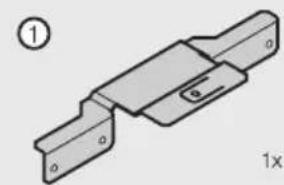
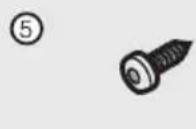
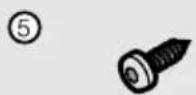
Depending on the niche, the following parts may be required for side-by-side installation:
- Connecting bracket with securing tab ① (connects appliances under a wooden worktop)
- Connecting bracket without securing tab ② (connects appliances under worktops which cannot be screwed into)
- Connecting bracket ③ (connects appliances on the front at the bottom)
- Connecting clamps ④ (connects appliances at the back)
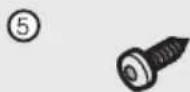
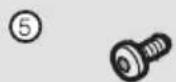
- Screws for the connecting clamps ⑤
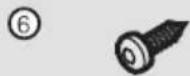
- Screws for securing the connecting bracket ⑥
natural_image
Mechanical component diagram showing a bracket and mounting flange assembly (no text or symbols)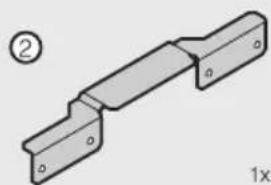
natural_image
Technical drawing of a mechanical bracket component (no text or symbols)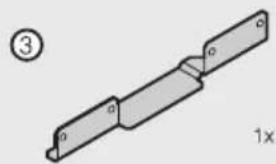
natural_image
Mechanical part diagram showing a bracket with mounting holes and a 1x scaling indicator (no text or symbols)
5x
The following tools are required for side-by-side installation:
- A selection of Torx screwdrivers,
- Drill bits of various sizes,
- Spirit level
- Tape measure
- Spanner wrench (supplied with the appliance)
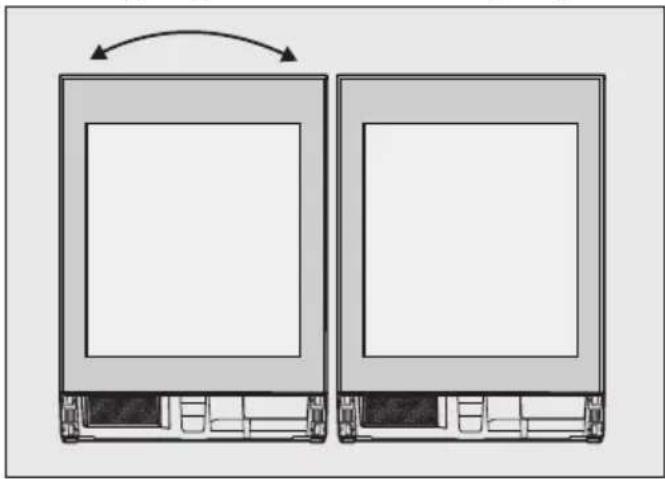
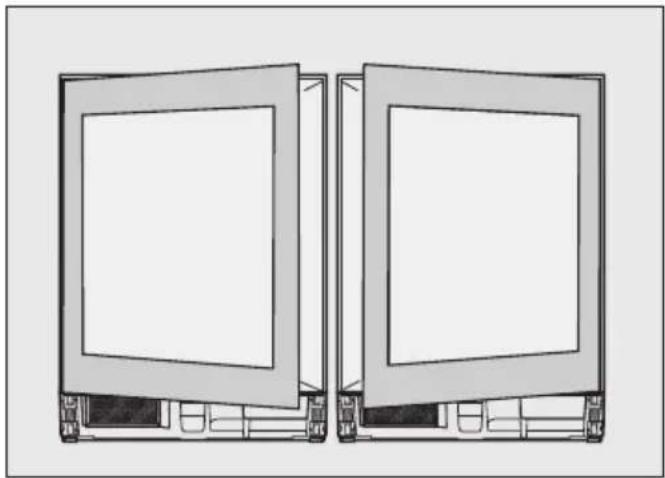
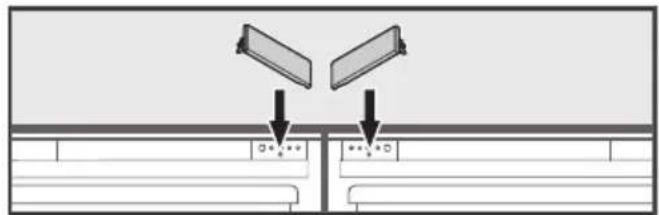
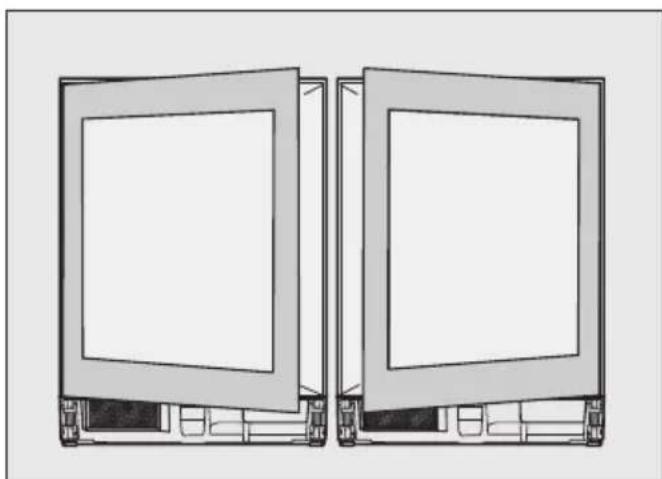
Changing the door hinging
natural_image
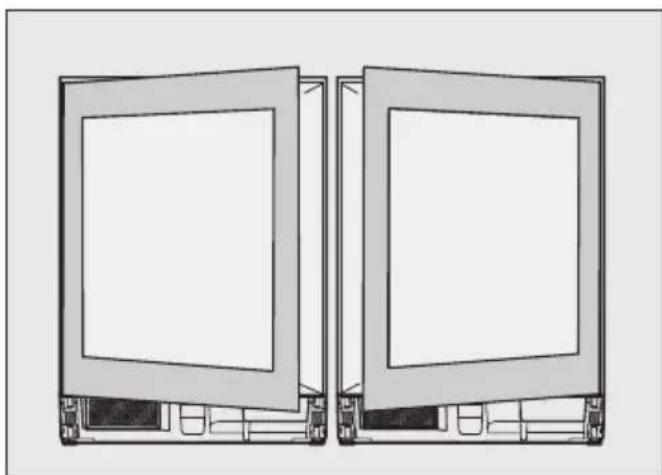
Diagram showing two rectangular electronic devices with one open and one closed, each with a side panel and internal components (no text or symbols)■ Change the door hinging for the left-hand appliance (see "Changing the door hinging" in the appliance Operating instructions).
natural_image
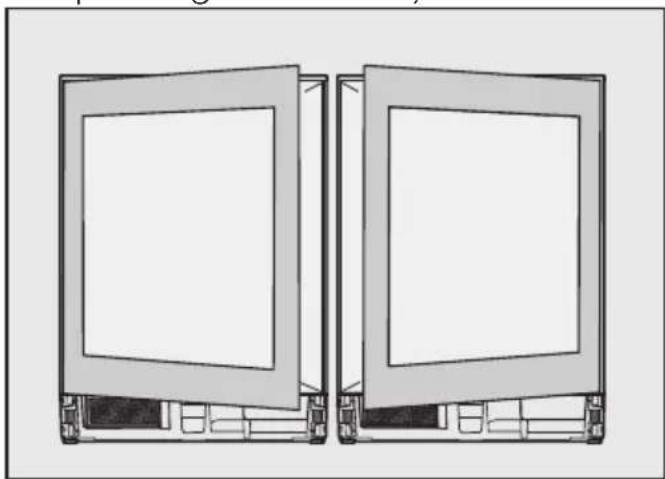
Diagram of two identical rectangular panels with open doors, mounted on a base (no text or symbols)The door hinges are each situated on the outside.
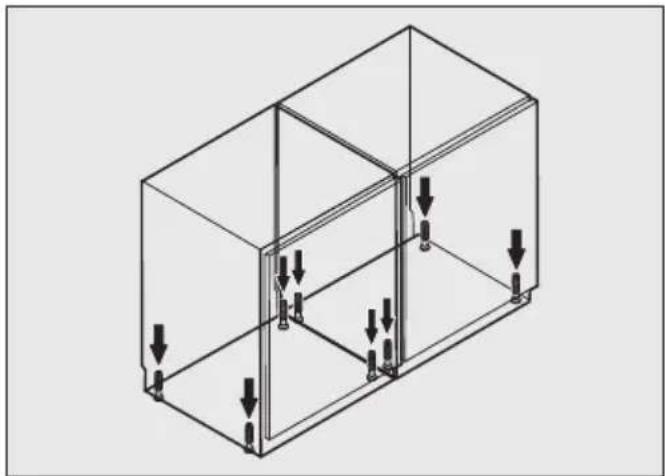
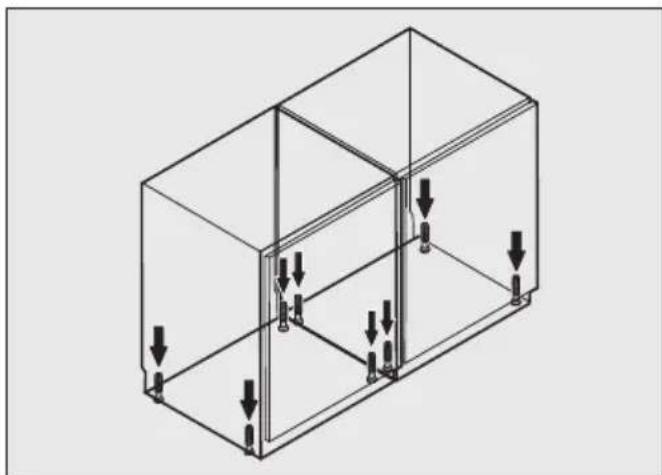
Preparing, aligning and connecting appliances.
■ Place the appliances side-by-side in front of the niche.
Leave sufficient space between the niche and the back of the appliances for working.
■ Prepare the appliances (See "Under-bench installation" in the appliance Operating instructions).
■ Unscrew adjusting feet clockwise to 4 mm less than the height of the niche.
natural_image
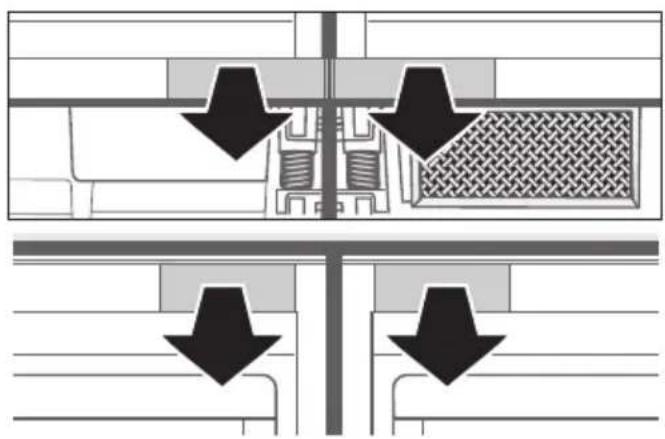
Isometric line drawing of a 3D rectangular frame with internal structural elements and downward arrows indicating force or movement (no text or symbols)■ Align the appliance by height and horizontally using the spanner wrench (see ""Underbench installation").
A misaligned appliance can become warped.
If you wish to align the appliance combination to taller furniture fronts:
■ Follow the Operating instructions for the appliance (See "Aligning the appliance to taller furniture doors").
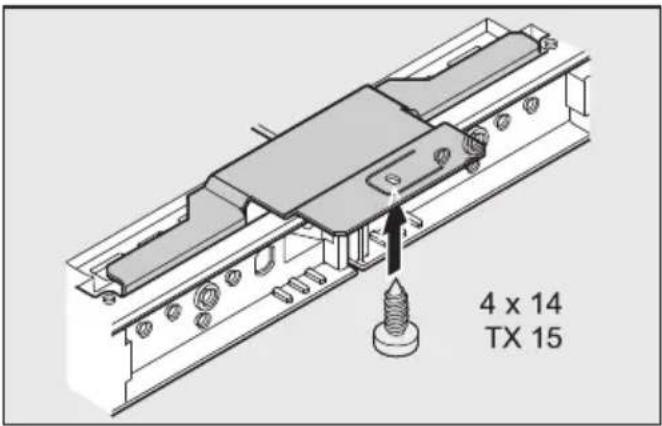
text_image
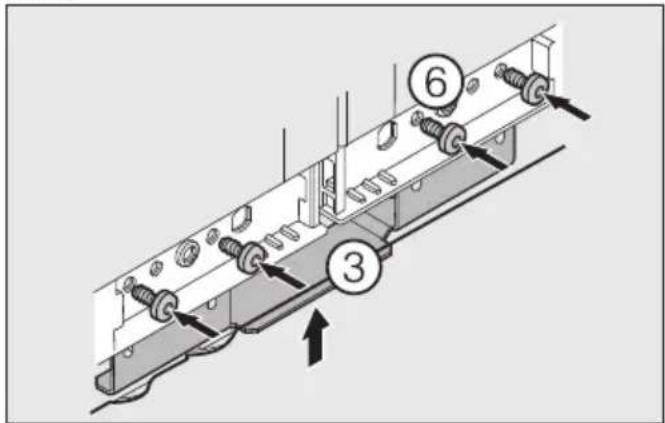
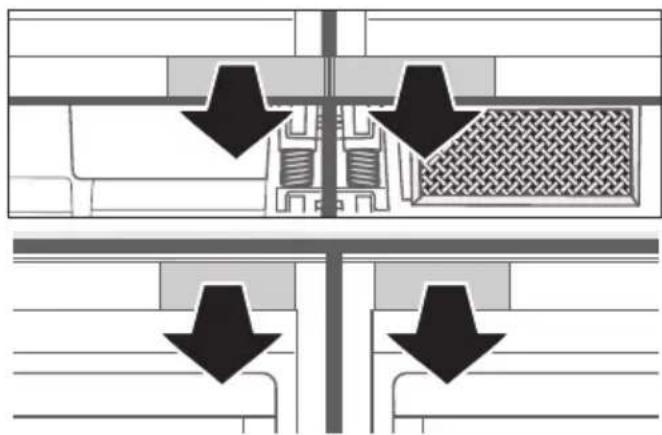
4 x 14 TX 15 4 x 14 TX 15■ Screw the appliances together at the back using the two connecting clamps ④.
natural_image
Pure mechanical assembly diagram showing two cross-sectional views with arrows indicating direction (no text or symbols)■ Remove the covers.
■ Screw the appliances together at the front top and bottom using the connecting brackets.
For installation under a wooden worktop
text_image
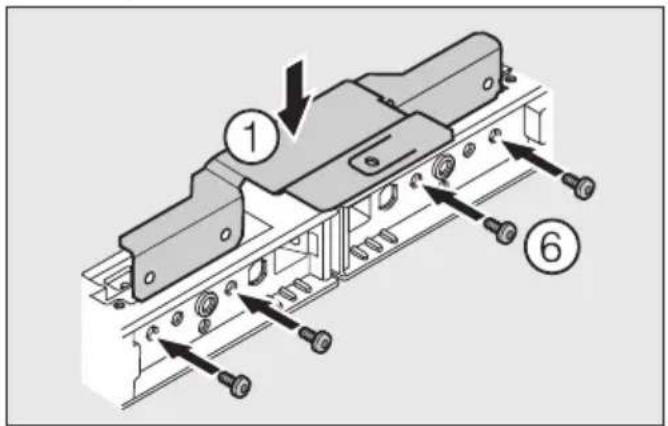
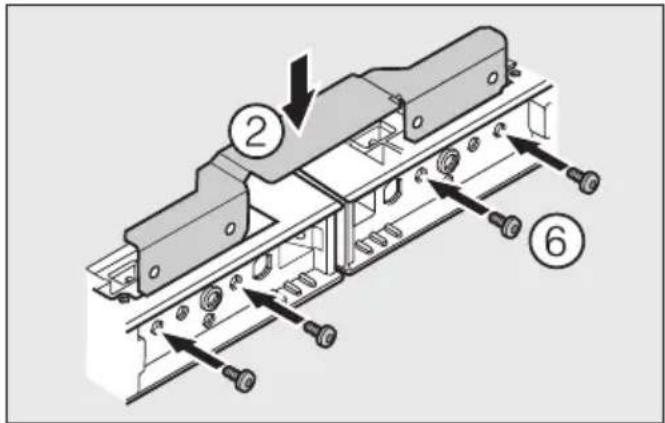
Technical diagram of a mechanical assembly with numbered components and directional arrows indicating parts of motion or assembly.■ Use the connecting bracket with the securing tab ①.
■ Fix the connecting bracket to the appliances using four screws.
For installation under a worktop which cannot be screwed into
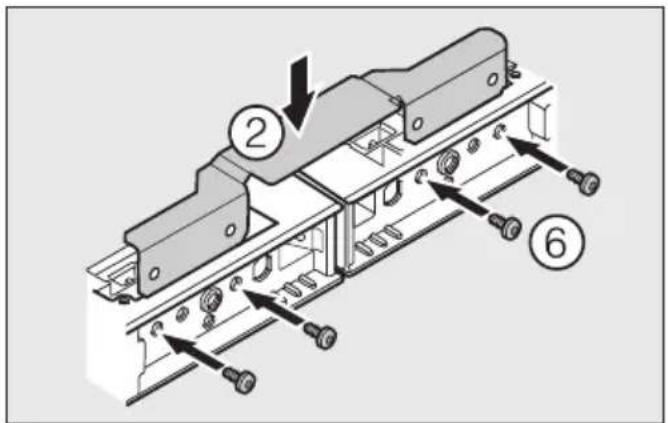
text_image
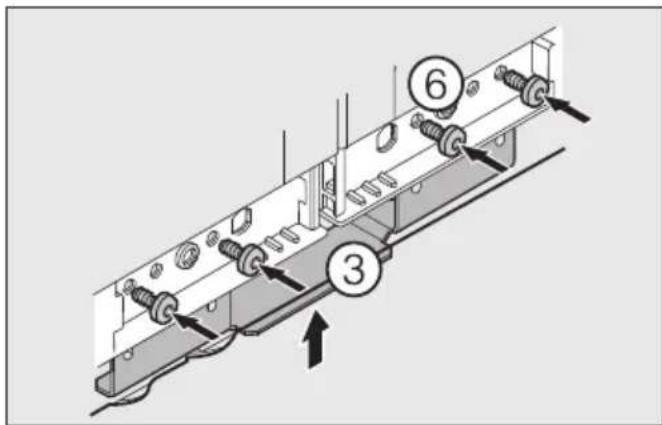
Technical diagram of a mechanical assembly with numbered components and directional arrows indicating assembly steps.■ Use the connecting bracket without the securing tab ②.
■ Fix the connecting bracket to the appliances using four screws.
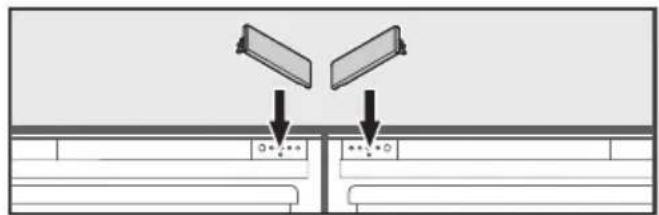
Connecting the appliances at the bottom
text_image
Technical diagram of a mechanical assembly with numbered components and directional arrows indicating motion or assembly.■ Use the connecting bracket ③.
■ Fix the connecting bracket to the appliances using four screws.
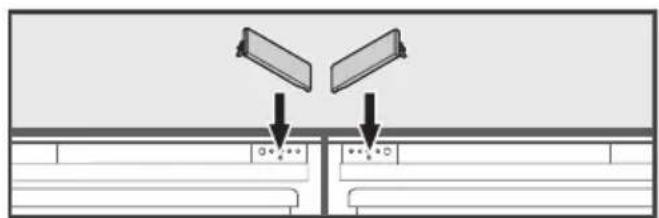
natural_image
Diagram showing two rectangular panels above a horizontal line with control points, no text or symbols present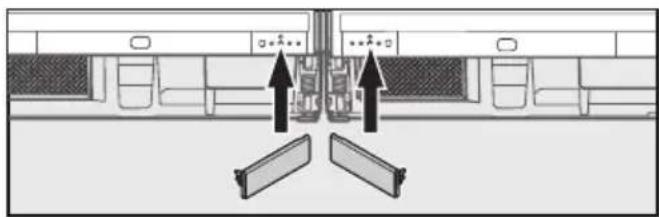
natural_image
Diagram showing three directional arrows pointing to a central vertical structure with surrounding vehicle frames (no text or symbols)■ Fit the covers.
Pushing the combination into the niche
The connection cable must not be damaged.
Push the combination into the niche carefully to avoid damaging delicate flooring.
natural_image
Diagram of a dual-chamber appliance with two doors and directional arrows indicating flow or movement (no text or symbols)■ Push the combination back into the niche so that the appliance doors stand proud of the furniture doors by 2 mm.
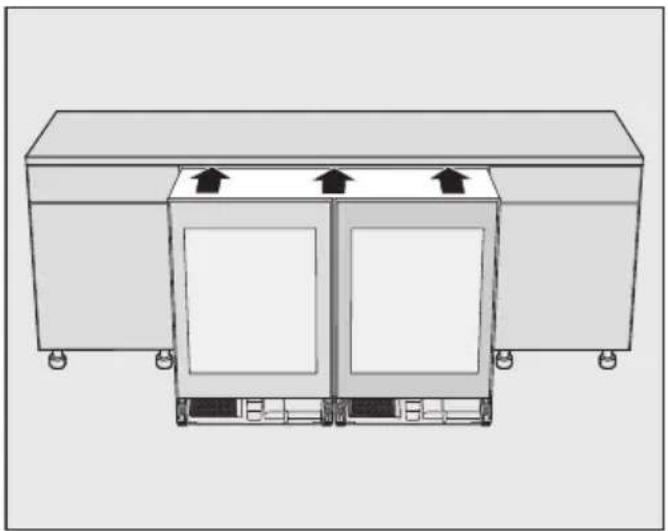
Securing the combination in the niche
The screws are supplied with the appliances.
■ The combination stands proud of the furniture doors evenly by 2 mm.
natural_image
Diagram of a device rear panel with two connectors and directional arrows indicating movement or force (no text or symbols present)
text_image
4 x 30 TX 15■ Screw the combination to the surrounding furniture at the bottom right and bottom left.
The combination will align itself to the left side of the niche. The front of the appliance door is flush with the furniture front.
■ Adjust the lateral alignment of the appliance doors (see "Building in the appliance" in the appliance Operating instructions).
Wooden worktops

text_image
4 x 14 TX 15■ Screw the appliance combination to the worktop through the securing tab.
■ Complete the installation as described in the appliance Operating instructions (see "Underbench installation").
The ventilation grille supplied and foam block supplied must be fitted and used together in accordance with the appliance Operating instructions.
natural_image
Diagram showing two rectangular electronic devices with internal compartments and a bidirectional arrow indicating rotation (no text or symbols)natural_image
Diagram of two open computer monitors with front panels and base legs, no text or symbols presentnatural_image
Isometric line drawing of a 3D rectangular enclosure with internal structural elements and downward arrows indicating force or movement (no text or symbols)natural_image
Pure mechanical assembly diagram showing two cross-sectional views with arrows indicating direction (no text or symbols)text_image
Technical diagram of a mechanical assembly with numbered components and directional arrows indicating parts of each part.text_image
Technical diagram of a mechanical assembly with numbered components and directional arrows indicating parts of motion or assembly.text_image
Technical diagram of a mechanical assembly with numbered components and directional arrows indicating motion or assembly.text_image
Diagram showing two rectangular components above a grid with control buttons and arrows indicating movement or interaction.
natural_image
Diagram of a vehicle interior with directional arrows indicating movement or force (no text or symbols present)natural_image
Diagram of a dual-chamber appliance with two doors and directional arrows indicating top-down orientation (no text or symbols)natural_image
Diagram of a device rear panel with two connectors and directional arrows indicating movement or force (no text or symbols present)
text_image
4 x 30 TX 15natural_image
Diagram showing two rectangular electronic devices with internal compartments and a bidirectional arrow indicating rotation (no text or symbols)natural_image
Diagram of two open rectangular electronic devices with internal compartments and mounting base (no text or symbols)natural_image
Isometric line drawing of a 3D rectangular frame with internal structural elements and downward arrows indicating force or movement (no text or symbols)natural_image
Pure mechanical assembly diagram showing two cross-sectional views with arrows indicating direction (no text or symbols)text_image
Technical diagram of a mechanical assembly with numbered components and directional arrows indicating parts of motion or assembly.text_image
Technical diagram of a mechanical assembly with numbered components and directional arrows indicating assembly steps.text_image
Technical diagram of a mechanical assembly with numbered components and directional arrow indicating motion or forcetext_image
Diagram showing two rectangular panels above a grid with control buttons and arrows indicating movement or interaction.
natural_image
Diagram showing three directional arrows pointing to a central vehicle or terminal (no text or symbols present)natural_image
Diagram of a dual-chamber appliance with two doors and directional arrows indicating top-down orientation (no text or symbols)natural_image
Diagram of a computer monitor with two ports and directional arrows indicating orientation (no text or symbols)
text_image
4 x 30 TX 15natural_image
Diagram showing two rectangular electronic devices with internal compartments and a bidirectional arrow indicating rotation (no text or symbols)natural_image
Diagram of two open rectangular electronic devices with internal components, shown from front and side views (no text or symbols)natural_image
Isometric line drawing of a 3D rectangular box with internal structural elements and downward arrows indicating force or movement (no text or symbols)natural_image
Pure mechanical assembly diagram showing two cross-sectional views with arrows indicating direction (no text or symbols)text_image
Technical diagram of a mechanical assembly with numbered components and directional arrows indicating parts of motion or assembly.text_image
Technical diagram of a mechanical assembly with numbered components and directional arrows indicating parts of motion or assembly.text_image
Technical diagram of a mechanical assembly with numbered components and directional arrow indicating motion or forcetext_image
Diagram showing two rectangular panels above a grid with arrows pointing to labeled points, likely illustrating a process or measurement setup.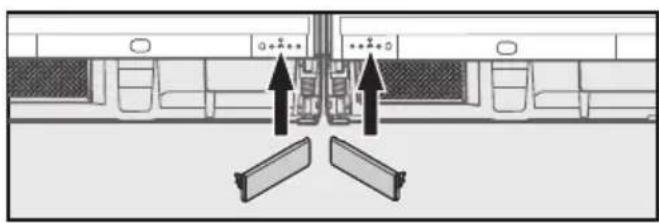
natural_image
Diagram of a vehicle interior with directional arrows indicating movement or force (no text or symbols present)natural_image
Diagram of a dual-chamber kitchen appliance with two doors and directional arrows indicating flow or movement (no text or symbols)natural_image
Diagram of a device rear panel with two connectors and directional arrows indicating movement or force (no text or symbols)
text_image
4 x 30 TX 15natural_image
Diagram showing two rectangular electronic devices with internal compartments and a bidirectional arrow indicating rotation (no text or symbols)natural_image
Diagram of two open rectangular electronic devices with internal components, no text or symbols presentnatural_image
Isometric line drawing of a 3D rectangular box with internal structural elements and downward arrows indicating force or movement (no text or symbols)natural_image
Technical diagram showing mechanical assembly with two arrows indicating direction (no text or symbols)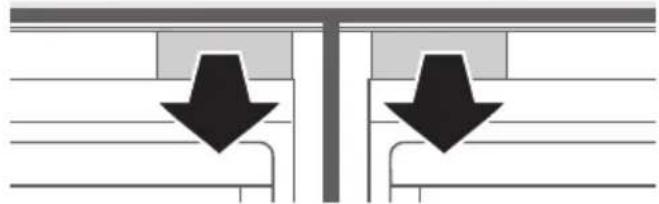
natural_image
Pure diagram of two vertical structures with downward arrows indicating direction, no text or symbols presenttext_image
Technical diagram of a mechanical assembly with numbered components and directional arrows indicating parts of motion or assembly.text_image
Technical diagram of a mechanical assembly with numbered components and directional arrows indicating parts of motion or assembly.text_image
Technical diagram of a mechanical assembly with numbered components and directional arrow indicating motion or forcetext_image
Diagram showing two rectangular objects above a vertical barrier with control points marked by asterisks and arrows indicating flow or interaction.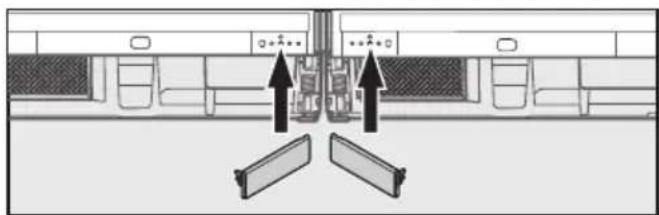
natural_image
Diagram showing three directional arrows pointing to a central vertical structure with surrounding rectangular elements (no text or symbols)natural_image
Diagram of a dual-chamber appliance with two doors and directional arrows indicating top-down orientation (no text or symbols)natural_image
Diagram of a vehicle rearview system with two vertical panels and directional arrows indicating orientation (no text or symbols)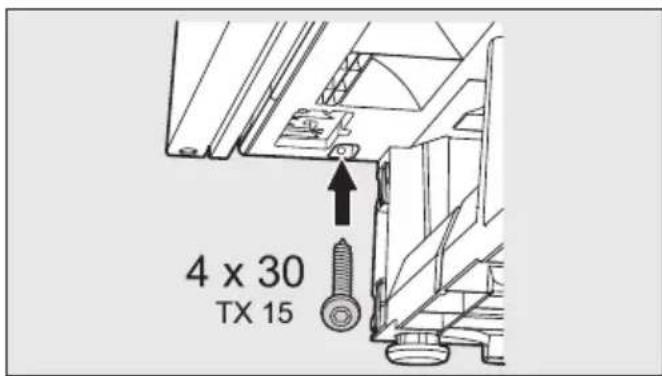
text_image
4 x 30 TX 15natural_image
Diagram showing two rectangular electronic devices with internal components and an arrow indicating rotation or assembly (no text or symbols present)natural_image
Diagram of two open computer monitors with front panels and base modules (no text or symbols)natural_image
Isometric line drawing of a 3D rectangular enclosure with internal structure and directional arrows indicating force or movement (no text or symbols)natural_image
Pure mechanical cross-section diagram without any text, numbers, or symbolstext_image
Technical diagram of a mechanical assembly with numbered components and directional arrows indicating parts of motion or assembly.text_image
Technical diagram of a mechanical assembly with numbered components and directional arrows indicating assembly steps.text_image
Technical diagram of a mechanical assembly with numbered components and directional arrows indicating motion or force.text_image
Diagram showing two layout views of a vehicle with directional arrows and labeled components, likely illustrating vehicle positioning or assembly.natural_image
Diagram of a dual-chamber kitchen appliance with two doors and directional arrows indicating top-down orientation (no text or symbols)natural_image
Diagram of a computer monitor with two arrows pointing to the front panel (no text or symbols present)natural_image
Diagram showing two rectangular electronic devices with internal compartments and a bidirectional arrow indicating rotation (no text or symbols)natural_image
Line drawing of two open-framed electronic devices with visible internal components (no text or symbols)natural_image
Isometric line drawing of a 3D rectangular frame with internal structural elements and downward arrows indicating force or movement (no text or symbols)natural_image
Pure mechanical assembly diagram showing two components with arrows indicating direction (no text or symbols)
natural_image
Pure diagram of two vertical structures with downward arrows indicating direction, no text or symbols present■ Odstraňte krytky.
text_image
Technical diagram of a mechanical assembly with numbered components and directional arrows indicating parts of motion or assembly.text_image
Technical diagram of a mechanical assembly with numbered components and directional arrows indicating assembly steps.text_image
Technical diagram of a mechanical assembly with numbered components and directional arrows indicating motion or force.text_image
Diagram showing two rectangular panels above a grid with arrows pointing to labeled points, likely illustrating a process or layout concept.
natural_image
Diagram of a vehicle interior with three directional arrows indicating movement or force (no text or symbols present)■ Nasad'te krytky.
natural_image
Diagram of a dual-chamber appliance with two doors and directional arrows indicating flow or movement (no text or symbols)natural_image
Diagram of a computer monitor with two ports and directional arrows indicating orientation (no text or symbols)
text_image
4 x 30 TX 15natural_image
Diagram showing two rectangular electronic devices with internal compartments and a bidirectional arrow indicating rotation (no text or symbols)natural_image
Diagram of two open rectangular electronic devices with internal compartments, shown from different angles (no text or symbols)natural_image
Isometric line drawing of a 3D rectangular box with internal structural elements and downward arrows indicating force or movement (no text or symbols)text_image
Technical diagram showing electrical panel installation with labeled components and close-up views of a mechanical assembly.natural_image
Pure mechanical assembly diagram showing two components with arrows indicating direction (no text or symbols)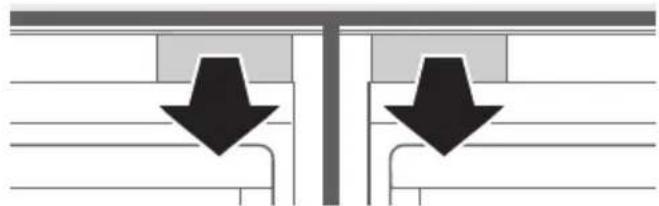
natural_image
Pure diagram of two vertical structures with downward arrows indicating direction, no text or symbols presenttext_image
Technical diagram of a mechanical assembly with numbered components and directional arrows indicating parts of motion or assembly.text_image
Technical diagram of a mechanical assembly with numbered components and directional arrows indicating parts of motion or assembly.text_image
Technical diagram of a mechanical assembly with numbered components and directional arrow indicating motion or forcetext_image
Diagram showing two rectangular components above a grid with arrows pointing to labeled points, likely illustrating a process or measurement setup.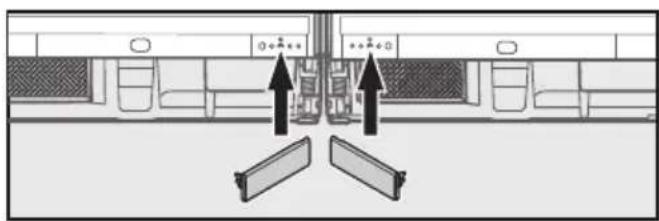
natural_image
Diagram showing three directional arrows pointing to a vehicle or vehicle interior with no visible text or symbolsnatural_image
Diagram of a dual-chamber appliance with two doors and directional arrows indicating top-down orientation (no text or symbols)natural_image
Diagram of a device rear panel with two arrows pointing to the front panel (no text or symbols present)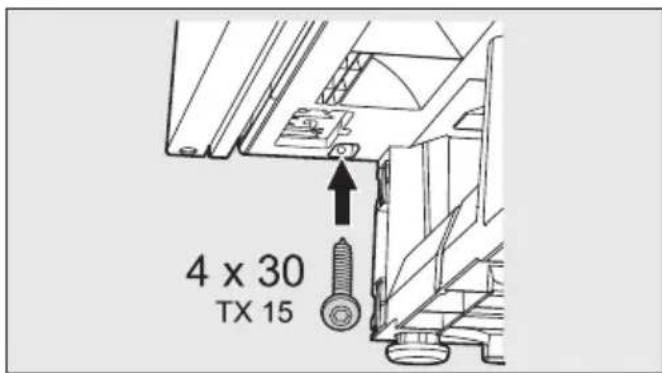
text_image
4 x 30 TX 15natural_image
Diagram showing two rectangular electronic devices with internal compartments and a bidirectional arrow indicating rotation (no text or symbols)natural_image
Diagram of two open rectangular electronic devices with internal panels, shown from front and side views (no text or symbols)natural_image
Isometric line drawing of a 3D rectangular box with internal structural elements and downward arrows indicating force or movement (no text or symbols)text_image
Technical diagram showing electrical panel installation with labeled components and close-up views of a mechanical assembly.natural_image
Pure mechanical cross-section diagram without any text, numbers, or symbolstext_image
Technical diagram of a mechanical assembly with numbered components and directional arrows indicating parts of each part.text_image
Technical diagram of a mechanical assembly with numbered components and directional arrows indicating assembly steps.text_image
Technical diagram of a mechanical assembly with numbered components and directional arrow indicating motion or forcenatural_image
Diagram showing two rectangular panels above a horizontal line with control points and arrows pointing to them (no text or symbols present)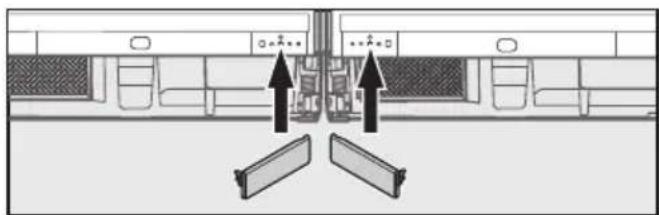
natural_image
Diagram showing three directional arrows pointing to a vehicle interior with no visible text or symbolsnatural_image
Diagram of a dual-chamber appliance with two doors and directional arrows indicating top-down orientation (no text or symbols)natural_image
Diagram of a device rear panel with two arrows pointing to the front panel (no text or symbols present)
text_image
4 x 30 TX 15natural_image
Diagram showing two rectangular electronic devices with internal compartments and a bidirectional arrow indicating rotation (no text or symbols)natural_image
Diagram of two open computer monitors with front panels and side connectors (no text or symbols)Uksehinged on mölemal seadmel vä- liskülje pool.
natural_image
Isometric line drawing of a 3D rectangular box with internal structural elements and downward arrows indicating force or movement (no text or symbols)natural_image
Pure mechanical assembly diagram showing two cross-sectional views with arrows indicating direction of movement (no text or symbols)■ Eemaldage katted.
text_image
Technical diagram of a mechanical assembly with numbered components and directional arrows indicating parts of motion or assembly.text_image
Technical diagram of a mechanical assembly with numbered components and directional arrows indicating assembly steps.text_image
Technical diagram of a mechanical assembly with numbered components and directional arrows indicating motion or assembly.natural_image
Diagram showing two rectangular panels above a horizontal structure with arrows pointing to specific points (no text or symbols present)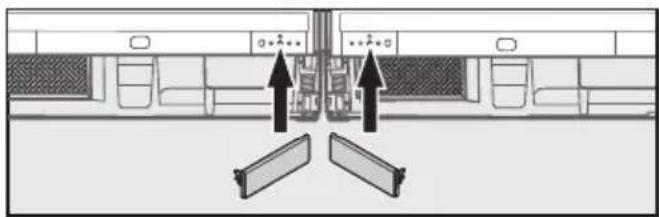
natural_image
Diagram showing three directional arrows pointing to a vehicle interior layout (no text or symbols)■ Paigaldage katted.
natural_image
Diagram of a dual-chamber appliance with two doors and directional arrows indicating top-down orientation (no text or symbols)natural_image
Diagram of a device with two arrows pointing to components, no text or symbols present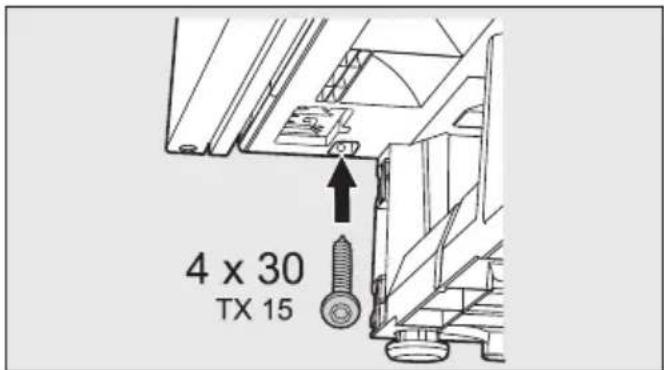
text_image
4 x 30 TX 15natural_image
Diagram showing two rectangular electronic devices with internal compartments and a bidirectional arrow indicating rotation (no text or symbols)natural_image
Line drawing of two open-framed electronic devices with visible internal panels and base connectors (no text or symbols)natural_image
Isometric line drawing of a 3D rectangular frame with internal structural elements and downward arrows indicating force or movement (no text or symbols)natural_image
Pure mechanical assembly diagram showing a component with arrows indicating direction (no text or symbols)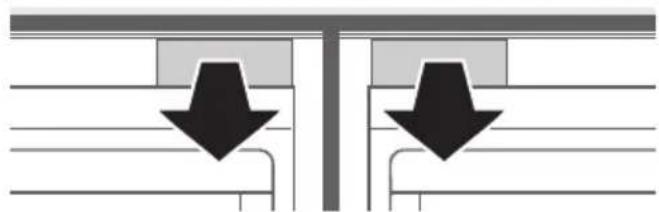
natural_image
Pure diagram of two vertical structures with downward arrows indicating flow or movement (no text or symbols)text_image
Technical diagram of a mechanical assembly with numbered components and directional arrows indicating parts of motion or assembly.text_image
Technical diagram of a mechanical assembly with numbered components and directional arrows indicating parts of motion or assembly.text_image
Technical diagram of a mechanical assembly with numbered components and directional arrows indicating motion or assembly.text_image
Diagram showing two rectangular panels above a grid with arrows pointing to a central cell, some marked with asterisks or symbols.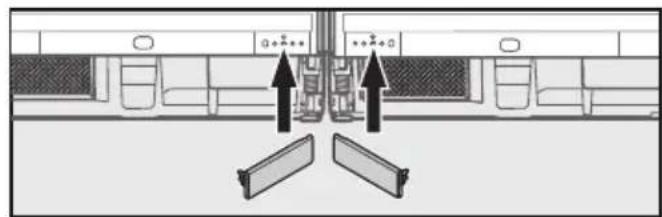
natural_image
Diagram of a vehicle interior with four directional arrows indicating movement or force (no text or symbols present)natural_image
Diagram of a dual-chamber appliance with two doors and directional arrows indicating top-down orientation (no text or symbols)natural_image
Diagram of a device rear panel with two arrows pointing to the front panel (no text or symbols present)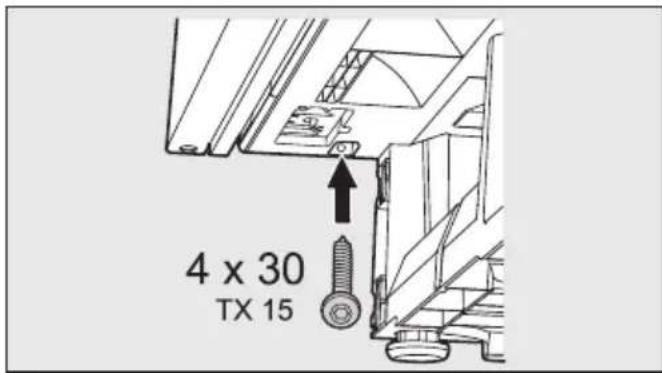
text_image
4 x 30 TX 15natural_image
Diagram showing two rectangular electronic devices with internal compartments and a bidirectional arrow indicating rotation (no text or symbols)natural_image
Line drawing of two open electronic devices with front panels and base connectors (no text or symbols)natural_image
Isometric line drawing of a 3D rectangular frame with internal structural elements and downward arrows indicating force or movement (no text or symbols)natural_image
Technical diagram showing mechanical components with arrows indicating direction (no text or labels)
natural_image
Pure diagram of two vertical structures with downward arrows, no text or symbols presenttext_image
Technical diagram of a mechanical assembly with numbered components and directional arrows indicating parts of motion or assembly.text_image
Technical diagram of a mechanical assembly with numbered components and directional arrows indicating assembly steps.text_image
Technical diagram of a mechanical assembly with numbered components and directional arrows indicating motion or force.text_image
Diagram showing two rectangular objects above a central barrier with three labeled points below, likely illustrating a physical or engineering concept.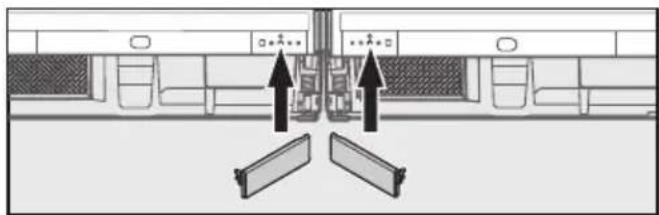
natural_image
Diagram showing two directional arrows pointing to a central vertical structure with surrounding rectangular elements (no text or symbols)natural_image
Diagram of a dual-chamber kitchen appliance with two doors and directional arrows indicating top-down orientation (no text or symbols)natural_image
Diagram of a device rear panel with two arrows pointing to the front panel (no text or symbols present)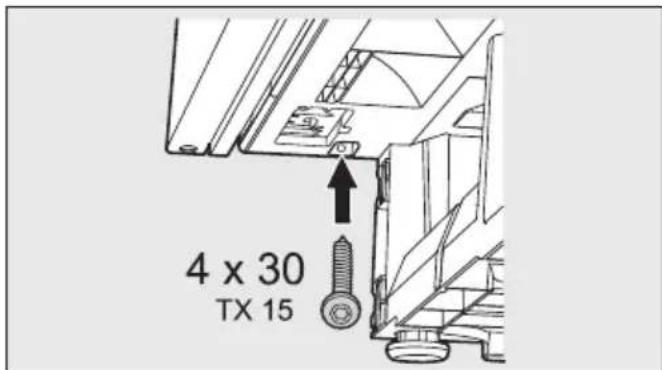
text_image
4 x 30 TX 15natural_image
Diagram showing two rectangular electronic devices with internal compartments and a bidirectional arrow indicating rotation (no text or symbols)natural_image
Line drawing of two open-framed electronic devices with visible internal compartments (no text or symbols)natural_image
Isometric line drawing of a 3D rectangular frame with internal structural elements and downward arrows indicating force or movement (no text or symbols)natural_image
Pure technical diagram showing mechanical components with downward arrows indicating alignment or force (no text or symbols)text_image
Technical diagram of a mechanical assembly with numbered components and directional arrows indicating parts of motion or assembly.text_image
Technical diagram of a mechanical assembly with numbered components and directional arrows indicating assembly steps.text_image
Technical diagram of a mechanical assembly with numbered components and directional arrow indicating motion or forcetext_image
Diagram showing two rectangular panels above a grid with arrows pointing to a central cell, some marked with asterisks.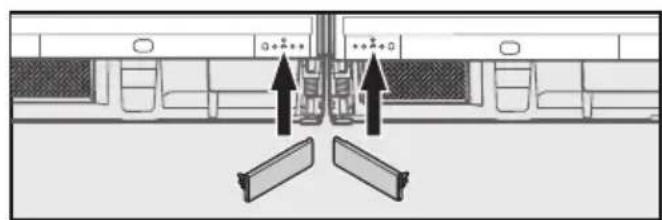
natural_image
Diagram showing vehicle rearview system with directional arrows indicating movement or force (no text or symbols)natural_image
Diagram of a double-door appliance with two doors and directional arrows indicating top-down orientation (no text or symbols)natural_image
Diagram of a device rear panel with two arrows pointing to internal components (no text or symbols)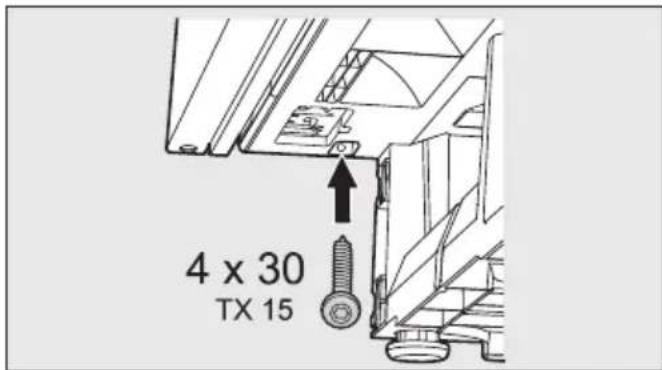
text_image
4 x 30 TX 15natural_image
Diagram showing two rectangular electronic devices with internal compartments and a bidirectional arrow indicating rotation (no text or symbols)natural_image
Line drawing of two open-framed electronic devices with internal compartments (no text or symbols)natural_image
Isometric line drawing of a 3D rectangular box with internal structural elements and downward arrows indicating force or movement (no text or symbols)natural_image
Pure mechanical assembly diagram showing two cross-sectional views with arrows indicating direction of movement (no text or symbols)text_image
Technical diagram of a mechanical assembly with numbered components and directional arrows indicating parts of motion or assembly.text_image
Technical diagram of a mechanical assembly with numbered components and directional arrows indicating parts of motion or assembly.text_image
Technical diagram of a mechanical assembly with numbered components and directional arrows indicating motion or force.text_image
Diagram showing two rectangular panels above a grid with arrows pointing to labeled boxes, likely illustrating a process or layout concept.
natural_image
Diagram showing three directional arrows pointing to a vehicle or terminal area with no visible text or symbolsnatural_image
Diagram of a dual-chamber kitchen appliance with two doors and directional arrows indicating airflow or ventilation (no text or symbols)natural_image
Diagram of a computer monitor with two ports and directional arrows indicating orientation (no text or symbols)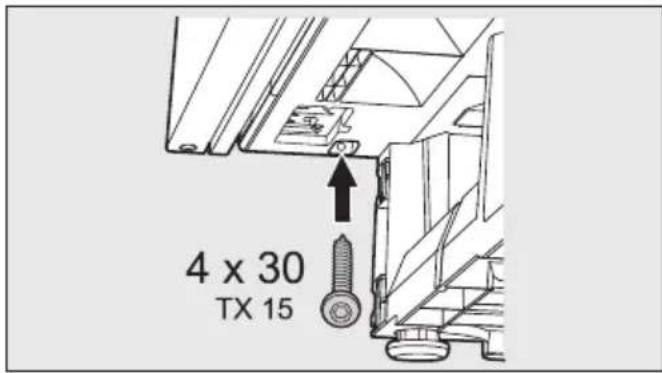
text_image
4 x 30 TX 15natural_image
Diagram showing two rectangular electronic devices with internal compartments and a bidirectional arrow indicating rotation (no text or symbols)natural_image
Diagram of two open rectangular electronic devices with internal components, shown from top and side views (no text or symbols)natural_image
Isometric line drawing of a 3D rectangular frame with internal structural elements and downward arrows indicating force or movement (no text or symbols)natural_image
Diagram showing two arrows pointing to a mechanical component or assembly (no text or symbols present)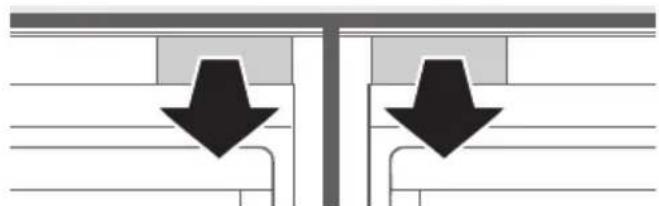
natural_image
Pure diagram of two vertical supports with downward arrows indicating force or direction (no text or symbols)text_image
Technical diagram of a mechanical assembly with numbered components and directional arrows indicating parts of motion or assembly.text_image
Technical diagram of a mechanical assembly with numbered components and directional arrows indicating assembly steps.text_image
Technical diagram of a mechanical assembly with numbered components and directional arrows indicating motion or force.text_image
Diagram showing two rectangular objects above a grid with arrows pointing to labeled boxes, likely illustrating a process or layout concept.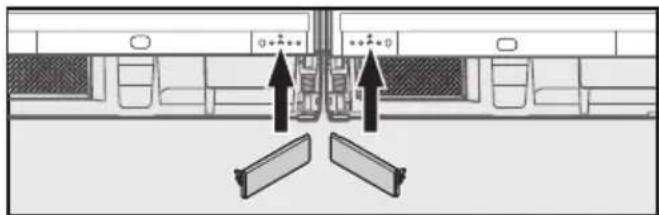
natural_image
Diagram showing three directional arrows pointing to a central vertical structure with surrounding furniture (no text or symbols)natural_image
Diagram of a double-door appliance with two doors and directional arrows indicating top-down orientation (no text or symbols)natural_image
Diagram of a device rear panel with two arrows pointing to the front panel (no text or symbols present)
text_image
4 x 30 TX 15natural_image
Diagram showing two rectangular electronic devices with internal components and an arrow indicating rotation (no text or symbols)■ Na lijevom uređaju zamijenite graničnik na vratima. (pogledajte: Upute za uporabu uređaja, Zamjena graničnika na vratima)
natural_image
Technical line drawing of two open hard drive units with mounting brackets (no text or symbols)natural_image
Isometric line drawing of a 3D rectangular box with internal structural elements and downward arrows indicating force or movement (no text or symbols)natural_image
Pure mechanical assembly diagram showing two cross-sectional views with arrows indicating direction (no text or symbols)■ Uklonite pokrove.
■ Uređaje s prednje stane gore i dolje pričvrstite pomoću kutnika za povezivanje:
text_image
Technical diagram of a mechanical assembly with numbered components and directional arrows indicating parts of motion or assembly.■ Kutnik za povezivanje postavite s umetkom za pričvršćenje ①.
■ Kutnik za pričvršćenje pričvrstite za uređaj pomoću ⑥ četiri vijka.
Za montažu ispod radne površine za koju se uređaji ne mogu pričvrstiti vijcima
text_image
Technical diagram of a mechanical assembly with numbered components and directional arrows indicating parts of motion or assembly.■ Postavite kutnik za povezivanje bez umetka za pričvršćenje ②.
■ Kutnik za pričvršćenje pričvrstite za uređaj pomoću ⑥ četiri vijka.
Spajanje uređaja odozdo
text_image
Technical diagram of a mechanical assembly with numbered components and directional arrows indicating motion or force.■ Umetnite kutnik za povezivanje ③.
■ Kutnik za pričvršćenje pričvrstite za uređaj pomoću ⑥ četiri vijka.

text_image
Diagram showing two rectangular objects above a central barrier with three labeled points below, likely illustrating a physical or engineering concept.
natural_image
Diagram of a vehicle interior with directional arrows indicating movement or force (no text or symbols present)■ Postavite pokrove.
natural_image
Diagram of a dual-chamber appliance with two doors and directional arrows indicating top-down orientation (no text or symbols)■ Kombinaciju uređaja gurnite u nišu tako da vrata uređaja vire 2 mm ispred fronte namještaja.
natural_image
Diagram of a device rear panel with two arrows pointing to the front panel (no text or symbols present)
text_image
4 x 30 TX 15natural_image
Diagram showing two rectangular electronic devices with internal compartments and a bidirectional arrow indicating rotation (no text or symbols)natural_image
Line drawing of two open electronic devices with front panels and base modules (no text or symbols)natural_image
Isometric line drawing of a 3D rectangular box with internal structural elements and downward arrows indicating force or movement (no text or symbols)natural_image
Pure technical diagram showing mechanical components with downward arrows indicating alignment or force (no text or symbols)text_image
Technical diagram of a mechanical assembly with numbered components and directional arrows indicating parts of motion or assembly.text_image
Technical diagram of a mechanical assembly with numbered components and directional arrows indicating parts of motion or assembly.text_image
Technical diagram of a mechanical assembly with numbered components and directional arrow indicating motion or forcetext_image
Diagram showing two rectangular panels above a grid with arrows pointing to a central cell, likely illustrating a process or measurement setup.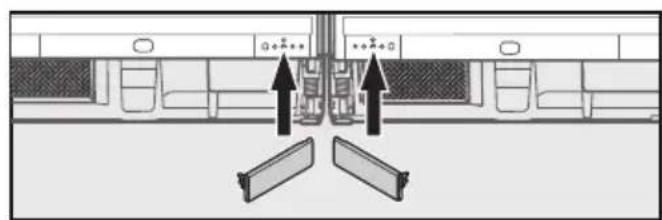
natural_image
Diagram of a vehicle interior with directional arrows indicating movement or force (no text or symbols present)■ Applicare le coperture.
natural_image
Diagram of a dual-chamber appliance with two doors and directional arrows indicating top-down orientation (no text or symbols)natural_image
Diagram of a device rear panel with two arrows pointing to the front panel (no text or symbols present)
text_image
4 x 30 TX 15natural_image
Technical line drawing of a mechanical component with mounting holes and a central bracket (no text or symbols)
natural_image
Technical drawing of a mechanical bracket component (no text or symbols)
natural_image
Technical line drawing of a mechanical bracket or clamp assembly (no text or symbols)
8x
natural_image
Diagram showing two rectangular electronic devices with internal components, one with an arrow indicating rotation or assembly (no text or symbols present)natural_image
Diagram of two open rectangular electronic devices with internal compartments, shown from top and side views (no text or symbols)natural_image
Isometric line drawing of a 3D rectangular box with internal structural elements and downward arrows indicating force or movement (no text or symbols)natural_image
Cross-sectional diagram of a mechanical assembly with two arrows indicating directional components (no text or labels)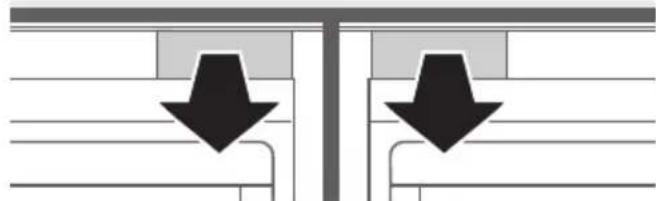
natural_image
Pure diagram of two downward-pointing arrows between parallel lines, no text or symbols presenttext_image
Technical diagram of a mechanical assembly with numbered components and directional arrows indicating parts of motion or assembly.text_image
Technical diagram of a mechanical assembly with numbered components and directional arrows indicating motion or assembly.text_image
Technical diagram of a mechanical assembly with numbered components and directional arrows indicating motion or force.text_image
Diagram showing two rectangular objects above a barrier with labeled symbols and arrows indicating flow or interaction.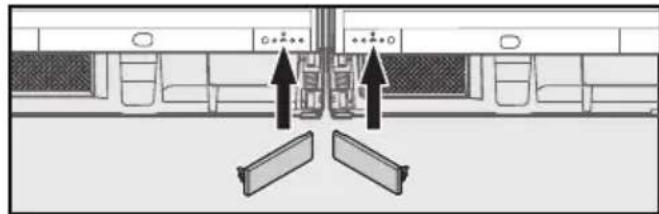
natural_image
Interior view of a vehicle with two doors and directional arrows indicating movement or orientation (no text or symbols)natural_image
Diagram of a dual-chamber refrigerator with two doors and directional arrows indicating top-down orientation (no text or symbols)natural_image
Diagram of a device with two ports and directional arrows indicating movement or force (no text or symbols present)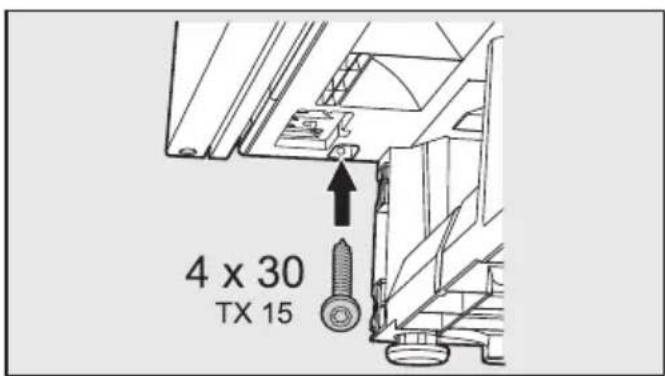
text_image
4 x 30 TX 15natural_image
Technical illustration of a mechanical component with mounting holes and a central bracket (no text or symbols)
natural_image
Technical line drawing of a mechanical bracket or bracket (no text or symbols)
natural_image
Mechanical bracket diagram with mounting holes and a 1x load, no text or symbols present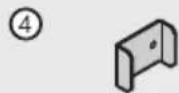

8x
natural_image
Diagram showing two rectangular electronic devices with one open and one closed, each with a side panel and internal components (no text or symbols)natural_image
Diagram of two open rectangular electronic devices with internal panels, shown from front and side views (no text or symbols)natural_image
Isometric line drawing of a 3D rectangular box with internal structural elements and downward arrows indicating force or movement (no text or symbols)natural_image
Pure mechanical cross-section diagram without any text, numbers, or symbols■ Nuimkite gaubtus.
text_image
Technical diagram of a mechanical assembly with numbered components and directional arrows indicating parts of motion or assembly.text_image
Technical diagram of a mechanical assembly with numbered components and directional arrows indicating parts of motion or assembly.text_image
Technical diagram of a mechanical assembly with numbered components and directional arrow indicating motion or forcetext_image
Diagram showing two rectangular objects above a barrier with labeled points and arrows indicating movement or force direction.
natural_image
Interior view of a vehicle showing dashboard, rearview, and frontview with directional arrows indicating movement (no text or symbols)natural_image
Diagram of a dual-chamber kitchen appliance with two doors and directional arrows indicating flow or placement (no text or symbols)natural_image
Diagram of a device rear panel with two connectors and directional arrows indicating movement or force (no text or symbols)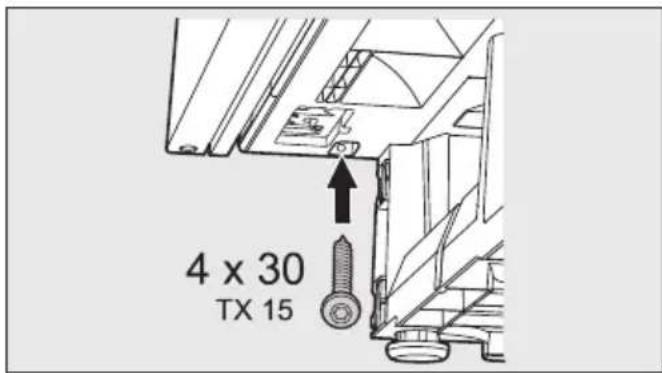
text_image
4 x 30 TX 15natural_image
Diagram showing two rectangular electronic devices with internal components and an arrow indicating rotation or assembly (no text or symbols present)natural_image
Diagram of two open electronic devices with internal components, no text or symbols presentnatural_image
Isometric line drawing of a 3D rectangular box with internal structural elements and downward arrows indicating force or movement (no text or symbols)natural_image
Pure technical diagram showing mechanical components and directional arrows without any text or symbolstext_image
Technical diagram of a mechanical assembly with numbered components and directional arrows indicating parts of motion or assembly.text_image
Technical diagram of a mechanical assembly with numbered components and directional arrows indicating assembly steps.text_image
Technical diagram of a mechanical assembly with numbered components and directional arrows indicating motion or assembly.text_image
Diagram showing two rectangular panels above a grid with arrows pointing to labeled cells or indicators below.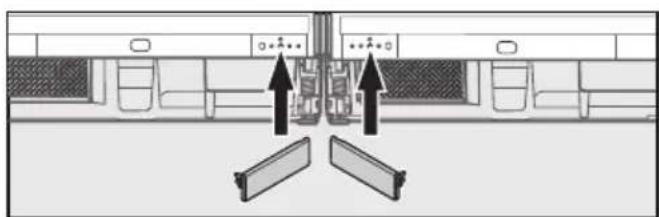
natural_image
Diagram showing a vehicle interior with directional arrows indicating movement or force (no text or symbols present)natural_image
Diagram of a dual-chamber appliance with two doors and directional arrows indicating flow or movement (no text or symbols)natural_image
Diagram of a mechanical assembly with two vertical components and directional arrows indicating movement or force (no text or symbols present)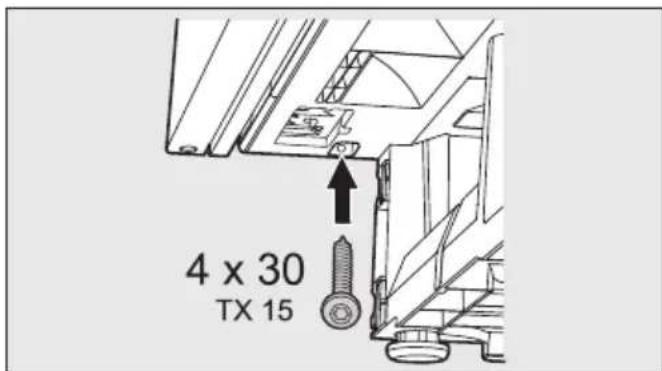
text_image
4 x 30 TX 15natural_image
Diagram showing two rectangular electronic devices with internal compartments and a bidirectional arrow indicating rotation (no text or symbols)■ Hengsle om døren på det venstre apparatet. (se bruksanvisningen for apparatet, kap. Omhengsling av døren).
natural_image
Line drawing of two open-framed electronic devices with visible internal components (no text or symbols)Dørhengslene sitter på utsiden.
natural_image
Isometric line drawing of a 3D rectangular frame with internal structural elements and downward arrows indicating force or movement (no text or symbols)natural_image
Pure technical diagram showing mechanical components with downward arrows indicating direction (no text or symbols)■ Fjern dekslene.
text_image
Technical diagram of a mechanical assembly with numbered components and directional arrows indicating parts of motion or assembly.■ Sett inn forbindelsesbeslaget med festebrakett ①.
■ Skru forbindelsesbeslaget på apparatene med fire skruer ⑥.
text_image
Technical diagram of a mechanical assembly with numbered components and directional arrows indicating assembly steps.text_image
Technical diagram of a mechanical assembly with numbered components and directional arrows indicating motion or assembly.■ Sett inn forbindelsesbeslaget ③.
■ Skru forbindelsesbeslaget på apparatene med fire skruer ⑥.
natural_image
Diagram showing two rectangular panels above a horizontal structure with arrows pointing to specific components (no text or symbols present)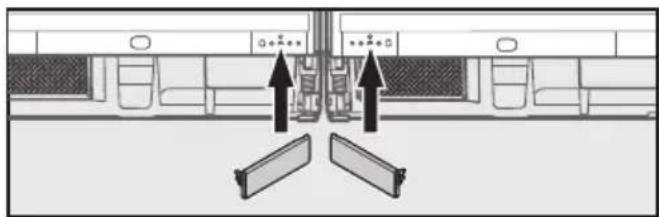
natural_image
Diagram of a vehicle interior with directional arrows indicating movement or force (no text or symbols present)■ Sett på dekslene.
natural_image
Diagram of a dual-chamber refrigerator with two doors and directional arrows indicating top-down orientation (no text or symbols)natural_image
Diagram of a device rear panel with two arrows pointing to the front panel (no text or symbols present)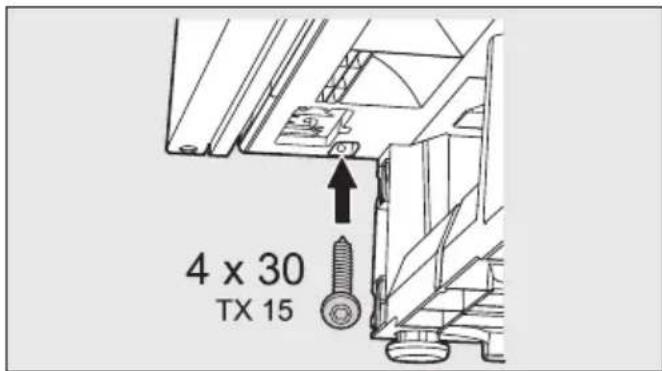
text_image
4 x 30 TX 15natural_image
Diagram showing two rectangular electronic devices with internal compartments and a bidirectional arrow indicating rotation (no text or symbols)natural_image
Diagram of two open computer monitors with visible internal components and mounting brackets (no text or symbols)natural_image
Isometric line drawing of a 3D rectangular enclosure with internal structural elements and downward arrows indicating force or movement (no text or symbols)natural_image
Technical diagram showing a mechanical assembly with two directional arrows indicating movement or force (no text or symbols present)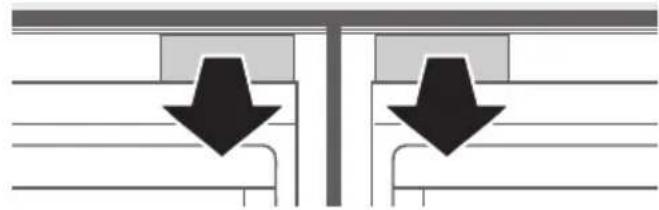
natural_image
Pure diagram of two vertical structures with downward arrows indicating direction, no text or symbols present■ Zdjąć pokrywki.
text_image
Technical diagram of a mechanical assembly with numbered components and directional arrows indicating parts of motion or assembly.text_image
Technical diagram of a mechanical assembly with numbered components and directional arrows indicating parts of motion or assembly.text_image
Technical diagram of a mechanical assembly with numbered components and directional arrows indicating motion or assembly.text_image
Diagram showing two rectangular components above a grid with arrows pointing to specific symbols, likely illustrating a process or assembly.
natural_image
Diagram of a vehicle interior with three directional arrows indicating movement or force (no text or symbols present)■ Założyć pokrywki.
natural_image
Diagram of a dual-chamber kitchen appliance with two doors and directional arrows indicating flow or placement (no text or symbols)natural_image
Diagram of two computer monitors with arrows pointing to their front panels (no text or symbols present)
text_image
4 x 30 TX 15natural_image
Technical drawing of a mechanical bracket component (no text or symbols)②
natural_image
Technical drawing of a mechanical bracket component (no text or symbols)③
natural_image
Technical line drawing of a mechanical component with two parallel plates and a central slot, labeled '1x' (no text or symbols on the diagram itself)④

2x
⑤

⑥

8x
natural_image
Diagram showing two rectangular electronic devices with internal compartments and a bidirectional arrow indicating rotation (no text or symbols)natural_image
Line drawing of two open-framed electronic devices with visible internal components (no text or symbols)natural_image
Isometric line drawing of a 3D rectangular box with internal structural elements and downward arrows indicating force or movement (no text or symbols)■ Nivele os aparelhos na vertical e na horizontal com a chave de bocas (consulte: encastrar o aparelho)
natural_image
Pure mechanical assembly diagram showing two cross-sectional views with arrows indicating direction (no text or symbols)text_image
Technical diagram of a mechanical assembly with numbered components and directional arrows indicating parts of motion or assembly.text_image
Technical diagram of a mechanical assembly with numbered components and directional arrows indicating parts of motion or assembly.text_image
Technical diagram of a mechanical assembly with numbered components and directional arrows indicating motion or assembly.natural_image
Diagram showing two rectangular components above a grid with arrows pointing to specific points (no text or symbols present)
natural_image
Diagram of a vehicle interior with three directional arrows pointing to different compartments (no text or symbols present)natural_image
Diagram of a dual-chamber kitchen appliance with two doors and directional arrows indicating top-down (no text or symbols)natural_image
Diagram of a computer monitor with two ports and directional arrows indicating orientation (no text or symbols)
text_image
4 x 30 TX 15natural_image
Mechanical component diagram showing a bracket and mounting flange assembly (no text or symbols)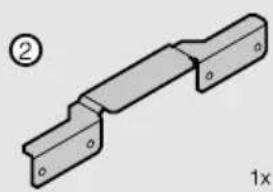
natural_image
Technical drawing of a mechanical bracket component (no text or symbols)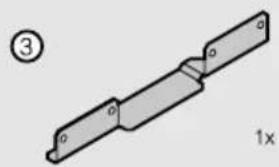
natural_image
Mechanical part diagram showing a bracket with mounting holes and a 1x scaling indicator (no text or symbols)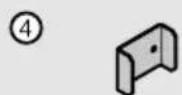
8x
natural_image
Diagram showing two rectangular devices with internal compartments and a bidirectional arrow indicating rotation (no text or symbols)Schimbarea balamalelor uşii
natural_image
Technical line drawing of two open-framed electronic devices with mounting brackets (no text or symbols)natural_image
Isometric line drawing of a 3D rectangular box with internal structural elements and downward arrows indicating force or movement (no text or symbols)natural_image
Technical diagram showing a mechanical assembly with two arrows pointing to components, no visible text or symbols.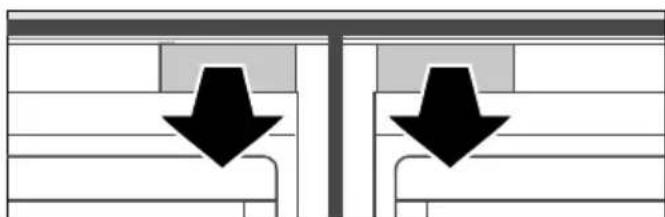
natural_image
Pure diagram of two identical mechanical components with downward arrows indicating force or direction (no text or symbols)text_image
Technical diagram of a mechanical assembly with numbered components and directional arrows indicating parts of motion or assembly.text_image
Technical diagram of a mechanical assembly with numbered components and directional arrows indicating parts of motion or assembly.text_image
Technical diagram of a mechanical assembly with numbered components and directional arrows indicating movement or force.text_image
Diagram showing two rectangular panels above a vertical line with arrows pointing to labeled points, likely illustrating a process or measurement setup.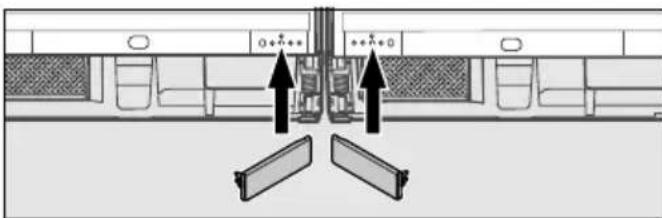
natural_image
Diagram of a vehicle interior with directional arrows indicating movement or force (no text or symbols present)■ Puneti la loc capacele.
natural_image
Diagram of a dual-chamber appliance with two doors and directional arrows indicating top-down orientation (no text or symbols)natural_image
Diagram of a vehicle rearview system with two arrows pointing to the components (no text or symbols present)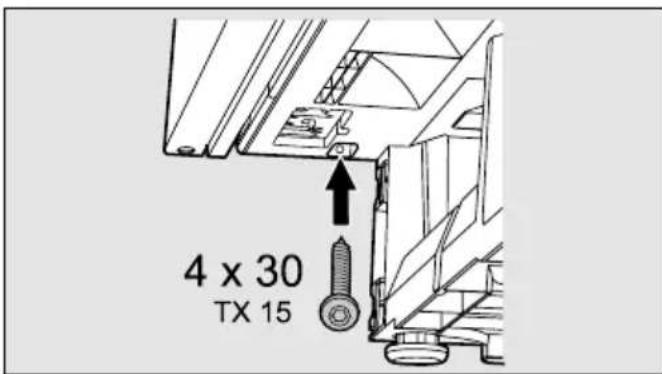
text_image
4 x 30 TX 15natural_image
Diagram showing two rectangular electronic devices with internal compartments and a bidirectional arrow indicating rotation (no text or symbols)■ Na desnom uređaju promenite smer otvaranja vrata. (Vidi: uputstvo za upotrebu uređaja, promena smera otvaranja vrata)
natural_image
Technical line drawing of two open electronic devices with mounting base (no text or symbols)Šarke vrata se nalaze sa spoljne strane.
Pripremanje, centriranje i spa- janje uređaja
■ Uređaje postavite jedan pored drugog ispred otvora u donjem delu elementa.
Kako biste mogli komotnije da radite na zadnjem delu uređaja, ostavite prostora između zadnje strane uređaja i donjeg dela elementa.
■ Pripremite uređaje. (Vidi: uputstvo za upotrebu uređaja, ugradnja uređaja u donji element)
■ Odvrnite podesive nožice u pravcu okretanja kazaljke na satu do 4 mm ispod visine ugradnog otvora.
natural_image
Isometric line drawing of a 3D rectangular box with internal structural elements and downward arrows indicating force or movement (no text or symbols)■ Viljuškastim ključem podesite uređaje po vertikali i horizontali. (Vidi: ugradnja uređaja u donji element)
Krivo centriran uređaj može da se deformiše.
Ukoliko želite da podesite kombinaciju prema višim vratima elemenata:
■ Sledite uputstvo za upotrebu uređaja. (Vidi: podešavanje uređaja prema višim vratima elemenata)

text_image
4 x 14 TX 15 4 x 14 TX 15■ Spojite uređaje vijcima sa zadnje strane pomoću dve vezne spone ④.
natural_image
Pure technical diagram showing mechanical components with downward arrows indicating direction (no text or symbols)■ Skinite gornje ploče uređaja.
■ Spojite uređaje vijcima sa prednje strane gore i dole pomoću veznih ugaonika:
text_image
Technical diagram of a mechanical assembly with numbered components and directional arrows indicating parts of motion or assembly.■ Stavite vezni ugaonik sa pričvrsnom spojnicom ①.
■ Pričvrstite vezni ugaonik sa četiri vijka na uređaje ⑥.
text_image
Technical diagram of a mechanical assembly with numbered components and directional arrows indicating parts of motion or assembly.■ Postavite vezni ugaonik bez pričvrsne spojnice ②.
■ Pričvrstite vezni ugaonik sa četiri vijka na uređaje ⑥.
text_image
Technical diagram of a mechanical assembly with numbered components and directional arrows indicating motion or force.■ Postavite vezni ugaonik ③.
■ Pričvrstite vezni ugaonik sa četiri vijka na uređaje ⑥.
text_image
Diagram showing two rectangular panels above a grid with arrows pointing to labeled boxes, likely illustrating a process or layout concept.
natural_image
Diagram of a vehicle interior with three directional arrows indicating movement or force (no text or symbols present)■ Stavite pokrivnu kapicu.
Postavljanje kombinacije u otvor elementa
Mrežni kabl ne sme da se ošteti.
natural_image
Diagram of a dual-chamber appliance with two doors and directional arrows indicating flow or movement (no text or symbols)■ Gurnite kombinaciju uređaja u otvor tako da vrata uređaja vire još 2 mm ispred frontova elemenata.
natural_image
Diagram of a device rear panel with two arrows pointing to the front panel (no text or symbols present)
text_image
4 x 30 TX 15■ Vijcima pričvrstite kombinaciju dole desno i dole levo ispod na okolne elemente.
Kombinacija se tačno uklapa levo u otvor elementa. Front vrata stoji poravnato sa prednjim delom elementa.
■ Podesite bočno poravnanje vrata uređaja. (vidi: uputstvo za upotrebu uređaja, ugradnja uređaja u donji element)
Drvena radna ploča
text_image
4 x 14 TX 15■ Vijcima pričvrstite kombinaciju uređaja dodatno pomoću spojnice za radnu ploču.
■ Zatvorite donji deo elementa prateći uputstvo za upotrebu uređaja.(Vidi: uputstvo za upotrebu uređaja, ugradnja uređaja u donji element)
Priložena ventilaciona rešetka mora obavezno da se ugradi i da se, prema uputstvu uz uređaj, zajedno sa pri-loženim blokom od penastog materijala ugradi i koristi.
natural_image
Diagram showing two rectangular electronic devices with internal compartments and a bidirectional arrow indicating rotation (no text or symbols)natural_image
Line drawing of two open-framed electronic devices with visible internal compartments (no text or symbols)natural_image
Isometric line drawing of a 3D rectangular box with internal structural elements and downward arrows indicating force or movement (no text or symbols)natural_image
Cross-sectional diagram of a mechanical assembly with two arrows indicating directional movement (no text or symbols)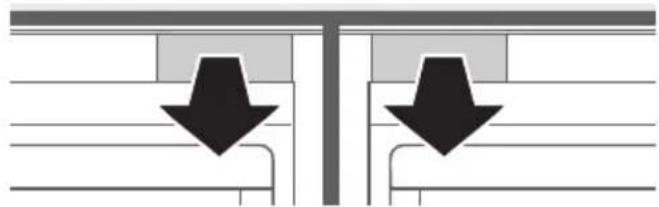
natural_image
Pure diagram of two vertical supports with downward arrows indicating direction, no text or symbols presenttext_image
Technical diagram of a mechanical assembly with numbered components and directional arrows indicating parts of motion or assembly.text_image
Technical diagram of a mechanical assembly with numbered components and directional arrows indicating assembly steps.text_image
Technical diagram of a mechanical assembly with numbered components and directional arrows indicating motion or force.natural_image
Diagram showing two rectangular components above a horizontal line with control points, no text or symbols present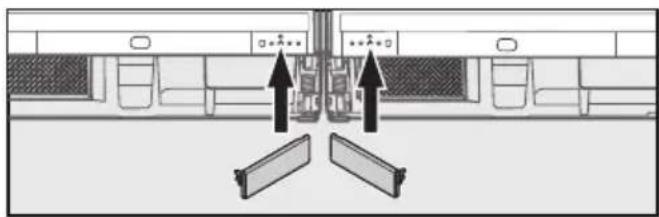
natural_image
Diagram showing three directional arrows pointing to a central vertical structure with surrounding rectangular elements (no text or symbols)natural_image
Diagram of a dual-chamber appliance with two doors and directional arrows indicating flow or movement (no text or symbols)natural_image
Diagram of a device rear panel with two arrows pointing to the front panel (no text or symbols present)
text_image
4 x 30 TX 15natural_image
Diagram showing two rectangular electronic devices with internal compartments and a bidirectional arrow indicating rotation (no text or symbols present)natural_image
Diagram of two open computer monitors with visible front and back panels, no text or symbols presentnatural_image
Isometric line drawing of a 3D rectangular frame with internal structural elements and downward arrows indicating force or movement (no text or symbols)natural_image
Pure mechanical assembly diagram showing two cross-sectional views with arrows indicating direction (no text or symbols)text_image
Technical diagram of a mechanical assembly with numbered components and directional arrows indicating parts of motion or assembly.text_image
Technical diagram of a mechanical assembly with numbered components and directional arrows indicating parts of motion or assembly.text_image
Technical diagram of a mechanical assembly with numbered components and directional arrows indicating motion or force.natural_image
Diagram showing two rectangular components above a grid with arrows pointing to specific cells (no text or symbols present)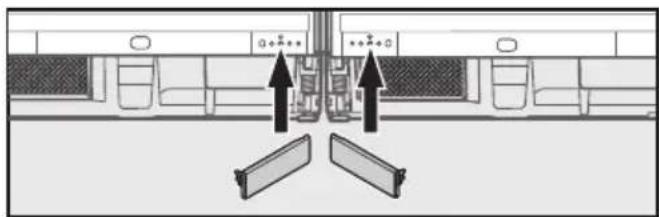
natural_image
Diagram of a vehicle interior with three directional arrows pointing to the front panel (no text or symbols present)natural_image
Diagram of a dual-chamber kitchen appliance with two doors and directional arrows indicating top-down (no text or symbols)natural_image
Diagram of a device rear panel with two arrows pointing to the front panel (no text or symbols present)
text_image
4 x 30 TX 15natural_image
Diagram showing two rectangular electronic devices with internal components, one with an arrow indicating rotation or assembly (no text or symbols present)natural_image
Diagram of two open rectangular electronic devices with internal compartments and mounting base (no text or symbols)Teèaji vrat morajo biti pri obeh aparatih na zunanji strani.
Priprava, poravnavanje in po-vezava aparatov
■ Aparata postavite enega poleg drugega pred vgradno nišo.
natural_image
Isometric line drawing of a 3D rectangular frame with internal structural elements and downward arrows indicating force or movement (no text or symbols)natural_image
Pure mechanical assembly diagram showing two cross-sectional views with arrows indicating direction (no text or symbols)text_image
Technical diagram of a mechanical assembly with numbered components and directional arrows indicating parts of motion or assembly.text_image
Technical diagram of a mechanical assembly with numbered components and directional arrows indicating assembly steps.text_image
Technical diagram of a mechanical assembly with numbered components and directional arrows indicating motion or assembly.text_image
Diagram showing two rectangular panels above a grid with arrows pointing to labeled points, likely illustrating a process or layout concept.
natural_image
Diagram of a vehicle interior with three directional arrows indicating movement or force (no text or symbols present)■ Namestite pokrova.
Potiskanje aparatov v nišo
natural_image
Diagram of a dual-chamber kitchen appliance with two doors and directional arrows indicating top-down orientation (no text or symbols)■ Aparata potisnite v nišo tako, da za 2 mm izstopata iz površine sprednjih stranic omar.
natural_image
Diagram of a computer monitor rear panel with two connectors and a close-up view of the front panel (no text or symbols)
text_image
4 x 30 TX 15■ Kombinacijo aparatov privijte spodaj desno in spodaj levo na sosednji omarici.
natural_image
Diagram showing two rectangular electronic devices with internal components and an arrow indicating rotation (no text or symbols)natural_image
Diagram of two open electronic devices with front panels and base connectors (no text or symbols)natural_image
Isometric line drawing of a 3D rectangular box with internal structural elements and downward arrows indicating force or movement (no text or symbols)natural_image
Pure mechanical assembly diagram showing two cross-sectional views with arrows indicating direction (no text or symbols)■ Kapakları alınız.
text_image
Technical diagram of a mechanical assembly with numbered components and directional arrows indicating parts of each part.text_image
Technical diagram of a mechanical assembly with numbered components and directional arrows indicating assembly steps.text_image
Technical diagram of a mechanical assembly with numbered components and directional arrows indicating motion or assembly.text_image
Diagram showing two rectangular panels above a grid with arrows pointing to labeled boxes, likely illustrating a process or layout concept.
natural_image
Diagram of a vehicle interior with four directional arrows indicating movement or force (no text or symbols present)natural_image
Diagram of a dual-chamber kitchen appliance with two doors and directional arrows indicating top-down orientation (no text or symbols)natural_image
Diagram of a device rear panel with two arrows pointing to the front panel (no text or symbols present)
text_image
4 x 30 TX 15natural_image
Technical line drawing of a mechanical component with mounting holes and a bracket (no text or symbols)
natural_image
Technical line drawing of a mechanical bracket or coupling (no text or symbols)
natural_image
Mechanical component diagram showing a shaft and flange assembly (no text or symbols)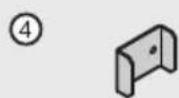

8x
natural_image
Diagram showing two rectangular electronic devices with internal compartments and a bidirectional arrow indicating rotation (no text or symbols)natural_image
Diagram of two open rectangular electronic devices with internal compartments and base blocks (no text or symbols)natural_image
Isometric line drawing of a 3D rectangular frame with internal structural elements and downward arrows indicating force or movement (no text or symbols)natural_image
Pure mechanical assembly diagram showing two cross-sectional views with arrows indicating direction (no text or symbols)text_image
Technical diagram of a mechanical assembly with numbered components and directional arrows indicating parts of motion or assembly.text_image
Technical diagram of a mechanical assembly with numbered components and directional arrows indicating assembly steps.text_image
Technical diagram of a mechanical assembly with numbered components and directional arrows indicating motion or assembly.text_image
Diagram showing two rectangular panels above a grid with arrows pointing to labeled points, likely illustrating a process or layout concept.
natural_image
Diagram of a vehicle interior with three directional arrows indicating movement or force (no text or symbols present)natural_image
Diagram of a double-door appliance with two doors and directional arrows indicating top-down orientation (no text or symbols)natural_image
Diagram of a device rear panel with two arrows pointing to the front panel (no text or symbols present)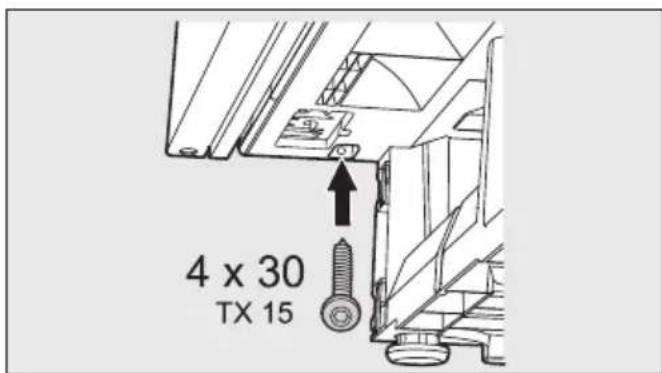
text_image
4 x 30 TX 15natural_image
Mechanical component diagram showing a bracket and mounting flange (no text or symbols)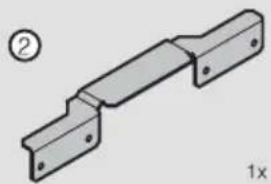
natural_image
Technical drawing of a mechanical bracket with mounting holes and a 1x multiplier label (no text or symbols on the diagram itself)
natural_image
Mechanical component diagram showing a bracket with mounting holes and a 1x scaling indicator (no text or symbols)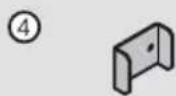
8x
進行並列安裝時,需使用以下工具:
natural_image
Diagram showing two rectangular electronic devices with internal compartments and a bidirectional arrow indicating rotation (no text or symbols)natural_image
Diagram of two open-framed panels with internal compartments, no text or symbols present兩邊門鉸都應裝在外側。
準備、調校和接駁装置
■ 將裝置並排放在嵌入位置前方。
natural_image
Isometric line drawing of a 3D rectangular box with internal structural elements and downward arrows indicating force or movement (no text or symbols)未經對齊裝置可能會意外傾側。
如需將裝置與較高身櫥櫃前端對齊:
natural_image
Pure technical diagram showing two mechanical assembly states with downward arrows indicating motion or force (no text or symbols)■ 拆下護蓋
text_image
Technical diagram of a mechanical assembly with numbered components and directional arrows indicating parts of motion or assembly.text_image
Technical diagram of a mechanical assembly with numbered components and directional arrows indicating motion or assembly.text_image
Technical diagram of a train track system with numbered components and directional arrows indicating movement or force.text_image
Diagram showing two layout views of a vehicle with directional arrows indicating movement or positioning, labeled with Chinese characters.■ 裝上護蓋。
將裝置組合推入嵌入位置
請勿損壞電線。
natural_image
Diagram of a dual-chamber appliance with two doors and directional arrows indicating flow or movement (no text or symbols)natural_image
Diagram of a mechanical assembly with two vertical components and directional arrows indicating movement or force (no text or symbols present)KSK 6300 Side by Side Kit