
GXT 33 18101 - Mouse TRUST - Free user manual and instructions
Find the device manual for free GXT 33 18101 TRUST in PDF.
| Product Type | Wired Gaming Mouse |
| Brand | Trust |
| Model | GXT 33 18101 |
| Connectivity | Wired USB |
| Number of Buttons | 8 programmable buttons + clickable scroll wheel |
| DPI Button | Yes (4 sensitivity levels) |
| Profiles | 3 profiles (red, green, blue) with internal memory |
| Macros | Programmable via software (up to 5888 bytes) |
| Adjustable Weight | Yes, with weight system |
| Cable Length | Approximately 1.8 m (estimate) |
| Dimensions (L x W x H) | Not specified in the manual |
| Weight | Variable depending on weight configuration |
| Power Supply | USB (5V, 500 mA max) |
| Software | Provided on CD-ROM or downloadable |
| Operating System | Windows (not specified for Mac) |
| Care and Cleaning | Clean with a soft, dry cloth |
| Safety Precautions | Avoid moisture, do not disassemble |
| Spare Parts | Not provided |
| Repairability | User not repairable |
| General Information | Gaming mouse designed for gamers, with advanced customization |
Frequently Asked Questions - GXT 33 18101 TRUST
User questions about GXT 33 18101 TRUST
0 question about this device. Answer the ones you know or ask your own.
Ask a new question about this device
Download the instructions for your Mouse in PDF format for free! Find your manual GXT 33 18101 - TRUST and take your electronic device back in hand. On this page are published all the documents necessary for the use of your device. GXT 33 18101 by TRUST.
USER MANUAL GXT 33 18101 TRUST
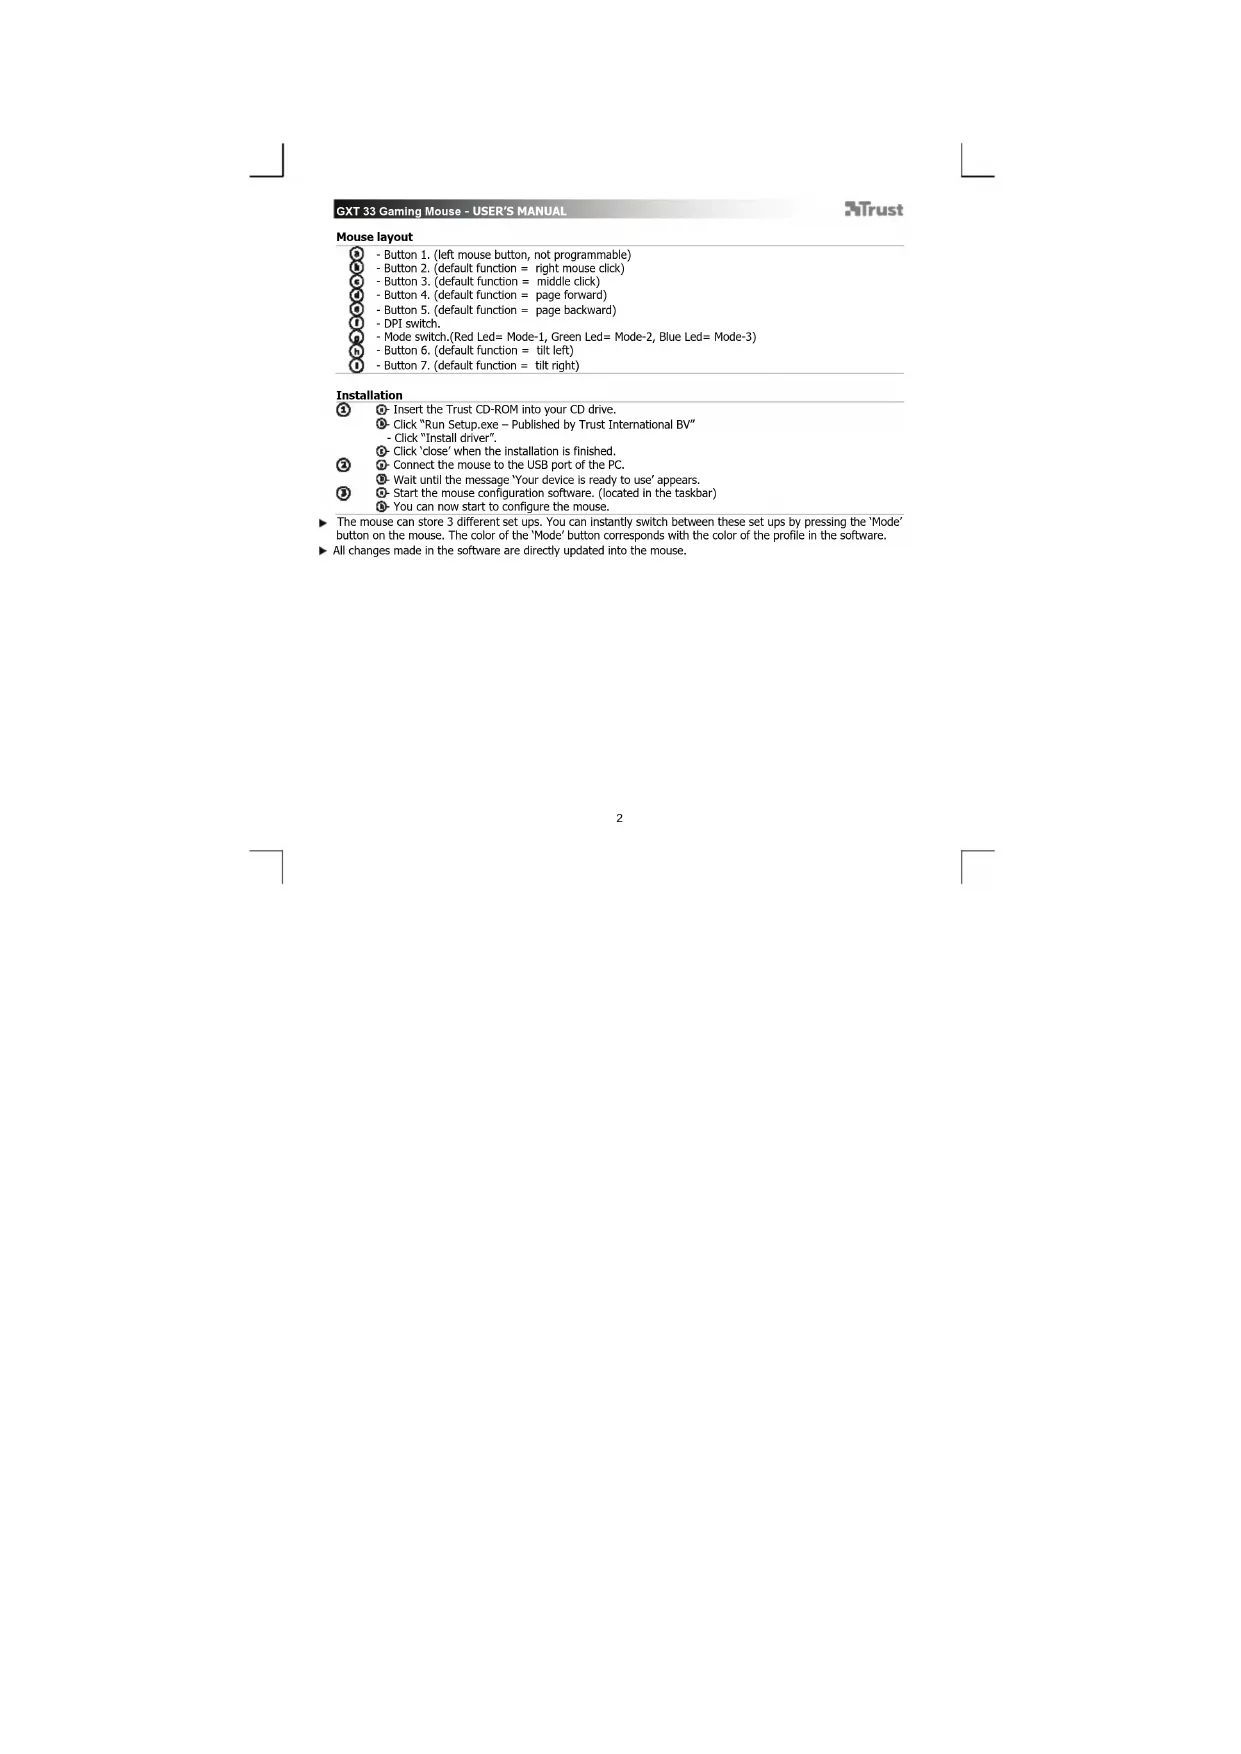
Insert the Trust CD-ROM into your CD drive.
Click "Run Setup.exe - Published by Trust International BV"
- Click "Install driver".
Click close'when the installation is finished.
Connect the mouse to the USB port of the PC.
Wait until the message 'Your device is ready to use' appears.
Start the mouse configuration software. (located in the taskbar)
- You can now start to configure the mouse.
The mouse can store 3 different set ups. You can instantly switch between these set ups by pressing the Mode
button on the mouse. The color of the 'Mode' button corresponds with the color of the profile in the software.
All changes made in the software are directly updated into the mouse.
Configuration
Create a profile
The mouse has 3 different profiles (Red, Green and Blue) The color of the profile corresponds with the
color of the 'Mode' button on the mouse.
- Click on the tab 'Button settings'.
- To name a profile, double click on the white space next to the profile color.
- Enter a name for the profile. (max. 8 characters)
Configuration
Create an Macro
-
Click on the tab 'Macro settings',
-
Click on the 'Record' button
-
You can now record the macro. (the maximum for all macro's combined is 5888 Bytes)
-
Click on 'Stop' to stop the macro recording
-
Click and hold on a random event in the macro editor and drag the macro to an empty field in the left window. (Macro List)
-
Give the macro an name and press Enter.
-
The recorded macro can be assigned to a mouse button in the 'Button settings' tab.
Assign an macro to an mouse button
- Click on the tab 'Button settings'.
- Click on the button witch you want to re-assign.
- Click on a macro in the list.
- The selected macro is now assigned to the button.
DPI Settings & Tools
The Mouse has 4 different DPI settings that can be defined in the software.
Change a DPI setting
Click on the DPI settings tab
- Click on the DPI setting that you whish to change.
- By moving the sliders from left (low DPI) to right (high DPI) you can adjust the mouse speed.
The settings are directly uploaded to the mouse
Backup the mouse configuration
- Click on 'Backup'.
- Choose the location where you want to save your backup
- Give the savefile an name. (default name is backup + current date)
-
Click on 'Save'.
-
the backup file is now beeing created. (this will take a couple of seconds/minutes)
Restore a backup file
- Click on 'Restore'
- Select the backup file that you which to be restored.
-
Click on 'Open'
-
The mouse is now bee ing restored. (this will take a couple of seconds/minutes)
Reset all settings
- Click on 'Reset'.
(Warning you will loose all data) -
Click on 'Yes'.
-
The mouse is now beeing reset. (this will take a couple of seconds/minutes)
Changing the weights
-
Remove the backcover of the mouse by turning it.
-
Place or remove the weights.
- Store the removed weights in the storage box.
Fare cliC su "Run Setup.exe - Published by Trust International BV".
-Farecliscu"Installa driver".
Published by Trust International BV"
- Clique em "Instalar controlador". ["Install driver"]
Klik gå "Run Setup.exe - Published by Trust International BV".
- Klik pa "Installer driver".
Klik pa Luk, nar installationen er udfort.
vindue (Macro List).
Kliknij Run Setup.exe - Published by Trust International BV".
- Kliknj, Install driver" [Zainstalu sterownik".
6-Weckniete Run Setup.exe - Published by Trust International BV>.
- -LJIENKHTe «Installdriver»[«YcTaHOBtBdpaHBeP»]
-1eKHTe 一 Close [三 3a k p b t b ] nocne oKOHaHn yCTAHOBKn.
-0noknouHcMeMbIbKUSB-nopTyIK.
PnOoXnTe, noka nOaBnTc coo6eHHe «Your device is ready to use» [«YcTpOuCTBO roTOBO K
NCHONB30BAHNO》
3anyCTHn nporpammy HactpoMk Mbiu (KOTOPA HAXOITCA Ha naHenn 3aDau).
Tenepb MoKHO HaaTaB HAcTpOy MbIiN.
MbIb IMeET 3 paIIMHbIX pexkIMma HACTPOKn. Bbl MoXeTe peEKPJIouATbcg MEXdy 3TNIM pEXIMMAmH, HAXAB KHOKNY MIIIN Mode [Pekim] .LqET KHOKNI Mode [Pekim] COOTBETCTBYET LQETy npOPIHMBA nporpAMc.
Bce H3MeHHe, KOtOpbIe BHOcTcB IpOpaMMHoe 06ecneHHe, HenocpeCTBeHHo 06HOBJIIOTCnM Myi.
Hactpoika
Co3daT npoФnB
MIMMBIEE3p3HNNHbXPnOHH (KpaCHB, 3eneHHN cHHH).UEB npOHHcooTBeCTBYET UBEY KHOKNI [Mode] /PekHM
- 申EeKHTe BknaDky «Button settings» [«NapaMeTpbl KhoIKN»].
-ДИРПСВЕОЕМЕСИΝΡОДПЛЮЕКНITEДАЖДHA NAΥСТOMΝΡОСТРАСТBE BOЗLE ZEBETA PDPCHN.
-BBcInTe NmI npoHnIa (MaKc.8 CmHbONOB).
⑨Hacrpoika
Co3dHne MaKpoca
- WENKHNTE KONKY《Record》[3anncb].
TenepeHNO pnoaBCTn 3aNNb MaKpOca (MAKcIMaIbIb pa3Mep BCex MAKpOCOB dONKeH COCTAaRTb HE Gooee 5888 6aHT). - UenKHTe
[OCTaHOBtB], YTO6bI OCTaHOBtB 3aNc6 MaKpoca. - ⅢeKnHtne I yedkhaaIte cnayhnoe c6bIyHe B peaktope MakoPoB, nepetauitme MaKpoc B nycToe none B neBOM ok E(MacoLr)[CcnKoc MakoPoB]。
-Письштак мakpop сма и Наммгite «Enter», -Занимын мakpos может Битун Истонов КОНКЕ мьши В Кладд«Button settings»「Параметри конд�」
Ha3haeyHne MaKpOca KhoNke MbIu
- 申enKHTeBknaKy «Button settings》[«NapameTpkiKhoIKNI].
- 申EeKHTe KONky, KOtopyIO Heo5xOdmo NepeHa3HaHTb.
-ENKHTe MaKPOc n3 CNHCKa
BbippaHHbMakpoc TenepeHa3aueh KhoIke.
⑦HactpoKn HNCTpyMeHTbI DPI
MbHb HMeet 4 pa3nHbIX HactpOKn DPI, KOtOpBle MoXHO ONpeDeNITB B npOrpaMMHom o6ecneEHm.
3 MeHeHHe HACTPOeK DPI
- UenKHTe BknaKy DPI & Tools] [DPI n HnCTpyMeHtB].
- ⅢeKHTHe HAcTPOH KOTOpBHe O6xOIMn N3MeHHTb.
- Nepemua non3yHKn CneBa (H3Koe pa3peuHne DPI) HanpaBO (BbICOKoe pa3peuHne DPI), MoXHO HAcTpOnTb
CKOPoCTb nepMeueHHyKa3aTeHJ.
-HactpoK3aRpykaiOTcHEnocpcCTBeHHBO Mblb.
Co3daHnepe3epBHOKONHHaCTpoekMbIIN
-1eKHTe《Backup》[PeepBnKoNnR].
-BbIbePte MeCToNoIOXKeHne dna coXpaHeHHpe3epBHOKoHN.
-ПисбовпгpepebHOMyФаИу ИМЯ (ИМЯ NO yMOnuHaHnIO - backup [d#aT a pe3epBHorO kONnPoBaHnI] + TeKyuuaa
data).
-ENKHTe «Save» [«CoxpaHNTb»]
- Nocne 3TOrO 6yDenT co3dAn faHn pe3epBHOI KOHN (3OT npoucc 3aHMeT HeKcONbKO cekHyD/MHHY).
BocTaHOBHeHe paHa peepBHOI KOHN
-ENKHTe «Restore»[«BocctaHOBTb»]
- Bb6cpnte paH pc3epBHO KONHH, KOtOpH Hc06xOIMO BOcCTaHOBTb.
-UenKnTe[OTKpbntb]. - Nocne 3TOrO 6ydyT BOCCTAHOBHeHb HAcTPOkM Mblu (3OT npoecc 3aIeMeT HeCKoNbK eKyHd/MnHyT).
C6poc Bcex HacTpoek
- WENKHNTE «Reset» [«C6pocuTb»].
(BHMMaHMe!Bce daHHbIe 6dyT noTepeHbI.)
-UenKHTe
-Notne 3Toro 6dyT cpoWeHb HAcToPmMbHn (3TO T npouecc 3aHMeT HeckoBko CekyHd/MnHyT).
N3MeHeHne Beca MbIu
- NobephyB 3aHIOK KpbuKy Mbu, CHMMTe ee.
- YCTaHOBHTe HNN CMeHHTe rpy3KN.
-XpaHHTe CHTbIe rpy3nK B KOHTeHepE dJa xpaHeHna.
AiTaEgTou novTKIOU
Anuupyia iac paKpoEvToAic
KAVTE KAIK OTNV KAPTELA 'Macro settings' [Puθμiεις μακροεντολύν].
-KavTe KAIK OTO kouml 'Record' [Eyypa].
-Mnopeite Tupa va kataypauette n paekoevtoln (to eioo oov pakoevtowv qivai 5888
KAVTE KIK OTO 'Stop' [STon] yia va TepuatioET TIV Eyypaq
- KavTe kai kpaTHoTne natnuevo To nAnKToPO Tou novTKou oE eva TuXalo OuBav OTO ouVtaktn paKpoEvToAow
kai opete Tn jakpoevtoan oEv n evo nedio oTo apotepo npapduo (Macro List [AigTa jakpoevtoaw])
-Avaote evoova otn paokoeVtoi kai natntote Enter. - H JakupeVToA'nu Nau katayapdtKe nmuope va avtioaioTe OE EVA nAnktpo Tou novtkiou Otny KapteLa Button settings [Puroiueic nAnktpov].
Avtoxian paacpokoevtolc e eva nktpo tou novtkiou
-KavTE KAIK OTNV KapTeAa Button settings' [PuBuloeic nAnkTpwv].
-KavTe KAI OTO nAnKTPO TOU onoiou BéAETe va aaaaEETe TIV AVTIOTIOxION.
KavTe KAIk OE pia paKaepvToAn Otn AioTa.
-H eniayevn paKPOeVToaH eXeavntoiaTei naov oTo nAHTpo.
7 Puθμioεic DPI & Epyaεia
To novtiki diaheTei 4 diaopopetikc puioeic DPI, o onoe c npopoov va opiotou o loiajkko.
Alambdai puaqpuianDSPI
- Kävte kλik Θην καρτέλa 'DPI & Tools' (DPI & Epyaλείσι).
-KayTe KAIK OTn pUOn DPI nou BAAETe y aAaEETe.
-Mnopeite va npooapuoote Tny TaxUTnTo Tou novTKIOU etakivwVtac Ta puBtiOIA ano Ta apioTepa (xunhTm)
DPI) eoc ta deEio (wnnTn DPI) - Oi puoiieic anootelovtai aea oto novia.
AviypaopaoaopaaleiaqyaTn diauoppwn Tou novtkiou
- Configuration
- Create a profile
- Create an Macro
- DPI Settings & Tools
- Change a DPI setting
- Backup the mouse configuration
- Restore a backup file
- Reset all settings
- Changing the weights
- Hactpoika
- ⑨Hacrpoika
- ⑦HactpoKn HNCTpyMeHTbI DPI
- MeHeHHe HACTPOeK DPI
- Co3daHnepe3epBHOKONHHaCTpoekMbIIN
- BocTaHOBHeHe paHa peepBHOI KOHN
- -ENKHTe «Restore»[«BocctaHOBTb»]
- C6poc Bcex HacTpoek
- - WENKHNTE «Reset» [«C6pocuTb»].
- N3MeHeHne Beca MbIu
- AiTaEgTou novTKIOU
- Puθμioεic DPI & Epyaεia
- Alambdai puaqpuianDSPI
- AviypaopaoaopaaleiaqyaTn diauoppwn Tou novtkiou
Brand : TRUST
Model : GXT 33 18101
Category : Mouse