
MB 4 RTP - Lawn mower VIKING - Free user manual and instructions
Find the device manual for free MB 4 RTP VIKING in PDF.
| Product type | Lawn mower |
| Brand | Viking |
| Model | MB 4 RTP |
| Usage category | Professional |
| Cutting width | 53 cm |
| Adjustable cutting height | 30 - 70 mm (5 positions) |
| Engine | Kohler XT8, 4-stroke |
| Displacement | 173 cm³ |
| Rated power | 2.6 kW at 2800 rpm |
| Fuel tank capacity | 1.4 L |
| Fuel | Unleaded gasoline |
| Engine oil | Biodegradable (SAE 30 or 10W-30) |
| Cutting system | Mulching |
| Drive | Front-wheel drive |
| Front/rear wheel diameter | 210 mm / 205 mm |
| Weight | 42 kg |
| Dimensions (L x W x H) | 140 x 57 x 108 cm |
| Guaranteed sound power level | 93 dB(A) |
| Sound pressure level at operator station | 86 dB(A) |
| Safety device | Engine cut-off bar (stops in 3 s) |
| Starting | Recoil start |
| Blade rotation speed | 2800 rpm |
| Spare parts | Blade (63837020100), Fixing screw (90083199067), Lock washer (00007026600) |
| Maintenance | Clean after each use, check blade before each use, annual service by authorized dealer |
| Compliance | CE (directives 2006/42/EC, 2000/14/EC) |
Frequently Asked Questions - MB 4 RTP VIKING
User questions about MB 4 RTP VIKING
0 question about this device. Answer the ones you know or ask your own.
Ask a new question about this device
Download the instructions for your Lawn mower in PDF format for free! Find your manual MB 4 RTP - VIKING and take your electronic device back in hand. On this page are published all the documents necessary for the use of your device. MB 4 RTP by VIKING.
USER MANUAL MB 4 RTP VIKING
MB 4 R, MB 4 RT, MB 4 RTP
VIKING

MB 4.0 R MB 4.0 RT MB 4.0 RTP
DE Gebrauchsanleitung
EN Instruction manual
FR Manuel d'utilisation
NL Gebruiksaanwijzing
IT Istruzioni per l'uso
ES Manual de instrucciones
PT Manual de'utilisation
NO Bruksanvising
SV Bruksanvisning
FI Käyttoopas
DA Betjeningsvejledning
PL Instrukcja obslugi
HU Hasznalati utmutató
HR Upute za uporabu
LV Lietosanas pamaciba
LT Naudojimo instrukcija
RU Hctpyku no 3Kcnnyatau
ET Kasutusjuhend
C

www.viking-garden.com


MB 4.0 RT
MB 4.0 RTP
97/68/EC, 2000/14/EC, 2004/108/EC, 2006/42/EC
MB 4.0 R, MB 4.0 RT:
MB 4.0 R, MB 4.0 RT, MB 4.0 RTP
Thank you for choosing a VKING quality product.
This product has been produced using state-of-the-art production methods and extensive quality assurance procedures, because our goal is only achieved if you, the customer, are satisfied with your machine.
If you have any questions concerning your machine, please contact your dealer or our sales agency directly.
I hope that your VIKING machine will give you great enjoyment.

Dr. Peter Pretzsch
Management
Svanen

The MB 4.0 R,
MB 4.0 RT, MB 4.0 RTP
models
comply with the Nordic
Ecolabel.
1. Table of contents
Notes on the instruction manual 30
General 30
Instructions for reading the instruction manual 30
Machine overview 30
For your safety 30
General 30
Refilling the tank - handling petrol 31
Clothing and equipment 32
Transporting the machine 32
Before operation 32
Working with your machine 33
Maintenance and repairs 34
Storage for prolonged periods without operation 35
Disposal 36
Description of symbols 36
Standard equipment 36
Preparing the machine for operation 37
General 37
Assembling the handlebar (MB 4 R, MB 4 RT) 37
Assembling the handlebar (MB 4 RTP) 37
Installing the cable clip 37
Attaching the cable (MB 4 RT, MB 4 RTP) 37
Fuel and engine oil 37
Controls 38
General 38
Height adjustment of the handlebar 38
Folding down the handlebar 38
Attaching and detaching the recoil starter rope 38
Cutting height adjustment
Safety devices
Motorstop lever
Notes on working with the machine
General information on mulching
When is mulching permissible?
How should mulching be performed?
How often should mulching be performed?
Operating the machine
Starting the engine
Stopping the engine
Self-propulsion (MB 4 RT, MB 4 RTP)
Maintenance
Cleaning the machine
Checkingblade wear
Sharpening the mowing blade
Removing and installing mowing blade
Engine
Storage (winter break)
Transport
Transporting
Environmental protection
Minimising wear and preventing damage
Standard spare parts
CE - manufacturer's declaration of conformity
Technical specifications
Troubleshooting
Service schedule
Handover confirmation
Service confirmation
2. Notes on the instruction manual
2.1 General
This instruction manual constitutes original manufacturer's instructions in the sense of EC Directive 2006/42/EC.
VIKING is continually striving to further develop its range of products; we therefore reserve the right to make alterations to the form, technical specifications and equipment level of our standard equipment.
For this reason, the information and illustrations in this manual are subject to alterations.
2.2 Instructions for reading the instruction manual
Illustrations and texts describe specific operating steps.
All symbols which are affixed to the machine are explained in this instruction manual.
Viewing direction:
Viewing direction when left and right are used in the instruction manual: the user is standing behind the machine (working position).
Section reference:
References to relevant sections and subsections for further descriptions are made using arrows. The following example shows a reference to a section: ( 4.)
Designation of text passages:
The instructions described can be identified as in the following examples.
Operating steps which require intervention on the part of the user:
- Release screw (1) using a screwdriver, operate lever (2)...
General lists:
- Use of the product for sporting or competitive events
Texts with added significance:
Text passages with added significance are identified using the symbols described below in order to especially emphasise them in the instruction manual:

Danger
Risk of accident and severe injury to persons. A certain type of behaviour is necessary or must be avoided.

Warning
Risk of injury to persons. A certain type of behaviour prevents possible or probable injuries.

Caution
Minor injuries or material damage can be prevented by a certain type of behaviour.

Note
Information for better use of the machine and in order to avoid possible operating errors.
Texts relating to illustrations:
Illustrations relating to use of the machine can be found in the front of this instruction manual.
The camera symbol serves to link the figures on the illustration pages with the corresponding text passages in the instruction manual.

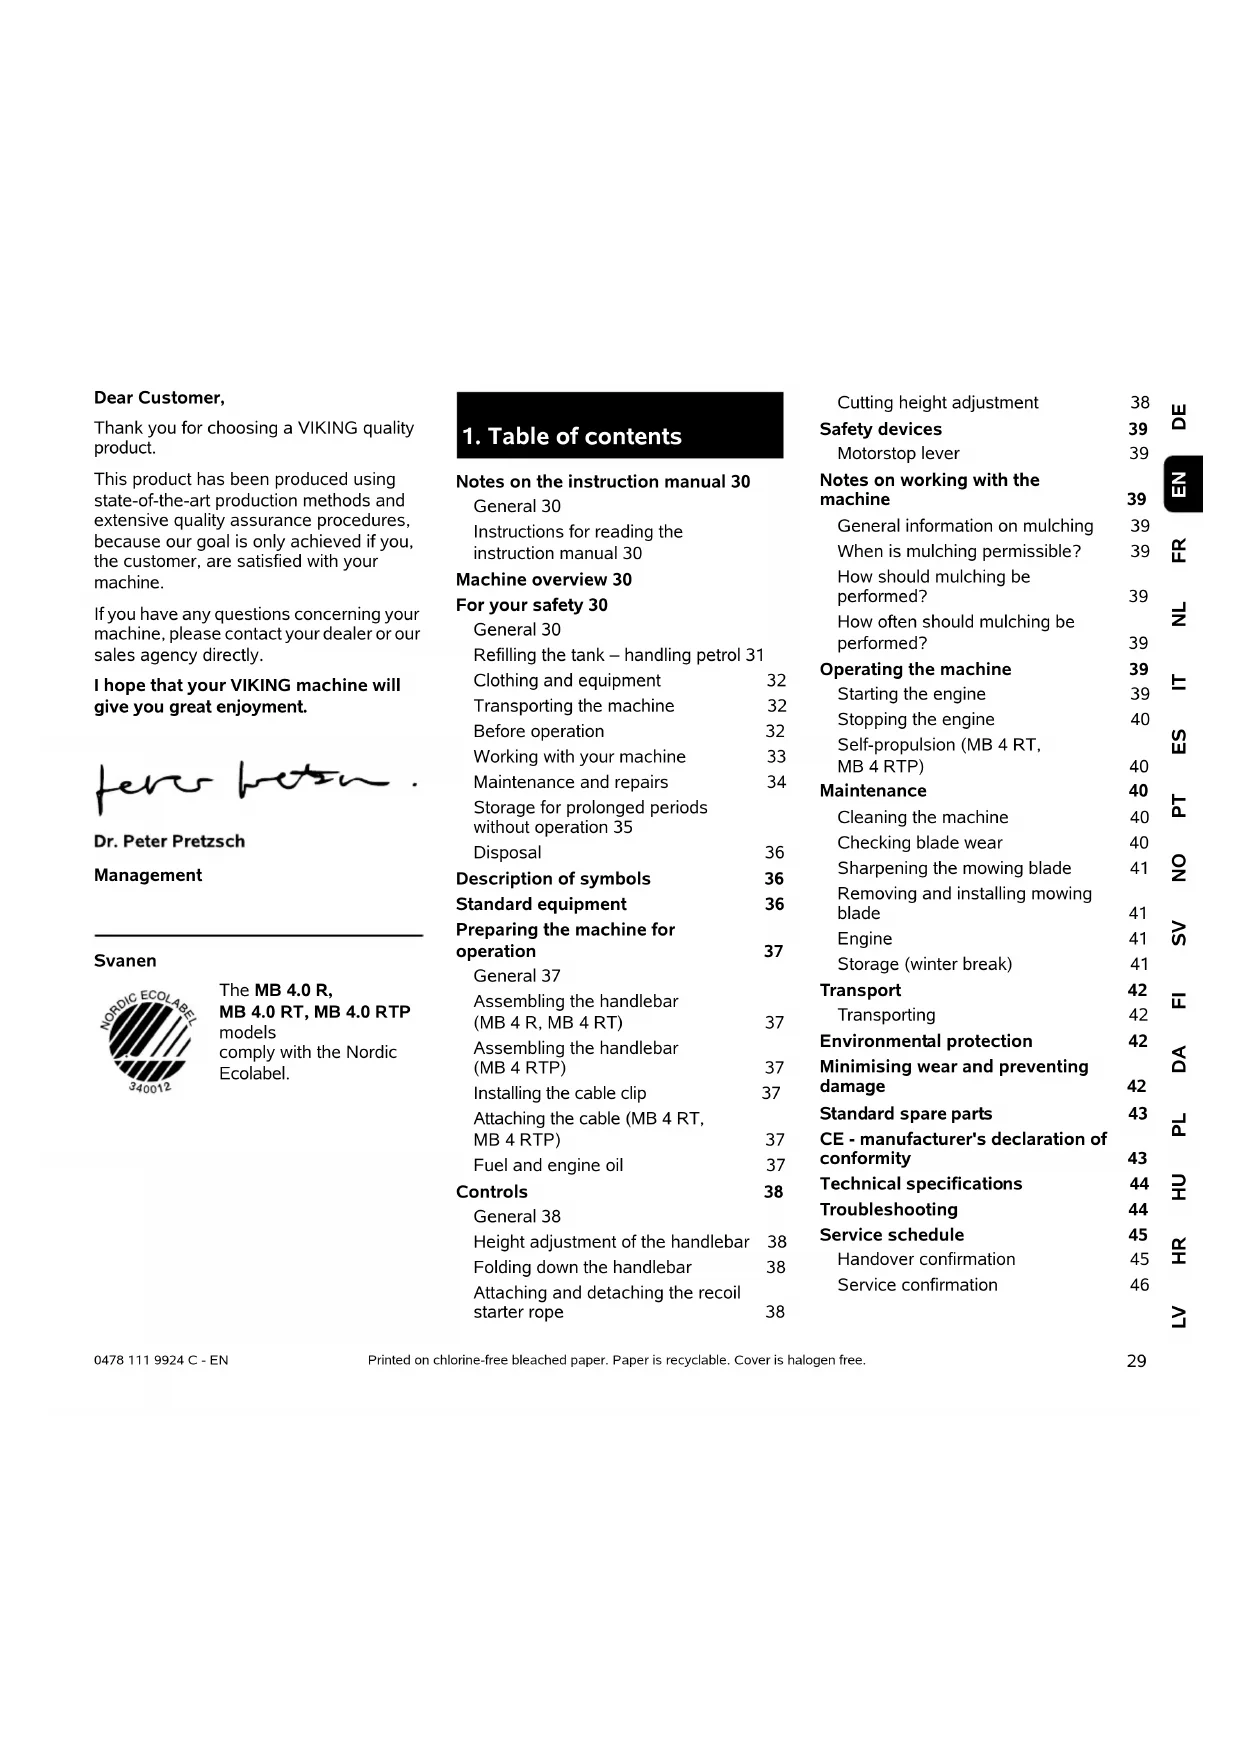
3. Machine overview

1 Motorstop lever
2 Self-propulsion lever (MB 4 RT/RTP)
3 Handlebar
4 Cable guide
5 Handlebar screw fastening (MB 4 RTP)
Quick-clamping device (MB 4 R/RT)
6 Cutting height adjustment
7 Housing
8 Impact protectors
9 Combustion engine
10 Spark plug socket
11 Carrying handle, front
12 Carrying handle, rear
13 Wheel scraper
4. For your safety
4.1 General

These safety regulations must be observed when working with the machine.

Read the entire instruction manual before using the machine for the first time. Keep the instruction manual in a safe
place for future reference.
Observe the operating and maintenance instructions contained in the separate engine instruction manual.
These safety precautions are essential for your safety, however the list is not exhaustive. Always use the machine in a reasonable and responsible manner and be aware that the user is responsible for accidents involving third parties or their property.
Make sure that you are familiar with the controls and use of the machine.
The machine must only be used by persons who have read the instruction manual and are familiar with operation of the machine. The user should seek expert and practical instruction prior to initial operation. The user must receive instruction on safe use of the machine from the vendor or another expert.
During this instruction, the user should be made aware that the utmost care and concentration are required for working with the machine.
Only give or lend the machine, including any accessories, to persons who are familiar with this model and how to operate it. The instruction manual forms part of the machine and must always be provided to persons borrowing it.
The machine must only be operated by persons who are well rested and in good physical and mental condition. If your health is impaired, you should consult your doctor to determine whether working with the machine is possible. The machine should not be operated after the consumption of alcohol, drugs or medications which impair reactions.
Never allow children under the age of 16 to use the machine. Local regulations may specify a minimum age for users.
This machine is not suitable for use by persons (in particular children) with impaired physical, sensory or mental faculties or those lacking the appropriate experience and/or knowledge, unless supervised by a person responsible for their safety or having received instructions on use of the machine from such person. Children must be supervised, in order to ensure that they do not play with the machine.
The MB 4 R and MB 4 RT models are intended for private use.
The MB 4 RTP model is intended for professional use.
Caution - risk of accident:
The lawn mower is only intended for mowing lawns. Its use for other purposes is not permitted and may be dangerous or result in damage to the machine.
Due to the physical danger to the user, the lawn mower must not be used for the following applications (incomplete list):
- for trimming bushes, hedges and shrubs.
- for cutting creepers,
- for the care of lawn roofs and balcony boxes,
- for shredding or chopping tree or hedge cuttings,
for clearing paths (vacuuming, blowing), - for levelling earth mounds, e.g. mole hills.
For safety reasons, any modification to the machine, except the proper installation of accessories approved by VIKING, is forbidden and results in voiding of the
warranty cover. Information regarding approved accessories can be obtained from your VKING specialist dealer.
In particular, any tampering with the machine which increases the power output or speed of the engine or motor is forbidden.
It is not permitted to transport objects, animals or persons, particularly children, on the machine.
Particular care is required during use in public green spaces, parks, sports fields, along roads and in agricultural and forestry businesses.

Caution: Danger to health due to vibrations!
Excessive exposure to vibrations can result in damage
to the cardiovascular or nervous system, particularly in persons with cardiovascular problems. Please consult a physician if you experience symptoms that may have been caused by vibrational loads.
Symptoms of this kind principally affect the fingers, hands or wrists and include (incomplete list):
- numbness,
- p a i n ,
- muscular weakness,
- skin discolouration,
- unpleasant tingling sensation.
4.2 Refilling the tank - handling petrol

Danger to life!
Petrol is poisonous and extremely inflammable.
Petrol must only be stored in appropriate, tested containers (canisters). Always screw on the fuel tank and canister caps properly and tightly. Defective caps must be replaced for safety reasons.
Never use beverage bottles or similar for disposal or storage of fuels and lubricants. Persons, particularly children, could be tempted to drink out of them.

Keep petrol away from sparks, naked flames, pilot lights, heat sources, and other ignition sources. Do not smoke!
Refill the tank out-of-doors and do not smoke during refilling.
Before refilling the tank, stop the engine and allow it to cool.
Refilling with petrol must be performed before the engine is started. When the engine is running or is hot, the tank cap must not be removed and the tank must not be refilled with petrol.
Do not fill fuel tank completely, but fill to approx. 4 cm below the edge of the filler neck so that the fuel has room to expand.
If petrol is spilled, the engine must only be started after the petrol-contaminated area has been cleaned. All attempts at starting must be avoided until the petrol fumes have dispersed (wipe dry).
Any spilt fuel must be wiped up immediately.
Clothing must be changed if it comes into contact with petrol.
Never store the machine with petrol in the tank inside a building. The resulting petrol fumes could come into contact with naked flames or sparks and could be ignited.
If it is necessary to drain the tank, this must be done out of doors.
4.3 Clothing and equipment

Always wear sturdy footwear with high-grip soles when working. Never work barefoot in ample, in sandals.
or, for example, in sandals.

Also always wear sturdy gloves and tie up and secure long hair (headscarf, cap, etc.) when performing maintenance and
cleaning work or when transporting the machine.

Wear suitable safety glasses when sharpening the mowing blade.

Always wear hearing protection when working with the machine.
Always wear long trousers and tight-fitting clothing when operating the machine.
Never wear loose clothes which may become caught on moving parts (control levers) – do not wear jewellery, ties or scarves.
4.4 Transporting the machine
Always wear gloves in order to prevent injuries due to sharp-edged and hot components.
Do not transport the machine with the engine running. Switch off the engine, let the blades come to a standstill and remove the spark plug socket prior to transport.
Only transport the machine once the engine has cooled down and with an empty fuel tank.
Use suitable loading aids (loading ramps, lifters).
Secure the machine on the load floor using adequately dimensioned fastening materials (straps, ropes, etc.).
Avoid contact with the mowing blade when lifting and carrying the machine.
Observe the information in the section "Transport". It describes how to lift and lash the machine. ( 13.)
When transporting the machine, always observe regional legislation, especially regarding load security and the transport of objects on load floors.
4.5 Before operation
Make sure that only persons who are familiar with the instruction manual are permitted to use the machine.
Check the fuel system (particularly visible parts such as e.g. tank, tank cap, hose connections) before operating the machine. In the event of any leaks or damage, do not start the engine - fire hazard!
Have the machine repaired by a specialist dealer prior to operation.
Observe the local regulations regarding permitted operating times for gardening power tools with combustion engines or electric motors.
Carefully inspect the complete area on which the machine is to be used and remove any stones, sticks, wires, bones and other foreign objects which could be thrown up by the machine. Obstacles (e.g. tree stumps, roots) can be easily overlooked in long grass.
For this reason, mark all foreign objects (obstacles) which are hidden in the lawn and cannot be removed before commencing work with the machine.
Defective mufflers and all other worn or damaged parts must be removed before use of the machine. Replace any illegible or damaged danger signs and warnings on the machine. Your VKING specialist has a supply of replacement stickers and all the other spare parts.
Check secure seating of the spark plug socket on the spark plug before using the machine.
The machine must only be used in good operating condition. Before each use, check whether:
- The machine is properly assembled.
- The cutting tool and the entire cutting unit (mowing blade, fastening elements, mowing deck housing) are in good condition. In particular check for secure fastening, damage (notches or cracks) and wear. ( 12.2)
- The tank cap is properly attached.
- The tank and fuel-carrying parts as well as the tank cap are in good condition.
- The safety devices (e.g. motorstop lever, housing, handlebar, protective grille) are in good condition and working properly.
- The oil cap is properly attached.
Carry out any necessary work or consult a specialist dealer. VIKING recommends VIKING specialist dealers.
4.6 Working with your machine

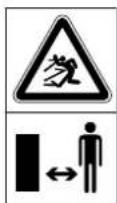
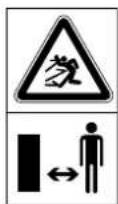
Never work when animals or persons, particularly children, are in the danger area.
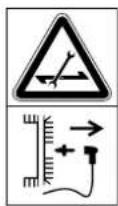
The switch and safety devices installed in the machine must not be removed or bypassed. In particular, never secure the motorstop lever to the handlebar (e.g. by tying it).

Caution - risk of injury! Never put hands or feet on or underneath rotating parts. Never touch the rotating blade.
Always observe the safety distance provided by the handlebar. The handlebar must always be installed correctly and must not be modified. Never operate the machine with the handlebar folded down.
Never attach any objects to the handlebar (e.g. work clothing).
Only work during the day or with good artificial light.
Do not operate the machine in the rain or during thunder storms, particularly when there is a risk of lightning strike.
The risk of accidents is higher if the ground is damp due to increased danger of slipping.
Particular caution should be exercised during working in order to prevent slipping. If possible, avoid using the machine when the ground is damp.
Exhaust gases:

Danger to life through poisoning! In the case of nausea, headache, impaired vision (e.g. decreasing field of view) hearing disorder, dizziness, decreasing power of concentration, stop working immediately. These symptoms may be caused by excessively high exhaust gas concentrations.

The machine generates poisonous exhaust gases when the engine is running. The gases contain poisonous
carbon monoxide, a colourless and odourless gas, as well as other pollutants. The engine must never be operated in closed or poorly ventilated spaces.
Starting:
Exercise care when starting and observe the instructions contained in the section entitled "Initial operation of machine". ( 11.)
Keep your feet a safe distance from the cutting tool.
The machine must not be tilted during start-up.
The self-propulsion lever must not be pressed when starting the engine.
Working on slopes:
Always work across and back on slopes, never up and down. If the user loses control when mowing up and down, there is a risk of being run over by the machine.
Be particularly careful when changing direction on a slope.
Always ensure good stability on slopes and avoid mowing on excessively steep slopes.
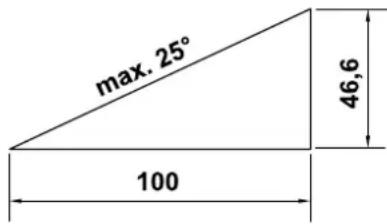
For safety reasons, the machine must not be used on slopes with an inclination of more than 25^ (46.6%). Risk of injury!
A slope inclination of 25^ corresponds to a vertical height increase of 46.6cm for a 100cm horizontal distance.

In order to ensure an adequate oil supply for the engine, the information in the accompanying engine instruction manual must be additionally observed when using the machine on slopes.
Working:

Risk of injury
Never place your hands or feet above, underneath or on rotating parts.

Do not try to examine the blade while the lawn mower is operating. Rotating blades can
cause injury.
Only operate the machine at walking speed - never run when working with the machine. Working quickly with the machine increases the risk of injury due to stumbling, slipping, etc.
Be particularly careful when turning the machine around or pulling it towards you. Risk of stumbling!
Use the machine with great care when working near rubbish dumps, ditches and embankments. In particular, ensure that you maintain sufficient distance to such danger areas.
Objects hidden in the grass (lawn sprinkler systems, posts, water valves, foundations, electrical wires, etc.) must be avoided. Never intentionally run over any such foreign objects.

Beware of the cutting tool running on for several seconds before coming to a standstill.
STOP Switch off the engine, allow the work tool to come to a complete standstill and detach the spark plug socket
before leaving the machine unattended,
- before re-filling the tank. Allow the engine to cool down before filling the tank.
Fire hazard!
- before remedying blockages, including those in the mowing deck housing,
before lifting or carrying the machine,
before transporting the machine, - before carrying out any work on the mowing blade,
- before checking or cleaning the machine or before carrying out any other work (e.g. folding down the handlebar) on it.
- after hitting a foreign object or if the lawn mower begins to vibrate excessively. In these cases check the machine, in particular the cutting unit (blade, blade shaft, blade fastening) for damage and carry out the necessary repairs before restarting and working with the machine.

Risk of injury!
Strong vibrations are generally an indication of a fault. In particular, the lawn mower must not be operated with a damaged or bent blade shaft or mowing blade. If you do not have the appropriate expertise, have the necessary repairs carried out by a specialist dealer (VIKING recommends VKING specialist dealers).
Switch off the engine:
- When pushing the machine to and from the area to be worked.
- Before pushing the machine onto an area not covered with grass.
- When the machine has to be tilted for transportation.
- Before adjusting the cutting height.
4.7 Maintenance and repairs

Before beginning cleaning, adjustment, repair and
maintenance operations, park the machine on firm, level
ground, stop the engine, allow it to cool down and detach the spark plug socket.

Risk of injury due to the mowing blade!
Pulling the recoil starter rope starts the work tool rotating. Always ensure sufficient distance between the mowing blade and your body, particularly your hands and feet, when you pull the recoil starter rope.
Allow the machine to cool down before working on or around the engine, exhaust manifold or muffler in particular. Temperatures of 80^ and above can be reached. Danger of burns
Direct contact with engine oil can be dangerous. Engine oil must not be spilled. VIKING recommends leaving the task of topping up engine oil or performing engine oil changes to a VIKING specialist dealer.
Cleaning:
The complete machine must be cleaned thoroughly following use. ( 12.1)
Remove accumulated clipping deposits using a stick. Clean the underside of the mower with water and a brush.
Never use high-pressure cleaners and do not clean the machine under running water (e.g. using a garden hose).
Do not use aggressive cleaning agents. These can damage plastics and metals, impairing the safe operation of your VIKING machine.
In order to prevent fire hazards, keep the area around the air vents, cooling ribs and the area of the exhaust free from e.g. grass, straw, moss, leaves or escaping grease.
Maintenance operations:
Only maintenance operations described in this instruction manual may be carried out. Have all other work performed by a specialist dealer.
If you do not have the necessary expertise or auxiliary equipment, please always contact a specialist dealer.
VIKING recommends that you have maintenance operations and repairs performed exclusively by a VKING specialist dealer.
VIKING specialist dealers regularly attend training courses and are provided with technical information.
Only use tools, accessories or attachments approved for this machine by VIKING or technically identical parts. Otherwise, there may be a risk of accidents resulting in personal injury or damage to the machine. If you have any questions, please consult a specialist dealer.
The characteristics of original VKING tools, accessories and spare parts are optimally adapted to the machine and the user's requirements. Genuine VKING spare parts can be recognised by the VKING spare parts number, by the VKING lettering and, if present, by the VKING spare parts symbol. On smaller parts, only the symbol may be present.
For safety reasons, fuel-carrying components (fuel line, fuel cock, fuel tank, tank cap, connections, etc.) must be checked regularly for damage and leaks and replaced by a technician if necessary (VIKING recommends VKING specialist dealers).
Always keep warning and information stickers clean and readable. Damaged or missing stickers must be replaced by new, original plates from your VIKING specialist dealer. If a component is replaced with a new component, ensure that the new component is provided with the same stickers.
Only perform work on the cutting unit when wearing thick work gloves and exercising extreme care.
Ensure that all nuts, pins and screws (in particular the blade fastening screw) are securely tightened so that the machine is in a safe operating condition.
Check the entire machine for wear or damage on a regular basis, particularly before extended periods when the machine is not in use (e.g. over winter). For safety reasons, worn or damaged parts must be replaced immediately to ensure that the machine is always in a safe operating condition.
Never alter the basic setting of the engine or run at excessive engine speeds.
Components or guards that are removed for maintenance operations must be properly reinstalled immediately.
4.8 Storage for prolonged periods without operation
Allow the engine to cool before storing the machine in an enclosed space.
Allow the machine to cool down completely before covering it.
Store the machine with empty fuel tank and the fuel reserve in a lockable and well-ventilated room.
Ensure that the machine is protected from unauthorised use (e.g. by children).
If the tank has to be emptied (e.g. to store the machine before the winter break), this should only be done out of doors (e.g. by running the tank empty).
Thoroughly clean the machine before storage (e.g. winter break).
Only store the machine with the spark plug socket disconnected.
Store the machine in good operational condition.
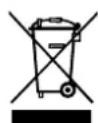
4.9 Disposal
Waste products such as used engine oil or fuel, used lubricants, filters, batteries and similar wearing parts can be harmful to people, animals and the environment, and must consequently be disposed of properly.
Consult your recycling centre or your specialist dealer for information on the proper disposal of waste products. VIKING recommends VIKING specialist dealers.
Ensure that old machines are properly disposed of. Render the machine unusable prior to disposal. In order to prevent accidents, remove the ignition lead, empty the fuel tank and drain the engine oil in particular.
Risk of injury due to the mowing blade! Always store an old lawn mower in a safe place prior to scrapping. Ensure that the machine and particularly the mowing blade are kept out of the reach of children.
5.Description of symbols

Caution!
Read the instruction manual before initial use.
Risk of injury!
Keep other persons out of the danger area.
Risk of injury!
Detach the spark plug socket before performing work on the cutting tool or maintenance and cleaning work.

Risk of injury!
Cutting tool runs on for several seconds after switching off (engine/blade brake).
MB 4R, MB 4RT:
Start the engine.
MB 4 RTP:
Start the engine.

MB 4R, MB 4RT:
Stop the engine.
MB 4 RTP:
Stop the engine.
MB 4 RT:
Switch on self-propulsion.

MB 4 RTP:
Switch on self-propulsion.

MB 4 RTP:
Wear hearing protection when working.
Service position marking on the detent segment.
(12.1)
6. Standard equipment

Item Designation Qty.
A Basic unit with handlebar 1
B Cable clip 2
-Instruction manual 1
-Engine instruction manual 1
MB 4R, MB 4RT
C Flat head bolts 2
D Quick-clamping devices 2
E Protective sleeves 2
MB 4 RTP
F Flat head bolts 2
G Retaining washers 2
H Lock nuts 2
1 Protective sleeves 2
7.Preparing the machine for operation
7.1 General

Risk of injury!
Observe the safety instructions in the section "For your safety" ( 4) .
- Place the machine on level and firm ground when performing all the operations described.
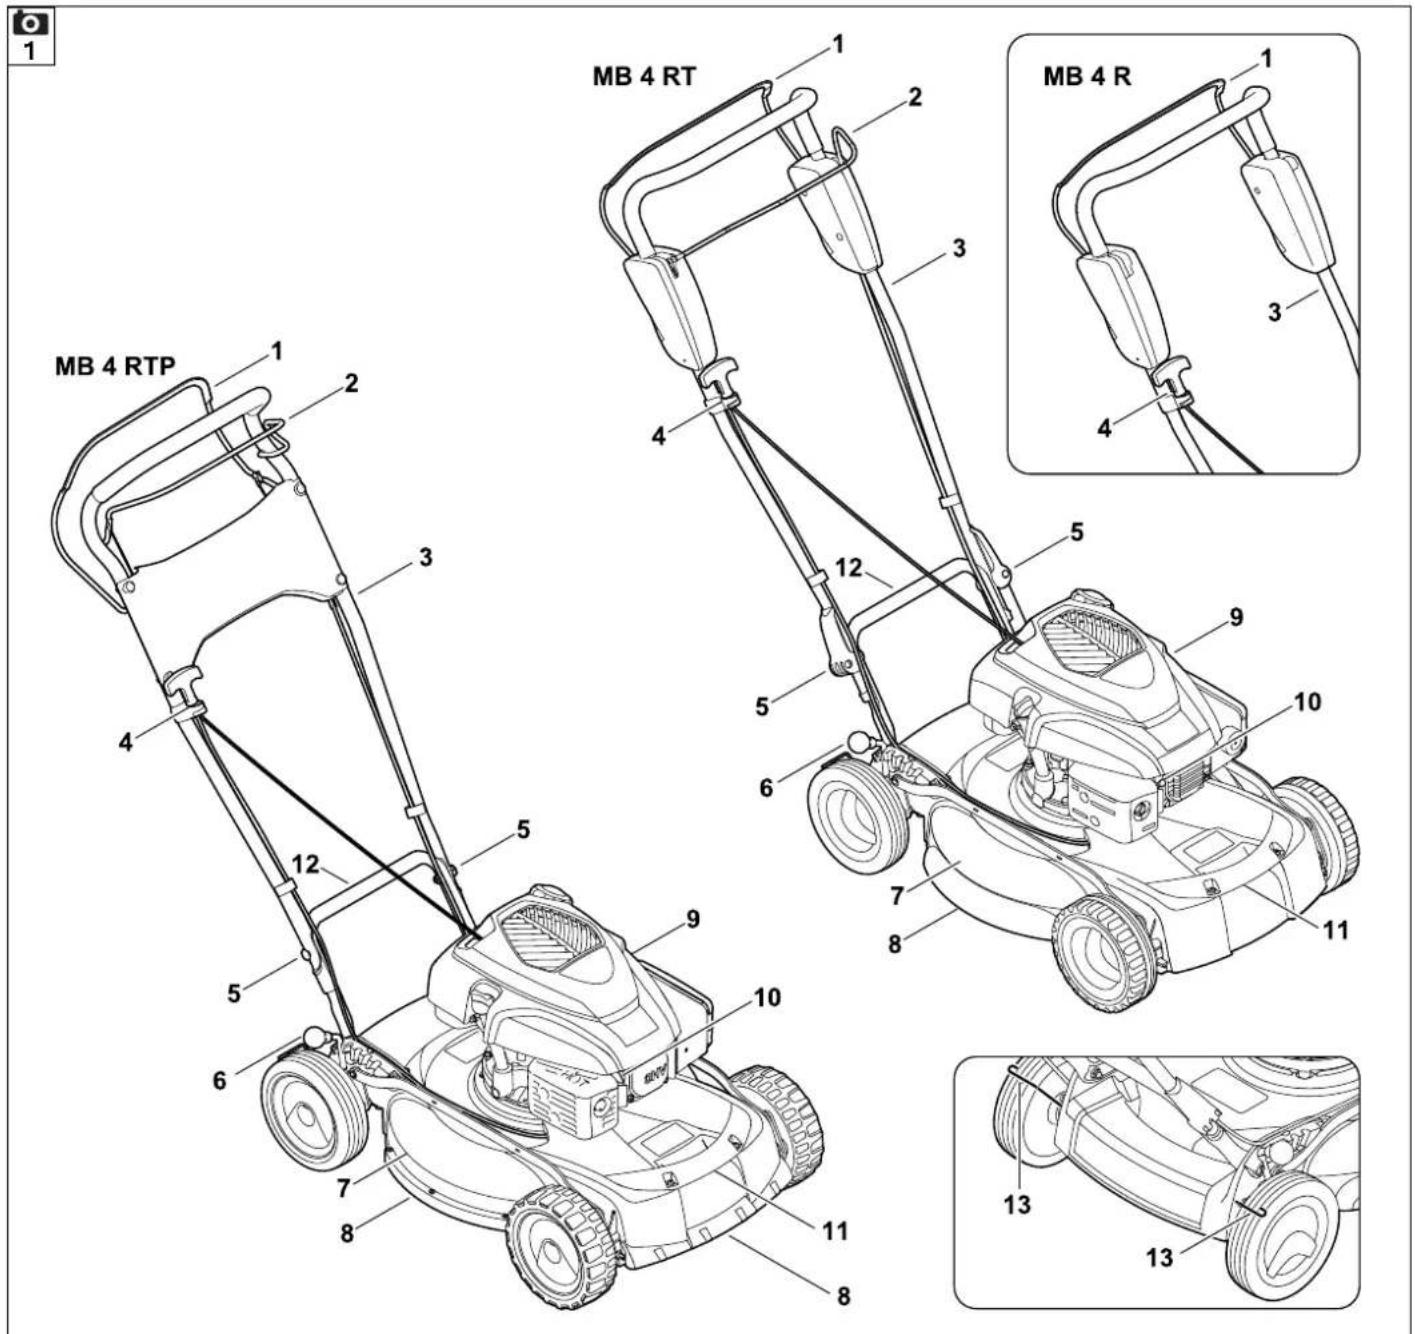
7.2 Assembling the handlebar (MB 4R, MB 4RT)

- Fit the protective sleeves (E) onto the upper handlebar (1) with the long side facing inwards.
- Hold the upper handlebar (1) on the lower handlebar (2) and insert the screws (C) through the bores (3) from the inside outwards.
- Screw in the quick-clamping device (D) at the screws (C) (it should project by about one screw thread turn) and fold upwards.
- Check correct assembly: The quick-clamping devices (D) must be sufficiently tightened so that they are pressed tightly against the handlebar and the upper handlebar is firmly connected to the lower handlebar. If the handlebar is not firmly installed or the quick-clamping devices are not correctly located, fold open the quick clamping devices and adjust them to the correct position by screwing out and back in again.
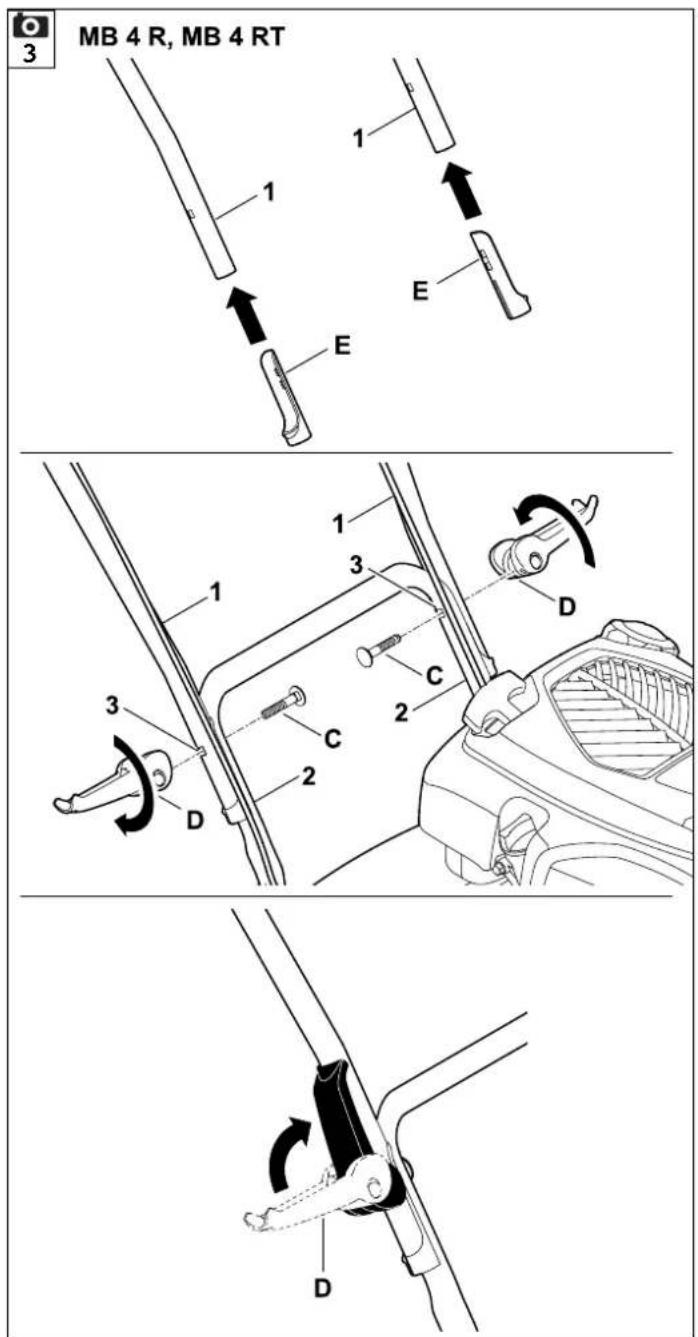
7.3 Assembling the handlebar (MB 4 RTP)
- Fit the protective sleeves (I) onto the upper handlebar (1) with the long side facing inwards.
- Hold the upper handlebar (1) on the lower handlebar (2) and insert the screws (F) through the bores (3) from the outside inwards. Fit the retaining washers (G) and lock nuts (H) and tighten to 22 - 28 Nm.
- Check correct assembly: The upper handlebar must be firmly fastened to the lower handlebar.
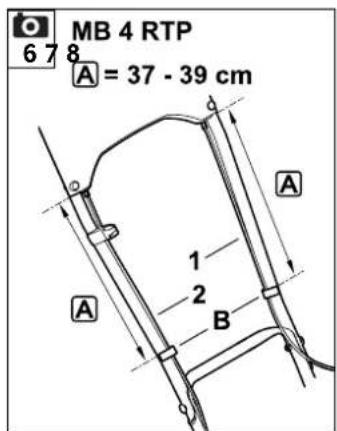
7.4 Installing the cable clip
- Fasten motorstop cable (1) to the left upper handlebar using cable clip (B).
- MB 4 RT, MB 4 RTP:

Fasten self-propulsion cable (2) to the right upper handlebar using cable clip (B).
Observe the following distances between the lower edge of the boot/panel and the cable clip:
MB 4R, MB 4RT: 42 - 44 cm
MB 4 RTP:37-39 cm
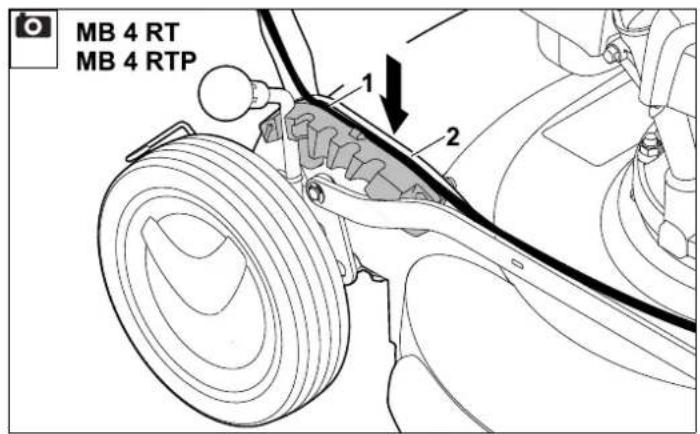
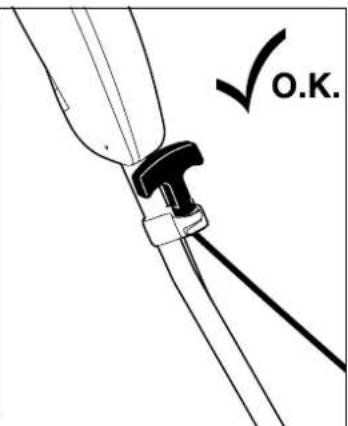
7.5 Attaching the cable (MB 4 RT, MB 4 RTP)
- Press the self-propulsion cable (1) into the guide (2) along the detent segment.

7.6 Fuel and engine oil

Risk of injury!
Observe the safety instructions in the "For your safety" section. ( 4.2)
Fuel
Use only fresh, environmentally friendly, good quality fuel:
- Unleaded petrol


Please consult the engine instruction manual for precise details on the fuel quality/octane rating.
Engine oil
Use only biodegradable engine oils. VIKING recommends the use of the following engine oils:

-
VIKING SAE 30
-
VIKING 10W-30
Please consult the engine instruction manual for the oil capacity.

Check the oil filling level at regular intervals (see engine instruction manual).
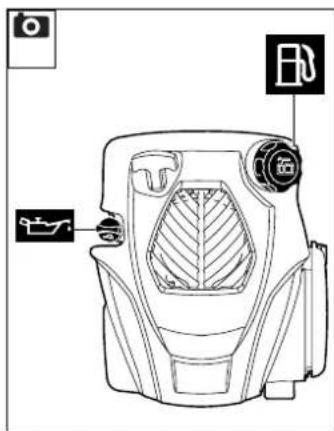
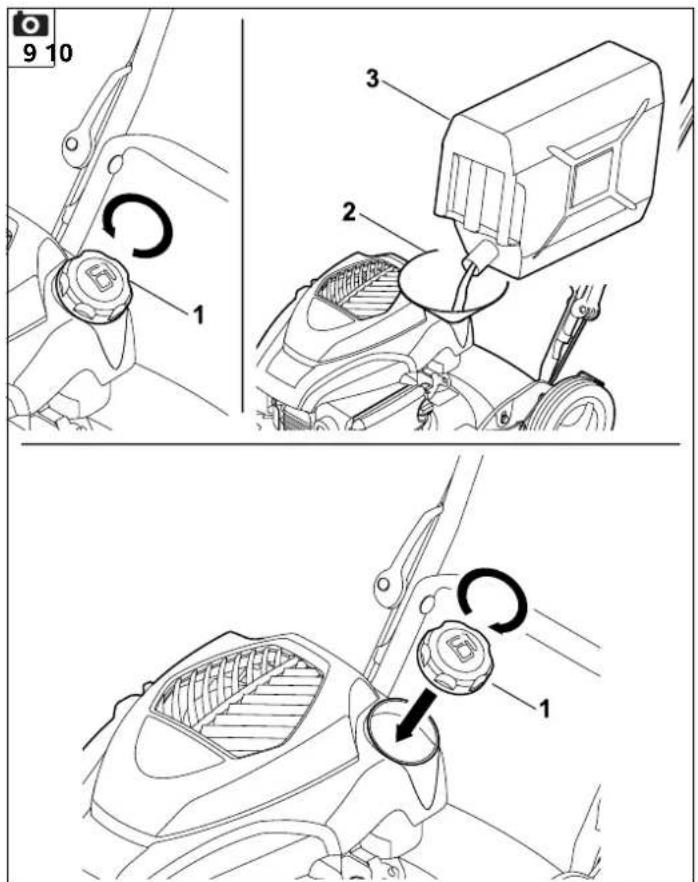
Filling the fuel tank

Use a suitably dimensioned funnel when filling the tank with fuel, in order to prevent the fuel from spilling.
- Unscrew the tank cap (1).
- Insert the funnel (2).

- Hold the canister (3) steady and pour in the fuel carefully in several stages up to approx. 4 cm below the edge of the fuel tank.
The more fuel has already been filled into the tank, the smaller the filling quantities should be for each filling operation.
Keep checking the filling level of the tank at regular intervals while filling the tank; remove the funnel for this purpose.
- Screw the tank cap (1) back on again.
8. Controls
8.1 General

Risk of injury!
Observe the safety instructions in the section "For your safety" ( 4) .
- Place the machine on level and firm ground when performing all the operations described.
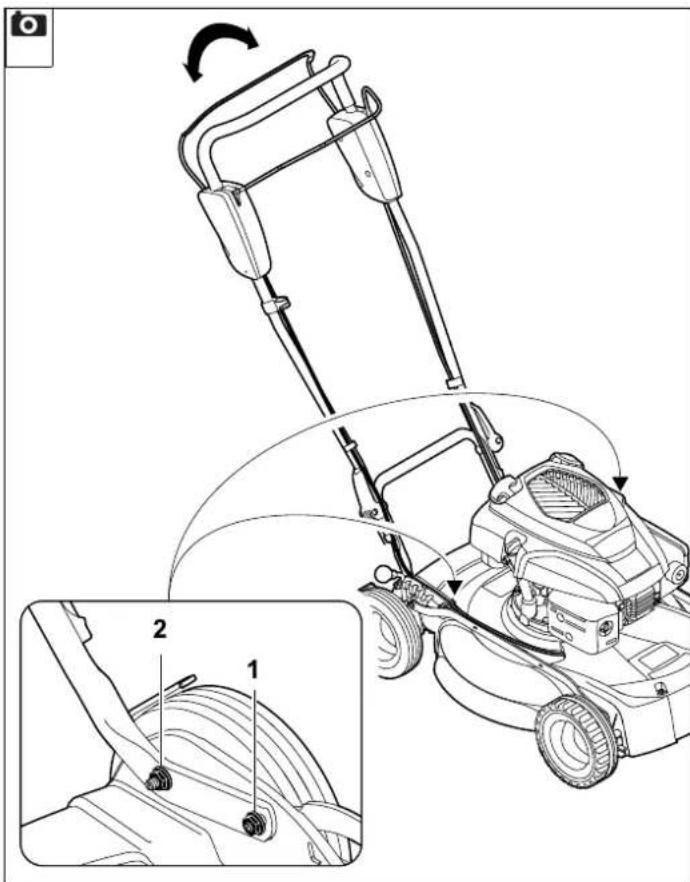
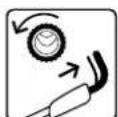
8.2 Height adjustment of the handlebar

The height of the handlebar can be individually adjusted.
- Loosen nuts (1) and (2).
- Adjust the handlebar to a pleasant operating height by moving it upwards or downwards and hold it in position.
- Tighten the nuts (1) and (2) again.
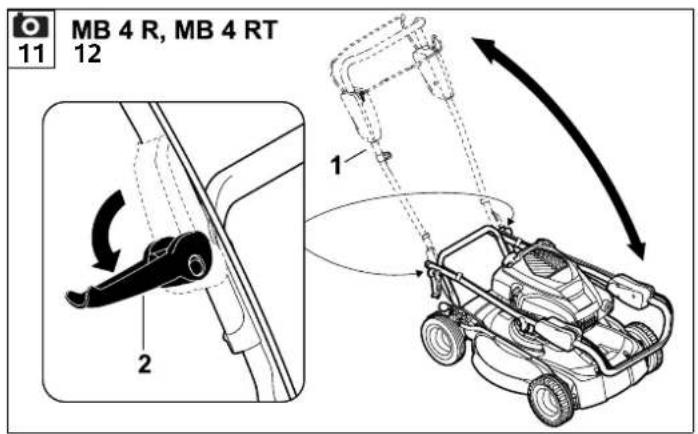
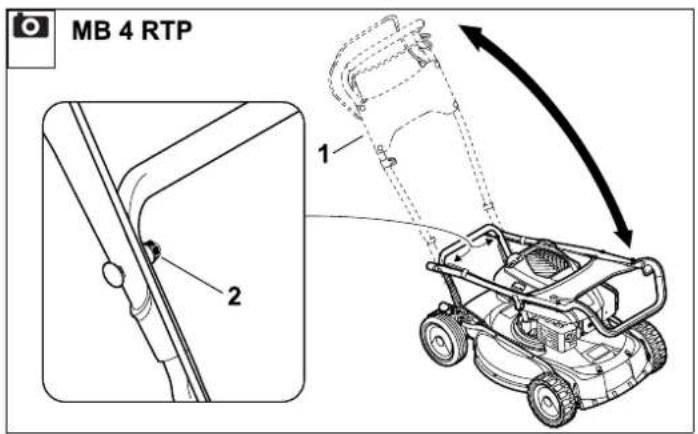
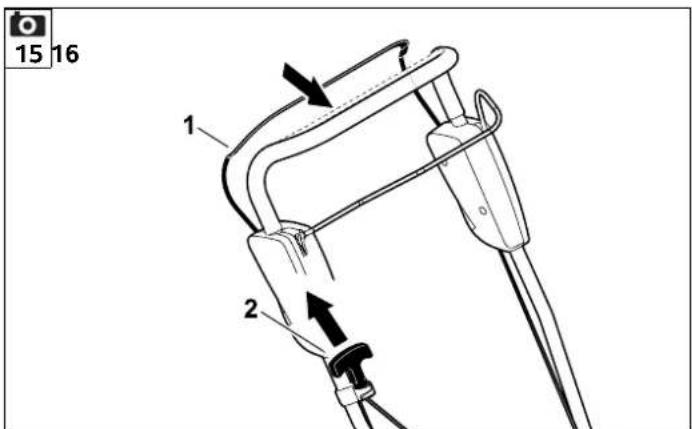
8.3 Folding down the handlebar
The handlebar can be folded down for space-saving transport and storage of the mower.

Danger of pinching!
The handlebar can fold down or retract inadvertently when the quick-clamping device/handlebar screw fastening is released.
For this reason, always hold the handlebar with one hand when you release the fastening.
-
Stop the engine and remove the spark plug socket. ( 11.2)
-
Detach the recoil starter rope. ( 8.4)
- MB 4R, MB 4RT:
Hold the handlebar (1), open the left and right quick-clamping devices (2) and carefully fold the handlebar downwards to the front.
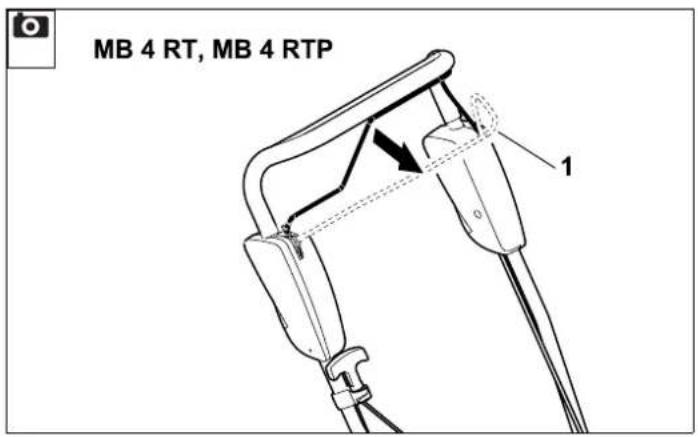
- MB 4 RTP:
Hold the handlebar (1), loosen the left and right nuts (2) and carefully fold the handlebar downwards to the front.
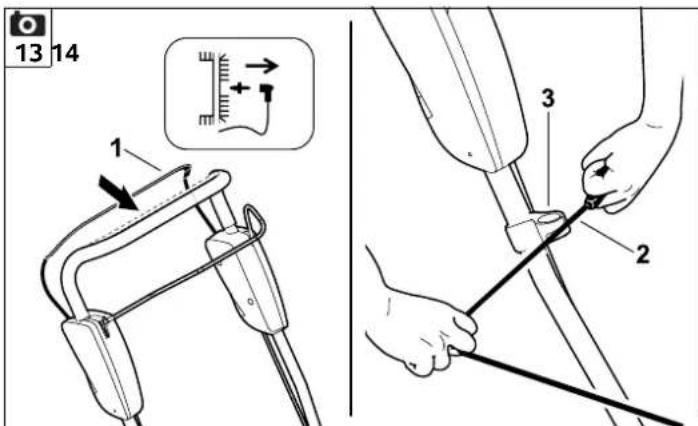
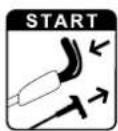
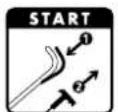
8.4 Attaching and detaching the recoil starter rope

Attaching
- Detach the spark plug socket from the engine.
- Press the motorstop lever (1) to the handlebar and hold.
-
Slowly pull out the recoil starter rope (2).
-
Release the motorstop lever (1) and attach the recoil starter rope (2) to the rope guide (3).
- Connect the spark plug socket.
Detaching
- Detach the spark plug socket from the engine.
- Detach the recoil starter rope (2) from the rope guide (3).
8.5 Cutting height adjustment


Risk of injury!
Stop the engine before adjusting the cutting height.
Five different cutting heights can be set.
The highest cutting level (70 mm) is selected when the cutting height adjustment lever is in the rearmost position (see marking).
The lowest cutting level (30mm) is selected when the cutting height adjustment lever is in the frontmost position.
- Press the cutting height adjustment lever (1) outwards towards the rear wheel and hold in position.
- Set the cutting height adjustment lever (1) to the required position in the detent segment (2) and allow it to engage.
9. Safety devices
9.1 Motorstop lever
The lawn mower is equipped with a motorstop device.
The engine stops when the motorstop lever is released during running operation. The engine and blade come to a standstill within 3 seconds.

Risk of injury!
If the run-on time of the blade exceeds this delay, stop using the machine and take it to your specialist dealer.
Measuring the run-on time
Following engine start-up, the blade rotates and a wind noise is audible. The run-on time corresponds to the duration of the wind noise after the engine stops. This can be measured using a stopwatch.
10. Notes on working with the machine
10.1 General information on mulching
During mulching, the cut grass is chopped up several times through a special air flow guidance system in the mower blade area and then blown back into the turf. The clippings remain on the lawn.
Benefits
The decomposing clippings return organic nutrients to the soil, serving as a natural fertiliser.
Advantages
Emptying the grass catcher box and disposal of the clippings are dispensed with. Weed growth is slowed down and significant amounts of fertilizer are saved.
10.2 When is mulching permissible?
VIKING recommends mulching only when the lawn is dry and the grass is not too high.
If the grass is too high, the lawn should be mowed in two stages. ( 10.3)

Caution
If the cutting height is too low or the grass is wet, the housing may become clogged, blocking the blade!
10.3 How should mulching be performed?
Requirements for good mulching results:
- Set the optimal cutting height: A third of the grass height should be cut.
- Use well sharpened blades.
- Vary the mowing direction and ensure that the mowing strips overlap.
Working method in high grass
In high grass, the lawn should be cut in two stages.
First stage:
The lawn is mowed at the maximum cutting height.
Second stage:
12 to 24 hours after the first stage, mulch the lawn to the desired grass height at right angles to the first mowing direction.
10.4 How often should mulching be performed?
To ensure a perfect, thick lawn, mulch regularly and keep the grass short.
Main growth period:
Spring:
mulch at least twice per week.
Summer and autumn:
mulch at least once per week.
11. Operating the machine
11.1 Starting the engine


Avoid damage to the machine.
Top up the engine oil before starting for the first time (see engine instruction manual).

Do not start the engine in tall grass or at the lowest cutting height. This makes starting difficult.
- Press the motorstop lever (1) to the handlebar and hold.
- Slowly pull out the recoil starter rope (2) to the point of compression resistance. Then pull forcefully and quickly to arm's length.
- Slowly return the recoil starter rope (2) so that it is rolled up again. Repeat the procedure until the engine starts.
Thanks to the fixed throttle setting, the engine always operates at the optimum working speed after starting.
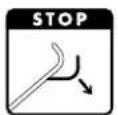
11.2 Stopping the engine
- Release the motorstop lever (1).
The engine and blade come to a standstill within 3 seconds.

11.3 Self-propulsion (MB 4 RT, MB 4 RTP)


The MB 4 RT and MB 4 RTP
models feature front-wheel drive.
Switching on self-propulsion
- Start the engine. ( 11.1)
Pull the self-propulsion lever (1) to the handlebar and hold.
Self-propulsion is switched on and the lawn mower moves forwards.
Switching off self-propulsion
- Release the self-propulsion lever (1).
Self-propulsion is switched off and the lawn mower comes to a standstill.
The engine and blade continue to run.
12. Maintenance

Risk of injury!
Carefully read the section "For your safety" ( 4.) , particularly the subsection "Maintenance and repairs" ( 4.7) , and follow all safety instructions exactly before performing any maintenance or cleaning operations on the machine.
Allow the machine too cool and detach the spark plug socket before performing any maintenance or cleaning operations.

Annual service by the specialist dealer:
The lawn mower should be inspected once annually by a specialist dealer. VIKING recommends VIKING specialist dealers.
12.1 Cleaning the machine
Maintenance interval:
After each use.

Risk of injury!
Stop the engine, allow the machine to cool and detach the spark plug socket.
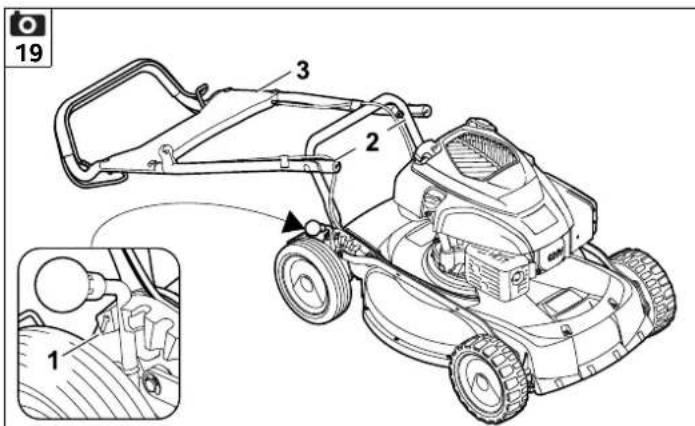
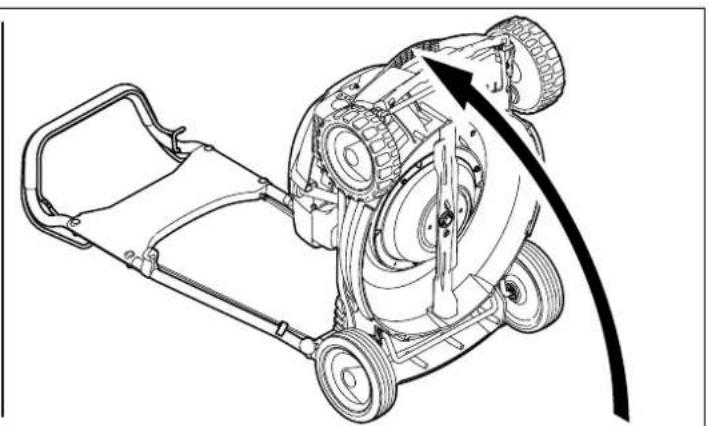
Placing machine in service position
- Set the cutting height adjustment lever to the highest position (1).
(⇒ 8.5)
- Loosen handlebar screw fastening/quick clamping device (2) and fold down upper handlebar (3) to the rear.
- Lift up the machine at the front and place in the service position as shown.
12.2 Checking blade wear
Maintenance interval:

Before each use.

Risk of injury!
Blades are subjected to differing degrees of wear depending on the location and duration of use. If you use the machine on sandy ground or use it frequently under dry conditions, the blade will be subjected to greater loads and will wear more quickly than the average.
A worn blade may break off and cause serious injuries. The instructions for blade maintenance must therefore always be observed.
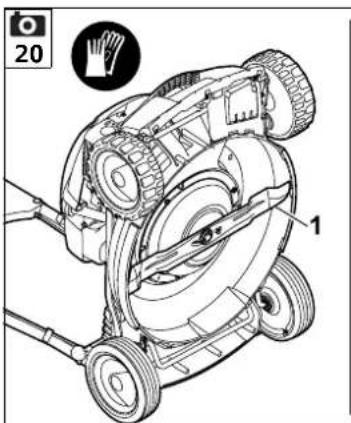
Check procedure

Risk of injury!
Observe the safety instructions in the "For your safety" section. ( 4.7)
- Place the machine in the service position. ( 12.1)
-
Clean the mowing blade (1).
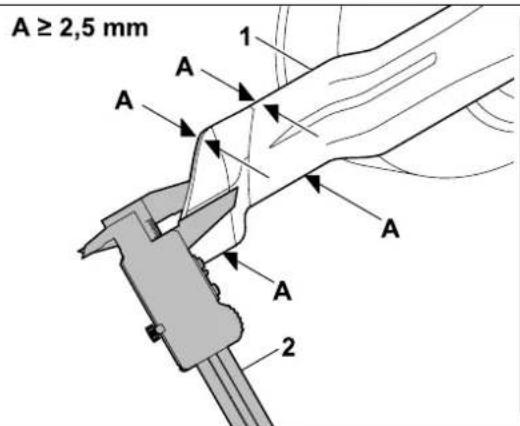
-
Use a slide calliper (A) to measure the blade thickness (A) at several points.
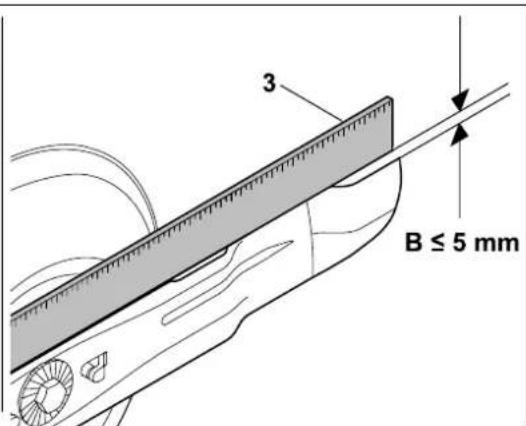
- Measure the permissible grinding (B). Place a ruler (3) against the front blade edge as shown for this purpose.
Wear limits
The blade thickness (A) must be at least 2.5mm at any point. The most important points are marked in the illustration.
The cutting edges must not be ground back by more than 5 mm - distance (B) (permissible grinding) during sharpening.
12.3 Sharpening the mowing blade
If you do not have the necessary expertise or auxiliary equipment, we recommend that you have the blade sharpened by a specialist dealer. Operation of the machine is impaired in the case of an incorrectly sharpened blade (incorrect sharpening angle, imbalance etc.).
Sharpening instructions
- Remove the mowing blade. ( 12.4)
Cool the mowing blade during sharpening, e.g. with water. The blade must not be allowed to display blue colouring, as this would reduce its cutting quality. - Sharpen blades evenly to prevent vibration due to imbalance.
- Observe a sharpening angle of 30^ .
- Observe the wear limits ( 12.2) .
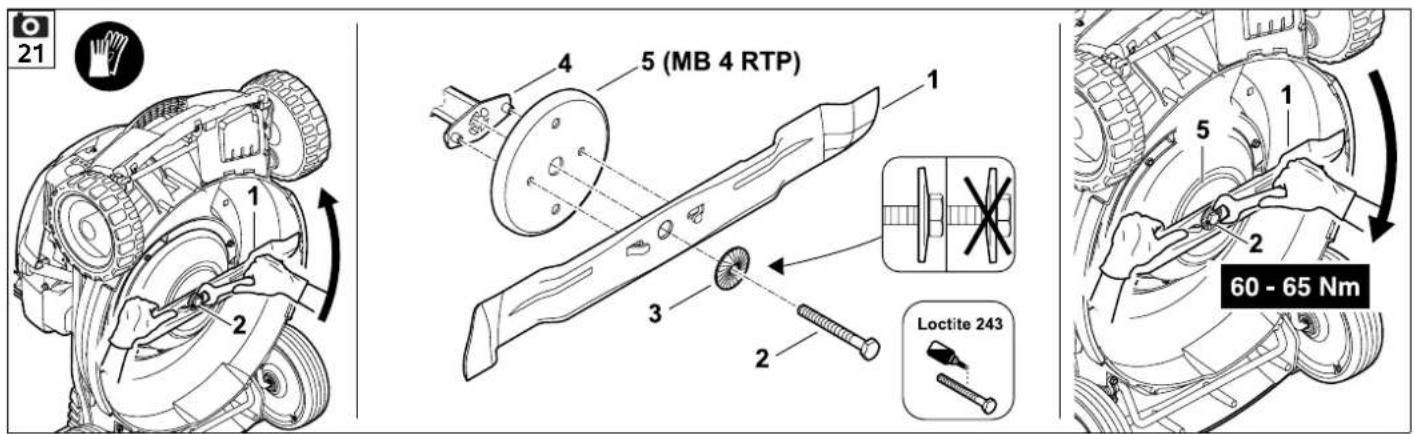
12.4 Removing and installing mowing blade


Risk of injury!
Observe the safety instructions in the "For your safety" section.
(⇒ 4.7)

Risk of injury!
Always wear gloves.

Removing
- Hold the mowing blade (1) and loosen the blade fastening screw (2).
- Remove the blade fastening screw (2), retaining washer (3) and mowing blade (1).
Assembly

The mowing blade must be replaced if notches or cracks are detected or if a wear limit is reached ( 12.2)
- Clean the blade contact surface and blade bushing (4).
- Secure the blade fastening screw (2) with Loctite 243.
- Fit the mowing blade (1) onto the blade bushing (4) as shown.
MB 4 RTP: Make sure that the thrust washer (5) is positioned correctly.
- Position the retaining washer (3) as shown and tighten with the blade fastening screw (2) to 60 - 65 Nm.

Risk of injury!
The prescribed tightening torque for the blade fastening screw must be observed.
The retaining washer (3) must be replaced each time the blade is installed.
The blade fastening screw (2) must be replaced each time the blade is replaced.
12.5 Engine
Maintenance interval:
See engine instruction manual.
General information:
Observe the operating and maintenance instructions contained in the attached engine instruction manual.
To achieve a long service life, it is always particularly important to maintain a sufficient level of oil and to change the oil and air filter regularly.
The recommended oil change intervals as well as information on engine oil and oil capacities can also be found in the engine instruction manual.
The cooling ribs must always be kept clean to ensure that the engine is adequately cooled.
12.6 Storage (winter break)
Note the following points when storing the machine for long periods (winter break):
- Clean all external parts of the machine with care.
-
Thoroughly lubricate/grease all moving parts.
-
Empty the fuel tank and carburettor (e.g. by running empty).
- Unscrew the spark plug (see engine instruction manual) and pour approx. 3cm^3 of engine oil into the engine via the spark plug hole. Turn the engine several times with the spark plug removed (pull the recoil starter rope).

Fire hazard!
Keep the spark plug socket away from the spark plug hole due to the danger of ignition.
- Screw the spark plug back in (see engine instruction manual).
- Perform an oil change (see engine instruction manual).
- Store the machine in a dry and locked place that is generally free of dust.
Make sure that it is out of the reach of children.
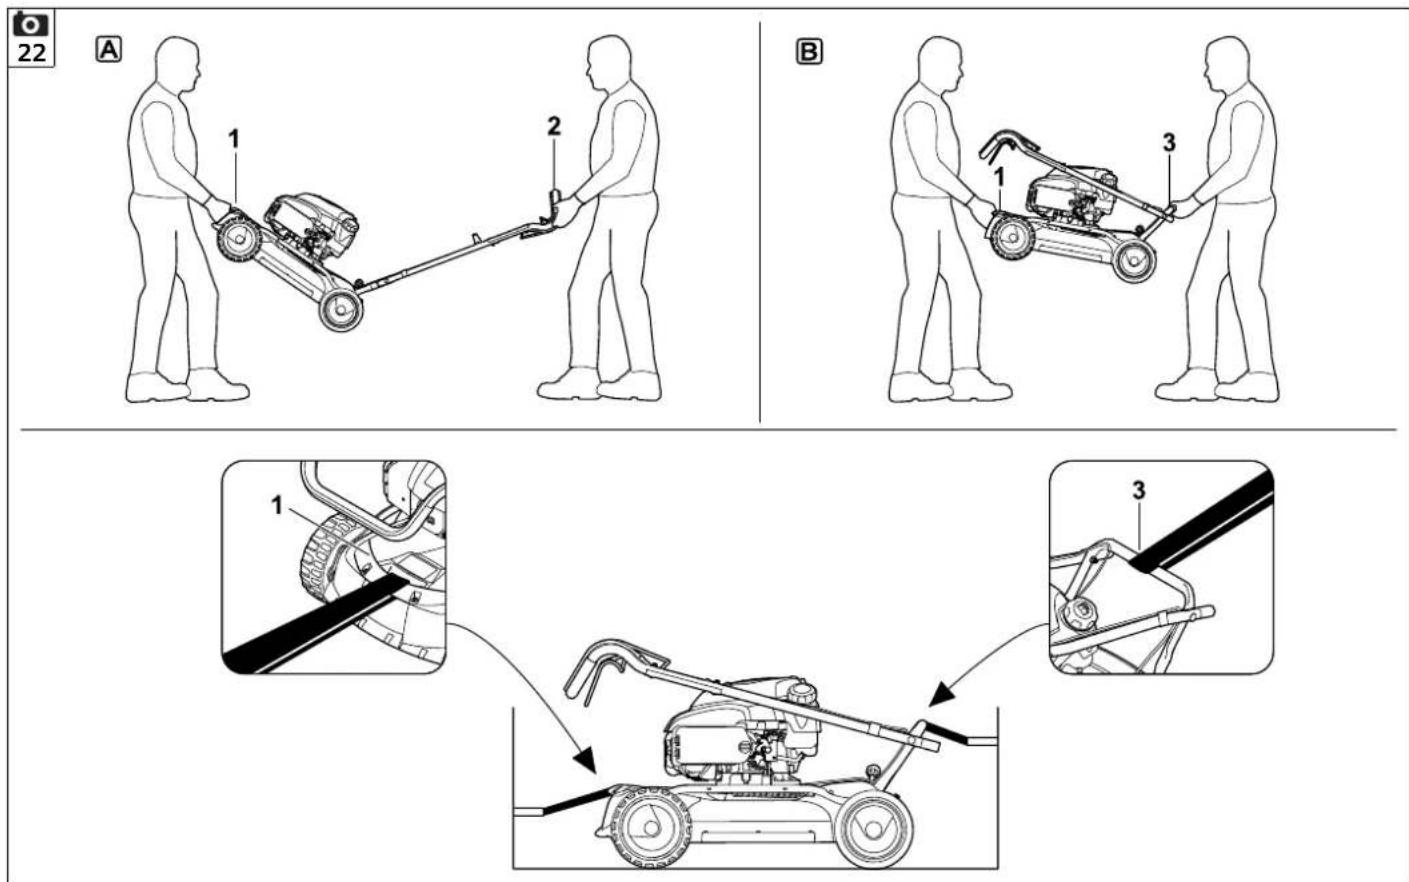
13. Transport
13.1 Transporting


Risk of injury!
Observe the section "For your safety" before transporting. ( 4.4) Carry the machine only with the help of a second person. Always wear suitable safety clothing (safety shoes, thick gloves). Detach the spark plug socket before lifting or transporting.
Lifting or carrying the machine
- Handlebar installed: Hold the machine at the front carrying handle (1) and at the handlebar (2).
- Handlebar folded down: Hold the machine at the front carrying handle (1) and at the rear carrying handle (3).
Transporting the machine
Only transport the machine, on all four wheels, on a clean, level load floor.
- Secure the machine against slipping using suitable fastening materials. Fasten straps at the front carrying handle (1) and at the rear carrying handle (3).
14. Environmental protection
Lawn clippings should be composted and not disposed of in household waste.
The machine, its packaging and accessories are all produced
from recyclable materials and must be disposed of accordingly.
By disposing of materials separately, and in an environmentally friendly manner, valuable resources can be re-used. For this reason, the machine should be disposed of for recycling at the end of its useful life. Pay particular attention to the information in the "Disposal" section during disposal (4.9).
Consult your recycling centre or your specialist dealer for information on the proper disposal of waste products.
15. Minimising wear and preventing damage
Important information on maintenance and care of the product group
Petrol lawn mowers
VIKING assumes no liability for material or personal damage caused by the non-observance of information contained in the operating instructions, in particular with regard to safety, operation and maintenance, or which arise through the use of unauthorised attachment or spare parts.
Please always observe the following important information for the prevention of damage or excessive wear to your VKING machine:
1. Wearing parts
Some parts of the VKING machine are subject to normal wear even when used properly and must be replaced in due time depending on type and duration of use.
These include:
- Mowing blades
V-belt (MB 4 RT, MB 4 RTP)
-Tyres
2. Compliance with the information in this instruction manual
The VIKING machine must be used, maintained and stored with the care described in this instruction manual. Any damage caused by non-compliance with the safety, operating and maintenance instructions is the sole responsibility of the user.
This applies in particular to:
- Product modifications not approved by VIKING.
- Use of fuel and lubricants not approved by VIKING (lubricants, petrol and engine oil, see engine manufacturer's specifications).
- The use of tools or accessories which are not approved or suitable for the machine, or are of inferior quality.
- Improper use of the product.
- Use of the product for sporting or competitive events.
- Resultant damage due to continued use of the product with defective components.
3. Maintenance operations
All operations listed in the section "Maintenance" must be performed regularly.
If these maintenance operations cannot be carried out by the user, a specialist dealer must be commissioned to perform them.
VIKING recommends that you have maintenance operations and repairs performed exclusively by a VKING specialist dealer.
VIKING specialist dealers regularly attend training courses and are provided with technical information.
If these operations are neglected, faults may arise which are the responsibility of the user.
These include:
Corrosive and other resultant damage caused by incorrect storage.
- Damage to the machine through the use of inferior-quality spare parts.
- Damage due to untimely or inadequate maintenance or damage due to maintenance or repair work not performed in the workshops of specialist dealers.
16. Standard spare parts
Mowing blade (mulching blade)
63837020100
Blade fastening screw
90083199067
Retaining washer
00007026600

The fastening elements for the mowing blade (e.g. blade fastening screw, retaining washer) must be replaced when replacing the blade, i.e. when installing the blade. Spare parts are available from a VKING specialist dealer.
17. CE - manufacturer's declaration of conformity
We,
VIKING GmbH
Hans Peter Stihl-Strasse 5
declare that the machine,
Manually-operated lawn mower with combustion engine (MB)
manufacturer's
brand:
type: MB 4.0 R
VIKING
MB 4.0 RT
MB 4.0 RTP
Serial number 6383
conforms to the following EU directives: 97/68/EC,2000/14/EC,2004/108/EC, 2006/42/EC
The product has been developed in conformance with the following standards: EN ISO 5395-1, EN ISO 5395-2
Applicable conformity assessment procedure:
Appendix VIII (2000/14/EC)
Name and address of relevant, named location:
Compilation and storage of technical documentation: Johann Weiglhofer
VIKING GmbH
The year of manufacture and serial number appear on the identification plate of the machine.
MB 4.0 R, MB 4.0 RT:
Measured sound power level: 93.1 dB(A)
Guaranteed sound power level: 94 dB(A)
MB 4.0 RTP:
Measured sound power level: 91.2 dB(A)
Guaranteed sound power level: 93 dB(A)
Langkampfen,
2014-01-02 (YYYY-MM-DD)
VIKING GmbH

Research and Product Development Manager
18. Technical specifications
MB 4.0 R, MB 4.0 RT, MB 4.0 RTP
Serial number 6383
Fuel tank 1.4 I
Cutting utilities Cutter bar
Cutting width 53 cm
Speed of cutting
utilities 2800 rpm
Safety device Motorstop
Starter Rope start
Tightening torque for
blade fastening
screw 60 - 65 Nm
Cutting height 30 - 70 mm
MB 4.0 R, MB 4.0 RT
Engine, design 4-stroke combustion engine
Engine type Kohler XT675
Fuel consumption 427 g/kWh (Medium)
Displacement 149 cm
Nominal output at 2.2 - 2800 nominal speed kW - rpm
Engine output speed 2800 rpm
MB 4.0 R, MB 4.0 RT
In accordance with
Directive
2000/14/EC:
Guaranteed sound power level L_WAd 94 dB(A)
In accordance with
Directive
2006/42/EC:
Sound pressure level
at workplace L_pA 82 db(A)
Uncertainty K_pA 1 db(A)
Specified vibration
characteristic in
accordance with
EN 12096:
Measured value a_hw 3.33 m/s²
Uncertainty K_hw
Measurement in
accordance with
EN 20643
MB 4.0 RT Drive:
Front wheel 1 forward gear
Wheel diameter (front) 200 mm
Wheel diameter
(rear) 200 mm
Weight:
MB 4.0 R 33 kg
MB 4.0 RT 35kg
L/W/H 140/57/107 cm
MB 4.0 RTP
Engine, design 4-stroke combustion engine
Engine type Kohler XT8
Fuel consumption 441 g/kWh (Medium)
Displacement 173 cm
Nominal output at 2.6 - 2800
nominal speed kW - rpm
MB 4.0 RTP
Engine output speed 2800 rpm
In accordance with
Directive
2000/14/EC:
Guaranteed sound
power level LwAd
In accordance with Directive
2006/42/EC:
Sound pressure level
at workplace L_pA 80 db(A)
Uncertainty K_pA 1 db(A)
Specified vibration
characteristic in
accordance with
EN 12096:
Measured value a_hw 2.40 m/s²
Uncertainty Khw 1.20 m/s²
Measurement in
accordance with
EN 20643
Drive:Front wheel 1 forward gear
Wheel diameter
(front) 210 mm
Wheel diameter
(rear) 205 mm
Weight 42 kg
L/W/H 140/57/108 cm
19. Troubleshooting
If necessary, contact a specialist dealer; VIKING recommends VIKING specialist dealers.
See engine instruction manual.
Fault:
Engine does not start
Possible cause:
Motorstop lever not pressed.
- No fuel in tank.
-Fuel line blocked.
- Inferior, dirty or old fuel in tank.
Air filter dirty.
- Spark plug socket detached from spark plug; ignition lead not properly fastened to socket.
- Spark plug dirty or damaged; incorrect electrode gap.
Remedy:
-Press motorstop lever to handlebar and hold. ( 11.1)
- Refill fuel tank. ( 7.6)
Clean fuel line.
- Always use fresh, good quality fuel, unleaded petrol; clean carburettor. [1],
- Clean air filter.
- Connect spark plug socket; check connection between ignition lead and socket.
- Clean or replace spark plug; adjust electrode gap.
Fault:
Starting problems or deteriorating engine power.
Possible cause:
Lawn mower housing blocked.
- Mowing at an excessively low cutting height or propulsion speed is too high in relation to the cutting height.
Water in fuel tank and carburettor; carburettor blocked.
-Fuel tank contaminated.
Air filter dirty.
- Spark plug dirty.
Remedy:
Clean lawn mower housing (detach spark plug socket!). ( 12.1)
- Select a higher cutting height or reduce the pushing speed. ( 8.5)
- Empty fuel tank, clean fuel line and carburettor.
- Clean fuel tank.
- Clean air filter.
- Clean spark plug.
Fault:
Engine overheating.
Possible cause:
- Oil level in engine too low.
Cooling ribs dirty.
Remedy:
- Change engine oil. (⇒ 12.5)
- Clean cooling ribs. (⇒ 12.1)
Fault:
Excessive vibration during operation.
Possible cause:
- Cutting unit defective.
- Engine mounting loose.
Remedy:
- Check mowing blade, blade shaft and blade fastening (blade fastening screw and retaining washer), and repair if necessary.
- Tighten engine mounting bolts.
Fault (MB 4 RT, MB 4 RTP):
No drive when self-propulsion lever is actuated
Possible cause:
- Self-propulsion cable damaged (e.g. kinked)
Remedy:
-Replace cable
Fault:
Poor cut, lawn turning yellow
Possible cause:
- Mowing blade is blunt or worn,
Remedy:
- Sharpen or replace the mowing blade ( 12.3) ( 12.4) ,
20. Service schedule
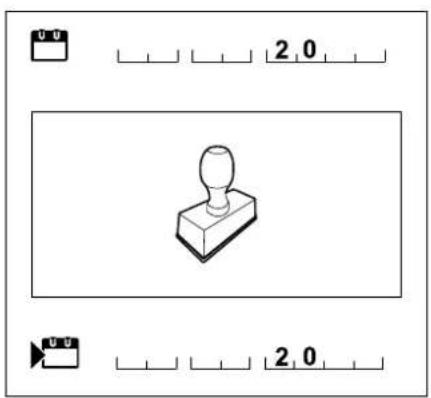
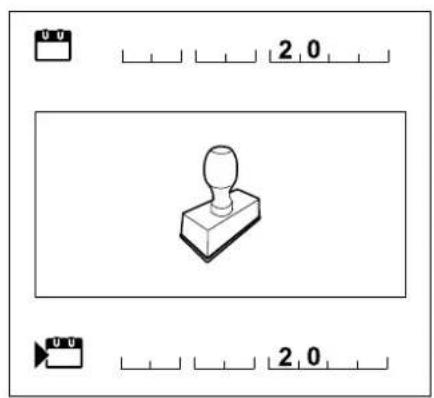
20.1 Handover confirmation
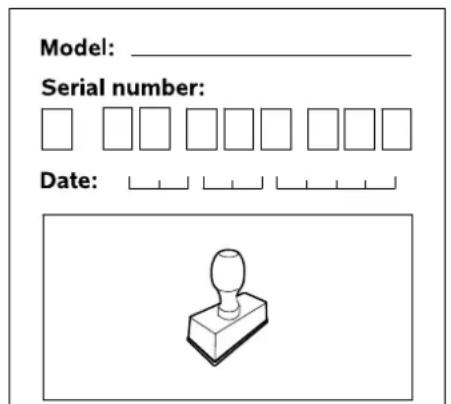
Next service
Date:
20.2 Service confirmation
Please hand this instruction manual to your VKING specialist dealer in the case of maintenance work. He will confirm the service operations performed in the pre-printed boxes.

Service performed on

Next service date
Chere cliente, cher client,
Transport 61 Transport 61
MB 4.0 R, MB 4.0 RT:
MB 4.0 R, MB 4.0 RT, MB 4.0 RTP
N° de série 6383
Reservoir a carburant 1,41
MB 4.0 R, MB 4.0 RT:
Gemeten geluidsniveau: 93,1 dB(A)
MB 4.0 R, MB 4.0 RT, MB 4.0 RTP
Serie identificatie 6383
Brandstoftank 1,4 I
Storing (MB 4 RT, MB 4 RTP):
- MB 4 RT, MB 4 RTP:
MB 4.0 R, MB 4.0 RT:
MB 4.0 R, MB 4.0 RT, MB 4.0 RTP
N. di series 6383
Serbatoio carburante 1,4 I
- MB 4 RT, MB 4 RTP:
MB 4.0 R, MB 4.0 RT:
2014-01-02 (AAAA-MM-DD)
VIKING GmbH

MB 4.0 R, MB 4.0 RT, MB 4.0 RTP
Identificacion de
serie 6383
Deposito de
combustible 1,4 I
regimen nominal kW - rpm
Régimen de salute del motor 2800 rpm
- MB 4 RT, MB 4 RTP:
MB 4.0 R, MB 4.0 RT:
MB 4.0 R, MB 4.0 RT, MB 4.0 RTP
MB 4 RT: Koble inn fremdriften.
MB 4 RTP: Koble inn fremdriften.
MB 4R, MB 4RT: 42-44 cm
MB 4 RTP:37-39 cm
7.5 Feste vaieren (MB 4 RT, MB 4 RTP)
Trykk fremdriftsvaieren (1) inn i forgen (2) lungs sperresegmentet.


Fylle pa drivstoff

Koble inn fremdriften
- Start forbrenningsmotoren. (⇒ 11.1)
Trykk fremdriftsbøylen (1) mot styret, og hold den der.
Husk falgende his maskinen skal settes bort i lengre tid (vinter):
MB 4.0 R, MB 4.0 RT:
Malt lydeffektniva: 93,1 dB(A)
Garantert lydeffektniva: 94 dB(A)
MB 4.0 RTP:
Malt lydeffektniva: 91,2 dB(A)
Garantert lydeffektniva: 93 dB(A)
Langkampfen, 2014-01-02 (AA-AA-MM-DD)
VIKING GmbH

Weighlofer
MB 4.0 R, MB 4.0 RT, MB 4.0 RTP
Driving (MB 4 RT, MB 4 RTP) 175
Underhäll 175
Gora rent maskinen 176
Kontrollera knivslitage 176
Slipa kniv 176
Varning - risk for olycksfall!
97/68/EC, 2000/14/EC, 2004/108/EC, 2006/42/EC
MB 4.0 R, MB 4.0 RT:
Uppmatt Ijudniva: 93,1 dB(A)
Garanterad ljudniva: 94 dB(A)
MB 4.0 RTP:
Uppmatt ljudniva:
91,2 dB(A)
Garanterad Ijudniva: 93 dB(A)
Langkampfen,
2014-01-02 (AAA-MM-DD)
VIKING GmbH

Weighlofer
MB 4.0 R, MB 4.0 RT, MB 4.0 RTP
Modellnummer 6383
Bransletank 1,4 I
97/68/EC, 2000/14/EC, 2004/108/EC, 2006/42/EC
MB 4.0 R, MB 4.0 RT:
Mitattu aenentehotaso: 93,1 dB(A)
MB 4.0 R, MB 4.0 RT, MB 4.0 RTP
Saratunnus
6383
Polttoainesaillio
1.4
Leikkuukoneisto
Terapalkki
MB 4.0 R, MB 4.0 RT, MB 4.0 RTP
Leikkuuleveys 53 cm
Leikkuukoneiston
4.4 Transport of maskinen
Risiko for at snuble!
97/68/EC, 2000/14/EC, 2004/108/EC, 2006/42/EC
MB 4.0 R, MB 4.0 RT:
Malt lydeffektniveau: 93,1 dB(A)
Garanteret lydeffektniveau: 94 dB(A)
MB 4.0 RTP:
Malt lydeffektniveau: 91,2 dB(A)
Garanteret lydeffektniveau: 93 dB(A)
Langkampfen, 2014-01-02 (AAA-MM-DD)
VIKING GmbH
Weiglhofer
MB 4.0 R, MB 4.0 RT, MB 4.0 RTP
Serienummer 6383
Benzintank 1,4 I
97/68/EC, 2000/14/EC, 2004/108/EC, 2006/42/EC
MB 4.0 R, MB 4.0 RT:
MB 4.0 R, MB 4.0 RT, MB 4.0 RTP
Kerekhajtas (MB 4 RT, MB 4 RTP) 250
Karbantartás 251
11.3 Kerekhajtas (MB 4 RT, MB 4 RTP)


MB 4.0 R, MB 4.0 RT:
MB 4.0 R, MB 4.0 RT, MB 4.0 RTP
Transport 270 Transport 270
Zašita okoliša 271
Minimaliziranje trosenja i izbjegavanje steta 271
Uobicajenirezervni dijelovi 271
EU izjava o uskladenosti proizvodača 272
Tehnicki podaci 272
Trazenje pogresaka 273
Servisni plan 274
Potvrda predaje 274
Potvrda servisa 274
4.4 Transport uredaja
97/68/EC, 2000/14/EC, 2004/108/EC, 2006/42/EC
MB 4.0 R, MB 4.0 RT:
MB 4.0 R, MB 4.0 RT, MB 4.0 RTP
Sirina reza 53 cm
Broj okretaja rezne
naprave 2800 o/min
Sigurnosna naprava Zaustavlianje motora
Pokretacka naprava
Moment pritezanja
vijka noza
Visina reza
Pokretanje užem
60-65Nm
30-70mm
MB 4.0 R, MB 4.0 RT
Motor's unutarnjim
izgaranjem, izvedba
4-taktni motor s
unutarnjim
sagorijevanjem
Tip motora Kohler XT675
Potrošnja goriva
427 g/kWh
(srednja)
Obujam
149 ccm
Nazivna snaga kod
nazivnog broja
2,2-2800
okretaja
kw - o/min
Broj okretaja motora
2800 o/min
Prema direktivi
2000/14/EC:
Garantiranarazina
buke LwAd
94 dB(A)
Prema direktivi
2006/42/EC:
MB 4.0 RT
MB 4.0 RTP
MB 4.0 R, MB 4.0 RT:
Izmertais troksnu jaudas limenis: 93,1 dB(A)
Garantēais trokšnu jaudas limenis: 94 dB(A)
MB 4.0 RTP:
Izmertais troksnu jaudas limenis: 91,2 dB(A)
Garantēais trokšnu jaudas limenis: 93 dB(A)
Langkampfene, 2014-01-02 (GGGG-MM-DD)
VIKING GmbH

Petijumunproduktuattistibasnodalias vaditajs
18. Tehniskie parametri
MB4.0R,MB4.0RT,MB4.0RTP
Serijas numurs 6383
MB 4R, MB 4RT: 42-44 cm
MB 4 RTP:37-39 cm
7.5 Lynu sistemas fiksavimas (MB 4 RT, MB 4 RTP)

- Pavaros (1) lynuistema ispauskite i kreipiamaja (2) išilgai fiksavimo segmento.
7.6 Degalai ir variklio alya


Pavojus susiesteisti!
Atkreipkite demesi skyriije, Jusugumui" pateiktas saugos nuorodas. ( 4.2)
Degalai
Naudokite tik sviezius, ekologiskus kokyibiskus degalus:

- naudokite bešvinj benzina.
11.3 Pavara (MB 4 RT, MB 4 RTP)


97/68/EC, 2000/14/EC, 2004/108/EC, 2006/42/EC
MB 4.0 R, MB 4.0 RT:
Ismatuotas garso galios lygis: 93,1 dB(A)
MB 4.0 R, MB 4.0 RT, MB 4.0 RTP
MB 4.0 R, MB 4.0 RT, MB 4.0 RTP
Ybaxaemble nokynateIn!
Bolbwoe cnacn6o 3a To, yTo Bbl Bb6pann BlicOKokayecTbeHoe n3deneKOMnaHHN VIKING.
3To n3deJnne 6bIto I3rOToBNeHo NO cambIM COBpeMeHHbIM TEXHOJIOnueckmM ToDAM N B COOTBeTCTBn C MepaMn NO obecneeyHIO KaueCTBa PPOyKuIN, BeDb Ha7a cIeNB CHTaTeTcA DOCTUHyTOI TOIbKO B CJIyae NOJHOrO yDoBJIeTBOpEHN NOKynateJI.
EcynBacnmeKOTcBONpocbI NO BaewMy yctpoiCTBy,TO o6paauTecb, noxaynta,KBaewMy dInepy nn HenocepndBeHHo BHauy KomnaHIO.
Mbl Haneemcra 4TO pa60Ta c yCTpOINCTBOM KOMnAHNVIKING doCTaBNi Bam ydoBOJbCtBne

Dr. Peter Pretzsch
DinpekTop
Svanen

Moei MB 4.0 R, MB 4.0 RT, MB 4.0 RTP OTMeueHbI
CKAHINHABCKIM 3KOLIOnueCKIM 3HaKOM.
1. CodepkaHne
O nonb3OBaHH daHHo HnCTpyknei no 3Kcnnyatau 312
06aHnΦopMa3 312
Yka3aHne no npOteHnIO
TexHueckoe 6cbnyKBAhne
peMOHTbIe pa6Otbl
XpaenHe npn dntteBbix
nepepbibax B pa60Te
YTuNua 319
OncaHne CmBOJIOB 320
KoMnneKT noCTaBKn 320
IpoTobka yctpOcTBa K pa6oTe 321
Obua HnHopmaun 321
MoHTaK BeDyue npuKn (MB 4R, MB 4 RT)
MOnTaX BeDyUeI pyuKn
(MB 4 RTP) 321
MoHTaX 3axmka6eJr 321
Фиксанtrpoca(MB4RT, MB 4 RTP)
TOnnBO MToPHOe MacIO 322
3nemEnbI ynpabHeHH
OmbaHOpMa3 322
PerynpobKa BbICOTb BeDyue pyuK
CknaDbBaHne Bedyue pyu 322
YcTaHOBka IN CHrTne TpOca CTapTepa 323
PerynpoBka BbICToBcpe3aHn 323
3aunTHbIe yCTpoiCtBa 323
ByreIb octaHOBKn Dniratela 323
PekomEndaaun no pa6oTe 323
OmbaHOpMaun no MylbUPOBaHIO 323
Korda pa3peaetcma? 324
Kak cneJeT BbInoJIHЯTb MyIbUnpOBAHnE? 324
Kak yacto cneyet BbINOHNrMbIbHpOBaHne? 324
BBeHeHne yCToPocCTBa B pa6Oty 324
3anyck DnBraTeI BHyTppeHero cropaHna 324
BbIkuOHeHneDbIrTaTeJIa BHyTpHeHrO cropaHn 325
Пивовдвижени (MB 4 RT, MB 4 RTP) 325
Texnueckoe 06cnykBaHne 325
OuNTka yCTpoNCTBa 325
PpOBepka u3Hoca Hoxa 325
3aToKa HOKa KocnKn 326
ДeMoHTaЖ M OHTaЖ HOXa KOCNJIKN 326
BnuratEnb BHyTppeHrero cropaHn 326
XpaHeHHe(B3MmHn nepnoD) 327
TpaHcnpTnpoBka 327
TpaHcnpTIpOBka 327
OxpaHa OkpykaIooien cepbl 327
CbeHHeK MmHmMy m3Hoca npeoTbpaueHne nobpexdeHn 328
CtaHdapThbIe 3aunactu 329
Eknapaunn 3rOToBnteI O COOTBeTCTBn DpuKeTnBaM EC 329
Texnueckne daHhble 329
Ponck HEnCnpaBHOCTe 330
TpaΦnK cepBnCHOrO
06cnyxuBaHn 331
IoNTBepKdHne nepeaun 331
IoNTBepxKeHne cepBnCHOrO 06CnyXnBaHn 331
2. O noIb3OBAHm DaHHoH mHCTpyKcnei no 3Kcnpnyatau
2.1 O6ua Hnfoopmaun
I03TOMy nepepa6oToC yCTpoiCTBOM Ha ra3OHHom yuactke CnEdyet NometNTb BCECKpbITbIe 06BeKbI (npenrTCTBnR), KOTOpBle HeBO3MOxHOy6paTb.
IpeepncnOb3oBaHmE yctpoiCTBa
cneJeT 3aMeHrTb HeuCnpaBHeIe
rnyuHTeTI, a TaKke BCE dpYrIe
n3HOWeHHBe IINIOBpeXdeHHBe y3JIbI
IeTaJI.N. NobpeXdeHHBe IIN
Hepa36OpHbIe HakNeIKN Ha yCTpoiCTBe
C npDeynpeXdeHHMn uYka3aHnIMn o6
ImeOuxxCR ONACHOCTx HEo6xoDIMO
3aMeHrTB.HobIe HAcNkMn BCE dpYrIe
3aNaChbIe Yactn IMeOTcB
CneUaN3nPoBAHHOM CepBnCHOM
ZeHTpe VIKING.
IpeepncnoJIb3ObaHnem yCTpoiCTBa npOBepntb npouHoe nHaedXHoe noJIOxHe He WTeKepa npoBoJa CBeu H 3axirahnHa CBeue 3axirahn.
YCTPOIcTB OIOJXHO NcNOJIb3OBaTbcra TOJIbKO B TexHnueeCKn 6e3ONaCHOM COCTOAHM. IpePe KaKDbIM NcNOJIb3OBaHHem YCTPOIcTBa CJeNyET npOBepTaB,
CMOHITUPOBaHO JIN YCTPOIcTBO B COOTBETCTBNN CnpEaNCAHnA M
-6e3ynpeHNO nIcOCToHnpejyUero HNCTpyMeHTa NBCero pexJuero MexaHN3Ma (HOXA KOCUNK, KpenExhBIX 3JeMeHTOB, Kopnyca KOCINIOuHOro MexaHN3Ma).Oc60e BHNMaHne CNeJyET o6paTb Ha NaDeXHOCTb NOJoxHeHn, HAnuHne NOBpeXdEHH (HaceyeK INI TpeuH), I3HOca,a TaKke Ha To, ( 12.2)
- npaBnIbHO JIN 3aBnHcHa KpbIiKa TOnPiBHO6aka
COCTOHNIE TONINBHO 6aKa n y3IOB, CB3aHHbIX C NOdaeN TOINBa,a TaKKe KpbIuKN TOnINBHoro 6aKa, KOtOpBle DoJIKHbI 6blb 6e3yKOpn3HeHHbIM
-6e3ynpeHNO nI COCTOHNHe n npabnIbHa IIN pa6oTa 3aunTHbIX ycTPOINCTB (HanpIMep, 6yreNn OCTaHOBKn DnIraTeJI, KopnyCa, BeNyUeI pyuKn, 3auNTHOJ peWETKn)
- PpaBnIbHO JIN 3aBnHcH KOJINaQK MacJIAHOrO 6aKa.
Pn Heo6xOIMOCn BbINOpHeHne BCex Tpe6yEmbIX pa60T cNeIyET npCyatb CneuaJIn3NpuOBaHHOMy cepBnCHOMY ceHTpy.VIKING peKomeHnyET CneuaJIn3NpuOBaHHbI cepBnCHbI ceHTp VIKING.
4.6 Bo Bpempa60tbi

He pa6oTaTb,ecnB onaCHOI 3OHe HaxoJrTcXINBOTHbIe IIOJN,OOC6eHHo DeTn.
3anpeaaetcyaJdAJIbIINI nepeMbikatb
yCTaHOBnEHbIe Ha yCTpoiCTBe
nepeKnUoyuOuIe N 3auNThIe
yCTpoiCTBa.B uactHOCTN,HN B KOEM
Clyuae He fHKCuPOBaTb 6yreIb
OCtaHOBKn DBIrTaTeNa H cToKe BeNyuee
pyk (HaNPmep,nyTem CBAIBAHNA).

BHMaHne - onachoctb noJyehn TpaBM! Hb Koem cIyae He KnaCTb pykn NIN HOHa
BpauoouneCn TaHn HnN Hnx. 3anpeeHo npKaacTbcn K BpaauooucMyc HOxy.
Bcerda co6nOaTb 6e3oNaChoe paccToHne O t yCtpoCTBa, oBeceNeHHoe BeDyUe pyKoN.
Beya pyka Bcerda DOnkha 6bItb CMOHTnpoBaHa HaIneKaUIM O6pa3OM. 3anpeaaetc BHeceHne N3MeHEnB Bee KOHCTpyKuIO. 3anpeaaetc HauHaTb pa60Ty yctpoiCTBa CO CNOKeHHoB Beyuie pyko.
Hnkorga He 3akpenIte npedMeTbHa Beyuuei pyuke (hanpimep,paobuyo ndy).
CneNyet pa60TaTb TOJbKO npn DHeBHom CBETe NIN XOPOwEM NCKYCCTBEHHOM OCBeueHIN.
HelenbaPabotatbCyctpoCTBOM BO Bpemdoxndnro3bloc6eHBO Cnyae onachoctynapaMOHNH.
Pn HauHnBlaJxHNOBepxHocTn HeCyTOuHBoe NIOXKeHne NOpb3OBaTeN yBeJIuHbAeT onaCHOCTb HeCuaCTHO Cnya.
CneNyet pa6oTaB, co6NIOaIaO c06yO octopoxkHOCTb, YTO6bI He NOCKOJIb3HyTbC. IIO BO3MOXHOCTn 136eRaTb npIMHeHna yCTPOIcTBa Ha BNaXHO NOBepxHOCTn.
Otpa60taBwne ra3bl:

OnachocbIgXn3H
BCJeCTBne OTPaBHeHn!
Pn NOABHeHn ToUHOTbl,
rOIOHO60nn, HApUeHn
3peHn (HaNPmep, yMeHbSeHne
noIa 3peHn), HApUeHn Cnyxa,
roLOBOKpyKeHn, yXyDuaHOueiCnOCo6HocTN KOuEHTpaCmN
Heo6xOIMO cpoHNo pKePaTtB
paBoTy. 3Tu CNMTOMb MOYT,
KpOME npOero, 6bITb Bb3BaHbI
CNIuKOM BbICOKO KoUeHTpaCne
OTpa6oTabnx ra3OB.

YcTpoIcTBo BbldeIeRr
IIOBNTbIe Otpa6OtabUne ra3bl
BO Bpempa6Otbl Dnuratela
BHyTpeHrero cropanra. B HIX coepkntcraIOBHTaOKncb yrnpoJa ra3, He nmeounn cBeTa n 3anaxa, a TaKke I npytne BpeNbIe BeueCTBa. 3anpeaaetcpaBoTa DBnRaTeJRA BHyTpeHrero cropanra B 3akpbItbIX ININ pNOx pOBeTpnaBembIX NOMeueHHX.
3anyck:
3anyck npoun3BOuNTb c octopoKHOCTbIO, co6nIOdA yka3aHn rnaBbI «BBeDeHne yctpoiCTBa BpaOToY. ( 11.) HorndoJXhbl HaxoDHTbcra Ha doCTaTOHOM pacCToHmOT pexyUero IHCTpyMeHTa.
Pn3ayncke 3anpeaaetc onpOKnDbBaTb yCTPOINCTBO.
Pn3ayncke 3anpeaaetc npNBOuNTbB DeiCTBne 6yreIb npNBOda DBNXeHna.
Pa60TbHaCKJHOHax:
HaKNoHbIe yUacTk Bcerda
obpaTaBtB B nonepeuHOM
HaPpABLeHn, HN B KOe Clyue Ae He B
npoJoBHom HApPabLeHn.
Ecnn noJb3OBeTb npi Koc6e B
npoJoBHom HApPabLeHn NToepaET
KoHTpoB, 3TO MoKeT npNBecTu K TOMy,
YTO OH nonaTe NOd pa6oTaUooee
yCTPOINCTBO.
Будte ocobo octopokhbl, ecn Bbl MeHareTe HappaBneHne DnBXKeHnHa CKNoHe.
Bcerda cneIte 3a TeM, yTo6bl coCTOHaHne cKnHOHOB 6bIIO XopoUHM, n 136eRaIte paobOT C yCTPOHCTBOM Ha cnLHKOM KpyTbIX CKNHOHAX.
13 coo6paqhen 6e3onacnoctn 3anpeueHO nCNOJb3OBAy bYCTPOIcTB OHa cKnOHA KpyTN3H0B0nee 25^ (46,6%). Onachoctb noyuene TpabM!
YroJn KaJIOHa 25° COOTBeTCTByeT BepTKaJIbHOMy NOBemy 46,6 cm npu 100cm rOpN3OHTaJIn.
Дя obecneueHnI DoCTaTOHcMa3Kn DBuRaTeJI BHYTpEHHero CROPAHn npi pa6oTe yCTpoHCTBa Ha cKIOHax Heo6xOIMo Co6JIOnDaTb DONOJIHnTEJbHbIe CBeDeHnB IMeIoUeCn IHCTpyKcNn NO 3KcPnyatauDNBuaTeJI BHYTpEHero CROPAHn.
BoBpempa6oTbI:

Onachoctb noyuHn TpaBm!
Hikorda He Knaactb pykn uHn Hn Ha Bpaauounea Detan, a TaKke He DepeKaTb nx Ha nPi NOd 3TNMI detanarn.

He nbitaTbca OcMaTpNbTaB HOX BO Bpempa60tblra3OHOKOcNIKN.BpaaHouuNcR
HOKMOKeTCTaTb npuHNoTeNeChbIX NOBpeXdEHH.
IpeBnraTecb C yCTPOB TOM TOJbKO B TEMne Waara - npaBoTe 6bICTpoe nepeDbXKeHne 3anpeUeHO. BCJeCTBne 6bICTPOrO nepemueHn BO3paCTaET OnaCHOCTb HeCuaCTbIX CnyaEB N3-3a CNOTbKaHn, CKoJIbXKeHn I T. D.
Будte ocobo octopoxhbl, ecn Bbl nobopaunBaTe yctpoCTBO nlin noDburaTe erK c6e.
Onachoctb cNOTkhytbcra!
PnncnoB3OBaHn yctpoiCTBa B6n3m MycOpHBIX CBaJOK,AMN 3eMnHbIX BaJIOB co6IouaIte Oco6yO OCToPOXHOCTb. Oco6oe BHIMaHne o6paUaIte Ha doCTaTOHHe paCtOHaNe DO IIOo6HbIX onaChbIX 3OH.
Heo6xoJIMMo n36eRaTb Hae3Ja Ha HeBUNMbIe 06BeKtbl (6pbI3raJIbHbIe yCTaHOBKn IJRA rAOHOB, 3a6NTbIE B NOyBy CBaN, BOJrHbIe BeHTnIN, FyHNaMeHTbl, 3JeKTpUneCKNe Ka6EJIu T.I.).
3aIpeuaeTc npdHaMepeHHbHae3n Ha TaKne o6bekbl.

Cneintb 3a INhepuHnHbIM DnHexnem pexyueo HnCTpyMeHTa, KOtOpoe dNITcA HECKOJIbKO CEkyHd DO NOHON OCTaHOBKn.
BbIKIOHTb DmraTeNb BHyTpeHHeRcropaHn,doXdAToCBn POJHOOCTaHOBKn paOohero opraHa N BbHyTb WTeKepe npoBoDa CBeu 3axKrHaHn,
- npexJe yem ocTabuBt yCTpoiCTBO, IIN, B TOM Cnyuae, eCNI yCTpoiCTBO haoiNTc8e3 npncMoTpa,
- npexdE yem 3anpaBnTB yctpoiCTBO. 3anpaBky npoIN3BOAnTB toIbKO npn octbIBwEM DnIraTeNe BHyTpHHeRo cropaHna.
Onachoctb noxapa!
- npexJe yem ocbo6oJntb 6IOKnPOBKn IIN CHrTb 3aJIyUKN C KOpnyCa KOCNIOHOro MExAHN3Ma,
- npexJe Yem NODHMaTb HnnpenepenocHTyCTpOHTBO,
- npexJe yem TpaHcnpTnpoBaTb yCTpOJCTBO,
-
npexKeJe yem BblIOJIHNHtbpa6Otbl Ha HOKe KOCNIK,
-
npexde yem npoBepntb nnn Ounchntb yctpoicTBO nnn npoBeCTn Ha HEM nHbIe pa60tBI (HaNPmep, CKnaDbBaHHe BeNyuei pyKn),
ecn3aTeNocToPOHHnPpeDMeTnnnyra30HOKOCNIKNo8BUNNCbHeHOpMaJIbHbIe CInbHbIe Bn6paunn.B 3TNxCnyaX Heo6xOIMo npOBepntyycTPOINCTBO,BOCo6eHHoCTnpeKyuMmexAHN3M(HOKn,HOKeBOBaJ,KpenJIeHne HOKa)HaOTcyTCTBNE NOBpeKdEHN IN CNeJeYET BbINOHNHTb Tpe6yEmbpeMOHT,npExe YemCHOBA Haatb pa60Ty cYcTPOINCTBOM.

Onachoctb noJyueHn TpaBM!
HaHnue CnBHO Bbpaun, Ka npabnIO, CBnTeIbCTByeT O HeNCnpaBHOCTN. 3anpeaaetc npnbOHTb ra3oHOKocNIky B DeICTBne, HAnpIMep, C nobpeKDeHHbIM NnN nOrHytBM HOKeBbIM BaOM NIN C NOBpeKDeHHbIM NnN NorHytBM HOKOM KOCNIk. Ecn Bam He Xbataet Hyhbx 3HaHn, IopyUte Heo6xOIMbI pEmoHT cneuaNlncTy - KomnaHnVIKING peKomeHdyet obaaatbc B cneuaJIn3npOBaHHbI cepBnchbl ueTp VIKING.
HeoXoDIMO BbIKIOHTb DnraTeIb BHyTppeHrero cropaHna,
ecn yctpoiCTBO nepemeaetc co ckaunBaemorO ra3oHOrO yactKa nn Ha Hero,
- nepeTem KaK nepemeCTnTB yCTpOiCTBO Ha yAcTOK, He NOpocuIM TpaBoi,
-eCNI yCTpoIcTBo Heo6xOaIMOn OnpOKHyTb Ira TpaHCnOpTpIOBKn, -peed TEM kak yCTaHOBtB BbICOTy Cpe3aHna.
4.7 TexHnueeckoe 06cnyxuBaHne n peMOHTbIe pa6oTbI

Ipeed hauanom pa6oT no Ounchke,yctahOBKe,peMOHTy IN TexHnueckomy 06cnyKbAHIO yCTpOncBo He06xOdmo
nocTaBntbHa TBepdoe,poBHOE OCHOBaHHe,BblKIOUHTb DnBraTeIb BHyTpeHHero CropaHn I DoXdaTbcr OCTbIBaHn,3aTeM BblHyTb 1TeKepe npoBoDa CBeyn 3axKraHna.

Onachoctb nonyuhenra TpaBM n3-3a HOXA KOCHIKI
BbITRnBaHHe TpOca CTapTepa npINBOiNT K BpaUeHNo paBooery oprHa. BcerIa HaxoDntbcra Ha IOCTaTOHOM pacCToHnO THOKa KOCNIK, OOC6eHHO CNeIITb 3a NOIOXeHnEM pyK n Hor, BO Bpem BbITrNBaHn TpOca CTapTepa.
IpeenBbINONHeHempa6oT, npexde Bcero,Bobactn DBInaTeN BHyTpneHero cropaHna,BbInyckHoro KOnNeKTopa n IyyuHTeNCLcyETdoxdaTbcra OCTbHaHn yCTpoiCTBa.TemepaTybl MOryt DOCTnRaTb 80° C N Bblwe.
Onachoctb oxorob!
HEnocpeCTBeHHbIKoHTaKT C MOTOpHBIM
MACIOM MOKeT 6bITb ONaCHbIM.KpOMe
TORO,HeOnyckaETcnpOIIBaHne
MOTOPHO RAMa.
KOMPAnHnVIKING peKoMeHnyeT
IPOIN3BOIDtB 3aINBky INN CMeHy
MOTOPHO MCA B
CNEuAIn3nPoBaHHom ceHTpe VIKING.
OuNTka:
Iocne pa6oTb BCE yCTpoNCTBO Heo6xOaMnTO TuaTeNbHO OuHCTNTb. ( 12.1)
YdaNTbOCTaKN TpaBbI DepeBHHoH naIOUKO.OuNCTNbTeKoN BOIo HNXHOIO NOBepXHOCTb KOCUNK.
3anpeaetcncnoJb30BaT aannapat
DnOuCTKN BbICOKO DaBJeHnA, aTaKKe
npomBaTb yCTPOICTBO CTPyAMN BObl
(HanpImep, pni NMOUcCaDoboro
wnaHra).
HEnb3nncnoB3oBaTb arpeccNBhie 电CTAue CpeCTBa.3TN CpeCTBa MoryT NOBpeNTb NtactMaccy N MeTAn, YTO MOKeT Bbi3BaTb HapyuEne6eOanChOn 3KcNpyatauyn yctpoCTBa VIKING.
CzelbIO NCKJIOUeHn BO3ropaHn
OTBepCTN OXnaJdeHn,pe6pa
OxJaXdEHHn IObnactb BbIXJOna DOJXHbI
6bITb UcTbIMn, HApPImep,OT TpaBbl,
COJIOMbl, MxA, JINCTbeB INN BbITEKWei
CMA3Kn.
Pa60tblnoTexHnueckomy 06cIyKmBAHHO:
Pa3pewaetcBbINOJHrTbTOJbKO Te
pa60tI NO TEXNHueckOMy
obCnyKuBaHNIO,KOTOpbIE ONICaHBi B
daHHoN INCTpyKUIN NO 3KcNPyatauIN.
Bce DpyRnpe pa60tI DOJIKNHbI
npON3BOdNTbcRA B CneuaJIn3IpOBAHHOM
cHTpe.
Дя поуенна Heo6xOIMbIX CbeHn н OKa3aHn NOmoUng ObaaauTecb Bcerda B cneuaIaN3IPOBaHbHbI ueHTp. KOMnaHry VIKING peKomeHdyET BblONJIHrT bpaOtBi ITO texHmYeCKOMy OBcJyXuBaHnIO n peMOHT ToJIbKO B CneuaIaN3IPOBaHHom cepBnCHOM ueHTpe VIKING.
Cneuaan3npoBaHhble cepBnchIe
ceHTpbVIKINGpernyapnpeIanaHOT Kypcbi npeIOCTaBnaT TEXHueckyU HΦopMaunu.
CneNyet nNoIb3ObaT TObKO
HnCTpyMeHTbl, npHaJdNExHocTn nn
Habechoe o6OpyDoBaHne, dOnyuSeHHbIe
VIKING dJa daHoro yCTpoiCTBa nn
TexHueckn aHaIOruHbIe y3bl. B INOM
cLyueae BO3MOXHbI HeCuaCThBiE cLyUan,
npINBOJAAuNE K NoJyueHIO TpaBM nn
IOBpeXJeHNo yCTpoiCTBa. Pn
BO3HNKHOBeHN BONpOCOB CneDeYET
O6paAaTbcra B CneuaJIaM3InpOBaHHbI
ZeHTp.
OpunHaJIbHbIe INCTpyMeHTbl, npnHaJIeXHocTn 3aIacTn VIKING no CBOIM CBOIcTBAM ONTImaJIbHO COOTBeTCTByOT yCTpoIcTBy u YOBIJIeTBOPaIOT Tpe6oBaHnA m NOJIb3OBAteJIA. OpunHaJIbHbIe 3aIacHbIe qactN VIKING ono3HaIOTCn no HOMepy 3aIacHO qactN VIKING, no HaIINcN VIKING n B clyae Heo6xOIMOCtN no 3haky 3aIacHBx qacteY VIKING.Ha MANeHbKnX DeTaJnx 3HaK MoKET CTOrTb TaKke OTJeMbHO.
I3 coo6paqhen 6e3onacHocTn
Heo6xOIMO peryIaRPHo npOBepaTb y3Nbl, CBraHHbcie C noDaaye TOnJIbBa (ToNNBONpOBOd, ToNNBHyk PcaH, ToNNBHyb 6ak, KpbIuKy ToNNBHOro
6aka, noCoeDInHeHry n. Na) Ha
OTcyTCTBne IOBpeXJdeHn i
HerepMeTuHocTn, pni Heo6xOIMOCTH
COOTBETCTByUOuJe y3Nbl DOJIXHbI
3aMeHrTaCnEuaNtCM (KOMNaHn
VIKING peKomeHdyet
cneuaNIm3npoBaHHb CepBnCHbI ceHTp VIKING).
HaKeiC npEnpyEeHnMaN yKa3aHnMaCneDyET Bcerda CopeKAtbB uCTOM XopoOo YHTabeHbHom coCTOHN. NOBpeXeHhIe Hn
yTepeHHbHe HakKeHKn Heo6XoIMMo 3aMeHHTb HOBbIMn OpuHHaJIbHbIMn, KOToPbIE MoKHO NOLyHTb B CneuaIaN3npoBaHm OeHTpe VIKING. Pn 3aMeHe y3Na nJn DeTaJIn HOBbIM y3IOM nJn DeTaJbIO, CneJITb, YTObbl HOBbie YaCTn NOnyUHIn TaKne Jx HAcKeKN, KaN npexKHe y3NbI n DeTaJIn.
Ppi pa6oTe c pejxum MexaHn3MOM He06xoJIMMO Bcerda Hocntb npOuHbIe pa6oUne nepaTkn u coBIOdaT npdeJIbHyIO OCTOPXHOCTb.
TTOUTo6bIyCTpoICTBOpa6oTANO HAdexKHO,CJeDye3aTARnBaTbBCEraKN, 6OHTBIuBNTbIdoynopa,BOCo6eHHOCTN BnHT HOXa.
CneJeT perynpho npOBepaBt Bce
yCTpoiCTBO,OCO6eHNO npeApYcTAHOBKO
Ha DInTeNbHoe XpaHeHne (HaNPIMep,B
3MHNI nepNO), Ha OTCyTCTBNE u3HOca N
NoBpeXeHNI. N3 COo6paxKeHNI
6e3OnaChOCTN Heo6xOdmo cpa3y
3AmEHrTB N3HOWeHHbIe NIN
IOBpeXeHnBe DeTaJI, O6ecNeuHBa
TEM CAMbIM HAdExKHyO pa6Oty
yCTpoiCTBa.
HeIb3a MeHrTb OCHOBHOe NOLOXKeHne DBrIraTeJI BHyTpEHHero CropaHnI nepeBopaUHaBaTb erO.
B cnyae cHantna kaknx-Jin6o deTanei nn 3aunTHbIX npncnoc6neHn BO Bpem npOBeHn pa60nt no TexHnueckomy o6cnykBaHnIO HnoxOIMO HeMeIeHHo CHOBa yCTaHOBTb Ha MeCTo B COOTBeTCTBn C npdeNtcaHnMn.
4.8 XpaHeHne npn dInTeJbHbIX nepepbBax B pa60Te
Ipeed TEM KAK CTaBnTb yCTPONCTBO B 3aKpbItoe NOMEUeHne, CJeDyET DaTb BO3MOXHOCTb DBNrAteJIIO BHYTpEHHeRO CROPAHN OCTbTb.
Ipeed TEM KAK HApbItb yctpoiCTBO, DOxdaTbcraeroNtHoro OCTbIBaHn.
YcTpoIcTBo CneDyET XpaHnTb C OnyCTOWeHHbIM TOnJIINBbIM 6aKOM I 3aNaCOM TOJIINBa B 3aKpbIBaEMOM XopoJO BEHTNIINpyEMOM NOMEueHN.
HeoXoHMO NCKIIOHTb BepoTHOCTb NOJ30BaHnY yCTpoNCTBa IOCTOpOHHMNIaAMn (HanpImep, dTeBMn).
EcIn Tpe6yeTc onyctountb 6ak, Hanpnmep, npn pnekpauehen pa60tb B 3mHnn nepnoD, onopoxhne Hte TOINBHO 6aka DOJXHO npOn3BOUNTBcA ToIbKO Ha OTkpblOM BO3dyxe (nyTeM Bblpa6OKn TOINBa Ha XONOCOM XOdy).
Ipepe yctahOBKOHa xpaenHe (Hanpimep,B 3mHn nepnoD) yCTpoCTBO CneNyET TuaTeJbHO OuNtB.
YcTpoNCTBO CNeJeYeXpaHnTB TOnbKO C BbIHyTbIM WTeKePOM IpOBoJa CBeuH 3aXnTaHn.
XpaHb yctpoCTBO B COCTOBHn IROTOBHOCTN K EKCNyatauIN.
4.9 Ytulnaaun
Takne OTOxObl, KAK OTPa6oTaHHoe MacNo 1NJN TOJINBO, CMA3OHyBle CpeDCTBa, 0nIbTpbl, AkkMyJrTopHbIe 6aTapen n NIOOBHbIe N3HaUNBaemblye y3JIb MOryT
PnHHTB BPeIIOJAM,XNBOTbIM N 3KONOru,NO3OTMy OHN DOnXHb6bITb yTIN3NpOBAhbl HaJIeKaaUM O6pa3OM.
O6paaItecB B Baw ceHtp no yTnN3aunnn nIn B nHOJ cneuaan3npoBaHHbI ueHtp, YTO6bl nOlyntb HOpMaunO npaBnBHOyTnN3aun OTXoOB. KomnaHry VIKING peKomeHdyET cneuaan3npoBaHHbI ueHtp VIKING.
CneNyet oecneHb npabnblhyo ytnn3aUIO OTCnyKMBeero yctpoiCTBa. Ipeed ytnn3auein npBBeNTe yctpoiCTBO H enpnoIroDHOe COCTOHNHe. Bo n36exaHHe HecacthIx Cnyaeb HaDo cneuaNbHO ydaNtB npBOD, BbICOKOr HaprrxHn, onyctOuHb TOnnBBhB 6ak n CnTb MOTOPHOe MacNo.
Onachoctb noJyehn TpaBM n3-3a HOXA KOCNIK!
Kpome TOrO, HNKoRda He OCTaBnIe TcnykNbUyHO ra30HOKocnIKy 6e3 npncMOTpa. YOcTOOBepbTecb, YTO yCTpoiCTBO NOCoBeHHO HOX KOCnIKx XpaHrTCB HHeOCTyINHom DnA DetEn Mcte.
5.Опсанге символов

BhimaHne!
IpeepnepBbIM npmehennmpoHTaH nHCTpyKUIO NO 3Kcnpyatau.
Onachoctb noyuhen TpaBM!
3anpeeHNO npCytCTBne noctopoHHnx IuC B pa6oey 3OHe.

Onachoctb noJyehn TpaBM!
peepaobotamn C
pexyuHm HNCTpyMeHTOM,a
Takke nepeppaobotamno
Texo6cnyKbAHnIO
OuNCtke CNeDyET BbIHMaTb
WTeKe pnpoB0da CBeyn
3aXnraHn.

Onachoctb noJyehnra TpaBM!
PexyuHnHCTpyMeHT npoDOnJaet BpaaTaBcra nHepeun B TeueHN HeCKOJIbKnx CekYHd NocJe BbIKIOUeHnA (TopMO3 DBrIaTeJI BHyTpEnHero CropaHn/Hoxa).
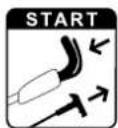
MB 4R, MB 4RT:
3anyctntb DnBraTeJIb BHTpeHHeRo cropaHna.
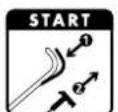
MB 4 RTP:
3anyctntb DnBraTeJI BByTppeHHeRo CropaHna.

MB 4R, MB 4RT:
BbiklouHTb Dnuratelb BBytpenHero cropaHna.

MB 4 RTP: BbiklouHTb DBrIaTeIb BByTppeHrero CropaHra.
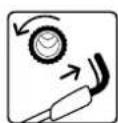
MB 4 RT: BkHouHTb npBOD DnHexHn.
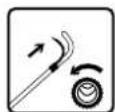
MB 4 RTP: BkHouHTb npNBOd DnKHeHJ.

MB 4 RTP: Bo bpema pa60tbl NcNoIb30BaTb 3aunTHbIe HayuHnKn.
Mapknupobka nonoxeHHa
dIa cepBnCHORO
06cnyKnBaHnHa
ΦHKCnpyUoE M CeMHeT.
(12.1)
6. KomnJIeKT NOCTABKIN

No3.HaMeHOBaHne 1T.
A Ba30BOe yCTPOINCTBO C 1 BeDyue pyuKoI
B 3aKIM Ka6eJ 2
-1HCTpyKnna 13Kcnnyataa
-1HCTpyKUaNo 13KcNpyatauIN DBnraTeJI BHyTpeHrero cropaHn
MB 4R, MB 4RT
No3. HanmeHOBaHne 1T.
C BnHTbI C noJyNtaiHoi 2 roNoBko
D BbICTpoJeIcTByUoU 2
E 3aunTHbIe BtynK 2
MB 4 RTP
F BnHTbI C noJyNtaiHoi 2 roJOBKOI
G CtonopHbIe 1aai6bl 2
H CToOpNbIe raIKn 2
3aunTHbIe BtynK 2
7. Побтовka устpoиства Кра6оTe
7.1 O6uaHnΦopMaun

Onachoctb nonyuehn TpaBM
CneNyetco6nHoaTb npednncanHnnoTexnke 6e30nacHOCTB RnaBe «Texnka 6e30nacHOCTN» ( 4.)
- BInONHeNBCex ONCaHHbIX pa60 yCTpoiCTBO DOnKHO 6bITb Ropn3oHTaIbHO yCTaHOBNeHO Ha POBHOM N TBepDOM OCHOBAHIN.
7.2 MoNTaX BeNyuei pyuKN (MB 4 R, MB 4 RT)
- UCTaHOBtB 3aUHTbIe BTyIKN (E) Ha BepXHIOU qAcTb BeDyUeJ pyuKn (1) TaK, YTO6bI IN X DInHHa CTOpOHa 6blna o6paueHa BHyTpB.
- YndePknBaTb BepXHIOU qactb BeNyuee pyu (1) Ha HxNHe uactn BeNyuee pyu (2) n BCTaBNTb BnHTbl (C) B OTBepCTn3 no HanpaBneHIO n3Hytpn HapKy.
HabnHTb 6bICrpoeIcTByUuNE rANK (H) H3aTAYb INX C MomeHTOM - UCTaHOBtB 3aUHTbIe BTyIKN (I) Ha BepXHIOU Yactb BeDyuee pyuKn (1) TaK, YTO6bl Nx DnHHHa CTOpHa 6bJa ObaPaeHa BHyTpB.
- YdepxnBaTb BepxHIOu qactb Beyuuepyk (1) Ha HuxHe uactn Beyuuepyk (2) n BCTaBnTB BNHTb (F) BOTBePcTna (3) C HapyKHO CTOpOH bNoHa npBaJIeHHO BOHyTp. HaTe bCTOnOpHbIe Wai6bl (G) n CTOnOpHbIe raKn (H) n 3aTAYb INC Momettom 22 - 28 Hm.
BnHTbC) (OJXKnB BbICTyNaTb npImepHO Ha oINH BnTOK pe3b6bl) n OTKNHyTb IN BBepx.
- PpOBepka npaBnIbHOCtmoHTaKa: BbICTPOeIcTByIOuNe pKcNpyIOuNe pbUar (D) 0JXhbl 6bITb 3aTMyTb C TaKo CNIO, YTObI OH N IIOHO npINerAII K BeDuJe pyKe, a ee BepxHra qACTb 6bIJa npOuHO coEInHeHa C HIXHe qAcTbIO BeDuJe pyKn. Ecnn BeDuJaa pyka 3akpenJIeHa HeNPouHO INI 6bICTPOeIcTByIOuNe pKcNpyIOuNe pbUar yCTaHOBneHbI HeNPaBnIbHo, HeOBxOdIMo OTKHyTb 6bICTPOeIcTByIOuNe pKcNpyIOuNe pbUar IN ppABnIbHO OTPeyIpOBaTb IN NyTeM BpaueHnB O6e CTOpOHbI.

7.3 MoThax BeDyuei pyuKN (MB 4 RTP)
10.3 Kac cneyuET BbINOnHrTb MylbNPOBaHHe?
YcnoBnIyIOCTNKeHnXopoWero pe3yNbTaTaMyNbCuPobAHn:
- YCTaHOBnTb ONTMaMbHyo BbICOTy Cpe3aHn: Heo6xOIMo Cpe3aTb TpeTb BBICOTbl TpaBbl.
Pa6oTaTb C xopoIio 3aToueHHbIMN HOXAMN. - MeHЯr Ta HappaBJIeHne IbIXKeHnI npKoUHeHn I CNeDHTb 3a TeM, YTO6bl NOIOcBi npN KoUHeHn He nepeceKaIncb.
Popraok pa6oT npu BbICOK TpaBe
Tg30n C BbICOKO TpaBOcCneDyET 6pb6aTaBtBaTb B DBA npoxoJa.
PepBbI npoxoI: PpeBapnteHbHO noDpe3aTb TpaBy Ha ra3OHe, yCTaHOBIM MaKcMmaJIbHbI ypoBeH cpe3aHn.
Btopo npoxo:
Yepe3 12-24 nocne nepBoro npoxoJa,
DnurraCy nepNeHnKUyIrpHo
Ha npabEnHIO nepBOI NOpe3Kn,
BbINOHNb MylbChIpOBaHne ra3OHa,
cpe3aB TpaBy Do Tpe6yEmo BbcOTbl.
10.4 KaK qacto cneIyET BbINOnHrTb MylbHnpOBaHne?
Длп поуеня кpacивога ra3oHa c rctOn TpaBoM MyIbHpObaHne He06xOAnMo npON3BODnTb YactO, cpe3a npN 3TOM TpaBy KopoTko.
PepnoD aKTHBHoro poCTa TpaBbl:
Becha:
BbIIOJIHrMbMyIbHIpOBaHHe Me Hee 2
pa3 B HeJeIIO.
JIeTo n OceHb:
BbIIOJIHrMbMyIbHIpOBaHHe Me Hee 1
pa3a B HeJeIIO.
11.Вて徳てYeCTpoIcTBAВ pa60ty
11.1 3anyck dBuraTeia BByTppeHrero cropaHn


He donyckaTb noBpeKdHn yctpoiCTBa!
IpeepnepBbIM nyckom 3aNTb MOTOPHoe MacNo (CM. «NHCtpyKUIO NO kCnpyatauIN DBrnraTeJI BHyTpeHHeRo CropaHNA>).

He 3anyckatb DnBiratel BHyTpeHrero cropaHnB BvICOKo TpaBe NIN pN CaMOH H3KO Bbcote cpe3AHn. 3TO MOKET NOBLeh 3a co60 npo6JIeMbI npN 3anycke.
PnKtB 6yReIb OCTaHOBKn DnuratJIe (1) K BeNyUe pyuKe n ydepKNaBaTb erO B 3TOM NOJIOKeHHN.
M eIJIeHNO BbITaHyTb Tpoc CTapTepa (2)do nOBHeHn COIpOTuBHeHn HaTajKeHHo.3aTEM pe3KO depHyTb Tpoc,6bICTpo BbITaHyB erO Ha DInHy pyKn.
- MeDneHNO BepHyb Tpoc cTapTepa (2) Ha MeCTO TaK, YTO6bI OH HamOTaJIcR o6paTHo. NOBTOPaTb npouecC Do Tex nop, noka DnBiratEnb BHyTpEHHero CropaHn He 3apa6otaet.
Bnaorappepyrnapo naTOnnBa c cnKcnpoBaHHbIM NOIOXKeHEm DnurTaTeNb BHTpeHrero cropann noCne 3anycka BCerda pa6oTaet C ontImaIbHo npaoey qactOTOn BpaueHn.
11.2 BbikloueHne DvuraTeNa BHyTpeHHero CropaHn

OTnyctntb 6yreIb octaHOBkn DBnIraTeJI (1).
BnraTeIb BHyTpHeHrero CropaHnN HOK NOHOCtBIO OCTaHaBnBaIOTcB TeueHne 3cekynd.
11.3ПивODДВИЖЕнь (MB4RT,MB4RTP)


Y moJeIeM 4 RT n MB 4 RTP UMeecTc npBOD nepeDnHex konec.
BkIIOueHnepuBODaDbNKeHn
3anyctntb DnBraTeJIb BHyTppeHHe ro copaHna. ( 11.1)
- OToHt b 6yreI npBoda I BnKeHn (1) K BeDyuIe pyUke n ydepKInBaTb erO B 3TOM noLoXeHN.
PnBOD DnBxKeHn BKnOyaeTc, Ra30HOKoCnIka HauHnaet DnBxKeHne Bnepe.
BbIKIOueHne npIBoDa dBIXeHna
-OTnyctntb6yreIb npB0da DnHexn (1).
PnBOD DnBxKeHn BbIKIouaETcR, Ira3OHOKOCNIka OCTaHaBnBaeTcR.
BnuratEnb BHytpenHero cropaHn HOK npoDnKaHp TaB.
12. TexHnueckoe o6cnyxnbAHne

Onachoctb noJyehnra TpaBM!
IpeB BCEMn pa6oTAMn no Texo6CnyKuBaHNO INN OCHCTKe yCTpOHTBa Heo6XoDmO BHMaTeNbHO npOHTaTB rABy TexH 6e3oNaCHOCTn ( 4.) BOCo6EHHOCTn pa3dEi TexO CnyKuBaHne n peMOHT ( 4.7) ,TOHBO BInONHtB BCE npNBBeHHbte TaM npEJaNCaHnno TExHKe 6e3oNaCHOCTn.
Ipebn BCemn pa6oTaMn no TexO6cnyKuBaHnIO uOyCTKe He0xOdmo DoXdaTbC8 OxnaKdeHnry CToPocTBa N BbHyTb UT npOBoDa CBeyn 3axnHaH
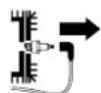
ExeroDHOeTexHueckoe 06cnyXnBaHne B cneuaJn3npoBaHHOM ueHtpe:
Ta3oHokocnky CneDyET EkeoJHO npOBepaBt B CneuaJIn3uPoBaHHOM ceHTpe. KomnaHry VIKING peKomeHdyeT cneuaJIn3uPoBaHHbI ueHTp VIKING.
12.1 OuicTka yctpoiCTBa
INHTepBaJI TexHnueckoro 06cIyKnBaHHa:
nocJe KaXDoRo npImeHHeHna.

Onachoctb nonyuhenra TpaBm! BblkIIOHTb DnurateIb BByTpeHHeRcCropaHn,doXJaTbcOxnaJdeHn yCTpoiCTBa N BblHyTb WTeke npooba CbeHn 3axirahan.
YcTaHOBnTb yCTpoiCTBO B nIoJKeHne, npEHa3NaHeHHoe Ia cepBnCHOrO 06CnyKmBaHHa.
- YctaHOBtbypyKoTky peryInpoBn BbICOTbl cpe3aHnB KpaHHee BepxHee noOKeHne (1). ( 8.5)
Ocna6ntb pe3b60Boe coeHHeHne BedyupeyKn nn 6bICTpoJeCTByUoyni KncpyUoyni pbYar (2) nOTIOXnTb BepxHIOU Yactb BedyupeyKn (3)Ha3a.
- PpInNoDnHb yCTpoNCTBO Cnepei n yctaHOBnT b erO B NoIOKeHne, npEHa3HaueHHoe dIa cepBnCHoro 06CnyKuBaHna, KaK Noka3aHo Ha pncyHke.
peed KaKdbim npimeHeHnEM.


Onachoctb nonyuhenia TpaBm! B 3aBucnmoctn OT MeCTa n npoDIOKHTeJIbHOCTn
3KcNpyaTuHNOxN NOBepKeHb
H3HOCy Bpa3nHOn CTeneHH. Pp
3KcNpyaTuH yCTpoiCTBa Ha
NEcuaHoi NOBepXHOCTu HIN ppi
YactoH pa6Ote B ycNoBnx Hn3KoB
BlaJXHOCTu Harpz3Ka Ha HOX
NOBbIaETC, N OH n3HaUNBaETC
6bICTpee.
N3HOWeHHbH HOX MOKET CLOMaTbCn I CTaTb npuHNOH NOyueHn cepbe3HbIX TpaBM. TOnTomy CneNyET Bcerda CO6HnDaTb INHCTpyKunn IO Texo6cIyKnBaHnIO HOxa.
Ppoecc npoBepkn

Onachoctb noIyueHnra TpaBm! CneNyet co6nOaTb npEaNcaHn noTexnke 6e3oNaChocTN, npNBedeHHbE B rnaBe «Texnka 6e3oNaChocTN>. ( 4.7)
- UctaHOBt b yCTpoIcTBO B nOIOKeHne, npEHa3HaueHHoe dIe cepBnCHOrO 06CnyKuBaHna. ( 12.1)
Ou n t b HOX (1). - IV3mepntb TOnuHny Hoxa (A) B HeCKoNbKnx MeCTax C NOMOuBHO WtAHReHcNpKyJ (2).
I3MepuTb,Ha cKoJbKO CTOUINcH OX (B). 3TOrO pNIOxNTb IInHeKy (3) K npeDHeK kPOMKe HOxa, KaK noka3aHO Ha PnCyHKe.
PpeJeIbI n3HocA
ToIuHa Hoxa(A)B IIO60 ToUKe 1OJIxHa COCTaBnTb He MeHee 2,5 MM. BaxHeiune TOKn OTMeueHb Ha pucyHke.
DonycKaTcTaUHbHneJe3BnHe 60Jee HeM Ha5 MM (CM.pacCToHnE(B).
12.3 3aToUka HOXa KocnIKn
Ecnn BaM He Xbatae 3HaHn mIn BCNOMOraTeIbHbIX CpeDCTB, Mbl peKoMeHnyem NopyauTb 3aToCy HOKa cneuaJIncTy. HenpaBnJbHO 3aToeHHbI HOK (HenpaBnJbHbI yrO1 3aTOckN, dnc6aJaHC n T. d.) HapuShaET HopMaJIbHbI xoJ pa6Otbl yCtpoiCTBa.
PykoBOdCTBO no 3aToUKe
CHATb HOK KOCNJIK. ( 12.4)
Bo Bpem 3aToQn CneIyE ToXlaJkaTaB HOK KOCUNK, HApnpMep, BOIoN. HeIb3a DOnyckaTb NOBHeHnCnHeBaTO rBETA, TAK KAK B 3TOM Clyuaye yMeHbShaetc DOIroBeHuOCTb HOXa.
Hoxkocnkn CneNyET ToHTb paBHomepHo, YTo6bl N36ExaTb Bn6paun n3-3a dnc6anahca.
- YrOJ 3aToUckn DOJIKeH COCTaBnTb 30^
- YyHTbBaTb npedeJIbI n3Hoca ( 12.2).
12.4 DeMoHTax N MOHTax HOKa KOCNJIKN


Onachoctb nonyuhenra TpaBM! CneJeT c6nHdaT b npedncaHna noTexnke 6e0NaCHOCTN, npBVeEHhBe B rnaBe «Texnka 6e0NaCHOCTN». ( 4.7)

Onachoctb noIyueHn TpaBM! Pa6oTaTb TOnbKO B nepuAtkax.

DemOHtAX
- YIepKINBaH OXK KOCNJKN (1),OcJnABtB BnHT HOXa (2).
- CHaTb BnHT HoJa (2), CToNOpHyo
- Wai6y (3) u HOK KocuJkn (1).
MOHTAX

HoxKocJHK Heo6xOJIMO 3aMeHNb,ecnBnHbHaCeKn nIIN TpeunHb,a TaIOKe ecn IOCTnHyT npednN3HOca ( 12.2).
OuHCTNTb NOBepxHOCTb KOHTaKTa HOKa N BTyIky HOka (4).
3aФнКсИрОВаТь BИNT HOKa (2)ФнКсИрУЮцIM COCTaBOM Loctite 243.
- YctaHOBtB HOK KOCUNK (1) HA BTyIKy HOKA (4), KaN NOKa3aHo Ha pncyHke. MB 4 RTP: cIeINMb 3a npaBnBhbM noIOKeHem ynpHOro dNcKa (5)!
- YctaHOBtB CTOnOpHyU 7aMy6y (3), KAK NOKa3aHO Ha PnCyHKe, N 3aTAYb BMECTe C BnHTOM HOXa (2) C MOMEHTOM 60 - 65 Hm.

Onachoctb noJyueHnra TpaBm! HeoXoDIMO BvIePKeNBaTb npEiNcAHbI MOpHT 3aTjKKn BnHTa HOka.
PpiKaKdoIyCTaHOBKe Hoxa CneJeYET 3aMeHrTa CTOnOpHyIO Wai6y (3).
PnKaKdo3aMeHe HOxBAHT HOxA2TAKKeNoDnEeNT3aMeHe.
12.5 DnraTeB BHyTpHnero cropaHH
INHepBaI TexHuYeCKoro 06cIyKuBaHHa:
CM. «VHCTpyKUHIO NO 3KnJyTaUIN DBNfATEJI BHYTpEHHero CROPAHIA>.
06une yka3aHnA:
Co6nOdaTb yka3aHnno ynpabIeHnIO texo6cnyKINBaHNO, KOtOpBie npBedeHb B npInarAemoi «YNCTpyKuNn no 3KcnNyataun DniratelaBHyTppeHero cropaHnra».
Ipi npoDOnJXnTeJIbHOrO cPoka cnYk6bl Oc06eHHo BaxKnBIM BCerda RaBnETCa DOCTaTOuHbI yPoBeHb MaCna, a TaKke peRyLnpHa 3aMeHa MaCnHbIX I BO3dyuHbIX pNlNbTPOB.
PekomeHdyemble INTEpBaIbI 3aMeHbI Macna, a TAKKe INHOpMaUra O MToTOpHOM Macne I KOJIYeCTBe MaCNa IJRA 3aINVBKn npBedeHb I B «NHCtpyKuIN NO 3KcNpyataun DnIRatela BByTppeHero cropaHra>.
YTo6bI oBecneHTb DOCTaTOHoe OXIAJKeHHe IIBrAteJIry BHYTpEHHero CropaHn,pe6pa OXIAJKeHnIOJIHXhBI BCERda OCTaBaTbCRA YNCTbIMN.
12.6 XpaHHeHne (B 3mHnI nepnoi)
PnI dIINTeBbHOM npocToe yctpoiCTBa (B nepIOd 3MmHero xpaHeHna) co6JIoDaTb CNeDyUOUIne NyHKtbl:
TtataTeJIbHO OuHCTnTB BCE HApyHbIe. qactynycptpoCTBa.
Bce DnKxuieCn DeTaN XopoOo Cma3aTb.
OnyctoWntb TOnnBbH6akN Kap6kpaTOp (Bbpa60TaTb TOnnBO Ha XOIOCTOM XOdy).
BbIBHNTb CByu 3aXnraHn (CM. «INHCtpyKUIO NO 3KcNluyatauIO DBrIaTeJI BHyTpEHHero CropaHn>>) n 3aInTb np6n. 3cm3MOtphoro Macna B DBrIaTeJI BHyTpEHHero CropaHn Ypee3 OTBepCTne dJa CBeu 3axnraHn. PpokpyTb DBrIaTeJI BHyTpEHHero CropaHn HeckOJbKO pa3 6e3 CBeu 3aXnraHn (NOTAHyTb 3a Tpoc cTapTepa).

Onachoctb noxapa!
UTeke npoBoda cBeyn 3axirahan H3-3a onaCHOCTN BOCnnaMeHeHn DEpKaTb Bdann OT OTBepCTn NOc CBeuy 3axirahan.
BHOBB BBNHTNTb CBevy 3aXnIraHnA (CM. «INHCTpyKUHO NO 3KcNlyaTaUIN DBnIraTeJI BHyTppeHero cropaHnRA)
CmeHntb macNo (cm. «MHCTpykUHIO nO 3KcNpyataun DBnraTeaBHyTpeHHero cropaHna?).
- UcTpoIcTBo Heo6xOIMo XpaHnTb BCyXOM, 3aKpbITOM n HEnblNBOM NOMeueHN. YIOCTOBepbTeCb, yTO yCTPOIcTBo HaxoINTCB HeIOCTynHom IJRA DeTeMecTe.
13. TpaHcnpTnupOBka
13.1 TpaHcnpTupOBka


Onachoctb noyuene TpaBm!
Ipeep TpaHcnpTupOBko
co6nOaTb Tpe6oBaHnra IaBbl
ToNbKO BBoE.M. Pn 3Tom BCerda
HocNt NIOxOJaUyIO 3aUnTHyIO
OedJy (3aUnTHbIe 6OTnHKn,
npouhIbe nepuATKn).
Ipeed noDbemOM nIN TpaHCnOpTnpOBKo BbHyTb WTeke npObOa CBeH 3axiraHna.
IopdbemnnnepeHoc yctpOCTBa
A Beyuza pyka ycTaHOBnHa: DePkaTb ycTroPiCTBO 3a nepeDnHOpyky dIypeHocA (1) n3a BeDuYOp yku (2).
B Beyuza pyka cIoxKeHa: depXaTb yctpoiCTBO 3a nepeHIOy pyky dInepeHocA (1) n 3a 3aIHHIO pyky dInepeHocA (3).
TpaHcnpTnpoBka yctpOCTBa
TpaHcnpToPbOka yctpoiCTBa pa3pe7aetcHa NCToN IOPOHOI norpy3OuHOI nlaTΦopMe,ecnYCTpOCTBO CTOUT Ha BCex CBOUX 4 Konecax.
- UCTpoIcTBo Heo6xOIMo 3aKpeINJIbTb npn NOMOUI NOXODAUX CpeIcTB KpeINHeHraTak, YTObI NCKNIouHTb BO3MOXHOCTb erO COCKaJIb3bIBaHn. 3aKpeINITb TPOCb IIN peMHn Ha nepeHne pyuKe IJNA nepeHoCa (1) n Ha 3aDHepyKe IJNA nepeHoCa (3).
14. Oxpana okpykaooscpebl
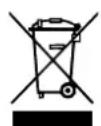
CkOWeHHa TpaBa He OTHOCNTCA KOTXoJam, ee CJIeNyET NCIOJb30BaTb DnI nprirotOBHeHnKOMNoCTa.
YCTPOINCTBO,IPnHaIeXHOCTN K Hemy INx ynaKOBKa I3ROTOBJeHbI IN3 MaTePnaJIIOB,IPnIOhBIXIg BTOpUHOrO IcNoJIb3OBAHnI,INoJIeXaT COOTBeTCTByUoSeIyTuNl3aCUN.
Pa3dHbHaYtUNI3aUOcTkoB MaTePnAIOB,yDOBNETBOPRAUaJ 3KoONrueckm Tpe6oBaHnM, CNOcO6CTByET BO3MOXHOCTN MHOrOKpATHOROpnMeHeHn MaTePnAIOB. ITOI npuHne nocNe HCTeHnO o6bIHyoro cpoKa cnjx6bl yCtpoIcTBO cJeDuET OTnpaBnTb Ha nyHKyTuIN3aun. Pn yTuIN3aun CJeDuET co6JIOnDaTb daHHbIe B rnaBe «YtUNI3aUH» ( 4.9)
06paauTecb B Baw nykT npnemayntlbcbipbnyB CNEuaJN3npoBaHHbIueHtp, T06bl NOyUHTb NfOpMaunO npabuBHOYTNIN3aUNOTXODOB.
15. CBeDeHne K MInHMymuN3HocA N ppeDoTbpaUeHne NOBpeXdeHn
BaxHbIe yka3aHHn no TexHnueckOMy 06cnyKbAHnU uyOdy dna cNeDyUoXn rpynn n3denn
Besh3HOBbIe ra3OHOKOcNkN
KomnaHnVIKING He hecet HnkaKoI OTBETCTBENHOCTN 3a NOJUeHHe TpaBM n HaheCHe MATEpNaIbHOrO yUepe6a, KOtOpBle IPOJIOUIN BCNEcTBe NHEcOJIIODeHn IHCTpyKlMn O3KcNlyatauHN, BOCOeHNOCTN B OTHoWeHN 6e3OnaChOCTN, ynpaBNeHn IN TexHnueCKOrO 06CJyXnBaHn, mN B pe3yNbTaTe NCNoJIb3OBAHn HEONyUeHHbIX HabeCHbIX y3NoB mN HeOpunHaJIbHbIX 3aJuaCTeN.
InpneoTbpauen HBO3HKnHOBeHHNIOBpeXeHn nn ype3MepHoro n3HocaTeTaeBawero yctpoNCTBaVIKINGO63aTeNbHOco6JIOnaTe CJeDyUOuHeBaxHbIe yka3AHN:
1.БыICTpon3HaUNBaIOUneC KOMNOHEHTbl
HekotopbIe Detaln yctpoicTba VIKING
daxke npn nCnoNb3OBAHN IN NO
Ha3NaueHNO NOBepraHOc
HOpMaJIbHOMy mHOCy, INx Heo6xoIMo
CBoeBpeMeHHO 3aMeHrTB B 3aBNCmOCTN
OT BnA u npOJXHTelbHOCTN
3KcnnyatauIN.
KHIM OTHOCRTCA:
-HoK KocnJIKN
- KJIINHOBoI peMeHb (MB 4 RT, MB 4 RTP)
-山nHbI
2. Co6HIOeHHe npEaHn daHHo HNCTpyKuIN NO 3KcNlyaTaauIN
IcnoJb3OBaHHe,TexHueckoe
obCnyKuBaHHe n XpaHHeHne yCTpoiCTBa VIKINGdoXhblOcUeCTBnTbCToHOTAK,Kak OINCAHO BdaHHo INHCTpyKuIM NO 3KcnNyatau. IOnb3OBaTeNb cam HeceT OTBeTCTBeHHocTb 3a BCE NOBpeJdeHnur uUep6,Bbl3BaHhbHe HecO6JIkoDeHEm
npedncaHn no TexHke 6e3onacHOCTn,
yka3AHnNo npaBHeHNO yCTpoiCTBOM n TexHueckomy obCnyKuBaHIO.
3To, B nepByu OuepeBb, pacnpoCTpaHReTcHa:
- N3MeHeHn B KOHCTpyKuNn H3DeJnA, He CoJIaCoBaHHbIe C KOMNaHnei VIKING.
- NcnoIb3ObaHne He pa3peWeHHbIX KOMnahaney VIKING npo13BOdCTBeHHbIX MaTePnaIaOB (Cma3OuHbIe CpeICTBa, 6eH3IN MOTOPHOe MaCNo: CM. yKa3aHn Ipnou3BOOnITeJI).
- PpIMHeHn HnCTpyMeHOB nIN npHaIeXHOCTeK, KOtOpBie He DOnyuEHBn IN He pNIODhBn IyctpoiCTBa, INJRAIBNIOTCa HN3KOKaYeCTBeHHbIMN.
- NcnoIb3ObaHne H3dEInn He B COOTBETCTBnC Ha3HaYeHHeM.
- PpIMHeHHe n3JeIINB BO BpeM CnOpTnBbIX MeOpnpTuN IJI N KOHKypCOB.
KocBeHbIe y6bITKn Bpe3yJbTaTe NOCJIeNyUOJIero NCN0JIb3OBAHn I3DeJIINCAHECNCPaBBHIMDetaJIAMN.
3. Pa60tbl no TexHnueckomy 06cJyKnBaHHIO
Bce pa60tblnpBedeHHbE Bpa3dene «TexHueeckoe 0cbnyKnBaHne》,DJIKHbI BblONHrTbcpeyJpHO.
Ecnn 3tn pa60tbI nonb3ObaTeJIb He MoKeT npOn3BOUInb CaMOCToTeJbHO,TO Heo6xoDIMO o6paTnTBcB CneuaHn3uPoBaHHbIeHTp.
KOMnHaHnVIKING peKOMeHnyeT BbIIOJIHrTa pa6Otbl NO Texo6cIyXnBaHnO npeMOHTy TOnbKO B CneuaIaI3npoBaHnHom ceHTpe VIKING.
CneuaIIN3npoBaHHbIe cepBnchIbe
ueHTpbVIKINGperynpHnpeIpaIaOT
kpcbl npdeOCTabJIOTTexHueCKyIO
HOpMaUIO.
B cnyae yuepe6a n3-3a nobpeckdeHn BCNeDCTBHe HeBbINOHNHeHHbIX pa60 NTexHNueCKOMy 6cJyKuBAHnO OTBeTCTBeHHoCTb HecET NOIb3OBaTeNb.
K TAKIM NOBpeKdEHNM OTHOCATC:
KoppoHbIe NOBpeXdEHNn Ipyrne nocIeDCTBnH HenpaBnBHorO xpaHeHn.
IIOBpeKdEHHyycTpoCtBA B pe3yNbTaTe npMHeHn HeKaueCTBeHHbIX 3anpaCTei.
-Повржденя BCNeДCTBnE HeCBOeBpeMeHHOCTN nI IN HeIOCTaTOUHOCTN TexHnueCKORO 6bClyKuBaHNy, nIIN pa6OT NO TexHnueCKOMy o6cIyKuBaHNIO IN peMOHTY, KOTOpBIE npoIN3BOIDJINCb HeyNoTHOMOeHHbIMn CneuaJIInCTaMn He B CneuAnm3INOBAHHbIX MaCTepcknx.
16. CtaHdapThbIe 3aNuaactn
HoxKocnKn (HOxIa
MylbUnpoBaHn)
63837020100
BnHT HOXa
90083199067
Ctoonopnha wai6a
00007026600
KpeIeXhBie 3JIeMeHbI HOxKa KocnIKn (HaNPIMep, BnHT HOxKa, CTOpHna 7aI6a) Heo6xoJIMo MeHrTB KaKDbI pa3 npi 3aMeHe INN MoTAtxe HOxKa. 3aNaChbIe Yactn MoXHO pnpO6peCTN B CneuAnIm3InpOBAHHOM cepBnCHOM cENTpe VIKING.
17.Декларача.
N3ROTOBNTEJRA O
COOTBETCTBUN INPeKTHBaM EC
Mbl,
VIKING GmbH
COOTBeTCTByET CNeIyUOuIM IInpeKtNBaM
Ebponeckoro Coo6uecTba (EC): 97/68/EC, 2000/14/EC, 2004/108/EC, 2006/42/EC
I3JeIe 6bIIO pa3pa6oTaHO B COOTBeTCTBmC O CJIeDyUOuIMn HOpMaMn: EN ISO 5395-1, EN ISO 5395-2
MB 4.0 R, MB 4.0 RT:
I3mepenHHbI ypoBeHb IyMa: 93,1 B(A)
TapaHTnpoBaHHbI ypOBeHb 9yMa: 94 dE(A)
MB 4.0 RTP:
I3MepeHHbI ypoBeHb IyMa: 91,2 D(A)
TapaHTnpoBaHHbIyPOBeHbUMya: 93 d6(A)
JaHrKaMnDpeH, 2014-01-02 (Trrn-MM-Ⅱ)
VIKING GmbH 4

Weighlofer
PykoBOnTeIb OTeIa HayHbIX UCCneObaHH n pa3pa60Tkn npOkykun
18. TexHnueckne daHHbIe
MB 4.0 R, MB 4.0 RT, MB 4.0 RTP
CepnHbH Homep 6383
TOnnBb6ak 1,4
PexyuMmExaHn3M HOKeBa TpaBepca
山nhape3a 53cm
CkopocTb BpaueHnpexyuero
MexaHn3Ma 2800o6/MNH
3aunTHoe yCTpoCTBO ycTPOIcTBo OCTaHOBKn DUNrAteJIa
TnyckoBoe
yctpoiCTBO 3anyck TPOCOM
MOMeHT 3aTAXKIN
BnHTa HOka 60-65HM
BbICota cpe3aHH 30-70 MM
MB 4.0 R, MB 4.0 RT
Двагать
BHyTpeHHero
CROPAHNA, KOHCTp.
HcnoJ. 4-TaKTHbI DBC
TnDnBnraTeJn Kohler XT675
HencnpaBHOCTb (MB 4 RT, MB 4 RTP):
OTcyTCTByET Tgra npn npNBeDeHnn B DeiCTBne 6yreI npNBOda DnKHeHH
Bo3moXHa npnHa:
Tpoc npBbOda DnBKeHnnoBpeKdH (Haepmep, neperHyT)
YcTaPaHeHne:
-3aMeHHTb Tpoc
HcnpabHOctb:
HeuHCToe cpe3aHne,ra3OH cTaHOBNTcJ XeJTbIM
Bo3MOxHn npuHa:
HOK KOCUKN 3aTynnEHNnN3HOWeH
YcTpaHHeHne:
-3aToHTb ININ 3aMeHHTb HOX KOCNJIKN ( 12.3),( 12.4)
MB 4R, MB 4RT: 42-44 cm
MB 4 RTP: 37-39 cm
7.5 Trossi fikseerimine (MB 4 RT, MB 4 RTP)
MB 4.0 R, MB 4.0 RT:
moodetud muratase: 93,1 dB(A)
garanteeritud muratase: 94 dB(A)
MB 4.0 RTP:
moodetud muratase: 91,2 dB(A)
garanteeritud muratase: 93 dB(A)
Langkampfen, 2014-01-02 (AAAA-KK-PP)
VIKING GmbH

MB 4.0 R, MB 4.0 RT, MB 4.0 RTP
Seerianumber 6383
Kütusepaak 1,4 I
Löikeinstrument lattvikat
Niitmislaius 53 cm
Löikeinsturmendi
pörlemiskirus
Turvaseadised
Käivusseadis
2800 p/min
mootori pidur
trosskaivitus
MB 4.0 R, MB 4.0 RT, MB 4.0 RTP
Tera poldi
Rike (MB 4 RT, MB 4 RTP)
Veoajami hooba rakendades ei toimu midagi.
Voimalik pohjus
- Veoajam trioss on katki (nt murdunud).
Abinou
Vahetage tross valja.
Rike
Kehvloige, muru mutub kollaseks.
Voimalik pohjus
- Niitmistera on nuri voi kulunud.
Abinou
- Teritage niitmistera voi vahetage valja ( 12.3) ( 12.4) .
20. Teenindusplaan
20.1 Üleandmise kinnitus
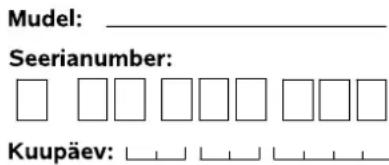
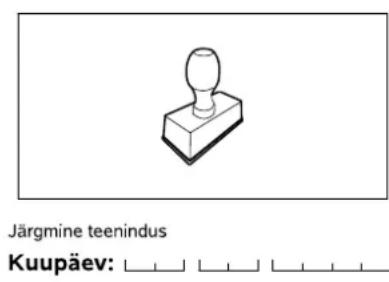
20.2 Teeninduse kinnitus
Andke hooldustöde korral see kasutusjuhend VIKINGi Müugiesindusele.