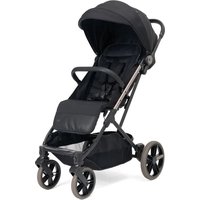
Together Twin - Stroller CHICCO - Free user manual and instructions
Find the device manual for free Together Twin CHICCO in PDF.
User questions about Together Twin CHICCO
0 question about this device. Answer the ones you know or ask your own.
Ask a new question about this device
Download the instructions for your Stroller in PDF format for free! Find your manual Together Twin - CHICCO and take your electronic device back in hand. On this page are published all the documents necessary for the use of your device. Together Twin by CHICCO.
USER MANUAL Together Twin CHICCO
Compartment porte-objects
IMPORTANT: PLEASE READ THESE INSTRUCTIONS CAREFULLY BEFORE USE FOR YOUR CHILD'S SAFETY, AND KEEP THEM FOR FUTURE REFERENCE. WARNING: BEFORE USE, REMOVE AND DISPOSE OF ALL PLASTIC BAGS AND PACKING MATERIALS AND KEEP THEM OUT OF REACH OF CHILDREN.
WARNING
WARNING: YOUR CHILD'S SAFETY IS YOUR RESPONSIBILITY! Your child's safety may be affect if you do not follow these instructions.
WARNING: children must always be strapped in their seats with their safety harness and must never be left unattended.
WARNING: keep children away from all moving parts whilst you adjust the stroller.
- WARNING: This stroller requires periodic maintenance by the user. Overloading the stroller, closing it incorrectly or using unapproved accessories could damage or even break it.
WARNING: It may be dangerous to leave your child unattended.
WARNING: before assembly, check that neither the product nor any of its components have been damaged during transportation; if this is the case, do not use the product and keep it out of the reach of children.
WARNING: The rear seat on this stroller is intended for use by children aged between 0 and 36 months, weighing up to a maximum of 15kg .
- WARNING: When used for children from 0 to 6 months of age, the backrest must be reclined as flat as possible.
WARNING: The front seat on this stroller is intended for use by children aged between 6 and 36 months, weighing up to a maximum of 15kg . WARNING This seat unit is not suitable for children under 6 months.
WARNING: Ensure that all locking devices are engaged before use. In particular, make sure that the stroller is locked in the open
position, checking that the two side bars are locked in place.
WARNING: Do not overload the basket with weights of over 5kg
WARNING: Do not carry more than two children at a time.
- WARNING: Do not fit any accessories, spare parts or components on the stroller which have not been supplied and approved by the manufacturer.
WARNING Any load attached on the handle affects the stability of the pushchair.
- WARNING: the use of the crotch strap and safety harness is necessary to guarantee the safety of your child. WARNING Always use the crotch strap in combination with the waist belt.
- WARNING: Ensure that the persons using the stroller know how to use it safely and how it works.
- WARNING: when opening, adjusting or closing the stroller, ensure that your child is at a safe distance: do not attempt to open or close the stroller with a child sitting in it. When adjusting the stroller, make sure that no moving parts come into contact with your child.
WARNING: Always apply the brakes whenever the stroller is stationary.
WARNING: Always apply the brakes when placing a child in, or removing a child from, the stroller.
WARNING: never leave the stroller on a sloping surface with a child inside, even with the brakes applied.
WARNING: Do not allow children to play unsupervised near the stroller, and make sure they do not climb onto it.
WARNING: To avoid all risks of strangulation, never give children objects with cords or strings attached, or leave them within their reach.
WARNING: never use the stroller on staircases or escalators: you could suddenly lose control of it.
WARNING: Always pay attention when going up and down steps or pavements.
WARNING: If the stroller is left exposed to direct sun light for a long time, allow it to cool down before placing your child inside.
WARNING: Prolonged exposure to direct sun light may cause the colour of the
materials and fabric to fade.
WARNING: Do not use the product if any parts are broken, torn or missing.
WARNING: when it is not being used, the stroller should be kept out of children's reach.
WARNING This product is not suitable for running or skating.
- WARNING: Prevent the stroller from coming into contact with salt water. It may cause the formation of rust.
WARNING: Do not use the stroller on the beach.
WARNING: this product must only be used by an adult.
WARNING Check that the pram body or seat unit attachment devices are correctly engaged before use.
CLEANING AND MAINTENANCE
The cleaning and maintenance of this product must be carried out on a regular basis by the user. The cleaning and maintenance of the stroller must only be carried out by an adult.
CLEANING
The cover cannot be removed. Clean all fabric parts with a damp sponge and neutral detergent. Please refer to the care labels for instructions on how to clean the fabric parts. Below are the cleaning symbols and their meanings:

Wash by hand in cold water

Do not bleach

Do not tumble dry

Do not iron

Do not dry clean
Periodically wipe clean plastic parts with a soft damp cloth. Always dry the metal parts to prevent the formation of rust if the stroller has come into contact with water.
MAINTENANCE
Lubricate the moving parts only if necessary, with the light application of a silicone based lubricant. Regularly check the condition of the wheels and, keep them clean of dust and sand. To avoid friction that may prevent the correct operation of the stroller, ensure that all the movable plastic parts placed along the metal frame are clean of dust, dirt or sand. Keep the stroller in a dry place.
GENERAL INSTRUCTIONS
ASSEMBLING AND OPENING THE STROLLER CARRY-ALL TRAY
- The mechanism which opens and closes the stroller is fitted inside the carry-all tray. The 2 tabs on the end of the carry-all tray are used to fasten it to the stroller frame: slide the 2 tabs along the slots inside the handlebar (diag. 1A) and push the
tray towards the handlebar until you hear it click into place (diag. 1B).
Check that the closing mechanism wire does not interfere with the carry-all tray fasteners.
WARNING: before you start, check that your children are at a safe distance.
Ensure that during these operations the moving parts of the stroller do not come into contact with your child.
- Once the carry-all tray has been fastened to the frame, move the sliding button on the tray (diag. 2A) to the left whilst pressing the centre button and raising the handle (diag. 2B); now open the stroller by using your other hand to push the front section of the frame downwards, until you hear it click into place (diag. 2C).
Make sure the stroller is open properly before proceeding any further.
-
The rear seat on the stroller is fitted with a footrest. Once the stroller is open, lower the footrest (diag. 3).
-
To adjust the height of the handlebar, press the two side buttons (diag. 4) at the same time and move the handlebar to the required position.
BASKET
- The stroller comes with a practical carry-all basket. To assemble the basket, slide the U-shaped tube into the tube ends on the back of the stroller, as seen in diag. 5A. The U-shaped tube is fitted correctly when you see the 2 grey rods on the bottom, protruding from the holes below the stroller frame tubes and you hear them click into place.
To finish, fasten the fabric to the tube using the press studs (diag. 5B). Never use the carry-all basket without the supports inserted properly. Always remove all contents from the basket before you close the stroller.
- You can also open the zip (diag. 6) on the back of the basket to access it more easily.
FITTING THE BACK WHEELS
-
Parts needed to fit the back wheels: see diag. 7.
-
Remove the caps from the ends of the rear axle, then slot the rear axle onto the frame, until you hear it click into place (diag. 8).
WARNING: always check the rear axle is fitted properly before using the stroller.
-
To assemble the wheels on the rear axle A) follow the instructions in the correct order (see diag. 9A):
-
the wheel B)
-
the washer C)
-
the spring pin D)
-
the cap E)
Make sure you insert the fastening spring pin as indicated in the diagram: the flat side must be inserted in the whole on the axle, whilst the closed end of the spring pin must be facing outwards (diag. 9B). Repeat the operation to assemble the other wheel, following the instructions in the same order.
FITTING THE FRONT WHEELS
- Slot the front wheel block onto the stroller frame as seen in diag. 10, until you hear it click into place. Repeat this procedure for the other wheel block.
WARNING: check that the wheels are fitted correctly.
BUMPER BAR
- To assemble the bumper bar, simply slot it into the two holes on the ends of the front armrests, as seen in diag. 11.
- To remove the bumper bar, press the two buttons found under the armrests, and pull the bar towards you (diag. 12).
HOOD
The stroller comes with two hoods.
13. To assemble the front hood, connect the hood fastener to the guides on the armrests (diag. 13). Repeat the operation to fasten it to the other side of the stroller.
14. To assemble the rear hood, connect the hood fastener to the round stopper on the rear stroller tube (diag. 14). Repeat the operation to fasten it to the other side of the stroller.
15. How to open the hoods: open the hood as illustrated in fig. 15A and press the two side snap-bars down to lock it in place (diag. 15B). Warning: always release these two snap-bars before trying to close the hood.
USING THE SAFETY HARNES
Each seat is fitted with a five-point safety harness which consists of two shoulder straps, a lap belt and a crotch strap with a buckle. WARNING: when carrying children from 0 to 6 months of age, the shoulder straps must be threaded through the adjuster slots before being fastened.
16. Thread the safety clasps through the fabric loops (diag. 16A) and check that the shoulder straps are fitted at the right height for the child: if this is not the case, adjust the height as necessary (diag. 16B). You can also use the padded strap covers by sliding them onto the straps (diag. 16C).
17. Place the child inside the seat, connect the safety clasps to the 2 toothed ends, and insert the 2 toothed ends into the buckle (diag. 17). Now use the clasps to adjust the length of the lap belt. 18. For extra safety, the stroller is fitted with D-rings which can be used to fit a separate safety harness, compliant with BS 6684 Standards. The rings are fitted internally on the right and left side of the stroller seat, as seen in diagram 18.
19. To release the lap belt, press the two toothed ends together at the same time (diagram 19).
WARNING: the safety harness must always be fastened to guarantee safety for your child.
WARNING: the safety harness must always be used with the crotch strap to guarantee safety for your child.
ADJUSTING THE FRONT SEAT BACKREST
- To release the recliner mechanism on the front seat backrest: use your thumb to press button A and then slide it to the left whilst pulling the handle upwards (diag.20).
- Now push the backrest backwards (Diag. 21). To raise the backrest, simply lift it to the desired position, without pressing on the handle.
The front seat backrest can also be adjusted forwards, so the stroller can be used with the child car seat (see the "USING THE CHILD CAR SEAT" section).
ADJUSTING THE REAR SEAT BACKREST
- To recline the rear seat backrest, lift the adjuster handle on the back of the backrest and pull it downwards (diag. 22). To raise the backrest, simply lift it to the desired position, without pressing on the handle.
WARNING: these operations can become more difficult when the child is sat in the seat.
REAR BRAKES
The rear wheels are fitted with a twin-braking system which allows you to use just one foot pedal to control both the rear wheels.
- To apply the brakes, press one of the two levers on the rear wheels downwards, as illustrated in diagram 23.
24.. To release the brakes, press one of the two levers on the rear wheels upwards, as illustrated in diagram 24.
WARNING: Always apply the brakes whenever the stroller is stationary.
WARNING: Never leave the stroller on a sloping surface with a child inside, even with the brakes applied.
WARNING: after applying the brake lever, check that the brakes are locked in place on both rear wheels.
SWIVEL WHEELS
The front wheels on this stroller can be used in fixed or swivel mode. 25. To use the wheels in swivel mode, lift the lever fitted between the two wheels. Use the swivel wheels on smooth surfaces. To use the wheels in fixed mode, press the lever downwards again (diag. 25).
WARNING: the swivel wheels make the stroller easier to manoeuvre; it is however recommended to use the wheels in fixed mode on uneven ground to guarantee better stability (on gravel, unpaved roads etc.)
WARNING: Both wheels must be switched to swivel or fixed mode at the same time.
WARNING: when closing the stroller, make sure that your child and all other children are at a safe distance.
Ensure that during these operations the moving parts of the stroller do not come into contact with your child.
26. To close the stroller, start by switching the swivel wheels to the fixed wheel position. Move the sliding bar on the tray to the left (diag. 2A) whilst pressing the centre button and raising the handlebar (diag. 2B). If you are using the version which conforms to BS 7409:1996 Standards, pull the snapclasp on the left side of the stroller upwards at the same time (diag. 26A). Now close the stroller by pressing the centre of the carry-all basket downwards with one foot (diag. 26B).
27. When the stroller is closed and locked in place, it will stand up on its own (diag. 27).
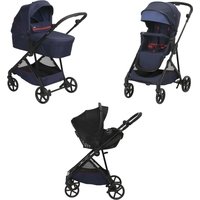
USING THE CHILD CAR SEAT
The stroller is fitted with clasps so you can use two KEYFIT child car seats without the need for additional fastening devices.
WARNING: When using the child car seat, please read the relative instruction manual carefully.
WARNING: only CHICCO KEYFIT child car seats can be hooked onto the stroller.
Improper use of this stroller with an incompatible child car seat can cause serious injuries to children. Before using the stroller in combination with the child car seat, always check that the hook-on system is correctly closed and locked in place.
WARNING: Children must always be strapped into the child car seat using the safety harness.
INSTALLING THE CHILD CAR SEAT ON THE FRONT SEAT OF THE STROLLER
-
Remove the bumper bar and adjust the front seat backrest forwards, following the instructions provided in paragraph 20 to release the backrest recliner mechanism and push it forwards (diag.28).
-
Open the Velcro on the flaps so that the side anchor points are visible (diag. 29).
- Now position the child car seat inside the stroller seat aligned with the side anchor points. The child car seat will then automatically click into place (diag 30). Try pulling the child car seat upwards to check that it is fitted correctly.
WARNING: When you remove the child car seat, remember to close the velcro flaps before using the stroller.
INSTALLING THE CHILD CAR SEAT ON THE REAR SEAT OF THE STROLLER
- Recline the rear seat as far as possible following the instructions provided in paragraph 22, now position the child car seat inside the rear seat of the stroller, aligned with the side anchor points (diag. 31A). The child car seat will then automatically click into place (diag 31B). Try pulling the child car seat upwards to check that it is fitted correctly.
HOW TO REMOVE THE CHILD CAR SEAT
- To remove the child car seat from the stroller, press the handle on the back of the car seat and lift it out of the stroller (diag. 32).
ACCESSIONS
WARNING: The accessories described below are not necessarily available on some versions of the product. Please read the instructions relative to the accessories fitted on the type of stroller you purchased carefully.
FULL-COVER RAIN HOOD
WARNING: Pay particular attention when using the rain hood. 33. To assemble the full-cover rain hood, thread the ties around the stroller tubes and close the ties and velcro fasteners in the positions indicated in diagram 33. When you have finished using the rain hood, allow it to dry properly if it is wet.
WARNING: the full-cover rain hood can not be used on a stroller which has no hood or sun-hood as it could suffocate the child.
WARNING: when the full-cover rain hood is fitted on the stroller, never leave it exposed to direct sunlight with the child inside, as the temperature will rise considerably.
LEG COVER
- To use the leg cover on your stroller, close the velcro fasteners on both sides after threading the leg cover under the bumper bar, as illustrated in diagram 34.
Important Note: The pictures and instructions contained in the booklet refer to the complete stroller model. Some of the components and functions described here may vary according to the model purchased.
FOR FURTHER INFORMATION:
Artsana S. P. A. - Customer Service
Chicco UK Ltd - Customer Service
Prospect Close - Lowmoor road Business Park
Kirkby in Ashfield - Notts NG17 7LF
Tel: 01623 750870 (Office hours)
TOGETHER
AVISO IMPORTANTE
IMPORTANTE: ANTES DEL USO LEA ATENTAMENTE Este MANUAL DE INSTRUCCIONES PARA EVITAR PELIGROS EN SU USO Y GUARDARLO PARA FUTURAS CONSULTAS. ATENCION: ANTES DEL USO QUITAR Y ELIMINAR LAS BOLSAS PLASTICAS Y TODOS LOS ELEMENTOS QUE FORMEN PARTE DE LA CAJA DEL PRODUCTO O, DE TODOS MODOS, MANTENERLOS ALEJADOS DEL ALCANCE DE LOS NINOS.
ADVERTENCIAS
VOOR MEER INFORMATIE
Pharsana N.V. - Temselaan 5
1853 Strombeek-Bever - Belgie
Tel. 02/300 82 40 -
www.chicco.be
s TOGETHER
VIKTIG INFORMATION
VIKTIGT: LÄS NOGA DEN HÄR BRUKSANVISNINGEN INNAN DU ANVÄNDER PRODUK- TEN FÖR ATT UNDVIA KAR AVID ANVANDINING. SPARA FÖR FRAMTIDA BRUK. OBS! TA FÖRST AV ALLT BORT OCH SLÁNG EVENTU-ELLA PLASTPASAR OCH ALLA ANDRA KOMPONENTER AV FÖRPACKNINGSMATERIALET ELLER FÖRVARA UTOM RACKHÄLL FÖR BARN.
WARNING
MEPbI INPEDOCTOPOXHOCTN
BHIMAHNE: 5E3OJACHOCTb PEBEHKA 3ABVCNTIOTBAC!
BHIMAHHE: o6aTeNbHO npnteRnBaIte DeTepeMHm 6e3OanchoCTn. He octabJaIte DeTe 6e3 npncMOTpa.
BHIMAHHE: BO Bpemr peynpOBKn KOJcKn CJIeIte, YTO6bI DeTn HaxOINcB Ha 6e3OpacHOM paCCToAHN OT NOBHXbIX qacte.
BHIMAHNE:3aKoJcKa Tpe6yeT nepnoDnueckoro yXOda CO CTOpOHb IOnb3OBaTeIa. Ipeerpy3ka, He npabInbHoe cKnadlbBaHne nncNoB3OBaHne He yTBepxJeHHbxPruHaJIeXHOCTe MoXeT PnpBeCTN KIOBpeXDeHNIO KOJcKN.
BHIMAHHE: onacno octabnTb pe6eHka 6e3 npncmToPa.
BHIMAHHE: neped c6opkoi u3dennn He- o6xOIMO y6eINTbC B cIeIOCTHOCTn erO KOMNoHENTOB; npN O6hApJxEHN NOBpeK- DeHn BCJeCDTBn EpeBO3Kn He NCnObl- 3OBaTb u3dennne i XpaHNTb erO Bdann OT deten.
BHIMAHHE:3aJHee cndHne nporylouHOI KOJIACKn IpeHa3HaueHo Ira TeTeOT POXdEHHN I Do 36 MecaeB, BeCOM He 60nee 15 Kr.
BHIMAHHE:ДЯ HOBOPOKdHbIX DeTei N DeTei BO3pactOM Do 6 MecraeB KOJIaCKa DOJXHa IcPONb3OBaTbC R C NOJIHOCTbIO HaKJIOHeHHO CINHKOI.
BHIMAHHE: Npeedhe cndeHbe nporyloHOn KOJACKn PpeHa3HaueHO dJeTeB Bo3pactOM 6 ndo 36 MecaueB,Be-
com He 60nee 15 kr. BHIMAHNE: daHhoe cndeHbe He IODXoIIT dIa Tei BO3paTOM Do 6 MecaueB.
BHIMAHHE: npeed hauaIOM nCNoB3OBAHnI npOBepbTe NcnpaBHOCTb CcpeNHeHn3aUHTbIX MexAHn3MOB. B qactHOCTn, y6eDNTecb B TOM, YTO KOLRAcka 3aΦNKcnpoBaHaB OTKpbITOM NOLOKeHn I pRn 3TOM DBe6OKOBblpepaBl yCTOuHBbl.
BHIMAHNE:He harpykaTe KOp3nHy Cbbl-We5Kr.
BHIMAHHE:3anpeaetcyaKuBaTbB KoJncky 60nee DByx DeTei ODHOBpeMeHNO.
BHIMAHHE: He kpeHnTe K KOJrcke OoNOnHnTeIbHbIe akceccyapbl, He 3aMeHnTeYactn N KOMNoHEnTbI, eCNI OHN He NoCTaJIeHbI IIN He ODo6peHbI n3rOToBnTeJeM.
BHIMAHHE:Kaqdaaycymka nnIIO6oI pyroynpy3,poDBeWeHHbHa pyuKax KOJIACKN,MOryHApUWHTbeyeYCTOUYBOCTb.
BHIMAHHE:63aTeIbHO nCNoIb3yIte naXOBblpeMeHbpeMHn 6e3ONaCHOCTn, TaK KaK OHn rapaHTnpuyt 6e3ONaCHOCTb pe6eHka.PemHn 6e3ONaCHOCTn DOJIxHbI NCIOJb3OBaTbCra OndHOBpeMeHHo C naxOBblm peMHeM.
BHIMAHHE:Y6eHntecbBTOM,HTO NOJb30BaTeJI KOLIACKN 3HaKOMbl C npHcHnamMee pa60Tbl.
BHIMAHNE: BO Bpemr DeiCTBnI NO CKla- DbIBaHIO NN paCKJaDbIBaHIO KOJcKn CneIte, yTObI pe6eHOK He HaxOuNCra NObN3OCTn: He BblONHaIte paCKpbITne NIN 3aKpbTne KOLaCKn C HaxOJaUIMCRA B HeI pe6eHke. Bo Bpemr DeiCTBn I No peryLIpOBKe KOLaCKn CJIeNTe, yTObI ee NODBIXHbIe qACTn He Kacalncb pe6eHka.
BHIMAHNE:При Кадон OCTaHOBKe 683aTeNbHO CTaBbTe KOJIACKy Ha TOPMO3.
BHIMAHHE:KaKdbi pa3 npu ycaKbAHn N BbICaKbAHn pe6eHka CTaBbTe KOJIaCKy Ha TOPMO3.
BHIMAHHE: HN B KOEM Cnyae He octaBJIaIte KOLACKy C pe6eHKOM Ha HaKIOHHoN NOBepxHOCTN, DaJke ecn 3aJeICTBOBaH TOPMO3.
BHIMAHHE: CneiTe, TTo6bl DpyrHe DeTn He ngpannno6nn3OCTN KOJACKn H He B36npaIncb Ha Hee.
BHIMAHNE:Bo n36eXaHne ydyuSeHnHe DaBaIte pe6eHky i He octaBnaTe BO3Je
Hero npedMeTbI CO shypamn.
BHIMAHHE:He noJIb3yIteCb KOJIcCKoHaJeCTHnue nn Ha 3ckaJatope:BO3MOxHaYTepr KoHTpOJa.
BHIMAHNE: BybTe octopoxHbHa noDbEmax nnn cnysckax (ctyneHn, TpoTyapbl np.).
BHIMAHHE: Nocne dnteHoro npe6bIBaHn KaONCKHa cOnHcE DoXNTecb, YTO6bl OHa OCTbIa, IN TObKO NOTOM yCaXnBaITe B Hee pe6eHka.
BHIMAHNE:ДиTeNbHoe npe6bIbAHne KoJIaCKn Ha cOJHcE MoKcET Bbl3BaTb OBeCuBe-CHBaHne ee NOKpbITn.
BHIMAHHE:3aIpeucaetcNcNoB3OBaTb KOJIaCKy C NOBpeXdEHHbIMN,OTOPBaHHbIMN IIN HeIOCTaIOUzIMN YaCTaMn.
BHIMAHHE:ecnBbHe noIb3yeTeEc bKoJIACKO, XpaHHTe ee B HeIOCTyHOM dJaDeTe MeCTe.
BHIMAHHE: He noIb3yITeCb KOJIaCKoB BO BpeMg 6era nII KaTaHnHa ha pOInkax.
BHIMAHHE: N36eraTe KOHTaKTA KOJACKN C COJIeHOBoO, NOCKoJIbky OHa CnOCoB-CTByET NOABHeHIO PjAByHbl.
BHIMAHNE: He nCnoJIb3yIte KOLaCKy Ha nnJxke.
BHIMAHHE: KOJIACKO MOrYT ynpaBnTb TOnbKO B3PocNble Iuca.
BHIMAHHE: Npeed tem KaK NOJb3OBaTbcKoJIaCKOy6eIITecbBTOM,HTO IIOJIbKa INCNiDeHHe 3aKpeIIeHbI npabINbHO.
PEKOMEHDAUINIOOCHCTKEUYXOyD
DahHoe n3dennne Tpe6yET nepnoDnueckoro yxoJa. Onpaunn NO OHCTKe N yxoNy DOJXHB BbINONHATBCr TOIbKO B3pOcNbiMNIuCaMn.
OuNTKA
O6nBka KOLIACKN He ABHETC BcEMHO. TkaHcBbIE NOBcpxHOCTN CJIe- dyet YHCTNTB BLaJHKOH Ry6KO IN HEITpaJIbHbIM MblIOM, BblIOJIHHN HHTpyKUIN C3TUKETKN (Ha KOTOPOYKA3AH COCTAB N3dEINNA). HIXe npNBedeHb CmBONbIC 3TUKETOK INX 3NaueHIN:

Puyha CTnpka B XOJIIOHON BOe

He0f6eJINBaTb

He noDBepratb MexaHnuecko cyuke

He rnaTb

He noDBepratb XmMuecko YnCTke
Пл actmaccobbie acTn Heo6xOdmo nepnoDneckn OuHuaTb

BnaxHO TkaHb. Yo6bHe O6pa3oBaIacb pKaBHyHa, Heo6XOIMO BicCyWbTaB MeTJIINueCKNe qACTN B CInyae KOHTaKaTaC BOIOI.
yXoD
Pn Heo6xOJIMOCIn BblIOJIHIne Cm3Ky NOBHXbIX qacte cyXIM CNIKKOHOBBIM MAcIOM. IepnoJueckn npOBepnre KOneca Ha n3Hoc, OCHuaTe INOT blln IN necka. Y6eINTecb BOTCYTCTBnINbII, Tpr3N INNECKa HA IIaCTMaCCOBbIX KOMIOHeHTax, KOtOpBe IepemeauTc IO MetaJIuYeCKM TpyBaM. TaKIM o6pa3OM, MoKHO n36ExKaTb TpeHn, KOtOpoe OTpNiataTeNbHO Bo3dEiCTBOByET Ha npabInbHyio pa60Ty KOn- cKn XpaHIne KOJIACKy B CYXOM MeCTe.
OBUHEMHCTPYKUN
C6OPKA IN PACKPbITNE KOJRACKN IOCTABKA JIJI IPEMETOB
1.BnoCTabKe BCTpoEHmexAHn3M nIpaKnaDbIBaHnI INCKNaDBBaHnI KOaCKN. NoCTabKa KpeINTCK KapKacy KOJACKN C NOMOuBIO DByX 3bIKOB, KOToPbIE HxOaTcN IO eeKpam; npOnyCTnte 2 3bUka B KaHaJIb BHyTpN pyuKn (pnc,
1A) npotojknHte noctabky Kpyke, taK TTO6bpa3dancsIeYOK,CBnTeTbCTByIOUIM O 3aHrTIN npABINbHOro nOIOJKeHHA (pnc.1B).
PpOBepbTe, UTObI uHyp CnCTEmbl CKNaDbBHaHn He MeuAn KpenneHnMa Hn noCTabKe dnn npemetob.
PACKJIADbIBAHNEKOLRCKN
BHIMAHHE; npn BInnoJIHeHH 3ToI onepaun cneJte, yTo6bI pe6eHok He oka3anC no6bn3ocTn. Y6eHntecb, yTo npN 3TOM NOBnXHbIe qactn KOJIaCKn HE KAcaiOTc Tena pe6eHka.
- Nocne 3akpennene HnoctabKn Ha Kapkace MoKHO paKpbTb KONACKy: nepemecTe BNEBO NOn3yHOK Ha NOCTaBKe (pnc.2A) nOndOBpeMeHHo C 3TNM HaxmITE Ha UeHTpaNbHyIO KNIIky, npnNOHMAR pyKy (pnc.2B),packpoNTe KOJIACKy, npotaKNBaB BTOPOI pyKOIN BHIN3 nepeDHIIO qAcTB KapKaCa do ueNka (pnc 2C).
PpeKJe Hm npEepnHMaTb Dpyrme DeIcTBnA, ybeNITecB TOM, YTO KOJIraCKa NONHOCTbIO pACKpbita.
3.3aJHee cIneHbe KOJIaCKN OChAueHo NOcCTabKoI dIra Hor.B packpblToI KOJIaCKe ONyCTte NOcCTabKy dIra Hor (Pnc.3).
- TTo6bI OTperyIINPOBaTb BbICOTy pyKu KOLaCKn:HaKmTe OJHOBpeMeHNo Ha 2 60KObIE KhoNk (pnc.4) n yCTaHOBtE pyKu Ha HyXHyIO BbICOTy.
KOP3nHA
5.Детсая nporynoчня коляcka Imeet ydo6hyo kop3nHy nIЯ Beuei.YtO6bI 3aKpeNITb Kop3nHy IЯ Beuei, BCTaBBte U-OBpa3HyTOpy6ky B HakoHeuHKn Tpy6ok B 3aHHei cactn KOLRACKN, KaN oKa3aHO Ha pnc.5A.U-OBpa3HaR Tpy6ka CHTaETc IIpaBnblHo 3akpePnEHHo,ecm2 cepbIX WtHToBa 3aHHei cactn BixOJNT N3 OTBepCTN, KOTopbIe paCNoIoxKeHbI NOI Tpy6kAMKOLRACKN, IN Pa3daETcIeNvOK.
C6opka 3aBepwaeTcKpePnHem TKaHeBOro NOKpbTnK Tpy6ke cNOMOuBcneUaNBbIX KHOONK (pnc.5B). Kop3nHy MOXHO INIOJIb3OBaTB TOJIbKO IocIe yCTaHOBKn ONOpbl. Ipepe CKlaDbIBaHEM KOJRAckNo6BaTeNbHO ONOPOXHnTE KOp3nHy.
- Yo6bI O6nErHtB DoCTyI, MoXHO OTKpbITb 3aJHIO HaCTb KOp3HHbI C NOMOuBIO MOHNH (PNC.6).
MOHTAX 3ADHIX KOJEC
- KompoHeHbI, Heo6xOaMble Ia MoHTaKa 3aDHnx Konec: cm.pncyHOK 7.
8.BbHbTe 3aIyukn C HakoHeuHKnOB 3aIHe OcN u BCTaBbTe BbICTyNb 3aIHeN OcN B CneuaJbHbIe ONOpbl, pa3DaBwniC

IeJUOK NOITBepKjaET npaBnBHyIO yCTaHOBKy (pnc.8).
BHIMAHHE: neped hauaIOM nCIOJIb3OBAHn y6eINTEcB B npabNlbHom KpeJIeHH 3aHeN OCN.
-
Mohtax Konec Ha 3aHIO Oc6 A) BbINONHReTcB CneDyio-
IeM IopRKe (CM. PnC. 9A): -
koneco B)
-шайбаС) - npyuxnka D)
-Konnaok E)
CneDNTe, TTO6bI KpENEXHn pynKnHk 6bIa BCTaBNeHa, KaNIOKA3aHO Ha pUCyHKe: PnmaT CTOPOHa DOnJXHa 6bITb BCTaBHeHa B OTBepCTne Ha OcN, a 3aKpbTbI KoHEu npYknHKn DoJIKeH CMOTpeTb HApKy (pnc.9B).
Iobtopnte Onpaunn mo MOnTaKy B Tom Je npAKe n C dpYroi CTOpOnbOcN.
MOHTAX IPEPENK KOJEC
10.YctaHOBnTe Ha KONCKy 6NOK nepeDnIX KOnc, KaK NOKa3aHo Ha pnc. 10, pa3dABuINcra 6eYOK noTBePjdaet npabInbHyO yCTaHOBky. IOBTOPnTE 3TN JKe JeIeCTBnI BTOPO6JOKa KONEc.
BHIMAHHE: y6eHntecb HnadeXHOM KpeIJIeHm KOJIeC.
POTUBOYAPHbI BAMNEP
- Yo6bI yCTaHOBnTb IPOTNBOyApHbI 6aMnep,IOCTaTOUHO BCTaBnTb ERO B DBA OTBepCTnIO KpaAM IpeEHNX IOJNOKOTHnKOB,KaK NOKa3aHO Ha pncyHke 11.
- 4to6bI CHaTb IpOToBouyapHbI Bamnep, HaxMnte Ha DBe KHOJKN IOD YexNaMn POJNOKOTHKnOB N NOTAHNTe pyKy B IPOTOBONIOXHOM OT KOJIACKn HApBaJIeHN (pnc.12).
KANIOOH
TeTCKa npOryNoHnKa KOnrKa IMeET Da KaHIOHOHa.
- 7to6b3aKpeNtB nepeHn KAnHOOH: 3aCenITe KpOcOK Ha HapBaJnIOxN, KOtOpBie HaxoJATc H a NDoIIOKOTNIkax (Pnc. 13). NOBTOPte 3Tu JKe DeICTBnA INa BTOPOrO KpUcKa C dpyroT cToPOhBi KONACKn.
- Yto6bI 3akpenntb 3aHnn KAnIOOH: 3aCennte KpOcK KaIIIOHOHa H KpyIbn 6IoknPaTOp, KOtOpBn HaxoITcR Ha 3aHne Tpy6ke KOLACKn (Pnc. 14). NObTOpNTe 3TN JKe JeNCTBnA DInB BTOPO R KIOUka C dpyro CTOpOHb IOLACKn.
- PackpbTne KaIIOJOHOB:packpoTe KaIIOJOH, KaN OKA3aHO Ha pncyHke 15 A, 3a6bNOKpUye erO c NOMOUsDByX 6OKOBx CUPKyNei (Pc. 15 B). BHIMAHHe: YTO6bI 3aKpBTb KaIIOJOH, CJIeYET PpeDbapNTeJbHo pa3bIOKpOBoTa b 6OKOBbie CIPKUYII.
NCIOJIb3OBAHNE PEMHENBE3OJNACHOCTN
Kakdoe cndeHne KONCKN CHABKeHO CNTEmo ydepXnBaHnB INTNTOUKkax, COCTOauei N3 DByX JAMOK, NOCHOROp pemHn naxOBOro pemHc c 3actekko. BHIMAHNE: npu nepebo3ke Deten Bo3pactom do 6 Mecaueb Heo6xOJMo IcNoIb30BaTb JAMKn, PpeBapntelbHO IpOpyCTNB IN B peryInpyIOune netnn.
16.ПpoJeHbTe 3aTeKk 6e30nacHcOCTN B CneuHaNbHbIe TkaHeBbIe Nttn (pnc.16A) n npOBepbTe, YTObbl JAMKn XopoWo npJneran no Bbcote Kpe6Eky: B npOTNBOM Clyyae OTperynpyte IN NO Bbcote (pnc.16B).PnJxenaHnn MOxHO NCNoJIb3OBaTb HaKnJaDN, KOToPbIE HAdeBaIOTcH Ha JAmKn (pnc.16C).
17.YcaINBpe6eHka,3aCenITe npxKn pemHe 6e3OnacHOCTN K2 BUNKAM BnpxKne NBCTaBBte 2 BNKN B HNXHIOI npxKky (pnc.17).Pn Heo6xoDmOcTn OTperynpyTe noRCHon peMeHb NO DInHe C NOMOsbIO npxKe.
18.Дябовсь�эоангocкаOchauHaKobuaM
BΦopMe «D», KOTOpbIe CnyKaT KpeHJIeHnДOONIHHTeHbHOpeMH630NaCHOCTN, B COOTBeTCTBmC HOpMoB BS 6684. Kolba paacnoIOKeHb BYTpN cnDEHnKoJIaCKn, cnpaba n cneBa, KaNKoKa3aHoHa pnc.18.
- TTo6bI paCzENITb NOrCHOn pEmeHb, HaxMMTe OINHOpeMeHHO Ha DBe 6OKOBBIE BUNKn (pnc. 19).
BHIMAHHE:ДлбобсчесенябezonaachoctnBaшerope6eHka HeobxOIOIMO Bcerda INCNoIb3OBaTb pemHn 630NaocHOCTN.
BHIMAHHE: nna oecneueHn 6eOnacHOCTn BaIero peBeHka Heo6xOIMO OAnHOBpeMeHHO NcNoIb3OBaTb naXOBblpeMeHb n peMHn 6eOnacHOCTn.
PERYIMPOBKA CINHKNI PEPEDHEO CNDEHNA
-
4to6bpa36JokpoBaTb MExaHn3M IJaHaKnOHa CnHKn nepeJeHrO cnEHN: 6oIbIIM nAJIbUeM HAKMTe Ha 6eryHOK A n npotOnkHnte ero BIEBO, OndOBpemEHNO notyB pyky B BBepx (pnc.20).
-
OTKNoHnTe CnDEHHe Ha3aI (pnc. 21). YTo6bI BepHyTb CnNH Ky B BepTnKaJIbHOe NOnOKeHne, IOCTaTOUHO npINoIHrTb ee B HyKHOe NOnOKeHne, He HaxmHa pyuKy.
CnHnKa nepdHeRo CnDEHnMoKeT OTKnDbBaTbCnBnepeD, TTo6bl ObcneuNTb NCnONb3OBaHHe KOJACKn C aBTOMO6nIbHbIM Kpeclom (cm. naparpaF «NCN0JIb3OBAHNE DETCKOFO ABTOMO6nJIbHOFO KPECNA').
PERYIMPOBKA CINHKN 3ADHEO CUNDEHNA
- TTo6bI ONyCTNTb CnNHKy 3aDHeRo CnDEHn, npInNoHNIMTe perynipOBOHyIO pyKy N03aDN CnNHKn N NOTAHTE CnDEHne BnH3 (pnc.22).TTo6bI BEPhyTb CnNHKy B BeptNKaJIbHOe NOIOJXHe, IOCTaTOUHO npInoDnHTb ee B HyXHOe NOIOXHe, He HaxHMaHa pYkY.
BHIMAHHE: c pe6eHKOM, HaxoJHUMcB KONcKe, yKa3aH HbIe OpeaUNMOryT 6bITb 3aTpUdHeHbI.
3ADHNE TOPMO3A
3aHnne KOleca 06OpuyoBaHb CDBOeHHbIMTOpMO3aMn, KOTOpBpe N03BOJIAOT C NOMOuIbO OHOIN PeaIIN OCTaHOBTb OBe napbl 3aHnX KOLEC.
- 4To6bI NOCTaBnTb KONACKy Ha TOpMO3, HaxMMTe BHN3 OINH n3 DByX pbUarOB, paCNoNOnKeHHbIX MExNy 3aDHIMN KOENcAMN, KaK NOKa3aHO Ha pucyHke 23.
- UTo6bI CHaTb KOnJcKcY C TOpMo3a, HaxMNTe BHN3 OINH N3 DByx PbUarOB, paCnONoXeHHbIX MExDy 3aDHmN KOncAMN, KaK nOKa3aHO Ha pucyHke 24.
BHIMAHHE: npn octaHOBke BcERda nCIOJIb3yIe TOPMO3.
BHIMAHHE: HN B KOEM CNYaue He OCTabJIte KOJIaCKy cpe6eHKOM Ha KaIIOHHo NOBepxHOCTn, DaXe ECIN 3aJeIcTBOBAH TOPMO3.
BHIMAHHE:3aIeCTBOBABpyuARTopMO3a,CJeNyETy6eIHTb CBA TOM,HTO TOPMO3aPpABINbHOcpa6oTaNHa 06oNx 3aHnKoJIecax.
IIOBOPOTHbIE KOJIeCA
Ipeepnne Koneca KOJcKIMoYT 6bITb KaNIOBOPOTbIMn, TaK HENODINXHbIMN.
25. 4to6bI oBecneuHb CBO6OJHoe NOBOPaUHBAHHe KOJIe, NOHNMTe paCNOJoxKeHHbM MeKdy HmN pblar. IVcNoJIb3yIn Te CBO6OJHO NOBOPaUHBaEMbIe KOJIeCa Ha POBbIX NOBepXHOCTax. 4to6bI 3a6nOKpOBaTb KOJIeCa, nepeBeJITe pbIar BHI3 (pnc.25).
BHIMAHHE: nobopothbte koneca cnkyat nnyuwe MahepeHHOCTN KOJACK;Ha HEPOBHOn dOpore (ue6eHb,pa3bntaI npora n np.) nyuwe 3a6nokupoBaTb Koneca, uTo6bl obecneYHTb JyUwH XOD KOJRACK.
BHIMAHHE:Bce KOleca DonXHbB BcERda 6bTb OHOBpeMeHHO
Ji6o3a6IoknpoBaHbI,Ji6o pa36IoknpoBaHbI.
CKIaIbIBAHNE KOJIaCKN
BHIMAHHE: npn BbINONHeHm 3ToI onepaun CneIte 3a Tem, TTO6bl BaW pe6eHOK nDpyrHe nTe HaxOHNICb Ha 6e3Onac-HOM paCCToHnn. Y6eHNTecb, YTO pNp NTOM NODBKNHbE qACTN DetCKOH pOryLIOUHOH KOJACKn He KacaOTcT eJa pe6eHka.
26. TTo6bI CLOXnTB KOJNCKy, npedBapntelbHO CneJeYet 3a6JIOKnpoBaTb NOBOPOTbE KOJLcA. NpeMeCTNTe BJIeBO 6eryHOK Ha IIOCTABKe (pnc. 2A), OJHOBPemEHNO C 3TUM HAXMITE Ha CEHTpaNBHyO KHONKy I npINoHNIMTe pyKy (pnc. 2B). EcnMoJeB KOJRAckn COOTBeCTByET TpeOBaHm HopMb BS 7409:1996, OJHOBPemEHNO ITaHNTe BBepx CNYCKOBo KPOUOK, KOTOpBih HaxODITcB B JEBOI YactN KOJRAckn (pnc. 26A). 3aTeM CLOXnTE KOJNCKy, HadaBnIBaHOrO II OeHTpy Kop3INbI (pnc. 26B).
27. Cnoxehna n 3a6noknpoBaHHa KOncKa coXpaHReT CBoe yctOuHBOe nooxeHne 6e3 dononHHTbHbIX DeIcTBn (pnc. 27).
NCIOJIb3OBAHNE DETCKOTO ABTOMOBJIbHOFO KPECJIa
KoJracka cHa6KeHa KpOuKaMn dJa KpeIeHn DaByx ABTOMo6NJIbHbIX Kpecen KEYFIT,HTo He Tpe6yET nCIOJb3OBaHn HbIXdoONHnTeNbHbIX yCTpoiCTB.
BHIMAHHE: INCTpyKun no NCNoB3ObaHnIO detcKOra ABToMo6nblHO KpeCna npedctabHebI B cneuaJIbHoJ 6poiope C INHCTpyKUAMN.
BHIMAHINE: K KOJANCKe MORYT KpeINTBcra TOnbKO ABTOKpeCna CHICCO KEYFIT.
NcnoB30BaHHe daHHoK KOJnCKn He No Ha3NaeHnO C HcOBMeCTnMbIM aBTOKpeCnOM MOKeT pINBeCTn K cepBe3HOMy TpaBMnPOBaHIO peBENKa. IpexJe cem NcNoB30BaTb KOJnCKy B KOMuHaCmC DetCKM m ATOKpeCnOM, BcerDa npoBepaTe HaedxHOCTb CNCTEmbl KpeJIeHNr.
BHIMAHHE: O6a3aTeNbH npOBepaIte, TTOb pe6eHOK 6bl npCTeHT K aBTOMo6nHbHomy KpeCny C nOmoIbIO pEmHei 6e30NaCHOCTN.
KpenneHne Detckoro ABtokecna Ha nepeHem naccknpCKOM CndeHHN ABTOMO6nla
28.CHIMTe npOTnBOyDapHyb 6aMnep H aKIOHnTe CnNHK nepeJeero cndeHn Bneped, cney HnCTpyKnAm n3 npapaRa 20,TO6bpa36JNOknpoBaTb MexaHn3M HaKnOHa CnIHKN, BCNE3a Yem npOTOnKHnTe CnNHky Bneped (pnc.28).
29.ПинлднIMITE6OKOBBLEOTBOPOTbl,OTCTeHNYBЛINnyKU NOCBO6OxJaTakIM06pa3OM,6OKOBLEKPOUKN(pnc.29).
30. Nomectte ABOKpeCNO Ha CnDEHne B COOTBETCTBN C 60KOBbIMN KpOUKAMN. KpenneHne ABOKpeCna K DByM KpOuKam NpON3OJTe ABOMaTNUeCKn, pa3dABuINcA UeUOK NOtTBepXJaet npabUNbHyU yCTaHOBky (pnc. 30). Nonpo6yIte npINOHNb ABOKpeCNO, YTObI pOBepNTb HAdEKNOCb KpenJeHHN.
BHIMAHHE! Nocne CHTnA BTOKpeCna Heo6xOIMO CHOBA npCTeHTb OTBOPOtI IN TOJIbKO IOTOM NCIOJIb3OBaTb KOJIrCKy.
KPEIIIEHNE DETCKOTO ABTOKPECJA HA 3ADHEI NACCAJKPCKOM CNDEHNI ABTOMOBNJIA
31.ПОПНOCТБИОннКИОПИВСПИKHу 3ДАнeroСИДЕнЯ CORNACHOHCTpyKUIMN3napaPpα22,ПOMeCTNTe ABTOKpeCIOHa 3a-ДпсчссEпс,В COOTBeTCTBиC6OKOBbIMN KPIOCHaMn (pnc.
31A).KpeHneHne aBToKpeCna K DBym KpUckam npOn3oJdeT aBtOMaTHueCKn, pa3dabWunc 7eIyOK noTBePjkDaet npaBnblbHyO yCTahOBky (pnc. 31B). IOnpo6yIte npInoDnHrtb ab
TOKpeCIO, yTO6bI npOBepuTb HAdExKHOCTb KpeHIIeHIA.
KAKOTCOEIMHHTb ABTOKPECJIO
- TTo6bI CHrTb ABTOKpeCnO C cnDEHnA KONRcN, HAdaBNTe Ha pyuKy, HaxoJauyUoc 3a KpeCnOM, IN npInoDnMMTe ABTOKpeCNo C KOnRcN (pnc. 32).
AKCECCYAPbl
BHIMAHHE: Akceccyapbl, onncahnbte daane B hactoemdoKymeHTe, MoryT OTCYCTBOBaTb B HeKOTOpbIX MOINKauJAXN3dJIIN. BHIMaTeJIbHO O3HaKOMbTEcB C INHCTpyKUHM, OTHOcIUMC9 K IMeOuIMc9 PnHaDNeXHOCTaM B pIno6peTeHHo Bamn MoINΦkauIN.
DOXKDEBVK
BHIMAHHE: 6yIbTe BHIMaTeJIbHbI npu nCNoJIb3OBAHN DoJXDCBnKA.
33.Дя Крпненяdoхдевика npponyctnte shhypkn BOKpyr Tpy60K KONAKN 3aФКСИРуTe shhypkn NINnyuKn B NOLOKeHnax, yka3aHHbIX Ha pnc. 33. HAMOKWNI doxkeBnK cneDyeT OCTaBtB CyUHTbC RA HOKpblOM BO3dyxe.
BHIMAHHE: HnB3a NcNoB3OBaTb DOXKDeBVK Ha KOJIrCKe, KOtopa He IMeET KaHIOHOHa INI HABeCA OT COJHua, NOCKoJIbKy OH MOKeT CTaTb PInuHOn yUdweHnpe6eHka.
BHIMAHHE: BO n36ekaHne neperpeBa HnKOrda He octaBnIte KOJnCKy c pe6eHKOM u yCTaHOBJIeHHbIM DoXKeBnKOM Ha coJIHcE.
HAKDKAДЛЯ HOF
34.Дя крпнеленя HabкндяHor: nponyctte HaKnydЯ Hor NOJ npOTnBOyDapHbIM 6amNepom, 3aTeM 3aФNKcUpyTe C obexxCtopoH JInNyUkAM, KaK NOKa3aHO Ha pnc.34.
BaxHoe npimueaHHe: nIIOCTpaunn INHCTpyKun, COepxauinec B daHHoB 6poWIOpe, OTHOCTCR K OJHO N3 MOINOKNAUN DetCKOH pOryLOOH KOJACKN; HEKOTOpBIE KOMNOHETbU fHyHKUN, ONICAHBte 3deCb, MORYT OTNIuAHTCBr OT TEX, KOTOPbIMN OCHaUeHa Ppno6peTeHHaBAMM MODINOKNaCua.
ДЛЯ GOЛEE NOДРОБΗΝΗΦΟΡΑЦΝ
Artsana S.P.A.
KlneHtcka cnlyk6a
3A DONTBJHINTEJIHA INHOFOPMALI:
Artsana S.P.A.
Servizio Clienti (Otten 3a obcnyKBahe Ha KIneHTn)
g jg Lgslj Jalal jilao jaiy 1i i jaiy 8: aii
aill jai! g jui sll caiiwi a ciis
Caiwi y. aeiell no ayally aoi yell ljiab8 cawiy
aai jaii gluii iis pgi
Jlci "Lolw Jalal Iooj guiy jaiy jaiy iinai
aio yjali gail iia o "Lolw gaiy
cix,asnil pll wllgcipll wll acjll Jaiwi 8: aii
jlae Jsiay aiay ilc ojbiu u
aasssg jglj g jglg jlc gaaal sic jdl slil y lcl
ygi jlblxlae aagb oiai jauell caiy i
lgjabll g g j
ayall g jn gl nnaaill jglal baoi g j 5c
lgaiag
aaii g aig so gnilj qbiLs! ayell Jaoi
Jglio nc Iaeg Lgbliaizb jny aqell Jaoiip pac sic aii
Jlabiy
gajlgl jzll ic ac ayell Jaoi! uc elioxl cyle: aii
Lgdc laall ng ciuyu ylo slo yy aqell Jaoi
gblll lc ayell Jaoi
bae gll yasw ieill lio Jaoi w jaiy j bai: aii
eie yie ll iis Jaoiwl jaiy j bai: aii
aillallll lclac ne cllnai Jie no aillalall aiblll olloc plai jy yag ailssll liin 1ao gll yannnn 2jbiill
Aioi aiaiwl jlanwul aylaal all glaill aybi, clc. ayall aybl 5j S
Jusell jay Iae gill ayolldl coxlallg yjnl ng 1gill oog
jull sll Lg yj u
jolde blo Janae
Sjll Jauu Janae
gSs
Jusell Juae Juae
Ile a, jai ae hai jianuwly aeg aywuy wnuu slj Aaihui tle
aIgall
clge gigSglw jllnly dlig a5jnl slj111111
Jolgl Jlal no lgblzglc abldlg yogosy glsml 10
no alle yagao ydlc dssy ygssy yll s21111
ogayy JocLc ydl lslx21 ygiinll dg JoIg Igngg
2
jolj1
JUULI GAAU 1A aU (1)
JUULI E: aU U Lc UaU aU uU aU uU
JUULI aU (1A aU) uU uU uU uU uU uU uU uU uU uU uU uU uU uU uU uU uU uU uU uU uU uU uU uU uU uU uU uU uU uU uU uU uU uU uU uU uU uU uU uU uU uU uU uU uU uU uU uU uU uU uUl Uu Uu Uu Uu Uu Uu Uu Uu Uu Uu Uu Uu Uu Uu Uu Uu Uu Uu Uu Uu Uu Uu Uu Uu Uu Uu Uu Uu Uu Uu Uu Uu Uu Uu Uu Uu Uu Uu Uu Uu Uu Uu Uu Uu Uu Uu Uu Uu Uu Uuu
2
aIoo JIab81 0o slll aolll oag plalll aaii
g aSnnll s88 0o slll bue yIaill oia i. jaball gaaasss2 ayell
ci piJ5gall lc aoljefkbl aie cuiu 0o slll a (2
Jauill gai aaiell lac aggall aaijial aaiil ayell
gybawgljllgc hawai waiy gl piall (2A ogall)
ayell gai aaiill dy Jaoi! (2B ogall)
asiogwaiy jauy jLgall no goloal gaiy .(2C ogall) ciaill
ciailly, jauy jLgall ayell jo slll bny
siull liu jiu plalld uioe alal (3
.(3 ogall) ayell zrae
egy quanl lcl baal y aay eel jauy bai (4
galiqlaqlaqlaqlaqlaqlaqlaqlaqlaqlaqlaqlaqlaqlaqlaqlaqlaqlaqlaqlaqlaqlaqlaqlaqlaqlaqlaqlaqlaqlaqlaqlaqlaqlaqlaqlaqlaqlaqlaqlaqlaqlaqlaqlaqlaqlaqlaqlaqlaqlaq
L
JL JALI ALW OIO JALI JALI AL W Lc aalll (5
LAS ayall alooggl Iaalw y U Jscuagj 1
Cus U Jscuagj uU Jscuagj uU.5A oogull
gail no gail wail gail uolagl lal ooll 1
y .5B aqall) awlSJI JlrJlQeWu baiell 6
JLALI ALW qae jy JALI ALW JQeWu
aayll Jx
abwgl alwgl pwlil cia Jwgl Jgwi (6
(6 aagll)
a131 044
7
8
9
10
11
12
13
14
15
16
17
18
19
20
aol081 4x2-11 4s
LoL aolI Ic aolOxl xlll acgao 10
Ic aIqell oia uai .Cuiill Aciogoo gwi 10 agall
. xlll no gaiy acgai
clauuieilieiag
alogll oie jol cdoall aell alogll (11
aagll gloLs aol8i 0jilu aai jg jnngjnnn n.11
yll lcl blll cdoall aeill alogll alljx (12
mStll ol3xyl alogll paaal qe 21 yll uo .(12 a)
1
aJ111111111111111 13
gaiu oL cuii i jy golai lalai yj
aaii .(13 aai) jciai gaiu oL aogai Laiu!
ayai no Jaiai wai! Lc raiiaai i
le aiai ciui yaiy jiyai aiai sii
.(14 ayai yaii aiai yaiy aiai yaii
ayai no Jaiai wai! Lc raiy aiai ayai oia
aig 15A ayai yoi Las lae i:uiiaai (15
elai qei 15: (15B ayai) jniinlilai yaiy ayai ygi
xj
JLo81 aojai JLoa2wI
Jolblai quo 0gSj Jalalll plljle J5 g
gill qall y plqg qalil pglg alu w jolc
Jlalai ic alis1y Jaoiwi gssnll o auii
joiy joll no gwl 1 aggl adgel ggl
Lg aolal aaiall gagll gaoa (16
wlae lai jlc lao 85y jayu w no sLig (A16 aygall)
ogall) elajj yae bclc. uis k y oJia Jalaal aill
abacg cie cne bauil ljaai Jaaai Ii .B16 (16C aasall) aybtaa nno y aall qg
golal yda bclc aegll f Jabal gag
ogall) chlll g ne iiaai all ylo Lg aaiu! aIgill d gail
ogall) chlll baiaa bllg o2y pjl ruiy jiaei y .(17
Jswgc alalgcayell ggs aalal aoLw Jaa
aclaleil go waiy gaiol aoLw pji B Ss "D"
nllgge Lc aayel sao Jala oggo ot alh BS 6684 .18 agall fo Lk Jy
niiiall qiebaill lc baially clc gai J .(19
.(19 aygal) dgl cag g y jnuul
leil oolx aojai Jaoiwi y jabal aoLw gla: aui
aojgl ngnnl y pl Jaoiwi y jabal aoLw jaoi jai
0000000000000000000000000000000
golal jglll iio gaiy jil yj 20
gai lgsol "A>> aai jai bali lc oIogjiaaiol: yI Lpai
aygai) jxl gai B" jaii gai dci aaii cagll gai jLwJ
.20
gai .(21 aygal) ai! jglal iinoo gai (21
lc baill ng gall glaiy aeji Ie! gbll siin
jaii Jlauiu Iauuui uoi oloj yjli iinoo juii s
aao Jlaei! ayil jaii jaii jaii jaii
1211 12211 12311 12411
jao g jaiy jgbl iinno yjayll 22
(22 ayall) jaiygi aeiagjgbll iinno als ygl Jaiell
elai,lae jlcil jgbl iinno gis yjgbl iinno gj
jaiall lce kiaill nggall
aerell gloggo Jaall ili neol cldall oia aaii
a_1 = 1
gagao 1aaiy cawai ailaoi y So lc uaiai l iiaalll g3
lae bao ayuogao la biwally dug ao gao ayaiidl Cxalall
gao! Lc Jauwai gao baaiall jayaiall alayd (23
.23 aayall gLoS ayaiidl Cxaiell nyuyiyaiyaiyaiyaiyaiyaiyaiyaiyaiyaiyaiyaiyaiyaiyaiyaiyaiyaiyaiyaiyaiyaiyaiyaiyaiyaiyaiyaiyaiyaiyaiyaiyaiyaiyaiyaiyaiyaiyaiyaiyaiyaiyaiyaiyaiyaiyaiyaiyaiyaiyai
aagall aylal yolol oogol 25
yogol alwglg y, yaglgs yd cwlal gai (25
as. alg. aclll glc ydl cwlal jaoi .yol
.(25 ayall) jawgi yo awlgall gds ydl cwlal
g. ayall asyjogwi aygill ayll lclll comega :
ayell plaswni ic ayll clll Jaoi wu ydi ydo jy
lls g(..ell aiis xkawg f agw) aginw yacj, ylc
.ayell Jw ljl jiai
.10g cag g lg5 cwlal ciuui gj y
#
Jlalol jllal 10o slal aai oai paoi yj
10o slil jolal oia .ayall no aiol adawa 1c po
. Jlalal po gao mokk 2 ayell g 26
gagill alall clll pks! bny aell qk (26
Ie Ic aggall aajl aaiy aaiy aaiy aaiy
Ic Iaai Cgll g (2A aog) Lwll gai
go aaiy aaiy clls .(2B aag) jaiy gag
gagb plall B5 7409:1996 aaiy
(26B aag) alll no laaggl glc loaiaaiaaie
ogall) ciag lzL iic aggall aegn aegn
Jabu jyjwJgS JgW!
yI yI yI yI yI yI yI yI yI yI yI yI yI yI yI yI yI yI yI yI yI yI yI yI yI yI yI yI yI yI yI yI yI yI yI yI yI yI yI yI yI yI yI yI yI yI yI yI yI yI yI
yololalglc jabll
gall si mo golg closuall ailll allog alljy pa 28
aall g oog sll clogleil lio gao plo81 gai ayol 20
lae pe galt iin no yann jayn jayn d1g .20
.28 20
Cw Lg (gsl) baiy aiai 29
.29 29
.451111111111111111111111111111111111111
.30
.45i Gaaag aiclogig og yssll yssll yssll yssll yssll yssll yssll yssll yssll yssll yssll yssll yssll yssll yssll yssll yssll yssll yssll yssll yssll yssll yssll yssll yssll yssll yssll yssll yssll yssll yssll yssll yssll yssll
aill JlaoiW Jia aai 81 cai bie I yguySll ai! ay:
21 1
aaloljglsls jLs ydlgblssmo 31
gmao jc gmll oall Jdaalb oall wswS gao a.22
ogaae klll gswSll caiy .(31A aagall) aagall lalil
geJg.(31B aagall) ci si gao gao gao logig]
.
jabu ayLgWJyS 1
aJyIe 32
jai jai Jai yS (32
jai jai Jai yS aJyJIyai Jai yS
.32 ayai Jai yS
#
a a 100000000000000000000000000000000000000000000000000000000000000
Jalil no jolg klae
J 33
133 aal 133 aal 133 aal 133 aal 133 aal 133 aal 133 aal 133 aal 133 aal 133 aal 133 aal 133 aal 133 aal 133 aal 133 aal 133 aal 133 aal 133
a_i a a_i 分母最小值为 k .
34
yoo yoo yoo yoo yoo yoo yoo yoo yoo yoo yoo yoo yoo yoo yoo yoo yoo yoo yoo yoo yoo yoo yoo yoo yoo yoo yoo yoo yoo yoo yoo yoo yoo yoo yoo yoo yoo yoo yoo yoo yoo yoo yoo yoo yoo yoo yoo yoo yoo yoo yoo
loguelljoo
Arstana SpA
juljul 2025 amii
1eJLJLSJLJLg
[{\left( 2\right) }^{1}{\left( 3\right) }^{1} - {\left( 5\right) }^{1} = 0]
www.chicco.com-898800-188:

NOTE