EP7035 - Epilator REMINGTON - Free user manual and instructions
Find the device manual for free EP7035 REMINGTON in PDF.
| Brand | Remington |
| Model | EP7035 |
| Product type | Cordless rechargeable epilator |
| Power supply | AC adapter 5V 1000mA (PA-0510EU/PA-0510U) |
| Battery life | 40 minutes after full charge |
| Charging time | 4 hours for first and subsequent charges |
| Number of speeds | 2 (Low for fine hair, High for thick hair) |
| Minimum hair length | 0.5 mm |
| Usage | Dry or wet skin (in the shower or bath) |
| Included accessories | Epilation head, shaving head, pedicure head, exfoliating brush, bikini trimmer guide, aloe vera massage accessory, cleaning brush |
| Additional features | Swivel head, precision light, removable and washable head, non-slip handle |
| Safety | Automatic shutdown if excessive pressure; do not use on irritated or damaged skin |
| Cleaning | Removable epilation head washable with water; brush provided for other accessories |
| Maintenance | Clean after each use; 70° alcohol for stubborn residue |
| Recycling | Removable lithium-ion battery at end of life (procedure in manual) |
Frequently Asked Questions - EP7035 REMINGTON
User questions about EP7035 REMINGTON
0 question about this device. Answer the ones you know or ask your own.
Ask a new question about this device
Download the instructions for your Epilator in PDF format for free! Find your manual EP7035 - REMINGTON and take your electronic device back in hand. On this page are published all the documents necessary for the use of your device. EP7035 by REMINGTON.
USER MANUAL EP7035 REMINGTON
7 in 1 Cordless Epilator
Thank you for buying your new Remington product. Before use, please read these instructions carefully and keep them safe.
Remove all packaging before use.

IMPORTANT SAFETY INSTRUCTIONS
WARNING - TO REDUCE THE RISK OF BURNS, ELECTROCUTION, FIRE OR INJURY TO PERSONS:

1 This appliance can be used by children aged from 8 years and above and persons with reduced physical, sensory or mental capabilities or lack of experience and knowledge if they have been supervised/instructed and understand the hazards involved. Children shall not play with the appliance. Cleaning and user maintenance shall not be done by children unless they are older than 8 and supervised. Keep the appliance and cable out of reach of children under 8 years.
2 This appliance should never be left unattended when plugged into a power outlet, except when charging.
3 Only set the appliance down on a heat-proof surface.
4 Do not use the appliance if it is damaged or malfunctions.
5 If the supply cord of this unit becomes damaged, discontinue use immediately and return the appliance to your nearest authorised Remington service dealer for repair or replacement in order to avoid a hazard.
6 Do not use attachments other than those we supply.
7 Do not twist or kink the cable, or wrap it around the appliance.
8 This product is for cordless use only. Do not use your epilator while it is plugged into the mains.
9 Make sure the power plug and cord do not get wet.
10 Do not plug or unplug the appliance with wet hands.
11 Suitable for use in a bath or shower.
12 Ensure the appliance is switched off and unplugged from the mains before cleaning.
13 Do not use this appliance with a damaged or broken tweezer barrel as injury may occur.
14 This appliance is not intended for commercial or salon use.
15 This appliance should be supplied with approved safety isolating adaptors PA-0510EU (for Europe) and PA-0510U (for United Kingdom) with the output capacity of 5DC; 1000mA (adaptor output).

13
15
14
16

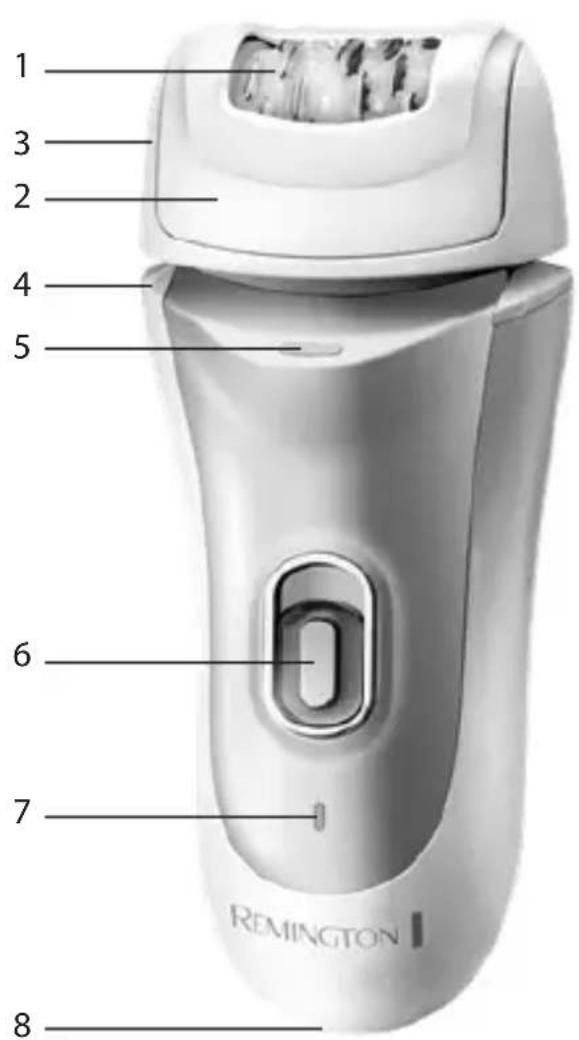
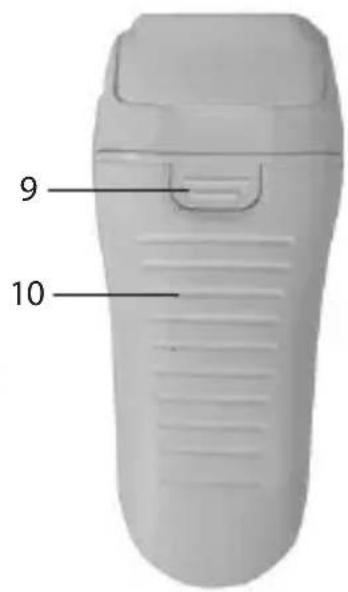
KEY FEATURES
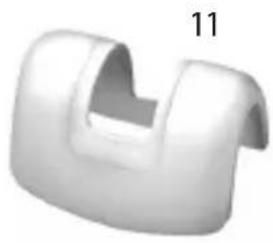
1 Tweezers 11 Detail Cap
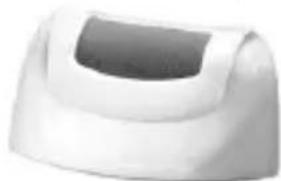
2 Perfect Angle Cap 12 Massage Cap with Aloe Vera
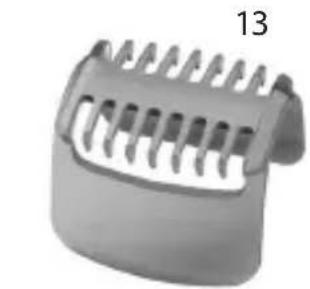
3 Removable & Washable Head 13 Bikini Comb
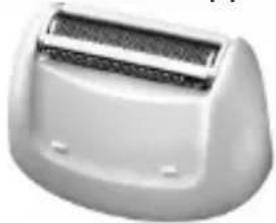
4 Pivoting Head 14 Shaver Head
5 Precision Light 15 Pedicure Head
6 On/Off Switch - 2 Speeds 16 Exfoliating Brush Head
7 Low Battery/Charging Indicator Light 1 7 Cleaning Brush (not shown)
8 Power Inlet 18 Beauty Bag (not shown)
9 Head Release Button 19 Power Adaptor (not shown)
10 Anti Slip Grip
GETTING STARTED
Be patient when first using your epilator as with any new product, it may take a little while to familiarise yourself with the product. Take the time to acquaint yourself with your epilator, as we are confident you will receive years of enjoyable use and complete satisfaction.
INSTRUCTIONS FOR CHARGING
Always ensure that your hands, epilator and adaptor are dry before charging.
- Before using your Remington epilator for the first time, charge for 4 hours for initial use and for every charge thereafter. One full charge allows 40 minutes of cordless usage time.
- Ensure the product is switched off and attach the mains adaptor to the epilator.
The charging indicator will illuminate green while charging.
- Charge for the time indicated above.
The epilator will be fully charged when the green light goes off.
- Use the product until the battery is low. This is indicated by a red indicator light.
Note: this product is for cordless use only. The epilator cannot be turned on while it is charging. Do not try to use the epilator while it is plugged into the mains.
- Your epilator cannot be overcharged, however, if the product is not going to be used for an extended period (2-3 months), unplug it from the mains and store. Fully recharge your epilator when you want to use it again.
GENERAL INFORMATION ON EPILATION
- This Remington epilator has been designed to make the removal of unwanted hair as efficient, gentle and easy as possible. The rotating tweezers catch even the shortest hairs (minimum length 0.5mm ) and pull them out by the root. That hairs that grow back are soft and thin. Epilating leaves your skin smooth and hair-free for several weeks.
- If you have not used an epilator before, or if you have not epilated for a long period of time, it may take a short while for your skin to adapt to epilation.
- The discomfort experienced at first is considerably reduced with repeated use as the skin adjusts to the process.
- Using an epilator may cause reddening or irritation of the skin. This is a normal reaction that will quickly disappear. However, you should consult your doctor if the irritation has not disappeared within three days. All methods of hair removal from the root can result in in-growing hair depending on the condition of the skin and hair.
Regular exfoliation helps to prevent in-growing hair. In some cases inflammation of the skin could occur when bacteria penetrates the skin (eg. when sliding the appliance over the skin). Thorough cleansing of the epilation head before each use will minimise the risk of infection.
INSTRUCTIONS FOR USE
This epilator is suitable for wet or dry use and may be used in the shower.
- This epilator is for cordless use only.
USEFUL TIPS
- When using an epilator for the first time it is best to try it on a small area to get used to the process of epilation.
- The optimum length for hair removal is between 2-5mm. Epilation is easier and more comfortable.
- Take a warm bath or shower before epilating and exfoliate to remove dead skin cells. This will make your skin more pliable, making the epilation process less uncomfortable.
- Epilate in the evening so that any possible reddening can disappear overnight.
- After use you can use a body cream or aloe lotion to soothe the skin and reduce skin irritation.
- Exfoliate regularly to avoid in-growing hair.
WHY EXFOLIATE?
- Exfoliation prevents in-growing hairs. Ingrown hairs occur when the growing hair curls up under the skin instead of growing out like it should. It results in an often painful red bump and possible infections. Using the Exfoliating Brush Head provided with this product will help reduce ingrown hairs or infections.
WETUSE:
- Ensure the skin is moist. For added comfort, shower gel can be added to the skin during use. It is best to try different methods to determine your preferred method of epilation.
Note: after each wet use with shower gel, clean the epilator under running water.
DRYUSE:
-
Before epilating make sure that the skin is clean, dry and free from creams or oils. Rub the skin in the area to be epilated to lift short hairs to optimise hair removal.
-
Turn the epilator on to the desired speed:
- LOW is recommended for fine hair.
- HIGH is recommended for coarse hair or stronger hair growth.
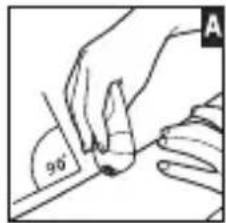
- Using your free hand, hold the skin taut to make the hairs stand upright.
- Position the epilator flat so that the tweezers are at a 90^ angle and flat against the skin. The Perfect Angle Cap will ensure the optimum tweezing angle (Diagram A).
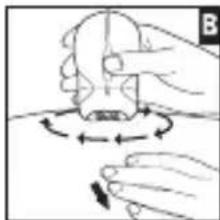
- Using small circular motions, slowly and gently glide the epilator over the skin. This circular motion is the most effective method and makes the process less uncomfortable. Alternatively, guide the epilator in a slow, continuous movement against the hair growth (Diagram B).
- Repeat within each area until all the unwanted hair is removed.
After epilating, turn the epilator off.
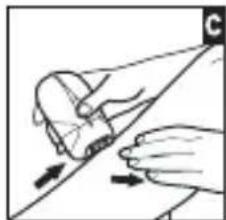
ARM/LEG EPILATION: (Diagram C)
- Epilate from the lower arm/leg and slowly move upwards. To epilate behind the elbow/knee, keep the arm/leg straight to stretch the skin.
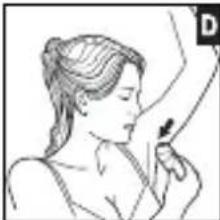
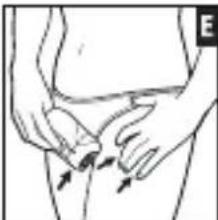
UNDERARMS AND BIKINI: (Diagram D and E)
- Please be aware that these areas are particularly sensitive. However this sensitivity will reduce after repeated usage. For more comfort, ensure that the skin is held taut and that the hair is at the optimum length of 2-5mm. If it has been an extended period of time since you have removed hair, trim the hair with the Bikini Comb Attachment before epilation.
It is recommended to use LOW speed or detail cap for these sensitive areas.
FACIAL EPILEATION
- Use the detail cap.
- Place the epilator at a 90^ angle to the skin and move the epilator head in a circular motion.
Note: Do not use for removing hair from the eyebrow.
- Keep the product away from hair on the scalp, eyebrows and eyelashes.
PRECISION LIGHT
- The precision light is incorporated into the ON/OFF switch to help to see every hair.
DETAIL CAP
- The detail cap is designed for small areas (including the face) and spot treatments.
- Ensure the epilator is switched off.
- Remove the Perfect Angle or Massage Cap.
- Place the Detail Cap into the appropriate slots at the top of the epilator.
- Gently press the Detail Cap into place until you hear a 'click'.
MASSAGE CAP WITH ALOE VERA
- The Massage Cap is designed for gentler epilation.
- Ensure the epilator is switched off.
- Remove the Perfect Angle or Detail Cap.
- Place the Massage Cap into the appropriate slots at the top of the epilator.
- Gently press the Detail Cap into place until you hear a 'click'.
SHAYERHEAD
- The Shaver Head provides a close shave for sensitive areas.
- Ensure the epilator is switched off.
- Press the head release button and remove the Epilator Head.
- Attach the Shaver Head until it clicks into place.
- Hold the shaver head at a 90^ angle to the skin and move against the direction of hair growth.
TRIMMING AND SHAPING
- Attach the bikini trimmer attachment.
- Hold the shaver at a right angle to your skin and press down gently.
- Edge and shape the areas as desired.
EXFOLIATING BRUSH HEAD
- The Exfoliating Brush spins to remove dead skin cells from the surface and helps to prevent ingrowing hairs.
- Ensure the epilator is switched off.
- Press the head release button and remove the Epilator Head.
-
Attach the Exfoliating Brush Head until it clicks into place.
-
For best results dampen the skin with water and apply shower gel or body wash.
- Turn the unit on to the LOW speed setting.
- Applying gentle pressure sweep the brush over the skin targeting the desired areas. If required the Exfoliating Brush can also be operated on the HIGH speed setting.
Note: The Exfoliating Brush is not to be used on the face or sensitive areas.
- Can be used on wet or dry skin.
PEDICURE HEAD
- The Pedicure Head spins to gently remove hard, dry skin from the feet.
- Ensure the epilator is switched off.
- Press the head release button and remove the Epilator Head.
- Attach the Pedicure Head until it clicks into place.
- Turn the unit on to the LOW speed setting.
- Applying gentle pressure glide the roller over the hard skin you wish to remove. Do not press too hard.
- After 2-3 seconds, stop and check the skin. Repeat this process until you have the desired effect. If required the Pedicure Head can also be operated on the HIGH speed setting.
Note: The Pedicure Head is only designed for use on the feet. DO NOT use on any other part of the body.
- Do not use on wet skin.
- Do not use in the same area for more than 2-3 seconds at a time.
CAUTION
- For your protection your epilator may slow down or even stop if pressed too firmly against the skin.
- Do not use the Epilating Head on irritated skin or skin with varicose veins, rashes, spots, moles or wounds without consulting a doctor. People with reduced immune response eg: during pregnancy, or people who suffer from diabetes mellitus, haemophilia or immunodeficiency should also consult their doctor before using this product.
- Do not use the Exfoliating Brush or Pedicure Head on broken, sore or irritated skin or on warts or any other protrusions.
- For hygiene reasons do not let another person use your epilator. It is recommended for use by one person only.

CLEANING AND MAINTENANCE
- To ensure a long lasting performance of your epilator, clean the head assembly regularly.
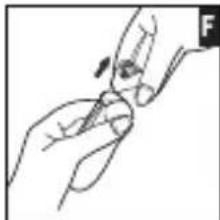
CLEANING THE EPILATION HEAD AFTER EACH USE:
- Ensure the epilator is turned off and disconnected from the mains.
- Press the head release button and open the head assembly (Diagram F).
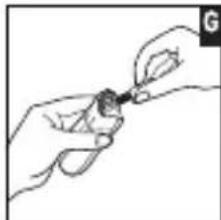
- Turn the head assembly upside down.
- The epilator head can be removed and rinsed for cleaning. For optimal cleaning, brush hairs from the tweezers before rinsing.
- Although the epilator is suitable for use under running water, it is not recommended to submerge the unit under water.
NOTE: Do not completely submerge in water. The epilator head can be submerged after it has been removed from the epilator body.
TOREMOVERESIDUE:
- To remove residue from the stainless steel tweezers, dampen a swab with alcohol.
Gently rub the swab over the tweezers until the residue has been removed.
CAUTION: Make sure the cotton swab is not soaked in alcohol as this may damage the epilator.
CLEANING THE SHAYER HEAD AFTER EACH USE:
- Ensure the epilator is turned off and disconnected from the mains.
- Press the head release button and remove the shaving head.
- Remove the blade and trimmer assembly by placing your fingers either side of the assembly pulling upwards.
- Gently shake the blade and trimmer assembly to remove the hair. Use the cleaning brush to brush the trimmer and shaver housing.
- Replace the blade and trimmer assembly.
NOTE: Never use the cleaning brush on the foil as damage may occur.
CLEANING THE PEDICURE HEAD AFTER EACH USE:
- Ensure the epilator is turned off and disconnected from the mains.
- Press the head release button and remove the pedicure head.
- To clean, gently brush the roller head with the cleaning brush.
Note: the Pedicure Head is not washable.

CLEANING THE EXFOLIATING BRUSH HEAD AFTER USE:
- Ensure the epilator is turned off and disconnected from the mains.
- Press the head release button and remove the exfoliating brush head.
- To clean, rinse bristles under water and allow to dry.

BATTERY REMOVAL
- Battery must be removed from the appliance before it is scrapped.
- The appliance must be disconnected from the supply mains when removing the battery.
- Turn the unit on and discharge all remaining power.
- Begin by removing the head attachment from the unit.
- Using a small screw driver remove the screw at the bottom of the unit.
- Unclip the decorative panel from the unit.
- Pull and slide out the inner housing to reveal the PCB and battery.
- Cut the wires on both ends of the battery. Remove the battery.
- Battery is to be disposed of safely.

ENVIRONMENTAL PROTECTION
To avoid environmental and health problems due to hazardous substances in electrical and electronic goods, appliances marked with this symbol must not be disposed of with unsorted municipal waste, but recovered, reused or recycled.
ACCESSORIES ZONES SENSIBLES
ASCELLE E INGUINE (Imagine D & E)
MASSAGTILLBEHÖR MED ALOE VERA
MASAZNY NADSTAVECS ALOE VERA
- Masáźny nadstavec s aloe vera je určeny najemnejsu epiláciu.
- Skontrolujte,Či je epilátor vypnutý.
Zlozte nadstavec Perfect Angle alebo nadstavec na detailné epiláciu.
Vlozte masázny nadstavec do prislušnych otvorov na yrchnei Časti epilátrora.
Jemne zatacta measzny nadstavec na miesto, až kym nezacyakne.
ZASTRIHÁVANIE A TVAROVANIE
Pripoite nadstayec na zaatrihávanie oblasti bikin.
- Drzejte detailny zastrihávač y správnom uhle k pokožke a jejne zatlackte.
- Oblast ochraniţe a vytyarujite podlă yašich prestdáv.
HLAVA S PEELINGOVOU KEFKOU
- Hlava s peelingovou kefkou sa otáča, aby odstránila z povrchu pokožky odumreté bunky a tym pomáha predchadzat zarastaniu chípkov.
Rukavicu a pokožku navlhcite teplouvodou.
Zlozte nadstavec Perfect Angle alebo nadstavec na detailnú epiláciu. - Hlavu s peelingovou kefkou pripoite, až kým nezacvakne na miesto.
- Pre dosiahnutie majlepsich vysledkov navlhcite pokozku vodou a naneste sprchovy qel alebo telové mydlo.
- Prístroi zapnite na NÍZKU (LOW) rychlost.
-
Kefkujemn pritlaçajte a prechadzajte nou po pokožke so zameranim sa na požadované oblasti. Podla potreby je mozné peelingovu kefku použivat aj pri nastaveni VYSOKEJ (HIGH) rychlosti.
-
POZN.: Peelingová kefka nie je určena na používanie v oblasti tváre alebo na citlivych miestach.
Dá sa použit' na vlhkej ajSuchej pokožke.
HLAVA NA PEDIKÜRU
He noHocTe yCTpoIcTBO 6n3K K BOLOcam Ha roLoBe, 6pOBam n peCHnIaM.
ПОДCBETKA
- Побсвета сешина с поpeкючatelem BKЛ./BbIKЛ., оha nomoraet yBnDeTb OTdelenHbIe BOLOCKN.
HACADKA-HAKOHEHNIK:
Hacadka-HaKoHeuHK npedHa3HaueHa dIy He6OJIbXx yUacTKOB (BKnIOuaJnio) dIy ToueHoi 6pa6OTkn.
- Y6eI NTecb, yTO 3nnJIaTOp BblKJIIOueH.
- Chmnte hacaKy Perfect Angle nn MaccaKHyo hacaKy.
BCTaBbTe HacaKy-HaKoHeuHKn B n3bl Ha BepXHeu qactn 3nnIyTopa.
- OctopoxHo BdaBte Haacky-HaKHeuHK Do xapaKTePHoro igeJyKa.
MACCAKHAR HACAKC AIOBEPA
- Maccahna HacaKa npedHa3HaueHa dIy MArKoI 3nnlaun.
- y6eNTecb, yTO 3nIaTOp BbIKIOueH.
- Chmunte Hacaiky Perfect Angle n DeTaNbHbI TpMMep.
BCTaBbTe MaccxHyu HacaKy B na3bHa BepxHe yactn 3nnlaTopa. - Octopokho BdaBnte MaccxHyo HacaKy do xapaKTepeHoro ueJyka.
BPUTBEHHA TOLOBKA
- Bpeoza rOIOBka oBeCneuNbae TnCToe 6pntbe YyBCTbHbIX qacte TeJa.
- Y6eI NTecb, yTO 3nnJIaTOp BbIKIOueH.
- Haxmte KhoNky fNKcauIN rOJOBKN IN CHMnTe rOJOBKY 3nnjTopa.
- Ппсоевине 6рntвеную rolOBky do ee Фнкаци C xapaКтернь m шелчkom.
- YdeprknaBaiTe 6pntBENHyIO rOIOBky noI yrIOM 90^ K KOKe n nepeDburraTe
ee npotnb HappaBneHn poCTa BOJOC.
PIOJPAHBHBAHNEIIPNDAHNEΦOPMbI
- YctaHOBnte HacaIky TpIMMepa IJIa 3OHIb6IKHH.
-ДержпгеMeнКиТрIMМерпдпяMbIM yrIOM OTHOCHTeJbHO KOKИ n Clerka npKmTe. - PoiapBnIe n npiaTe xeJaemyio fOpMy.
TOJOBKA UETKINJI INIHRA
- Κέτα δληνινγα Bρασετγα, δλασοδρα γεΜγ yιαληεΤΟMEρΤΒΕΒχηκ ΚλέΤΚις ΚΝΟβερχόθους κόχινι ΜΟΜΟγαε ΠρεδοΤΒρατιΤβ BραστΑΗΝΕ ΒΟλος.
- Y6eI NTecb, yTO 3nnJIaTOp BbIKJIouHeH.
- HaKmTe KHONky ΦHKcauIN rOJOBKn IN CHMnTe rOJOBky 3nnJIaTopa.
- ПпсоeДиHnte rOJOBky ьETKn ДЯ пИнHra, Дя 3TOrO BCTaBbTe ee Do ьeLчka.
- ДяdoeschkeHЯ ONTIMaIbHbIX pe3yIbTaTOB CMOUHTe KOKy BODOИ HaHecNTe reIb ИИ npryroe cpeCTBO dIyua.
- YctahOBnTe np6Op Ha Hn3KyIO ckOpoCTb (LOW).
- Clerka HadaBnBaJ Ha uteKy, npoBoDnte e no XeJaEMbIM yAcTkam Koxn. Ecn Heo6xOIMO, uteKy dIra nnHra MoXHO TaKKe IcNoIb3OBaTb Ha BbICOKo CKopocTn (HIGH).
PIMMEUHNE. 1eTka dIy nnHra He npedHa3HaueHa dIy o6pa6oTKn Iuca nIy CBNTbHbIX 3OH.
- MoXHo IcNoIb3OBaTb Ha BlaXHo IJIu CyXo Koxe.
TOJOBKAДЛЯПЕДИКIOPA
IHCTPYKlI13 3APJXAHH
- Перацяжань м обов'язково пося руки, спларот римержевшадтетсух.
- Парапшим ВИКОРИСТАннЯm i пи КОЖHOMу NaCTUHOMy 3apДжанHi eniIЯTopa Remington 3apДжайTe Иоу npOTЯrOm 4 roDInH. OdHe nobHe 3apДжанняdoЗВOLЯ经 ВИКОРИСТОВУВaTи npINaD y 6e3ДрOTOBOMу peKIMi npOTЯrOm 40xbuINH.
- PepekoHaITeC8 B TOMy, 10 npicTp iBmKHeHO.
PiD'EnaHte 3apAHN aAnTeP Do npucTpoU, nCn yOro yBIMKHiTb aAnTep y MepeKy XNBHeHHra.
-Пд уас зарджанн CBITLOBи iHДИКaTOp rOpNTb 3eJIeHIM CBITlOM. - 3apädkaïTe npotTrom 3a3NaueHoro Bnüe Yacy.
KoIe enilrTop 6yde nobHicTIO 3apJxKeHO, 3eJeHe CbitNo 3rache.
EkCnnyatyte npncptiin,doKnb6atapea nobHicTIO He po3pndtbcra. Y Takomy pa3i 3arOpntbcya cepBOHa cBITNOBa iHdNkaizia.
Ppimitka: Cen npnaad cIid BnKOpncTOBbATN BnKJIouHOB 6e3dpoTobomy pekmi. Iic yac 3apJxKaHHB BIMKHTn enIaTOp HEMOxKnBO. He HamaraTeCk KopcctyBaTcA enIaTOpom, KOIN BIn NiKIOUeHN do Mepekj KINBHeHH.
HaJnKOBn 3apd zbo rno enilrTopa HmOxNbN. Ondak kso npila He BnKOpNCTOBvBaTImeTbcra npoTgrom Tpnbaloro npomixkky acy (2-3 Micayi), Ioro cIid BmKHyTu 3 MepeXi XNBLeHnTa cKlaCTu dJa 36epirAHn. Npeed HaCTynHM BnKOpNCtAHnM npnilady noRo cnId NOBHicTIO 3apdntn.
3AΓΑJIbHI BIDOMOCTI IPO EΠΙΑζΙΟ
-
Lcen eniIaTOp Remington npn3HaueHn dJa MaKcMaJIbHO eΦeKTINBHorO, oBepeXHoro n 3pyuHoro BuaJaleHn He6aXaHoro BOLOccr. PInUeTn, 0o oBePtaIObCra, 3axoJIIOUToB HabITb HauKOpoTse BOLOccr (MInImaJIbHa DOBXnHa 0,5 MM) Ta BuaJALIOToB NOrO pa3OM i3 KopeHAm. BOLOccr, 0o BiDPOCTaE, 6yde M'AKm Ta TOHKm. 3aBDAKn enIlaqii BaSha Wkipa Ha KInbKa TnXHIB No36yDeTBcR BOLOCCr Ta CTAHe rJaadeHbKOIO.
-Якwo bpaHiwe He KopnctybaIncra enIaTOpom a6o Bke daBHO He po6nJIe enIaIciIO, BaWiJ shKipi 3HaIo6bIbCra DeaKm Yac, 0o6 aAdaTpyBaTnsc.При NOBTOPHOMy BnKOpNCtAHHi DnCKOMΦOpT 3HaUHO 3MeHsyeTbcR, OckInbKn ShKipa npn3BnuAioEtbCra Do npOecy.
Bukopustahna eniTopa moKe BnKlnkaTu noeepBoHHa 6o npda3HeHHa wkipu. Lc HOpMaIbHa peakia, kA WbNDko 3HnKHe. Ipote KaIO pOpa3HeHHa He MInHylo 3a TpN do6n, Heo6xIDHO 3BepHyTnCdo Iikapra. -
Y 3aIeJxHocTi BiD cTahy WkipKu Ta BOLOccs 6yd-b-aki MeToi BuJaJIeHHB OLOCCs BiD KopeHIB MoKyTb npn3BeCTn Do BPOCTaHHB OLOCCs. PeryIapHn niiHr 3anO6iraE BPOCTaHHIO BOLOCCs.
- Y deякнх BnnaKax 3anaJIeHHЯ shkp n MoKe BnHnKaTu Yepe3 notpaIIaHH naKtepi y shkipy (Ha npNKlaI, KOJI N Bu npOBoIte npIaIOM y3doBx shkpI). Ioo6 mIniImi3yBaTn pN3NK iHΦiKyBaHHa, peTeIbHO OOnuYte roJOBky dJa enilraui nepeD KoxHm BnKOpIcTaHHaM.

IHCTPyKlIa3 EKCJIyATAUJIi
- LcH eniIaTOp nixoAnb Ira o6pO6Kn BOnoroI a6o cyxoI shKipn Ta MoKe BnKOpNCToBvBaTncB dywi.
- Lcien eniIaTOp cnId BnKOpncTObYBaTn BnKJIIOuHNo B 6e3dpoTOBOMy peXmI.


KOPUCHI NOPADIN
Iiud cepworo BnKOpncTaNHe enilAToBaPto cNoaTkO obpoBntn Ine MaJIeHbky dInrHKy uKipu, 0o6 np3BnuaiTncsdo npocecy enilaii.
-Оптимальна DOВЖИнha BOLOССДЯ BИДALEHЯ CTaHOBNTb 2—5 MM.ToDi enilяця 6уde npocTiwaй кOMфopТиwa.
- Пиимить тени Bavни abo duш поатkom enilяцii ta 3po6itb niniH, zuob vndaHTN BiDmeprni kniTnH uKipn.
3abnybmyBaawa kipacTaHe M'kiwo,apoec eniia - MeHn He npneMHm.
Po6itb eniiau 3Beuopa, o6 moxlnbe noepboHHaMHylo 3a HiU.
Iicna BnKOpncTaHn npuAdy MoXHa HamaCTnTnC Kpemom dJa Tla a6o IocbNoHOM 3 aLoe, 06 3acNOKoITn Wkipy n 3MeHUnTI NOpa3HeHHa.
- ьб ункуtn noBn Bpocnofo BoLocca, perylaepHo po6itb niiHr.

HABIIO TEPNITI LyueHHa WKIPN?
Piinr 3anobirae BpoctaHHIO BOLOcra. Bolocra Bpoctae, kOni nid qac pocty BOHO nounhae 3aKpyuBaTnca nID ukiPOo 3amictb TOrO, uO6 poCTn Ha3OBHI, RaK ue NOBUNHO 6yTu. Lc npn3BODntb Do yTBOpENHRA 3a3Bnuay 6oIouoi YepBOHOI ryni MOKNIBORo BNHKHeHNA Ta p03BNTky iHfekuihnx npoecib. BnkopncTahnHa HacaKn dny niiHry (B KOMPNeKTi), donomarae 3MeHNHTN KInbKiCTb Bpocnoro BOLOCsA abn yHnKHytn iHfekuii.

OBPO6KA BOJIOI WIKIPN
- IpekehaiTeC8 B Tomy, 90 wKipa e BoIoro.ДЯ 6iNbwoRo KOMΦopTy nId Yac npOeDpyn MoKHa DODaBAtn Ha Wkipy reB dIywy.
- PaДиMo cnpo6yBaTn pi3Hi MeToDn, ⅢO6 3'AcyBaTn, kNn NiIxOuNTb BaM NaIkpaae.
PIMITKA. Opa3y nicna o6po6kn B0loroi shkipn 3 reJem dnyu peTebHo npomBaaiTe eniAToP npOTUHO BOIOU.
OBPOBKA CYXOI WKIPN
- Ipepe eniiaieo nepekoHaTecra, 0o 1kipa uNcTa n cyxa, He 3MaueHa Kpemamn nn OIaMn.
- Iotpitb dianhky shkpn, dny koi tpe6a 3po6ntn eniiauio, uo6 niHraTn KopoTke BOnocca n noerwntixHc BuaaneHHa.
YbIMKhitb eniIaTOp i BCTaHOBItb 6aKaHy WBNkictb:
Дляобpo6кToHkoTOBOLOCca paДIMO Hn3bky WbNdkiCt b (HaIaHTyBaHHA «LOW»);
BncoKa WbNdkiCtb (HanaTByBaHHa «HIGH») peKomeHnyeTbcra JIJ KOpCTKoro a6o rCytiWoro BOnocca.
BilbHOIO pyKOIO haTARHITb uKipy, 06 BONOCs CToAno nepEnkUyApHO do uKipn. - Ппншить силгот ДО Шкірп ТAKИМ YHOM, 606 nIHcETN 6yln po3taшовahi nID KUTOM 90^ i illsbHо npTnCKaIncra Do shkip. Hacadka dIy iDeaIbHoro KyTa roJIbKm MaE cneizaiNbHy FOpMy, 7O 3a6e3neUye ONTImaIbHni KytДЯpo6OTn NInCetIB (PscyHOK A).
- ObeptaIbHIMn pyxamn HeBEnkoro paDiIcy nobIbHo oBepeXHo npoBoIb enIaTOpom no shKipi. Taki oBeptaIbHi pyxn Do3BOJIoTb Na6IbIeΦeKTINBHO BnDaJIaTn BOLOCC Ta po6JIaTb npOceDpy MeHs DnCKOMΦOpTHOIO.
Takokmoxha nobilbHo, He BIDpmbauOn eniIaTOp BiD uKipn, BeCTN noOr npOTn Hapmky poCTy BOLOccr (pcuHOK B). - Повторюйт ecii dIi kOxHoiДiЯHKn uKipn,doKN He 6yde BuaJeHo BCE He6aKaHe BOLOccr.
- Picna eniia BmKHTb eniAToP.
EINIAIpyK/HIR (PNCYHOKC)
-Поунайт eиляцio 3 Hнжнix уаctин рук/нir i nobilbno nepecybaiTeca Bropy.Дя enilayci diЯнkn 3a liKtem/KoIiHOM BnnpaMItb pyky/Hory, O6 haTarHytn wKipy.
PIIINAXBAMNTAB3OHI BIKIH: (pucyHKD TaE)
- Pam'yaTaeTe, zu zi diJHKn BiDpi3HJIObCg OcO6nNBOU cyTnBicTIO. OHaK 3a yUTnBicTb 3MeHNtbcg NiCJkBkoX 3aCTOCyBaHb npuAdy. 06 3pO6HTn IpoeDpy 6IbW KOMΦOpTHO, o6OB'ra3KOBO HATaRyIte Wkipy Ta nepeKoHaITeCg, zu BOLOccMaE ONTImaJIbHy DOBXInHy, TO6To 2—5 MM. Rkso Bn daBHO He BuaJaan BOLOcc, To nepeD eniJIaIciIcIO cNoaTky NiDPixTe BOLOcc 3a DonomoroTO TpUmepa Remington® dJa 3OnH 6iKiHi a6o KocMeTuHOro TpUmepa.
-ДяцихЧутлNBIXдянOK Мп paДIMо 3aCTOCOByBaTN Hn3bKу wBndkiCt b (налаштувань «LOW») a6o habakry dny DeTaIbHoI o6po6kn.
EINIAIJAOBNIyA
BnKOpncOByTe HacaIky IJra IeTaJIbHOi O6pO6Kn.
- YctaHObitb eniIaTOp nID kyTom 90^ do uKipn nepecyBaIe rOIOBky eniIaTopa o6eptaIbHmnpyxaMn.
PIMITKA.He BnKOpncToByte npnaI dIy BndaJIeHRA BOLOccs 6piB.
JAMNA BNCOKOTOHORO IIDCBIyBAHHA
- Y nepeMnKaU «YbIMK./BmK.» B6yObaHo IaMny BnCOKOTOHOro nIDcBiUyBaHHra, kA d03BOJAE NObaHTN KOKHy OKpeMy BOLOCSHry.
HACADKAДЯDETAJIbHOIOBPOBKN
Hacaiky dIaTeaIbHOi 6pO6Kn cnpoeKToBaHO dIra 6pO6Kn MaIeHbKnX dIIAHOK (y TOMy uicni o6nue) n ToUKoBOi 6pO6Kn.
- PepekoHaIteC8 B TOMy, 10 eniTOp BUMKHeHO.
3HIMITb HacaKy IJI iJealbHorO KyTa rOlBKn a6o MaCaXHy HacaKy.
- YctaHOBIb HacaIky dny DeTaIbHoi o6po6Kn y BiIDNoBiDiHi na3n y BepxHiyactuHi eniIraTopa.
- Obepejno HaTnckaIte Ha HacaKy DeTaIbHOi o6po6Kn, 0o6 yCTaHOBtN ii, DOKn He NouyTe KlaUaHHa.
MACAXKA HACAKA 3 AIOE BEPA
MacaxHa hacaKa npn3NaeHa dny o6epexhioi eniiaii.
- PepeKoHaITeC8 B TOMy, 10 eIJIaTOp BUMKHeHO.
3Himitb HacaKy dny iedeanbHO rKyTa rOiBKn a6o HacaKy dny deTalbHOi 6bo6kn.
- UctahOBiTb MacaJHy HacaIky y BiIDnOBiHi na3ny BepxHi yactHHi eninraTopa.
- Obepejxho haTnckaIte Ha hacaKy deTaIbHOi o6po6Kn, 0o6 yCTaHOBtN ii, DOKn He noyTe KlacaHHra.
TOJOBKA TOJIINH
- Fonobka 6pntBn 3a6e3neyu e nuCTe roJIHHy cYtIINBux dIinaHOK.
- PepeKoHaITeC8 B TOMy, 10 e nIJIaTOp BUMKHeHO.
- Hatnchitb KhoNky fikcaTopa roNoBkn Ta 3HimItb roNoBky eniIraTopa.
- PnKpinitb roIOBky 6pntbn Ta 3aikcyte II Ha Micui Do xapaKTePHoro KlaaHHa.
TpmaTe roOBky 6pntBn iD kyTom 90^ do shkpin npoBoDbTe HeOp npOTn HapmKv poCTy BOLOCCr.
PIIDPIBHIOBAHHHAADAHHFOPMN
- Ppɪnkɪpiɪt b Hacaɪkʌ Tprɪmepa dʒə 3ɔŋ 6iːni.
TpmaTe dpi6Hn TpImep nI npAmm Kytom do uKipu Ta 3nerka npTncItb noTo do uKipu. - OφopmIIOuTe n o6pO6JIIOuTe KpaI dIJIaHKn 3a 6aKaHHaM.
HACADKAДЯПИIHGY
Hacadka nian ninhy oepTaetbca Ta BuaanBidmepli KltuHn 3 nobepxhi shkipn 3anobirae BpoctaHHIO BOLOCCra.
- PepekoHaItecB TOMy, 10 e nIaTOp BmKHeHO.
- Hatnchitb KhoNky fikcaTopa roNoBkn Ta 3HimiTb roNoBky eniIraTopa.
- ПикpinItb hacaKy Дя пinHy Ta 3aikcyte II Ha Micci Do xapaKTePHoro KlaцAHHЯ.
- Дя досягннаийкраших pe3ультатов Змочьшкірь ворою та наhecітб reь abo inшин засдл душ.
- YbIMKHiTb npnlai i BcTaHOBiTb Hn3bKy WbNdkicTb (LOW).
- Побовытейсядадково пошкірі,лагінho натуckаюч,цo6 орбипг 6рахаи діянки.якшо тpe6а, наcadky дя піингу takож можна BИКОРИСТОВУВАТИ НА ВИСКИй šвиДКOCti (HIGH).
PIMITKA: HacaKy dny niiHry He moXHa BnKOpncTOByBaTu nn o6nue a6o yTnBux dlnaHOK.
Mozke 3actocobyBaTnca Ha Bolori a6o cyxin shkipi.
HACADKAДЯ ПЕДИКIOPY
Hacadka IJIeIeNIOpy NOBilbHO o6epTaETbcra Ta BndaIaE 3arpy6iny cyxy uKipy 3i CTyneHb.
- PepekoHaItecB TOMy, 10 eniTOp BUMKHeHO.
- Hatnchitb KhoNky fikcaTopa roNoBkn Ta 3HimItb roNoBky eniIraTopa.
- YbIMKHiTb npnlai i BCTaHOBiTb Hn3bKy WbNdkicTb (LOW).
- Пикріпіть rolOBky дя п\'днікіюр та 3aфіксуіte ii Ha miціdo xapaKTePHorO Klaцання.
- Пювовы Балимов, лагдно натусяюн, по загубенишкірі, яку тpe6а видал'tи. He натусятze заюто сильно.
3yynnayTecbKoXHi 2-3 cekyHni nepeBipraIte wkipy. NOBTOIpTe zu npOceDpy,doKN He doCgrHeTe 6aXaHOro eΦeKTy. KaTpe6a, roNobky Dn peNkIpy TaKox MoXHa BnKOpNCtOByBaTu Ha BnCOki WbNDKOCTi (HIGH).
IpnmiTka. HacaKa dJa neDnKIOpy npu3HaueHa dJa DOrJy Lnwe 3a uKipoiO cTyneHb. HE BnKOpncTOByTe II dJa DOrJy 3a iHsIMNu actiHAMn Tiia.
He BnKOpncToBnyTe Ha BoIori uKiPI.
He 3atpmyte npncptiHa ti cami dIJIHci wKipn 6ilbwe 2-3 cekyhd.
OBEPEXHO
3apaBnBaIoro 3axNCTy eniIaTOp MoKe 3MeHUnTIuBnKICTb a6o HABiTb 3ynHHTncra, kIo HaTo CnIbHO npNTucHyTu NOrO Do uKipn.
He BnKOpNCTOBuYTe rOIOBky eIINrTopa IJIy o6pO6Kn nOJaP3NeHoi iKipn a6o dIinHok, De e BapNKo3Hi BeHn, BucnH, PoDmI pnnMa 6o paHn, 6e3 nonepedhboi KOHCyIbTaUcii 3 liKApem. JIoDn 3i 3HnJKeHm imHyHITetom, HApNklaad BariTHi a6o Ti, XTO cTpaJdae Ha uKpOBrn diA6eT, remofoiio a6o imHyOnDephiIcNT, TaKoX MaOTb npOKOHcyIbTyBaTncs 3 liKApem, nepH hIX BnKOpNCTOBuBaTu Cei npInaI.
He BnKOpncToBvIe HacaKy IJI nIIInHy a6o HacaKy IJI neNkOpy Ha NowkoJKeH, 3aIaNHeH i a6o Noppa3HeH i u Kipi uHa dIJIHKax, de e 60pOdaBKn a6o iHsi NOBepxHeBi yTBOpEHn.
I3 mipkyBaHb ririchn He do3B0JrTe iHsIM IIOJAM KOpNCyBaTncBaSMM eniIaTOPom. Cey npnaad npn3HaaycBcra IINDbIyalbHoro BnKOpNCTaHHa.

OuHJEA TATEXHlUHE OBCIyTOBvBAHH
- 3a6e3neuHTIOBry Ta eΦeKTHBHy po6Oy eIJIaTopa, peryIpaHO OunuYte 6nok roNoBkn.
CHIUEHHH HACADKN IJI PENIKIOPY IICJI KOKHO BNIKOPUCTAHN
- PepekoHaTeC8, 0e nIaTOp BmKHeHO Ta BiD'cHaHO BiMepexi KINBJIeHHJ.
HaTnCHiB KhoNky fikcatopa N BiDkpiTe 6noK roNoBKn (pncyHok F). - PepeBepHiTb 6Iok roJIOBKn.
- BLOK rOIOBKn MoXHa 3HrTu peTeIbHO npOMuTn dJa YNuSeHHa. Jn ONTMaJIbHOro YNuSeHHa nepei npOMBaHHa M BuJaJIb BOJocCra 3 NiHcetIB 3a DOnOMOrO cNeuaJIbHOi 7tKN.
Xoua eniIarTop MoJHa BnKOpNCTOByBaTu NiI npOTouHO BOIOU, He peKoMeHdyETbCra 3aHypIOBaTu NOrO NiD BODy.
ПРИМITKA. He 3aHypioTe npuaY Body nobHicTIO. TOnOBky eniIaTopa Do3BOJAEbCra 3aHypoBaTu y BDOy TiNbKn NiCnToro, kii 6yJe 3HrTO 3 Kopnycy eniIaTopa.
BnDAJIeHHa3AINiWKIB
PIMITKA. He BnKOpncToBnyTe 1y dny uHHeHHc tKn, OckIbKn ce MoKe np3BeCTn DO NOxKOJxHeHHa.
* YIUSHEHHA TOLOBKII DIA NIEINKIOPOY IICJI KOKHO BUKOPUCTAHH
Pnmitka:HaacdknIJIneNkOpy He MoXHa MNTu BOIOU.
* YIiueHHa HAcADKn IITKN IJIINHry IICJBA NKOPNUCTAHH
- IpekehaiTec, 0e eniTop BmKHeHO Ta BiD'EDHaHO BiMepexi KINBJIeHHJ.
HaTnchItb KhoNkY fikcatopa hacaKn 3HimtB hacaKy IJIiHry.
-ДячишнгпомитeteцetNHknПIDBODOTOdaiteHacadciBnCOxHyTN.
BUNyueHHaTapei
- Pered ytni3aicio npictpoio i3 hboo ciiid icatn 6atapeo.
IpeTmK iCTaBAtn 6aTaapeo i3 npncTroo, noTo Tpe6a BiEHaTu BiMepeXi XnBHeHH. - YbIMKnHtB npnctpi i po3pAitb noRo do KInca.
CnoataKy 3HimItb i3 npnlaNy hacaIky.
3a donomoro moIaeHbKOI BnKpyTKI BnKpyTiTb rBnHT i3 HxHboi qactHn npnilady.
Bid'εdHaTe BID npuJaIy deKOpaTnBHy nAHeIb.
- NotarHitb i 3HimiTb BHyTpiriHni Kopnyc, 0o6 oTpMaTu DoCTyn Do eNeKtpoHHOi PnAtu N 6aTapei.
- Ipepejke Te npotn 3 o6ox 6okib 6atapei. BntarHitb 6atapeio.
- YtNi3yIte 6aTapeIO HaJIeXHIM YHOM.

3AXNCT HABKOLINHbOTo CEPEIOBnIa
Дя ункненя HaHeceHЯшКODи HabKOLINHbOMy cepeOBnUy Ta 3dopOB'Ю ЛODEи, lo nob'raHa i3 BnKOpNCtAHNM He6e3neuHx peOBN B eJeKTPnUHnx Ta eJeKTPoHnX Tobapax, no3NaueHi Bka3aHm CmBOJOM npncTpoI He cIiD yTuJI3yBaTu pa30m i3 HeBicOPTOBaHm NO6yTOBnM cmITTam. Taki npncTpoI niJaRaIoTB BiHOBJIeHHIO, NOBTOPHOM ByNKOpNCtAHNIO a6O nepepo6ci.

Blaoradapm Bn, ye 3akynxTe HOB npoaykT Ha Remington. MoIy, npooyete BHNMaTeJHNO INCTpyKzraTa 3a ynoTpe6a n y 3ana3eTe.

BAXHH INHCTPYKUIN 3A 6E30PACHOCT
BHIMAHHE: YpeBcT ce HaropeuBa. Na3eTe ro daJeU OT Docbna Ha deca no BcKO BpeMe.
1 To3n ypei moKe da 6bJe n3NoJ3BaH OT Deca HaI 8-roJiHa Bb3paCT IN Xopa c HamaJIeHN n3UeCKN, CeTINBHN IJN YMCTBeHN Bb3MOXHOCTN, IJN IINCa Ha ONIT N 3HaHnA, OCBeH aKO ca Ha6JIoJaBaHn /InHCTpyKTIpaHn I pa36npaT CBbp3aHnTe pNCKOBE. DeaTa He 6NBa Da cn INrpaT C ypeJa.
NouchTaHTo I NOdRpBxKkata Ha ypeHa He Tp86Ba Da ce npabT OT deca, OCBen aKO Te ca Na 8-rodnHa Bb3pact n ca Ha6IIOdaBaan. Na3eTe ypea N Ka6ena My daleu OT DOCTbna Ha deca PoD 8-rodnHa Bb3pact.
2 To3n ypei Hnkora He Tp6Ba Da ce octaB8 6e3 Ha3Op, KOraTo e BkIoueh B eJeKtpnueckaT a MpeJka, OCBen KOraTo ce 3apeJda.
3 NocTaBraIte ypeDa cAmo Ha TOnlOyCToiUHbNIOBbPxHOCTn.
4 He n3noJI3BaIte ypeDa, aKo e noBpeDeH nIi He pa6OTo n3npaBHO.
5 Ako Ka6eIbT ce noBpeDi, He3a6abHNo npeKpaTe ynoTppe6aTa u BbpHeTe ypeDa B Hau-6n3Kn Da Bac oTopu3npaH cepBn3 Ha Remington 3a nonpaBka nn 3amHa, 3a da ce n36erHaT pncOBe.
6 He n3noJ3BaIe npucTaBKn, pa3nUHn OT Te3N, KOnTO Hne npedocTbAme.
7 He yBnBaIte n He orbBaIte Ka6eNa, He ro yBnBaIte OKoNo ypeDa.
8 3A6EJEXKKA: To3n npOyKT e npeHa3HaueH eDINCTBeHO 3a 6e3xNHy ynoTpe6a.
9 BnMaBaIe Hnkora Da He MOKpuTe Ka6eJa IJN UenCeJa.
10 He BkIIOUBaIe nII IN 3KIIIOUBaIe ypeJa c MOKpn pbue.
11 PoiXoJa3a n3noJ3BaHe BbB BaHa nn dywa.
12 YBepTe ce, ye ypeDbT e n3KnIOueH OT 6yToHa N OT eNeKtpnueckaTa MpeKa npedn da rO nouCTBaTe.
13 He n3noJ3BaIte ypeDa c nobpeDeH nn CuyneH cnnnHdbp C nHHcTeN, Tb' KaTO MOKe Da Ce CTnHRe Do HapaHЯBaHe.
14 To3n ypei He e npedHa3naueH 3a KomepcnlaHa ynoTpe6a n ynoTpe6a BbB p 3bopcKn caIOHN.
15 Tbnypei cIeBbIa 6bIe 3apeKdH C oIo6peHnTe I3OJnpaHn 3a 6e3oNaChocT aIaItePn PA-0510E (3a Ebpona) nIu PA-0510U (3a BeNko6pntAHn) cI3xOJaI KanaIITet ot 5 dc; 1000mA.
OCHOBHn XAPAKTEPNUKn
1 NnHcTeN
2 HakpaHnK 3a nepoekTeH bTbJ
3 NObBnKHa rnaBaTa, KOrTO MoKe Da ce n3MnBa
4BbptraCe rnaBa
5 Ppeun3Ha lamnnuKa
6 BkIIOUBaHe/U3KJIIOUBaHe -2 cKOpocTn
7 INdikatop 3a cna6a 6atepna/3apekdahe
8 BxoJHa 3axpaHbHeTo
9 ByToH 3a OcBO6OxJaBaHe Ha rJaBaTa
10ДрьжкпpoTNВПь3BaHe
11 HakpaHnK 3a DeTayNI
12 MacaKeH NaKpaHnK c Aloe Bepa
13「pe6eH 3a 6nKnHn 3oHaTa
14 Bpbchesea rnaBa
15 TnaBa 3a neuKIOp
16 TlaBa ekcfoJnpaa qeTka
17 YeTeKa 3a NoUcTBaHe (He e Noka3aHa)
18 YaHTnUka (He e noka3aHa)
19 Aaantep 3a 3apekkahe (He e noka3aHa)
ПОДГOTOBКА 3A YNOTPEБА
БыдTe BнIMaTeHn Пи ПьВОTO n3ПОЛ3ВaHe Ha ypeHa, Ть KATO BCEKN HO npOdyKT e Bb3MOxHNoДа ce HuxKaTe OT MaIko BpeMe, 3a Дa ce 3aNO3HaTe C Hero. OТдeЛeTe BpeMe 3a n3yuaBaHe Ha xapaKTePncTnKITe My n Hne cme yBepen, Ye She Ce HacnaJdaBaTe Ha nBJHOuceHHOTo My n3ПОЛ3BaHe dBJrI rOdINHn.
HHTPYKUN3A3APEXDAHE
BunarnCe yBepaIte,Ye pbcTe, ennlaTopa n aanTepa ca cyxnpedna 3apejdahe.
- Ппдддддддддддддддддддддддддддддддддддддддддддддддддддддддддддддддддддддддддддддддддддддддддддддддддддд徳
4 уа са за пьвоначална уnotpe6а и 3а BCЯКо 3apexДане след това.Ено пьнho 3apexДанe поЗВOLЯВа 40 мнунги 6eЖИЧНО n3ПОЛЗВАнe.
- yBepTe ce, ye ypeIbTe e N3KJIIOueH.
- CbpxkTe aanTepa 3a 3apeKdaHe KbM npOyKta n Cnei TOBa KbMeIeKtpnueckaTa MpeXa.
- INHdkaTOpbT 3a 3apeXkaHe ige CBetn B 3eJeHO DOKaTO ce 3apeXda.
- 3apekdaIte 3a BpeMeTo, nocoueHo no-rope.
- INHnKaTOpbT 3a 3apeXdAHe ige CBeTN B 3eJeHO DOKaTO ce 3apeXdA.
- I3noI3BaIte npOdykTa,doKaTo 6aTepeyra nokaxe ce n3xa6n. Toba ce o6o3HaayBa OT CBeTeuca YepBeHa CBETInHa.
3A6EJIEXKKA: To3n npoJyKT e npeHa3Hauhen eDINHCTBeHO 3a 6e3xNHy aNoTpe6a. EInIaTOPbT He MoKe da 6bJe BKNIOUeH DOKaTO ce 3apeKda. He ONITBaIte Da n3PON3BaTe eInIaTopa, DOKaTO e BKNIOUeH B eNeKTPuYeCKaTa MpeKa.
Baata camo6pbchauka He moke da ce cbpbx3apejka.Ako npoduktbT Hama da ce n3no3Ba 3a npodbnknteien nepnoD ot BpeMe /2-3 mecea/, Tpa6Ba da ro n3knouHTe OT KOHTaKa I da ro npn6epTe 3a cbxpanHe. 3apeTe ypeDa HanbIHo, KoraTo NcKaTe da ro n3no3BaTe OTHOBO.
ObuaHΦOPMAU3A EINJALURA
To3n enHnAtof Remington e npoeKtnpaH c ceJ da HapBn OTCTpaHraBaHeTO Ha HexeJaHnTe KOCMn MaKcMaJIHO eΦeKTHBHO, HeXHO n IecHO. BbptaIte Ce nnHcETn XBaUaT dOpN u Na-KnCtne KOCMn (MnHmAlHa DblkInHa 0,5 MM u rN u3dPbPaT ot KopeHnTe. KOCMnTe, KOHTO n3pactBaT CNeD TOBa Ca MeKN u TbHKn. EnHlaZnraTa OCTaB KaTa BN rJaKa n 6e3 KOCMn 3a HrKOJIko CeMnCiu.
- Ако He CTe n3noJ3BaJIи eIINaTOp npeiN, nIIaKO He CTe ce eIINIpaJIи 3aДьЛВгперIoD OT BpeMe, мОже Дa BV OTHeme MaIko BpeMe DOKaTO KOKaTa Bn Ce aIaNTuPa KbM eIINJaCnЯТa.
-ДиСКOMФОрТБТ,КоИTO ce n3ПNTBa OTHaЧАло,ЗнчИтELHо HAMаЛЯВa C BCSa CNeДВaшаТуNotpe6a И КЖаТс epnCnocOбЯВ KaM npOuceca.
- I3noJ3BaHeTo Ha enJaTop MoKe Da npEiN3BnKa 3auepBBAHe NJI dpa3He He KaKata. TOb a HOpMaHa peakun, KOTo 6bP3O ige n3e3He. Ho, Tpa6Ba Da ce KOnCytIpaTe C nekapra cn, aKO Bb3PaJIeHneTo He n34e3He B pAMKITE Ha TprdH. BcUckm MeToDn 3a OTCTpaHBAHe Ha KOCMn OT KopeHa MoKe Da IOBeDaT Do paCTaHn HabbTpE KOCMn B 3aBNCIMoCT OT CbCTOHNrTO Ha KoxaTa N KOCMnTe. PeIOBHaTa ekCfoJNaunn nomara 3a IpeDoTbPaTaBAHe Ha pactaHn HabbTpE KOCMn.
B HЯКос с lyuaи може да ВьзнкHe Вьзпаленe Ha KOKaTа, KOraTo 6aKTeри npoHnKHaT npe3 KOKaTa (Hanp. Korato nIb3rate ypeDa no KOKaTa).
LJIOCTHO NOUCTBAHe Ha ennnpaata rnaBa npedn BcKa ynoTppe6a ue CBeDe DO MNHmym PnCKa OT nHΦekun.
HCHTPYKUN 3A IN3NOJ3BAHE
To3n ennilatop e noxoada 3a MOKpa nn cyxa ennaunr n moKe da 6bnde n3no13BaH n noD ywa.
To3n ennilatop e camo 3a 6e3ka6enHa ynoTpe6a.

→ NIOJE3HN CbBETN
Korato n3no3BaTe ennlaTopa 3a nbpBn nbTe haN-dO6pe da ro npo6BaTe Bbpxy MaIka PNOU, 3a Da CBNKHeTe C pOueca Ha ennlaunia.
- OnTImaJIHaTa IbIgXInHa Ha KOCMnte 3a eINlaucnE mExkdy 2-5 MM.
- Eπιλαύητα e πο-νεςΗ ἀνγόδΗ.
B3emete TOnla BaHa IIN dyu npedn ennaucn n ekcfoInpaIte, 3a da npemaxheTe MbpTbTE KLeTKn Ha KOkata. ToBa Ue HapabN KOkata Bn NO-JeCHO NODaBaUca ce Ha npoueca Ha ennaucn, KaTO rO HApabN He TOJkoBa HEnpiaTeH.
- Eπιπιραῖν Te Bεύρ, ἀς Αγκό Ββ3ΜΟχΗ 3aύρερΒαῦ έν Μόχε έλησε έλειδε έλειδε έλειδε έλειδε έλειδε έλειδε έλειδε έλειδε έλειδε έλειδε έλειδε έλειδε έλειδε έλειδε έλειδε
- CnéД уnotpe6a можete Да ИЗПОЛЗВATE КрЕЗТЯ ТА NO, ИИ NLOСNOH с anоe Дд успOKONTE KOKaТИ Дд НAMALITe pa3Дрa3HeHNeToи.
- EkcoInpaIte peIOBHO, 3a da ce n36erHaT pactaun HaBbTpke KOCM.
3AUODACEEKCΦOJNVPATE
- EKCΦOJIpaHTo npEIoTbPaTaBa paCTaUnte HaBbTpE KOCMn. PaCTaU nHaBbTpE KOCMn Ce NOBRABa, KOraTO paCTaU KOCbM Ce 3aBbPtn NOd KOxAta, BMeCTo Da paCTe HaBbN KaKTo TpA6Ba. ToBa BoU N Do YecTo 60Je3HeHa YepBeHa N OdyTuHa N Bb3MOxHa N HΦeKzua. KaTo n3NoJ3BaTe EKCΦOJIpaUaTa YEtKa, DocTaBeHa C To3N npOyKT, Ue cNoMOrHete Da ce HaMaJr paCTaUnte HaBbTpE KOCMn IIN INΦeKzua.
MOKPA YIOTPEBA
- YBepTe ce, Ye KOxata e BnaXHo. 3a DoIbHnTeJeH KOMΦOpT MoKe da Ce do6abu HaHeceTe Ha KOxata dUw reN no Bpeme Ha yNoTppe6a. Hau-do6pe Da ONiTate pa3nnuHm MeToDn, 3a Da peWnte KoE Baunn npednoHTan MeToD 3a ennua.
3A6EJIEXKKA: CneB BcRAKO MOKPO N3nOJ3BaHe C dyuI reN, noUInCTeTe enIaTopa nOd Teuaa BOJa.
CYXA YNOTPE6A
- Прази силача ce ybepeTe, ye koxaTa e qncta, cyxa n He e c Kpem nIIMacna no He.
Pa3TbPkaiTe KOxKaTa B 30HaTa 3a ennInpaHe, 3a Da BdInrHeTe Ha- Kbcnte KocbMueTa 3a ONTNm3npaHe Ha ennlaqra.
- BklioueTe enHnataTopa Ha JKeJHaTa cKopoocT:
- HNCKA ckopocT ce npenopbUba 3a φnHn KOCMn
BVCOKA ce npenopbya 3a rpy6n KOCMn Nnno NO-CINHO OKOCMaBaHe
- KaTO n3NoJ3BaTe CBO6OHaTa CN pKa,ДрБЖTe KOJaTa ONbHaTa, Taka Ye KOCMnTe Da CToT N3nPaBHeH. NocTaBeTe eNlaTopa Ha paBHo, Taka Ye NInHcTeNTe Da ca NOd bIbN 90^ n HapabHc Opeu KoKaTa. HApKaHnka 3a IepΦeKTeH bIbN ige rapaHTnpa ONtMaHnna 3a PInHcTeNTe bIbN (Dnarpama A).
- Използваite малки КрьroВи ДвИженя, 6abHо И ВнмаTeПиьзraITE eпILATopa по кожа.TOba КрьroBO ДвИжене e HaN-eФeKTINBnIr MeToI n npaВи поцеса NO-MaIKO HeNPnIaTeH. AInTePHaTINBHO, yNOTpe6ЯBaIte eпILATopa c 6abHо, HENpeKbСHaTO DVBIXeHne CpeUy pAcTeXa Ha KOCMITE (ДиаграMa B).
- Повторе Вьв BCяka облacr, ДOKATO BCИЧКи Нжени КOCМN 6ьдат OTCTpaHeH.
- Cné énpilaçnia n3Kljuoye e npilaTopa.
EINJALUHA NaPbKA/KPAK:(DnarpamataC)
- EилраTe OT NO-HnCKaTa YacT Ha pbKaTa, KpaKa 6abHo ce npuBnKBaIe Harope. 3a eNilpae 3ad NaKbTЯ/KoJHOTO dpBXTe pbKaTa/koPaKa n3npaBeHn, 3a Da onbHeTe KOxKaTa.
OBE3KOCMRAHE HA IOdMNHnI N BUKHH: (Dnarpama D n E)
Mol, mai Te npedn, ye Te3n o6naTn ca ocObeHo yvBCTBntenHn. Ho Ta3n YyBCTBNTeHNOCT ue HamaII nCleM MHOROKpaTHa yNOTpe6a. 3a nobuee KOMoPT, yBepeTe ce, ye DbpxKe KOxKaTa ONbHaTa Nye KOCMTe ca Ha ONTMaJIHaTa dIbIXnHa OT 2-5 MM. Ako e MInHaI npoJbXkTeJeH nepNoD OT Bpeme, OTkaKTo CTe I3noI3BaII enNuAuaB T a3N 30Ha, NOdCTpIXeTe KOCMTe c Remington® TprImep 3a 6uKnHn IIIN KO3MeTuH eTrime ppei enNuauTata.
- Пренистелно сда узпогост пп рпсдтабката за
- Deтылл 3a Teи чьвстелни зони.
NLIUEBA EINJALUNA
- I3noI3BaIte npeIcTaBkata 3a JeTaJIu.
- Пocтавее силалота поьгл OT 90° кьм кожату и DBижete
- силарацета гаВа с Крв罗Ви DBижени.
3A6EJIEXKKA:Да He ce n3noJ3Ba 3a npemaxBaHe Ha KOCMn OT BejKnTe.
- Na3eTe npódykTa dαleue OT Kocata Ha cKaIINa, BexKdIte N MmIJIne.
PPEU3HA JAMNNUKA
-Претиз haTа lamnueKa e BrpaTeHa B 6yToHa 3a BkIIOUbaHe n N3KJIIOUbaHe (ON/OFF), 3a Da Bn NOMorHe da BnITe BCEKn KOCbM.
HAKPAHHK 3A DETAHIN
- HakpaHnka 3a DeTaN e npedHa3NaueH 3a MaKN nIOoN (BKnIOuHTeHNO nIeTo) n enlaun Ha KOHKpeTHMaKN 3OHN.
- YBepeTe ce, Ye eEnIaTopa e N3KJIIOueH.
- MaxHeTe HaKpaHnKa 3a nepoekTeH bTbI nn MaCaJHnHaKpaHnK.
- Пocтавete Накраинka 3a DeТайи B CBOTВeTHnЯ поцen B roрнata ча
Ha enlaTopa.
BHNMaTeHNO HaTnCHeTe HaKpaHnKa 3a DeTaJIuHa MxCTO,doKaTO CyYeTe "UpaKBaHe".
MACAXEHN HAKPAHHK c AIOE BEPA
MacaxHnT hakpaHnK e npedHa3HaueH 3a HeXHa ennlaZn.
- YBepete ce, ye ennlaTopbTe n3KIOUeH.
- MaxheTe HaKpaHnKa 3a nepoekTeH bTbI nII NaKpaHnKa 3a DeTaII.
- Пocтавete Накраинka 3a Macax B CbOTBeTHnЯ РоцелВ Горнata част Ha enilaTopa.
BHNMaTeHNO HaTnCHeTe HApaiHnKa 3a DeTaIIN Ha MxCTO, DOKaTO CyYeTe "uPaKBaHe".
BpbcHEUaIJABA
-БрсHeaTa rIaBa OcInrpyBa rIaIko 6рьСheHe 3a ChBCTBnTeJIHn 3OHN.
- YBepeTe ce, Ye eEnIaTopa e n3KJIoueH.
- Hatnche 6ytoHa 3a ocbo6oxdaBaHe Ha rnaBata n MaxheTe ennilpaata Ta rnaBa.
- NocTabete 6pbcheaata rnaBa,doKaTo paKHe Ha Macto.
-ДрьжTe caMo6рьсачkaTaNOD bгbl OT 90° KbM KOxata NЯ DBNjKeTe CpeuNoCOKaTa Ha paCTeKa Ha KOCMTe.
IIOCTPUNGBAHENOΦOPMЯHE
- PpnuKaueTe npucTabkata 3a 6nKuHn.
-ДрьжTe TpIMepa NOI npab bTbI KbM KoxKaTa N HATnCKaIe HaOJy IeKO. - OφopMeTe 3ɔHaTa nO BaIe XeJaHne.
TJLABA EKCΦOJIINA UA YETKA
-
Ekфолираца та уетka ce Bbptn, 3a Да пемaxhe МьртВITE KneTkn OT NOBbpxHOCCTTa Ha KOЖаТи NOMara 3a ПпEDOTВpaTЯBaHe Ha paCTaUN HaBbTpE KOCMn.
-
YBepete ce, ye ennlaTOpbTe n3KlouyeH.
- Hatnche 6ytoHa 3a ocbo6xdaBaHe Ha rnaBata n MaxheTe ennilpaata Ta rnaBa.
- Пocтавete ГлаваТаЕксфолираша четka на място,ДOKATO ce Фнкшира сцраКваHe.
3a Hau-IO6pnpe3yIaTn HABNaXHeTe KOxKaTa C B0da N HaHecTe DyuI. - Bkliouhe Te yctpoicTBOTO Ha HnCKA ckopocT.
- Пилагайки лек натуck мине с чека то кожа та, koTo ce HaCoUBaTe Kьм желанITE ообл actn. Ако e hyжно, ekсфолupaца тутka можда pa6otи и на ВИСОКА сkopocт.
3A6EJIEXKKA: EKcfoInpaata Ta YeTka He Tp8Ba Da ce n3no3Ba no IuTeTo NnBbpy CyBCTBNTEN 3OHN.
- Moxe da ce n3no3Ba Bbpxy Mokpa nn cyxa Koxa.
TJLABA 3a ПЕДИКIOP
- ΓΙΑΒΑΤΑ 3Α ΠΕΝΙΚΙΟς ευναλίνηκο, 3a Ανα πρεμαχήν έχκην τὴντινατα, cyxατα κόχα στένηκαστα.
- YBepete ce, ye ennlaTOpbTe n3KJIIOueH.
- HaTnchHeTe 6yToHa 3a ocB06xJaBaHe Ha rIaBaTa n MaxHeTe enNIIpaAaTa rIaBa.
- BkIIOUeTe yCTpoiCTBOTo Ha HNCKA ckopoCt.
- NocTabeTe TlaBata 3a NeDnKOp, DOKaTO upaKHe Ha MAcTo.
- Пплагаite Лек натуки пьзгайт e валяka Вьрху Тврд aТ Кожа, когTo
Жетаete д a npemaxheTe. He натуckai Te Tврд e синho.
Cle2-3 cekyncnpeTe n npoBepTe koxata. NobTapnTe To3n npocec, Dokato noyuHTe keJahnna eΦeKT. Ako e HxKHO, TnaBaTa 3a PediKIOp Moke da pa60Tu Ha BNCOKA ckopocT.
3a6eJekka:ΓIaBata 3a IeNIOp e npEHa3HaueHo cAmO 3a yNoTpe6a 3a KpaKaTa. HE n3nON3BaIte Bbpxy HNKoA dpyra qact OT TAnOTO.
He n3no3BaIte Bbpxy MOKpa Koxa.
He n3noJ3BaIe B cbIaTa o6IacT 3a NOBue oe ot 2-3 ceKyHnB paMKInTe Ha eHa npOceDypa.
BHUMAHNE
3a Ba7a 3a7u7a e7n7aTOp7 Mo7e Da 3a6abN nn Dopn da cnp, aKO e TBbpe N7bTHO nPTnCHa KbM KOxata.
He n3noJ3BaIe ennnpaata rnaBa Bbpxy Bb3paleHa KOka nn KOKa c pa3upeHn BeH, 6pnBn, nTHa, 6eKn nn paH 6e3 KOHCytauC nekap. Xopata c HamaJeHa mMyHha peakun Ha npimep no BpeMe Ha 6peMeHHocT, nnn Xopa, kOnTO cTpaat OT 3axapeH da6et, xeMoOJIInn nn mMyHn HeIOCTaTBuHOCT Tpr6Ba cbso da ce KOHCytipa C nekapr cn npedn da n3noJ3BaT TO3n npoDyKT.
He n3noJ3BaIe EkCphiOpnaaTa Yetka nn INaBaTa 3a PeDnKIOp Bbpxy pa3paHeHa, Bb3paIeHa nn pa3dpa3HeHa Koxa nn 6paDaBnU nn npyrn NOdyTnHn.
- По xигнени пични He nO3BOJЯBaIte Ha dpyr YOBeK da n3NoJ3Ba Baшяя eHnlaTOp.прелорьВа ce DA ce n3NoJ3Ba caMo OT eHn YOBeK.
CHCTEHE I IOdIPbXkA
3a da ce ocnrypn IbIroTpmaHa pa6OTocno6HocT Ha ennataopa, nouchTaIe rnaBata Ha ennataopa peoBHO.
IOUHCTBAIte EINJNIPAaTATA TJIABA CJEI BCAKO IOn3BAHE
- YBepete ce, ye ennlaTopbTe n3KIOUeH n OT KOnyeTo, n OT eNeKtpnueckaT aMpexa.
- Hatnche6yToHa 3a OCBO6OxJaBaHe Ha rIaBaTa n OTBopeTe MexaHn3Ma Ha rIaBaTa (dnaarpama F).
- 06bpeMeXaHn3Ma Ha rJaBaTa HApOly.
-「IaBaTa Ha ennlaTopa MoKe Da ce CbAIn Nn3PnAkaB, 3a Da ce nouNCTn. 3a ONTImaJIHo NOUcTBaHe; C YeTKa NoUcTeTe NnHcETnTe OT KOCMn npeiN n3PnAkBaHe.
Bbnpekn,ye ennilaTopbTe eoXoJus 3a ynoTpe6a noTteaua B0da,He ce npenopbUba da notanrte ypeDa noD B0da.
3A6EIXKKA: He notanayte ypea HanbIHO noD BOda. IanaBata Ha ennlaTopa moxe da 6bJe nTooneHa, cIeI KaTO TRe e 6nla OTcTpaHeHa OT TAnoto Ha ennlaTopa.
3A DA INPEMAXHETE OCTATbLNTE:
3a da npemaxheTe OCTaTbUnte OT NnHcTInTe OT HepbXJaema CTomHa, HablaXHeTe TaMnOH cAnKoxOJ/cnIpt.
- Лек поке веду сокатудддддддддддддддддддддддддддддддддддддддддддддддддддддддддддддддддддддддддддддддддддддддддддддддддддд徴.
- Доставлелова по пинсетитешто оctацптешто бьдаюстра themselves.
BHIMAHHE: YBepete ce, ye naMyuHna TaMnOH He e TBbpDe HaBnaXHeN c ankoXoJ/cnnpT, Tb' KaTO TOBa MoKe Da NOBpeNi enIaTopa.
IIOUHCTBAHE HA BpbcHEUATA TJIABA CJIED BCRAYIOTPEBA
- YBepete ce, ye ennlaTopbTe n3KIOueH n OT KOnyeTo, n OT eNeKtpnueckKaTa MpeXa.
HaTnchHe 6yToHa 3a ocB06xJaBaHe Ha rIaBaTa n MaxHeTe 6pbcheaTa rIaBa OT enIaTopa. -
MaxheTe octpneTo n Tpimepa KaTo noCTaBnTe npbCTnTe cn OT dBete CtpaHn Ha ypeDa n DpbNHete Harope.
-
Леко пазклате OCTрпсTo И Тримера на урEDA, за за пемaxнete KOCMITE.
- Използваite поочьваши чека за поочьваные на Тримерпеши Корпунca на самобравсанкута.
- CmHa Ha ocTpneTo n TpImepa Ha ypeJa.
3A5EJEXKKA: HnKora He n3noJ3BaIe yeTKaTa 3a noUcTbaHe Ha 6pbcheseaTa Mpeka, Tb' KaTo MoKe da ro NOBpeiN.
NOUHCTBAHE HA IJABATA 3A PENIKIOP CIEB BCRA KAYOTPEBA
- YBepete ce, ye ennlaTopbTe cnpaH OT 6yToHa n e N3KIOUeH OT 3axpaHBAHeTO.
- HaTnCSHe 6yToHa 3a ocB06OxJaBaHe Ha rIaBaTa n MaxHeTe rIaBaTa 3a peNkOp.
3a da nouchte, BnMaTeHNO n3ueTkai Te polkaTa C yeTka 3a nouCTBaHe.
3a6eJekKa:IaBaTa 3a neiKIOp He MoKe Ia Ce Mne.
NOUHCTBAHE HA TLABATA C EKCFOJNPAUa YETKA CJEI yNOTPEBa
- YBepete ce, ye ennlaTopbTe cnpaH OT 6yToHa n e N3KIOUeH OT 3axpaHBAHeTO.
- HaTnchTe 6yToHa 3a ocB06KdaBaHe Ha rIaBaTa u MaxHeTe ekCfoIInpaUaTa yeTka.
3a da nouchnte, n3nlaKHeTe yeTkaTa NOd BOHa cTpyr I a octabete da n3cbxHe.

N3BAKDAHE HA BATEPNA
- BaTePnIa TpI6Ba Da 6bIe MaxHaTa OT ypeNa, npEi ToI da ce ckpanHe.
- YpeIbT TpI6Ba Da 6bIe N3KIOUeH OT 3aXpaHBAHeTO, KOraTO BaInte 6aTePnIyTa.
BkIoueTe ypea n pa3peTe 6aTepyraTdo kpaia. - 3aNoUHeTe c MaxBaHeTo Ha rnaBaTa OTypeJa.
- C MaJIka OTBepTKa MaxHete BnHTa B DoJIHaTa YacT Ha ypeJa.
- Ocbo6oJeTe DeKopaTbHnnaHeI otypea.
-Дрьн Heипь3HeTe HabbH BbTpEwHnЯ KOpnyc, 3a Да pa3KpNeTe neuathata ПлТka И 6aTepeyra - OTPxeTe Ka6eInTe BДBaTа KpaI Ha 6aTePnIa.ИЗБaIeTe 6aTePnIa.
- I3xBbPte6aTepeYHa npabNlHOTo MactO.

3AHTA HA OKOHATA CPeIa
3a da ce n36erhat npo6lemn c OKonHaTa CpeDa n 3dpaBeTo nopadn HauuyeTo Ha onaChn BeueCTBa B eJeKtpnueCKte N eJeKTPoHNCTOKN, ypeinte He Tp6Ba Da ca n3XbPnT 3aeDnC HecOpTnpaHtE O6uHcKn OTpaBcu, a Tp6Ba Da ce Bb3CTaHOBBAt, n3NoI3BaT NOBTOPO IIN peunKnnpaT.
ailll aal

jnnn nnnn nn nnnn nnnn nnnn nnnn nnnn nnnn nnnn nnnn nnnn nnnn nnnn nnnn nnnn nnnn nnnn nnnn nnnn nnnn nnnn nnnn nnnn nnnn nnnn nnnn nnnn nnnn nnnn nnnn nnnn nnnn nnnn nnnn nnnn nnnn nn
all 123 all
A
Jgss 100000000000000000000000000000000000000000000000
y
E 1
J
15 15
y
a
aill 1
Jelll 1y
Jaaaiy 1
y
1
i 1
1
a
aaiil aal bll 1
.
jll jai jai wall s 1
a
"dd" 1000000000000000000000000000000000000000000000000000000000000000000000
ALOE VERA MASSAGE CAP
jE jaiSlo oJoo
JjJgSgJgJgB1J
Jee 1
"J" 1 1 1 1 1 1 1 1 1 1 1 1 1 1 1 1 1 1 1 1 1 1 1 1 1 1 1 1 1 1 1
aX11 a≤L0
JUJU
j 1
1
Ailso
a 90 aal al
J.
i 1
a
15
J 1
j 1
J1
J 1
1
111 111 111 111 111 111 111 111 111 111 111 111 111 111 111 111 111 111 111 111 1
a 1
a 111111111111111111111111111
LOWpll
HIGHS
i 1
abuaaagaae aaiiuiuuiy i jn g s buaia g a y jai g 10g lssl jnaiaiaiaiaiejil jnnn nnnn nnnn e jni
(A)
Remington® is a Registered Trade Mark of Spectrum Brands, Inc., or one of its subsidiaries
VARTA Consumer Batteries GmbH & Co. KGaA, Alfred-Krupp-Str. 9, 73479 Ellwangen, Germany
www.remington-europe.com
© 2017 Spectrum Brands, Inc.