USER MANUAL Zoo'o ProAnimal BSGL5ZOO2 BOSCH
121.44040050
28 49000000
64000000
v. kcb,cbc,cbc,cbc
v. kcb,cbc,cbc,cbc,cbc
v. cbcb,cbcb,cbcb,cbcb
v. cbcb,cbcb,cbcb
v. cbcb,cbcb,cbcb
v. cbcb,cbcb,cbcb
& b1 = a^2c^2b + 1 = 0, & b2 = a^2c^2b + 2 = 0, & b3 = a^2c^2b + 3 = 0, & b4 = a^2c^2b + 4 = 0, & b5 = a^2c^2b + 5 = 0, & b6 = a^2c^2b + 6 = 0. &~1=0,~2=0,~3=0,~4=0,\&~1=0,~2=0,~3=0,~4=0,\&~1=0,~2=0,~3=0,\&~4=0,

de Sicherheitshinweise 2
Gebrauchsanleitung 42
en Safety information 4
Instructions for use 45
fr Consignes de sécurité 6
Mode d'emploi 48
it Normedi sicurezza 8
Istruizioni per I'uso 51
n| Veiligheidsvoorschriften 10
Gebruiksaanwijzing 54
da Sikkerhedsanvisninger 12
Brugsanvisning 57
no Sikkerhetsanvisninger 14
Bruksanvisning 60
Sv Sakerhetsanvisningar 15
Bruksanvisning 63
fi Turvaohjeet 17
Käyttoohje 66
es Consejos y advertencias de seguridad 18
Instrucciones de uso 69
pt Indicações de segurança 20
Manual de instruções 73
el YnooieiEic aOaaleiaC 22
O8nyiec Xpnoic 76
tr Güvenlik bilgileri 24
Kullanma kilavuzu 79
p| Wskazówki dotyczace bezpieczeniastwa 26
Instrukcja uzytkowania 82
hu Biztonsagi utmutató 28
Hasznalatiutasitas .86
ru IpaBnIaTexHnK6e3OpacHoCTn 30
Ounncanne npnbopa 89
ro Instruetiuni de siguranţă 32
Instruetiuniutilizare 92
kk Kayinci3ik HyckaJapbl 34
CizhiHwahcopfbIbHbI3 96
38. fa
101
41 4
104
de
Please keep this instruction manual. When passing the vacuum cleaner on to a third party, please also pass on this instruction manual.
Intended use
This appliance is intended for domestic use only. This appliance is intended for use up to a maximum height of 2000 metres above sea level. Only use this vacuum cleaner in accordance with the instructions in this instruction manual.
In order to prevent injuries and damage, the vacuum cleaner must not be used for:
Vacuum-cleaning persons or animals
Vacuuming up:
- hazardous, sharp-edged, hot or glowing substances.
-damp or liquid substances.
- highly flammable or explosive substances and gases.
- ash, soot from tiled stoves and central heating systems.
- toner dust from printers and copiers.
Spare parts, accessories, dust bags
Our original spare parts, original (special) accessories and original dust bags are designed to work with the features and requirements of our vacuum cleaners. We therefore recommend that you only use our original spare parts, original (special) accessories and original dust bags. This will ensure that your vacuum cleaner has a long service life and that the quality of its cleaning performance will remain consistently high throughout.
Please note
Using unsuitable or inferior-quality spare parts, (special) accessories and dust bags can damage your vacuum cleaner. Damage caused by the use of such products is not covered by our guarantee.
This vacuum cleaner complies with the recognised rules of technology and the relevant safety regulations.
The appliance may be used by children over the age of 8 years and by persons with reduced physical, sensory or mental capacity or by persons with a lack of experience or knowledge if they are super
vised or have been instructed on the safe use of the appliance and the have understood the potential dangers of using the appliance.
Children must never play with the appliance.
- Cleaning and user maintenance must never be carried out by children without supervision.
- Plastic bags and films must be kept out of the reach of children before disposal. Risk of suffocation.
Proper use
Only connect and use the vacuum cleaner in accordance with the specifications on the rating plate.
- Never vacuum without the dust bag or dust container, motor protection or exhaust filter.
This may damage the vacuum cleaner.
Always keep the vacuum cleaner away from your head when using nozzles and tubes.
This could cause injury!
- When vacuuming stairs, the appliance must always be positioned below the user.
- Do not use the power cord or the hose to carry or transport the vacuum cleaner.
- For safety reasons, if this appliance's mains power cable becomes damaged, it must be replaced by the manufacturer, their after-sales service department or a similarly qualified person.
If using the appliance for longer than 30 minutes, pull out the power cord completely.
- When disconnecting the appliance from the mains, pull on the plug itself to remove it; do not pull on the power cord.
- Do not pull the power cord over sharp edges or allow it to be-come trapped.
- When the cable is being automatically rewound, ensure that the mains plug is not thrown towards persons, body parts, animals or objects.
=> Use the mains plug to guide the power cord.
Pull out the mains plug before carrying out any work on the vacuum cleaner.
- Do not operate the vacuum cleaner if it is damaged. Unplug the appliance from the mains if a fault is detected.
Please note
- For safety reasons, only authorised after-sales service personnel are permitted to carry out repairs and fit replacement parts to the vacuum cleaner.
- Protect the vacuum cleaner from the weather, moisture and sources of heat.
- Do not pour flammable substances or substances containing alcohol onto the filters (dust bag, motor protection filter, exhaust filter, etc.).
The vacuum cleaner is not suitable for use on construction sites.
=> Vacuuming up building rubble could damage the appliance.
- When not in use, switch off the appliance and pull out the mains plug.
At the end of its life, the appliance should immediately be rendered unusable, then disposed of in an appropriate manner.
The mains socket must be protected by at least a 16 amp circuit breaker.
If a circuit breaker is tripped when you switch on the vacuum cleaner, this may be because other electrical appliances which have a high current draw are connected to the same power circuit.
To prevent the circuit breaker from tripping, select the lowest power setting before switching the appliance on, and increase the power only once it is running.
■ Packaging
The packaging is designed to protect the vacuum cleaner from being damaged during transportation. It is made of environmentally friendly materials and can therefore be recycled. Dispos of packaging that is no longer required at an appropriate recycling point.
Old appliance
Old appliances still contain many valuable materials. Therefore, please take appliances that have reached the end of their service life to your retailer or recycling centre so that they can be recycled. For current disposal methods, please enquire at a retailer or your local council.
Disposal of filters and dust bags
Filters and dust bags are manufactured from environmentally friendly materials. Provided they do not contain substances that are not permitted in household waste, you can dispose of them with your normal household waste.
Notes on the energy label
This vacuum cleaner is a general purpose vacuum cleaner with a primary hose.
To achieve the declared energy efficiency and cleaning performance class on carpet, please use the interchangeable universal nozzle.
To achieve the declared energy efficiency and cleaning performance class on hard floor with nooks and crannies, please use the hard floor nozzle provided.
These calculations are based on the Commission Delegated Regulation (EU) No. 665/2013 of 3rd May 2013 supplementing Directive 2010/30/EU.
Unless otherwise stated, all the procedures referred to in these instructions were carried out in accordance with the EN 60312-1:2017* standard.
*As the motor service test is carried out with the dust collector empty, the stated motor service life must be increased by 10% for tests with the dust collector half filled.
fr
Yka3aHHn no HcNoJIb3OBAHHIO
3TOT np6op npedha3aueH ToIbKO dIy DomaHero nCnoB3ObaHHN B 6bITOBbIX ycNoBHX. DaHHbI np6op npedha3aueH dIy NcNOB3oBaHHHa BaBicote He 6onee 2000 M ha, ypOBhem MOpJ.
Bo n36exaHne TpaBM n NOBpeKdeHn nbinecoc Henb3r HCnOJIb30BaTb Dn:
UHCTKNIIOJEnIKHBOTbIX;
BCaCbBaHHa
BpeHbIXIIN3IOPOBByBeUcTB,OCtpbIX,ROPaHXIINpackanEHbIXnpeDMeTOB;
-MOKpbIX ppeDMeTOH XKnDkoCTei;
- JERKOBOCIIaMeHIOUxXcI INN B3pbIBaTbIX BeIecTB Ira30B;
- neIIa, caKn n3 KaΦeIbHbIX Neuei N CNTEm ΚeHTpaIbHOrO OToIJIeHINr;
-ToHepa H3 npHTepoB HIN KOHpoBaHbHbIX annapaTOB.
3anachbIe yactn, npHnAdneXHOCTN, MeuKN dIy nbIN
HaunOpnHnHaNbHbIe 3anaChIbe qactn I npnHaJnxKHOCTN, a TaKKe opnHnHaNbHbIe DOnONHInTeNbHbIe npnHaJnxKHOCTN, KaN OpnHnHaNbHbIe MeuKn DnI NbIIIN, ONTImaMbHO NODXoJrK CBOJCTBaM IN Tpe6OBaHNrMa HauNX PbIEcOCOB. PoTOMy MbI peKOMeHdyEM Bam HCNoJIb3OBA Tb NCKIOUHTeNbHO opnHaNbHbIe 3anaChIbe qactN IN npnHaJnxKHOCTN, a TaKKe NIIb OprnHaNbHbIe DOONHInTeNbHbIe npnHaJnxKHOCTN M EuKN DnI NbIIIN. ToBko TaKIM o6pa30m ObecneuBaETcD OJrnn CpOK cnYk6bl I rapaHTnpyeTcB bICOKN pe3yIbTaT y6opkn C NOMOuBaWoBaero PbIEcOca.
!yka3aHHe:
HcNoJIb3OBAHnHe HenoJXoJxH NIn HeKaueCTBeHHbIX 3aNaChbIX qAcTei, PpHaIeXHOCTe/IOIoHNHTeBbHbIX PpHaIeXHOCTe HnN MeIKOB DnI PbIN MoKeT BbI3BaTb NOpeKdHne Iblncoca. Haia rapaHTnH He pacnPoCTpaHReTc H yCtpaHene IOBpeXdHn, BbI3BaHHbIX HcNoJIb3OBAHnEM NDo6HbIX N3deHn.
ПразвILA Тхнк 6e3oNaChocTN
ДаHHьпылесoc COOTBeTCTByet 6ирн3HaHHbIM TeXHnueCKm Tpe6ObaHnM n CneuJIbHbIM npaBnIam TexHnKn 6e3oNaCHOCTN.
IcnoIb3OBAHne nIleecoca DeTbMn CTapwe 8 letn IIncaMn C OrpaHnueHHbIMN cN3NuEcKmN nn yMCTBeHHbIMN cNoC6HOCTaMn, a TaKxe IIncaMn, He HMeIOUHMn OnbTa o6paUeHNr C NODbIM O6OpyDoBaHHeM, DOnyckaetc TOnbKO nOd pN-CMOtPOM nn NocLe INHCTpykTaJka no 6e3oNacHomy nCNoIb3OBAHnIO np6opa n Oco3HaHnJaHHbIMN IIncaMn ONaChOCTeN, CBraHHbIX C eRo 3KcNpyaTuNe.
-Детям 3апецень Играьс пиборom.
UHCTKa H yXoI He IOnJXHbI pOuN3BOIDHTbcr DeTbMn 6e3 npNCMOtpa.
■Пл actNKOBbie MeWKI NOHMePHyIO pEHKy XpaHnTe N yTHIN3npyte B HeOCTynHom dIaDeTeMecTe.
= > OpanchoCTb ydywba!
PpaBnIbHoe nCnoJIb3OBAHne
IIOKJIIOUeHne K 3JIeKTpOcETn I BKJIIOUeHne IbJIncoca DOnJXHO IPOIN3BOINTBcA TOnbKO C yUeTOM DaHHbIX TINOBOIT Ta6NIuKn.
■Hikorda He nCnoB3yIe nbIeNoc 6e3 cMeHHoro nbIeNc6bOpHka nI6o KOHTeHepa dIa c6opa nbIN, MOTOPHO I BblYcCKHO φnIbTPOB. => PbIeNOC MoKET 6bIb NOBpeXdE!
He noHocHTe BCacBbAHOu HacaKy N Tpy6Ky K rONoBE. => 3To MoKET npNBecTn K TpaBME!
■Pn y6opKe necTHNcbl nbinecoc Bcerda DOnkeHaxoNTbcn Hxke Nolb3OBaTeIa.
He nCnoIb3yIte cTeBOe Ka6eBn IuJaHr dIra nepeHoCKN /TpaHCnOpTnPoBKN bIInecOca.
Bo n36eKaHne onaChocn 3aMeHa nobpeXdHnHO cTeBOro Ka6eJa daHHoro np6opa MoKet 6bITb BbIIOJIHeHa TOIbKO npOn3BOJNTeJIeM HnABTOpN3OBaHHo IM cepBnCHOH cnjX60n INo6o NtOOM, NMEIOUIM aHaIOnHyKBAJIHcKauHIO.
Pn npoJOnKnteHbOcTH 3KcIpyaTauHH 60nee 30 MmHyTeBeOB Ka6eJIb Heo6XoHMo IOJIHOCTbO BbITraHyTb.
Pn OToCoeHHeHH np6opa ot 3neKtpocetn Bcerda 6epntecb pyko3a BNky, a He 3a cTeBOk Ka6enb.
CneIte 3a TeM, YTO6bI ceTeBOI Ka6eBb He 6bII 3axKATn He nonaIan Ha ocTpbie KpaI npEIMToB.
IpeepaBtOMaTHueckm CMaTbIBaHnEM CeTeBOrKa6eYbEHTecbBTOM,TO eRO TEKepe He cENPReTCraJIIODey,aACTN TeJa,XHBOTbIX ININ DpyrHe OBeKbTI.
=>OTcoeHnHTe cTeBOI Ka6JIb OT 3JIeKTpOcETN,NOTAHyB 3aUTeKeP.
He noJIb3yIITecb HeNCpPaBHyIM nbJIeCOCOM. PnB03HnKHOBeHN HeNCpPaBHOCTH BblHMaTe BnIKy H3po3eTKN.
■Bo n36eXaHHe onaChocTH Bce pa6oTbI no peMoHTy n 3aMeHe DeTaNe IbnecOca CneJyET BblONHrTb TOnbKO B aBTOpN3OBaHHoCepBuCHoCnYx6e.
3aunuaiTe nbinecoc O T Bo3eJeCTBn H6naornpraTHbIX MeTeOpOnOrnuecknx ycNoBn, BnaXHOCTN n ICTOCHNKOB Tenna.
He noDBepraTe fHbTpbl (cMeHHbI nbIe6OpHNK, MOTOPHbI ΦHbTp, BbINyCKHO fHbTp n T. d.) BO3DeJCTBIO BOCnJaMeHryUHXCn HnCnIPTOCoDEpKaUHX BeueCTB.
■Пьисoc He npedHa3HaueH nЯ 3KcnnyatauHn Ha CTponTeNbHbIX 06beKtax. => Pn 3acacbHaHH CTponTeNbHOrO Mycopa Пьисoc MoKet BblTHn H3 CTpor.
Iocne oKoHuaHnE 3KnpyatauBbIKNouHTe np6op n CMotaTe cTeBOJ Ka6enb.
OcnyKWBnne np6opbl cdaIte HnpnroHbIMn dnaBHeIwero hCNoB3OBaHnA, a 3aTEM yTnN3npyIte B COOTBeCTBHN C DeICTBYIOHMn PpaBnAmn.
BHHMaHHe:
CeteBa po3eTka 0JXHa 6bIb 3aunueHa npedoxpaHntenem He Mehee yem Ha 16A. PnB KJIouehnn pnp6opa npedeoxpaHntenb MoKet cpa3y cpaobTaB,ecnN ONDOBpeMeHHo B daHHyo 3NeKTPuYeCKyO ueB BKIOUeHb IpyrHe np6opblc 60JIbwoi o6uei NOTpe6hEmoM MoHocTbHO.
Cpa6aTbIbAHne npedeoxpahnteJI MOxHO npedotBpaHTb, ecn nepeB BKIOUeHHeM npnbopa yCTaHOBTb MHNMaJIbHyIO MOUHOCTb, a 3aTeM NOCTeNEHHO yBeINuHTb ee.
HCTpyKzna no yTHn3aun
ynaKOBka
YnakOBKa Cnyknt Dnla 3aunItb IbIneCocA OT NOBpeKdHn
Pn TpaHCnpTnpOBke. OHa N3rOToBHeHa N3
3KoJIoNueCKn UcTbIX MaTepHaIOB, PO3TOMy eE MOxHO
NCNoIb3OBaTb DnI BTOpHuOH nepepa60Kn.
HcIb30BaHHbIe yNaKOBouHbIe MaTePnAblb OTHCnTE BpyHKTbI npHemaBTOpcbipb.
OToCnyKuBnne np6Opbl
OcnykBwne np6bpy ABJIOCTC eHHbIM cbIpbeM dJaIbHeNwero IcNoIb3OBaHn. Po3TOMy OTCnyKuBnI np6Op cJeDyET OTHeCTN DInEpy Hn B NyHKT pHEma BTOPCbIP8dIra DaJIbHeNwe yTININ3aUN. INΦopMaun o BO3MOXHOCTN yTININ3aUN hXoDHTcY dINepa Hn B MeCTHOJ aDMHNCTpaUN.
YTNH3aunqnBnTPOB nCMeHHORo nbinec6OpHnKa
ФИЛьТрbl И CMEHHbI ПblIeC6OpHIn I3rOToBJIeHbI I3 3KoIIOrHueCKn 6e3BpeHbIX MaTePnaIOB. EcN OHN He coDEpKAT B Ce6e HNKaKNx BeIecTB, 3aIpeIeHHbIX K yTHIN3aUHN C 6bITOBbIM MycopoM, TO Bbl MoKeTe yTHIN3HPOBaT bX BMeCTe C 6bITOBbIM MycopoM.
Cy3ri MeH WAn Ka6bIn KdEre Xapaty
Cy3ri MeH raH ka6bI KOp7arAH optara 3nH KeTIPMeTINH MaTePnaIaIapdAn JkacaiFaH. Erep OHda y KoebicbI ywiH TbIbIM CaIbIHFaH 3aTTeKTeP xoK 6oNca, Ohbl KaJIbINTbI yKoKbcibaHa Tactay MymKH.
3Hepn6eIrci 6oBbIHwa HycKaynap
OcbI wahcopfbIwem6e6an wahcopfbIw anfawkbI wnaHrnen 6oanaI.
Ka3bInfah 3Heprn TIminirine XeHe KInem Ta3anay cbHbInbHa XeTy ywiH aybcBn KocblNaTbH eM6eBan fOp-cyHKaHb naindaNaHbHb3.
Ka3bInFaH 3Heprn TImdiJiriHe KHe KaTbI eEn TecikTepi KHe OnbIKTapbMeH Ta3aJaiy CbIHbNbHa XeTy YliH KNaHaKTaFb KaTbI eEn CONIOcbH NaJaAnaHbHbI3.
EcenTep KOMnCCnHbIH (EO) Nr. 665/2013 3. Mai 2013
KapHaMaCbHa 2010/30/EU nIpeKTnBacbHa KocaJIkbl
BoJraHra Heri3deJreH. OcbI HycKayda dən
cHnataTmaraH eicTeP DIN EN 60312-1:2017* herizHne
OpbHdAnFaH.
*Erep MOTOP Kymblc icTey MEP3imH TeKcepy 6oc wan bIbIcBImeOpbHdanaTbIH 6oJca, peTteJIeIH MHeI MOTOP Kymblc icTey MEP3imH XapTbIaN ToIbIw H bIDbcIMeH TeKcepy yuH beipirreH mHaH e 10 % Xofapbl petTey Kepek.
yai 4gibb
ailll lal aal alal alall alall alal
Lg 1
yall aayai ayaiil sny slal yss jnss
Aaill 1
jiall jilai jalsll
Lalb, auiy yia jie 10 go jie gao jiall jai
ai jiaaii iaiai jiaia la yilai jia jia sa ayj ysiayi
Aaalai jiaai aaii jiaialegia jaisill
aill gaiagai
y
a
a
Jiaaiiie 1
1
2013/665 (
.EU/30/2010 2013
aay
yduwulaiolalgaiu
.*1:2017-EN 60312
jaii i jaii jaii jaii jaii jaii jaii jaii jaii jaii jaii jaii jaii jaii jaii jaii jaii jaii jaii jaii jaii jaii jaii jaii jaii jaii jaii jaii jaii jaii jaii jaii jaii jaii jaii
30 1
Juaauiu jaoyai aai y ayaaolil sll galey
yss aai aiil, ayaaal yaaal yaaal, sla
ysslll lslg cllall jn jnn 3
yjssg.aysslllalgl
··
aalll lall, aall lal lal, alal
a a
piai jiaiy iaiy aiil yaiaiai
1,aaalaaalalalalalol
yjg jae jaini, jie
:
4
y
a
Clll 0i jie piai iie
de
Congratulations on your purchase of a Bosch vacuum cleaner from the GL50 product series.
This instruction manual describes various GL50 models, which means that some of the equipment features and functions described may not apply to your model. You should only use original Bosch accessories, which have been specially developed for your vacuum cleaner, to achieve the best possible vacuuming results.
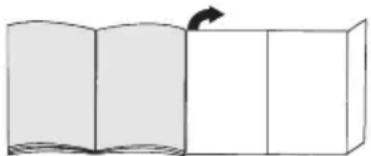
Fold out the picture pages.
Your vacuum cleaner
1 Adjustable floor tool with locking collar
2 Hard-floor tool with locking collar
3 Telescopic tube with adjusting sleeve (and locking collar)*
4 Handle
5 Flexible hose
6 Dust bag change indicator
7 ON/OFF button
8 Parking aid
9 Power cord
10 Exhaust grille (corresponds to one of the two variants shown)*
11 Upholstery nozzle
12 Crevice nozzle
13 Accessories compartment
14 Dust bag
15 Motor protection filter, washable
16 Exhaust filter
17 Storage aid (on underside of unit)
18 Carrying handle
19 Dust bag compartment lid
20 "Animal"* turbo nozzle
21 Pet hair upholstery tool
Replacement parts and special accessories
A Replacement filter pack
To get the most out of your appliance, we recommend using PowerProtect genuine replacement bags (BBZ41FGALL).
Contents:
- 4 dust bags with fasteners
- 1 micro-hygiene filter
PLEASE NOTE
- We therefore recommend that you only use our original dust bags.
Your appliance is a highly efficient vacuum cleaner that achieves excellent cleaning results when used with high-quality dust bags.
Only by using high-quality dust bags (such as Bosch original dust bags) can you ensure that your vacuum cleaner is working at the energy efficiency class, dust pick-up rate and dust retention capacity listed on its EU energy label.
The use of inferior-quality dust bags (e.g. paper bags) can have a negative effect on the service life and performance of your appliance.
Using unsuitable or inferior-quality dust bags can also damage your vacuum cleaner.
Such damage is not covered by our guarantee.
You can find more information about this at www.bosch-home.com/dust-bag. You can order our original vacuum cleaner bags here.
B Hepa filter BBZ154HF
Additional filter for cleaner exhaust air.
Recommended for allergy sufferers. Replace once a year.
For vacuuming hard floors
(parquet, tiles, terracotta, etc.)
D Bionic filter BBZ11BF
Combats unpleasant odours over a long period
Please replace the filter once it begins to lose its effect (after approx. 1 year)
Ordering code: 468637
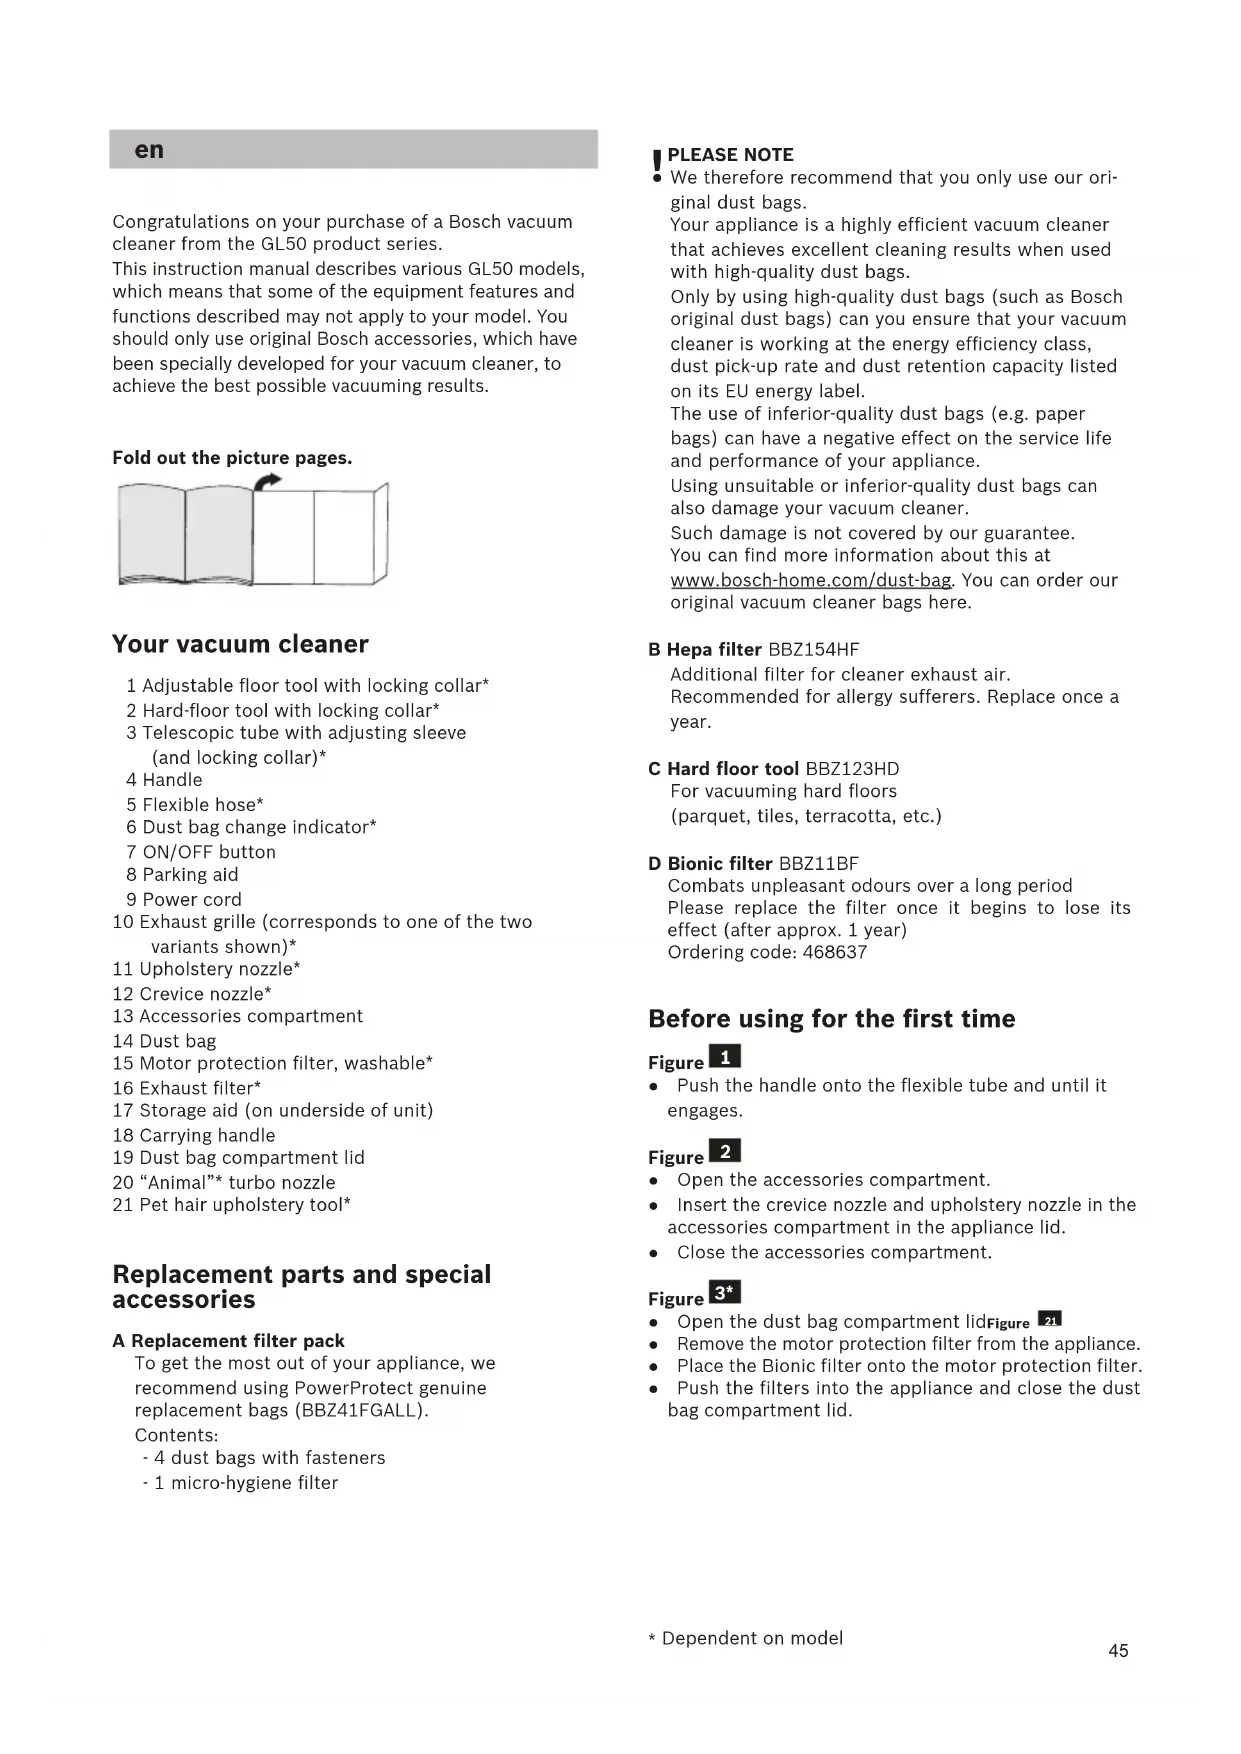
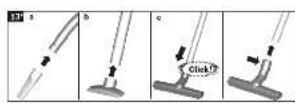
Before using for the first time
- Push the handle onto the flexible tube and until it engages.
- Open the accessories compartment.
- Insert the crevice nozzle and upholstery nozzle in the accessories compartment in the appliance lid.
- Close the accessories compartment.
- Open the dust bag compartment lidFigure 21
- Remove the motor protection filter from the appliance.
- Place the Bionic filter onto the motor protection filter.
- Push the filters into the appliance and close the dust bag compartment lid.
Initial use
a)Push the flexible hose connecting piece into the air intake opening in the vacuum cleaner lid until it engages.
b)To remove the flexible hose, press the two locking catches together and pull out the hose.
- Push the handle into the telescopic tube until it locks in place.
To release the connection, press the locking collar and pull out the telescopic tube.
- Push the telescopic tube into the connecting piece on the floor tool until it locks in place.
To release the connection, press the locking collar and pull out the telescopic tube.
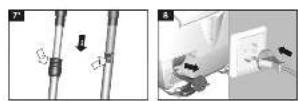
- Move the sliding sleeve in the direction of the arrow to release the telescopic tube and adjust it to the length required.
- Holding the power cord by the plug, pull out to the required length and insert the plug into the mains socket.
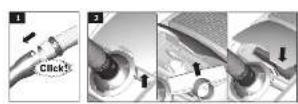
- To switch the vacuum cleaner on or off, press the ON/OFF button.
The required suction level can be set to the level required by turning the control knob in the direction of the arrow.
Low power range
For vacuuming delicate materials, e.g. curtains.
Medium power range
For the daily vacuuming of light dirt deposits.
High power range
For vacuuming durable floor coverings, hard floors and heavy deposits of dirt.
Vacuuming
Please note:
Depending on the type of hard floor involved (e.g. rough rustic tiles), floor tools are subject to a certain amount of wear. Therefore, you must check the underside of the floor tool at regular intervals. Worn undersides of floor tools may have sharp edges that can damage sensitive hard floors, such as parquet or linoleum. The manufacturer does not accept any responsibility for damage caused by worn floor tools.
Adjusting the floor tool:
Rugs and carpets
Hard floors


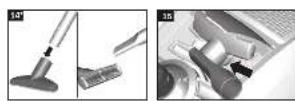
- Remove the crevice nozzle or upholstery nozzle from the accessories compartment in the appliance lid.
Attach the nozzles to the suction pipe or handle as required:
a)Crevicne nozzle for vacuuming crevices and corners, etc.
b)Upholstery nozzle for vacuuming upholstered furniture,curtains,etc.
c)Hard-floor tool
For vacuuming hard floor coverings (tiles, parquet flooring, etc.)
- Push the telescopic tube into the connecting piece of the hard floor tool until it locks in place.
To release the connection, press the locking collar and pull out the telescopic tube.
- For intensive cleaning of upholstered furniture (attach to the handle or suction pipe, depending on requirements).
- To clean the professional upholstery nozzle, simply vacuum it using the handle.
- After use, place the crevice or upholstery nozzle back into the accessories compartment in the appliance lid.
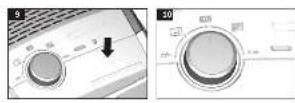
- You can use the parking aid on the back of the appliance if you wish to stop vacuuming for a short time.
- Once you have switched off the appliance, slide the hook on the floor tool into the recess on the rear of the appliance.
To overcome obstacles, e.g. steps, the appliance can also be carried by the handle on the appliance body.
When the work is done
Pull out the mains plug.
Tug the power cord briefly and then let go (the power cord retracts automatically).
Changing the filter
Please note: Always switch off the appliance before
- changing the filter.
Replacing the bag
- If the dust bag change indicator in the lid is filled completely when the floor tool is lifted from the floor with the highest suction level selected, the dust bag must be changed, even though it may not yet be full. Even if the dust bag is not full, it may still need changing, due to the type of dust which has been vacuumed. First check that the nozzle, suction pipe and flexible hose are not blocked, as this would also lead to the dust bag change indicator being triggered.
- Open the lid by moving the locking lever in the direction of the arrow.
a) Seal the dust bag by pulling the sealing plate, and remove the bag.
b) Slide the new dust bag into the holder up to the stop.
Please note: the lid will only close if a dust bag has been
Cleaning the motor protection filter
The motor protection filter should be cleaned regularly by tapping out the dirt and rinsing.
- Open the dust bag compartment lidFigure 21
- Remove the motor protection filter from the appliance in the direction of the arrow.
- Disconnect the motor protection filter from the Bionic filter.*
- Clean the motor protection filter by tapping out the dirt.
- If it is very dirty, the motor protection filter should be rinsed. The filter must then be left to dry for at least 24 hours.
Please note: the Bionic filter must not come into contact
with water, as this will adversely affect the correct operation of the filter.
After cleaning, place the Bionic filter onto the motor protection filter as necessary and push both filters into the appliance.
- Close the dust bag compartment lid.
Replacing the Bionic filter
If your appliance is equipped with a Bionic filter, it should be replaced once it begins to lose its effect (after approx. 1 year).
Replacing the exhaust filter
Replacing the micro-hygiene filter
This should be replaced with every replacement filter pack.
- Open the dust bag compartment lidFigure 21
- Release the filter holder by turning the locking lever in the direction of the arrow.
- Remove the micro-hygiene filter. Insert the new micro-hygiene filter into the appliance.
- Insert the filter holder in the appliance and lock it in place.
Cleaning the Hepa* exhaust filter
The Hepa* filter is designed so that it does not need to be replaced, provided the appliance is used as intended in the household.
To ensure that the vacuum cleaner is working at its optimum power level, the Hepa* filter should be rinsed out after one year. The filtering action of the filter remains intact, even if the filter surface becomes discoloured.
- Open the dust bag compartment lidFigure 23
- Unlock the Hepa* filter by moving the locking tab in the direction of the arrow, and remove it from the appliance.
- Tap out the filter unit and rinse it under running water. Alternatively, the unit can be cleaned in a washing machine at max. 30^ using a gentle programme and the lowest spin speed.
TIP: To protect other laundry items, put the filter unit into a laundry bag.
- Once the Hepa* filter has dried completely (at least 24 hours), insert it back into the appliance and lock it in place.
- Close the rear flap.
After vacuuming fine dust particles (e.g. gypsum, cement, etc.), clean the motor protection filter by tapping it out or, if necessary, replace the motor protection filter and exhaust filter.
Care
Always switch off the vacuum cleaner and disconnect it from the mains before cleaning the vacuum cleaner. The vacuum cleaner and plastic accessories can be cleaned with a commercial plastic cleaner.
Do not use abrasive agents, glass or all-purpose cleaning products. Never immerse the vacuum cleaner in water.
If necessary, the dust compartment can be cleaned with a second vacuum cleaner or simply wiped with a dry cloth or dusting brush.
Subject to technical modifications.
fr
Bionic filter verrangen
TOMy BO3MOxHO,TO HeKOTOpbIe yHKcHIN n npHaJnEaXHOCTN, ONCaHHbIe 3Decb, MOrY T
OTCYCTBOBaTb y BaWero npH6opa. YTo6bl rapaHTnpOBaTb ONHMaNbHbN pe3yNbTaT y6OpKn, Bam Heo6xOIMMo HcNoJIb3OBaTb TOnbKO oprHnHaJIbHbIe npHaJdEHHocTH Bosch, pa3pa6oTaHHbIe cneuaNbHo dJa BaWero nbIeCocca.
Pa3BepHnTe cTpaHnUc b pncyHKamn!

Onncanne npn6opa
1IpeeknouaemaHacaKaIy nctkn noJa/KOBpa c pa36noknpoBOOH MyToi*
2IeTka dna TBepdbix HanoNbblx NOKpbTn Cpa36nokpoBOOH MyToi
3 TeneckonHueckar Tpy6ka C MyΦToI-NoI3yHKOM (n pa36nKnpOBOuHOMyΦToI)
4PyukaIHaHra
5LnaHr*
6 INHnKaTOp 3aMeHbI nbilec6opHnKa*
7 Bbikniouatetb
8 NapKOBka Tpy6kn
9 CeTeBoi Ka6eIb
10 PeWetka BeHTnIaTopa (COOTBeTCTByeT OndHomy n3 DByx npEcdTaBHeHHbX BapHaHTOB)
11 HacaKa dJa MrgKoM Me6en*
12 电EBAHacdaKa
13OTcEKdI npHaadnEeHocTei
14 CmennbI nbIe6opHnK
15 MoTOpHbI ΦnIbTp, MoUoiuNcra
16 BbIyckHOH qINbTp
17 NapkoBoUHbIe HkCaTOpbl (CNKHei CToPOhbl NJIeCocca)
18 Pyuka
19 Kpbiuka nbinec6bopHoro oTceka
20 Typ6oHaacJa «Animal»
21 HacaKa IЯ MяКоМe6eHn (IydaJIeHnI WepcTHx KHBOTbIX)*
3anachbIe yactn H cneunhaBhbIe npHaadJeKHOCTN
A ynaKOBka CMeHHbIX nbinec6OpHNKOB
Дя obecneueHЯ ONTIMaIbHOrO yPoBHa MoUHocTn np6oba peKoMeHdyTeC nCNoIb3OBaTb opuHaJIbHbIe MeuKN dJa nbIn: TnP PowerProtect (BBZ41FGALL).
B KOMIIeKT BXOJAT:
-4MeWkaIyIbINc3aUckoN
-1rurnHeHnueckmMnKpOphnIbTp
yka3aHne
Mbl pekomehnyem Bam nCnOlb3oBaTb NCKHIOHTeIbHO OPHINHaJIbHbIe MeWKn DnI PbIIN. 3TOT BbICOKO3ΦΦeKTHBHyI PbIEcOC o6ecneuBAET BbICOKN pe3yIbTaYbOpKn pNn CnONb3OBaHH N BbICOKOKaueCTBeHHbIX MeWKOB dIg PbIIN.
TolbKO HcNoJIb3OBAHHe BbICOKKaueCTBeHHbIX MeWKOB DnI PbIN, TaKNX KaK OpNHaJIbHbIe MeWKU DnI PbIN Bosch, rapaHTpyET DoCTnHexHe NOKa3aTeNe KNaCCa 0000KeTbHocTH
3Heprnonotpe6lenHn, ydaenHn nbInn
nbIeNoRnoLoaIoSe cnoc6hOcTn, yka3aHHbIX Ha
3tNkeTke 3Heprnonotpe6lenHn.
HcnoIb3OBAHHe MeKOB dIy nbIIN 6OJIe Hn3KOrO KaueCTBa (HaPImEep, 6ymaxKhbIX MeKOB) MoKeT 3HaunTeBHO NOBNIATb Ha cPoK CnyX6bl I MOUHOCTb np6opa.
IcnoB3ObaHne HenoDxOaJnx NnN HeKaueCTBeHHbIX MeKOB dIy NbIIM MoKeT oByCNoBnTB Bo3HKnHOBeHne NOBpeXeHn BaWero nbinecoca.
Haasa rapaHTnHa paacnpoctpaHareTcHa yctpaHeHne NOBpeKeHn, oBycNoBHeHHbIX BblweyKa3aHHbIMn npuHHamn.
Bonee noDpo6HyIO INHΦopMaunHO MOKHO HaHTN NO CcbInke www.bosch-home.com/dust-bag.3Decb BbyMOKeTe 3aKa3aTb HauN opuHaNbHbIe MeWKn DnI NBIN.
BΦnIbTpHEPA BBZ154HF
DOnONHHTeNbHbI ΦnBtp DnA OUnCTKn BblyBaemoro BO3dyxa.
PeKOMeHnyeTcIaJIaJIpePrIKOB.3aMeHЯTb exKeOrdIoHO.
C HacaKa dЯ TBePbIX hAnOJIbHbIX nOKpbITn BBZ123HD
ДячNTКгнДкнхNOLOB
(napKeTa, KaΦeNbHOn Hn KepaMnueckOg nnTKn n T. d.)
DΦnIbTp «Bionic» BBZ11BF
IpeodTbpaaet NOBHeHHe HnprTHbIX 3anaxOB npXpaHeHH
PnOcna6bneHnn 3ΦΦeKta ΦnIbTp nOJIeXHT 3aMeHe (npIM. Upe3 1 roJ)
Homep nla 3aKa3a:468637
IpeepnepBbIM HcnoJb3ObaHHeM
Pnc.1
HaenehepepyKaHa7nHaHn3aennKnTe e.
PNC. 2
- OTKpoIte OTceK dIa IpiHaIeJxHocTe.
BcTaBbTe 电eEneByH hAcAnKy H hAcAnKy IIN MmRKO Me6en BOTceK DnI npHaJNeXHoCTeB KpbIWe Knp6opa.
3akpoTe oTceK.
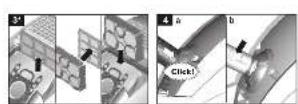
PNC. 3*
OTKpoTe KpbIshky nbIne6bOpHOro OTceKaPnc. 21
- BbHbTe MOTOpHbI ΦnIbTp n3 np6opa.
- PnncoeHnHTe HObI ΦnIbTp «Bionic» K MOTOPHOMy ΦnIbTpY.
BCTaBbTeΦnIbTpblB npnbOp n 3akpoTKe KpbIuKy nbIeocbOpHoroOTceKa.
PnOdrtoBka K pa6oTe
PNC. 4
a)IOncoeHnHte NaTpy6OK UHa K BCacbIBaOuEmy OTBepCTnO, pacNoJooKeHHOMy Ha KpbIuKe.
6)TO6blOTcoeHNHTb WnHaH,HaxMHTe Ha 06aΦKcaTopa N BbHbTe WnHaH n3 OTBepCTnA.
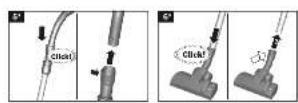
PMC. 5*
3aBnHbTe pyky IanaHra B TeNeckoNueeCKyTOpy6Ky DO HAdEHHOHNKcaNN.
- OTOCOEINHeHnHaKMITE Ha pa36NoKInPOBOHyIO MyoI H3BNEKInTe TeneCKOnNueckyIO Tpy6Ky.
PHC. 6*
3aBnHbTe TeneckonnueckyU Tpy6ky B natpy6ok HacaKn DnY UcTkn Nola/KOBpa Do fKcaun.
- OTOCOEINHeHHaHKMnTe Ha pa36IOKnPOBOHyIO MyoN H3BnKeNTe TeneCKOnnueckyIO Tpy6Ky.
PNC.7\*
HaKaTHeMa KHOIpKy-Non3yHok B HAppaBneHH, yKa3aHHOM CTePknKo, pa36nOKnpyIte TeNeCKOnnueckyIO Tpy6ky N yCTaHOBInTe Heo6xOdMMyIO nnHy.
PMC.8
Bo3bMntecb 3a Bnky CeTeBOrO Ka6en, BbITHnTe Ka6enb Ha HyKHyIO nnHy n BCTaBbTe BnKy B po3eTKy.
Pnc. 9 BkIIOueHne/ByIKIOueHne
BkIouheHne/BbIKIOueHHe nbIeCocAcOcyecTBnEeTcHaXkaTHEm BblKIOUoYaTeJI.
Pnc.10 tynpobkMOUHOCTN BCAcbIBAHIN
IIOBOPaHbA nepeKIOUoATEb B HApBaJIeHNCTpeKN, MoXHO IJIaBO HO yCTaHOBHTb Heo6xOdMyMOuHOCTb BCaCbIBAHN.
MHHMaHbHa MOnHoCTb ⅡIaYnCTKn H3deNIn N3 DeNkAThbIX TkaHe, HApnMeP, 3aHaBecOK.
CpeHnMaOuHocTb 门EeKeHHeBHOy6OpKn npn cna6om 3aPra3HeHH.
MaKcHMaJIbHaM MoUHOCtB ⅡIaOuNCTKN IpoUHbIX TBePdbIX HaNOLbHbIX NOKpbITn I npn CnIbHOM 3aqr3HeHH.


y60pka
BhimaHne:
HacaKn Ia YnCTKn Nona/KOBpa NoBvepKeHb, B 3aBncMocTn OT KaueCTBa TBepDOro HanoIbHoro nOKpbITnBa Baem Dome (HaNPmep, WepoxoBaTaA, rpy6a Kepamuecka Pntka), OnpedeHHomy n3Hocu Po3Tomy Heo6xOAnMo peryIaRPho npOBeprTa pa6ouyIO nobepxHocTB HacaKn. N3HOWeHHle, C 3aoCTpNBUnmnc KpaAMn pa6oune NOBepxHocTH HaCaKn MOrYt npBeCTN K NOBpeXDeHNIO y3BNMbIX TBepDbIX HANOJIbHbIX NOKpbITn, TaNX KaK napKeT INN INHOJeM. IpOn3BOIndTeB He HecET OTBeTCTBeHHOCTH 3a BO3MOXHbIe NOBpeXdEHn, KOToPbIe BB3BaHbI N3HOWeHHo HAcaKDOn INaNoA.
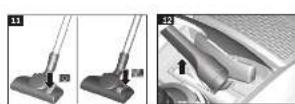
PNC. 11
HcnoIb3yIte HacaIky IJry uNCTkn Nona/KoBpa:
ДЯ KOBPOBИ KOBPOBbIX NOKpbTIN =>
ДлгладкнхHaONbHbIX NOKpbTIN


Pnc. 12
H3BnKeNte ⅢeEByo HacaKy nHn HacaKy dny MmKoM Me6en H3 OTcKa dny npHaJnxHOCTe B KpbIwke np6opa.
PnC.13\* y6opka c HcnoJb3OBAHHeM
DONONHHTeNbHbIX npHaadNexKHOCTe
HacaKn HaneBaTe Ha pyuKy IHaHaIra IIN BCacBbAIOyU Tpy6Ky:
a)UeneBaHacaKaDnA uNCTKn UeNe, yrnoB nT. d.
6)HacaKa dJa MraKoM Me6eN dJa UnCTKn MraKoM e6eN, TOp N T. D.
B)UETKaDnT BEPbIX HAnOpNbHbIX NOKpbY6OpKa TBepDbIX HAnOpNbHbIX NOKpbITN(KepaMnuecka NNNTKa, NapKeT N.T.)
3aBnraTe TeneckonueeckyTo Tpy6ky B natapy6ok 1ETKN IJRA TBepbIX HAnOJIbHbIX NOKpbITN Do HAEDKHOI KCAUIN.
- OTOCOEINHeHHaHKMITEHa pa36nOKnPOBOUHyO MyoN H3BNEKHTeTEneCKOnueckyIO Tpy6ky.
Pnc.14\*
HacaKa dIy MaRkoM Me6enn Profi
- IINHTEHCHBHOH YNCTKN MRAKOH Me6eHN (HaedeBaIte Ha pyky WnAHRa INN BCacbIBaIOUyTOpy6ky).
-Дя ouHcKn HacaKn dЯ MmKoM Me6eN Profi npocTo nponblncocbTe e.
Pnc. 15
- Iocne nCOnb3OBAHnue 9eNEBOH HacaKn HnHacaKn dIy MrgKo Me6eIN BCTaBbTe INX CHOBA BOTcEKNpHaNdNeKHOCTe B KpbIwKe np6opa.
PmC. 16
Bo BpemKopoTKnX nepepbIBOB B npocece y60pkn HcnoIb3yTe napkoBky Tpy6kn Ha 3aJHe nCTopoH np6opa.
- Nocne BblknioueHn nIeCocA BCTaBbTe uETky dna nona KpOuKOM B rHe3do, paCnoIooKeHHoe Ha 3aHHe CTopoH e nIeCocA.
PmC. 17
Pn nepehoce uepe3 npenTCTBna, HnnpMep, no nectHncaM, np6op MOxHO depKaTa 3a pyu Ky uHaHa.
Pocne y6opkn
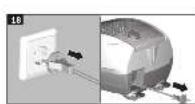
PmC. 18
- BbHbTe BnIKy n3 po3eTKn.
Cnerka notaHHTe 3a ceTeBOK Ka6enb H OTNyCTHeero-Ka6enb aBTOMaTHueCKn CMOTaeTc.
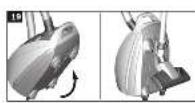
PMC. 19
-ДяханениИТраHCnOpTnpoBKN nbIneCoca MoKHOHcNoJIb3OBAtB napKOBOUHbIeФNKCaTOpbl,pacnoJOnKeHHbIe CHN3y.
- NocTaBbTe nbIeCoc BepTnKaIbHo. BcTaBbTe hacAnky dnn Iona KpUqKOM B rHe3do Ha HnXHeN cToPoH npnbopa.
3aMeHaΦnIbTpα
BnmaHne: nped KaKdoJ 3aMeHo fNbTpa nn
- nbilec6opnka BbiknouaTe np6op!
3aMeHa nblnc6OpHnka
Pnc.20\*
- Ecnn HacaKa DnA qNCTKn nOla He KacaTcna nOla npn MaKcHMaJIbHOJ MOUHOCTH BcAcblBaHnra, a HdNKaTOP 3aMeHbI NbInec6OpHnKa Ha KpbIuKe NOnHocTBIO 3aONHINcR, Heo6XoIMo 3aMeHHTb MeWOK dnn PbIIN, DaJce ecnn OH eue He HanoIIHe. B ATOM clyuae Heo6XoIMocTb 3aMeHbI ONpeJeETcB INDOM cOepjkaUerocR B nbInec6OpHnke Mycopa. IpoBebpTe, uTo6bl HacaKa, BCacblBaIoJaa Tpy6ka n ShNaHR He 6bln 3a6NTbl NbInbO, Notomy UTo HdNKaTOP 3aMeHbI NbInec6OpHnKa B TaKOM cnyuae ToKe cpa6aTbIBaet.
Pnc. 21 OTKpbIbAHne KpbIshKn
- OToXMMTe pbluraf hNkcaTopa B HnPaBHeHH n CtpeKNn OTKpoNTe KpbIWKy.
Pnc. 22
a)Notaryb3a3actKky,3akpoTe CmehhblnIbnec6opHnN BihbTe erO.
6)BcTaBbTe HObBi CMeHHbI Nblne6OpHNK B depXaTeNb Do yNopa.
BHHMaHHe: KpbIiKa nIbIeNc6OpHOro OTeKeA
3aKpbIbAeTcTOnbKO npN BCTaBHeHHOM nbIne6OpHKe.
UHCTKa MOTOPHORO 1nIbTpA
MToPbHbI pHnIbTp Heo6xOJMo peryIaHPO ouuTaB nyTEm npombIKN Hn BBkOnaunBaHH!
Pnc.23\*
- OTKpoIe Te KpbIiKhny nbIine6OpHoro OTeKeKaPnC. 21
- BbHbTe MoToPbHbI ΦnIbTp n3 npn6opa B HnPaBHeHH, yKa3aHHOM CTpeKoN.
- OTcoeHnHTe ΦHnBtp «Bionic» OT MOTOPHOrO ΦHnBtpa.*
BbIKoNToTne nbIb n3 MToPHoRo 0nNbTpA.
B cnyuae cnIbHoro 3aIrp3HeHHn npomOHTe MoTOpHbI NpIbTp. DaIte nIbTppy 06COxHytB B TeueHne MmHmym 24 uacob.
BHHMaHHe He donyckaTe KOHTaKtaΦnIbTpTa
BionicCBOIO,TaKKaK3TOMOKETOTpuCaTeNbHOCKa3aTbCnHaeroΦyHKUx.
- Nocne ouncTk npncoeHHHe nIbTp «Bionic» K MOTOPHOMy nIbTpPy I BCTaBbTe o6a nIbTpBa II pnp6op.
3aKpoIe KpbIuKy nbIeScbOpHoro oTceKa.
C KaTbI eDe conJocbl BBZ123HD
Teric eendepi wahcopy yuih
(napKeT, nIITKa, TeppaKota,...)
D Bionic cy3ri BBZ11BF
¥3ak yakblt KafbImcb13 6onfah nictepdiH andbH anaabi
Ocep Kemeine cy3rihi anMaactbipbHb3
(шam.1 KBIJa coH)
Tancbipbc Hempi: 468637
Bipinwi naandaHaHa aIbIH
Cyper 1
- KonnyTkaHbI copy wHaHbHa caBn 6ekTiH3.
Cyper 2
KepeK-KapaKaTap 6eJIIMUeCiH aUbIbI3.
OuHK HeMeCe KaTayB1W CONNocBn KypblnFbI KaKnaFBHdaFbI KepeK-JkapaKTap 6eJIMuecihe caJIbHbI3.
Kepek-kaapakTap 6enimMwecin Kaa5bHb3.
Cyper 3*
- WaaH 6eNMeCi KaKaNaBbIH aWbIbI3. CypTe 21
- Motopdk Kopfay cyricin Kypbnfbdaan WbifrapbHb3.
Bionic cy3ricin MOpTopbI KOpFay cy3riciHe opHaJnactbipHbI3.
Czy3riHi KpybIbIbIfacanbIu WAn 6eJImeciH KaKnaBbI Xa6bIbIbI3.
Xymbictbi 6actay
Cyper 4
a)Copy wJHaHrbl KeJIte K6bIpbIH KaKnakTaBbI copy TeciriHe calbin Tipetih3.
b)Copy wlaHrbH anya eki 6ekitkiu imekti kbicbin WnaHrbl WbIfapbHb3.
*Ka6dbIkTayfa 6aIIaHbICTbl
Cyper 5*
KontyKaHbI TipenreHwe TeneckoNtblk Ky6biprafa XblNXblTbHb3.
BaHbctb axbipaty 60cay TymeWirhe 6acbin TeNECKONTBKy6bipDbl WifapbHb3.
Cyper 6*
TeeneckontbIK Ky6bipdbI tipety yuiH eEN CONNOCBihH KeNTe Ky6bipbHa caJIbHb3.
BaHbctb axbipaty 60cay TymeWirhe 6acbin TeNECKONTBKy6bipdbI WbIFapbIHb3.
Cyper 7*
KbIINkbIMaJIbMaHKeTaHbI TeJeCKoNTbIK KbIbp KepeTkici 6aftbIHda 6ocatbn KepeKTI y3bHbIKbIbp peTeH3.
Cyper 8
- Kenire kocy ka6einih aibpbihan yctan kepekti y3bIHbIKKa uibfapbnx jeni aibpbih canbiHb3.
Cypet 9 cy xhe eipipy
- WHaHcOpFbIUtBkocy/eWippy nepHeciH XblXbItbIn KocbiHb3 XaHE eWiipiH3.
Cypet 10 Copy kyuih petrey
Pettey Tymecin 6aftTama 6afblHda 6ypan KepeKti copy KyuHbackbIcB3 pettey MymKiH.
TeMeH Kyat aMafbl Ce3iMaT 3aTTeKTePdi copy yuH,Mbicanbi,nepeJeepdi, T.6.
OpTa Kyat aMafbl A3JactaHaH Ke3de KYN caBbIH Ta3aJay yuH.
KorapbI KyaT aMafbl KaTbI eEH KANTamaJapbIH, KaTbI eEHepdi XeHe KaTbI NaCTapDbI Ta3anay ywiH.
Copy
Ha3apbHbI3da60ncbH:
EeH conlonapb KaTb eHeHi3 canacbHa 6aIaNbIcTb (MbicaJIb, 6yKbip, DepeKi nnTKanap) 6enrini depexede To3aJIb. Con yuH conNohBn eTERi kyyenik type TeKcepy KepeK. To3bHaH, eTKip Kblconllo eTERi napket Hee ee Honeym CnAeTb CeiMTaKtB eEHdi 3aKbIMdaybl MymKIn. EHdpuyi To3bHaH eEH connocb apKblbl MyMknHnaHap yuH xayankep emc.
Cyper 11
EeH conIOcbH pettey
■KinemdepmEn KInemdkeHdep
KaTbIeep
Cyper 12
- OuiK conIOcbH HeMece KaTaybiu cNOcBih KpybInfBi KaNaftbIHbIH Kepek-JapaTap 6eimueieh anbHbI3.


Cypet 13\* KocbIMwa KepeK-kaPaTapMeH waHcopy
- Connonapbkepek60nca copy Ky6bipbHa Hemece KOntyTKaFa caJIbHbI3:
a)WetTep MeH 6ypbIHTapDbI WaHCopy yuH WETTK conNo, T.6.
b)KanTaybiw connocbi kantaybiuTBik jinha3apdbi, nepdenepei T.6. wahcopy yuiH.
cKaTbIeENCONIOcbI
- KaTbI eDeH kaTAmanapbIH waHcopy ywiH (nIITkAnap, napKeT t.6.)
TeileckonTbIK Kybipbl TipeHreHwe KaTbI eEn conNocbi KeNTe KybipbHa XblXbITbHb13.
- BaɪnlaHbICTbI axkIpaTy 60cAty TymMeWirHe 6acbln TeNeCKoNTbIK Ky6bIpDbl WbIFapblHb3.
Cypet 14\* Ppoqn kantaybiu connocbi
KymcaKaXnha3aapbIe6dH Ta3anay yuiH (Kepek 6onca, KOnTyTKara Hemece copy KybipbHa caBih3).
- PpOcn KanTaybiu CONNOCbIH KONTYTKaMeH WaHcOpbIn Ta3anaHbI3.
Cyper 15
- PaniDanaFaHHAH COH OMBI KHeMeCE KaTaybiI CONNOCBI Kpyblfki KaKNaFbIHDaBfI KepeK-KapaKTap 6eIMwecine KaTaNbIHbI3.
Cypet 16
Kbicka copy y3iicTepiHde ToKaTAty KEmeri H KypbInFbl apKa KaFbIHda naiDanaHy MymKiH.
KypblfblbEwipreHHHeCoh eeh connocbHdafb InReKTi Kypblfbl apkacbiHdafb Tecikke KblnKbItbHb3.
Cyper 17
Keeprinepe ety yuiH, MbicJIbI, caTbIHbI, KpyblfbiHa KONrTkadaH yCTan TaBImaJday MyMKiH.
KmbictaH KeiH
CypTe 18
- AwaHbI po3eTkaaHa WbIrapbIbI3.
- Xeni kocy ka6eJIiHeH KbICKa TApTbIn KI6epiH3 (ka6eB abTomaTTbI KINHaJaDbI).
Cyper 19
KypblfbiHbI aBnIO/taCbImaJday yWIn Kpyblfbi TEmehri XaftbiHbI aBnIO KOEMeIH naDanaHy MymkiH.
KypblfblbI Teric KoiHb3. Edeh conlncbHaarbl iTReKTi Kypblfbl actbHafl Tecikke XblkbItbHb3.
Cy3rHi aJMaCTbIpy
!Ha3ap ayadapbHb3: ap cy3ri anMaCTbipydaH andbH KypbIrfbHbI eWipiH3!
*Ka6dbIkTayfa 6aHbICTbl
Wah Ka6bHAnMactbipy
Cyper 20*
- Erep eH conlncbEeHHHe Kepin copy KyatbE H KofapnnapameTpde TpyraHa KaKaTaBc cy3riH anMaCTbipy KepeTki COnbla 6onca, 7an Ka6bH anMaCTbipy KepeK, ON ToBik 6oImaca da. Byn KaFdaJa KaKa Kipreh 3aT anMaCTbipyKaKeT etedi. ConNo, copy Ky6bPbXhe copy WnaHrbi 6itEnInkAnMaybl Tnic, ce6e6i 6yN cy3rHi anMaCTbipy KepeTkiCih iTeen KeTyIHe aIbIn KeJIeI.
Cypet 21 naKTbI awy
KaKnakTbI Xa6y TyTkblbHbH 6afblTTama 6afbltbHaXbJTKblTbnAulbHb3.
Cyper 22
- 5aH Ka6bIH Jx6y LyndepepiT TapTbI N Ka6BIn 5bIrapbHb3.
KaHaIaH Ka6bIH TipenreHwe yCTaFbIwka XblkbItbI KOnblbI3.
Ha3ap aydapbIbI3: KaKnaK TeK caIbIHfAH WaH Ka6bIMeH Ka6blaIbI.
MotopbI KopFay cy3ricin Ta3anay
Motopkopray cyricin kynenik pette Kaftin Kee Kybin Ta3anay kepek!
Cyper 23*
- ⅢaH 6eMeci KaKaNarBih aWbHbI3. CypTe 21
- Motopdbi Kopfay cy3ricin 6afbittama 6afbittihda KypblfbiDah WbifapbHb3.
Motopkopray cyrici meh Bionic cyricia xipatbH3.
- Motopdbi Kopray cy3ricin Karfbin Ta3anaHb13.
KaTbI NaCTaHyda MOTOpDbI cKaTay cy3ricH Jyy KepeK. Cy3riHi JyBIn COcbIH KEMiHde 24 carat kENTripiH3.
!Ha3ap ayapbHb3: Bionic cy3rici cyra Tmeyi Tnic, ce6e6i 6yn cy3ri kymbcyla icep etedi.
Tazanaydah coH,Kepek 60nca,Bionic cy3ricin MToOpdbi Kopray cy3riche opHaJnactbipbn eki cy3riHi Kypblfba caIbIHb3.
- ⅢaH 6eMeci KaKnaBbH Ka6bHbI3.
Bionic cy3ricin anMactbipy
Erep KpybIbIbI bionic cyricimeH xabIkTaIraH 6oIca OHBI ecepTeMeHdienreHde anMaCTbIpy KepeK 6oJaB1 (wam. 1 XblIaH coH).
Cyper 24\*
- ⅢaH 6eMeci KaKnaBbIH aWbHbI3. CypTe 21
- Motopdbi Kopray cy3rici MeH Bionic cy3rici Kypblfblda
- Wblraptblb13.
Ecki Bionic cyariciH MOTOpBbI KopFay cy3ricHe anbIn TactbHbI3.
Bionic cy3ricin MOpTopbI KopFay cy3ricine opHaNactbIPbIHbI3.
Czy3riHi KypbnfbfacanbIn WAn 6eJmeciiH KaKnafbl Xa6bHbI3.
- Motopdi Kopray cy3ricin Bionic cy3rici 6acka naDanaH6aku b6onMaFaHbIb3da da KpypbIFbifa cany kepek
Ypney cy3ricin anmactbipbHbI3
MnKpornrHeHaBk cy3riHi anMaCTbipbHbI3
KaHaH anMaCTbipy KepeK: eP XaHa KocaIkbI cy3ri XINHaBbIHda.
Cypert 25
- WaH 6eJImeci KaKaNaFbIh aWbIbI3. CypTe 21
Kab6yTkybblbih6afbittama6afbItbHdaXblNXbITbIN cy3n yCTaftbWbIH 6ocatbHbI3.
MnKporrHneHaBik cy3riH i anbIn KOnbHbI3. KaHa MmKporrHneHaBik cy3riH KpybIJIbIfa caIbHbI3.
Cy3ri yctarblbH KypblfBira cabn tipeTih3.
Hepa* wibiratbih aya cy3ricin Ta3anay
Hepa* cy3rici OHbl anmactbipy Kepek 60JMaHbH peTte Xacanfah, erep KpybIbIbI Tnicti peteTte ynde KOJaHaCA. WaHcOpfbIw ONtImaNdbI Kyat DeHreinHe JyMbIC icTeyi yHIN Hepa* cy3ricih bip kblndah coH wao KepeK. Bip cy3riHH cy3riney apeketicakTanabI, cy3ri 6eti TyciH e3repTce da.
Cyper 26*
- Apka KaKaNaKTblaWbHbI3. CypTe 23
- Hepa* cy3ricih YcTaBbIbH KynbIITay TiniH 6aftTama 6aftbIbHa XbJXbItbn KpbInfbJaH anbIN TactaHbI3.
Czy3ri 6niorb Kaftin afaTbH cy actbda waihbl3. BaIamalpeTte,6IOKtbi kip xyfblMaWHaDa MaKC. 30^ He3ik 6aFapnama XeHe eH TeMeH aHJbipy XblAmdbfHda Ta3anay MymkIH.
KEHEC:Backa kipnepei kopray ywiH cy3riH iipnep Ka6bHa caBbHb3.
- Hepa* cy3rici TOIbIFbIMeH KypfaraHHaH coH (KEMIHde 24 carat), OHbl Kypblfba KaTc aCbln KaNbda 6yFaTTahb13.
- Apka KaKaNaKtBi KaAbHbI3.
WarbH WAn 6eNwEKeTepi HwHcOpyaH coH (Mbicn, rnc, cEmeHT, T.6.), MOTOpdbI Kopray cy3rici Karbin Ta3anaHb13 Hemece, KepeK bOJca, MOTOpdbI Kopray cy3rici MeH aya WbIFbc CY3rici anImactbipbHb13.
KyTim
WahcnpfbIbIbp Ta3aIarAHnOH, OHbI eWipin Jxeni aibipbH TaTbIN KOKepeK. WahcnpfbIbNEN NnactNK KepeK-KapaKaTapDbI CTAHdApTTbI NnactMaCCa Ta3apTkblbIMeHN KYTy MymKiH.
! blickanaaayb3aTKeTepi, bihbHemece om6e6an Ta3apTkbiuTb naDanaHbHb3. WaHcOpfBiWtB eKkaaHa cyra 6atbipMaHb3.
Wan 6eimin Kepek 6onfaHa ekiHw 7aHcopfBwnen copy Hemece OHn Kpyak WAn WybeperImeH/7aH KaKbIbIMeH Ta3anayra 6oana.
Bi3eTexHnKaIbIe3epicTepeHri3y KykbIbI6ap.
g
y
25
21
aji jjdi ojjgi jijg joo
< 0, < 0, > 0
1-0sJ 1
2ab = 2j30^
1
j 1 j 4 4 4 4 4 4 4
m = 311
j 24
1
中
()
j 1
1
05
1 j j j j j j j j j j j j j j j j j j j j j j j j j j j j j j j j j j j j j
1
.25 jai gaiy 10g y 1000i5 jai jolaiu l jil
ydiolol ydi gai ygai jglao oiaa gla j
a
jie
gai 1 oiiui jia gai jia dai aai
g
20
y j 1 y j 1 1 1 1 1 1 1 1 1 1 1 1 1 1 1 1 1 1 1 1 1 1 1 1 1 1 1 1 1 1 1 1 1 1 1 1 1 1 1 1 1 1 1
21
gaa j 1 r jaii gao jia Saa
24
Bionic
a 1
Bionic j
1
y
Bionic
jssy bly jy Bionic yll ay laol kss 4
(1)(20 1
24
21
25 C 10 Bionic jy
Bionic
Bionic
g j 1
1
jia Bionic jla jolalw 1 Jda
2g 021j j000000000000000000000000000
13
S_ APQ = 3
J
:duai 45
()CgBgEgiAa
J 1
JjL 1 J j
sly
y 1s y jw wu wu wu wu wu wu wu wu wu wu wu wu wu wu wu wu wu wu wu wu wu wu wu wu wu wu wu wu wu wu wu wu wu wu wu wu wu wu
j 1 j 0000000000000000000000000000
1.2y
11


12
100 5
1
Clllall lllllllllllllll
dilll lal 1i ylll jgaiall ay
a
oia ciaiai g i jil ciaia 2g aia 1a gaa
121 1
Liay JolSly LiKao cIbally jali 1513
J 1
i j 1
a 1
4y jie cie 1y jiu jai jiu jiu jiu jiu jiu jiu
y 1
jI 1
Jus Jus Jus Jus
21
aill oai jie ai jie baiy cai
22 1
a
aowisoll
Aeall Jalal yjll jil (b
15 1
aal aas jie bii
aaii jia aaii iie 1i iiaai iiaai
11111111
23°
08 1234567890
aill oaiy aaiisall ao aiail ayas jil
*.Bionic jilj n jall ayas jilj
Aaii jia jia jiaaiyai jilieiy
j 24 2d jil
Bionic 1
jill 121
Bionic
aaiiie
yj11 jzj 10
Bionic
jieiieo Bionic jiejodjo kio
()
24*
A Bionic jia jai jai jia jia
11 1
1
1
1
12
13
1
a 1
1
1
1
1
1
1
1
1
1
1
1
14* 1
20
30
40
50
60
70
15
y
CiaIaIyIySicIaIaIy, yIe IaIy
Jua aiaiaiaaie 1i iaiy bla y jil ay
suiuie juiiie 1
a
www.bosch-home.com/dust-bag
chwww.bos-home.com/dust-bag
11
BBZ154HF Hepa 2
jolalgaoaolajglaloo
AaJ 0
BBZ123HD
eulalil 1i
( ) C
BBZ11BF Bionic D
AaBb Baaannn aa Cll
(aaiy gaa)aial jil
468637:11111111
乙
乙
Jg 1
1*
a 1
2
= u
a1 ≤ a2 ≤ a_3
*(jssssssssssssssssssssssssssssssssssssssssssssssssssssssssssssssssss
11
*g 12
aill 13
14
*Jell 15
*j16
To arrange an engineer visit, to order spare parts and accessories or for product advice please visit www.bosch-home.co.uk or call Tel.: 0344 892 8979*
*Calls are charged at the basic rate, please check with your telephone service provider for exact charges
GRzGreece,EAa
BSH Ikiakes Siskeves A.B.E.
Central Branch Service
17 km E.O. Athinon-Lamias &
Potamou 20
14564 Kifisia
NaevAynio TnEewo:181 82
(AOTIKxpewon)
mailto: nkf-CustomerService@bshg.com
www.bosch-home.gr
HK Hong Kong,港
BSH Home Appliances Limited
Unit 1 & 2, 3rd Floor
North Block, Skyway House,
3 Sham Mong Road
Tai Kok Tsui, Kowloon
Hong Kong
Tel.: 2565 6151
Fax: 2565 6681
mailto:bosch.hk.service@bshg.com
www.bosch-home.cn
HR Hrvatska, Croatia
BSH kučni urežaji d.o.o.
Kneza Branimira 22
10000 Zagreb
Tel.: 015520888
Fax: 01 640 36 03
mailto:informacije.servis-hr@bshg.com
www.bosch-home.com/hr
www.bosch-home.com/hu
IE Republic of Ireland
BSH Home Appliances Ltd.
Unit F4, Ballymount Drive
Ballymount Industrial Estate
Walkinstown
Dublin 12
Service Requests, Spares and Accessories
Tel.: 01450 2655
Fax: 01450 2520
www.bosch-home.co.uk
*0.03 € per minute at peak
0.0088 € per minute.
IL Israel 77
C/S/B/ Home Appliance Ltd.
1, Hamasger St.
North Industrial Park
Lod, 7129801
Tel.: 089777222
Fax:089777245
mailto:csb-serv@csb-ltd.co.il
www.bosch-home.co.il
IN z India, Bharat,
BSH Household Appliances
Mfg. Pvt. Ltd. Arena House, Main Bldg,
2nd Floor,
Plot No. 103, Road No. 12
MIDC, Andheri East
Mumbai 400 093
Toll Free 1800 266 1880*
www.bosch-home.com/in
(exclude public holidays)
IS Iceland
Smith & Norland hf.
Noatuni 4
105 Revkiavik
Tel.: 0520 3000
Fax: 0520 3011
www.sminor.is
IT Italia, Italy
www.bosch-home.com/it
KZ z Kazakhstan, Ka3aKCTAH
IP Turebekov Yerzhan
Nurmanovich
Jangeldina str. 15
Shimkent 160018
Tel.: 0252 31 00 06
mailto:evrika_kz@mail.ru
LB Lebanon
Teheni, Hana & Co.
Boulevard Dora 4043 Beyrouth
P.O.Box 90449
Jdeideh, 1202 2040
Tel.: 01 255 211
mailto:Info@Teheni-Hana.com
LT Lietuva, Lithuania
Senuku prekybos centras UAB
Jonavos g. 62
44192 Kaunas
Tel.: 0372 12146
Fax: 0372 12165
www.senukai.lt
UAB "AG Service"
R. Kalantos g. 32
52494 Kaunas
Tel.: 0700 556 55
Fax:037331363
mailto:servias@agservice.lt
www.agservice.lt
Baltic Continent Ltd.
Luksio g. 23
09132 Vilnius
Tel.: 052741788
Fax:052741722
mailto:info@balticcontinent.It
www.balticcontinent.it
LU uxem bourg
S.R.L. "Rialto-Studio"
yI. UycBa 98
2012 KnuHnHeB
TeJ./dakc:022238180
mailto:bosch-md@mail.ru
ME Crna Gora, Montenegro
Elektronika komerc
UI.Slobode17
84000 Bijelo Polje
Tel./Fax: 050 432 575
Mobil: 069324812
mailto:ekobosch.servis@t-com.me
MK Macedonia,MakeOnn
GORENEC
Jane Sandanski 69 Iok.3
1000 Skopje
Tel.: 022 454 600
Mobil: 070 697 463
mailto:gorenec@yahoo.com
MT Malta
Oxford House Ltd.
Notabile Road
Mriehel BKR 14
Tel.: 021 442 334
Fax:021488656
www.oxfordhouse.com.mt
MV Raajjeyge Jumhooriyyaa,
Maledive
Lintel Investments
Ma. Maadheli, Majeedhee Magu
Malé
Tel.: 0331 0742
mailto:mohamed.zuhuree@
lintel.com.mv
NEueialus, Neueialius
Unit F 2, 4 Orbit Drive
Mairangi Bay
Auckland 0632
Tel.: 0800245700*
Fax:0800256535
mailto:aftersales.nz@bshg.com
www.bosch-home.co.nz
(exclude public holidays)
PL Polska, Poland
SA Kingdom Saudi Arabia,
Abdul Latif Jameel Electronics
and Airconditioning Co. Ltd.
BOSCH Service centre,
Kilo 5 Old Makkah Road
(Next to Toyota), Jamiah Dist.
P.O.Box 7997
Jeddah 21472
Tel.: 800 244 0043
mailto:kunnumalsp@aj.com
www.aljazeera.com.sa
SE Sverige, Sweden
BSH Home Appliances AB
Landsvagen 32
169 29 Solna
Tel.: 0771112277 local rate
mailto:Bosch-Service-SE@bshg.com
www.bosch-home.se
SG Singapo新加坡
BSH Home Appliances Pte. Ltd.
Block 4012, Ang Mo Kio Avenue 10
01-01 Techplace 1
Singapore 569628
Tel.: 6751 5000*
Fax:67515005
mailto:bshsgp.service@bshg.com
www.bosch-home.com.sg
- Mo-Fr: 8.30am to 7.00pm, Sa: 8.30am to 5.30pm (exclude public holidays)
SI Sloveniaja, Slovenia
BSH Hišni aparati d.o.o.
Litostrojska 48
1000 Ljubljana
Tel.: 015830700
Fax: 01 583 08 89
mailto:informacije.servis@bshg.com
www.bosch-home.com/si
SK Slovensko, Slovakia
BSH domaci spotbrebe s.r.o.
www.bosch-home.com/tr
- Cagli merkezini sabit hatlardan
aramanin bedeli sehir icücretlendirme,
Cep telefonlarrindan isekullanlan
BSH Home Appliances Private Limited
台北市內湖區洲子街80號11樓
11F., No.80, Zhouzi St., Neihu Dist.
Taipei City 11493
Tel.: 0800368888
Fax: 02 2627 9788
mailto:bshtzn-service@bshg.com
Service-General SH.P.K.
Rruga Mag Prishtine-Ferizaj
70000 Ferizaj
Tel.: 0290 321 434
Tel.: 0290 330 723
mailto:a_service@
gama-electronics.com
XS Srbija, Serbia
BSH Kučni aparati d.o.o.
Milutina Milankovica br. 92
11070 Novi Beograd
Tel.: 011 353 70 08
Fax: 011 205 23 89
mailto:informacije.servis-sr@
bshg.com
www.bosch-home.rs
ZA South Africa
BSH Home Appliances (Pty) Ltd.
15th Road Randjespark
Private Bag X36, Randjespark
1685 Midrand-Johannesburg
Tel.: 086 002 6724
Fax:0866171780
mailto:applianceserviceza@bshg.com
www.bosch-home.com/za

de
This appliance is labelled in accordance with European Directive 2012/19/EU concerning used electrical and electronic appliances (waste electrical and electronic equipment - WEEE). The guideline determines the framework for the return and recycling of used appliances as applicable throughout the EU.
fr
((waste electrical and electronic equipment - WEEE
ωωcωSωsoS1ω.
UgBbSsoSsJwJWJgJSoEoOJoo
SUsuoguJyusgulsls
SoooS,1SueSooSooSoo.
DE Garantie
GB Conditions of guarantee
For this appliance the guarantee conditions as set out by our representatives in the country of sale apply. Details regarding same may be obtained from the dealer from whom the appliance was purchased. For claims under guarantee the sales receipt must be produced.
FR Conditions de garantie
HpakAio - KpnTnc .........Aewp. Eovikc AvioTaOeWc 23 & Kaama, 713 06 HpaKaeio
KutpoC Apx. Makapiou F 39.2407Eykwun Aekwofa, Kutpoc
IANEAAAIKOTHEAΦΩNO EYHPETH∑NEAATΩN


BOSCH
(Sabit telefonlardan vya ceptelefonlarindan alan kodu cevirmeden)
www.bosch-home.com/tr
www.bosch-yetkiliservisi.com
PpOyKzI npEHa3HaeHa K nCnONb3OBaHHIO B yCIOBnX TeMnpaTpybI Bblwe 0^ nOTHOCTbHOB bNaxHOCTn, He ppeBbIaioe 93%.
IpeHnAon 3KcNpyataun npOdykun, dInTeNbHO Bpem HaxoDHBueCn NOB O3dEeCTBnEM OTpuTaHbHO TEmnpaTpy, Heo6xOIMOBbIDepKaTbe B y cNOBmX KOMHaTHOH TempePaTpyb HECKONko Yacob.
Ppabina peaun3aun npoaykun onpeednnoTc npednpnraTMPO3HUYHO TPOBUN B COOTBECTBUN C Tpe6oBaHmN DeIcTBUOero 3aKoHO-datelbCTBA.
Yka3aHnNo yTNnHaCnN npOyKcNn CoepKaTcB HCTpyKcNn No 3KcnNyatauM Myr5bIt yTOUHeHbI y MyHUnnaNbHbIX opraHOB nCNOHN-TeNbHO Bnactn.
IpyoDyKu,peaHn3OBAHHO n3rOToBHTeMe B TeueHne Cpoka DeiCTBna cepTnΦkata COOTBeCTBna, 3OT CEPTNΦkAT DeiCTBteHe npie ee nocTaBke, npdaxke IncnObl3OBAHm (npimeHeHH) B TceHne Cpoka cnjxkbI, yCTAHOBNEHORo COOTBECTBm co ctaTbeN 18 3aOKHa P0 o 3auHtme npab noTpeBHTeNe. Cpok cnjxkbI ha npOdykuHyo kkaan pOn3BOHNTeMe B nictOBKe «INHopMaun H3rTOBHTeJI O rapaHTHMn HcEPBCHOM 0cbNyKBaHnM
PpOdyKmOxet bIb NdeHTnHcHPOBaHa no MoeBbHOMy 6o3aHueHHIO (nonE-E-Nr.), anpObaauHOHOMy Tnny (nole «Type») n ToBapHOMy 3haky Bosch, h a npOyckHbM no npOyckHbM y npAkoBky i (nN) coepekaunxcB 3kCnlyatauONHHbIX DOkymENTax. B COOTBETCBN C BYHTpeHHM cTaNAPDcTOM IROTOBNTeB 6bTOBAH TexHnka NdeHTnHcHpyTeC NO cneDuoue cXMeE:
E-Nr. /
Maternblhno Hmep npectabrae c6oB 6yKBENHO-undpOoe 603aueHne npodykun nnHn He 6one 10 CMBONOB, nCnObl3yEmoe npnpodakme (mHeMyemoe moEnbHm o603aueHne Hn mOnEbn 6bTOrBO np6opa) toproBO mapKos Bosch. MaTePnAnbHm Homep (Moenb) yka3BaAETCA MEXdy KODOBIM CNOBOM «E-Nr.» KocO uhePTO «/'.
HndekceepBnCHOnCnyk6bl-Dbv3NaHoe znpoBoe 063HaueHne, pncBaNAeMOe eHNuE npOyKmB npoecce npo3BOcTBa HcnoJIb3yeMOe cepBnCHOn Cnyk60n.
3KcnnyatauHbIe DOKyMeHTb pa3pa6aTaBIAOTcB yHnHnCupOBaHHoF pOme IINI WpOKoAccOpTmEHTa npOkytIN, NO3OMY INTOBTENEM pNepyCMOTpeHO YkazAHHe TPOBOrO 063Haehne B nPbOba B 3KnPLyatauONHbIX DOKYMHTAX KAK NIOHCTbO, TAK NCAHTHNO, TTO 3TO N03BOReT ONPeHNITb PnHaDnEXHoCTb DaHnHO 3KnPLyatauONHDO DOKYMHTK B 6bTobOMpy npBOPCy, COpPOBXdEMOMY 3TM 3KcnNyTAUHNNHbIM DOKYMHTOM. YctAHOBHeNBE B PnOCECE NDeHTnDnKAcUN CoTBeTCTBn XapAKePTcIK 5bTOBOrO pN6Opa N0NXeHMN CopeXPAUMCBA PPnNAeMbx K Hemy 3KnNPyatauONHbIX DOKYMHTax, PBOOITcR NyTEM AHnn3a INHOpMaun, INHOxEHHO B 3KnNpyTAUOnHHbIX DOKYMHTAX.
B coCTAB 3KcPnIyatauHbIX DOkymeHTOB, PpeDyCMTopeHHbIX I3ROTOBtEnem IINI pOdyKmM, MOrY TBxOITb HAcTOraH INHOpMaqna, INHCTpyKU (pykoBOdCTBO) no 3KcPnIyatauHm, INHOpMaua 6 yCNoBnx rapaHTnHoro n cepBnCHORo 0cbnykmbAHn.
MapKpOBAHHe npOdykUm OcyueeCTBnRETCs HrTOBHTeNem Ha TINOBo TaBnue Kepbopa,Ha ynakobHOH O3MKeTke,HENOPcEeCTBeHHo HAynakOBKe pnp6pa aTKe MOKeT npOn3BOuNTBCra INbIM cNoCobAM, o6ecneuBaIOUM DoCTyHoe nHarJIAHOpe PpeCTaBJIeHne INHOpMaum O np6be B Mectax Pnojad.

PpOdyKn, KOTOPA pnoa I npOeDpy NOdTBePjXeHn COoTBeTCTBn COrnaCHO Tpe6oBaHnM TexHnuecknx PerIaMeHTOB TaOxKeHOro coHO 1/INN texHnuecknx perIaMeHTOB EbpaaNCKORO 3KOHOmueckco KOHO, MapKnpyTeC eINbHM 3AnkOM oBaJIH M npoDyKuIM na BpHke TocSyapcTB-NeHOB TAMoXeHnO CoHO3 (EbpaaNCKORO 3KOHOmueckco KOHO).
PpOdykUa COOTBeTCTByET CJIeDyUoUIM TexHnueckm peIamEHTAM TaMOxEHORO COIO3a:
·1TP TC 020/2011 ΘneKtpomarHHTha COBMeCTMmocTb TEXHnuecknx CpeDcTB
·1TP TC 004/2011 O6e3oNaCHOCTH H3KOBJbTHORO o6OpyIOBaHn
1TP EA3C 037/2016 O6 orpaHueHn npMHeHn onaChbIX BeueCTB B n3dEeHX 3neKtpoTeHHKn n paDIOeKtpoHHKn C daTbI BcTyPHeHn erO B cnny
3KCNPIAATAUHOHbIe DOkyMeHTbHa IpoDyUKIO HbIOINHOTcH a pycckOra3bIke. 3KCNPIaTauONHbIE DOKyMeHTbHa ITOcYdapCTBeHHbIXa3bIKAXTOCJAPCTBEBPAHNCIO EKHOHMECHCKO rOco30a,OTNIHbX bOPTcPCCKo, npn HAHNHbX OoT BcTeCTByIOUX TpeBOaHNB 2a3koHOaTeNcBte MoKHO63B03me3dHO nonyNTb yToprHyouei oprahn3aun-pes3IeHNT COOTCTBHyioEro rocydapCTBa-NeHc EBAp3nckoro EKOHMOHeCKO coo30a.
HΦopMaIgO KOMIIeKTAuIN npOdyKUIN ppeCTaBHeA TTOPBbIX 3aJax, MoKeT 6bIT 3aPPOWeHa No TepePhy 6ecnlaTHoN «Topruei NHHN (800) 200-2961, a TaKke DoctynBa B INTEpHete Ha caIte npOn3Bodntela http://www.bosch-home.ru
| Toproboe
обзauthenie | Алоб acquинны
ТП | Сергфкат COОВТСВИ | Страhal-
нотовпь |
| Рergшточiosны homeroдата вдауаоюдуаует do |
| BBH21621LVXAS011V16LC-DE.A46.B.7318 | L20.01.2016L19.01.2021LКтай | | | |
| BBH21622LVXAS011V16LC-DE.A46.B.7318 | L20.01.2016L19.01.2021LКтай | | | |
| BBH21631LVXAS011V16LC-DE.A46.B.7318 | L20.01.2016L19.01.2021LКтай | | | |
| BBH21632LVXAS011V16LC-DE.A46.B.7318 | L20.01.2016L19.01.2021LКтай | | | |
| BBH21633LVXAS011V16LC-DE.A46.B.7318 | L20.01.2016L19.01.2021LКтай | | | |
| BBH21634LVXAS011V16LC-DE.A46.B.7318 | L20.01.2016L19.01.2021LКтай | | | |
| BBH21635LVXAS011V16LC-DE.A46.B.7318 | L20.01.2016L19.01.2021LКтай | | | |
| BBH21636LVXAS011V16LC-DE.A46.B.7318 | L20.01.2016L19.01.2021LКтай | | | |
| BBH21637LVXAS011V16LC-DE.A46.B.7318 | L20.01.2016L19.01.2021LКтай | | | |
| BBH21638LVXAS011V16LC-DE.A46.B.7318 | L20.01.2016L19.01.2021LКтай | | | |
| BBH21639LVXAS011V16LC-DE.A46.B.7318 | L20.01.2016L19.01.2021LKtai | | | |
| BBH21640LVXAS011V16LC-DE.A46.B.7318 | L20.01.2016L19.01.2021LKtai | | | |
| BCH256N1LVCS010V25LC-DE.A46.B.7318 | L20.01.2016L19.01.2021LKtai | | | |
| BCH256N2LVCS010V25LC-DE.A46.B.7318 | L20.01.2016L19.01.2021LKtai | | | |
| BCH256N3LVCS010V25LC-DE.A46.B.7318 | L20.01.2016L19.01.2021LKtai | | | |
| BCH256N4LVCS010V25LC-DE.A46.B.7318 | L20.01.2016L19.01.2021LKtai | | | |
| BCH256N5LVCS010V25LC-DE.A46.B.7318 | L20.01.2016L19.01.2021LKtai | | | |
| BCH256N6LVCS010V25LC-DE.A46.B.7318 | L20.01.2016L19.01.2021LKtai | | | |
| BCH256N7LVCS010V25LC-DE.A46.B.7318 | L20.01.2016L19.01.2021LKtai | | | |
| BCH256N8LVCS010V25LC-DE.A46.B.7318 | L20.01.2016L19.01.2021LKtai | | | |
| BCH256N9LVCS010V25LC-DE.A46.B.7318 | L20.01.2016L19.01.2021LKtai | | | |
| BCH256N10LVCS010V25LC-DE.A46.B.7318 | L20.01.2016L19.01.2021LKtai | | | |
| BCH256N11LVCS010V25LC-DE.A46.B.7318 | L20.01.2016L19.01.2021LKtai | | | |
| BCH256N12LVCS010V25LC-DE.A46.B.7318 | L20.01.2016L19.01.2021LKtai | | | |
| BCH256N13LVCS010V25LC-DE.A46.B.7318 | L20.01.2016L19.01.2021LKtai | | | |
| BCH256N14LVCS02Z235MLC-DE.A46.B.7325 | L20.01.2016L19.01.2021LKtai | | | |
| BCH256N15LVCS02Z235MLC-DE.A46.B.7325 | L20.01.2016L19.01.2021LKtai | | | |
| BCH256N16LVCS02Z235MLC-DE.A46.B.7325 | L20.01.2016L19.01.2021LKtai | | | |
| BCH256N17LVCS02Z235MLC-DE.A46.B.7325 | L20.01.2016L19.01.2021LKtai | | | |
| BCH256N18LVCS02Z235MLC-DE.A46.B.7325 | L20.01.2016L19.01.2021LKtai | | | |
| BCH256N19LVCS02Z235MLC-DE.A46.B.7325 | L20.01.2016L19.01.2021LKtai | | | |
| BCH256N20LVCS02Z235MLC-DE.A46.B.7325 | L20.01.2016L19.01.2021LKtai | | | |
| BCH256N21LVCS02Z235MLC-DE.A46.B.7325 | L20.01.2016L19.01.2021LKtai | | | |
| BCH256N22LVCS02Z235MLC-DE.A46.B.7325 | L20.01.2016L19.01.2021LKtai | | | |
| BCH256N23LVCS02Z235MLC-DE.A46.B.7325 | L20.01.2016L19.01.2021LKtai | | | |
| BCH256N24LVCS02Z235MLC-DE.A46.B.7325 | L20.01.2016L19.01.2021LKtai | | | |
| BCH256N25LVCS02Z235MLC-DE.A46.B.7325 | L20.01.2016L19.01.2021LKtai | | | |
| BCH256N26LVCS02Z235MLC-DE.A46.B.7325 | L20.01.2016L19.01.2021LKtai | | | |
| BCH256N27LVCS02Z235MLC-DE.A46.B.7325 | L20.01.2016L19.01.2021LKtai | | | |
| BCH256N28LVCS02Z235MLC-DE.A46.B.7325 | L20.01.2016L19.01.2021LKtai | | | |
| BCH256N29LVCS02Z235MLC-DE.A46.B.7325 | L20.01.2016L19.01.2021LKtai | | | |
| BCH256N30LVCS02Z235MLC-DE.A46.B.7325 | L20.01.2016L19.01.2021LKtai | | | |
| BCH256N31LVCS02Z235MLC-DE.A46.B.7325 | L20.01.2016L19.01.2021LKtai | | | |
| BCH256N32LVCS02Z235MLC-DE.A46.B.7325 | L20.01.2016L19.01.2021LKtai | | | |
| BCH256N33LVCS02Z235MLC-DE.A46.B.7325 | L20.01.2016L19.01.2021LKtai | | | |
| BCH256N34LVCS02Z235MLC-DE.A46.B.7325 | L20.01.2016L19.01.2021LKtai | | | |
| BCH256N35LVCS02Z235MLC-DE.A46.B.7325 | L20.01.2016L19.01.2021LKtai | | | |
| BCH256N36LVCS02Z235MLC-DE.A46.B.7325 | L20.01.2016L19.01.2021LKtai | | | |
| BCH256N37LVCS02Z235MLC-DE.A46.B.7325 | L20.01.2016L19.01.2021LKtai | | | |
| BCH256N38LVCS02Z235MLC-DE.A46.B.7325 | L20.01.2016L19.01.2021LKtai | | | |
| BCH256N39LVCS02Z235MLC-DE.A46.B.7325 | L20.01.2016L19.01.2021LKtai | | | |
| BCH256N4LVCS02Z235MLC-DE.A46.B.7325 | L20.01.2016L19.01.2021LKtai | | | |
| BCH256N5LVCS02Z235MLC-DE.A46.B.7325 | L20.01.2016L19.01.2021LKtai | | | |
| BCH256N6LVCS02Z235MLC-DE.A46.B.7325 | L20.01.2016L19.01.2021LKtai | | | |
| BCH256N7LVCS02Z235MLC-DE.A46.B.7325 | L20.01.2016L19.01.2021LKtai | | | |
| BCH256N8LVCS02Z235MLC-DE.A46.B.7325 | L20.01.2016L19.01.2021LKtai | | | |
| BCH256N9LVCS02Z235MLC-DE.A46.B.7325 | L20.01.2016L19.01.2021LKtai | | | |
| BCH256N10LVCS02Z235MLC-DE.A46.B.7325 | L20.01.2016L19.01.2021LKtai | | | |
| BCH256N11LVCS02Z235MLC-DE.A46.B.7325 | L20.01.2016L19.01.2021LKtai | | | |
| BCH256N12LVCS02Z235MLC-DE.A46.B.7325 | L20.01.2016L19.01.2021LKtai | | | |
| BCH256N13LVCS02Z235MLC-DE.A46.B.7325 | L20.01.2016L19.01.2021LKtai | | | |
| BCH256N14LVCS02Z235MLC-DE.A46.B.7325 | L20.01.2016L19.01.2021LKtai | | | |
| BCH255N15LVCS02Z235MLC-DE.A46.B.7325 | L20.01.2016L19.01.2021LKtai | | | |
| BCH255N16LVCS02Z235MLC-DE.A46.B.7325 | L20.01.2016L19.01.2021LKtai | | | |
| BCH255N17LVCS02Z235MLC-DE.A46.B.7325 | L20.01.2016L19.01.2021LKtai | | | |
| BCH255N18LVCS02Z235MLC-DE.A46.B.7325 | L20.01.2016L19.01.2021LKtai | | | |
| BCH255N19LVCS02Z235MLC-DE.A46.B.7325 | L20.01.2016L19.01.2021LKtai | | | |
| BCH255N20LVCS02Z235MLC-DE.A46.B.7325 | L20.01.2016L19.01.2021LKtai | | | |
| BCH255N21LVCS02Z235MLC-DE.A46.B.7325 | L20.01.2016L19.01.2021LKtai | | | |
| BCH255N22LVCS02Z235MLC-DE.A46.B.7325 | L20.01.2016L19.01.2021LKtai | | | |
| BCH255N23LVCS02Z235MLC-DE.A46.B.7325 | L20.01.2016L19.01.2021LKtai | | | |
| BCH255N24LVCS02Z235MLC-DE.A46.B.7325 | L20.01.2016L19.01.2021LKtai | | | |
| BCH255N25LVCS02Z235MLC-DE.A46.B.7325 | L20.01.2016L19.01.2021LKtai | | | |
| BCH255N26LVCS02Z235MLC-DE.A46.B.7325 | L20.01.2016L19.01.2021LKtai | | | |
| BCH255N27LVCS02Z235MLC-DE.A46.B.7325 | L20.01.2016L19.01.2021LKtai | | | |
| BCH255N28LVCS02Z235MLC-DE.A46.B.7325 | L20.01.2016L19.01.2021LKtai | | | |
| BCH255N29LVCS02Z235MLC-DE.A46.B.7325 | L20.01.2016L19.01.2021LKtai | | | |
| BCH255N30LVCS02Z235MLC-DE.A46.B.7325 | L20.01.2016L19.01.2021LKtai | | | |
| BCH255N31LVCS02Z235MLC-DE.A46.B.7325 | L20.01.2016L19.01.2021LKtai | | | |
| BCH255N32LVCS02Z235MLC-DE.A46.B.7325 | L20.01.2016L19.01.2021LKtai | | | |
| BCH255N33LVCS02Z235MLC-DE.A46.B.7325 | L20.01.2016L19.01.2021LKtai | | | |
| BCH255N34LVCS02Z235MLC-DE.A46.B.7325 | L20.01.2016L19.01.2021LKtai | | | |
| BCH255N35LVCS02Z235MLC-DE.A46.B.7325 | L20.01.2016L19.01.2021LKtai | | | |
| BCH255N36LVCS02Z235MLC-DE.A46.B.7325 | L20.01.2016L19.01.2021LKtai | | | |
| BCH255N37LVCS02Z235MLC-DE.A46.B.7325 | L20.01.2016L19.01.2021LKtai | | | |
| BCH255N38LVCS02Z235MLC-DE.A46.B.7325 | L20.01.2016L19.01.2021LKtai | | | |
| BCH255N39LVCS02Z235MLC-DE.A46.B.7325 | L20.01.2016L19.01.2021LKtai | | | |
| BCH255N4LVCS02Z235MLC-DE.A46.B.7325 | L20.01.2016L19.01.2021LKtai | | | |
| BCH255N5LVCS02Z235MLC-DE.A46.B.7325 | L20.01.2016L19.01.2021LKtai | | | |
| BCH255N6LVCS02Z235MLC-DE.A46.B.7325 | L20.01.2016L19.01.2021LKtai | | | |
| BCH255N7LVCS02Z235MLC-DE.A46.B.7325 | L20.01.2016L19.01.2021LKtai | | | |
| BCH255N8LVCS02Z235MLC-DE.A46.B.7325 | L20.01.2016L19.01.2021LKtai | | | |
| BCH255N9LVCS02Z235MLC-DE.A46.B.7325 | L20.01.2016L19.01.2021LKtai | | | |
| BCH255N10LVCS02Z235MLC-DE.A46.B.7325 | L20.01.2016L19.01.2021LKtai | | | |
| BCH255N11LVCS02Z235MLC-DE.A46.B.7325 | L20.01.2016L19.01.2021LKtai | | | |
| BCH255N12LVCS02Z235MLC-DE.A46.B.7325 | L20.01.2016L19.01.2021LKtai | | | |
| BCH255N13LVCS02Z235MLC-DE.A46.B.7325 | L20.01.2016L19.01.2021LKtai | | | |
| BCH255N14LVCS02Z235MLC-DE.A46.B.7325 | L20.01.2016L19.01.2021LKtai | | | |
| BCH255N15LVCS02Z235MLC-DE.A46.B.7325 | L20.01.2016L | L20.01.2016L | L20.01.2016L | L20.01.2016L |
| BCH255N16LVCS02Z235MLC-DE.A46.B.7325 | L20.01.2016L | L20.01.2016L | L20.01.2016L | L20.01.2016L |
| BCH255N17LVCS02Z235MLC-DE.A46.B.7325 | L20.01.2016L | L20.01.2016L | L20.01.2016L | L20.01.2016L |
| BCH255N18LVCS02Z235MLC-DE.A46.B.7325 | L20.01.2016L | L20.01.2016L | L20.01.2016L | L20.01.2016L |
| BCH255N19LVCS02Z235MLC-DE.A46.B.7325 | L20.01.2016L | L20.01.2016L | L20.01.2016L | L20.01.2016L |
Hhopmaunn H3roBHTeI O rapaHTnHOM n cepBnCHom 6cnyKnBaHHN
KpyrnocytohBtenefoH cnyx6bI nOdepkKn*: 8 (800) 200-29-61
OΦnuaNbHbI caHT B INThepHete: www.bosch-home.ru
Adepeca aBTOPN30BAHbIX cepBnCHbIX ueHPOB, a TAKKc Bc HhOpMaun no cepBnCHomy 6CnyXnBaHHIO DOCTynHa Ha oHnuaNBHom caHTe B NHTepHe: www.bosch-home.ru.
PeKoMeHdyem Bam nonb3OBAtbc yCnyramn TOnbko ABTopn3OBAHHbIX cepBCHbIX cHTPOB.
OphnHbIe AceccayapB No yxoy dno btoBo Texnn Bocsh B MoKeTe pno6pctn B hAeM HmHOM HHTepHemae3HHe: www.bosch-home.ru/store. C ynoBMA maka3a, ontaB n doCTabK BMOKeTe oHaKoMTbcra Ha caTte. TaKke opHnHbHbIe akcecbpyi CpeCTBa no yxoy D moKeTe npno6pctn B aTOPnOBAHbIX cepBNCbIX cHtPax.
1.Изdenne
- Moenb
IyHKtI 1-2 3aONHHTcR ToBko B Cnyae,ecnN 3TN DaHHbIe He cOepKATcR B DOkymeTAX O NOKynke H3dEHN (KaccOBbl Yek n/nnTOBapHbI ueK, TOBapHaH NaadHa).
- DānHá NīHΦopMaùnI paacpOeTaPbAaretca Hα MaIIbe 6bItobBe npN6bpI ToBaHOrO ΣhAk: KΦeBaepK, KΦeMauiHbI, KΦeMOnK, BeCbI, KxohHbIe KOMbaHbIe, MkncBpe, nbIEcOe, pεKHz, TocTepe, yTfHΩ, paCπρaMTeNi IǎBOLc, ΘηEKTPOaayHKnK, COKOBjXmApKN, hMéNbUHTenI, δhEnDepe, rfaɪnltbHe bdoCKn, BAHNoCHq, HanoNtBHe becSe, yTfHΩ, NaPObBe CTaHcIu, rfaɪnltbHe bde ODCKn I aHaIOTNHybIe IM IaDJIENy.

- YBaKaemble DaMbI rOcnoJa, coo6aem Bam, yTo nOtBepKJHHe COOTBeCTBnHr HaWe npOyKun O6raTeBbHm Tpe6oBAHHM B COOTBeTCTBnC 3aKaHOaTeNbCTBOM OcyueCTBnEeT C B FOPMe O6raTeBhoH cepTHMQKaUN INeKapnPOBAAHCOOTBeCTBnR. HfOpMaUIO 663aTeBHom NpOteBxepKJHIncoTBeCTBnHr HaWn pnpOB, B TOM Ucne DaHbIe oHomepe cepTHQHKata COOTBeTCTBn (DeKapauAOnooTBeCTBnH) I cpoke er (ee) DeNCTBnBbl Moekete NOnyUHT B OOO BCX BtTOBbe Pnp6Opby).
Hnau npnoynu npno3BDOiNtCn oKoHTPonen TpAnhCaOnHbNo KOpnpaunin EBCX YAcrypeTe I8739 MoHNek, Kapn-Bepn UTrpacc 34, ErfmaNa (BSH Hausgerate GmbH, Carw-Wery-Str. 34, 81739 Munchen, Germany).
OprHn3aueH, BblnoHIOUeIyHKnUHOCtPaHHo H3rTOBHTeRA, yNOnHMOeHHoH 3rTOBHTeENMa HA OCHOBAHIN DOROBOPa C HMM, ABRtceTc OOO E5CX BbToBte PIn6bp), 198515, CaHKT-PTeTp6Byr, r. Tepeprof, yn. Kapna Cmehca, d.l nrt. A, fnnn an Br. MockBa, 119071, yn. Manar Kanyckan, d.15, tenepon (495) 737-2777, daac (495) 737-2798.
- 063aTeBhIe CBeHnO TeXnuecknx XapakTeepntkax npbopa npnbedeHb Ha TINOBo Ta6nueke npb6opa nnHa erO 3tKeTke n/nn B cOnpOBOHTeBHO DOKyMeNTauHH.
6. AkceccyapbI n cpeCTBa no yxOdy
Jn 63ynpeHoro fynkuOHnpoBaHn Baawen texHHNn uXOda 3 he npno3BDOHTe peKomeHyet nCIOBt BToBko opunnaHbIbe akccceCyapbl n cpeCTba no yxOdy. OprinHaNbIbe ackceCyapbl pa3pa60aHbl npno3BOITnelem, OH nJealho NIO xOyad HmEHO BaWero npbiopba. OprinHaNbIbe aekccceApbl n cpeCTBa no yxOdy COOTBeTCTBYOTc CAMbl BbcOKHM Tpe6oBaHn KaueCTBa TObAPHoro 3Aka Bosch, OH npoxOar 3ABODCKne HcNbTAHn IIN oBecneueHn MaKcMaIbHO HadeXHOCTN B pa6ote. NO BCem Bonpocam, CB83AHbIM C AkceccyapaMn n cpeTBAMn no yxOdy dnn Baew 6bTOBn texHHKn, Bbl MoKeTe o6pTaTbCn B abTopn3oBaHhIe cepBNCbIe ceHTpbI nn No TenefoHy cnjkbbl ndoepjkN.
7. rapaHTnH3ROTOBNTeN
Hnma 3r08oHTbI npedctabHn Hn pno6pTeHnB Bamn B Pocchckon Fepaunn 6btoBo nnp6op rataHHN BOOTBeCTBN CdeTByuHm 3akOHaTeBcTBM P cpoK 1 ro. Ha npno6pTeHnB B Pecny6nke Benapcyb 6bTOBO np6op, k KOTOpmy npnokynke 6bl BbHaDraHnHb TaON, DeeyCTBYOT rapaHTnHbye cNoBnA, He npotOBpeauane 3akOHOaBcTBpy Cpey6nKn Henapcyb.
8. Bhimahne! Baxhna HhOpmaqna dna notpebutee
JaHb npn6op npedha3aueH nIcnoB3oBAHn IckNoHTeBHO dnnuHbix, CEmeiHbix, Domaunnx N Hbix Hykd, He CBraaHHbIX C ocUy-ectBHeHem npednpnHmATEnbCKO deTneBHoCTN 160 yDOnBTBOpEHem 6bITOBx Notpe6hOctE B Ofncie npedpnhTm, UpyexdHn INn opraH3aun. NcnoB3oBAHne np60paB a cienx, OTnHbix OT bWeyka3AHbIX, ABnHETcH hApweHem npabIN HaJnHexauen EKcnnyataun npn6opa.
HaHnue HmpeHno 3aOboKo TINOBOI TabnnuKHa npbope 683aTeBHO! OxanyctA, ybeNtecb Ee HaNNH N coXpaHnE ee Ha npbope B TeueHne Bcero CpoKa Cnyk6bl npbopa. YdaenHe TaBnuk Beet K oBe3nueHIO npbopa I K BO3MOxHbIM HApUeHNr npabIN erO 3Knpyataun.
HrTOBtIe He hecet OTeCTBeHHoCTb 3a HeOCTaTKn B np6oep, cNn CepBnCHOn CnyK6o ByedT DOKa3Ao, Yo OH N03HNKn Nocne nepedeau np6oBntpe6nTIO BCNECTBHe HApueHm N pabnn NoIbZoBaHnn, TpaCnOpTHpOBKn, XpaHHeH, DeCTBN TpeBHX NIIu, HenPeODJHMO CNbl (NoXapa, npPOdHOkataPcDbl n. n), nonAaHnBb bIOBoTb HaceKOMbIX nRpsByOH, BO3JeCTBn HbIXn octOpONHHx qA KTOpOB, a TAKKe BCNECTBHe CYaeeHBeHbN HApueHnTexNueckHnx Tpe6oBaHnn, OrOBopeHbX B INCTpyKUIN NO EKnNpyaunu, B TOM YHCNE HectaBnBHOCTn napamPoBn AEKT poTeH, ycaHOBNeHHbY FOCT 32144-2013.
Ia noTbepKHeHHa TaBnOKynKn npHbopa npn rapaHTnHOM peMOHTe HnnpEbnEHn HhBx npDcMOTpeHHbx 3aKOHOM Tpe6oBaHHyBeNTbHO npocm Bac coxaHrtb DOKymHeTb o NOkynke (ueK, KntaHnIO, HhBie DOKymHeTb, noTbepKDaOuHne DaTy n MeTo NOKynKn).
C6bIeHnepeKoMaHauN yKa3aHn, cOepRzAunxCB nHCTpyKcnn O kcnPnyatau nn (npabnnaonb3oHaHH) nOMOKeT n36eKaTh np6blem BkCNyatau np60pa er 6cbNykaHHa.
HeHcnpabHbIe y3bl npnbopB B rapaHTnHbI nepno 6ecnnaTHo pmoHTpyOTc Hnn 3aemeHIOCTHOBBIMn. PeueHne BONpOca o cenecoo6pa3HOCTN X3aMeHbI INn peMOHTa ocTaetc 3a cnKbAMn cepBnca.
9.нфорmaцьо cepвиce
B nepno nocne hcteehn rapaHTHnHO rpoka haa Cnyk6a Cepbna, a taKe MaCTepckne haunx napTHeOB Bcerda roTOBb npEnoKtB Bam cboynytn. CNcOcAopce yonHMOOHbIX nroTOBHTeEM nyHKTo ABTOpI3OBAHHOR cepBCHORO oCnyhBaHHra HaxoINTcHa opHuaBHOM caie B INrTePheTe: www.bosch-home.ru.
Cpok cnkybMnBx 6bTOBbX npHbOpB (KpOme KxyoHHbx KOMbAHO H nIbNEcOCOB) coCTaBnRE 2 rOda. Cpok cnkyb Kxohhix KOMbAHOB H nIbNEcOCOB COCTABNRe 5 net. Cpok cnkyb HnDEHn HNCnRETCa D aTb erO nOKyHK, NIOo pNn HEBO3MOXHOCTe ee ONpeDeneHn, C dTaH n3ROTOBHeHn HnDEHn HAHeCEHNO HA TINOBYIO TaBnUky HnDEHn B COOTBeTcBm CO cTAHApTOM n3ROTOBHeTn DaTn H3ROTOBHeHn MAPkpyETC FDIITMMrEIT- rOd n3ROTOBHeHn MInHyc 1920, a MM - MeCAu n3ROTOBHeHn DnONpeDeneHn rOHa n3ROTOBHeHn PnB6opa Heo6xoJMoK 1920 np6abHTb YncNo IT.
*Becnntbky KpyrnoCyToHy Tepeoh dny 3BOHkoB Ha TeppuTOpN PΦ.
B34C065N1-1M00 03/2017

BOSCH
Pa3pa6oTaHOAIAJXH3HN
bosch-infoteam@bshg.com