
BCS61PETGB - Vacuum Cleaner BOSCH - Free user manual and instructions
Find the device manual for free BCS61PETGB BOSCH in PDF.

| Product Type | Cordless Stick Vacuum Cleaner |
| Model | BCS61PETGB |
| Brand | Bosch |
| Battery Voltage | 18 V |
| Battery Type | Lithium-Ion (removable) |
| Runtime | Up to 60 minutes (on low setting) |
| Charging Time | Approximately 5 hours |
| Dust Capacity | 0.4 L |
| Filtration System | HEPA filter (washable) |
| Dimensions (assembled) | 250 x 200 x 1100 mm |
| Weight | 3.5 kg |
| Power Settings | 2 speeds (Eco, Turbo) |
| Accessories Included | Crevice tool, combination brush, upholstery nozzle |
| Convertible to Handheld | Yes (detachable handheld unit) |
| Dust Sensor | Yes (LED indicator) |
| Wall Mountable | Yes (wall bracket included) |
| Noise Level | Approx. 78 dB(A) |
| Maintenance | Washable filter, empty dust bin after each use |
| Safety Features | Overheat protection, battery management system |
| Spare Parts Availability | Battery, filter, brush roller available separately |
Frequently Asked Questions - BCS61PETGB BOSCH
User questions about BCS61PETGB BOSCH
0 question about this device. Answer the ones you know or ask your own.
Ask a new question about this device
Download the instructions for your Vacuum Cleaner in PDF format for free! Find your manual BCS61PETGB - BOSCH and take your electronic device back in hand. On this page are published all the documents necessary for the use of your device. BCS61PETGB by BOSCH.
USER MANUAL BCS61PETGB BOSCH
new device on MyBosch now and get free benefits:
bosch-home.com/ welcome
Cordless handstick vacuum cleaner
BBS61 BCS61 BSS61
[en] User manual Cordless handstick vacuum 7
cleaner
3
4
5
6
natural_image
Technical illustration of a blue handheld device with an arrow indicating a component, shown from two different angles (no text or symbols present)7
8
9
10
natural_image
Diagram of a camera lens with an arrow pointing to the lens area, showing no text or symbols.11
The image is too blurry to recognize any text content.
13
The image is too blurry to recognize any text content.
15
16
17
18
19
20
natural_image
Illustration of a hand pouring granular material into a trash bin with a 'no waste' symbol nearby (no text or labels)21
natural_image
Illustration of a hand pouring liquid into a trash bin with a person silhouette below (no text or symbols)The image is too blurry to recognize any text content.
natural_image
Illustration of hands cleaning a blue plastic container with a cloth (no text or symbols)[Non-Text]

23

24
natural_image
Illustration of a mechanical assembly with scissors cutting through a gear-like component (no text or symbols)25
The image is too blurry to recognize any text content.
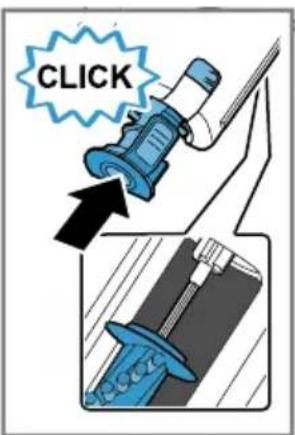
Table of contents
Safety...... 8
General information...... 8
Intended use.... 8
Restriction on user group...... 9
Safety instructions 9
Preventing material damage ..... 12
Environmental protection and saving energy.... 13
Disposing of packaging 13
Unpacking and checking 13
Unpacking the appliance and parts 13
Included with the appliance ..... 13
Familiarising yourself with your appliance.... 13
Appliance 13
Controls 14
Status display 14
Accessories.... 14
Before using for the first time ..... 15
Installing the base station ^1 ...... 15
Inserting and charging the battery.... 15
Basic operation 15
Charging.... 15
Installing the appliance 17
Dismantling the appliance.... 17
Switching on the appliance 18
Switching off the appliance 18
Using turbo mode 18
Vacuuming with accessories...... 18
Cleaning and servicing.... 18
Cleaning products 18
Cleaning the appliance 18
Emptying the dust container ..... 18
Cleaning the filter unit 19
Cleaning the nozzles 19
Troubleshooting...... 20
Malfunctions 20
Transportation, storage and disposal 22
Disposing of old appliance 22
Disposing of batteries 22
Sending batteries 22
Customer Service.... 22
Product number (E-Nr.) and production number (FD) 23
Warranty conditions.... 23

Safety
Please read the safety information to ensure that you use the appliance safely.
General information
You can find general information about this instruction manual here.
- Read this instruction manual carefully. Only this will ensure you use the appliance safely and efficiently.
■ This manual is intended for the user of the appliance.
■ Follow the safety instructions and warnings. - Keep the instruction manual and the product information safe for future reference or for the next owner.
- Check the appliance after unpacking it. Do not connect the appliance if it has been damaged in transit.
Intended use
Please read the information on intended use to ensure you use the appliance correctly and safely.
Only use this appliance:
■ As specified in this instruction manual.
■ With genuine parts and accessories. Damage caused by using third-party products is not covered under the warranty.
■ For cleaning surfaces.
■ In private households and in enclosed spaces in a domestic environment at room temperature.
■ Up to an altitude of max. 2000 m above sea level.
Do not use the appliance:
■ For vacuum-cleaning persons or animals.
■ For vacuuming up harmful, sharp-edged, hot or burning substances.
■ For vacuuming up damp substances or liquids.
■ For vacuuming up highly flammable or explosive materials and gases.
■ For vacuuming up ash or soot from tiled stoves and central heating systems.
■ For vacuuming up toner dust from printers and photocopiers.
■ For vacuuming up building rubble.
Disconnect the appliance from the power supply when:
■ cleaning the appliance.
Restriction on user group
Avoid risks to children and vulnerable persons.
This appliance may be used by children aged 8 or over and by people who have reduced physical, sensory or mental abilities or inadequate experience and/or knowledge, provided that they are supervised or have been instructed on how to use the appliance safely and have understood the resulting dangers.
Do not let children play with the appliance.
Cleaning and user maintenance must not be performed by children unless they are being supervised.
Safety instructions
Follow these safety instructions when using the appliance.

WARNING – Risk of electric shock!
■ Improper repairs are dangerous.
▶ Repairs to the appliance should only be carried out by trained specialist staff.
▶ Only use genuine spare parts when repairing the appliance.
▶ If the power cord of this appliance is damaged, it must be replaced by trained specialist staff.
■ If the appliance or the power cord of the quick chargéris damaged, this is dangerous.
▶ Never operate a damaged appliance.
▶ Never operate an appliance with a cracked or fractured surface.
▶ Call Customer Service. → Page 22
▶ Repairs to the appliance should only be carried out by trained specialist staff.
■ An ingress of moisture can cause an electric shock.
▶ Only use the appliance in enclosed spaces.
▶ Never expose the appliance to intense heat or humidity.
- Do not use steam- or high-pressure cleaners to clean the appliance.
■ If the insulation of the power cord on the quick chargéris damaged, this is dangerous.
▶ Never let the power cord come into contact with hot appliance parts or heat sources.
▶ Never let the power cord come into contact with sharp points or edges.
▶ Never kink, crush or modify the power cord.
■ Improper installation is dangerous.
- Connect and operate the charging cable ^1 and the quick charger ^1 only in accordance with the specifications on the rating plate.
- Connect the charging cable ^1 and the quick charger ^1 to a power supply with alternating current only via a properly installed socket with earthing.
- The protective conductor system of the domestic electrical installation must be properly installed.

WARNING – Risk of burns!
The filter systems may become warm during operation and may catch fire when used in conjunction with flammable substances or substances that contain alcohol.
- When cleaning the appliance, do not use flammable substances or substances that contain alcohol.

WARNING – Risk of injury!
■ Moving parts and openings on the appliance may cause injury.
- Keep clothing, hair, fingers and other body parts away from the openings on the appliance and the moving parts.
▶ Never point the pipe or the nozzles towards eyes, hair, ears or mouths.
■ An appliance that falls may endanger people.
- Ensure that children do not play with the appliance, even when it is in the base station ^1 .
⚠ WARNING – Risk of magnetism!
Permanent magnets that are contained in the appliance may affect electronic implants, e.g. heart pacemakers or insulin pumps.
▶ Persons with electronic implants must stand at least 10 cm away from the appliance.
⚠ WARNING – Risk of suffocation!
Children may put packaging material over their heads or wrap themselves up in it and suffocate.
- Keep packaging material away from children.
▶ Do not let children play with packaging material.
⚠ WARNING – Risk of explosion!
A short-circuit may cause the battery to explode.
▶ Protect the battery against fire, heat and constant sunlight.
▶ Protect the battery against water and penetrating moisture.
▶ Never open the battery.
- When not in use, keep the battery away from metal objects, e.g. paper clips, coins, keys, nails or screws.
⚠ WARNING – Risk of harm to health!
■ Fumes that escape from a damaged battery are dangerous.
▶ Supply fresh air.
▶ If there are any problems, seek medical advice from a doctor.
■ Liquids that escape from a damaged battery are dangerous.
▶ If these come into contact with the skin, wash immediately with cold water.
▶ If these come into contact with the eyes, seek medical help.
Preventing material damage
To prevent material damage to your appliance, accessories or any other objects, follow these instructions.
ATTENTION!
■ Liquid that escapes from a damaged battery may lead to material damage.
▶ Check and clean any wet objects.
▶ Replace damaged objects.
■ Worn or sharp-edged outsides of nozzles may damage sensitive hard floors, such as parquet or linoleum.
▶ Regularly check the outsides of the nozzles for wear.
▶ Replace the worn nozzle.
■ Vacuuming without the brush roller in place may damage the rotating drive axle.
▶ Never use the nozzle without the brush roller in place.
■ Dirt in the motor may damage the motor.
▶ Never operate the appliance without the filter unit.
Environmental protection and saving energy
Help protect the environment by using your appliance in a way that conserves resources and by disposing of reusable materials properly.
Disposing of packaging
The packaging materials are environmentally compatible and can be recycled.
- Sort the individual components by type and dispose of them separately.
Information about current disposal methods are available from your specialist dealer or local authority.
Unpacking and checking
Find out here what you need to note when unpacking the appliance.
Unpacking the appliance and parts
- Take the appliance out of the packaging.
- Take all other parts and the accompanying documents out of the packaging and place them to hand.
- Remove any packaging material.
- Remove any stickers or film.
Included with the appliance
After unpacking all parts, check for any damage in transit and completeness of the delivery.
Note: The appliance comes with additional accessories depending on its features.
→ Fig. 1
| A | Base station ^1 |
| B | Mini electro-nozzle ^1 |
| C | 2-in-1 furniture brush with upholstery nozzle ^1 |
| D | Replacement nozzle for power brush ^1 |
| E | Replacement brush for mini electro-nozzle ^1 |
| F | Adapter for XXL upholstery nozzle ^1 |
| G | Mattress nozzle ^1 |
| H | XXL upholstery nozzle ^1 |
| I | Crevice nozzle ^1 |
| J | Battery ^1 |
| K | Quick charger ^1 |
| L | Charging cable ^1 |
^1 Depending on the appliance specifications
Familiarising yourself with your appliance
Familiarise yourself with the parts of your appliance.
Appliance
You can find an overview of the parts of your appliance here.
→ Fig. 2
| 1 | Dust container |
| 2 | Fluff filter |
| 3 | Cartridge filter |
| 4 | Turbo switch |
en Accessories
| 5 | On/off switch |
| 6 | Status display |
| 7 | Dust container release button |
| 8 | Suction pipe |
| 9 | Floor nozzle with power brush |
Controls
You can find an overview of the controls for your appliance here.
①
■ Switch on the appliance.
→ Page 18
■ Switch off the appliance.
→ Page 18
Turbo
Use turbo mode. → Page 18
Status display
The status display indicates the different operating statuses.
| Operating status | Status display |
| Normal mode Display lights up white. | |
| Turbo mode LED slowly flashes white. | |
| Battery charge below 20% | Display rapidly flashes red. |
| Battery empty Display goes out. | |
| Charging process | LED slowly flashes white. |
| Battery is fully charged | Display lights up white and goes out after approx. two minutes. |
| Over-/under-temperature protection | Display lights up red and goes out after approx. 10 seconds. |
Accessories
Only use original accessories. These have been made especially for your appliance. Here you can find an overview of your appliance's accessories and how to use them.
Accessories Accessory number Use
| XXL upholstery nozzle BBZ130SA Clean upholstered furniture. | |
| XXL crevice nozzle BBZ131SA Clean crevices, corners and nar- row and hard-to-reach places. | |
| Mattress nozzle BBZ133SA Clean mattresses. | |
| Rechargeable battery ^1 | BHZUB1830 Supply the appliance with power. |
| Rechargeable battery ^1 | BHZUB183CN Supply the appliance with power. |
| Quick charger ^1 | BHZUC18N Charge the 18 V Power for ALL rechargeable battery. |
| Quick charger ^1 | BHZUC18NCN Charge the 18 V Power for ALL rechargeable battery. |
^1 Depending on the country version
Accessories Accessory number Use
| Quick charger1 | BHZUC18NGB Charge the 18 V Power for ALL rechargeable battery. |
| Accessory set BHZUKIT | |
| 1 Depending on the country version | |
Before using for the first time
Prepare the appliance for use.
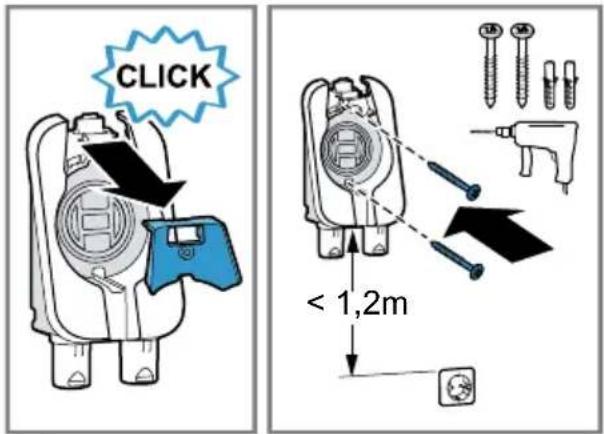
Installing the base station ^1

WARNING
Risk of electric shock!
Incorrect installation is dangerous.
▶ Check whether any household wiring could be damaged in the installation area.
- Do not install the base station horizontally or vertically above, below or next to a socket.
-
Remove the front panel towards the front. → Fig. 3
-
Wall-mount the base station ^1 . Install the base station ^1 close to a socket.
-
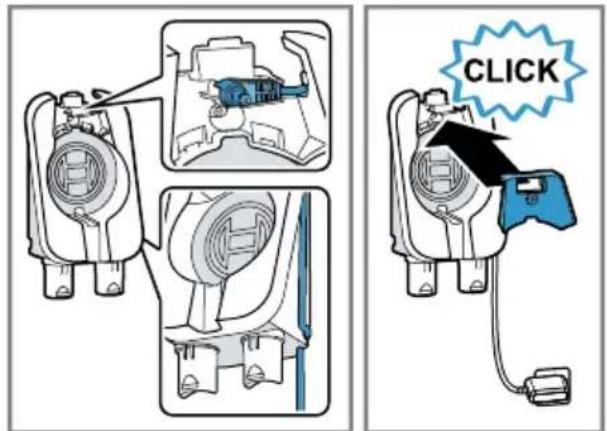
Insert the appliance plug for the charging cable ^1 into the recess in the base station ^1 . → Fig. 4
-
Guide the charging cable ^1 along the side of the base station ^1 and secure it in the recess.
-
Insert the front panel. The front panel secures the appli- ance plug into the base station ^1 .
-
Plug the charging cable's mains plug ^1 into the socket.
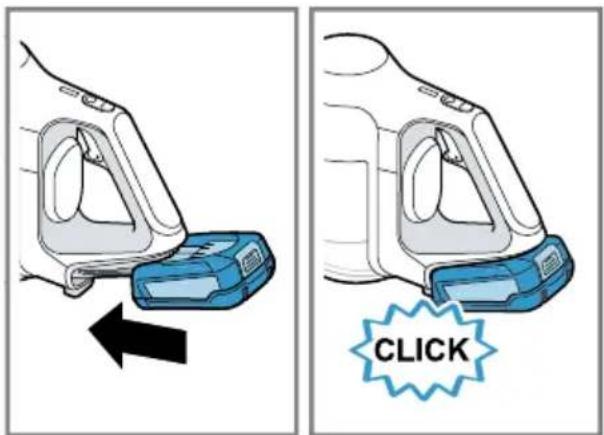
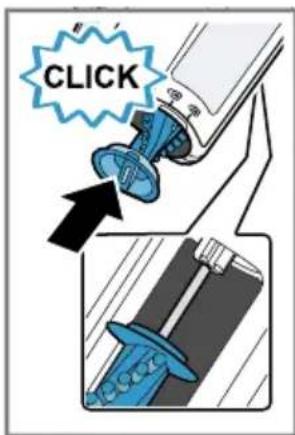
Inserting and charging the battery
- Use the guide rail to insert the battery into the vacuum cleaner.
- Fully charge the battery.
$$ \rightarrow \bar {F} i g. ⑤ $$
$$ \rightarrow " C h a r g i n g", P a g e 1 5 $$
Basic operation
You can find out everything you need to know about operating your appliance here.
Charging
Depending on the appliance features, you can charge the battery in three different ways.

WARNING
Risk of fire!
Improper use of the battery and the rapid charger ^1 is dangerous.
▶ Only charge the battery in chargers that are recommended by the manufacturer.
▶ Only use the battery in connection with the Bosch appliance.
- Charge the battery using the original charging cable ^1 or the original quick charger ^1 .
▶ Only use batteries from the Power for ALL 18 V series.
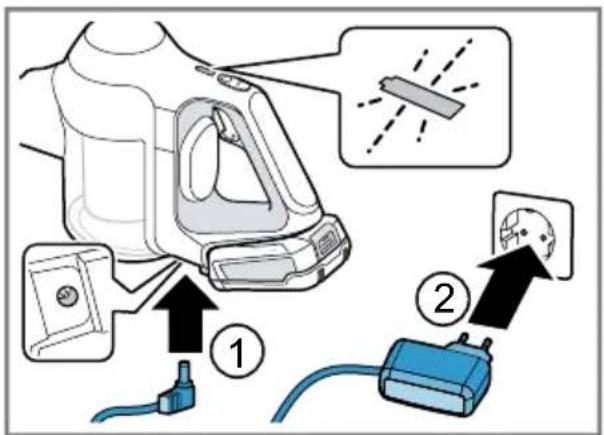
Charging using the charging cable ^1
Note: The charging cable ^1 and the vacuum cleaner heat up while charging. This is normal and harmless.
Requirement: The battery has been inserted.
→ "Inserting and charging the battery", Page 15
- Place the vacuum cleaner close to the socket.
-
Plug the appliance plug into the vacuum cleaner. → Fig. 6
-
Insert the mains plug into the socket.
√ The status display slowly flashes white while the battery is charging. Once the battery is fully charged, the status display lights up white for a few minutes.
Tip: To check that the battery has charged fully, briefly disconnect the vacuum cleaner from the mains. The status display then lights up white. You can charge the vacuum cleaner whenever it is not in use.
Battery charging times
You can find an overview of the battery charging times here.
Charging in the base station ^1
WARNING
Risk of injury!
An appliance that falls may endanger people.
- Ensure that children do not play with the appliance, even when it is in the base station ^1 .
Note: The charging cable ^1 and the vacuum cleaner heat up while charging. This is normal and harmless.
Requirement: The battery has been inserted.
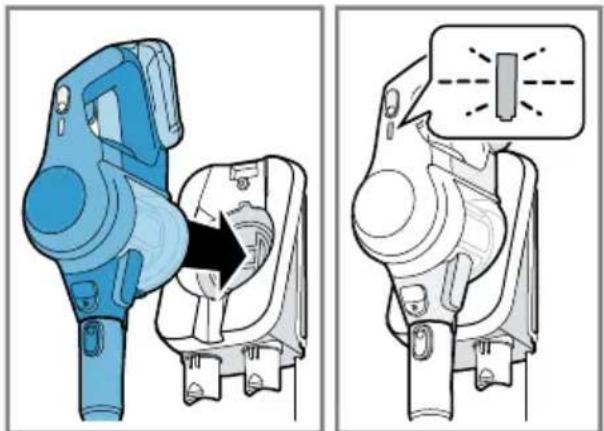
- Insert the vacuum cleaner into the base station ^1 from the front.
→ Fig. 7
√ The status display flashes white while the battery is charging. Once the battery is fully charged, the status display lights up white for a few minutes.
Tip: To check that the battery has charged fully, briefly disconnect the vacuum cleaner from the mains. Once the status display lights up white, the appliance is fully charged.
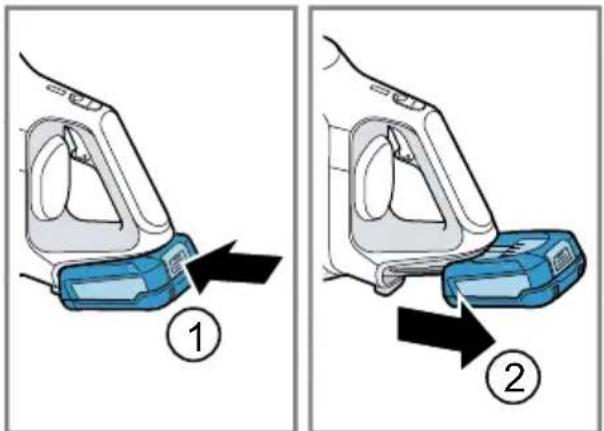
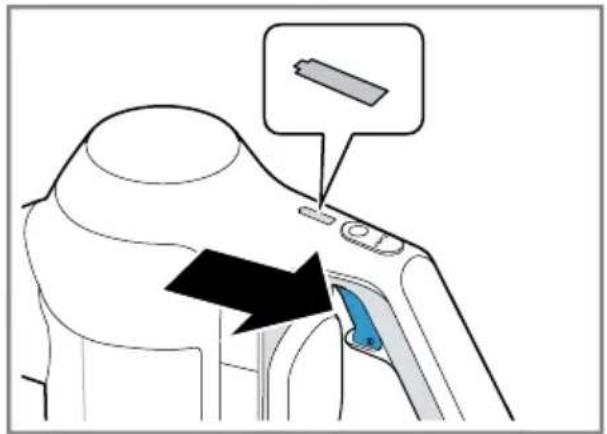
Charging using the quick charger ^1
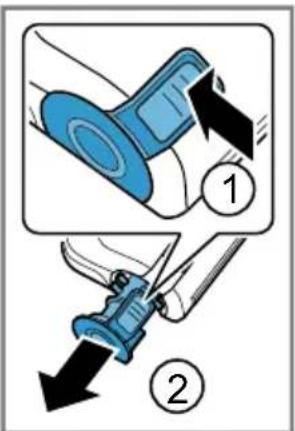
-
Press the release button and remove the battery to the rear. → Fig. 8
-
Observe the enclosed instructions.
Notes
■ The specified charging times may vary depending on the battery charging status, the battery temperature and the age of the battery.
■ You can find out which battery charging times are achieved with the quick charger ^1 in the instructions of for the quick charger ^1 .
Tip: If the quick charger ^1 displays a battery charging status of approx. 80%, you can remove and use the battery.
Battery charging status of 18 V 2,5 Ah 18 V 3,0 Ah
| 80% in hrs 3,5 4 |
| 97%-100% in hrs 4 5 |
Battery runtimes
You can find an overview of the battery runtimes, depending on the battery that is used, here.
Note
The following modes affect the battery runtime:
■ Mode 1: Normal mode with non-electrical accessory
■ Mode 2: Normal mode with electrical floor nozzle
■ Mode 3: Turbo mode with electrical floor nozzle
Runtime 18 V 2,5 Ah 18 V 3,0 Ah
| Mode 1 up to min. 30 35 |
| Mode 2 up to min. 25 30 |
| Mode 3 up to min. 8 10 |
Notes
■ Like every Li-ion battery, the batteries from the Power for ALL 18 V series wear out over time, meaning that the battery capacity and the runtime decrease. This is a natural aging process and not the result of a material error, manufacturing error or material defect.
■ You can delay the natural wear by using the following measures:
- Only charge the battery in the temperature range between 0 °C and 45 °C.
- Only store the battery in the temperature range between -20 °C and 50 °C.
- Do not store the battery for an extended period of time if it is fully charged or fully discharged.
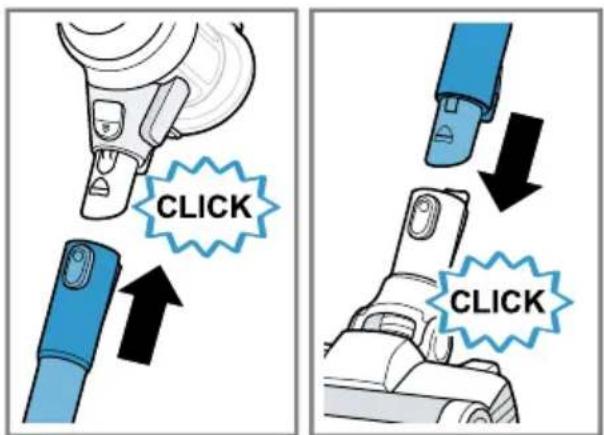
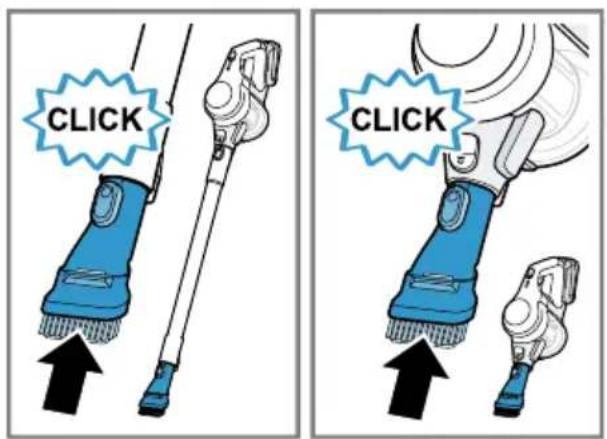
Installing the appliance
- Place the suction pipe onto the appliance's connection port and lock it in place.
$$ \rightarrow \text {Fig.} 9 $$
- Insert the end of the suction pipe into the floor nozzle and lock it in place.
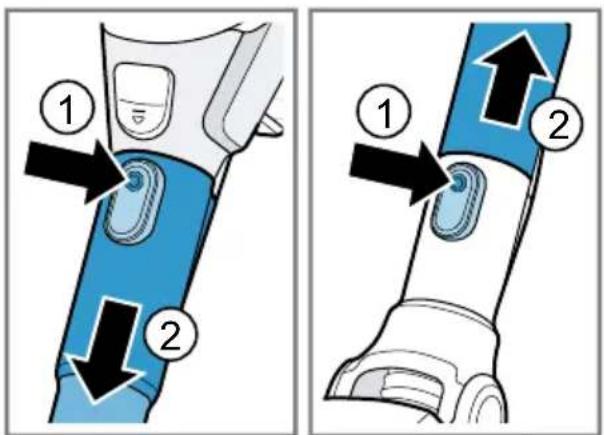
Dismantling the appliance
- Press the release button and pull the suction pipe out of the floor nozzle.
$$ \rightarrow \text { Fig. } \boxed {1 0} $$
- Press the release button and pull the suction pipe out of the appliance's connection port.
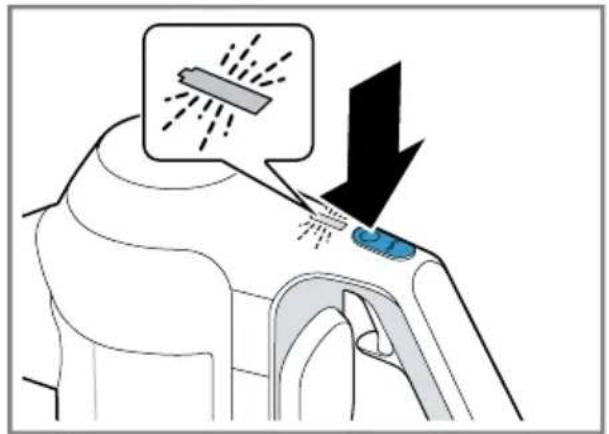
Switching on the appliance
▶ Press Ⓘ
→ Fig. 11
√ The status display lights up white.
Switching off the appliance
▶ Press Ⓘ
√ The status display goes out.
Using turbo mode
Requirement: The appliance has been switched on.
→ "Switching on the appliance",
Page 18
▶ Press Turbo
→ Fig. 12
√ The status display flashes white.
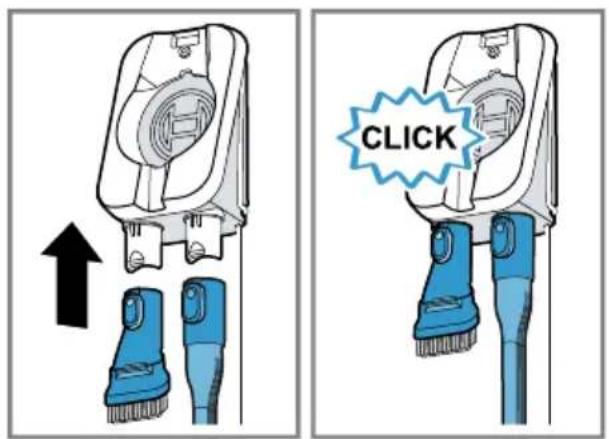
Vacuuming with accessories
- Place the required accessory onto the suction pipe or the appliance's connection port.
→ Fig. 13
- After use, insert the accessory into the base station ^1 .
→ Fig. 14
Cleaning and servicing
To keep your appliance working efficiently for a long time, it is important to clean and maintain it carefully.
Cleaning products
Only use suitable cleaning products.
ATTENTION!
Using unsuitable cleaning products or incorrect cleaning may damage the appliance.
- Do not use harsh or abrasive detergents.
- Do not use cleaning products with a high alcohol content.
- Do not use hard scouring pads or cleaning sponges.
- Wash sponge cloths thoroughly before use.
Cleaning the appliance
Requirement: The appliance is switched off.
→ "Switching off the appliance", Page 18
- Disconnect the appliance from the charging cable ^1 .
- Clean the appliance and the accessory with a soft cloth and a commercially available plastic cleaner.
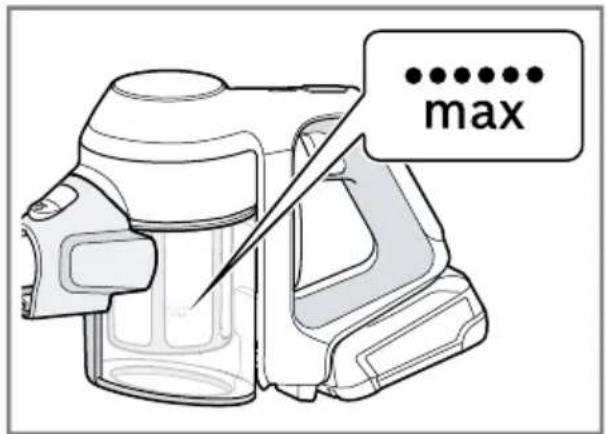
Emptying the dust container
Empty the dust container at the latest when the fill level has reached the
max mark. In order to achieve the best possible vacuuming results, empty the dust container after every use of the vacuum cleaner.
Requirement: The appliance is switched off.
→ "Switching off the appliance", Page 18
- Check the fill level of the dust container.
→ Fig. 15
- Check how dirty the filter unit is and clean it if necessary.
→ "Cleaning the filter unit",
Page 19
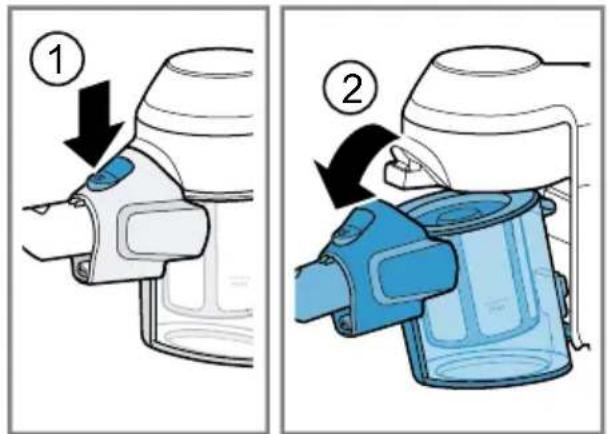
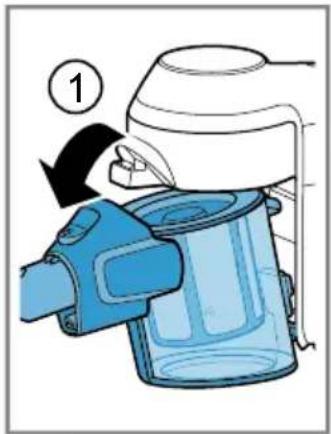
- To remove the dust container, press the release button.
→ Fig. 16
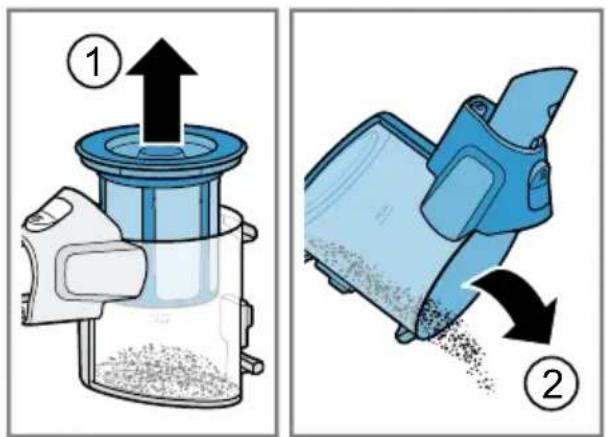
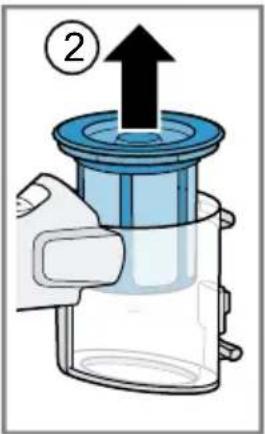
- Remove the filter unit from the dust container.
→ Fig. 17
-
Empty the dust container.
-
If there is dirt underneath the ejection opening, remove the dirt.
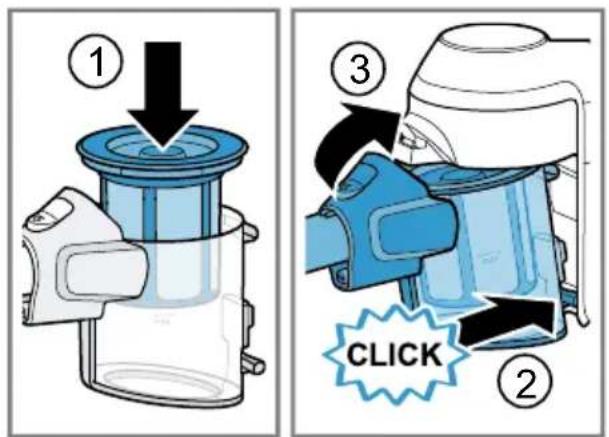
-
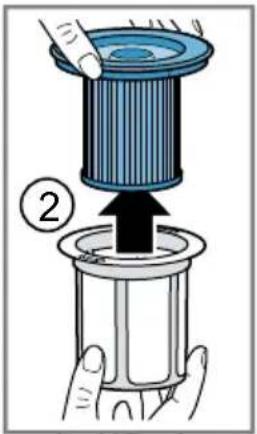
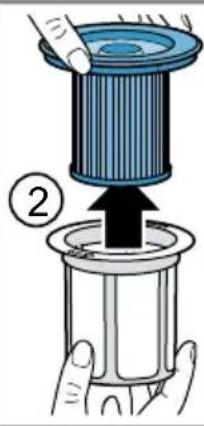
Insert the filter unit into the dust container and check that it is seated correctly.
→ Fig. 18
- Insert the dust container.
√ The dust container audibly clicks into position.
Cleaning the filter unit
When you empty the dust container, also clean the filter. This gives you a good vacuuming result.
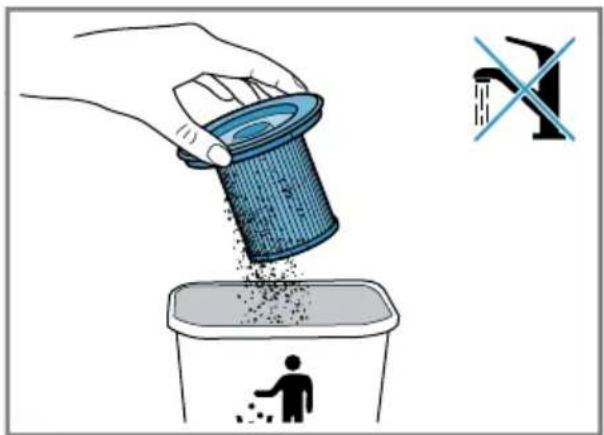
ATTENTION!
Penetrating moisture may damage the filters.
▶ Never allow the filters to come into contact with liquids.
Requirement: The appliance is switched off.
→ "Switching off the appliance", Page 18
- Remove the dust container.
→ Fig. 16
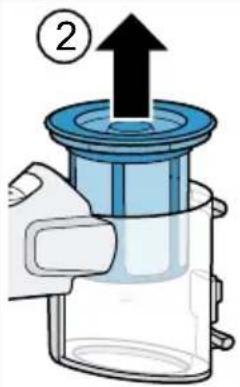
- Remove the filter unit from the dust container.
→ Fig. 19
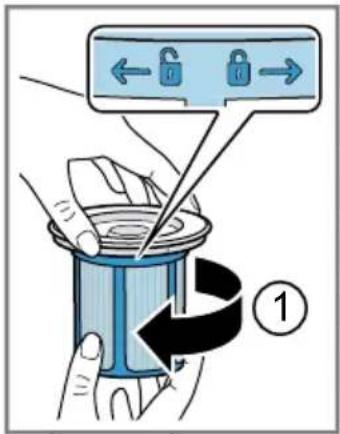
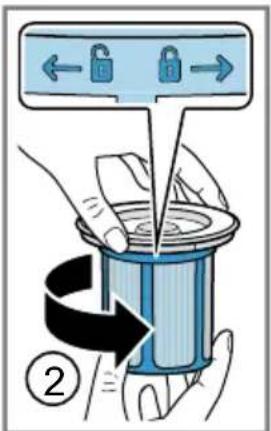
- To unlock the cartridge filter, turn the filter unit in the 6 direction.
→ Fig. 20
-
Remove the cartridge filter.
-
Tap out the cartridge filter over a bin.
→ Fig. 21
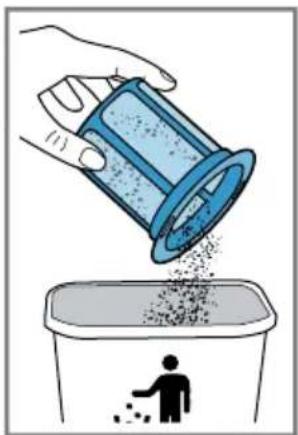
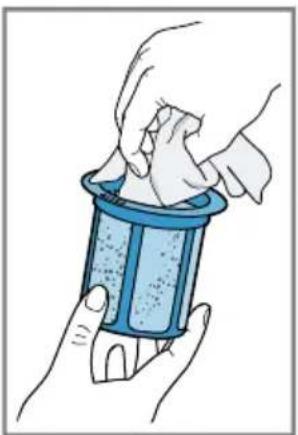
- Lightly shake the fluff filter over a bin and lightly tap on it.
→ Fig. 22
-
Clean the fluff filter with a dry cloth.
-
Insert the cartridge filter into the fluff filter.
→ Fig. 23
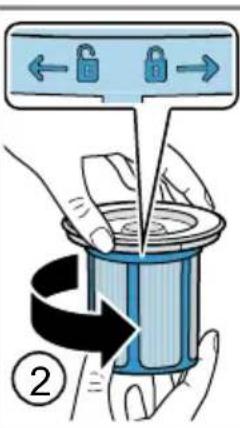
-
Lock the cartridge filter in the direction.
-
Insert the filter unit into the dust container.
→ Fig. 18
- Insert the dust container.
√ The dust container audibly clicks into position.
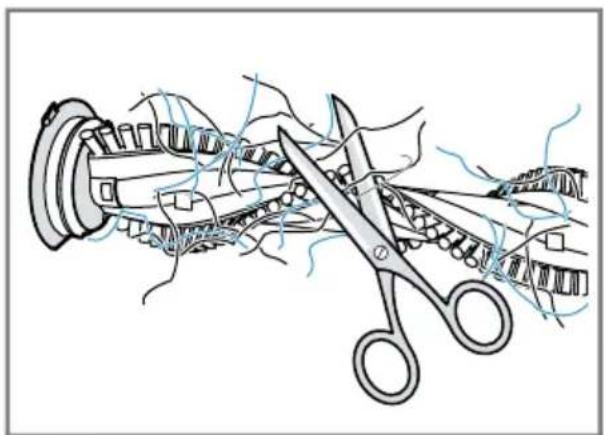
Cleaning the nozzles
Requirement: The appliance is switched off.
→ "Switching off the appliance", Page 18
-
Disconnect the nozzle from the appliance.
-
Release the brush roller.
→ Fig. 24
-
Remove the brush roller sideways from the nozzle.
-
Use scissors to cut through threads and hairs wound round the brush and then remove them.
→ Fig. 25
- Insert the brush roller sideways along the guide bar and into the nozzle.
→ Fig. 26
- Lock the brush roller.
Troubleshooting
You can rectify minor faults on your appliance yourself. Read the troubleshooting information before contacting Customer Service. This will avoid unnecessary costs.

WARNING
Risk of electric shock!
Improper repairs are dangerous.
- Repairs to the appliance should only be carried out by trained specialist staff.
▶ Only use genuine spare parts when repairing the appliance. - If the power cord of this appliance is damaged, it must be replaced by trained specialist staff.
Malfunctions
| Errors Cause Troubleshooting | ||
| The appliance is not working.The battery status display does not show any status.The red battery status display lights up for 10 seconds. | The battery has not been inserted correctly. | Insert the battery correctly. "Inserting and charging the battery", Page 15 |
| The battery has not been charged. | Charge the battery. "Charging", Page 15 | |
| The battery has overheated or overcooled. | Switch off the appliance and disconnect the appliance from the power supply.Wait until battery has reached room temperature. | |
| The appliance has overheated or overcooled. | Switch off the appliance and disconnect the appliance from the power supply.Wait until the appliance has reached room temperature. | |
| The dust container cannot be inserted. | The filter unit is not complete. | Check whether the filter unit is complete. |
| The filter unit or dust container is not positioned correctly. | Check whether the filter unit and dust container are inserted correctly. | |
| Suction is reduced. | The filter is blocked. | Switch off the appliance and disconnect the appliance from the power supply.Clean the filter unit. "Cleaning the filter unit",Page 19 |
| Suction is reduced. | The nozzle is blocked. | 1. Switch off the appliance and disconnect the appliance from the power supply.2. Check whether the air channel from the nozzle to the appliance is blocked.3. Empty the dust container.→ "Emptying the dust container", Page 184. Clean the filter unit.→ "Cleaning the filter unit", Page 195. Once the appliance has cooled down, switch the appliance back on. |
Transportation, storage and disposal
Disposing of old appliance
Valuable raw materials can be reclaimed by recycling.
- Dispose of the appliance in an environmentally friendly manner.
This appliance is labelled in accordance with European Directive 2012/19/EU concerning used electrical and electronic appliances (waste electrical and electronic equipment - WEEE). The guideline determines the framework for the return and recycling of used appliances as applicable throughout the EU.
Disposing of batteries
Batteries should be recycled in an environmentally friendly manner. Do not dispose of the batteries in the household rubbish.
- Dispose of batteries in an environmentally friendly manner.
Only for EU countries:
According to the European Guideline 2006/66/EC, defective or used battery packs/batteries, must be collected separately and disposed of in an environmentally correct manner.
Sending batteries
The lithium-ion batteries in the appliance are subject to the requirements of dangerous goods legislation. You can transport the batteries by road without any further requirements. In the event that they are shipped by a third party (e.g. transported by air or
freight carrier), special requirements regarding packaging and identification must be met. In this case, a dangerous goods expert must be consulted when preparing the goods for dispatch.
- Only send undamaged batteries.
- Mask the open contacts.
- Pack the battery so that it cannot move.
- Observe the national regulations in the recipient country.
Customer Service
If you have any queries, are unable to rectify faults on the appliance yourself or if your appliance needs to be repaired, contact Customer Service. You can solve many problems yourself by consulting the information on troubleshooting in these instructions or on our website. If this is not the case, contact our Customer Service. We always find an appropriate solution.
With any warranty claims we will make sure that your appliance is repaired by trained Customer Service technicians using genuine spare parts, including after the manufacturer's warranty has expired. Function-relevant genuine spare parts according to the corresponding Eco-design Order can be obtained from Customer Service for a period of at least 7 years from the date on which your appliance was placed on the market within the European Economic Area.
Note: Under the terms of the manufacturer's warranty the use of Customer Service is free of charge.
Detailed information about the warranty period and terms of warranty in your country are available from Customer Service, your dealer or our website.
When contacting Customer Service, you will need the product number (E-Nr.) and the production number (FD) of your appliance.
The contact details for Customer Service can be found in the Customer Service directory at the end of the manual or on our website.
Product number (E-Nr.) and production number (FD)
The product number (E-Nr.) and the production number (FD) can be found on the rating plate of the appliance.
Make a note of your appliance's details and the Customer Service telephone number to find them again quickly.
Warranty conditions
You can make warranty claims for your appliance under the following conditions.
The guarantee conditions for this appliance are as defined by our representative in the country in which it is sold. Details regarding these conditions can be obtained from the dealer from whom the appliance was purchased. The bill of sale or receipt must be produced when making any claim under the terms of this guarantee.
ko
목차
안전성 25
일반 지침 25
올바른 사용법 25
사용자그룹의제한 26
안전 지침 26
물적 손상의 방지...... 28
환경 보호 및 비용 절감 30
포장 폐기 30
포장 풀기 및 점검 30
장치 및 부품 포장 풀기 30
공급 사양 30
제품 알아보기 30
제품 30
조작부 31
상태 표시 31
부속품 31
처음 사용하기 전에 32
Central Service Contacts
AE United Arab Emirates, إِمْلَعْرِابِيُ المَتَّحَدَة
BSH Home Appliances FZE
Round About 13, Plot Nr MO-0532A
Jebel Ali Free Zone - Dubai
Tel.: 04 881 4401*
mailto:service.uae@bshg.com
www.bosch-home.com/ae
*Sun-Thu: 8.00am to 5.00 pm (exclude
public holidays)
AL Republika e Shqiperise, Albania Elektro-Service sh.p.k
Rruga Kasem Shima, Kodi postar-1050,
Prane Ures Mezezit
1023 Tirane
Tel.: 4 227 8130;-131
mailto:info@elektro-servis.com
Gate 1, 1555 Centre Road
Clayton, Victoria 3168
Tel.: 1300 369 744*
mailto:customersupport.au@bshg.com
www.bosch-home.com.au
*Mo-Fr: 24 hours
BA Bosna i Hercegovina, Bosnia-Herzegovina
"HIGH" d.o.o.
Gradačačka 29b
71000 Sarajevo
Tel.: 033 21 35 13
mailto:centralniservis@yahoo.com
Business center FPI, floor 5, Cherni vrah
Blvd. 51B
1407 Sofia
Tel.: 0700 208 17
mailto:informacia.servis-bg@bshg.com
www.bosch-home.bg
*Sat-Thu: 7.00am to 5.00 pm (exclude
public holidays)
Grand Union House, Old Wolverton
Road, Wolverton
Milton Keynes MK12 5PT
To arrange an engineer visit, to order spare parts and accessories or for product advice please visit www.bosch-home.co.uk Or call Tel.: 0344 892 8979*
*Calls are charged at the basic rate, please check with your telephone service provider for exact charges
GR
Greece, Ελλάς
BSH Ikiakes Siskeves A.B.E.
Central Branch Service
17 km E.O. Athinon-Lamias & Potamou 20
14564 Kifisia
Building, 388 Castle Peak Road
Tsuen Wan, New Territories, Hong Kong Tel.: 2626 9655 (HK)
Toll free 0800 863 (Macao)
mailto:bosch.hk.service@bshg.com
www.bosch-home.com/hr
www.bosch-home.com/hu
IE Republic of Ireland
BSH Home Appliances Ltd.
M50 Business Park, Ballymount Road
Upper, Walkinstown
Dublin 12
To arrange an engineer visit, to order spare parts and accessories or for product advice please call Tel.: 014502655*
www.bosch-home.ie
*Calls are charged at the basic rate, please check with your telephone service provider for exact charges
IL Israel
C/S/B/ Home Appliance Ltd.
1, Hamasger St., North Industrial Park
Lod, 7129801
Tel.: 08 9777 222
mailto:csb-serv@csb-ltd.co.il
www.bosch-home.co.il
IN India, Bhārat, भारत
BSH Household Appliances Mfg. Pvt. Ltd.
Arena House, Main Bldg, 2nd Floor, Plot
No. 103, Road No. 12, MIDC, Andheri East
Mumbai 400093
Toll Free 1800 266 1880*
www.bosch-home.com/in
*Mo-Sa: 8.00am to 8.00pm (exclude public holidays)
IS Iceland
Smith & Norland hf.
Noatuni 4
105 Reykjavik
Tel.: 0520 3000
www.sminor.is
IT Italia, Italy
www.bosch-home.com/it
Dong Suh Foods Corporation
Dongsuh Bldg., 324, Dongmak-ro, Mapogu
Seoul 121-730
Tel.: 080 025 9114
KZ Kazakhstan, Казақстан
BSH Home Appliances LLP
Dostyk 117/6, Business Center "Khan Tengri"
Almaty
Hotline: 5454*
mailto:ALA-Service@bshg.com
Toll free from mobile only
LB Lebanon, لبنان
Teheni, Hana & Co.
Boulevard Dora 4043 Beyrouth, P.O. Box 90449
Jdeideh 1202 2040
Tel.: 01 255 211
mailto:Info@Teheni-Hana.com
LT Lietuva, Lithuania
Senuku prekybos centras UAB
Jonavos g. 62
44192 Kaunas
Tel.: 037 212 146
www.senukai.lt
LU Luxembourg
S.R.L. "Rialto-Studio"
ул. Щусева 98
2012 Кишинев
тел.: 022 23 81 80
mailto:bosch-md@mail.ru
ME Crna Gora, Montenegro
Elektronika komerc
Lintel Investments and Management
Services Pvt. Ltd.
Ma. Maadheli, Majeedhee Magu
Malé
Tel.: 030 10 200
mailto:mohamed.zuhuree@lintel.com.mv
www.lintel.com.mv
NL Nederland, Netherlands
| NZ | New Zealand |
| BSH Home Appliances Ltd. | |
| Level 3, Air NZ Building, Smales Farm, 74 | |
| Taharoto Road, Takapuna | |
| Auckland 0632 | |
| Tel.: 0800 245 700* | |
| mailto:aftersales.nz@bshg.com | |
| www.bosch-home.co.nz | |
| *Mo-Fr: 8.30am to 5.00 pm (exclude public holidays) |
| TH | Thailand, ราชอาณาจักรไทยBSH Home Appliances LimitedItal Thai Tower, 2034/31-39, 1st floor,New Petchburi Road, Bangkapi, HuayKwangBangkok, 10310Tel.: 02 975 5353*www.bosch-home.com/th*Mo-Sa: 8.00am to 6.00pm (exclude public holidays) |
Thank you for buying a Bosch Home Appliance!
Register your new device on MyBosch now and profit directly from:
- Expert tips & tricks for your appliance
• Warranty extension options
• Discounts for accessories & spare-parts
• Digital manual and all appliance data at hand - Easy access to Bosch Home Appliances Service
Free and easy registration – also on mobile phones: www.bosch-home.com/welcome
BOSCH HOME APPLIANCES SERVICE
Looking for help? You'll find it here.
Expert advice for your Bosch home appliances, help with problems or a repair from Bosch experts.
Find out everything about the many ways Bosch can support you: www.bosch-home.com/service
Contact data of all countries are listed in the attached service directory.
- Cordless handstick vacuum cleaner
- Table of contents
- Safety...... 8
- Environmental protection and saving energy.... 13
- Unpacking and checking 13
- Familiarising yourself with your appliance.... 13
- Accessories.... 14
- Before using for the first time ..... 15
- Basic operation 15
- Cleaning and servicing.... 18
- Troubleshooting...... 20
- Transportation, storage and disposal 22
- Customer Service.... 22
- Safety
- General information
- Intended use
- Restriction on user group
- Safety instructions
- WARNING – Risk of electric shock!
- WARNING – Risk of burns!
- WARNING – Risk of injury!
- ⚠ WARNING – Risk of magnetism!
- ⚠ WARNING – Risk of suffocation!
- ⚠ WARNING – Risk of explosion!
- ⚠ WARNING – Risk of harm to health!
- Preventing material damage
- ATTENTION!
- Environmental protection and saving energy
- Disposing of packaging
- Unpacking and checking
- Unpacking the appliance and parts
- Included with the appliance
- Familiarising yourself with your appliance
- Appliance
- en Accessories
- Controls
- Status display
- Accessories
- Before using for the first time
- Installing the base station 1
- WARNING
- Risk of electric shock!
- Inserting and charging the battery
- Basic operation
- Charging
- Risk of fire!
- Charging using the charging cable 1
- Battery charging times
- Charging in the base station 1
- Risk of injury!
- Charging using the quick charger 1
- Notes
- Battery runtimes
- Note
- Installing the appliance
- Dismantling the appliance
- Switching on the appliance
- Switching off the appliance
- Using turbo mode
- Vacuuming with accessories
- Cleaning and servicing
- Cleaning products
- Cleaning the appliance
- Emptying the dust container
- Cleaning the filter unit
- Cleaning the nozzles
- Troubleshooting
- Transportation, storage and disposal
- Disposing of old appliance
- Disposing of batteries
- Sending batteries
- Customer Service
- Product number (E-Nr.) and production number (FD)
- Warranty conditions
- ko
- 목차
- Central Service Contacts
- Thank you for buying a Bosch Home Appliance!
- Looking for help? You'll find it here.
Brand : BOSCH
Model : BCS61PETGB
Category : Vacuum Cleaner