
Athlet BBH85B2 - Vacuum Cleaner BOSCH - Free user manual and instructions
Find the device manual for free Athlet BBH85B2 BOSCH in PDF.


| Product type | Cordless stick vacuum cleaner |
| Brand / Model | Bosch Athlet BBH85B2 (Series 6) |
| Power supply | Rechargeable lithium-ion battery (20V or 28V depending on variant) |
| Power levels | 3 levels (Power 1, 2, 3) |
| Runtime | Up to 60 min (level 1), 30 min (level 2), 10 min (level 3) |
| Filter technology | Sensor Control, external filter unit, filter cartridge, foam filter, lamellar filter, cartridge filter |
| Floor brush | Removable rotating electric brush |
| Included accessories | Upholstery nozzle, crevice tool, professional upholstery nozzle, professional crevice tool, carrying strap, accessory adapter, suction hose with handle, cushion nozzle, additional cylindrical brush, drill accessory |
| Dust container capacity | Dust container with fill level indicator |
| Charge status indicator | Blue LED (solid: charged, blinking: needs charging) or multiple LEDs |
| Safety | Overheat protection, automatic shutdown in case of overheating, child safety (use from age 8 with supervision) |
| Recommended maintenance | Empty the container after each use, clean filters regularly (external unit and cartridge, washable foam filter) |
| Filter cleaning | Sensor Control blinks red when cleaning is needed; foam filter machine washable (30°C, delicate cycle) |
| Operating conditions | Room temperature, indoor, max height 2000 m, do not vacuum liquids or hot/flammable substances |
| Spare parts and accessories | Use only original Bosch accessories; authorized after-sales service for repairs |
| Warranty | Warranty according to conditions of purchase country; contact dealer or Bosch subsidiary |
| Customer service (France) | Home intervention service: 01 40 10 11 00; Consumer Service: 0 892 698 010 (€0.40/min) |
Frequently Asked Questions - Athlet BBH85B2 BOSCH
User questions about Athlet BBH85B2 BOSCH
0 question about this device. Answer the ones you know or ask your own.
Ask a new question about this device
Download the instructions for your Vacuum Cleaner in PDF format for free! Find your manual Athlet BBH85B2 - BOSCH and take your electronic device back in hand. On this page are published all the documents necessary for the use of your device. Athlet BBH85B2 by BOSCH.
USER MANUAL Athlet BBH85B2 BOSCH
[en] Instruction manual 51


natural_image
3D mechanical component diagram showing a vacuum cleaner performing a press or assembly process, with no visible text or symbols.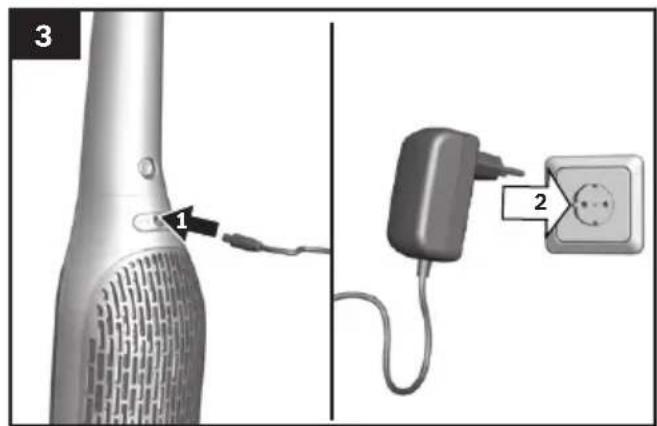
natural_image
Close-up of a metallic electronic device with a black arrow pointing to a small circular component (no text or symbols visible)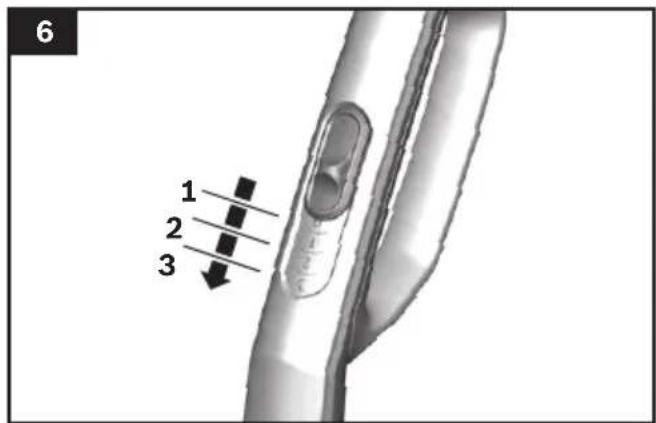

natural_image
3D rendering of a vacuum cleaner with an inset close-up showing the mechanical component (no text or symbols visible)
natural_image
3D rendered image of a device with a curved arrow indicating motion or force (no text or symbols)


natural_image
3D illustration of a cylindrical object with granular texture and scattered particles, labeled '17* b' (no text or symbols on the object itself)
natural_image
3D rendered mechanical component with a downward arrow indicating force or change, accompanied by an inset showing a water level indicator (no text or symbols on the component itself)
natural_image
3D rendered mechanical parts including a cylindrical component and a hollow cylinder, with an hourglass icon indicating 24 hours (no text or symbols on components)
natural_image
3D rendered mechanical component with threaded shaft and arrow indicating direction (no text or symbols)
natural_image
3D rendering of a mechanical device with a downward arrow indicating motion (no text or symbols)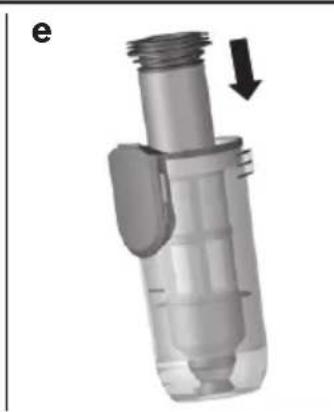
natural_image
3D rendered mechanical component with a black arrow indicating direction (no text or symbols)
natural_image
Mechanical component with two lock icons on a cylindrical body (no text or symbols)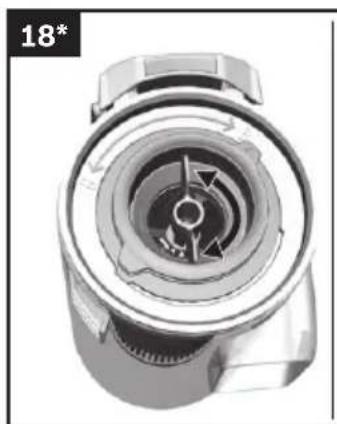
natural_image
Close-up of a mechanical component with internal gear-like structure (no visible text or symbols)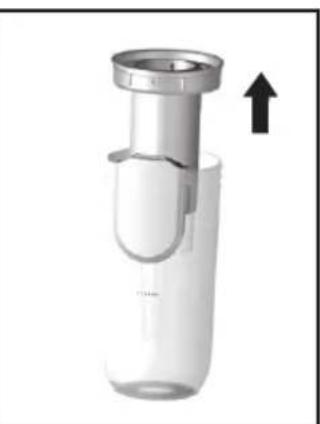
natural_image
Cross-sectional view of a laboratory glassware device with a central cap and an upward arrow indicating motion (no text or symbols)
natural_image
Mechanical component with threaded shaft and flange, labeled 'a' and marked with number 19* (no text or symbols on the part itself)
natural_image
Illustration of a cylindrical mechanical component with motion lines indicating movement (no text or symbols)
natural_image
3D mechanical component with arrow indicating a fastener shift (no text or symbols visible)
natural_image
3D rendered image of a mechanical tool with a meshed handle and threaded end (no text or symbols)
de Sicherheitshinweise....8
Gerätebeschreibung 48
Safety Information 10
Your vacuum cleaner....51
Consignes de sécurité 12
Description de l'appareil....54
Istruzioni di sicurezza....14
Descrizione dell'apparecchio....57
Veiligheidsvoorschriften....16
Beschrijving van het toestel....60
Sikkerhedsanvisninger 18
Beskrivelse....63
Sikkerhetshenvisninger....20
Beskrivelse av apparatet....66
Säkerhetsanvisningar 22
Produktbeskrivning....69
Turvallisuusohjeet....23
Laitteen kuvaus....72
Instruções de segurança....25
Descrição do aparelho....75
Consejos de seguridad 27
Descripción de los aparatos 78
Υποδείξεις ασφαλείας......29
Περιγραφή της συσκευής 81
Güvenlik bilgileri....32
Kullanma kılavuzu 84
Wskazówki dotyczące bezpieczeństwa....34
Opis urządzenia....87
biztonsági útmutató....36
A készülék leírása....90
Bezpečnostní pokyny....38
Návod k použití....93
Указания по технике безопасности.... 40
Описание прибора.... 96
安全信息 42
您的吸塵機....100
Please keep this instruction manual for future reference.
When passing the vacuum cleaner on to a third party, please also pass on this instruction manual.
Intended use
Please read the information on intended use to ensure that you use the appliance correctly and safely.
Only use this appliance:
■As specified in this instruction manual.
■With genuine parts and accessories. Damage caused by using third-party products is not covered under the warranty.
■For cleaning surfaces.
■In private households and in enclosed spaces in a domestic environment at room temperature.
■Up to an altitude of max. 2000 m above sea level.
In order to prevent injuries and damage, the vacuum cleaner must not be used for:
■Vacuuming persons or animals.
■Vacuuming up:
- Hazardous, sharp-edged, hot or red-hot substances.
- Damp or liquid substances.
- Highly flammable or explosive substances and gases.
- Ash, soot from tiled stoves and central heating systems.
- Toner dust from printers and copiers.
Spare parts, accessories
Our original spare parts and original (special) accessories are designed to work with the features and requirements of our vacuum cleaners. We therefore recommend that you only use our original spare parts and original (special) accessories. This will ensure that your vacuum cleaner has a long service life and that the quality of its cleaning performance will remain consistently high throughout.
Please note:
Using unsuitable or inferior-quality spare parts and (special) accessories can damage your vacuum cleaner. Damage caused by the use of such products is not covered by our guarantee.
Safety information
This vacuum cleaner complies with the recognised rules of technology and the relevant safety regulations.
■The appliance may be used by children over the age of 8 years and by persons with reduced physical, sensory or mental capacity or by persons with a lack of experience or knowledge if they are supervised or have been instructed on the safe use of the appliance and have understood the potential dangers of using the appliance.
■Children must never play with the appliance.
■Cleaning and user maintenance must never be carried out by children without supervision.
■Plastic bags and films must be kept out of the reach of children and disposed of.
= There is a risk of suffocation.
Proper use
■To charge, only use the charging cable included in the scope of supply.
■The charging cable must only be connected and operated as specified on the rating plate.
■The appliance must only be stored and charged indoors.
■Do not expose the appliance to temperatures below 0 °C or above 40 °C.
■Never vacuum without the dust bag or dust container, motor protection or exhaust filter.
= This may damage the vacuum cleaner.
- Keep the vacuum cleaner away from your head when using nozzles and tubes. => This could cause injury.
■Do not use a damaged charging cable. Replace it with an original charging cable.
■When disconnecting the charging cable from the mains, pull the plug itself to remove it; do not pull on the power cord.
- Do not pull the charging cable over sharp edges or allow it to become trapped.
- Before carrying out any work on the vacuum cleaner, switch off the appliance and disconnect it from the charging cable and the mains.
■Do not operate the vacuum cleaner if it is damaged.
■If a fault is detected, switch off the appliance and disconnect it from the charging cable and the mains.
■For safety reasons, only authorised after-sales service personnel are permitted to carry out repairs and fit replacement parts to the vacuum cleaner.
■In the following cases, you must stop the appliance immediately and contact the after-sales service:
- If you have accidentally vacuumed up some liquid or liquid has entered the inside of the appliance; - If the appliance has been dropped and damaged.
■Protect the vacuum cleaner from outside weather conditions, moisture and sources of heat.
■Do not pour flammable substances or substances containing alcohol onto the filters (motor protection filter, exhaust filter, etc.).
■The vacuum cleaner is not suitable for use on construction sites. => Vacuuming up building rubble may damage the appliance.
■Switch off the appliance when it is not in use.
■For safety reasons, the appliance is fitted with an overheating protection system to safeguard the battery and motors. The appliance will switch off automatically if it or the battery is too hot.
= The appliance will need around 30 minutes to cool down before it can be used again.
■The packaging is designed to protect the vacuum cleaner from being damaged during transportation. We therefore recommend keeping the packaging for the purpose of future transportation.
Li-ion batteries
■Read all the safety information and instructions.
= Failure to act in accordance with the safety information and instructions may result in electric shock, fire and/or serious injury.
- Keep all the safety information and instructions for future reference.
■Protect the battery from heat sources, for example avoiding long periods in the sun and exposure to fire, as well as from water and moisture.
= Risk of explosion.
■Fumes may be released if the battery is damaged or used improperly. Circulate fresh air, and seek medical assistance in the event of physical symptoms arising as a result of exposure.
= The fumes may irritate the airway.
■If the battery is used incorrectly, liquid may leak out of the battery. Avoid touching the liquid. In the event of accidental contact, rinse the affected area with water. If the liquid comes into contact with the eyes, seek medical assistance.
= If battery liquid leaks, it can irritate or burn the skin.
Transportation information
The Li-ion batteries in the appliance are subject to the requirements of dangerous goods legislation. The batteries can be transported by the user by road without any further requirements. In the event that they are shipped by a third party (e.g. transported by air or freight carrier), special requirements regarding packaging and identification must be met. In this case, a dangerous goods expert must be consulted when preparing the goods for dispatch.
Information on disposal
Vacuum cleaners, batteries, accessories and packaging should be recycled in an environmentally friendly manner.
Do not dispose of the vacuum cleaner or the batteries in the household rubbish.
Packaging
The packaging is designed to protect the vacuum cleaner from being damaged during transportation. It is made of environmentally friendly materials and can be recycled. Dispose of packaging that is no longer required at an appropriate recycling point.
■Old appliances
This appliance contains rechargeable lithium-ion batteries. The appliance must therefore only be disposed of by an authorised after-sales service or dealer.
■Batteries
Please follow the notes on transport.
Integrated batteries may only be removed by specialist personnel for the purpose of disposal. Opening the housing shell may damage the vacuum cleaner.
Only for qualified professional:
To remove the battery from the vacuum cleaner, press the on/off switch (Fig. 5 + Fig. 10) until the battery is fully discharged. Unscrew the screws on the housing and take off the housing shell to remove the battery.
To prevent a short circuit, disconnect the battery connections individually one after the other and then insulate the terminals.
Even in the case of complete discharge, the battery still contains a residual capacity that may be released in the event of a short circuit.
fr
= Fare for kvelning!
Tiltenkt bruk
Congratulations on your purchase of the Bosch BBH8 / BCH8 / BKH8 / BLH8 vacuum cleaner.
This instruction manual describes various BBH8 / BCH8 / BKH8 / BLH8 models, which means that some of the equipment features and functions described may not apply to your model. You should only use original Bosch accessories, which have been specially developed for your vacuum cleaner, in order to achieve the best possible vacuuming results.
Your vacuum cleaner
1 Floor tool with electric brush
2 Dirt container release button
3 Battery charging status indicator
4 Sensor Control indicator
5 Dust container
6 Outer filter unit
7 Filter cartridge with motor protection filter and foam filter*
8 Plate filter*
9 Handle
10 On/off switch
11 Upholstery nozzle*
12 Crevice nozzle*
13 Professional upholstery nozzle*
14 Professional crevice nozzle*
15 Carrying strap*
16 Accessory adapter*
17 Flexible hose with handle*
18 Upholstery crevice nozzle*
19 Additional rotating brush for the floor nozzle*
20 Charging cable
21 Drill dust nozzle*
22 Short handle*
Before using your appliance for the first time
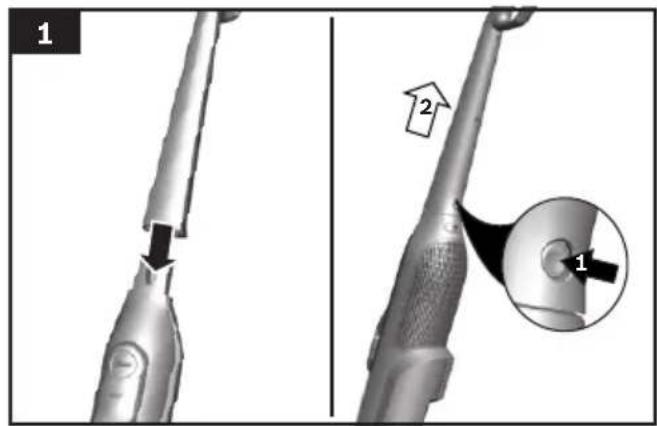
Fig. 1
Carefully plug the handle onto the main housing and lock into place.
To release the handle, press the release button and carefully lift the handle upwards to remove it.
Fig. 2
- Plug the hand vacuum cleaner into the floor tool and lock into place.
- To release the floor tool, press the release button and pull the hand vacuum cleaner out of the tool.
Charging
! Caution: Before using the vacuum cleaner for the first time, the batteries must be charged for at least 6 hours.
Fig. 3
- To charge the vacuum cleaner, place it near to a socket. The appliance can be left standing anywhere in the room. Fig. 7
- Plug the charging cable into the connection at the rear of the appliance.
●Plug the charging cable plug into the socket.
●The charging indicator flashes during the charging process. - Once the battery is fully charged, the charging indicator lights up in blue and no longer flashes.
●The LED goes out after two minutes in order to save energy. - It is normal for the power adapter and vacuum cleaner to heat up and this is not a cause for concern.
Battery charging status indicator
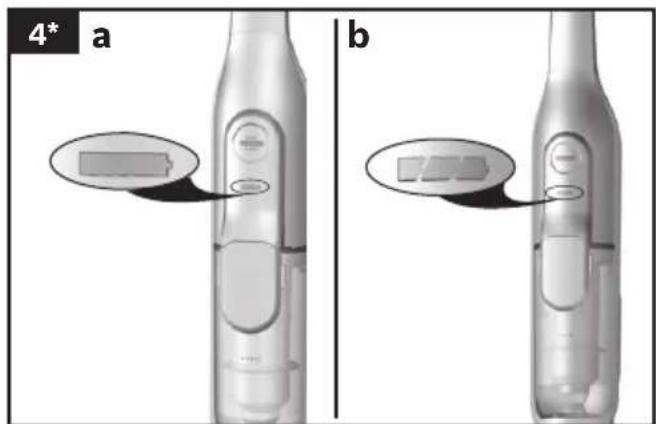
Fig. 4\*
The battery charging status indicator for the appliance corresponds to one of the two following variants:
a) The indicator shows the charging status of the battery.
■Once the battery is fully charged, the indicator lights up in blue.
- When the indicator flashes, the battery must be re-charged.
b) The indicator LEDs show the charging status of the battery.
■Battery fully charged

■Battery semi-charged

■Battery low

- When the final LED flashes, the battery must be re-charged.
Vacuuming
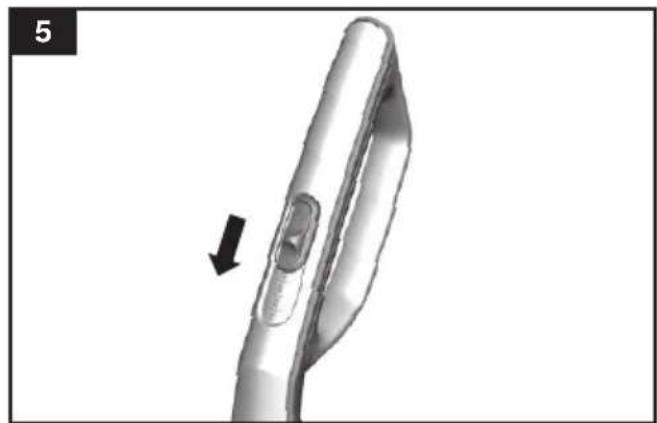
Fig. 5
- Move the on/off button in the direction of the arrow.
Controlling the suction level
Fig. 6
To change the suction power, slide the on/off switch to the desired position:
Power level 1 1
Vacuuming without the electric brush switched on. For routine cleaning tasks and particularly low operating noise. The appliance achieves the maximum run time at this level.
Power level 2 2
Vacuuming at normal power and with the electric brush switched on. For difficult cleaning tasks at an average run time.
Power Level 3 3
Vacuuming at full power and with the electric brush switched on. For stubborn cleaning tasks on all surfaces (carpets, in particular) and when using an optional accessory. The appliance achieves a shorter run time at this level.
Runtime
The runtime time stated here may vary due to charge status, battery temperature and battery age etc.
| Athlet20 V | Athlet28 V | |
| Level 1: | Up to 45 min. | Up to 60 min. |
| Level 2: | Up to 30 min. | Up to 25 min. |
| Level 3: | Up to 8 min. | Up to 10 min. |
Fig. 7
During short pauses in vacuuming, the appliance can be left standing anywhere in the room. To do this, tilt the vacuum cleaner forwards slightly in the direction of the nozzle.
Caution: When the appliance is left standing, it must
- be switched off, because if the brush is turning while the appliance is standing still, it could cause damage to the floor covering.
Vacuuming with accessories
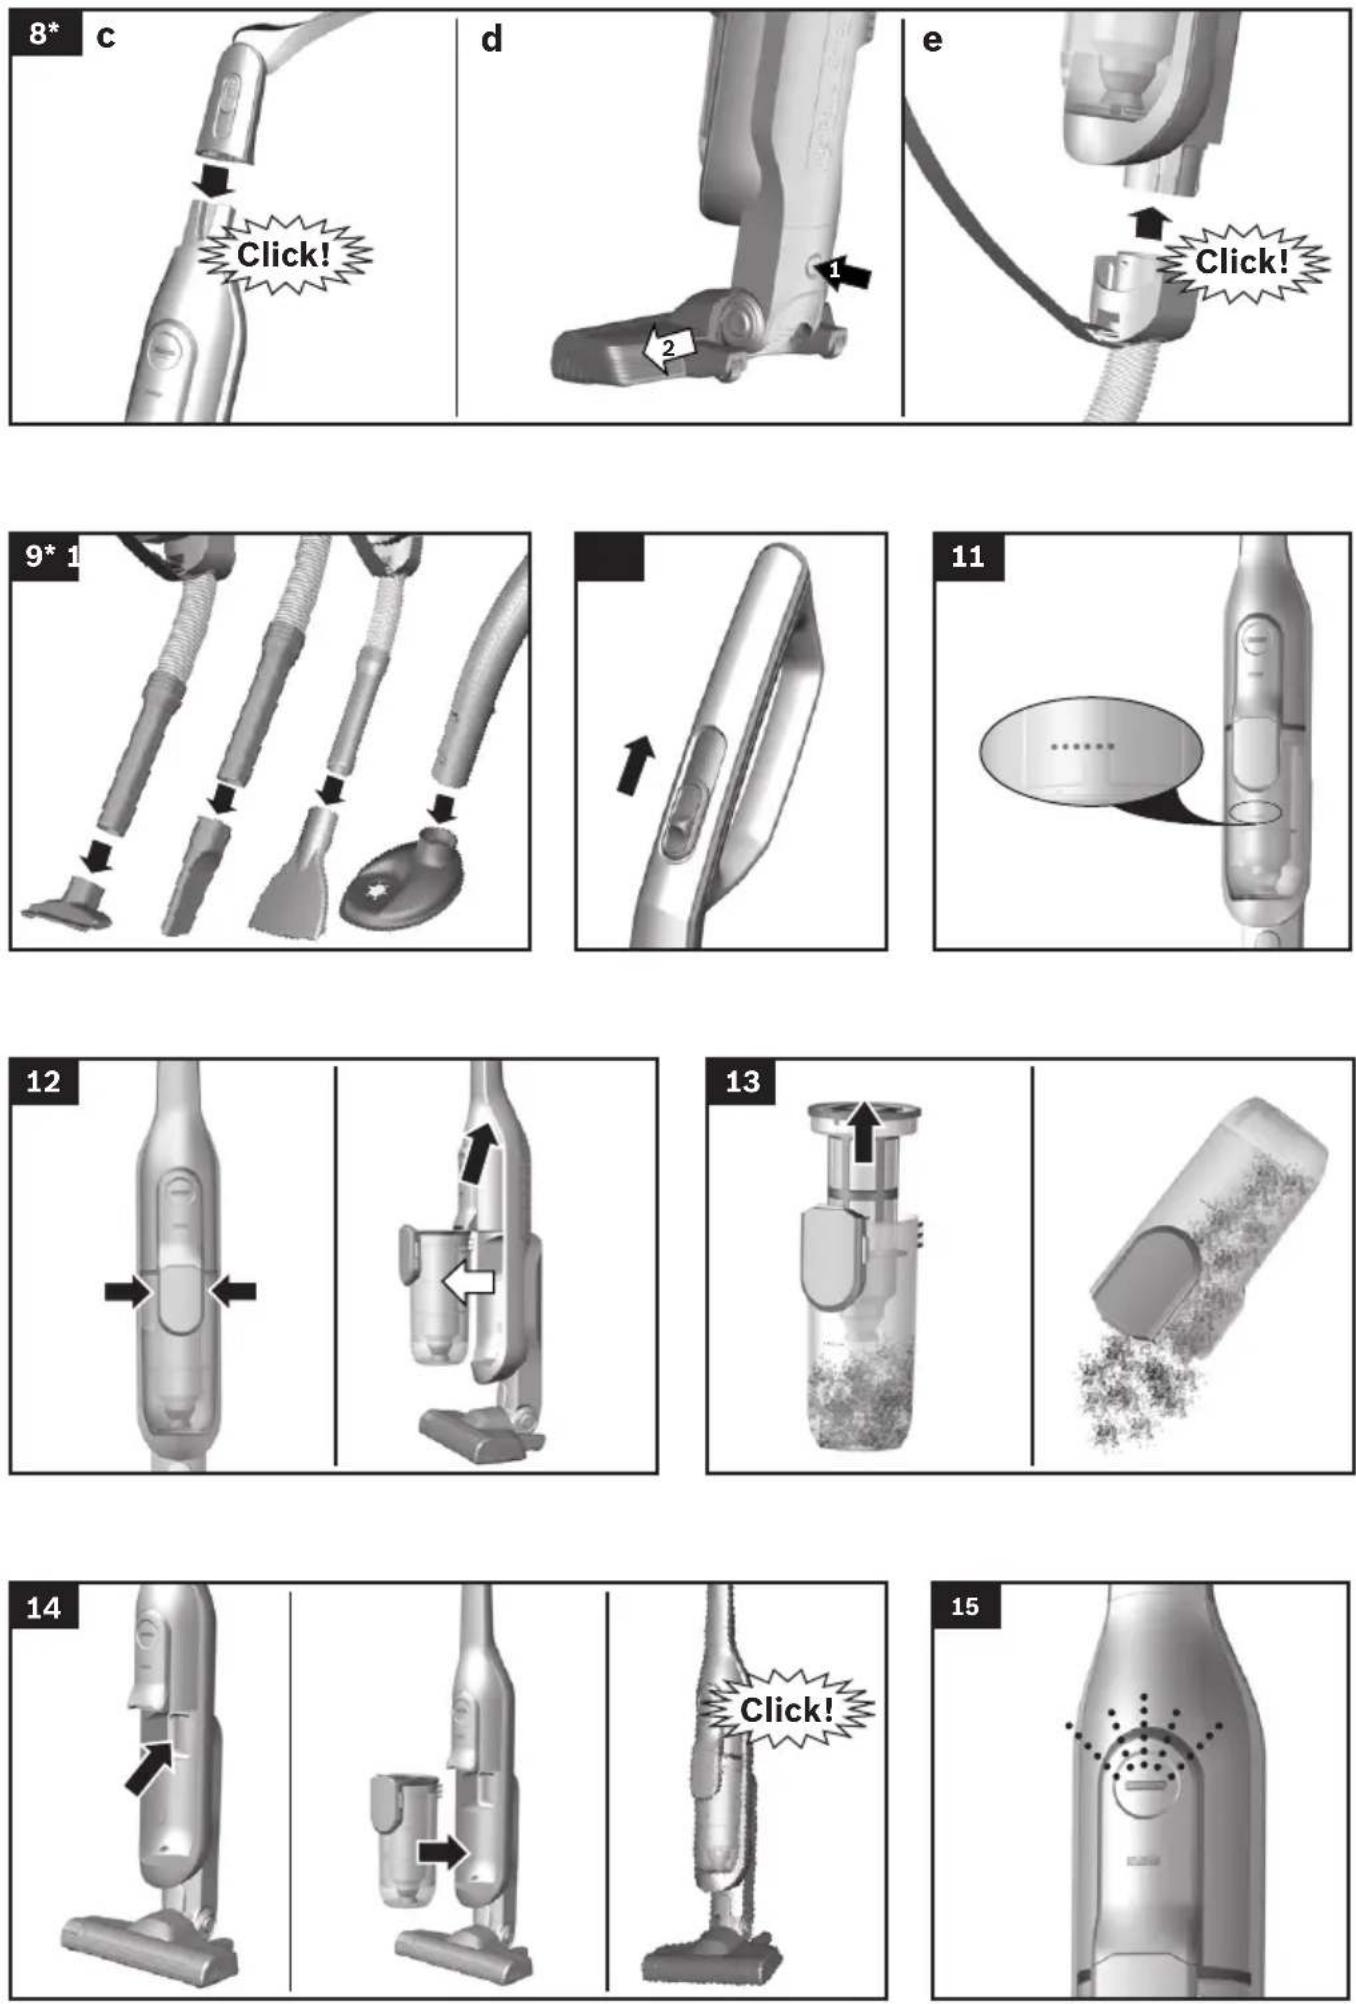
Fig. 8\*
a) Fasten the carrying strap to the short handle provided.
b) Remove the long handle from the main housing.
c) Insert the short handle and lock it in place.
d) Remove the hand-held vacuum cleaner from the floor nozzle. Fig. 2
e) Plug the accessory adapter into the hand-held vacuum cleaner and lock it in place.
Fig. 9\*
Fit nozzles as required to the flexible hose with the accessory adapter handle:
- Upholstery nozzle for vacuuming upholstered furniture, curtains, etc.
- Crevice nozzle for vacuuming crevices and corners, etc.
●Upholstery crevice nozzle for vacuuming upholstery, ideal for cleaning car seats in particular - Secure the drill dust nozzle to the handle and then place against the wall, so that the nozzle drill hole opening sits directly over the hole to be drilled.
After using the appliance
Fig. 10
●Switch off the appliance after vacuuming.
Emptying the dust container
Fig. 11
In order to achieve the best possible vacuuming results, the dust container should be emptied after every use or, at the latest, when dust at one point in the dust container has reached the marking.
We recommend that you not fill the dust container beyond the marking, as this leads to considerable soiling of the filter.
When emptying the dust container, always check how dirty the outer filter unit is and, if necessary, clean it as detailed in the "Cleaning the outer filter unit" instructions. Fig. 16
! Caution: The filter can only be cleaned if the appliance is switched off.
Never vacuum without the outer filter unit and its fitted filter cartridge.
Fig. 12
- Using the release button, unlock the dust container and remove it from the appliance.
Fig. 13
●Take the filter unit out of the dust container.
●Empty the dust container.
Fig. 14
- Remove any dirt which may have been lodged underneath the container ejector opening.
- Insert the filter unit into the dust container, making sure it is correctly seated.
- Insert the dust container in the appliance, so that it 'clicks' audibly into place.
! Caution: If you notice any resistance when inserting the dust container, check that the filter is complete and that the filter unit and dust container are correctly seated.
Filter care
! Caution: The filter can only be cleaned if the appliance is switched off.
Your appliance is equipped with a "Sensor Control" function.
This function constantly monitors whether your vacuum cleaner is working at its optimum power level. The indicator light lets you know when you need to clean the filter cartridge, so that the appliance can reach its optimum power level once more.
Fig. 15 Sensor Control
The indicator lights up blue or is off when the ance is working at its optimum level. Once the indicator turns red and flashes, the outer filter unit and filter cartridge must be cleaned.
The appliance is automatically adjusted to power level 1.
Fig. 16 Cleaning the outer filter unit
The outer filter unit should be cleaned at regular intervals in order to ensure optimum operation of the vacuum cleaner.
Please switch off the appliance to clean the outer filter unit.
Remove the dust container from the appliance. Fig. 12
Take the filter unit out of the dust container. Fig. 13 Clean the outer filter unit.
a) It is usually sufficient to lightly shake or tap out the whole filter unit when the dust container is emptied in order to dislodge any particles of dirt.
b) If this is not sufficient, you can use a dry cloth to remove dirt particles from the surface.
Fig. 17\* Cleaning the filter cartridge
Switch off the appliance.
Remove the dust container from the appliance.
Fig. 12
Take the filter unit out of the dust container. Fig. 13
a) Turn the filter cartridge lid anti-clockwise and remove the filter cartridge from the filter unit.
b) Firstly, clean the filter cartridge by tapping out the dirt.
c) Pull out the foam filter from the motor protection and rinse separately.
Allow the foam filter and motor protection filter to dry completely (approx. 24 hours)
d) After fitting the foam filter, insert the filter cartridge into the dust container.
e) Insert the filter cartridge into the filter unit and lock it by turning the lid clockwise.
If, after hand-washing the filter cartridge, the "Sensor Control" indicator flashes red again, the filter cartridge is so heavily soiled that it must be washed in a washing machine. Use a gentle programme at max. 30 °C and the lowest spin speed.
New filters can be obtained from our after-sales service, if required.
Fig. 18\*
- Switch the appliance off in order to clean the plate filter.
! Caution: the filter can only be cleaned if the appliance is switched off.
- To clean the plate filter, turn the knob at least three turns through 180^ .
You can also clean the filter if the suction is becoming less powerful, even if the indicator has not lit up. We recommend that you clean the plate filter each time before emptying the dust container. It must be cleaned at the latest when the "Sensor Control" indicator lights up.
appli-
Tapping out the plate filter
Fig. 19\*
If the plate filter is particularly dirty, the dirt can also be tapped out.
●Tap out the filter over a dustbin.
The dirt will fall down out of the filter.
Cleaning the floor tool
Before carrying out any maintenance, switch off the vacuum cleaner and disconnect it from the charging cable.
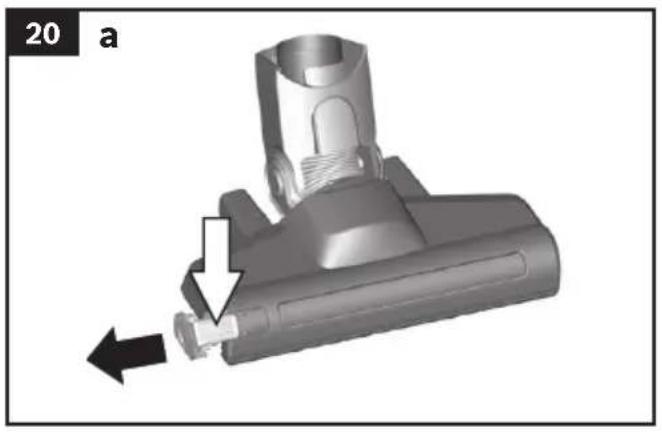
Fig. 20\*
a) Release the brush roller using the release button and pull it sideways out of the floor tool.
b) Using the groove provided, cut through threads and hairs wound round the rollers with scissors and then remove them.
c) Push the brush roller in sideways along the guide rod in the floor tool and lock in place using the release button.
! Caution: The floor tool must only be put into operation with the brush roller fitted.
Care
Before cleaning the hand vacuum cleaner, it must be switched off and disconnected from the charging cable. The vacuum cleaner and plastic accessories can be cleaned with an ordinary plastic cleaner.
Caution: Do not use abrasive materials, glass-
- cleaning agents or all-purpose cleaning products. Never immerse the vacuum cleaner in water.
Subject to technical modifications.
fr
www.bosch-home.com/ae
*Sun-Thu: 8am to 5pm (exclude public holidays)
AL Republika e Shqiperise, Albania
Elektro-Service sh.p.k
Rruga Kasem Shima, Kodi postar-1050
Prane Ures Mezezit
1023 Tirane
Tel.: 4 227 8130; -131
mailto:info@elektro-servis.com
EXPERT Service
Rruga e Kavajes, Kulla B Nr 223/1 Kati I
1023 Tirane
Gate 1, 1555 Centre Road
Clayton, Victoria 3168
Tel.: 1300 369 744
mailto:customersupport.au@bshg.com
www.bosch-home.com.au
*Mon-Fri 24 hours
AZ Azärbaycan Respublikası, Azerbaijan
Baku Service Company MMC
75-79, Bakikhanov Str.
Baku, AZ1007
Tel.: 12 480 33 01
mailto:info-service@yurd.az
www.yurd.az
Optimal Elektronika MMC
Hasanoghlu 7B, Narimanov discrit
Baku, AZ1072
Tel.: 12 954
mailto:STMS@optimal.az
www.optimal.az
BA Bosna i Hercegovina, Bosnia-Herzegovina
"HIGH" d.o.o.
Gradačačka 29b
71000 Sarajevo
Tel./Fax: 033 21 35 13
mailto:centralniservis@yahoo.com
Business center FPI, floor 5,
Cherni vrah Blvd. 51B
1407 Sofia
Tel.: 0700 208 17
mailto:informacia.servis-bg@bshg.com
www.bosch-home.bg
BH Bahrain
Khalaifat Est.
BLD 898, R 533, TASHAN 405
Manama
Tel.: 01 740 05 53*
mailto:service@khalafat.com
*Sat-Thu 7am to 5pm (exclude public holidays)
Building 3, No. 18 Qingjiang South Road,
Gulou District,
Nanjing, Jiangsu Province
Service Tel.: 400 8855 888*
mailto:careline.china@bshg.com
www.bosch-home.cn
*phone rate depends on the network used
CY Cyprus, Kúπρος
BSH Ikiakes Syskeves-Service
39, Arh. Makaariou III Str.
2407 Egomi/Nikosia (Lefkosia)
Tel.: 777 78 007
mailto:EGO-CYCustomerService@bshg.com
CYN Turkish Rep. Of North Cyprus
Argas Limited Company
To arrange an engineer visit, to order spare parts and accessories or for product advice please visit www.bosch-home.co.uk Or call
*Calls are charged at the basic rate, please check with your telephone service provider for exact charges.
GE Georgia
Elit Service Ltd.
Vake-Saburtalo district,
Intersection of Al. Kazbegi ave.
and Kavtaradze Str. 0186
Kavtaradze str. 1
Tbilisi
Tel.: 32 300 020
mailto:info@es.ge
GR8 8Greece,8Ελλάς
BSH Ikiakes Siskeves A.B.E.
Central Branch Service
17 km E.O. Athinon-Lamias & Potamou 20
14564 Kifisia
Unit 07, 23/F, CDW Building,
388 Castle Peak Road,
Tsuen Wan, New Territories,
Hong Kong
Tel.: 2626 9655 (HK)
Toll free 0800 863 (Macao)
mailto:bosch.hk.service@bshg.com
www.bosch-home.com/hr
www.bosch-home.com/hu
IE Republic of Ireland
BSH Home Appliances Ltd.
M50 Business Park,
Ballymount Road Upper,
Walkinstown
Dublin 12
To arrange an engineer visit, to order spare
parts and accessories or for product advice
please call
Tel.: 01450 2655*
www.bosch-home.ie
*Calls are charged at the basic rate, please check with
your telephone service provider for exact charges
IL Israel
C/S/B/ Home Appliance Ltd.
1, Hamasger St.,
North Industrial Park
Lod, 7129801
Tel.: 08 9777 222
mailto:csb-serv@csb-ltd.co.il
www.bosch-home.co.il
IN8 8ndiY,8BhārYHARAT
BSH Household Appliances Mfg. Pvt. Ltd.
Arena House, Main Bldg, 2nd Floor,
Plot No. 103, Road No. 12,
MIDC, Andheri East
Mumbai 400 093
Toll Free 1800 266 1880*
www.bosch-home.in
*Mon-Sat: 8am to 8pm (exclude public holidays)
IS Iceland
Smith & Norland hf.
Noatuni 4
105 Reykjavik
Tel.: 0520 3000
www.sminor.is
IT Italia, Italy
www.bosch-home.com/it
JO Jordan,

Diab Qawasmi & Sons Co.
Khaled Ben Al-Waleed Street,
Jabal Al Hussein (11121),
P.O. Box 212292
Amman
Tel.: 06 465 8505, -2650
Tel.: 79 110 3430
mailto:boschjo@yahoo.com
KG KyrgyzstYn,8Кыргыз8Республикасы
OcOO Alfa Systems
Jibek Jolu str. 40
Bishkek
Tel.: 0702 98 53 53
mailto:alfas-service@mail.ru
KR Republic Korea,
Daehan Minguk,대한민국
Empel Co. Ltd
1201 ACE High Tech City 1 Building
775 Gyeongin-ro Youngdeungpo-gu
Seoul 07299 South Korea
Tel.: 1899-4636
mailto:hsshim@empel.co.kr
Business Center "Khan Tengri"
Almaty
Hotline: 5454*
mailto:ALA-Service@bshg.com
*Toll free from mobile only
LB Lebanon
Tehlni, Hana & Co.
Boulevard Dora 4043 Beyrouth,
P.O. Box 90449
Jdeideh 1202 2040
Tel.: 01 255 211
mailto:Info@tehini-hana.com
LT Lietuva, Lithuania
UAB "AG Service"
R. Kalantos g. 32
52494 Kaunas
Tel.: +370 (8) 700 556 55
mailto:servisas@agservice.lt
www.agservice.lt
Baltic Continent Ltd.
Lukšio g. 23
09132 Vilnius
Tel.: +370 (8) 700 555 95
mailto:info@balticcontinent.lt
www.balticcontinent.lt
UAB Emtoservis
S.R.L. "Rialto-Studio"
Lintel Investments and Management
Services Pvt. Ltd.
Ma. Maadheli, Majeedhee Magu
Malé
Tel.: 030 10 200
mailto:mohamed.zuhuree@lintel.com.mv
www.lintel.com.mv
NL Nederlande, Netherlands
BSH Home Appliances Ltd
Level 3, Air NZ Building
Smales Farm Business Park
74 Taharoto Road,
Takapuna
Auckland 0622
Tel.: +64 0800 245 700*
mailto:aftersales.nz@bshg.com
www.bosch-home.co.nz
*Mon-Fri: 8.30am to 5pm (exclude public holidays)
PK Pakistan, پاکستان
MEGA Home Appliances
Plaza 46-A, Commercial Sector XX,
Phase 3, DHA
Lahore
*Mon-Sat: 9am to 6pm (exclude public holidays)
PL Polska, Poland
SA Kingdom Saudi Arabia,
Abdul Latif Jameel Electronics and
Airconditioning Co. Ltd.
BOSCH Service centre, Kilo 5 Old Makkah
Road (Next to Toyota), Jamiah Dist.,
P.O. Box 7997
Jeddah 21472
Tel.: 800 127 9999*
mailto:ALJECC8@ALJ.COM
www.aljelectronics.com.sa
*Sat-Thu: 8am to 11pm (exclude public holidays)
SE Sverige, Sweden
BSH Home Appliances AB
Landsvägen 32
169 29 Solna
Tel.: 0771 197 000
mailto:Bosch-Service-SE@bshg.com
www.bosch-home.se
SG Singapore新加坡
BSH Home Appliances Pte. Ltd.
38C Jalan Pemimpin, #01-01
Singapore 577180
Tel.: 6751 5000*
mailto:bshsgp.service@bshg.com
www.bosch-home.com.sg
*Mon-Fri: 9am to 6pm, Sat: 9am to 1pm
(exclude public holidays)
SI Slovenija, Slovenia
BSH Hišni aparati d.o.o.
Litostrojska 48
1000 Ljubljana
Tel.: 01 5830 700
mailto:informacije.servis-slo@bshg.com
www.bosch-home.com/si
SK Slovensko, Slovakia
Ital Thai Tower, 2034/31-39, 1st floor,
New Petchburi Road,
Bangkapi, Huay Kwang
Bangkok, 10310
Tel.: 02 495 2424*
www.bosch-home.com/th
*Mon-Sat: 8am to 6pm (exclude public holidays)
TJ Tadschikistan, Чумхурии8
Точикистон
P.E. Suhrob Muhitdinov
Shamsi street no: 67/A
Dushanbe
Tel.: 091 867 80 43
mailto:sino2003@list.ru
Vostok Co. Ltd.
Yakkacinarskaya street No: 144/4
Dushanbe
Tel.: 44 600 78 72
mailto:Lola.Mirzoeva@vostok.tj
www.volna.tj
TM rKönenistan, Turkmenistan
Bayram Anna Yuryewna
Stariya marka, Atabeyeva str.
Spectrum mağaza
Ashgabat
Tel.: 012 26 94 16
mailto:steptm@mail.ru
TR Türkiye, Turkey
www.bosch-home.com/tr
BSH Home Appliances Private Limited
台北市內湖區洲子街80號11樓
11F., No.80, Zhouzi St., Neihu Dist.
Taipei City 11493
Tel.: 0800 368 888
mailto:bshtzn-service@bshg.com
Republic of Uzbekistan
Elektronik Magnat
Beruni street No: 5/6
Tashkent
Tel.: 712 156 333
mailto:magnat.service.uzb@gmail.com
XK Kosovo
Service-General SH.P.K.
rr.Magjistralja Ferizaj Prishtine
70000 Ferizaj
Tel.: 00381 (0) 290 330 723
mailto:servicegeneral527@gmail.com
XS Srbija, Serbia
BSH Kućni aparati d.o.o.
Omladinskih brigada 90E
11070 Novi Beograd
Tel.: 011 353 70 08
mailto:informacije.servis-sr@bshg.com
www.bosch-home.rs
ZA South Africa
BSH Home Appliances (Pty) Ltd
96 Fifteenth Road, Randjespark
1685 Midrand - Johannesburg
Tel.: 086 002 6724
mailto:bsh@iopen.co.za
mailto:applianceserviceza@bshg.com
www.bosch-home.com/za

natural_image
Symbol of a trash bin crossed with two crossed lines, representing no waste or discharge (no text or labels)
de
This appliance is labelled in accordance with European Directive 2012/19/EU concerning used electrical and electronic appliances (waste electrical and electronic equipment - WEEE). The guideline determines the framework for the return and recycling of used appliances as applicable throughout the EU.
fr
natural_image
Simple line drawing of a trash bin with two crossed lines indicating no waste or restriction (no text or symbols)pt
GB Conditions of guarantee
For this appliance the guarantee conditions as set out by our representatives in the country of sale apply. Details regarding same may be obtained from the dealer from whom the appliance was purchased. For claims under guarantee the sales receipt must be produced.
FR Conditions de garantie
www.bosch-home.com/tr
www.bosch-yetkiliservisi.com
Bandrol ve Seri No. :
bosch-infoteam@bshg.com
natural_image
Blue square icon with a white user silhouette and plus sign, labeled 'MyBosch' (no additional text or symbols)Thank you for buying a Bosch Home Appliance!
Register your new device on MyBosch now and profit directly from:
- Expert tips & tricks for your appliance
- Warranty extension options
• Discounts for accessories & spare-parts
• Digital manual and all appliance data at hand - Easy access to Bosch Home Appliances Service
Free and easy registration – also on mobile phones:
www.bosch-home.com/welcome
BOSCH HOME APPLIANCES SERVICE
Looking for help? You'll find it here.
Expert advice for your Bosch home appliances, need help with problems or a repair from Bosch experts.
Find out everything about the many ways Bosch can support you:
www.bosch-home.com/service
Contact data of all countries are listed in the attached service directory.
BSH Hausgeräte GmbH
Carl-Wery-Straße 34
81739 München, GERMANY
A Bosch Company
www.bosch-home.com

8001205248
010820
博西家用電器股份有限公司
台北市內湖區洲子街80號11樓
客服專線: 0800-368-888
Valid within Great Britain:
Imported to Great Britain by
BSH Home Appliances Ltd.
Grand Union House
Old Wolverton Road
Wolverton, Milton Keynes
MK12 5PT
United Kingdom
- Intended use
- Only use this appliance:
- In order to prevent injuries and damage, the vacuum cleaner must not be used for:
- Spare parts, accessories
- Please note:
- Safety information
- Proper use
- Li-ion batteries
- Transportation information
- Information on disposal
- Packaging
- ■Old appliances
- ■Batteries
- fr
- Tiltenkt bruk
- Your vacuum cleaner
- Before using your appliance for the first time
- Fig. 1
- Fig. 2
- Charging
- Fig. 3
- Battery charging status indicator
- Fig. 4\*
- Vacuuming
- Fig. 5
- Controlling the suction level
- Fig. 6
- Power level 1 1
- Power level 2 2
- Power Level 3 3
- Runtime
- Fig. 7
- Vacuuming with accessories
- Fig. 8\*
- Fig. 9\*
- After using the appliance
- Fig. 10
- Emptying the dust container
- Fig. 11
- Fig. 12
- Fig. 13
- Fig. 14
- Filter care
- Fig. 15 Sensor Control
- Fig. 16 Cleaning the outer filter unit
- Fig. 17\* Cleaning the filter cartridge
- Fig. 18\*
- ! Caution: the filter can only be cleaned if the appliance is switched off.
- Tapping out the plate filter
- Fig. 19\*
- Cleaning the floor tool
- Fig. 20\*
- Care
- GR8 8Greece,8Ελλάς
- IE Republic of Ireland
- IL Israel
- IN8 8ndiY,8BhārYHARAT
- IS Iceland
- IT Italia, Italy
- JO Jordan,
- KG KyrgyzstYn,8Кыргыз8Республикасы
- KR Republic Korea,
- LB Lebanon
- LT Lietuva, Lithuania
- NL Nederlande, Netherlands
- PK Pakistan, پاکستان
- PL Polska, Poland
- SA Kingdom Saudi Arabia,
- SE Sverige, Sweden
- SG Singapore新加坡
- SI Slovenija, Slovenia
- SK Slovensko, Slovakia
- TJ Tadschikistan, Чумхурии8
- Точикистон
- TM rKönenistan, Turkmenistan
- TR Türkiye, Turkey
- Republic of Uzbekistan
- XK Kosovo
- XS Srbija, Serbia
- ZA South Africa
- de
- pt
- GB Conditions of guarantee
- FR Conditions de garantie
- Thank you for buying a Bosch Home Appliance!
- Looking for help? You'll find it here.
Brand : BOSCH
Model : Athlet BBH85B2
Category : Vacuum Cleaner