USER MANUAL Caffè Italiano OneTouch 242124 PRINCESS
You have purchased a Princess appliance. Our aim is to provide quality products with a tasteful design and at an affordable price. We hope that you will enjoy this appliance for many years.
Instructions for use
The instructions for use have been collected in the corresponding section. Be familiar with the safety instructions when you consult the instructions for use.
Safety instructions
Warning!
- When using mains-powered appliances, basic safety instructions must always be followed to reduce the risk of fire, electric shock and personal injury.
- Do not use the appliance near bathtubs, showers, basins or other vessels containing water.
Read the entire manual carefully before use. The intended use is described in this manual. The use of any accessory or the performance of any operation with this appliance other than recommended can cause a risk of personal injury. Keep this manual for future reference.
Children should be supervised to ensure that they do not play with the appliance.
- The use of this appliance by children or persons with a physical, sensory, mental or motorial disability, or lack of experience and knowledge can give cause to hazards. Persons responsible for their safety should give explicit instructions or supervise the use of the appliance.
Use
- Switch off the appliance before connecting to or disconnecting from the mains. Always be careful when using the appliance.
- Do not use the appliance outdoors.
Always protect the appliance from water or excessive humidity.
Do not operate the appliance if your hands are wet. Do not operate the appliance if you are barefoot.
Do not touch moving parts. Keep long hair and loose clothing away from the moving parts.
Carefully guide the mains cable to make - sure that it does not hang over the edge of a worktop and cannot be caught accidentally or tripped over.
Never pull the mains cable to disconnect the - mains plug from the mains. Keep the mains cable away from heat, oil and sharp edges. Switch off the appliance and wait for the motor to stop running before disconnecting the mains plug from the mains.
Do not remove any part or accessory when the mains plug is connected to the mains. Always first disconnect the mains plug from the mains.
If the mains cable becomes damaged - during use, immediately disconnect the mains plug from the mains. Do not touch the mains cable before disconnecting the mains plug from the mains.
Disconnect the mains plug from the mains when the appliance is not in use, before assembly or disassembly and before cleaning and maintenance.
Safety of others
Do not allow children or any person unfamiliar with these instructions to use the appliance. Do not allow children or animals to come near the work area. Do not allow children or animals to touch the appliance or mains cable. Close supervision is necessary when the appliance is used near children.
After use
Disconnect the mains plug from the mains and let the appliance cool down before leaving it unattended and before replacing, cleaning or inspecting any parts of the appliance.
Store the appliance in a dry place when not in use. Make sure that children do not have access to stored appliances.
Inspection and repairs
Before use, check the appliance for damaged or defective parts. Inspect the appliance for breakage of parts, damage to switches and other conditions that can affect the operation.
Do not use the appliance if any part is damaged or defective.
Have any damaged or defective part - repaired or replaced by an authorised repair agent.
Never attempt to remove or replace any parts other than those specified in this manual. Before use, check the mains cable for wear or damage.
Do not use the appliance if the mains cable or mains plug is damaged or defective. If the mains cable or mains plug is damaged or defective, it must be replaced by the manufacturer or an authorised repair agent.
Safety instructions for coffee makers
- Before use, always check that the mains voltage is the same as the voltage on the rating plate of the appliance.
- Connect the appliance to an earthed wall socket. If necessary, use an earthed extension cable of a suitable diameter (at least 3 × 1 ~mm^2 ).
Only use the appliance in frost-free environments if the appliance is filled with water.
- Do not use the appliance in damp environments.
- Do not use the appliance in locations higher than 1,500m above sea level.
- Place the appliance on a stable and flat surface.
- Do not place the appliance on hot surfaces or near open flames.
- Be careful with hot water and steam to avoid burns.
- Disconnect the mains plug from the mains if the appliance is not used for a long period.
U.K. Wiring instructions Class 1
The wires in the mains lead are coloured in accordance with the following code:
BLUE NEUTRAL
BROWN LIVE
GREEN/YELLOW EARTH
As the colours of the wire in the mains lead of this appliance may not correspond with the colour markings identifying the terminals on your plug, proceed as follows:
The wire which is coloured BLUE must be connected to the terminal which is marked with the letter N or coloured black.
The wire which is coloured BROWN must be connected to the terminal which is marked with the letter L or coloured red.
The wire which is coloured GREEN/YELLOW must be connected to the terminal which is marked with the letter E or (12) and is coloured GREEN or GREEN/YELLOW.
If a 13Amp (BS1363) plug is used, a 13Amp (BS1362) fuse must be fitted, or if any other type of plug is used, a 13Amp fuse must be fitted, either in the plug or adaptor, or on the distribution board.
Warning! This appliance must be earthed.
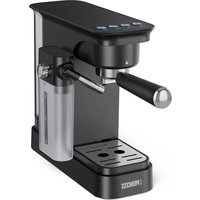
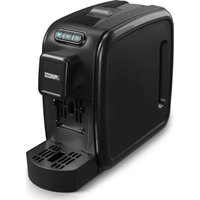
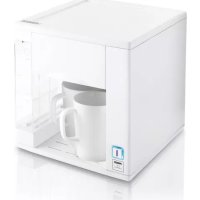
Description (fig. A)
Your 242124 Princess coffee maker has been designed for preparing various types of coffee, hot water and hot chocolate.
- On/off button
- Start/stop button
- Water level indicator
- Steam indicator
- Descaling indicator
- Cup size selector
- Beverage selector
- Locking collar for coffee pad cassette
-
Dispenser cassette
-
Coffee dispenser
-
Hot water dispenser
- Milk froth dispenser
- Coffee pad cassette
- Ground coffee cassette
-
Cup tray
-
Drip tray
- Water reservoir
- Anti-chlorine filter
Initial use
Preparation
Clean the dispenser cassette in soapy water (fig. K).
Clean the coffee pad cassette and the ground coffee cassette in soapy water.
- Clean the cup tray and the drip tray in soapy water.
- Clean the water reservoir and the lid of the water reservoir in soapy water.
- Rinse the accessories under running water.
Deventilation (fig. A, B, C & J)
The appliance must be deventilated before first use. Deventilation is only required for new appliances.
Warning! Be careful with hot water and steam to avoid burns. Hot steam can escape from the milk froth dispenser during the process.
Caution!
- Only fill the water reservoir with fresh cold water. Do not use carbonated water or other liquids to fill the water reservoir.
- Do not exceed the maximum mark when you fill the water reservoir.
- Remove the water reservoir (17) from the appliance.
- Remove the lid (19) from the water reservoir (17).
- Remove the cover (20) from the filter holder (21).
- Place the anti-chlorine filter (18) in the filter holder (21).
Place the cover (20) on the filter holder (21).
- Place the lid (19) on the water reservoir (17).
- Fill the water reservoir (17) with water up to the maximum mark in the filling opening of the lid (19).
- Place the water reservoir (17) in the appliance.
- Set the locking collar (8) to position 'B'.
Insert the empty coffee pad cassette (13) in the appliance.
Set the locking collar (8) to position 'A'.
Note: If the coffee pad cassette is not inserted, the locking collar cannot be set to position 'A'.
Place one cup (500ml) under the coffee dispenser (10).
Put the flexible tube (24) into the milk jug. Press the on/off button (1) to switch on the appliance.
Briefly press the start/stop button (2) to start the deventilation. The water starts to flow out of the coffee dispenser (10) after approximately 30 seconds. The pump switches off automatically.
Set the locking collar (8) to position 'B'. The water is heated until the start/stop button (2) changes from red to green after approximately 80 seconds.
Use
Designation of the indicators
Component Indication Designation
| Start/stop button (2) Red The appliance is heating or rinsing. |
| Red flashing Stand-by mode. |
| Green The appliance is ready for use. |
| Green flashing Preparation in progress. |
| Water level indicator (3) | Yellow flashing | Fill the water reservoir. |
| Steam indicator (4) | Yellow flashing | Descale the steam device. |
| Yellow | Active steam mode. |
| Descaling indicator (5) | Yellow flashing | Descale the appliance. / Water hardness setting mode. |
| Yellow | The descaling program is running. |
Switching on and off (fig. A)
To switch on the appliance, press the on/off button (1). The start/stop button (2) flashes red. The start/stop button (2) becomes green when the appliance is ready for use. To switch off the appliance at any time, press the on/off button (1) again.
Pre-brewing function
The pre-brewing function makes sure that the appliance initially only supplies a small quantity of water. The coffee-making process continues after a short interval.
Economic brewing function
If you switch off the appliance after preparing a beverage, the economic brewing function can be activated automatically. To activate the economic brewing function, keep the start/stop button (2) pressed. The start/stop button (2) becomes green. The water level indicator (3), the steam indicator (4) and the descending indicator (5) briefly flash yellow after approximately 3 seconds. The economic brewing function has been activated. If the brewing process is completed, the appliance will not heat anymore. The appliance switches off automatically.
Stand-by mode
If the appliance is not used for more than approximately 5 minutes, the stand-by mode is activated automatically. The start/stop button (2) flashes red. To activate the appliance for use, press the start/stop button (2) again. If you turn the cup size selector (6) or the beverage selector (7) or if you fill the water reservoir (17) with water, the stand-by mode is deactivated automatically.
Automatic switch-off function
The appliance switches off automatically if it is has not been used for a period of 30 minutes.
Water level indicator (fig. A)
The fresh water supply is monitored continuously by a float which moves up and down in the water reservoir (17). The water level indicator (3) flashes when the level comes below the required minimum filling quantity.
Setting the cup size (fig. D)
The cup size selector is used to set the required quantity of water to be delivered from the appliance.
Set the cup size selector (6) to the required position. Refer to the table below to set the correct cup size.
Setting Cup size
A 1 cup of espresso
B 1 normal cup of coffee
C 1 large cup of coffee
D 2 normal cups of coffee
E 1 extra large cup of coffee
Selecting the beverage (fig. E)
The beverage selector is used to select the type of beverage to be made.
Set the beverage selector (7) to the required position. Refer to the table below to select the correct beverage.
Setting Beverage
A Hot water
B Coffee
C Milk froth
D Cappuccino
E Latte macchiato
F Café au lait
Making coffee with coffee pads (fig. A, C, D, E, F & I)
Use conventional coffee pads with an outer diameter of 7cm
Caution!
- Do not use the following types of coffee pads:
- coffee pads with an outer diameter smaller than 7cm
- hard coffee pads for espresso makers;
- coffee pads with additives for cappuccino, etc.
- Do not put damaged coffee pads, loose ground coffee or instant coffee into the coffee pad cassette.
Caution! Follow the instructions below to put coffee pads into the coffee pad cassette:
- Use the side marked '1' on the coffee pad cassette for one cup of coffee. Use the side marked '2' on the coffee pad cassette for two cups of coffee.
- Lightly tap the coffee pad with your fingertips to evenly distribute the ground coffee in the coffee pad. Make a small indentation in the centre of the coffee pad.
- Put asymmetrical coffee pads in the appliance with the flat side down.
- If you use two coffee pads at the same time, firmly press the first coffee pad into the recess of the coffee pad cassette with the paper edge facing upwards. Subsequently, put the second coffee pad into the coffee pad cassette according to the instructions above.
Set the locking collar (8) to position 'C'.
Remove the coffee pad cassette (13) from the appliance.
Put the coffee pad in the coffee pad cassette (13).
- For one cup, put the coffee pad in the side marked '1' on the coffee pad cassette (fig. F1).
- For two cups, put the coffee pads in the side marked '2' on the coffee pad cassette (fig. F2).
Insert the coffee pad cassette (13) into the appliance with the coffee pad upwards.
Make sure that the coffee pad does not shift.
Set the locking collar (8) to position 'A' as close as possible (see arrow in fig. C).
Place the required amount of cups under the coffee dispenser (10).
- For one cup, place the cup under both dispenser nozzles of the coffee dispenser (fig. 11).
- For two cups, place one cup under the left dispenser nozzle and one cup under the right dispenser nozzle of the coffee dispenser (fig. 12).
Press the on/off button (1) to switch on the appliance. The start/stop button (2) illuminates red. The start/stop button (2)
becomes green when the appliance is ready for use.
Set the cup size selector (6) to the required position.
Set the beverage selector (7) to position 'B'.
Press the start/stop button (2).
To interrupt the process, press the start/stop button (2) again.
If the process is completed, set the locking collar (8) to position 'B'.
Making coffee with ground coffee (fig. A, C, D, E, G, H & I)
Use 5.5 - 7.5 grams of ground coffee, depending on the quality of the coffee.
Set the locking collar (8) to position 'C'.
Remove the coffee pad cassette (13) from the appliance.
If required, insert the paper filter (22) in the ground coffee cassette (14).
Put the ground coffee in the ground coffee - cassette (14).
-
If you want regular coffee, put ground coffee in the ground coffee cassette.
-
If you want espresso, put espressopowder in the ground coffee cassette.
Place the lid (23) on the ground coffee - cassette (14).
Put the ground coffee cassette (14) in the side marked '2' on the coffee pad cassette (13).
Insert the coffee pad cassette (13) into the appliance with the ground coffee cassette upwards.
Set the locking collar (8) to position 'A' as close as possible (see arrow in fig. C).
Place the required amount of cups under the coffee dispenser (10).
- For one cup, place the cup under both dispenser nozzles of the coffee dispenser (fig. 11).
- For two cups, place one cup under the left dispenser nozzle and one cup under the right dispenser nozzle of the coffee dispenser (fig. 12).
Press the on/off button (1) to switch on the appliance. The start/stop button (2)
illuminates red. The start/stop button (2) becomes green when the appliance is ready for use.
Set the cup size selector (6) to the required position.
Set the beverage selector (7) to position 'B'. Press the start/stop button (2).
To interrupt the process, press the start/stop button (2) again.
If the process is completed, set the locking collar (8) to position 'B'.
Frothing milk (fig. A, C, D, E & J)
The milk frothing unit combines milk, steam and air dispensing a cascade of frothy milk directly into the cup.
Warning!
- Make sure that the milk jug is correctly filled. If the milk jug becomes empty during the milk frothing process, milk and hot steam can escape from the milk froth dispenser.
- Only remove the milk jug and the cup when the milk frothing process is completed. The milk frothing process does not stop immediately.
Caution! Only use the milk frothing unit under the following conditions:
- The milk frothing unit must be properly assembled.
- The milk frothing unit must be properly mounted to the appliance.
- A cup must be placed directly under the milk froth dispenser.
- A suitable milk jug filled with a sufficient amount of cold milk must be placed as close to the left side of the appliance as possible. The flexible tube must reach the bottom of the milk jug.
Fill the milk jug with a sufficient amount of cold milk.
Place the milk jug as close to the left side of the appliance as possible. Make sure that the flexible tube (24) reaches the bottom of the milk jug.
Place the cup on the cup tray (15) directly under the milk froth dispenser (12).
Press the on/off button (1) to switch on the appliance. The start/stop button (2) illuminates red. The start/stop button (2) becomes green when the appliance is ready for use.
Set the cup size selector (6) to the required position.
Set the beverage selector (7) to position 'C'. The steam indicator (4) illuminates yellow.
The start/stop button (2) becomes green when the appliance is ready for use.
Press the start/stop button (2).
To interrupt the process, press the start/stop button (2) again.
If the process is completed, set the locking collar (8) to position 'B'.
If you do not immediately use the milk - frothing unit again, perform express cleaning. Refer to the section "Express cleaning".
Making espresso (fig. A, C, D & E)
Espresso is a concentrated type of coffee brewed by forcing hot water or steam under pressure through finely ground coffee. The defining characteristics of espresso include: a higher coffee strength than regular coffee; a higher amount of dissolved solids than regular coffee; a smaller amount of coffee in one cup than regular coffee (25 - 30 ml).
Use coffee pads with a stronger type of roasted coffee or use espresso powder in the ground coffee cassette.
Prepare the appliance for making coffee. Refer to the section "Making coffee with coffee pads" or to the section "Making coffee with ground coffee".
Set the cup size selector (6) to the required position:
- For a regular espresso, set the cup size selector (6) to position 'A'.
- For a long espresso, set the cup size selector (6) in the centre between position 'A' and 'B'.
Set the beverage selector (7) to position 'B'. Press the start/stop button (2).
To interrupt the process, press the start/stop button (2) again.
If the process is completed, set the locking collar (8) to position 'B'.
Making cappuccino
(fig. A, C, D & E)
Cappuccino is a type of coffee that consists of coffee, hot milk and frothed milk.
Prepare the appliance for making coffee. Refer to the section "Making coffee with coffee pads" or to the section "Making coffee with ground coffee".
- Prepare the appliance for frothing milk. Refer to the section "Frothing milk".
- Set the cup size selector (6) to position 'B', 'C', 'D' or 'E'.
- Set the beverage selector (7) to position 'D'. Press the start/stop button (2). To interrupt the process, press the start/stop button (2) again. If the process is completed, set the locking collar (8) to position 'B'.
- Sprinkle some cacao powder on top of the frothed milk.
- As a Christmas specialty, sprinkle some cinnamon on top of the frothed milk. If you do not immediately use the milk - frothing unit again, perform express cleaning. Refer to the section "Express cleaning".
Latte macchiato is essentially an inverted caffe latte, with the coffee poured on top of the milk.
- Prepare the appliance for making coffee. Refer to the section "Making coffee with coffee pads" or to the section "Making coffee with ground coffee".
Prepare the appliance for frothing milk. Refer to the section "Frothing milk".
- Set the cup size selector (6) to position 'B', 'C', 'D' or 'E'.
- Set the beverage selector (7) to position 'E'. Press the start/stop button (2). To interrupt the process, press the start/stop button (2) again. If the process is completed, set the locking collar (8) to position 'B'.
- Sprinkle some chocolate flakes or cacao powder on top of the frothed milk. If you do not immediately use the milk - frothing unit again, perform express cleaning. Refer to the section "Express cleaning".
- Prepare the appliance for making coffee. Refer to the section "Making coffee with coffee pads" or to the section "Making coffee with ground coffee".
Prepare the appliance for frothing milk. Refer to the section "Frothing milk".
- Set the cup size selector (6) to position 'B', 'C', 'D' or 'E'.
Set the beverage selector (7) to position 'F'. Press the start/stop button (2).
To interrupt the process, press the start/stop button (2) again.
If the process is completed, set the locking collar (8) to position 'B'.
If you do not immediately use the milk - frothing unit again, perform express cleaning.
Refer to the section "Express cleaning".
Making tea or instant beverages (fig. A, C, D & E)
The hot water dispenser can be used for preparing tea or instant beverages.
Warning! Be careful with hot water and steam to avoid burns.
Place the cup on the cup tray (15) directly under the hot water dispenser (11).
Press the on/off button (1) to switch on the appliance. The start/stop button (2) becomes red. The start/stop button (2) becomes green when the appliance is ready for use.
Set the cup size selector (6) to the required position.
Set the beverage selector (7) to position 'A'. Press the start/stop button (2).
To interrupt the process, press the start/stop button (2) again.
If the process is completed, set the locking collar (8) to position 'B'.
Hints for use Café mocha
Café mocha is a type of coffee that consists of coffee, hot chocolate and frothed milk.
Prepare the appliance for making espresso.
Refer to the section "Making espresso". Add the hot chocolate to the espresso.
Add the frothed milk to the espresso with hot chocolate.
Frothed cacao
Put fresh milk in a suitable milk jug. Add the required amount of instant cacao powder to the milk.
Stir the cacao powder through the milk directly in the milk jug.
Froth the milk with the cacao powder.
Refer to the section "Frothing milk".
Cleaning and maintenance
Warning!
- Before cleaning or maintenance, always switch off the appliance and remove the mains plug from the wall socket.
- Do not immerse the appliance in water or any other liquids for cleaning.
Caution! Do not use aggressive or abrasive cleaning agents to clean the appliance and the various parts of the appliance.
Regularly check the appliance for possible damage.
- Use a damp cloth to clean the outside of the appliance. Use a clean, dry cloth to dry the appliance.
- Clean the dispenser cassette in soapy water. Clean the coffee pad cassette and the ground coffee cassette in soapy water. Clean the cup tray and the drip tray in soapy water.
Clean the water reservoir and the lid of the water reservoir in soapy water.
Rinse the accessories under running water.
Rinsing the appliance (fig. A, B, D & E)
The appliance must be rinsed if it has not been used for a couple of days. Always start rinsing the appliance directly after switching on in order to decrease energy consumption.
Warning! Be careful with hot water and steam to avoid burns. Hot steam can escape from the milk froth dispenser during the process.
Caution!
- Before rinsing the appliance, make sure that the milk frothing unit is assembled and mounted correctly.
-
Before rinsing the appliance, make sure that the water reservoir is placed in the appliance.
-
Rinse the water reservoir (17).
Make sure that the cover (20) of the filter holder (21) is correctly placed in the water reservoir (17).
- Place the lid (19) on the water reservoir (17).
Fill the water reservoir (17) with water up to the maximum mark in the filling opening of the lid (19).
Place the water reservoir (17) in the appliance.
Set the beverage selector (7) to position 'A' or 'B'.
Insert the coffee pad cassette (13) into the appliance.
Set the locking collar (8) to position 'A'.
Place one cup (500ml) under the coffee dispenser (10).
Make sure that the milk frothing unit is assembled and mounted correctly.
Press the on/off button (1) to switch on the appliance.
Simultaneously press on/off button (1) and the start/stop button (2) to start the rinsing process.
If the process is completed, set the locking collar (8) to position 'B'.
Cleaning the coffee dispenser after (fig. K)
The quality of the cream layer reduces when the coffee dispenser filter is clogged by calcium or coffee residue. The coffee dispenser filter must be cleaned regularly.
Caution! If the two filters of the coffee dispenser filter are pressed against each other, replace the coffee dispenser filter.
Remove the dispenser cassette (9) from the appliance.
Remove the coffee dispenser filter (28) from the dispenser cassette (9).
Clean the coffee dispenser filter (28) in soapy water using a soft brush to remove coffee residue.
Pour a small amount of descending agent through the opening of the coffee dispenser filter (28) to remove calcium.
Rinse the coffee dispenser filter (28) under running water.
Mount the coffee dispenser filter (28) to the dispenser cassette (9).
Mount the dispenser cassette (9) to the appliance.
Cleaning the milk frothing unit (fig. A, D, E & J)
Express clean
- Set the beverage selector (7) to position 'C', 'D', 'E' or 'F'.
- Place one cup (500 ml) under the coffee dispenser (10).
- Fill the milk jug with cold water.
Put the flexible tube (24) into the milk jug.
Make sure that the milk frothing unit is assembled and mounted correctly.
- Wait until the start/stop button (2) illuminates green.
Simultaneously press on/off button (1) and the start/stop button (2) to start express cleaning.
Basic cleaning
Disassemble the milk frothing unit.
- Clean the milk froth dispenser (12), the flexible tube (24), the tube adapter (25) and the milk froth dispenser adapter (26) in soapy water using a soft brush.
Fully dry the parts of the milk frothing unit.
- Assemble the milk frothing unit.
- Tightly screw the red steam valve (27) to the steam outlet (30).
Mount the milk frothing unit to the appliance.
Cleaning the red steam valve (fig. L)
The red steam valve must be cleaned monthly or when the appliance clearly produces less steam.
- Manually remove the red steam valve (27) from the steam outlet (30). If necessary, use the hexagonal key (29) at the underside of the coffee dispenser filter (28).
Note: If you do not manage to remove the red steam valve, call our service number.
- Clean the red steam valve (27) using the descending agent. Rinse the red steam valve (27) under running water.
- Manually screw the red steam valve (27) to the steam outlet (30).
Replacing the anti-chlorine filter (fig. A & B)
The anti-chlorine filter is available from our service station. The anti-chlorine filter removes chlorine and other contaminants from the water for a pure coffee taste.
The anti-chlorine filter must be replaced every two months at an average daily consumption of 8 cups of coffee (approximately 500 cups).
Remove the water reservoir (17) from the appliance.
Remove the lid (19) from the water reservoir (17).
Remove the cover (20) from the filter holder (21).
Remove the anti-chlorine filter (18) from the filter holder (21).
Rinse the new anti-chlorine filter (18) under running water.
Place the anti-chlorine filter (18) in the filter holder (21).
Place the cover (20) on the filter holder (21) (fig. B).
Place the lid (19) on the water reservoir (17).
Place the water reservoir (17) in the appliance.
Setting the water hardness range (fig. A)
The appliance can be set to various water hardness settings. The factory setting of the water hardness is 4. Contact your waterworks company or your local authorities for the water hardness range in your area. If the water hardness range in your area is lower than 4, the water hardness setting can be changed to reduce the number of times that the appliance must be descaled.
Use the on/off button (1) to set the appliance to the water hardness in your area. Refer to the table below to set the correct water hardness range.
Flashing Water hardness Water hardness signal range (^)
| 1 (soft) 0 - 7 |
| 2 (medium) | 7 - 14 | |
| 3 (hard) | 14 - 21 | |
| 4 (very hard) | above 21 | |
- Press the on/off button (1) to switch off the appliance.
- Keep the start/stop button (2) pressed for 3 - 5 seconds until the descending indicator (5) flashes.
Press the start/stop button (2) to increase the water hardness range by one level. (Range 4 is followed by range 1, etc.)
- Briefly press the on/off button (1) to save the new water hardness range. If the on/off button (1) is not pressed within ten seconds, the appliance switches off automatically without saving the setting.
- Repeat the first two steps to check the water hardness range.
Descaling (fig. A, B, C, K, L & M)
The appliance must be descaled regularly. The appliance has an automatic descending indicator which informs the user when descending is required.
If the descending indicator (5) flashes, the appliance must be descaled. It is still possible to brew coffee and prepare hot water, but frothing milk for cappuccino, latte macchiato or cafe au lait is no longer possible.
If the descending indicator (5) lights continuously, the descending program is running.
The automatic descending program of the appliance is optimised to be used for 125ml of durgol® swiss espresso®. The product is used undiluted, is highly effective and guarantees a reliable descending and therefore a long operational life of the appliance. The descending agent is available from our service station.
Warning! Be careful when descending the appliance to prevent damage to furniture or clothing. Place an empty pot (at least 1.8 l) under the coffee dispenser (10), the hot water dispenser (11) and the milk froth dispenser (12) in such a way as to prevent splashes.
Caution!
Only use durgol® swiss espresso® in the specified quantity to descale the appliance.
- Do not use vinegar or vinegar concentrate to descale the appliance.
- Do not use citric acid to descale the appliance.
Preparation
Press the on/off button (1) to switch off the appliance.
Remove the dispenser cassette (9) from the appliance.
Remove the milk frothing unit from the appliance.
Manually remove the red steam valve (27) from the steam outlet (30). If necessary, use the hexagonal key (29) at the underside of the coffee dispenser filter (28).
Remove the water reservoir (17) from the appliance.
Remove the lid (19) from the water reservoir (17).
Remove the cover (20) from the filter holder (21).
Remove the anti-chlorine filter (18) from the filter holder (21).
Put the red steam valve (27) in the filter holder (21).
Place the cover (20) on the filter holder (21).
Make sure that the arrow on the cover (20) points in the direction as shown (fig. B).
Fill the empty water reservoir (17) with 125ml of durgol swiss espresso.
Place the lid (19) on the water reservoir (17).
Fill the water reservoir (17) with water up to the maximum mark in the filling opening of the lid (19).
Place the water reservoir (17) in the appliance.
Part 1 - Descaling
Set the beverage selector (7) to position 'A' or 'B'.
Insert the coffee pad cassette (13) into the appliance.
Set the locking collar (8) to position 'A'.
Place an empty pot (at least 1.8 l) under the coffee dispenser (10).
Press the on/off button (1) to switch on the appliance.
Keep the on/off button (1) and the start/stop button (2) pressed at the same time until the pump starts to run. The descending phase is running. The descending indicator (5) remains on as long as the descending phase is running.
Wait for approximately 35 minutes until the water level indicator (3) starts to flash.
Part 2 - Rinsing
Place the lid (19) on the water reservoir (17). Fill the water reservoir (17) with water up to the maximum mark in the filling opening of the lid (19).
Place the water reservoir (17) in the appliance.
Place an empty pot (at least 1.8 l) under the coffee dispenser (10).
Wait until the start/stop button (2) illuminates - green.
Press the start/stop button (2) to start the first rinsing cycle. If the water level indicator (3) flashes, the first rinsing cycle is completed.
Repeat the above steps to run the second rinsing cycle. If the second rinsing cycle is completed, the appliance switches off automatically.
If the process is completed, set the locking collar (8) to position B'.
Remove the lid (19) from the water reservoir (17).
Remove the cover (20) from the filter holder (21).
- Remove the red steam valve (27) from the filter holder (21).
- Tightly screw the red steam valve (27) to the steam outlet (30).
Place the anti-chlorine filter (18) in the filter holder (21).
Place the cover (20) on the filter holder (21).
Make sure that the arrow on the cover (20) points in the direction as shown (fig. B).
Place the lid (19) on the water reservoir (17).
Place the water reservoir (17) in the appliance.
After descending the appliance, clean the coffee pad cassette (13), the milk frothing unit and the coffee dispenser filter (28) in soapy water using a soft brush.
Assembly
Warning! Before assembly, always switch off the appliance and remove the mains plug from the wall socket.
Mounting the anti-chlorine filter and the water reservoir (fig. A & B)
Place the anti-chlorine filter (18) in the filter holder (21).
Place the cover (20) on the filter holder (21).
Place the lid (19) on the water reservoir (17).
Place the water reservoir (17) in the appliance.
Mounting the drip tray and the cup tray (fig. N)
Place the drip tray (16) in the bottom of the appliance.
Place the cup tray (15) above the drip tray (16) in the bottom of the appliance.
Mounting the dispenser cassette and the coffee dispenser filter (fig. K)
Mount the coffee dispenser filter (28) to the dispenser cassette (9).
Mount the dispenser cassette (9) to the • appliance.
Mounting the coffee pad cassette
If you use coffee pads, refer to the section
"Making coffee with coffee pads".
If you use ground coffee, refer to the section
"Making coffee with ground coffee".
Mounting the milk frothing unit (fig. J)
Warning! Push the tube adapter into the milk froth dispenser adapter until it clicks into place. If the tube adapter is not properly mounted to the milk froth dispenser adapter, milk and hot steam can escape from the milk froth dispenser.
Slide the flexible tube (24) over the tube adapter (25).
Push the tube adapter (25) into the milk - froth dispenser adapter (26) until it clicks into place.
Mount the milk froth dispenser adapter (26) to the red steam valve (27).
Mount the milk froth dispenser (12) to the milk froth dispenser adapter (26).
Emergency opening for coffee pad cassette (fig. A & O)
If the locking collar (8) cannot be set to another position after 1 hour, the coffee pad cassette (13) must be removed according to the following procedure:
Insert a straightened paper clip horizontally into the opening (31) directly next to coffee pad cassette (13) and slightly press the paper clip into the opening.
Warning! Wrap a kitchen towel around the paper clip to avoid burns. Hot coffee will escape from the appliance.
If the paper clip is pressed into the opening (31) for approximately 3cm , the pressure will be released and the locking collar (8) can be set to another position.
Remove the coffee pad cassette (13) from the appliance.
Thoroughly clean the coffee pad cassette (13).
Before each use, take the following actions:
-
Make sure that the coffee pads are undamaged.
-
Make sure that the coffee pad cassette (13) can be removed freely.
-
Clean the ground coffee cassette (14).
Troubleshooting
Refer to the table below to solve problems yourself. If you are not able to solve the problem yourself, contact our service station.
- The water reservoir cannot be mounted.
- Hold the holes in the bottom of the tilting mechanism and tilt the tilting mechanism forward (fig. P).
- The water level indicator flashes, but the water reservoir is filled.
- Empty the water reservoir.
- Shake the empty water reservoir to check whether the float moves freely.
- Clean or descale the water reservoir.
The pump makes loud noises.
- Make sure that the cover of the filter holder is correctly placed in the water reservoir.
- Rinse the appliance.
The pump does not provide water, but the water reservoir is filled.
- Make sure that the cover of the filter holder is correctly placed in the water reservoir.
Rinse the appliance.
The locking collar (8) is blocked far before reaching position 'A'.
- Make sure that the coffee pads are correctly placed in the coffee pad cassette. The coffee is too weak.
- Choose a stronger type of coffee.
- Set a lower coffee quantity using the cup size selector.
- Make sure that the coffee pads are correctly placed in the coffee pad cassette.
The coffee is too strong.
- Choose a weaker type of coffee.
- Set a higher coffee quantity using the cup size selector.
The coffee dispenser continues to drip for a long period.
- Set the locking collar (8) to position 'B' after each use.
Water escapes from the coffee pad - cassette.
- Make sure that the coffee pads are correctly placed in the coffee pad cassette.
Water comes under the appliance.
- Empty the drip tray.
- Only fill the water reservoir up to the maximum mark.
- Only remove the water reservoir from the appliance briefly for filling or cleaning.
The coffee quantity is reduced.
- Set the locking collar (8) to position 'A' as close as possible (see arrow in fig. C).
- Clean the coffee pad cassette.
- Descale the appliance.
- Make sure that the cover of the filter holder is correctly placed in the water reservoir.
- Rinse the appliance.
The cream layer is deteriorating.
- Regularly clean and descale the coffee dispenser filter.
- If the two filters of the coffee dispenser filter are pressed against each other, replace the coffee dispenser filter.
The appliance switches off after heating.
- Do not use the appliance in locations higher than 1,500m above sea level.
The steam indicator flashes and the start-stop button remains illuminated red.
- Descale the appliance. It is still possible to brew coffee and prepare hot water, but milk frothing is no longer possible.
The milk is not suctioned.
- Rinse the appliance.
- Wait until the start/stop button illuminates green and attempt to froth the milk again.
- Clean the red steam valve.
The milk froth does not develop.
- Make sure that the milk frothing unit is assembled and mounted correctly.
- Manually tighten the red steam valve.
- Thoroughly clean the milk froth dispenser, the flexible tube, the tube adapter and the milk froth dispenser adapter.
The milk froth splatters extremely.
- Make sure that the milk frothing unit is assembled and mounted correctly.
- Only use milk that comes directly from the refrigerator.
- Allow the appliance to cool down completely. Tightly screw the red steam valve to the steam outlet.
The milk froth runs continuously.
- If you use a milk jug in which the milk reaches higher than the milk froth dispenser adapter, the milk jug is suctioned dry after frothing milk: Make sure that the milk jug is not higher than 14cm .
The descending program cannot be started.
- Keep the on/off button and the start/stop button pressed at the same time. Release the on/off button and the start/stop button only when the pump is operating.
- Set the beverage selector (7) to position 'A' or 'B'.
The locking collar (8) cannot be set to another position. No coffee emerges while the pump is operating.
- Remove the mains plug from the wall socket and leave the appliance for several hours to reduce the pressure.
- Refer to the section "Emergency opening for coffee pad cassette". Caution: coffee may spray out during the process.
Disclaimer
Subject to change; specifications can be changed without further notice.
Felicitations!
Ultrusting (fig. A, B, C & J)
Apparatet ma luftes ut forrste gangs bruk. Utlufting er kun nodvendig med nye apparater.
| Blinkende signal | Vannets hardhetsgrad | Vannets hardhet (°dH) |
| ··· | 1 (mykt) | 0 - 7 |
| ······ | 2 (middels) | 7 - 14 |
| ········ | 3 (hardt) | 14 - 21 |
| ·········· | 4 (svært hardt) | over 21 |
Trykk pa/pa/av-knappen (1) for a sla av· apparatuset.
Egaptnma Evdsign Opiogos
Diaokottns KOKKIO H oukeu thepaivei
Evap9n/ nEETAeVEI.
δiakottnc (2) Kokkivo Tou Katataaon avapovnc. avaaboBnvei
Ppao H ouokun eivai Etoiynia xpno.
PpaoVTOPOeToiaOεkTeAeon. aaoBv
IK KITpivo Tou Γeipote To doxéio vepou. 计 avaβoαβnvei
vερού (3)
IK KITpivo Tou ApaalatwoTe Tn oukeun atpu (4) avaaboBnvei atpu.
Ktpivo TpOToG Aetoupyiaevepyou atou.
ik ns KIpivo Tou Kavte apalatwn Tns
aopalawons (5) avaoepnvei oukeu/. /Tpottos
puoians oKAnpoTntac
Vepou.
Kripivo To npoypa ma apalatwong AetoupyeI.
EvpyoToinon kai aTevpyoToinon (EK.A)
Tia va evepyotoioge Tn oukeun, TIEOTE TO diaKOITIN ON/OFF (1).O diaKOTING evapcng/daKOITNG 2) avaboBneVEI ME KOKKIO Xpwa. O diaKOITING Evapcng/ diaKOITNS (2) yivetai Ppaivoc otav n oukeun Eivai Etoiun YIA xpnoN. Tia va attevepyotoioge Tn oukeun OTIOAONTE OTIyUn, TIEATE KAI TAI TO diaKOITTN on/off (1).
Aeitoupyia Tpokatepyaoias kaé
BaTe TnV TaTtAeTa KaPe OTNv KaoEToa TaTtAeTuW KaPe (13).
- Tia eva uztcavi, bale tnv taTnAeta tou Kaep otnv puaou eTionmuivetaie 1' otnv kaotawtupntwvKaep (EK.F1).
Tia duo qautzavia,baTe Tc taTTAEteC tou kape OTNV TIAEUPa Tou ETIONmuivetai e 2' OTNV KAeTa Tuv TaTTAETW Kape (EK.F2).
Eioayayete Tny kaoeta TaTNTW Kape (13) Otn OoKEun TNY TaTNTA Tou Kape va BAETEI POG ta TAVW. BEbaIWeITE OTI n TaTTa KAPE DEV ETEAKIVEITAI.
B'gai (8) jia jia bai -
J
(J)
Jusu Juaa 1 Juaa aie 1
J 1
aalall gge jn jn jnlll
J24) 24
.(25)
25)
(26)
aI(Sa)
(26)
(27)
(12)
.(26)
80gololal 1s)gl (s)gl bll a
(O,A)
(8) 1
iie 1 jai iia ad aee
(13)
(31) aaii
.(21) jali lal (20) 1
.(17)claljla (19)cllall
a21 (20 17)cll j
wJ1j-1 j
B' A' (7)
j(13)jol
A' 8 (8)
J(11,8)
.(10)
(1)
A
1j(1)
12 12
i 1
(5) 1
a
35
(3)cll
2c - 1 = 0
(17) all jz (19) 1
11 J 12 (17) 13
(19) all you are
17) all j
(11,8)
(10)
(2)
S OBC = S COD + S_ BOC
(2)/jll
cll sinnn jin no nnnn
(3)
- 与会人员食宿及交通费用自理。
1
8 (8) 1
B
.(17) (19)
.(21) jilali Jda 20 (20)
jiall Jala jao (27) jaoJI jaoJia pao
.(21)
(27)
.(30)
(21) (18)
i 10 11 11 11
11 11 11 11 11 11 11 11 11 11 11 11 11 11 11
| (dH°) | العربية | العربية | العربية |
| 7-0 | (العربية)1 | | ... |
| 14-7 | (العربية)2 | | ... |
| 21-14 | (العربية)3 | | ... |
| 21-14 | (العربية)4 | | ... |
durgolswiss espresso y
y jy ydy dydy dydy dy dy dy dy dy dy dy dy dy dy dy dy dy dy dy dy dy dy dy dy dy dy dy dy dy dy dy dy dy dy dy dy dy dy dy dy dy dy dy dy dy dy dy dy dy dy dy dy dy dy dy dy dy dy dy dy dy dy dy dy dy dy dy dy dy dy dy dy dy dy dy dy dy dy dy dy dy dy dy dy dy dy dy dy dy dy dy dy dy dy dy dy dy dy dy dy dy dy dy dy
(1) 1
(1) 1
(2) 9
(30) jll
(29) xw y w
(28) gall g
3 2 5
(5) w 5
1 4 1
j j j j j j j j j j j j j j j j j j j j j j j j j j j j j j j j j j j j j j j j j j j j j j j j j j j j j j j j j j j j j j j j j j j j j j j j j
(17)cllljzjc (19)cllgljcrj 21) jolcljoc (20)cllgljcrj 21) jolcljoc (18)jgklljzjjgrj 21) jolcljgc (27) jzJljlplgs 21
(21) jilall Jolc (20) 1blll.
4gao (20) cIblll JcJGjogwllnJn
.(B Jkill) Coo gao LsOJIy
150- (17) 1al all cl all jz
. durgol swiss espresso
(17) all jz (19) 1blz
(17) all jz (17) all jz
(19) all jz (17) all jz
J (MgLgKgBgA J) j 1j yjyj yj yj yj yj yj yj yj yj yj yj
1 111111111111111111111111111111111111111111111
(5) wuwrll all j! wocclal 1
Jzill qwulwrll all j! zolni j J L
yil u yilall wulwrll all j! zolni j R
durgol@ 125 Jdol
Swiss espresso
Wuwrll j! nnnnny aiee Jg g
Ljuyi y iay jac pnnn ng
Aed jraa wulwrll all j! d
(L)
loic g l jy jzj 1jll plao y
J 1
(27)
(30)
jia jaii (29) 1
.(28)
jai jiai pi aai jiaai ai iia
Lilai
(27)
a3^2 + a4^2 + a_5^2 = 8
.
(27)
(30)
(BgA)
Lulolall aodll jya jno gll all j jia
J 1
jll jlll l. gell lal glg e liu u
12 12
.(y)≤500)8
jglj 17
.(17) (19)
(21) jilali Jala jce (20) 1
.(21)jldlJdoJ (18) jklalj jjj
claljaw(18) 22 jil
.
.(21) (18)
(21) jilal Jala 20 1
.(B
(17) aIJI JIs 19)
(17)
(A)
jIale ie gioia! 1aia 1e iJyI Iua Jsay
clalisJwJwJ.4gclaljLwJGnall
iJbji 1j
aiiill jbi jS iL jie jue gill aiaial aiall
aaiiaiaiaiaiaiaiaiaiaiaiaiaiaiaiaiaiaiaiaiaiaiaiaiaiaiaiaiaiaiaiaiaiaiaiaiaiaiaiaiaiaiaiaiaiaiaiaiaiaiaiaiaiaiaiaiaiaiaiaiaiaiaiaiaiaiaiaiaiaiaiaia
aJ1 j0 wJg allj g j 23d Jdi
1e 8gall jiljiljiljiljiljiljilj
.8gill jgiu jilj Jdiwl jaiell lagia
9)
28) 0gall
(9)
jolall oally ( 28) odell jilla aii
.8gall 111jy aclil slu jplldiy
jw jll jla jda J
allj(28)
Jolal Jai (28) o jil
iie (28) 1
(9)
A. d 为 d (9) J 与 d 互换, d 与 d 互换
1111 0g jol 1
(JE,D,AJ<
C' 7
F'E'D
gall J500) 500
(10)
(24)(24)
g j g j j j j j j j j j j j j j j j j j j j j j j j j j j j j j j j j j j j j j
a=1
(2)
y
jill (1)
(2)
wuuu
1
(12)
J (25) J (24)
J 26)
aLi slu j plui
alai 1111 o8e jolcljai
- | x - 2| = | x - 4|
(27)
.(30)
A
(E,C,B,AJ)
121 123 124 125 126 127 128 129 130 131 132 133 134 135 136 137 138 139 140
y jn nn nll lglg 10 g jn jn jn nnnn nnnn nnnnnn nnnnnnnnnnnnnnnnnnnnnnnnnnnnnnnnnnnnnnnnnnnnnnnnnnnnnnnnnnnnnnnnnnnnnnnnnnnnnnnnnnnnnnnnnnnnnnnnnnnnnnnnnnnnnnnnnnnnnnnnn
(17) clal jdz (19) cblz
(19) 1111111111111111111111
B' A' 7) w y D
. jgl (13) gall Jala aie Lj
A' gll (8) glg b
J500) 500
(10) gall
gssy gol all oge jn d
(1)J 1
(1)/j (2)
(8)gbsbuaaai 1 B
(K) 0gall jilj
aBilj 0gall jia jilie
12 1
Loo
s s s s s s s s s s s s s s s s s s s s s s s s s s s s s s s s s s s s s s s s s s s
J 1
4ySgSgSgSgSgSgSgSgSgSgSgSg
1 1 1 1 1 1 1 1 1 1 1 1 1 1 1 1 1 1 1 1
gaaa aal yall gge gaiy
a. 1,2,3 , 4,5,6
1
aIyI yIyI yIyI yIyI yIyI yIyI yIyI yIyI yIyI yIyI yIyI yIyI yIyI yIyI yIyI yIyI yIyI yIyI yIyI yIyI yIyI yIyI yIyI yIyI yIyI yIyI
s j 11 g s g o lal jgai y
Lgai lii
aI aI aI aI aI aI aI aI aI aI aI aI aI aI aI aI aI
Joo 100
aaii aiaaae i 1
a
gell 100 g 8ell Jol 100 8bii p
aolly jbaill aag gssll aaiy
clll clll jz cIbc g clll jz 1y
J
(E,D,C,A)
Jus Jus jus jus jus Jus Jus Jus Jus
jll jll jll jll jll jll
a_i = 40%
( a + b) ( a^2 - ab + b^2) = a^3 + b^3
y
S_ OBC = 12 · BO · OBC = 12 × BO × 5
ai gaaal o gaaal g aaii i o gaaal Jolgina
o geall Jolal aic gai y jgal o geall g ai Skaal
a
Jol = 1
ai a ai 的最小值为 k .
piai. 0gai jao gai
Jolalule 2' axlalul
.0gai 100
aalalalalalalalalalalalalalalal
Jolaljuaia Jkiyai jaihail o gill
0gell Jolb bwo g 8 o yoo
aaiiaaiiaaiiaaiiaai
Jaaa
()clll
Jds no Jyrnno nn no nnnn no
clll jj jai Jauu, pao ai aie aia
Jia Lioic (3) clall g sinae jao.17
aal aal alal
(D)
aill 1 aal 1 1
A
6 6
cllll jj cllc g clll jj 1
.
(JgCgABJL)aegill Jlae.0oJgolaluaIgaiyiaagaa
yolil jlll jllg eall g jll lgl 1jnl
n jlll jlll jlll jll jll kgs y aal y
aal l l l l l o g r
14u 2. jll clall bcll clll jz eJy p - Jd jil gill g i jssll clll jii
clll jjz jie 12ll aoe jglii y .jgall (·17)clll jjz
(17) all jzjc (19) 1
(21) (20)
.(21) (18)
(21) jilil Jolc (20) cll
(17) clal jz (19) cbill g 11
.19) 11111111111111111111111111
B 8) 10
A'ggl 8) gbl bal .
A' 500)
(24)
(1)
(2) 0j j j j j j j j j j j j j j j j j j j j j j j j j j j j j j j j j j j j j j j j j j j j j j j j j j j j j j j j j j j j j j j j j j j j j j j j j
J 1
yolai juiiall jilll glall gjll
S APQ = S AQP + S_ QPQ
y
a. a b a jial jie 111111111
(A)
Princess 242124
jolll clllg goll jiaie gill
aill 4y Sall
Jy
a1 = 2,an + 1 = n1 + an - 2a_n
culls gina jiao 3
jù 4
( a + b) ( a^2 - ab + b^2) = a^3 + b^3 .
6
4.2.1.7
8
S APQ = S AQP + S_ PQQ
.10
jollll jgi 11
12
Princess you recommend durgol swiss espresso