Pod Coffee Maker - Coffee machine PRINCESS - Free user manual and instructions
Find the device manual for free Pod Coffee Maker PRINCESS in PDF.
| Product Type | Pod Coffee Machine |
| Brand | Princess |
| Model | Pod Coffee Maker (ref. 242800) |
| Use | Indoor, domestic |
| Pod Type | Conventional pods 7 cm diameter |
| Number of cups at once | 1 or 2 |
| Programming | Customizable coffee quantity |
| Energy-saving functions | Economic brewing, standby mode, auto shut-off |
| Indicator lights | Low water level, ready for brewing, descaling |
| Descaling | Automatic with indicator, uses durgol® swiss espresso® |
| Water hardness adjustment | 4 levels (soft to very hard) |
| Optional accessories | Ground coffee cassette |
| Maintenance | Clean accessories with soapy water, regular rinsing |
| Spare parts | Diffuser filter, pod cassette, etc. |
| Safety | Auto shut-off, burn protection, child safety |
Frequently Asked Questions - Pod Coffee Maker PRINCESS
User questions about Pod Coffee Maker PRINCESS
0 question about this device. Answer the ones you know or ask your own.
Ask a new question about this device
Download the instructions for your Coffee machine in PDF format for free! Find your manual Pod Coffee Maker - PRINCESS and take your electronic device back in hand. On this page are published all the documents necessary for the use of your device. Pod Coffee Maker by PRINCESS.
USER MANUAL Pod Coffee Maker PRINCESS
natural_image
Line drawing of a modern kitchen brushset with control panel and base (no text or symbols)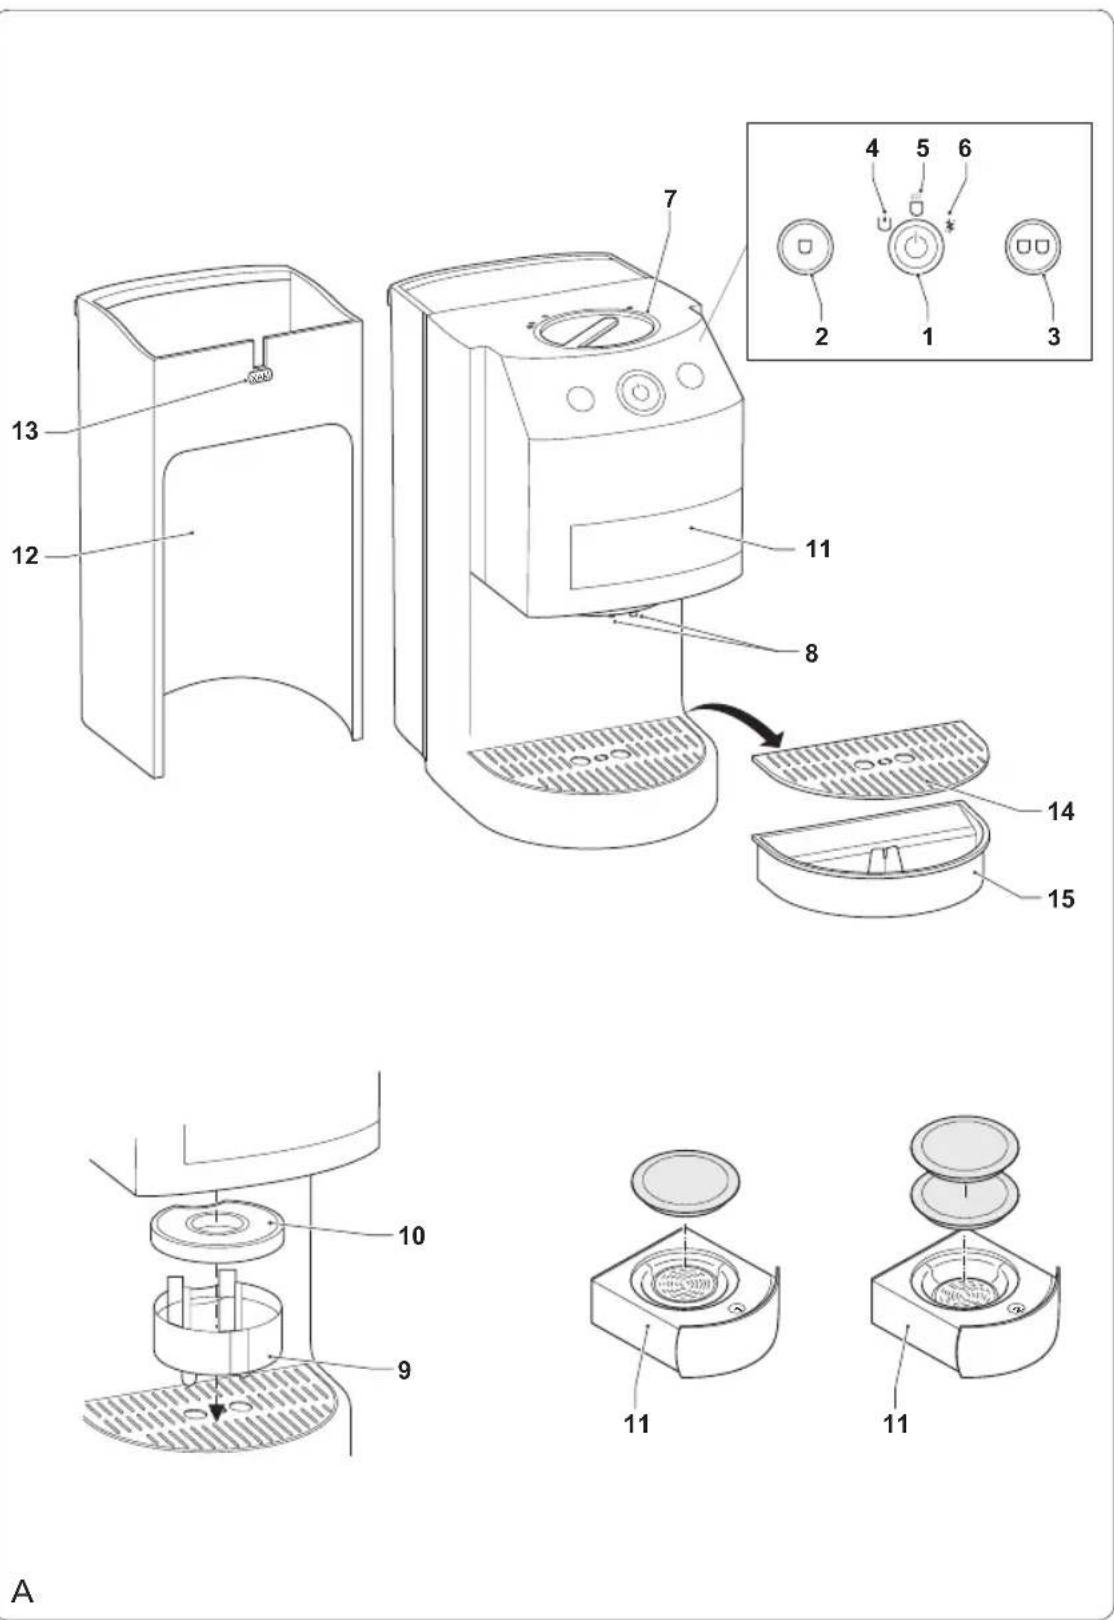
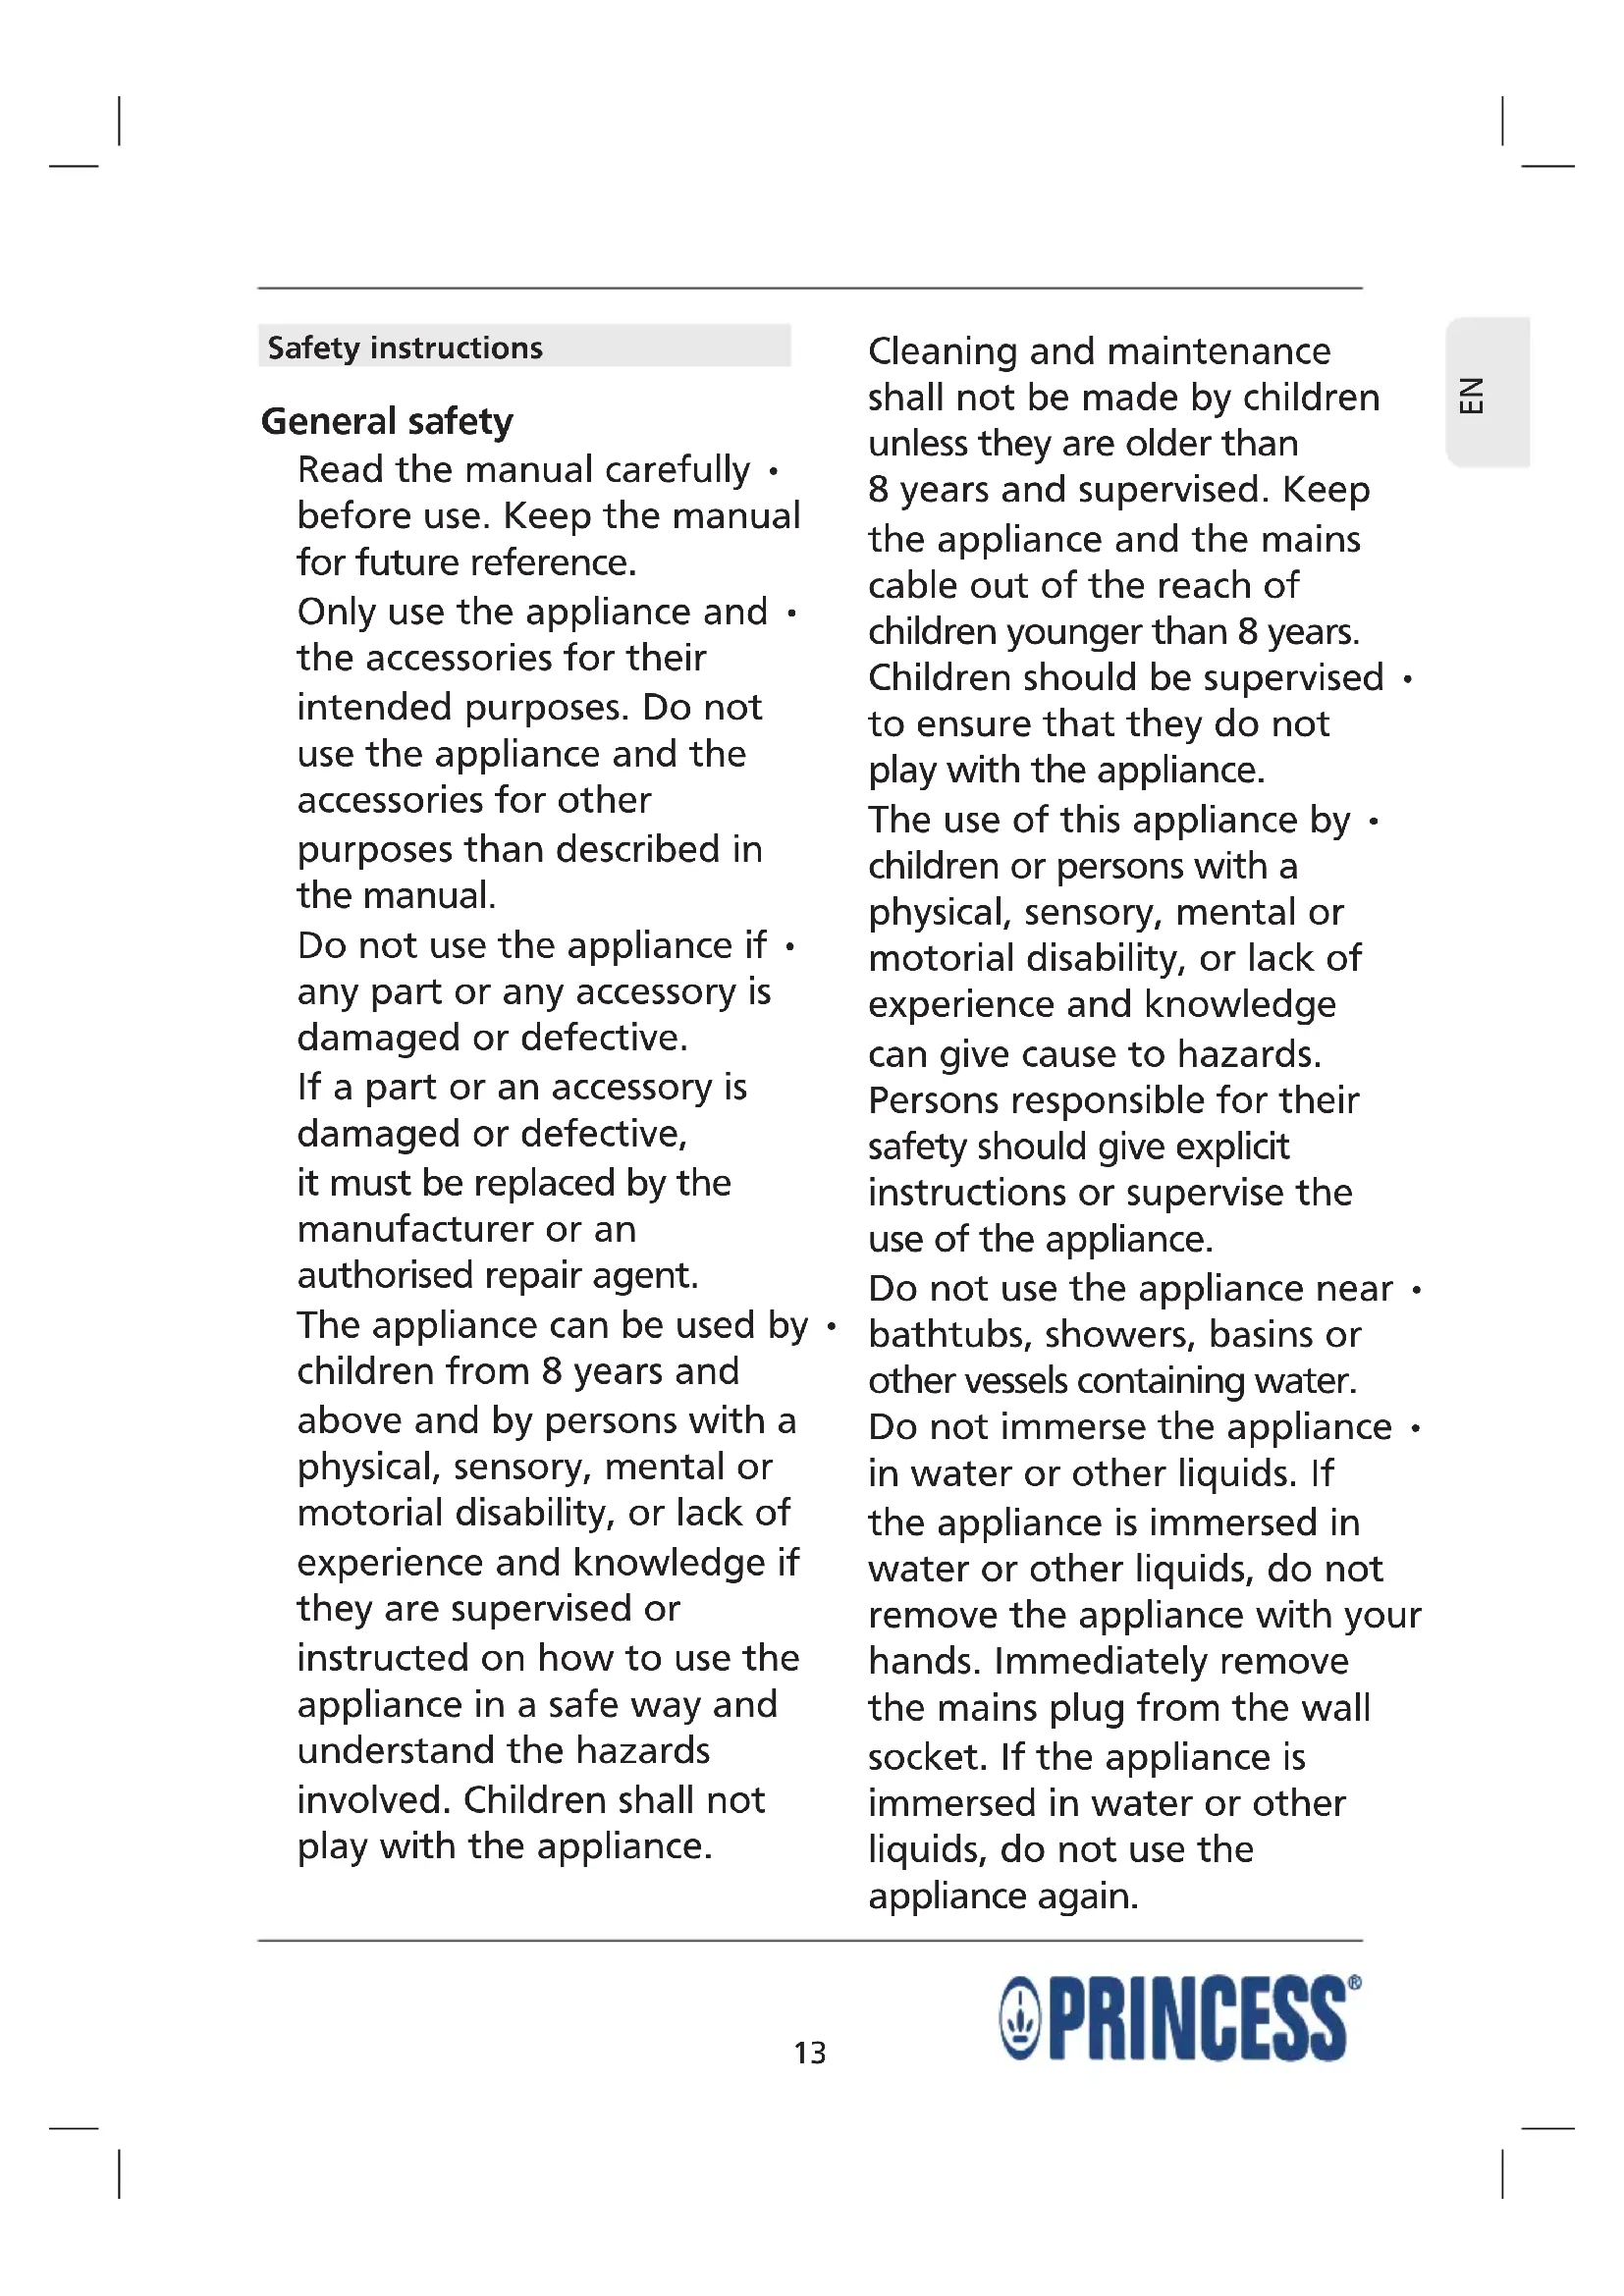
Read the manual carefully • before use. Keep the manual for future reference.
Only use the appliance and the accessories for their intended purposes. Do not use the appliance and the accessories for other purposes than described in the manual.
Do not use the appliance if any part or any accessory is damaged or defective.
If a part or an accessory is damaged or defective, it must be replaced by the manufacturer or an authorised repair agent.
The appliance can be used by children from 8 years and above and by persons with a physical, sensory, mental or motorial disability, or lack of experience and knowledge if they are supervised or instructed on how to use the appliance in a safe way and understand the hazards involved. Children shall not play with the appliance.
Cleaning and maintenance shall not be made by children unless they are older than 8 years and supervised. Keep the appliance and the mains cable out of the reach of children younger than 8 years.
Children should be supervised • to ensure that they do not play with the appliance.
The use of this appliance by children or persons with a physical, sensory, mental or motorial disability, or lack of experience and knowledge can give cause to hazards.
Persons responsible for their safety should give explicit instructions or supervise the use of the appliance.
Do not use the appliance near bathtubs, showers, basins or other vessels containing water.
Do not immerse the appliance • in water or other liquids. If the appliance is immersed in water or other liquids, do not remove the appliance with your hands. Immediately remove the mains plug from the wall socket. If the appliance is immersed in water or other liquids, do not use the appliance again.
Clean the appliance and the • accessories. Refer to the section "Cleaning and maintenance".
Electrical safety
Before use, always check that the mains voltage is the same as the voltage on the rating plate of the appliance.
The appliance is not intended to be operated by means of an external timer or separate remote-control system.
Connect the appliance to an earthed wall socket. If necessary, use an earthed extension cable of a suitable diameter (at least 3 x 1 mm ^4 ).
Make sure that water cannot enter the contact plugs of the mains cable and the extension cable.
Always fully unwind the mains cable and the extension cable.
Make sure that the mains • cable does not hang over the edge of a worktop and cannot be caught accidentally or tripped over.
Keep the mains cable away • from heat, oil and sharp edges.
Do not use the appliance if • the mains cable or the mains plug is damaged or defective.
If the mains cable or the mains plug is damaged or defective, it must be replaced by the manufacturer or an authorised repair agent.
Do not pull the mains cable • to disconnect the mains plug from the mains.
Disconnect the mains plug from • the mains when the appliance is not in use, before assembly or disassembly and before cleaning and maintenance.
Safety instructions for coffee makers
The appliance is suitable for • domestic use only.
Do not use the appliance • outdoors.
Do not use the appliance in • damp environments.
- Only use the appliance in • frost-free environments if the appliance is filled with water. Do not use the appliance in • locations higher than 1,500 m above sea level.
Place the appliance on a stable and flat surface.
- Place the appliance on a heat-resistant and splash-proof surface.
Do not place the appliance • on a hob.
Do not place the appliance • on hot surfaces or near open flames.
Make sure that the appliance does not come into contact with flammable material.
Keep the appliance away • from heat sources.
Be careful with hot water • and steam to avoid burns.
Cleaning and maintenance
Warning!
- Before cleaning or maintenance, switch off the appliance and remove the mains plug from the wall socket.
- Do not immerse the appliance in water or other liquids.
Caution!
- Do not use aggressive or abrasive cleaning agents to clean the appliance and the various parts of the appliance.
Regularly check the appliance for possible damage.
Clean the outside of the appliance with a soft, damp cloth. Thoroughly dry the outside of the appliance with a clean, dry cloth.
Clean the accessories after each use:
- Clean the coffee pad cassette and the ground coffee cassette in soapy water.
- Clean the dispenser cassette and the coffee dispenser filter in soapy water.
- Clean the water reservoir and the lid of the water reservoir in soapy water.
- Clean the cup tray and the drip tray in soapy water.
- Rinse the accessories under running water.
- Thoroughly dry the accessories with a
clean, dry cloth.
Rinsing the appliance (fig. A - C)
The appliance must be rinsed if it has not been used for a couple of days. Always start rinsing the appliance directly after switching on in order to decrease energy consumption.
Warning!
- Be careful with hot water and steam to avoid burns. Hot steam can escape from the coffee dispenser during the process.
- Before rinsing the appliance, make sure that the water reservoir is placed in the appliance.
Rinse the water reservoir (12).
Fill the water reservoir (12) with water up to the maximum mark ("MAX") on the water level indicator (13).
Place the water reservoir (12) into the appliance.
Insert the coffee pad cassette (11) into the appliance.
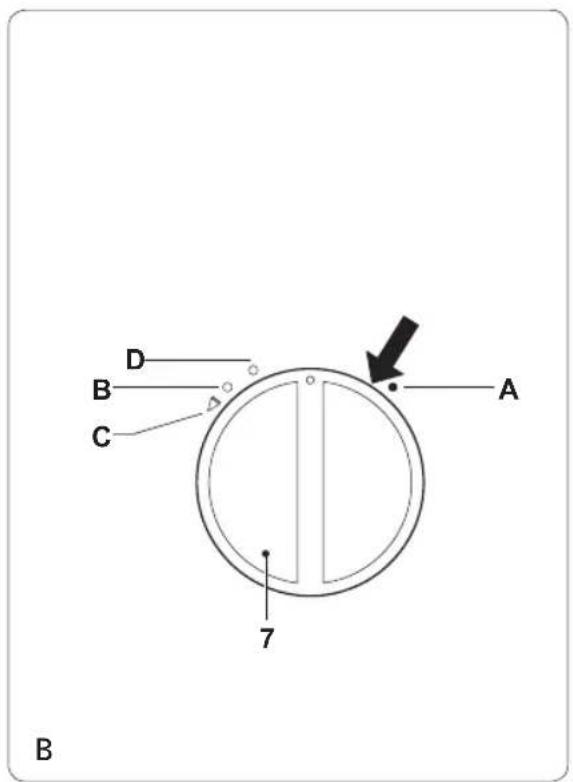
Set the locking collar (7) to position 'A'.
- Place two large cups next to each other onto the cup tray (14).
Press the on/off button (1) to switch on the appliance. - Keep both start/stop buttons (2/3) pressed simultaneously to start the rinsing process. The ready-to-brew indicator (5) lights red.
- If the process is completed, set the locking collar (7) to position 'B'.
Cleaning the coffee dispenser filter (fig. A)
The quality of the cream layer reduces when the coffee dispenser filter is clogged by calcium or coffee residue. The coffee dispenser filter must be cleaned regularly.
Caution!
- If the two filters of the coffee dispenser filter are pressed against each other, replace the coffee dispenser filter.
Remove the dispenser cassette (9) from the appliance.
Remove the coffee dispenser filter (10) • from the dispenser cassette (9).
Clean the coffee dispenser filter (10) in • soapy water using a soft brush to remove coffee residue.
Pour a small amount of descaling agent through the opening of the coffee dispenser filter (10) to remove calcium.
Rinse the coffee dispenser filter (10) under running water.
Mount the coffee dispenser filter (10) to the dispenser cassette (9).
Mount the dispenser cassette (9) to the appliance.
Setting the water hardness range (fig. A)
The appliance can be set to various water hardness settings. The factory setting of the water hardness is 4. Contact your waterworks company or your local authorities for the water hardness range in your area. If the water hardness range in your area is lower than 4, the water hardness setting can be changed to reduce the number of times that the appliance must be descaled.
Use the on/off button (1) to set the appliance to the water hardness in your area. Refer to the table below to set the correct water - hardness range.
Flashing Water hardness Water hardness signal range (°dH)
| ···1 (soft) 0 - 7 | |
| ······2 (medium) | 7 - 14 |
| ······3 (hard) | 14 - 21 |
| ······4 (very hard) | above 21 |
- Press the on/off button (1) to switch off the appliance.
- Keep the start/stop button (3) pressed for 3-4 seconds until the descaling indicator (6) flashes.
- Press the start/stop button (3) to increase the water hardness range by one level. (Range 4 is followed by range 1, etc.)
- Briefly press the on/off button (1) to save the new water hardness range. If the on/off button (1) is not pressed within ten seconds, the appliance switches off automatically without saving the setting. Repeat the first two steps to check the water hardness range.
Descaling the appliance (fig. A - C)
The appliance must be descaled regularly. The appliance has an automatic descaling indicator which informs the user when descaling is required.
Note: Damage caused by not regularly descaling the appliance is not covered by the guarantee.
- If the descaling indicator (6) flashes, the appliance must be descaled. It is still possible to brew coffee.
- If the descaling indicator (6) lights continuously, the descaling program is running.
The automatic descaling program of the appliance is optimised to be used for 125 ml of durgol ^® swiss espresso ^® . The product is used undiluted, is highly effective and guarantees a reliable descaling and therefore a long operational life of the appliance. The descaling agent is available from our service station.
Warning!
- Be careful when descaling the appliance to prevent damage to furniture or clothing. Place an empty pot (at least 1.2 l) under the coffee dispenser (8) in such a way as to prevent splashes.
Caution!
- Only use durgol ^® swiss espresso ^® in the specified quantity to descale the appliance.
- Do not use vinegar or vinegar concentrate to descale the appliance.
- Do not use citric acid to descale the appliance.
- Fill the empty water reservoir (12) with durgol® swiss espresso® (125 ml) added with fresh water (0,8 l).
- Place the water reservoir (12) into the appliance.
- Insert the empty coffee pad cassette (11) into the appliance.
Set the locking collar (7) to position 'A'. Place an empty pot (at least 1.2 l) under the coffee dispenser (8).
Press the on/off button (1) to switch on the appliance.
Keep both start/stop buttons (2/3) pressed simultaneously for 4 seconds to start the descaling process. The descaling indicator (6) lights yellow.
After approximately 10 minutes, the low-water indicator (4) flashes yellow.
Empty the pot and place it back under the coffee dispenser (8).
Fill the empty water reservoir (12) with fresh water (1 l). The ready-to-brew indicator (5) flashes green.
Press the start/stop button (2/3) to start the first rinsing cycle.
After approximately 2 minutes, the first · rinsing cycle is completed. The low-water indicator (4) flashes yellow.
Empty the pot and place it back under the coffee dispenser (8).
Fill the empty water reservoir (12) with fresh water (1 l). The ready-to-brew indicator (5) flashes green.
Press the start/stop button (2/3) to start the second rinsing cycle.
After approximately 2 minutes, the second rinsing cycle is completed. The descaling process is completed. The appliance switches off automatically.
After descaling the appliance, clean the • dispenser cassette (9), the coffee dispenser filter (10) and the coffee pad cassette (11) in soapy water using a soft brush.
- Coffee dispenser
- Dispenser cassette
- Coffee dispenser filter
- Coffee pad cassette
- Water reservoir
- Water level indicator
- Cup tray
- Drip tray
Designation of the indicators
| Indicator Status Designation | ||
| Low-water indicator | Yellow flashing indicator | Fill the water reservoir. |
| Ready-to-brew required. | Green flashing | Deventilation indicatorThe programming mode is active. |
| Green | The appliance is ready to brew.Brewing function. | |
| Red flashing | The economic brewing function is active. | |
| Red | The appliance is heating. Rinsing function. | |
| Descaling indicator | Yellow | Descale the appliance.The descaling program is running.Water hardness setting mode. |
Description (fig. A)
Your 242800 Princess coffee maker has been designed for making coffee. The appliance is suitable for indoor use only. The appliance is suitable for domestic use only.
- On/off button
- Start/stop button (1 cup)
- Start/stop button (2 cups)
- Low-water indicator
- Ready-to-brew indicator
-
Descaling indicator
-
Locking collar (coffee pad cassette)
Optional accessories
Optional accessories are not included in the packaging. You can obtain optional accessories from selected dealers or you can order them directly online: service.princess.info
Ground coffee cassette
With the ground coffee cassette, you can enjoy your favourite brand of coffee freshly ground and with cream without needing standard commercial coffee pads.
Initial use
Preparation
Clean the coffee pad cassette and the ground coffee cassette in soapy water.
Clean the dispenser cassette and the coffee · dispenser filter in soapy water.
Clean the water reservoir and the lid of the water reservoir in soapy water.
Clean the cup tray and the drip tray in · soapy water.
Rinse the accessories under running water.
Thoroughly dry the accessories with a clean, dry cloth.
Deventilation (fig. A & B)
The appliance must be deventilated before first use. Deventilation is only required for new appliances.
Caution!
- Only fill the water reservoir with fresh cold water. Do not use carbonated water or other liquids to fill the water reservoir.
- Do not exceed the maximum mark ("MAX") when you fill the water reservoir.
- Do not interrupt the deventilation cycles, do not remove the water reservoir and do not remove the mains plug from the wall socket in order to prevent a necessary restart of the deventilation process.
Fill the water reservoir (12) with water up to the maximum mark ("MAX") on the water level indicator (13).
Place the water reservoir (12) into the appliance.
Set the locking collar (7) to position 'B'. Insert the empty coffee pad cassette (11) in the appliance.
Set the locking collar (7) to position 'A'.
Note: If the coffee pad cassette is not inserted, the locking collar cannot be set to position 'A'.
Place the drip tray (15) into the bottom of the appliance.
Place the cup tray (14) onto the drip tray (15).
Place two large cups next to each other • onto the cup tray (14).
Press the on/off button (1) to switch on the appliance.
Briefly press the start/stop button (2/3) to • start the deventilation. During start-up, the number of rinsing cycles required is established electronically. If several rinsing cycles are required, the process will be aborted every 45 seconds and the ready-to-brew indicator (5) will flash green. If necessary, empty the cups and press the start/stop button (2/3) again. The start/stop button (2/3) will light red when the appliance has been rinsed sufficiently. The water is heated until the start/stop button (2/3) changes from red to green. Set the locking collar (7) to position 'B'.
Making coffee with coffee pads (fig. A - C)
Use conventional coffee pads with an outer diameter of 7 cm.
Warning!
- Before assembly or disassembly, switch off the appliance and remove the mains plug from the wall socket.
Caution!
- Do not use the following types of coffee pads:
- coffee pads with an outer diameter smaller than 7 cm;
- hard coffee pads for espresso makers;
- coffee pads with additives for cappuccino, etc.
- Do not put damaged coffee pads, loose ground coffee or instant coffee into the coffee pad cassette.
Caution!
- Follow the instructions below to put coffee pads into the coffee pad cassette:
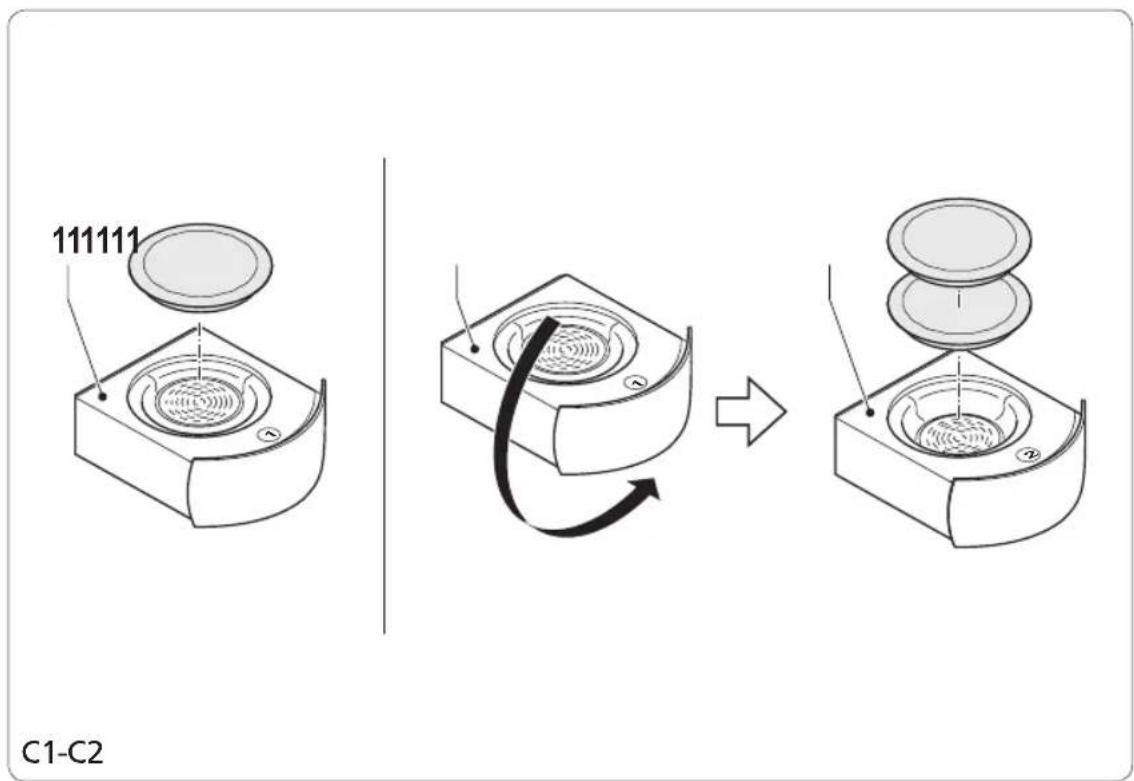
- Use the side marked '1' on the coffee pad cassette for one cup of coffee. Use the side marked '2' on the coffee pad cassette for two cups of coffee.
- Lightly tap the coffee pad with your fingertips to evenly distribute the ground coffee in the coffee pad. Make a small indentation in the centre of the coffee pad.
- Put asymmetrical coffee pads in the appliance with the flat side down.
- If you use two coffee pads at the same time, firmly press the first coffee pad into the recess of the coffee pad cassette with the paper edge facing upwards. Subsequently, put the second coffee pad into the coffee pad cassette according to the instructions above.
Fill the water reservoir (12) with water up to the maximum mark ("MAX") on the water level indicator (13).
Place the water reservoir (12) into the appliance.
Set the locking collar (7) to position 'C'. Remove the coffee pad cassette (11) from the appliance.
Put the coffee pad in the coffee pad • cassette (11).
- For one cup, put the coffee pad in the side marked '1' on the coffee pad cassette (fig. C1).
- For two cups, put the coffee pads in the side marked '2' on the coffee pad cassette (fig. C2).
Insert the coffee pad cassette (11) into the appliance with the coffee pad upwards. Make sure that the coffee pad does not shift.
Set the locking collar (7) to position 'A' as close as possible (see arrow in fig. B).
Place the required amount of cups under • the coffee dispenser (8).
- For one cup, place the cup under both dispenser nozzles of the coffee dispenser.
- For two cups, place one cup under the left dispenser nozzle and one cup under the right dispenser nozzle of the coffee dispenser.
Press the on/off button (1) to switch on the appliance. The ready-to-brew indicator (5) lights red. The appliance starts heating. If the process is completed, the ready-to-brew indicator (5) lights green.
Take one of the following actions: •
- For one cup, press the start/stop button (2). The appliance starts making coffee. To interrupt the process, press the start/stop button (2) again.
- For two cups, press the start/stop button (3). The appliance starts making coffee.
To interrupt the process, press the start/stop button (3) again.
If the process is completed, set the locking · collar (7) to position 'B'.
Press the on/off button (1) to switch off the appliance.
Allow the appliance to cool down completely.
Pre-brewing function
The pre-brewing function makes sure that the appliance initially only supplies a small quantity of water. The coffee-making process continues after a short interval.
Programming the coffee quantity (fig. A - C)
The appliance features a convenient function for programming the required quantity of coffee individually for both start/stop buttons (2/3). You can change the coffee strength according to your taste.
Note: The programming mode is active for approximately 30 seconds after pressing start/stop button (2) or approximately 60 seconds after pressing start/stop button (3). If you do not press the start/stop button (2/3) before the brewing cycle stops automatically, the maximum coffee quantity will be programmed.
Put the coffee pad in the coffee pad • cassette (11). Insert the coffee pad cassette (11) into the appliance. Refer to the section "Making coffee with coffee pads". Set the locking collar (7) to position 'A' as • close as possible (see arrow in fig. B). Place one or two large cups onto the cup • tray (14).
Press the on/off button (1) to switch on the appliance. The ready-to-brew indicator (5) lights red. The appliance starts heating. If the process is completed, the ready-to-brew indicator (5) lights green.
Keep the start/stop button (2/3) pressed for 3-4 seconds until the ready-to-brew indicator (5) flashes green. The programming mode is active. The appliance starts making coffee.
- If the required coffee quantity is obtained, press the same start/stop button (2/3) again. The appliance stops making coffee. The brewing time is programmed.
To restore the coffee quantity to the factory - settings, press the on/off button (1) to switch off the appliance.
Keep both start/stop buttons (2/3) pressed simultaneously for 3-4 seconds until all indicators light briefly.
Emergency opening for coffee pad cassette (fig. A & D)
If the locking collar (7) cannot be set to another position after the appliance has cooled down, the coffee pad cassette (11) must be removed according to the following procedure:
Insert a straightened paper clip horizontally • into the opening (16) directly next to coffee pad cassette (11) and slightly press the paper clip into the opening.
Take one of the following actions: •
- For one cup, press the start/stop button (2). The appliance starts pouring water. To interrupt the process, press the start/stop button (2) again.
- For two cups, press the start/stop button (3). The appliance starts pouring water. To interrupt the process, press the start/stop button (3) again.
If the process is completed, set the locking · collar (7) to position 'B'.
Press the on/off button (1) to switch off · the appliance.
Allow the appliance to cool down completely.
Boiling water (fig. A - C)
Warning!
- Before assembly or disassembly, switch off the appliance and remove the mains plug from the wall socket.
- Do not use the appliance for boiling water with coffee pads in the coffee pad cassette.
Fill the water reservoir (12) with water up to the maximum mark ("MAX") on the water level indicator (13).
Place the water reservoir (12) into the appliance.
Set the locking collar (7) to position 'C'. Make sure that the coffee pad cassette (11) is empty and inserted in the appliance. Set the locking collar (7) to position 'D'.
Place the required amount of cups under the coffee dispenser (8).
- For one cup, place the cup under both dispenser nozzles of the coffee dispenser.
- For two cups, place one cup under the left dispenser nozzle and one cup under the right dispenser nozzle of the coffee dispenser.
Press the on/off button (1) to switch on the appliance. The ready-to-brew indicator (5) lights red. The appliance starts heating. If the process is completed, the ready-to-brew indicator (5) lights green.
Energy-saving functions
Economic brewing function
If you want to switch off the appliance after one brewing cycle, the economic brewing function can be activated automatically. To activate the economic brewing function, press the on/off button (1) until the ready-to-brew indicator (5) lights green, then keep the on/off button (1) and both start/stop buttons (2/3) pressed simultaneously. The ready-to-brew indicator (5) flashes red to indicate that the appliance will switch off automatically.
Stand-by mode
If the appliance is not used for more than approximately 5 minutes, the stand-by mode is activated automatically. The ready-to-brew indicator (5) flashes red. To activate the appliance for use, press the start/stop button (2/3) again.
Automatic switch-off function
The appliance switches off automatically if it is has not been used for a period of 30 minutes.