
DJCONTROL INPULSE 500 - USB controller HERCULES - Free user manual and instructions
Find the device manual for free DJCONTROL INPULSE 500 HERCULES in PDF.
| Product type | USB DJ Controller |
| Brand | Hercules |
| Model | DJControl Inpulse 500 |
| Dimensions (folded feet) | 54 x 29,6 x 5,6 cm |
| Dimensions (unfolded feet) | 54 x 29,6 x 9,1 cm |
| Weight | 3,2 kg |
| Power supply | Via USB (bus power) |
| Number of decks | 2 |
| Jog wheels | Capacitive with touch detection |
| Pitch faders | 2 tempo sliders |
| Performance pads | 2 banks of 8 pads (16 pads) |
| Pad modes | Hot Cue, Loop, Slicer, Sampler, TonePlay, FX, Slicer Loop, Beat Jump |
| Equalizer | 3 bands (HIGH, MID, LOW) per deck |
| Filter / Effects | 2 knobs + 4 FX buttons |
| Crossfader | Yes, with curve selector (Mix, Scratch, Off) |
| Audio interface | 24-bit / 44,1 kHz, multichannel |
| Master outputs | 2 RCA + 2 6.35 mm jacks |
| Headphone output | 3.5 mm jack + 6.35 mm jack |
| Microphone input | Balanced 6.35 mm jack |
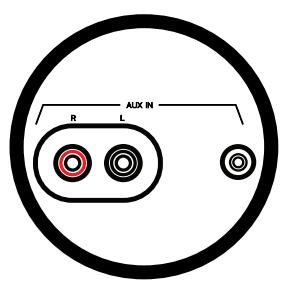
| Auxiliary input | 2 RCA + 3.5 mm jack |
| Compatible software | Serato DJ Lite, DJUCED®, Serato DJ Pro (trial) |
| Integrated tutorials | Hercules DJ Academy |
| Care and cleaning | Clean with a soft, dry cloth |
| Safety | Use only with a quality USB cable |
| Spare parts and repairability | Not user-serviceable; USB cable provided |
Frequently Asked Questions - DJCONTROL INPULSE 500 HERCULES
User questions about DJCONTROL INPULSE 500 HERCULES
0 question about this device. Answer the ones you know or ask your own.
Ask a new question about this device
Download the instructions for your USB controller in PDF format for free! Find your manual DJCONTROL INPULSE 500 - HERCULES and take your electronic device back in hand. On this page are published all the documents necessary for the use of your device. DJCONTROL INPULSE 500 by HERCULES.
USER MANUAL DJCONTROL INPULSE 500 HERCULES
- Hercules DJControl Inpulse 500
- USB cable
- Installation and quick start guide
- Warranty information
3. Controller specifications
3.1. Mechanical specifications
- Dimensions: 21.3 × 11.7 × 2.2 inches / 54 × 29.6 × 5.6 cm (width x depth x height, with feet retracted, i.e. folded in) — 21.3 × 11.7 × 3.6 inches / 54 × 29.6 × 9.1 cm (width x depth x height, with feet extended, i.e. folded out)
Weight: 7.1 ~lb / 3.2 ~kg
3.2. Technical specifications
- USB MIDI controller, featuring:
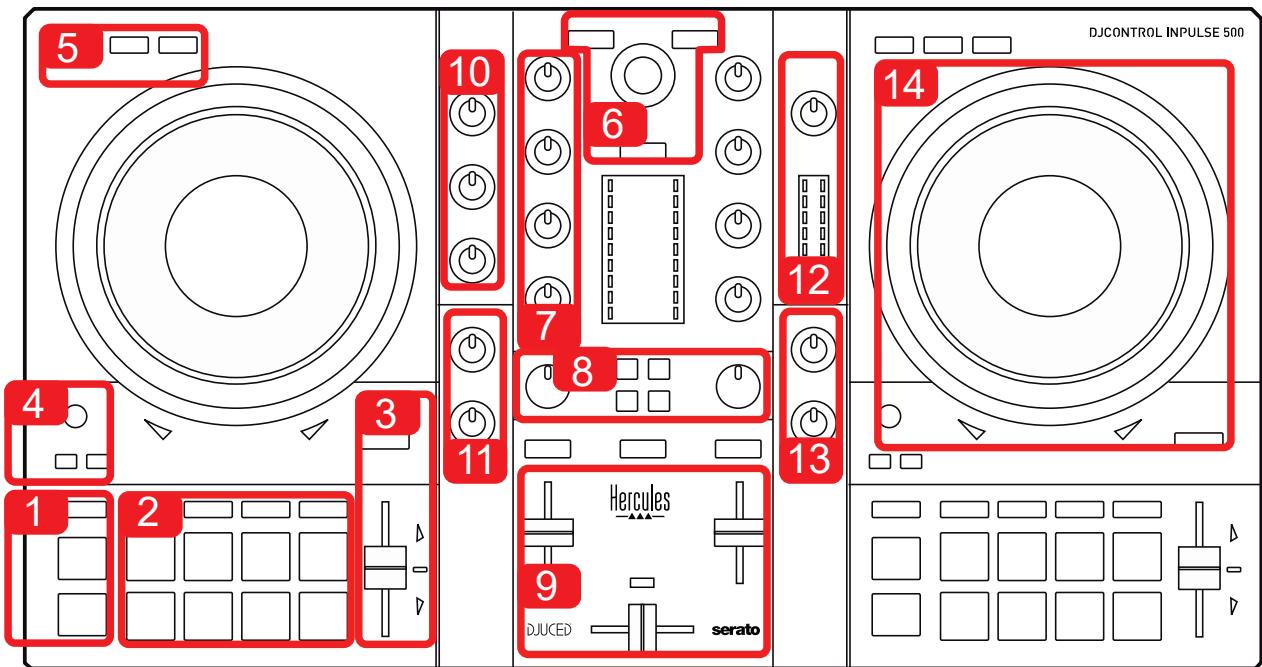
2 DECKS
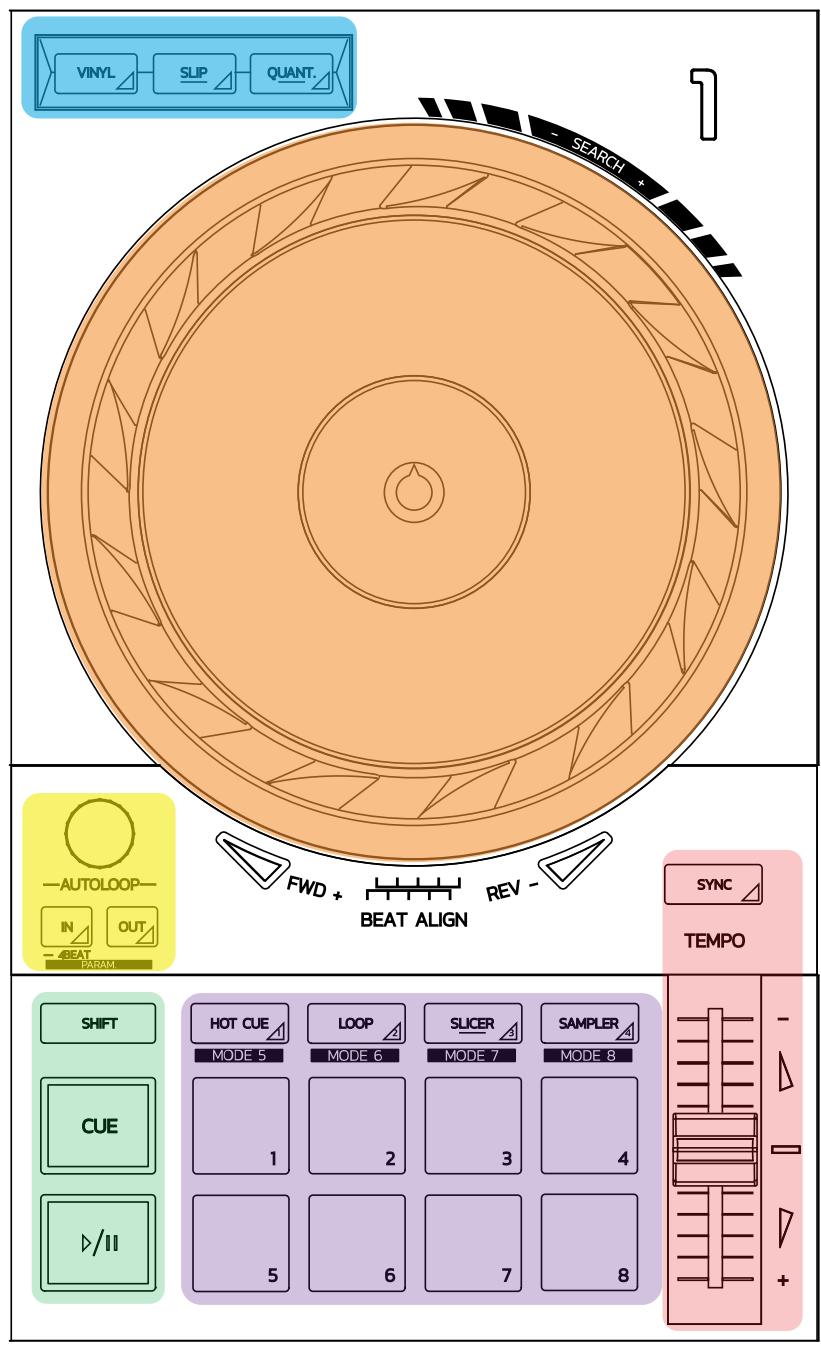
- 2 x 4 transport buttons: SHIFT / PLAY / CUE / SYNC
- 2 sets of 8 pads = 16 in total; and 2 sets of 4 mode buttons for pads = 8 in total (HOT CUE, LOOP, SLICER, SAMPLER, MODE 5, MODE 6, MODE 7, MODE 8)
- 2 × 3 LOOP controls: LOOP IN and LOOP OUT buttons on each deck; 1 LOOP SIZE rotary encoder on each deck with built-in push button; Reloop (exit the loop)
- 2 × 3 mode buttons: Vinyl / Slip / Quantize
- 2 jog wheels with capacitive touch detection
- 2 pitch faders
- 2 × 2 light guides (Tempo and Phase), to help with beatmatching
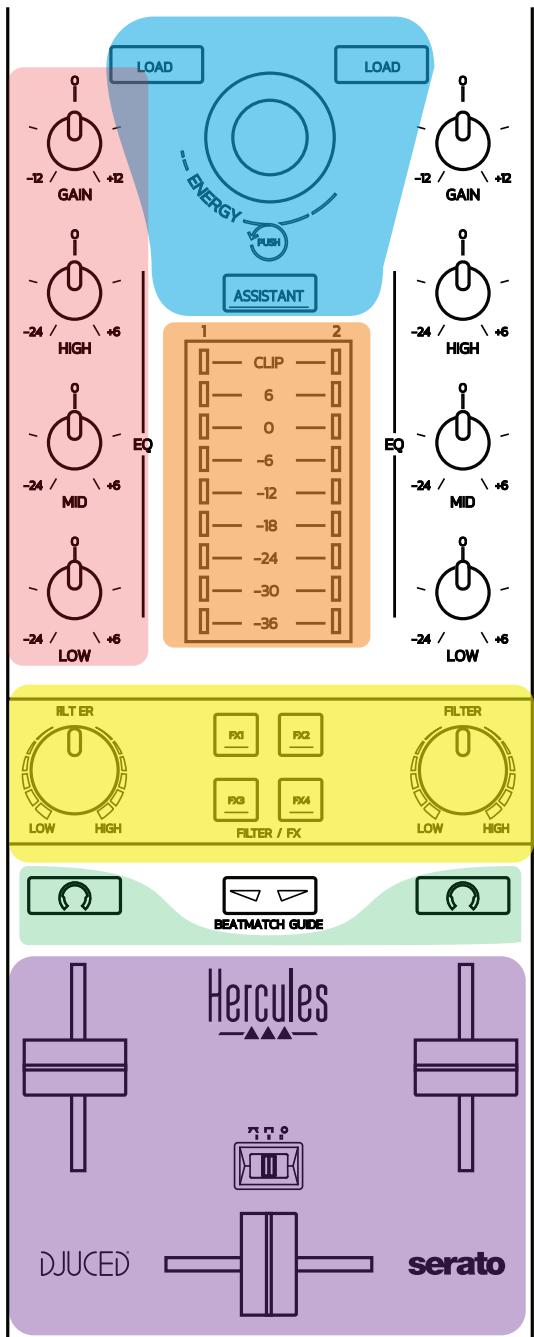
MIXER
- Navigation controls:
1 rotary encoder with built-in push button to navigate through the music library, and 1 backlit ring showing the energy level of the master track
2 buttons to load tracks onto the decks (virtual turntables)
1 Assistant button, to help you select tracks to be played
1 Beatmatch Guide button
Deck mixing controls:
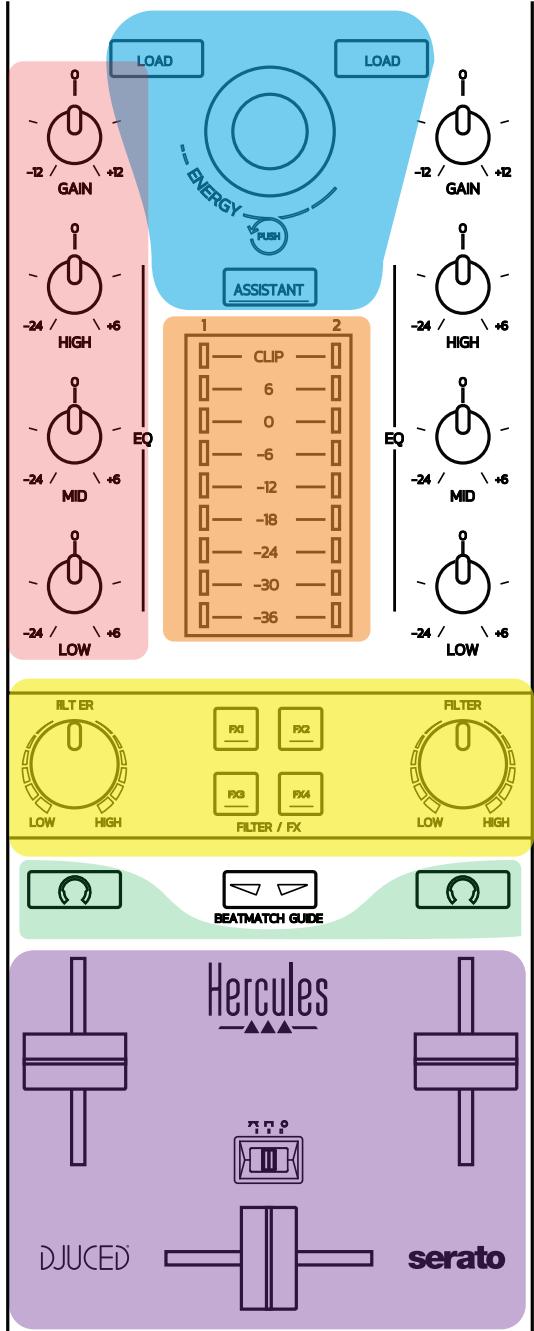
○ 2 three-band equalizers with HIGH (treble), MID (medium) and LOW (bass) frequency knobs
2 deck gain knobs
2 deck volume faders
2 deck volume VU-meters, with 9 levels each
o 2 buttons to enable/disable monitoring of the decks on headphones, and 1 button to enable/disable monitoring of the Master output on headphones
1 crossfader, plus 1 switch to select between the 3 different crossfader curves
- Filter/Fx controls:
2 filter/effects knobs
○ 4 effects buttons to enable an effect controlled via the filter/effects knobs
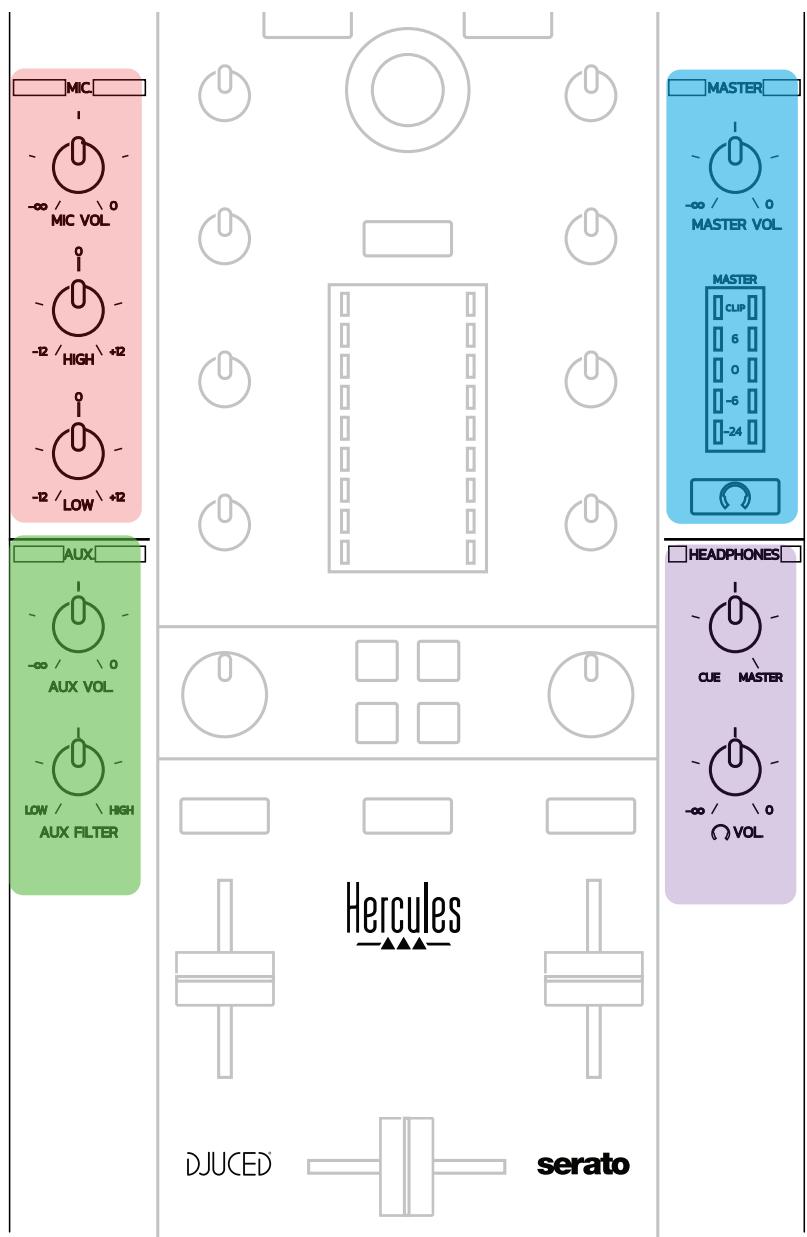
- Mixing controls for inputs and outputs (via hardware):
Microphone input: 1 microphone volume knob; 2 microphone equalizer knobs for HIGH (treble) and LOW (bass) frequencies; 1 two-color VU-meter (off = no audio signal / green = audio signal / red = audio signal saturation) (hardware adjustment)
○ Aux input: 1 auxiliary input volume knob and 1 auxiliary filter knob (hardware adjustment); 1 two-color VU-meter (off = no audio signal / green = audio signal / red = audio signal saturation) (hardware adjustment)
○ Headphones output: 1 headphones volume knob; 1 Cue/Master knob to select what you hear on your headphones (hardware adjustment)
○ Master output: 1 master volume knob; 1 master VU-meter, with 5 levels (hardware adjustment)
2. Built-in multichannel audio interface
Audio resolution: 24-bit
Sample rate = 44.1 kHz
Outputs:
- Speakers output (= 1-2): 2 x RCA outputs + 2 x 1/4" / 6.35 mm jack outputs
- Headphones output (= 3-4): 1 / 8'' / 3.5 mm stereo mini-jack + 1 / 4'' / 6.35 mm stereo jack outputs
Inputs:
- AUX auxiliary input (= 1-2): 2 × RCA inputs + 1 × 1/8'' / 3.5 mm stereo mini-jack input
- MIC microphone input: balanced 1 / 4'' / 6.35 mm jack input
4. Installation
4.1. Connections
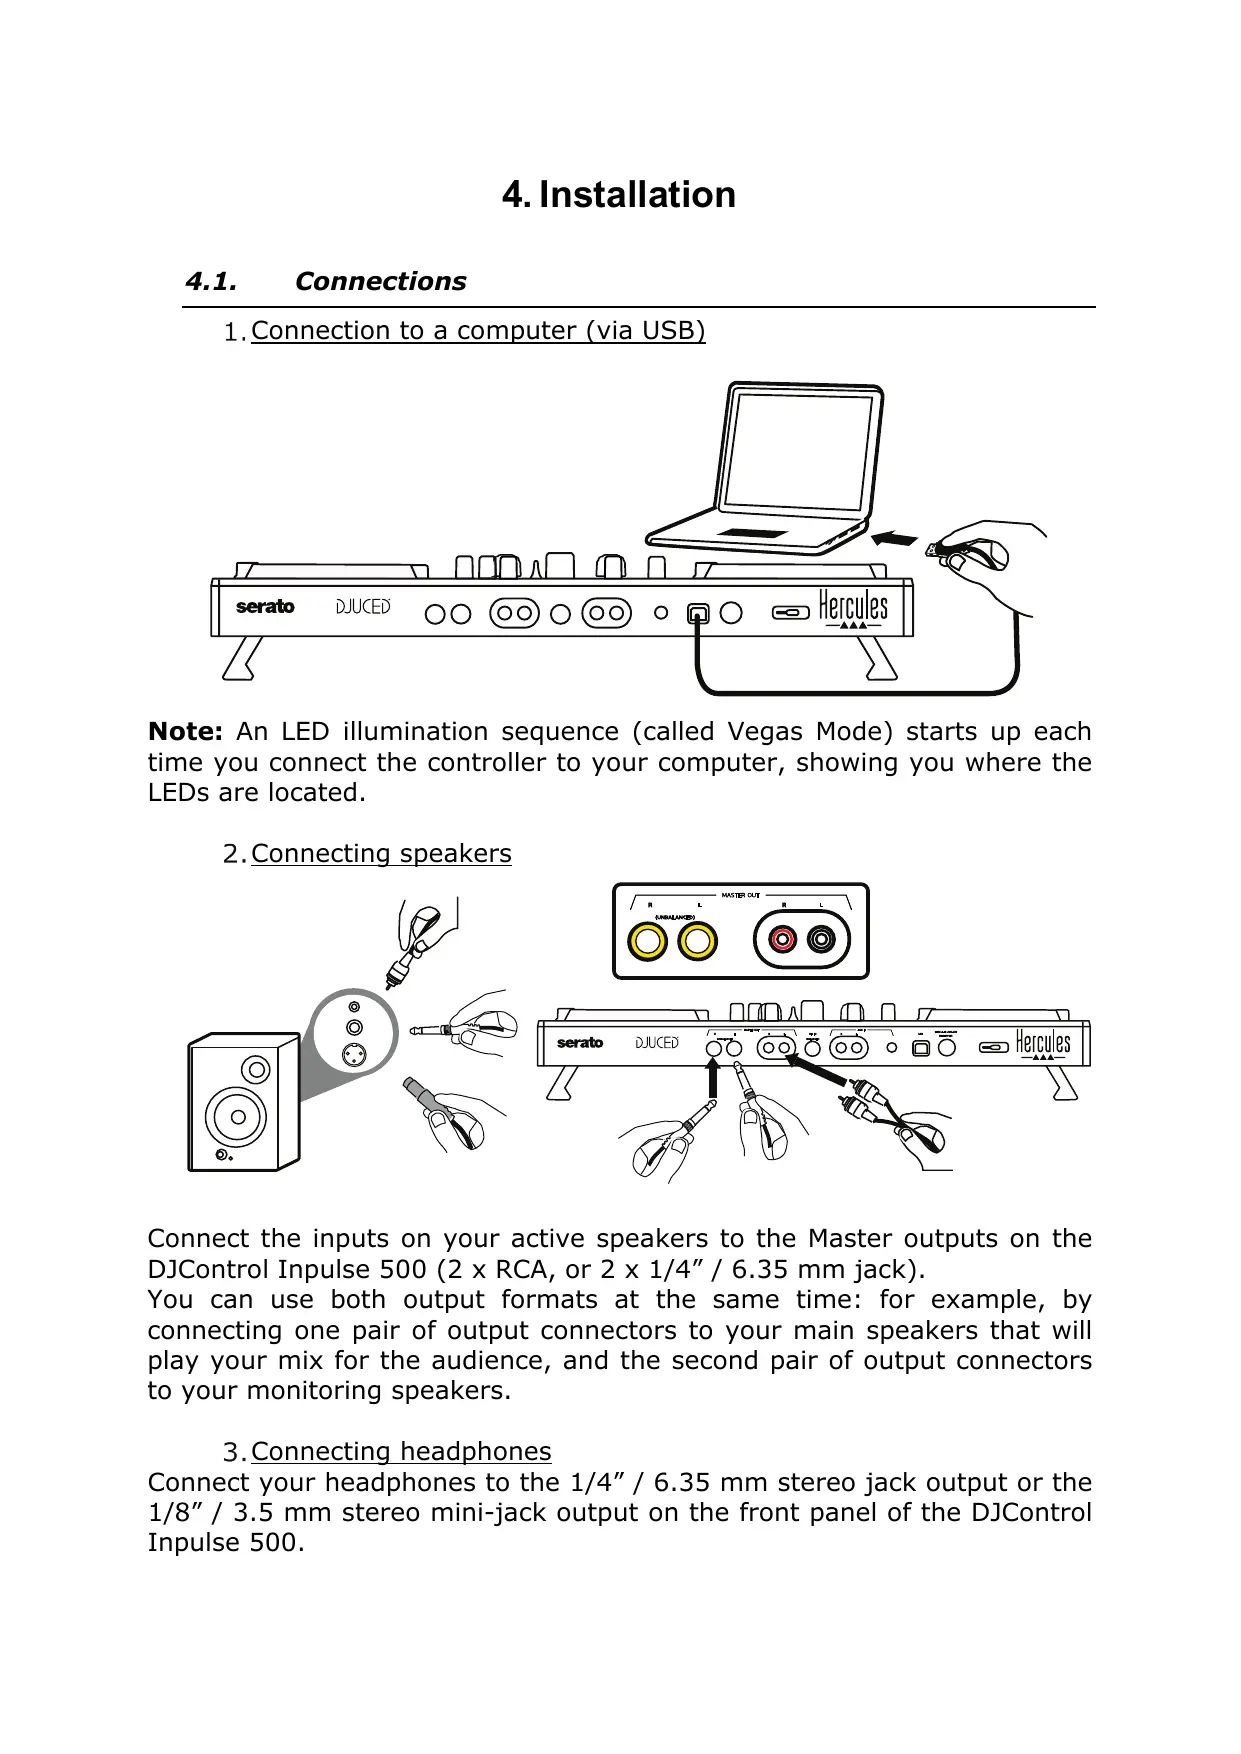
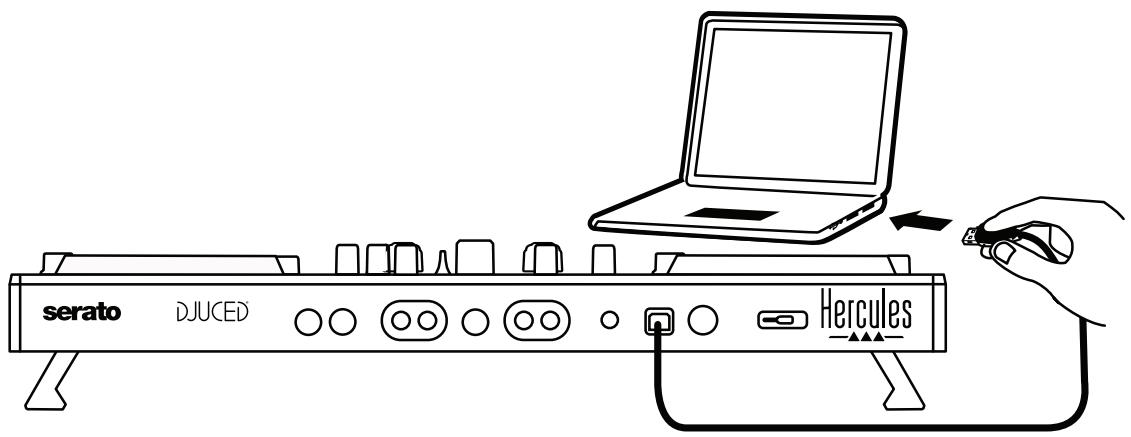
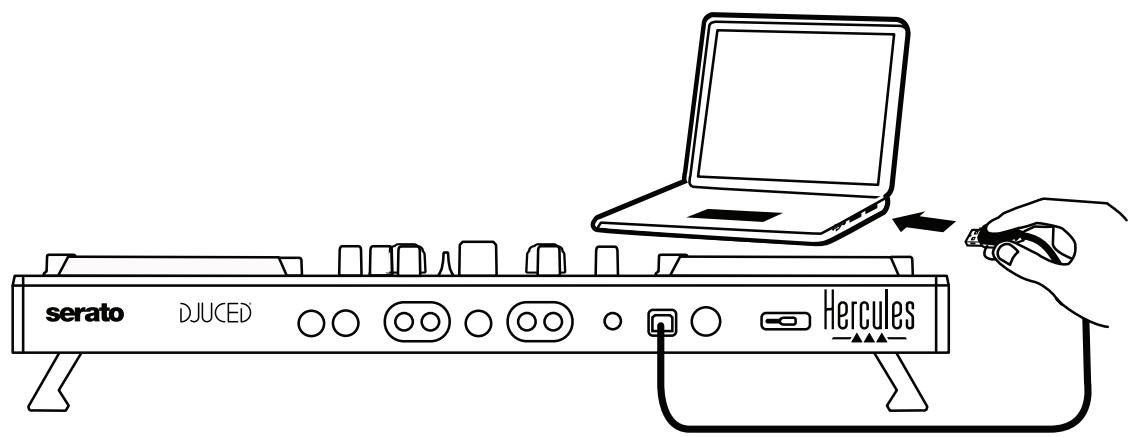
- Connection to a computer (via USB)
Note: An LED illumination sequence (called Vegas Mode) starts up each time you connect the controller to your computer, showing you where the LEDs are located.
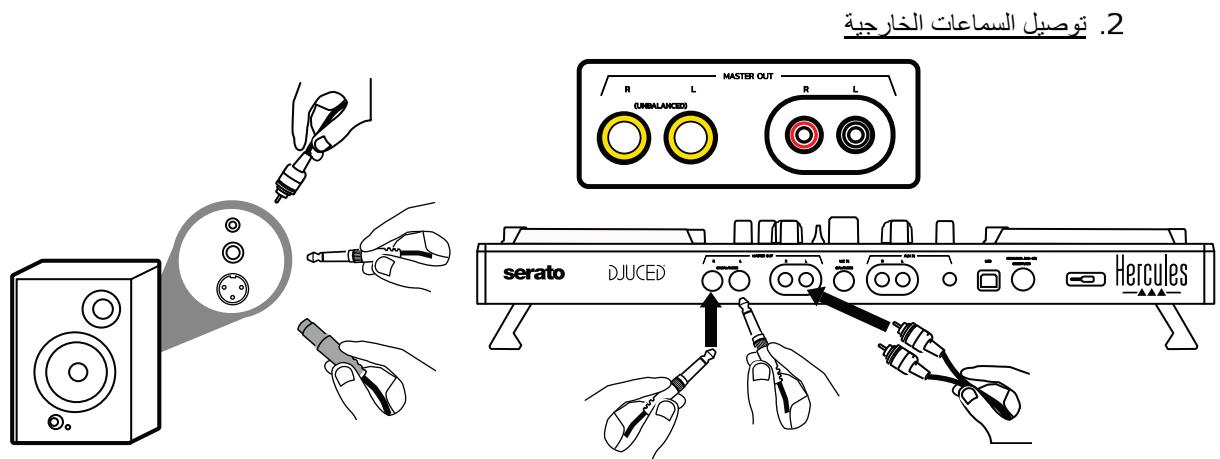
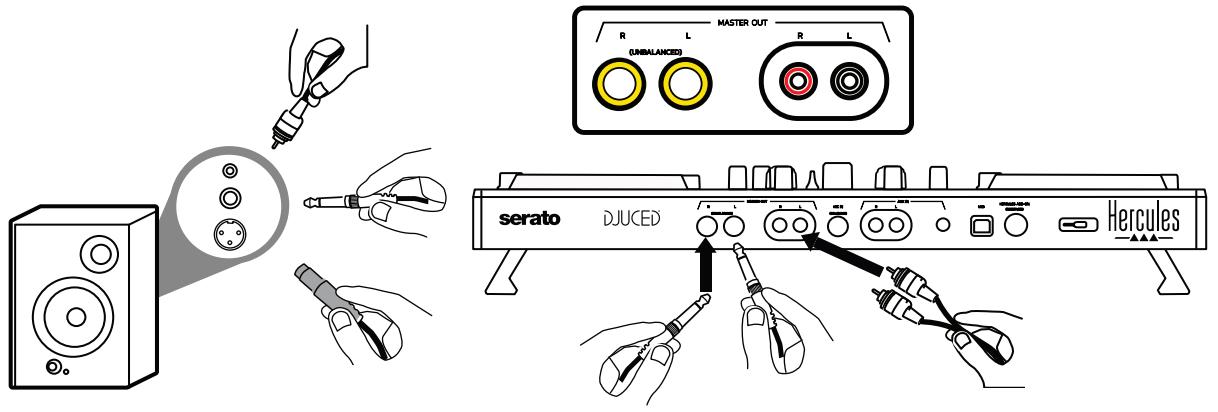
- Connecting speakers

Connect the inputs on your active speakers to the Master outputs on the DJControl Inpulse 500 (2 x RCA, or 2 x 1/4" / 6.35 mm jack).
You can use both output formats at the same time: for example, by connecting one pair of output connectors to your main speakers that will play your mix for the audience, and the second pair of output connectors to your monitoring speakers.
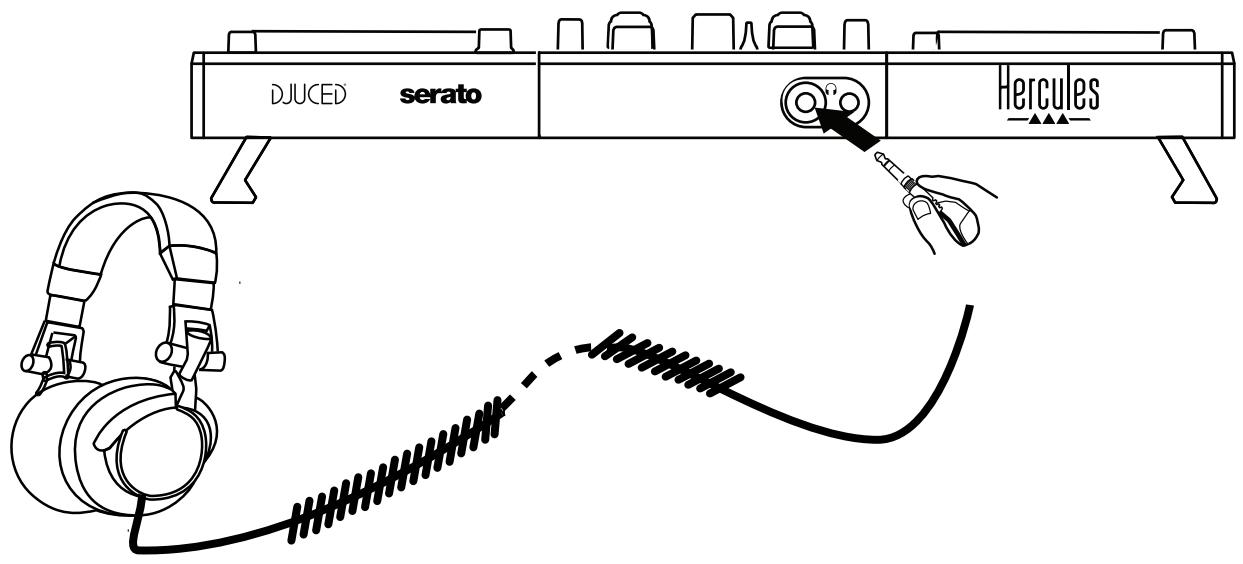
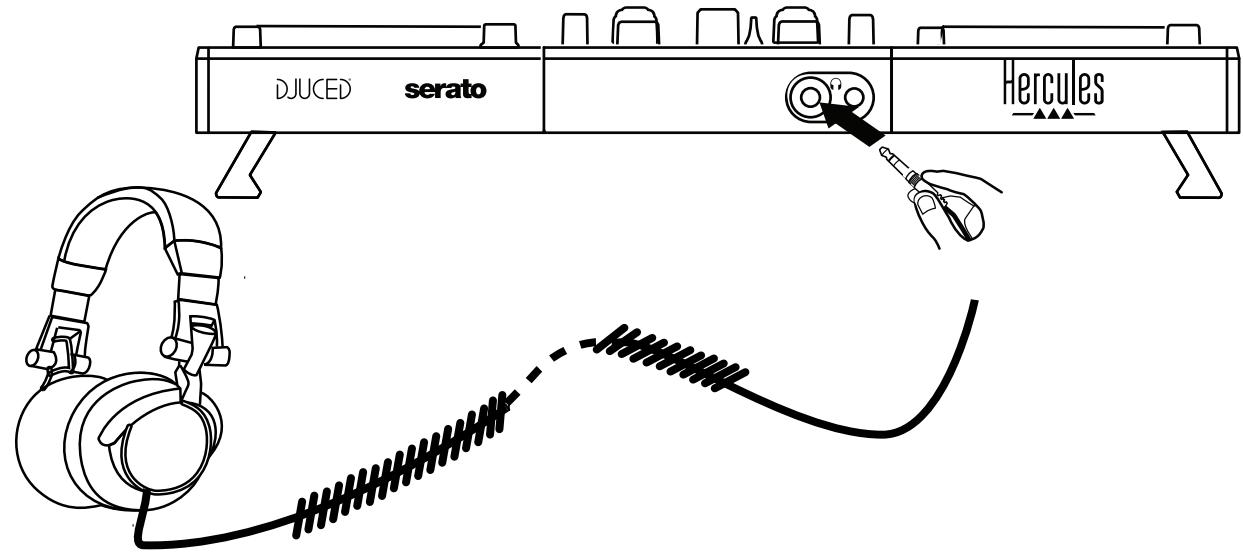
- Connecting headphones
Connect your headphones to the 1 / 4'' / 6.35 mm stereo jack output or the 1 / 8'' / 3.5 mm stereo mini- jack output on the front panel of the DJControl Impulse 500.

4.2. Downloading the software
- Serato DJ Lite
Please visit: https://serato.com

Download and install Serato DJ Lite.

serato DJ Lite
Note: DJControl Inpulse 500 includes a license for Serato DJ Lite, not a license for Serato DJ Pro. If you install Serato DJ Pro instead of Serato DJ Lite, Serato DJ Pro will work with your DJControl Inpulse 500 for the duration of a trial period. Should you wish to keep on using Serato DJ Pro at the end of the trial period, you will have to purchase a license for Serato DJ Pro.
- DJUCED®
Please visit: https://www.djuced.com/hercules

Download and install DJUCED®.
3. Hercules drivers
Please visit: https://support.HERcules.com/product/djcontrolinputse500/
Download the driver pack for your computer's operating system.
- For macOS®: HDJCSeries Mac
- For Windows®: HDJCSeries PC
Windows® needs the drivers in order to use DJControl Inpulse 500 in ASIO mode, which reduces the latency in relation to WASAPI mode, and is generally more stable.
The drivers also let you test your DJControl Impulse 500 and verify the firmware version in both Windows® and macOS®.
4.3. Getting started with DJUCED®
- Detection
When DJUCED® starts up, the software displays the message "DJCONTROL INPUT 500", indicating that the controller is detected.
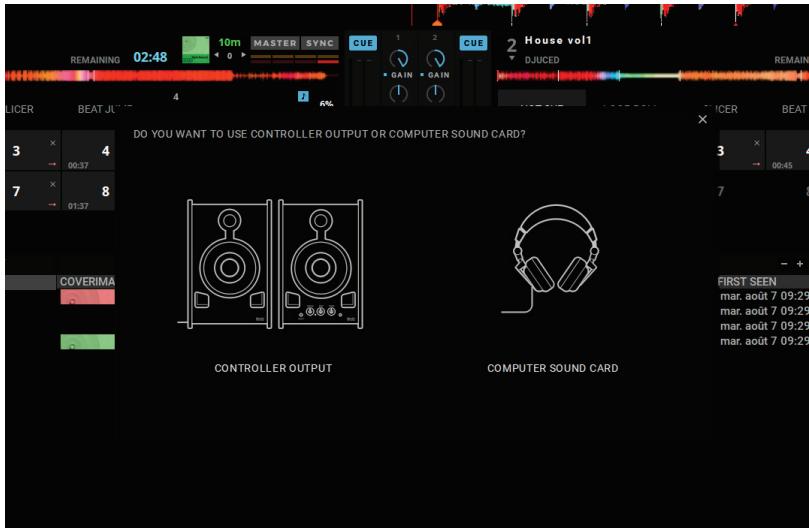
2. Connections
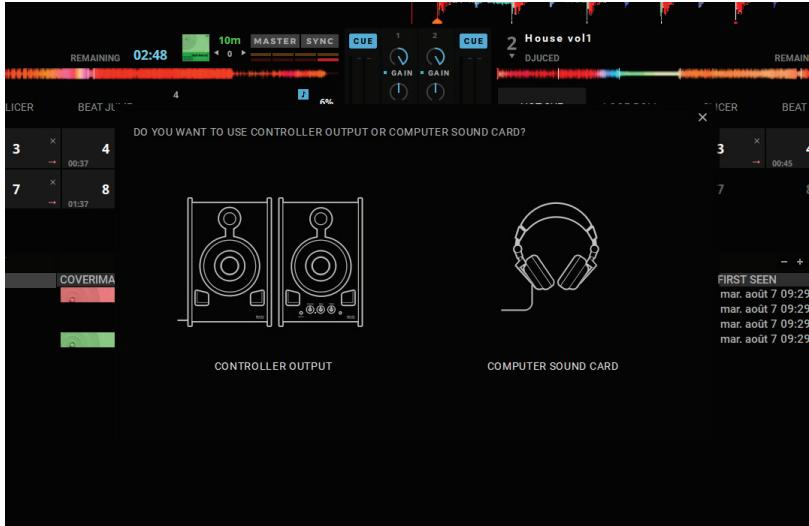
When you run the software for the first time, DJUCED® guides you through connecting your headphones and active speakers (or lets you use the speakers built into your computer, if you don't have external active speakers).
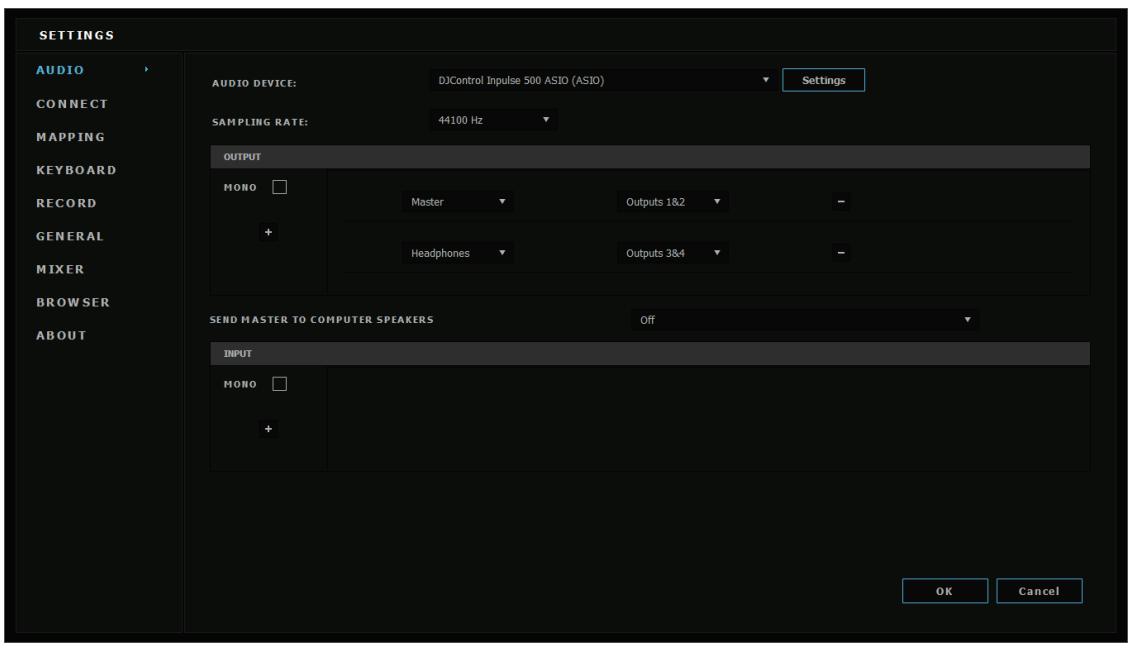
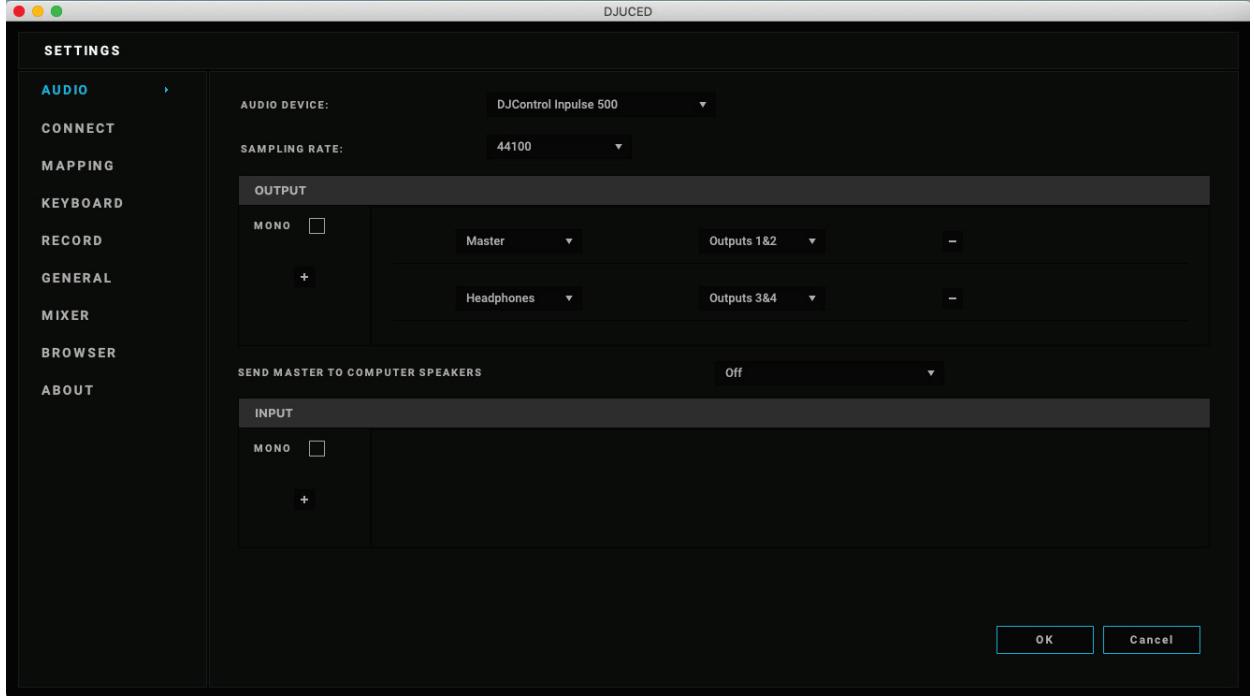
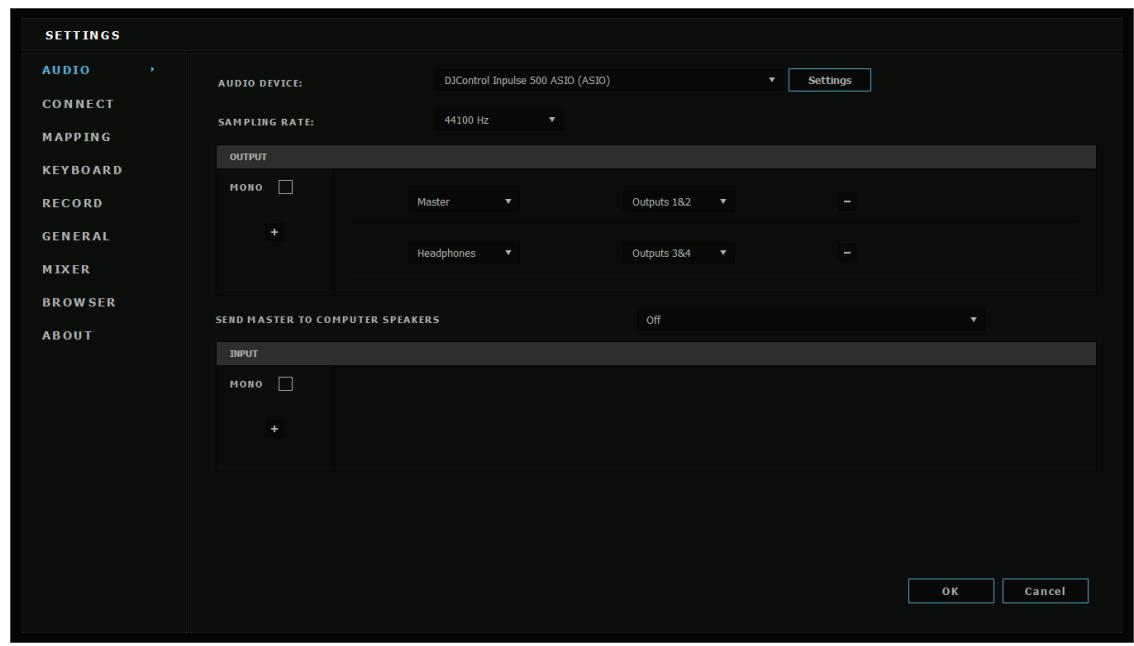
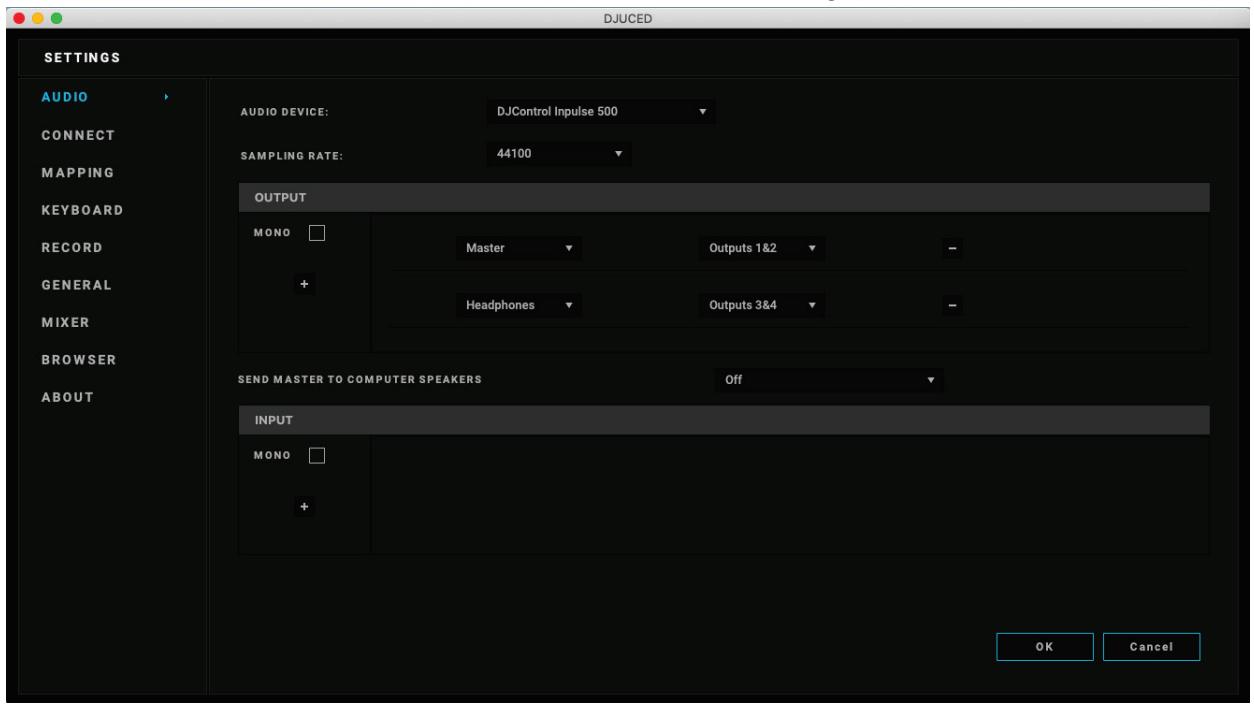
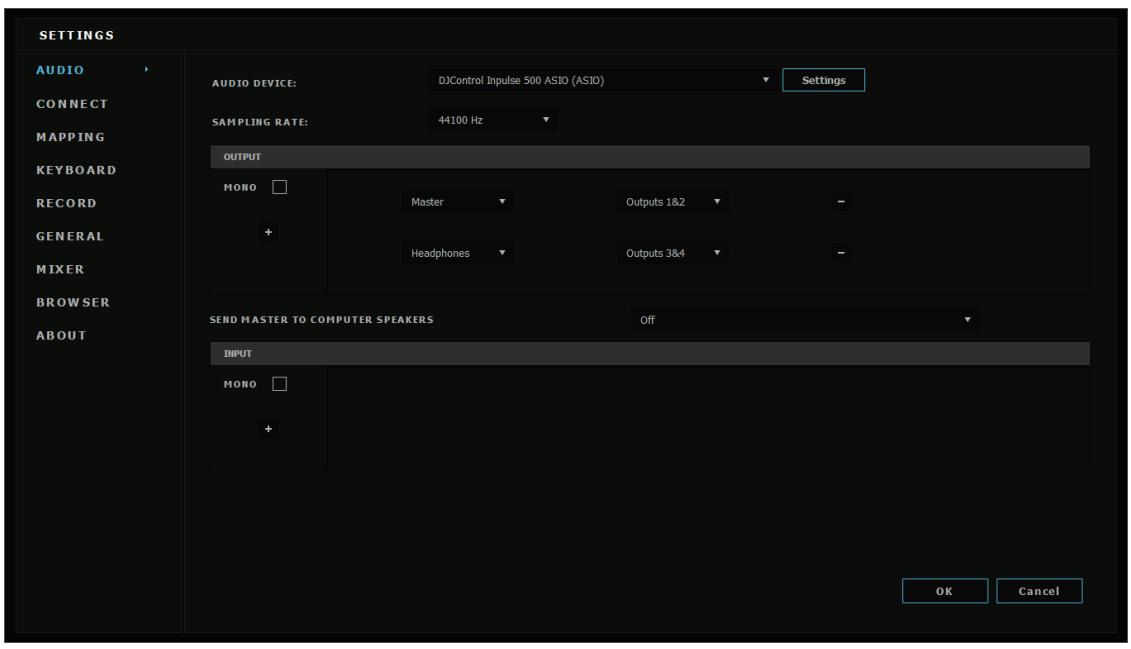
3. Audio settings
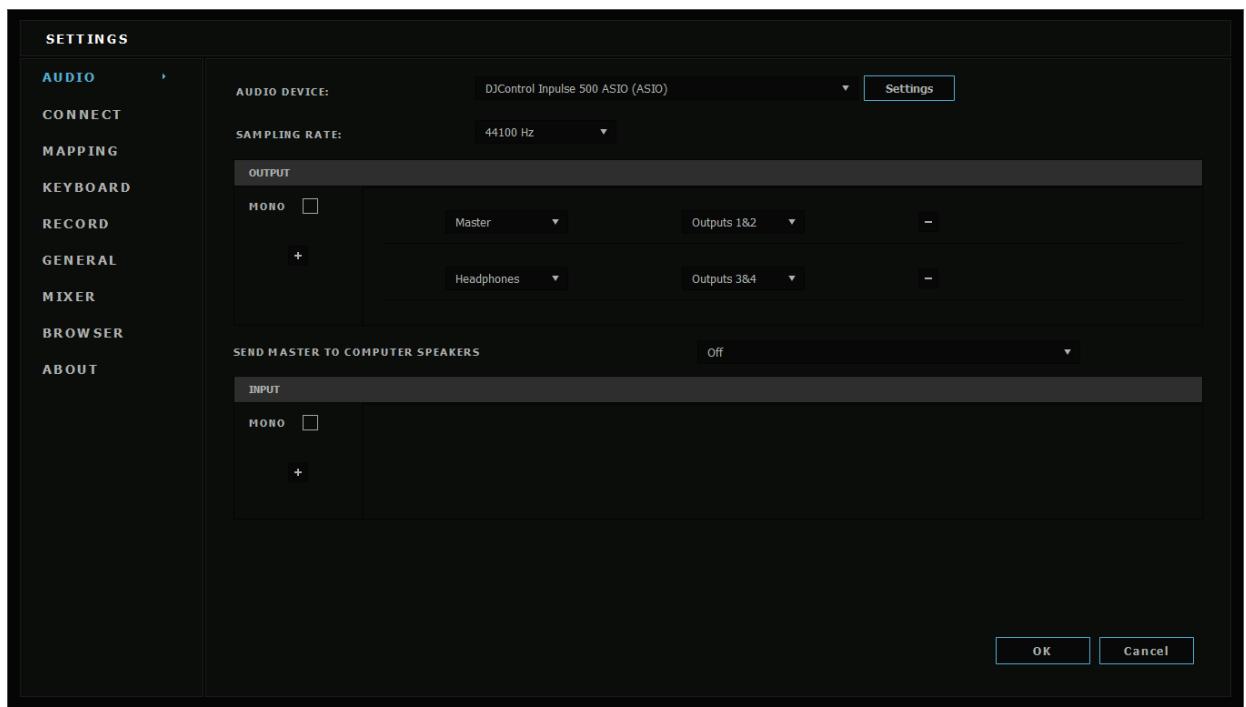
To modify the sound card settings in DJUCED®, click the gear wheel icon in the upper right-hand part of the screen, which opens up the Settings menu.
In the Settings menu, the Audio menu lets you select your sound card and assign the headphones and speakers outputs.
The standard setup for Windows® is as follows:
Audio device: DJControl Impulse 500 ASIO (ASIO)
Output:
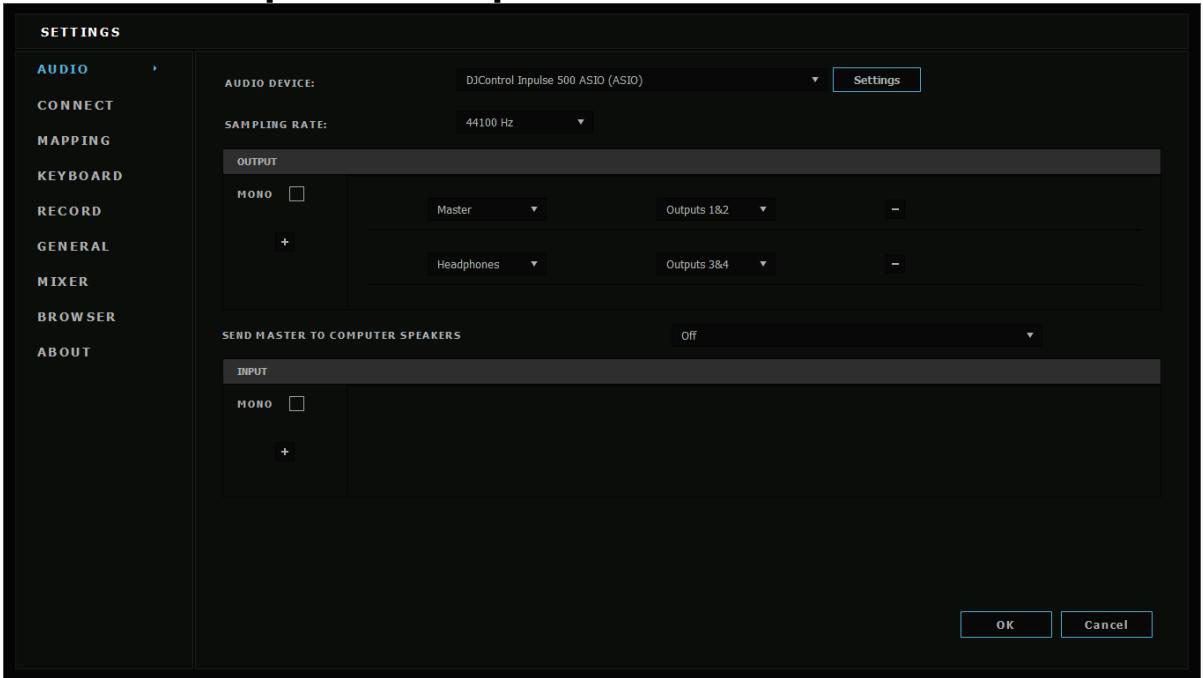
Master: Outputs 1&2 Headphones: Outputs 3&4
The standard setup for macOS® is as follows: Audio device: DJControl Inpulse 500 Output:
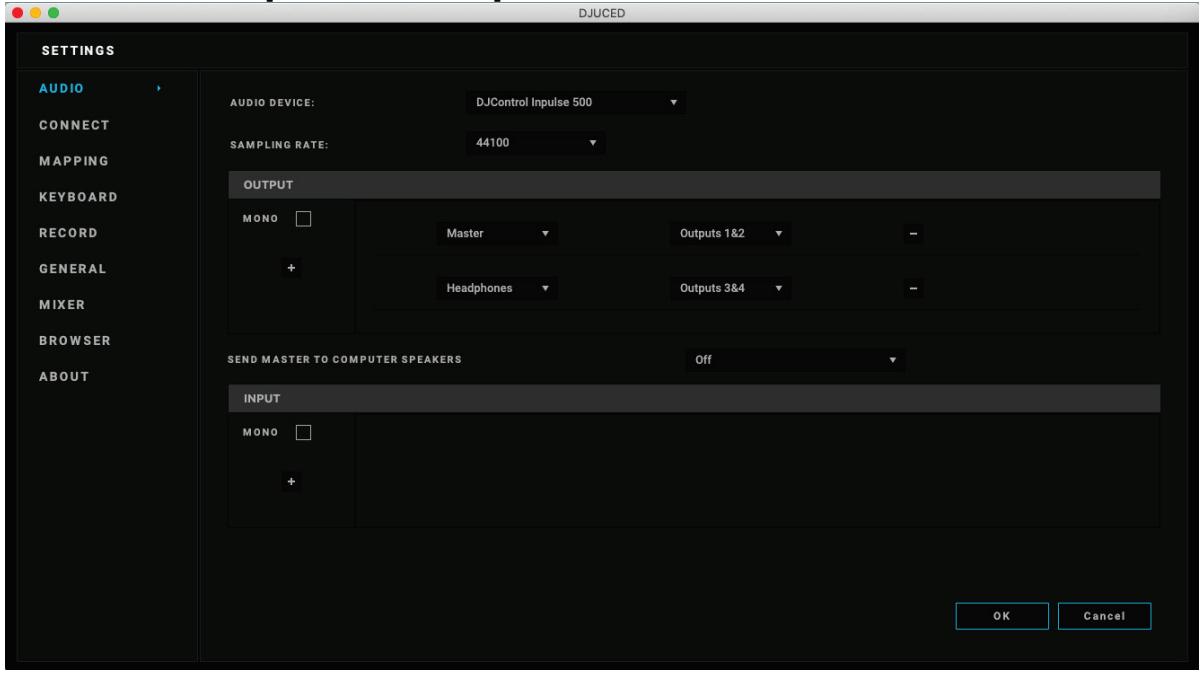
Master: Outputs 1&2 Headphones: Outputs 3&4
DJControl Impulse 500 mixes the inputs in hardware mode (via hardware mixing). Don't bother enabling the inputs (1-2 = Aux and Mic) in the software's audio menu, unless you plan on recording (or broadcasting) these inputs.
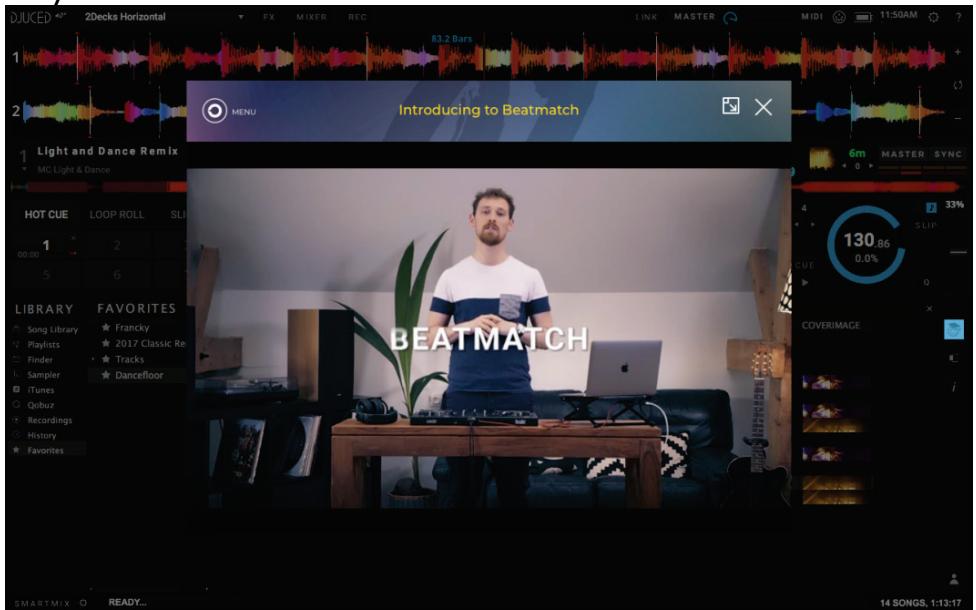
4.4. Hercules DJ Academy
The Hercules DJ Academy video tutorials built into DJUCED® can be accessed by clicking on the graduation cap icon, to the right of the audio library.
5. Overview of features
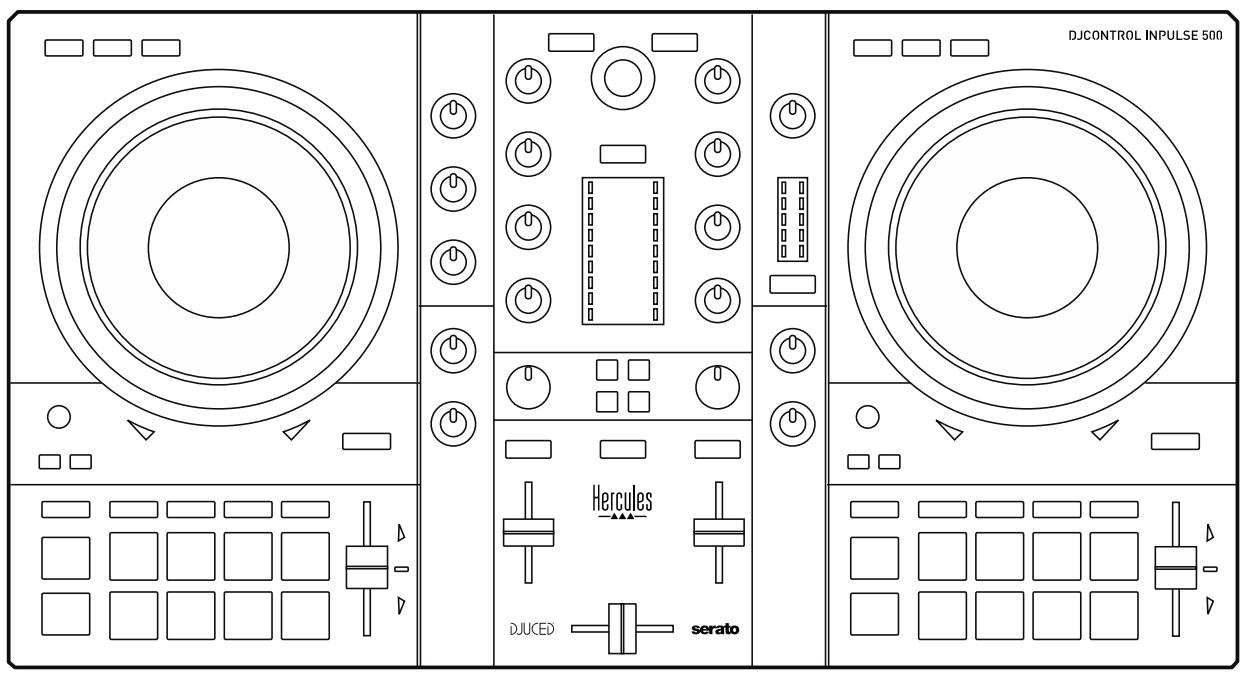
5.1. General DJControl Inpulse 500 overview
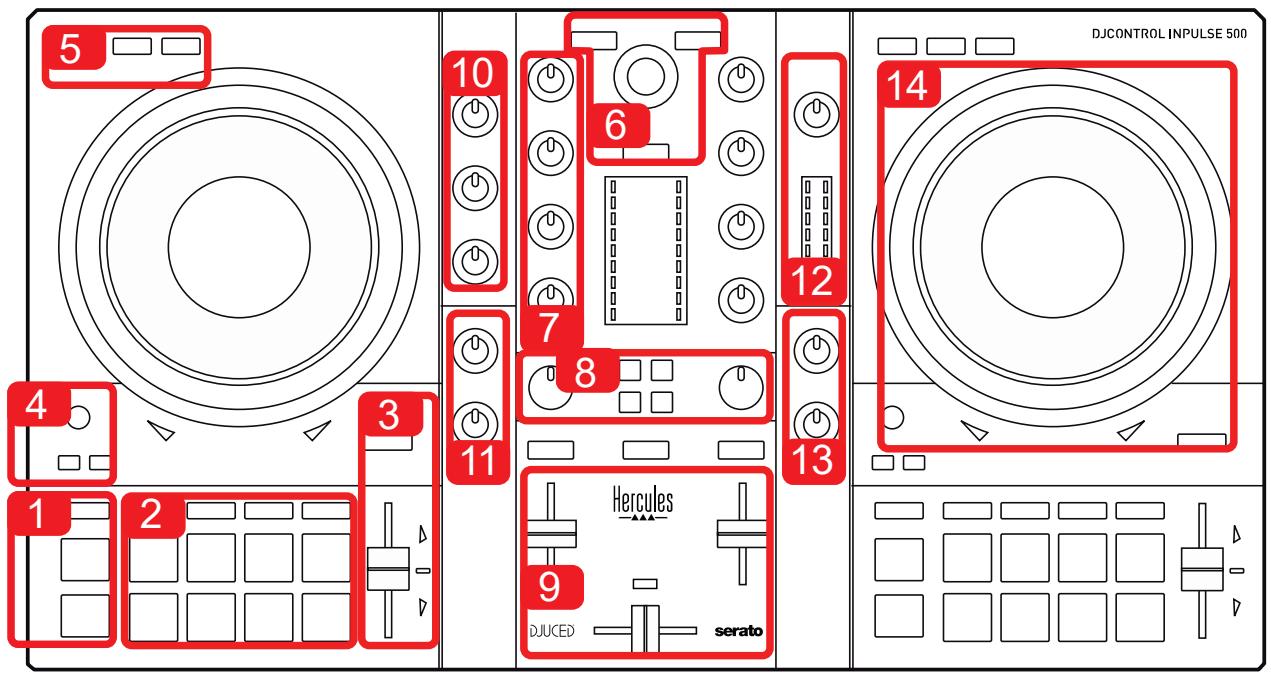
- Transport buttons: play/pause, Cue point, SHIFT
- Performance pads
- Tempo fader with beatmatching help (glowing red arrows), green LED showing the original tempo, and SYNC (synchronization) button
- Loop In/Out (start of the loop/end of the loop), size of the loop, and Reloop (exit the loop)
- Mode: Vinyl (scratch), Slip and Quantize
- Navigation through the music library, buttons to load tracks on the corresponding deck, Assistant and backlit ring showing the energy level (in DJUCED®) or the rhythm (in Serato)
- Gain and 3-band equalizer (HIGH / MID / LOW)
- Filter/FX: filters and effects
- Mixing with volume faders, crossfader, and switch to select between 3 different crossfader curves
- Microphone volume and 2-band equalizer for the microphone input (hardware functions = independent of the software being used)
- Aux (auxiliary) input volume and filter on the auxiliary input (hardware functions = independent of the software being used)
- Master volume knob and master volume VU-meter (hardware functions = independent of the software being used)
- Headphones volume knob and Cue/Master knob to select what you hear on your headphones (hardware functions = independent of the software being used)
- Jog wheel with capacitive touch detection, with beatmatching help (glowing red arrows)

- MASTER output (or Main or Mix) = channels 1-2 (2 x RCA, and 2 x 1/4" / 6.35 mm mono jack), for connecting active speakers
- MIC (microphone) input (1 / 4^ / 6.35mm mono jack): balanced input, compatible with both balanced and unbalanced microphones
- AUX (auxiliary) stereo input (2 x RCA, and 1 x 1/8" / 3.5 mm stereo mini-jack)
- USB port (type B)
- Hercules Add-On Reserved: reserved extension port

- Stereo headphones output (1/4" / 6.35 mm stereo jack, and 1/8" / 3.5 mm stereo mini-jack)
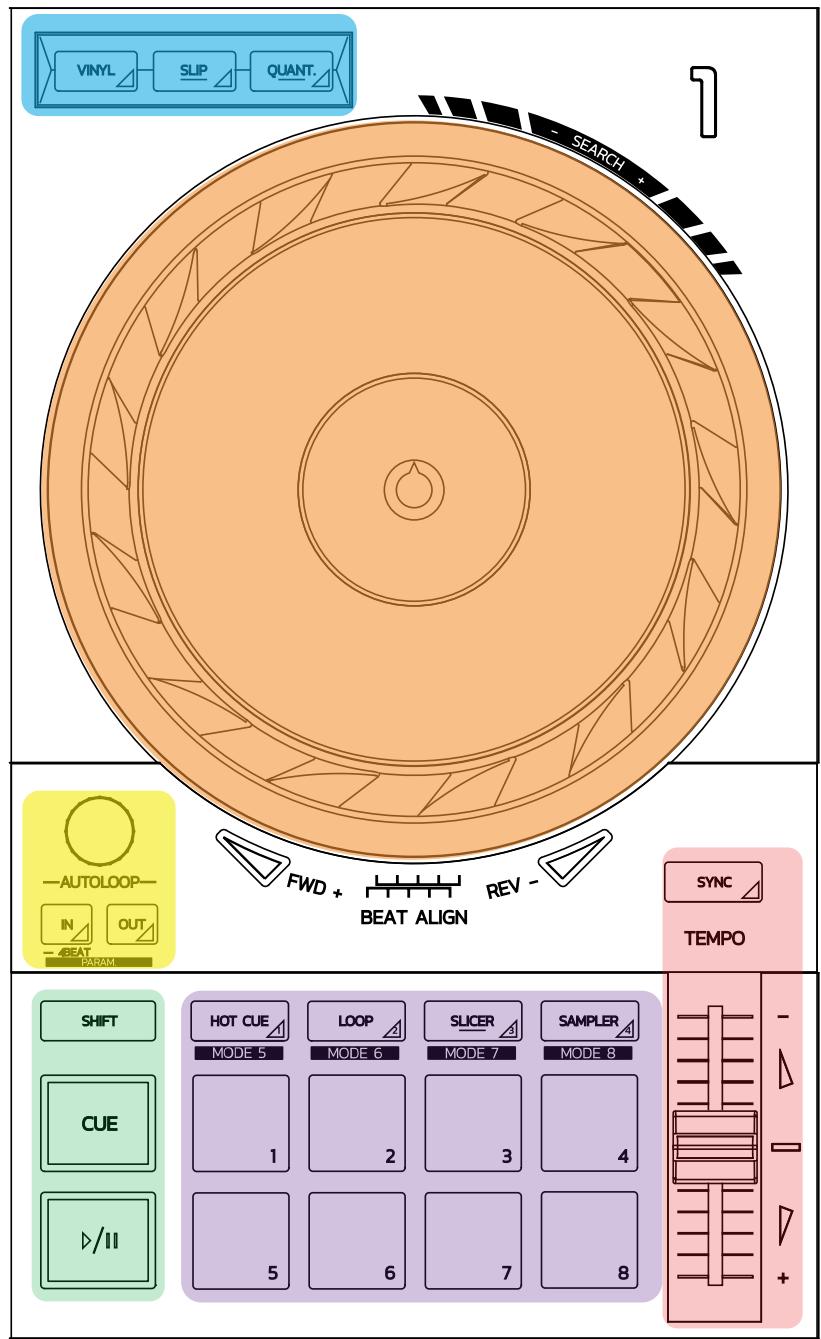
Loop controls
In = Loop In: inserts the marker for the start of the loop.
In (long press): starts a 4-beat loop.
Out = Loop Out: inserts the marker for the end of the loop, and starts playing the loop.
Shift+In/Shift+Out: divides the length of the loop by 2/doubles the length of the loop.
Autoloop: turning the encoder changes the length of the loop.
To exit the loop:
- In Serato: press the encoder = Reloop.
- In DJUCED®: press the Out button.
Transport buttons
Play/Pause: plays the track/pauses playback.
Cue: when stopped, inserts a marker at the current point in the track / during playback, moves playback to this location.
Shift: use this button in conjunction with other buttons — for example, Shift+Cue = return to the start; Shift+Hot Cue = erases the hot cue; Shift+Sample = stops playback of the sample...
Playback modes
Vinyl (or Scratch): puts the jog wheel in vinyl mode, allowing you to scratch when you place your hand on the top of the jog wheel.
Shift+Vinyl: In DJUCED®, turning the jog wheel using the ring on its edge in Shift+Vinyl mode creates a Beatjump effect.
Slip: mode which plays the track at its normal speed in the background; at the end of a scratch, it returns to the point where you would have been if you hadn't scratched, thereby keeping the track's original phrasing.
- Serato DJ Lite does not include Slip mode, while Serato DJ Pro does include Slip mode.
- DJUCED® includes Slip mode.
Quantize: mode which lines up actions with marks on the beat grid, in order to synchronize the triggering of a sample or the placement of a cue point with the rhythm of the track.
- Serato DJ Lite does not include Quantize mode, while Serato DJ Pro does include Quantize mode.
- DJUCED® includes Quantize mode.
Shift+Quantize: in Serato, Shift+Quantize changes the pitch scale (for example: +8%, +16%, +50%).
Tempo controls (pitch/BPM)
Tempo fader (pitch fader): adjusts the playback speed of the track.
Shift+tempo guide: in Serato, you can move the tempo fader without changing the speed, to shift the tempo scale (for example, switch from a tempo scale of -8% - +8% to 0 - +16% ).
Tempo guide: glowing arrows indicating the direction in which you should move the tempo fader in order to play the track at the same BPM as the track on the other deck.
Sync button: instantly adjusts the speed of the track to match the BPM value of the track being played on the other deck.
- In DJUCED®, Sync locks the BPM value of the "slave" track to that of the "master" track continuously.
- In Serato, Sync is a one-off action: the BPM value is instantly adjusted, but not locked to that of the other track being played.
Pads
Pads 1 to 8: in Serato DJ Lite, pads 1 to 4 carry out the actions of the selected mode, while pads 5 to 8 carry out the Reverse, Rewind, Fast Forward and Censor actions.
In DJUCED® and Serato DJ Pro, pads 1 to 8 carry out the actions of the selected mode.
Pad modes
| DJUCED® | Serato DJ Lite | Serato DJ Pro* | |
| 1 | Hot Cue | Hot Cue | Hot Cue |
| 2 | Loop Roll | Manual Loop | Manual Loop |
| 3 | Slicer | Auto Loop | Slicer |
| 4 | Sampler | Sampler | Sampler |
| 5 | TonePlay | - | Pitch Play |
| 6 | FX | - | Loop Roll |
| 7 | Slicer Loop | - | Auto Loop |
| 8 | Beat Jump | - | Beat Grid |
*Serato DJ Pro licence not included
- In Serato DJ Lite, modes 1 to 4 (Hot Cue, Loop, Slicer, Sampler) enable the following modes on pads 1 to 4: 1 = Hot Cue ; 2 = Manual Loop (Loop In, Loop Out, Reloop); 3 = Autoloop ; and 4 = Sampler .
- In Serato DJ Pro, modes 1 to 8 enable the following modes on the pads: 1 = Hot Cue; 2 = Manual Loop ; 3 = Slicer ; 4 = Sampler ; 5 = Pitch Play ; 6 = Loop Roll ; 7 = Autoloop ; 8 = Beatgrid .
- In DJUCED®, modes 1 to 8 enable the following modes on the pads: 1 = Hot Cue; 2 = Loop Roll; 3 = Slider ; 4 = Sampler ; 5 = TonePlay ; 6 = FX ; 7 = SliderLoop ; 8 = BeatJump .
Jog wheels
The jog wheels let you move within tracks, and modify the playback depending on the part of the jog wheel that you touch (the ring [edge] or the top), and the selected mode (Vinyl mode enabled or disabled).
In Serato DJ Lite and Pro:
Vinyl mode disabled
During playback: speeds up or slows down playback (= pitch bend).
○ When no music is playing: slow movement when you touch the jog wheel's ring (edge); medium-speed movement when you touch the jog wheel's top.
Shift + jog wheel: beatjump = very fast movement.
Vinyl mode enabled
During playback: scratch on top of the jog wheel; pitch bend on the jog wheel's ring (edge).
○ When no music is playing: slow movement when you touch the jog wheel's ring (edge); medium-speed movement when you touch the jog wheel's top.
Shift + jog wheel: beatjump = very fast movement.
In DJUCED®
Vinyl mode disabled
During playback: speeds up or slows down playback (= pitch bend).
○ When no music is playing: slow movement when you touch the jog wheel's ring (edge); medium-speed movement when you touch the jog wheel's top.
Shift + jog wheel's ring (edge): beatjump = very fast movement.
Vinyl mode enabled
During playback: scratch on top of the jog wheel; pitch bend on the jog wheel's ring (edge).
- When no music is playing: medium-speed movement when you touch the jog wheel's ring (edge) or top.
Shift + jog wheel's ring (edge): beatjump = very fast movement.

Navigation controls
Rotary encoder: turn the encoder = move through your audio library; press the encoder = change levels.
Light ring around the rotary encoder: displays the energy level of the master track in DJUCED®; displays the rhythm in Serato.
Load: loads a track onto deck 1 or 2.
Assistant: in DJUCED®, brings up the Assistant, which suggests well-suited tracks to be played; in Serato, enables Automix (automatic mixing of tracks).
Gain and EQ line
Gain: gain (= volume before the volume fader is taken into account) on deck 1 or 2.
3-band equalization: lets you adjust the HIGH (treble), MID (medium) and LOW (bass) frequencies on each deck.
Deck VU-meters
VU-meter with 9 levels for each deck.
Filter/FX
Filter: low-pass filter and high-pass filter on each deck, enabled when FX1, 2, 3 and 4 are off.
FX1 to FX4 buttons: applies effects FX1 to FX4 (modulated via the Filter knob) on deck 1 or 2.
- In DJUCED®, FX1, 2, 3 and 4 are selected in Settings > Mixer.
- In Serato, FX1, 2 and 3 are the effects loaded on the slots for the virtual decks, while FX4 lets you activate the Beats setting to assign to the effects.
Monitoring
The buttons with a headphones symbol on them let you play the sound from the corresponding deck on your headphones, when the Cue/Master knob (for the headphones) is set to Cue mode.
Mixing
Volume fader: adjusts the volume for virtual decks 1 and 2.
Crossfader: adjusts the mix of the sound between decks 1 and 2.
Crossfader curve: switch that lets you select between 3 different modes for the crossfader curve:
- Mix = progressive mixing of the 2 decks.
- Scratch = very fast mixing of the two decks.
- Off = crossfader disabled (to mix using the volume faders only).
Microphone input
MIC VOL: controls the microphone volume (hardware adjustment).
Light ring: off = no audio signal / green = audio signal / red = audio signal saturation.
2-band EQ: lets you adjust the HIGH (treble) and LOW (bass) frequencies for the microphone.
Aux (auxiliary) input
AUX VOL: controls the volume for the Aux input (hardware adjustment).
Light ring: off = no audio signal / green = audio signal / red = audio signal saturation.
AUX FILTER: filter for the Aux input.
Master output
MASTER VOL: controls the master volume (hardware adjustment).
VU-meter: displays the volume level on the Master output (two RCA outputs, and two 1/4'' / 6.35 mm mono jack outputs).
Button with headphones icon: plays the Master output on your headphones.
Headphones output
Cue/Master knob: adjusts the signal being played on your headphones between Cue for monitoring upcoming tracks (decks 1 and 2, depending on the function selected using the two buttons above the volume faders), and the Master output.
Headphones volume: adjusts the volume for the headphones output.
The controller features a built-in multichannel sound card, allowing you to:
- Play your mix on speakers for the audience (Master output);
- Monitor the next track that you're preparing on your headphones (headphones output);
-
Use a microphone and/or a device featuring a line level output as an audio source.
-
Speakers on the Master output (= outputs 1-2)
Your speakers must be connected to one of the two stereo speakers outputs located on the controller's rear panel: 2 × RCA , or 2 × 1 / 4'' / 6.35 mm mono jack.
- Headphones (= outputs 3-4)
Your – headphones – must be – connected to – one – of the two
headphones outputs (1/8" / 3.5 mm stereo mini-jack, or 1/4" / 6.35 mm stereo jack) located on the controller's front panel.
By default, the headphones output is assigned to channels 3-4 for monitoring tracks in all DJ software — including Serato DJ Lite and DJUCED®.
However, to listen to music played by non-DJ software such as iTunes, Media Player or VLC on your headphones, you must play the Master output on your headphones by pressing the button with a headphones icon below the Master VU-meter.
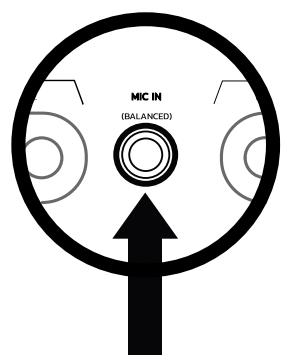
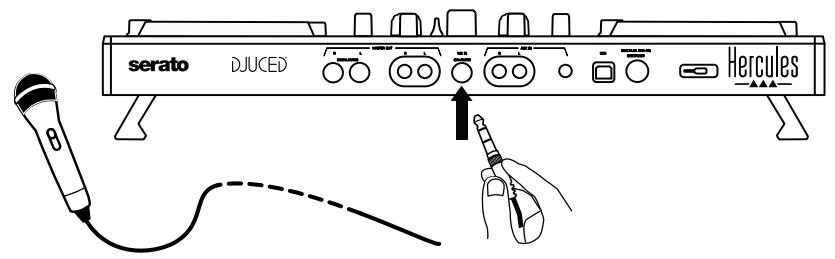
3. Microphone (= Mic/Aux 1-2 input)
Connect the microphone to the Mic In input (1/4" / 6.35 mm jack) located on the controller's rear panel.
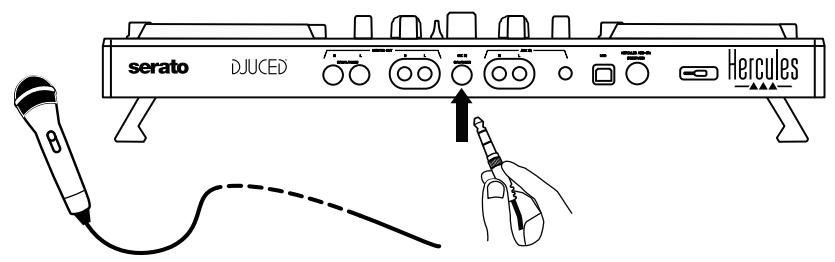
The microphone input is balanced (or symmetrical), allowing you to connect either a balanced or unbalanced microphone. The advantage of using a balanced microphone is that it provides better sound, with less breathing noise and other noise.
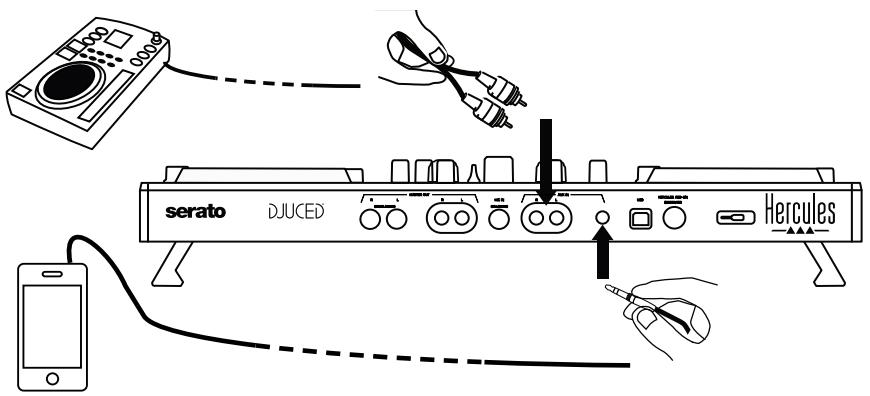
4. Auxiliary (= Mic/Aux 1-2 input)
Connect an auxiliary audio source such as a smartphone or CD player to the Aux In inputs on the controller's rear panel (2 x RCA inputs, and 1 x 1/8'' / 3.5 mm stereo mini-jack input).
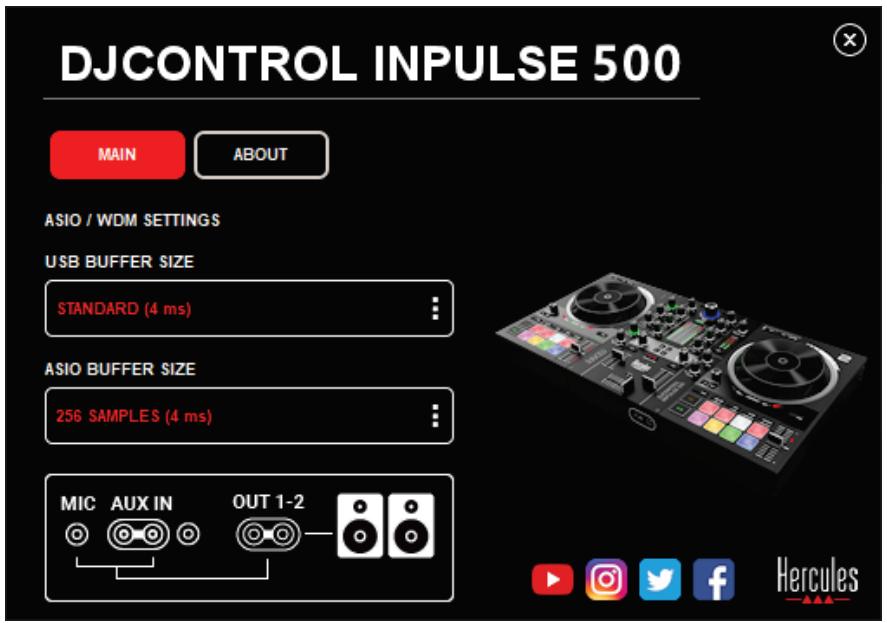
6. Drivers and control panel
DJControl Impulse 500 is a USB Audio and USB MIDI plug and play DJ controller, and can function without drivers in the DJUCED® software — in both Windows® and macOS®. Nevertheless, it comes with a pack including drivers and a control panel, allowing you to get the most out of your controller.
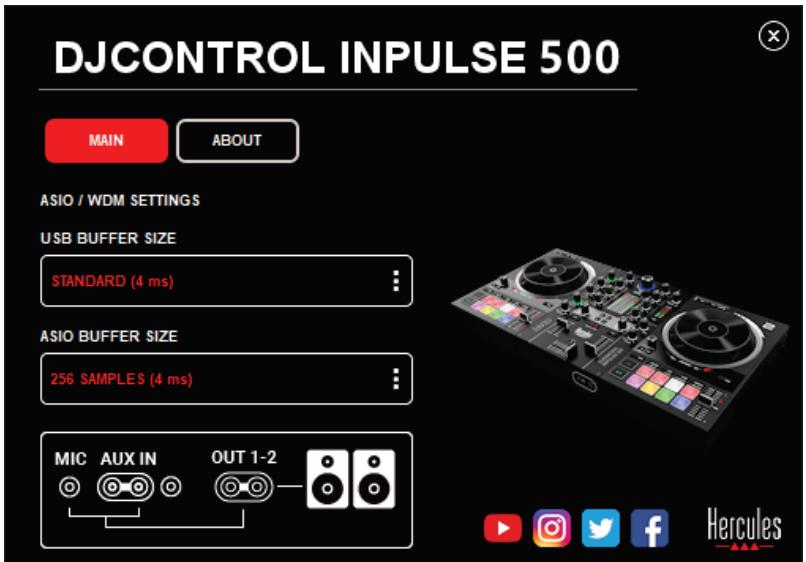
6.1. ASIO drivers (for Windows®)
A pack of drivers including the ASIO drivers is available on the Hercules support website (https://support.hercules.com): ASIO lets you reduce the audio latency compared with WASAPI mode in Windows®, which is useful for scratching.
In Windows®, the Hercules DJControl Inpulse 500 control panel lets you adjust the ASIO buffer size, thereby adjusting the latency.
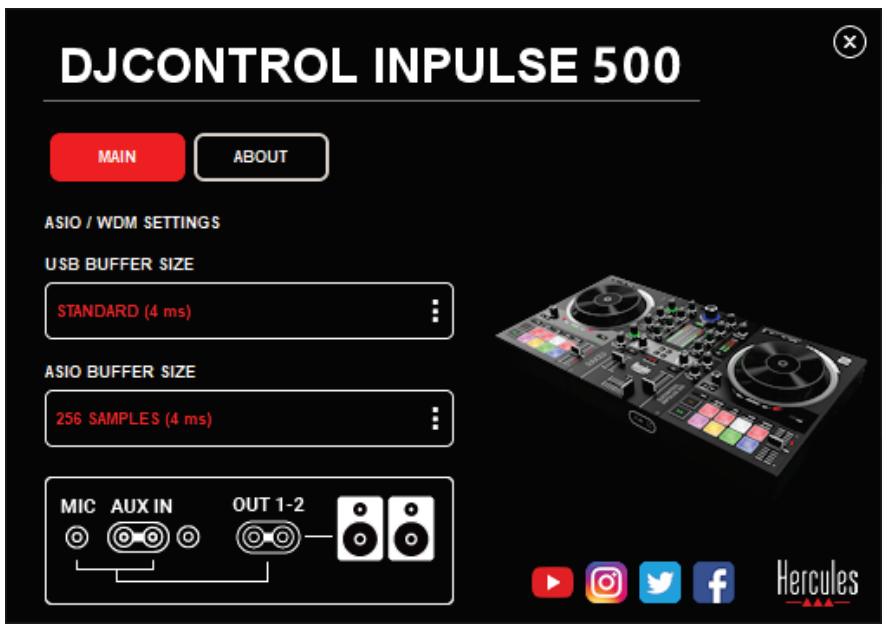
The procedure to adjust the ASIO settings is as follows:
- First, set the USB buffer size to Standard (4 ms).
- Select an ASIO buffer size, for example 256 Samples (4 ms).
- Start up your DJ software (Serato DJ Lite or DJUCED®).
- In DJUCED®, select the DJControl Impulse 500 ASIO (ASIO) audio device:
Once the software has loaded the ASIO device, the ASIO settings in the control panel can no longer be modified.
If you hear clipping, clicks or crackling in the DJ software's audio, the latency must be adjusted by increasing the buffer size. In that case, close the DJ software and adjust the ASIO buffer by one value in each test:
- Reduce the buffer size to decrease the latency.
- Increase the buffer size in the event of audio clipping or artefacts.
Repeat this procedure until you have found an optimal buffer size for your system.
6.2. Updating the firmware
The drivers for the DJControl Inpulse 500 update the controller's firmware: if the Hercules DJ drivers are installed and up to date, they will display instructions onscreen explaining how to update the firmware, if necessary.
The drivers are available at https://support.hercules.com
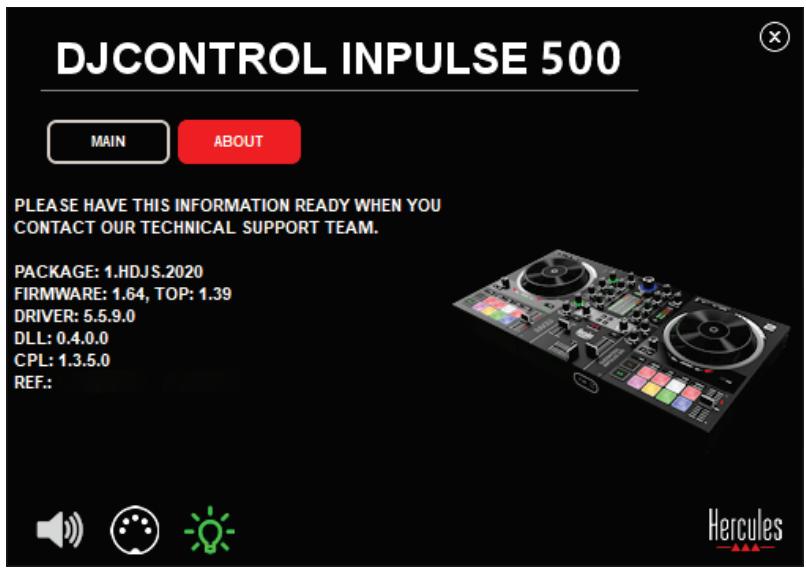
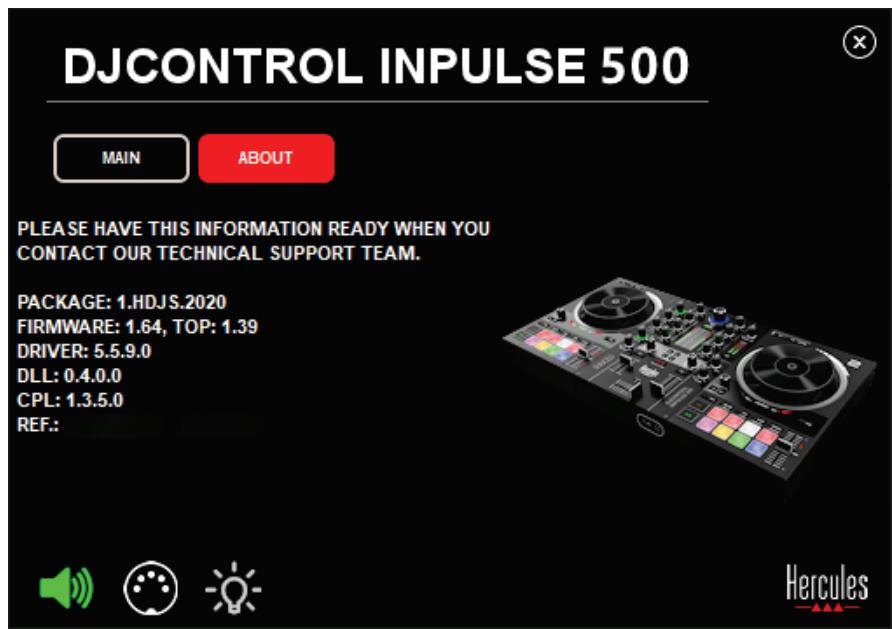
The control panel displays the version of the firmware on the controller and the drivers installed on your computer, in the ABOUT tab. Please have this information ready if you need to contact Hercules' technical support team.
6.3. Testing the DJ controller in the control panel
The DJControl Inpulse 500 control panel lets you test the audio, MIDI and lighting for the DJ controller (in the ABOUT tab).
1. Audio test
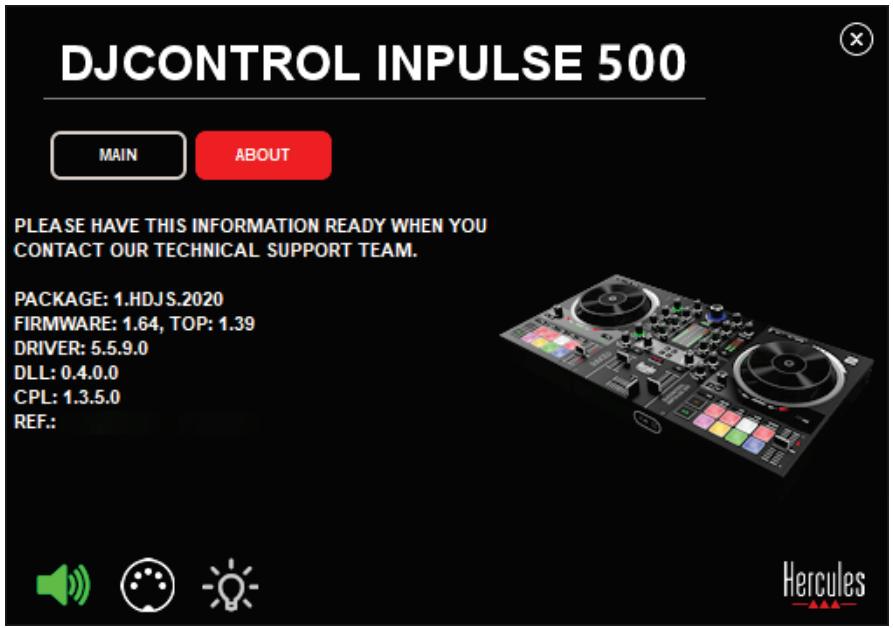
To test the DJ controller's audio, click the speaker icon in the bottom left-hand corner of the control panel: the icon turns green during the test, and the program plays a sound on the controller's outputs (for the speakers and headphones).
2.MIDI test
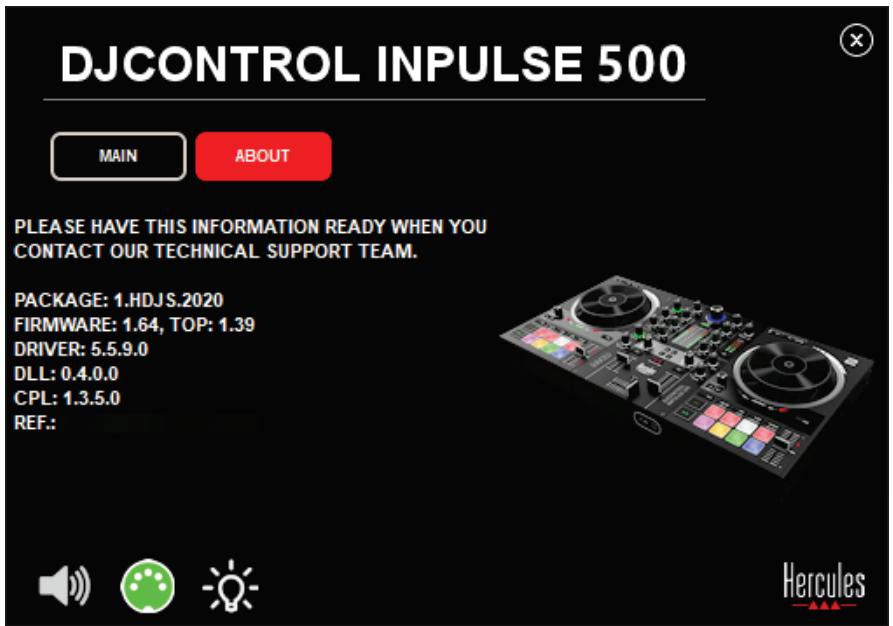
Press the buttons that you want to test on the DJ controller: if the DIN connector icon (with 5 dots) in the bottom left-hand corner of the control panel turns green, it means that a MIDI command is being received.
3. Lighting test
Click the light bulb icon in the bottom left-hand corner of the control panel, to light up the controller's LEDs: when the icon is green, the LEDs are lit up.
6.4. Disabling the audio input
The Microphone and Auxiliary audio input is enabled by default via hardware mixing (i.e. without going through the DJ software being used). If you wish to disable the input, click the icon representing the MIC and AUX IN input (linked to output 1-2).
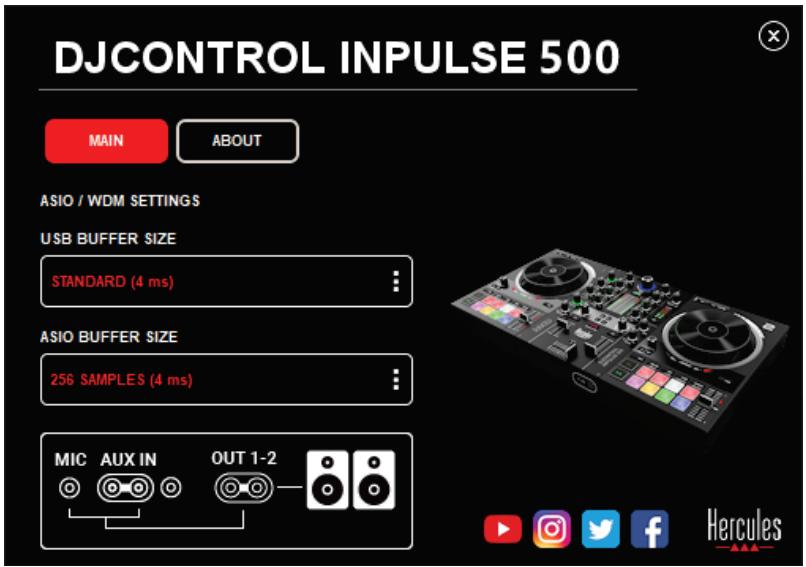
A red X appears on this icon if the sound from the input is no longer being played on output 1-2.
7. Demo mode
This mode is a light show that starts up automatically when you connect the controller to a USB power supply. In this case, the DJ controller is not operational, but is in demo mode: a demo sequence keeps on repeating itself.
8. Tips and tricks
8.1. Switching on all of the LEDs
Press the Loop In and Loop Out buttons on decks 1 and 2.
8.2. Switching on/switching off the 4 LEDs under the controller's feet
Press pads 1 and 5 on deck 1, along with pads 4 and 8 on deck 2.
8.3. In Serato DJ Lite
- Changing the tempo scale (from 8% to 16% or 50% ) Press the Shift + Quant buttons.
- Moving the tempo scale while maintaining the same precision Enable Sync mode on the virtual deck, press the Shift button and move the tempo fader: the software stops following the tempo fader's movement while the Shift button is held down, and resumes following its direction of movement when the Shift button is released.
Example: switching from a tempo scale of -8% - + 8% to +8% - + 24% .
1) Enable Sync.
2) Move the tempo fader completely to the bottom (+8%) .
3) Press the Shift button and move the tempo fader completely to the top: the software remains at +8% .
4) Release the Shift button: the minimum position (at the very top) gives you a tempo at +8% , while the maximum position (at the very bottom) is at +24% .
9. FAQs
9.1. No sound is coming out of my headphones.
Make sure that you have connected your headphones at the front of the controller: headphones must not be connected anywhere else.
By default, monitoring of the two virtual decks is enabled when the software is first launched. You can then select either deck that you want to listen to on your headphones, or the Master output.
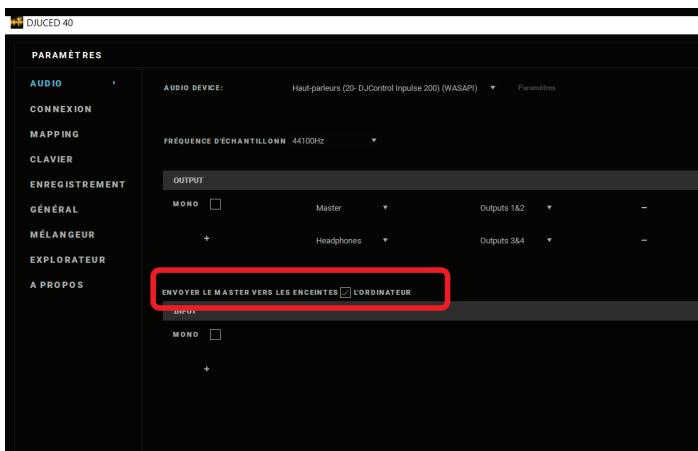
9.2. No sound is coming out of my speakers.
Make sure that you have connected your speakers to the 2 × RCA , or 2 × 1 / 4'' / 6.35 ~mm jack connectors on the controller's rear panel.
9.3. No sound is coming out of my laptop computer speakers.
The controller has been designed to play music via its built-in audio interface, and not via a laptop computer's speakers.
In Serato DJ Lite, you must connect the speakers to the DJControl Inpulse 500.
In DJUCED®, if you want to use the speakers built into your laptop computer, select the SEND THE MASTER TO THE SPEAKERS option in the DJUCED® audio settings.
9.4. No sound is coming out of my headphones, or my laptop computer speakers.
The controller has been designed to play music via its built-in audio interface, and not via a laptop computer's headphones output or speakers.
In Serato DJ Lite, you must connect the speakers and the headphones to the DJControl Impulse 500.
In DJUCED®, if you want to use the speakers built into your laptop computer, select the SEND THE MASTER TO THE SPEAKERS option in the DJUCED® audio settings. Then, connect your headphones to
headphones output on your DJControl Inpulse 500. On a laptop computer, the headphones output plays the same signal as the built-in speakers: therefore, you will not be able to monitor upcoming tracks on your headphones if the headphones are connected to your laptop computer.
9.5. I can't connect my active speakers to my DJ controller.
If your speakers' connectors differ from the connectors on the DJ controller, you can use:
- A dual RCA to 1 / 8'' / 3.5 mm stereo mini-jack cable (not included) to connect multimedia speakers; or
- Two XLR to 1/4” / 6.35 mm jack cables to connect PA speakers; or
- Any other format corresponding to your speakers.
You can test out your multimedia speakers by connecting them to the headphones output on your DJControl Inpulse 500. Play the sound of the mix on the headphones output by pressing the button with the headphones symbol in the Master area on the DJ controller.
9.6. How can I connect the DJ controller to a USB-C port, or a Thunderbolt 3 port?
You can connect the DJ controller to a USB-C (or Thunderbolt 3) port in 3 different ways:
- By using an adapter (male USB-C (or Thunderbolt 3) to female USB type A) between the DJ controller and the computer. Please note that some low-cost adapters will not work properly, as they cut off a part of the power supply.
- By using a USB-C (or Thunderbolt 3) dock between the computer and the DJ controller. Make sure that the dock has a dedicated power supply, as a dock powered only via the USB-C (or Thunderbolt 3) port may not have enough power.
- By replacing the included USB cable with a USB-C (or Thunderbolt 3) to USB 2 type B cable.
10. Trademarks
Intel® and Intel® Core are registered trademarks of Intel Corporation.
Microsoft® Windows® 8 and 10 are registered trademarks or trademarks of Microsoft Corporation in the United States and/or in other countries.
Mac and macOS are trademarks of Apple Inc., registered in the U.S. and other countries.
Serato, Serato DJ Lite and Serato DJ Pro are registered trademarks of Serato Audio Research Limited.
The DJUCED® brand and graphic elements related to DJUCED® are the property of Guillemot Corporation.
Velvet Sound is a trademark of Asahi Kasei Microdevices (AKM).
ASIO is a trademark of Steinberg Media Technologies GmbH.
All other trademarks and trade names are hereby acknowledged in this document and are the property of their respective owners. Illustrations not binding. Contents, designs and specifications in this document are subject to change without notice and may vary from one country to another.
11. Copyright
No part of this manual may be reproduced, summarized, transmitted, transcribed, stored in a retrieval system, or translated into any language or computer language, in any form or by any means, electronic, mechanical, magnetic, manual, via photocopying, recording, or other, without the express written consent of Guillemot Corporation S.A.
12. End User License Agreements applicable to the DJUCED® and Serato DJ Lite software
Please read the End User License Agreements displayed during installation of the DJ software carefully.
Gaaar: https://www.djuced.com/hercules

Download en installer DJUCED®.
3. Hercules-drivers
Gaaar: https://support.HERcules.com/product/djcontrolinpulse500/
6.1. Driver ASIO (per Windows®)
Visita: https://www.djuced.com/hercules

Descarga e instalala DJUCED®.
3. Controladores de Hercules
Visita:
https://support.hercules.com/product/djcontrolinputse500/
Visit: https://serato.com

Transfira e instale o Serato DJ Lite.

serato DJ Lite
Visite: https://www.djuced.com/hercules

Transfira e instale o DJUCED®.
3. Controladores Hercules
Visit: https://support.hercules.com/product/djcontrolinputse500/
2 BOJIOMeTp a rPOMKOCTn, KaJdbI N3 KOToPbIX IMeET 9 yPoBHei
2 KHONKДЯ BKJIQUeHn/ByIKJIQUeHn MOHITOPINrA DeK uepe3 Hayshnki n 1 KHOJa DЯ BKJIQUeHn/BbIKJIQUeHn MOHITOPINrA BbIXOda Дя HayshNKOB Master
1 Kpoccfeiep 1 nepeKluoataeIb Mexdy 3 KpNBbIMN Kpoccfeiepa
- YnpaBLeHneFilter (ФильТр)/Fx (спeцэфөкты):
2 perylaTopa ΦnIbTpOВ / cpeuΦΦeKToB
4 KHONKДЯ BKJIQUeHЯ ΘΦΦeKTa, KOHTPOJNpyEmoro C NOMOuIPOperyIaTOpOBΦnIbTpOB/CneUΦΦeKTOB
- YnpaJIeHne MmKshIpObaHnem Chepe3 BxOdbI N BbIXOdbI (C NOMOu bIO aannapatHoro obecneueHna)
○ BxodДЯ Mнкpoфona: 1 peryIaTOp rPOMKocTn MnkpoФOHa; 2 peryIaTopa MnkpoФOHbIX əkBaIaI3ePoB dJa YactOT HIGH (BbICOKne yactOTbl) n LOW (6acbl); 1 DBYxCBeTHbI BOLIOMeTp (BbIKl. = Het aydnocnHana / 3eJIeHbI = aydnocnHan / KpaCHbI = HaCbIeHHoCTb aydnocnHaIa) (aIInapaTHaHa NaCTpOka)
Посети: https://support.HERCULES.com/product/djcontrolinput pulse500/
AydnooyctpoiCTBO: DJControl Inpulse 500 BbIXoI:
Master (OCHOBHÖ): BbIXoAbI 1-2
Hayushnkn: BbIXoAbI 3-4

KoHTpOJIlep DJControl Inpulse 500 MmKShnpye TBXODbI B aannapaTHom pexHme (c nOMoUbIO aannapaTHoro MmKShnpOBaHnia). He cTOnT BKJIuOaTB bByxOdbI 1-2 = Aux (dONOpHnTeIbHbI) n Mic (MnKpofoH) B MeHIO AyDIO, ecII N Bt He PnlaHpyeTe 3aINCb IJI IN TpaHCJauCIO C NOMoUbIO 3TIXBxOIOB.
4.4. Akademia Hercules DJ Academy
Uye6HbI BndeomatepehJIbI Hercules DJ Academy, BCTpoEHbIe B DJUCED®, MOxHNO NOCMOTpeTb, ⅢeJIKNHyB Ha 3HauchKe ⅦaNouKIn DnIIOMIpOBaHHOrO cneuaJIncTa, cnpaba OT aydnoTEKn.
5.Описане BO3MOXHOCTeй yCtpoiCTBa
5.1. 06ио63op kontrpoJIpea DJControl Inpulse 500

- TpaHcnpTbIe KhoNk: play/pause (BocnpOn3BeJeHne/nay3a), Cue point (MeTKa), SHIFT (CMEHA)
2.Функциональныепды - Φeindep Tempo (perylnpobka temna) c noidepejko6ntm3tunHra (cBeTaeinecKpaChbIe cTpeJKN), 3eJeHbIM LED-uhdkaTopoM, POKa3bVbaUoIm nCXOHDhI Temn, n KhoNka SYNC (CINxpoHn3aun)
- Loop In/Out (начало петл / okончане петл), pa3mep петл n Reloop (выхови зпетл)
- Pěkimi Vinyl (BvHnI) (cKpeT), Slip (cKoJIbXeHne) n Quantize (dNcKpeTn3aun)
- Habirgaця no aydnoTeke, KHONKДЯ 3aRpy3KN TpeKOB Ha COOTBETCTByUOyU Deky, KHONKa Assistant n KOJIbUc C NOdCBeTKoJ, N03BOJIAUOee BnDeTb yPoBeHb 3Heprn TpeKa (B DJUCED®) nIi pNTM TpeKa (B Serato)
- Ycnilntelb n TpexnoolochbI 3KbaIaJ3ep (HIGH/MID/LOW)
- Filter/FX: ΦιλβTpbl n cπeζδΦεκTbI
-
Мкшроване с Испльбзованem Фeйдеров Грмков, крocсфейдеров, a Тадже Вьбори поpeключене мжdy 3 КрИвIMи крocсфейдера
10.Громкocь MнКрофona И DByXNoJIoCHbI 昂KВаJaJ3ep Дя ВхОду МнКрофona (aannapatHbIe ΦyHKcUH = He 3aBnCЯr OT nCnoJb3yeMOrO npoRpaMMHOrO obecneueHry) -
Aux (dOONHnTeNbHbI) rpoMkoCTb n fNJIbTpbl Ha dOONHnTeNbHOM BXoJe (aannapatbIe yHKcnn = He 3aBnCrt OT nCNOJb3yEmoro nporpaMMHO oecneueHna)
- Peryjatop u Boliometp ochOBHou rpoMKoCTn (aapapathbIe yHKcnn = He 3aBncT OT nCNoJb3yeMOrO nporpaAMMHO o6ecneueHna)
- PerfyЯтop Гомкости hayшнков и Perfyятop Cue/Master (MeTKa/ochOBHOJ) Ддя Bbl6opa TOrO,ЧTO Bbl CnblIHTe B HayshNKax (aannapathbIe Функци = He 3abncrT OT IncnoJIb3yeMOrO nporpaMMHoro obecneueHna)
- CeHcOpHbIe DnCKn C paCpO3HaBaHHeM CnJIbI HaKaTnI N PoDdepKkoB 6HTM3TuHHra (CBeTЯUneCkpaChbIe CTpeJKN)

- MASTER (ochOBHoi) BbIXoD (nII N OCHOBHoi nII MmKsepHbI) = KaHaJIb 1-2 (2 x RCA pa3bema n 2 x 1/4" / 6,35 MM MOHO pa3beMa TINa «Джек») ДЯ NOДКЛЮЧЕНЯ AKTINBHyX DInHaMnKOB
- MIC (MnKpofoH) (MOHO BXoI dIy MmKpofoHa 1/4" / 6.35MM MM Tnna «ДжeК»): 6aIahChbI pa3bEm, COBMeCTmbl KAc C 6aJahCHbIMN, TaK n C He6aJahCHbIMN MmKpofoHHbIMN Ka6eJIaMn
- AUX (Доюнельнь) стейевхов (2 x RCA pa3bем n 1 x 1/8" / 3,5 MM стейео pa3bem Типа «Мини-джек»)
- USB-nopT (TnB)
- Hercules Add-On Reserved (фирменый поту расшиpenя Hercules) Дд доролнельнix akceccyapobВ

- Ctepeo BbIXOdbI dIyHauShnKOB (1/4" / 6,35 MM TnPa «ДжeК» n 1/8" / 3,5 MM TnPa «MHHN-ДжeK»)

YnpabLeHne neTnei
In (BxOД) = Loop In (HauaLo netI): BCTabJIeT MapKeP b HauaJIe netI.
In (BXoI) (dIHTeJIbHOe HaxKaTne): 3aynyckaet 4-6nTOByo neTJIO.
Out (BbIXoI) = Loop Out (okOHyAHne neTIn): BCTaBJIeT MapKeP B KOHcE neTIn N BOCpOIN3BOJNT neTIO.
Shift+In/Shift+Out (cmeHa+BxO)/(cmeHa+BbIXo): cokpaaet B 2 pa3a npdoJXnTeBHOCTb neTIN / yDbaHbAET npdoJXnTeBHOCTb neTIN.
Autoloop
(aBtOMaTnuecka
netra):
noBopot
энкодара
MeHЯET
IpoDIOJXNTeJIbHOCTb NeTNI.
BbIXoN3 neTJn:
Khonka Sync (cHxpoHn3aun): MRHOBeHNO peryIuPyET cKOpocTb TpeKa dNcooTBeTCTBnB BPM (K-BO 6ntOB B MInHyTu) 3HaueHnO TpeKa, KOTopbI BOCpON3BOJNTcRa Ha dpuroJ DeKe.
- Пи ИспOLTьЗовани DJUCED®, Кногka Sync (синхронзаця) Нени Вно phИКСИРует 3начене BPM BTOPOCTepeHOrO TpeKa B 3aBnCIMocTи OT BPM ГlaBHOrO TpeKa.
- Пи ИспOLTьовин Serato, Sync (синхронзаця) — Кногka OДнокраТHorO DeiCTBn: 3начене BPM мговенho рулруетс, Ho He привязано K 3наченю друг罗 BOCPON3ВODIMORO Tpeka.
Пэдbl
O Pn BOCnpOn3BedeHnn: yckopraT nn 3aMeJraTe BocnpOn3BeJeHne (= CmHa MoDyIaCn).
O Korda My3bika He irpaet: MedlenHHoe DvIXeHne npn npNKoCHOBHn K KpaHO KOJIbca CeHCOPHOrO DNCKa; npn npNKoCHOBHn K NOBepxHOCTN CEHCOPHOrO DNCKA - CpeHry CKOpOCTb DvIXeHn.
Shift (cmeHa) + kpa Koblca cehcohporo dncka: beatjump (Jxamn-6nt) = ouehb 6bictpbI TEMn.
Vinyl Mode (BHHNIOBbI peKm) BKJIUcHe

YnpablenHe Habnraune
Light ring (cBeToBoe KoIbUo): BblKl = HeT 3ByKOBOrO CnHaJa / 3eJeHbI = 3ByKOBoi CnHaJ / KpaChbI = HaCbIuEHHOCTb 3ByKOBOrO CnHaJa.
2-band EQ (2-nolocnbl 3Kbala3ep): NaCTpoiKa HIGH (BbICOKnx) and LOW (6acbl) uactOT MKNPOΦOHa.
Aux (dONOpHnTeIbHbI) BXoA
Light ring (cBeToBoe KoIbO): BbIK = HeT 3ByKOBOrO CnHaJa / 3eJeHbI = 3ByKOBoi CnHaJ / KpaChbI = HacblIeHHOCTb 3ByKOBOrO CnHaJa.
Khonka co 3HaayHkoB: BOCnpoN3BOIDT BbIXoHoi CnHai Master (OCHOBHO) B HayHnKax.
BbIXoIdIyHsHnKOB
Cue/Master (MeTKa/OCHOBHoi): HacTpoiKa CnHaJa, BOCnpOn3BODIMoTO B HayuHKax, Mekdy 3NaueHnAMy Cue (MeTKa) dIy MoHITOpINrA ppeCTOaNx TpeKOB (deKn 1 n 2, B 3aBvCSMOCTn OT yHKcN, Bb6paHHo C nOMoUbO DByX KHOJOK HaI feiepamn rPOMKOCTn) n BbIXoJa Master (ocHOBHO).
Headphones volume (rpomkoctb HayshnkoB): NaCTpoiKa 3Byka Ha BbIXOnde nla HayshnkoB.
KoHTpOJIepe OcHaIeH BCTpoEHHoM MHOrOKaHaJIbHOm 3ByKOBOJ KapToJ, P03B0JIaIooIeBam:
9.5. He ydaetc npoknouhtb nnHaMKK K DJ-koHTpoJIpepy.
Ecnn pa3bembl Baushx DnHaMnKOB OTnUaIOTc r OT pa3beMOB Ha KOHTpOJIpe DJ, Bbl MoXeTe nCNoJb3OBA Tb:
Navštivte: https://www.djuced.com/hercules

Shift:全过程 is a 100% correct answer.
Režimy prehrávání
Wejdź na strone https://www.djuced.com/hercules

Shift:体系建设的步骤 - Shift: Everything is going to be good. - Step 1: The project is going to be good. - Step 2: The project is going to be good. - Step 3: The project is going to be good. - Step 4: The project is going to be good. - Step 5: The project is going to be good. - Step 6: The project is going to be good. - Step 7: The project is going to be good. - Step 8: The project is going to be good. - Step 9: The project is going to be good. - Step 10: The project is going to be good. - Step 11: The project is going to be good. - Step 12: The project is going to be good. - Step 13: The project is going to be good. - Step 14: The project is going to be good. - Step 15: The project is going to be good. - Step 16: The project is going to be good. - Step 17: The project is going to be good. - Step 18: The project is going to be good. - Step 19: The project is going to be good. - Step 20: The project is going to be good. - Step 21: The project is going to be good. - Step 22: The project is going to be good. - Step 23: The project is going to be good. - Step 24: The project is going to be good. - Step 25: The project is going to be good. - Step 26: The project is going to be good. - Step 27: The project is going to be good. - Step 28: The project is going to be good. - Step 29: The project is going to be good. - Step 30: The project is going to be good. - Step 31: The project is going to be good. - Step 32: The project is going to be good. - Step 33: The project is going to be good. - Step 34: The project is going to be good. - Step 35: The project is going to be good. - Step 36: The project is going to be good. - Step 37: The project is going to be good. - Step 38: The project is going to be good. - Step 39: The project is going to be good. - Step 40: The project is going to be good. - Step 41: The project is going to be good. - Step 42: The project is going to be good. - Step 43: The project is going to be good. - Step 44: The project is going to be good. - Step 45: The project is going to be good. - Step 46: The project is going to be good. - Step 47: The project is going to be good. - Step 48: The project is going to be good. - Step 49: The project is going to be good. - Step 50: The project is going to be good. - Step 51: The project is going to be good. - Step 52: The project is going to be good. - Step 53: The project is going to be good. - Step 54: The project is going to be good. - Step 55: The project is going to be good. - Step 56: The project is going to be good. - Step 57: The project is going to be good. - Step 58: The project is going to be good. - Step 59: The project is going to be good. - Step 60: The project is going to be good. - Step 61: The project is going to be good. - Step 62: The project is going to be good. - Step 63: The project is going to be good. - Step 64: The project is going to be good. - Step 65: The project is going to be good.
Tryby odtwarzania
x(x)5.6×29.6×54/2.2×11.7×21.3
9.1x29.6x54/3.6x11.7x21.3(JL
(c)
3.2/7.1 -
iiistl.1oll.3.2
USB MIDI 1
J
SYNC/CUE/PLAY/SHIFT:2×4
8 16 8 jn jn
- MODE 7. MODE 6. MODE 5. SAMPLER. SLICER. LOOP.HOT CUE)
(MODE 8)
LOOP 1LOOP OUT, LOOP IN :LOOP 3 x Jz
(jll) Reloop 2000 1000
Quantize / Slip / Vinyl :2 x 3 -
Saaalll aaiis
EiYie
(Phase Tempo)2xJn
eiji 1
:
0
g jll jall lall aill g iinnn
()
Lgilllll lssssssssssssssssssssssssssssssssssssssssssssssssssssssssssssssssssssss
Beatmatch Guide j
LOW (a) MID (a) HIGH
()
1 1
Jdall jall gdlal
9 15 Lgia Js Jaiy jaij y jai jai jai jai jai
aJy JbZj/2kSai jzj gJzj 1iJzj 1jzj
aJl lclaw Jy jll y
ailllll lllllllllllllllllllllllllllllllllll
:Fx/Filter
iJai jai jai jiia 0
/14 0
:(jz)zjdzjz)zjzall jzlal all jolly aolai
n 1 1 1 n 1 n 1 n 1 n 1 n 1 n 1 n 1 n 1 n 1 n 1 n 1 n 1 n 1 n 1 n 1 n 1 n 1 n 1 n 1 n 1 n 1 n 1 n 1 n 1 n 1 n 1 n 1 n 1 n 1 n 1 n
()LOW(HIGH
(j)()()
)gullll lalld gaiuagaiuuljulalauuuaAUX
jJ= jA Jg 1
()g 1
Mster/Cue 1JwJlclawg jwJdJwJc
(jlaill bain) jll claw aaii lo
Gall sssssssssssssssssssssssssssssssssssssssssssssssssssssssssssssssssssssssssssssssssssssssssssssssss
(jglb)5 5
24:
j44.1=
c 小二
6.35/4 1/4 mnnn nnnn nnnn nnnn nnnn nnnn nnnn nnnn nnnn nnnn nnnn nnnn nnnn nnnn nnnn nnnn nnnn nnnn nnnn nnnn nnnn nnnn nnnn nnnn nnnn nnnn nnnn nnnn nnnn nnnn nnnn nnnn nnnn nnnn nannn nnnn nnnn nnnn nnnn nnnn nnnn nnnn nnnn nnnn nnnn nnnn nnnn nnnn nnnn nnnn nnnn nnnn nnnn nnnn nnnn nnnn nnnn nnnn nnnn nnnn nnnn nnnn nnnn nnnn nnnn nnnn nnnn nnn
1,2,3
3.5/8/1 8/1 RCA2-1=)AUX 6.35/8/14 mM MIC
(USB alisiw) jssll sall .1
J (Vegas Mode y) LED 1. LED
RCA (J) DJControl Inpulse 500 Master abj Jg jclal Jlclal Jlclal Jlclal Jlclal Jlclal Jlclal Jlclal Jlclal Jlclal Jlclal Jlclal Jlclal Jlclal Jlclal Jlclal Jlclal Jlclal Jlclal Jlclal Jlclal Jlclal Jlclal Jlclal Jlclal Jlclal J
J 3
1 6.35/480 1/4
DJControl Inpulse 500 m
e/11/4.2
Serato DJ Lite .1
https://serato.com

.Serato DJ Lite

serato DJ Lite
Serato DJ Lite Serato DJ Lite Serato DJ Lite Serato DJ Pro Serato DJ Pro Serato DJ Pro Serato DJ Pro Serato DJ Pro Serato DJ Pro Serato DJ Pro Serato DJ Pro Serato DJ Pro Serato DJ Pro Serato DJ Pro Serato DJ Pro Serato DJ Pro Serato DJ Pro Serato DJ Pro Serato DJ Pro Serato DJ Pro Serato DJ Pro Serato DJ Pro Serato DJ Pro Serato DJ Pro Serato DJ Pro Serato DJ Pro Serato DJ Pro Serato DJ Pro Serato DJ
Serato DJ Lite Serato DJ Lite Serato DJ
Serato DJ Lite Serato DJ
Serato DJ Lite Serato DJ
Serato DJ Lite Serato DJ
Serato DJ Lite Serato DJ
Serato DJ Lite Serato DJ
Serato DJ Lite Serato DJ
Serato DJ Lite Serato DJ
Serato DJ Lite Serato DJ
Serato DJ Lite Serato DJ
Serato DJ Lite Serato DJ
Serato DJ Lite Serato DJ
Serato DJ Lite Serato DJ
Serato DJ Lite serato DJ
Serato DJ Lite Serato DJ
Serato DJ Lite Serato DJ
Serato DJ Lite Serato DJ
Serato DJ Lite Serato DJ
Serato DJ Lite Serato DJ
Serato DJ Lite Serato DJ
Serato DJ Lite Serato DJ
Serato DJ Lite Serato DJ
Serato DJ Lite Serato DJ
Serato DJ Lite Serato DJ
Serato DJ Lite Serato DJ
Serato DJ Lite Serato DJ
Serrato DJ Lite Serato DJ

.DJUCED
Hercules 3
:j
https://support.hercules.com/product/djcontrolinputse500/
J 1
HDJCSeries Mac :macOS® -
HDJCSeries PC :Windows® -
DJControl Inpulse 500 Windows®

a a a a a a a a a a a a a a a a a a a a a a a a a a a a a a a a a a a a a a a a a a a a a a a
(2)
3
J 1
J
J
J
:Windows® 11111111111111111111111111111111111111111111
2g1 c:
493 cJalal:JrJl
:macOS@
DJControl Impulse 500 :g
2g1 cJ:
4.3 cJalal:JrJl
J. (j) j 500
Hercules DJ Academy .4.4
Quantize, Slip Vinyl
eclal aegl g eaoaag llaalllg aolglge ciaaaa aai jzj 6
(Serato) ^品 (DJUCED® ^品 ) a laa
(LOW/MID/HIGH)
:Filter/FX .8
Cgall Clllial 3 1 yill cll 3 gll 9
j 10
( a + b) ( a^2 - ab + b^2) = a^3 + b^3
JJIJIJIJIJIJIJIJIJIJIJIJIJIJIJIJIJIJIJIJIJIJIJIJIJIJIJIJIJIJIJIJIJIJIJIJIJIJIJIJIJIJIJIJIJIJIJIJIJIJIJIJIJIJIJIJIJIJIJIJIJIJIJIJIJIJIJIJIJIJIJIJIJIJIJIJIJIJIJIJIJIJIJIJIJIJIJIJIJIJIJIJIJIJIJIJIJIJIJIJIJ
( a + b) = 0
j 12
( a + b) ( a^2 - ab + b^2) = a^3 + b^3
= 8 jzj1 (a) Jclaw Jzaw Jzaw Jzaw Jzaw Master/Cue , wJwJwJwJwJwJwJwJwJwJwJwJwJwJwJwJwJwJwJwJwJwJwJwJwJwJwJwJwJwJwJwJwJwJwJwJwJwJwJwJwJwJwJwJwJwJwJwJwJwJwJW
(1)
(ajgcljaa)gljyai jao xeloo 1iunly g wauu uuuuuiu. 14

J 6.35/4 1/4 2RCA2)2-1 = (Mix Main)MASTER .15
abill 4jll clll j
j 6.35/24 (j) MIC 16
ii jgioll
(3.5/4 1/8 1/RCA2) (AUX .17
(Bg) USB 18
J:Hercules Add-On Reserved .19

(3.5/4 1/4 6.35/4 1/4 20
Manual = 2 Hot Cue = 1 :Hot Cues :Hot Cues :Hot Cues :Hot Cues :Hot Cues :Hot Cues :Hot Cues :Hot Cues :Hot Cues :Hot Cues :Hot Cues :Hot Cues :Hot Cues :Hot Cues :Hot Cues :Hot Cues :Hot Cues :Hot Cues :Hot Cues :Hot Cues :Hot Cues :Hot Cues :Hot Cues :Hot Cues :Hot Cues :Hot Cued
- Beatgrid
=3LoopRoll=2HotCue=1:8J 8J1JJJDJUCED@
. BeatJump = 8 : SlicerLoop = 7 : FX = 6 : TonePlay = 5 : Sampler = 4 : Slicer
(VinyI 1000000000000000000000000000000000000000000
:Pro Serato DJ Lite
Vinyl
.(pitch bend ) 1111111111111111111111111111
=beatjump:+Shift
Vinyl
(ahll) bdd t b a l pitch bend 1scratch :dill o j jall d ic ae aabgia 4y 123456789000000000000000000000000000000000000000000
=beatjump:Shift
DJUCED
JibvnyVinyl
.(pitch bend=) oIbI J IJ 1jIeill j:JIeill e 0
oJall ual ic ae wll abwgi a5ra:Jydiill sRy dA (4aL) ual ic e bbl 4s J:Jgall Jie 0
=beatjmp:+Shift
Vinyl
(ali) 111111111111111111111111111111111111
10
=beatjmp:+Shift
Jalll Jg Caglll al.
Ljy j 1000000000000000000000000000000000000000000000000000000000000000000000000000000000000000000000000000
FX/Filter
.4,3.2.FX1 4iJd iJiJiJiJiJiJiJiJiJiJiJiJiJiJiJiJiJiJiJiJiJiJiJiJiJiJiJiJiJiJiJiJiJiJiJiJiJiJiJiJiJi
.2 1 FX4 JFX1 JFX1
. Settings > Mixer 4, 3, 2, FX1 , DJUCED® -
32.FX1.Serato -
Beats
aaiiie 15 iie 15 iie 15 iie 15 iie 15 iie 15 iie 15 iie 15 iie 15 iie 15 iie 15 iie 15 iie 15 iie 15 iie 15 iie 15 iie 15 iie 15 iie 15 iie 15 iie 15 ie
joll
2.1 gai jai jai jai jai jai jai gai gai gai gai gai
2.1JJJJIJIJIJIJIJIJIJIJIJIJIJIJIJIJIJIJIJIJIJIJIJIJIJIJIJIJIJIJIJIJIJIJIJIJIJIJIJIJIJIJIJIJIJIJIJIJIJIJIJIJIJIJIJIJIJIJIJIJIJIJIJIJIJIJIJIJIJIJIJIJIJIJIJIJIJIJIJIJIJIJIJIJIJIJIJIJIJIJIJIJIJIJIJIJIJIJIJIJIJIJ
:olal alol alol 3 1 y jy all cai :
.1 1
. 1 . 1 . 1 . 1 . 1 . 1 . 1 . 1 . 1 . 1 . 1 . 1 . 1 . 1 . 1 . 1 . 1 . 1 . 1 . 1 . 1 . 1 . 1 . 1 . 1 . 1 . 1 . 1 . 1 . 1 . 1 . 1 . 1 . 1 .
(bai)all jaliis diisily (jall) all odl jubi = Off
-
-
j
.(jllb)jssysss:MIC VOL
gall 1j 1 j 1 j 1 j 1 j 1 j 1 j 1 j 1 j 1 j 1 j 1 j 1 j 1 j 1 j 1 j 1 j 1 j 1 j 1 j 1 j 1 j 1 j 1 j 1 j 1 j 1 j
a a a a a a a a a a a a a a a a a a a a a a a a a a a a a
6.35/4 1/4 2RCA2

(4-3 jisoll = )jllleIeLaL .2
8/1

-
- D] 4-3 w
.DJUCED® , Serato DJ Lite
:DJControl Inpulse 500 ASIO (ASIO) JJJJJJJJJJJJJJJJJJJJJJJJJJJJJJJJJJJJJJJJJJJJJJJJJJJJJJJJJJJJJJJJJJJJJJJJJJJJJJJJJJJJJJJJJJJJJJJJJJJJJJJJJJJJJJJJJJJJJJJJJJJJJJJJJJJJJJJJJJJJJJJJJJJJJJJJJJJJJJJJJJJJJJJJJJJJJJJJJJJJJJJJJJJJJJJJJJJJJJJJJJJJ
ASIO ASIO
Jz j 1234567890123456789012345678901234567890123456789012345678901234567890123456789012345678901234567890123456789
1 1 1 1 1 1 1 1 1 1 1 1 1 1 1 1 1 1 1 1 1 1 1 1 1 1 1 1 1 1 1 1 1 1
1.2
DjControl Inpulse 500 Jusll Jusll Jusll Jusll Jusll Jusll Jusll Jusll Jusll Jusll Jusll Jusll Jusll Jusll Jusll Jusll Jusll Jusll Jusll Jusll Jusll Jusll Jusll Jusll Jusll Jusll Jusll Jusll Jusll Jusll Jusll Jusll Jusll Jusll
https://support.hercules.com
J 1111111111111111111111111111111111111111111
JJJDJJ.6.3
(a) DJ 一 _ 一 JIJIJIJIJIJIJIJIJIJIJIJIJIJIJIJIJIJIJIJIJIJIJIJIJIJIJIJIJIJIJIJIJIJIJIJIJIJIJIJIJIJIJIJIJIJIJIJIJIJIJIJIJIJIJIJIJIJIJIJIJIJIJIJIJIJIJIJIJIJIJIJIJIJIJIJIJIJIJIJIJIJIJIJIJIJIJIJIJIJIJIJIJIJIJIJIJIJIJIJIJIJIJIJ
J 1 J 1 J 1 J 1 J 1 J 1 J 1 J 1 J 1 J 1 J 1 J 1 J 1 J 1 J 1 J 1 J 1 J 1 J 1 J 1 J 1 J 1 J 1 J 1 J 1 J 1 J 1 J 1 J 1 J 1 J 1 J 1 J 1 J 1 J
MIDI .2

(DJ 1000000000000000000000000000000000000000000000000000000000000000000000000000000000
2-1 2j all jall no cull ll lal jolll X oX
g.7
y 11111111111111111111111111111111111
2,1 Loop Out,Loop In
8.2
.2 8,4 1 5,1
Serato DJ Lite 8.3
(%50 %16 %8 m)
Shift ^+ Quant jll b
aai jai le liai Jao fai yai 2
J 1 J 1 J 1 J 1 J 1 J 1 J 1 J 1 J 1 J 1 J 1 J 1 J 1 J 1 J 1 J 1 J 1 J 1 J 1 J 1 J 1 J 1 J 1 J 1 J 1 J 1 J 1 J 1 J 1 J 1 J 1 J 1 J 1 J 1 J
y.9.2
6.35 / 4 1/4 2008 RCA 2008
Jaa// jssu// 1/1// clau// Jy.9.3
JGaaallllclaw g w g aagwallgig w g Gwgl LjLil Ssaii D .DJControl Inpulse 500 -B Jy Serato DJ Lite .d j. Jgaoa Jgaoa Jgaoa Jgaoa Jgaoa Jgaoa Jgaoa Jgaoa Jgaoa Jgaoa Jgaoa Jgaoa Jgaoa Jgaoa Jgaoa Jgaoa Jgaoa Jgaoa Jgaoa Jgaoa Jgaoa Jgaoa Jgaoa Jgaoa Jgaoa Jgao a Jgoc C DJCED 忍 .DJUCED 忍 send the master to the speakers

Jssll lclaw/ jw/ jclaw 9.4
J .DJ (Thunderbolt 3) USB-C
) USB-C 1200000000000000000000000000000000000000000000000
(Thunderbolt 3
.USB 2 (Thunderbolt 3) USB-C USB
.10
Intel Corporation lall laln nllntl Intel Core, Intel
Microsoft 45K 10, Microsoft® Windows® 8
Corporation
JUe Jy Jy Apple Inc. 4k 1234567890 macOS, Mac
.
Serato Audio Serato DJ Pro Serato DJ Lite Serato
Research Limited
Guillemot 45 DJUCED 們 DJUCED 們
.Corporation
.Asahi Kasei Microdevices (AKM)äVelt Sound
Steinberg Media Technologies GmbH ASIO
a a a a a a a a a a a a a a a a a a a a a a a a a a a a a a a a a a a a a
jai jia jia jia jia jia jia jia jia jia jia jia jia jia jia jia jia jia jia jia jia jia jia jia jia jia jia jia jia jia jia jia jia jia jia jia jia jia jia jia jia
1
J 1 J 1 J 1 J 1 J 1 J 1 J 1 J 1 J 1 J 1 J 1 J 1 J 1 J 1 J 1 J 1 J 1 J 1 J 1 J 1 J 1 J 1 J 1 J 1 J 1 J 1 J 1 J 1 J 1 J 1 J 1 J 1 J 1 J 1 J
. Corporation S.A
DJUCED® le lal y ilgilll alal Serato DJ Lite
D]
一-一夏一夏二一艾儿
DJCONTROL INPUT 500
1. 概要
2. モックス内容
请访问:https://www.djuced.com/hercules

下载并安装 DJUCED®。
3. Hercules(嗨酷乐)驱动程序
请访问:
https://support.hercules.com/product/djcontrolinput pulse500/
請瀏覽:https://www.djuced.com/hercules

下載並安裝 DJUCED®。
- StEtReO HeDfom ChlRc(1/4" /6.35mm StEtReO Jck f 1/8" /3.5mm StEtReO MiNt)

甲元
In = LoopIn :LoupIn: 裁印的,即在上面中,
In(判策卜韋):4 bitr rufi to siakahnii.
Out = Loop Out: 起马器将自启动。
Vinyl MoD3 BvHcHcHcHc
Vinyl MoD3 BvHcHcHcHc
Filter: 麻杜克是的默默的默默的默默的默默的默默的默默的默默的默默的默默的默默的默默的默默的默默的默默的默默的默默的默默的默默的默默的默默的默默的默默的默默的默默的默默的默默的默默的默默的默默的默默的默默的默默的默默的默默
HeD3Pon AaiIcRiE iNt Bttn: HeD3PonAeT Mster HsreLto TaeHnO.
海三元查
HeDf Serato DJ Lite DJCED® to foH an moDs DJ sFtEer of tRle to MoNtTgHJiHJ iH3-4 e hldto doK gBn selrgd Hs.
Mic In 命题(1/4" /6.35mm 页)
Heard on it. He had been there, but he didn't see him.
SofrteerhagchimtsiakhdaeKmoNtRgHcHsOoDtoLokgIbFb 1.
9.2. 連販/私/私/私/私/私/私/私/私/私/私/私/私/私
S形器为“1/4”/6.35mm 2个“1/4”
9.3.上三部兵 1
SπfKerJFJDKTJFJFJFJFJFJFJFJFJFJFJFJFJFJFJFJFJFJFJFJFJFJFJFJFJFJFJFJFJFJFJFJFJFJFJFJFJFJFJFJFJFJFJFJFJFJFJFJFJFJFJ
Gà till: https://www.djuced.com/hercules

6.1. ASIO-drivrutiner (for Windows®)
(ynn nn nnn x nn x nn) n"05.6 x 29.6
^ 73.2:
2017.3.2
:USBMIDI.1
D7T2
(100)SYNC/(n'o)CUE/(p)PLAY/(yyn)SHIFT:4x2
8 = 4 16 = 8 2
不 n ) MODE 5, (不 的 ) SAMPLER ,SLICER,(n) LOOP,(n n'o) HOT CUE)
((8 xn) MODE 8, (7 xn) MODE 7, (6 xn) MODE 6, (5
nnn nn nnn nnn nnn nnn nnn nnn nnn nnn nnn nnn nnn nnn nnn nnn nnn nnn nnn nnn nnn nnn nnn nnn nnn nnn nnn nnn nnn nnn nnn nnn nnn nnn nnn nnn nnn nnn nnn nnn nnn nnn nnn nnn nnn nnn nnn nnn nnn nnn nnn nnn nenn
Nnnn nn nnnnnnnnnnnnnnnnnnnnnnnnnnnnnnnnnnnnnnnnnnnnn
()2
nniin nnnn nn nnnn (ynon) Assistant 1
(Beatmatch nTn) Beatmatch Guide 1
TTOOIOY
MID ,(H) HIGH nTn nT nTn nn nn nn nn 2
(oo) LOW-1 (n nn)
2
2
TNN79 9V VU2
TNN 19901 ,nTTX 1971 1971 1971 1971 2
Master nn nn nn nn nn
79017 7u uuiy 3 1n nn 79017 1
: (口 口 N) F x / (口 N) Filter
D'U'ON/N'ON N'T'2
n nn nnn nnn nnn nnn nnn nnn nnn nnn nnn
. 1
n.3
n7 , 1/8/n"n 3.5 yy-yn nn n' 6.35 nnn nn
.DJControl Inpulse 500 w mtn

mnnn 4.2
Serato DJ Lite .1
https://serato.com

.Serato DJ Lite 1

serato DJ Lite
Ji, Serato DJ Lite JI DjControl Inpulse 500 .Serato DJ Lite Nx DjSerato DJ Pro Nx .Serato DJ Pro Nx .DjControl Inpulse 500 . Serato DJ Pro JI.
.Serato DJ Pro y

.DJUCED® JN | JNJI TIN
Hercules 3
:JXJ7
https://support.hercules.com/product/djcontrolinput pulse500/
ynnn nn nnnn nn nnnn nn nnnnnnnnnnnnnnnnnnnnnnnnnnnnnnnnnnnnnnnnnnnnnnnnnnnnnnnnnnnnnnnnnnnnnnnnnnnnnnnnnnnnnnn
unnn
HDJCSeries Mac :macOS®-7 -
HDJCSeries PC :Windows®- 7 -
DJControl Impulse 500-2 wnnn7 Tn n n n n n Windows
JNJN JNJN, WASAPI NNN NNN NNN NNN, ASIO NNN DJControl Inpulse 500 NNN NNN NNN NNN
.macOS®-Windows®-nnuipn no
DJUCED 4.3
1
DJCONTROL INPULSE " nytnn nn nynnn ,DJUCED® wnyon
. 500
n.2
JINN NNN NNN DNICED,NNNN NNNNN NNNNN NNNNN NNNNN NNNNN NNNNN NNNNN NNNNN NNNNN NNNNN NNNNN NNNNN NNNNN NNNNN NNNNN NNNNN NNNNN NNNNN NNNNN NNNNN NNNNN NNNNN NNNNN NNNNN NNNNN NNNNN NNNNN NNNNN NNNNN NNNNN NNNNN NNNNN NNNNN N
nuu nntan .3
n nn no y nny ,DJUCED®- ny nnn nnn nnn . (nntan) Settings nn nn nn nn nn nn nn nn nn nn nn nn nn nn nn nn nn nn nn nn nn nn nn nn nn nn nn nn nn nn nn nn nn nn nn nn nn nn nn nn nn nn nn nn nn nn nn nn nn nn nn nn nn nn nn nn nn nn nn nn nn nn nn nn nn nn nn nn nn nn nn nn nn nn nn nn nn nn nn nn nn nn nn nn nn nn nn nn nn nn nn nn nn nn nn nn nn nn nn nn nnnnnnnnnnnnnnnnnnnnnnnnnnnnnnnnnnnnnnnnnnnnnnnnnnnnnnnnnnnnnnnnnnnnnnnnnnnnnnnnnnnnnnnnnnnnnnnnnnnnnnnnnnnnnnnnnnnnnnnnnnnnnnn
:Windows®
DJControl Inpulse 500 ASIO (ASIO):ynu
:
2-1 1 nix:Master
4-13 nix:niTIN

2-1 1 nix:Master
4-13 nix:niTIN
JX .(nnn n nn nn nn) nn nn nn nn nn nn nn nn nn nn nn nn nn nn nn nn nn nn nn nn nn nn nn nn nn nn nn nn nn nn nn nn nn nn nn nn nn nn nn nn nn nn nn nn nn nn nn nn nn nn nn nn nn nn nn nn nn nn nn nn nn nn nn nn nn nn nn nn nn nn nn nn nn nn nn nn nn nn nn nn nn nn nn nn nn nn nn nn nn nn nn nn nn nn nn nn nn nn nn nn.
Hercules DJ Academy .4.4
J,DJUCED- ,Hercules DJ Academy w nnnn nn .

DJControl Inpulse 500 w n np7o.5.1
SHIFT,Cue nTn,nnn/ynn:nnn 1
niyni 2
190n nn nnnn nn nnnn (nnnn nn nn) beatmatch-ny ny 190n
(170)SYNC
(Shnn nn) Reloop-1 nnn, (n nn qio/nn nn) Loop In/Out .4
Quantize-1 Slip,('y7o) Vinyl :xn .5
n nn y nnnn Assistant ,nnnnnnnnnnnnnnnnnnnnnnnnnnnnnnnnnnnnnnnnnnnnnnnnnnnnnnnnnnnnnnnnnnnnnnnnnnnnnnnnnnnnnnnnnnnnnnnnnnnnnnnnnnnnnnnn
(Serato-1) (DJUCED®-1) nnnn nn nn nn, ninn
(LOW/ MID / HIGH) 30
D:FX/Filter .8
n 3 nnnn nn nnnn nnnn nnnn nnnn nnnn nnnn nnnn nnnn nnnn nnnn nnnn nnnn nnnn nnnn nnnn nnnn nnnn nnnn nnnn nnnn nnnn nnnn nnnn nnnn nnnn nnnn nnnn nnnn nnnn nnnn nnnn nnnn nnnn nnnn
n 10
(wnynnn
nynnnn nnnn nn nnnn nnnn nnnn nnnn nnnn nnnn nnnn nnnn nnnn nnnn nnnn nnnn nnnn nnnn nnnn nnnn nnnn nnnn nnnn nnnn nnnn nnnn nnnn nnnn nnnn nnnn nnnn nnnn nnnn nnnn nnnn nnnn nnnn nnnn nn
(wn·w
(1/8/n"n 3.5 INTOO yRCA x 2) (T) AUX INTOO no. .17
(B 1io) USB nX.18
Hercules Add-On Reserved .19

(1/8/n"n 3.5 n'oo ypu-ny 1/4/n"n 6.35 n'oo ypu) n'oo nnyn .20

917 T79
.9nn nn no qin: (nno) Loop In = In
= 8 ;Autoloop = 7 ;Loop Roll = 6 ;Pitch Play = 5 ;Sampler = 4 ;Slicer = 3 ;Loop
- Beatgrid
=3;LoopRoll=2;HotCue=1:87000000000000000000000000000000000000000000000000
. BeatJump = 8 ; SlicerLoop = 7 ; FX = 6 ; TonePlay = 5 ; Sampler = 4 ; Slicer
a1a4
y
. (nwn in ywn Vinyl ax) nn nnnn (nnn [n] nyun)
:Pro- Serato DJ Lite-
naivn Vinyl axn
.(pitch bend =) nywnn nn uynn in yynn :nywnnn
n nn nnn ;(n) nnn nnn nnn nnn nnn nnn nnn nnn nnn
y
. 日 _ 1 ^ 日 beatjump:+Shift
Vinyl
.(pitch bend =) nywnn nn uynn in ynnn :nywnn nn
n nn nnnn ;(n) nnnnnnnnnnnnnnnnnnnnnnnnnnnnnnnnnnnnnnnnnnnnnnnnnnnnnnnnnnnnnnnnnnnnnnnnnnnnnnnnnnnnnnnnnnnnnnnnnnnnn
y
. 日 _ 1 ^ 日 nnnnyn = beatjump :(wiv) a'an nn nyu + Shift
Vinyl
. nnnn nn = beatjump :(w) w+Shift
111779
n nn n nn nn nn nn nn nn nn nn nn nn nn nn nn nn nn nn nn nn nn nn nn nn nn nn nn nn nn nn nn nn nn nn nn nn nn nn nn nn nn nn nn nn nn nn nn nn nn nn nn nn nn nn nn nn nn nn nn nn nn nn nn nn nn nn nn nn nn nn nn nn nn nn nn nn nn nn nn nn nn nn nn nn nn nn nn nn nn nn nn nn nn nn nn nn nn nn nn nn nn nn
.Serato-2x7n
.2 IN 1 pTn nyu: (nyo) Load
,Serato-;nuunh ninnn nnny y ynnu,ynon'nxyn ,DJUCED®-:(y"on) Assistant
.(niivn w unioiX o7n)Automix nn
Filter/FX
4-1 3,2FX1 nnnn nn nnnn nn nnnn nn nnnn nn nnnn nn nnnn nn nnnn nn nnnn nn nnnn nn nnnn nn nnnn nn nnnn nn nnnn nn nnnn nn nnnn nn nnnn nn nnnn nn nnnn nn nnnn nn nnnn nn nnnn nn nnnn nn nnnn nn nnnn nn nnnn nn nnnn
.2 IN 1 (Filter n n nn pnnn) FX4 ty FX1 n nn n nn :FX4 ty FX1 nn
nNIN nIN = nNITN / yNIN IN = nIN / yNIN IN = nIN :IN
.111nnn (o) LOW-1 (7) HIGH nnn nn nn 2 nn
(7y) Aux no?
.(nnn n)Aux noyny npny npnyAUX VOL
.ynu nIN n"n = nnTN / ynU nIN = nTn / ynU nIN n = nD:IN nyu
AUXNON:AXFXFILTER
JITIN JN
D) nniin nn nnnn (n'o) Cue i niin nn ninn nn ninn nn ninn :Master / Cue nTI
Master nnnn, (n nn nn nn nn nn nn nn nn nn nn nn nn nn nn nn nn nn nn nn nn nn nn nn nn nn nn nn nn nn nn nn nn nn nn nn nn nn nn nn nn nn nn nn nn nn nn nn nn nn nn nn nn nn nn nn nn nn nn nn nn nn nn nn nn nn nn nn nn nn nn nn nn nn nn nn nn
nntnn nnyy nn nyiy nn noi:niinna
7 777777777777777777
;Master nyn) npnnn nn nn
;(nTINNIX)|n nnw nn nnnn nn nnnn
.ynun nnnn ,n nn nn nn nn nn nn nn nn -
(1-2nix' =) Master nix' 0'177.1
y nnnn nn y nnnnn ,n 00 nnnn nn nnnn nnnn nnnn nnnn nnnn nnnn nnnn nnnn nnnn nnnn nnnn nnnn nnnn nnnn nnnn nnnn nnnn nnnn nnnn nnnn nnnn nnnn nnnn nnnn nnnn nnnn nnnn nnnn nnnn nnnn nnnn nnnn nnnn nnnn nn
(3-4 nixy=)nix.2
1/8/n"n 3.5 n'nu-yn) nnnn nn nnnn nn nnnn nn nnnn nn nnnn nn nnnn nn nnnn nn nnnn nn nnnn nn nnnn nn nnnn nn nnnn nn nnnn nn nnnn nn nnnn nn nnnn nn nnnn nn nnnn nn nnnn nn nnnn nn nnnn nn nnnn nn nnnn nn nnnn nn nnnn nn nnnn
-."a. n nn 3-4 nnnn nn
.DJUCED*1 Serato DJ Lite nT 7
iTunes 1,1111111111111111111111111111111111111111111111111111
.Master VU nnnn
(Mic/Aux 1-2 no' =) 119n7.3
y n nn nn nn nn (yn 1/4/n"6.35 y) Mic In no nnnn nn nnnn nn
(Windows®-3) ASIO 6.1
w nn nn nn nn, ASIO w nn nn nn nn nn nn nn nn nn nn nn nn nn nn nn nn nn nn nn nn nn nn nn nn nn nn nn nn nn nn nn nn nn nn nn nn nn nn nn nn nn nn nn nn nn nn nn nn nn nn nn nn nn nn nn nn nn nn nn nn nn nn nn nn nn nn nn nn nn nn nn nn nn nn nn nn nn nn nn nn nn nn nn nn nn nn nn nn nn nn nn nn nn nn nn nn nn nn nn nn gn nnnn nnnn nnnn nnnn nnnn nnnn nnnn nnnn nnnn nnnn nnnn nnnn nnnn nnnn nnnn nnnn nnnn nnnn nnnn nnnn nnnn nnnn nnnn nnnn nnnn nnnn nnnn nnnn nnnn nnnn nnnn nnnn nnnn nnnn
Hercules DJControl Inpulse 500 w n,Windows®-ASIO w
:ASIO nntan y 111n
.(nunnn 4)Standard (4 ms)-USB wyn nn nnn ,n
.256 Samples (4 ms) ,ASIO -
. (DJUCED® IN Serato DJ Lite) . " ' ' ' ' ' ' ' ' ' ' ' ' ' ' ' ' ' ' ' ' ' ' ' ' ' ' ' ' ' -
:DJControl Impulse 500 ASIO (ASIO) ynnn nn ,DJUCED®-
ASIO 172,ASIO 172
n nn n nn nn nn nn nn nn nn nn nn nn nn nn nn nn nn nn nn nn nn nn nn nn nn nn nn nn nn nn nn nn nn nn nn nn nn nn nn nn nn nn nn nn nn nn nn nn nn nn nn nn nn nn nn nn nn nn nn nn nn nn nn nn nn nn nn nn nn nn nn nn nn nn nn nn nn nn nn nn nn nn nn nn nn nn nn nn nn nn nn nn nn nn nn nn nn nn nn nn nn nn
:nnn nn
.177 1077 7777 1077
.0707X IN D1107 17 17 X U DN 7N
.77n77n77n 77n77n77n
nwnynn7.6.2
(50% in 16% tv 8%-n) isnon noio .1
Shift + Quant nongny
Tnnnnn nn nn nn nn nn nn nn nn .2
n nn n nn nn nn nn nn nn nn nn nn nn nn nn nn nn nn nn nn nn nn nn nn nn nn nn nn nn nn nn nn nn nn nn nn nn nn nn nn nn nn nn nn nn nn nn nn nn nn nn nn nn nn nn nn nn nn nn nn nn nn nn nn nn nn nn nn nn nn nn nn nn nn nn nn nn nn nn nn nn nn nn nn nn nn nn nn nn nn nn nn nn nn nn nn nn nn nn nn nn nn nn
Shift nnnn nn nn nn nn
. +8% - +24% 7N-8%- +8% wIOnDion:
Syncn yon (1
(+8%) nunqion ty 19nun TnN (2
n nn nnnn nn nn nn nn nn nn nn nn nn nn nn nn nn nn nn nn nn nn nn nn nn nn nn nn nn nn nn nn nn nn nn nn nn nn nn nn nn nn nn nn nn nn nn nn nn nn nn nn nn nn nn nn nn nn nn nn nn nn nn nn nn nn nn nn nn nn nn nn nn nn nn nn nn nn nn nn nn nn nn nn nn nn nn nn nn nn nn nn nn nn nn nn nn nn nn nn nn nn nn nn
. +8 % 7w
+8% w onn (ynn qon ty) mnn :Shift n nn (4
+24% w nna (nunqion ty) dnoyn
n nn nnnn nn nnnnnnnnnnnnnnnnnnnnnnnnnnnnnnnnnnnnnnnnnnnnnnnnnnnnnnnnnnnnnnnnnnnnnnnnnnnnnnnnnnnnnnnnnnnnnnnnnnnnn
.
.9.2
1/4/n 6.35 ynn x 2-7 n RCA-n nn x 2-7 ny n nn n nn
.9.3
wnn nn nnn nn nn nn nn nn nn nn nn nn nn nn nn nn nn nn nn nn nn nn nn nn nn nn nn nn nn nn nn nn nn nn nn nn nn nn nn nn nn nn nn nn nn nn nn nn nn nn nn nn nn nn nn nn nn nn nn nn nn nn nn nn nn nn nn nn nn nn nn nn nn nn nn nn nn nn nn nn nn nn nn nn nn nn nn nn nn nn nn nn nn nn nn nn nn nn nn nn nn nn nn
.DJControl Impulse 500-7 ynnn nn, Serato DJ Lite- nwnn nn, wynnnnnnnnnnnnnnnnnnnnnnnnnnnnnnnnnnnnnnnnnnnnnnnnnnnnnnnnnnnnnnnnnnnnnnnnnnnnnnnnnnnnnnnnnnnnnnnnnnnnnnnnnnnnnnnnnnnnnnnnnnnnnnnnnnnnnnnnnnnnnnnnnnnnnnnnnnn

NwT WNTW T W O'pIyTN IN NITININIO NO wvN 9.4
IN;PA-n 1/4/n"n6.35 yXLR "
?Thunderbolt 3 NNSN USB-C .9.6
3-3 (Thunderbolt 3) USB-C . . . . . . . . . . . . . . . . . . . . . . . . . . . . . . . . . . . . . . . . . . . . . . . . . . . . . . . . . . . . . . . . . . . . . . . . . . . . . . . . . . . . . . . . . . . . . . A. AIO USB-7 (Thunderbolt 3) 'OR USB-C ) nnnn nn nn nn nn nn nn nn nn nn nn nn nn nn nn nn nn nn nn nn nn nn nn nn nn nn nn nn nn nn nn nn nn nn nn nn nn nn nn nn nn nn nn nn nn nn nn nn nn nn nn nn nn nn nn nn nn nn nn nn nn nn nn nn nn nn nn nn nn nn nn nn nn nn nn nn nn nn nn nn nn nn nn nn nn nn nn nn nn nn nn nn nn nn nn nn nn nn nn nn nn nnnn
Tn (Thunderbolt 3) USB-C nn nn nn nn nn nn nn nn nn nn nn nn nn nn nn nn nn nn nn nn nn nn nn nn nn nn nn nn nn nn nn nn nn nn nn nn nn nn nn nn nn nn nn nn nn nn nn nn nn nn nn nn nn nn nn nn nn nn nn nn nn nn nn nn nn nn nn nn nn nn nn nn nn nn nn nn nn nn nn nn nn nn nn nn nn nn nn nn nn nn nn nn nn nn nn nn nn nn nn nn
nunson (Thunderbolt 3 IN) USB-C-n n
Audio Research Limited
Guillemot wDUCED- DUCED
.Corporation
.(AKM) Asahi Kasei Microdevices nn Velvet Sound
.Steinberg Media Technologies GmbH non ASIO
y
IN YTN NNNNNONN,NTYNNN PNNN IN TNNN,DOONN INX NNNN XN NNNN IN NNNN IN NNNN IN NNNN IN NNNN IN NNNN IN NNNN IN NNNN IN NNNN IN NNNN IN NNNN IN NNNN IN NNNN IN NNNN IN NNNN IN NNNN IN NNNN IN NNNN IN NNNN IN NNNN IN NNNN IN NNNN IN NNNN IN NNNN IN NNNN IN NNNN
.Guillemot Corporation S.A.
-DJUCEDw nnnn nn nn nn nn nn nn .12 Serato DJ Lite
"J. 1000000000000000000000000000000000000000000000000

- Controller specifications
- Mechanical specifications
- Technical specifications
- DECKS
- MIXER
- Built-in multichannel audio interface
- Outputs:
- Inputs:
- Installation
- Connections
- Downloading the software
- serato DJ Lite
- Hercules drivers
- Getting started with DJUCED®
- Connections
- Audio settings
- Output:
- Hercules DJ Academy
- Overview of features
- General DJControl Inpulse 500 overview
- Loop controls
- To exit the loop:
- Transport buttons
- Playback modes
- Tempo controls (pitch/BPM)
- Pads
- Pad modes
- Jog wheels
- In Serato DJ Lite and Pro:
- Vinyl mode disabled
- Vinyl mode enabled
- In DJUCED®
- Navigation controls
- Gain and EQ line
- Deck VU-meters
- Filter/FX
- Monitoring
- Mixing
- Microphone input
- Aux (auxiliary) input
- Master output
- Headphones output
- Microphone (= Mic/Aux 1-2 input)
- Auxiliary (= Mic/Aux 1-2 input)
- Drivers and control panel
- ASIO drivers (for Windows®)
- Updating the firmware
- Testing the DJ controller in the control panel
- Audio test
- 2.MIDI test
- Lighting test
- Disabling the audio input
- Demo mode
- Tips and tricks
- Switching on all of the LEDs
- Switching on/switching off the 4 LEDs under the controller's feet
- In Serato DJ Lite
- FAQs
- No sound is coming out of my headphones.
- No sound is coming out of my speakers.
- No sound is coming out of my laptop computer speakers.
- No sound is coming out of my headphones, or my laptop computer speakers.
- I can't connect my active speakers to my DJ controller.
- How can I connect the DJ controller to a USB-C port, or a Thunderbolt 3 port?
- Trademarks
- Copyright
- End User License Agreements applicable to the DJUCED® and Serato DJ Lite software
- Hercules-drivers
- Gaaar: https://support.HERcules.com/product/djcontrolinpulse500/
- Driver ASIO (per Windows®)
- Controladores de Hercules
- https://support.hercules.com/product/djcontrolinputse500/
- Controladores Hercules
- Visit: https://support.hercules.com/product/djcontrolinputse500/
- AydnooyctpoiCTBO: DJControl Inpulse 500 BbIXoI:
- Akademia Hercules DJ Academy
- 5.Описане BO3MOXHOCTeй yCtpoiCTBa
- 06ио63op kontrpoJIpea DJControl Inpulse 500
- YnpabLeHne neTnei
- BbIXoN3 neTJn:
- Пэдbl
- YnpablenHe Habnraune
- Aux (dONOpHnTeIbHbI) BXoA
- BbIXoIdIyHsHnKOB
- He ydaetc npoknouhtb nnHaMKK K DJ-koHTpoJIpepy.
- Režimy prehrávání
- Tryby odtwarzania
- Hercules DJ Academy .4.4
- :Pro Serato DJ Lite
- DJUCED
- FX/Filter
- g.7
- Serato DJ Lite 8.3
- .10
- 1
- DJUCED® le lal y ilgilll alal Serato DJ Lite
- 一-一夏一夏二一艾儿
- DJCONTROL INPUT 500
- 概要
- モックス内容
- Hercules(嗨酷乐)驱动程序
- 甲元
- Vinyl MoD3 BvHcHcHcHc
- 海三元查
- 連販/私/私/私/私/私/私/私/私/私/私/私/私/私
- 9.3.上三部兵 1
- ASIO-drivrutiner (for Windows®)
- D7T2
- https://support.hercules.com/product/djcontrolinput pulse500/
- 2-1 1 nix:Master
- DJControl Inpulse 500 w n np7o.5.1
- JITIN JN
- ?Thunderbolt 3 NNSN USB-C .9.6
- -DJUCEDw nnnn nn nn nn nn nn nn .12 Serato DJ Lite
Brand : HERCULES
Model : DJCONTROL INPULSE 500
Category : USB controller