
DHD7561B - Basket DE DIETRICH - Free user manual and instructions
Find the device manual for free DHD7561B DE DIETRICH in PDF.

| Brand | De Dietrich |
| Model | DHD7561B |
| Product type | Built-in downdraft hood |
| Version | Ducted or recirculating |
| Width | 850 - 950 mm |
| Depth | 430 mm |
| Height | 350 mm |
| Power supply | 220-240 V single phase, 50/60 Hz, 10-16 A fuse |
| Standby power consumption | < 0.5 W |
| Number of speeds | 4 |
| Control type | Electronic touch controls |
| Grease filters | Metallic, washable (by hand or dishwasher) |
| Charcoal filter | Active, replaceable (every 6 months) |
| Special functions | Timer 10 min, automatic shut-off 4h, filter saturation indicator, anti-crushing protection |
| Minimum distance from cooking surface (electric) | 65 cm (electrical enclosure) |
| Minimum distance from cooking surface (gas) | 60 mm from rear edge |
| Connection duct section | 220 x 90 mm |
| Grease filter lifespan before cleaning | 30 hours of operation |
| Customer service | De Dietrich, 0892 02 88 04 (€0.50/min) |
Frequently Asked Questions - DHD7561B DE DIETRICH
User questions about DHD7561B DE DIETRICH
0 question about this device. Answer the ones you know or ask your own.
Ask a new question about this device
Download the instructions for your Basket in PDF format for free! Find your manual DHD7561B - DE DIETRICH and take your electronic device back in hand. On this page are published all the documents necessary for the use of your device. DHD7561B by DE DIETRICH.
USER MANUAL DHD7561B DE DIETRICH
FR GUIDE D'UTILISATION
SV INSTALLATIONSGUIDE
- RISQUES D'ASPHYXIE
1- RELATIONS CONSOMMATEURS FRANCE
text_image
Diameter: 10 Size: 25 mm x 10 mm Height: 300 mm Balance: 50 mm Balance: 50 mm Balance: 50 mm Balance: 50 mm Balance: 50 mm Balance: 50 mm Balance: 50 mm Balance: 50 mm Balance: 50 mm Balance: 50 mm Balance: 50 mm Balance: 50 mm Balance: 50 mm Balance: 50 mm Balance: 50mm Balance: 50mm Balance: 50mm Balance: 50mm Balance: 50mm Balance: 50mm Balance: 50mm Balance: 50mm Balance: 50mm Balance: 50mm Balance: 50mm Balance: 50mm Balance: 50mm Balance: 50mm Balance: 50mm BALANCE- Important precautions 31
- Electrical risk 32
- Asphyxia risk 32
- Fire risk 32
- Installing the hood 33
• Description of the appliance 34
1 / INSTALLING THE HOOD
- Use 35
- Filtering version 35
- Grease filter removal - charcoal filter installation 36
- Connecting the hood to power supply 36
- Electrical connection 36
2 / HOW THE HOOD WORKS 37
3 / CLEANING THE HOOD 39
4 / OPERATIONAL ANOMALIES 40
5 / AFTER-SALE SERVICE 40
6 / ENVIRONNEMENT
- Care for the environment 41
⚠️ Important: These warnings are also available at the De Dietrich brand website.
Please follow all the instructions given below, before installing and using your appliance.
They have been written down for ensuring your personal safety and the safety of other people, as well. Keep these instructions for use with the appliance. Should the appliance be sold or passed on to others, please make sure these warnings are passed on with it.
- Constantly seeking to improve our products, we hereby hold the right to modify their technical, operational and aesthetic features in line with any new technical innovation available.
- We suggest you to take note of the appliance technical details/ references in the “Consumers’ Service” page, so that you can easily find then when necessary.
The manufacturer declines any liability for possible problems, damages or fire caused by not abiding to the instructions specified in this manual.
- IMPORTANT PRECAUTIONS
- This appliance has been designed for personal use in the household environment. Never use the appliance for commercial or industrial use or for purposes other than its intended use.
- Take the appliance immediately out of its packaging on delivery, or ask the courier to do it for you. Check the appliance overall conditions. Write down any claims on the delivery note, and take a copy of it .
- The appliance can be operated by children over the age of 8 and by people with impaired physical , sensorial and mental faculties or without the necessary experience and competence only if properly supervised and if they had been duly provided with the necessary instructions concerning the safe use of the appliance and informed of the potential associated risks.
Children shall not be allowed to play with the appliance. Cleaning and maintenance operations on the appliance shall not be performed by children without adults' supervision.
- ⚠️ Caution: Accessible parts of the hood may become hot when used with cooking appliance.
- Use only the screws provided with the appliance during installation. The use of other screws may cause electrical or mechanical problems. Caution: Failure to use screws and fixing devices in compliance with the instructions specified in this manual, may result in electrical risk. The use of accessories which are not provided with the appliance is not recommended.
- ELECTRICAL RISK
- Disconnect any power supply circuits before reaching the connecting terminals. In case the power cord is damaged, it shall be replaced by either the manufacturer, the technical assistance service or qualified personnel in order to avoid any kind of risks.
- Electrical disconnection can be done by using an accessible socket or by providing fixed pipes with a breaker, in accordance with the installation instructions.
- Do not alter or try to alter the technical features of the appliance, as it might be very dangerous.
- Repairs on the appliance shall be performed by authorized technicians only.
- Always disconnect the appliance from power supply before carrying out any cleaning and maintenance operation.
- Never use steam/ or high pressure devices to clean the appliance (precautions connected to electrical safety).
- ASPHYXIA RISK
- Standards concerning air- exhaust methods should be complied with. The ducting system for this appliance must not be connected to any existing ventilation system which is being used for any other purpose such as discharging exhaust fumes from appliances burning gas or other fuels (this does not apply to appliances conveying only air into the room).
- The room where the appliance is installed must be properly ventilated, when the kitchen hood is used together with other gas combustion devices or powered by other fuels (this does not apply to appliances conveying only air into the room).
- FIRE RISK
- It is not allowed to cook food over open flames (flambè cooking) and operate gas hobs without pots or pans on them (the flames sucked into the hood might damage the appliance).
- Frying under the appliance shall be done under constant supervision as overheated oils and fats may ignite.
- Respect the guidelines for the cleaning and replacement of grease filters. Accumulated grease deposits represent a fire risk.
- The use of the appliance over flames produced by fuels (wood or coal) is not allowed.
WARNING:
Place the metal box containing the electrical components at minimum distance of 65 cm from the gas hob, in any case at 65 cm form the hood suction area.
WARNING:
We recommend to place the metal box containing the electronic components at a distance of at least 10 cm from the ground and at a safe and proper distance from any heat source (e.g. oven or hob side).
INSTALLING THE HOOD
Installation shall be performed in compliance with any applicable standards on the ventilation of enclosed spaces. In France, these requirements are specified in DTU 61.1 issued by CSTB.
In particular, the air collected shall not be conveyed into any existing ventilation system which is being used for any other purpose such as discharging exhaust fumes from appliances burning gas or other fuels. The use of disused ducts is not allowed, except upon approval by a qualified technician.
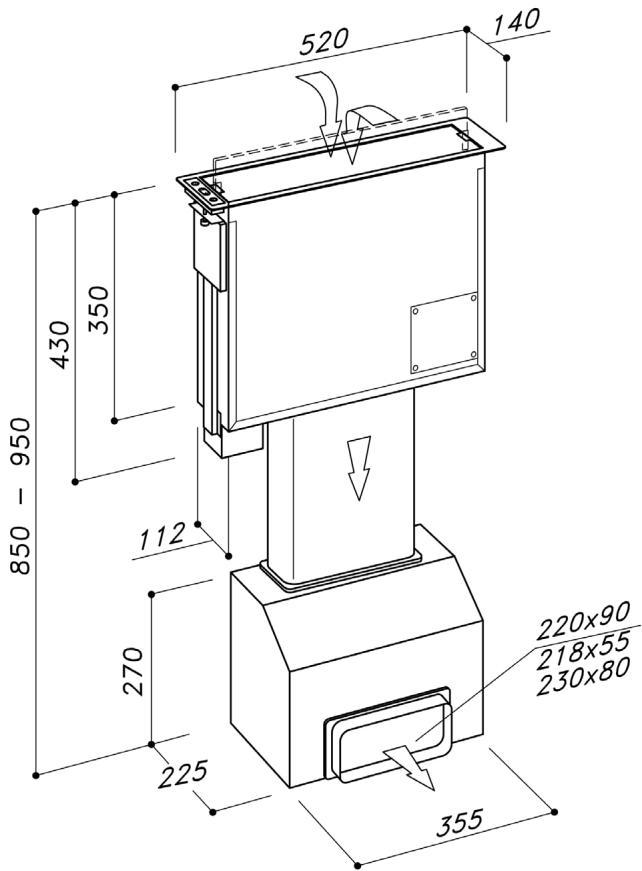
text_image
850 - 950 430 350 112 270 225 355 520 140 220x90 218x55 230x80• 1 HOW TO INSTALL THE HOOD
In order to ensure the Downdraft proper operation, installation instructions shall be carefully followed.
1) Drill a 507x114 mm hole in the perfect centre of the two hobs (fig. 1).
2) In case of gas hobs, the minimum distance from the downdraft edge to the hob rear edge shall be of a least 60 mm.
3) Before making the hole, check that there are no structural or other parts inside the cabinet, where the appliance is to be placed, which could hinder a proper installation. Check that the overall dimensions of the Downdraft and its motor are compatible with the cabinet so that installation can be carried out properly.
4) Place the suctioning motor under the appliance, making sure to match the downdraft air outlet with the motor air inlet (fig.2). The size of the duct used to connect the two appliance is 220x90mm, therefore it shall be cut according to the cabinet height. Rotate the motor by directing the air outlet towards either right or left, as shown in fig. 3, based on your installation needs. The motor air inlet shall be moved as much as backwards as possible: to do that, rotate the flange as shown in figure 3A. Figure 4 shows the motor directed towards the two options available: one motor has the air outlet oriented to the right and the other one to the left.
5) Apply the glue on the lower side of the frame (fig. 5).
6) Fit the Downdraft inside the cabinet by inserting it from above, without removing the glass and panel protections.
7) The appliance frame shall perfectly adhere to the kitchen upper worktop.
8) Secure the hood inside the cabinet by using the two brackets provided. Fix the two brackets on the sides of the appliance and then couple them, as shown in fig. 6.
9) Fasten the clamping screws, as shown in fig. 7, using a screwdriver rather than an electric drill. Be careful not to excessively tighten the screws, as it may damage the appliance.
If the cabinet dimensions do not allow the use of the brackets shown in figures 6 and 7, other brackets suitable for floor-fixing are provided with the appliance. In such a case, fix the brackets either on the front or rear side of the downdraft, as shown in figure 8, then secure the appliance using the two floor-screws, as shown in fig. 9.
Fit the air exhaust duct (not provided with the appliance). Connect the other end of the duct towards the outside of the cabinet if you choose to have your hood working in filtering mode or towards the outside of the building if you choose to have your hood working in suctioning mode.
Caution: do not drill any other hole on the appliance, in order to prevent any damage on the internal sliding components and on the electric ones, as well.
10) Connect the appliance to the power supply.
11) Open the glass front panel, (see the 'How the hood works' section) then take the grease filter from the packaging and fit it, as shown in fig. 10.
USAGE
This appliance is intended to suck cooking fumes, greases and steam. It has been designed to work in both suctioning mode, with outside evacuation, and filtering mode.
Exhausting piping is not supplied with the appliance.
FILTERING VERSION
In case fumes and vapour cannot be discharged to the outside, the appliance can be used in the filtering mode, Activated charcoal filters are required in this operation mode (fig. 10). The air recycled through the charcoal filters is then re-circulated into the kitchen, thanks to a duct conveying the air on one side of the cabinet.
GREASE FILTER REMOVAL, ACTIVATED CHARCOAL FILTER INSTALLATION
Grease filters and charcoal filters removing and fitting operations shall be carried out with the downdraft open. To open the downdraft, push the key ☐.
Remove the grease filters to reach the charcoal filters. Charcoal filters shall be replaced (fig. 10-11) accordingly to the actual use of the Downdraft, in any case at least once every 6 months.
CONNECTING THE HOOD TO POWER SUPPLY
This appliance is equipped with a H05 VVF with 3 x 0,75 mm2 conductors (neutral, phase and ground) power cord. It shall be connected to a 220V – 240 V electrical mono-phase network through a CEI 60083 approved power socket, which shall be accessible after installation, in compliance with installation regulations. We hereby decline any liability in case of accidents due to failure to connect the hood to the ground or incorrect ground connection. The fuse to be used shall be 10 or 16A. In case of damages to the power cord, please call the after-sale service in order to avoid any kind of risk.
ELECTRICAL CONNECTION
This appliance complies with European Directives 2006/95/CE (Low Voltage Directive) and 2004/108/CE (Electromagnetic Compatibility).
The hood shall be disconnected from power supply during installation and maintenance operations, while fuses shall be disconnected or removed. Electrical connection shall be completed before fitting the appliance into the cabinet.
Check that:
- Power is adequate
- Power lines are in good conditions.
- Cables diameter is compliant with installation regulations.
Caution
In case the hood shows any anomalies, please disconnect it or remove the fuse corresponding to the appliance power disconnecting line.
• 2 HOW THE HOOD WORKS
IMPORTANT: All of the hood features/functions are enabled only if the glass front panel is open.

This key opens the glass front panel and activates the motor second speed.
When the motor is on, by pressing this key the appliance will be turned off.

This key decreases the motor speeds, from 4^th to 1^st speed.

This key displays the speed set by lighting up the Led.
It also displays the TI MER activation by lighting up the related Led.
Flashing of the Led when the appliance is off, signals the grease filter saturation (see the ‘Cleaning the hood’ section).

This key increases the motor speed, when the glass front panel is open.

After 10 min from setting, this key allows to stop the motor and close the glass front panel.
The function set is signaled by the flashing of the led. To disable the timer function, press the key again.
As a result of the EU65 “Energy label” and EU66 Ecodesign regulations issued by the European Commission, which came into force as from January 1st, 2015, our products have been adapted to comply with these new requirements. The energy consumption of the appliance in stand - by mode is lower than 0.5W.
OTHER FUNCTIONS
Automatic turn-off
After 4 hours of continuous operation from the last setting, the appliance turns off and closes automatically.
Grease filters saturation
After 30 hours of operation, the speed indicator will flash, signaling the grease filters saturation. To reset this function, press the "TIMER" key when the appliance is off.
CRUSH-PROOF SAFETY DEVICE
If an obstacle obstructs the closure of the glass front panel, closure is stopped.
• 3 CLEANING THE HOOD
Careful maintenance ensures proper operation and good performances over time.
The hood shall be disconnected from the electrical network, by both unplugging the appliance from the socket and activating the magnetic circuit breaker (safety cut-out), before removing the metal grease filters. After cleaning operations, refit the metal grease filters as detailed in the installation instructions.
| MAINTENANCE | HOW TO PROCEED? | PRODUCTS /ACCESSORIES TO USE |
| External surface and accessories | Do not use metallic scrubbers, abrasive products, or hard brushes. | To clean the external surface of the hood and the light housing screen, use only commercially available household detergents diluted in water. Then rinse with clean water and dry with a soft cloth. |
| Grease filter with extractable unit open | After 30 hours of operation, the downdraft will signal the grease filter saturation.The saturation is signaled by the flashing of the 4 central Leds.To reset, press the timer key 📊 . | Grease filters can be washed by hand or in the dishwasher. These filters need to be cleaned on a regular basis, otherwise they may represent a fire risk. |
| Activated charcoal filter | In the filtering version, the activated charcoal filter shall be replaced regularly. To remove the charcoal filter panel , first of all it is necessary to remove the grease filter grid and then pull the plastic key of the panel itself, in order to disengage it from its seating. Follow these steps in reverse order to fit the activated charcoal filter. Replace the used charcoal filter on an average of every six months. |
• 4 OPERATIONAL ANOMALIES
| PROBLEM | SOLUTION |
| The cooker hood does not work..... | Check that:There is not a power outage.A specific speed has actually been selectedThe red reset key, found over the electrical system box, has been pushed.Make sure that the wires are inserted properly in the connector itself (during the connection, an excessive pressure could bend the contacts). |
| The cooker hood has low performances... | Check that:The motor speed selected is adequate for the quantity of fumes and vapors present in the room.The kitchen is ventilated well enough to allow for air intake.The charcoal filter is not worn out ( filtering version hood).The air outlet channel is free and compliant with paragraph no. 2. |
| The cooker hood stops during operation | Check that:There is not a power outage.The omnipolar device has not tripped. |
• 5 AFTER-SALE SERVICE
Any maintenance operation on your appliance should be carried out by:
- Your retailer,
- A qualified professional technician, authorized by the brand.
When calling, please mention the appliance details (model, type, serial number). This information can be found on the rating label stuck on the downdraft.
• 6 ENVIRONNEMENT
CARE FOR THE ENVIRONMENT
This appliance's packaging can be recycled. Recycle and contribute towards protecting the environment by disposing of packaging in local waste containers designed for this purpose.
Your appliance also contains a lot of recyclable material. This logo indicates that used appliances must not be mixed with other waste.
Appliance recycling organized by your manufacturer is carried out under optimum conditions, in accordance with European Directive 2012/19/EC on the disposal of waste electrical and electronic equipment.
Contact your local authority or retailer for information on used appliance collection points close to your home.
Thank you for helping to protect the environment.