
DHD120XE1 - Range hood DE DIETRICH - Free user manual and instructions
Find the device manual for free DHD120XE1 DE DIETRICH in PDF.


| Product type | Wall-mounted cooker hood |
| Model | DHD120XE1 |
| Width | 120 cm |
| Depth | Approx. 50 cm |
| Height | Adjustable: 70-120 cm (including chimney) |
| Weight | Approx. 25 kg |
| Power supply | 220-240 V ~ 50 Hz |
| Total connected load | 250 W |
| Motor power | 200 W |
| Lighting | LED, 2 x 3 W |
| Controls | Touch control panel with display |
| Number of speeds | 4 + intensive mode |
| Maximum extraction rate | 800 m³/h (ducted) |
| Noise level | 42-65 dB(A) |
| Grease filter | Aluminum, washable in dishwasher |
| Odor filter | Charcoal filter (optional, for recirculation) |
| Installation | Ducted or recirculation |
| Duct diameter | 150 mm |
| Energy class | A+ |
| Annual energy consumption | 25 kWh/year |
Frequently Asked Questions - DHD120XE1 DE DIETRICH
User questions about DHD120XE1 DE DIETRICH
0 question about this device. Answer the ones you know or ask your own.
Ask a new question about this device
Download the instructions for your Range hood in PDF format for free! Find your manual DHD120XE1 - DE DIETRICH and take your electronic device back in hand. On this page are published all the documents necessary for the use of your device. DHD120XE1 by DE DIETRICH.
USER MANUAL DHD120XE1 DE DIETRICH
FR GUIDE D'UTILISATION
EN GUIDE TO INSTALLATION
Hotte décor
Decorative Hood
De Dietrich

natural_image
Modern kitchen interior with stainless steel oven, staircase, and large windows (no visible text or symbols)De Dietrich

FR 02
Dear Customer,
EN 22
You have just acquired a DE DIETRICH hood and we would like to thank you.
Our research teams have created this new generation of appliances for you. Their quality, design, features and technological advances make them exceptional products, and reveal our unique know-how.
Your new DE DIETRICH hood will blend harmoniously into your kitchen and will perfectly combine cooking performance and ease of use. We wanted to offer you a product of excellence.
In the DE DIETRICH product line, you will also find a wide range of hobs, ovens, microwaves, cookers, dishwashers and fridges, that you can coordinate with your new DE DIETRICH hood
Of course, in an ongoing effort to best satisfy your demands with regard to our products, our after-sales service department is at your disposal and ready to listen in order to respond to all of your questions and suggestions (contact information at the end of this booklet).
Visit our website www.dedietrich-electromenager.com, where you will find our latest innovations as well as useful and complementary information.
DE DIETRICH
Setting New Values
As part of our commitment to constantly improving our products, we reserve the right to make changes to them based on technical advances to their technical and functional features and appearance.
Warning:
Before installing and using your appliance, please carefully read this Guide to Installation and Use, which will allow you to quickly familiarise yourself with its operation.
www.dedietrich-electromenager.com
TABLE OF CONTENTS
EN
1 / NOTICES TO THE USER
- Safety recommendations ____ 24
• Environmental protection ____ 25
• Description of your appliance ____ 26
2 / INSTALLING YOUR APPLIANCE
• Using the evacuation mode ____ 27
• Using the recycling mode ____ 27
• Electrical connections ____ 28
- Assembling the hood ____ 29
- Assembling the ventilation shaft
- Outdoor evacuation ____ 31
- Recycling ____ 32
3 / USING YOUR APPLIANCE
• Description of control panel ____ 33
- Powering on ____ 34
- Delayed stop 34
- Immediate stop ____ 34
- Saturated cartridge 34
- Recycling mode 35
• Evacuation mode ____ 35
- Carbon filter saturation 36
• Auto stop fan ____ 36
• Auto stop lighting ____ 36
4 / CARING FOR AND CLEANING YOUR APPLIANCE
- Cleaning the filter cartridges 37
- Changing the carbon filter 37
- Cleaning the outer surfaces 38
- Changing the light bulb 38
- Maintaining your appliance 39
5 / TROUBLESHOOTING ____ 40
6 / AFTER-SALES SERVICE 40
EN 1 / NOTICES TO THE USER
Attention Keep this u
Keep this user guide with your appliance. If the appliance is ever sold or transferred to another person, ensure that the new owner receives the user guide. Please become familiar with these recommendations before installing and using your oven. They were written for your safety and the safety of others.
• SAFETY RECOMMENDATIONS
—This oven was designed for use by private persons in their homes.
—This appliance is to be used by adults. Make sure that children do not touch it and that they do not treat it as a toy. Make sure that they do not touch the appliance's control panel.
—When you receive the appliance, unpack or have it unpacked immediately. Give it an overall general inspection. Make note of any concerns or reservations on the delivery slip and make sure to keep a copy of this form.
-Your appliance is intended for standard household use. Do not use it for commercial or industrial purposes or for any other purpose than that for which it was designed.
—Do not modify or attempt to modify any of the characteristics of this appliance. This would be dangerous to your safety.
—Repairs must only be carried out by an approved specialist.
— Always unplug the hood before cleaning it or performing other maintenance acts.
- Provide adequate ventilation for the room in the case of simultaneous use of the hood and other appliances powered by an energy source other than electricity. This will prevent the hood from aspirating the combustion gases.
- You should never "flambé" dishes under the hood or operate gas rings under the hood without placing cookware on them (the flames sucked up into the hood can damage the appliance).
- When frying food under the appliance, you must carefully monitor the preparation at all times.
Oils and grease brought to very high temperatures can catch fire.
-Respect the recommended frequency of cleanings and filter replacements. The accumulation of grease deposits may cause a fire.
—The hood should never be used over a combustible fuel burning stove (wood, coal, etc.).
—Never use steam or high-pressure devices to clean your appliance (requirement imposed by electrical safety).
- With a view to constantly improving our products, we reserve the right to modify their technical, functional or aesthetic characteristics, making any changes to their features considered necessary or desirable in view of technical progress.
—In order to easily locate the reference information for your appliance, we recommend that you note these data on the "After-Sales Service Department and Customer Relations" page.
(This page also explains to you where to find this information on your appliance.)
Warning In the case
In the case of a kitchen heated by a device connected to a chimney (a stove, for example) the "recycling" version of the hood should be installed. Do not use the hood without metal filters.
Suitable ventilation should be provided in the room when the hood is used at the same time as appliances operated by gas or another combustible fuel.
1 / NOTICES TO THE USER
EN
• ENVIRONMENTAL PROTECTION
- This appliance's packaging material is recyclable. Help recycle it and protect the environment by dropping it off in the municipal receptacles provided for this purpose.
- Your appliance also contains a great amount of recyclable material. It is marked with this label to indicate the used appliances that should not be mixed with other waste. This way, the

appliance recycling organised by your manufacturer will be done under the best possible conditions, in compliance with European Directive 2002/96/EC on Waste Electrical and Electronic Equipment. Contact your town hall or your retailer for the used appliance collection points closest to your home.
- We thank you doing your part to protect the environment.
Warning Installation
Warning Remove the protective film from the filter cartridge before use.
EN 1 / NOTICES TO THE USER
• DESCRIPTION OF YOUR APPLIANCE


Vents

Top surface

Ventilation shaft

Control panel
2 / INSTALLING YOUR APPLIANCE
EN
- The appliance must be unplugged during installation or when any repairs or maintenance work is being performed.
- Ensure that the network voltage corresponds to the voltage noted on the identification plate located inside the hood.
- If the electrical installation at your residence requires any changes in order to hook up your Appliance, call upon a professional electrician.
- If the hood is being used in evacuation mode, do not connect the appliance to a combustion gas exhaust duct (boiler, chimney, etc.) or to a CMV (controlled mechanical ventilation) system.
- Under no circumstances should the exhaust duct empty into the attic.
- Install the hood at a safe distance of at least 70 cm from an electric, gas or combined cooking hob.
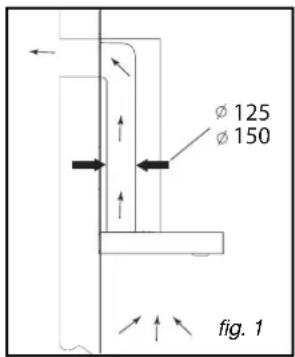
• USING THE EVACUATION MODE
If you possess an outlet to the exterior
(fig. 1)
Your hood can be connected to this outlet using a flue (minimum diameter ∅ mm that is enamelled, in aluminium, flexible or made of inflammable material). If your flue is less than 125 mm in diameter, you must use the recycling mode.
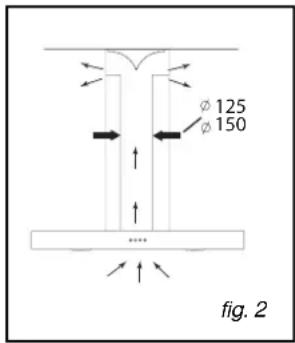
• USING THE RECYCLING MODE
If you do not possess an outlet to the exterior
(fig. 2)
All of our appliances can be used in recycling mode.
In this case, you should add an active carbon filter which will keep in odours.
(See Chapter 4: Changing the carbon filter.)
EN 2 / INSTALLING YOUR APPLIANCE
• ELECTRICAL CONNECTIONS
During installation and maintenance operations, the appliance must be unplugged from the electrical grid; fuses must be cut off or removed.
The electrical connections are made before the appliance is installed in its housing. Ensure that:
- the electrical installation has sufficient voltage,
- the electrical wires are in good condition,
- the diameter of the wires complies with the installation requirements.
Warning
This appliance is delivered with a H 05 VVF power cord that has three-0.75 mm² conductors (neutral, phase and ground). It must be connected to the main power supply (which should be a 220-240 V single phase current) via a CEI 60083 standardised socket that should remain accessible after installation, in keeping with installation guidelines.
We cannot be held responsible for any accident resulting from an inexistent, defective or incorrect ground lead. The fuse for your installation must be 10 or 16A. If the power cable is damaged, call the after-sales service department in order to avoid danger.
Warning If the elec
If the electrical installation at your residence requires any changes in order to hook up your appliance, call upon a professional electrician.
Warning If the bus
If the hood displays any malfunctions, unplug the appliance or remove the fuse corresponding to the electrical socket where your appliance is plugged in.
2 / INSTALLING YOUR APPLIANCE
EN
• ASSEMBLING THE HOOD
Warning The hood
The hood must be installed in compliance with all applicable regulations concerning the ventilation of premises. In France these regulations are described in DTU 61.1 from the CSTB. In particular, the evacuated air should never be conveyed to a duct used to evacuate smoke from appliances that use gas or other combustible fuels. Unused ducts may only be used after approval from a competent specialist.
The minimum distance between the cooking surface and the lowest part of the hood must be 70 cm. If the instructions for the hob installed under the hood specify a distance of more than 70 cm, this requirement must be respected.
- Draw a horizontal line 70 cm minimum from the cook top (fig. 1).
– Draw a vertical line (B/fig. 1) on the wall that is centred over the cook top and that extends from the horizontal line drawn in the previous step (A) to the ceiling. - Cut the drilling template by following the dotted lines to obtain two parts, C1 and C2 (fig. 1).
- Place the C2 template (fig. 1) on the wall, superimposing the line that represents the hood's axis over vertical line B (fig. 1) drawn in a previous step.
- Place the C1 template (fig. 1) against the wall flush with the ceiling.
- Drill the six holes. Insert the 6 wall plugs.
For the DHD120XE model, follow the additional instructions (figure 2) on the following page.
- Screw in the top two screws for the hood (D/fig. 1), leaving 5mm sticking out from the wall.


Tip
Adjust the level of your hood before
fully tightening up the four D and E screws.
EN 2 / INSTALLING YOUR APPLIANCE
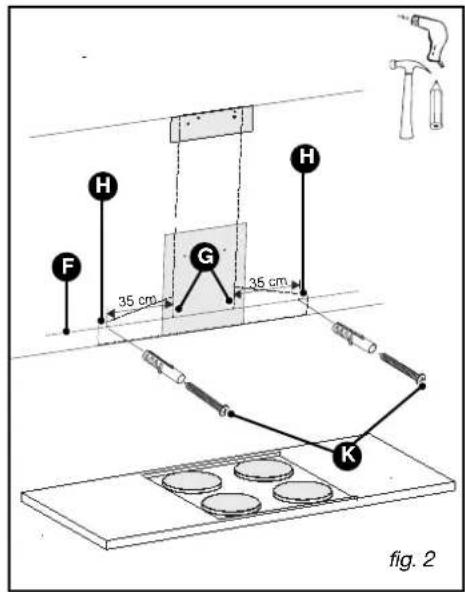
For the DHD120XE model only:
- Draw a horizontal line (F/fig. 2) through the two previously drilled holes (G).
- Drill the two additional holes (H/fig. 2) located on the line (F) at a distance of 35~cm from the initial holes (G).
- Insert the two additional wall plugs.
- Screw in the top two screws for the hood (D/fig. 1), leaving 5mm sticking out from the wall.
- Hang the suction hood on the two screws (fig. 3).

- Remove the filter cartridges (J/fig. 4). - Screw in the two bottom screws (E/fig. 4).
For the DHD120XE model only:
- Screw in the two additional bottom screws (K/fig. 4).
Tip Before fully tightening the four D and E screws (or six D, E and K screws depending on the model), adjust the level of the hood.

2 / INSTALLING YOUR APPLIANCE
EN
• ASSEMBLING THE VENTILATION SHAFT
• Outdoor evacuation
- Using the two screws (fig. 1), attach the metal chimney bracket against the wall, flush with the ceiling for support.
- Mount the back-flow valve near the motor outlet (fig. 2). This back-flow valve makes it possible to block the entry of air from the outside.
- If a 125 mm flue is being installed, use the adapter provided (fig. 3).
If the diameter of your exterior flue is less than 125 mm, you must connect your hood in recycling mode.
- Slide the end of the flue over the motor outlet (fig. 4).
- Prepare your telescoping ventilation shaft, taking care not to block the vents (fig. 4).
Fit the ventilation shafts into one another as far as they will go.
- Attach the upper portion of the chimney (B/fig. 4 on the metal chimney bracket (A/fig. 4) using the two screws (G/fig. 4).
- Adjust the length of the telescoping chimney by bringing down the lower part and fitting it into the top of the hood.
A Chimney bracket
B Telescoping ventilation shaft
C Flue
D Adapter
Back-flow valve
F Motor outlet
G Chimney holding screw


EN 2 / INSTALLING YOUR APPLIANCE
• Recycling
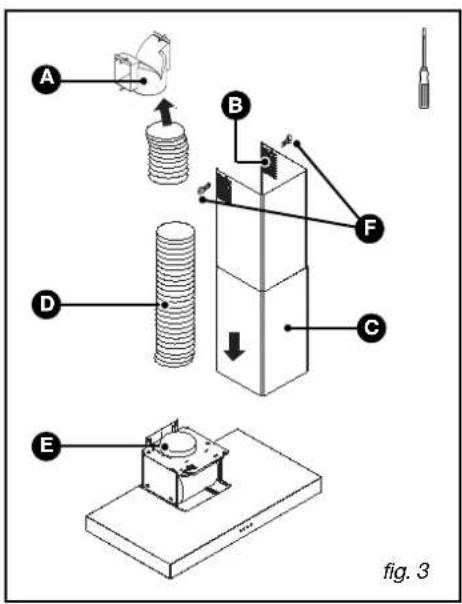
- Remove the back-flow valve (fig. 1).
- Using the two screws (fig. 2), attach the plastic smoke deflector against the wall, flush with the ceiling for support. Be careful to centre the deflector in relation to the vertical line drawn on the wall (fig. 2).
- Slide one end of the flue over the deflector and the other end over the motor outlet (fig. 3).
- Prepare your ventilation shaft, taking care to face the vents upward so that they are visible (B/fig. 3).
- Attach the upper portion of the chimney (C/fig. 3) on the metal smoke deflector (A/fig. 3) using the two screws (F/fig. 3).
- Adjust the length of the telescoping chimney by bringing down the lower part and fitting it into the top of the hood.

natural_image
Technical diagram showing a mechanical component with a top view and a cross symbol, labeled 'fig. 1' (no text or symbols on the diagram itself)
A Smoke deflector
B Vents
Telescoping ventilation shaft
D Flue
Motor bracket
F Chimney holding screw
Tip
For optimal use of your appliance, we recommend that you connect the hood to a 150 mm-diameter flue (not delivered with the appliance). Minimise the number of angles and bends and the lengths of the flue. In the event that the hood will be operated using outdoor evacuation, you should ensure a sufficient inflow of fresh air to avoid a pressure deficiency in the room.
3 / USING YOUR APPLIANCE
EN
• DESCRIPTION OF CONTROL PANEL
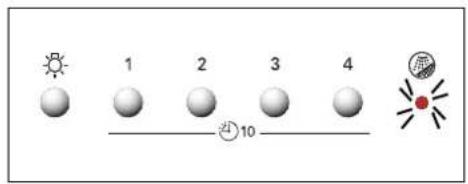
• Four-speed electronic model
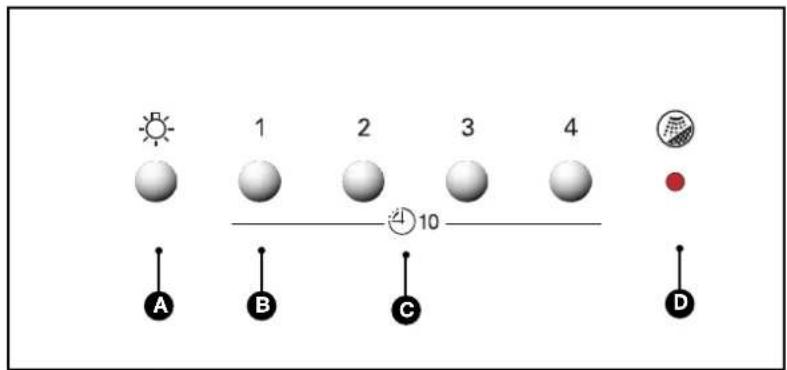
A Light
C Delayed stop (10 minutes)
B Speeds 1 to 4
D Filter cleaning indicator light

Tip
This Guide to Installation and Use is valid for several models. Minor differences in its and fittings may emerge between your appliance and the descriptions provided.
EN 3 / USING YOUR APPLIANCE
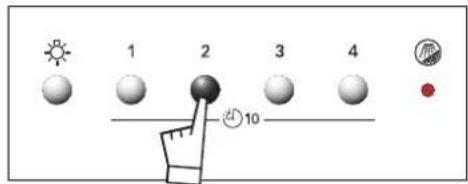
• POWERING ON
Press the button corresponding to the desired speed (1 to 4).
Example: speed 2.
The 2 indicator lights up.
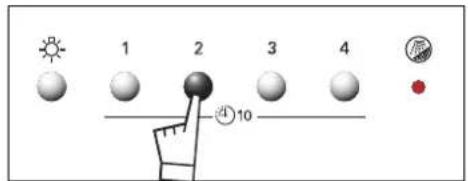
• DELAYED STOP
Press the lit button.
The hood automatically stops operating after 10 minutes.
The button flashes until the hood stops.
• IMMEDIATE STOP
Press the lit button twice.
The hood stops and the light goes out.
• SATURATED CARTRIDGE
When the light flashes, this is an indication that the filter cartridges need to be cleaned (you can put them in the dishwasher).

To deactivate the filter cartridge saturation function, simultaneously press the 1 and 2 buttons for two seconds.
The light goes out.

3 / USING YOUR APPLIANCE
EN
- RECYCLING MODE
Your hood will be used in recycling mode, configure it for recycling mode:
For three seconds, simultaneously press the 1 and 4 buttons, which will light up.
The indicator either lights up or begins flashing.
To configure for recycling mode, press the 1 button until the indicator lights up (but does not flash).
Confirm the configuration by pressing the 4 button.
The indicator and the 1 and 4 buttons go out.

• EVACUATION MODE
Your hood has an external air outlet, configure it for evacuation mode:
For three seconds, simultaneously press the 1 and 4 buttons, which will light up.
The indicator either lights up or begins flashing.
To configure for evacuation mode, press the 1 button until the indicator begins flashing.
Confirm the configuration by pressing the 4 button.
The indicator and the 1 and 4 buttons go out.

EN 3 / USING YOUR APPLIANCE
• CARBON FILTER SATURATION
When your hood is in recycling mode.
The indicator lights up, indicating that the carbon filter must be changed (we recommend that you replace your filters every six months).
To turn out the indicator, simultaneously press the 3 and 4 touch controls. The light goes out.

• AUTO STOP FAN
If you forget to turn off your hood, it will automatically turn itself off after nine hours of operation.
• AUTO STOP LIGHTING
If you forget to turn off the light, it will automatically turn itself off after nine hours of operation.
4 / CARING FOR AND CLEANING YOUR APPLIANCE
EN
Warning
Always unplug the hood before cleaning it or performing other maintenance acts. Regular maintenance of your appliance is a guarantee of proper functioning, good performance and durability.
Warning Failure to
Failure to respect the guidelines for cleaning the appliance and filters may cause fires. Please carefully adhere to the maintenance recommendations.
• CLEANING THE FILTER CARTRIDGES
They must be cleaned after approximately 30 hours of use or at least once a month. These filters can be cleaned in a vertical position in your dishwasher.
Use a brush, hot water and mild detergent. Rinse and dry them thoroughly before returning them to the hood.
- Dismantling the filter cartridge (fig. 1)
- Turn the built-in filter cartridge handle.
– Tilt the filter cartridge downward.

natural_image
Diagram showing two mechanical assembly steps with arrows indicating motion (no text or symbols)- CHANGING THE CARBON FILTER
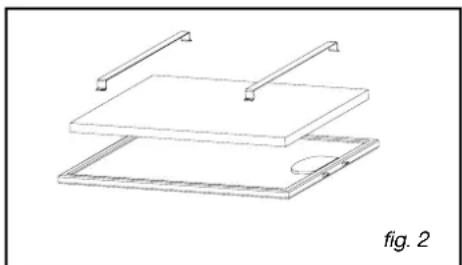
Replace it after approximately 120 hours of use.
- Remove the filter cartridge (fig. 2).
- Place the carbon filter on the filter cartridge on the inside of the hood.
- Pull the two fastener clips over each side of the filter cartridge.
- Repeat these steps for all the filter cartridges.
natural_image
Technical line drawing of a layered electronic component or assembly (no text or symbols)EN 4 / CARING FOR AND CLEANING YOUR APPLIANCE
• CLEANING THE OUTER SURFACES
To clean the outside of your hood, use soapy water, but do not use abrasive creams or scrubbing sponges.
• CHANGING THE LIGHT BULB
Warning Before car
Warning
Before carrying out any work, the power supply to the hood must be turned off, either
by unplugging it or by using the circuit breaker switch.
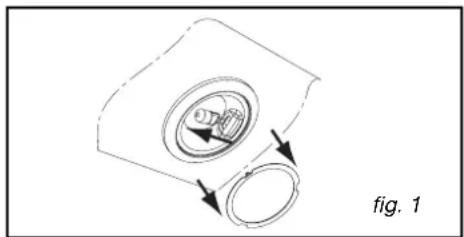
Model with halogen bulb
- Remove the lighting port (fig. 1).
—Change the G4-20W-12V halogen bulb.
—Replace the bulb by repeating these steps in reverse order.
natural_image
Diagram showing a mechanical component with arrows indicating motion, labeled 'fig. 1' (no text or symbols on the diagram itself)4 / CARING FOR AND CLEANING YOUR APPLIANCE
EN

Warning
Before carrying out any work, the power supply to the hood must be turned off, either by unplugging it or by using the circuit breaker switch.
• MAINTAINING YOUR APPLIANCE
| MAINTENANCE | WHAT TO DO | PRODUCTS/ACCESSORIES TO USE |
| Top surface and accessories | Never use metal scouring pads, abrasive products or excessively stiff brushes. | To clean the body and the lighting port, you should use only commercial household cleaning products diluted in water and then rinse using clean water, drying with a soft cloth. |
| Filter cartridge | This filter traps fatty vapours and dust. This component plays an important role in ensuring the effectiveness of your hood. In the event of tough stains, use a non-abrasive cream, then rinse with clean water. | Use a commercial household cleaning product then rinse abundantly and dry. These filters can be cleaned in a vertical position in your dishwasher. (Do not allow them to touch dirty dishes or silverware.) |
| Activated carbon filter | This filter traps odours and must be changed at least once a year depending on your level of use. You should order these filters from your dealer (quoting the reference shown on the identification plate located inside the hood) and note the date the filter was changed. |
To preserve your appliance, we recommend that you use Clearit cleaning products.

Professional expertise
serving individuals
Clearit offers you professional products and solutions designed for the daily care of your household appliances and kitchens.
They are on sale at your regular retailer, along with a complete line of accessories and consumable products.
EN 5 / TROUBLESHOOTING
| SYMPTOMS | SOLUTIONS |
| The hood is not working... | Ensure that:• The power is not cut off.• A speed has been selected. |
| The hood is not operating effectively... | Ensure that:• The selected motor speed is sufficient for the quantity of smoke and vapours to be cleared.• The kitchen is sufficiently ventilated to allow for fresh air intake.• The carbon filter is not worn (hood operating in recycling mode). |
| The hood stopped working | Ensure that:• The power is not cut off.• The single-pole cut-off device was not activated. |
EN 6 / AFTER-SALES SERVICE
Any maintenance on your equipment should be undertaken by:
- either your dealer,
- or another qualified mechanic who is an authorized agent for the brand appliances.
When making an appointment, state the full reference of your equipment (model, type and serial number). This information appears on the manufacturer's nameplate attached to your equipment.

- De Dietrich
- FR 02
- EN 22
- Warning:
- TABLE OF CONTENTS
- / NOTICES TO THE USER
- / INSTALLING YOUR APPLIANCE
- / USING YOUR APPLIANCE
- / CARING FOR AND CLEANING YOUR APPLIANCE
- EN 1 / NOTICES TO THE USER
- Attention Keep this u
- • SAFETY RECOMMENDATIONS
- Warning In the case
- • ENVIRONMENTAL PROTECTION
- Warning Installation
- Warning Remove the protective film from the filter cartridge before use.
- • DESCRIPTION OF YOUR APPLIANCE
- • USING THE EVACUATION MODE
- • USING THE RECYCLING MODE
- EN 2 / INSTALLING YOUR APPLIANCE
- • ELECTRICAL CONNECTIONS
- Warning
- Warning If the elec
- Warning If the bus
- • ASSEMBLING THE HOOD
- Warning The hood
- Tip
- For the DHD120XE model only:
- Tip Before fully tightening the four D and E screws (or six D, E and K screws depending on the model), adjust the level of the hood.
- • ASSEMBLING THE VENTILATION SHAFT
- • Outdoor evacuation
- • Recycling
- EN 3 / USING YOUR APPLIANCE
- • POWERING ON
- • DELAYED STOP
- • IMMEDIATE STOP
- • SATURATED CARTRIDGE
- - RECYCLING MODE
- • EVACUATION MODE
- • CARBON FILTER SATURATION
- • AUTO STOP FAN
- • AUTO STOP LIGHTING
- Warning Failure to
- • CLEANING THE FILTER CARTRIDGES
- - Dismantling the filter cartridge (fig. 1)
- - CHANGING THE CARBON FILTER
- EN 4 / CARING FOR AND CLEANING YOUR APPLIANCE
- • CLEANING THE OUTER SURFACES
- • CHANGING THE LIGHT BULB
- Warning Before car
- • MAINTAINING YOUR APPLIANCE
- Professional expertise
- serving individuals
- EN 5 / TROUBLESHOOTING
- EN 6 / AFTER-SALES SERVICE
Brand : DE DIETRICH
Model : DHD120XE1
Category : Range hood