
EA 819E - Automatic coffee machine KRUPS - Free user manual and instructions
Find the device manual for free EA 819E KRUPS in PDF.

| Product Type | Automatic coffee machine with built-in grinder |
| Brand | KRUPS |
| Model | EA 819E |
| Power supply | 230 V, grounded plug |
| Water tank capacity | 1.7 L max |
| Coffee type | Coffee beans (not ground coffee) |
| Prepared beverages | Espresso, Ristretto, Lungo, Cappuccino |
| Two cups preparation | Yes, for coffee recipes |
| Grind fineness adjustment | Yes, via rotary knob in the bean container (adjust during grinding) |
| Coffee strength adjustment | 3 levels (1 to 3 beans) |
| Volume adjustment | In 10 ml increments, depending on recipe |
| Temperature adjustment | 3 levels |
| Water hardness adjustment | From 0 (very soft) to 4 (very hard) |
| Milk system | Integrated milk jug with cappuccino and cleaning function (CAPPUCCINO/CLEAN button) |
| Favorites function | Store 2 coffee recipes and 2 cappuccino recipes (A and B) |
| Automatic shut-off | Adjustable from 15 to 120 minutes |
| Automatic rinsing | Programmable at startup |
| Cleaning | Cleaning cycle with KRUPS tablet (every 3 months or on demand) |
| Descaling | Cycle with KRUPS descaler (every 3 months or on demand) |
| Milk jug maintenance | Automatic rinsing after each cappuccino, manual cleaning of parts |
| Indicators | Water level, coffee grounds, drip tray, maintenance messages |
| Accessories | Claris Aqua Filter System filter cartridge (optional), KRUPS tablet and descaler |
Frequently Asked Questions - EA 819E KRUPS
User questions about EA 819E KRUPS
0 question about this device. Answer the ones you know or ask your own.
Ask a new question about this device
Download the instructions for your Automatic coffee machine in PDF format for free! Find your manual EA 819E - KRUPS and take your electronic device back in hand. On this page are published all the documents necessary for the use of your device. EA 819E by KRUPS.
USER MANUAL EA 819E KRUPS
FR HOTLINE:B:070233159-F:0974501061-CH:0448371840
EN HOTLINE:UK:0345 3306460-ROI:016774003
DE HOTLINE: DE: 0212 387 400 - AT: 01 890 3476 - CH: 044 837 18 40
NL HOTLINE: NL: 0318 58 24 24
DA KUNDESERVICE: 44663155
NO KUNDESERVICE:81509567
SV KUNDSERVICE:0859421330
FI ASIAKASPVALEU:096229420
ES HOTLINE:ES:902312300
IT SERVIZIO CONSUMATORI: IT: 199207 701 - CH: 044837 1840
PT Centro de Contacto do Consumidor: PT: 808 284 735
EL ΓPAMMH EeyNHPETHsH2: 2106371251
CS HORKÁ LINKA: 731 010 111
SK ZAKAZNICKA LINKA:232 199 930
HU FORRóDRóT: 06 1 801 8434
PL INFOLINIA:801300420
RU TogpaJyIINH:4952133228
UK TAPRAJIAJIHII:0443001304
RO CENTRUL DE ASISTENTÀ CLIENTI:0 21 316 87 84
BG TOPEUJAINHNA:070010330
HR HOTLINE:013015294

www.krups.com
EA819 ARABICA LATTE
KRUPS
Chere clientele, cher client,
Thank you for purchasing your KRUPS espresso maker with bean grinder. Designed and manufactured in France to deliver a café-quality drink with the greatest ease of use, your machine KRUPS enables you to enjoy espresso, ristretto, lungo, cappuccino coffees at any time of day.
Your espresso maker with bean grinder is equipped with advanced technologies and an intuitive interface; to obtain the best possible extraction with ease, to reveal a maximum amount of aromas and flavours from freshly ground coffee beans. For an optimal taste experience, be sure to use fresh tap water.
For increased pleasure, you may use your KRUPS ARABICA LATTE machine to automatically make perfect cappuccinos with frothy foam at the touch of a button, thanks to its built-in milk pot.
Since all coffees are not alike, you may personalise your drinks:
- By changing the coffee beans (different mix or roast), you may discover different flavours. You will probably need several trials to find the coffee beans that match your taste.
- By varying the fineness of the grind, you may obtain coffees that more or less full-flavoured.
- By choosing your length, strength to obtain the perfect cup.
- By saving your favourite coffees using the favourites key
We wish you pleasant moments spent around coffee and we hope that your KRUPS machine will fully satisfy you.
The KRUPS team
Tips
- The quality of the water strongly influences the quality of the aromas. Limescale and chlorine can alter the taste of coffee. We recommend that you use the Claris Aqua Filter System cartridge, or water with low mineral content, in order to preserve all the aromas of your coffee.
- When preparing drinks we recommend using preheated cups (by passing them under hot water) whose size is adapted to your desired quantity.
- The roasted coffee beans can lose their aroma if they are not protected. We advise you to use the amount of beans equivalent to your consumption over the coming 2-3 days and to choose 250g bags.
- The quality of the coffee beans is variable and tastes are subjective. Arabica will give you fine, floral aromas unlike Robusta which is higher in caffeine, more bitter and full-bodied. It is common to mix the two types of coffee to get a more balanced coffee. Please do not hesitate to seek advice from your roaster.
- We do not recommend the use of oily and caramelised beans as these can damage the machine.
- The fineness of the ground beans influences the strength of the aromas and the quality of the crema. The more finely ground the beans, the smoother the crema. Grinding can also be adapted for the desired drink.
- Use pasteurised, UHT, skimmed, semi-skimmed or whole milk from the fridge (3 - 5^) for best results.
- The use of special milks: micro filtered, raw, fermented, enriched or plant milks such as rice, oat or almond milk can give results that are less satisfactory in terms of quality and quantity of froth.
CONTROL PANEL
| Keys and overall functions | |||
| ① | Start/stop button Turn the machine on and off | → | Navigation button Go from one function to another |
| ② | Recipes selection button Choose coffee or cappuccino recipe | - + | + or - button Raise or lower |
| ③ | Favourites button Save your favourite recipes | START STOP | Start/stop button Start or stop a function |
| ④ | Settings and maintenance button Access settings | Grind fineness setting button Choose the grind fineness | |
SIGNIFICANCE OF THE PICTOGRAMS
| Pictograms | Steady | Flashing | Significance |
| ● | The coffee grounds collector is absent or improperly positioned. | ||
| ● | Empty the coffee grounds collector and the drip tray. | ||
| ● | Fill the water reservoir. The water reservoir is improperly positioned. | ||
| ● | Position a container of approximately 600 ml under the coffee and steam outlets. | ||
| ● | Maintenance cycle under way. | ||
| ● | Faulty operation: unplug the appliance for 20 seconds then plug in again. | ||
| ● | Installing the filter cartridge. | ||
| ● | Rinse cycle under way. | ||
| ● | ● | Request to rinse the milk pot. | |
| ● | ● | Request to clean using a KRUPS cleaning tablet. | |
| ● | Interrupted cleaning cycle. | ||
| ● | ● | Request for descaling with KRUPS descaler. | |
| ● | Descaling cycle interrupted. | ||
| ● | Water hardness setting. | ||
| ● | Programming the automatic rinse of the coffee outlets at machine start-up. | ||
| ● | Programming the period of non-use after which the machine will automatically turn off. | ||
| ● | ● | Coffee temperature setting Preheating indicator. | |
| ● | Choice of desired milk volume. | ||
| A B | ● | A-B favourites Ability to save 2 coffee recipes and 2 cappuccino recipes. | |
| ● | Saving favourites A or B. | ||
| ● | ● | Preparation progress indicator. | |
| PRESS START | ● | Press the start/stop button. | |
| [000] | ● | Coffee strength indicator. | |
| [BBBmin] | Volume indicator. | ||
| [00] | ● | Number of cups (1 or 2). | |
| ▲ | Selection indicator. |
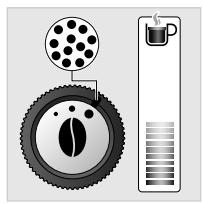
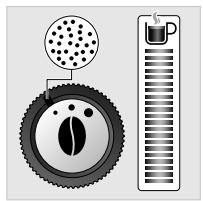
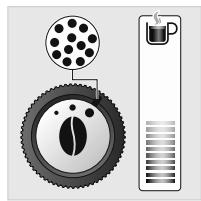
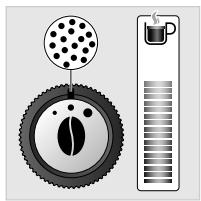
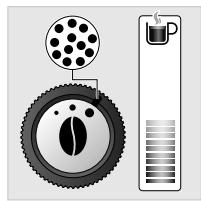
APPLIANCE DESCRIPTION
A Water reservoir handle/lid
B Water reservoir
C Coffee grounds collector
D Coffee outlets
E Grill and removable drip tray
F Coffee bean reservoir lid
1 Coffee bean reservoir
Grind fineness setting button
H Metal burr mill
I Opening for the cleaning tablet
J Cup tray
Screen and control panel
K Start/stop button
L Recipe selection button
M Favourites button
N Settings and maintenance button
0 Start/stop button
P +or - button
Q Navigation button
3 Milk pot
R RLid
S Lock lever
T CAPPUCCINO/CLEAN selection knob
U Flexible tube for milk foam flow
V 3-part cassette which can be dismantled
W Container
X Steam nozzle
USING YOUR APPLIANCE INSTALLING THE APPLIANCE

Danger : Connect the appliance to an earthed 230 V mains socket. Failure to do so means that you run the risk of fatal injury due to electricity!
Respect the safety guidelines indicated in the "Safety guidelines" booklet.
Preparing the appliance
To prevent used water flows from dirtying your counter top or from potentially burning you, don't forget to insert the drip tray. (E)
- Remove, fill the water reservoir and put it back in place. (1-2)
- Remove the coffee bean reservoir lid, pour in the coffee beans and put the lid back on. (3)
First use
- Switch the appliance on by plugging it in
- Press the start/stop button (4)
- The machine preheats, at the end of the cycle, the pictograms 日 and press start PRESS START flash.
- Place a container (at least 600ml ) under the coffee and steam nozzles, then press the start/stop key (7).
- The machine primes itself and rinses the hydraulic circuits (coffee and steam) for approximately 2 minutes.
- At the end of the cycle, the coffee recipe menu is displayed (8).
Installing the cartridge in the appliance: Sold separately
We advise the use of a Claris Aqua Filter System filter cartridge to eliminate all traces of chlorine and limescale. Limits the formation of limescale and ensures your machine's longevity. The use of this cartridge ensures a more flavourful coffee.
To perform the installation, you will need:
-1 filter cartridge
- 1 container (minimum 600ml )
Attention: to properly prime your filter cartridge, ensure that you have properly followed the installation procedure at each set-up.
- Set the date by turning the grey ring located on the upper end of the cartridge (5).
- Screw the cartridge into the water reservoir (6).
- Press the settings and maintenance button
- Using the navigation key , select the pictogram .
-
The pictograms and press start PRESS START flash.
-
Place the 600 ml container under the coffee outlets (7).
- Press the start key (start) (7); the priming cycle starts.
The installation of the filter cartridge is complete; the coffee recipe menu appears, and you may again use your machine (8).
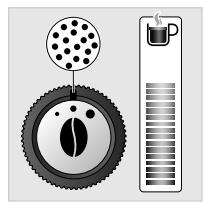
Water hardness
Water hardness is a high concentration of minerals, specifically of calcium, which is responsible for the formation of limescale. To prevent the scaling of your machine, which may lead to the improper operation or alter the taste of your coffee, you must set your machine according to the hardness of your water (between 0 and 4).
Prior to the 1st use and in order to set your machine, determine the hardness of your water by using a pH test stick:
- Fill a glass of water
- Immerse the stick
- Wait 1 minute for the result
It is also possible to contact your water company.
You will find detailed information on the classes in the table below:
| Degree of hardness | Class 0 Very soft | Class 1 Soft | Class 2 Average hardness | Class 3 Hard | Class 4 Very hard |
| ° dH | < 3° | > 4° | > 7° | > 14° | > 21° |
| ° e | < 3,75° | > 5° | > 8,75° | > 17,5° | > 26,25° |
| ° f | < 5,4° | > 7,2° | > 12,6° | > 25,2° | > 37,8° |
| Appliance setting | 0 | 1 | 2 | 3 | 4 |

Be sure to perform this operation at each time you use your machine in a place where the water hardness is different or if you notice a change in the hardness of your water.
BEFORE PREPARED DRINKS IMPORTANT INSTRUCTIONS
Your machine offers pre-set drinks to obtain optimal results. You may nonetheless personalise your coffee and have an effect on the results in your cup.
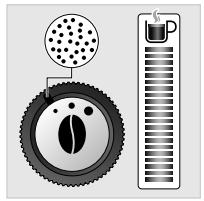
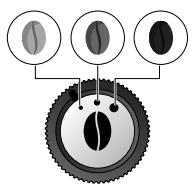
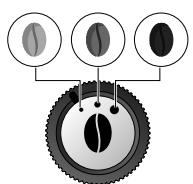
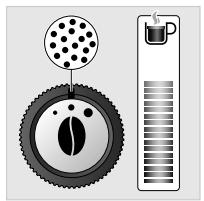
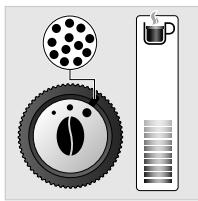
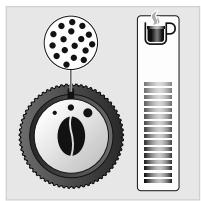
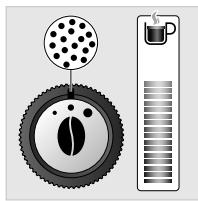
Preparing the grinder: set the grind fineness (9)
You may adjust the strength of your coffee by setting the grind fineness of the coffee beans; the finer the setting of the coffee grinder, the more the coffee is strong and creamy. The type of coffee used may also influence the result obtained.
We recommend a very fine setting for ristretto, fine for espresso and coarser for lungo.
To set the level of grind fineness:
- Turn the setting knob located in the bean reservoir. This setting must be performed during grinding and notch by notch.
- After 3 preparations, you will notice a very distinct taste difference.
The variation of grinding fineness allows:
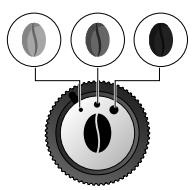
- To be able to adapt to the different types of bean: a highly roasted and rather oily bean will require a coarse grinding while a more lightly roasted bean will be drier and will require a finer grinding (dark to light bean)
Roasting:

Light (Blonde)

Average (Light French)

Long (Brune)
Adjusting the coffee outlet (10)
For all drinks offered, you may lower and raise the coffee outlets depending on the size of your cup(s).
Stopping a drink while preparation is under way
You may stop the preparation at any time by pressing the start/stop key
When a cycle is interrupted, stoppage is not immediate. The machine will be inaccessible over a certain period.
Preparing two cups
You may use your appliance to simultaneously prepare two cups. The double cups function is only accessible for coffee recipes by choosing 2 cups when you enter the settings of your drinks.
PREPARING DRINKS
| COFFEE RECIPES | Number of cups possible | Recommended settings Volume (10 ml increments) | Possible settings Strength |
| RISTRETTO | 1 | 20 to 30 ml | 1 to 3 beans |
| 2 | 2x 20 to 30 ml In two cycles | ||
| ESPRESSO | 1 | 30 to 70 ml | 1 to 3 beans |
| 2 | 2 x 30 to 70 ml In two cycles | ||
| LUNG | 1 | 80 to 180 ml | 1 to 3 beans |
| 2 | 2 x 80 to 180 ml In two cycles | ||
| CAPPUCCINO | 1 | 60 to 100 ml | 1 to 3 beans |
PREPARING AN ESPRESSO, RISTRETTO AND LUNGO
Please note: each time a drink is started, the machine will take into account the settings of the last drink made.
Ristrettos, with a strong, powerful taste, covered with a caramel-coloured crema for those difficult mornings. To prepare a ristretto, choose a volume between 20 ml and 30 ml.
Espressos, with full-flavoured taste and pronounced aromas, are covered with a slightly bitter caramel-coloured crema. Choose a volume between 40 ml and 50 ml.
A café lungo is an 80 ml espresso, with a higher caffeine content but lighter on the palate. Very appreciated in the morning.
Steps involved in making the drink:
- Coffee bean grinding
- Compacting the coffee grounds
-Percolation
Starting the preparation (for 1 or 2 cups):
- Press the recipe choice key (11) until the pictogram is displayed.
- The coffee recipe menu is displayed.
- Place either 1 cup or 2 cups under the coffee outlets. You may lower or raise the coffee outlets based on the size of your cup (10).
Personalisation
Strength
- Select the coffee strength (symbolised by coffee beans displayed on-screen between brackets) [000] using the + key to increase it or the - key to reduce it (-+) . (12)
Volume
- Press the navigation key to go to the setting of the recipe volume.
- Select the desired volume [120]_w using the + or -+ keys (13).
Number of cups
- Press the navigation key to next go to the setting of the number of cup(s).
- Select 1 or 2 cups using the + or - keys (14).
If you choose 2 cups, the machine will automatically link 2 full coffee preparation cycles.
- Press the START key (15).
At any time, you may set the recipe volume using the + or - keys - + .
To stop the flow into your cup, press the START/STOP key
You may also adjust the temperature of your coffee; to do so, press the settings and maintenance button 60 then, using the navigation key, position it on 61 and set the desired temperature level using the keys -1 + .
BE CAREFUL, IF YOU INTERRUPT THE PREPARATION OF YOUR DRINK, STOPPAGE IS NOT IMMEDIATE.
Depending on your drink, you may modify the grind level of the coffee beans; to do so, please refer to the "BEFORE PREPARED DRINKS IMPORTANT INSTRUCTIONS" chapter.
Saving to your favourites
After having made your drink, you may save it to your favourites.
To do so, at the end of the flow of your drink, press the favourites key once to select favourite A or twice to select favourite B.
For more details, refer to the section SAVE YOUR FAVOURITES.
PREPARING A GAPPUCCINO
Please note: each time a drink is started, the machine will take into account the settings of the last drink made.
To obtain a good quality foam, we recommend using recently opened fresh, pasteurised or UHT (4 - 5^) . Raw milk will not produce optimal results.
Steps involved in making the drink:
- Preheating the machine: at any time during this phase, you may set the volume of milk using the + and - keys
- Milk frothing phase
- Coffee flow: at any time during this phase, you may set the volume of coffee using the + and - keys.
Starting the preparation
For a personalised cappuccino, the machine enables you to choose different volumes of milk and coffee, according to your preferences.
- Press the recipe choice key (17) until the pictogram is displayed.
Installing the milk pot on the machine
Prior to first use, carefully clean the various elements.
The milk pot is composed of a plastic container (W), a lid (R) including a cassette (V) and a flexible tube (U) connecting to the machine's drink outlet.
- Pour the milk in the pot (a minimum of 150 ml) (18).
- Put the lid on the pot by screwing it on (19).
- Lift the lock lever (20).
- Install the milk pot on the machine by connecting it to the steam outlet (21) then lower the lock lever (22).
- Insert the flexible tube in the cassette opening intended for this purpose (23) then place the other end under the magnetic drink outlet (23).
- Check that the cappuccino/clean selection knob on the milk pot lid is properly set to the cappuccino position (24).
Personalisation
Strength
- Choose the desired intensity by increasing or reducing the number of coffee beans [ ] using the keys + (25).
Volume of coffee
- Next, press the navigation key to go to the setting of the final desired drink volume. You may increase and reduce the volume using the keys (26).
Volume of milk
- And finally, you may set the desired volume of milk using keys (27).
- Press the start/stop key (28).
To stop the flow into your cup, press the start/stop key
You may also adjust the temperature of your coffee; to do so, press the settings and maintenance button 念 then, using the navigation key, position it on 念 and set the desired temperature level using the keys -1 + .
BE CAREFUL, IF YOU INTERRUPT THE PREPARATION OF YOUR DRINK, STOPPAGE IS NOT IMMEDIATE.
Rinse of the milk pot (approximately 30 seconds)
Each time a cappuccino recipe is prepared, the machine prompts you to perform a rinse of the milk pot via the appearance of the pictogram (31). It is preferable to perform the rinse of your milk pot to guarantee the performance of your machine and optimal hygiene. To perform this rinse, it is not necessary to empty the milk remaining in the milk pot.
- When the pictogram is displayed, press the parameters button (31).
- Turn the knob of the milk pot to the CLEAN position (32).
- Ensure that the milk pot is properly connected to the machine and in locked position (lever lowered) (22).
- Press the START/STOP button (33), the rinse cycle starts.
SAVE YOUR FAVOURITES
Your ARABICA LATTE machine gives you the option to save 2 coffee recipes and 2 cappuccino recipes.
Saving a new favourite
After your drink has stopped flowing, you may press the favourites key once to select favourite A or twice to select favourite B (29).
To save the recipe, hold down the favourites key.
Replace your favourites
Proceed in the same manner as for a 1st save.
GENERAL MAINTENANCE
Performing proper maintenance of the machine will extend the life of your machine and will preserve the authentic taste of your coffee.
Maintenance of the coffee grounds collector tray and drip tray
The drip tray collects the used water.
The coffee grounds collector tray collects the used coffee grounds.
If the pictogram flashes, empty and clean:
- The drip tray (some ground coffee may be present). The drip tray is equipped with floats that constantly indicate when it must be emptied (34).
- The coffee grounds collector tray. Empty it completely to avoid any overflows afterwards (35,36).
The warning message will remain displayed if the coffee grounds collector is not properly pushed in or installed. It will then be impossible to prepare any drinks.
Rinsing the coffee circuit
You may perform this operation whenever you wish to rinse the coffee outlets. We recommend that you perform a rinse each time you turn off your machine to ensure optimal hygiene.
After several days without use, rinsing the coffee circuit is recommended.
- Press the settings and maintenance key
- Using the navigation key , select the rinse pictogram
- Press the START key
- Once the coffee menu appears, you may again use your machine.
Activating and deactivating the automatic rinse of the circuits upon switching on the machine
By default, the option to automatically rinse the circuits upon switching on the machine is activated. You may choose to activate or deactivate the automatic rinse at each start-up.
To do so:
- Press the Settings and maintenance key
- Using the navigation key , select the automatic rinse pictogram.
- Press the start/stop key to choose to activate the automatic rinse.
- To deactivate, press the key + , the automatic rinse is then no longer programmed.
- The cycle only lasts a few seconds and will stop automatically.
- To go back to the coffee menu, press the settings and maintenance key.
BE CAREFUL: during this rinse operation, hot water flows through the coffee outlets. Ensure that the drip tray is always in place, even when the machine is not used.
IMPORTANT: it is advised to perform this rinse:
- After each cappuccino for optimal hygiene.
- Before placing the milk pot in the refrigerator if it still contains some milk.
After each rinse, it is advised to clean the different parts of the system by running them under water; please refer to the "Milk Pot Maintenance Manual" chapter.
The machine offers to perform a rinse of the milk pot after making cappuccinos, but you may also perform this rinse any time that you wish to do so. This is possible even if there is some milk left in the container.
- Ensure that the milk pot is properly connected to the machine in locked position (lever lowered) (32).
- Turn the lid knob to the CLEAN position (32).
- Press the settings and maintenance key (31).
- Using the navigation key, is positioned on
- Press START (33).
At the end of this cycle, return the cappuccino system knob to the CAPPUCCINO position (24) before starting a new recipe.
Manual maintenance of the milk pot: Approximately 5 minutes
IMPORTANT: it is recommended to clean the different parts of milk pot by running them under clean water.
These parts are not designed to be dishwasher-safe.
- Remove the flexible tube from the pot's opening and from the drink outlet (37)
- Unlock the milk pot by lifting the lock lever (38)
- Turn the knob to clean position (39)
- Extract the cassette (40)
- Remove by pulling the cappuccino/clean selection knob (41)
- Remove the black silicone body from the cassette (42)
- Unscrew the steam nozzle tip located on the pot lid (43), unplug it if need be, using the needle provided for this purpose (44)
- The milk pot is now fully disassembled.
- Clean each element using warm water (45)
- Dry them.
- Put them back in place (46) (to properly insert the knob, be sure to put it in clean position!:)
- Again place the cassette in the pot lid (47)
Cleaning program: Approximately 13 minutes
Cleaning the coffee circuit serves to combat residue, greasy coffee deposits and to preserve the aromas of your drinks.
To perform this cleaning, you will need:
-1 KRUPS cleaning tablet
- 1 container (minimum 600ml )
The cycle will link two phases:
- 1 cleaning phase
-1 rinse phase
When should this program be performed?
-Each quarter.
- When the appliance advises you by lighting up the pictogram .

Important: You are not obliged to immediately perform the cleaning program when the appliance requests it, but you must perform it soon. If the cleaning is postponed; the pictogram will remain displayed so long as the operation is not performed.
It is recommended to perform the cleaning operation to degrease the appliance and to ensure optimal preservation of your drinks' aromas.
The cleaning program is an intermittent cycle; do not place hands mains under the coffee outlets during the cycle.
When the pictogram is displayed, you may start the cleaning program:
- Press the settings and maintenance key
- Ensure that the pictogram is selected, otherwise use the navigation key .
- The pictogram flashes.
The cleaning cycle: environ 10 minutes
- Lift the cup tray (J).
- Insert the KRUPS cleaning tablet in the opening intended for this purpose (I).
- Fill the water reservoir up to its maximum level of 1.7L (2).
- Empty the coffee grounds collector and the drip tray (34, 35, 36).
- Place the 600ml container under the coffee outlets and the steam nozzle (7).
- Press the START (DAP)
- The pictogram stops flashing.
- The first phase of the cleaning cycle starts.
- At the end of this cycle, the pictogram flashes.
- Empty the container and the drip tray and put them back in place.
The rinse cycle: environ 3 minutes
- Press the START (do)
- The pictogram stops flashing.
- At the end of this cycle, empty the container and drip tray (34, 35, 36).
- Put the drip tray back in place.
Important: if you turn off or unplug your machine during cleaning or in the event of a power failure, the cleaning program will start again at the step under way during the incident. It will not be possible to postpone this operation, this is compulsory in order to rinse the water circuit. In this case, a new cleaning tablet may be necessary. Properly perform the entire cleaning program to eliminate any trace of cleaning product harmful to health.
Descaling program: Approximately 20 minutes
Running your machine's descending program ensures that it is operating properly and eliminates any limescale deposits that may influence the taste of the coffee.
The frequency at which this program is run depends on the quality of water used and whether or not a Claris Aqua Filter System filter cartridge is used. The harder your water, the greater the frequency of descaling.

Important: ensure that you disconnect the milk pot (37) and remove the Claris Aqua Filter System cartridge if it is fitted before starting a descaling cycle.
To perform this descaling, you will need:
- 1 dose of KRUPS descaler
- 1 container (minimum 600ml )
The cycle will link three phases:
-1 cleaning phase
- 1st rinse phase
- 2nd rinse phase
When should this program be performed?
-Each quarter.
- When the appliance advises you by lighting up the pictogram .

Important: You are not obliged to immediately perform the descaling program when the appliance requests it, but you must perform it as soon as possible. If the descaling is postponed, the pictogram will remain displayed so long as the operation has not been performed.
It is recommended to perform the descaling to eliminate any limescale deposits that may influence the taste of coffee.
The descending program is an intermittent cycle; do not place hands under the steam outlet.
When the pictogram 8 is displayed, you may start the cleaning program:
- Press the settings and maintenance key
- Ensure that the pictogram 0 is selected, otherwise use the navigation key.
- The pictogram flashes.
The descending cycle: approximately 8 minutes
- Fill the water reservoir up to the CALC mark.
- Pour a dose of KRUPS descaler into it.
- Place the 600 ml container under the coffee outlets and the steam nozzle.
- Press START
- The pictogram stops flashing.
- Empty the container, the drip tray and put them back in place.
- Clean the water reservoir, clean it using a sponge, then fill it and put it back in place.
- At the end of this cycle, the pictogram flashes.
The 1st rinse cycle: approximately 6 minutes
- Press START (G)
- The pictogram stops flashing.
- Empty the container and the drip tray and put them back in place.
- The pictogram 山 flashes.
The 2nd rinse cycle: approximately 6 minutes
- Press the START (start)
- The pictogram stops flashing.
- Empty the container, the drip tray and put them back in place.
D escaling is complete; the coffee recipe menu appears, and you may again use your machine..

Important: if you turn off or unplug your machine during descending or in the event of a power failure, the descending program will start again at the step under way during the incident. It will not be possible to postpone this operation; this is compulsory in order to rinse the water circuit. Properly perform the entire cleaning program to eliminate any trace of descending product harmful to health.
OTHER FUNCTIONS
- To access the machine's other functions, press the settings and maintenance button
- To go from one function to another, use the navigation key
- To modify the values, you must use the keys - + .
- To exit the settings and maintenance menu, press the settings and maintenance button
Maintenance
| To start a rinse of the coffee outlet circuit for optimal hygiene. | |
| To start a cleaning of the coffee circuit to eliminate greasy deposits and coffee residues. | |
| To start a descending of the water circuit to combat limescale. | |
| For the set-up and priming of your Claris Aqua Filter System filter cartridge. |
Settings
| Enables you to set your water hardness at a value between 0 and 4 by pressing the keys ⋅. See Water hardness below. | |
| Enables you to activate or deactivate automatic rinsing each time the machine is switched on. Press the start/stop key ⋅ to activate and the key ⋅ to deactivate. | |
| Enables you to choose the period of non-use after which your appliance will stop automatically, from 15 to 120 minutes, by pressing the keys ⋅. | |
| Enables you to adjust the temperature of your coffee by pressing the keys ⋅, 3 levels available. |
Switching off
You may stop your appliance at any time. While the appliance is stopped, it produces a double beep and OFF is displayed on-screen.
The appliance has received your request and will stop as soon as possible.
PROBLEMS AND CORRECTIVE MEASURES

If one of the problems listed in the table persists, contact the KRUPS customer service department.
| OPERATION | The appliance does not turn on after pressing the Start/Stop key. | Turn off and unplug the machine, remove the filter cartridge; wait 20 seconds and restart the machine. Check that the plug of the electrical cord is properly pushed into the outlet |
| The logo \(\ddagger\)is displayed | Unplug the appliance for 20 seconds, remove the Claris Aqua Filter System cartridge if applicable, then put it back into service. | |
| A power outage occurred during a cycle. | The appliance automatically resets itself when its switches on again and is ready for a new cycle. If the power outage takes place during a cleaning or descaling cycle, the machine will continue the cycle at the step under way during the incident. | |
| The appliance is operating, but no liquid comes out. | Check that the water reservoir is properly in place and that the cord is not jammed between the body of the appliance and the water reservoir. | |
| USE | The grinder produces an abnormal noise. | Foreign bodies are present in the grinder. |
| There is some water or coffee under the appliance. | The drip tray has overflowed: empty it and clean the coffee grounds collector tray. Check the proper positioning of the drip tray. Do not remove the reservoir before the end of the cycle. | |
| The appliance did not output any coffee. | An incident was detected during preparation. The appliance has automatically reset itself and is ready for a new cycle. | |
| You used ground coffee instead of coffee beans. | Using your vacuum cleaner, vacuum the pre-ground coffee contained in the bean reservoir. | |
| The grind fineness setting knob is hard to turn. | An incident was detected during preparation. The appliance has automatically reset itself and is ready for a new cycle. | |
| Some water or steam abnormally comes out of the steam nozzle. | Using your vacuum cleaner, vacuum the pre-ground coffee contained in the bean reservoir. | |
| The grind fineness setting knob is hard to turn. | Only modify the setting of the grinder when it is in operation. Foreign bodies are present in the grinder: contact the KRUPS customer service department. | |
| Some water or steam abnormally comes out of the steam nozzle. | In the case of repeated operation, a few drops may flow out of the steam nozzle. | |
| The steam outlet of your cappuccino system seems to be partially or completely blocked. | Start the cappuccino system's rinse cycle to clear out the rest of the deposits. Clean the steam outlet and check that the nozzle hole is not obstructed by milk residues or limescale. Use the cleaning needle if necessary. | |
| Some ground coffee is found in the drip tray. | This occurs in cases where the coffee grounds fall outside of the percolation vat: this maintains the cleanliness of the inside of the machine. | |
| MAINTENANCE | After having emptied the coffee grounds collector tray, the warning message continues to be displayed. | Wait at least 6 seconds before properly reinstalling the coffee grounds collector tray. |
| After having filled the water reservoir, the warning message continues to be displayed on-screen | Check the proper positioning of the reservoir in the appliance. The float in the bottom of the reservoir must move freely. Check the float and unblock it, if necessary. | |
| The machine is not requesting any descaling. | The descaling cycle is requested due to a large number of uses of the steam circuit. | |
| DRINKS | The cappuccino system is not drawing up any milk. The cappuccino system produces little to no foam. | Check that the system is properly assembled. Check that the setting knob is on the CAPPUCCINO position. Check that the steam outlet is not blocked. Check that the flexible tube is not obstructed or pierced and that it is properly fitted into the cassette so as to avoid any air intake. Check that the milk suction tube is properly immersed in the milk. Rinse and clean the system (see corresponding chapter). For milk-based preparations: we recommend using recently opened fresh, pasteurised or UHT milk. It is also recommended to use a cold container. |
| The coffee flows too slowly or does not flow at all. | Turn the grind fineness button to the right to obtain a coarser grind (may depend on the type of coffee bean used). Perform one or several rinse cycles. Run a damp sponge under the coffee outlet. | |
| The espresso or coffee is not hot enough. | Change the coffee temperature setting . Heat the cups by rinsing them under hot water. | |
| The coffee is too light or not full-flavoured enough. | Check that the coffee bean reservoir contains coffee and that it is flowing properly. Avoid using oily, caramelised or flavoured coffee. Reduce the volume of coffee using the + and - buttons. Turn the grind fineness knob to the left to obtain a finer grind. Make your preparation in two cycles by using the 2-cup function. | |
| The coffee is too acidic | The infusion temperature is too low The water is too acidic | |
| The coffee is too bitter | The infusion temperature is too high The level of grinding is too fine The water is too hard | |
| The coffee has little aroma | The infusion temperature is too low The ground coffee is too old The grind is too coarse The water is too soft/alkaline | |
| The coffee has no body | The infusion temperature is too low The ground coffee is too old The grind is too coarse The water is too soft/alkaline | |
| The coffee is not very creamy. | Turn the grind fineness knob to the left for a finer grind (may depend on the type of coffee used). Change the Aqua Filter System cartridge (follow the installation procedure on page 3). Perform one or several rinse cycles. | |
| The cappuccino foam is too liquid | Use fresh (3/5C°), UHT or whole milk. Check that the milk pot and the tube are not obstructed |
Here are some recipes to make:
Café crème
Prepare a lungo in a large cup, sweeten it and then pour in thick cream. For even more luxuriousness add chocolate chips.
Moka
Run a cappuccino, sprinkle the milk foam with a teaspoon of cocoa and finally cover with whipped cream
Coffee Smoothie
For a luxurious breakfast, mix a natural yoghurt with an espresso. To soften add 1 teaspoon of liquid honey, then depending on the season, add a banana or a peach to make the smoothie more creamy.
Café Viennois
Make yourself a double espresso or doppio, sweetened, and then cover it with a generous layer of whipped cream. Those looking for something more luxurious can sprinkle with a teaspoon of cocoa and/or add chocolate sprinkles.

medium (Light French)

lang (Brune)


BESCHRIJVING VAN HET APPARAAT

Medium (Light French)

Lang (Brune)

Middels (Light French)

Lang (Brune)
Justering av kaffeuttaket (10)
GENERELT VEDLIKEHOLD
Uftöring av korrekt vedlikehold vil forlenge levetiden til maskinen og bevare den autentiske kaffesmaken.
-1 KRUPS-rengjoringstablett
- 1 beholder (minimum 600ml )
K Start/stopp- knapp
K Start/stop-painike
L Reseptin valintapainike

Media (Light French)

Larga (Brune)

Intermedia (Light French)

Lunga (Brune)

Média (Light French)

Longa (Brune)
PROBLEMAS E AÇÜES CORRETTIVAS

Eis as receitas a preparar:
Café crème
EvapEnTncnapaokeuuc(yia1n2kouneC):
- Pntto To koumi Eiloyic ovTuayw (11) mexvi a eavioi te to ekovidio
- Θα εμφανισει to Μενού συντayων καρέ.
- TOnoTeTnOte 1 n 2 KouteKATw anTo tic Edooc Kape. Mtopeite va xaunlambdae tva avuwoote tic Edooc Kaape avaloya me To meyEooC nou exi n Kouna (10).
PpOoWNIkEc EINIOyEc
Evtaon
Cisticicycllus:cca13 minut

Kozepes (Light French)

Hosszú (Brune)
PROBLEMY I DZIALANIA NAPRAWCZE

3 EMKOCtB Jnra MoNoka
R Kpbilka
S Pbyar 6JIOKINPOBKN
T Khonka Bb6opa «KANUYUNHOOCTKA»
U I6Ka Tpy6Ka IJI NOaun MoLouHoi NeHKN
V Pa3bemna Kacceta n3 3eTanei
W KOnTeHep
X OTrBepTne IJn BbIXOda npa
IIOIROTOBKA K PABOTE YCTAHOBKA IPIPUEOPA

Onachoctb:ПодключITE npi6op K 3a3eMJIeHNo pO3eTke эЛКТрчecко сeTu 230 B.ВnpOTnBHom cIyae bIpyckyeTe nolyuHTb CMeptelhBiIe TpaMbIOT eKTPruYeCTBa!
CleyuTe Hnctpykunm no texhne 6e3oNaChOCTN B 6yKneT e "HnfoMaun o 6e3oNaChOCTn".
Ioprotobka yctpoicTba
He 3a6ydbte yctahOBnTB noDIOH dIra c6op aKaenb BO n36exKaHne 3aqr3HeHna pa6oey nobepxHOCTn n noyuHnO xKorOB BblTeKaIoUeI OTpa60TaHHoB Vdoi. (E)
IoproTOBka KofoemOJKN: n3MeHeHne CTeneHn TOHKoCTn NOMOA (9)
Kpeoctb Kofo MoKHO peRyIINPOBaTb, n3MeHnA CTeIeHb NOMOla KofoeHbIX 3epeH. Yem TohIe NOMOJI, TEm BblIe KpeoocTb Kofo e I rUeIe NeHa Ka. BnI nCnOJb3yEmo Ro Kofo MeKOT TaXke BInraTb Ha peZylbTaT.
PekomeHnyem CBepxTOHKn NOMON dIy pncptpTo, TOHKN — nIy 3cnpecco n 6Oone rpy6bl — nIyHro.
Iopadok perynipobkn cTeeneHn nomona:

CpeDnra (Light French)

Диltelьнаг (Brune)


PeryunpoBka o6bema Kofoe (10)
IЯ BCex npednaeMbIX HAnITKOB MOxHOb YMeHbUnTb IIN YBeJIuNtB ObEB M 3aBcIMOCTn OT BbcOTb YaWeK.
OctahOBka npuroTOBHeHnHaHNTKa
UcpoCTBO NO3BONAEI npiroTOBnTb OJHOOBpeMeHNO DBe YauKNI HAHTKa. OyHKJIa npiroTOBneHn IByX HAIITKOB DOCTUYHa TOnbKO JnrepeNTOB KoOe C Bb6Opom 2uAweK [O] KOrDa BblNoHnReTc HAcTPOJa HAHTKOB.
3anyc npoceypbipnpiroTOBleHna 1 nnn 2 yawkn):
- YdepKnBaIte KhoNkY BbIbOpa peIeNTa (11), nOka He 3aRopITc8 3NaOHOK
- OTo6pa3ntcMeHIO peuNTa KoFe.
-Посавп Te NOД OТВЕРСТЕ ДЯ NOДачи Koф e 1 ИИ N 2ЧашК. Tpyбк ДЯ NOДачи Koф можно ONуСkaT b ИИ NOДнIMaT b B 3aBcIMOCTN OT BbICOTb ChSkn (10).
HnBuaJbHbIe HaCTpoKu
KpenocTB
- Bb6epnTe cTeenHb KpeoNtKofoe (OTobpaKaetaCHa 3KpaHe B VnDE KofoeHbIX 3epeH B KBaDpaTHbIX cO6kax)[00], yBemuBae ee KHONKO «++» and UMeHbJaa KHONKO «-». [12]
06bem
- Hαmte Ha KhONky HauBauaicn √ДЯ nepexoJa K hactpoKe oBemaHaHNTka.
- Bb6epntepe6yembl o6bem [120] c nOMOuBIO KHOJOK «+» uNII «-» (13).
KoImueCTBo qaewek
- Hajmnte Ha Khojny Habiruau nI dny nepexoJa K hactpoKe konuectBa uaeK.
- Bb6epnTe 1 nIin 2 uAsKIn [ ] c NOMOoiBIO KHOIOnK «+» IINI «-» (14).
EcN Bblb6epete 2 uakn, yctpoictBO aTOMaTueeKn bblnoHNT 2 nohblx uKla nprirotobHeHn Kofe.
- HαmMTe Ha KhONkY «CTAPT» (15).
MoXHO B IIO6O MOMeHT U3MeHNTb O6bem HAINTKa C NOMOUIK KOHIOK «+» JIIN «-» (1+).
TTo6bI OCTaHOBNTb NOpau Hy HauNTka B YauKU, HauKMte KhoNkY «CTAPT/CTOП» (100.
Takke moxho n3meHnTb temepaTy pkofo, haxab Ha KHONky HAcToPkn N o6cnykBaHna 3atem BbI6paB C nOMOsbIO KhONKn HABrAunn 3NaOH U yCTAHOBu Tpe6yEmbl ypOBeHb TemepaTyb KHONkAmu
BHMAHNE! B CJUYAE IPEPBIBAHN IPIIOTOBJEHNA HAPNTKA OCTAHOBKA HE IPOICXOINT MTHOBEHNO.
B 3aBcMocTn OT HauNTka MoKHO I3MeHnTb CTeHb NOMOA KoFeHbIX 3epeH, cM. pa3dEe «IPEEd HauAIONPINrTOBJIeHnH HApNTkOB. BAXHbIE YKA3AHNIA.
CoxpaheHneBn36paHHoe
Iocne 3aBepseHnnpiroTOBHeHnHaHNTKa Bbl MoKeTe coXpaHb ero Bn36paHHoe.
ДялэТоуногинмite 1 pa3 Na KhoNkUdo6aBleHnBu 36paHnOe () nocTe 3abepWeHnNoaHnHaNTKa, yTObI coxpaHnTb 36paHHbI HAnITOK KaK «A» , nIIu 2 pa3a, yTObI coxpaHnTb KaK «B» .
Iopno6hee cm. B pa3dene «COXPAHEHIE BV3bPAHHOE»
ПИГOTOBЛЕнгЕ KANYUMHO
Ппмочанne: пи Кадом HOВOM ПпгOTOBLEHIM HaNTka yCTpoiCTBO yuHTbIbaeT hAcToPIKn NocJeHero пngroTOBLeHHORO HaNTka.
Длп пolyчесни peнки b6оee bblcOKO kaueCTBa peKOMeHdyeTcN cNoIb3OBaTb TOnbKO yTO OTKpbIToe CBexkee nactepn3OBaHHoe mIn yIbtpanacTepeu3OBaHHoe MONOk (4-5°C).ПрИncPONb3OBaHHn cIporo MONoka He rapaHTnpyETc ONtIMaJIbHbI pe3yIbTaT.
3tanbl npriroTOBJeHnHaNTka:
IBAXHO! PeKoMeHnDyeTc npOMbIbTaB BCE DeTaJIeMkoCTN UcHToB BODoJ.
3Tn dTaHn He npedHa3HaueHb IyraMbItb B NOcydmoeHou MaHHe.
- BbInbTe rI6KyIO ty6Ky I3 OTBepCTnHa EMKoCTn I3 OTBepCTnNoaHn HauITka (37)
-Pa36IoknpyTe eMKoCTb nla MoJOKa, noHnB pUayr 6IoknpoBKn (38)
-ПеревдenteКнонкуВположенке《ИСТKA》H: (39)
-BbIhTe kaccety (40)
-ИЗВЕКИTEе,notЯнвзакну рекиma «КанунHo/ИСТka»(41) - BbHbTe uehbl CnNkoHObbl KOpnyc KaCCeTbI (42)
- Otkpytnte hakoheuHk OTBepCTnA DnA BbIXOda npa (43), npoHcTnte erO C nOMoUIO npedHa3NaueHNoI DnA 3TOrO ngJIbl (44)
-Tenepb emkoctb dIy MONoka nonHoctbu pa3o6paHa.
-ПомоITE BCE элемпы Теллои ВОДои (45)
-ПорсушпЕ ВСЕ ЗЛЕМЕТbl. - YctaHOBITE 3JIEMENTbHa MeCTO (46) (YTO6bI IpaBnIbHo BCTaBtB KONKy, YCTaHOBITE ee B NIOJoxHeNc «HicSTKa»
- BCTaBbTe KacCeTy B KpbIuKy EMKOCTN (47)
PporpaMaMa YnCTKn: npn6n. 13 MNHyT
OuNCTka KOeHOro KOHtpya N3BOnIeT ydAJIbTa pa3NIuHbIe 3aRpa3HeHn, OTIOKeHn Jkpu, YTO6bl COxpaHbT abPOMaTb HAnITKOB.
Korda BbIOnHЯTb npOeDpy?
-KaKdIbIe Tprn Meca.
-KoTnHa yCTPOINCTBE BbICBEnBaETc3HaOK

Baxho! BbI He o63aHbI 3anyckaTb nporpaMMy OunchTk ncp3ay Nocne TOrO, KaK yctpoiCTBO npouHΦopMpyeT Bac o Heo6xOIMOCSTn ee npOBeEHN, ODAKO NOCTapaiTeCb npOBeCTu 3Ty npoueDpy KAK MOXHO b6tpee. Ecn I npoueCC OunchTk OTknaDbIbaETc, COOTBeTCTBvUoHm 3HaOH Kdyet BbcBeeNBatcbdo Tex nop, noka He 6ydet npOBeEHDo OHCTKa.
OuICTky peKOMeHnyETc BblIOJIbTb B cIeJx ydaJIeHn JmPbIX 3aRpa3HeHn n CoXpaHEHn ONTMaJIbHbIX apOMaTOB HApNTKOB.
IporpamMa OUcNtKn BbIpOJIHЯeTcB IIpepbIBnCTOM pexIme, He IOnHOCHTe pyKn IOn OTBepCTn IOnaCh KoΦe BO BpeMn BbIpOJIHeHn OUcNTKn.
Korda noarBtca 3aHcOK ,MOKHO 3anyckaTb nporpaMMy ONUCTK:
- Hαmnte Ha KhoNkY hAcToPouKn U o6CnyKuBaHnA
-у6eДИТСБ,чTO Bыбразн 3ачОК 8 δ,B pOTOBHOM CnUyae IcNOnJIb3aYIte KHOHOKI YHABINaIIM
-3Haoyok Mmraet.
LcklOuNCTkn: npn6n.10 mnuHT
-ПоднIMITEpeWeTkyДЯпраЗMuSeHЯЧаseK(J).
- BCTaBbTe ouHcTnTeIbHyTo Ta6NeTky KRUPS B npEHa3HaueHHoe dI Hee OTBepctne (I).
-HaIeTe Bpe3epByap BOy DO MaKcIMMaJIbHOro yPOBn-1,7JI (2).
- Onopoxhnte kohteynep dIa OTPa6oTaHoro Kofoe IIOdoOn dIra c6opa Kaenb (34, 35, 36).
-Пометichte поотberгстя заюдуки кофи вьхда па epokoctb obbeMOM 600 m7.
-HaKmTe Ha KhoNky CTAPT
-3NaOH HauHET ropeb HenpepbBHO.
- Hauhetaepbby 3tan uikla ounctkn.
-ПО OKOHУанн ИКЛа 3нaуOK [H aHET Mnrgatb.
- Onopokhne KOHTHeP, noDOnH dJe c6Opa KaTeNb y UcTaHOBnTe uX Ha MeCTO.
Lukn npombyk: npu6n.3 MmHytbi
-HaKMTeHa KhoNkY《CTAPT》
-3NaOH HauHET ropeb HenpepbBHO.
-По Okohaannu zukla onopoxknte KOHTeHep npoDOn dЯсбopa kaneь (34, 35, 36).
- YctaHOBITE NOIDOH dIa c6opa Kaenb Ha MeCTO.
LcKlOuHCTKn 3aBepWeH,Ha 3KpaHe NpOBITcA MeHIO peCenTob KoΦe,Tepeb Bbl MoKeTe NpIb3ObaTbcr yCTpoiCTBOM,KaK O6bIHO.

Baxho! Ecn B xode npoBeEHH ONUCTKN Bb BYkIIOUHTe UCTBO NnnpOn3OJET OTKIOUHHe NITAHN, npOrpAmma ONUCTKN BO3O6HOBITc H a TOM 3Tane, H KOTOPOM OHa npEBPBAJcB. HeOBMOxH OTOJXHTb 3Ty npOeDpyu nocJe ee hauJa, Ta KaK OHa AIBTcER o63aTeBHO Jn pOmbIKBn BO4HORO KOHTypa. B 3ToM cUYae Heo6XoHMo IcNoB3OaBT HOBYU Ta6JIeTK dnn ONUCTKN PpaBInhOE BbINONHEHne npOeDpyb IONUCTKN NOMaet YdAnITb BCE BpeHbIe Jn 3DOPOB8A pnoyKTb ONUCTKn.
Iporpamma oucnctkn ot hakinn: npn6n.20 mnyT
OuICTka yctpoictbTa oHaKnPiNs oecneuBaet ero npabInbHyU pa6Ot u yaIaIe Tce OTIOKeHna KaIbIa IIN HaKnPiN, KOTOpBle MOrYT BJIraTb Ha BKyc KoIe.
Yactota BbInOpHeHn DaHHoI npOeDpyb3aBcNt OT KaueCTBa NcPOnb3yEmoB BoBi n HauNnHa fInbTp a Claris Aqua Filter System. Yem BblSe copejXaHne KalbZuB B BOe, Tem WaSe cLeDeYET BbInOpHbTb ONUCTKy OT HauNn.

Baxho! Ipeed nauom uKna Ouchknt Ot haknni oToeDHNte emKoctb dJa MoLoKa (37) n3BneKeHte fInbtp Claris Aqua Filter System, eCNI OHN 6bln paHee yCTaHOBNeHbI.
Korda BbIOnHЯTb npOeDpy?
-KaKdbIe Tpu Mecaua.
-KordaHa yctpoiCTBe BbICBeynBaETc3HaYOK

Baxho! Bb He o63aHb 3aNyckatb nporpaMMy OuchTKn OT haknncpca3y nocle TOR, KaK yctpoCTBO npoHfOpMpyet bac O He6xOuIMoc7e npoBeDEHn, OndaKo NocapaiTeB npoBeCtN 3Ty npoEduPy KAK moXHO 6bIcTpe. Ecn npoCecc OuchTkn OT haknnc OTknaDbBaetc, COOTBeTcByUoHm 3Haouk 6dET BbcBueBaTbCdo Tex nop, noka He 6dET npoBeDeHa OuchTKn.
PekomeHnyetcBbIPOJIHrTbOChCTkyOTHaKINB CJIeXyDJIeHnBCEX OTIOKeHn KaJIbUry HAKINN, KOToPbIE MOrYT BmIyTa HbKyc Kofe.
Iporpamma YnCTKNOT HAKINB BYINONHARETCB INpepbIBNCTOM pexime, He NODHOCITE pykn IOD OTBepCTne BbIXOda npa.
Korda noarBtca 3naQOK ,MOKHO 3anyckaTb npOrpaMMy OunchkI:
- Hαχmite Na Khoπky HactpoKи ngcnyxmbaHn
-86eIHTcB, YTO Bb6pAH 3aOHOK , B nPOTIBHOM cJyae iCnOJIb3yIte KHOINKJY HABINaIIM
-3Haoyok Muraet.
Lukl oucntkn OTHAKnnn: npn6n.8 MmhyT
-HaONHHTeEMKoCTbBOOJDOOTMETKN《CALC》.
-Добавытунистуессдъво KRUPS.
-Помecntte IOI OTBepTnДЯ ПОДЧИ KOфe N BbIXOda napa emKocstb obemom 600 mI.
-HaKMTeHaKHONky《CTAPT》
-3NaOH HauHET ropeb HenpepbBHO.
- Onopokhnte KOthHePepoDOnIa c6opa Kaenb u yctahOBnTe Hs Ha MeCTO.
-Почисте pezeервардя Вобь сnomошьу rбки,нанолнитe erо BODОи уctahOBHTe ha MeCTO.
-ПО OkOHuaHnI ZIknla 3HaYOK HauHET MnIaTb.
IepBbI zukn npomblkN: np6n. 6 mHyT
- HαmMITE ha KhoNkγ (CTAPT)
-3NaOH HauHET ropeb HenpepbBHO. - Onopokhnte KohteyHep, noDOnn dIa c6opa kaIeNb uYCTaHOBtE IN HA MeCTo.
-3HaOK Muraet.
Btopo uKn npombbKn: np6n. 6 mHyT
- HαmMITE ha KhoNky «CTAPT»
-3NaOH HauHET ropeb HenpepbBHO. - Onopokhnte KOthHePepoDOnIa c6opa Kaenb u yctahOBnTe Hs Ha MeCTO.
OuICTka OT haKINn 3aBepheHa, Ha 3kpaHe IIOABITcMeHIO peIeNTOB KoIe, TeIepb Bbl MOKeTe NJIb3OBAbCra YCTPOINCTBOM, KAK O6bIHO.

Baxho! EcIn B Xode OuchCTKN OT hKnINB bbl BbIKIOHTe YcTPOCTBO INI npOn3OJeT OKIIOUEHne NITAHN, npOrpAmma OuchTKN OT hKnIN BO3OBHOBNTC Ha TOM 3Tane, Ha KOTOPOM OHa IpePBaNcB. Heo3MOXHO OTNOJNTb 3Ty npOeDpyu nocle ee Hauana, TAK KaK OHa AIBaETCn OB3aTeJIbHOd IpnOpMbIKN BOJHOrO KOHTypa. PpaBnHoe BblONHeHne npOeDpybI OuchKTN OT hKnIN NOMORAet YdaJIbNb BCE BpeHbIe Idn 3doPobBb OTINOJEHn HAcNI.
DpyrmeOyHKLINN
-Длгпоресда К другм Функцяам усточьmaнocлььуITE коньк hyастори и обслuyжваня
-Длга nepexoda мжду ФункцямИнспьзүхонку habиагци ( -
-ДИАИЗМЕHENHAЗЧЕНСЛЕДУТИСПОЛБ3OBaTB KHOПКI 1
-Дявьхаяи MeHIO NaCTPOIKNu IOBcIyKINBaHnIa HaNKMITE Ha KHNky NaCTPOIKNu IObClyKINBaHnI
06cnyxmbHne

Длэзуcke npombykki kOHTypa Kofoe b cêяnx PoIdepjazHn rIgneHnuecko ChCTOTbI.
R KpnuKa
S Baxjib 6IokyBaHHa
T KhoNka Bn6bOpy CAPPUCCINO/CLEAN (KanyuHNO/OuHcENHa)
U UlnaHr dny moJouHoI niHN
V 3HIMHa Kaceta 3 wT.
W EMHiCTb
X PapOBe conno
ПИДГOTOBКДО POБOTN BCTAHOBJIENHЯ ПИЛАДY

06epexno!PiiknloHt npicpti do po3etkn 230 B i3aemleHHaM. B iHOMy Bnpanky Bam 3arpoxyoB cmeptbHi TpaBMn Ype3 HauBHicTb eKeTpKIn!
Dotpmytecb ihtpykui 13 texhikn 6e3nekn B 6yklerti "Inphiopmaiz npo 6e3neky".
Onnc npnna
306 3a7b60n68iTn 3ab6pydneHHIO p6oohOIO NOBepxHt Ta pnsuKy OTPMaHNN OpiKIB rapaQIO BOOIO, 0o MoKe nITkAeTn 3 npicpOIO, He 3a6yBaIte BCTAHOBIIOBATn NiDOn DnI KpaneJIb. (E)
-BnIMiBt i 3anOBHItb pe3epByap IJRA BOIN Ta BCTaHOBITb NOrO Ha Micue. (1-2)
- 3HimItb KpiuKy 3 NOTka dIJI KABOBx 3epeH, 3acnITe 3epHa KaBn Ta 3akpniTe KpnuKy. (3)
Nepwe BnKOpncTahnn
- Ybimkhntb npnla, nikknHouBun noo do po3eKn.
- HATNCiTb Ha KhoNkY «Пуск/СтOn» (4).
- KabomauHa BnKohye nonepedH HarpibAHHa, HapnkiHcI zHKly 6JIIMaOTb nIKTOrpaM I i press start PRESS START (HaTNCITb «Tysck»).
-Помісітів EMHICt bO6'EMOM npHauMHi 600 MM nID cOnla对阵BuxOу kABu i napu Ta HATNCHITb KONkY «ПуСК/CTon» (7). - KabomamaHa 3aynckaetbca Ta npomBae ripabniH KoHTpyn (kABu Ta napi) npotraom npin6n3No 2 xBnIH.
- HanpiKiuHci ziKJy BiOobpaKaæTbCMeHIOpeIeNTiB KaBn (8).
UctahOBJIeHHa KapTpuaB npiucrpi: npodaetbca OkpeMo
Mn peKoMeHdyeMo BvKnOpriCTOBByBatn fiNbIpyBaJIbHnn KApTpiJxk Claris Aqua Filter System, 06B VdAaNTu Bci cNi xLnpy Ta BAnHky. BiN o6mExy eYTBOpEHHaKInNy ta 3a6e3neUe IOBROiHicTb KaBOMaunHn. BvKnOpIcTaHn y bOro kApTpiJxg rapaHTye CMAChHy KaBy.
ДяВСТАНБЛЕнHЯВAM3HAДОБNTбс:
-1 KaptpnIXK φinbTpa
-1EMHictb 06'EMOM npnHaMHi 600 M
Ybara!Длп npabInbHoro ΦункioHyBaHHа Kaptrpua φиьтpa 3aBxdi nOToPmMyTeCn npoceDpyn Ioro BCTaHOBJIeHHa.
- YctahOBit bDaty, noBepHyBw n cipe KInbue Ha BepXhBomy KpaI KapTpniJka (5).
- 3akpytib KaptpnIx y pe3epByapi dlya BOni (6).
- Hatinchitb KHONky perynioBaHHa Ta o6cnyroByaHHa
-Пiktordpami i press start 6nIMaHTb.
-Пiktorpami i press start PRESS START 6JIIMAMOTb.
-Пoctabe Emhictb 6'Emom 600 m n iД conna Дя вихочу Kabи (7).
- HatnchItb KHonKy 3anucky (7), nouchtecbr cnkn 3anycy.
KoIbTaHOBnEHHaipbTyBaIbHOrO KapTpuaJx3aBepuHo, 3'ABJIeTbCmEHO peueNTIB KABN, I BV MoKeTe 3HOBy BIKOpNCTOBByATn npICrpi (8).
KopctkictbBoDn
Jokctkictb BODn - ue Bucoka KOHcHTpaqij MHepaniB, 3OKpema KaIbciio, JyKn BiDnOBiAc 3a fOpmyBaHHaHKny. Uo6 yHNKHyTn HAKOnuYeHn HAKIny B KabOMaunHi, AKe MoTe CnpuHnHTn HeCnpabHicTB a60 3mHNTn CMAK KABN, Heo6xIdHO hanaatbyatn KabOMaunHy BiINobiDn DO JoKpCTKOCTI BODn, BiD 0 do 4.
Ipeed nepuIM BnKOpncTahHm dIg TOrO, 06 HalaTuBaTn KabOMaunHy, Bu3HaUte JopcTkicTb Bodn 3a DOnomorOIO naHnckn dIra TecTy Ha pH:
- Haji Te Body BCKJHky
-3aHypTe nannky
-3auekaeTe 1xbuniny,io6 otpmaTn pe3yIbTaT
TakoX MOxHa 3BepHyTnCЯ DO CBORO NOCTaaybHnKa BODN.
PNEPeI PNIIGOTYBAHHHMAHIOIB BAXJIIB I BKA3IBKIN
KabomauHa nponoHye nonepedHbO BCTaHOBnHei HanoI dJe OTpMaHHa ONTmAbhnx pe3yIbTaTIB. Odnak BN MoKeTe nepcoHai3yBaTu Kaby I BnInHyTu Ha pe3yIbTaT y aushi.
Пиготовka млинka: PerynioBaHHToHKOci nOmeNy (9)
Bn mojete BvdpeyIIOBAtu MiHicItb Kabu, peYIIOUOn ToHKcTb Nmely KaBOHX 3epeH: 10To TOnHe NmEn, To Kaba MiHiHa i 6IbI KpemOnoI6Ha. TIN BIKOpNCTOByBaHO Kabu TAKOX MOJE BIIHNHTn Ha pe3yIbTAT.
Mn pekomehdyemO duke Tohkn nomen dIa pncpto,Tohkn dJe epcno i rpybiu nn IyHro.
Ic6 BiDpeRyIOBAtn CTyniHb ToHKoCTi nOmeNy:

cepeDnE (Light French)

Dobre (Brune)
- OTPmaTn 6iIbIa 6O MeHApOMaTHy iMiUHy KabY bAaUi.

PerylloBaHHa conla BuxOdy KaBn (10)
IpyBaHnBcix 3anpOHOBAHnx HanoB BV MoKeTe onyCTTu Ta niDnTn CoNla BnXoY KabN BiDnOBiDNo Do po3mipy qaok.
PpnnnHeHH noToCHOro npuroTyBaHH HanoIO
Bn mojke TnpinHHT npiroTOyBaHHa B 6yDa-kynn Cac,HaTnCHyBn KNhKny «Ipyck/CTOn»
Koln zukn nepeepuBaETcB, 3ynHkne B ViD6yBaETbc HeraHNo. KabomauHa 6yde Deekn Yac HeoctynHOIO.
PnurotybaHHaDboxaHok
Pnncpii dae 3mory roTybaTn DbI yauKn OndHouacHo. FyHKJia nprirotybaHHa DBOX yaWok DocTyHnHa Nlue dnerpecenttib Kabn . Bn6epitb 2 uawkn [ ] niD cac HalaawTybaHHa Hanoib.
PUNIROTYBAHNA HANOIB
| PEÇEPTTI KABN | Можлова Кількісты чашok | Рекомендовani наразуваши Об'EMS (10 мл на 10 мл) | Можлени наразуваши Miцпісты |
| РИСТРЕТо | 1 | 20-30 мл | 1-3 зерна |
| 2 | 2x 20-30 мл 3a дваartzкели | ||
| ECПЕССо | 1 | 30-70 мл | 1-3 зерна |
| 2 | 2x 30-70 мл 3a дваartzкели | ||
| ЛУНГо | 1 | 80-180 мл | 1-3 зерна |
| 2 | 2x 80-1800 мл 3a дваartzкели | ||
| КАПУСHО | 1 | 60-100 мл | 1-3 зерна |
ПИГOTУBAHHЯ ECNPECO, PMCTPETO TA JIYHRO
3BepHitb yBary: nID cak KOxHoro 3anycky npiroToYbaHHa HanoIO KabOMaunHa BpaxOByBaTmE HanaHTyBaHHo OCTaHHbOrOpnpiroTOBaHoro HanoIO.
Pncpteto 3 miuHm Ta nOtuyHM cMaKOM, ykpuTNI pIHKOI KapaMeNbHO rO KOJIbOpy, o6pe nIXoDITb Ira BaxKnx paKIB. 06 npnroTyBaTu pnCPTeO, Bn6epiB o6'EM 20-30 Ml.
Ecpnc0 3 miuHm CMAKOM i BnpaKeHMM apomatamn BKpntn TPOXn ripkoio kapaMeIbHOIO nIKKOIO. B6epitb 6'em 40-50 mN.
Lynro - ce ecnpco 80 mn, io mictnb 6iNbwe Kofoehny, ane biDyBaetbca nerwe B poti. Dyke iHyetcba BpaHci.
Etann npnrotybaHHa HanoIO:
-Помензерн
- Tpam6yBaHHMaMeHoi KaBn
-Прocоувань.
3anyck npnroTyBaHn (1 a6o 2 caaok):
- HatnckaTe KhoNky Bn6Opy peuente (11),doKNe He bIo6paXaTaMBeTcBna NkTOrpaMa
-BiD06pa3ntb8cMeHIOpeuenteKaBn.
-Посавte 1abo2чашкипд солba вихody кави.Ви можete onуctитиabo piнятс conla bixody kabи Biindobidno do po3mipy qashkn (10).
Pepcohaniaqia
Miuchictb
-Bn6epitb miuHCTb KaBn (no3NaaetcbKa KabOBUMn 3epHaAMn, 0o BiO6paKaIOTBcRa Ha ekpaH B KbaIpaTHnx DyKkax) [O O O] 3a donomoroHO KHONKn +, 0o6 36InbUnTn, a6o -, 0o6 3MeHNtN + , (12)
06'EM
-Hatncitb Habiraiy knabiuy, 06 npeuTn do hanaTuBaHHn o6'Em pecenTa.
-Bn6epitb notpi6HmO6'EM 3a DOIOMORIO KHOONK + a6o - (13).
Kibkictb yawok
- HatnciHb HabirayuHcyabiyu ,io6nepeintn do hanaTuBaHHKaIbKoCTaawok.
-Bn6epitb 1 a6o2aushkn [□]3aDOnOMORIOKHOHOK+ a6o-(14).
Kuio Bn Bn6epete 2 uakn, KabomauHa ABTOMaTHNo BkOHOBtme 2 nobH zuKJIn npriGToYBaHn KaBn.
- HaTnCHiB KhONkY IYCK (15).
Bydb-RAKOI MNTI BN MaTe 3MOry perynIOBaN O6'Em peuENTa 3a donOMoROIO KhONOK +a60 -
Ioo3yunHHTBnTikAAHBAaUKy,HaNTCHiTB KONKpyNCK/CTOIN
Bn TAKO MoKTe HanauTyBaTn Tempeatpy Kabv. IaIy BoTo HATNCiThb KONky HalaTuYBaHHa Ta oClyroBuBAHN a Notim 3a donomoroo HabirauiHoi KhoNkn nepeiditb do i BCTaHOBt b6axahn pibehb Temnepatypn 3a donomoroo KHONO
YBATA! PIPINIHENHHI PIPIOTUYAHH HAIIOIO BIDBYAETBCR HE OJPA3Y.
3aIeJxO BID HANOIO BV MOKeTe 3MInTu TOHKicTb NOMEny KaOBnx 3epeH.ДЯ ZbOrO dN.B. po3dIN «IPEED IPIIOTYBAHHrM HANOIB: BAXJIINBI BKA3IBKN|.
36epexeHHBnOdoanb
Picra npirotoybaHHa HANOIO Bm MaTe 36epeTn Noro B ynooobahnx.
Дяцього habрики витikанг haioю haTCHiB 1 pa3 KhoNky BnoO6aHb , zu6 Bn6paTn BnoO6aHHA A a6o 2 pa3n, zu6 Bn6paTn BnoO6aHHA B
3BepHitb yBary: nID cak KOxHoro 3anycky npiroToYbaHHa HanoIO KabOMaunHa BpaxOByBaTmE HanaHTyBaHHo OCTaHHbOROpnpiroTOBaHoro HanoIO.
Дя OTримання як ho iNiH Mn peKoMHyEM BoKOpNCTOBYBaTи CBiKe HeDaBHO BiDKnTe npoxoJodne (4-5 °C) NaCTepn3OBAhe a60 yIbtpaNaCTepn3OBAHe MOnIOko. BInkopNCTaHn Cnporo MONoka He 3a6e3neUe ONtIMaHbHorO pezIbTaTy.
Etann npnrotybaHHa HanoIO:
-Попeredнe HarpiBaHЯ KabOMaшин:пд уасці\'e Фазв Ви може вidperуловати ob'\'em MOLOKA B 6yd-якIM MOMENT, BИКОРИСТОВУЮЧ NKHONKU + Ta -
-Фa3a CnIHIOBaHHM MONOKa
- BvtikaHnKaBn: niz uac zuiei fa3n Bu MoKeTe BiDperyIIOBaTn 06'EM KaBn B 6yDb-RAKNI MOMENT, BVKOPICTOBYUOHN KHOPIK + Ta -
3anyck npuroTybaHHa
Дяпегсаніцій кanyунно KBOMашина дæ 3MORY Bn6paTи pi3hi 6'EMN MONOKA та KBAN BiID nobiDNo Do BAuxn no6axhaB.
- Hatnckaite KhoNkY Bn6bopy pecenTa (17),doKne He bIDobpaKaatmMetbcra nikTOrpama
UctaHOBJIeHHHa npuilaKoTHeHepa IyI MoNOKa
Ipeed nepuHBM BkOpncTaHHm peTeJbHO BmMne KOHTeHep i Ioro deTani.
KoHTeHep dIy MoLOKa cKlaaAeTbc3 nIaCTMaCOBoI EMHocTi (W), KpUshKn (R) 3 KacetoIO (V) Ta rHyUrkO IoJnHaRa (U), Akn 3'EDHyETbc3 OTBOPOM BNTOKY HAnIO 3 npUnaLy.
- HajiInTe B KOHTeHep MOJoka (PpHaMHi 150 mI) (18).
-3aKpInTe NOro KpInuKOIO 3aKpIniTb (19).
-Пдимимь Ваджь крпльно (20). - YctaHOBITb CKJIHKy 3 MONOKOM Ha npinad, 3'EDHABUNIoro 3 OTBOPOM BHXOy napn (21), notim onyctitb Baxijb KpInnen (22).
- BCTABTE rhykni shaHr y npn3naeHn dIy cboO OTbip kaceTn (23), a iHsiN KHeCb 3'edHaIte 3 MarHITHM OTBOPM BVXOy HanoIO (23).
-Пелеверп,ч.Kнога Вибору carrpuccino/clean (калунно/ошиценя) Ha кршік Контейнера дя молoka nepe6yba в положенniВ положенni carrpuccino (калунно) (24).
Nepcohanizauia
Miuchictb
-Bn6epitb notpi6hy miuHicTB, 36iNbBwBn a6o 3MeHNWBm KInbkicTB KaOBnx 3epeh [00] 3a donomoroKHOJOK (25).
06'EMKABN
-ПOTIM HATINCHITb HABIRaIciHny KHNKny 念 ,山OpeiTNdoNotpiBHOKInCeBOrO 06'EmyHaNOIO.BnMOKeTe36InbHHTa3MeHUnTI N06'EM3aDOnOMoROO KHONOK-+ (26).
06'EM MONoka
- I Hapei, Bn MOKTe HalaHTyBaTn Notpi6Hm 06'EM MoNOKa 3a DOMONOHO KHOONOK (27).
-Hatnichitb KhoNkY «Pnyck/CTon» (28).
Ioo3yunHnTn BvtikKaHHB YaAku,HaTNCiBtKhONkny Pync/CTon
Bn Takok Mojete HanaaTyBaTn Temepatpy Kabv.Для сьоно HATNCHITb KONKY HanaaTyBaHHa Ta o6cnyroBbAHNra 8, a nOtim 3a donomoroo Habirauihoi KhoKnpeeJdltb do i BCTaHObitb baxaHni pBeHb Temepatpyra 3a donomoroo KhoNOK -+
YBAIATIPININHEHHIPIFOTYBAHNNHAIOIOBIDSYBAETbCAREOJPA3Y.
-1 Ta6JIeTka dIy uIuIeHnI KRUPS
1EMHICTb 06'EMOM npuHaMHHi 600 M
-1do3a3ac06yDnBnBdAeHnHaKunyKRUPS
-1EMHicb 06'EMOM npHaMHi 600 M
Lckl npoxoantme B tpr etan:
-1 etan ouhienHH
-1-ηetan npommbHHa
-2-η ean npommbaHH
KoNn BnKoHcyBaTn IIO npOrpaMy?
-Pa3Ha KBapTaN.
-Koln npictriip nonepedjae Bac, BiDobpaaxoyni niktorpamy 8

Baxnbo! He 3608'3a3i 3aynckatnporpamy OunuHneHry Opa3y, KOnI npnctpi nnonpocntb npo ce, aene oTpi6HO 3po6n npotrom KOpOTKORO cacy. RaIO BuaaleHna KaINy BiKNaedeHo, NiKTOrpama BiDobpaKaTMetbcra, DOKN onepaio He 6yde bkoHaoH.
PeKOMeHdyETcBnKOHyBaTn BnIaJIeHHa KaNpy dIy cyHeHHa KaNpy BAnHbX BAnHbX BIDKnlaDeHb aBO KaNpy, 1O MoJE BnIINHYTu Ha CMAK KabN.
Iporpama OunueneHn BID hakiny npoxoDntb i3 nepepbamn. 3 ornaHy na ce npotraom 3diicHeHHa iei onepaui 3a6opohreTbca doTopkataoc da cnonla BNxOdy napn.
KoNn iNkTOrpama BiIO6paJaaCtbcB, Bn MoXeTe 3aNyCTITn nporpamy OuHneHHA:
- Hatachitb KhoNky peryIIOBaHnTa o6CnyroBvBaHn
-ipekeKohaiTecA,io niktorpaMA 8 Bn6paba, B iHwOmy pa3i BNkOpncTobyIte KhoNky Habirauii
-Пiktorpama 6nmae.
Lukl BndaJIeHnHaKuny:6m3bko8XBnnH
-3anOBHITb pe3epByap dЯ BODI Do No3HauchKn CALC.
-ДоаиTe Do3y Засовдя Видаленну Нakiny KRUPS.
-ПocTABTe EMHicTb 6'EMOM 600 mN iД солla дя Вихody kabи i napu.
- Hattncitb KhoNkny NyCK
-Пiktorpama bIbO6paXaCTbC8 63nepepeBHO
- CnopoxhHtB emHi b i ndon HJ Kpanelb Ta BCTaHObitb ix Ha Micue.
- Ounchtepe3epByap IJRA BOIN, NOMIte NOrO r6KOIO, HAnOBHITb NOrTo Ta NoCTaBTe Ha3aD HA Micce.
- HanpiKiuHci zuoro uikny niktorpama 6nmae.
1-πnKπ npomBaHn8:6n3bKO 6XBnINH
- Hatnchitb KHONky NYCK
-Пiktorpama bIbO6paXaεTbC8 6e3nepeBBO - CnpoXHItb EMHICTb i niDOn dIg Kpanelb Ta BCTaHOBiT bix Ha Micue.
-Пiktorpama 6nmae.
2-ицклпромьаннг:6n3bko6xbuINH
- Hatncitb KhoNkny NyCK
-Пiktorpama bDio6paXaebTc6e3nepeBbHO - CnpoXHItb EMHICTb i niDOn dIg Kpanelb Ta BCTaHOBiT bix Ha Micue.
KoNn BvndaJIeHNa hakiny 3aBepSeHO, 3'YBIAETbCm EHO peIeNTiB KABN, i BN MoJcTe 3HOBY BvKnOpNCTOByBaTn npncTpi.

Baxnbo! kio BV BmKHe Ta BiDkIouHne pnpnaD BiD mepekni iud cac BuaIaENHa HauNny a6o BiB DkiKIOHTbcB pezylbTaI 36IO pOtoT nEkeTpOmepekni, nporpama cama zanyCTNTbC3 TOrO etany, KOJI CTANOCB BIDKIOUeHN. Lio onepaio hemoxJbnBoi DkIactn, BOHa oob'83KObA 3 npuHn Heo6xIHocti npomBaHNN BoHOrO KOHTpy. PpoBeDEHNOB NOKNy BuaIaENHn HauNpy daE 3Mory BuaIaNTn Bc cnDn 3aco6y dLn BuaIaENHn HauNpy, shKDINBO rOg 3doop8'.
IHUHUYHKU
-Ⅲo6 Otpnmati Doctyn do iHinx yHKzij KabOMaunHH, HATNCHTb KHNky hanaHTyBaHH Ta o6cnyroByBaHH
-Длп néремиени вiodонебиуншьддnoшьвикористову te konhky habirajuli
-ⅢMHTN3HaueHHBKNOPNCOTByTe KHOHKn
-ⅢO6 BmTn 3 MeHIO HanaHTyBaHHa Ta o6CnyroBvBaHHa, HATNCHb KhoNky HanaHTyBaHHa Ta o6CnyroBvBaHHa
06cnyrobyaHHa:

ДяЗуСКУпOMиВаннсСТЕМСонелДЯВИХОуKaBиДЯ ONТIMаьHoi ririEHN.

Stimata clienta, stimate client,

mediie (Light French)

lunga (Brune)
K ByTOH BKJIIOUBaHe/U3KJIIOUBaHe
L BytoH 3a n36op Ha peuentn
M Byton npednoHTAHN
N ByToH HAcTpoKa n PoIdpbJxKa
0 ByTOH CTAP/CTON
P ByTOH+nn-
Q ByTOH3aHaBnRaCua
3 Cby 3a Mnyko
R Kanak
S BLOKIPAJIOCT
Бутон за主题教育 КАПУЧИНО/ПОЧИстBAHE [CAPPUCCINO/CLEAN]
U Mapkyu 3a n3TOBaHe Ha pa3neHeHTo MJIko
V DEMOHTNpyema KaceTa O T 3aCTn
W CbD
X 103a 3a npa
ИЗПОЛ3BAHE HA UРЕДА ИНСТAJИРАЕ HA UРЕДА

Ipeynpexdne: Cbbpke Te ypea KbM 3a3eMeH eeneKtpueckn KOHTaTHa 230 V. B npotmben cnyau pnckybaTe foatalno HapaHbAbe OTOKOB yap!
CnazBaIte HAcOKIne 3a 6e3oNaCHOCT, nocouEn B 6poUypata,"HacOKn 3a 6e3oNaCHOCT".
NoTobKaHa ypea
3aJa He 3ambpcBaTe pa60HTOc cn MraCTo C n3TEKla OTPa60TeHa BOa I da N36eHHe pNCK OT n3rapAHe, He 3a6paBraTe da NOCTaBtte Ha MRACTO TabuKaTa 3a OTceXdahe. (E)
-ИЗвадеTe,наньлесе peзервоара ЗВОДА И Г NOCTABeTe OБpaTHO Ha MЯСТOTO MY. (1-2)
- BdInHHeTe KaNaKa Ha KOHTeHepa 3a KaΦeeHInTe 3bPHa, CINTe KaΦeeHInTe 3bPHa IN BbPHeTe KaNaKa OpaTHo. (3)
PbBOu3nOJ3BaHe
- BkIIOUeTe ypeDa KbM eNEKtpo3axpaHbAHeTO
- Hatnchete 6yToH cTapT/CTon (4)
- Maunnata noqprba, B kpa Ha zukbna nKtorpamnte u nHnDkaTOP hATNCH CTAP PRESS START 3anoCbat da MMraT.
-Пoctabete подюзITEа Kaфеи за napa сьдс ВмectmocT NOHe 600 ml И натус悔Е Клавиш CTapT/CTOn (7). - MaunHata ce 3aJeCTBa u n3nlaKbXuDpaBnuHHTe KpbroBe (kafe u npa) 3a OKOLO 2 MmHyTN.
-BkpaHa zukbna Ce noka3Ba MeHIO peuentn 3a Kafe (8).
HCTaIpaHe Ha ounbPHaTa Kaceta Bypea: PpOdaBa ce OTdElnHO
IpnopobvBame Bn 3n0n3BaHTo Ha fNtbpHa KaceTa Claris Aqua Filter System, 3a da otctpaHnte BcKa cneda ot xnp nInB aboBnK. OrpauHuaBa o6pa3yBaHTo Ha bapOBnK n ocNpyraBa IbIroTpaiHOCT ha BaUata mAsHa. N3noL3BaHTo Ha ta3nKaceta Bn rapAnTupa no-Bkycho Kafe.
3a n3pbIHeHne Ha nHCTaIIpaHTo ige mAte Hxka O:
-1Φnntbphakacet
-1 CbD CBMECTMIOCT NOHE 600 ml
BnmaHne: 3a npabunho 3aedeIcbane Ha Baata PhntbphKaCeta, MoJ, CneBaTe CTpKTHo npoueypata 3a MOHTaK PnBCAO NOCTaBHe.
- HactpoTe DaTaTAta, KaTo 3aBbPTnte CnBnI npbCTeH, HamnpaIc Ce B rOpHnI KpaI Ha KaceTata (5).
- 3aBnTe kaceTaBpe3epBoapa 3a BOda (6)
- Hatachete 6byoH hactpoKn n noaepbXka
-CnomooutaHaKlaBn3aHabnraunna H36epeteNkTOrpamataC
-IMKTOrpamite U INHINKATOP HaTCHN CTAPT PRESS START MIRat.
-ПосравETe CBДС ВмостIMоCT NOHE 600 ml NOДИЗХODINTE 3a KaΦe (7).
- HATINCHETe KnaBnS CTAP (7), 3anOuBa ZnKbNa Ha CTapTnpaHe.
MOHTaKbT Na HINTPbHaTa KaCeta 3aBbPmN, NOABA BaMeHIO CpeeENTn 3a KaFe, MOXeTe OTHOBo Da NOn3BaTe BaaTaMaHHa (8).
TbpbdoCT Ha BObata
TbpyoCTHa BODa TnpctablaBb VBCOKA KOHcHTpaun HA MNHepnn I NO-cneuaHNO Ha KALI, KOTo e OTROBOpEn 3a 6bp3aYBaHTo H a BapOBnK. 3a Da m36erHete Opa3yBaHTo H KAtonkamkb BB Bauata MaunHa, KoTo Moke da hapuHn HeHOTo fHyKnUOnHApHeTo n nn da pa3Baann Bkya Ha BaWte Kafe, Bne TpRbda Na hactpoNTe Bauata MaunHa b 3abncmOCT o TBpyoCTHa BODaT, KOTo No3BaTe, B dnuana3OHa ot 0 do 4.
Ipeeni 1Ba ynoptpe6a n3a maokete da hactponte Baata MaunHa, onpeeneleTe TBbPocTt Ha BODaTa, KOrTo I3non3BaTe c nomouna ha pH teT leNTa:
- HatoyeTe yaaBoda
-Notonete Tect IeHTata
-ИЗчakайтЕ 1 минут,a за отугете peztултata
Moxete da ce obpheTe n KbM MeCTHaTb BuK KompaHna.
Iopno6hctn 3a KnaocBeTe Ue Hamepnte B doHaTa Ta6nla:
| Стени на Тьрдост | Клас 0 Много мека | Клас 1 Мека | Клас 2 Среда на Тьрдост | Клас 3 Тьрда | Клас 4 Много Тьрда |
| °dH | < 3° | >4° | >7° | >14° | >21° |
| °e | < 3,75° | >5° | >8,75° | >17,5° | >26,25° |
| °f | < 5,4° | >7,2° | >12,6° | >25,2° | >37,8° |
| Нстрика на урEDA | 0 | 1 | 2 | 3 | 4 |

I3nblnaBaiTe Ta3n npoceUpa BnHarn KOrato n3no13BaTe Baata MaunHa Ha MCTO c pa3nUHa TBpOCT Ha BOata. nn Korato KOHCTaInpate pomraHa Ha TBpOCTTa Ha BOata.
ПЕДИ ПИГOTВЯНETO HA HANITKITE BAXHIN YKA3AHNIA
Baata mAsnHa npedna npedbapntenH nactpoKn 3a otJeHNHe HAnNTK 3a noJyUbaHe Ha onTImaJIeH pe3yIaT. Bne o6aue moKeTe da nepcoHaun3npate Baeto Kafe n da NobInraTe Ha pe3yIaTaB uasaTa.
IoproToBka Ha KaΦeMeJaUKaTa: HacTpoiBaHe Ha eEpiHaTa Ha CMnlaHe (9)
Mozete da peryunipate cnilata ha Baute Kafe, KaTo hAcptone eepinata Ha cmmane Ha kaeeenHte 3bpa, KOkoto no-phiHc mlnane cte 3aapan, toKOBa KaeTo e nO-cnHIO n c nobuee KaMaK. I3noI3BaHnT copT KaFe cbto Moke da noBnne Ha nonyuhenpezylntat.
IpenopbUbame Bn hactpoiKa 3a MHOrO fHNO cMInaHe 3a pncpteO, fHNO 3a ecnpceo n no-rgy6o 3a LyHro.
3a perynipaHe Ha cTepeHTa 3a MeJeHe Ha KaΦeMeJaUKaTata:
-3aBbptete6ytoHa 3a perynipaH,HamnpaCe B pe3epBoapa 3a KaFe Ha 3bPna.Ta3n HacTroika Tp86Ba da Ce N3BbprBaNo BpeMe HA MeIeHe I CTenEH CJIed CTenEH.
-EdBa cnei 3 nprirotbHnIe moKTe OTuETnIO Da yCeTInTe pa3Nka BvB BKyCa.
PpomHaHa CTeneHTa Ha CMnlaHe N03BOLraBa:
-3a da MOJE da ce aadantnpa 3a pa3nHHTe BIVOBE 3bphA: MHORO CINHO IN3peHEnTe 3bphA n HAI-Beue OMACNEHITe IN3CKBAT NO-eIPO CMNlaHE, DOKATO HApOTMB, PO-YMEpeHO IN3peHEnTe ige ca PO-CyXn Ie IN3NCBAt FOHO CMnlaHe (OT NO-TbMHN Do NO-CBETTI)
U3npuhan:

Лево (Blonde)

CpeiNo (Light French)

BbIgBrune


Perynipane Ha n3XoJa 3a Kafe (10)
3a BcKa O T npEJaRaHnTe HAnrKn MoKeTe Da HABeKdAte N IOBdInrAte N3XoJnte 3a KaΦe B 3aBcMocT OT pa3Mepa Ha BaWata/BaWnte Yauu.
CnipaHe Ha Hanntkata no BpeMe Ha npuroTbAne
Mozete da cnpe Te nprirotBHeTo BvB BCEKn EHN MOMeT C HATNCaHa He KnaBnH CTAP/CTOn
Korato 6bIe npekcbchat daen cikbl, cnipaHTo He e he3a6abHNo. 3a malko maunHaTc octBa HeooctbnHa 3a pa60Ta.
PnroTbHe Ha DBe YaaH
YpeBt Bn IMa Bb3MOXHOCT 3a eHOBPemEHNO pIPOROTBAHe Ha DBe CaIIN.ΦyHKUATA DBe CaIIN e DocTBnHa cAmo 3a peCENTte 3a KaFe, Kato n36epete 2 aain [ ] npn HAcTpoKNTe 3a Baunte HanNTKn.
PIMIOTBBAHE HA HANITKITE
| PEÇEPTTN 3A KAΦE | Възможен 6рй чаши | Преорьчтелни有很大тошки 0бем (10 ml по 10 ml) | Възможни有很大тошки Слana |
| РИСТРЕТО | 1 | ot 20 до 30 ml | ot 1 до 3 зрпа |
| 2 | 2x 20 до 30 ml На двацкъla | ||
| ECПЕССО | 1 | ot 30 до 70 ml | ot 1 до 3 зрпа |
| 2 | 2x 30 до 70 ml На двацкъla | ||
| ЛУНГо | 1 | ot 80 до 180 ml | ot 1 до 3 зрпа |
| 2 | 2x 80 до 1800 ml На двацкъla | ||
| КАПУСHО | 1 | ot 60 до 100 ml | ot 1 до 3 зрпа |
ПИГOTВЯНЕ HA ECПЕСО, PMICTPEО И ЛУНΟ
3a6eKka: npu BCaKO CTapTnpaHe Ha HAnITKaTa, MaunHaTa ige NOMHn HAcTpOKeIte 3a NocLeHaTa pNiroTbHa HaNTKa.
Pncpteto e cbc cnlen H mouen Bkyc, nokpnT c kaMak c kapaMeIeH zBrt, npxOJa3 3a TpydHnTe cyTpHn. 3a nprirotBHe na pncpto n36epete o6em mekdy 20 ml n 30 ml.
EcnpecoTc nIbteH Bkyu nI3pa3eH apomatn e NOKpTuO c KaIMaK c KapaMeH, IeKO rOpUvB Bkyc. N36epTe 06em MeJy 40 ml n 50 ml.
KafoTo LyHro e cnpco ot 80 ml, cno-roTlmo CbDpbJxAHne Ha KofoEH, Ho no-NeKO h BAkyc. LHeH c MHO r KaTO cyTeuHa HauITka.
Etannte Ha npnroTBaHe Ha HanNTkata:
-CMnnaHeHa3bpHata
-ПпесованеHaСмлготоKaфe
-EkctpaKua
CtaptanheHa npnroTbHeTo (3a 1 nn 2 aun):
- HatnccheTe KnaBn 3a n36op Ha peuenta (11),doKato Ce noKaaxe nIKTORpama
-ПокаЗВа ce MeHIOTo Ha peцentata.
-Пoctabete 1 чаши поинхODиTe 3a Kafe.Можete д свалгte ил подогate ИхODиTe 3a Kafe B 3abucmocT ot pa3mepa на Baшата чаши (10).
PepcoHaun3aun
Cun
- ɪn36epeTe cɪŋa Na KaΦeTo (cɪmBɔlɪnɪpɑna O T 6pɔr KaΦeēHɪ 3bρhɑ, nɒkɑaɪn Hɑ ekpɑha B ckoδn) [O O D] c klaBɪnɪn + 3a yBɛnɪuʌbaH e Nɪn - 3a hʌmʌlaɪbaH e - [D].(12)
06em
- Hatachete KlaBmHa 3a Habirauia, 3a da npemHete KbMa hactpoika Ha o6ema 3a peentata.
-136epeTe XeJaanHra [120] 6oBc KnaBmHn+nn- (13).
BpOu aun
- HatncheTe KlaBnla 3a Habiragauia ,3a da npemHete KbM HacTPOJa Ha 6poa aui.
-Изберете 1 [O nnn 2 chaun [O]c knabuunn + nnn - (14).
Ako n36epete 2 qaun, MaunHaTa ABTomauH Oe 3anOue He n3PbHeHne Ha 2 PbHn cKbna 3a npiroTBAHe Ha Kafe.
- HATINCHETe 6yTOH CTAPT (15).
BbB BCEKn eDIN MOMENT MOKTe Da NaCTPOBAte O6ema 3a peCenTata C KnaBnSi+ nIi -□+
3a cnnpahe Na CtpyTa BvB BaWata YaHa, HATNCHTe KnaBmCTAPT/CTO1 n
MoJxTe CbTo TaKa Da NaHactPoiBaTe TEMpepatpata Ha BaWeTo Kafo, 3a ZeIa HATncHe 6yToHa HactPoiKa N oIadPbXka CnE ToBA,C NOMoTa Ha 6yToHa 3a Habiruaqna, Ce no3uOnHpaTe Ha n peryInpaTe JKeJaHaTae TMpepatpa C KnaBnWite = +
BHIMAHNE, AKO IPEKbcETE IN3JIbJIHEHIEHO HA BAJATA HANITKA, CINIPAHETO HE CTABA HE3A5ABHO.
Moxete da npomehre eepnHaTa Ha cmilhae Ha KaphieneHte 3bPna B 3abcIMoCT O T haNTkata Bn, kaTo 3a ceta Ta Hapabite cnpaBa c rnaBa,"IPEiN IPIFOTBRAHETO HA HAPNTKNTE BAXHN YKA3AHIN".
3anncBaHe BnpednoHTaHn
Cnei3nblHeHneTo Ha BaWata HAnITka, IMATE Bb3MOXHOCT Da HapabNTe 3aNtB N ppeNoHTaHna.
3a ceta, B kpa Ha n3tOuaHTo Ha BaWata HAnITka HATnCHete KlaBm npEepoHTaHn 1 nT, 3a da n36peTe npEpoHTaHn A nIu 2 nTu, 3a da n36epeTe npEpoHTaHn B
3a no-rolama TouHocT, HanpaBeTe cnpaBaKc pa3dien 3ANICBAHE B INPEIIOCHHTAHIA.
ПИГOTВЯНЕHA KANYUNHO
3a6eexka: npn BcAko CstapHe Ha HAnITKaTa, MaunHaTae NOMHn HAcTpoKInTe 3a NocJeHaTepnroTBAHa HAnITKa.
3a da noluynte xy6aba pnaHa, Bn npenopbuchame da n3no13BaTe naCtBOpnsnapo Mmko nn CTyedeHO mIko npemHaIO UHT 06pa60ka (4 - 5°C), KoETO kky-io cte OTBOpNI. Cypoboto Mmko He ocnrypba NoCTrHHeTo Ha ONTImaHIn pe3yntaTn.
CtaptnPaHe Ha npiroTbHeto
3a nepcoHaJIImIpaHOb KaIyuHIO, MaIInHata DaBa Bb3MOKHOCT 3a I36Op Ha pa3JIuYeH O6e MIAKO N KaFe, B 3aBVCUMOCT OT BaWnte JekAHn.
HaTINCHETe KIaBIMs 3a I36bOp Ha peuCenTa (17), DoKATO Ce nOKaKe TnKTOrpaMaTa
HCTaIupaHe Ha cBda 3a MIAKO BbB BaShaTa MaunHa
Ppei npbpo n3non3BaHe, cTapaTeJHo nooHCTe Te OTdJIHnTe enemeHTn.
CbIbT 3a MJIko e CbCTaBeH OT PJIaCTMaCOB CbI (W), KApA K (R), BKJIIOUBaIc KaceTa (V) IN MapKyU (U) 3a BpB3Ka c N3XoJa 3a HAnITka Ha MaSiHaTa.
-VCnneTe MnaKToB Cbda (MHNmym 150 ml) (18).
-ПoctabeTe KaNakA Bbpyx Cbda, KaTo ro 3aBnete (19).
-BdunrHete6JokupauaJnoCT (20).
-Инсанрапе сьда за мляко на машината, кATO Г CBbpxeTe КБМ Дюзatura за пара (21), сдд това счсichte 6лokupaши loct (22).
-Пьхнete МаркуаВ OTbopaHa Kacetata,прдиденЗацлta (23),сеД Което поставete Дугя Край подуногнелтИрани ИЗXDЯнITКATA (23).
-Пюверетдали бутоьт 3а ИЗБОр калунно/почиствае на Кала К на сбда 3a Мляко DeиCTBNTeHо E B ПОЗИЦЯ Калунно (24).
PepcoHaJIIn3aun
Cun
-ИЗберете калани INHTeH3IeT KaTO yBelenuBaTe IIN HaMaJIaBATE 6poR KaФeEHN 3bPHa [OOO] 6laRaOdapeHne Ha KlaBAniIte l + (25).
06emHa kafo
-CneTToBaHATNCHEKJIaBnIa 3a HABINrAunie ,3a da npemHHeTe KbM hAcTpoKa Ha JekanHnO6eM 3a BaNAta HAnITka.MoKeTe Da yBeInuYabate NHaMaJIraBte O6ema 6NaRoJaepHe Na KJIaBUni (-+) (26).
06emHaMnKOTO
-Инakра,ВиMuKTe Da perylnipate ZeJahnO MmIaKo C nOMOHTa H NaKJIaBnITe -+ (27).
- Hatnchete 6ytoh cTAP/CTON (28).
3a cnpahe Ha ctpyra BbB Bawaata aha, haTnCHete KlaBNI CTAP/CTON
MoJxTe CbI O Ta Ka Da HAcTPOBnBaTe TEMpePAtypaTa Ha BaWeTo Kafo, 3a ceIHaHtncHete 6yToHa HAcTPOkA N oIaDpBXKc, cnE ToBA, C NOMOHTa Ha 6yToHa 3a HABURAuA, Ce No3NIOHnpaiTe Ha n peryInpuAte XeJaHaTa TEMpePAtypa C KnaBnUHTe +
BHIMAHNE, AKO IPEKbcETHE 3IbJIHeHEnTO HA BAaTATA HAnITKA, CINPAHETO HE CTABA HE3A5ABHO.
U3nnakBaHe Ha Cbda 3a MIIKO (okono 30 cekyHn)
CnE BcKo npKKnUOVAHe Na peeNTa3a KaNuyHIO, MaunHaTa Bn ppeNaIa Da n3bNInTe N3PkaBA He Ha CbDa 3a MJIKO cNoBa HnIKTORpamata (31). 3a npednoHTane e da n3PknHete Cbda 3a MJIKO, 3a da rapaHTnpate pa6OTnTE xapakTePcTkn H Baata MauHn OOTmAlHaTa XmHHe. 3a ToBa n3PknAKBaHe e Heo6xOIMo Da n3Ppa3nHte OCTaHANO B CbDa MJIKO.
-Korato ce nokaxe nIKTORpamata HATINCHETe 6yToHa npaMetpn (31).
-3abptete 6ytoHa ha cda 3a mlyaBo n03uynIIOYHCTBAHE (32).
- YBepeTeCe, ye CbIbT 3a MJIko HauNTHa e CbBp3aH KbM MaIIHnAte H e B 6LoKIpaHa nO3uZia (CpyCHaT 6IOKIpaU, noCT) (22).
HaTnCHETe KlaBmCTAPT/CTON (33), 3aIOyBa IINKbIbHT HaI3nJIaKBAHe.
3AINCBAHE H A BALI NT E PDEIOHTAHNIA
Bauata Maunna ARABICA LATTE Bn daBa b3moXnoCT 3a 3anCbaHe Ha 2 peCNTn 3a kaFe n 2 peCNTn 3a kanyuHNO.
3aHcBaHe Ha HOBO npednoHTaHne
3a ceIta, B kpaHa n3ToBaHeto Ha BaWata HauNTka MoXeTe Da HauTcHete KlaBnI npEpoNHTaHnI 1 nbT, 3a da n36epetepnePnoOHTaHne A nn2 nTn, 3a da n36epete npEpoNTaHne B (29).
3a 3a ncahe Ha peuente Ta Tp6Ba Da ce HataCHe npOdbJnxIeHNO KlaBnI npEdoNHTaHn.
CmHa Ha BaunTe npednoHTaHn
Ipoceepaite no cbyuHaunH KaTo np1 1Bo 3anCbaHe.
ObuaIPOIDPbJXKA
Ió6pata noDpBxKHa MaaunHata Bn ydbNxBa HneHnJxNBoT n3ana3Ba aBTeHTnUHn Bkyc Ha BaWeto Kafe.
IopdpbKkaHa KonekTopa 3a yTaKa n TaBnKaTa 3a otceJdaHe
B TabuKhata 3a OTcEJaHe Ce Cb6npa Otpa6OteHaTa B0da.
KonekTopt 3a ytaika cb6upa n3no13BaHOTo cmJHO Kafe.
Ako nIKTOrpamata Mnra, n3npa3heTe n ooucctete:
- TabuKhata 3a Otuexdane (MOKe Da NMa N yTaKa).TabuKhata e Cha6deHa C nonlaBbK, KoTo Bn noka3Ba BbB BCEkN eIN MOMENT KORA da Ro I3npa3HInTe (34).
- Konektobt 3a ytaika.Изпраэнete ro,За д пенитbatite nocleдвацо npelenBahe (35,36).
CbO6eHHeTo 3a npdUnpEckDHe nce octaba Ha ekpaHa, aKo KonekTOpbT 3a yTaIka He e npaBnHb BmBkHaT IIN HCTaInpaH.
PnTOBa nOLOJKeHne e HeBb3MOxHO npriOTBHeTo Ha HIKoA THaNITKInTe.
U3nnakBaHe Ha Kpbra Ha Kafo
Moxete da n3nlaKbATE n3xOduTe 3a kafe, BnHaRn KORATO noXeJaTe. IpeopobuBaMe Bn da n3nbHnBaTe n3nlaKbaHTo npi BCaKO n3KnUcbHe Ha BaWata MaShHa, 3a da rapaHTnPate ONTImaJIHa xHmEHa.
I3nlaKbaHTo Ha Kpbra Ha KafoeTo e npenOpbUHTeHNo Da ce npaBn, Korato Ca MHaJI HЯKOJIO dH 6e3 da Ce n3nOJI3Ba
- Hatachete KlaBIMu NaCTPOKa mNoDpBxKka
- C nomoouta ha knablni 3a habnraucnir n36epete niktorpamata 3a n3nnkbahe
- Hatachete 6bytoh CTAPT
-Korato MeHOTO 3a Kafe Ce IIOBIMoXeTe OTHOBO Da n3IOn3BaTe BaJata MaunHa.
AKTUBPae He I deakTBpae He Ha yHKnraTa 3a aBTOMaTuHo N3PiakBaHe npBkIouBaHe Ha MaunHaTa
IIO npda36bnpaHe OOnnAra 3a ABtOMaTHNO n3PnakBaHe Ha KpbroBeTe ce aKtBnpa npn BkInouBaHe. MoKeTe da n36epeTe da aKtBnpaTe nII DeaKtBnpaTe fHKnuaTg 3a ABtOMaTHNO n3PnakBaHe npn BCEkn Pnyck.
3a ceIa:
- Hatnchete KlaBmH NaCTPOkA m NoDpBxka
- C nomoouta ha KJIaBnI 3a Habuauzaun i36epete nIKTORpamata 3a ABTOMAHNO u3nlaKBAhe
- Hatnche T KJIaBnST CTAP/CTON 3a da n36epete AKTNBnPAhe Ha aTOMaTHNHO tN3nKBAHe.
-3a da deakTNBnape, HATNCHE T KnaBnui ^+ n ABOTMATNCHOTO n3nlaKBaHe e p3nporpamnpaHO.
-LKbIbT e npOdbJIxNtJHOCCT cMo HAKOLKO CekyHn n aBToMaTHUHO cHnpa.
-3a da ce bþhete KbM MEHIO TO KaΦe, HATINCHETe KlaBNI HAcTPOKn I NOdpBXKa
BHMMAHNE: npa Ta3n Opeaun 3a n3nnakBaNe ot n3xOndte 3a KaFe tee ropeua Boda. BHMaBaTe TabuKaTa 3a oTeJdaHe da e BHaHn Ha MCTOTo cN, DOpN I KOraTO MaunHata He ce N3NoJI3Ba.
BAXHO: npenopbUba ce ToBa n3nlaKBaHe da CTaba:
-Преши BCЯКо KanyuHNo, c сeн ONТMuJHa XnIgHeHa.
-Преди Да сложиTe CBдЗа МлякВхладинka,aKOВ Hero Има Oше мляко.
CnEiBcAkoI3nnkBaHe e npenOpbHntelHO da nouchTe OToeHne Ta, KaTO IIN3MnTe C B0Da, 3a KoEtO HapBaBe cnpabKa B rIabe, pBuHO o6cLyXbaHe Ha cbDa 3a MlKo".
Program Čišćenja je ciklus koji不同程度 in the study of the relationship between the risk of stroke and the risk of diabetes.
Kada se nazaslonu prikaze piktogram mozetePokrenuti program cişcenje: