USER MANUAL LFV429K ELECTROLUX
3. DAILY USE
Check the pre-filter speed in accordance with the nameplate.
| Y1 | При заюленье нахан;rotbvete с постavenка-пак. |
| Y2 | При rotbvete сkanak Вьрху Няковко 30ни 3a ro-TBEne Или KOTLOHи,пьржete на Сразб огьн. |
| Y3 | При варе и пьржete на rolеми колочевахрана 6e3 kanak, rotbvete Вьрху Няковko 30ни 3arotbvete Или KOTLOHи. |
| Yn | При варе и пьржete на rolеми колочевахрана 6e3 kanak, Висoka Влажноct. |

The pre-filter should be left to operate for approximately 15 minutes after switching on.

The control panel is a touch field. Touch the symbols for 1 second to activate the functions.
To work with the absorber:
- Switch on the device by touching symbol ①.
You can activate the functions.
- To activate the function, touch the symbol. If necessary, touch the lamp symbol to illuminate the cooking surface. To switch off the device, touch the symbol again.
The hood must be set to low temperature and short cycles. The filter for the microwave may absorb light, but this does not affect the operation of the device.
- To install the filter back, insert the two tabs in the reverse order.
Repeat the steps for the recirculation filter, if applicable.
4.3 Replacing the activated carbon filter
The activated carbon filter must be replaced if the filter alarm is activated.

For more information about the function, see the filter notice in the chapter on daily use.

ATTENTION!
FILTER ACTIVE IN BGLEN
NOT DIRTY AT ALL!
Filter cannot be regenerated!
To replace the filter with an active carbon filter:
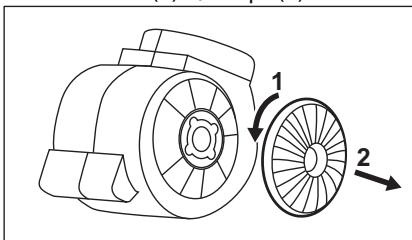
1. Remove the filter for the hood from the appliance. See "Replacing the filter for the hood" in this chapter. 2. Turn the filter clockwise (1) and pull it out (2).
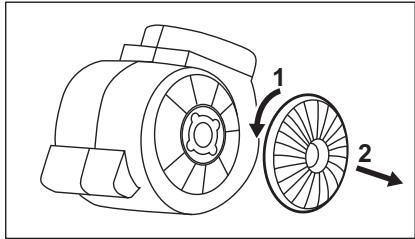
To install the filter, insert the tabs in the opposite direction.
4.4 Replacing the lamp
This appliance is equipped with an LED lamp and a separate control unit (which activates the light mechanism). These parts can only be replaced by a technician. In case of malfunction, see "Service" in the "Safety Instructions" chapter.
5. ENVIRONMENTAL PROTECTION
Recycle materials with the
symbol. Place the packaging in the appropriate containers for recycling. Help protect the environment and everyone's health, as well as the recycling of waste
electrical and electronic appliances. Do not dispose of appliances marked with the symbol , together with household waste. Return the appliance to your local recycling point or contact your municipal service.
CONTENTS
- SAFETY INFORMATION AND INSTALLATION 7
- DESCRIPTION OF THE APPLIANCE 8
- DAILY USE 8
- CONTENTS AND MAINTENANCE 10
- ENVIRONMENTAL PROTECTION NOTES 11
WE'RE THINKING OF YOU
WE'RE THINKING OF YOU
Thank you for purchasing an Electrolux appliance. You've chosen a product that brings with it decades of professional experience and innovation. Ingenious and stylish, it has been designed with you in mind. So whenever you use it, you can be safe in the knowledge that you'll get great results every time.
Welcome to Electrolux.
Visit our website to:

Get usage advice, brochures, trouble shooter, service and repair information: www.electrolux.com/support

Register your product for better service: www.registerelectrolux.com

Buy Accessories, Consumables and Original spare parts for your appliance: www.electrolux.com/shop
CUSTOMER CARE AND SERVICE
Always use original spare parts.
When contacting our Authorised Service Centre, ensure that you have the following data available: Model, PNC, Serial Number.
The information can be found on the rating plate.
Warning / Caution-Safety information
① General information and tips
Environmental information
Subject to change without notice.

WARNING!
Refer to the separate
Installation Instructions
booklet for Safety
Information and Installation.
Read carefully the Safety chapters before any use of
maintenance of the
appliance.
2. PRODUCT DESCRIPTION
2.1 Control panel overview

| Function | Description |
| 1 | On / Off | Turns the hood on and off. |
| 2 | First speed | The motor switches to first speed level. |
| 3 | Second speed | The motor switches to second speed level. |
| 4 | Third speed | The motor switches to third speed level. |
| 5 | Maximum speed | The motor switches to maximum speed level. |
| 6 | Speed boost | The motor switches to maximum speed level. After 5 minutes the appliance returns to previous setting. |
| 7 | Filter notification | Reminds to change or clean the charcoal filter and clean the grease filter. |
| 8 | Hob²Hood | Indicator of the function to control hood from hob. |
| 9 | Lamp | Turns the lights on and off. |
3. DAILY USE
3.1 Using the hood
Check the recommended speed according to the table below.
| Y1 | While heating up food, cooking with covered pots. |
| Y2 | While cooking with covered pots on multiple cook- ing zones or burners, gentle frying. |
| Y3 | While boiling and frying big quantities of food with- out a lid, cooking on multiple cooking zones or burners. |
| and | While boiling and frying big quantities of food with- out a lid, big humidity. |

It is recommended to leave the hood operating for approximately 15 minutes after cooking.

The control panel is a sensor field. Touch the symbols for 1 second to activate the functions.
To operate the hood:
- Turn on the appliance by pressing the ① symbol.
You can now activate the functions. 2. To activate the function, touch the symbol. 3. If needed, touch the light symbol to illuminate the cooking surface.
To turn off the appliance, press the ① symbol again.
3.2 Hob²Hood function
It is an automatic function which connects the hob with a hood. Both the hob and the hood have an infrared signal communicator. The speed of the fan is defined automatically on the basis of mode setting and temperature of the hottest cookware on the hob. You can also operate the fan using the hob manually. The function can be activated from the panel of the hob.

For more information on how to use the function, refer to the hob user manual.
3.3 Activating Maximum Motor Speed
When you touch , the Maximum Motor Speed starts to operate for 8
minutes. After that time, the appliance returns to its previous speed settings.

When the function is turned on, additional touch on does not have any effects.
3.4 Filter notification
The filter alarm reminds you to change or clean the charcoal filter and to clean the grease filter. The filter indicator ⊕ turns on for 30 seconds if the grease filter must be cleaned. The filter indicator ⊕ flashes for 30 seconds if the charcoal filter must be replaced or cleaned.

Refer to cleaning the grease filter in the care and cleaning chapter.

Refer to cleaning the charcoal filter or replacing the charcoal filter in the care and cleaning chapter.
To reset the function, touch for 3 seconds.
To activate or deactivate the function:
- Switch on the control panel.
- Make sure that the icons turn white.
- To activate the function, touch for 3 seconds.
If the function is activated, the filter icon flashes five times. 4. To deactivate the function, touch for 3 seconds.
If the function is deactivated, the filter icon ⊕ turns on for 4 seconds.
4. CARE AND CLEANING
4.1 Notes on cleaning
| Cleaning Agents | Do not use abrasive detergents and brushes.
Clean the surface of the appliance with a soft cloth with warm water and a mild detergent. |
| After cooking some parts of appliance can get hot. To avoid stains appliance must be cooled down and dried with clean cloth or paper towels. |
| Clean stains with a mild detergent. |
| Keep the hood clean | Clean the appliance and grease filters each month. Clean the interior and grease filters carefully from fat. Fat accumulation or other residue may cause fire.
Follow the instructions for cleaning the accessories when filter notification is on. Refer to Filter notification in daily use chapter. |
| Grease filters can be washed in a dishwasher.
The dishwasher must be set to a low temperature and a short cycle. The grease filter may discolour, it has no influence on the performance of the appliance. |
| Charcoal filter | The time of saturation of the charcoal filter varies depending on the type of cooking and the regularity of cleaning the grease filter. |
4.2 Cleaning the grease filter
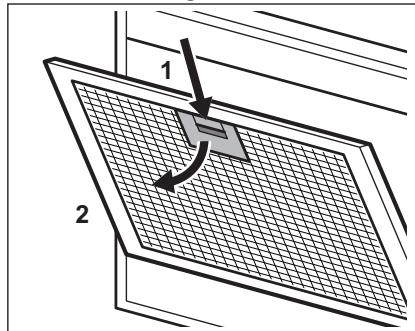
Filters are mounted with the use of clips and pins on the opposite side.
To clean the filter:
- Press the handle of the mounting clip on the filter panel underneath the hood.

- Slightly tilt the front of the filter downwards, then pull.
Repeat the first two steps for all filters.
- Clean the filters using a sponge with non-abrasive detergents or in a dishwasher.

The dishwasher must be set to a low temperature and a short cycle. The grease filter may discolour, but this has no influence on the performance of the appliance.
- To mount the filters back, follow the first two steps in reverse order.
Repeat the steps for all filters if applicable.
4.3 Replacing the charcoal filter
The charcoal filter must be replaced if the filter alarm is on.

Refer to the filter notification in the daily use chapter for more information about the function.

WARNING!
The charcoal filter is NON-washable! The filter cannot be regenerated!
To replace the charcoal filter:
- Remove the grease filters from the appliance. Refer to "Cleaning the grease filter" in this chapter.
- Turn the filter counterclockwise (1) and then pull (2).
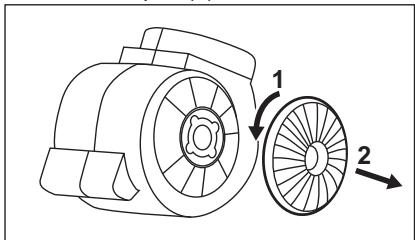
To mount the filters back follow the steps in reverse order.
4.4 Replacing the lamp
This appliance is supplied with a LED lamp and separate control gear (LED driver). These parts can be replaced by a technician only. In case of any malfunction refer to "Service" in the "Safety Instructions" chapter.
5. ENVIRONMENTAL CONCERNS
Recycle materials with the symbol . Put the packaging in relevant containers to recycle it. Help protect the environment and human health by recycling waste of electrical and electronic appliances. Do not dispose of
appliances marked with the symbol with the household waste. Return the product to your local recycling facility or contact your municipal office.
CONTENTS
- SAFETY INSTRUCTIONS AND INSTALLATION 33 2. PRODUCT DESCRIPTION 34 3. DAILY USE. 34
- MAINTENANCE AND CLEANING 36
- ENVIRONMENTAL CONCERNS 37
WE THINK OF YOU
4.3 Replacing the charcoal filter
When the filter warning is on, the charcoal filter must be replaced.

3. DAILY USE
3.1 Using the hood
Check the recommended speed according to the table below.
| Y1 | Prilikom zagrijavanja hrane, kuhanja sPokrivenim posudama. |
| Y2 | Prilikom kuhanja sPokrivenim posudama na više zona kuhanja ili plamenika, lagano prženje. |
| Y3 | Prilikom ključanja i prženja velikih količina hrane bezPoklopca, kuhanja na više zona kuhanja ili plamenika. |
| i | Prilikom ključanja i prženja velikih količine hrane bezPoklopca, visoka VLCznost. |
It is recommended to leave the hood running for about 15 minutes after cooking. The control panel is a sensor field. Touch the symbols for 1 second to activate the function.
To operate the hood:
To connect to the Wi-Fi network:

For appliances with remote control, Wi-Fi, and similar devices, follow the instructions for the appliance.
www.electrolux.com/support

To receive service, register your appliance:
www.registerelectrolux.com

Buy original accessories, consumables, and spare parts for your appliance:
www.electrolux.com/shop
CUSTOMER CARE AND SERVICE
Always use original spare parts.
When contacting our authorized service center, make sure you have the following data available: Model, PNC, Serial Number.
The appliance is not covered by warranty for technical defects.
Equipment/device for safe installation and operation of gas equipment ①This equipment is intended for installation and operation in accordance with the requirements of the technical regulations.
Read the instructions carefully before use.
1. INFORMATION FOR SAFE INSTALLATION AND OPERATION

WARNING!
For safe installation and
operation of the equipment
read the manual
before installation.
Follow the instructions.
The manufacturer
or its service
representative
for safe operation
should be contacted
if necessary.
2. BYиbIM CINATTAMACbl
2.1 Baçkapy nahanıne shony

- ① taH6acbIH 6acy apKblbl KypblfblHbl Kocblbl3.
Ehdi yHKyIapdbI 6eIceHdipe aJacbi.
2.Функци�ньбeнсeндipy yuH TaHбаны TypTih3. 3. KaKeT 6oJca, nicipy 6eTih KApbIKTaHDbIpy YwIH WAm TaH6acbIh TypTiH3.
KypbIJIfblHbI cHdpy yuHIN TaH6acbln KaTaNbAcbl3.
3.2 Hob²Hood yuHKnIaCbI
Byn newi aya tapTkbiu Kypanfa Kaifaih ABtomaTbI cyHKun. Nei neh aya tapKbiu Kypan ekeyi de Hnppak3bl cnHann
KOMMyHnKaTOpbImeJXa6bIbIaTaNFaH. XenDeTeKiUTh JxbldAmdbIbI pexIM napaMeTpI MeN neu yCTIHderi eH bICTbIK bIDcTBIn TMnepaTypacbi 6oBbIHwa aBTOMaTTbI Tpyde anbIKTaIaNblc. CoHdaIak neWtI KOlmE baCKapbn aya TapTkblTbI Koc aancbI3. Byn fYHKuaHbI neuTIh naHei apkblbI icKe Kocyfa 6oNaIbI.

ФункцянblаадаанHyfakatbICTbTOJIbIKaKNapaTTbIneW yctIhn naДanaHywhHyCKayIbIFbIHah KapaHbI3.
3.3 Ko3FaJIaTkbIiHTbIH eH KOFapFbI XblIJaMDbIFbIH iCKe KOCy
TYImeWirIH TpyTKeHHe, KO3faJIaTKbIiHTbIH eH XOFapFbI KblnDaMdbfB 8 MNHyTTbIH iUHHe Kymblc icTei bactaDbI. OcbI yaBlTTaH KeiH, KypbIINbI aIbIHbI JbIaNMaDbIK napametpiH opanaDbI.

Функця icke kocblfahda,
TMyMewiKti KaiTAtypTeH JxafdaJa eUkaHdai e3repic 60ImaIdbI.
3.4 Cy3ri TpyaNbI xa6apnaHdbipy
Press and hold the POWER button for 30 seconds to reset the device if it does not respond or malfunctions. If the device malfunctions, press and hold the POWER button for 30 seconds to reset it.

See the "Device Reset and Cleaning" section, "Device Cleaning" paragraph.

The device reset and cleaning section covers device cleaning and device reset.
To turn on the function, press and hold the button for 3 seconds.
To turn off or cancel the function:
- Press the button again.
- When the indicator light is on, press and hold the button for 3 seconds to turn off the function. When the function is turned off, the indicator light will blink five times. Press and hold the button for 3 seconds to turn on the function. When the function is turned on, the indicator light will blink four times.
4. CLEANING AND MAINTENANCE
4.1 Safety precautions for cleaning
| Жуrbш 3aTTAP | Жemіріш жуrbш 3aTTAPды және щетkeларді
пайдалианбаны3.
Курьлгынbilн оалдынгы каflын жумсak жуфыш 3at кocьлfaнжылы
суfa 6atbIpIlnFaH кумсak ушbepeкнен тазаланы3. |
| Таşам Nicіpresненій Кійн Kурьлгынbilн Кійбір 6eЛіктepі рьсын кетуі
Мумкін. Дады 6oJырмас ушін Курьлгынbilny суын, тazа
шуbepeкнен Немес Kafla3 сулгіmen Hур {@у Кур {@у}. |
| Даітарды жумсak жуфыш 3aTпнен ТAZALANH3. |
| Aya tarTkblsh
Куралды TAZA
Устаны3 | Курьлгынbilжэн май суглорін ai сayын тazalaanbly3.
Курьлгынbilн iшін жэн май суглорін майдан тazapынbil3. Май
Жиналлогда hemecce 6ackka kaJdskжиналca, орт kayіпн Тудырь
Mумкін.
Суглінін xabapлама сиигалы кocуны Ke3de kepek-jжарктарды
ТAZALANHунсayларын opbɪdaнbil3.Сугri typalny xabapламаы
КУнdenіkti пайдалиану tarayынані карынbil3. |
| Майысуглорін bIDlc kуьfuш машида жууfa 6oJanaы.
bIDlc kуьfuш машида Temen TempepaTyражэne Кыскcaциkn
OPHAу.Tу
Kepek.Май суг RicinH Tyci e3repyi Mумкін,Бул
Курьлгынжумсic ICTeyiHe acep etne'di. |

Device
Before cleaning the device, make sure it is turned off and disconnected from the power source.
4.2 Cleaning the device
To arrange the parts, place the brushes and nozzles in the opposite direction.
To clean the device:
- Press the release button on the underside of the device to remove the dust container.
- Turn the handle counterclockwise, then pull it. The first two steps are repeated for all filters.
- Repeat the steps for each filter until the desired cleaning effect is achieved.
If the filter is heavily soiled, it may be necessary to rinse it with warm water. If the dirt is stubborn, this may affect the cleaning performance. 4. Repeat the first two steps in reverse order to reinsert the filter.
Repeat the steps for all filters as needed.
4.3 Replacing the filter
If the filter has an emergency signal, the filter must be replaced.

For more information about the function, see the instructions for use in the operating manual.

WARNING!
Do not operate the filter without a filter! The filter cannot be used without it!
To replace the filter:
- Remove the filters from the device. See the section "Cleaning the filters" in this manual.
- Turn the filter counterclockwise (1), then pull it out (2).
Repeat the steps in reverse order to reinsert the filter.
4.4 Cleaning
This device is equipped with a special filter (HEPA filter). These filters must be cleaned regularly. If the filter is damaged, see the "Service" section in the "Safety Instructions".
5. KOPUFAH OPTAFA KATbICTbI XAFDAJJIAP
Benri caIbIHfAH MaTePnIaIapbl KaIbTa eHdeUeH eTki3yRe TaIcbIbIbI3. OpaM MaTePnIaIapbl H KaIbTa eHdeUeH eTKi3y UwH TNICTI KOHTeHepNepre caIbIbI3. 3NeKTPnIK KHe 3JIeKTPoHnKaIbIK KpybINfbJaapblH KaIbIbFbIH KaITa eHdeUeH eTki3y apKbIbI, KopuHaH opTaFa KHe aAdAMhIH DeHCaylbIFbHa 3NbIH
KeTiptinKaFdainapfKaon6epMeyre e3 yneciH3di KocbIbI3.Benri caIbIHFaH KypblfBnapDbTypMbICTbIK KanblkTapMeH 6ipre TactaMaHbI3. OhimDi XeprinikTi KaetaeHdey opTaIbIbHa eTKi3iH3 Hemece XeprinikTi Mekemere xa6apnaCbHbI3.
TURINYS
1.SAUGOSINFORMACIJAIRIRENGIMAS. 74 2. GAMINIO APRASYMAS 75 3. KASDIENIS NAUDOJIMAS 75 4. VALYMAS IR PrieziURA 77 5.APLINKOS APSAUGA 78
MES GALVOJAME APIE JUS
3.3 AKTINBnpaHBe Ha MaKcImaJIHata 6p3nHa Ha MOTOPOT.
Kora ke ro donpete 3anochnyba da pa6oTn MaKcImaJIHata 6p3nHa Ha MOTOPOT BO nepIOd oD 8 MNHyTu. Nocne ToJ nepIOd, anapaTOT ce Bpaka Ha HeroBbTE npTeXODH INoCTaByBaHa 3a 6p3nHaTa.

Kora e BknyeHa dyHKnjuata, dONOpHInTeHnOtn DOnnp Ha Hema HnKaBn BnJaHnja.
3.4ИЗВЕСТУВАБезаФИNTЕРOT
Anapmot 3a fntep Be notceTyBa da ro CMeHNTe nn INCnCTnTe fntepOT 3a jaJIenH da rO nCnCTnTe fntepOT 3a machOTnn. Ioka3aTeNOT 3a fntep e BkJyueH 30 cekyn aKO fntepOT 3a machOTnn Mopa da ce nCnCTn.
IokaTeNoT 3aФntTepe Tpenka 30 cekyHnAkoФntepOT 3a jaJIeH Mopa da Ce 3aMeHnNInNCuNCTn.

Budete BO deJOT 3a
ЧИСТЕНе Ha ФИNTЕРOT 3a
МACHOTIN BO NOrIaNJIbJETo 3a
ГРИХА И ChICTeHе.

BnTe Bo DeIOT 3a ChTeHbHa fNITepoT 3a jarJen Hnn 3ameHa Ha fNITepoT 3a jarJen BO NoIJIabJeTo 3a rpnKa n ChTeHb.
3a da ja pceTe npaTe 6yHKuJaTa, donpeTe ro 3 cekyHn.
To activate the TNB function:
- Turn on the control panel.
- Check if the icon is white. To activate the function, press and hold the button for 3 seconds.
If the function is activated, the filter icon will blink. 4. To deactivate the function, press the button again.
If the function is deactivated, the filter icon will stay on for 4 seconds.
4. CLEANING AND MAINTENANCE
4.1 Safety instructions for cleaning
| Средства 3a
чисhevе | He користец abразвни дергенти и чеки.
Повришина на Neчкatable чис te ja co мека крna натопения с толл вда и средстvo за чисөе. |
| Пос rotveьөт, неkon Deелови од anapatot може DA ce 3arpeat.
За за Избоге по jabа на дамки, anapatot мора DA ce олади и (
исуш co чиска крпа плхартунны крп. |
| Чис te дамки сблар дергrent. |
| ... | Чис te ro anapatot и Фильэрпente 3a масоти секов месец.
Чис te ГВатразшоста и Фильэрпente 3a масоти Вимателно
OD machotи. Habocupaьeteю на мрсоти плдруг OCTatoци
OD xpha на може DA pezулtnupa co пожар.
Следе ти упатства对接а DA chstendeю кога
Изberгүүвагьтэндүүүүүүүүүүүүүүүүүүүүүүүүүүүүүүүүүүүүүүүүүүүүүүүүүүүүүүүүүүүүүүүүүүүүүүүүүүүүүүүүүүүүүүүүүүүүүүүүүүүүuces.
Фильэрпente 3a масоти може DA ce мілaj BO машина 3a мінөе садови.
Машина差别 за мінөе садови мора差别 Дбide поставену на Нисka
temпература и кратукүлүс. Фильэрот за масоти може差别
Изгубы差别 IPA, Нма влідане Вр зпрформансITE на anapatot. |

Grease filter
The saturation time of the grease filter varies depending on the type of cooking and the frequency of cleaning of the oil filter.
4.2 Cleaning the oil filter
The filters are mounted using clips and pins on the opposite side.
To clean the filter:
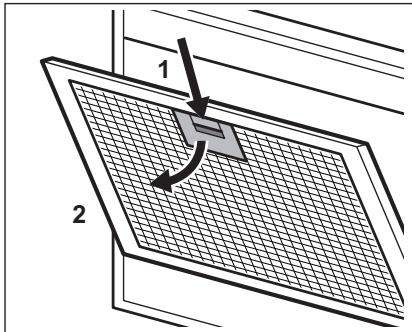
- Press the handle on the side of the filter towards the aspirator.
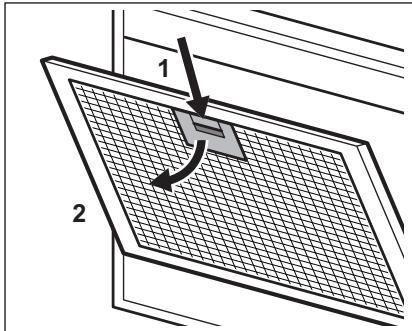
- Then pull the front part of the filter downwards, and then pull it out. Repeat these two steps for all filters. 3. Wash the filters with a non-abrasive detergent in the dishwasher or by hand.

The dishwasher must be set to a low temperature and a short cycle. The oil filter may lose its shine, but this has no effect on the performance of the appliance.
- Press the START button again, then perform the two steps in reverse order.
Repeat the steps for the hood.
4.3 Replacing the oil filter
The oil filter must be replaced if the oil filter indicator is on.

For more information about this function, see the description of the filter in the chapter "Daily Use".

WARNING! The oil filter cannot be cleaned! The filter cannot be regenerated!
To replace the oil filter:
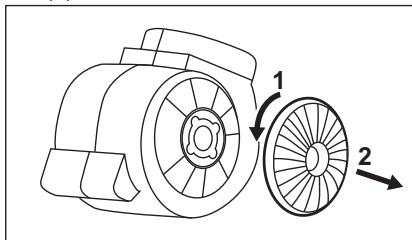
1. Remove the oil filter from the appliance. See "Oil filter" in this section. 2. Turn the filter to the left (1) and then pull it out (2).
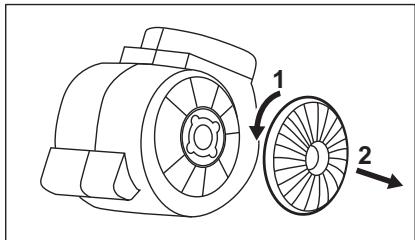
To reinstall the filter, follow the steps in reverse order.
4.4 Replacing the light bulb
The appliance is equipped with a LED light and special control equipment (LED light). These parts can only be replaced by a technician. In case of a defect, see "Service" in the chapter "Safety Instructions".
4. MAINTENANCE AND CLEANING
It is recommended to run the hood for about 15 minutes after cooking.

The control panel is touch-sensitive. Functions are activated by touching the symbols for 1 second.
Turning on the hood:
- Turn on the device by pressing the symbol ①. Now you can enable the function. 2. To enable the function, touch the symbol. 3. If necessary, touch the backlight symbol to illuminate the control panel. To turn off the device, press the symbol ① again.
3.2 Hob²Hood yuHKnja
This function uses an automatic system that connects the cooking surface to the extractor hood. Both the cooking surface and the extractor hood are connected through a radio frequency connection. The speed of the ventilator is set automatically based on the selected temperature mode of the cooking surface. There is also the possibility of manual adjustment of the ventilator using the cooking surface. The function is activated on the control panel of the cooking surface.

For more detailed information on using this function, see the instructions for the cooking surface.
3.3 Turning on the motor at maximum speed
By touching the motor for 8 minutes, it switches to maximum speed mode. After this period, the device returns to the previous speed setting.

If this function is enabled, further touches do not produce any result.
3.4 Filter warning
The filter indicator reminds you of the need to replace the grease filter or clean the activated carbon filter. If cleaning of the carbon filter is necessary, the filter indicator lights up for 30 seconds. If replacement of the grease filter is necessary, the filter indicator starts flashing for 30 seconds.

See the description of the cleaning or replacement procedures for the carbon filter in the chapter "Maintenance and Cleaning".
To reset the function, press and hold for three seconds.
Enabling and disabling the function:
- Turn on the control panel.
- Make sure that the symbols become white. 3. To enable the function, press and hold for three seconds.
If the function is enabled, the symbol lights up 5 times.
4. To switch off the function, press and hold the button for 3 seconds.
If the function is switched on, the filter indicator will flash for 4 seconds.

See the section "Cleaning the filter".
4. CARE AND CLEANING
4.1 Notes on cleaning
| Чinctашие cpeč央BA | He IncnoJIb3уITE abpa3nVBныe моюшиce cpeIcTBAи сеТКИ.
ПоверхноCTь пriбopa прOTираite Мякой Тkaньо, СmoчEHоВВ
Тeпло ВODEС MOюшIM cpeIcTВOM. |
| Послne priroTOВлЕнna HeKOtОрьie чaStи пriбopa сильно нагpe-
BaETсЯ. Визбеканe образOBAVияпTeHе NOБxODIMо дыь
пriбору OCTыть И ВbltepeТь erO hAcyxo ChIcToI TprЯПКоИ АЛIN Бу-
МaxныIMи ПОЛТeHцAMN. |
| Очицайte пЯТHA мЯrkIM моюшIM cpeIcTВOM. |
To install the filter, perform the steps described above in reverse order.
4.4 Replacing the lamp
This appliance is supplied with a LED lamp and a separate control device (LED driver). These parts may only be replaced by a qualified technician. In case of any malfunction, see the "Service" chapter in the "Safety Instructions".
5. ENVIRONMENT PROTECTION
Materials marked with the symbol should be recycled. Place the packaging in the appropriate containers for recycling of secondary raw materials. By participating in the recycling of old electrical appliances, you help protect the environment and human health. Do not throw away
household appliances marked with the symbol together with household waste. The appliance should be taken to a local collection point for waste electrical and electronic equipment for subsequent recycling.
OBSAH
- BEZPEČNOSTNÉ POKYNY A INŠTALÁCIA 122
- POPIS VÝROBKU 123
- KAŽDODENNÉ POUŽÍVANIE 123
- SETTING AND CLEANING 125
- ENVIRONMENTAL PROTECTION 126
DESIGNED FOR YOU
KOPINCHNCHKA NOIDPISHA I CEPBNC
Always use original spare parts.
When contacting the authorized service center, have the following information ready: model, product number, serial number.
For service, contact a technician with the appropriate qualifications.

Use/Disposal - Safety information

General information and tips

Information about the environment
Subject to change without notice.
1. SAFETY INFORMATION FOR INSTALLATION

WARNING!
Check the seal
brochure
Installation
Information about
safety
Installation. Section
read the safety
information before
installation.
The appliance is designed.
2. PRODUCT DESCRIPTION
2.1 Control panel

| Функциja | Опис |
| 1 | Уклычи/Исклычи | Уклычуje и Исклычуje acnPираТор. |
| 2 | Прва 6рзинa | Мотор п的对象и на пву 6рзину. |
| 3 | Друга 6рзинa | Мотор п的对象и на другу 6рзину. |
| 4 | Т repe ha 6рзинa | Мотор п的对象и на т repe ha 6рзину. |
| 5 | Мakсимална 6рзинa | Мотор п的对象и на мakсималну 6рзину. |
| 6 | Пове hahe 6рзинe | Мотор п的对象и на мakсималну 6рзину. Наков 5MinHyta урehaj ce bpaha y петхоюно поедшава-ъe. |
| 7 | Оьавшte ha e o Филтete- ру | Повсян bасда je повсян заменити ялиочитп oчирстп o-fiNilTeр са akтуВим угьем и очирстп o-fiNilTeр за мacr. |
| 8 | Hob²Hood | Инданатор Функциje за конт polу acnPираTopа сплоу за Кубаъe. |
| 9 | Лампица | Уклычуje и Исклычуje сбетпа. |
3. DAILY USE
3.1 Using the appliance
Check the recommended speed in the table.
Service information:
www.electrolux.com/support
Register your product for better service:
www.registerelectrolux.com


3.3 Activating maximum suction power
The booster function increases the suction power to maximum for 8 minutes. When this function is activated,
the display shows the remaining suction time.
When the function is deactivated, the booster function is not active.
3.4 Filter reminders
The filter reminders indicate the need to clean or replace the HEPA filter and the carbon filter. If the HEPA filter needs cleaning or replacement, the indicator will flash for 30 seconds. If the carbon filter needs cleaning or replacement, the indicator will flash for 30 seconds.
See the section "Cleaning the HEPA filter" in the chapter "Maintenance and Cleaning".
See the section "Cleaning the carbon filter" or "Replacing the carbon filter" in the chapter "Maintenance and Cleaning".
To reset the function, press and hold the button for 3 seconds.
Activating or deactivating the function:
4.2 Cleaning the HEPA filter
Jd 1

Therefore, m : x = 1 or 3x + 4y + 1 = 0

.1
(2) omega omega omega (1) aclll
.
24.11 JI 4.4