USER MANUAL INTUITION KRUPS
Thank you for purchasing your KRUPS espresso machine with bean grinder. Designed and manufactured in France to give you "cafe" quality drinks with the greatest ease, your KRUPS machine makes Espresso, Ristretto, and Lungo, and you can also manually make milk froth to create other milk-based drinks: Cappuccino, Latte Macchiato, Café Latte, etc. KRUPS has developed intuitive warning lights to make life easier. They will guide you in the use of your machine and brighten up your coffee breaks.
Your KRUPS espresso machine is equipped with advanced technologies and an intuitive touchscreen interface; in order to obtain the best extraction possible with total ease, to reveal maximum aromas and flavours from the freshly ground coffee.
Because not all coffees are the same, you can customise your drinks:
- By changing the coffee beans (different origins or roasts), you can discover different flavours. You will probably need to taste several different types to find the coffee beans that suit your tastes.
- By varying the grinding fineness you can obtain coffee that is more or less full-bodied.
- By choosing your shot length and coffee strength, you'll always achieve the perfect cup.
We wish you a great coffee experience and hope that you are completely satisfied with your KRUPS machine.
The KRUPS team
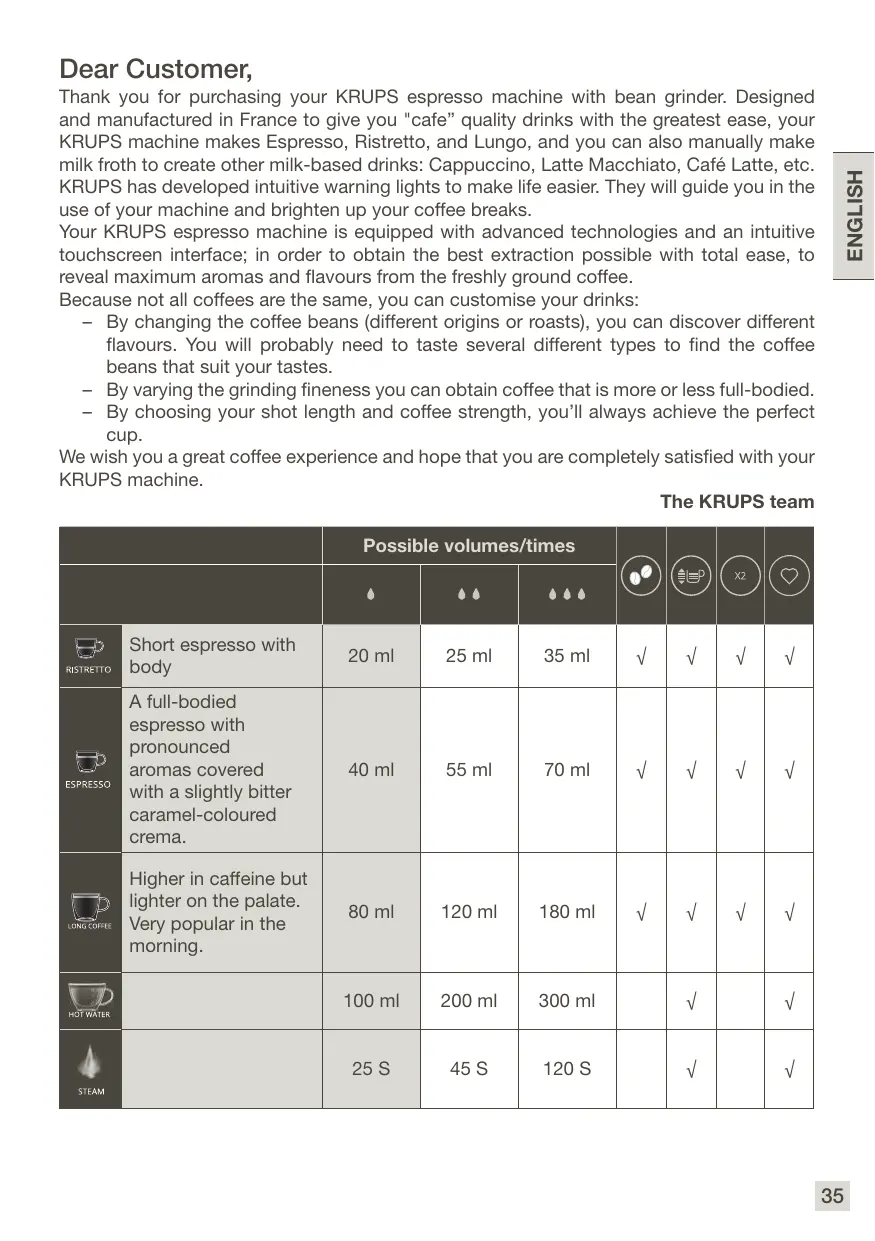
| Possible volumes/times | | | | |
| | | | | | | |
| RISTRETTO | Short espresso with body | 20 ml | 25 ml | 35 ml | √ | √ | √ | √ |
| ESPRESSO | A full-bodied espresso with pronounced aromas covered with a slightly bitter caramel-colouredcrema. | 40 ml | 55 ml | 70 ml | √ | √ | √ | √ |
| LONG COFFEE | Higher in caffeine but lighter on the palate. Very popular in the morning. | 80 ml | 120 ml | 180 ml | √ | √ | √ | √ |
| HOT WATER | | 100 ml | 200 ml | 300 ml | | √ | | √ |
| STEAM | | 25 S | 45 S | 120 S | | √ | | √ |
Advice and Tips
- The quality of the water strongly influences the quality of the flavours. Limescale and chlorine can alter the taste of coffee. We recommend that you use the Claris Aqua Filter System cartridge, or bottled water with a dry residue content lower than 800 mg/L (look at the label on the bottle), in order to preserve the flavours of your coffee.
- When preparing drinks we recommend using preheated cups (by passing them under hot water), their size adapted to your desired quantity.
- The roasted coffee beans can lose their flavour if they are not protected. We advise you to use the amount of beans equivalent to your consumption over the coming 2-3 days and to choose 250g bags.
- The quality of the coffee beans is variable and tastes are subjective. Arabica will give you delicate, floral flavours, unlike Robusta, which is higher in caffeine, more bitter and full-bodied. It is common to mix the two types of coffee to get a more balanced coffee. Please do not hesitate to seek advice from your roaster.
- We do not recommend the use of oily and caramelised beans as these can damage the machine.
- The fineness of the ground beans influences the strength of the flavours and the quality of the crema. The more finely ground the beans, the smoother the crema. Grinding can also be adapted for the desired drink.
Read the instruction manual carefully before you use your appliance for the first time and keep it for future reference: improper use will release KRUPS from any liability. It is important to respect the safety information.
SYMBOLS GUIDEFOROPERATINGINSTRUCTIONS

Danger:
Warning against the risk of serious bodily injury or death. The lightening symbol alerts you to the electricity-related dangers.

Please note:
Warning against any possible malfunction, damage or destruction of the appliance.

Important:
General or important remark for operating the appliance.
Products supplied with your machine
Check the products supplied with your machine If an item is missing, contact your hotline immediately.
Parts supplied:
- Automatic Espresso Machine, EA870810 Series
- Two cleaning tablets
- One cleaning needle brush
- Safety information leaflet
- Instructions for use
- Directory of Krups After-Service centres
Warranty documents
TECHNICAL DATA
| Appliance | Automatic Espresso EA87 |
| Power supply | 220-240V~ / 50 Hz |
| Pump pressure | 15 bar |
| Coffee bean container | 250 g |
| Energy consumption | When operating: 1450 W |
| Water container | 3 L |
| Getting started and storage | Inside, in a dry place (away from ice). |
| Dimensions (mm) H x L x P | 365 x 240 x 400 |
| Weight EA87 (kg) | 8.2 |
Subject to technical modifications. Place the appliance on an horizontal, stable, heat-resistant, clean and dry work surface
APPLIANCE DESCRIPTION
A Handle for water container cover
B Water container
C Coffee grounds collector
D Height-adjustable coffee outlets
E Grid and removable drip tray
F Coffee bean container lid
G Steam nozzle
H Water level floats
1 Coffee bean container
I Grinding fineness adjustment button
J Cleaning tablet funnel
K Metal grinding mill
2 Display panels
L ON/OFF button
M Drink selection buttons
N Coffee strength adjustment button
Important:

The drip tray allows you to collect the water or the coffee that flows from the appliance during and after preparation. It is important to always leave it in place and to empty it regularly or as soon as the floats indicate.
OVERVIEW
Overview of the control panel:
| Button | Description / General Functions |
| RISTRETTO ESPRESSOLONG COFFEE HOT WATER | Turn the machine on and off.A beep sounds each time the “ON/OFF” button is pressed. |
| Select a drink. The selection is backlit. |
| STEAM | Select the steam function in order to foam the milk to make a milk-based drink manually. The selection is backlit. |
| Press before drink selection to increase or reduce the coffee strength, by modifying the amount of ground coffee. You have 3 possible choices, from weak to strong. The selection is backlit with 1 to 3 beans. |
| Press before drink selection to increase or reduce the volume of the drink, by modifying the volume of water used. You have 3 possible choices, from a small to large drink. The selection is backlit with 1 to 3 drops. |
| STARTSTOP | Start or stop the current drink. |
| ! | This warning icon appears on the control panel when there is a problem linked to the machine's operation. For example, when there is no water, coffee beans or maintenance is required. |
| X2 | Press before drink selection to make double the amount. The selection is backlit with 2 cups. |
| CLEAN | Allows access to the maintenance functions: rinsing, cleaning and descaling. The relevant maintenance function is backlit. |
| Accesses the “Favourite” menu and your saved favourites / After a drink is made, it allows you to save a favourite. You can save 2 favourites: A and B. The selected favourite A or B is backlit. |
TOUCHSCREEN INTERFACE
Our interface and its buttons light up intuitively way to facilitate the use of the machine and to guide you.
| Light status | Meaning |
| Unlit button | The corresponding function is not selected/is not accessible. |
| Press the pulsing light (dimly lit with long flashes) | An action with the selected function is in progress |
| Press the flashing light | An action is in progress |
| Lit button/bright light | The function is selected |
INTUITIVE WARNING LIGHTS
Your machine is equipped with intelligent technology to make daily life easier. The machine automatically detects and controls the levels of coffee beans, water and ground coffee. When these containers must be filled or emptied, a warning light will notify you.
If maintenance is required, the "warning" LED A appears on the touchscreen interface and one or more of the three light bars will be lit:
| Intuitive warning light | Action to be performed |
| Water container (U) | The water tank is almost empty, it must be refilled. See 7 - REFILLING THE WATER TANK fig 1 to 7. |
| Coffee bean container (V) | The coffee bean container is almost empty, it must be refilled. See 8 - REFILLING THE COFFEE BEAN CONTAINER, fig 1 to 8. |
| Coffee grounds collector (W) | The collector is filled with coffee grounds, it must be emptied. See 9 - EMPTY THE COFFEE GROUNDSCOLLECTOR, fig 1 to 5. |
GETTING STARTED INSTALLING THE APPLIANCE
Switching on and preparing the machine

Danger:
Connect the appliance to a grounded 230 V socket. Otherwise, you expose yourself to fatal injuries due to the presence of electricity!
Respect the safety information in the "Safety information" leaflet.
Priming the machine allows the water circuits to be filled, so that the machine can operate.
Preheating and automatic rinsing will take place.
For more information, refer to section 1 - 1ST USE, fig 1 to 14.
Once the machine is switched on, it automatically switches to a default drink selection.
You can make your first coffee!
GRINDER: ADJUSTING THE GRINDING FINENESS
You can adjust the strength of your coffee by adjusting the grinding fineness of the coffee beans.
Varying the fineness of the grinding enables you to adapt to the different types of bean: a highly roasted and rather oily bean will require a coarse grinding while a more lightly roasted bean will be drier and will require a finer grinding. The finer the grinding, the more powerful the flavour.
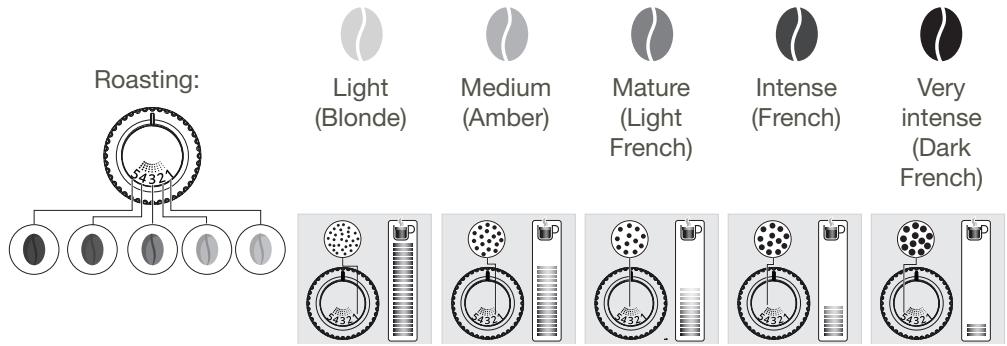
Turn the setting button located in the bean container (l), depending on your bean type and the strength of the desired flavour. This adjustment must be performed during grinding and notch by notch. After 3 preparations you will notice a very distinct difference in taste.
Adjusting the coffee output
For all drink types you can raise or lower the coffee outputs according to the size of your cup(s). Refer to section 2 - BEVERAGE SETTINGS, fig 7.
Stopping a drink mid-flow
Caution:

You can stop the preparation at any time by pressing the START/STOP button. When a cycle is interrupted, it does not stop immediately. The machine will be inaccessible for a period of time, which will be indicated by visual feedback.
PREPARING COFFEE DIRECTLY
The stages of preparing the drink:
- Bean grinding
Grind compaction
- Pre-infusion (at this point, several drops may fall into your cup)
- Percolation
Starting a drink:
- Check that the coffee bean container is full. If there is no coffee, the machine will notify you via a warning light (V). Then press START/STOP to confirm the coffee refill. Refer to section 8 - REFILLING THE COFFEE BEAN CONTAINER, fig 1 to 7.

Caution: Ensure that no water is poured into the grinder, so as not to damage your machine.
- Check that the water tank is filled. If there is not enough water in the water tank, the machine will flash up an alert (U) and ask you to fill the tank. Refer to section 7 - REFILLING THE WATER TANK - fig 1 to 7.
- Place the cup or cups under the coffee nozzles.
- Press the button for the chosen drink.
Possible settings
For more information, refer to section 2 - BEVERAGE SETTINGS, fig 1 to 9.
FAVOURITES FUNCTION
The Favourites section, accessible by pressing , allows you to access your preferred drink with a single press. Refer to section 2 - BEVERAGE SETTINGS, fig 1 to 9.
You can save a Favourite A and a Favourite B. Refer to section 3 - SAVE YOUR FAVOURITE SETTINGS / REPROGRAM A FAVOURITE, Fig 1 to 6.
- A favourite can only be saved after a drink has been made. You then have 10 seconds to press the Favourites button to save your preferred drink in A or B.
- You can customise your volume by stopping the drink while it is running. Press when it is running. The volume of your drink will then be saved in favourites.
Important:

When the flow stops, the machine returns automatically to its default drink. It is no longer possible to save it as a favourite.
If you save a favourite when a drink has already been saved, that drink will be deleted.
- Once a favourite has been saved, you can make your preferred drink by pressing a
single button. Then, follow the instructions in section 4 - START A FAVOURITE BEVERAGE, Fig 1 to 6.
DRINKS MADE USING STEAM
The steam nozzle (G) foams the milk to make a Cappuccino or Café Latte. As the steam production requires a higher temperature than for making an espresso, the appliance provides an additional preheating phase for the steam.
For manual milk foaming, use pasteurised or UHT milk from the refrigerator (3 - 5^) . The use of special milks (micro filtered, raw, fermented, enriched) or plant milks (rice, oat or almond milk) can give results that are less satisfactory in terms of quality and quantity of froth. It is not possible to make 2 cups at the same time: the "x2" function is not available.
The steps for making this drink with steam can be found in section 5 - MAKE A MILK RECIPE, fig 1 to 11.

Please note:
There are 2 preheating times: one for the machine and one for the steam. The LED flashes to indicate that the machine has finished preheating. Press "START/STOP" again to start steam production. See section 5 - MAKE A MILK RECIPE, fig 8.
Caution: risk of burns.
Important:
Steam production stops automatically depending on the steam time selected previously. You can press "START/STOP" before the end of the cycle if the amount of milk froth is sufficient.
THE CYCLE DOES NOT STOP IMMEDIATELY.
If you do not press the "START/STOP" button, the machine returns to its initial position after 2 minutes.
- The Favourites program is available for the steam function.
Advice and Tips:
To make the milk froth, fill 1/3 of the cup with milk. Immerse the steam nozzle in the milk and hold it against the edge of the cup. Tilt the cup 45^ . This technique creates a milk whirlpool, which makes the optimal amount of foam. By following these tips, you will create a barista-quality milk froth ready to be used to make a milky drink.
CLEANING THE STEAM NOZZLE

Important:
In order to obtain identical froth each time, we recommend that you carefully clean the tube and its connector AFTER EACH USE. Do not wash the steam nozzle in the dishwasher. It is recommended to clean the steam nozzle when not used for a longer period (more than 2 days)

Danger:
After using the steam function, the nozzle may be hot, we advise you to wait a few moments before handling it.
-
The steam nozzle can be removed for deep cleaning. Wash it with water and some non-abrasive washing up liquid with a brush. The steps for cleaning the steam nozzle can be found in section 6 - CLEAN YOUR STEAM NOZZLE, Fig 1 to 8.
-
To remove any traces of milk from the steam nozzle, place a container under the nozzle and launch a hot water drink. Then, take a clean, damp microfibre cloth and wipe the nozzle.
- If steam does not come out, the nozzle may be clogged: unclog with the needle supplied. See section 6-CLEAN YOUR STEAM NOZZLE, Fig 4 and 5.
HOT WATER DRINKS

- You can adjust the volume of the drink according to your preference. However, it is not possible to make 2 cups at the same time: the "x2" function is not available.

- Press STOP. The machine preheats (the lights flash), then the hot water starts to flow.
- The Favourites function is available. See section 3- SAVE YOUR FAVOURITE SETTINGS / REPROGRAM A FAVOURITE, fig 1 to 6.
GENERAL MAINTENANCE
Carrying out proper maintenance will prolong the life of your machine and preserve the authentic taste of your coffee.

Important:
To make things simpler and more efficient, your Krups machine has an automated cleaning system: a tablet is all that's needed! The appliance requires no manual maintenance. We guarantee thorough cleaning at high temperatures for a perfect coffee every time.
The drip tray receives the waste water.
The coffee grounds collector receives the grounds extracted.
When do I empty the drip tray? See section 10 - EMPTYING THE DRIP TRAY, fig 1 to 5.
When the floats are in the upper position, indicating that it is too full.
For hygienic reasons, as this container is in contact with milk and coffee, we recommend that you fully dismantle and clean daily each element under hot water.
It is recommended that you let it air dry before you put it back in the appliance. You can put the drip tray in the dishwasher.
When do I empty the coffee grounds collector? see 9 - WARNING LIGHTS (W): EMPTY THE COFFEE GROUND COLLECTOR, fig 1 to 5.
When the "alert" LED on the interface and the warning light (W) are lit up.
You can periodically empty it before the machine asks you to but when the machine is turned on so that it can register that the bin has been emptied.
For hygienic reasons, we recommend that you clean the coffee ground container daily under hot water with soap and sponge. It is recommended that you let it air dry before you put it back in the appliance.

Important:
The coffee grounds collector has enough capacity for about 9 coffee portions; not regularly emptying the coffee grounds container and drip tray as indicated above can damage your machine.
MAINTENANCE OF WATER TANK AND COFFEE BEAN CONTAINER
For the preservation of best coffee flavor impacted by the quality of the water and hygienic reasons, we advise you to use only fresh water and to daily clean the water tank with hot water and a bottle brush.
Coffee beans can leave greasy residue on the tank that can affect the quality of the coffee. For the preservation of best coffee flavor and hygienic reasons we recommend you to wipe it with a dry, soft cloth each time it needs to be refilled.

Important:
Do not clean with water, the presence of water in the bean hopper could damage the machine

It is recommended that you let it air dry before you put it back in the appliance
Rinsing the coffee system
This function is available at any time, unless the machine requires other maintenance.

- Select the rinse function

For hygienic reasons, it is recommended to rinse the coffee system daily or when not used for a longer period (more than 2 days).
This function can be automatically done on start up. For more information, please refer to "OTHER FUNCTIONS"
Full automatic cleaning program for the machine, 3 times a year (approximately 13 minutes)
For the preservation of best coffee flavor and hygienic reasons we recommend you to clean the coffee system 3 times a year.
For this cleaning you will need:
- 1 KRUPS cleaning tablet
- 1 container of at least 600ml
The cycle will link two phases:
- 1 cleaning phase
- 1 rinsing phase
When do I run this program?
When it is necessary to run a cleaning program, the appliance notifies you.
When the machine is switched on, the "alert" LED and the LED on the interface will light up. See 11 - AUTOMATIC COFFEE SYSTEM CLEANING PROGRAM, fig 1 to 27.
- You can also start a cleaning cycle when you wish: by pressing and selecting the cleaning program, indicated by the LED K. Then see 11 - AUTOMATIC COFFEE SYSTEM CLEANING PROGRAM, fig 1 to 27.

Important:
You do not have to run the cleaning program as soon as the appliance requests it, but you must do it reasonably soon after. If cleaning is postponed, the alert message will remain displayed as long as the operation has not been performed.
Important:

if you unplug your machine during cleaning or in the event of electrical failure, the cleaning program will resume the current step at the time of the incident. It will not be possible to postpone this operation: rinsing the water circuit is mandatory. In this case a new cleaning tablet may be necessary.
Automatic descending program (approximately 20 minutes)
Descaling your machine ensures its proper functioning and eliminates any deposit of limescale or tartar.

Caution: If your appliance is equipped with our Claris Aqua Filter System cartridge please remove it before the descending procedure (see "Removing the Claris Aqua Filter System cartridge").
- 1 dose of KRUPS descaler
- 1 container of at least 600 ml
The cycle will link three phases:
- 1 descending phase
- 1st rinsing phase
- 2nd rinsing phase
When do I run this program?
The appliance notifies you when it is necessary to run a descaling program.
Descending your machine ensures it proper functioning and eliminate any deposit of limescale or tartar This step is very important to ensure the proper functioning and longevity of your appliance. When the machine is switched on, the "alert" LED and the LED on the interface will light up. Then, refer to section 12 - AUTOMATIC DESCALING PROGRAM, fig 1 to 30.

Important:
The machine lets you know when it is necessary to do so. However, you can start
descaling the machine at any time by pressing CLEAN and selecting
The Claris Aqua Filter System cartridge
Installation:
Removal:
- Remove the water tank and empty it.
- Remove the filter cartridge.
- Then follow the instructions above, in "Installation", to change the used cartridge.
OTHER FUNCTIONS
Adjustments
You can customise various settings on your machine, by adjusting the parameters of the machine.

Important:
The machine is connected, but not switched on.
Press for 3 seconds on , you will hear a beep.
| Coffee temperature | Press RISTRETTO then to set the coffee temperature. There are 3 temperature adjustment levels for your coffee drinks. The setting is at 2 drops by default. |
| Low Medium High |
| Auto OFF | You can also choose the length of time after which your selected appliance will automatically turn off in order to optimise your energy consumption: 15 minutes, 30 minutes and 3 hours. The setting is at 3 hours by default.
Press ESPRESSO then to set auto OFF. |
| 15 mins30 mins3 hours |
| Auto rinsing ON | You have the possibility of setting up an automatic rinsing which guarantees the preservation of best coffee flavor and an optimal hygiene.
Press LONG COFFEE then to set auto rinsing to ON. |
| InactiveActive |
| Inhibit the “no beans” function | You can remove the function that detects the absence of coffee beans. You will no longer see the corresponding alert lights. The setting is active by default.
Press HOT WATER then to inhibit the “no beans” function. |
| InactiveActive |
"No beans" function
This function is used to predict the lack of coffee beans in the coffee bean container. This lack is indicated by the warning light (V), the alert and the stopping of grinding while in operation.
To resume the current drink after adding beans, press "START/STOP".
Example:
- Starting a drink
- Detection of a lack of beans: warning light (V), alert (A) + grinder stop
Put coffee beans in the coffee bean container
- Press "START/STOP"
- Restarts the drink, which means coffee is not wasted.

Please note:
Using greasy coffee can lead to incorrect detection as the beans descend poorly. If the detection function is activated, press the START/STOP button again to continue making the drink.
The function can be inhibited manually (see "OTHER FUNCTIONS" - "Inhibit "no beans" function).
PROBLEMS AND CORRECTIVE ACTIONS
| PROBLEM | CORRECTIVE ACTIONS |
| Operation | The machine displays a fault, the software is frozen. OR Your machine has a malfunction. | Turn off and unplug the machine, remove the filter cartridge, wait 1 minute and restart the machine. Press and hold the ON/OFF button for at least 3 seconds to start. |
| The appliance does not turn on after pressing the ON/OFF button (for at least 3 seconds). | Check the fuses and the power socket of your electrical installation. Check that the two power plugs are correctly inserted into the socket. |
| A power failure has occurred during a cycle. | The appliance resets automatically when it turns back on. |
| The grinder stops while making the drink and the bean LED lights up. | Add beans and press start. |
| Grinder turns empty. | The machine self-learns. |
| Use | The grinder makes an abnormal noise. | Foreign bodies are surely present in the grinder. |
| There is water under the appliance. | Before removing the water tank, wait 15 seconds after the flow of coffee so that the machine finishes its cycle correctly. Verify that the drip tray is well positioned on the machine. It must always be in place even when the machine is not in use. Verify that the drip tray is not full. |
| The adjustment button for the grinding fineness is difficult to turn. | Turn the grinding fineness adjustment button only when the grinder is operating. |
| The appliance has not issued any coffee. | An incident has been detected during its making. The appliance is reset automatically and is ready for a new cycle. |
| You have used ground coffee instead of coffee beans. | Use your vacuum cleaner to collect the ground coffee contained in the bean container. |
| Water flows from the coffee nozzles when the machine stops. | Automatic rinsing for cleaning the coffee nozzles and prevent clogging. |
| Steam | The steam nozzle makes noise. | Check that the steam nozzle is correctly positioned on its end. |
| The steam nozzle of your machine appears to be partially or completely clogged OR if the steam or hot water stops prematurely and the alert on the face flashes. | Check that the hole in the tip is not blocked by milk or limescale residue. Unclog the holes using the needle supplied with your appliance. See section 6 - CLEANING THE STEAM NOZZLE, fig 1 to 8. |
| The steam nozzle does not work or produces little foam. | For milk-based drinks, we advise you to use fresh, recently opened pasteurised or UHT milk. Using a cold container is also recommended. |
| No steam comes out. | A. During the first use of a steam cycle, if no steam comes out correctly:
· Check that the hole in the tip is not clogged.
See section above: “The steam nozzle of your machine appears to be partially or completely clogged”.
· Carry out the following protocol once and only once:
Empty the water tank and temporarily remove the Claris Aqua Filter System cartridge. Fill the tank with mineral water high in calcium (>100 mg/L) and make successive steam cycles (5 to 10 cycles) in a container until a continuous jet of steam is obtained. Put the cartridge back in the tank.
b. The steam nozzle had already worked:
· Check that the hole in the tip is not clogged.
See section above: “The steam nozzle of your machine appears to be partially or completely clogged”.
If after performing the above steps, the steam Nozzle still doesn’t work, please contact KRUPS Consumer Service. |
| The water or the steam leave the steam nozzle abnormally. | Check that the steam nozzle is correctly positioned on its end. At the beginning or end of making the drink, some drops may fall from the steam nozzle. |
| Appearance of steam under the bean tray lid. | Close the cleaning tablet funnel located under the lid. (J) |
| PROBLEM | CORRECTIVE ACTIONS |
| Maintenance | The machine does not request descending. | The descending cycle is requested after a large number of steam nozzle uses. |
| Some grounds are in the drip tray. | A small amount of ground coffee can get into the drip tray. The machine is designed to evacuate any excess ground coffee so that the percolation zone remains clean. |
| The warning messages are still displayed after the coffee grounds collector is emptied. | Reinstall the coffee grounds collector. |
| Maintenance | After having filled the water tank, the warning lights remain on. | Check the correct positioning of the tank in the appliance.
The floats at the bottom of the tank must move freely.
Check and unlock the floats if necessary. |
| Drinks | The coffee is flowing too slowly. | Turn the “grinding fineness” button to the right to obtain a coarser ground coffee (depending on the type of coffee used).
Perform one or several rinsing cycles.
Change the Claris Aqua Filter System cartridge. |
| The coffee is too light or not full-bodied enough. | Avoid the use of oily, caramelised or flavoured coffees.
Check that the bean container contains coffee and that it is moving down correctly.
Decrease the volume of the drink and increase the strength of the drink using the DARK function.
Turn the “grinding fineness” button to obtain a finer ground coffee.
Make your drink in two cycles using the 2-cup function. |
| The espresso or the coffee is not hot enough. | Rinse the coffee circuit before you start to make your coffee.
Increase the temperature of the coffee in the machine settings.
Heat the cup by rinsing it with hot water before starting to prepare the drink. |
| Clear water drips from the coffee nozzles before each coffee is made. | During the pre-infusion function, water may escape from the coffee nozzles. |
If one of the problems outlined in the table persists, contact KRUPS Consumer Service.
BESCHRIJVING VAN HET APPARAAT
BESKRIVEALSE AF APPARATET
INSTALLATION AF APPARATET
GENERELT VEDLIKEHOLD
Pulse 📦 📦 📦 📦 📦 📦 📦 📦 📦 📦 📦 📦 📦 📦 📦 📦 📦 📦 📦 📦 📦 📦 📦 📦 📦 📦 📦 📦 📦 📦 📦 📦 📦 📦 → 🨀 🨀 🨀 🨀 🨀 🨀 🨀 🨀 🨀 🨀 🨀 🨀 🨀 🨀 → → → → → → → → → → → → → → → → → → → → → → → → → → → → → → → → → → → → → → → → → → → → → → → → → → → → → → → → → → → → → → → → → → → → → → → → → → → → → → → → → → → → → → → → → → → → → → → → → → → →
Important:

Paraocularly, the opacification of the eye is necessary to be performed in order to achieve a good visual acuity. The opacification of the eye is achieved by using the following methods:
PROBLEMAS Y MEDIDAS CORRECTIVAS
PROBLEMAS AÇÖES CORRETTIVAS
UDRZBA NADRZKY NA VODU A NADOBY NA ZRNKOVOU KAVU
FUKCIA OBL'UBENE RECEPTY
Funkcia Oblübené recepty je dostupné pomocou tlacidla a vám umoznjue pristup{jedném tlacidlom k vašim obluběnym nápojom vdáka nastaveniam, ktoré ste vykonali. Postupujte podla kapitoly 2 - NASTAVENIA NÁPOJOV, obr.1. až 9.
Je maye uloiz oblubeny napoj A a obIubeny napoj B. Postupujte podla kapitoly 3 - ULOZIT VASE OBLUBENE NASTAVENIA,OCR.1 a6.
- Oblubeny napoj je moźne ulożit iba po ukonćení priḥravy receptu. M ate 10 sekünd na stlaczenia tlačidla Oblubeny recepta na ulożenie oblubeného napoja A alebo B.
- Je możné prisposobit objem zastavením pripravy počas vytekania nápoja. Počas vytekania

stlacte tlaicidlo .Vyteceny objem receptu sa ulozi medzi oblubené napoje.

PRIPRAVA POMOCOU PARY
PROBLEMY IDZIAŁANIA NAPRAWCZE
Ybaxaembl nokynaTeNb,
Blaroapum BAC 3a nokynky ABtomatnuecko KoemauinbI co BCTpoehno Koemolkn KRUPS KRUPS. YcTpoiCTBO, pa3pa6oTaHHe u Co3daHHe BO OpaHUn, no3BOJNT Bam rOTOBHTb HAnITKn, NO KaeeCTBy HnEm He yctyauOuime npoecCNOHaJIbHO CBapeHHOMy KoFe, HO pInr ETom C ropazdo MehushmN ycINnmaMn. C NOMOsbU yctpoiCTBa KRUPS Bbl cMOxete HaclaxJaTbCra 3cnpecco, PnCTpeTTO, LyHTo, a TaKke NOnyAtb MOnOCHyIO NeHKy DnA PrnROTOBHeHnHaHNTKOB C MoLOKOM: kanyuHNo, NaTte MaKKNaT0, NaTte n T. d.
Дляnomоци BO B3aIMOeIcTBn C yctpoiCTBOM KOMpaHЯ KRUPS pa3pa6oTaJa NHTyNTuBHBle CBETOBbIe CnHaJIbl. OHI NOMoRAHOT NOJb3OBAtbcr YcTPOIcTBOM, COO6uaJ O COCTOHN npiroTOBLeHnI Kofe.
AbTomatuecka Koemamaunha KRUPS co3daHa c npmHeHem COBpeMeHHbIX TexHOJOrn I OCHaSeHa HHTyNTNBbIM ceHCOPbIM INTEpEeCom, 6laOdapra Yemy Bbl JERKO NOJyUte HAINTK, HANOJIHeHHbIe BCEI rAMMOI BKycOB n apOMaTOB CBExeMoIOTbIX KOeHbIX 3epeH.
Поскольку кофейнBLE He NaHTKn He NoXoxNДpyrHaДpyra, Bbl MoXeTe CdeJaTb CBOI KoΦe HNDINBvDyalbHbIM:
- IcnoIb3yra pa3HbIe copTa KofoeHbIX 3epeH (pa3nUHbIe Cmecn nnn CTepeHn 06JapKn), Bbl MoKeTe packPbIBaTb pa3nUHbIe BKycbl Kofoe. Bam, BepoA rTHo, He ydaCTc n nepBoro pa3a npO6paTb KofoeHbIe 3epHa noD cBOi BKyc.
- I3mehra cTepeh nOMoHa 3epeH, MoXHO nOlyuHTb 6Olee nn MeHee HacbiueHHb KoFe.
- BbI6IpaJy aIshky no BbICOTe n CTeneHb KpeIOCTn Kofoe, Bbl HauJeTe CBOI NdeaJIbHbI BapnaHT.
XeIaem Bam MHOxEcTBO pIpyTHbIX KoOeHbIX MOMENTOB I HaJeEMcra, yTo yCTpOJCTBO KRUPS IOCTaBNT Bam He3a6bIbAemoe yIDOBONBJCtBne.
Komahda KRUPS
PekomeHnyetcdaTb emy BbICoxHyt b HbO3dyxpepepe yctaHOKo6paTHO
Ppombibka KofoHoro KOHTypa
3TaФyHKUЯДOCtUHbBcERda,KpOmeCnyaEBKOraTpe6yETcI npOBeHneIpyrOBOuDa 06CnyxuBaHnI.
IocTaBbTe eMKoCTb noi cOnNo noaHn npa.
- 3aynycntte yctpoinCTBO n HaxmTe KhONkY
CLEAN
BbI6epnte yHKnIO npomblkN


Haxmte 3aynycka npombIKn.
По Гинчесим-coбрахеням pekomeнуетс npombyBaT cnCTemy npiroTOBNeHЯ KoFeExeJHeBHO nIIN Bcnyae, KOrda OHa He nCNoJIb3yETcdoJIroe Bpemr (6Olee 2 dHei).
3Ty yHKUIO MOxHO BbIOnHHTb ABTomAtuCeCKN BO BpeM 3aynsKa npu6opa. IOnoHNtBnBHe CBeDEHn CM.B pa3dJe «DpyTNE OFyHKUIN
Поррамma abTomatnieckо ouNCTkn BCero yctpoiCtBa, 3 pa3aВ rod (npn6n.13 mnHyT)
Для coхраеня Hanluyшero Bkyca n apomata Koфe n no ГиreneHuYeCKm COO6paKeHЯ m pekomehdyetcry Ounuatab cnCTemy nprirotOBleny Kofo 3 pa3aВ roJd.
Korda BbInonHnTb npoueDpy?
Pn6op ybeomraT O Heo6xOaHmocTN BbIOnHeHn PpOrpaMMbl OunchTkN OT HaKIN.
OuchTka KofoemaunHbOT HauKIN oOecneuBaet ee npabInbHyIO pa60Tu n UcTaPaHReT OTIOXeHn
HaKINn IIN N3BeCtKOBOrO HaJIeta. 3TOT war ouehb Baxhen OBeCneueHn PpaBnBHO pa60TbI
n dInTeJbHoro cpoKa cnYk6bI np60pa.
Hakunu. Ipn 3ayncke yctpojctBa 3aropaoTcra HndnkaTOp «BhImaHne!» n HndnkaTOp Ha ceHCOPHO nnHeN. DaJIee cm. pa3dE12 — INPOrPAMMA YdaJIeHnRA HAKUNU, pnc. 1 - 30.
BaxhO!

KoemauHnA onOBecNTBACO Heo6xOaMOCTN BbIINHeHNA OUcTKn OT HaKNPi. Tem He MeHee Bbl MoKeTe 3aNyCTnTB cNkI ydaJeHna HAKPiB JIO6oe BpeMa, Haxab KONKy CLEAN n Bbl6paB
IopaT Ta peKomeHdaii
- YkicTB BOIN CINbHO BnINBaH Ja KICTB rOToBOro HANOIO. HaKIn i XJOp MOKytB 3MInHOBAcTm CMAK KABN. Mn peKOMeHNyEMO BNKOpNCTOByBATn KApTpIaIX φiNbTPaCi Claris Aqua Filter System a60 BOY 3 mINEpanlaizieMOmeIe 800 Mr/π (dINB. eTNKeTKy Ha PnAùs), οo6 36epertn cnpaBXHI apomat Kabn.
-Для пиготуваим HaNoIb Mн peKOMeHdyEm BOkOpncTObyBaTn nonpeedHbO harpiti chaшки (npomnti y rapaui BoDi), po3mipn knxpiXIOJyDЯBn6paHOi KjIbKOcti.
- 06cmaxehi kaboI zepHa moKytb BtpaTtN cBn apomat, kKIO 36epiraObCBAIKpntmM. Mn paIMMo BnKOpNCToBvBaTn KInbKiCTb 3epeH, IIO BIDNOBIAe BAOWMy CNOXNBAAHIO npotraROM HactynHnx 2-3 dHbI, i BIDATn nepebary ynaKOBkam no 250 r.
-Якіть кавobих зерен e різною i оцінhoeься cy6'ekTNBHO. Apa6ika MaE tohkn KBIkOBuApomat Ha BiDmHy BiD po6yctn,яka MICTNtB 6araTo Kofoeiny MaE 6iNbI ripKny Ta Hacnuehen cmaK. LiДBA copTu NaCTO 3MiUyIOb ДЯл OTPUMAnHry 6iNbI 36aIahCOBaHO KaBN. Be3 BaraHb 3VeptaTec7a npaoJo Do npodabz KaBN.
- Mн He peKOMeHnyEmo BnKOpNCTOByBaTn MaChi Ta KapameJIi3ObaHi 3epHa,як MoKyTb NOшКODNTn KaBOMaShHy.
- CtyniHB nepemelenen 3epeh BnIbAe Ha miuHcTB Kabn i kicTB nIHKn. Ym dpi6hiin CTyniHB nepemelenen 3epeh, Tm 6ilbsh Kpemonodioho 6yde nIHka. Kpim TOrO, CTyniHB nepemelenen MOxHa HanaTbyatn BiINOBIDHO do Tnpy HanoIO.
BAJKJINBA IHΦOPMAÇIŋ PPO IPIPNIJIa
Ipeed nepiHm BnKOpncTaHHm npnlaNy yBaXHo npouHTaTe iNCTpykciio 3 ekCnlyatauii Ta 36epejxtb ii, aJke HeHaJIeXHe BnKOpncTaHHn npnlaNy 3BilbHRe KOMpaHIO KRUPS BiD 6yDb-koB iDnOIdaIbHocTi. BaXInBO DoTpIMyBaTcN pabIN texHikn 6e3neKn.
PIONCHEHHA CIMBOJIB B IHCTPYKlI3 EKCJIYATAUJI

He6e3neka:
3aCTepexeHnIpo MoXJIbICtB HeuacHOro BnPaIky a6O OTPmuHaHHcepi03HOITpaBMn. 3o6paXeHnI 6nscKaBkn PonepeJkae Ipo He6e3neKy, NOB'raHy 3 eEKeTpiuHm CTrpymom.

yBara!
PonepeJxehn npo MoKInBe BHHKHeHn HeCnpaBHOCTe, NookdKeHb a60 nolomKn npnilady.

BaxklnBO.
3aŋbHa a6o BaxKnBa peKomeHdaizi 0do pO60tnpnlaNy.
Komplékt noctaçaHn pyuIaIy
IpebeipTe KOMPnKeT nocTaunHn npuJa. Kaio He Bnctauae kOicb deTani, 3aTeJefoHynte Ha rapauy lihiIO.
KOMnJIeKT NOCTaHaHHaPnlaNy:
- ABTomatuHa KaBOMaHnHa cepii EA870810
- 2Ta6JIeTKnIyOuIeHnI
- Tofka dIy ouHnEHH
Ihctpykui3Texhikn6e3nekn
IHCtpyKzj3eKcnnyataaii
-Перених abtopиobahinx cepbiKrups
-「gapaHTiHi DOKyMeHTn
TEXHIUHIXAPAKTEPNCTIKN
| Пробadge | АBSTOMатчна кавомаша серii EA87 |
| Еlektrочne жавлentesя | 220-240 B~ / 50 Гц |
| Тиwickуnomпi | 15 бар |
| Контейнера在这方面可靠您<|im_start|>assistant | 250 Г |
| Стоожиманая[eheprii] | У розочу му ржиму: 1450 Вт |
| Рezервayap за вори | 3л |
| Пдготовkadoespo6otniipozmiiцhevny | Усяревни розimциень, в сухому мicци (позади вidi дiiНизькх Tempeparatur) |
| Розміри(MM)ВхДхГ | 365 x 240 x 400 |
| Bara EA87 (кг) | 8,2 |
MoxkniBt texhui 3miHn. YcTaHOBiTb npiJaHa cTiIky, rOpu3oHTaJIbHy, jKapOTpNBky, uNCTy i cyxu po6oy nuBepxHIO.
ONNC PPNJAAy
A Pучka кршкpe3epyaba Дя ВОДи
B Pe3epByap nla BOIN
C KoHTeINHeP dIa BiIDpaucboBaHOi KABN
D OtvBopn noaqui KaBn, 1o peyIIOJbCra nOBUCOTi
E PewiTka i 3Himnni ndon JpnapeIb
F Kpnuika KOHTeHepa IJI KaBOBx 3epeH
G Papobe conno
H Ponnabci-iHdNkaTopnpBn BODn
1 KOHTeHepIgKaBOBux3epeH
I PerylaTOp cTypeHn nepemEnIOBaHHaKABN
OTBip Ta6nTn dny Ounuehn
K MetaJIeBn MInHOK JxOpHOBOrO TIny dIpy nepeMeJIIOBaHHa KaBu
2 PaHeIb KepyBaHHa
L Khonka ON/OFF (YBIMK./BIMK.)
M Khonkn Bn60py HanoiB
Baxlmbo.

Плдон Дя крапель ВИКОРиСТОВЕТСЯ Дя 3бору BODи a60 KaBN, со BИТIkaE 3 npunaу пid чac i niCЯ ригOTуВанн.ВaxknIBO 3aBxДи 3aIIuSATи IORo Ha Micci i peryIЯрно снорожнIOВати, a60 ΜОраЗ, як NonlaBICIcHrHJI3yBaTUMyTb npO HeOxidiHicTb OUHSeHH.
PANHEJI KEPYBAHNA
Oncn nahei kepyBaHHa:
MoxkIiBiHaJIaIStTyBaHnH
Длготриманндадатковоифорmaцii дв.po3дн2-HALAHTYBAHHH HANOIB,man.1-9.
ФУHKLЯ《УЛIOБЛЕHΙ HANOI》
MehIO «YIIO6JIeH I HanoI', DocTyI Do JAKORO MOKJINBIM 3a DONOMORIO KHOJKN , DO3BOJANE, npiroTOyBaTn BaI yIIO6JIeH N Hani ODNHM HATNCKAHHM 3aBDAJK M OJOJIBOCTI 36epirAtn B, nam'rti HanaSTyBaHH.ДИВ.po3dI2-HAIAHTYBAHHRAHANOIB,man.1-9.
Moxha 36epeTn B nam'rTi yIIO6JIeHn Hani A Ta yIIO6JIeHn Hani B. DInB. po3d13 - HAIaHTyBAHb DJIYIIO6JIeHnx HANOIB man. 1-6.
- 36epertn yIIO6JIeHn Hani mOJHa IInse nCJz 3akIHueHH npiroTuBaHH. IOTIM y BAC e 10 cekyH, 106 hATncHyTn Ha KHOKBy «YIIO6JIeH i Hanoi» Ta 36epertn yIIO6JIeHn Hani A a6o B.
- Moxha hanaHTyBaTn 06'EM, 3ynHnBUn npriroTyBaHHa. HAnCHiTB nID qac noaHi haHOJ. PicIe cIbOro 06'EM 6yJe 36epexeHo Jk napaMeTp dnyuIObeHeRo hanoIO.
BaxnIBo:

Picna nodaui Hanoi KaBOMaunHa aBTOMaTnH0 nepeMnKaeTbcra Ha Hanii 3a 3amOBuyBaHHa. Tenepe He moXHa 36epertn HanaTuBaHHy yIIOJeHO r Ho anio.
ЯкwoВиЗберекеВ«Улюблелe»нади,якni paNiше ВжE 6уВ 3берекeнni,поpe徝п napametprnБуDEВДaJIeNo.
OuHJENHNAPOBOTO COIIA

BaxJnBO:
Ioo6 koxhoro pa3y OTPmUbTaN OndaKOBy nIKky, peKoMeHdyeTbcra PICJIa KOKHO BVKOPNUCTAHN pyorpamn pnproTuBaHHn MoOnuHnx HanoiB peTeNbHO npomBuATn Tpy6ky dna MoLoka i napobe conno. He mniTe napobe conno y nocydomiHnMaunHi. PeKoMeHdyeTbcra Ounchatn OTbip dna Indaqi napri, AkiO BiH ne BVKOpncTOByBaBCr BnpoDbX Tpnbaloro uacy (6ilbwe 2-x dnHB)

yBara:
Picn npirotoybaHHa 3 BnKopncTahHnnpu cnoLo moKe 6ytn rapaum, paNMO nOueKaTu KJIbKa XBUNH, nepu HIX TOpKaTcNc Ioro.
- Napobe coŋllo moKHa 3Himatn Dny peTeIbHoro OunIeHHa. BmInTe Ioro BOIOU 3 HeBeJIHKoO KJIbKICTHo Hea6pa3INBHO MmHoro 3acOby Dny IocuSy 3a DonOMorOIO uITKn. DeTalbHy iNΦopMaciio npo Te, Jk OUnCTHTn napobe coILO, nIB. B po3dini 6 - OUnIeHHA NAPOBORO COIIA, man. 1-8.
- Uo6 Bnndn cnin moJoka 3 napOBoro conna, noCTaBe emHicTB niD conno i 3anyctitb yHKciu npdaui rapaoyi BOIN. IOTIM Bi3bMitb uHCTN BOJOrn pyuHnK i3 mikophiipn Ta npotpih napobe conno.
-Якшпара He bixoДиТь, conло може 6уTN 3aCmblueHe: npOuHcTiB JIoro roJIkoU, lo BxOДиТь y KOMnJIeKt.ДИВ.po3dɪJ 6-OчиSEHHЯ NAPOBOFO COJIλA,man.4i5.
ПОДАЧА ГAPЯЧОВОДИ
- NocTaBte yaukny iN PAOBE COJIO (G).

- HatnchItb KHONKY HOT WATER
- Bn mojete BiikopunybaTn KInbKicTB HanoIO BiINOBiHO Do CBOIX yNoO6aHb. IpoTe nprirotybaTn 2uaShKn OndHocHo HEmoXJIbO: yHKsIg «x2» HeIOCTynHa.

- Hatncihtb KhoNky. KabomauHa nonepedHbo Harpibaetbcra (cbitnoBi iHdkaTOpn «6IImaIoTB»), a NOTIM nOdaeTcra rapya Boda.
-Достунна Функця «Улобених(haои)ДиВ.po3дЛ 3-3БЕPEXFEHHAHAHTYBAHb YIIOBJEHIX HANOIB man.1-6.
IOBTOBE OBCJNYTOBYAHH
IpaBnJIbHe 06cIyROByBaHHn IpoIobXnTb TepmH cIyK6n KaBOMaunHn i 36epeKe cnpaBXnI CMAk KAb.

BaxJIMBO:
Ipoctiie Ta efeKtBHIe: Krups dae 3Mory ouNCTn KaBOMaHIny aBTOMaTNUHO: BcTaBTe Tabletky, i BCE roTOBO! He notpi6HO bpyHy ouNtBuATn 3aBaPbOBAJHy KaMepy. Mn rapaHTyEMo Bam peTeJIbHe ouNtEHHra pni BnCoki TeMnepaTypi dna OTPMaHHra ideaIbHo'i Kabn.
OBSCLYTOBYBAHNA KOHTEINHEPA IJI BIDINPAcBOBAHOI KABN I PII DOHA IJI KPANEJIb
y niDIOH dIa Kpanenb notpanJae 3aJIuKOBa BOda.
Y KOHTeHepIy BIDpaaBbOaHOi KABNOTpanJIe BiDpaaBoHa MeHeHa KaBa.
KoII cnOpOxHIOBaTNIIDOn dIy Kpanel? DnB. po3d1 10 - CNOPOXKHEHHI IIDHOA IJI KPAPEJIb, Man. 1-5.
Koln nonlaBci nHimaTbC Bropy, Bka3yUOn Ha nepeNoBHeHHa.
3 ririEhiHnxMipkyBaHb, OCKIbKn Cey KOHTeHep KOHTaKToE 3 MOJOKOM Ta KaBOU, M peKOMeHdyEMO NOBHCTIO NOro DEmOHTyBaTn i 0ODN HcCTnTn KOKeH eIeMeH NTiD rapAOTO BODIO. TAKOX paIMMO BcCyuBaTn CEi eIeMeH Na NobITpi, nepsi HIX BCTaHOBNIOBaTI NOrO Ha MlCtpeB pnpctpi. PIDOnDN kpanenb MoKHa MNTn Bnocydomnzi.
KoIi noTpi6Hc cnopoXHOBaTu KOHTeHep IJn BiiNpaCbOBAHOi Kabu? (INb. po3d19 - CBITIOBI CNOBIUeHHra (W): CNOPOXKHEHHa KOHTeHEPA IJn BIINPAcbOBAHOi KABU, Man. 1-5.
KoJi iHnKaTOp «CnoBiiueHnra Ha ceHCOPHomy ekpaHi ta cBiTIObe cnObiueHHa (W) KaBOMaUNHn BMNKaIOTbcra.
KoHTeHep MoXHa cNoPoXHrTn pErYpHNO, He YeKaIOuN CnIHaJy BId npIcTpOIO. KOnI anapat yBIMKHeHO, 506 BiN mI r3apeCTpyBaTn, 10 KoHTeHep Ira JxMxUy MaE 6byTr cNoPoXHeHNI.
3 ririHicnix MIPkyBaHb MN paIMo 0oJH yIcHTn EMHICTb IJIe MeJeHO KABN iIr rapAIO BOIO 3 MInOM Ta ry6KOIO. TakoX paIMo BucyBAtn cei enemEHT Ha nobITpi, nepu HIX BCTaHOBNIOBATn NOrO Ha Micce B npICTpri.

BaxJInBO:
KoHTeHep dIy BiIpaIbObaHO KABN BMIuae pnp6bn3HO 9 npuci. JaKIO perpyIaPHO He cIpOpXHOBATn KOHTeHep dIy BiIpaIbObaHO KaBN Ta nIDOn H Iy Kpanelb ce MoJKe pIn3BecTn DO N0sKOJxEHNNaBOMaunHN.
OBCSLYTOBYBAHNAEMHOCTIДЛЯBOINTA KOHTEHEPДЛKABOBUX 3EPEH
HaTnchItb i ytpmmyTe 3 cekyn, BN nooyeTe 3BykOBn CnHnA.
Stimata clienta, stimate client,
BkIIOUbaHe Ha eNEKtpo3axpaHbAheTo I NOIroTOBka Ha MaunHaTa

Onachoct:
BkIIOUeTe ypeJa KbM 3a3EmeH eEnKtpnueckn KOtakT 230 V. B npOTnbEN cIyauPnCKyBaTe fataJIHo HapaHbAHe nopadn HaJIuHne Ha eEnKtpnueckn TOK!
CnataBaiTe INCTpyKcunTe 3a 6e3oNaChocT O 6poUwpata, INCTpyKcun 3a 6e3oNaChocT".
Heo6xOIMO e cTApTnPaHe Ha MaunHata, 3a da 3anOpHe pa60Ta n Da ce 3aIbIHT BODHInTe KOHTpyn. N3pbJHnBa Ce noDprBaHe n aBtOMaTHUHO n3PnAkaBaHe.
3a noBuee HnΦopMaζη HaπpaBete cnpaBA b I-1-Bo N3IPOJ3BAHE, ΦIr. ot 1 do 14.
Cnei npikloubaHe Ha BbBexdaHTo B EKcnpoatauia MaunHaTa aBTOMaTuHO 3aCTaBa HapeuenTn no npda36npaHe.
Moxete da nycheTe nbpBOTo cn Kafe!
KAΦΕΜΕJIΑΥΚA: HACTPOΙΒΑΗ ΚΤΕΝΗΤΑΗ CMΙΝΑΗ
Mokete da peryinipate cnlaTa ha BaWeTo KaFe, kaTo HacTpOnTe CTePeHTa Ha CmInaHe Ha KaFeeeHnTe 3bPHa.
Bapnantte 3a cteneHTa Ha cmIlahe nO3BOLraBAT da ce npncnoc6nte KbMa p3IuHne BnObe KaeeHH 3bPHa: TBbpnde n3neueHHte mMa3Hn KaeeHH 3bPHa n3NcKBaT no-tpy6o cmIaHe n 06paTHO -no-Hen3neueHHte KaeeHH 3bPHa ca no-cyxu n N3NcKBaT no-phiHo cmIaHe. Kojkoto No-phiHO e cmJIAHO KaeTo, TOLKOBa NO-CINHe e apOMaTbT.
3aBbptete 6yToHa 3a HacTpoKa, pa3nOJoxen Bbpxy KOHTeHepa 3a KaFe Ha 3bPna (I), cnopeTnHa Na KaFeeeHnte 3bPna I JxenaHaTa HacNTeHocT Ha apomata. Ta3n HacTpoKa Tp8Ba Da ce HanpaBn npi MeJeHeto N da CTaba CTeNeH NO CTeNeH. EdBa CneD 3 npuROTBHnI yceTnTeOTcETnBa pa3JInuKa BB BKyCa.
Pergunpahe Na duO3nTe 3a Kafe
3a BcRA KA OT ppeIaRaHIne HAnrKMOKeJa cMbKBaTe NIOBdIraTe IIO3nTe 3a KaFe B 3aBcIMoCT ot pa3mepa Ha BaWata/Baunte qaun. HanpaBeTe cnpaBa B rnaBa 2 - HACTPOIKA HA HANrTKInE,Φnr.7.
CnnpaHe Ha HAnITKaTa No BpeMe Ha npIroTBaHe
BhimaHne:

Moxete da cnpete nprirotBraHTo BbB BCEKn eHN MOMeT C haTnCKaHe Ha KlaBnCTAPT/CTOIP. Korato npeKbcHeTe daJeHa nporpama, cnipaHTo He e He3a6aBHO. MaunHata ue 6bJe HeoCTbIHa 3a I3BeCTHO Bpeme, Koeto ue Bn 6bJe CnHaJIIN3IpaHO ue3 OHaJIeDeHa INHOpMaun.
ПИГOTВЯНЕ HA HAPITKИ С KAФЕ UPEЗ ДИPEKTEHdoCTbI
Etannte Ha npnroTBaHe Ha HanNTKaTa:
- Cmnahe Ha 3bphata
- PpecoBaHe Ha cMmHTo KaΦe
- PpeBapuTeHNo 3anapBaHe (HaTo3nEtan Buaaata BmMorat da nonaHaT HraKoKo KaKN)
- EkctpaKuzn
Пускане на是可以
- Поберете дали Контейнера 3а kaфе на зрна e пьлес. Ако лincba kaфe, машината щс Ви сигналзира за това сьс с Bretленин поедупедтелен сигнал (V). След това натушete CTAPT/CTOП 3а да поъдпге заржданeto с kaфe. Hanpавete справka в глива 8 - ПьлHEFE HA KOHTEИHEPA 3A KAФЕ HA 3bPHA, Фиг. ot 1 до 7.

BhimaHne: BhimaBaIte da He cunTe BOda B KaΦeMeJaKaTa, TbJ KaTO MoKeTe da NobpeIte BaWata MaUnHa.
- YBepete ce, ye pe3epBoapbT 3a BODa e nbIeH. Ako IINcBa BOda, MaunHaTa ue Bn CnHnIIn3npa 3a TOBa cBc CBeTIInHe npedynpeDnteH en CnHnA (V) n ige noncka da HApbInTe pe3epBoapa. HanpaBete cnpaBka B rnaBa 7 - IIbJIHEHE HA PE3EPBOAPA 3A BOIDA, fnr. or 1 do 7.
- Noctabete yawata nn yawnte nop dio3nte 3a Kafe.
- HaTinChHeTe 6yToHa Ha n36paHaTa HAnITKa.
Bb3MOxHn HaCTpoiKn
3a noBue HnΦopMaζη, NaPabTe cnpaBka B rIaBa 2 - HACTPOIKA HA HANITKNTE, ΦIr. ot 1 do 9.
ФУнКцЯ „ПЕДПОЧИТАН"
ФункцятЯ Ппсдочин, Достьпа OT 6уTOH, Ви осигуряв Baша Тпрдочида на Наитka само с endho NaTSCaHe Na 6уToHa, 6laIagopeHne Ha HacTpOuKnTe, KOnto cte HappaBnIn. Hanpabete cnpaBkA B rnaBa 2 - HACTPOIKA HA HANITKNTE, phr. ot 1 do 9.
Bb3MOxH0 e 3aNa3BaHe Ha eJNo npEiNoHTaHne A n eJNo npEiNoHTaHne B. HanpaBeTe cnpaBkaB rIaBa 3 - 3AIA3BAHE HA IPEIIOHTAHNTe BN IAPAMETPN, fnr. ot 1 do 6.
- 3ana3baHTo Ha npEiNoHTaHne MoJE da cTaHe cMo cIeI npIKHouBaHe Ha n3PbJIHeHHeTo Ha peCenTata. Imate 10 cekyHn 3a HaTnCKaHe Ha fynKcHg IpeDnoHTaHn n 3a 3a 3a3BaHepa Ta npEiNoHTaHa HanITka A nn B.
- MojkeTe Da nepcoHaJIIN3IpaTe DJIJIKHnHaTa, KaTo CnpTe peuEnTata B XOda Ha N3IbJIHeHneTO
I. IIO BpeMe Ha n3TnuaHeTo, HATNCHeTe . Toraba n3TEKNoTO KOJIuYeCTBO OT peCenTaTa 1e ce 3aPiNe B npEtnoHTaHn.
BaxhO:

Cnei n3tuHaTeo MaunHaTa ABTomaTuHc 3aCTBa Ha peuente Na no npda36npaHe. Toraba He e Bb3MOxHO da 3aAnuWe Te npednoHTaHne.
Ako 3aannwe Te npednoHTaHne, cne KaTO peeNTaTa Beue e 3aNcHa, Tt ige 6bde npenokpita.
- Cné kato cte 3aɪncaɪn ppeɪnnoʊtənneTo, Bne moʊkete da npɪrɒTbTe ppeɪnnoʊtənHaTa cn
HanNTka cMo C hATnCKaHe Ha To3n 6yToH . Cnej TOBa cneDbaiTe yka3aHnra Ta H raBa4- IPNIOTBRAHE HA IPREINPOHTAHA HANNTKA, fnr. ot 1 do 6.
HANITKIN PUNIGOTBARYN C IAPA
IIO3aTa 3a npapa (G) cnyxu 3a pa3neHbahe Ha MIAKOTO 3a npiroTOBHe HAnpIMep Ha KanyuHOnnHa Kafe Iate. TbKATO pOIN3BOIDCTBOTO Ha npapa N3NCKBa NO-BVOCKa TEMpePaTpyo OTa3n 3a npiroTOBHeTo Ha ecnpco, ypeDbT OCSInyprBa a3a Ha dONbJIHNTeHNO ppeBapNTeHNo 3arpaBaHe 3a npapa.
Pn pa3neHbHe Ha mIrkOTO B pBueH peKm e 3a npEiNoHTaHe n3no3BaHeTo Ha n3BaJeHO OT xHaJInHka (3 - 5^) nactbOpu3npaHO mIko c UHT o6paOtKa. I3no3BaHeTo Ha cneuaJIH MLeka (MkPoΦUnTPpuHn, CypOBn, fepMeHTpauN, o6oTaHn) nn MLeKa OT pAcTnteHn npOn3xOd (opn3OBO, OBecHo, 6aEmoBO Mlko) MoKe Ja DoBePe IO-He3aDoBOJNTeHN Pe3yTTaTn PO OTHoSeHne Ha KaueCTBOTO N KOJUYeCTBOTO Ha PnHaTa.
He e Bb3MOxH0 eDHOBpeMeHHOT nprirotBHe Ha 2 qa: cneIOBaTeHNo yHKzIy ^ 2^ He e DOCTbHHa.
3a no-noipro6ha nHΦopMaζη OTHOCHO etanHTe Ha nprirotbHe Ha peζenta c npapa BnKTe rnaBa 5 - PIPROTBHe HA PEÇENTAC MJIAKO, Φnr. ot 1 do 11.
BhimaHne:

Ima 2 BpemeBn INTepBaIa 3a npedBapnteHIO 3aqrBaHe: TOBa Ha MaunHaTa I TOBa Hnapa. CBeToNDIObT 3anoUba Da Mna, 3a da nokaxe, ye NOprrBaHEno Ha MaunHaTe e pInkNouHIO. HatncheTe OTHOBO,CTAPT/CTOIN" 3a da nycheTe reHepnpaHTo HA npapa. BnKte rnaBa 5 -PPIrOTBBAHE HA PEcENTA CMIAKO, fnr.8.
BhimaHne 3a onachoct ot n3rapaHe.
BaxhO:
THeHepnpaHTo Ha npa ige cnpe aBtOMaTHUHO cIeI npeBapntEnHo n36paHOTo Bpeme. MoKeTe Da haTusChete 6yToH „CTAPT/CTOIT" npei KpaHa nporpaMaTa, ako KOJIuecTBOTO pa3neHEno mJaKO e DocTaTbUHO n TaKa ige cnpe TReHepnpaHTo Ha npa.
CINIPAHETO HA IPOIPORAMATA HE CTABA HE3A5ABHO.
AkoBpaMKteHa2MnHytnHeHaTncHete"CTAPT/CTOIN"MaunHaTaCeBpbua B n3XoJHaNo3nuiy.
- 3ana3BaHeTo B npEДNoHTaHn eДОCTbNHO 3aФyHKUna napa.
CbBETNTPUKOBE:
Pn npiroTBaHe Ha MlueHa Pna Ha HApbHHeTe 1/3 ot YauaTa C Mmko. PoToNeTe dO3aTa 3a npapa B MmKOTO n I npinlenete Do p6ba Ha yauaTa. HaknoheTe yauaTa npd bTbN 45^ Ta3u Texnka N03BONBA 3aBnxpIe Ha MmKOTO n IO To3n Haunn NOnyuaBaTe ONTImaJIHO pa3neHbAHe. CneBaiKn Te3n CbBeTn, Je nOlyuHTe MlueHa Pna Ha DocToHa 3a 6apnCTa n rTOBa 3a N3nOJ3BaHe 3a npiroTBAHETo Ha HAnNTKa C MmKO.
ПОЧИСТВАЕ НА ДЮЗЛТЕ 3А ПAPА

BaxhO:
3a da ce paDbATE Ha eHNO i CbIoo KaueCTBO Ha IHaTa BceKn PbT, Bn CbBcETBaMe da NaOHCTBaTe CTapaTeJIHO npICSTAbKaTa i NaKpaHnka i CLEi BCJKO PON3BAHE. He MInTe JIO3a 3a napa B MnJHLMaShnHa. IpepOpbUHTeJIHO e Da noOuNCTBaTe JIO3aTa 3a napa, KOrato He ce H3NoJL3Ba 3a No-dbIbI r nepIoD OT BpeMe (NoBeue ot 2 dHi)

Onachoct:
Cnei n3noJI3BaHe Na fynKcIy npa IIO3aT MoKe Da e ropeu, npenopbYBaMe Bn da n3yaKaTe HAKOJIKO MnRa, npeDn Da onepnpate c Heia.
-Дюзата 3a пара e ДемоHTиPyemа, 3aда може да ce почSTВа в Блбочина.ИЗмвайтЯ с ВODа и малко количесТВо Hea6pa3nIBeн прпapat 3a сьдОBEс пOMOцTa Ha cheTKa.Порpo6HoctTN 3a etanITE ha почSTВане на Дюзата 3a пара може дa habeprite B rJaBA6 - ПОЧИСТВАЕ HA ДЮЗА 3A ПAPA,ФИR.OT 1do8.
- 3a ДАОТСТРANITE BCNUKIN EBEHTYALNO OCTAHAN CLEДN O T MЛКOTOBДIO3a 3a npa, NOCTABETe CBД NOД IO3aTaN PYNCHETe NpORPama 3a rOpeua BODa. CLEД TOBA B3EMETe YnCTa IN BIAJKA MNIKPOΦN6bPNa KbPna INI3bPwTe DIO3aTaN.
- Ako He n3nna npapa, moke I03ata da e 3aynuhea: OTnyweTe c npedocTaBeHaT a ngta. BnxTe rnaBa 6 -IOUHCTBAHE HA I03ATA 3A IAPA, fnr. 4 u 5.
ПИГOTВЯНЕHA HAPITКИ CTOPEЦА BODA
- NocTaBTe yawata noiIO3ATA 3A IAPA (G).


- HatncheTe . Maunhata N3Bpwa npedBapntelno 3aqrbahe (cBeTlnHHnTe INdkaTopn CBETT cnyncupaa CBeTlnHa), cneT TOBa nyca ropeua Boda.
-Функцяпредочин HeeocbHa.BnrgnaBa3-3APA3ETEBAWNTEPPEIPOHTAHN IAPAMETPN,ФИr.OT1do6.
OBUaIPOIDPbXKA
Ió6pata noДирьЖka ydbJIЖaBa ekCnIooTaUOHHNЯ JxIBOT Ha MaUNHaTЯ 3ana3Ba aBTeHTnHnBA BKYC Ha KaΦeTo.

BaxhO:
3a no-JeCHO n eΦeKTHBNO 13nOJ3BaHe npn Krups noUcTBAHeTo Ha BaUaTa MaunHa e aBTOMaTn3IpaHO: edHa Ta6JIeTKa n roTOBO! He e Heo6xOJIMo HnKaKBO pBuHO o6ClyjXBaHe Ha 6Ioka 3a 3aIapBaHe. Hne Bn rapaHTnpame nJIHo noUcTBAHe npn BnCOKA TeMpepAtpa 3a BnHaru IDeaJIHOTo KaΦe.
ПОДДРьЖKA HA СбДА 3A СбИРАНЕ HA YТайКATA OT KAФЕ И TÁВИЧКATA 3A OTЦЕЖДАНЕ
B tabuoka 3a oTuexkahe ce cb6upa oTpa6oTeHata Boda.
KonekTopbT 3a yTaKa cb6upa n3nO3BaHOTo cMIAHO Kafe.
Kora da ce u3npa3Ba TabuYkata 3a otexdahe? BuxTe 10 -u3PNA3BAHE HA TABUcKATA 3A OTEXDAHE, fnr. or 1 do 5.
PonlaBbCn B ropHa no3uCna ca nHdkaTOp 3a npenbIbaHe.
OT xinienHH CbO6paJHHe NppeopbUBaMe da pa3rIIO6BaTe HnblHo n da noCtBaTe exeJeBHO BCEKn eIemEnT NOI ropeuBa BODa, TbN KaTO TO3N cBd E B KOHTaKT C MIAKO NaΦe. CbTo taka Bn npenOpbUBaMe da ro octaBte Da n3cbxHe Ha Bb3dyx, ppei Da ro noCTaBte o6paTHo BVypea.MoKeTe da noCTaBte Tabata 3a OTcEJaHE B cbDomnJIHaTa MaunHa.
Kora Tp86Ba Da ce n3npa3Ba CbIbT 3a Cb6puAne Ha ytaikata OT KaFe? BnXte 9 -CBETNIHHN INPEyINPEDNTENH CNIHAN (W): N3PNA3BAHE HA CbDA 3A CbBnPAHE HA YTAIKATA OT KAFE, qnr. ot 1 do 5.
Korato CBeToIOnIObT, BnHMaHHe" Ha cEH3OpHna INTepeC n CBeTInHHnT npedynpeDHTeHc nganl (W) Ha maunHaTa CBETHaT.
Mojkete da rni n3npa3BaTe no-peoBHO n npdeMmaHnHaTa Da Bn pOkaHn. Ho KOraTo MaunHaTa e BKJIUoyHe, 3a da MoKe da perncTpnpa, ye KOHTeHepbTe eoHCTeH.
OT xunneHHn cbo6paJhen Bn npenopbUBaMe da nouchte BaTe KOHTeHepa 3a mnaHO Kafe exKeIHeBNO IOI ropeu a BODa CbC canyN Ib6a. CbTo TaKa Bn npenopbUBaMe da ro octabnte da n3cbxHe Ha Bb3dyx, npedn da ro noctabnte o6pato H bypea.

BaxhO:
Cbdt3a cb6npaHe Ha ytaKaTa OT KaFe c KanaunTeT OT OKONo 9 Do3N, aKO cbBt 3a cb6npaHe Ha ytaKaTa OT KaFe n TabuKata 3a OTeKdaHe He ce n3npa3BaT NO nocouHnHaun, Ba7aTa MaunHa Moxe da Ce nobpei.
ПОДДРьЖKA HA PE3EPBOAPA 3A BODA И KOHTЕНHEPA 3A 3bPHA KAΦE
3a 3ana3BaHe Ha Hn-IO6pna apomat Ha Kafo, NOBInH ON KaucTeBTO Ha BOata N XnIgHeHHTE Cbo6paJekn, Bn CbBeTBame Da n3NoJI3BaTe cAmO pRcHa BOda n EkeJeHbHO da NoUInCTBaTe pe3epBoapa 3a BOda c ropeu a BOda u Yetka 3a 6bytkn.
3bhpata Kafe Moar Da ocTabr Ma3Hn OCTaTbun Po pe3epBoapa, KOnto Morat Da NobJraT Ha KauecTBOTo Ha KafeTo. 3a Da 3ana3nte Hau-dO6pBn Bkyc Ha KafeTo n OT XmIeHNn Cbo6paJxHeN, BN npenopbUBaMe da ro n36bpcBaTe cbc cyxa MeKa Kbpna BCEKn T, Korato Tpr6Ba Da ce HanblHH OTHOB.

Baxho:
He nouchBaIte C BOda, HAIuHneTo Ha BOda BB FyHnraTa 3a Kafe MoKe Da NOBpei MaunHaTa

Cbto taKa Bn npenopbUBaMe da y ocTaBnTe da n3cbXHe Ha Bb3dYx, ppei da y noctaBnTe o6paTHo bypeda
I3nnlaKaBe Ha Kpbra Ha KaΦeTo
Ta3nФyHKZIeEOCTbHNa BvB BCEKN eINH MOMENT, C N3KJIIOUeHne Ha BpeMeTO, B KOETO MaJINHaTa
N3NCKBa Dpya OepaZuI NO NODpBjKKaTa.

CnojKeTe cBd nOД nIOu3nTe 3a Kafoe.
BkIIOUe TaMaHaTa MaunHa n CneT OBa HATNCHeTe
- I36epete yHKunia n3nlaKbaHe

- HatncheTe , 3a da ce n3BbPshn n3PnaKBaHeTo.
От xигуннсьображени e npenopbчntelno cnstemata 3a kaфе да се n3плakba exeДневнои korato He ce n3ползва 3a по-дльг петюд OT Врeme (nobeche ot 2 ди).
Ta3nФyHKUЯ moKe da 6bde n3BbpeHa aBtOMaTuH O npi cTapTnpaHe. 3a nobuee HΦopMaIa, MoJIa, hAnpaBeTe cnpaBA c,ДРУП NФYHKUIN"
Прогама 3a пьлно abTomatино поочтване на машинаТ, 3пьтуroidшо (okono 13 мнун)
3a da 3ana3nTe NaH-Do6pna Bkyc Ha KafoTo n OT XnIeHHn CbO6paJKeHHa, Bn npenopbUbaMe da nouchBaTe CnCTemata 3a Kafo 3 nbTn B rOdnHa.
3a TOBa NOUcHbAe ige IMaTe HUxJa OTo:
- 1 ta6JIeTKa 3a noOuNCtBaHe KRUPS
1cbd C BmectmoCT nohe 600 ml
UKNbIbT Ce cBcTON OT dBe a3n:
-1Φa3a nOuNCtBaHe
-1Φa3a n3nJaKBaHe
Kora da ce n3nbJHbTa Ta3n nporpama?
Korato e Heo6xOIMo da ce n3bJIHn IpOrpaMaTa 3a OTcPaHЯBaHe Ha KOTneHn KaMbK, ypeDbT ue Bn uHΦopMnpa.
I Ue UyeTe 3ByKOB CnHaJ.
| Temnepatypa на
kaфeto | Наточete RISTRETTO,а с蜱ед това 3a настwo BAHE на Tempepatypata
нада kaфeto. Има 3стenvи за настwo BAHE на Tempepatypata
Башитkaфе напитки. По поразьбираhte настwo Кату e на 2 калу. |
| Hocksta
Среда
Виска | Hocksta
Среда
Виска |
| АвTomатчно
ИЗКЛЮЧBAнe | Можete даизburate петюда, с蜱ед ковто Вшият уreed вавоматчно
да сизлочь, здда ONТIMИЗIPATE пOTреблиениTo сдда насязгия:
15 мину,则, 30 мину,则 3 ча. ПО поразьбираhte настwo Кату e на 3
чес.
HATICHTE ESPRESSO, с蜱ед това 3дда настwo вавоматчно
ИЗКЛЮЧBAнe. |
| Hocksta
Среда
Виска | Hocksta
С克思
3чес |
| Вьлочьане на
авTomатчно
ИЗПЛAKBAнe | Имате Вьзможhoe Дд настwo вавоматчно ИЗПЛAKBAнe, koeto
ragаHTURA за пазывенTo най-добрия apomat на Кфeto, КсКTo и
ONТIMALHATA XIIIIGUEHa.
HATICHTE LONG COFFEE, с蜱ед това 3дда настwo вавоматчно BKЛЮЧBAнe
авTomatчно ИЗПЛAKBAнe. |
| Hocksta
С克思
3чес | Hocksta
С克思
3чес |
| Бл_OKрале на
функция лимса на
kaфе на 3bphа | Можete дд Забраниte Функцията зд ретистор�аны лимсата на
kaфе на 3bphа. Тогава Нема дд Имате сьOTBETNITE CBETLINHN
празу pridNETENI сИгналizац们 ПО поразьбираhte настwo Кату e
akTINBA.
HATICHTE HOT WATER, с蜱ед това 3дда Забраниte Функцията зд
pericntprapaine лимсата на Кфeto на 3bphа. |
| Hocksta
С克思
3чес | Hocksta
С克思
3чес |
Функця Линca Ha Kaфe Ha 3bphA
Ta3nФyHKZnI NO3BOLJBa Da ce npEeBnKJa LInncata Ha KaΦe Ha 3bρHa B KOHTeHepa 3a KaΦe Ha 3bρHa. Ta3n LInnca Ce cRHaJIIN3npa O T CBeTnHEn npEynpeDITeHEn CInHaN (V), npEynpeDITeHEn CInHaN n CnIPAHe Ha TeKUso CMIIaHe no peCenTata.
3a noiHOBaHe Ha TeKuTa pecenTa cneI npnbAByHe Ha KaFe Ha 3bPha, HATncHeTe "CTAPT/ CTOn".
Празмер:
- PyncaHeHa peuenTa
- PerictpnpaHe Ha IInca Ha Kahe Ha 3bPHa: CBeTInHeH npedynpeiTeHe nCnHaI (V), npedynpeiTeHe cngHan +cnpaHe Ha KafeMeauKaTa
-Пьленье на Контейнера 3а Kaфе на 3bpна с Kaфeeин 3bpнa
- HatncheTe 6yToH,CTAPT/CTOPI
- PoiHOBaBaHe Ha peeTata, KoTo Ie No3BOJn Da ce neCTn Kafe.
BHUMAHne:

I3no3BaHeTo Ha Ma3Ho Kafo Me Moke Da CtaHe npuHnHa 3a HnPaBnHn PerncptnpaHe, KOeTo Ce DblJn Ha TpydHTo NaJaHe Ha 3bPnHa. Ako pernctpnPapHeTo ce akTbNpa e doCTaTbUHO Da HATNCHeTe 6yTOH,CTAPT/CTOIN,3a Da npoDblJnxTe peceNTaTa.
ΦyHKnIaTa MoKe da 6bIe pUHNo 6IoknpaHa (BIXTe,ДPYrN ΦYHKUN"-"bIoknpaHe Ha φyHKnIa IINca Ha KaΦe Ha 3bPHa").