
Authentic+ XP384E - Coffee machine KRUPS - Free user manual and instructions
Find the device manual for free Authentic+ XP384E KRUPS in PDF.


| Product type | Automatic coffee machine with grinder |
| Brand | Krups |
| Model | Authentic+ XP384E |
| Color | Black and silver |
| Dimensions (W x D x H) | 43 x 30 x 38 cm |
| Weight | 10 kg |
| Power supply | 220-240 V, 50-60 Hz |
| Power | 1450 W |
| Water tank capacity | 1.8 L |
| Bean container capacity | 250 g |
| Maximum pressure | 15 bars |
| Main functions | Espresso, lungo, steam, hot water |
| Programmable | Yes (water hardness, temperature, quantity) |
| Milk frother | Integrated, adjustable |
| Removable brewing unit | Yes, washable with water |
| Descaling indicator | Yes |
| Automatic shut-off | Yes |
| Maintenance and cleaning | Automatic cleaning, guided descaling |
| Safety | Pressure lock, automatic shut-off |
| Spare parts | Available (water filter, gaskets, brewing unit) |
| Repairability | Repairability index: 7.5/10 (estimated) |
| Package contents | Machine, manual, dosing spoon, water filter, grease tube |
| Manufacturer's warranty | 2 years |
Frequently Asked Questions - Authentic+ XP384E KRUPS
User questions about Authentic+ XP384E KRUPS
0 question about this device. Answer the ones you know or ask your own.
Ask a new question about this device
Download the instructions for your Coffee machine in PDF format for free! Find your manual Authentic+ XP384E - KRUPS and take your electronic device back in hand. On this page are published all the documents necessary for the use of your device. Authentic+ XP384E by KRUPS.
USER MANUAL Authentic+ XP384E KRUPS
www.krups.com
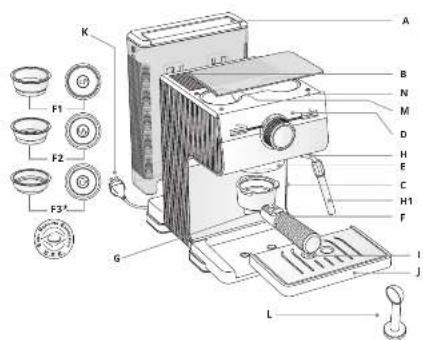


DESCRIPTION
A Removable 2L water tank B Cup holder tray C On/Off Button D Control panel
D1.1 Coffee and hot water (only on model XP384) selection button
D1.2 Coffee indicator light D2.1 Steam selection button D2.2 Steam indicator light D3.1 Knob to start and stop selection D3.2 Position •: neutral position
E Brewing head
F Portafilter
F1 Filter 1-cup
F2 Filter 2-cup F3 Filter for coffee pods (E.S.E) (only on model XP384)
G Filter holding hook
H Steam nozzle
H1 Steam nozzle tube
I Drip tray grid J Removable drip tray K Power cord L Spoon-Tamper M Filters storage lid N Filters storage
TECHNICAL SPECIFICATIONS
■ Pump: 15 bar ■ Manual start/stop
■ Accessories: 1-cup filter, 2-cup filter, ESE-pod filter (only on model XP384), measuring spoon/tamper
■ Steam function
■ Selection button: espresso, steam or hot water (only on model XP384)
■ Removable tank (2L capacity) ■ Power: 960 - 1140 W ■ Voltage: 220 - 240 V ■ Dimensions: 286 x 200 x 288 mm ■ Automatic shut down after 10 minutes

IMPORTANT!
Operating voltage: this appliance is designed to operate at 220-240 V alternating current only.
Type of use: this appliance is designed for DOMESTIC USE ONLY
FIRST USE OR IF THE MACHINE HAS NOT BEEN USED FOR A LONG PERIOD

IMPORTANT! Do not place heating elements on the appliance.

IMPORTANT! Remove the red protective cap from under the water tank.

IMPORTANT! Please read the safety instructions carefully before using your new appliance.
RINSING THE SYSTEMS BEFORE FIRST USE
1. RINSING THE ESPRESSO SYSTEM
To ensure your first cup of coffee tastes great, we strongly recommend that you rinse the espresso machine with hot water, as instructed below:
- Ensure you have removed the red protective cap from under the water tank (1).
- Plug in your machine (2).
- Remove the water tank (3) and fill it. The water level should not exceed the "MAX" mark on the tank and should contain at least 300 ml (= equivalent to 2 large cups) (4). Then replace the water tank, ensuring that the cover is closed (5).
- Press the On/Off button (6). On the control panel, the coffee indicator light is blinking, which indicates that preheating is in progress (7).
- Place a filter without coffee into the portafilter (8, 9). Slot the portafilter into place and turn it to the right until it stops (10). Place a container under the portafilter (11).
- When the coffee indicator light stops blinking and stays on (12), turn the knob to the left, to espresso preparation (13). The flow will start after approximately ten seconds.
- Let approximately 300 ml of water trickle out (change the container if necessary), then turn the knob to position • to stop preparation (15).
IMPORTANT / After 10 minutes of disuse, your appliance will switch off automatically as a safeguard.
- Remove the water tank and fill it (3). The water level should not exceed the "MAX" mark on the tank and should contain at least 300 ml (= equivalent to 2 large cups) (4). Then replace the water tank, ensuring that the cover is closed (5).
- Press the steam selection button (16). On the control panel, the steam indicator light is blinking (17).
- Place the steam nozzle into a container filled with water (18).
- When the steam indicator light stops blinking and stays on (19), turn the knob to the right, to the steam function (20).
- Let the water heat for 20 seconds then turn the knob to position • to stop the steam (22).
MAKING ESPRESSO

IMPORTANT!
If the espresso function is used for the first time, the appliance must be cleaned as described in the "FIRST USE" paragraph.

IMPORTANT! To prevent splashes of hot water, check that the portafilter has been tightened until it stops before preparing the coffee. Do not remove the portafilter while the water is flowing, as the appliance is still under pressure.
A. With ground coffee
The type of coffee you choose will determine the strength and taste of your espresso: the finer your ground coffee, the more intense your espresso will be.
To prepare your coffee, please refer to the first 4 steps in the FIRST USE - Rinsing the espresso system section and then follow the instructions below.
- Choose your filter: 1-cup or 2-cups (23) and insert it in the portafilter.
- Add the ground coffee to the filter using the measuring spoon (1 spoon = 1 measure = 1-cup espresso / 2 spoons = 2 measures = 2-cup espressos) (24) then tamp it using the tamper (25). Clean off any excess coffee from around the portafilter.
- The coffee indicator light stops blinking and stays on (12). Your machine is ready. The knob is set to function * .
TIPS:
- For the best result, we recommend preheating the accessories beforehand (portafilter, filter and cups) by pouring hot water inside.
- For the best result, we recommend preheating the brewing head. Place a container under the brewing head (26). Turn the knob to the left (13), to espresso preparation, for 10 seconds in order to heat your brewing head and make sure your first espresso is at the right temperature (27). Then turn the knob to position • to stop water (15).
- Slot the portafilter into place then turn it to the right until it stops (10).
- Place a cup or two under the portafilter (28), turn the knob to the left, to the espresso position (13), and the coffee will start to flow (29).
IMPORTANT / The coffee flow is stopped manually. Do not move away from the machine when it is in use.
- When the cup(s) is filled, turn the knob to position · to stop the flow (15)
- Remove the cup(s).
- Unlock the portafilter by turning it to the left and remove it from the appliance (8). Do not touch the filter as it will be hot.
- To empty out the coffee, invert the portafilter while holding the filter with the hook so that only the coffee falls away (30).
- Wash the filter and portafilter under running water to remove the rest of the coffee (31).
B. With E.S.E. pods - only on model XP384

You can use E.S.E. pods to make your espresso. They can be recognised by the logo above.
1 E.S.E. pod = 1 cup of espresso
Coffee preparation steps are identical to section A. With ground coffee, except:
- Insert the filter for coffee pods (E.S.E.) into the portafilter (32).
- Place the pod as centrally as possible in the portafilter (33). Follow the instructions on the packaging of the coffee pods for correct placement of the pod in the portafilter. Pods (E.S.E.) are designed to make one cup of coffee. Using two pods on top of each other is not recommended.
- The machine is turned on and the coffee indicator light stays on (12).
- Place a cup under the steam nozzle (34).
- Turn the knob to the right, to the steam position (35). Machine starts making hot water (36).
- To stop hot water, turn the knob back to the position • (37).
FROTHING MILK
The steam will foam the milk (for example to make cappuccinos).
- Plug in your machine (2).
- Remove the water tank and fill it (3). The water level should not exceed the "MAX" mark on the tank and should contain at least 300 ml (4). Then replace the water tank, ensuring that the cover is closed (5).
- Press the On/Off button (6); the coffee indicator light is blinking (7). The knob is set to position •.
- Press the steam selection button (16). The steam indicator light is blinking which indicates that preheating is in progress (17).
- Once preheating has finished, the steam indicator light stays on (19).
TIP to remove condensed water in the nozzle and ensure a good frothing:
- Just before frothing your milk, place an empty receptacle or cup underneath the nozzle (18)
- Open the nozzle system by turning the knob to the right, to the steam preparation (20) to run for 5 seconds the steam through the system (38)
- Turn the knob to position • (22).
- To make a cappuccino, fill a container with approximately 100 ml of milk (1/3 max of the container) (39).
TIP:
For best results, use a narrow and relatively small container that can be slipped under the steam nozzle.
- The milk and container should be very cold.
- We recommend using whole pasteurized or UHT milk.
- Place the steam nozzle into the milk container (40) and turn the knob to the right, to the steam position (20).
- For best results, take care not to touch the bottom of the container and make sure that the nozzle does not leave the milk. Then the steam nozzle will do the foaming for you (41).
- Once you have achieved the best foam (42), turn the knob to position • (22).
IMPORTANT: To prevent overheating the milk, do not use the steamer for more than 45 seconds (for 100ml of milk).
TIP: To prevent milk from drying inside the nozzle, clean it after each use:
- Unplug the machine (43).
- (Be careful, it is hot.) Remove the steam nozzle tube (44) and wash it in clean water (45).
- Clean the steam nozzle using a damp cloth (46, 47).
- Replace the tube on the steam nozzle (48).
GOOD TO KNOW - PRACTISE AFTER USING STEAM
If you want to make an espresso after using the steam function, you need to cool down your coffee machine because the water is too hot for optimum espresso preparation.
Follow the steps below:
- Make sure the knob is on position •
- Press the coffee selection button (49).
- The steam indicator light is orange, indicating the coffee machine is too hot for espresso preparation (50).
- Immerse the steam nozzle completely in a container filled with 60ml of water (18).
- Turn the knob to the right, to the steam position (51), to release the hot water and steam inside the boiler, in order to cool down the machine.
- After around 10 to 20 seconds, you will see the orange indicator light switch off and the coffee indicator light start blinking (21, 52). That indicates the machine is cooled down to the right temperature for espresso preparation.
- Turn the knob to position • to stop the operation (37).
Your coffee machine is now cooled down; you can make and enjoy your espresso!

IMPORTANT! Warning! To prevent the milk from spattering, do not lift the steam nozzle out of the milk when using "steam" mode.
IMPORTANT! Warning! The steam nozzle is still hot! Be careful not to burn yourself!
IMPORTANT! After switching off the steam function, clean the nozzle immediately and carefully.
CLEANING AND MAINTENANCE
1. The appliance
- Unplug before each clean and let the appliance cool down first (43).
- Clean the outside of the appliance with a damp sponge when you think it necessary.
- Regularly clean the water tank, drip tray and its grid then wipe them down.
- Rinse the inside of the water tank regularly.
- When you plug the machine, if the two lights are blinking 10 times, descale the appliance (refer to the section on descaling)
- Do not use alcohol or solvent-based cleaning products.
- After unplugging the appliance, regularly clean the brewing head using a damp sponge.
- Clean with a damp cloth only. Do not use detergent or abrasive products.
2. The portafilter
- Using a damp cloth, regularly clean the portafilter housing in order to remove any residual coffee that may have collected in this area.
- Do not remove the screws from the portafilter. This may only be carried out by an approved servicing center.
- To prolong the life of the brewing head seal, do not refit the portafilter if the coffee machine will not be used for an extended period of time.
3. The drip tray
- If necessary, clean the drip tray and its grid using water and a little mild detergent. Rinse and dry.
The filters, the drip tray grid (only for model XP384), and the stainless steel steam tube (only for model XP384) are dishwasher safe.
DESCALING
A. Descaling
To know if you must descale your machine, plug your machine into the socket: - If the lights blink 10 times, it is time to descale. - If the lights blink only 1 time, wait for the descaling alert before descaling. Descaling will help prolong the product lifespan. The coffee maker will not be repaired if: - Descaling is not carried out, - There are scale deposits, - The accessories have been washed in a dishwasher, as this is not covered under the guarantee. 1. Insert the portafilter (without coffee) into the appliance and turn it to the right until it stops (10). 2. Place a container with a volume of minimum 1/2 liter under the portafilter (11). 3. Check that the knob is set to position •.
- Fill the water tank with a mixture comprised of water and a part of white vinegar or lemon acid (total volume of mixture: 2L) (53, 4). 5. Plug the appliance in (2). Turn on the appliance by pressing the On/Off button (6).
- When the coffee indicator light stops blinking and stays on (12), turn the knob to the left and allow the mixture to flow through (about 500 mL of the volume = 1/4) (13).
- Stop the appliance by pressing the On/Off button (6) and leave the knob set to Coffee preparation.
- Empty the container and replace it under the portafilter (11).
- Wait 5 minutes, then repeat the process three times more by pressing the On/Off button (6) and following previous steps 6 and 7.
IMPORTANT / Make sure that the tank does not fully empty.
B. Rinsing

IMPORTANT!
After descaling, rinse 2-3 times using clean water (no coffee), as described in the "FIRST USE" paragraph.
Do not forget to rinse the nozzle. The appliance is now descaled and ready for use again.
GUARANTEE
Your appliance is under guarantee; however, any connection errors, handling mistakes or use of the machine for purposes other than set out in the instructions will void the guarantee.
This appliance is under guarantee for domestic use. Any other type of use will void the guarantee.
Repairs to the machine caused by a failure to descale it shall not be covered by the guarantee.
For any After-Sales or spare parts issues, please consult your retailer or an approved servicing center.
TROUBLESHOOTING
| PROBLEMS POSSIBLE CAUSES SOLUTIONS | ||
| The coffee is very moist. You have not used enough coffee. | Add more coffee. | |
| The espresso flows too slowly. | The coffee is too fine, too coarse or too mealy. | Choose slightly larger coffee grounds. |
| The portafilter is dirty. Clean your portafilter using the instructions in the section: CLEANING AND MAINTENANCE - 2. Portafilter. Clean the coffee filter as well. | ||
| The brewing head is clogged. | When the appliance has cooled, clean the grill through which the water flows using a damp sponge. | |
| Your machine is calcified. D | Descal your machine following the user instructions provided. | |
| There is too much coffee. O | Observe the maximum limits when filling the filter. | |
| A continuous flow of water pours from the portafilter after making an espresso. | Your machine is becoming calcified because the water is particularly hard. | Descal your machine immediately following the user instructions provided. |
| The red cap was not removed. | Remove the red cap. | |
| Your machine is becoming calcified because the water is particularly hard. | Descal your machine Immediately following the user instructions provided. | |
| Coffee grounds are present in the cup. | The portafilter is clogged. C | Clean the portafilter using hot water. |
| The coffee grounds are too fine. | Use slightly larger coffee grounds. | |
| The seal on the brewing head is clogged. | Clean the portafilter and the seal with a damp sponge. | |
PROBLEMS POSSIBLE CAUSES SOLUTIONS
| The espresso is not frothy. | The coffee grounds are too old. | Use freshly ground coffee. |
| The ground coffee is not suitable for making espresso. | Use finer grounds. | |
| There is too little coffee in the portafilter. | Add more coffee. | |
| The water tank leaks when it is moved. | The valve at the bottom of the tank is dirty or defective. | Wash the water tank and operate the valve with your finger, which is beneath the tank. |
| The valve is blocked by the calcified deposits. | Descale your machine following the user instructions provided. | |
| Water leak beneath the appliance. | There is an Internal leak. Check that the tank is positioned correctly. If the problem persists, do not use the appliance and consult an approved service centre. | |
| The pump is abnormally noisy. | No water in the tank. Fill the water tank and restart the pump (refer to the section: FIRST USE). Avoid emptying the tank completely. | |
| The espresso leaks out the sides of the portafilter. | The portafilter is not positioned correctly. | Fit the portafilter in position and lock it (turn from left to right until it stops). |
| Remove any excess coffee that prevents you from fully locking the portafilter. | ||
| The edge of the portafilter is clogged by the coffee. | Remove the excess coffee and clean the grill through which the water flows using a damp sponge. | |
| Your espresso tastes bad. | After descaling, the rinsing cycle was not carried out correctly. | Rinse the appliance in line with the user instructions and check the quality of the coffee. |
| PROBLEMS POSSIBLE CAUSES SOLUTIONS | ||
| The appliance does not work. | The pump is disabled due to a lack of water. | Fill the water tank and restart the pump (refer to the section: FIRST USE). Avoid emptying the tank completely. |
| The removable water tank is incorrectly positioned. | Position the water tank correctly. | |
| The appliance is not connected. | Ensure that the appliance is switched on. | |
| The nozzle does not work or produces little foam. | The foam nozzle is not correctly installed. | Check that the accessory is correctly mounted on the appliance: remove then re-install it on the hinged arm using a firm upward movement. |
| The milk is too hot. Use fresh | , pasteurised or UHT milk that has been recently opened. | |
| The orange light is on and espresso function does not work. | The water boiler is too hot for espresso after steam function. | Cool down your machine following the instructions of “Good to Know” on page 5. |
If it is not possible to determine the cause of the fault, consult an approved retailer. Never disassemble the appliance! (If the appliance is disassembled, this will void the guarantee).
ENVIRONMENT
Environment protection first!

Your appliance contains valuable materials which can be recovered or recycled. Leave it at a local civic waste collection point.
DESCRIPTION
PROBLEMS POSSIBLE CAUSES SOLUTIONS
PREPARING AN ESPRESSO COFFEE

IMPORTANT!
PROBLEMS POSSIBLE CAUSES SOLUTIONS
F1 1-cup filter F2 2-cup filter F3 Coffee pod filter (E.S.E) (only for model XP384)
G Filter holder hook



- DESCRIPTION
- TECHNICAL SPECIFICATIONS
- IMPORTANT
- FIRST USE OR IF THE MACHINE HAS NOT BEEN USED FOR A LONG PERIOD
- RINSING THE SYSTEMS BEFORE FIRST USE
- RINSING THE ESPRESSO SYSTEM
- MAKING ESPRESSO
- WITH GROUND COFFEE
- WITH E.S.E. PODS - ONLY ON MODEL XP
- FROTHING MILK
- GOOD TO KNOW - PRACTISE AFTER USING STEAM
- CLEANING AND MAINTENANCE
- THE APPLIANCE
- THE PORTAFILTER
- THE DRIP TRAY
- DESCALING
- RINSING
- GUARANTEE
- ENVIRONMENT
- ENVIRONMENT PROTECTION FIRST
- PREPARING AN ESPRESSO COFFEE
Brand : KRUPS
Model : Authentic+ XP384E
Category : Coffee machine