USER MANUAL AD 4 PREMIUM - AD4 KARCHER
Description of the Appliance EN 7
Operation EN 8
Care and maintenance EN 9
Troubleshooting EN 9
Technical specifications EN 9
General notes
Dear Customer,

Please read and comply with these original instructions prior to the initial operation of your appliance and store them for
later use or subsequent owners.
Proper use
In accordance with the descriptions and the safety information in these operating instructions the appliance is intended for use as a multi-purpose vacuum cleaner.
This appliance has been designed for use in private households and is not intended for commercial use.
- Protect the unit from rain. Do not store outside.
This device may not be used to suck in ash and soot.
Use the multi-purpose vacuum cleaner only with:
Original filter bag.
Original spare parts, accessories and special accessories.
The manufacturer is not responsible for any damages that may occur on account of improper use or wrong operations.
Environmental protection

The packaging material can be recycled. Please do not place the packaging into the ordinary refuse for disposal, but arrange for the proper recycling.

Old appliances contain valuable materials that can be recycled. Please arrange for the proper recycling of old appliances. Please dispose your old appliances using appropriate collection systems.
Disposing the filters and filter bags
Filters and filter bags are made from environment-friendly materials.
They can therefore be disposed off through the normal household garbage provided you have not sucked in substances that are not permitted to be thrown into household garbage.
Notes about the ingredients (REACH)
You will find current information about the ingredients at:
www.kaercher.com/REACH
Customer Service
Our KÄRCHER branch will be pleased to help you further in the case of questions or faults.
(See address on the reverse)
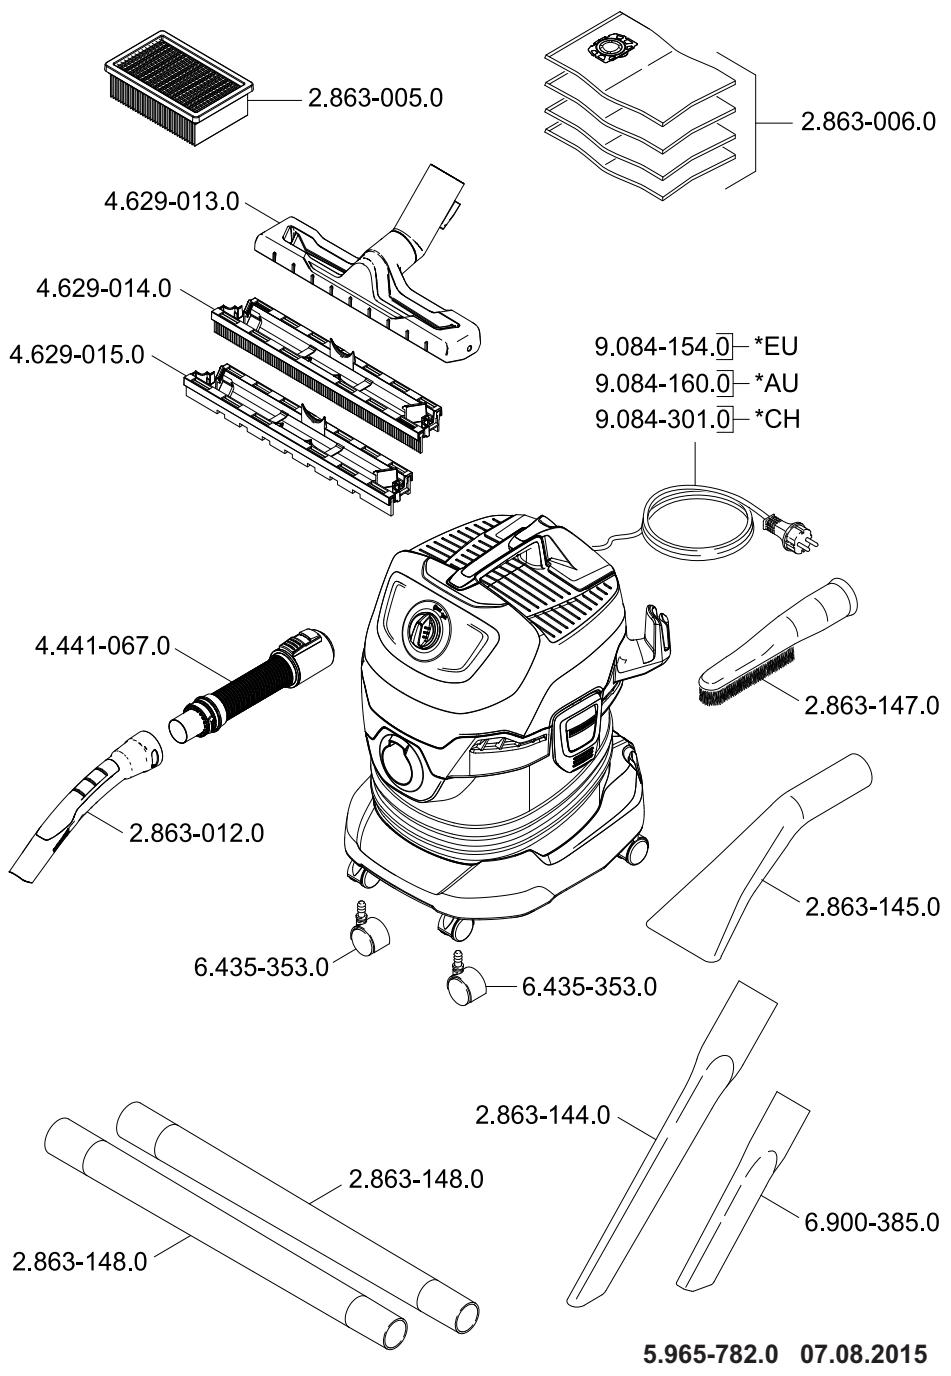
Ordering spare parts and special attachments
At the end of the operating instructions you will find a selected list of spare parts that are often required. You can procure the spare parts and the attachments from your dealer or your KARCHER branch office.
Warranty
The terms of the guarantee applicable in each country have been published by our respective national distributors. We will repair possible faults on your unit free of charge within the warranty period, insofar as the faults are caused by material defects or defective workmanship. Guarantee claims should be addressed to your dealer or the nearest authorized customer service centre, and supported by documentary evidence of purchase.
Safety instructions
DANGER
- The appliance may only be connected to alternating current. The voltage must correspond with the type plate on the appliance.
- Never touch the mains plug and the socket with wet hands.
- Do not pull the plug from the socket by pulling on the connecting cable.
- Check the power cord with mains plug for damage before every use. To avoid risks, arrange immediately the exchange by an authorized customer service or a skilled electrician, if the power cord is damaged.
-
To avoid accidents due to electrical faults we recommend the use of sockets with a line-side current-limiting circuit breaker (max. 30 mA nominal tripping current).
-
Turn off the appliance and remove the mains plug prior to any care and maintenance work.
- Repair works may only be performed by the authorised customer service.
WARNING
Certain materials may produce explosive vapours or mixtures when agitated by the suction air! Never vacuum up the following materials:
- Explosive or combustible gases, liquids and dust particles (reactive dust particles)
- Reactive metal dust particles (such as aluminium, magnesium, zinc) in combination with highly alkaline or acidic detergents
- Undiluted, strong acids and alkalies
Organic solvents (such as petrol, paint thinners, acetone, heating oil).
In addition, these substances may cause the appliance materials to corrode.
Hazard levels
DANGER
Pointer to immediate danger, which leads to severe injuries or death.
WARNING
Pointer to a possibly dangerous situation, which can lead to severe injuries or death.
CAUTION
Pointer to a possibly dangerous situation, which can lead to minor injuries.
ATTENTION
Pointer to a possibly dangerous situation, which can lead to property damage.
Description of the Appliance
Illustrations on fold-out page!

These operating instructions describe the multi-purpose vacuum cleaners listed on the front cover.
The illustrations show the maximum equipment; depending on the model, there are differences in equipment and supplied accessories.
When unpacking the product, make sure that no accessories are missing and that none of the package contents have been damaged. If you detect any transport damages please contact your dealer.
1 Suction hose connection
Illustration B1
To connect the suction hose during vacuuming.
2 ON/OFF switch for appliance
Illustration B3
Position 1: Appliance is switched on. Position 0: Appliance is switched off
3 Carrying handle
To carry the appliance or to remove the appliance head after unlocking.
4 Filter box and release key
Illustration E1
Illustration E2
In order to clean the filter, press the release key, fold out and remove the filter box.
5 Accessory compartment, hook
This accessory compartment allows the storage of suction nozzles and the power cable.
6 Parking position
Illustration C1
To rest the floor nozzle during work interruptions.
7 Container closure
Illustration A1
Pull out to open, push in to lock.
8 Accessory storage container
Illustration D2
This accessory compartment allows the storage of the suction pipes or other accessories.
9 Steering roller
Illustration A1
Turn the container, press in the steering roller in the openings at the base of the container till the end-point.
10 Filter bag
Note: Do not use a filter bag for wet vacuuming!
Illustration A2
Recommendation: To vacuum fine dust, use the filter bag.
Flat fold filter
(already installed in the appliance)
ATTENTION
Always work with an inserted flat fold filter - during wet as well as dry vacuum cleaning!
Suction hose with connecting piece
Illustration B1
Push the suction hose into the connection on the appliance, it snaps in place.
In order to disconnect it, push down with your thumb and pull the suction hose out.
Note: Accessories, such as suction brushes (optional) can be directly attached to the connecting piece and thus connected to the suction hose.
For convenient working even in tight spaces.
The removable handle can be attached between the accessories and the suction hose if necessary.
See position 13.
Recommendation: In order to vacuum the floor, attach the handle to the suction hose.
Illustration B1
Connect the handle with the suction hose until it snaps in place.
Illustration B4
To remove the handle from the suction hose, press the notch using your thumb and pull off the handle.
Note: Due to removing the handle, accessories can be directly attached to the suction hose.
See position 12.
Recommendation: In order to vacuum the floor, attach the handle to the suction hose.
14 Suction tubes 2 × 0.5m
Illustration B1
Put both suction tubes together and connect them with the handle.
15 Floor nozzle (with inserts)
When vacuuming dry dirt off the floor, clip an insert with two brush strips into the floor nozzle.
When vacuuming water off the floor, clip an insert with two rubber lips into the floor nozzle.
16 Crevicenozzle
For edges, joints, heaters and hard to reach locations.
Operation
ATTENTION
Always work with an inserted flat fold filter - during wet as well as dry vacuum cleaning!
Before Startup
Illustration A 1
Release and remove the appliance head.
Turn the container, press in the steering roller in the openings at the base of the container till the end-point.
Insert and lock the appliance head.
Start up
Illustration B1
Connect accessories.
Illustration B2
Plug in the mains plug.
Illustration B3
Turn on the machine.
Dry vacuum cleaning
ATTENTION
Work with a dry flat fold filter only.
Check the filter for damage prior to installation and replace as necessary.
Illustration A 2
Recommendation: To vacuum fine dust, use the filter bag.
The filling level of the filter bag depends on the dirt that is sucked in.
The filter bag needs to be replaced more frequently while sucking in fine dust, sand, etc.
Clogged filter bags can burst - therefore make sure to replace the filter bag in a timely manner!
ATTENTION
Vacuum cold ashes only when using a pre-filter.
Order no. basic design: 2.863-139.0, premium design: 2.863-161.0.
Wet vacuum cleaning
For vacuuming up moisture or wetness pay attention to the correct floor nozzle insert and connect the corresponding accessories.
ATTENTION
Do not use a filter bag!
Note: If the container is full, a float closes the suction opening, and the appliance works at a higher speed. Switch off the appliance immediately, and empty the container.
Interrupting operation
Illustration B3
Turn off the appliance.
Illustration C1
Hook the floor nozzle into the parking position.
Finish operation
Turn off the appliance and disconnect the mains plug.
Empty the container
Illustration D1
Remove the appliance head and empty the reservoir filled with wet or dry dirt.
Storing the appliance
Illustration D2
Store the accessories and the mains cable on the appliance and store the appliance in dry rooms.
Care and maintenance
Clean the appliance and accessory parts made of plastic with a commercial plastic cleaner.
If required, rinse the container and accessories with water properly and dry them before reuse.
Clean flat fold filter
Recommendation: Clean the filter box after every use.
Illustration E1
Unlock, fold out and remove the filter cartridge, empty dirt from the filter cartridge over a waste bin.
In order to clean the inserted flat fold filter, knock the filter box against the edge of the waste bin. It is not necessary to remove the flat fold filter from the filter box.
If necessary, clean the flat fold filter separately.
Illustration E 1
Unlock, fold out and remove the filter cartridge.
Illustration E2
Remove the flat fold filter from the filter box and tab it out.
When necessary, clean under running water only, do not wipe or brush down. Allow to dry completely prior to use.
Finally, reinstall the dry flat fold filter into the appliance. Insert the filter cartridge into the appliance.
Troubleshooting
Decreasing cleaning power
If the suction power becomes less, check the following points:
Accessories, suction hose or suction pipes are clogged, please remove the obstruction using a stick.
Illustration A2
Filter bag is full: Insert new filter bag.
Illustration E2
Flat fold filter contaminated: Remove the filter box and clean filter (see Chapter "Cleaning the flat fold filter").
Replace damaged flat fold filter.
Technical specifications
| Voltage
1~50-60 Hz | 220 - 240 | V |
| Output Pnom | 1000 | W |
| Mains fuse (slow-blow) | 10 | A |
| Container capacity | 20 | I |
| Water intake with handle | 12 | I |
| Water intake with floor nozzle | 10 | I |
| Power cord | H05VV-F
2x0,75 |
| Sound pressure level (EN 60704-2-1) | 72 | dB(A) |
| Weight (without accessories)
WD 4 | 7,0 | kg |
| Weight (without accessories)
WD 4 Premium | 7,3 | kg |
Subject to technical modifications!
Table des matieres
Consignes generales FR 5
www.kaercher.com/REACH
Service après-vente
www.kaercher.com/REACH
Servizio assistenza
www.kaercher.com/REACH
Klantenservice
www.kaercher.com/REACH
www.kaercher.com/REACH
Servico de assistencia的技术ica
Traek ud for at abne, skub ind for at lase.
8 Tilbehör shareholder beholder
Figur D2
www.kaercher.com/REACH
Kundetjeneste
2 Hovedbryter (AV/PA)
Figur B3
Anvisining filterpose
www.kaercher.com/REACH
Kundservice
Vid frägor eller problem hjälpernectmaste KÄRCHER-fi- lial garna till.
(Se baksidan for adress)
1 Sugslangsanslutting
www.kaercher.com/REACH
Asiakaspalvelu
www.kaercher.com/REACH
Ytnpeoia eGutnpetno nT eAatwV
επeiptnwn atopiw n βλαβwv μtpoite va ateuθuveo T O TAnoiéto p UToKAtaOnTua Tou Oikou KARCHER, to Toioo Thea cBon ΜθηεuexapiaTWC. (Tia thieuuvon bA. tny tiow eAlda)
PapayyEia avtalakTikw kai E1iKwv qptnmuTsw
Mia eTiloynTwv avtaalakTKiw TPO xpeiaovtai ouxvotepa 0a 0eiteo tTO TEACoS wO8nyiw XpnoC. MTopeite va TpountheAve aTALAKIKA kai Eapntmuata tor tov apuioE uptopo nto UTOkataoTmaTNS KARCHER Tns pioxnc oac.
Eyyunon
9 Tpoxiaokos odynonns
Eikóva
A1
TupioTe avantobaTov Kado, Tiote Touc tpoxouo sTa avoiyata Tou Kaou EwS to Tepma.
10
Zakoula qiaipou
YtOeIgN:Kata tyn uyn avappopnon 8ev pTei va xnpoiotioieita oakoula qIatpou!
Eikóva
A2
Suotaon: XpnoiouoieTe Tn oakoula qIaTpou yia tvv aappoqnon aeTTns OKovns.
11
EttEto TtuxwTo φIAtpo (hON ToTTOBETnIevo Otn OuaKeun)
PPO2OXH
XpnaioToei Tnva To EtnEe Bo Tnuxro qilrpo roo KaT a nyn ooo Kai kata nyn x np anapopan!
12
Elaotikos owlvac avappoqns ouvde-
Eikóva
B1
www.kaercher.com/REACH
Müsteri hizmeti
www.kaercher.com/REACH
CepBnchna cny6a
B Cnnyae Bo3NkHOBeHNA BOpC0B ININ NOmOK hAaI nnAn FnpMb KARCHER NOMOxET Bam pa3peuHTb nx.
(Adpec yka3aHa na o6oPoTe)
3aKa3 3anacHbIX qacteN cneuaJIbHbIX npHaIaeXHOCTeI
Bb6op Hn6oee qacto Heo6xOIMbIX 3aIpaCTeBbHaiDeTe B KOHcE INCHpyKuIN PO 3KcPnyatau.
3anaCbIe YaCTn I npHaIaNExHcOCTN Bbl MoXeTe nOlyuYt b y BaWero dInepa nn B fnnane fnpMbI KARCHER.
Fapantna
B KaKdoi CTpaHe DeIeCTbYOT COoTBeTCTBEHNO rapaHTnMbIe yCIOBnIA, INaDaHHbIy IyONHOMOeHHO OrpAHIa3ueMc6bItra NaHeI prOdykUn B DaHNO CTpaHE.
Bo3MOxHbIe HEnCnpaBHOCTn Pn6Opa B TeueHne rapantnHOrO cPoKa Mbl yUcTpaHReM 6ecnPaTHo,ecn npuHna 3akJIOuaTecR BdeFekTx mATEpmaNob nIn Oun6kax pnn IaTROTOBHeH N. B cnyae Bo3NHKHOBeHn npTeH3n B TeueHne rapaHTnHOrO cPoKa npoc6Ba o6paAutaTc,Imeepn Ce6e HeK O pOKynke,B ToproByo opraHn3aCuIO, npOdaBsuO Bam np6Op nIN B 6nJaKaHsu yOnlHOMoUeHHy Cnyk6y cepBuChoro 06cnuXBAHAHN.
ДаТа Выlnуca OTOбрахаETСЯ Ha 3aBOДСКОТаБИЧKEВЗAKOДиРОВАнHOMВИDE.
Pn3OMOTdIbHbIe cIpbl NMeHOT CneDyIOoee 3NaHeHNE::
Ппимер: 30190
3 roD BbInycka
0 cToJIeTHe BbInyCka
1 DecaTnIeTne BbInycka
9 BTOPAIuPpaMecaaBbInycka
0 nepBa yupeMa Mecaa BvInycka
Takim O6pa3OM, B DaHHOM npIMpe KoD 30190 03HaaeT daTy BbInycka 09 /(2)013.
Yka3aHnI NO TexHnKe 6e30NaChOCTn
ONACHOCTb
- Ppubop cneodyem eknoyamb molbo cemb nepemehno-2o moka. HanpjaKeHue doJHKHO coombeMcmBoaMb yka3aHm 6 3a6oDcKou ma-6nUpe npubopa.
He npukacambcK cemeoB 6unke u po3emKe MOKpbIMU pyKaMu.
He bimackueambcemeeyu umencelbnyo buky nymem nodmzueahna 3a cemeo u wHyp.
- Ppeo hauaom paobmbl c npubopom npoeepmbcembouwhyp uwmencbHyu buky Ha noepkdeHnur. NoepkdeHbui cemeo uhpy dojxhen 6bimb He3amadumelbHO 3aMeHen ynoHMOueHou cnykbou cepbuchoo 06cnykuhaun/cneuaan-cmOM-3eKmpukom.
-Bo u36exaHue Hecyaacmhbix cnyaee, C8ra3aHHbIX C 3JIeKmpuuecm6OM, Mbl peKomeHdyem uCnoB3ObaHue po3emok C npedkIoueHHbIM ycmpoUcM6OM 3auumbl om moka noBpejdeHna (MaKC. HOMuHaJIbHa cUla moka cpaabmbaHua: 30 mA).
-
Ppu npoeedeenu IIO6bix pa-bom no yxody u mexHuyeckoMy o6cnykueaHIO annapam cneodyem 6bIKIouumb, a ce-me0u uHyp - bInHymb u3 po-3emku.
-
Pemohmhbie pa6omblu pa6omblc 3neKmpueckumu y3- lamu moym npou3bodmbcra mOJIbKO yIOnHOMoeyHHOcnyXbOu cepueucHOzo o6cIyJxuaHua.
PNEUYPEXDEHNE
-Данhoe ycmpooucme0 He npedha3naeHOndЯ uCnoJb- 3ObaHua JIOdbMu C O2paHu- ueHHbIMu qU3UueCKUMU, ceHCOPbIMu UUNyUMcMeeH
HbIMU 603MOXHOcMmu, amakke luu c omcymcmbeem Onbima u/u nu omcymcmu- em Heo6xodumbix 3HaHu, 3a UCKJIoueHueM Cnyaee, Ko2da Onu haxoamcnohoad3Opom omeemcmehnho2o 3a 6eOanachocmb luua unu noIyuaom om Hezo yka3aHura n npumHeHuO ycmpoUcMa, a maKke ocO3HaUM 6blMeKaIoUue omCIOda pucku.
-Доуckaemсяnpumehene ycmpoucma dembmu,do-cmuueuumu 8-lemhezo e03-pacma u haxodayumucn pod npucmompom luca,omeem-cmeHHO2O 3a ux be3oapanchocmb,unu noIpyuWUMU uHcmpykuu O npumehenu ycmpoucmea om mako2o luua,a maKxe oco3Haouzumu ebimekaioue omcOda puCKU.
-
He pa3pewaüme demyum u-pambc ycmpoucm6om.
-
Cneodumb 3a meM, ymo6bl demu He uapau c ycmpou-cmeom.
-
He pa3pewaume demam npoeodumb ouucmky u ob-cnyxuehue ycmpoucme6a 6e3 npucmompa.
-
Ynakooeohnyo nIeHky depJxume noaIbwe om demeu, cyuecmeyem onacnoemb ydyuuenia!
-
Ppu6op cneoyem omknio- yamb nocne kaxdozo npume- Henu u neped npoeedeHuem
ouucmku/mexhueeckozo 06cnyxubaHua.
- Onachocmb noxapa. He donyckamb 8cacsbeHua 2opyaux unu mneouux npedmemos.
- Θксплуамаця npubopa 60 63рьбоонасьх 30нax 3a-npeшаemся.
- Ppu o6pa3o6aHu u neHbI uU bImeKaHuu xuDKocMu npu-bOp hadJexum HezAmedlUm meIbHo 8bIKIyUmb uU omcoedunmb om 3neKmpocemu!
He ucnolb3o6amb yucmuaux nacm, moouux cpeomd nla cmekna u yhu-epcahlhbx MOUUX cpeom? 3aipeuzaemcra noapyxamb npubop eody. Hekomopbie eeuecmba npu cmeweenucoecbiaeMbIM 803dyxom moym obpa3o6bl 6amb 63pbioOpachbIe napbl unu cmecu!
HukoaDa He cacbiamb cney-Iouue eeueemba:
- B3pbieaybte uu zoipouye a3bl, xudkocmu u nbInb (peakmueHa nblb)
- PeakmuaHa MemaJIuYeCKaIbIb (HaNPUMep, aIIO-MHuU, Ma2HuU, uHK) 6 coeDuHeuu C cunbHbIMu uce-JoYbIMU u KUCNOMHbIMU MOJUcpeDcMsaMu
- Hepa36ab8neHHbIe cunbHbIe Kucnombu u uenoou
- Opaanuueckue pactmbopu-meenu (hanpumep, 6eH3un,
pacmeopumelb, auemoh, ma3ym).
Kpome mo2o 3mu 8eueceMea Mo2ym pa3bedeamb uCnoJIb30- bAHNble 6 npubope MamepuaJIbl.
CTepeHb onaCHOCTn
ONACHOCTb
Yka3aHue omHocumeIbHo He- nOncpeDcMbeHNo 2po3auei OnacHocMu, Komopar npuO- dum K mjaKeIbIM yBeCybM uNk Cmepmu.
PNEpyPExKDEHNE
Yka3aHue omHocumelbHo 603- MoXHOI nOmeHuaJIbHO ONa- Chou cumyaauu, Komopar MoJxem npueecmu K mJxekblM y6eYbMa UUNK Cmepmu.
OCTOPOXHO
Yka3aHue Ha nomeHuaJIbHo OpanchyUc umyaUIO, Komopar MoKem npueecMu K noJyHeuIO ne2kux mpaEM.
BHIMAHNE
Yka3aHue omHocumelbHo 603- MoJHO JomeHuaJIbHO ona- Chou cumyaauu, Komopar MoJxem noBney MamepuJIbHbIy uep6.
Onncanne np6opa
1306pa9eHnMaHa pa3Bopote!

B DaHNOI INCTpyKIM No 3KcNpIyata-UMn pINBEdeHO ONCAnHe yHNBepcalbHorO nbIe-cca, npEcdTaeHHORHO naOBNoKke.
Ha nllnoctpaunx n3o6paqexHa MaKcHMaJIbHaN OCHACTKa yUcTPOICTBa. OChauene H KOJIuCteBO T OONHITeNbHbIX npHnAaJNeXHOCTeB, BXOJaUNX B OBsbEM NOCTABKl, 3aBcNTOT MOJeN yCtPOINCTBa.
Пи распakOBKE прбopa npOBepe Te erO KOMPJIeKTHOCTb, a takke erO ueNoctHOCTb. Пи OБаружehnIOBpeXdEHH, polYeuHbIbX BO BpEm TpaHcNoptuPOBKN, cneJyEt YBeDOMtB TopROByO pOrHaN3aUH, npOdaBsuO npIbOp.
1 3JemeHT NOKNUOeHnB BCaCbIBaUoIero UJahra
PucyhoK B1
→Пя посоeДиЕнЯ BCaCSbIbAIOUeRo WJIaHra BO BpeMpa60TbI.
2 BbiknOuataenb npn6opa (BKn./BbIKn.).
Pucyohok B3
→ПозцяI:УстpoиТВОВКЛЮЧЕН.
ПОЗИЗА 0:УстpoиCTBO ВБКЛЮЧЕН.
3 PykOaTka
→ PeKOMeHdaZa:IIBaBCaBbAHaMaMeIKoIpbJIcNeDyETPiPmEHaTbMeUOKdNc6OpApbIIN.
PncyHok B1
→ PπucoeHnHtB npHnAdneKHOCTN
PncyHok B2
BCTaBbTe wTencelHyIO BnIKy B3JIeKtropo3eTKy.
PncyHok B3
BbIKnIOuHTe npu6op.
CyxayuicTka
BHIMAHNE
Pabomamb moIbko c cyxum nnockum cknaadamblm pfunbmpom.
Peped npumehenuem cndeyem npoeepumb pfunbmp Ha nauue noepekdehu u, npu Heo6xodumocmu, 3aMeHumb.
PncyHok A2
→ PeKOMeHdaZa: IJIa BCaCbBaHnMa MeNKoI nbIIN CNeDyET pImMeHrTb MeWOk dNra c6Opa nbIIN.
Yka3aHnA OTHOCHTeBHO ΦNtPoBaJbHOro MEuKa
CteneHb3aONHeHnIbJIe6bOpHOroMeuKa3aBnCITOTBCaCbBaEmoIrp3N.
- Pnp MeIknO NblN, necke NTd. nbIe6OpHbI Me- WOK Heo6xOIO MeHrTb Yaue.
- YCTaHOBJIeHbI MHeWOK IJn c6Opa NbIIN MOXET IONHyTb, NO3ToMy erO CNeDyET CBOEBpeMeHNo 3a-MeHNb!
BHIMAHNE
BcscbieaHue xonoobho neIpaocyueceMeMb monbKo c npimehneHuem npedeapumembHOO omcekamena. Homep dna3aka3, 6a3oboEncnoHHeNe: 2.863-139.0, npemym-ncnoHHeNe: 2.863-161.0.
YnCTka BO BJIaXHOM pEXKIMe
→ PnBcBaBHmN BnAa nCneyET nCOnlB30aBt nOxOJaTuO BCTaBky HacAdK JIra IOnla NPOIePcOeHNrTa COOTBCTBYUQme pInHADJeXHOCTM.
BHIMAHNE
HeucnoIb3o6amb Hukako0nblnc6bphOoMeuka!
Yka3aHHe: npn noIiHOM pe3epByape BCacbIaIOUe ee OTBVPCTe 3akpBaIEcTc NOIIaBKOm, a yCTpoIcTB OHaHnHaet paBoTaTc NOBblIeHHbIM YNCNOM oBOpOTob. YctpoIcTB CneIyTe HeaMeIINTEbHO BbIKIOuHTb I ONOPOKHNTb pe3epByap.
IpepeBbBa pa60Te
PncyHok B3
BbIKJIOUHTe npu6op.
PncyHok C1
YCTaHOBnTb HacaIky IЯ NOJa B napKOBovHoe NO-NOXKeHne.
OkoHuaHne pa6oTbI
→ BbIKJIOUHTb npHOp n BbITaIuNTb cTeByO BnJIky.
Onopoxhntb pe3epByap
PncyHok D1
→ CHTb roJIOBky yCTpoNCTBa, onOpOxHnTb pe3epBy-ap C BnaJXHO Hn CyXoI rpa3bIO.
Xpahene yctpoiCTBa
PcvyHok D2
YnOxNtB npHnAdnEeXHoCTn n CeTeBOI Ka6eJIb B yCTPOIcTB O XpaHNTb eR O CByNX NOMEueHINX.
Yxod n TexHnueckoe o6cnyxnbAHne
Pnp60n npnaIeKHOCTn n3 NCKyCtBEHHbIX MaTePnAIOB CNEyET UcHNTb CTaHApTbIMM MOIOUIMn CpeCTBaMN dIJI NCKyCtBEHHbIX MaTePnAIOB.
→ PnI Heo6xOuIMocTb 6aK IeTaIIN npOnIoNcKaTb BOdoI N BbCyUHTb IaI NaocNeHyUcero IcNoJIb30BaHnI.
UcTka cKnlaUaToRo 0nJIbTpA
PekomeHaazn:ΦIbItpoBaIbHyO kaccety ouHuTaB nocJe kaskdOro npImeHeHn.
PncyHok E1
www.kaercher.com/REACH
Szerviz
www.kaercher.com/REACH
www.kaercher.com/REACH
Uporabniški servis
V primeru vprašanj ali motenj se obrnite na našo KÁR-CHER podružnico.
www.kaercher.com/REACH
Serwis firmy
Mult stimate client,

www.kaercher.com/REACH
www.kaercher.com/REACH
Servisna sluzba
V pripe otazok alebo poruch Vam rada pomoze naša pobočka KÄRCHER.
(Adresu najdetanazadnejstrane)
www.kaercher.com/REACH
Servisna sluzba
www.kaercher.com/REACH
Servisna sluzba
POMOuI npHnHn3npaBHOCTN BG 9
Texnueckn daHHN BG 9
06uynka3aHna
YbaxaemKnneHTn,

PnpnIbPBOTo n3noJBaHe Na BaWna Uyepe npOeHTe TOBAOpINHaHNO INCTyKUy yNBtBaHe 3a paBcTa, dJeCT-
BaIte CnopeI Hero I Go 3ana3eTe 3a No-KbCHO N3NoJ3BAHe INI 3a CneDbauIgnpTeXkATEn.
YnoTpe6a no npedHa3HaueHne
UpebTe npedHa3NaeHc 3a yonTpEba KaTO MHorOfHyHKINOHJIna IpxaoCmYkaKa CBflnACHO NOCOeHNTeB HactoJIIOy UyTBaHe 3a paBoTa ONCaHnIy Kya3AnHnIa 3a 6e3OnAChOCT.
To3n ypei e pa3pa6b0TeH 3a qactHa ynoTpe6a N He npedeBvIeH 3a HatoBapBaHnTa Ha nPOMuIneHaTa ynoTpe6a.
- PanaTe ypeJa OT dJxJd. He ro cBxaPraBaIte Ha OTKpITo.
-Пелели садди He 6иBa Да ce ИЗСмУКВaT C To3n ypeД.
MhorofyHKUHOHaHata npaxocmykaKaTa da ce n3- no13Ba caMo C:
OpunHaJHnA pntbPna TOp6nka.
- OpiuHaHnpe3epBn qactn, npuaJnxHocTn nn CneuaHn npuaJnxHocTn.
POnIbOdIeTnIaR He NoEma rapaHua 3a eBeHTyAaHn IIOpeDn, KOITo Ca npuHneH nOpadn H3nON3BaHe ne O no PndHaNaHcHEnTo mNn HnpabInNo 6cbNyBaHe.
Ona3BaHe Ha OKoHaTa CpeDa

OnakobbHnTe MaTePnAnMorTa Da ce peuKInpAr. MoNe HxBbPrnAte OnakOBKnTe npDOMaHNHe OTnaDbu, a N ppeaTe Ha BToPnHN CyobINCb cIeN NobTOPha yNtpe6a.

CTapnte ypein cbIbpxkat ueHHMATEpnaHn, NOIeJekaun HA peuHKInpahe, KOITMOrAT da 6bDat yNtOpebeHn NOBTOPO. Iopadn TOBa MOJN OTCpaHraBaJIte CTapnte ypein, n3noJ3BAJIHN POxOJaUN 3a CEJIa TcNCTeMn 3a cbHpaHe.
OTCTpaHbAHe KaTO OTnaBk Ha φnITbpa n φnITbphata Top6a
ФиNTbPbTиФиNTbPbHаТОрБаСпюзВeDEDиOT MATEрИАЛ,KONTO He CA ONACHN3a OKOJIHATA cpeД.
Ako Te He CbIbPkAT 3aCmYkaHN cy6CTaHcM, KOITo Ca 3aBpaHEHn 3a DOMaKINCKNTE OTnadlbu, MORat Da 6b- dATOTCPaHEn 3aeHNO C HopMaHnHte DomaKinckn OTnabdu.
Yka3aHn3a CbCTaBKeTe (REACH)
AkTuHa HOpMaZna 3a CbCTaBKeTe ige HamePnte Ha:
www.kaercher.com/REACH
Cnyk6a 3a pa6oTa c KIneHTn
Пи Вьпорси и посту Baшиядnictpbytopa KARCHER ue Bn nomorhe c ydoBONCTBne.
(AdpecnTe ige Hamepnte Ha 3aHaTa cTpaHnla)
IopbUkaHape3epBnHuaCTNNCneuHaHn npHaJdJIeXHOCTN
CnncbKaHa NaHaeCTO Heo6xOdmnte pe3epBHN qactn ue HamepTe B kpaar HA nTbTaHETo 3a ekcnIpoataua. Pe3epBN qactn i npHnaEekhOctn t ne npNyUte ot Baasna TbproBeu nn BBn fniua ana HA KARCHER.
Fapanz
BbB BCRA Ka CTPaHa Ca BaIiHn I3JaDeHIne YcNobn 3a rapaHnO rOCTPnHa Ha Hnwe OToPi3nPaHO DpyKecTB0 3a pa3npocTpaHHe Ha npOyKTHne Hn. EBeHTyaIHN nobpeBn U yPeDa B pAMKnTe Ha cPoKa Ha rapaHnIra Tce oCTpHaHBat 6e3nIaTHo, ako PrnuHnata 3a TaX e B mATEpHana II n npn npOn3BoDcTBoto. B cnyau Ha n3-nON3BaHe Na npBATO Ha rapaHnIe Ce 6bpuJaiTe, MoJI, kMb BaIina TBproBeu II n Hn Hn-6bn3knO tOpOn3Ipan cepBn3, Kato npEcdTabIne bOpdyBaHeto NdoKMeHTA 3a Nokynka.
yka3aHnna 3a6e3oNaChOcT
ONACHOCT
- C6pb36aume ypeda camo KbM npomeHnue mok. HanpeKxHuemo mpr6ba da cbomBemcmba Ha umupaHomo 6bpxy ma6ekama Ha ypeDa HanpeXeHue.
- Hukoza He dokocbaume KoHmakma u uencena c enaKHu pbuie.
- Μεπειμme δa He ce u3eax-kam nocpecdmδom u3dþpnaHe Ha npucbêduHumeŋHuKa6eJ om KOhmaKma.
-
Ppedu 6craKo c6b36aHe Ha Ka6eJa c KOHmakma Ha eKeMpo3axpaHbaHemo, npoepeBaume Ka6eJa 3a PoepeDu. He3a6a8Ho npeDaume nopeDeHume c6b36au Ka6eLu 3a NODMaHa Ha omopu3upaH cepu3/eKeKmpomexHuk.
-
3a da u36e2heme a6apuu c moka, Bu npenopb4ame da u3no136ame KOHmakmu, npedu koumo e MOhmupaH npedna3umel (MaKcUmHNO 30 mA homunaHa cuna ha moka 3a 3adeucmbaHe).
- Ppedu 6craKaeu paBomu no nodopbJxKama ypeDbm da ce u3KnIou6a u uencelmb da ce u3BaXkDa om KOhmaKma.
- Pemohmnu pa6omu u pa6omu no eIekmpuueckume enemeHmu moam da ce u3-6bpweam caMo om omopu3upaH cep6u3.
PNEpyPExDEHNE
To3u ypeD He e npedHa3Ha-ueH 3a mo6a, da 6bde u3-no13eAH om luca c opaHu-yeHu 4u3uuecku, ceH3OpHu U yMcmEenu CnocobHocmu U lunca Ha onum u/Unu Lunca Ha no3HaHua, ocBEN aKO me ca nOd Had3opa Ha om2oBa-paUO 3a mXhama 6e3onac-Hocm luue unu ca nOlyuUNu om He2o UHcmpykuu, KaK da u3no136am ypeDa.
- Pto3eJHo e deca da u3- noJ3eam ypeDa, cAmO aKO ca haad 8 zoDUnu u aKO ca noJ hAd3opa Ha luue, Koemo ce apuxu 3a mExnama 6e3oNacHocm unu ca noJyUu om He2o UHcmpyKuu 3a u3noJ3- 6aHemo Ha ypeDa u noJyuaEauume ce onachocmu u ca zu pa36paIu.
- Deuama He 6uba da uepa m c ypeda.
- Deuama mpr6ba da 6bdam noo ha3op, 3a da ce zapaHmupa, ye Hma da uepam cypeda.
- PocuembeHemo u noopbKama om cmpaHa ha nompeBumela He buea da ce u3-6bpwam om deua be3 hao30p.
-Дрьжme опakobунomo Фолuo daileye om deua, c-buecmebya onachocm om 3a-dywaabahe!
- Ypeobm da ce u3KlHou6a cned ecyaU3noJ36aHe Ulu npedeu ecyaNOucmeaHe/ nooDPbXka.
- Onachocm om noxap. He 3acMykaume oopau uIu mIeeu npedmemu.
- 3a6paheHa e pa6omama e b8 e3pu6oONacHu NOMeueHua.
- Ako ce obpa3yba pHa uIu u3muya meuHocm, u3KJIIOye me ypeda eedhaa uIu u3Ba-deme uenceIa!
He u3noI3BaUme abpa3uBuHu cpeOcMb8a, npenapamu 3a noUcMbAHe Ha cMbKIo Unu yHuepcalNu noUcMbauu npenapamu! Hukoza He no-ManJaUme ypeDa bBb Eoda.
Ipu 3a6uxpRe He c 6b3dyxa 3a 6cMyK8aHe OnpedelenHu 6eue-cm8a Mozam da o6pa3y6am ekCnlo3u6Hu napu uNu cMecu! Huko2a He u3cMyK8aume cneD-hume 6euecm8a:
-
Ekcpno3u6Hu unu aOpmu 2a3o6e, meuocmu u npaxo6e (peakmu6Hu npaxo6e)
-
PeakmueHume MemalHu npaxoBu (Hanp. anyMuHu, Ma2He3u, uHK) 6b6 epb3Ka cbc CUNHO akmuBu u KuceNu noucmbau npenapamu
- Hepa3peDeHu cunHu kuceJuHu u oCHO6U
- opaHuHu pa3meOpumenu (Haep. 6eH3uH, pa3peDumeJlu 3a 6ou, auemoh, Haqma). OcbeH moBa me3u eueceMea Mozam da noBpeJam MamepuAnlume, u3noJ3BaH npu u3pa6omkama Ha ypeDa.
CTeNEHn Ha onaCHOCT
ONACHOCT
Yka3aHue 3a HenocpeDcMbeHo ap03a oPacHocm, KoamO bdu do mexku melechHu hapaHraeaHua Upu do cMbpm.
PNEpyPExKDeHne
Yka3aHue 3a e6b3MOxHa onacHa cumyauz, KoJMo MoKe da doBeede do mexku meJechu HapaHraeaHua UNu Do Cmbpm.
PPEДПАЗЛИВОСТ
Yka3aHue 3a 6b3MOxHa OnaHa cumyaucu, KoJMo MoKe da do6eDe do Jeku HapaHraBuHa. BHIMAHNE
Yka3aHue 3a 6b3MOxHa Opancha cumyaun, Kjmo moxe da dobeede do mamepuanHu uemu.
OnncanHe na ypeDa
BuxTe cxemnte Ha pa3r bHaTata cTpaHnua!

ToBaYyIbTaBHe 3a pa60ta OINcBa NOCOeHNte Ha npedHaT a 6oJokka MHOrOFOHKnIOHaJIHn npaxoCmkyaKn.
ФИУРИТЕ NOKAБВАМ KAKIMARHOTO OБОЧДBAHe, CNopeД мODега Има разлки в ОБОЧДBAHeTO И DOCTABEHINE PпИнДЕХКHOCTN.
Pnpa3oNaKOBaHe npOBepeTe daJIb B onaKOBkata IINCBAT pInHaJdNEXKHOCTN OKOMPNeKTOBKaTaNIMa NOBPeDeHEn eLEMEnI. Pn npOBpeHn npr TpAnC-nopra YbEdomete TbproBaeca,OT KOROTO cTe 3akyniJnypea.
1 Bp3ka 3a BCMyKaTeHnHa Mapkyu
Φnγpa B1
3a cBbP3BaHe Ha Mapkya 3a 3acMyKBaHe npn n3-CMYKBAHe.
2 KnIOuHa ypea (BknIOUbaHe/N3KnIOUbaHe)
Φnypa B3
NonoJxHneI:YpeBbTe BkLIOUeH. NonoJxHneO:YpeBbTeN3KlIOUeH.
3 ApbKka 3a HocHe
3a hocene Ha ypeda nnn 3a cbaIaHe Ha rIaBaTa Ha ypeDa cnei de6nokupahe.
4 Φилтпраца kacета И.Deблokнрац 6утон
Φnypa E1
Φnrypa E2
→ 3a nouchctbahe Ha pfntbpa HauNTCHETe De6IOKpuaun 6byToH, hakloHe Te pfntpupaata kacetna IcBAneT.
5 Kyka B MRCOTO 3a CbXpaHeHne Ha npHaJnEeKHOCTN
ToBa MЯrcto 3a CbXpaHEnHe Na IprnHaIeNEXKHOCTne No3OBAJIbBa CbXpaHEnHeMo H a BCMyKaTeJIHNTe IIO3N I 3axPaBauSiMa Ka6en.
6 Ptozncy 3a napknpane
Phiura C1
3a cBaJIaHe Ha IIObObTa IIO3a npn IpeKbCBAHe Ha pa6Ota.
7 TanHa pe3epBoapa
Фиура A1
→ 3a OTbaparHe n3TeTneTe HABbH, 3a 6nOKnPae He HA-TtCHeTe HABbTpE.
8 MЯсто за сбханения на пиондлесхосту pe3epBoap
Фитура D2
Toba MRCTO 3a cbxpaHHe Hn pInHaJnEJXHOCTN nO3B0JIbA bCbxpaHEHe Hn BCMyKaTeJIHn TpB6n INn Dpyr nPnHaJnEJXHOCTN.
9 Boedeza poJka
Фиура A1
→ 3aBbPtepepeepBoapra, Bodeuite KoIena pinnTCHETe BOtBOPHTe Ha IOna Ha peepBoapao doynop.
10 ΦΠΤbρΗΤΟβΜΥΚΑ
Yka3aHHe:3aMOKPOI3CMyKBaHe He6nBa da ce noCTaBЯФиNTbPnaTOp6uNka!
Фи的游戏 A2
PnpopbKa:3a3acMykBaHeHaΦnH npax nocTa-BeteΦnITbPHTaTOPbUka.
11IIOscbKΦnITbp
(Beue e nocTaBeHa B ypea)
BHIMAHHE
Pabomeme eunau c noceaeu npocbk pfumtp, KaKmo npu MOKpo, maka u npu cyxo u3cmykeane!
12
BcmykaTeJen Mapky cbc Cbbp3BaU eJemEnT
Φnγpa B1
→ПиТИСНЕТЕ BCMyKaTeJIHЯ МарКуЧ B ИЗВОДа HaурEDA,TOI CEФКСИРа.
→ 3a CBAJIHe HATINCHETe ΦHKCaTOpa C nIaeU IN3-TeIne TBCMYKATEJHnMa MPkyu.
Yka3aHHe: PnHaJaIeKHOCTne, Kato Happ. BCMyKaTeJHn YteKu (Oua) MoRaT Da 6bDat NocTaBEni DnpeKTHo Ha CbPb3AuaJra ENEMeHT N CbPb3aHn No To3n HauHn C BCMyKaTeJHn MapKyu.
3a ydo6ha pa6oTa n B TeChn IomeeHn.
Pn Heo6xoHMOCT cBaanJauata Ce npbKka MoKeJa 6bJe noctaBeMaMekny pnpHaNaeKHOCTNe I BcMyKaTeHNIA MPkU.
BIXTe IO3nIa 13.
Ppenopka:3a n3cmykBaHe Ha noDa noCTabete Dpbkkata Ha BCMyKATEHnMa Mapkyu.
13
CbaIaIca ce IpbIbKka
Φnrgpa B1
→ Cbpxke Te npBXkaT a BCMykATEHnHa Mapkyu,doKaTo ce pKcapa.
Φnγρa B4
→ 3a CBAJHHe Ha DpbKkata OT BCMYkATEENHnMa MapKyu HATNCHEte KkCatopa C naneu n N3TertNete DpbKkata.
Yka3aHHe. NopcIeCTBOM CbAJaHE Na IdpbKkata pniHaNApNeXHoCTITE MoRaT a6bTaT NoCTaBeHN iDnPeKTHO Ha BCMyKATeNHIA MapKY.
Bnxte no3n12.
Ppenopbka:3a n3cmykbahe Ha noja noctabeTe Dpbkkata Ha BCMykateHnma Mapkyu.
14 BcmykaTeHn Tpb0n 2x0,5M
Φnγpa B1
NocTaBeTe DBeTe BCMyKaTeHn Tpb6n EaHa B Dpyra I rCbPjKeTe C dpjKkata.
POMOu npn HeN3npaBHOCTN
HeoctaTbueh eepkOT H3cMyKbaHeto
Ako MOUHOCCTHa HBCMUKBaHe Ha ypea Ce NOHNK, MoJI PNOBepTe CNeDHIte TOCHN:
→ Пинадлжноchte OT OKOMПLEKTOBkata, cmykaTeHnHT Mapkyu ИИN BCMykATEHnITE TpbOu ca 3aNyUHeH, MONIM, OCTpaHete C npbUka TOBa, KOToTn 3anyuba.
Φnγρa A2
→ Φπntbρhata Top6uKa e πbJHa: NocTabete HOba φπntbρhata Top6uKa.
Φnγρa E2
→ПлосьгФИNTbpeэмБрсЕн:ИЗБадетe ФИТРирашатakacetаипочichte ФИNTbpa(BИКТе rлава"ПлосьгФИNTbP").
→ PtoMeHeTe NOBpeHnI NIOcbKΦnTbp.
TexHnueckn daHHN
| Нарlexени
1~50-60 Hz | 220 - 240 | V |
| Мошист P_HOM. | 1000 | W |
| Проблattел (инертын) | 10 | A |
| Осем на розерboaра | 20 | л |
| Посаме на вoda с ръкхвац-
ката | 12 | л |
| Посаме на вoda с поювата
дюза | 10 | л |
| Зхсанваш кабел | H05VV-F
2x0,75 |
| Дорустимо НИВО на ШуМ
(EN 60704-2-1) | 72 | dВ(A) |
| Тетло (бeз пинадлесности)
WD 4 | 7,0 | Кт |
| Тетло (бeз пинадлесности)
WD 4 Premium | 7,3 | Кт |
3ana3ame cu npaeomo ha mexHuuecku u3MeheHua!
Sisukord
www.kaercher.com/REACH
Klienditeenindus
Küsumuste ja rikete korral aitab teid KÄRCHER'i filiaal. (Aadressi vt tagaküljelt)
www.kaercher.com/REACH
Klientu apkalpošanas centres
Jautajumu un aparata darbhas tracejumu gadijumaa Jums labprat sniegs padomu firmas KARCHER filiales darbinieki.
(Adresiskatit aizmugure)
Rezerves detalu un specialo pigeonum pasutisana
www.kaercher.com/REACH
Klientu aptarnavimo tarryba
Iskilus klausimams arba prietaisui sugedus, Jums pades musu KARCHER filialo darbuotojai.
(Adresa rasite kotoje puseje)
TexhiHixapaKTepeNCTnKN UK 9
3araJIbHI Bka3iBKN
UaHOBnI nokyneb!

Peped nepuim 3actocybaHnM BauoRo pncIpo npouitai Te OporirnaBHy iHCTpyku3Ecknlyatau, nCnla zuoro
ДиTe BiDIOBIDNO Do HeI Ta 36peXjtB IIДЯ NOДыБОТо KOpNCTyBaHnA abO dЯ NaCtynHOro Bnachnka.
Ppabnblhe 3acTOcyBaHHa
Pnpctpi npn3hauheo DnBVKOpncTaHnB BiDnOBiDHO do ONICIB, HabeNEHx y DaHOMY KepiBHNCTBI no EKCnnyataui, i Bka3iBOK n ToTexhiCi 6e3neKn iD vac pOBoTn 3yHBePCaBbHMn NINIOOCAMn.
LsqnpiTprPi npnHaueHennI pnpBaTHORO BkOpHCTaHnI e Hne pncTOcOBaHn DO habaHTaKeHb npOMCNBOrO BkOpHCTaHnH.
Heobxidno3axuataT npnlaB iD douy.He 36epi- ratn no3a npmiiueHHM.
3abopohraetbcbcBcMOKtyBaTH npnlaom noniTa caxky.
BnKOpncTOByBaTn yHiBePcAJIbHn nIIIOOC TJIbKn 3:
OpriHaBnHm fJIbTpByBaJbHm MiKOM.
- OpiHHaJIbHIMn 3aJAHCHIMn aChTINHAMn, AKCECyapAMn TaDOnaTkoBIMn 06JIaDHHNrM.
BnO6HKe He Hece BiNObiDaIbHocTi 3a 3bHTK, 3a- BdAHI HeiDIOBIDHM a60 HnePabINbHM 3actOcyBaH-NM pncTPOH.
Oxopoha doBkiJna

MATEPIAIN ynakoBKN iNDAIObC nepepO6ci dIy NOBOTOPHORO BIKOPICCTAHN. ByNb IaNcKa, He BIKUdAte nakyBaIbHi MATEPIAIN pa3OM i3 DOMAUHIM CMITAM, BiDAAITE IX NPOTOPHORO BIKOPICCTAHN.

CTapi npnctpoi MicTb cHHi MaTepiann, 10 MoKoYbB BIKOPNCTOBYBAITMC NOBTOPO. TOMy, 6bNy nacka, ytnI3yte CTapi npnctpoi 3a donomorOIO CNEUJIaNHX CNCTEM 3bOpCy CMTTA.
Ytniiaqia qinbtpa Ta qinbtpyBaIbHoro Mioka
www.kaercher.com/REACH
Cnyk6a niItpmkn KopncTyBauiB
3 pi3nix nntaHb Ta b pa3i noIOMOK Bam donomokyTb haji pndctabHniki pfianiy KARCHER.
(Adpecn nIb. Na 3Bopoti)
3amOBJIeHHaIapachnX qactH Ta cneiaIbHorO 0bnHaHHa
Aocptmert 3aapanxuactnH, uo cacto Heobxidni, MoKHa 3naTn B KInu iHCTpykuji no Eeknnyataui.
3anaChi YactiHn Ta cneiJIbHe 6noIaHaHHB NmOKeTe OTPMaTn y BaWero dUnepa afo y finiani fipMN KARCHER.
Tapaantria
YKOKH KpaHIN DIOIbYUMOBI rapaHTII, BDAHHa HAaHMMKOMTEHTHMMO TOBAPNCCTBAIM 3i 36bTy. HenOnaKn BPObot pnpCTPO M yycBaEMo Be3nPaTHo PpOraTOMTePMHI DII rapaHTI, kAIO OBOH BVNIKKAI H6pAKOMMaTepiAny cn NmIKAMN BINOROTBEHNHe. Y rapaTtiHOMy BINAky 3eptaiTeCb, 6yD naKc, 3 ObaNHaHNMa TdoKoymeTAM, IO nITBePdXHyTO pOKNYk npCTPO, Do BaIoTOrTOBROAreHTo ABO do npRBeDeHHx HxKYe nuHKTI BaparTtHOro 06CnryOBuBHNa KNICTb.
ПразвILA 6e3nekn
HE6E3NEKA
- Ppucmpiu cniD emukamu luue do 3mHnoo cmpym. Hanpyza noBuHa eioNoia-mu Eka3aHUM Ha qipMoei mabluci npucmpo o daHm uodo Hapyu.
- Hikolu He mopkaumecb Mepexho2o umekepy ma po3emku 60no2mu pykamu.
- HemoXHa 6umayamu MepeXHu umekep i3 po3emku 3a MepeXHu uHyp.
- Ppeesipamu nidkIoueHn npuIady do Mepexi Ha npedMem nowkoxdxeHHa neped KoxHum buKOpucmaHHa. 3amihb deqekmhu npoeid uepe3 aemopuzo8any cepiechny clyx6by/ enekmpuka.
- Uo6 yHukhymu Heuachux eunadki8 niδ qac bukopucmaHnaeJeKmpnpuladie, Mu peKomeHdyEmo bukopucmooyampuozemku 3 nopeDhbo yBIMKHeHum aBomamom 3axucmy iD moky
Бу'mokу (MaKc. 30 Ma cUlu mOKy HOMiHaJIbHOI dii).
NONEPEJXEHH
-Пд уас поведеня 6убьякux робим 3doэладу ma mexнihuzo obcny2oByeання anapam cnid bumkhymu, a Мерекш unwyp -bumraemu 3 pozemku.
- Pemohmhi po6omu ma po6omu 3 eIeKmpuHUMu 8y3nAmu MoKe uKoHy6amu minbku yno6H6aKeJcpeicHO2O o6cny2o6y6aHHa.
- Lii npucpii He npuzhaeHuu dya uKOpucmaHnna 1IOdbMu 3 oMexeHmu φi-3uHmu, ceHcOpHmu a6o pO3ymoBuMu MoXnueOcmMaMu a6o 3 iDcymHicmIo docei dy u/a6o iDcymHicmIo iDnoEiDHX 3HaHb, 3a eUHramKom Eunadkie, KOJIu BOHU 3hAxO-dambcn iid Haanrdom eIDnoEiDaIbHOi 3a 6e3neky oc6bu a6o ompumyIomb iD Hei Eka3IEku nO 3acmocyeaHHIO npucmpoU, a maKoJ yCei- domnIoumb MoXnuei pu3uku.
- Donyuckaembca 3acmocybaHnHa npucmpoio dimbmu, kiaDocrau 8-piuho2o biKy, 3naXodarmbc nio haeJadom ocObu, eioobdaIbHOi 3a ix 6e3neky, abo kia ompumalu iHcmpykui i3 3acmocybaHHnPpucmpoio bi maKoi ocObu, a makox ycbiDOMIOHMb MoxJIuei pu3uku.
He do360jme dima 3 npucmpoem.
- Cmexumu 3a mum, uo6 dimu He apanu i3 npu-cmpoem.
He do3e0jme dimm npo6oou m ouuueHnma o6cny2ooyeaHn npucmpoO 6e3 Haajy.
- Пакуьньну плійу мрumsуme подani eiD dimeu, icHye He6e3neka 3aduyweHnry!
- Ppucmpiu cnid bioknluoyamu nicna koxho2o bukopucmaHn i neped npoeedeHnM ouuueHHa/mexhichuo 0b-cny2oeybaHHa.
- He6e3neKa noxexi. He donyckamu 8cmokmyeaHnnaIauOuux abo mIIouux npedMemie.
- Poboma y bubyxoHe6e3ne4Hux yMo8ax He do360JembCra.
- Ppu ymeopenhi niu abo eumikaHHi piuHn npucmpiu cnid Heaunho bukIoumu abo bi'dHybamu biD eJekmpomepexi.
- He bukopucmoeyamu 3acobu dny uuehenn a6o yHivepcalbhi 3acobu dny uuehenn! 3abopohembcra 3ahypoeamu npucmpiu y 60dy.
PeeoMuMoJyMbcmOpouamuubxohoe3neHi a3u abo cymiwi, 3Miuyocucb 3i BCMOkmyaHUM noimprm.
Hikoku He ①ecmokmyeamu nulococom HacmynHi peoyouHu:
- Bubxohbe3neuHi a6o 2opiu 2a3u, pduHn a6o nun (peakmuHu nun)
- PeakmuHu MemaLeBu nul (HaPukna, aHOMiH, MaHiu, uHK) y cNoLyci 3 CUbHOJyXHumu ma KUCnomHUMu 3acobamu dnyuueH H
- Hesperides ciulbhi kucno-mu ma lyu
- OpeaHicHi po3uHnku (Ha-npuKnaD, 6eH3uH, po3piJxJyBau φap6u, auemoh, Ma-3ym).
До моз ож,uzi pevoBuHu moJxymb nooodmu mamepiAnu, uO buKOpucmoEyombcy y npuCmpoi.
Pibeh He6e3neKn
HEBE3NEKA
Bka3ieKa 0odo He6e3neku, Ka 6e3nocepedHbO 3aapoxye ma npu3bOdb do mxxkuxmpaM Yu cmepmi.
△NONEPEJXKEHH
Bka3iEka 0do nomeHciuHo moXJIuBoI He6e3peuHOc cumya- u, 0o MoKe npU3ecMu do mJkkux mpaM Yu cmepmi.
OBEPEXHO
Bkaieka uodo nomeuizHo He- be3neuHoi cumyaui, kA moKe cnpuunHumo ompumahnna Jeekux mpaem.
YBAFA
Bka3iBa 0do MoxIuBoi nOmeHciUHO He6e3peuHi cmyaui, 0o MoKe CnpuHuMu Ma-mepiaIbHi 36umku.
Onnc npuctpoH
3o6paekHn Da. Ha po3BopoTi!

UybOMy KeipBnTBI 3 EKcnnyatauJI HabeJeHO OINc YHlBepcaIbHorO nIIOcoCA, kYNI 3o6paxeNo HA OkBKnadInci.
Ha iIOCTpaJix HaamIbOaHO MAKcIMaJIbHe OCHAUEHn npICPTo. OCHAUEHn taIKbKICTb DoaTkoBOr npInaJa, 10x BxoJntb B o6crt noCTauaHH, 3aJeXHTb Bd MoDenI npCtPO.
Ponoxhen 0: Pnctpi BmKHeHn.
3 Puyka
Ipeed BBeDeHHMaB EeknJaTaauio
MaJIHOHOK A1
→ Po36nokyBaTu n 3HrTu rOiBky npunaNy.
Повернтуpeзеруар,Встави дуунopy поворотни колшata в отвори на niдстави peзеру.apa.
BcTaHOBiB Ta 3aΦikCyIe roIbky npunaIy.
BBeHnBeknIyataio
ManHOHOK B1
PiD'eHaTn akceCyapu.
ManHOK B2
BCTaBTe wTeNceIbHy BnIky.
MaJIHOHOK B3
→ BkIIOUHTb npncTpii.
Пилоссдясуочншк
YBACA
Ipaouoamu minbku 3 cyxum nnockum cknaadacmum
phiIbmpom.
Ipeed 3acmocyeaHnem cnid nepeepumu pfimnp Ha HaaBicmb nookodxeh b, 3a nompe6u, zamHmu.
MaHIOHOK A2
→ PeKOMeHauia:ДЯ BCMOKtYBaHHЯ DiIbHoro nIy cIa 3actocobByatn MiuKn dIra 3bOpny nIy.
Bka3iBkn 0oO oipIbtpyBaIbHoroMioka
Ctynih 3anOBHeHHaPbTyBaHbHorO MiIky 3a- JekTb BiD BCMOKTyBaHoro 3aBpyHeHH.
- PnB CMOKToBaHnI NmLy, nicky Ta iN. cnid qactiwe 3MInHOBatnФilbtpyBaIbn MiWOk.
BCTaHOBaNHeNiMiOKd36OpnyMooKe nonHHTu,TOMy HOrO cIe CBOeCAHO 3AmHItb.
YBAGA
Bcmokmyaehn xoIodHOo noneny 3diuchobammu i3acmocyaehn mnonepedhfoe eicikaaya.
Homep dIa 3amOBJIeHHa, 6a3OBe BnKoHaHHa: 2.863- 139.0, npemiym-BnKoHaHHa: 2.863-161.0.
Bolore npnbpaHn
→ДявCMOKTBYAHNBAOJN CnID BUKOPNCOTByATIN BIDNOBIDNY BCTABKу Do hacaJN DnI nyiNDOnI npiE-ENbYTu BIDNoBIHne pnpaADJ.
YBATA
He bukopucmoeyme pinbmpyeanbHu miouk!
Bka3ibKa: RaKIO pe3epByap NOBHN, nonIaBOK 3akPbBaE OTBIP DnA BCMKTOBAHNN I npNCTPI npAUOe 3 6INbIM NcNOM OeptIB. HeraHO BmKHTn npCTPi Ta BNOPOKHNTI pe3epByap.
Ipeepnbannpo60tn
ManHOHOK B3
BuknIOuITb npncTpi.
ManHOHOK C1
BCTAHOBNTI HACAIDKJ DAREI pIDIOH B nAPKYBaIbHe NPOJOXEHNA.
3akinyuHn np60Tu
Bumkhnytn npucpii Ta BnTgHyTu wTekep.
CnopoXHHTn pe3epByap
MaHIOHOK D1
→ 3HHTN roJIOBky npNCtpoU, cnOpOxHNt pe3epByap 3 BOJOrIM a60 cyXM 6pyDom.
36epiranHH npnctpoH
ManHOK D2
www.kaercher.com/REACH
БунбIM Колданушыларfa KbI3MeT KepceTy 6eJimi
Erep Cizde cypaKtap naJa bOnca HeMece Ciz 6eRINI bip KemuiNikTepe tan BocnCaHb3, 6iAdiH KARCHER 6eImuHepePi3 CiRe KyBpIana KaMeK KepCteTei. (MeekxHaApTkBoXaBfHda 6epinreH)
Kocanbl 6eJweKeTpimehapHaBbl 6eJweKeTepine Tancbipbc 6epy
Aca jki konlaanbtaibn Kocankbi 6eJneKtepiH Ti3imH NcayIbIKbIH eH actHda OKn anacb3.
Kocajb6eJnueKeptepMeApnaB6eJnueKeptin E3H3dH catyubh3da Hemece KARCHER KOMNAHINCBHIN JkepiNtkiEkinTirHde catbin anybH3 MymKiH).
Kenildeme
Biyimdapmb3 yinH eJne JxayantbEtim
cepiktceepim3 tapabnHaH nbIrapnataH KeniJeMe
wapTtapbl kUyTe 6oanDa. Erep MaepnAnadpblh
akaylFbI HeMece daHnDay bapbcHdaFl
kateniktep Tabla, cbi BTKmAn akayblkTapdb
keniMep3imi iuiHne aKbc3 xHeJeM3. KeniMep3imi
iiHne Hapa3blkTapblb3 6oJcA, acnTb catKaH
cayda MekeMecine Hemece XaKbHdAfE kIneTTi
cepBCTIK Kb3Met Kepcsey OphbHa caTbIn any YerIH
kpcetin, xaBapnacblb3.
HdpinreH KyHi KepceTiIreH Typ KeCTeciHde UnppnaHaH.
Keke caHapdbH MafbHacb KeleciJe60aIb:
MblcAnbl:30190
3 ΘHπipiIπeHxblb
0 ΘHdiipinreH facbipbl
1 ΘHДiPIIReH OHKbIINbIK
9 ΘHdpipireh aibihbH ekihsi caHBi
0 EHndipiriren aibHybH6ipihcahbI
CohImeH 6yI MbIcaIIa 30190 KoIbI 09/(2)013 eHdipinre H KyHn 6iJnipeJI.
Kayinci3dk TypalbI HycKaynap
KAYIN
-БуubIMdbI meK KaHa aybICnAJIbI mOKKa KocbIHbI3. Tok KepeHyi 6yubIMhIH mypi BeiaicHdezi KepceminaeH kepHeyHe caikec bonybl muic.
- Ka6eJIb awacbl MeH 3JIeKmp p03emKacbln ewkauaH bIINFaIDbI KOJMeH yCmAmHaI3 He mypmmHei3.
- Ka6eIb aWacbIH po3emKaadah wblrapy ywiH 6yubIM ka6eJIHeH mapmnaHbI3.
Kocy Ka6eIdepi MeH 6yubim awacbIH KOndaHy aandbIHan andbIHana 6y3bIraH Kepnepi 6oIraH 6oImaHaHbIH meKcepin aIbIHbI3. 6y3bIbIN KaIraH Ka6eIdepin, XapalaHy Hemece baca 6y3bIpybI 6oNbIpmnay yuH, depey mypde ocbl Kymbicmap yuH pyKcambl 6ap apnaBIMamAoHap apKbIbI aybcmbipmbl anybIHbI3 muic.
- Θл ekmp onammapbIH
болдырмпay γшin kame
mokmaн caKMay γшin
андынblI KOCblnfaH
apHaUbI po3emKacbIH
КолдаHybIHbI3dbl YcblHaMbI3
(KOCblnblN Kemy mofblHbH
MaKC. HOMUHaNoBik Kγwi 30
mA).
-БуubIM boUbIHwa emki3inemin 6aplbik kymbICmap yaKbImbIHda 6yubIMdbI mHDEMmi mypde 3neKmp moBHaH uBIFapbln, 3neKmp awacbln p03emKaadah wBIFapbln anbHybl muic.
- XeHdey JyMbICmapbI MeH 3JIeKmp 6eIueKmepi 6OuBihwa JyMbICmap meK KaHa OcbI JyMbICmap ywiH pyKcambl bap apHaubI MaMaHdap apKbINbl
aybicmbipmbin anybIHbI3 muic.
ECKEPTY
- ByI KypbIrfbIHbI u3ukaJIbIK, ceHcOpIbIK Hemece aKbIIN-OU daMybI weKmeJeaH Hemece mexipubeci JxHe/Hemece 6iikminiai xok adamdap 6iikmi MaMaHHbIH 6aKbIaybIHda BoMaHaH Ke3de Hemece ocbI MAmHap mapanbIHah 6yubIMdbI kOndaHy mecini XHe orAH kambicmbi Kayinmep mycihopijlmeseh Ke3de naudanaHbaybi muic.
- BaIaIap 8 xacmaH aCKaH XaRDauDa Hemece OnapdbH KAYinci3di2iHe XayanmbI adam bakblaybIHDA Hemece KypblfblHbH KOJdaHy mocinimeH XeHe orAH kambicMbI KayinmepmH maHbICKaH Ke3de rHa KypblfblHbI KOJaHa anadbl.
- Bañanapra KypblfBImeH ouHayra pyKcam bepMeHi3.
- BaIaIapra KypbIrfBImeH ouHayra Konl bepMey yuIH onapdbI baKbIan ombipy Kepek.
- BaIaIap KypblfblHbI meK epeceKmepeDih 6aKblaybIHda ma3aIaybl XHe naUdaIaNHybl MymkIn.
-
Kaamaybiw Kaara3obi
baanapdaH aynaK
ycmahbI3, myHwbIfbIn KaJy
kayni 6ap!
-
Byubimobi ap naudanany XeHema3aay/kbi3Mem KepcemyeH KeuiH eWipiHi3.
- Θpm kayni.Жангыш HeMece mmaHfbiu 3ammapdbi copyra 6oJMaUdbi.
- Kapbiny kayni 6ap kepnpde naaDaNaHyra mbiubim caNbHaDbI.
- KənipwikmeHy Hemece cyubikmbiK wbfambIH Ke3de, 6yubimobI owiipih3 Hemece 3neKmp awacbIH wbfapbIHbI3!
-Ew6ip mypniimama3apmambIH KypaIbbl,auHek ma3anaumbIH XHe6apIbIFbIH ma3anaumbIH KypaIpaOpbl KOlaHa6aHb13!ByubIMbI ewkaawan cyra6ambyPMAhbl3.
CopfbInbIn omblipran ayamEn KocblnraHda Keubip 3ammap Xapblnyfa kon awa anambln 6ynap men epimihinepiin naOda bonybHa anapa anadbl. Acmbdaftzammapdbi ewkaawh copfbIwneh copfbImnaHb3:
- KapbIbI Hemece XaHbI IN Keme anambyn 2a3dap, cynap MeH uAndapDbI (peakmu mi wanDap)
-
Peakmuemi Memann
waHdapbIH (MbICaJIbI
aIIOMuHuU, Ma2He3UU,
MbIPbIu) aca KyammbI
aNkAUNKanbIK XaHe KbIWKBIn
ma3aJAY bYbIMdapbImeH
6ipze
-
Epiminmezeh Kyammbl KbiwKbIJap MeH ciininepdi
- Opaanukalbik epiminho 6yubIMdapbIH (MbicaJIb 6eH3uH, 6oayepimihinepi, auemOH, Ma3ym).
OcbdaH baca, ocbI 3ammap 6yubIMdafti KOndaHbINFaH MamepuaandapbIHbIH
6y3bInybiHa da anapa anaDbI.
Kayin deHreii
KAYIN
Abyip kapaakammahyra He
eIIMae anapbIn corambIn
mikeNe mypde myce anambln
mayekelae Hycay.
ECKEPTY
Abyip kapaakammaHyra He
eIImee anapbIn corambIn
bIKmuman kayinmi xardaunapra
Hyckay.
ABAHJIAHbI3
KeHHJXapaKaMaHaMyFa anapbIn cofambH bIKmumaN kayinmi XardaAura HycKay.
HA3AP AYdAPbIHbI3
MamepuaIbik 3uHra anapbin corambin bIKmumanKayinmi kardaura Hycay.
ByiYbIM CnnaTtAmacbl
CypTep 6yKtemeni 6eTe KapaHbI3!

Ocb KOpIaHy TpyaBb HycKaaybIbbl anDbHbF bGetten EMe6ean copBbIwTbI cInnTaTaNbI.
CypeTepTe TOnbIK KOMnJIeKtAunia KApceTiIReH, eP MoDEJIte 6aJNaHbICTbl KOMnJIeKtAunia Da XHe bepinTeIH KepeK-kaPaKTapda e3reWeJiXkTeb 60lanbl.
BmybIM KopanuacbIH aushKaHda Kopanua iuiHderi 6ymbm Hm BnIeKTEPIH TOnbIK XeHE 6y3bIMarAH Tpyde 6oIraHdbfBtEh TeKcePin aIbHbI3. TaCbImaJAY hTMeXcHHe 6yInHRe Hxepi 6oNca, 6ymbmdIcTaKaH cayda MekeMeciHe xabapNaHbI3.
1 Copy wnaHrci
Cypet B1
Ta3aay Ke3iHde copfbyTu wnaHricin Kocy yuH.
2 BybIM KocBbIb (Kocy/Theta)
Cypet B3
→ I Kny: KpybIJfbl KOCbIJFaH. 0 Kny: ByuBIM eUipinreH.
3 TacbImaJay TtKacbl
→БиьIMdapbl TaCbIMaNay HeMece 6yibM xanBkIbITapBIn KOJaHaHn KeiH anBn Tactay yuH.
4 Cy3riu anemrKHe aXbipatTuMeci
Cyper E1
Cypert E2
→ Cyzirinepi Taanay yuH anbipaty TuMecin 6abcbH3, cyzriJnEMeHTTI uBfapbH3 XHe anbIN TACTaHb3.
Kepek-kaapakapdbicakTayxepiHin inneri
BnyKepeK-kaapaTapdbCaTay XeepiCopfbIi CnINKOH MeH JeNIIIK KaBeJIbDi CaTayFa MymKiHik Bepedi.
6 TypaKyni
Cypet C1
Y3inic ke3iHde copy wymeriH eWipy ywiH.
7 Cayt Knnnbl
Cypert A1
→ CbIPTka aIwI yIiH TaPbIbI3, iUke Xa6y YIiH 6acblbI3.
Kepek-kaapaktapdbicaayxepiHiccaybIb
Cypert D2
Ocbl Kepek-KapaKapTApDb caKaTay xepi copBbIu TYtiriH HeMece baca Kepek-KapaKapTApDb caKaTayfamymkiNdik bepedi.
9 Baftaftbip oponk
CypTeA1
CaybITbIaHAIaNDbIPbIHb3, 6aBtITTaBII polnKTePdi CaybITbIH TByiHderi CaHbIaynapra tipeRHe6 BacbIb3.
10 Cygriu k an
Hcyay:blrfaIbI Ta3aIay ywiH cy3riu KanTbI caMaHbI3!
Cypet A2
KeHec:XkaaHaHbI copy ywiH cy3riu KaNTbI OPHAeHbI3.
11 Teric 6yrinmeni cy3ri
(6yibimfaraaJndekaaahOpHaTbifan)
HA3AP AYdAPbIhbl3
blrandahe KpyraK mazanay ke3iHde, opkaaun Kipicmpinaen meiec byainmei cyzaimeH kymbic icmeH!
12 BaJIaHb 10nHaHrci
Cyper B1
Cporbity shaHriCIN 6yBIMdaBfKoHTAKTIRE eHr3iHa, on 6ekTineDi.
→ AnbTacay yuHoiOyIKbCaycaKneh 6aCbHb3 XaHE COPbTy WHaHrcIH WbIfapbHb3.
Hyckay: CopbIbI KblIbIaBfI (KocMbIua) CnAKeTbI KepeK
XapakTap baiNaHbICTbIpBfl BcIeKke TikeNei
XaIraHbYbI MymKIn XeHe OcbIaIIa MOpBfity
UlaHricIme HbIaNbICTbIpybIy MyMkiH.
WeKeTeJIreh aiMaKaTb BiHraIbI JxMbIc ICTeyre
apHaIraH.
AInh6aIbTtKaHbKaKeTeIHue Kepe-KapaKTap MeCHopfityuHaHnicHiaPacBHaOpHaTyfaBoJaAbI.13-KyJiKapaHbIa.
Kehe: EeHHHe copy yuHIn tyTKaHbI copfblty uHaHricine kAnFaHbI3.
13 Anb6anby Tytka
Cypet B1
TyTKaHbI copfbyTy wHaHricHe 6eKtiImereHwe oPhaTbIb3.
Cypet B4
→ TtKaHbI copBtIy IuaHriCHeH anbIn Tactay yuHIN OIIbIKbI CayCaKHe 6acbIHb3 KHe TtKaHbI WbIfApBbIb3.
Hcykay:YTkaHbI anbln Tactay Ke3iHe KepeKxapakTap copbyT WlaHrciHe TikeNeJ KaNfahyblMYKMHI.
12-Kyndi kapaHbI3.
Kehe: EeHHHe copy yuHIn tyTKaHbI copfby UHaHricHe kAnFaHbI.
14 Copfblu Tyliri, 2 x 0,5 M
Cyper B1
CopfbltuytkepiHIn ekeyiH de bipre kanaFahb3 XaHE TyKamEn BaunhaICTbIpbHb3.
15 EeHHeN copy yUmeri (enDipMeIepMeH)
→ Kyprak kipdi eeneHHen copy ywiin eki kbntapak J0jraFbIMeH enDipMeHi copy wMyerine caIbHbI3.
CydbI eDHeHHen copy yuHIn ekipe3eHKe ry6KacbIme HndIpMeHi copy wMyerIne canbHb3.
16 Xancapnap ywiin wymek
→ BpItap, kancapnap, 6atapera nap MeN kon JKTi3y KbHKepepre apHaIraH.
KoIdany
HA3AP AYdAPbIHbI3
blrndbI he kprak masanay ke3iHde, opkawah Kipicmpinaen meiec dyainmeni cyzaimeH ymbic icmeH1
Icke Kocy aIbHna
Cypet A1
→ KypbIINfbl 6acBH aftbITbHb3 XHe anbIn TaCTaHbI3.
CaybITbIaHaNDbIpBbI3, 6aBtTfAblu polnKTeprdi caybITbH TybHderi caHbIaynapra tipeRHee 6acbIbI3.
→ ByuM kAnKbIbH opHaTbIb3 XaHe 6eKiTiH3.
BybIMdbickeKocy
Cypet B1
KepeK-kaPakapbIkaJFaHbI3.
Cypet B2
XeniawacbH eHri3iH3.
Cypet B3
→ ByIbIMdbIKOCbIHbI3.
Kypfak Ta3anay
HA3AP AYdApbIhbl3
Tek KypraK meic 6yaiImeni cy3eimeh kymbc icmehi3!
Cy3aHINKoIanda6ac 6bpyIH 3aKbIMdapobIH 6ap-KoFBH meKcepiH3XeHeKaJem60nca,aybcMbpyHbI3.
Cyper A2
KeHec:Kya KaanDbI copy ywiin cy3riu KanTbOpHaTbHb3.
Cy3riu Kan 6oBbHua HycKay
Czy3iW kAntbH tony deHreN copbInfah Kipre 6aJnHaBcTb.
- Kya Kaah, Kym XeHa T.6. yuiH cy3riu KaNTbI kXn aybCTbIbH3I.
KaTbI TonFaH cy3riI KAn JxapblNybl MyMKiH, COHbIKaTH Cy3riI KaTbI YaKbITbIHda aybiCTbipHbI3!
HA3AP AYdAPbIHbI3
CyIk Kynoi meK anobin ana 6enaiuHn copbHb3.
Tancbpbic Nc. Heri3ri Hcyckacb: 2.863-139.0, Premium Hcyckacb: 2.863-161.0.
blfandbTa3anay
→ MbcaIb, bInFaIbIb copy yuHn Tnicti copy UymerHHeDmecH anbKtaHb3 xHeT ntiCTi KEPEk-XkapakTapdbXaJrAfbH3.
HA3AP AYdAPbIHbI3
Cy3iW Kanmbi KOndaHbHbI
Hcykay:ErepcaybITToTfAH60nca,KaTKnblKipic
CaBbIaNyBbIJxayBIn,6yBIMXoFarbpIxblJamdMbKnpe
XMyBlcICTeNdi.5yBIMDbIpeyeEwpiPi3XeHe
caybTTb6OcTaBbHbI3.
BmybIMhBiXyMbICICTeyih yaKbITwa TOKtataY
Cyper B3
→ ByIbIMdbI ICTeH IbIFapblHbI3.
Cypet C1
EeH copy wymeri Tpyak KyiHe opHaTbIb3.
Kymbictbiaaykay
→ BvibMbIeipin, aHaHbToKtah WbIfapBn anbHb3.
CaytItb60caTy
Cyper D1
→ Kypblfbl XaikblbHbH aIbIn TaCTaHb3, CayblTbI bIraIbI He Kypraf KipdeH 6ocatblHb3.
BiyibIMdbcaKray
Cyper D2
Kepek-xapaKapr men XeniNiik Ka6eBbI 6yBIMRa opHnAaTbIpbHb3 XKeHe 6yBIMbI KpyraK xepre cakayra KOHbHb3.
Kytu MeH TexHnKaJIbIK TeKcepy XyMbICTapbl
→ BvIbIM MeH pNactKTeH Jxacanfah KepeK-XapakTAPbl NpactK 6yIbIMdapbHa aPAnfah CTaHdapTTb Ta3aNaBbIsh 3aTTapMeH Ta3aNay KEpeK.
Kaxet 60fHaHda, caybT PEN KepeK-kaapkTapdb Cymen 1aBbH3 KHe KaTaN KOJaH6ac 5yphH KypratBbH3.
Teric 6yrinmeni cy3rihi taanay
Kehec: Op kondahyan Kein cy3riu 3nemHTTI
Ta3aJaHbI3. Cyper E1
→ Cy3iH anEMeHTI KYNbIITAH 6OcatbHb3 da, bIbIaPbIn TACTaHb3, cy3iH anEMeHTEN KIPDI KOKiC se6EtHe 6OcatbHb3.
Kipictipinren Teric 6yirImeni cyarinepdi Taaanay yuih cyrii shneMeHTTI cebeTTIH weTHe KaBIn TactaHb3. Teric 6yirImeni cyri cyriu shneMeHTTH WbIrapmayb kepek.
Kaxer 60nca, teric 6yriinmeni cy3rhi 6eek Ta3anaHbI3.
Cyper E1
→ Cy3rii 3IeMeHTTI KynbINTaH 6ocatbHb3 Da, WbIrapBn TactaHb3.
Cyper E2
Teric 6yriinmeni cy3rihi cy3riu 3neMeHTTeH KafbIn WbIfapbIHbI3.
Kaqet 60nfahna, Tek afbHdb cy actBihda Ta3anaHb3, CypTneH3 He KblnauKneH Ta3apTnAbH3. KOndany anDbHda TOIbIFbIMeH KpyrTaBb
CoBbHa Da Kpyfa Taeric 6yriPiMe cy3rHi 6yblm iuHe kaiTaan OpaTbHb3. Cy3riU 3nEmeHTi 6yblm iuHe caBnKoBiHb3.
KeedeprinepeonfahankaKemekany
TemeH copy kblldamdbifbI
BiyibMHbHn copy XblIaMdbIbI iTMeHece, Kelecinepepi TeKcepHi3:
Kepek-kaapakTap, copfblluHaHri HeMece copfbll tyiri bitenin kanaBb, bitenydi taKaen HKTipih3.
CypTe A2
Cy3riu Kan tonfah: Xka cy3riu kantb1 opHaTbIbI3.
Cypet E2
Teric 6yirinmeni cy3ri kipneHreH: Cy3riu 3nemHTti 6bIrapIn anbH3xHe cy3riHaTa7aHaB3 ("Teric 6yirinmeni cy3riHa Ta7aay"BenImiKapaH3).
→ 3aKbIMdAnfah Teric 6yriMei cy3riHi ayblCTbIpbHb3.
TexHnkaIbIK MaFlyMaTTap
| Kephey
1~50-60 Hz | 220 - 240 | V |
| HOMINAJI KUATBILIBI P | 1000 | ВТ |
| Жений садыдьрьш
(Nерсияы) | 10 | A |
| Саыт калемi | 20 | л |
| Тукамен су сihур | 12 | л |
| Соруши YMERIMEN су сihур | 10 | л |
| Жений кабeni | H05VV-F
2x0,75 |
| Дыбic Deнгrei
(EN 60704-2-1) | 72 | ДБ(A) |
| Бүймнын кеpek-JжарakTarpb3
салмafbl
WD 4 | 7,0 | Кг |
| Бүйmнын кеpek-JжарakTarpb3
салмafbl
WD 4 Premium | 7,3 | Кг |
Texhukanbik e3epicme npaoda 60nbin kanybi Mymkhi!
aI
a>1g a>2w9 jalll eblc cdd
a>1
.
bbsall gbsll jlll ljj
a> a> 1c jlll cllb cjjb
galllll
jdlal cllc no 2bawall
o>lccbaa//gba//jla//abii,
.0g/211c
E10jg
a>lg a>wg jdlal llbc 20 p
E20jg
joo 2aall sglbail jilal y
.aaagj jalll llac
aJll a>laIaI ic bui
gA>pcJcJgJLwaiJI
.0LwJJIa aab
J 10
.5j0j0j0j0j0j0j0j0j0j0j0j0j0j0j0j0j0j0j0j0j0j0j0j0j0j0j0j0j0
jLgJl jdlal lbc Jzj
4
Jn no nnnn nn nnnn
.2JUJUJU
2.863139.0:JL
.2.863161.0:
clll
Jg JgBjI JJ
aJyI aagjac oJwI olcl,
.wwlll lallll 10000
4
jldl/μspszuiy
aolge gagai jai el xiaol allg:abgalo
alogll 1aewll gpbj 1aetio
GwJgJlacgogal
yblabawll lc bdoi aew
gj bawl gbjwgl
.
aolaloljz:la:la
J 1 J 1 J 1 J 1 J 1 J 1 J 1 J 1 J 1 J 1 J 1 J 1 J 1 J 1 J 1 J 1 J 1 J 1 J 1 J 1 J 1 J 1 J 1 J 1 J 1 J 1 J 1 J 1 J 1 J 1 J 1 J 1 J 1 J 1 J
19gJlIg2 19gJgJolwJl JgJgJgJgJgJgJgJgJgJgJgJgJgJgJgJgJgJgJgJgJgJgJgJgJgJgJgJgJgJgJgJgJgJgJgJgJgJgJgJgJgJgJgJgJgJgJgJgJgJgJg
aig
29 sJg Jai2aJI bI aI gai Iolii I. abuBbIyI yI yS
4
29 1Jg Jai2al jI b2J Iol al. .a Jd
jgljll
!agball aaxall jbljogall
000000000000000000000000000000000000000000000000
Jzjzlll 100 Jzjzlll 100 Jzjzlll 100 Jzjzlll 100 Jzjzlll 100 Jzjzlll 100 Jzjzlll 100 Jzjzlll 100 Jzjzlll 100 Jzjzlll 100 Jzjzlll 100
1g 1000000000000000
Jc Jd
jglplaxwlaas jwclae
a a
jgljll jll jlabu 2
oJal Jabla a r
jLg ≤ jL pq ≤ x_L
aabll aalaa Jablyg y
aee 1y1 y aalg
aallll l aallll
JabJgoloo
!glly
J5 1jgJl Jf
g a baa Js pall g
.
jglj jz y. p12000000000000
clll jjllrjy.lcll
.
la 1/2,1/2,1/2,1/2,1/2
100 100 100
1.aaa/
:laIbaaJlllclawyIbeWpaY
gljygljzlaJlal
(a)aleaal aRyI) ayJyIg Jlgwll
j)JcJIJI JJIJI JJIJI JI
iic (jllg, pssieaJllg, g
aagglgulwjIjLwgo
a. g all a. a2019
oJrJg aagllslojIg Joo
aJ
ab = 1
.22j jj j j j j j
Jg 1
Jc g>gall galll Jc gss
[\text{.j}\left( {g > 1}\right) ]
15
algl E jNlJn no Jnll
.oo
J 1
poc no sll jgJL Jg
Jgll Jdawl jg>g
jL 5
joo aioe ooc ao2 jso gl aoiso
Jb>laEg g J>1
aaiyilr 1g>
g 2
Jll Oss Jll Jll Jll aIy
J 30
(aw)
wll wog jglg
Jllo pao joo J 5
aIulg aLis
oio
JALJGLaLgSALLgSALL
Jaisal lslao jao
#
p^a + 1 x^p - y^p.
g a d yd yd yd yd yd yd yd yd yd yd yd yd yd yd yd yd yd yd yd yd yd yd yd yd yd yd yd yd yd yd yd yd yd yd
aJgVJgaialgl aW
J 111111111111111
pbiol, piao paiau Jg no palec
lae 1c pgs>2gipgio
pIaSsJUuJUuJUuJUu
aJc aawll jIg JgJl i
yj jzjol 12wJlabU 2gama
jw|gaiu w g
p2j g 0g jy y aai Jooj Jn .aawliai gaojil
Jllss
a a 1000000000000000000000000000000000000
aIg aI g y IaI b
aIg aIg aI g aI aI
aIg aI g aI g aI aI
aIg aI g aI g aI aI aI
C
J J
J
J
J
J
J
J
J
J
J
J
J
J
J
J
J
J
J
J
J
J
J
J
J
J
J
J
J
J
J
J
J
J
J
J
J
J
J
J
J
J
J
J
J
J
J
J
J
J
J
J
J
J
J
J
J
J
J
J
J
J
J
J
J
J
J
J
J
J
J
J
J
J
J
J
J
J
J
J
J
J
J
J
J
J
J
J
J
J
J
J
J
J
jg y Jb0yI jgJyA aJy> -
a> gaiyA yJyJyI yJyJy
iag pJyJyI gJyJyI baw y
. jgJy
yo yjrJyddio aaiKall pddy:aaJIJI UgKoJI
Jlal aI ayiaaagaaal Jauw Jn Jg LdssuLAAaagaae alao 1blll gai aolgal
auiu a la>
oalglgwrll allaeall g 10
oalglgcr yj. pdswll
aIc nJgwl aolal all alsw
yoo lgl ayaiol all agd lgaai
.aa
aa 1g0 1c aaoaoll ojgey sgsi y gdo wylg ydl osly alol


http://www.kaercher.com/dealersearch

71364 Winnenden (Germany)
Tel.: +49 7195 14-0
Fax: +49 7195 14-2212