CITY TOUR - Stroller BABY JOGGER - Free user manual and instructions
Find the device manual for free CITY TOUR BABY JOGGER in PDF.
| Brand | BABY JOGGER |
| Model | CITY TOUR |
| Product type | Stroller |
| Maximum weight capacity (seat) | 15 kg |
| Usage | From birth to 15 kg |
| Safety harness | Adjustable 5-point harness with pads and strap covers |
| Backrest recline | Yes, with release lever at the back of the seat |
| Footrest recline | Yes, adjustable via levers under the footrest |
| Canopy | Removable with sunshade extension and double visor |
| Front wheels | Swivel with pivot lock (up/down button) |
| Parking brake | Yes, foot lever with button release |
| Storage basket | Yes, under the seat |
| Carrying bag | Included, with dedicated storage pocket |
| Carry straps | Short handle and removable shoulder strap |
| Folding | Compact with storage lock |
| Fabric care | Machine wash cold with mild detergent; air dry |
| Frame and wheel care | Wipe with mild soap and warm water; clean wheels with damp cloth |
| Warranty | Limited lifetime warranty on frame, 1 year on components (fabric, etc.) |
| Repairability | Repairs exclusively by an authorized Baby Jogger dealer |
| Replacement parts | Use only genuine Baby Jogger parts |
| Compatible accessories | Only Baby Jogger approved accessories |
Frequently Asked Questions - CITY TOUR BABY JOGGER
User questions about CITY TOUR BABY JOGGER
0 question about this device. Answer the ones you know or ask your own.
Ask a new question about this device
Download the instructions for your Stroller in PDF format for free! Find your manual CITY TOUR - BABY JOGGER and take your electronic device back in hand. On this page are published all the documents necessary for the use of your device. CITY TOUR by BABY JOGGER.
USER MANUAL CITY TOUR BABY JOGGER
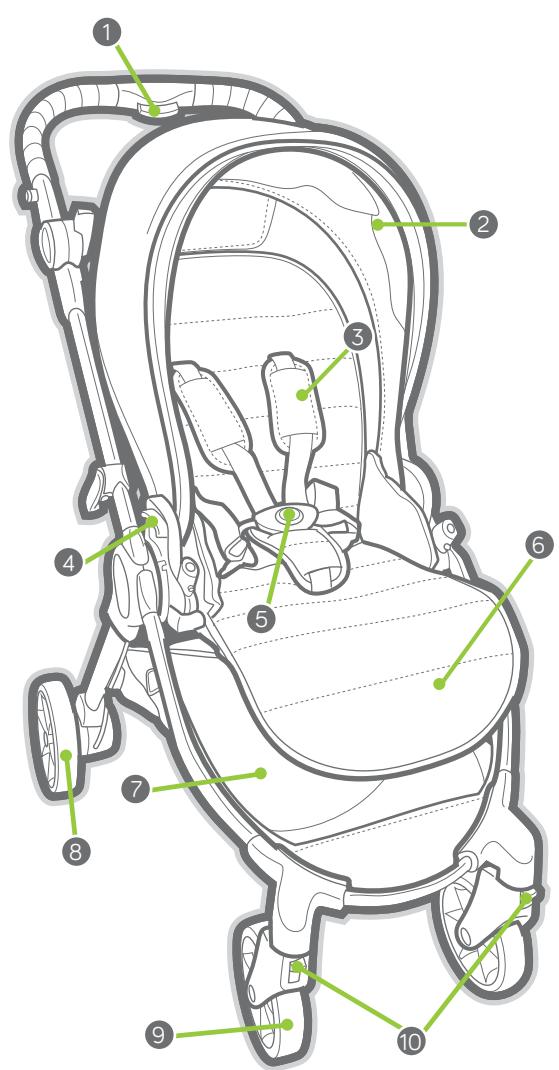
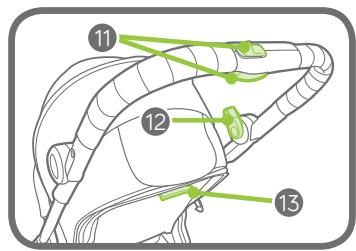
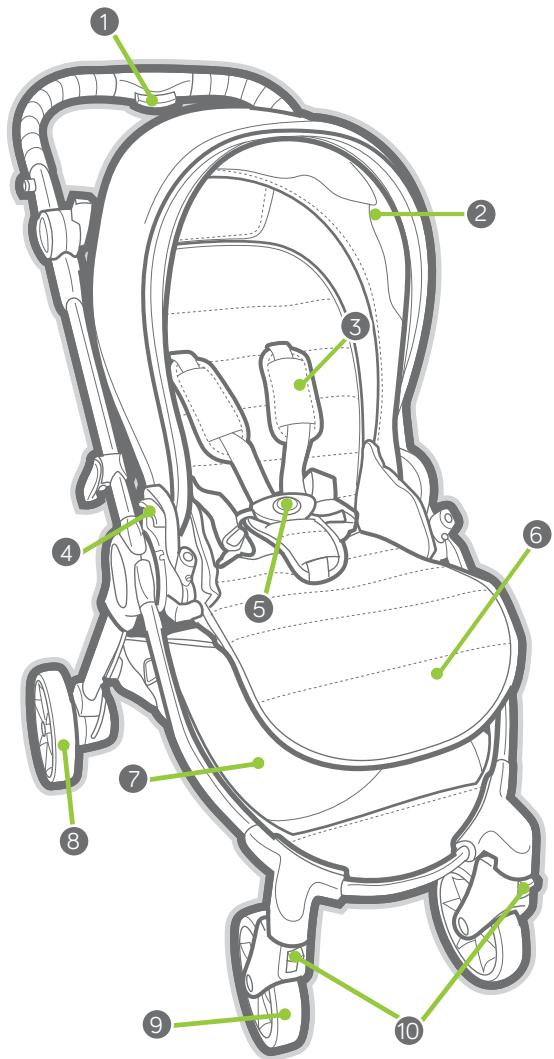
1 Handlebar Fold Button
2 Canopy
3 Harness Covers
4 Seat Release Lever
5 Harness Buckle
6 Foot Rest
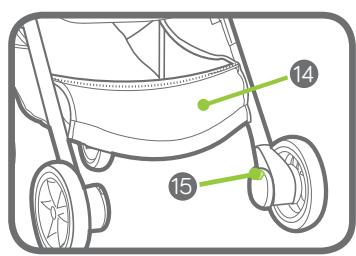
7 Storage Basket
8 Rear Wheel
9 Front Wheel
10 Swivel/Lock
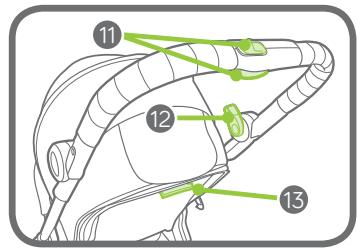
11 Handlebar Fold Release Button
12 Parking Brake
13 Seat Recline Handle
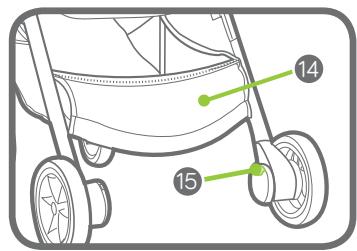
14 Carry Bag Storage Pocket
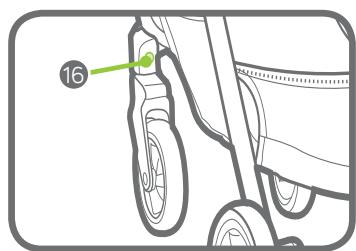
15 Rear Wheel Release Button
16 Front Wheel Release Button
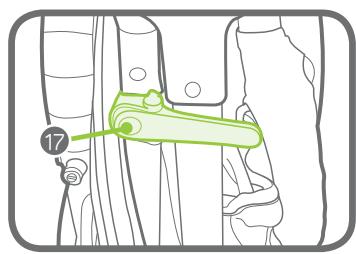
17 Storage Lock

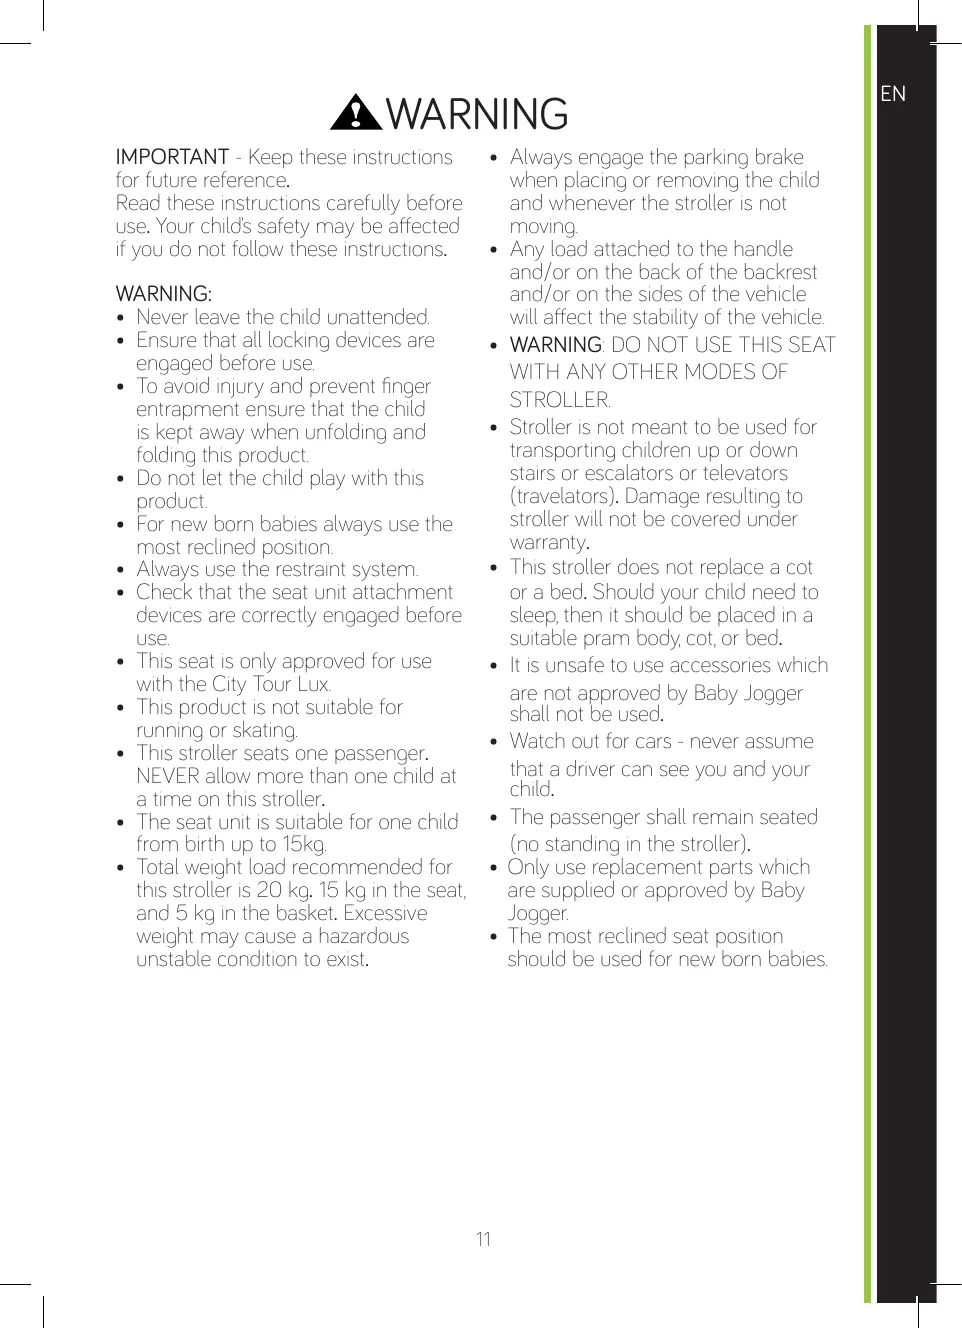
WARNING
IMPORTANT - Keep these instructions for future reference.
Read these instructions carefully before use. Your child's safety may be affected if you do not follow these instructions.
WARNING:
- Never leave the child unattended.
- Ensure that all locking devices are engaged before use.
- To avoid injury and prevent finger entrapment ensure that the child is kept away when unfolding and folding this product.
- Do not let the child play with this product.
- For new born babies always use the most reclined position.
Always use the restraint system. - Check that the seat unit attachment devices are correctly engaged before use.
- This seat is only approved for use with the City Tour Lux.
- This product is not suitable for running or skating.
- This stroller seats one passenger.
NEVER allow more than one child at a time on this stroller. - The seat unit is suitable for one child from birth up to 15kg.
- Total weight load recommended for this stroller is 20kg . 15kg in the seat, and 5kg in the basket. Excessive weight may cause a hazardous unstable condition to exist.
Always engage the parking brake when placing or removing the child and whenever the stroller is not moving.
- Any load attached to the handle and/or on the back of the backrest and/or on the sides of the vehicle will affect the stability of the vehicle.
WARNING:DO NOT USE THIS SEAT WITH ANY OTHER MODES OF STROLLER.
- Stroller is not meant to be used for transporting children up or down stairs or escalators or televators (travelators). Damage resulting to stroller will not be covered under warranty.
- This stroller does not replace a cot or a bed. Should your child need to sleep, then it should be placed in a suitable pram body, cot, or bed.
- It is unsafe to use accessories which are not approved by Baby Jogger shall not be used.
- Watch out for cars - never assume that a driver can see you and your child.
- The passenger shall remain seated (no standing in the stroller).
- Only use replacement parts which are supplied or approved by Baby Jogger.
- The most reclined seat position should be used for new born babies.
FRAME
1 Unpack the stroller frame from the box and set the wheels aside. Unlock the stroller by pulling the Storage Lock Lever.
2 Lift the front stroller frame away from the rear stroller frame.
3 Lift the upper frame up and away from the lower frame.
4 Rotate the handlebar up. The stroller will lock into place and you will hear a click.
WARNING: Ensure that all the locking devices are engaged before use.
WARNING: Moving parts when folding and unfolding stroller can cause injury. Children should stay clear when folding and unfolding.
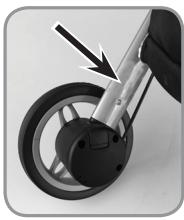
FRONT WHEEL
5 Installation
- Lay stroller on its back so the handlebar is resting on the floor.
- Attach the front wheel by sliding it into the front wheel mount until it clicks. Gently pull on the front wheel to make sure it is properly attached.
6 Removal
While pressing the front wheel release button, gently slide the front wheel out of the front wheel mount.
SWIVEL FEATURE
7 Push the swivel lock button up to lock the front wheel to a fixed position.
8 Press the swivel lock button down to allow the front wheel assembly to swivel.
WARNING: When loading and unloading child, lock the front wheel in a fixed position. Although the front wheel of your stroller locks, it is not intended for jogging or exercise purposes.
REAR WHEELS
9 Installation
- Align the rear wheel axle with the wheel mount on the stroller frame and insert it into the wheel mount until it locks into place. You will hear a click.
- Gently pull on the rear wheel to make sure it is properly attached.
10 Removal
- While pressing down on the wheel release button, gently slide the rear wheel out of the wheel mount.
BRAKE
11 To lock the brakes: Rotate the brake lever down to engage the brakes.
12 To release the brakes: Push the brake release button.
WARNING: Ensure that the brake is properly engaged by moving the stroller slightly back and forth. Lock the brakes before loading and unloading your child and whenever the stroller is not moving.
ATTACHING THE CANOPY
13 Insert the ends of the canopy into the seat frame.
14 Loop the small strap to the hook on the sides of the seat.
15 From the back of the seat, zip the canopy to the seat.
ATTACH SEAT
16 To attach the seat frame to the stroller frame: Unfold the seat and lower the seat onto the stroller frame mounting brackets. You will hear a click when it is securely attached.
- The seat may also be attached rear-facing.
17 To remove the seat: Lift up on the seat release levers.
CANOPY
18 Pull forward to open canopy, push backwards to close canopy.
19 To use the canopy extension: Pull the extension out from under the canopy, push the extension under the main canopy to hide.
20 When folding the double visor, make sure to fold each section of the visor one by one.
21 From the back of the seat locate the plastic square stopper. Turn stopper and pass through the openings in the seat back frame and seat fabric.
22 Reinsert stopper at seat opening closest to child's shoulders. Pass back through seat fabric and the seat back frame. Tug on strap to ensure stopper is locked. Repeat on both sides.
WARNING: Avoid serious injury from falling or sliding out. Always properly adjust and fasten safety harness.
23 Slide the harness pads up to access plastic guide on strap.
24 Hold the plastic guide and pull strap to tighten or loosen.
USING SAFETY HARNESS
25 Insert the waist strap buckle parts into the shoulder strap buckle parts on both sides.
26 Insert the connected shoulder and waist strap buckle parts into the sides of the crotch buckle.
27 Press button on crotch buckle to release.
28 Lift the release lever at the back of the seat to recline the backrest.

WARNING: When making adjustments to the stroller seat, make sure child's head, arms, and legs are clear of moving seat parts and stroller frame.
ADJUSTING THE FOOTREST
29 Pull the release levers underneath the foot rest to fold it down.
FOLDING
- Remove your child from the seat.
Disengage front wheel swivel locks.
- Remove all attached accessories and all items from basket.
30 From the back of the seat, Lift the release lever at the back of the seat and fold the backrest forward.
- The seat may also be folded while rear-facing.
IMPORTANT: The seat MUST be folded before folding the stroller frame.
31 Slide the handlebar fold release button while squeezing the fold button on the handle bar and fold the handlebar forward.
32 Fold the upper stroller frame down to the lower stroller frame.
33 Lift up the stroller from the hand carry strap to help fold the front and rear stroller frames together.
34 Make sure the storage lock lever clicks into place.
CARRY STRAPS
35 There are two carry straps for the stroller: Use the shorter hand carry strap, or the longer shoulder carry strap on the top of the folded stroller to easily carry the stroller.
36 The shoulder carry strap can also be used for carrying the frame without the seat. To attach the carry strap to the frame, first unhook the clasp to open the plastic loop on the end of the strap.
37 Slide the open end of the plastic loop through the webbed loop on the stroller frame. Then reattach the clasp to close the plastic loop.
38 With the carry strap securely attached, the stroller frame may now be carried.
REMOVING THE SEAT FABRIC
39 To remove the canopy fabric: Undo the elastic loop from the hook on the sides of the seat.
40 Pull the ends of the canopy out of the seat frame.
41 From the back of the seat, unzip the canopy from the seat.
42 Slide the metal bar out of the canopy fabric.
43 To remove the seat fabric: From the back of the seat locate the four plastic harness clips. Turn the clips and pass through the openings in the seat back frame and seat fabric.
44 Undo the two elastics loops on the back of the seat.
45 Undo the snaps along the sides and top of the seat.
46 From underneath the seat, locate the plastic square stopper. Turn the stopper and pass through the openings in the seat back frame and seat fabric.
47 Undo the fastening strip and pass through the openings in the seat frame and seat fabric. Then remove the seat fabric from the seat frame.
48 To remove the harness pads: with the harness removed from the seat, slide the pad off the harness strap.
49 To remove the buckle cover: with the harness removed from the seat, slide the cover off the crotch strap.
IMPORTANT: When refitting the seat fabric, assure that the harness system is properly re-assembled.
CARRY BAG
50 Unzip carry bag storage pocket, fold your stroller, place stroller into carry bag.
51 To store the carry bag: Fold the carry bag tightly, place into the storage pocket, and zip the pocket.
52 The stroller may also be stored in the carry bag with the Baby Jogger Folding Pram.
NOTE: The carry bag cannot hold both the seat and the folding pram at the same time. The seat must be removed from carry bag to store the folding pram in the carry bag.
53 To store the folding pram in the carry bag, first remove the pram body from the stroler frame. Follow the folding pram instructions to fold the pram.
54 Place the stroller frame in the carry bag first. Then fit the folded pram on top of the stroller. Make sure to have the crease of the folding frame facing toward the carry bag handle. Zip the carry bag closed.
CARE AND MAINTENANCE
To preserve the longevity of your stroller, it is important to perform simple, regular maintenance. From time to time, make sure that the joints and folding areas are still in good condition. If you hear any squeaking or feel tension, you can take your stroller to a local bike shop for added lubrication. All repairs should only be carried out by an authorized dealer.
WASHING
Seat Fabric
- You can machine wash your stroller's seat in cold water with a mild detergent.
- Do not use solvents, caustic or abrasive cleaning materials.
- To minimize shrinkage, simply reattach the seat to the frame to dry.
- Do not press, iron, dry clean, tumble dry or wring the fabric.
- If the seat covers need to be replaced, only use parts from a Baby Jogger Authorized Dealer. They are the only ones that are guaranteed to have been safety tested and designed to fit this seat.
Plastic/Metal Parts
- Wipe clean using a mild soap and warm water.
- You must not remove, dismantle or alter any part of the seat folding mechanism or brakes.
Wheel Care
- The wheels can be cleaned using a damp cloth. They will need to be dried completely with a soft towel or cloth.
STORING
- Sunshine can fade seat fabric and dry out tires, so storing your stroller indoors will prolong its good looks.
- DO NOT store outside.
- Ensure that the stroller is dry before storing for prolonged periods.
Always store the stroller in a dry environment. - Store the stroller in a safe place when not in use (i.e. where children cannot play with it).
DO NOT place heavy objects on top of the stroller. - DO NOT store the stroller near a direct heat source such as a radiator or fire.
Baby Jogger's Limited Lifetime Warranty:
Baby Jogger warrants that the frame is free of manufacturer defects for the lifetime of the product. Manufacturer's defects include but are not limited to the breaking of welds and frame tube damage. Textile or soft side materials and all other components shall be warranted for one year from the date of purchase (except for tubes and tires). Proof of purchase is required to make a warranty claim and the warranty is only extended to the original purchaser.
THIS WARRANTY DOES NOT COVER:
Normal wear and tear
Corrosion or rust
- Incorrect assembly, or the installation of third party parts or accessories not compatible with the original design
- Accidental or intentional damage, abuse or neglect, or use on stairs or escalators.
- Commercial use
- Improper storage/care of the unit
This warranty specifically excludes claims for indirect, incidental, or consequential damages. The implied warranties of merchantability and fitness for a particular purpose is according to the specific warranty period for this model unit at time of purchase. Some states do not allow the exclusion or limitation of incidental or consequential damages, so the above limitations or exclusions may not apply to you. This warranty gives you specific legal rights, and you may also have other rights which vary from state to state. To know what your legal rights are in your state, consult your local or state consumer affairs office or your State's Attorney General.
If your stroller was purchased outside of the United States, please contact the distributor in the country nearest you. Their contact information can be found on our website at http://www.babyjogger.com/retailers/#international. Claims for warranty outside of the country in which the product was purchased may incur shipping charges.
NOTE: When contacting Baby Jogger distributor regarding your stroller, please have your stroller's serial number and model number ready. They can be found on the inside of the rear leg.
JUSTERE SKULDERSTROpper
STELL OG VEDLIKEHOLD
GWARANCJANIE OBEJMUJE:
KhoNka cKaIaIbIbAHHpyuKIN
CTOHOHbIbTropMo3
KhONKa OTKnDbIbAHNA CINHKN
KapmamДлЯхаенясумки
Khonnka pa36nokpOBKN 3aDHeRo KOleca
Khonnka p36nokpovBk npedeHro kOleca
Фиксатордпяхраения

BHIMAHNE
BHIMAHHE! CoxpaHnte 3TN INHCTpyKUIN DJI NOCJIeDyUOJero NCIOJIb3OBaHn.
BHHMaTeIbHO O3HaKOMbTcEc C DaHHbIMN HnCTpyKzIaMn Ipeep NcNoJIb3ObaHneM. HApUeHne DaHHbIX NcHTpyKzI MOKeT cKa3aTbcra Ha 6e3OpacHOCTn BaWero pe6eHka.
BHIMAHNE:
- HnKoIa He ocTabJIaIe pe6eHka 6e3 npncMOTpa.
-Перед Испожьзоваимпюверьт, 3адейстованы Ли Сблокуюше усточа.
Bo n36exkHne TpaBM n 3aUeMLeHnI paJIbUeB CKlaDbIbAit e NpackJaIbIBaIte N3JeJIne Ha 6e3oNaChOM pacCTOJHm OT pe6eHka. - He n03B0JnTe pe6eHky nIgpaTb C əTtM n3dJIeNEM.
-Дя HOBOPOKdHbIX peKOMeHdyETcR BCErda NcIOJIb3ObAtb MaKCIMaJIbHbI HAKLOH CnDeHbJ.
Bcerda nCnoJb3yIte cnCTemy orpaHnueHnIOdBHXHOCTN. - U6eIITcB IpeE nCIOJIb3OBAHnEM, YTO yCTPOINCTBa KpeJIeHnA CInDeHbI npaBnIbHO 3aJeICTHBOBaHbl.
- 3TO cnDHeBpe pa3peWaaTcra NcNoJIb3OBAtbcra TOnbKO c KOnJcKoI City Tour Lux.
-
3TOи3dJIe He IpeIHa3HaueHoДЯ ИСПОЛьЗOBAHЯ BO BpeMЯ 6era ИЛКаТАнЯ HA KOHbKax.
CndeHbe daHHo npOryNoCHo KJIaCKn paccHTaHO Ha oNDHO pe6eHa. HNKoIa He dOnyckaTe, YTObI B TAKOH KOJrCKe ONDOBpeMeHHo haoDInocb 60lbwe ONDHO pe6eHa.
-Данhoe cndeHbe npedHa3NaueHo dno Ondoro pe6eHka OT MJaDeHueCKoro BO3pacta do pe6eHka BECOM 15 kr. -
Ośwaj Becobaj Harpy3ka, pekomehdyemaj dny TaKoI KOJЯСКИ -20 kT. N3 hnx 15 kT npNXOJATcH Na cndeHbe n 5 kT -Ha KOp3nHky. Upe3MepHbI BEC MOKeT npNBecTn K OnaCHO HeYCTOuNBOCTn N3DeJIyA.
Bcerda BkIIOaIte CToHOnHybI TopMo3, KOrJa ycaxKnBaTe pe6eHka nIIN 3a6npaete erO n3 KOJRAckn, a TaKKe B TOM Cnyuae, KOrJa KOJIraCKa CTOnT.
-Любая Harpy3ka Ha puуку u/unn 3aДнЮУчAstb CпИнКи u/unn КраeB KОлЯСКИ BЛЯЯТ Ha yCTочYNBOCTb KОлЯСКИ.
BHIMAHNE!HENCIOJIb3yIte3TO CINDEHBe IPNIIOBOM DpyROM PEXKIME PABOTbI KOJACKN. - PporylouHaj KoJiaCKa He
NpeHa3NaueHa IJa TpaHCnOpTnPOBKn
DeTei BBepx NII BHN3 NO JeCTHnCiAm/
3CKaIaTOPaM NJI IN DBNXUcMcR
TpOyapam. IObpeXdHeJe KOLaCKn
B pe3ynbTaTe TaKHX DeIeCTBnH He
POKpbIbAetcraPaHTnei.
Даннайnpогулочая коляста He 3amehaetльку Ип Кровать.Еси Baшему peбенky nopa cnaTb,уloxite erOВ ПОДхODЯшую Льку,КOLыбелы Кроватky. - Повьогатбая akceccуapamn, He oOobpeHbIMN kOMpaHnei Baby Jogger, He6e30napCHO.
Cneinte 3a cntyauee Ha dopore — HNKoIgHa He paccuHtBbAitte Ha To, YTO BOInteIb O6ra3aTeIbHO yBnIIT Bac N BaIero pe6eHka. - Pe6eHOK IOnJKeH OCTaBaTbCBA CnIaYem IIOJoxKeHIn (He CTOrTb B KOLJcKe).
-ПользугТecьTOлькоTeMn3aцactЯМN, KOtopье NOCTabJЯOTсЯИп peKOMeHdUyOTcяКOMпанeй Baby Jogger.
-Дпя HOBOPOXDEHNBIX peKOMeHnyETcNcPONb3OBAt b MaKcIMaJIbHbI HAKTOHcINDeHbJ.
PAMA
1 N3BnKeKInTe pamy nporyNochno KOnIckn n3 ynpaKOBKn n OTNOxKIne Ha BpeM kOleca.Pa3bNoKpyIne nporyNochnyo KOnIcky,notaryb pbYar pfNKcaTopa dIra XpaHeHna.
2ПоднIMITEpepeHIOpaMуKoJIЯСи OTOCoEДИNHTe ee OT 3aДнeРambl.
3ПОДнHMNTe 3aДHIOpaMy nOTCOeINHTe ee OT HIXKHe paMbI.
4 NobopaunBaItepykU,poHnMaee BBepx.KoJIaCKA BOJETB HuxHoeNoLOXKeHne; Bbl YcJIbIiHTe ⅢeJIyOK.
BHMMAHNE! NpeiNcNoJIb3OBAHNem y6eIITecb, YTO BCE 6JOKnpyUoIne ycTpoIcTBa3aueIJIeHbl.
BHIMAHHE!ДВИЖUJIeSCaTeJINI pRi CkJaIbIbAHmN I pACKJaIbIBaHmN KOJIaCKMOrYT pRiUnHHtB TpaBMY. PpRi CkJaIbIBaHmN I pACKJaIbIBaHmN KOJIaCKN CJIeIHTe, YTObI JETn HaxOJINICb Ha paCCTOHRn.
NEPEDHEE KOJECO
5 YctaHOBka
-ПоложиTe nporyIoNoHyo KOnIcKy Ha 3aДнЮ CTOpOHy TaK,чTOБыpyKa HaxODINacbHaNoIy.
- PnKpeHnTe nepeDHee KOleco, BCTaBnB eRo B 3aJxM dJa KpePnHeHnnepeHHeo KOLeca TaK, YTObI paZdAncry UeJyOk. OToPoxHo NtAHnTe nepeDHee KOleco, YTObI y6eINtbcR B TOM, YTO OHO HaJeXHo PnIKpeJIeHo.
6 Chrtne
- Haximma Ha KhoNky pa3bIoknOpaHnna NpeEhero KOleca, aKkypaTHo BbITrHNTe NpeEJHee KOJIeCO n3 3aXIMMa dJa KpeJIeHnna NpeEdHero KOleca.
IIOBOPOT KOJEA
7 OToXMMTe KHOJNky 6JIOKnPOBaHnna IOBOpota KOJeca, YTO6bl 3a6IoknPOBaTb NepeJHee KOJecO B fIKCnPOBaHHOM IIOJoxEHN.
8 Haxmte KhoNky 6JoknpoBaHnna NOBOPota KOleca dJa CbO6oHoro NOBOPota c6OpKn nepeDHeRo KOleca.
BHIMAHHE!ПиnomeшENn IN3BJIeueHn pe6eHka nepeHnE KOJeca CJIeUyET 6IOKIpOBAtB BФИКСИРОВAHHom NOJIoxKeHn. XOTЯ NOBOPOT NepeDnIX KOJEC npOryLIOuHOn KOLJCKN 6JIOKIPuyETcA, OHa He paaccuTahHa Na pOboeKKn IJIN 3aHHTNa Qm3NuYeCKMn UnpaxHeHnAMn.
3ADHEE KOJECO
9 YctaHObKa
BbipOBHnTe ocb 3aHrero KOleca 3aXHMOM dny KpeJIeHry KOleCa Ha pame npOryIoUHOH KOJRAckn IN BCTaBBTe TaK, YTO6bl KOleCO npINHJIO npABuNbHoe NOnOKeHne. Bbl yCblIiNte UeJyOK.
Octopoxho nToTnHe 3aHHee KOJIecO, yTObI yBeIITbcra B TOM, YTO OHO HaTeXKHO pNkpeINeHO.
10 CHaTne
HaKIma Ha KhoIky pa36IokIpOBaHnKaOleca, aKKypaTHo BbITaHInTe 3aJHee KOleco n3 3aXmMa dIy KpeJIeHn KaOleca.
TOPMO3
11 TTo6bI 3a6NoKIpObaTb TOPMO3, NOBepHnTe pbIurTopMO3a, N TOPMO3 cpa6oTaet.
12 TTo6bI pa36IOKINPOBaTb TOPMO3, HAKMITE KHOJky pa36IOKINPOBKN TOPMO3a.
BHMAHNE!UTo6bl npoBeptb, npabNtBHO Jn yCTaHOBHeT TOPMO3, CJIeKa IOBnraIte KOJACKO B3aD-BpePe. 3aJeCTByTe TOPMO3, PpeKeJeM YCaADMbIuN BbIHytb peBeHka n3 KOJACKn, a TaKke TOrda, KOrDa KOJACKa CTOnT Ha MecTe.
KPEENJIEHNIEBAJDAXINA
13 BctaBbTe KOHcBi 6aJdaxnHa B paMy cnDeHb.
14 HaJeHbTe 3JaCTnHyIO nTNI Ho KpIouOK NO 6OKaM CIdeHbJ.
15 HaHHa C 3aHne YacTn CUnHeb, PnCTeHNTe 6aJdxnMOnHneK CUnHebIO.
PNIKPREJIENHECNDEHbI
16 PnKpeNte pamy cndeHbKa pame KOnJcKn:Pa3BepHnte cndeHbe NOnyCTnte ero Ha 3axmbldny KpeJIeHna pAmbl KOJaCKn. Korda cnDeHbe 6ydt HndexHo 3akpeJIeHO, Bbl yCblIshTe UeJyOK.
CndeHbe TaKke MOxHO yCTaHOBtB IPOTNB XOda DnKKeHn.
17 UTo6bI CHaTb CnDeHbe, NOHIMNTEpbUaRn BbICBO6OxJDeHnCnDeHbJ.
BAJDAXINH
18 UTo6bI OTKpbITb 6aJdaxIN, NOTAHNTe Bnpei; YTO6bI 3aKpbITb 6aJdaxIN, TOJKNHtE Ha3a.i.
19 YuTo6bl yctaHOBNb ydNInHnTeJIb 6aIdaXnHa, BbITaUnte ydNInHnTeJIb n3-IOd 6aIdaXnHa n CnprybTe erO IOd OCHOBHO YacTbIO bJaXnHa.
20ПиСКЛадьВанДBOИНО
КOSTIPьka 6OB3aTeЛьНОСКЛадьВаNTe
ΚΑΚДΥΗ ΚΑΝΤБΚΟ3БIPьka ПООЧЕДΗ.
PERYIINPOBKAJIIEUEBbIX PEMHEN
21B3aHHeYacTnCnDEHbHaJdnte PnactIKOBbI KBaDpaTHbI CTOpOp. NObepHnte CToTOpI npOBeJte peMeHbYepe3OTBepCTna B 3aHHe paMe CnDEHbI TKaHN CnDEHbI.
22 Choba yctaHOBnTe cTOnOp B OTBepCTne B CnDeHbe, pacnoJIOKeHHoe 6JInxke BCero K PnIeYam pe6eHka. IpOBeInTe peMeHb OJrTb Upe3 TkAhnb CnDEHbry 3aAnHIOU pamy CnDEHb. IOTAHNTe 3a peMeHb, YTObbl Y6eINtbcraB TOM, UTO OH 3aФHKcnpOBaH. NOBTOPHTe 3TO DeNCTBnE C DpyrOu CTOpOHbl.
BHMAHHE! He donyckaite Cepe3hbyx TpaBM B pe3yIbTaTe NaDeHnna Hn BbICKaJIb3bIBaHnpe6eHka. Bcerda naJeXHo peYIpuyte n 3aTgNBaTe peMHn 6e3oNaChOCTn.
23 IpepeTnTe POnkJaDKn peMHei 6e3OpaCHocTn, YTObI HauTn PnactIKOByIO HaPpABJIIOUyIO DeTaNb Ha peMHe.
24 Bo3bMntecb 3a npaTnKOByH NaPpABJHOUo DeTaJIb I NOTAHTE peMeHb, YTObI 3aTaNHyTb INI N OcJa6NtB.
NCIOJIb3OBAHNE PEMHEI BE3OJNACHOCTN
25 BctabbTe DeTaJI NpJxKn IPOCHOro peMHRA DeTaJI NIIeueBbIX peMHeC o6Enx CTOpOH.
26 BctaBbTe npraKKn COBMeUeHbIX PnIeYebix NIOrCHbIX pEmHeN B npraKky naxOberopeMnC oBeNX CTOpOH.
27 Haxmnte KhoNky Ha npjxke naxoBoropemHry, YTO6bI OCBO6OINTb pemHn.
OTKnDbIBAHNE CnHKN
28ПоДнИМЛТе рьчаг pa3бLOКИРОВКИ На 3aДнЕСТОРОЕ СИДЕHBЯ,ЧTOБы OTКИНУТБ CINIHKY.
BHIMAHHE! Perynupy noJoxeHne CNDehbI npOryIOuOH KOJIaCKN, CNeDInTe 3a TeM, YTObI rOIOBa, pyKn HOrn peBcHka He IonoJIb N DBNVKUcECEy AcTn n paMy KOJIaCKN.
OTKUdbiBAHNE IOCTABKN IJN HOI
29NotaHnTe 3a pbyarN BbICBO6OJeHnNoI NoDCTaBKOJ DnI HOr, YTO6bIOTKINHyTb NODCTaBKY DnIHOr.
CKIaIbIBAHNE
- YbepnTe pe6eHka c cnDHeBja.
- I3BJIeKeHTe BCE yCTpoIcTBA KpeIIeHnI N BCE ppeMMeTbI N3 KOp3INHbI.
Ocbo6oIte 6IoknpoBky nOBopoTa nepeHero kOJIeCa. - N3BJIeKHTe BCE yCTpoIcTBA KpeJIeHnI N BCE IpeJMeTbI N3 KOp3INHbl.
30ПоДнИМЛТе рьчаг pa3блOKировки На 3aДнЕСТОРОЕ сДeнБЯ И нakLOHHTe CпИнКу ВпeрEd, СLOЖИ Б. ee.
CnJeHBe TaKKe MOXHO CKNaIbIBaTb B NOIOXeHn IPOTNB XOJa DBNXeHnBAXHO! CnJeHBe IOJXHO 6bITb CNOXeHO npeD CKNaIbIBaHnEm paMbIKOJIaCKN.
31 CdBnHbTe KHOJky pa36IOKIpOBKn pyuK, OJHOBpeMeHHo IpnKIma J KHOJky CKJaDbIbAHnHa pyuKe n HaKIOHЯ pyuKy Bnepei, CKJaDbIBaR ee.
32 Пистаьтеверхню pamу коляскк К Нжней, Скпадываяе ТAKИМ образим.
33ПоДнИМЛte KOLЯСКУ,уДeрЖиВая ee 3a рсуновперehocнoi peMeHB,облгчвТakIMобраЗOM CKlaДыВаHne пeredNeи 3aДнEH paMbI.
34 Y6eIntecb, yTO pbyIar qnkCaTopa IJRA XpaHeHnI npHnJI npaBnIbHOe NIOJOKeHHe; pIN 3OTOM DOJXeH pa3daTbcraJeNOK.
PEMHNДЛЯ ПЕPEHOCKN
CHYTNE YEXJA CINDEHBJ
35 Y KOJIaCKn eCTb DBa nepeHoCHbIX pEmHЯ. POnIb3yIteCb peMHem, KOToPbI NOKOpOue, IIN 6oJee EINHHbIM PIIeYeBBIM peMHem B BePxHeN yAcTn CLOXKeHHoN KOJIaCKn, UTo6bl Be3 TpyDa nepeHoCInTB ee.
36ПлесьоиpeMeHдЯпесн MOЖНToKHe NcNoJIb3OBAtBДЯпесн paMbIбe3 сидяь.ЧтобИ npИКрЕпNTb peMeHДЯпесн K pamE,Сачала OTцeПITE 3aCTeKKy, ChTOБы OCBOБODITb ПlaCTNKOBYIO PeTПЮ Ha KOHcpeMeHЯ.
37 PpOnycTnTe OTKpbITbKoHeC pIaCTNKOBOe NpTnU Ype3 PIIeTeHHyO HETnHO Ha pame KOnJcKn. 3aTeM CHOba 3aKpeNITE 3aCTeXkKy, YTObI 3aKpbITb INaCTNKOBYIO TnIO.
38 Tenepb, KoIda peMeHb dIy IpeHoNCKn HAdExKHO 3aKpeJIeH, MOxHO IpeHoNcHTb paMy KOJraCKn.
39 YTo6bI ChrTb TkaHb 6aIaXnHa, CHIMITE 3JNaCTNuHyIO PeTIO C KpOuKa IIO 6OKAM CInDeHbI.
40 BbITaHNTe KOHcI 6aJIaXnHa n3 paMbICNDHeB.
41B3aHHeuactn CnDeHbpaacTeHnTe MOJIHIO, CoeINHaUOyUo BaJIdaxInC cnDeHbEM.
42 BbITIaHNTe MeTaJIINueCKn CTepKeHb n3 TKAHI 6aJdaxHa.
43 YTO6bI CHaTB TKAHb CnDEhB, HauINTe B 3aADHe yACTn CnDEhB YeTbipe PnaCTNKOBbIX 3axkima pemHe 6e3oNaChocTn. IIOBepHnte 3axkmbi n IpoiDnTe uepe3 OTBepcTnB 3aADHe pame CnDEhB N TKAHn CnDEhB.
44 Ocbo6oJIte DBe 3NaCTnueCKeN X nTIN B 3aDHe Yactn CnDeHbY.
45 Chmmte 3aueIkn BdoJIb 6okOB n BepxHeuactn CndeHb.
46B3aDHeJyactn CNDHbHaIInTe PAACTNKOBbIKBaADpaTHbI CTOnOp. IIOBepHNTe CTOnOp INpOoiNTe UpeE3 OTBepCTnB 3aDHePame CNDHbI TKAHN CNDHbI.
47 OTeHnTe IIOLOCKy KpeIeHnI npOJInTe Upe3 OTBepCTnB 3aJHeI pAmc CnDeHbN I TKaHN CnDeHb. 3aTeM CHmMtE YexoJI CnDeHbC paMbI CnDeHbI.
48 TTo6bI CHrTb IIOKJIaKn peMHEn 6e3ONaCHOCTN, pRy y6paHbIX C cnDeHbY peMHx 6e3ONaCHOCTN CdbHbTe IOkJaKnY CpeMHra 6e3ONaCHOCTN.
49 TTo6bI CHaTB KpbIuKy npJxKn, Pn y6paHbIX C cndeHbЯ pemHax 6e3oNaChOCTn CdBnHbTe KpbIuKy C naxoBOro peMhra.
BAXHO!PnIOBTOPHOuCTaHOBKe TKAHN CINDeHbYoEaNTeCb, YTO CnCTema pEmHe 6e3OnaCHOCTN CO6paHa npabunbHO.
CUMKAДЛЯ ПЕPEHOCKN
50 OTkpOte KapMaH dIy XpaHeHcyMKn, paCTeHyB MOHIO, CNOXHTeKoJrCKy uYLOXHTe ee B CymKy.
51 TTo6bI yIoxNtB cymKy dIe IpeHocKn B KApMaH dIy XpaHeHnA, CIOXNte KOMNaKTHO cymKy, yLOXNte ee B KApMaH n 3aCTeHnTe MOHNIO.
52 Kojracka TaKke MoKeT XpaHnTbCBAcmKe DnIe NpeHocKn, BXoJaUeB KOMPiKeT CknaDnHoi IIOJbKn Baby Jogger.
ПРИМЕЧАHЕ:Сумka Для поснки He MOKET OДноВрЕмEHО BMeшаТсиденьи и СКладны Люльк. ПprxхаHEHIN CКЛаднОЛЮЛБКИВСUMKe Dля поснки сdденhoe Heo6xOДIMO CHЯтс рambl.
53 YTo6bl XpaHntb CknaAdHyo JIONbky B CymKe DnIepeHoCKn, Chaayana CHIMNTe KOpNyc JIOJbKn C paMbI KOJIaCKn. PnCkNaAdlbAHm NIOJbKn CneDyIte INHCTpyKzIyM NO CKNaAdlbAHmO JIOJbKn.
54 Chayana nomeCTne paMy KOJcKn B cMky dIe nepeHocKn. 3aTeM yCTaHOBnTE CLOXKeHHyU IIOJbKy NOBepx KOJcKn. YIOCTOBepbTeCb, UTO 3aN6 cKnadHOn paMbI o6paueK pyuKe cMkn dIe nepeHocKn. 3actErHnTe 3amOK-MoJIHnO cMkn dJIpeHocKn.
YXODI TEXHINUECKOE OBCJUYKINBAHNE
YTo6bI npOryNoHna KOJRAcKa
npocJyKnJa DOnJIbWe, BaxHO
BbIOJNHTb IpOCToI peYJrPHybI yXoD.
IepnoJOnuCheckn CneJyET npOBepaTb,
hAXOJrTa JIN COeINHeHn I MeCTa
CrN6OB B XopoWem pa6Oyem CoCToHn.
EcIn BBcIbIwnte CkPn IN NpyUyBCTByete
HaTjKeHne, MoXHO OTHeCTN KOJRAcKY B
6bnXkaIshm Mara3Hn BeLOCnpeDOb dJa
CMA3Kn. JIObIe Bnblp eMOHTa DOJXhbI
npOBOntBCsABTOPn3OBAHHbIM DInJePOM.
CTIPKA
Uexon cndehba
- YexoJI CnIeHbI npOryIIOuHOH KOJIaCKM OXH0 CTnPaTb B CTnPaIbHOIMaUNHe B XOJIOHO HO BoE, IcNOJb3yMRKoDEiCTBvUoIe MoUoIe CpeDCTBO.
He nCnoJIb3yIte pactBOpnteI, kayCTnueckne IIN a6pa3nBhble qNCTaIune cpeIcTba. - YTO6bIMHNIMM3NPOBaTb ycaKy, npocTo cHOba npNKpePnTe yexoI cnJeHbHa pamy dIra cyuKn.
He cyuHnte nOД npeccOM, He rIaIbTe, He NOdBepraIte XIMnueckoYnCTke, He cyuHnte B CTHpaJIbHOm MaIHHe N He BbIKpyUHbIe MaTEpnaJI. - Ecni yexon cndeHb Heo6xOJIMO 3aMeHNtB, NcNOJIb3yIte TOJIbKO n3JeJnA, NOCTabJIeMble aBTOpN3OBaHHbIMN dINepamn KOMNaHm Baby Jogger. ToJIbKO Ha TaKne n3DeJInn IpeIOCTabJIeTcR rapaHTnI pPOBeDEHn IcNbITaHn Ha 6e3OnaCHOCTb N COOTBETCTBnra6apNTam cndeHb.
Пл actиковbie/MeTaJInIuYeCKne DeTaJIu
- PnpaIte, nCNoJIb3yMaIKoDeIcTBUOuMblHbI paCTBOpN TeJIyO BDOy.
- HeJIb3Я y6bpaTb, pa36bpaTb nINn BnDOn3MeHЯTb JIObYIO YAcTb MExaHn3Ma CKJaDbIBaHnA CnDeHbA INI TopMO3OB.
YxOJ 3a KOnecamn
KoJeca MoXHo OuyuTaB BnaxHcOn TpIKnO. Ix HeoXoDmO NOpHocTbO BbICyUHTb MArKIM NOpTeHcEm INN TpIKnO.
XPAHEHNE
B pe3yltate Bo3deIcTBn coJIHeuHOro CBeta MaTePnaI CNDeHb MoKeT BbICBeCTn, a NOKpbIUsKn nepecoxHytB, PO3TOMy XpaHeHne KOJIaCKN B NOMeUeHN N03BOJraT DoJIbWe COXpaHITb PnIBNeKaTeJIbHbI BHeuHn BND.
HE xpaHnte Ha yJInIe.
- Y6eJntEcB, yTO KONRA Ka NOHOCbIO BbICoxJa, npKxe YeM CLOXHTb ee DnXpaHeHnHa dNITeNbHbI nepNoD.
Bcerda xpaHnTe KOJIaCKy B cyXOM MecTe.
XpaHnTe npOryIouHyo KojIaCKy B 6e3OnaChOM MecTe, eCIn OHa He IcNoJIb3yeTcra (T.e. TaM, rIe DeTn He CMOrTy C He NIrpaTb).
- HE CTaBbTe TЯKeJIbIe IpeДмEТыHa KOJIЯСКУ.
HE xpaHnte nporylOuyo KoJnCKy B6JIn3N OT npMbIX NCTOUYKOB TEJIa, TAKNX KAK OBOrpeBaTeJIb JIN OROHb.
UPORABA VARNOSTNEGA H-PASU
25 Vstavite sponko trebušnega pasu v dele sponke ramenskega pasu na obeh straneh.
26 Vstavite spet ramenski in trebušni del sponke v stranici mednožne zaponke.
27 Pritisnite gumb na mednožni zaponki, da jo sprostite.
NAGIBANJE HRBTNEGA NASLONA
28 Dvignite sprostitveno rocico na hrbtni strani sedeza, da nagnete hrbtni naslon.

JUSTERA AXELREMMARNA
(1.45 2008 JIABJU 2008)
Jlalbl al aqr no gglll jgll al alalal gaiy
jolal jolal jolal jolal jolal
xuulxuulxuulxu
abibibg abaaal alall loll o
joo. jaoaol ojiyoai jaoi aiaoal
aal aai alaal blaal gaoaogg
Jablil aie iis elsg. 1u 1u Jy
Jzao jaofojfofofofofofofofofofofofofofofofofofofofofofofofofofofofofofofofofofofofofofofofofofofofofofofofofofofofo
aBulI slgo gA ygSllg61.0u61pOoo
ab = 5 1
a a 3 Jllabll a g o g aolll Jllabll
. looll
51
all 1
52
Babjogger
JUaJI JU JUaJI JUaJI JUaJI JUaJI JUaJI JUaJI JUaJI JUaJI JUaJI JUaJI JUaJI JUaJI JUaJI JUaJI JUaJI JUaJI JUaJI JUaJI JUaJI JUaJI JUaJI JUaJI JUaJI JUaJI JUaJI JUaJJI JUaJI JUaJI JUaJI JUaJI JUaJI JUaJI JUaJI JUaJI JUaJI JUaJI JUaJI JUaJI JUaJI JUaJI
aagglglaigbgaabjjlal
公
aJbI Jg Ug Igbuaab 1j
. JIàb
gbl j j bdo gdo gdo
pOu Ogab1 2y gogab1 eJz 3gog6b
32
a
33
1.200 150
34
JooJI ab
pduai:JlilbIy Jzgc Jauo juaaia jbyu 35
ggljgljlllJooell jw gJnssll Jooell Jw
aJell Joo aJgbl Ujbl Joo joo gglal jol
.
aJl 36
3JUJIJI 1JUJI JUJI
aL aal alal
. 1234567890
aallln aassslll alall lnn 37
alolll aiaa gao alolll alolll 0
jai 1000000000000000000000000000000000000000000
.0aaiwog 15o
Jb 1000
10
allll aai jiaa alalalal alal
alssll jj jde bdoall
#
Jablll! gGg Gue aagull 50 aaaauu Ls1s p
.aaaoo UlaBbI ayjogSs Loaic
g/9 1000000000000000000000000000000000000000000000000000000
Jai oia Jlalbll ayge plauw jol aai 1n no wai
aerai bll gil wii n no bglll g i ogaaull Jlalbll
jlaall yi. (sylkll Jlalw) aaylsyll Jlalw g
xplauw yi. jy Jlalbll ayge cdi jg lllr jll
Jlll llllllllllllllllllllllllllllllllllllllllllllllllllllllllllllllllllllllllllllllllllllllllllllllllllllllllllllllllllllllllllllllllllllllllllllllllllll
Joo oiae 1n c taoaui npouo jn "Baby Jogger"
gIw I 1111 1111 1111 1111 1111 1111 1111 1111
2y)Jabbl aeg LjLj Jabll jg. (Jabbl aeg gogg
Joo o oia 1g jogjol Jolal ba hao pdoo. "Baby Jogger"
a a 1eaaal 15j gao gai plaiw y 0y
- plaiiill l aie ioulaeill oia oj 24
clauill oia g 15! eIab aoL w jil
:
.
alilill Jaaiaoo Jaall jllw gauo jou S
cuii liu jg jie uic liuyu elab lao jao 5j
Lgolwglggbll
aill lly labll y
.05y31 11j5u10s11
..
Jzabbljog Cui Jilw gao
Jabiiae gao aabibla ploaolw lde aabslb c
LUX
gjgl jyll uwo xie bio
1yj y.bdo jol sbj ayall oao gyy . ayall oia deo lgo cog jab no jg
ooj oJolg Jalj auio oiaafo
15^ 25^ 11^
20 aol oai dy sogbl dgaol jz jgll 5 g zbl 15
0jz 0jaaa x 100g j
10
11
12
13
14
aalal alalal jj 15
aolal alal 16
17
2gddjj 1
2
a1 = 12,a2 = 38,b1 = 48,b2 = 58
S OBC = S COD + S_ BOC
5
6
7
8
9


Imported for Baby Jogger in Europe by:
KoolTrade Ltd · Unit 3, Orbital Way
Denton, Manchester • United Kingdom M34 3QA
Bichos Atrevidos S.L.U. • CIF:B82998949
Infante Don Luis 18, 28660 Boadilla-Madrid • Spain
Tel. (+34) 91485550
9402 Morschwil • Switzerland
Euro-Trade Office, School & Baby Corporation
Čs. armády 360 • 735 51 Bohumín-Pudlov • Czech Republic
Euro-Trade Office, School & Baby Corporation
Dolné Rudiny 8363/5 • 010 01 Žilina • Slovakia
Alisa Company • 408 office • #26 Varshavskoye Shosse
Varshavskoye Plaza · Moscow, Russia

Baby Jogger, LLC
A new Company
6655 Peachtree-Dunwoody Rd. NE • Atlanta, GA 30328
www.babyjogger.com