
WQ9B1L - Fridge WHIRLPOOL - Free user manual and instructions
Find the device manual for free WQ9B1L WHIRLPOOL in PDF.
| Product Type | American multi-door refrigerator |
| Brand | Whirlpool |
| Model | WQ9B1L |
| Dimensions (H x W x D) | Approximately 180 x 90 x 70 cm |
| Net weight | Approximately 100 kg |
| Power supply | 220-240 V, 10 A, 50/60 Hz |
| Climate class | SN (10-32°C), N (16-32°C), ST (16-38°C), T (16-43°C) |
| Refrigerant | R600a (isobutane) |
| Number of doors | 4 (2 refrigerator, 1 freezer, 1 Flexi Freeze) |
| Controls | Touch panel on left door |
| Display | Temperature, function icons |
| Special functions | 6th Sense Fresh Lock & Freeze, Fast Cool, Fast Freeze, Flexi Freeze (3 settings + -20°C), Holiday mode, Demo mode, Door open alarm |
| Interior lighting | LED (not replaceable by user) |
| Defrost | Automatic |
| Exterior material | Stainless steel (depending on finish) |
| Cleaning and maintenance | Interior: mild detergent and warm water. Exterior: depending on finish (stainless steel: specific cleaner). |
| Safety | Mandatory grounding, key lock, child protection (supervision) |
| Spare parts and repairability | Contact authorized after-sales service for original parts |
| Warranty | According to the warranty document provided |
Frequently Asked Questions - WQ9B1L WHIRLPOOL
User questions about WQ9B1L WHIRLPOOL
0 question about this device. Answer the ones you know or ask your own.
Ask a new question about this device
Download the instructions for your Fridge in PDF format for free! Find your manual WQ9B1L - WHIRLPOOL and take your electronic device back in hand. On this page are published all the documents necessary for the use of your device. WQ9B1L by WHIRLPOOL.
USER MANUAL WQ9B1L WHIRLPOOL
Location Requirements. 6
Electrical Requirements 7
INSTALLATION INSTRUCTIONS 9
Getting Started. 9
Unpack the Refrigerator 9
Remove and Replace Refrigerator Doors 10
Remove and Replace Freezer/Flexi Freeze Door. 12
Refrigerator Levelling. 12
Using the Controls 14
Additional Features 15
Lighting the Refrigerator 15
REFRIGERATOR USE 16
Opening and Closing Doors 16
Food Storage 16
SHELVES, BINS AND DRAWERS. 17
Freezer Storage Compartments 18
Audio Reference 18
Accessories. 18
Assistance or Service 18
REFRIGERATOR CARE 19
Cleaning 19
Lights 20
Holiday and Moving Care 20
TROUBLESHOOTING 21
AFTER-SALES SERVICE 24
SAFETY INSTRUCTIONS
Before using the appliance, read these safety instructions. Keep them nearby for future reference. These instructions and the appliance itself provide important safety warnings, to be observed at all times. The manufacturer declines any liability for failure to observe these safety instructions, for inappropriate use of the appliance or incorrect setting of controls.
Very young children (0-3 years) should be kept away from the appliance. Young children (3-8 years) should be kept away from the appliance unless continuously supervised. Children from 8 years old and above and persons with reduced physical, sensory or mental capabilities or lack of experience and knowledge can use this appliance only if they are supervised or have been given instructions on safe use and understand the hazards involved. Children must not play with the appliance. Cleaning and user maintenance must not be carried out by children without supervision.
PERMITTED USE
CAUTION: The appliance is not intended to be operated by means of an external switching device, such as a timer, or separate remote controlled system.
This appliance is intended to be used in household and similar applications such as: staff kitchen areas in shops, offices and other working environments; farm houses; by clients in hotels, motels, bed & breakfast and other residential environments.
This appliance is not for professional use. Do not use the appliance outdoors.
The appliance is designed for operation in places where the ambient temperature comes within the following ranges, according to the climatic class given on the rating plate. The appliance may not work properly if it is left for a long time at a temperature outside the specified range.
Climatic Class Amb. T. (°C)
SN: From 10 to 32^ C ; N: From 16 to 32^ C ST: From 16 to 38^ C ; T: From 16 to 43^ C
This appliances does not contain CFCs. The refrigerant circuit contains R600(HC). Appliances with Isobutane (R600a): isobutane is a natural gas without environmental impact, but is flammable.
WARNING: Do not damage the appliance refrigerant circuit pipes.
WARNING: Keep ventilation openings, in the appliance enclosure or in the built-in structure, clear of obstruction.
IMPORTANT TO BE READ AND OBSERVED
WARNING: Do not use or place electrical devices inside the appliance compartments if they are not of the type expressly authorised by the Manufacturer. WARNING: Ice makers and/or water dispensers not directly connected to the water supply must be filled with potable water only.
WARNING: Automatic ice-makers and/or water dispensers must be connected to a water supply that delivers potable water only, with mains water pressure between 0.17 and 0.81MPa (1.7 and 8.1 bar). Do not store explosive substances such as aerosol cans with a flammable propellant in this appliance. Do not swallow the contents (non-toxic) of the ice packs (provided with some models). Do not eat ice cubes or ice lollies immediately after taking them out of the freezer since they may cause cold burns. For products designed to use an air filter inside an accessible fan cover, the filter must always be in position when the refrigerator is in function.
Do not store glass containers with liquids in the freezer compartment since they may break. Do not obstruct the fan (if included) with food items. After placing the food check that the door of the compartments closes properly, especially the freezer door.
Damaged gaskets must be replaced as soon as possible.
Use the fresh food compartment only for storing fresh food and the freezer compartment only for storing frozen food, freezing fresh food and making ice cubes.
Avoid storing unwrapped food in direct contact with internal surfaces of the fresh food or freezer compartments. Appliances could have special compartments (Fresh Food Compartment, Zero Degree Box, etc.). Unless specified in the specific booklet of product, they can be removed, maintaining equivalent performances.
C-Pentane is used as blowing agent in the insulation foam and it is a flammable gas.
INSTALLATION
The appliance must be handled and installed by two or more persons - risk of injury. Use protective gloves to unpack and install - risk of cuts.
Installation, including water supply (if any) and electrical connections, and repairs must be carried out by a qualified technician. Do not repair or replace any part of the appliance unless specifically stated in the user manual. Keep children away from the installation site. After unpacking the appliance, make sure that it has not been damaged during transport. In the event of problems, contact the dealer or your nearest After-sales Service.
Once installed, packaging waste (plastic, styrofoam parts etc.) must be stored out of reach of children - risk of suffocation. The appliance must be disconnected from the power supply before any installation operation - risk of electric shock. During installation, make sure the appliance does not damage the power cable - risk of fire or electric shock. Only activate the appliance when the installation has been completed.
Be careful not to damage the floors (e.g. parquet) when moving the appliance. Install the appliance on a floor or support strong enough to take its weight and in a place suitable for its size and use. Make sure the appliance is not near a heat source and that the four feet are stable and resting on the floor, adjusting them as required, and check that the appliance is perfectly level using a spirit level. Wait at least two hours before switching the appliance on, to ensure that the refrigerant circuit is fully efficient.
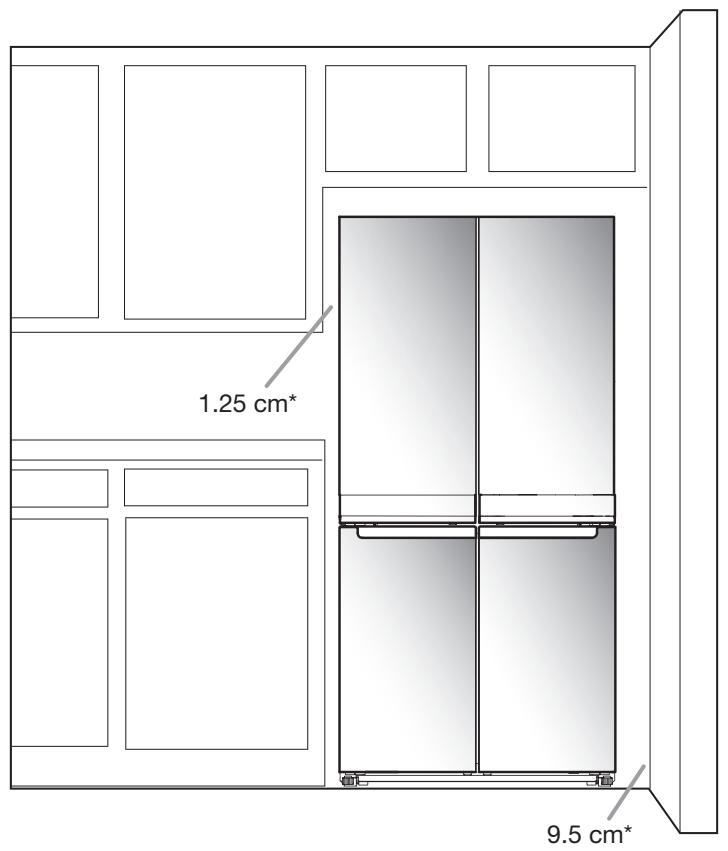
WARNING: When positioning the appliance, ensure the supply cord is not trapped or damaged. To guarantee adequate ventilation, leave a space on both sides and above the appliance. The distance between the rear of the appliance and the wall behind the appliance should be 50mm , to avoid access to hot surfaces. WARNING: To avoid a hazard due to instability, positioning or fixing of the appliance must be done in accordance with the manufacturer instructions. If it is necessary to replace the doors, please contact the Technical Assistance Center.
ELECTRICALWARNINGS
It must be possible to disconnect the appliance from the power supply by unplugging it if plug is accessible, or by a multi-pole switch installed upstream of the socket in accordance with the wiring rules and the appliance must be earthed in conformity with national electrical safety standards.
Do not use extension leads, multiple sockets or adapters. The electrical components must not be accessible to the user after installation. Do not use the appliance when you are wet or barefoot. Do not operate this appliance if it has a damaged power cable or plug, if it is not working properly, or if it has been damaged or dropped.
If the supply cord is damaged, it must be replaced with an identical one by the manufacturer, its service agent or similarly qualified persons in order to avoid a hazard - risk of electric shock.
WARNING: When positioning the appliance, ensure the supply cord is not trapped or damaged. WARNING: Do not locate multiple portable socket-outlets or portable power supplies at the rear of the appliance.
CLEANING AND MAINTENANCE
WARNING: Ensure that the appliance is switched off and disconnected from the power supply before performing any maintenance operation; never use steam cleaning equipment - risk of electric shock.
Do not use abrasive or harsh cleaners such as window sprays, scouring cleansers, flammable fluids, cleaning waxes, concentrated detergents, bleaches or cleansers containing petroleum products on plastic parts, interior and door liners or gaskets. Do not use paper towels, scouring pads, or other harsh cleaning tools.
DISPOSAL OF PACKAGING MATERIALS
The packaging material is 100% recyclable and is marked with the recycle symbol.
The various parts of the packaging must therefore be disposed of responsibly and in full compliance with local authority regulations governing waste disposal.
DISPOSAL OF HOUSEHOLD APPLIANCES
This appliance is manufactured with recyclable or reusable materials. Dispos of it in accordance with local waste disposal regulations. For further information on the treatment, recovery and recycling of household electrical appliances, contact your local authority, the collection service for household waste or the store where you purchased the appliance. This appliance is marked in compliance with European Directive 2012/19/EU, Waste Electrical and Electronic Equipment (WEEE). By ensuring this product is disposed of correctly, you will help prevent negative consequences for the environment and human health.
The symbol on the product or on the accompanying documentation indicates that it should not be treated as domestic waste but must be taken to an appropriate collection center for the recycling of electrical and electronic equipment.
ENERGY SAVING TIPS
Install the appliance in a dry, well ventilated room far away from any heat source (eg. radiator, cooker, etc.) and in a place not exposed directly to the sun. If required, use an insulating plate.
To guarantee adequate ventilation follow installation instructions.
Insufficient ventilation at the back of the product increases energy consumption and decreases cooling efficiency.
Frequent door opening might cause an increase in Energy Consumption. The internal temperature of the appliance and the Energy Consumption may be affected also by the ambient temperature, as well as location of the appliance. Temperature setting should take into consideration these factors. Reduce door opening to a minimum. When thawing frozen food, place in the refrigerator. The low temperature of the frozen products cools the food in the refrigerator. Allow warm food and drinks to cool down before placing in the appliance.
Positioning of the shelves in the refrigerator has no impact on the efficient usage of energy. Food should be placed on the shelves in such way to ensure proper air circulation (food should not touch each other and distance between food and rear wall should be kept).
You can increase storage capacity of frozen food by removing baskets and, if present, Stop Frost shelf.
Do not worry about noises coming from the compressor which are described as normal noises in this product's Quick Guide.

The Gulf Conformity Marking on the product indicates the conformity with all the requirements of the Gulf Technical Regulation for Low Voltage Electrical Equipment and Appliances BD-142004-01.
REFRIGERATOR SAFETY
Your safety and the safety of others are very important.
We have provided many important safety messages in this manual and on your appliance. Always read and obey all safety messages.

This is the safety alert symbol.
This symbol alerts you to potential hazards that can kill or hurt you and others.
All safety messages will follow the safety alert symbol and either the word "DANGER" or "WARNING."
These words mean:
DANGER
WARNING
You can be killed or seriously injured if you don't immediately follow instructions.
You can be killed or seriously injured if you don't follow instructions.
All safety messages will tell you what the potential hazard is, tell you how to reduce the chance of injury, and tell you what can happen if the instructions are not followed.
WARNING
Suffocation Hazard
Remove doors from your old refrigerator.
Failure to do so can result in death or brain damage.
IMPORTANT: Child entrapment and suffocation are not problems of the past. Scrapped or abandoned refrigerators are still dangerous—even if they will sit for "just a few days." If you are getting rid of your old refrigerator, please follow these instructions to help avoid accidents.
WARNING
Excessive Weight Hazard
Use two or more people to move and install refrigerator.
Failure to do so can result in back or other injury.
Location Requirements
WARNING

Explosion Hazard
Keep flammable materials and vapors, such as gasoline, away from refrigerator.
Failure to do so can result in death, explosion, or fire.
Electrical Requirements
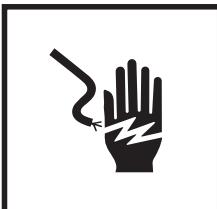
WARNING

Electrical Shock Hazard
Plug into a grounded (earthed) outlet.
Do not remove ground prong.
Do not use an adapter.
Do not use an extension cord.
Failure to follow these instructions can result in death, fire, or electrical shock.
IMPORTANT: Installation and electrical connection must be carried out by a qualified technician according to the manufacturer's instructions and in compliance with the local safety regulations.
The refrigerator is designed to operate on a separate 220-240 V, 10 A, 50-60 Hz circuit.
Make sure the voltage specified on the rating plate corresponds to that of your home.
It must be possible to disconnect the appliance from the power supply by unplugging it or by means of a main two pole switch installed upstream of the socket.
If the supply cord is damaged, it must be replaced by the manufacturer, its service agent or similarly qualified persons in order to avoid a hazard.
Before you move your refrigerator into its final location, it is important to make sure you have the proper electrical connection:
Recommended Earthing Method
220-240 V 50 Hz, 220 V 60 Hz, or 230/240 V 50 Hz AC only 10 A fused and earthed electrical supply is required.

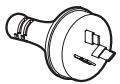
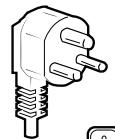
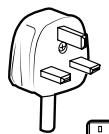
Type B
Type E and F

Type I
Type M
Type G
For Australia and New Zealand:
Your new appliance has been especially manufactured to meet all Australian Standards and Conditions.
Some notations in the installation instructions may refer to electrical requirements in other countries, so we draw your particular attention to these specific notes.
Your appliance needs to be plugged into a 230/240 V 50 Hz AC only 10 A earthed socket.
Electrical Requirements (Great Britain and Ireland only)
IMPORTANT: This refrigerator must be earthed.
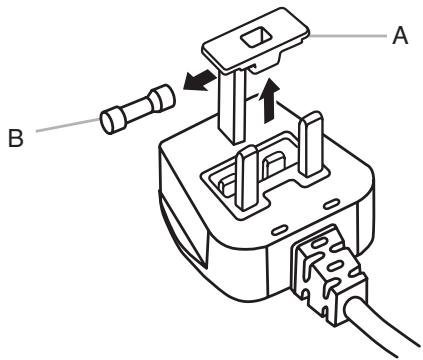
Fuse Replacement
If the main lead of this refrigerator is fitted with a BS1363A, 13 A fused plug, to replace a fuse in this type plug use an A.S.T.A. approved fuse to BS 1362 type and proceed as follows:
- Remove the fuse cover (A) and fuse (B).
- Fit replacement 13 A fuse into the fuse cover.
- Reinsert both the fuse and its cover into the plug.
IMPORTANT: The fuse cover must be refitted when changing a fuse. If fuse cover is lost, the plug must not be used until a correct replacement cover is fitted. A correct replacement is identified by the colour insert or colour "word" embossed on the base of the plug. Replacement fuse covers are available at your local electrical shop.
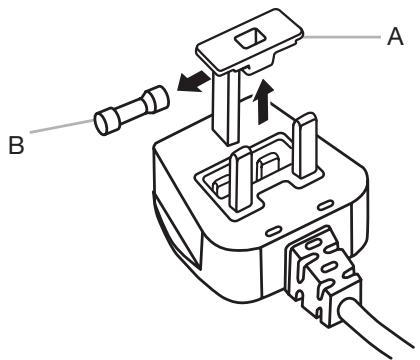
A. Fuse cover
B. Fuse
For the Republic of Ireland (only):
The information given in respect of Great Britain will frequently apply, but a third type of plug and socket is also used, the 2-pin, side earth type.
Socket/Plug (valid for both countries):
If the fitted plug is not suitable for your socket, please contact After-sales Service for further instruction. Please do not attempt to change the plug yourself. This procedure needs to be carried out by a qualified technician in compliance with the manufacturer's instructions and current standard safety regulations.

WARNING

Electrical Shock Hazard
Disconnect power before removing doors.
Failure to do so can result in death or electrical shock.

WARNING

Electrical Shock Hazard
Plug into a grounded (earthed) outlet.
Do not remove ground prong.
Do not use an adapter.
Do not use an extension cord.
Failure to follow these instructions can result in death, fire, or electrical shock.
- Plug into an grounded (earthed) socket.
- Return all removable parts and food to the drawers.
INSTALLATION INSTRUCTIONS
Getting Started
INSTALLATION CHECKLIST
Electrical Power
Plug refrigerator into a earthed socket.
Doors
If doors need to be removed during installation, see the "Remove and Replace Refrigerator Doors" and "Remove and Replace Freezer Door Fronts" sections.
Doors seal completely.
Refrigerator is level. Adjust leveling feet so they are snug against the floor.
- Doors are even across the top. (Use door alignment feature if necessary).
Unpack the Refrigerator
Refrigerator Delivery
A minimum door opening of 838 mm (33") is required. If door opening is 914 mm (36") or less, then removal of doors, drawer and hinges is required.
Cart the refrigerator from the side for all door openings.
When Moving Your Refrigerator:
Your refrigerator is heavy. When moving the refrigerator for cleaning or service, be sure to cover the floor with cardboard or hardboard to avoid floor damage. Always pull the refrigerator straight out when moving it. Do not wiggle or "walk" the refrigerator when trying to move it, as floor damage could occur.
Remove the Packaging
- Remove tape and glue residues from surfaces before turning on the refrigerator. Rub a small amount of liquid dish detergent over the adhesive with your fingers. Wipe with warm water and dry.
- Do not use sharp instruments, rubbing alcohol, flammable fluids, or abrasive cleaners to remove tape or glue. These products can damage the surface of your refrigerator.
- Dispose of/recycle all packaging materials.
Remove and Replace Refrigerator Doors
NOTE: Measure the width of your door opening to see whether or not you need to remove refrigerator doors to move refrigerator into your home. If door removal is necessary, see the following instructions.
IMPORTANT: If refrigerator was previously installed and you are moving it out of the home, turn refrigerator control off before you begin removing the doors. Unplug refrigerator or disconnect power. Remove food and adjustable door or utility bins from doors.
Gather required tools and read all instructions before removing doors.
TOOLS NEEDED: 6 mm socket wrench, 5 mm socket wrench and #2 Phillips screwdriver

Remove Right-Hand Door
- Unplug refrigerator or disconnect power.
- Keep refrigerator doors closed until you are ready to lift them free from the cabinet.
NOTE: Provide additional support for refrigerator door while the hinges are being removed. Do not depend on the door gasket magnets to hold the door in place while you are working.
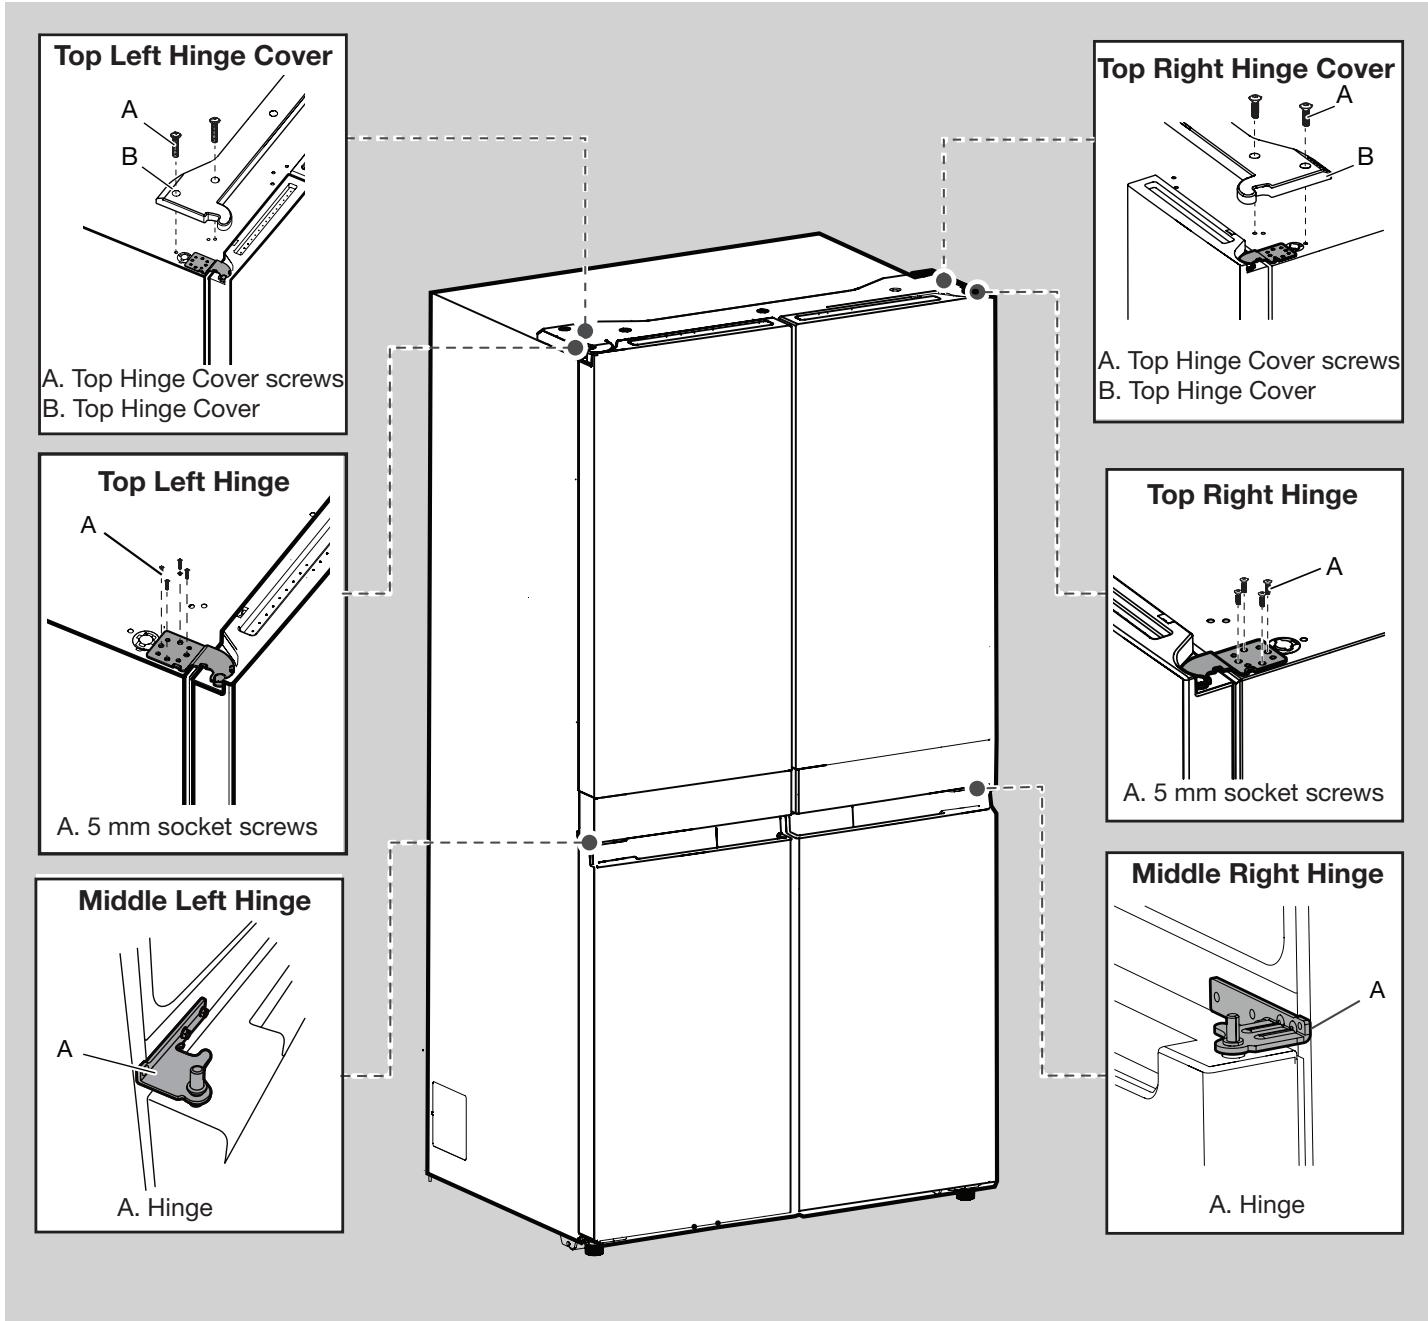
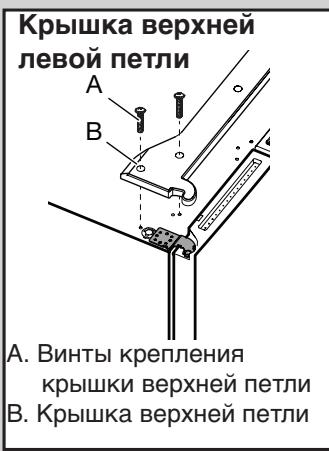
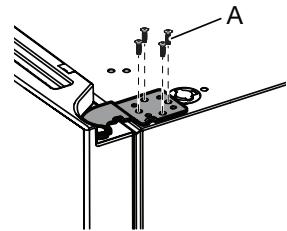
- Using a Phillips screwdriver, remove cover from top hinge.
- Using 5 mm socket wrench, remove four screws from top hinge and set aside.
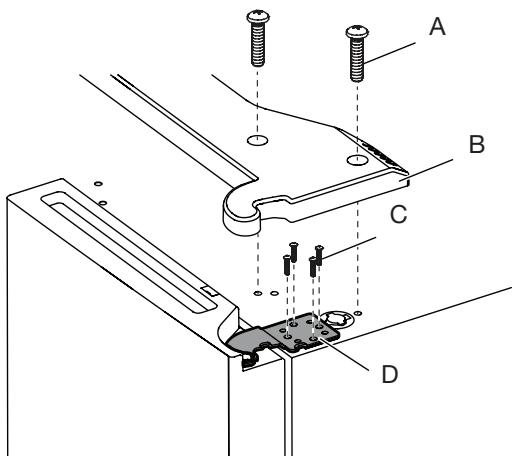
A. Top hinge cover screw
C. 5 ~mm socket screws
B. Top hinge cover
D. Top hinge
- Lift refrigerator door from the middle hinge pin. The top hinge will come away with the door.
Remove Left-Hand Door
IMPORTANT: The wiring for UI run through left-hand door hinge, so they must be disconnected before removing the door.
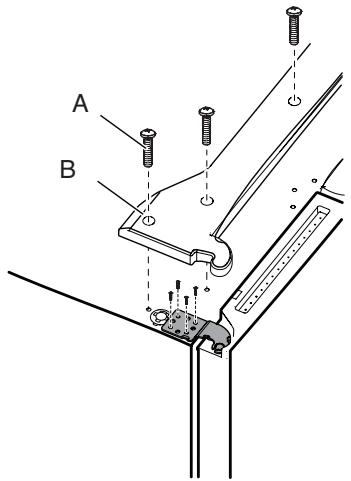
- Using a Phillips screwdriver, remove cover from top hinge.

A. Top hinge cover screw
B. Top hinge cover
-
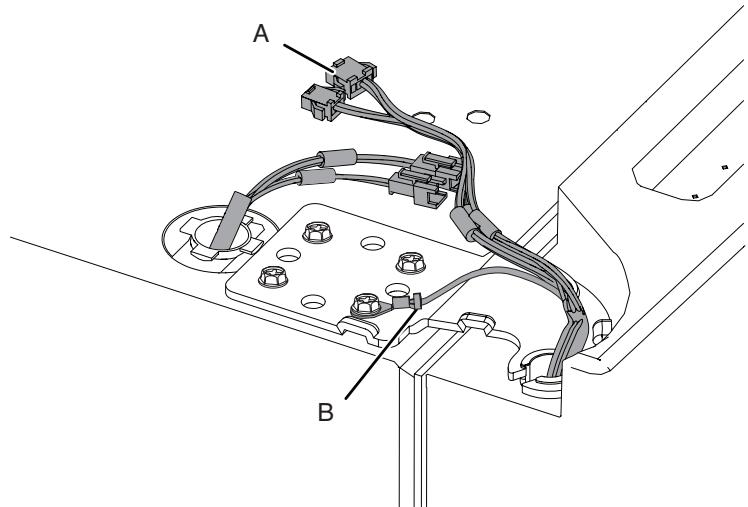
Disconnect two wiring plugs located on top of the door hinge.
-
Grasp each side of wiring plugs. With your left thumb, press down to release the catch and pull the sections of the plugs apart.
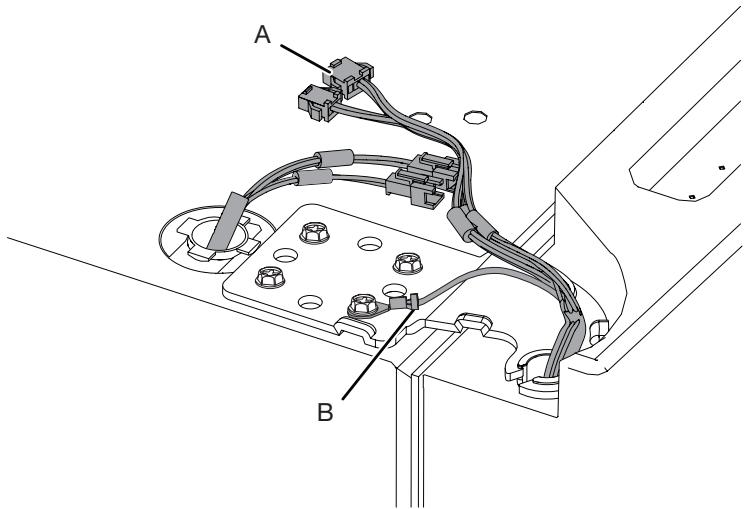
A. Wiring Plug
B. Ground (earth) connector
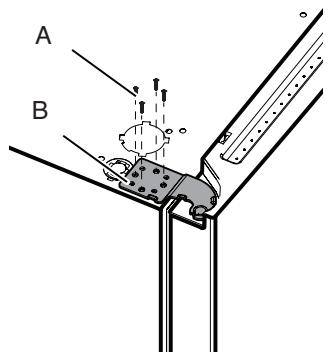
- Using 5 mm socket wrench, remove four internal screws from top hinge and set aside.
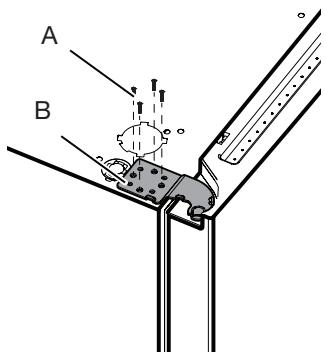
A. 5 ~mm socket screws
B. Top Hinge
NOTE: Provide additional support for refrigerator door while hinges are being removed. Do not depend on the door gasket magnets to hold the door in place while you are working.
- Lift refrigerator door from bottom hinge pin. The top hinge will come away with door.
NOTE: It may not be necessary to remove bottom hinges and brake feet assemblies to move the refrigerator through a doorway.
Only if necessary, use 6 mm socket wrench and #2 Phillips screwdriver to remove middle hinge.
Replace Right-Hand Refrigerator Door
- Set right-hand door onto middle hinge pin.
- Insert top hinge pin into open hole in top of refrigerator door.
- Using four 5 mm socket screws, fasten hinge to cabinet. Do not tighten screws completely.
Replace Left-Hand Refrigerator Door
- Set left-hand door onto middle hinge pin.
- Using four 5 mm socket screws, fasten hinge to cabinet. Do not tighten screws completely.
- Reconnect electrical wiring.
Push together two sections of wiring plug.
Reconnect earth wire to hinge screw.
Final Steps
- Completely tighten eight 5 mm socket screws.
- Replace top hinge covers.
Remove and Replace Freezer/Flexi Freeze Door
- Keep freezer doors closed until you are ready to lift them free from cabinet.
NOTE: Provide additional support for freezer door while hinges are being removed. Do not depend on door gasket magnets to hold door in place while you are working.
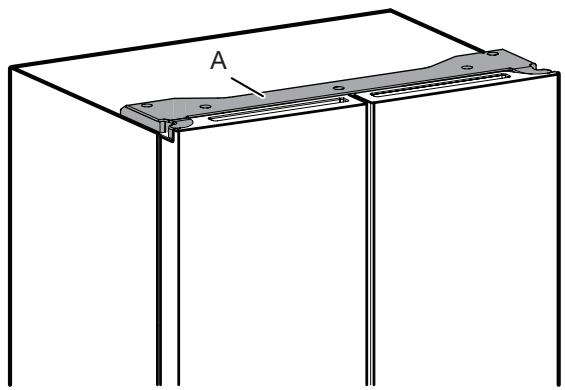
Using a #2 Phillips screwdriver and 6 mm socket wrench to remove middle hinge from cabinet.
A.Middle hinge
Lift freezer door from the bottom hinge pin.
A. Bottom hinge
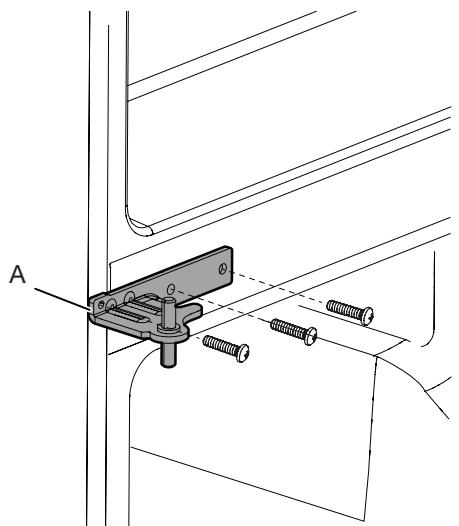
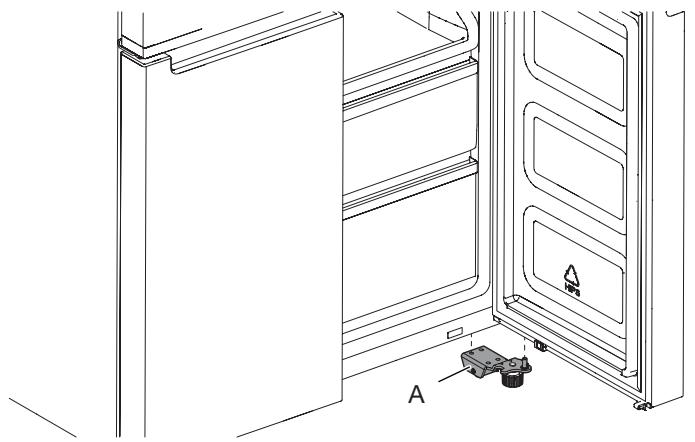
Refrigerator Levelling
- Move refrigerator to its final location.
- Using hand, rotate the brake feet. Turn them counterclockwise until the rollers are off the floor and both brake feet are snug against the floor. This keeps refrigerator from rolling forward when opening the doors.
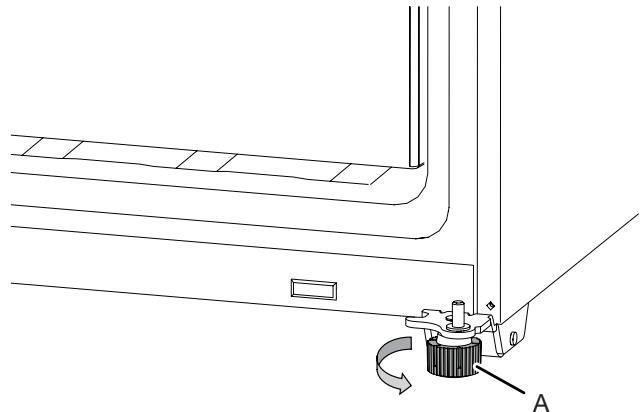
A. Brake feet
IMPORTANT: If you need to make further adjustments involving brake feet, you must turn both brake feet same amount to keep the refrigerator level.
- Use a level to make sure refrigerator is level from side to side and front to back.
PARTS AND FEATURES
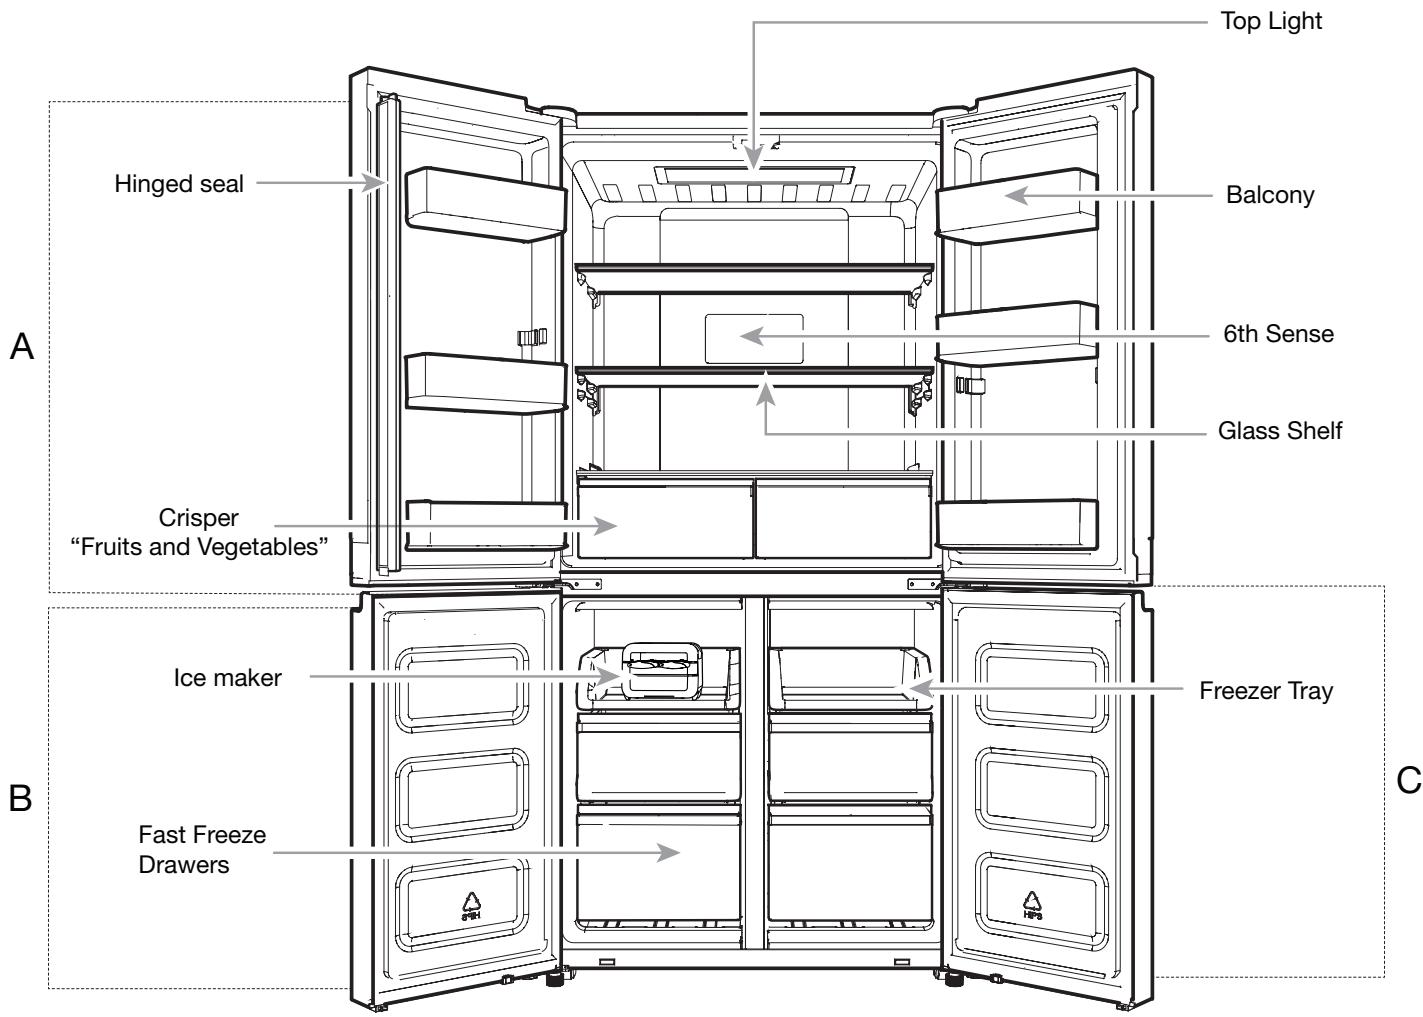
A. Refrigerator
B.Freezer
C. Flexi Freeze (only with WQ9 B1L, 6WM24NIHAS and WQ70900SXX)
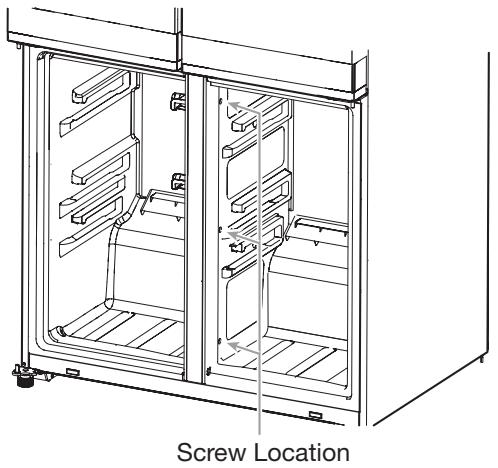
NOTE FOR SERVICE:
Center divider can be removed by taking out the 3 screws on the right side (see picture below); With the center divider removed the evaporator area can be reached for service.
STORAGE CAPACITY (WQ9 B1LUK and WQ70900SXX):
Fresh Food Compartment 387 L
Freezer Compartment 208 L
Total 595 L
STORAGE CAPACITY (6WM24NIHAS):
Total 603 L
Accessories:
Ice Maker
Using the Controls
The touch-activated controls are located on the left hand refrigerator door. The control panel includes information about various buttons and indicators. Refrigerator and freezer temperature indicator shows last temperature set point.

- Sound ON/OFF Button
- Refrigerator Temperature Button (hold 3 sec for Fast Cool)
- Flexi Freeze Preset Temperature Button (only with WQ9 B1LUK, 6WM24NIHAS and WQ70900SXX)
- Freezer Temp Button (hold 3 sec for Fast Freeze)
- Key Lock Indicator
- Key Lock Button
- Door Open Indicator
- Fast Freeze Indicator
- Soft Freeze Indicator (only with WQ9 B1LUK, 6WM24NIHAS and WQ70900SXX)
The Control Panel will automatically turn off after one minute of inactivity. To turn on the control panel, press any key.

Viewing and Adjusting Temperature Set Points
Adjusting Fresh Food and Freezer Compartment Temperature:
For your convenience, your refrigerator and freezer controls are preset at the factory.
When you first install your refrigerator, make sure that the controls are still set to the recommended set points. The factory recommended set points are 3^ for the refrigerator and -18^ for the freezer.
Pressing Refrigerator or Freezer Temperature button will toggle through temperature set points in Celsius (°C).
IMPORTANT:
Wait 24 hours before you put food into refrigerator. If you add food before refrigerator has cooled completely, your food may spoil.
NOTE: Adjusting the set points to a colder-than recommended setting will not cool compartments any faster.
If the temperature is too warm or too cold in the refrigerator or freezer, first check the air vents to be sure they are not blocked before adjusting the controls.
The recommended settings should be correct for normal household use. The controls are set correctly when milk or juice is as cold as you like and when ice cream is firm.
NOTE: Areas such as a garage, basement or porch may have higher humidity or extreme temperatures. You may need to adjust the temperature away from the recommended settings to accommodate for these conditions.
Wait at least 24 hours between adjustments. Recheck the temperatures before other adjustments are made.
- Mild Freeze Indicator (only with WQ9 B1LUK, 6WM24NIHAS and WQ70900SXX)
- 6th Sense Indicator
- Traditional Freeze Indicator (only with WQ9 B1LUK, 6WM24NIHAS and WQ70900SXX)
- Fast Cool Indicator
- Holiday Mode Button
- Demo Mode Indicator (only with WQ9 B1LUK, 6WM24NIHAS and WQ70900SXX)
- Holiday Mode Indicator
- Sound Indicator

6^th Sense Fresh Lock and Freeze Control
The 6^th SENSE Fresh Lock sensor ensures precise and consistent temperature control to preserve fresh food for longer, in the most natural way. Once a temperature variation is detected, the sensor activates a compressor that quickly restores the original temperature.
The 6^th SENSE Freeze sensor minimizes temperature fluctuations in freezer thanks to an innovative temperature management system. Freezer burns are reduced to preserving quality and color of food.


Flexi Freeze Setting (only with WQ9 B1LUK, 6WM24NIHAS and WQ70900SXX)
Flexi Freeze function allows you to toggle preset temperature for Flexi freeze compartment.
| Symbol | Function | Temperature |
| * | Traditional freezer | -18°C |
| * | Mild freezer | -12°C |
| Soft freezer | -7°C |
- To activate/deactivate Coolest setting (-20^) , press Flexi Freeze Preset Temperature Button for 3 seconds. When the Coolest setting is activated, all three icons will be lit.
Adjusting Multi Temperature Setting
Traditional freezer (-18^) : Food already frozen and fresh food (max 12 months)
Mild freezer (-12^) : Food already frozen (max 1 month)
Soft freezer (-7^) : Food already frozen (max 1 week)
If Flexible Freezer is set with lower temperature than freezer, freezer will set at same temperature of Flexible Freezer.
- Flexible Freezer compartment temperature might not be able to reach -7^ when the ambient temperature is around 10^ or colder.
When adjusting temperature set points, use the following chart as a guide:
| CONDITION | TEMPERATURE ADJUSTMENT |
| Refrigerator too cold | Refrigerator setting 1° higher |
| Refrigerator too warm | Refrigerator setting 1° lower |
| Freezer too cold | Freezer setting 1° higher |
| Freezer too warm/ too little ice | Freezer setting 1° lower |
NOTE: Before change temperature setting of Flexible Freezer, make sure that new temperature suits food which is already inside and food you would like to introduce in Flexible freezer.

Fast Cool
The Fast Cool feature assists with periods of high refrigerator use, full grocery loads, or temporarily warm room temperatures.
- To turn on the Fast Cool feature, press and hold the Refrigerator Temperature button for 3 seconds. When feature is activated, the Fast Cool icon will be illuminated. The Fast Cool feature will remain on for 2 hours unless manually turned off.
To manually turn off the Fast Cool feature, press and hold the Refrigerator Temperature button for 3 seconds. The Fast Cool icon will turn off when feature is not activated.
Adjusting refrigerator temperature will automatically turn off the Fast Cool feature.

Fast Freeze
The amount of fresh food (in kg) that can be frozen in 24 hours is indicated on the appliance rating plate.
Press Freezer Temperature button for 3 seconds (until the Fast Freeze Indicator lights up), 24 hours before placing fresh food in the freezer. After placing fresh food in the freezer, 24 hours on Fast Freeze function is generally sufficient; After 50 hrs the fast freeze function automatically deactivates.
To manually turn off the Fast Freeze feature, press and hold the Freezer Temperature button for 3 seconds. The Fast Freeze icon will turn off.
Adjusting the freezer temperature will automatically turn off the Fast Freeze feature.

Holiday Mode
This mode is designed to avoid your appliance from wasting energy during times when it's not in regular use (when you are in holiday for example).
By selecting this function the temperature of fresh food compartment will automatically be set to 12^ .
To use the Holiday mode, press mode button until Holiday mode indicator is lit on the display.
To exit the Holiday mode, press the mode button until no mode icon is lit on the display.
Adjusting the refrigerator temperature will automatically turn off the Holiday Mode feature.
IMPORTANT: If this mode is selected then all food and drinks must be removed from fresh food compartment.

Sound ON-OFF
Press button to activate/deactivate Sound Feedback.

Key Lock
Press and hold the Lock button for 3 seconds to activate lock feature.
To deactivate lock, press and hold the Lock button for 3 seconds.
The lock feature will ignore all interaction with control panel until the user unlocks the control panel. This feature is meant to avoid unintentional changing of settings.
Demo Mode (only with WQ9 B1LUK, 6WM24NIHAS and WQ70900SXX)
This mode is used when refrigerator is on display in a retail shop or if you want to turn the cooling off and deactivate all other functions (except interior lighting).
Demo mode can be used when going on extended holiday. See the "Holiday and Moving Care" section for proper steps on leaving your refrigerator in this mode for long periods of time.
If you turn on Demo mode, the "Demo" icon will light up on the display.
Enter or exit Demo mode by pressing and holding the Sound On or Off button and the Lock button simultaneously for 3 seconds.
In case Demo mode is activated, remove all food from both refrigerator, freezer and Flexible Freezer if present.
Additional features
Door Open Alarm
- The Door Open Alarm feature sounds an alarm and blinks the "Door Open" icon when any of the four doors is open for 2 minutes or more.
The alarm will repeat every 5 minutes. Close all doors to turn it off.
NOTE: To mute audible alarm while keeping the doors open, such as while cleaning inside of refrigerator, touch any button on control panel. The alarm sound will be temporarily turned off, but the Door Open icon will still be displayed on the control panel.
Lighting the Refrigerator
The refrigerator has an interior light that comes on any time door is opened.
NOTE: The light is LED which does not need to be replaced. If the LED does not illuminate when the door is opened, call service to replace light.
Opening and Closing Doors
Warm up of side panel is normal at first product start up. Temperature will decrease after some hours.
There are two fresh food compartment doors. The doors can be opened and closed either separately or together. There is a vertically hinged seal on left refrigerator door.
- When left-side door is opened, hinged seal automatically folds inward so that it is out of the way.
- When both doors are closed, the hinged seal automatically forms a seal between two doors.
NOTE: When closing the door, the hinged seal should be in correct position (be bent inside). Otherwise it will hit the right door or the fixing shaft.
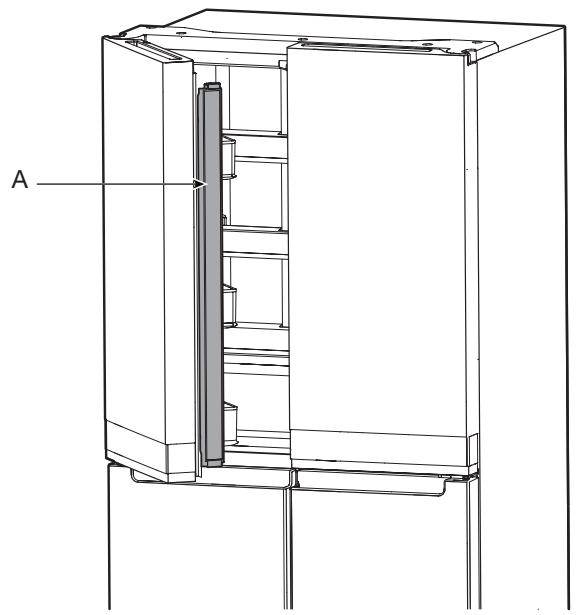
A. Hinged seal
The fresh food compartment door switch is located in top left and right hinge cover.
For Freezer and Multi Temperature Zone, door switch is located in the bottom mullion.
The door switch uses magnet to sense door opening/closing.
- Ensure there are no magnet or electronic devices (Speaker, Coolvox® etc.) within 7.62 cm of the hinge cap.
NOTE: The light will not turn on if door opening is not detected.
A. Hinge cover
Ice Maker
- To make ice, fill ice tray with purified water and place Manual Ice maker into Freezer top shelf. Allow time till ice gets formed and once ice is ready, turn the knobs in clockwise direction to eject ice cubes into the ice container.

- Lift ice container slightly and pullout ice container to get access to ice cubes.
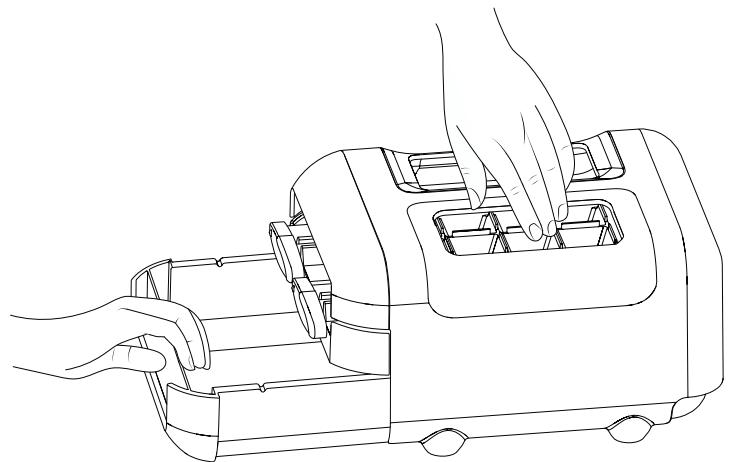
Manual ice maker assembly can be taken out of the freezer when ice is not required to make more compartment in freezer.
Food Storage
Egg Storage
It is recommended to store eggs at a consistent temperature to keep its freshness, so best is to keep them in the fridge on the middle shelf.
SHELVES, BINS AND DRAWERS
Important information to know about glass shelves and covers:
Do not clean glass shelves or covers with warm water when they are cold. Shelves and covers may break if exposed to sudden temperature changes or impact, such as bumping. Tempered glass is designed to shatter into many small, pebble-size pieces. This is normal. Glass shelves and covers are heavy. Use both hands when removing them to avoid dropping.
Shelf Height Adjustment
Shelf height can be adjusted by changing its location from bottom support to upper support and vice versa.
Open right side door to its full opening.
Take shelf out of refrigerator and place it to desired mounting position.

Ensure shelf is properly seated on the shelf mounts.
Shelves and Shelf Frames
The shelves in your refrigerator are adjustable to meet your individual storage needs.
Storing similar food items together in your refrigerator and adjusting the shelves to fit different heights of items will make finding the exact item you want easier. It will also reduce the amount of time the refrigerator door is open and save energy.
To remove and replace shelves:
- Open the right side door and left side door to its full opening.
- Remove middle shelf or top shelf by lifting it up and out of shelf supports. Then pull the shelf forward and tilt down to a vertical position. Turn shelf at an angle and pull out of the refrigerator.
- Remove the bottom shelf by lifting it up and out of the shelf supports. Then pull the shelf forward and tilt up to a vertical position. Turn the shelf at an angle and pull out of refrigerator.
- Replace middle and top shelves by putting shelf in the refrigerator at an angle with shelf front down. Lift front of the shelf up and slide in until the rear of shelf drops into shelf supports. Lower the front of shelf and make sure that the shelf is in position.
- Replace bottom shelf by putting shelf in refrigerator at an angle with shelf up. Lift front of shelf down and slide in until rear shelf drops into the shelf supports. Lower front of the shelf and make sure that shelf is in position.
Crispers
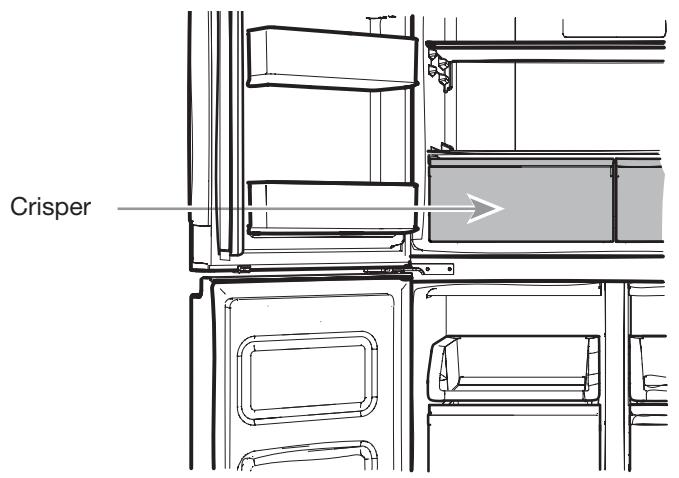
To remove and replace the Crispers:
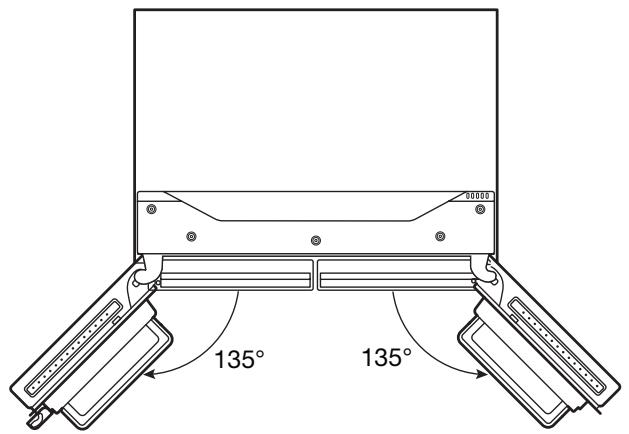
- Grasp handle of the Crisper and slide Crisper straight out to the stop. Lift the Crisper off the bottom guide.
- Replace/putting back the Crisper by placing it on bottom Crisper guide and pushing it past the Crisper stop into position.
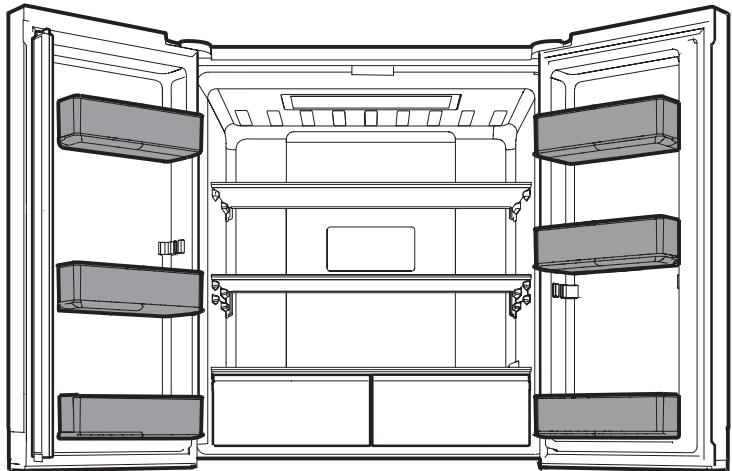
Refrigerator Balconies
The balcony on your refrigerator door are adjustable to meet your individual storage needs.
Freezer Storage Compartments
Freezer Tray
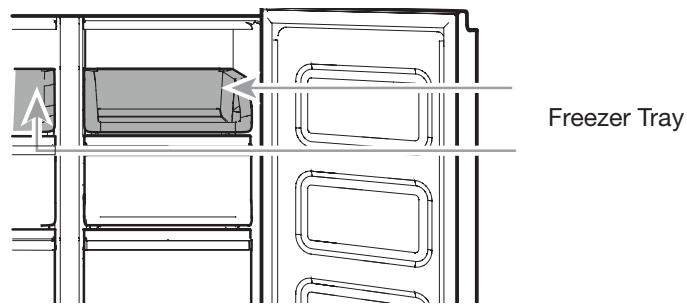
Freezer tray is useful to easily access frequently used products, freeze or simply store leftovers or small items.
Freezer Drawers
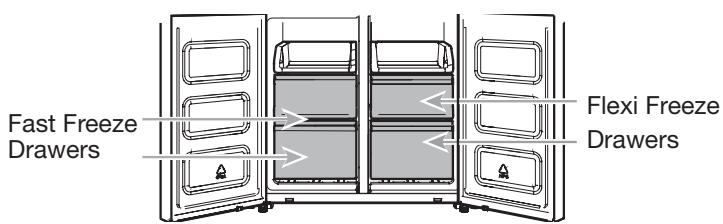
Fast Freeze compartment
Fast Freezer drawers allows you to conveniently store big volume items.
Fast Freeze option allows you to store all your frozen food safely and transparently.
NOTE: Freezer temperature might be cooled down to be same as Flexible Freezer Compartment temperature, when Freezer set to warmer than Flexible Freezer compartment.
Flexi Freeze Compartment (only with WQ9 B1LUK, 6WM24NIHAS and WQ70900SXX)
Flexi Freeze Compartment allows you to select one of three freezer temperature levels: -7^ , -12^ , -18^ and -20^ to provide the best storing conditions for different types of food. For maximum freezer capacity, you may remove the freezer drawer to expose the freezer shelf.
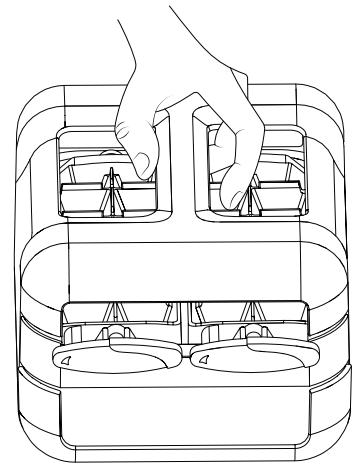
To remove the upper drawer:
- Grasp handle of the drawer and slide drawer straight out to the stop. Lift drawer off the bottom guide.
- Replace/putting back drawer by placing it on bottom drawer guide and pushing it past drawer stop into position.
Freezer Shelf (only with WQ9 B1LUK)
To maximize freezer capacity, you may remove mid drawer to expose freezer shelf beneath. You can then store upper drawer and load food directly on top of the shelf.
Audio Reference
Tone Assignment
| Tone Name | Usage Examples |
| Power On | Cooling system is turned on every time the product is powered on. |
| Key Press | User presses a valid button. |
| Invalid (Error) | User presses two or more valid buttons at the same time. Count-down interruption for press- and-hold buttons. |
| Engage | Acknowledgement of entry into any mode. |
| Disengage | Acknowledgement of exit from any mode. |
| Alert | Door Ajar alert. |
This table is for quick reference only. See corresponding sections for details. In case of inconsistency, section details will prevail.
Accessories
To order accessories, contact the dealer from whom you purchased your refrigerator.
REFRIGERATOR CARE
Cleaning
WARNING

Explosion Hazard
Use nonflammable cleaner.
Failure to do so can result in death, explosion, or fire.
All of the Refrigerator, Freezer and Flexi freeze sections (only with WQ9 B1LUK, 6WM24NIHAS and WQ70900SXX) defrost automatically. However, clean all the sections about once a month to avoid build-up of odours. Wipe up spills immediately.
Exterior Cleaning
Please see the exterior cleaning information specific to your model.
Style 1 - Smooth Door
IMPORTANT: Damage to smooth finish due to improper use of cleaning products or using non-recommended cleaning products is not covered under the warranty. Sharp or blunt instruments will mar the finish.
| DO USE | DO NOT USE |
| ✓ Soft, clean cloth | × Abrasive cloths × Paper towels or newsprint × Steel-wool pads |
| ✓ Warm, soapy water with a mild detergent | × Abrasive powders or liquids × Window sprays × Ammonia × Acidic or vinegar-based Cleaners × Oven cleaners × Flammable fluids |
NOTE: Paper towels scratch and may dull clear coat of painted door. To avoid possible damage, use only soft, clean clothes to polish and wipe the doors.
Style 2 - Stainless Steel IMPORTANT:
Use recommended stainless steel cleaners and cloths only. Damage to stainless steel finish due to improper use of cleaning products or using non-recommended cleaning products is not covered under the warranty.
- Avoid exposing stainless steel appliances to caustic or corrosive elements such as high-salt, high-moisture, or high-humidity environments. Damage due to exposure to these elements is not covered under the warranty.
| DO USE | DO NOT USE |
| ✓ Soft, clean cloth | × Abrasive cloths × Paper towels or newsprint × Steel-wool pads |
| ✓ Warm, soapy water with a mild detergent | × Abrasive powders or liquids × Ammonia × Citrus-based cleaners × Acidic or vinegar-based cleaners × Oven cleaners |
| ✓ For heavy soil, use only a stainless steel cleaner designed for appliances. To order the cleaner, contact the dealer from whom you purchased your refrigerator. | × Stainless steel cleaner is for stainless steel parts only. Do not allow the stainless steel cleaner and polish to come into contact with any plastic parts such as the trim pieces, dispenser covers, or door gaskets. |
Style 3 - Fingerprint-Resistant Stainless IMPORTANT:
- Avoid exposing stainless steel appliances to caustic or corrosive elements such as high-salt, high-moisture, or high-humidity environments. Damage due to exposure to these elements is not covered under the warranty.
| DO USE | DO NOT USE |
| ✓ Soft, clean cloth | × Abrasive cloths × Paper towels or newsprint × Steel-wool pads |
| ✓ Warm, soapy water with a mild detergent | × Abrasive powders or liquids × Window sprays × Ammonia × Acidic or vinegar-based cleaners × Oven cleaners × Flammable fluids |
NOTES:
If unintentional contact does occur, clean plastic part with a sponge and mild detergent in warm water. Dry thoroughly with a soft cloth.
- Just because a cleaner is a liquid does not mean it is non-abrasive. Many liquid cleansers formulated to be gentle on tile and smooth surfaces still damage stainless steel.
Citric acid permanently discolours stainless steel.
- To avoid damaging the finish of your stainless steel refrigerator:
Do not allow these substances to remain on the finish:
X Mustard
x Citrus-based sauces
X Tomato juice
X Citrus-based products
X Marinara sauce
Interior Cleaning
- Unplug refrigerator or disconnect power.
- Hand wash, rinse, and dry removable parts and interior surfaces thoroughly. Use a clean sponge or soft cloth and a mild detergent in warm water.
NOTE: Do not use abrasive or harsh cleaners such as window sprays, scouring cleansers, flammable fluids, cleaning waxes, concentrated detergents, bleaches, or cleansers containing petroleum products on plastic parts, interior and door liners, or gaskets.
- Plug in refrigerator or reconnect power.
Condenser
This refrigerator has skin condenser on both sides of refrigerator. It is normal to feel warm on the sides.
Lights
The lights in both the fresh food and freezer compartments are LEDs which do not need to be replaced. If the lights do not illuminate when the door is opened, contact the dealer from whom you purchased your refrigerator.
Holiday and Moving Care
Holidays
If You Choose to Leave the Refrigerator On While You're Away:
- Use up any perishables and freeze other items.
- If your refrigerator has an automatic ice maker and is connected to the household water supply, turn off the water supply to the refrigerator. Property damage can occur if the water supply is not turned off.
- If you have an automatic ice maker, turn off the ice maker.
Press the switch to Off (O) for the door ice maker.
- Empty the ice bin.
If You Choose to Turn Off the Refrigerator Before You Leave:
NOTE: Put refrigerator in Demo Mode while on Holiday. See the "Using the Controls" section.
- Remove all food from the refrigerator.
- If your refrigerator has an automatic ice maker:
Turn off water supply to the ice maker at least 1 day ahead of time.
- When last load of ice drops, press the switch to Off (O) for display to be unlit on the top inside of the refrigerator, depending on your model.
- Empty ice bin.
- Turn off temperature controls. See the "Using the Controls" section.
- Clean refrigerator, wipe it and dry well.
- Tape rubber or wood blocks to the tops of both doors to prop them open far enough for air to get in. This stops odours and mould from building up.
Moving
When you are moving your refrigerator to a new home, follow these steps to prepare it for the move.
- If your refrigerator has an automatic ice maker:
Turn off water supply to the ice maker at least 1 day ahead of time.
- Disconnect water line from the back of the refrigerator.
- When last load of ice drops, press the switch to Off (O) either on the ice maker or the control, depending on your model.
- Remove all food from refrigerator and pack all frozen food in dry ice.
- Empty ice bin.
- Unplug refrigerator.
- Clean, wipe and dry thoroughly.
- Take out all removable parts, wrap them well and tape them together so they don't shift and rattle during the move.
- Depending on the model, raise the front of the refrigerator so it rolls more easily or raise the levelling screws so they do not scrape the floor. See the "Adjust the Doors" or "Refrigerator Levelling and Door Closing" sections.
- Tape doors closed and tape the power cable to the back of the refrigerator.
When you get to your new home, put everything back and refer to the "Installation Instructions" section for preparation instructions. Also, if your refrigerator has an automatic ice maker, remember to reconnect the water supply to the refrigerator.
First try the solutions suggested here to possibly avoid a service call.
WARNING

Electrical Shock Hazard
Plug into a grounded (earthed) outlet.
Do not remove ground prong.
Do not use an adapter.
Do not use an extension cord.
Failure to follow these instructions can result in death, fire, or electrical shock.
| If you experience | Possible Causes | Solution |
| Refrigerator Operation | ||
| The refrigerator will not operate. | Check electrical supply. | Plug the power cable into an earthed socket. |
| Do not use an extension cable. | ||
| Make sure there is power to the socket. Plug in a lamp to see if the socket is working. | ||
| Reset a tripped circuit breaker. Replace any blown fuses. NOTE: If problems continue, contact an electrician. | ||
| Check controls. | Make sure the controls are turned on. See the “Using the Controls” section. | |
| New installation. | Allow 24 hours following installation for refrigerator to cool completely. NOTE: Adjusting the temperature controls to the coldest setting will not cool either compartment more quickly. | |
| Refrigerator control is in Demo mode (on some models). | If refrigerator is in Demo mode, cooling is turned off and “Demo” will be illuminated on the control panel. See the “Using the Controls” section for more information. | |
| The motor seems to run too much. | High-efficiency compressor and fans. | Larger, more efficient refrigerators run longer at lower, more energy efficient speeds. |
| The room or outdoor temperature is hot. | It is normal for refrigerator to work longer under these conditions. For optimum performance, place refrigerator in an indoor, temperature-controlled environment. See the “Location Requirements” section. | |
| A large amount of warm food has been recently added. | Warm food will cause refrigerator to run longer until the air cools to the desired temperature. | |
| The door(s) are opened too frequently or for too long. | Warm air entering refrigerator causes it to run more. Open the door less often. | |
| The refrigerator door or freezer drawer is open. | Make sure refrigerator is level. See the “Refrigerator Levelling and Door Closing” section. Keep food and containers from blocking the door. | |
| The refrigerator control is set too cold. | Adjust refrigerator control to a less-cold setting until the refrigerator temperature is as desired. | |
| The door or drawer gasket is dirty, worn, or cracked. | Clean or change the gasket. Leaks in the door seal will cause refrigerator to run longer in order to maintain desired temperatures. | |
TROUBLESHOOTING
First try the solutions suggested here to possibly avoid a service call.
| If you experience | Possible Causes | Solution |
| The lights do not work. | Your refrigerator is equipped with LED lighting which does not need to be replaced. | If there is power to the refrigerator and the lights do not illuminate when a door or drawer is opened, call for service or assistance. |
| Doors have been open longer than 10 minutes. | Close the doors and drawer to reset and open to resume lighted task. | |
| The door switch is not sensing the door opening. | Ensure there are no magnets or electronic devices within 7.6 cm (3") of the hinge cover. | |
| The Temperature Control UI does not turn on. | The Temperature Control UI went to sleep. | Press any button on the UI to wake up the The Temperature Control UI. |
| The Temperature Control UI buttons are not working well. | Try cycling power on the refrigerator to make the buttons reset. If problem continuous, call for service or assistance. | |
| The Temperature Control UI is not receiving power. | Check the wiring harness at the door hinge. | |
| Unable to adjust setting on The Temperature Control UI. | Door is open and Door ajar alarm is activated. | Close the door. |
| Unusual Noise | ||
| To listen to normal refrigerator sounds, go to the Product Help/FAQ section of the brand website and search for “normal sounds.” Below are listed some normal sounds with explanations. | ||
| The refrigerator seems noisy. | The compressor in your new refrigerator regulates temperature more efficiently while using less energy and operates quietly. | Due to this reduction in operating noise, you may notice unfamiliar noises that are normal. |
| Sound of the compressor running longer than expected. | High-efficiency compressor and fans. | Larger, more-efficient refrigerators run longer at lower, more energy efficient speeds. |
| Pulsating/Whirring | Fans/compressor adjusting to optimize performance during normal compressor operation. | This is normal. |
| Popping | Contraction/expansion of inside walls, especially during initial cool down. | This is normal. |
| Hissing/Dripping | Flow of refrigerant or flow of oil in the compressor. | This is normal. |
| Vibration | The refrigerator may not be steady. | Adjust the levelling screws and lower the levelling foot firmly against the floor. See the “Refrigerator Levelling and Door Closing” section. |
| Sizzling | Water dripping on the heater during Defrost cycle. | This is normal. |
| Water running/Gurgling | May be heard when ice melts during the Defrost cycle and water runs into the drain pan. | This is normal. |
TROUBLESHOOTING
First try the solutions suggested here to possibly avoid a service call.
| If you experience | Possible Causes | Solution |
| Temperature and Moisture | ||
| Temperature is too warm. | The refrigerator has just been installed. | Allow 24 hours following installation for refrigerator to cool completely. |
| The controls are not set correctly for the surrounding conditions. | Adjust the controls a setting colder. Check the temperature in 24 hours. See the "Using the Controls" section. | |
| The door(s) are opened often or not closed completely. Allows warm air to enter refrigerator. | Minimize door openings and keep doors fully closed. | |
| A large load of food was recently added. | Allow several hours for refrigerator to return to normal temperature. | |
| Demo mode is on. | Turn off the Demo mode. See the "Using the Control" section. | |
| Holiday mode is on. | Turn off the Holiday mode. See the "Using the Control" section. | |
| Temperature is too cold in the refrigerator/crisper. | The refrigerator air vent(s) are blocked. | If the air vent located in the middle rear of the fresh food compartment is blocked by items placed directly in front of it, the refrigerator will get too cold. Move items away from the air vent. |
| The controls are not set correctly for the surrounding conditions. | Adjust the controls a setting warmer. Check the temperature in 24 hours. See the "Using the Controls" section. | |
| Temperature is too cold in the temperature controlled drawer. | The control is not set correctly for the items stored in drawer. | Adjust the temperature setting. See the "Using the Controls" in the "Refrigerator Use" section. |
| There is interior moisture build-up. NOTE: Some moisture build-up is normal. | The room is humid. | A humid environment contributes to moisture build-up. |
| The door(s) are opened often or not closed completely. Allows humid air to enter the refrigerator. | Minimize door openings and close doors completely. | |
| The door(s) are blocked open. | Move food packages away from door. | |
| A bin or shelf is in the way. | Push bin or shelf back into the correct position. | |
| Storing liquid in open containers. | This adds humidity to refrigerator interior. Keep all containers tightly covered. | |
| There is frost/ice build-up in the freezer compartment. | The door is opened often or left open. | Minimize door openings and close drawer completely after use. |
| The door has poor door seal. | Ensure door seals are making full contact with the refrigerator cabinet to allow for an adequate seal. | |
| Temperature controls are not set correctly. | See the "Using the Controls" section for recommended temperature settings. | |
First try the solutions suggested here to possibly avoid a service call.
WARNING

Explosion Hazard
Use nonflammable cleaner.
Failure to do so can result in death, explosion, or fire.
To view an animation showing how to adjust and align the doors, refer to the Product Help/FAQ section of the brand website and search for "Door Closing and Door Alignment."
| If you experience | Possible Causes | Solution |
| Doors | ||
| The doors will not close completely. | The door is blocked open. | Move food packages away from door. |
| A bin or shelf is in the way. | Push bin or shelf back into the correct position. | |
| Recently installed | Remove all packaging materials. | |
| The doors are difficult to open. | The door gaskets are dirty or sticky. | Clean gaskets and contact surfaces with mild soap and warm water. Rinse and dry with soft cloth. |
| The doors appear to be uneven. | The doors need to be aligned or the refrigerator needs to be levelled. | If you need to align door please call for service. |
| The refrigerator is unsteady or it rolls forward when opening and closing doors. | The refrigerator brake feet are not snug against the floor. | Turn both brake feet (one on each side) counterclockwise, the same amount, until they are snug against the floor. See the “Refrigerator Levelling and Door Closing” section. |
AFTER-SALES SERVICE
BEFORE CALLING THE AFTER-SALES SERVICE
- See if you can solve the problem by yourself with the help of the suggestions given in the TROUBLESHOOTING.
- Switch the appliance off and back on again to see if the fault persists.
IF AFTER THE ABOVE CHECKS THE FAULT STILL OCCURS, GET IN TOUCH WITH THE NEAREST AFTER-SALES SERVICE
To receive assistance, call the number shown on the warranty booklet or follow the instructions on the website www.whirlpool.eu
When contacting our Client After sales service, always specify:
a brief description of the fault;
the type and exact model of the appliance;

- the service number (number after the word Service on the rating plate). The service number is also indicated on the guarantee booklet;

your full address;
your telephone number.
If any repairs are required, please contact an authorised after sales service (to guarantee that original spare parts will be used and repairs carried out correctly).
Summario
SICUREZZA DEL FRIGORIFERO 29
Compartment de congélation rapide
OTdelenHmOp03nIbHOKamepbl. 89
Tablina 3ByKOBbIX CnHaIOB .89
DOnonHnTeIbHbIe npHaIaJIexKHOCTn 89
YXOD 3A XOJIOJIbHNIKOM 90
YnCTka 90
OcBeueHne 91
Otnyck n TpaHcnpTnpoBka 91
PONCKI YCTPAHEHNE HENCINPABHOCTE 92
CEPBNUCHbI UeHTP. 96
Tablina 97
Ipeed Tem KaK npnCTynatb K nCNoJb3OBaHnIO npn6opa, npounTaIte HactOaUne yka3aHn NO 6e3ONaCHocTn. Depxnte nx noD pykoI dN KOHCyIbTauIN B 6byUsem. DaHHbIe yka3aHnA, a TaKxge cam npn6op coedePkat BaxhIbe ppeynpeKdEHNr NO 6e3ONaCHocTn, KOtOpbIX Heo6XoIMo NOCToAHNO npndepkUnBaTbc.N3rTOBnTeNb CHMaET C c68A BcayU O TBetCTBeHHOCtB B Cnyuae Heco6JIHODeHNr HactOaUnx yka3aHn I NO 6e3ONaCHocTn, HeHaJIeJkaUe IO nCNoJb3OBaHn rnp6opa IIIN HeBepHO YCTaHOBKn OprAHOB ynpabLeHn.
Ouehb MaIeHbKx DeTeB (B Bo3pacte 0-3 let) He cIeIyET nOaNcKaTb K np6bOpy. MaIeHbKx DeTeB (B Bo3pacte 3-8 let) MoJHO nOaNcKaTb K np6bOpTyOBtOMClyuae,ecIINOHnHaXoJrTcra NOI NOCTOHHbIM pncmOTpom. DaHHe N3deJIne MoKeT 3KcNlyaTnPOBaTbCra DeTbMn B Bo3pacte 8 let in CTapWe nIiAmn C orpaHnueHHbIMn fN3nueCKIMn, CEHCOPHbIMn IIN yMCTBeHHbIMn CNOC6HOCTaMn IIN C HeIOCTaTOUHbIM ONbITOM IIN 3HaHnAMy MTOlbKO B TOM Cnyuae, eCIn OHN HaxoJrTcRA NOd pncmOTpom IIN NocJe POnLyehna COOTBeTCTByIoUx INHCTpyKzni, PO3BOJraUoIcx IM 6e3OJaACHO 3KcNlyaTnpoBaTb I3deJIne I DaIOUxN IM npedCTaBHeHne 06 ONaCHOCTaX, CoPraJeeHHbIX C erO 3KcNlyaTaUeNe. He PO3BOJraIte DeTAM nIgPaTB C np6bOpom. DeTn DOJXhbl OcyuEcTBJrTb YnCTKy pncbopa IIN yXOD 3a HNM, POJaEkaUnn BblONJIHeHNU ONoIb3OBaTeJIem, TOlbKO IOd pncmOTpom B3POCSbIX.
PA3PEUEHHOE INCIOJIb3OBAHNE
ПРЕДУПЕЖДEHNE: Данны пибор He npedHa3HaueH Дя pa6Oы C упраВлe"Hem OT BHeшHERO yCtpoIcTBA, HanpIMep, TaIMepa nJIOTdEHLBOrO nyIbTa DY.
ДанныnpиборпретнанhaueндяИСПОь-3OBAHЯВ6byTy,aTaKxeB CNeDyUOuXCSlyuaX:B MaRa3Hax,OfncaxиINhblxMeCTax paBoTbI B NOMEseHnx,NcPONb3yeMbIX NOJ KUYHIO;B KUYHAX HaΦepMax,BOTeJIaX,MOTeJIaX,pe3nDEHun-axи rOCTInHncax Tnna B&BДЯ ПОЛb3OBaHЯ OTeJIbHbIMKJIneHTaMn.
He nCnoJb3yIte ydJIuHInTeJI.
HeBbINOJIHHeHne 3Tnx yka3aHn MOxKe TnpVBecTn K CmepTeIbHOI TpaBMe, BO3rOpaHnIO IJN NopaxKeHnIO 3JIeKTPnueCKn TOMOK.
BAKHHA INHΦOPMALU: ΘeKtpnueckoe NOdkIIOUeHne Pp6opapdoJXHO BbINOpHrTbCRA KBaINΦuIPOBaHHbIM 3eKtpnOM B COOTBETCTBm C yKa3aHnMn N3ROTOBNTeJI N MeCTHBIMn HOpMaTHBaMn NO 6e3ONaCHOCTN.
XoOnOuNbHnK npEHa3HaueH nIpa60TbIC 3JNEKTPOINTaHnEM OT OTeJIbHOJ 3JeKTPnueckOc cTeH NaHpJxehnEM 220-240 B, TokOM 10 A ucaToTOy 50/60 T.
Y6eHNTecb, yTO HApJxHeHne, yKa3aHHoe Ha Ta6nUKe TexHnuecknx DaHHbIX npi6opa, COOTBeTCTByET HApJxKeHIO B BaIeM DOME.
Должна 6ьтб obecneueHa BO3MOxHocTb OTKJIQUeHnnpi6opa ot cetn 3JIeKtpoNTaHnC NOMOuBb BbIHMaHnBUNKc CTeBOrO uHypa n3 p03eTKn nIN OTKJIIOUeHnDByXNoJIOCHOro BbIKJIOuHaTeIa, paCNOJIOKeHHOROB3JIeKtpuYeCKoI cENI nepeI dpo3ETKO.
B cnyae nobpejdeHnCeTeBOro shHpya erO 3aMeHa OJnxHa OcUeCTBJIbTBcN 3rTOBUNTeJEM, pa6OTNHKOM cepBnCHoro ceHTpa INI dpyTmP a6OTNHKOM cAHAJIOrHuHO KBAINΦnKaunE BO n36eKaHne pncKa IopaxKeHn JNEKTPnueckn TOKOM.
Ipeed Tem kak nepemeeaTb XOJIOJNbHk B MeCTO erO OKOHaTeJIbHOY yCTaHOBKn, Heo6XoJIMo y6eINtbcR B HAnuHn Heo6XoJIMOrO 3NeKTPoPNTaHnA:
PeKOMeHdyembI MeTOd 3a3EmJIeHnI:
BAKHAR INHOPMALI: Pn3aMeHe npedoxpaHnteIer KpbIshka DoJxHa 6bItb yCTaHOBJIeHa Ha MeTo. B cIyae yTepr KpbIshK BuIKy He CNeDyET IcNoJIb3OBAt b DO Tex NOp, NOKa He 6yDet pIno6peTeHa n UcTaHOBJIeHa HOBa KpbIshKa.
HEO6XODMbIe IHCTPYMEHTbl: 6-MM KJIIOU, 5-MM KJIIOU IN KpeCTOBaY OTBeptKa #2.
ANPEDUYPEXDEHNE
Onachoctb npaxkhen 3Jektpnueckn m Tokom
OTKJIouHTe 3JIeKTPoPnTahHe nepeTeM, KaK npucTyNaTb K ChaTnIO DBepeu.
B npTbHOM cnyae BO3MOXHa CmeptelhA TpaBMA IJI NopaxeHne 3JeKtpueeCKM TOKOM.
A. BnHTbI KpeJIeHnKpbIwKn BepXHei neTIN
B. Kpbiioka BepxHei peTnI
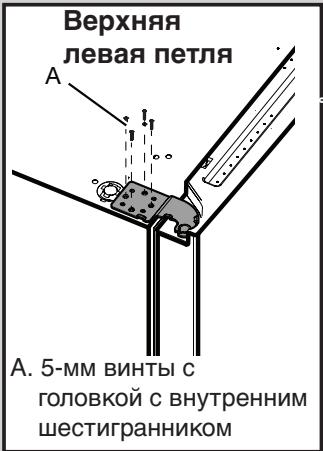
BepxHn npabaanetna
A.5-MM BINTbI C ROJIOBKO C BHYTpEHNM JECTUNPapHHKOM

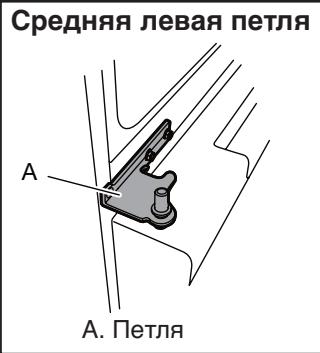
CpeHn npaBn neTJn
A. Петли
А. Дул
В. Вал
С. Рост
D. М.
ChTne npaBOv DBepuB
- BbInbTe BnIky ceTeBOrO shHpya n3 po3eTKn nn OTKJIouHTe 3JIeKTPoNITaHHe.
2.ДерхиTe Деверсы XОЛоДиьнka 3aКрыТыМпdo TOTO, KaK Bbl 6удeTe rOTOBbl ChЯт b IX C KOpnyca.
ПРIMEЧАНЕ: Дожинштелов подорпге Дерухлдьнka пri снглппгь. He paccuHTbBaNTe Ha To,чTO MaHnTbI pOKlaJdkN Дерцbl BydYt ydepxNBaTb ДеруHa MecTe, POKa Bbl pa6oTaTe.
- C NOMOJIIO KpeCTOBOI OTBepTKI CHIMITE KpbIJKy C BepXHeI PeTJN.
4.CnOMOuIO KJIouHa Ha 5 MM OTKpyTInTe YeTbIpe BnHTa OTBepxHeN PeTJIN OITJNOXInTe INBCTOpOH.

A. BnHT KpeJIeHnRA KpbIuKnBepxHeI neTIn
B.KpbiWka BepxHei peTNI
C.5-MM BnHTbIC rOJIOBKOI C BHyTpEHNM WECTNrpaHHNKOM
D. Bēpxnīn
- CHMNTe DBepuy XOJIOINbHnKa C NaJIbca cpeHneI neTNI. BepxHra TneTJr OTOcoEduHnTCr OT KOpNyca BMeCTe C DBePcEi.
CHATNE JEBOI DBepci
BAKHHA INHΦOPMALI: ΘлкТрпровдка ИНТерфсева NOьБОВATEЛ ПОХODТ УЕЗ ПЕЛTO ЛБОД ВЕРСВИ NO3TOMY ee CLEДуET OTCOEДИNHТь ПЕДСНТиEM DBERцы.
- C NOMOJIIO KpECTOBON OTBepTKN CHIMITE KpbIJKy C BepxHNe IeTJIN.
A. BnHT KpePJIeHnKpbIuKbBepXHeN peTnI
B.Kpbiuka Bepxnei peTn
- OToCoEInHInTe DBa 3JeKtpnuecknx pa3bema, pacNoJIOKeHHbIX HaI neTJIe NDBepciI.
Bo3bMntecb 3a kpar pa3bEmOB. BoJIbIIM nJIbIeM JeBOI pyKn HaxMNTe Ha 3aUeJIky dIe ee BbcBO6OJDeHnI npa3beDInHtE COCTaBHeIy AcTn pa3bEmOB.
A. Pa3bem 3JIeKTPoPnpOBOdkn
B. Pa3bem 3a3emJIeHnIa
- C nOMOJIbIO KJIHOa Ha 5 MM OTKpyTIne YeTbIpe BHyTpEHHNX BnHTa OT BepXHeN PeTJN IN OTINOXInTe INX BCTOPOHy.
A. 5-MM BnHTbI C rOJOBKO C BHYTpEHHM WcETnrgpaHHNKOM
B. Bēpxnny nětny
ПРИМЕЧАНЕ: Доллинтелов подорпге Деру хлоблнika ри сныпгпгь. He paccHTbIbaNTe Ha To, чTo MaHHTbl пOKладкдерць bydUT ydepxkBaTb Dberpuy Hа МecTe, ПOKa Bbl pa6Otaete.
- Chmnte DBepy XoJIoNJIbHnKa c naJIbca HIXKHei peTJI. BepxHra neTla OTcoeDInHITcra OT KOpnyCa BmecTe C DBepei.
ПРIMEЧАНЕ: КTOбI XОЛДИNBи Пpoшел Урет Здевно\ пpoeM, можETnotpeбоваТьССЯнЖнx ПeTeьи\ ONOPHbIX HOKeK.
ToIbKO B cIyuae Heo6xoDMOCn CHMnTe CpeHIO peTJIIO, IcNoJb3y 6-MM KJIIOU N KpeCTOByIO OTBepTkY #2.
YctahOBKa npaBoi DBepuBxOJIoDnIbHoi KaMepbl
- HanaheIte npaByIO dBepu Ha naneu cpeDnei neTIn.
- BcTaBbTe napeU BepxHei peTIn B OTBepCTne B BepxHei qactn DBePcI xOLOdINbHOJ KAmepbl.
- C nomoBIO ueTbIePex 5-MM BnHTOB C rOJIOBkoC BHyTpEHHM IecTIRpaHHNKOM PnIKpyTNe TneJIIO K KopnyCy. He 3aTARBaIte BNHTbI Do yNopa.
YctaHOBka JIeBOI DBepcI XOJIOINbHOI KaMEpbI
- Hanahebte IeByIO DBepy Ha naJeC pEdneI neTJN.
- C NOMO乙 Yo YeTbIePex 5-MM BnHTOB C rOJIOBkoC BHyTpEHHM WecTIRpaHHKOM pNkpyTne TNeTIO K KopnyCy. He 3aTARBaIte BnHTbI do ynpa.
- BocctaHOBnTe 3JIeKTPnueckne CoeDHeHnIa.
CoeHHnte o6e yactn pa3bema.
IopdoeDHHTe npoBOHnK 3a3EmHeN K BnHTy neTJIN.
3aKJIIOUHTeIbHbIe WArN
- 3aTaNHe Do yNopa BOCemb 5-MM BNHTOB C rOJOBKO C BHYTeHHM WecTnIpaHHNKOM.
- YcTaHOBInTe Ha MecTo KpbIiKn BepXHnX NeTeJIb.
U3MeHeHne yCTaBOK TEMnepaTpypbI
TpaIINIOHHbI pexIM MOpO3NbHoi KaMepbl (-18°C): Yke 3amopoxKeHHbIe n CBExnpe npOyKtbl (MaKc. 12 MeCAUEB)
UmepeHHbI pexIM MOp03nJIbHOJ KAmepbl (-12°C): YXe 3amopoxeHHbI npOdyKbI (MaKC. 1 MeCau)
Märkni peXIM MOpO3nIbHoi KAmepbl (-7°C): Yxke 3amopoxeHHbIe npOdyKTbI (MaKc. 1 HeJeJIa)
EcnB OTeJeHn Flexible Freezer 3aHa 6oJee Hn3Kaay TempeaTypa Yem B MOpO3nIbHOJ Kamepe, B MOpO3nJIbHOJ Kamepe 6ydt yCTaHOBHeHa taKaJ Xe TempeaTypa, KaK N B OTeJeHn Flexible Freezer.
Tempepatya B OTeJenHn Flexible Freezer moKet OKa3aTbCn He B COCToRHN DoCTuRHyTb -7°C rpaIyCoB C, ecNl Tempepatya OkpykaIooJe cpebl paBHa nIi HnKe 10°C rpaIycoB C.
Ipn n3MeHEnn yCTaBOK TempepaTpybI pyKOBOcTByntecb cLeDyUoSe TaBnuee:
BbICOTy noJIKMOxHOppeyIINPOBaTb nyTeM u3MeHeHn MeCTa ee yCTaHOBKn C HNXHNx ONop Ha BepXHne n HAO6OpOT.
OtkpoTe npaByu DBepu Do ynopa.
BbInbTe noJIky n3 xOIOJNbHOJ KaMepbl yCTaHOBnTe ee B HxKHOe noIooKeHne.

YIOCTOBepeBbTeCb B TOM, YTO IONKa IIOHTHO BCTaHa Ha ĀrpKaTeJI.
Ponkn nixpambi
IonoKHe nolok BaWero XoJIoNJIbHnka MoXHO peryIInpoBaTb B 3aBNCIMOCTn OT BaUnx INIINBnDyalhBbIX NOTpe6HOCTe B OTHoSeHm XpaHEnn IPOdyKTOB.
XpaHHe NoXoKHX PPOyKTOB B ODNOM MeCTe n peRyIINPOBKa PONOXHEN NOLOK B COOTBETCTBN C pa3NIuHOB BbICOTOn XpAHJxNxCn POyKTOB NOMOryT Bam JERc HauTN HUKHbIE PPOyKtbl. 3To TaKKe CHN3NT BpEMr, B TeeHne KOTOPOr DBePcI XOLODINbHO KAMEpbI RBLIOTCA OTKpbITbIMn I NO3BOJNT C3KOHOMITb 3JIeKTPO3HEprHIO.
CHATNE yctaHOBKa IIOJOK:
- OtkpoTe npaByIO n IeByIO DBepuI Do ynpa.
- Chmnte cpeHIOU INI BepxHIOU NOKy C depKaTeJeN, npnIOHNB ee. 3aTEM NOTHnTE NOKY Ha ce6y I NOBepHnTe ee BHN3 B BepTKaJIbHOe NOLOXKeHne. NOBepHnTe NOkY Ha HEKOTOpBI yTOJ IN BbIHbTe n3 XOJOuINbHnKa.
- CHIMITE HIXHIOI NOKU c depkataTei, npnOndHB ee. 3aTEM NOTAHTE NOKU Ha ce6n IOBEPHTe ee BBepx B BEPTNkaJIbHOe NOLOXKeHne. IOBEPHTe NOKU Ha HeKOToPbI yrOJ IN BbIHbTe n3 XOJOnuNbHnKa.
- YcTaHOBnTe Ha MeCTO BepxHIO U CpeDnHO IOJIK, BCTaBJIa Ix B XoIOnIDNbHyU KAmepy POd yrIOM, npu 3OTM NpeDnHe KpaI NOJOK DOJNXbIb ObytB ONyuSeHbI. POnDNmITe NpeDnHn KpaI NOJKN iCdBnHbTe ee BHyTpb TaK, YTO6bl 3aDnHya cAcTb NOJKN IerNa Ha DEpXaTeiN. OncyTnTe NpeDnHn KpaI NOJKN uYbeDnTEcb, YTO OHa BCTaJa HA CBOE MeCTO.
- YctaHOBnTe Ha MeCTO HIXHIOI ONKY, BCTaBJIe ee B XOJIOINbHyIO Kamepy IOI yIOM, pIIN 3TOM nepeDHIK kpa IONKIOJIXe 6bITb PpNIOHNr. IOnHMITE nepeDNH Kpa IONKIN CDBINbTe ee BHYTpTaK, UTO6bl 3aDHNAcTB IONKIN LErNa HA dEprKaTeiN. OncyTE TE peEDNI Kpa IONKIN yBeIDNTecB, UTO OHa BCTaJa HA CBOE MECTO.
Aunkn dIa fpykTOB n Oooste
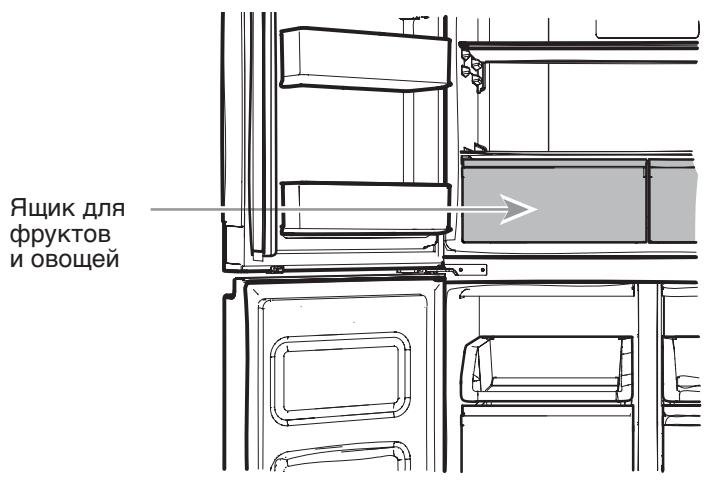
BbHMaHne n yctaHOBka Ha MeCTO RnKOB dIy pkykTOB n OBOe:
1.Bo3bMntecb 3a pyuKy ruiNka dIy pfpyKTOB n OBOUe N BblBnHbTe erO do ynpa.CHMnTe ruiNK dIy pfpyKTOB n OBOUe C HxHHe HappaBIAIOse.
2. YTo6bI yCTaHOBnTB IuIK JIINIpyKTOB IN OBOUeH Ma MeCTO, YCTaHOBnTE eRO Ha HIXKHIO HAnpaBnIOUyIO IN 3aDbNHbTe BHyTpB Do yNopa.
BbHMaHne BepXHeRo BbIDBXHOrO RuaNKa:
1.Bo3bMntecb 3a pyuKy aunka n BblBnHbTe ero do ynpa. Chmnte aunk C HxKHei HanpaBnaOuie.
2. YtobI yCTaHOBntb IuIK Ha MeCTo, yCTaHOBnTe erO Ha HxHIO HAnpaBJIHOU IO 3aDbHbTe BHyTp b Do yNopa.
Ta6JIuca 3ByKOBbIX CnHajIOB
PacnpedeneHne ToHOB
BAXHAHINHFOPMAUH: NObpeJdeHn, noJIyehHbIe B pe3yIbTaTe BO3JeCTBnHa rJaIKOE NOKpbItne, Bbl3BaHHbIe HeHaIJIeKaUIM IcNOLb3OBaHnEM MOUUX CpeDCTB INI INPImHeHnEM HepeKOMeHNDoBAAHbIX MOUUX CpeDCTB, He IOKpbIbAIOTCra pAHTne. OCTpbIE INI TynbIe IHCTpyMeHTbl MOYr OCTaBnTB OTMETKN Ha NOKpbITnn.
He cHmMaTe KOHTaKT 3a3eMLeHn.
He nCnoJb3yIe nepexOdnKn.
He nCnoJb3yIte ydJIHHTeJI.
HeBbINOJIHHeHne 3Tnx yka3aHn MOKeT npNBecTn K CmepTeIbHOr TpaBMe, BO3ropaHIO nI IN NopaxKeHIO 3JIeKTPnueCKM TOKOM.
IPEED TEM KAK OBPAAATbCBA CEPBnChbI UENTP
1.ПорбуTe yctpaHnTb HeNCpPaBHOCTb CaMOCTOЯTeIbHo, DeIcTByB COOTBeTCTBm C yKa3aHnAIMN, pINBeDeHHbIMN B pa3dJe IONCK N YCTPAHEHNE HENCPpABHOCTEi.
2. BbIKHIOUHTe n CHOBA BKJIIOHTe npi6Op, yTO6bl ONpeJEnTb, He IcHe3Ja IIN HeNCpPaBHOCTb.
ECJINIOCSJIPEIPOBEDEHNA BbIiSEYKA3AHHBIX IPOBEPOK HENCIPABHOCTb HE NCYE3JA,OBPATNTECb BBJXKAIIMCEPBNCHBi CEHTP
Длл пolyеня обслуживаня поЗBOHNTе NOHomepy, yka3aHHOMYВ rapaHTNIMHom TaIOHe,ИИN CNeДyIte yka3aHnIМ, npINBEdeHHbIM Ha caITe www.whirlpool.eu
PnO6paueHmBcepBncbIyHeTp BcERda yka3bBaIte:
KpaTkoe OINscaHne HEnCnpaBHOCTN;
TINI TOUHOE Ha3BaHne MoDEJI npi6opa;
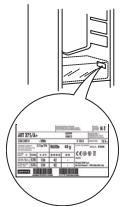
CepBnCHbI HOMep (HOMep nOcne cNoBa Service Ha Ta6nUKe TexNuecknx DaHHbIX). CepBnCHbI HOMep yKa3aH TaKxE B rapaHTnHOM TaIOHe;
SERVICE 000000000000

BaW noJIbI aIpeSc;
BaH HOMep TelefoHa.
Pn Heo6xOdmocTn peMOHTa o6pa7aITeCb B aBTOpN3OBaHHbI cepBnCHbI ueHtp (3TO nOcnyKNT rapaHTne NcNoJIb3OBaHnOpINHaJIbHbIX 3aNaChbIX Yacte N IpaBUNbHOCTN BblONHeHnpeMOHTa).
Ta6nna
WHIRLPOOL EMEA S.P.A.
VIA CARLO PISACANE N.1,
BUPJITUJ EMEA C.IA.
BNA KAPJIO NIN3AKAHE 1
20016 IEP0 (MUNAH) ITAJIN
ДЛЯ POCCUNI N CTPAH TAMOXEHHOFO COIO3A:
IMNOPTEP TOnbKO DnIPOccmckoro pbHka
YIJIHOMOUEHHbI IPECTABNTIELb
ДЯ Дугнх CTpaH:
OOO «BИРЛПУЛ РС»
C Bopocamn (B Pocnn) obaaTaTbcn no aDpecy
Poccn, 127018, MockBa,
yI. IbInueB, dom 12, Kopn. 1
BblMOKeTeHaHTN KOHTaKTHyIO INHOpMaunIO B rapaHTnHOM
DOKyMeHTe.
CDEJIAHOBKUTAE
RU
WAARSCHUWINGEN M.B.T. ELEKTRICITEIT
Sound On/Off (Ljud På/Av)
RENGJØRING OG VEDLIKEHOLD
KASTING AV HUSHOLDNINGSAPPPARATER
KJØLESKAPETS SIKKERHET
HYLLER, BOKSER OG SKUFFER
X Sitrusbaserte sauser
X Tomatjuice
X Sitrusbaserteprodukter
X Marinarasaus
A. Tampa do fusivel
B. Fusivel

A. Dobradiça central
Te3n dymn O3HaayabaT:
ONACHOCT
ПРЕДУПЕЖДЕНЕ
Mоже дбыдeteу bintи nii cepno3ho hapaehn, ako He cna3nteBeDHara cneHnTe INHCTpyKcun.
Mоже дбьдete yбитп пи серноЗн Наразен, akо He cna3nte nHctpyKunTe.
Bcunckn cboeHnna 3a 6e3oNaCHOC Tne BN NocOuat, KaKBa e noteHuaHaTaONaCHOCT, KaK Da HamaIIne BepoTHOCTTa 3a HapAraBaHe n KaBO MoKe Da Ce Cnyu, Ako He Ce Cna3Bat INHCTpyKUnITE 3a 6e3oNaCHOCT.
ПРЕДУПЕЖДЕНЕ
Onachoct ot 3aDywaBaHe
MaxheTe BpaTte Ha cTapnBn xlaaJlnHK.
Hecna3BaHTo Ha TOBa n3nCKBaHe MoKe Ja doBoeJe Do Cmpt Nnn yBpeXdaHe Ha M03bKa.
BAxHO: 3aKJeuBaHTo n 3aDyUbaHTo Ha Deua He ca npo6JIeMn CBbP3aHn C MmHaIOnTO. BpaKyBaHn IJIn I3OCTaBeHn XJaIINHnIcBce OUsne PpeCDTaBnBaT OAnCHOCt - DOpN, Ako Te 6bJat OCTaBeHn "CAM0 3a HrKoNk Odn". Ako BV3hAmepRbATE da ce OCBo6Ondte Ot Baunr CTap XJaDiuHnK, MoJr, CNeDbAit Te3n INHCTpyKUnn, KOINT OSe Bu NOMOrHaT Da n36BerHeTe INUdENTn.
ANPEDAUYIPKDEHNE
OnachocT OIpeKomepho TerIIO.
I3noJI3BaIte DbAma IINIOBuee dyuN 3a npemeCTBaHe IMOHTnpaHe Ha XlaIaIIHnka.
Hecna3BaHeTo Ha TOBa n3nCKBaHe MoKe Da IOBeDe Do HapaHaBaHe Ha rbp6a uIN dpyro HapaHaBaHe.
Изwickваня за раимолаганe
APPEДУПЕЖDEHINE

OnachoctOTB3pMB
Дрькту ВьзламеонмITE MaTeРиали И napи, KaTo HanpIMep 6eH3nH, Дaley OTO XlaDInHnKa.
Hecna3BaHeTo Ha TOBa yKa3aHne MoKe da DoBeJe do cMbpt, B3pNB nIIN noKap.
ПРЕДУПЕЖДЕНЕ

Onachoct OT TOKOB yap
BkJIIOUeTe B 3a3eMeH n3BOd.
Ha He ce cBajra pa3KJIOHeHneTo 3a 3a3emBaHe.
Aa He ce n3noJ3Ba aanTep.
Aa He Ce n3nOJI3Ba yIbJIxNITeJIeH UHyp.
Hecna3BaHeTo Ha Te3n INHCTpyKcIMMOKe Da IOBeDe do CmbpT, NOxap NII TOKOB ydp.
BAKHO: INHCTaJIpaHETo I eJekTpIueCKOTo CBbp3BaHe Tp6Ba Da CE n3BbPmO NT KBaJIncuPAH TexHnK, CbIaCHO IHCTpyKcUNTe Ha IPOUN3BOIDTEJI N B CbOTBeTCTBnE C MeCTHInTe pa3npoe6n 3a 6e30NaCHOCT.
XnaHnHkBt e npEHa3HaueH da pa6oTu Ha otDeHa eNeKtpuYecka Bepira 220-240 BoTta, 10 A, 50/60 Hz.
YBepeTe ce,Ye NocOeyHOTo HAnpExeHne Ha TabeJIkaTa C HOMHaJIHnTE DaHHN,OTROBa HA TOBa BbB BaWeTO XJInIe.
Tp6Ba Da 6bIe Bb3MOxH Oa I3KJIIOHTe ypeDa OT eJekTpO3axpaHbAHeto KaTO I3BaIInTe UeIcena OT KOHTaKTa IIN IOCpeIDCTBOM IJaBeH DByNIOIOCEH PpeKbCBaU, MOHTupaH CneI KOHTaKTa.
Ako 3axpaHbauT Ka6eI e NobpeDen, TOn Tpr6Ba Da 6bDe 3aMeHeN OT Ipon3BODInTeJI, HeTOB CepBn3eH TEXHk NIIJ LInca C PNO6Ha KBaJIINΦnKaUIN, 3a Da ce N36eHrHE BCraKaKBA OnaCHOCT.
IpeNi Da npemecnte Baunr XnaDnHnK Ha HcROBTo OKOHaTeJIHO MRCTo e BaxKHO da Ce yBepNTe,Ye en3BbPseHo IpaBnJHO eNEKtpnuecko CBbp3BaHe:
PpenopbuaH MeToD Ha 3a3eMaBaHe
ИзнckBa ce 3a3eMeHo eJekTpnuecko 3axpaHbaHe oT 220-240 Bonta 50 Hz, 220 Bonta 60 Hz, nii 230/240 Bonta 50 Hz AC calo 10 A c npednaznten.


TnB
TnE nF

Tun I
Tun M
Tun G
3a ABCTpaIIy HOba 3eJaHnIy:
BaunrHOByepEeCNEUAnHO npOn3BeDenHa OTROBapHa BCnUKNCTaHdApTn UcNoBnB ABCTpAInn.
HЯкон HOTaиь ИНСТPyкипTe 3a ИНСТалпаHe MOraT da ce OTHacrTdoИЗСКВанЯТа 3a CBbp3BaHe KbM eJekTpnueckaTa МрекаВДуги CтpaHи,Тaka Ye npBnUчame BaWeTo ocObeHo BHNMaHne KbM Te3N CpeuФuHn 6eJIeKKn.
Bawnayr ypei Tpr6Ba Da 6bIe BkIIOueH B 3a3EmeH KOHTaKT 230/240 BoNTa 50 Hz AC caMo 10 A.
EneKtpnueckn n3nCKBaHnna (cAmo 3a BeInko6pTuHnna nIrpnaHnna)
BAXHO: XlaanHbT TpaBa da 6bDe 3a3emeh.
CmHa Ha npednataTeI
Ako mpexobnT npoBOnHK Ha T03n XnaDnHnK e Cna6DeH c c npedpa3nteJ BS1363A, 13 A, 3a da cmehnte npedpa3nteJ npu T03n TnT n ceJ, n3noJ3BaIte Odo6peh npedpa3nteA.S.T.A. 3a TnB 1362 n ppoeDnpaIte KaKTo cJeDbA:
- CbaIeTe kanaUkata Ha npEpa3nteTnA (A) n npEpa3nteTnB).
- ПoctabeTe HOBnI npeIpa3nte1 13 A B KanaKkata Ha npeIpa3nteJIa.
- MoNTipaIte OTHOBO I npEJa3nTeJI N HerOBaTa KanaUka B uENCeJIa.
BAXHO: Kaanukkata Ha npedna3nte Ta Tpr6Ba Da 6bde NoctabeHa OTHOB, KORATO CE CMEHn PpeNa3nte. Ako e 3ary6eHa Kaanukkata Ha npedna3nte, UencelbT He Tpr6Ba Da ce N3NOJ3Ba, DOKATO He CE NOCTaBn PpaBnHaTa HOBa KaanuKa. IpaBnHATA pe3epBHa Yact Ce ONpeDenr OT CBeta HA BINOxKata INIOT CBeTA QAMNobAH C dymn B OCHOBaTa Ha uencela. Pe3epBn Yactn KaTO Kaanukn 3a npedna3nte MoKe Da HamePte B MeCTHn MaRa3NH 3a eNeKTPOUCATr.
A. Kanayka Na npedna3ntel
B. Праздаител
Camo 3a Peny6nka IpnaHnla:
HhOpMaIyTa,daHeHa 3a BeJInKo6pTuHaHn, B nobYeTo cIyuae n npJIOxIma, HO ce n3NoJ3Ba n TpeTn TnnpEcnEn I KOHTaKT,2-uzpTOB,CbC CTpaHnUHO 3a3EmBaHe.
KoHTaKT/UeIeCEJI (BaIIuHIO 3a IBeTe IbPkaBn):
Ako nocTaBeHnT uenCeI He e noXoJa3a Baun KOnTaKT, ce CbPjKeTe c OTdeLa 3a CneInpOdaJbeHo 06cnyKbaHe, 3a DonbHnTeJIHn INCTpyKuH. He Ce ONITBaIte Da CmeHrTe uenCeIa Camn. Ta3n npOeDypa Tpr6Ba Da ce N3BbPUn OT KBaINΦnUpaH eJeKTPoTexHnK, B CbOTBeTCTBnE C INHTpyKuNTe Ha npON3BOIDnteJI N TeKyuIte pa3nopeIbN 3a 6e3OnacHOCT.
ПРЕДУПЕЖДЕНЕ

Onachoct OT TOKOB ydap
Изклочьм Te 3axpaHbaHeto OT KOHTaKta Ппедида МахаTe BpATnTe.
He cna3BaHeTo Ha ToBa yKa3aHne MoKe Da DoBeJe Do Cmpt Nnn TOKOB yap.
ПРЕДУПPEЖДЕНЕ

Onachoct OT TOKOB yap
BkIIOUeTe B 3a3eMeH n3BOd.
a He ce cBaIpa3KIOHeHneTo 3a 3a3EmBaHe.
Aa He ce n3noJ3Ba aanTep.
Ha He Ce n3IOJ3Ba yIbJIxNITeJIeH uHyp.
Hecna3BaHeTo Ha Te3n INHCTpyKcnn MoKe da DOBeDe do CmbpT, NOxap NII TOKOB ydap.
- BkIIOUeTe B 3a3eMeH KOHTaKT.
- IocTabete O6paTHO BbB ppi3epa BCnUKN CBAJIeH N cactn, a xpaHaTa BueKMeJxKeTata.
TbpBNCTbNKN
CINCSbK 3A N3BbPbBAHE HA IPOBEPKA HA INHCTAJINPAHETO
EneKtpo3axpaHbaHe
BknHouTe XnaDnHnKa B 3a3eMeH KOHTaKT.
BpaTnUKN
Ako e Heo6xoDIMO da ce CbaIaT BpaTuKInTe NO BpeMe Ha IHCTaJInpaHe, BIXTe 3a cnpaBka pa3JeJIte "CbaJIne HIOCTaBAHHe Ha BpaTIte Ha XlaIaIIHnKa" N "CbAJIHe HIOCTaBAHHe Ha BpaTIte Ha @pI3epa".
Bpatnte ca ynnbTHeHn 34JIO.
XnaHnKbTe HNBenpaH. PerynpaTe HNBenpaunTe Kpaka, Taka Ye Te Da ca npinepHaJI NblTHO Ha nOda.
BpaTnTe ca n3paBHeHn OT kpaJ Do KpaJ OTKbM roPHaTa cTpaHa. (Ako e Heo6xoDmO, n3NoJ3BaJTe xapaKTeprnCTnKaTa 3a noOpBaHNBaHe Ha BpaTaTa).
Pa3onaKobaHe ha xJaDiNlHnka
DocTabka Ha XnaJnHnKa
ИзickBa ce Mниммално OTbapЯHe ha BpaTata O T 838 mm (33"). Ako OTbapaHTo Ha BpaTata e 914 mm (36") Ии no-MaNKo,В TaKbB CnyaH e Heo6xOДmO da CBaIeTe BpaTata, YeKMeJxKeTo nшарнрпte.
TpaHcnpOpTupaIe XJaIaIIHnIka OTKbM CTpaHaTa 3a BCNuKIn OTBOpN Ha BpaNTe.
Korato npemecTBate BaunrXlaaJlnk:
Baunay xlaaninke TeKbk. KOrato npemectbate Xlaaninka 3a nouchte HnI O6cnykBaHe, nokpnite PoJa C TBbpK KapToH nIi TaJawnt, 3a da ce n36erHe Nobpejdahe Ha nOda. BnHaRn DbprnaiTe Xlaaninka n3npabEn, KOrato ro npemecTBate. He Bbptete nn "He 6ytaTte" Xlaaninka, KOrato Ce ONITBaTe da ro MeCTnte, Tb' KaTO TOBa MOKe da nobpedi nOda.
CbaIaHHe Ha onaKOBkata
Ipei Da BkHouHTe XJaAnNHka,OTcPaHete OCTaTbUITE OT JeHenKn I JeNIO OT NOBbpxHOCTte.C NOMOuTa Ha npbCTnte Bn, BTPNIte MaJIKO KOJInueCTBO TeeH DeTepeHT 3a MHeHa CbIOBE B CInENBaUTo BEUeCTBO.136bpweC TOIIa BOda N IOdCyUeTe.
Ja He Ce n3noJ3BaT OCTPN INHCTpyMeHTN, aIKOXON 3a TprneHe, 3aapanIMn TeuHOCTN IIN a6pa3NBHN IOHNCTBauN CpeIcTBA 3a OTCTpaHraBaHe Ha JIeNEHKN IIN IeINIO. Te3n npOdyKTn MOrat Da NOBpeJAT NOBbpxHocTtHa Baunx XnaDInNHK.
I3XbPneTe/peuKnnpaTe BCnUKN OnaKOBbHm MaTepnaJI.
CbaJIaHe I NOCTaBHe Ha MЯCTO Ha BpaTte Ha XJaIINHnka
BELEXKA:Измеретешипату ha OTварян ha BaшаТа ВраТа,за Да вдnte Дали e Heo6xOДIMо Илн He,да CBaJIte BpaTITe Ha xlaДINHnka,за Да псемecтnte xlaДINHnka BbB BaSeToЖиЛиш.Ако e Heo6xOДIMо DA CBaJIte BpaTAta,BnKTe 3a CnpaBka CJeДHnTE INHCTpyKUIN.
BAXH0: Ako xnaaunnKbTe 6nil moHTnpaH no-mpeNi e Heo6xOIMo da ro n3HeceTe OT XnIuTe, n3KJIouTe ycTpoiCTBaTa 3a ynpabLeHne Ha xnaaunnKa, npdeN da CBAInTe BpaTte. N3BaJeTe qencela O T KOHTaKta nn N3KJIouTe 3axpaHbaHeTO. N3BaJeTe xpaHata n CbaInTe peryInpyeMaTa Bpata nn KocnKte OT BpaTte.
Cb6epTe Heo6xoDmnte HnctpymeHTn n npouTeTe BCnKn HnCTpyKcnn, npEa da CbaNTe BpaTne.
HEO6XODIMN IHCTPYMEHTN: 6 mm rnyx raehen KJIou, 5 mm rnyx raehen KJIou #2 OTBepkaФилinc.
ПРЕДУПЕЖДЕНЕ
OnachoctOT TokOB yap
Pa3kaueTe 3axpaHbaHeTo, npei cBaIaHETo Ha BpaNTte.
He cna3baheTo Ha TOBa yka3aHne MOKe da IOBepe Do CMBpT NII TOKOB yap.

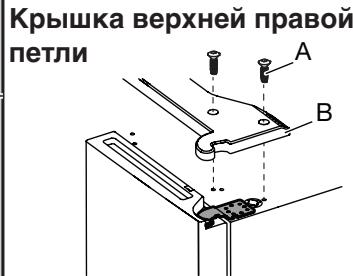
Kanaucha Ha ropeh JIbW shapHnp
A. BinhToBe Ha KaNaUka Ha rOpEn ⅢapHnP
B. Kanayka ha ropeh shapnip
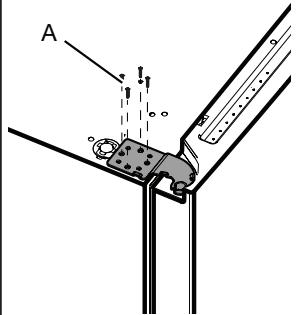
TopeHJIAB WapHnP
A.5mm BnHTObec 贝CTOBgBlnHO THe3do
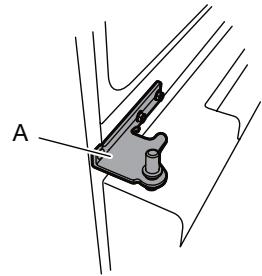
CpeenJIaBwaHnp
A.単napnip
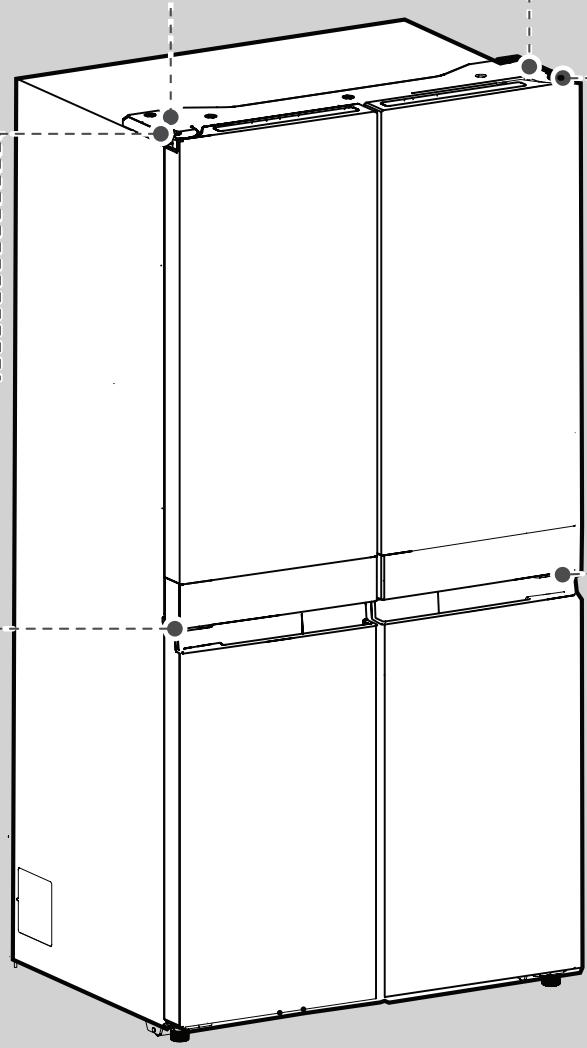
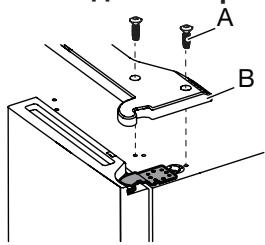
Kanayka Ha decen shapnip
A. BnHTObe Ha KaNaUka Ha ropeH shapHnp
B. Kanayka ha ropen shapnip
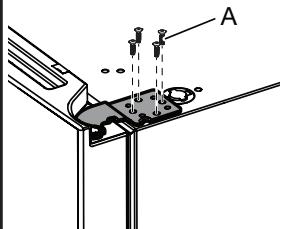
TopeH Decen WapHnp
A.5mm BnHTObec 贝CTOBgBlnHO THe3do

Cpehen Decen shapnnp
A.単napHp
CbaIaHHe Ha IaChHaTa BpaTa
1.ИЗвадеTe ΜενCEILA OT KOHTaKТа ИЛИ N3КЛЮЧЕТe 3axpaHbAHeTO.
2. Пдьржай Te BpaTITE Ha XlaДиннka 3aTbOpeHn, ДOKaTO cTaHete rOTOBu Да Гп NOBdInrHete CBO6OdHo OT KOpnyCa Ha XlaДиннka.
БЕЛЕЖKA:Осигуретe Дольнтелha onopa 3a BpaNTte Ha xlaДИNHka,ДOKaTO CBAJTe shapHnPnte. He pa3uNTaTe,Че МагнITte Ha yIJIbTHHeHЯТа HbPaTne MoRat Da 3aДьржATВpaTaTaHa MAnCTO,ДOKaTO pa6OTne.
- KaTo n3NoI3BaTe OTBepKa ΦnJIInc, CBAJIeTe KanaUkaTa oT roPnIa WapHnp.
- KaTo n3No3BaTe 5 mm rnyx raeueh KJIouc, cBaJeTe YeTnpuTE BnHTa OT rOpHnI uapHnp I rI noCTaBeTe HaCTpaHn.

A. BnHT ha kanaqka Ha ropeH shapHnp
C. 5 mm BnHTObe C WecTObIbIHO rHe3do
B. KaanuKa Ha ropeH shapnip
D. Töpen shapnip
- Повдигнелу враза на Хладинда сепдшарни. Горнишарни ще Излессь враза.
CbaJIaHe Ha JIABaTa Bpata
BAxH0: Oka6eIbAHeTo 3a UI npemHaBa npes3 wapnpa Ha IaBtA BpTa, Taka Ye Tpr6Ba Da ro pa3KaunTe npen Da CBaJIte BpTaTata.
- KaTo n3PON3BaTe OTBepKa ΦnJIInc, CBaJIeTe KanaUkaTa oT roPHnIaHnIp.
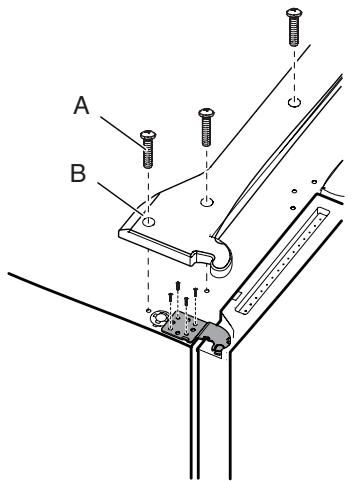
A. BnHT ha kaanayka Ha ropeh shapnip
B. Kanayka ha ropen shapnip
- Pa3kayeTe Dbata eJektpnueckn uencena, KOIO Ca pa3noJIOXeH N B rOpHaTa YacT Ha shapHnpa Hb BpaTaTa.
XbaHeTe BcKa cTpaHa Ha eJeKtpnuecknte uenceHn. HatncheTe C Baun JnB naneu, 3a da ocbo6oJnte 3actonopraBaIoo yCTpoiCtBO u n3BaJeTe hactnte Ha ounenCeJIte HacTpana.
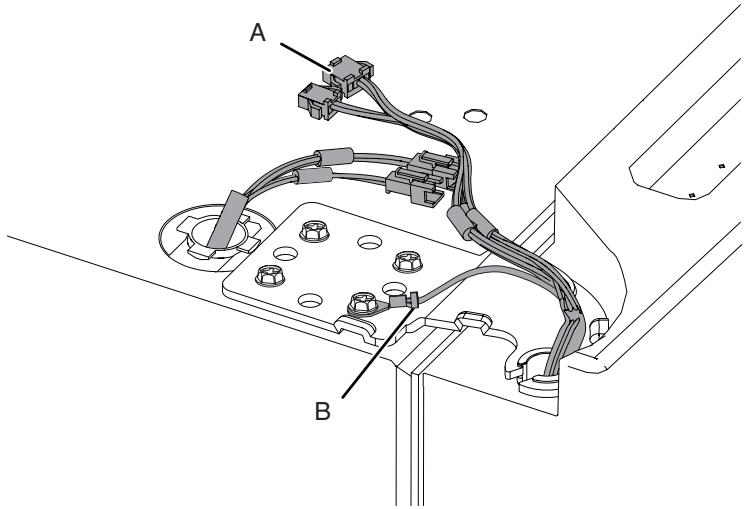
A.Еnéктуческицения
B. KoHeKTop 3a 3a3eMBAHe
- KaTo n3nOJ3BaTe 5 mm rIyX raeueH KJIou, CBAJeTe YeTnpTE BbTpEshn BInTa OT rOpHnJ WapHnP IN NoCTaBeTe HAcTpaHa.
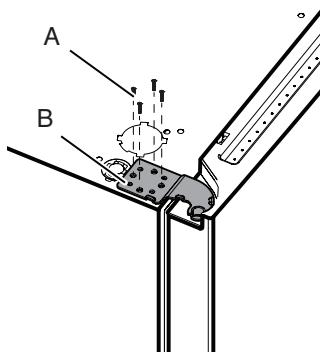
A. 5 mm BnHTObe C wecToBfBJHo rHe3do
B. Topen shapnip
БЕЛЕЖKA: Oсигуре ДОпьнтелна onopa 3a BpaTata
На Xладиннka, дOKATO CBалгte Шарнирпte. He pa3чNTaTe,
ЧЕ Магните Ha улътэнгета Ha BpaNTe MOrat ДЗаДьржат
ВраТаТа Ha мяСТо, дOKATO pa60NTe.
4. Повдигнелу Вратata Ha xlaДИЛNHиka OT uHΦTa Ha DoIHHa shapHnр. ГорнRT shapHnp ige n3ne3e c BpaTata.
БЕЛEXКА: Може да не сеонбхдимо да CBалгд ДОннite Шарни ри спрачнite крачета, за да пемecтITE xладинда празь BXODa.
Camo ako e Heo6xOДМо, n3noI3BaIte 6 mm rJyX rauehen KJIIOH n OTBepKa ΦnJIInc #2, 3a da CBaJInte cpeDnIg IapHnp.
IocTABaHE Ha MRCTo Ha DaChata BpaTa Ha XlaDnIHnKa
- Пoctabete Дясота Врета Вьрху спфта на срднишарнир.
-
BkapaIte uinΦTa Ha rOpHnI uapHnP B OTbopa B rOpHaTa YacT Ha BpaTaTa Ha XlaDInHnKa.
-
KaTo n3POnl3BaTe 5 mm rJyXn raeuHn KJIIOUObe, 3aTeHHeTe shapHnpa Ha Kopnyca Ha xJaIINHnka. He 3aTЯraTe BInHTOBeTe HAnbJIHO.
IocTabaHe Ha MaCTO Ha JIABaTa Bpata Ha XlaJINHnKa
- NocTaBeTe JIABaTa BpaTa Bbpyu ZnΦTa Ha cpeDnHaapHnp.
- KaTo n3nI3BaTe 5 mm rJyXn raeuHn KJIouObe, 3aTeHHeTe shapHnpa Ha Kopnyca Ha xJaDiuHnka. He 3aTraJte BInHTOBeTe HAnbJIHO.
- CbþkæTe OTHOBO eIeKtpnuecknte KaβeJIn.
HaTncheTe 3aeIHO DBeTe Yactn Ha eIeKtpueckn IeIeCen.
CbpxTe OTHOBO Ka6eJa 3a 3a3EmraHe KbM BuHTa Ha IapHnpa.
PocleHn CTbKn
- 3aterheTe HanbIHO OcEMTe 5 mm BnHTObe C wecToBbIHO rHe3do.
- NocTabaHHe Ha MAcTo Ha KaNaUcKIne Ha rOpHnIaHapHnIp.

MeCTOnOToXKeHne Ha BnHTa
KAPALIHTET HA CbXPAHEHNE (WQ9 B1LUK WQ70900SXX):
OTdeneHne 3a npcHa xpaHa 387 L
Key Lock (3aKJIIOUcBaHe Ha KJIaBnI)
3a daakTbupate cyHKunraTa 3a 3akNIOUbaHe,HaTncHe n 3aDpBxTe HaTNCaH 6yToHa 3a 3akNIOUbaHe 3a 3cekyHd.
3a da DeakTbupate 3aKJIIOUbaHeTo,HaTncHeu 3aIpbjTe HATnCHaT 6yToHa 3a 3aKJIIOUbaHe 3a 3ceKyni.
Функцята 3a 3akluyBaHe ue nHopnpa BCnKU B3aIMMOeIcTBnC KOHTPOJHnI NaHEI, DOKaTO NOTpe6ntJIrT He OTKJIIOU KOnTPOJHnI NaHEI. Ta3nФyHKZIe e npdHa3HaueHa 3a npedOTbpaTBAHe Ha HeBOLHa npOMHa Ha HAcTpoKNTe.
PékmuHa pa6oTa "Demo" (camo 3a WQ9 B1L, 6WM24NIHAS u WQ70900SXX)
To3n pekIM ce n3NON3Ba, KOraTO xlaAnIHnKbT ce Bn3yaN3npa Ha nncIeB MaRa3IN 3a npOJaX6n Ha Ipe6HO nJIn, aKO XeNaTe Da n3KNIOUHTe OXnaXJaHETo IN DeaAKTNbPaTe BCNUKn dpyrN fynKcNn (C n3KNIOUHHe Na BbTpEshOtoOCBETJIeHne).
PeximbT ha pa6ota "Demo" moKeJa ce n3non3Ba, KOraTo OTnBaTe Ha npOdbJnxIteJHa BaKaHua. BxKTe pa3deJ "BakAHuN IpnKu 3a npemecTbaHe", 3a n3BbPwBaHe Ha npabUNHIne CTbIKn 3a octABrHe Ha BaWnXnaDnHNk B TO3n peXIM Ha pa6ota 3a no-dblIn nepnoOn ot BpeMe.
Ako BkIIOUHTe peXIM Ha pa6Ota "Demo", Ha IINcPJIe ige CBETHe INKoHata "Demo".
Bn3aHTo n 3n3aHTo OT pexKm Ha pa6oTa "Demo" CTaba NocpeIcTBOM eHOBpeMeHHo HATNCKaHe n 3aJbPkaHe 3a 3 cekyHn Ha 3ByKOBn8 6yToHa 3a BKJIIOUvaHe nnn 3KJIIOUbaHe n 6yToHa 3a 3akJIIOUbaHe.
B cnyaui e 3aJeICTBaH IEmo peXmblT, n3BaJeTe BCnUkata xpaHa KaKTo OT XJaUNJIHnka, TaKa N OT fPn3epa n TbBKABnI fPn3ep, aKO nMa TaKbB.
DonbHnTeJIHHyHKcnn
Anapma 3a OTBoPeHa Bpata
Функиета 3a aJapma 3a OTbpeHa Bpata n3daBa aJapma, aИКонота “OTbpeHa Bpata" npemirBa , KOraTO KoTTo nJa e OTeHnPe BpaTnKn e OCTaBeHa OTbpeHa 3a 2 nJIn NOBeYe MmHyTu.
AnapMaTaIe Ce noBtApHa BceKn 5 MInHyTn.3a da ce H3KJIIOUH anapMaTa,3aTBopeTe BCNUKN BpaTuKN.
BEJIEXKA: 3a da 3arIyunite 3BykoBaTa aIapMa, DOKaTO BpaTnUknte ca OTbOpeHn, HAnpImep, KOraTo NOuNCTBaTe XlaDnIHnKa OTbTpE, DOKoCHete KOITOn Ida e 6yToH NaKHTPOJHnI paHeI. 3BykBT Ha aIapMaTa Iue Ce N3KJIIOuHi BpeMeHHo, Ho INKoHaTa "OTbOpeHa BpaTa" Iue Ce BN3YaIIN3npa BCE OSe Ha KOHTPOJHnI paHeI.
OcbetJIeHne Ha xJaIJIHnka
XnaHnHKbTe cHa6eHc BbTpewHO OCBetIeHne, KOeTO CBETBa BCEKN bT, KOraTO ce OTbApBbPaTaTa.
БЕЛЕЖKA: OCBETЛЕнeto E CBETOДЮДно И He E HeOBXODMO Da ce n3BbPwBa CMЯHa. Ako CBETOДIOДТ He CBETBa, KORAto Ce OTBOPn BpTaTata, ce obaTeTe B cepBn3HnI YeHTbp 3a CMЯHa Ha JAMnTaT.
OTbapЯHe 3aTbapЯHe Ha BpaTnUknte
3aTOpJIaHToHa cTpaHnUHnI NaHeI e HOpMaJIHo pIiNbBOHaJHTo BKNIOuBaHe Ha npOduKyTa. TempePaTypTa 1cnaDHe CneI dNkOJIKO Yaca.
Ha OTdeneHnra Ha cpn3epa mMa dBe BpaTnKn.
BpaTnKHTe MoTa Da ceOTbAPr IINI NOOTJeHNO, ININ 3aeJHO.
Ha JIABaTa BpaTnKHa HA xJaDnJIHnKa IMa wapHnPHo 3aKpeNeHO
BbB BEpTKaJIHo NOJIOKeHne yNJbTHHeHne.
Korato e OTBOpHa JIbBaTa BpaTnUka, IapHnIpHO 3aKpeneHOTO yIbTHHeHne Ce CbBa HABbTpe, TaKa Ye To He npeuN.
Korato n DBeTe BpaTnUKN ca 3aTbOpEH, uapHnPHo 3aKpeHEnOTo yNtBTHHeHne QOpMn pa aBTOMaTnUHO yNtBTHHeHne MExDy DBeTe BpaTn.
БЕLEЖKA: KoraTo 3aTbaprTe BpaTaTa, shapHnphoto ynlbTHehne Tpr6Ba da 6bJe B npaBnHNo nOJKeHne (nperehato habbTpE).B npotnbEn cnyaI, To ue ydApn dNCHata Bpata nnФNKcnpaun BaI.

A.単napирно 3aKpeNeHo ynIbTHeHne
IpeBknHcyBaTeJIaTbVpaTnUkTaHaOTJeHeHneTo Ha XJaAnNHka e pa3NoJoxKeH Ha rOpHaTa JRABa N DaCha KaNaUKa Ha shapHnpa.
3a φρπερα ΜιγΙΝι-ΤέΜηρερΑΤρηλΑΤΟΗ, ΠρεΒΚΙΝΥΒΑτΕΙΑν Ḁναβατηκατης Μιδύηλα Μιροχα.
IpeBkHouBaTeJrHa BpaTuKkaTa N3IOJ3Ba MaHHT 3a BB3PnEmaHe Ha OTbapAHeTO/3aTBapAHeTo Ha BpaTuKaTa.
YBepete ce,Ye B paMKnte Ha 7,62 cm OT KanaqkaTa Ha shapHnpa, HMa MaHnT IIN eNEKTPoHHN yCTpOICTBa (paIIOrObOpuTeI, Coolvox' etc.).

A. Kanayka Na shapnip
Jedorehepatop
3a npoI3BexJaHe HaJeI, HAnbJIHHeTe TaBaTa 3a JeI c YnCTa BOda n IocTabeTe pUHNrT JeIOReHepaTOP Ha rOpHna paT Ha cPn3epa. IVzakaiTe, DOkato ce fOpMnpa JeI n IOM KaTO JeIbT e rOTOB, 3aBbPtTe KOnyTeTa T NO NOCOKa Ha YacOBHnKOBaTa CTpeJka, 3a Da I3XBbPJIIne JIeDeHInTe Ky6uTe BAcbIa 3a JeI.
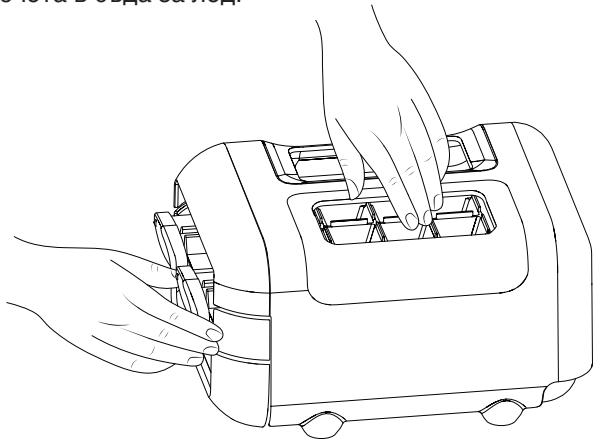
IIOBUNHHeTe IeKO CbJa 3a JeN uN3TerIe Te CbJa 3a JeN, 3a Da IMaTe DOCTbN DoJeNeHIne KynuTa.
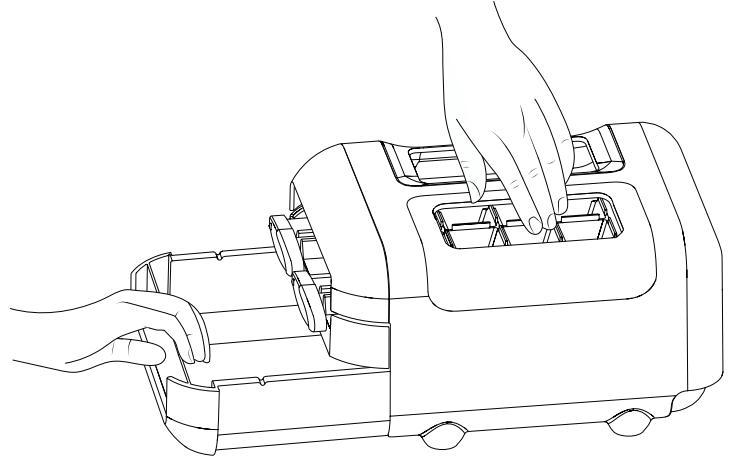
KOMnIeKtBt pByeH JeDoReHepaTop MoKe Da ce I3BaIi OT φpI3epa, KOraTO He e Heo6xOIM JeI, 3a Da ce HappaBn IO-ROJMO MAcTO BbB φpI3epa.
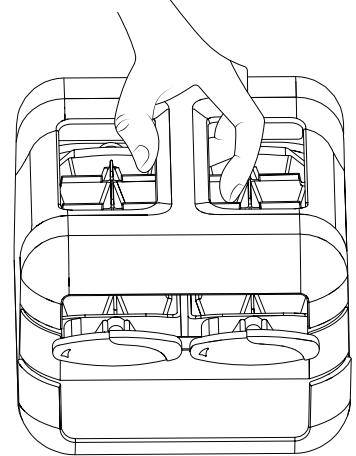
Paft Na pfn3epa (camo 3a WQ9 E1L n WQ9 B1L)
3a MaKcImn3npaHe Ha KaNaUInTeHa HcPn3epa, Bne MoKe Da CBAJIIne CpeHNOTo YekMeJxke, 3a OTKpINBaHe Ha paΦTa Ha φppn3epa. CneI TOBa, Bne MoKe Da cBxpaHIne rOpHTo YekMeJxke I Da NoCTaBnTE xpaHaT a HanpaBO Ha rOpHnRA paΦT.
CnpaBka 3a 3ByKObnte CnHaJI
3aahanhe hacnraH
He n03B0JIaBaIe Ha Te3n BeIecTb Da oCTaHaT Bbpxy IlaHca:
XTopuHa CocOBHe Ha oCHOBaTa Ha UHTpyCObn IIODoBe
XДомаTeH cOK XПpoДуКТи Ha OCHOBaTa Ha CHTpyCObN ПLOДОBE
XMapuHOBaHcoc
NoHcTbAHe OTBbTpE
1.ИЗвадеTe ΜεπCEILA OT KOHTaKTA ИЛИ N3КЛЮЧЕТe 3axpaHbAHeto.
2. CtapaTeJIHO n3MnIte Ha pbKa, n3PJIaKHeTe I NOcUWeTe HAnbJIHO CBaJIeMITE YAcTn I BbTpEWHITe NOBbPxHOCTN. 3nON3BaIte YIcTa r6Ba IJIN MEka KbpNa I MeK MmJIeH npenapat, pa3TBOpEH B TOnla BOda.
OnachoctOT TokOB yap
BkIIOUeTe B 3a3eMeH n3BOd.
aHe ce cBaIpa3KJIOHeHneTo 3a 3aEmBaHe.
Aa He ce n3nOJ3Ba aanTep.
Aa He Ce n3noJ3Ba yIbJXnTeJeH uHyp.
Hecna3BaHeTo Ha Te3n INHCTpyKcnn MOKe da IOBeDe do CmbpT, NOxkap NII TOKOB ydap.
| Ако пгеврипe | Вьзможни почни | Решения |
| Равota на xладилика | ||
| Xладилике в не равOTи. | Проберete сеюстрахданeto. | Вкlioочete зхранвашият кабел в 3aЗеменя kohtakт. |
| Да не се излолзва удължителен кабел. | ||
| Уberete се, чь в kohtakta за ток. Вкlioочete лamпа в kohtakta, за видпente далу то равOTи. | ||
| Нулрайte излоувшият пекьсвач. Сmedete BCЯкви nзrogenу п体现在л. БЕLEЖKA: Ако поблесma повьлжава за сьшестува, сьържete се сеюсторхим. | ||
| Проберete устейоствата 3a управлице. | Уberete се, чь устейоствата 3a управлиенье са Вкlioочeni. Вixтete 3a срравka paздел "Излолзваны на устейоствата 3a управлиенье". | |
| Ново мontиранe. | За пьлно охлajдаме на xладилика, ичakайte 24 ча с Vide не говOTO мontиранe. БЕLEЖKA: Perugларениу на temпераурнite рeredулатори на на-стунота настroyka, нама ду охлади по-бързо Нто сдно OTдение на xладилика. | |
| Perugлатор на xладилике в в ржим "Demo" (при有很大йся мodyел). | Ако xладилике в в ржим "Demo", охлajданeto e Излолочену и "Demo" сеьде осветен на kohtролня палел. 3a пооче Иndформац,在 fixte за срравka paздел "Излолзваны и устейоствата 3a управлиенье". | |
OTKPNBAHE N OTCTPAHЯBAHE HA HEN3ПРABHOCTN
IpbBO OnntaTe npednoxKeHnte Tuk peSeHHa, 3a da n36eHHe eBentyaJIHO TepeOHNo oaxJaHe 3a o6cnyKBaHe.
| Ако п repлитe | Възможни почими | Решения |
| Изгелжда, чь моторыт рабOTипразалноMHOTO. | Вьсокоedgeфektiven komпесори вентлиатори. | Послеми, по-ефektвенихладини рабOTЯ по-дьлго на по-ниски, сөргийнө оевektвениоборOTи. |
| Съйнatable Tempepatура улі вьншата Tempepatура у bс��ка. | Hормално e xладилньт да рабOTи по-дьлго р pris тети ус��ови. 3a олtmална розьдогл endocst, поставete xладилнika на зakрITO, в creda с контrolлара Tempepatура. Вьхte 3a срравka радел "Изickbaаня за мостOTО на мontrelане на xладилнika". | |
| Небтувна в xладилнika e сlogenдануюламо колочectвToTлma xрана. | При сclarаге на тонлхаха, xладилньт се рабOTи no-дьлго, дokato Вьздуныт се oxлади до желанata Tempepatура. | |
| Вразата(ITE) ce OTваря(T) Тьрдец cheсто улл за Тьрдддддддддддддддддддддддддддддддддддддддддддддддддддддддддддддддддддддддддддддддддддддддддддддддддддд徳. | Korato в xладилнika e вляль тонль Вьздунх, тол рабOTи no-nobechе. OTваряп'te вратITE no-praДК. | |
| Вразата на xладилнika улл чекmedжто на чрзера e otворега(o). | Уberете, чхладилньт e 히ьелран. Вьхte 3a срравka радел "Ньvelларе на xладилнika и 3atваряп на врата". Paiznoложete xpanahа и сьdoberte схара, тaka чу.de на БлоркатВрата. | |
| PerugalatorbТ на xладилнika e настroduн на Тьрдддддддддддддддддддддддддддддддддддддддддддддддддддддддддддддддддддддддддддддддддддддддддддддддд徳. Tempepatура. | Настое рeredулatable на по-mалко StTydeHa nactroрka, дokato TempepatуypataВ xладилнika STaHe KaTO Ta3iЖеланata. | |
| Уллбтуненeto на врата улл чекmedжто e мрсchio, ИЗхабero uлл habуkanho. | Почистете улл смение уллтэнneto. НалчNETO на Тechove пresZ уллтэнneto на врата, се п徴изыт NO-дьлга рбotingа на xладилнika, за дa се подьржатжеланite Tempepatурri. | |
| Освettingенeto He grabOTи. | Вашатхладилнik e сныбдан сьс сvetodinoно (LED) ocsetление и He e Heobxodimo Da ca es n3bBypmba smяна. | Ако щeled耗зхарbanetо на xладилнika Ne e n3klnqueho n ocsetление He cBeTN, kORATO BpATAru TEL quETAru TEL quETAru TEL quETAru TEL quETAru TEL quETAru TEL quETAru TEL quETAru TEL quETAru TEL quETAru TEL quETAru TEL quETAru TEL quETAru TEL quETAru TEL quETAru TEL quETAru TEL quETAru TEL quETAru TELQUBAme nii NOMOUI. |
| Вразата e bila otворега Nobeeч ot 10 minnytNi. | За дa вьзстановite OCsetлэнneto, 3aВратITE n Chekmedжто e OTворега(O), оБадete сe, за дa полuyнite StBOTBETHOTO obcIyKBaHe nii NOMOUI. | |
| Празвлочьагелт на врата He b3trpniemera OTворянeto HaВрата. | Уberете сe, чу Нм МагнIT улл се КALANKATn U SH 62 cm (3") ot KanaChkata Na shapHRIPA. | |
| Temperapatурнaitr pereylatop UI He se Вьлочьа. | Temperapatурнaitr pereylatop UI He se 3aJaeCTBa. | Натисные koTи и дe 6byToH na UI, за дa 3aJaeCTBaTe Temperapatурнaitr pereylatop UI. |
| БутонITE на Tempepatурнia replanatop UI He pabotraydoople. | Оптайе сцankLINCHO zaxpaRanBaHe na xладилнika, за дa hyлрate 6byToHnte. Ако пбоблма рpondы КAZaba Да СьшecTByBa, obaadete сe, за дa полuyнite StOTBETHOTO obcIyKBaHe nii NOMOUI. | |
| Temperapatурнaitr pereylatop UI He se 3aXapranBa. | П探测ete kabelenite в shapHRIPA na BpATAta. | |
| He moşkete da n3Bvprilne terpylmpahe na hacltrojkaata na Temperapatyrnir prerylmpahe UI. | Вразата e OTbOpena i anapmata 3a OTKPexhata Brpata e akTINBipana. | Затворетe врата. |
OTKPNBAHE N OTCTPAHЯBAHE HA HEN3ПРABHOCTN
IpbOOnnataTe npednoxKeHnte Tuk peSeHHa, 3a da n36erHe TeBentyAalHO TepeOHNo 0axJaHe 3a O6cnyKbaHe.
POLICE, POSUDE I LADICE
Informacione koje je važno znati o staklenim policama iPoklopcima:
Staklene police iliPoklope ne cistite toplom vodom dok su hladni. Police iPoklopci mogli bi se slomiti ako se izloze naglim promjenama temperature ili udarcima, kao sto je sudaranje. Temperirano staklo projektirano je takdo se razbije u mnogo malih komadica velicine oblutaka. To je normalno. Staklene police iPoklopci su teški. Prilikom njihova vadenja koristite obje ruke kako ih ne bi ispustili.
Prilagodba visine police
Visina police移到jog mjejozn jnejzinog mesta od donje potpore prema gornoj potpor i obratno
X Sinep
X Tsitrusepohised kastmed
X Tomatimahl
X Tsitrusepohised tooted
X Marinara-kaste
Sisepindade puhastamine
KENTPO EeyINHPETHsH NEAATON 374
Piiv ano tn xphon tnC ouokcnc, diaaote autec TIC odnyie c aopaaiaac. DuIae TIC OE Kovtio 0nue yia eAiovTikn avapopa. O odnyie c autec kai n idia n ouokcun nepiIauabavouv onmuavtike c npoeidoinoeic oxetika me tv aoopaia, tic oioiec npene i va tnpeitee oe kaee npintwn. O kataoekuaotnc dev avalaamabei kaia euvyn yia bIaBcLoyw untnpnonc autwv twv odnyiw 0xaepaliaic, yia akatalanlAnxpnon tn C ouokcun ng ia eopaluevnpuohmiontwv xepiOtnpiow. Ta nolu mikpa naidia (0-3 etw) dev npenla va pnoiaouv tn ouokun. Ta miKpa naidia (3-8 etwv) dev npenla va nnoiaceuov tn ouokun, ektoc ev npouvtai diapkwc. Ta naidia nlikiac 8 etwv kai avw kai ta atoumaemuveocomegaatikec, aiOthnpiec n diavontikec ikavotntec n eElambdaeipiac kai yywoewu mnpouv va xpnoiopoiouv autnv tn ouokun movo eoov Bpiokovtau noeitnponn n exouv labetai ondyie c oxetikca me tn v aqaln xphon tnC ouokunc kai katavoouv touc oxetikouc kivduvouc. Ta naidia dev npenei va naiouv me tn ouokun. O kaapiaouc kai n ouvtnpnon xphotn dev npenei va npayatotoiouvtai ano paia xwpic eitnpnon.
ENITPENOMENXPHsH
A PPOsOXH: H ouokeu n dev npoopi zetai yia toupyia meow eWTEpiKnc ooukeun c evepyoioin onc, onwC xpvodiakOtnn, n exwpiotou ouotnaatoc aTouaakpuouevou eVxou.
Houkeun autn npoopiEeai yia oikiaekxpnon kai npoioiec eapuoyec onwc: oe koucivec npoownkooukataotnuv,ypaepiwv kai aalwwxwpwv epyaioac,oe aypoktnmuata, ano paletec oEvdoxxia, navoxia, navoxia tunou «bed and breakfast» kai aalouc xwpouc diaovnc. H oukeun autn dev npoopiEeai yia enayylambda tkiKxpnon.Mn xnpoiopoieite tn ouokun 0E TepikoXwpo.
H oukeun exei oxediostei yia leitoupyia
oe xwpo onou n 0epuokpaoia nepiabaalovtoc
kumaivetai evtoc tov npakatw eupouc tiuw,
avaloya me tnv klambdaikn katnyopia nou
avaypaqetai otnv nivakida texvikow stoiexiw.
H oukeun mnpei va un 5eitoupyi owta,
evn papaeevi yia myao xpviko diotma
oe 0epuokpaoia ektoc tov eupouc tiuw nou
kathetai.
Klμatikn katnyopia Θερμ. περβ. (°C)
X Ipoiovtra aon to KITpiKO eU
X Σαλτοα μαρινάρα
EomegakeipokcKaatapiooC
PROBLEMU NOVER'SANA 416
GARANTIJAS APKALPE 419
Police mraznicky (pouze u WQ9 E1L a WQ9 B1L)
6th 6. cut Fresh Lock in nadzor zamrznitve sense
Senzor 6. CUT Fresh Lock zagotavlja natančnost in skladnost nadzora temperature za dolgotrajno ohranjanje svežine hrane na kar se da naraven način. Ko je zaznana spremba temperature, senzor aktivira kompresor, ki hitro obnovi privotno temperaturo.
Senzor 6. CUT zamrznitve zmanjsuje nihanja temperature v zamrzovalniku zaradi inovativnegaSYSTEMa za uravnanje temperature. Ožganine zamrzovalnika so zmanjsane na ohranjanje kakovosti in barve hrane.
Nastavitev Flexi Freeze (samo p 6WM24NIHAS in WQ70900SXX)
Funkcija Flexi Freeze omogoca vnaprejsnjo nastavitev temperature oddelka Flexi freeze.
| Simbol | Funkcija | Temperatura |
| ※ | Tradiconalni zamrzovalnik | -18°C |
| ※ | Srednji zamrzovalnik | -12°C |
| ※ | Mehki zamrzovalnik | -7°C |
* Za vklop/izklop najhladnejse nastivite (-20^) pritsinite tipko nastivite temperature Flexi Freeze za 3 sekunde. Ko je nastavljena najhladnejsa nastivite, svetijo vse tri ikone.
Police in okvirji polic
Police v hladilniku so nastavljive takto, da ustrezajo vašim potrebam po hrambi.
6th 6th Sense Fresh Locky Freeze Control
Compartmento Fast Freeze
Scharnier Mitte links
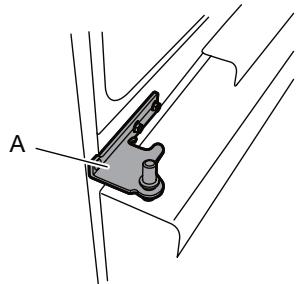
A. Scharnier

First try the solutions suggested here to possibly avoid a service call.
▲WARNUNG
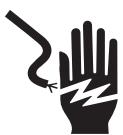
First try the solutions suggested here to possibly avoid a service call.
First try the solutions suggested here to possibly avoid a service call.
First try the solutions suggested here to possibly avoid a service call.
WARNING

Explosionsgefahr
XKAFEF, KAXEX U KXAXEN 549
Kompartimenti tal-Hažna tal-Freezer 550
Referenza tal-Awdjo. 550
Accessorji 550
KIF TIEHU HSIEB IL-FRIGG 551
Tindif. 551
Dwal .552
Kif Tiehu Hsiebha Meta Tmur fuq Vaganza jew Timxi
Xi Mkien lehor 552
INDIVIDWAZZJONI TA' SOLUZZJONI. 553
SERVIZZ TA'WARAL-BEJGH 556
ISTRUZZJONIJIET DWAR IS-SIGURTÀ
Qabel tuza l-apparat, aqra dawn I-istruzzjonijiet dwar is-sigurtà. Zommhom vicin biex tirreferi ghalihom fil-futur. Dawn I-istruzzjonijiet u l-apparat innifsu jipprovdu twissijiet importanti dwar is-sigurtà, li ghandom jigu osservati f'kull mument. Il-manifattur jiñad kwalunkwe responsabbiltà ghan-nuqqas ta' osservazzjoni ta' dawn I-istruzzjonijiet dwar is-sigurtà, ghal uzu mhux xieraq tal-apparat jew issettjar hazin talkkontrolli.
Tfal zghar hafna (0-3 sin) ghandom jinzammu 'I boghod mill-apparat. Tfal zghar (3-8 sin) ghandom jinzammu 'I boghod mill-apparat sakemm ma jkunux taht supervizjoni kontinwa. Tfal minn 8 sin 'il fuq u persuni b'kapacitajiet fizici, sensorji jew mentali mnaqqsa jew nuqqas ta' esperjenza u gharfien jistghu juaw dan l-apparat biss jekk ikunu taht supervizjoni jew jekk inghataw astruzzjonijiet dwar l-uzu sigur u jifhmu l-perikli involuti. It-tfal m'ghandhomx jilaghbu bl-apparat. lt-tindif ul-manutenzjoni mill-utent m'ghandhomxjitwettqu mit-tfal minghajr supervizjoni.
UZU PERMESSAGE
ATTENZJONI: L-apparat mhuwix intenzjonat biex jigi operat permezz ta' switching device esterna, bhal timer, jew systemd remote controlled separata.
Dan l-apparat huwa intenzjonat li jintuza f'unità domestika u applikazzjonijiet simil bihal: zoni talkkina ghall-istaff fil-hwienet, ufficciu ambjenti ta' xoghol ohra; farmhouses; minn kljenti f'lukandi, motels, bed & breakfast u ambjenti residenzjali ohra.
Dan l-apparat mhuwieux ghal uzu professionl. Tuzax l-apparat fuq barra.
L-apparat huwa mahsub biex jopera f'postijiet fejn it-temperatura ambjentali tkun fil-meded li gejjin, skont il-klassi klimatika li tinghata fuq il-pjanca tal-klassifikazzjoni (rating plate). Jista' jkun li l-apparat ma jaḥdimx sew jekk jinzamm f'temperatura li mhix fil-medda specifikata ghal hin twil.
Klassi Klimatika Amb. T. (°C)
SN: Minn 10 sa 32^ C ; N: Minn 16 sa 32^ C
ST: Minn 16 sa 38^ C ; T: Minn 16 sa 43^ C

Dan l-apparat ma fihx CFCs. Ic-cirkwit refrigeranti fih R600(HC). Apparati b'Isobutane (R600a): isobutane huwa gass naturali minghajr impatt ambjentali, imma jiehu n-nar.
TWISSIJA: Taghmilx hsara lill-pajpijiet tac-cirkwit refrigeranti tal-apparat.
TWISSIJA: Zomm il-ftuḥ tal-ventilazzjoni, fl-enclosure tal-apparat jew fl-istruttura integrata, hieles minn kwalunkwe ostruzzjoni.
IMPORTANT TOSSERVAHOM
LI TAQRAHOM
TWISSIJA: Tuzax jew tpoggix apparati talelettriku fil-kompartamenti tal-apparat jekk majkunux tat-tip awtorizzat b'mod espress mill-Manifattur.
TWISSIJA: Apparati li jaghmlu s-silg u/jew dispensers tal-ilma li mhumieux imqabbda direttament mal-provvista tal-ilma ghandhom jimtlew b'ilma tajbeb ghax-xorb biss.
TWISSIJA: Apparati li jaghmlu s-silg u/jew dispensers tal-ilma awtomatici ghandom jigu muqabbda ma' provvista ta' ilma tajbeb ghax-xorb biss, bil-pressjoni tal-ilma tal-mains tkun bejn 0.17 u 0.81 MPa (1.7 u 8.1 bar).
Tahžinx sustanzi splussivi go dan it-taghmir,
bhal aerosol cans bi propellant li jista' jiehu n-nar.
Tiblax il-kontenut (mhux tossiku) tal-pakketti tas-silg (ipprovdut ma' xi mudelli). Tikolx l-ice cubes jew l-ice lollies ezatt wara li tohroghom mill-freezer ghax jistghu jikkawzaw hsara lill-gismek minhabba kesha qawwija.
Ghal prodotti mahsuba biex juzaw filtru talarja go ghatu ta' fann accessibbli, il-filtru dejjem ghandu jkun fil-poizzjoni t-tajba meta l-frigg tkun ged tiffunzjona.
Tahzinx kontenituri tal-hgieg b'likwidi golkompartiment tal-freezer ghax jistghu jinkisru. Tostakolax il-fann (jekk hu inkluz) b'oggetti talikel. Wara li tpoggi l-ikel, iccekkja li l-bieba talkompartmenti tinghalaq kif suppost, spejalment il-bieba tal-freezer.
Gaskets bil-ḥsara jridu jinbidlu kemm jista'jkun malajr.
Uza l-kompartiment tal-ikel frisk biex tahtzen ikel frisk biss u l-kompartiment tal-freezer biss biex tahtzen ikel iffrizat, tiffriza ikel frisk u taghmel l-ice cubes.
Evita li taḥzen ikel mhux miki f'kuntatt dirett mal-ucuḥ interni tal-kompartimenti tal-ikel frisk jew tal-freezer. L-apparati jista' jkollhom kompartimenti specjali (Kompartiment tal-ikel Frisk, Kaxxa ta' Grad Žero, ečč.). Sakemm majkunx spećifikat mod ieḥor fil-ktejbeb tal-prodott spećifiku, dawn jistghu jitnehew minghajr bidla fil-prestazzjoni.

C-Pentane jintuza bhala blowing agent filfoam tal-insulazzjoni u huwa gass li jiehun-nar.
INSTALLAZZJONI
L-apparat irid jingarr u jigi installment minnzewg persuni jew aktar - riskju ta' korriment. Uza ingwanti protettivi biex tnehhi mill-ippakkjar utinstalla l-apparat - riskju ta'qtugh.
L-installazzjoni, inkluzi l-provvista tal-ilma (jekk hemm) u l-konnessjonijet tal-elettriku, u t-tiswijiet ghandom jitwettqu minn tekniku kkwalifikat. Issewwix jew tissostitwix I-ebda parti tal-apparat sakemm ma jkunx iddkjarat b'mod specifiku fil-manwal tal-utent. Zomm it-tfal 'il boghod mis-sit tal-installazzjoni. Wara li tnehhi mill-ippakkar l-apparat, zgura li ma saritlux hsara waqt it-trasport. F'ka' za problema, ikkuntattja lillagent jew lis-Servizz ta'Wara I-Bejgh li hu I-eqreb tieghek.
TINDIF U MANUTENZJONI
TWISSIJA: Kun cert li l-apparat hu mitfi u skonnettjat mill-provvista tal-elettriku qabel twettaq kwalunkwe operazzjoni ta'manutenzjoni; qatt tuza taghmir ta'tindif bil-fwar - riskju ta' xokk elettriku.
Tuzax materjali ta' tindif li joborxu jew horox bhal sprays tat-twieqi, scouring cleansers, fluwidi li jiehdun-nar,xama'tat-tindif,detergentik concentrati, bleaches jew cleansers li fihom prodotti talpetroleum fuq partijiet tal-plastik, inforri interjuri u tal-bibien jew gaskets. Tuzax srievet tal-karti, scouring pads, jew ghodod ta' tindif horox ohra.
RIMITAL-MATERJALITAL-IPPAKKJAR
Il-materjal tal-ippakkjar huwa 100% riciklabblu u hu mmarkat bis-simbolu tar-riciklagg.
Ghalhekk id-diversi partijiet tal-ippakkJar ghandom jintremew b'mod responsabblu f'konformita shiha mal-ligijiet tal-awtorità lokali li tirregola r-rimi tal-iskart.
RIMITA' APPARATI TAD-DAR
Dan l-apparat hu mmanifatturat b'materjali riciklabbli jew li jistghu jergghu jintuzaw. Armih skont kif jitolbu l-ligijiet lokali dwar ir-rimi taliskart. Ghal aktar informazzjoni dwar it-trattament, l-irkupru u r-riciklaagg ta' apparati elettrici tad-dar, ikkuntatta lill-awtorità lokali tieghek, lis-servizz ta' gbir tal-iskart domestiku jew lill-hanut fejn xtrajt l-apparat. Dan l-apparat hu mmarkat b'konformità mad-Direttiva Ewropea 2012/19/UE, Skart minn Taghmir Elettriku u Elettroniku (WEEE). Billi tizgura li dan il-proddott jintrema kif suppost, inte se tgin tipprevjeni konsegwenzi negattivi fuq I-ambjent u s-sahha tal-bniedem. Is-simbolu fuq il-proddott jew fuq id-dokumentazzjoni ta'mieghu jindika li m'handux jigi trattat bhala skart domestiku izda ghandu jittiehed f'centru ta' gbir xieraq ghar-riciklagg ta'taghmir elettriku u elettroniku.
PARIRI BIEX TIFFRANKA L-ENERGIGJA
Tuzax extension cord.
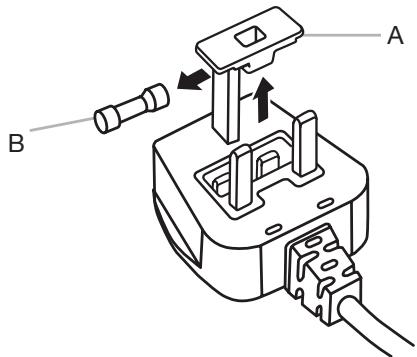
A. Ghatu tal-fuse
B. Fuse
Ghar-Repubblika tal-Irlanda (biss):
L-informazzjoni moghtija fir-rigward tar-Renju Unit hafna drabi tapplika, imma jintuza wkoll it-tielet tip ta' plug u socket, it-tip 2-pin, ert mal-genb.
Socket/Plug (validu ghaz-zewg pajjizi):
Jekk il-plug iprovduta ma tkunx taqbel mas-socket tieghek, jekk joghgbok ikkuntattja lis-Servizz ta' Wara I-Bejhgh ghal aktar istruzzjonijet. Jekk joghgbokx tipprovax tibdel il-plug int stess. Din il-procedura trid titwetta minn tekniku kwalifikat f'konformità mal-istruzzjonijet tal-manifattur u l-liigijiet dwar is-sigurtà standard attwali.
TWISSIJA

Tuzax extension cord.
CHECKLIST TAL-INSTALLLZZJONI
^+ Energija Elettrika
Ipluggja I-frigg f'socket ertjata.
Bibien
■ Jekk il-bibien ghandhom bzonn jitnehew waqt I-installazzjoni, ara t-taqsimiet "Nehhi u Ssostitwixxi I-Bibient tal-Friigg" u "Nehhi u Ssostitwixxi I-Bibien tal-Freezer".
Il-bibien jissigillaw kompletament.
Il-frigg tkun lixxa mal-art. Aggusta s-saqajn tal-livellar biex ikunu lixxi u ssikati mal-art.
Il-bibien huma f'livell catt fin-naha ta' fuq. (Uza l-karatteristika tal-allinjament tal-bibien jekk hemm bzonn).
Ohrog il-Frigg mill-Ippakkjar
Forniment tal-Frigg
Il-bieb irid ikun jinfetaḥ sa minimu ta' 838 mm (33"). Jekk il-fetha tal-bieb hi 914 mm (36") jew inqas, ikun hemm bzonn li jitnehew il-bibien, il-kexxun u c-cappetti.
Gorr il-frigg mill-genb ghal kull fetha ta'bieb.
Meta Čcāqlaq il-Frigg Tieghek:
Il-frigg hi tqila. Meta ccaqlaq il-frigg biex tnaddafha jew ghasservice, kun cert li tiksi l-art bil-kartun jew bil-hardboard biex tevita li taghmel hsara lill-art. Dejjem igbed il-frigg dritt 'il barra meta ccaqlaqha. M'ghandekx iccaqlaq il-frigg minnaha ghall-ohra meta tipprova ccaqlaqha, ghax tista tikkawza hsara lill-art.
Nehhi I-lppakkjar
Nehni t-tape ur-residwu tal-kolla mill-ucu h qabel tixghel ilfrigg. Oghrok ammont zghir ta' detergent likwidu tad-dixxijiet fuq l-adeziv bis-swaba' tieghek. Imsah b'ilma shun u nixxef.
Tuzax strumenti bil-ponta, rubbing alcohol, fluwidi li jiehdu n-nar, jew materjali ta' tindif li joborxu biex tnehi t-tape jew il-kolla. Dawn il-producti jistghu jaghmlu hsara lill-wicc tal-frigg tieghek.
■ Armi/irricikla l-materjali tal-ippakkjar kollha.
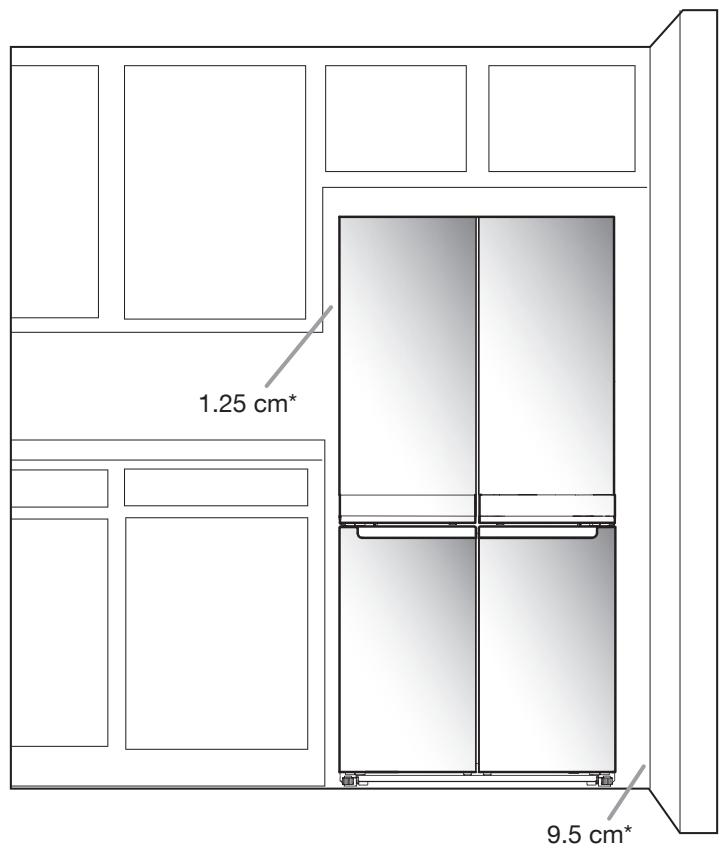
Nehhi u Ssotitwixxi I-Bibien tal-Frigg
NOTA: Kejel il-wisa' tal-bieb tieghek biex tara jekk hemmx bzonn tnehhi I-bibien tal-frigg biex iddaehal il-frigg f'darek. Jekk hemm bzonn li tnehhi I-bibien, ara I-istruzzjonijiet li gejin.
IMPORTANT: Jekk il-frigg giet installata fil-passat u qed tohrogha mid-dar, iffti I-kontroll tal-frigg qabel tibda tnehi I-bibien. Nehi I-plug tal-frigg jew skonnettja I-elettriku. Nehhi I-ikel u l-bieba aggustabbli jew il-kaxex b'uzu generali mill-bibien.
Igbor I-ghodod mehtiega u aqra I-istruzzjonijiet kollha qabel tnehhi I-bibien.
GHODOD NECCESSARJI: 6 mm socket wrench, 5 mm socket wrench u turnavit #2 Phillips

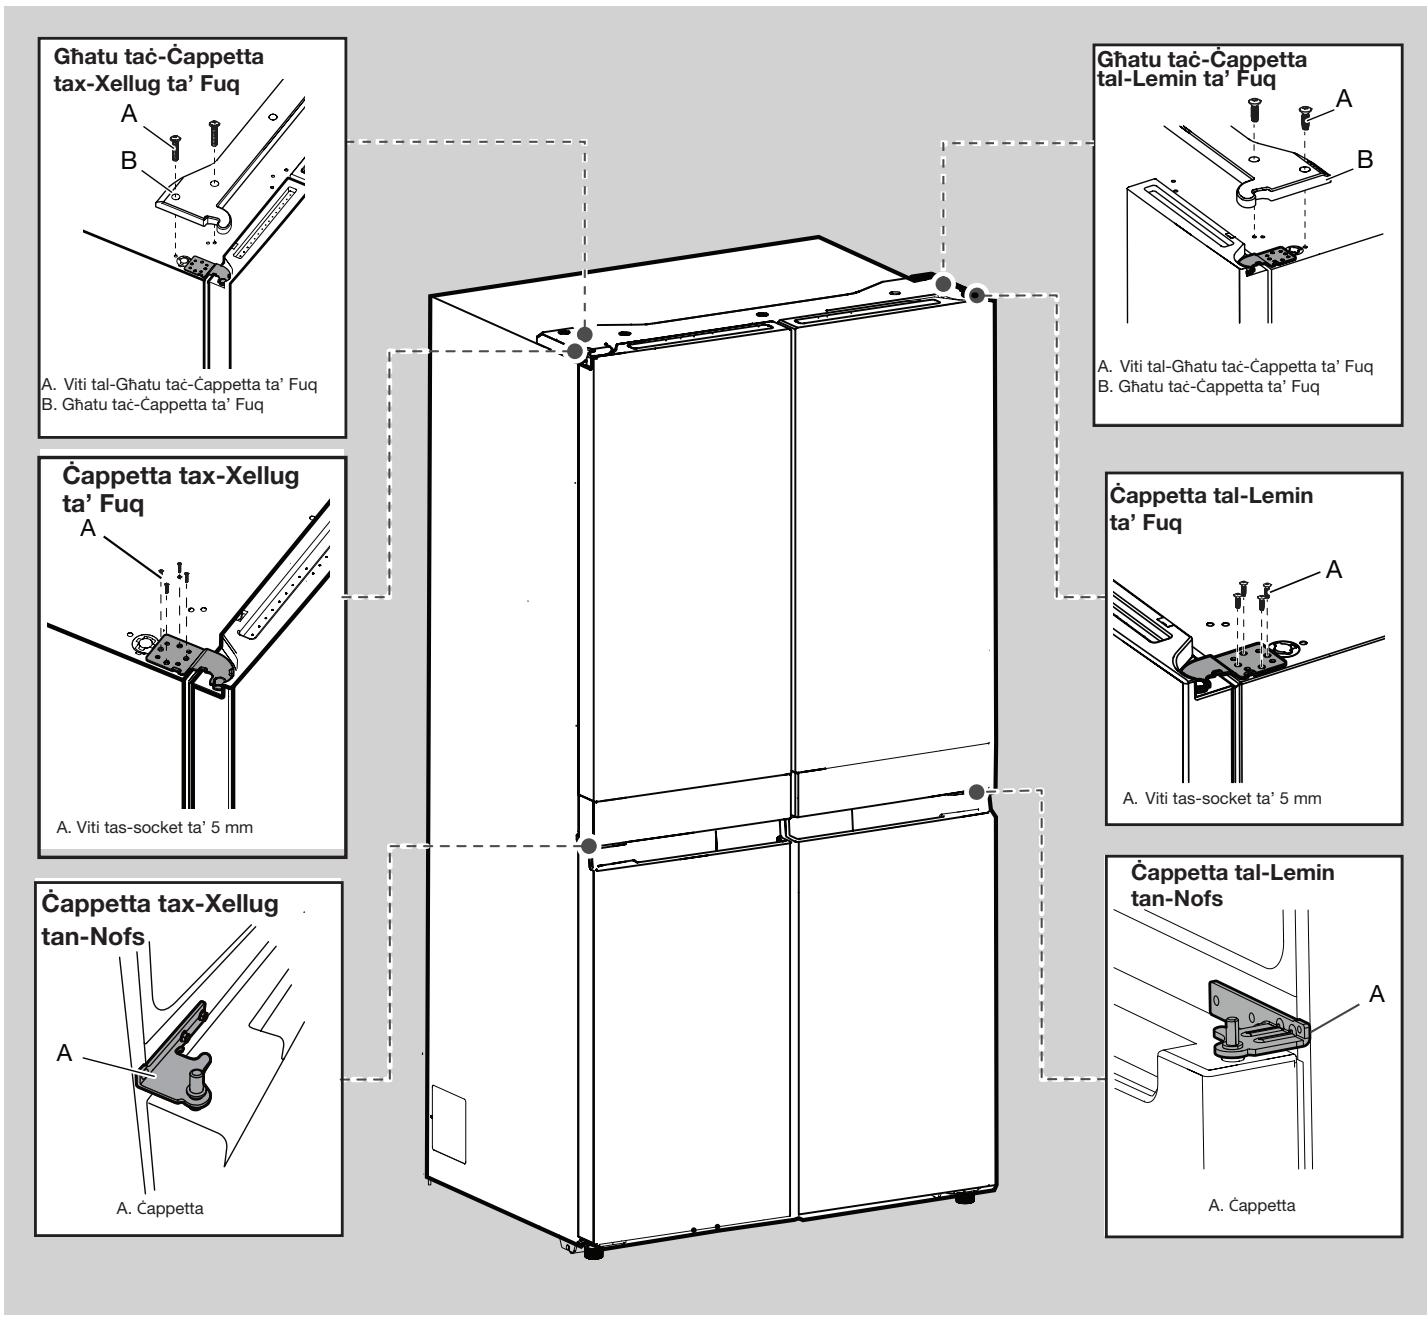
Nehi I-Bieba tal-Lemin
- Nehhi I-plug tal-frigg jew skonnettja I-elettriku.
- Zomm il-bibien tal-frigg maghluqa sakemm tkun lest biex tghollihom 'il barra mill-cabinet.
NOTA: Ipprovdi sapport addizzjonali ghall-bieba tal-frigg waqt li jkunu qed jitnehew ic-cappetti. Tiddependix fuq il-kalamiti tal-gasket tal-bieba biex izommu l-bieba f'postha waqt li qed tahtdem.
- Uza turnavit Phillips biex tnehhi I-ghatu mic-cappetta ta' fuq.
- Uza 5 mm socket wrench biex tnehhi erba' viti mic-cappetta' fuq u pogghom fil-genb.
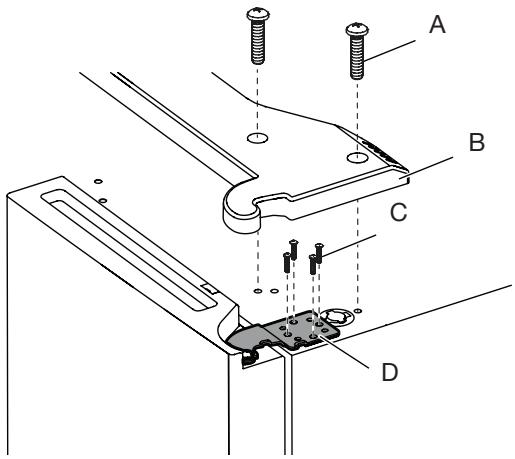
Kompartment tal-Freezer 208 L
Total 595 L
KAPACITA TAL-HAZNA (6WM24NIHAS):
Total 603 L
Accessorji:
Apparat li Jaghmel is-Silg
Uzutal-Kontrolli
ll-kontrolli attivati billi tmiss jinsabu fuq ix-xellug tal-bieba tal-frigg. Il-panel tal-kontrolli jinkludi informazzjoni dwar diversi buttuni u indikaturi. L-indikatur tat-temperatura tal-frigg u l-freezer juri l-a'hhar punt issettjat tat-temperatura.
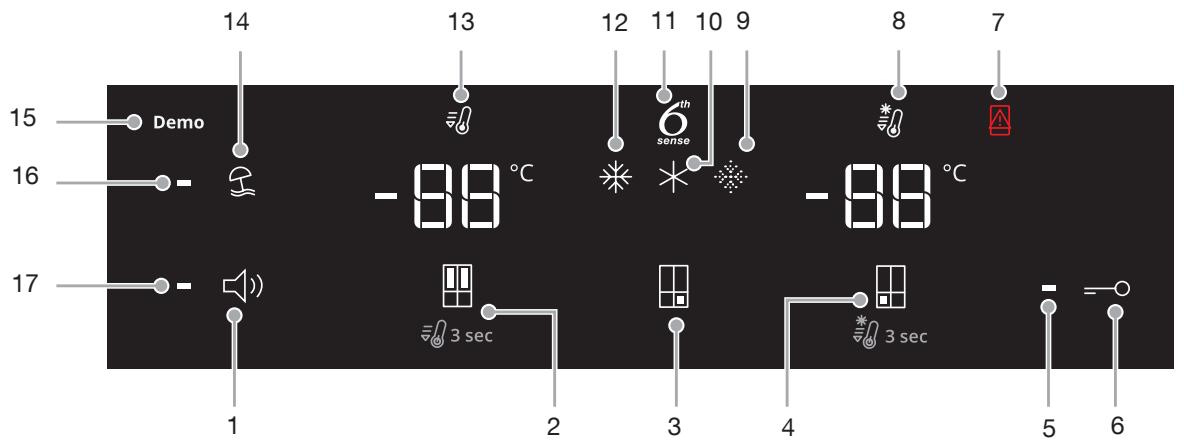
- Buttuna IXGHEL/ITFI tal-Hoss
- Buttuna tat-Temperatura tal-Frigg (zommha maghusa ghal 3 sekondi ghal Tkessih Malajr)
- Buttuna tat-Temperatura Ssettjata minn Qabel ta' Iffrizar Flessibbli (disponibbli biss f'WQ9 B1LUK, 6WM24NIHAS u WQ70900SXX)
- Buttuna tat-Temperatura tal-Freezer (zommha maghusa ghal 3 sekondi ghal Iffrizar Malajr)
- Indikatur tal-Key Lock
- Buttuna tal-Key Lock
- Indikatur ta' Bieba Miftuha
-
Indikatur tal-lfrižar Malajr
-
Indikatur tal-Iffrizar Baxx (disponibbli biss f'WQ9 B1LUK, 6WM24NIHAS u WQ70900SXX)
- Indikatur tal-Iffrižar Moderat (disponibbli biss f'WQ9 B1LUK, 6WM24NIHAS u WQ70900SXX)
- Indikatur 6th Sense
- Indikatur tal-Iffrižar Tradizzjonali (disponibbli biss f'WQ9 B1LUK, 6WM24NIHAS u WQ70900SXX)
- Indikatur tat-Tkessih Malajr
- Buttuna tal-Modalità ta' Vaganza
- Indikatur tal-Modalità Demo (disponibbli biss f'WQ9 B1LUK, 6WM24NIHAS u WQ70900SXX)
- Indikatur tal-Modalita ta' Vaganza
- Indikatur tal-Hoss
Il-Panel tal-Kontrolli jintefa wahdu wara minuta minghajr attivita. Biex tixghel il-panel tal-kontrolli, aghfas buttuna li tkun.

Kif Tara u Taggusta I-Punti Ssettjati tat-Temperatura
Kif Taggusta t-Temperatura tal-Kompartiment tal-Ikel Frisk u tal-Freezer:
Ghall-konvenjenza tieghek, il-kontrolli tal-frigg u l-freezer tieghek huma ssettjati minn qabel fil-fabbrika.
Meta tinstalla l-frigg tieghek ghall-ewwel darba, zgura li l-kontrolli ghadhom issettjati ghall-punti ssettjati rakkomandati. Il-punti ssettjati rakkomandati tal-fabbrika huma 3^ ghall-frigg u -18°C ghall-freezer.
Jekk taghfas il-buttuna tat-Temperatura tal-Frigg jew il-Freezer tibda taqleb bejn il-punti ssettjati tat-temperatura f'Celsius (^)
IMPORTANT:
Stenna 24 siegha qabel tpoggi I-ikel fil-frigg. Jekk izzid I-ikel qabel il-frigg tkun keshet kompletament, jista' jehzienlek I-ikel.
NOTA: Jekk taggusta l-punti ssettjati ghal setting iktar kiesah minn dak rakkomandat, il-kompartimenti mhux se jikshu iktar malajr.
■ Jekk it-temperatura fil-frigg jew il-freezer hija shuna wisq jew kiesha wisq, qabel taggusta I-kontrolli I-ewwel iccekka I-ventilaturi tal-arja biex tkun cert li mhumieux imblukkati.
■ Is-settings rakkomandati ghandom ikunu tajbin ghall-uzu normali ta' unità domestika. Il-kontrolli jkunu ssettjati tajeb meta l-halib jew il-meraq ikunu keshin kemm tixtieqhom u meta l-gelat ikun iebes.
NOTA: Zoni bhal garaxx, kantina jew veranda jista' jkollhom umdita oghla jew temperaturi estremi. Jista' jkollok bzonn taggusta t-temperatura u ma thallihex fis-settings rakkomandati biex takkomoda ghal dawn il-kundizzjonijiet.
■ Halli mill-inqas 24 siegha bejn kull aggustament. Erga' cekkja t-temperaturi qabel taghmel kwalunkwe aggustament iehor.

Lock tal-Iffriskar u Kontroll tal-Iffrizar 6^th Sense
Is-sensor tal-Lock tal-lffriskar 6th Sense jizgura kontroll tat-temperatura preciž u konsistenti biex ilk frisk jigi ppresvat ghal aktar zmien, bl-izjed mod naturali. Ladarba tiqi identifikata varjazzjoni fit-temperatura, is-sensor jattiva kompressur li malaj jregga' lura t-temperatura originali.
Is-sensor tal-lffrižar 6^th Sense jimminimizza l-bidliet fit-temperatura tal-freezer bis-saḥha ta'SYSTEMA innovattiva ta' gestjoni tat-temperatura. Il-hruq tal-friza jitnaqqsu biex jigu ppreservati l-kwalita u l-kulur tal-ikel.


Is-Setting Iffrizar Flessibbli (disponibbli biss f'WQ9 B1LUK, 6WM24NIHAS u WQ70900SXX)
Il-funzioni Iffrizar Flessibbli tippermettilek taqleb bejn it-temperaturis ssettjati minn qabel ghall-kompartiment tal-Iffrizar Flessibbli.
| Simbolu | Funzioni | Temperatura |
| ※ | Freezer tradizzionali | -18°C |
| ※ | Freezer moderat | -12°C |
| ※ | Freezer baxx | -7°C |
- Biex tattiva/tidizatattva s-setting I-Aktar Kiesah (-20°C), aghfas il-Buttuna tat-Temperatura Ssettjata Minn Qabel ta' Iffrijar Flessibbli ghal 3 sekondi. Meta s-setting I-Aktar Kiesah ikun attivat, it-tliet icons ikunu mixghulin.
Aggustament tas-Setting ta' Temperaturi Multipli
Freezer tradizzionali (-18^) : Ikel digà ffrizat u ikel frisk (massimu ta' 12-il xahar)
Freezer moderat (-12^) : Ikel diga ffrizat (massimu ta' xahar)
Freezer baxx (-7^) :Ikel diga affriat (massimu ta' gimgha)
■ Jekk Freezer Flessibbli jkun issettjat b'temperatura aktar baxxa mill-freezer, il-freezer jigi ssettjat bl-istess temperatura bhall-Freezer Flessibbli.
■ Jista' jkun li t-temperatura tal-kompartiment tal-Freezer Flessibblma tkunx tista' tilhaq -7°C meta t-temperatura ambjentali tkun 10°C jew aktar kiesha.
Meta tkun qed taggusta l-punti ssettjati tat-temperatura, uza l-grafika li gejja bhala gwida:
| KUNDIZZJONI | AğGUSTAMENT TAT-TEMPERATURA |
| II-friğk kieshā wisq | Setting tal-friğg 1° oghla |
| II-friğshūna wisq | Setting tal-friğg 1° inqas |
| II-freezer kiesah wisq | Setting tal-freezer 1° oghla |
| II-freezer shūn wisq/m'hemmx biżzejjed silg | Setting tal-freezer 1° inqas |
NOTA: Qabel tibdel is-setting tat-temperatura tal-Freezer Flessibbl, kun zgur li t-temperatura I-gdida hija adattata ghall-ikel li diga jinsab fih u I-ikel li tixtieq iddahhal fil-Freezer Flessibbl.

Tkessih Malajr
Il-karatteristika tat-Tkessih Malajr tghinek b'perjodu ta' uzu qawwi tal-frigg, taghbijet shah tax-xiri mill-grocer, jew temperaturi tal-kamra temporanjament shan.
Blex tixghel il-karatteristika tat-Tkessih Malajr, aghfas u zomm il-buttna tat-Temperatura tal-Frigg ghal 3 sekondi. Meta l-karatteristika tkun attivata, l-icon tat-Tkessih Malajr tkun mixghula. Il-karatteristika tat-Tkessih Malajr tibqa' mixghula ghal saghtejn sakemm ma tintefiex b'mod manwali.
Blex titfi l-karatteristika tat-Tkessih Malajr b'mod manwali, aghfas u zomm il-buttuna tat-Temperatura tal-Frigg ghal 3 sekondi. L-icon tat-Tkessih Malajr tintefa meta l-karatteristika ma tkunx attivata.
L-aggustament tat-temperatura tal-frigg awtomatikament jfitl I-karatteristika tat-Tkessih Malajr.

Iffrizar Malajr
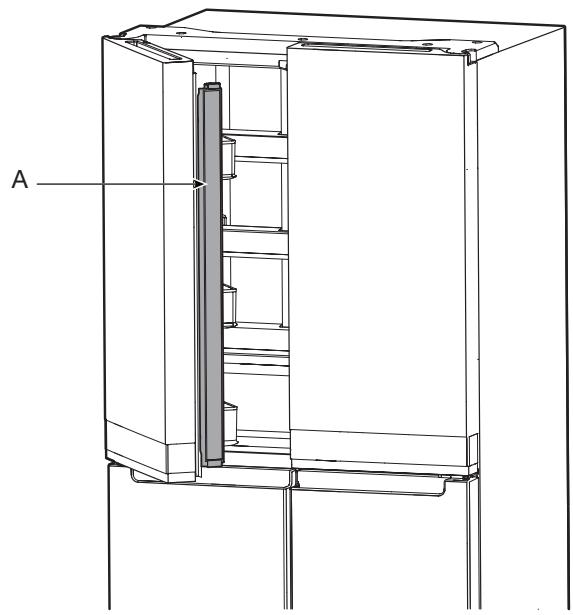
A. Sigill b'çappetta (Hinged seal)
Is-switch tal-bieba tal-kompartiment tal-ikel frisk jinsab fl-ghatu tac-cappetta tax-xellug u tal-lemin ta' fuq.
Ghall-Freezer uż-Zona ta' Temperaturi Multipli, is-switch tal-bieba jinsab fl-istrixxa tal-qiegh.
■ Is-switch tal-bieba juza kalamita biex jinduna meta tinfetah/ tinghalag bieba.
Zgura li m'hemm l-ebda kalamita jew apparat elettroniku (Speaker, Coolvox® ec.) f'distanza ta' 7.62 cm jew inqas millghatu tac-cappetta.
NOTA: Id-dawl ma jixghelx jegk ma jigix identifikat il-ftuñ tal-bieba.
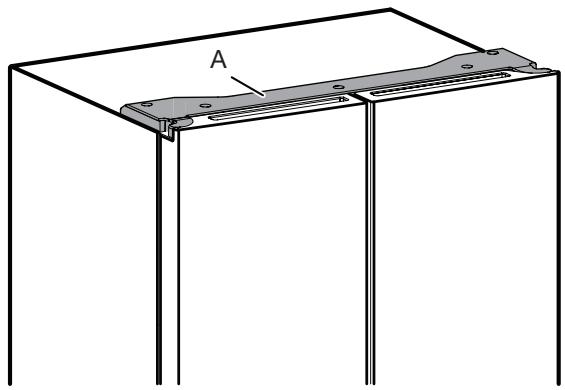
A. Ghatu tac-cappetta
Apparat li Jaghmel is-Silg
Biex taghmel is-silg, imla ice tray b'ilma ppurifikat u pogi l-apparat li jaghmel is-silg manwali fl-ixkaffa ta' fuq tal-Freezer. Halli I-hin jghaddi sakemm is-silg jifforna u ladarba s-silg ikun lest, dawwar il-pumijiet skont I-arlogg biex titfa' I-ice cubes fil-kontenitur tas-silg.
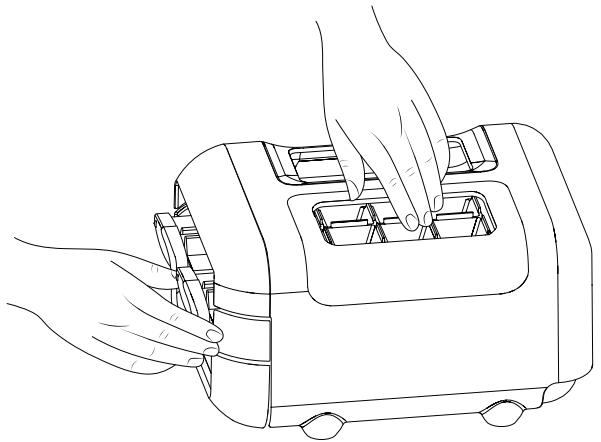
Gholli kemm kemm il-kontenitur tas-silg u igbdu 'I barra biex tkun tista' taçcessa I-ice cubes.

L-assemblagg tal-apparat li jaghmel is-silg manwali jista' jinhareg mill-freezer meta s-silg ma jkunx mehtieg biex izid kompartiment fil-freezer.
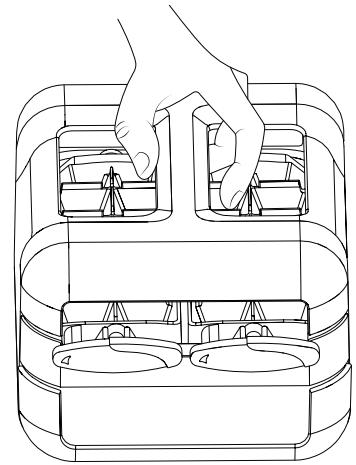
Hažna tal-Ikel
Hažna tal-Bajd
Huwa rakkomandat li tahzen il-bajd f'temperatura konsistenti biex izzommhom friski, ghalhekk l-ahjar mod hu li zzommhom fil-frigg fuq l-ixkaffa tan-nofs.
XKAFEF, KAXEX U KXAXEN
Informazzjoni importanti li ghandek tkun taf dwar l-ixkafef talhgieg u l-ghatjien:
Tnaddafx l-ixkafef tal-hgieg jew l-ghatjien b'ilma shun meta jkunu keshin. L-ixkafef u l-ghatjien jistghu jinkisru jekk jigu esposti ghal tibdil f'daqqa fit-temperatura, jew impatt, bhal meta thabbathom ma' xi haga. Hgieg tat-tip tempered hu mahsub biex jinkiser f'hafna bicciet zghar tad-daqs ta' caghka. Dan hu normali. L-ixkafef tal-hgieg u l-ghatjien huma tqal. Uza idejk it-tnejn meta tnehihom minn posthom biex tevita li twaqqaghom.
Aggustament tal-Gholi tal-lxkaffa
L-gholi tal-ixkaffa jista' jigi aaggustat billi tibdlilha postha missapport tal-qiegh ghas-sapport ta' fuq u bil-kontra.
Iftah il-bieba tal-lemin sal-massimu li tinfetah.

Ohrog I-ixkaffa mill-frigg u poggiha fil-poizzzjoni mmuntata li tixtieq.

Zgura li I-ixkaffa hi mpoggija sew fuq is-support tal-ixkaffa.
Tuzax extension cord.
奢荫han congri h 100mm 50mm 50mm
④ ト어をは状態Hzahhengengwhngohj
战功
Ii ngjg hJ 1363A,13A jz has nng rge J
J 1362
J 1362
夏:BraleiK daliJ&J#JHJ#J#J#J#J#J#J#J#J#J#J#J#J#J#J#J#J#J#J#J#J#J#J#J#J#J#J#J#J#J#J#J#J#J#J#J#J#J#J#J#J#J#J#J#J#J#J#J#J#J#J #
6th Sense 6th Sense sense
凿:艹默默默默默默默默默默默默默默默默默默默默默默默默默默默默默默默默默默默默默默默默默默默默默默默默默默默默默默默默默默默默默默默默默默默默默默默默默默默默默默默默默默默默默默默默默默默默默默默默默默默默
摺険尼日內通同信(WQ9B1LUK,6WM24NIHAS WQ70900SXX簡連)
I. 1. 1. 1. 1. 1. 1. 1. 1. 1. 1. 1. 1. 1. 1. 1. 1. 1. 1. 1. 1. 1. 1. 1. 1. 1. 1. 1. 1. 1. 1. 1. 1. 1. 1. 2. 2. 2. 2. 2. 2. 2. 2. 2. 2. 2. 2. 2. 2. 2. 2. 2. 2. 2. 2. 2. 2. 2. 2. 2. 2. 2. 2. 2. 3. I. 4. I. 5. I 6. I 7. I 8. I 9. I 10. I 11. I 12. I 13. I 14. I 15. I 16. I 17. I I I I I I I I I I I I I I I I I I I I I I I I I I I I I I I I I I I I I I I I I I I I I I I I I I I
ACKS
Door Closing and Door
BD - 142004-01 (Gulf Technical Regulation for Low Voltage Electrical Equipment and
3ACTEPEXEHH! PpnaJ He npn3NaueHo JIe KepyBaHH 3OBHiHIM nepemKauem, HapnKJaTaNMePOM,a6O OkpeMOU CnCTeMOU DnCTaHciNHOKepyBaHH.
Κe npnlaad npn3NaueHo dIy BnKOpncTaHnB DAOMaunbOMy rocnoapCTBi Ta CXOXN BnJaKaX: Ha KxHax y MaRa3uHax, oicax Ta iHux pObouNx cepoobuX; Ha eepMax; MeuKaHcMyrOTeJIb, rypToXkTkB Ta iHux JntNoBnx npmimiJeH.
Bimorngo p03TaUyBaHn
ПОЕРДЖЕHHЯ
He6e3neKa BiD Bn6bxyx
TpmaTe IerKo3aMnCTi MaTePiaIa Ta npaponoi6hi peOuHN, HapnKnad 6eH3uN, noaIi BiD XoJIoNbHnKa.
HeDToPmMaHn yicBmOrn MoKe np3BeCTn do cMepti, Bu6yxy a6o noxexi.
IIOPEJXKEHHa
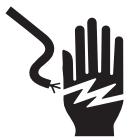
He6e3neka ypaXeHH enEKeTpHnM cTpyMOM
PiiEaHnyTe do 3a3emHeoio po3eKn.
He np6naiTe KOHTaKT 3a3eMJIeHHa.
He BnKOpNCTOBuTe aAnTep.
He BnKOpncTObuYte npObXyBaU.
HedotpmaHHa uix iNctpykui MoKe npu3BecTu do cMepti, noKexi a6o ypaKeHHa eNeKTpuHm Ctpymom.
YBAG! BcTaHOBJIeHHI NIIKIIIOUeHHI DO eJIeKTPomepexi MaEC BnKOHyBaTN KBAJIiΦIKOBaHm ΦaxIBEu 3rIiHO 3 IHCtpyKzIaMn BnPo6Hnka i3 DoTpImaHHaM MiCueBx IpaBnI TexHiKn 6e3IeKn.
XoIOnIbHnK pIu3HaueHo IaI pa6Otn B OkpeMomy KOHTpyi 220-240 B, 10 A, 50-60 T.
YneBHTbcra, 10 Hapya, yka3aHa Ha nacnOpTHi Ta6nUci, BiNobiIaC HAppy3i B DomauHII eEKeTpomepeXki.
Ma6 6ytm mojInBicTb BiD'edHaTn npuaB BiEneKTOXINBHeHH, BnHnBn WTeNCeJIb i3 PO3ETKn, AKNo Do PO3ETKn E DOCTyn, a6o CKOpNCTaBUnCn DBOxNIOHCHM BnIMKaHem, yCTaHOBNeHm Do PO3ETKn.
Jkuo shyup kublennno okoJeHo, uo6 yHKnHytn Hebe3neKn, no 3amHy Mae 3diChOBaTn BnpobHk, no npdeCTabHnk a6o faxiBci 3 BiDIOBHO KbaJIqkaueio.
Ipepe TmRANKBVCbTaHOBVTe XOLOdINbHnK Ha NoCTiHemicue, BaxkJIbBO yneBHnTncra, 0o TaM 6yde nOTpiHe eJNEKTPOXNBHeHHA:
PekomeHdoBaHm MeToD 3a3EmJIeHHA
Iotpip6Ho eJektpoxnBHeHH 3MiHHO CTpyM y Iuhe 220-240 B 50 Tc, 220 B 60 Tc a6o 230/240 B 50 Tc i3 3aNo6iXnKamn Ha 10 A i 3a3emJennm.
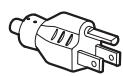

TnB
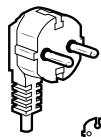
Tun E i F
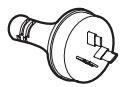

Tun I
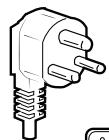
Tin M
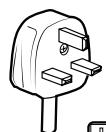
TnG
Дя Астралт Ta HoBoi 3eJaHdIi:
Baw HOBn npnilaCneiaJbHO cnpoeKToBaHO BiJnoiHDo BCix aBCTpAlIcBKnX cTaNdaptiB i BmOr.
Дяк BiIDOMOCTI BiHCTpyKcii 3i BCTaHOBJIeHH MoKyTb CTOCyBaTnCBAIMOR Do KINBJIeHH B IHUHX KpaIHax, TOK M3BepTaEM BoSy yBaIy Ha ci BiIDOMOCTI.
He npn6naIte KOHTaKT 3a3eMJIeHHJ.
He BnKopncToBvIe aanTep.
He BnKOpncTObuYTe nOobKyBaU.
HedotpmaHHaix IHctpkui MoKe npu3BecTu do cmepti, noKekia a6o ypaXeHH eNeKTPnUHM CTpyMOM.
- BCTaBTe wTencEJIb y 3a3eMJIeHy po3eTKy.
- BcTaBTe B CkPnHbKn Bci 3HIMHi DeTani Ta xapObi npoDyKtn.
Початок ровоти
KOHTPOJIbHn CnICOKДЛЯ BCTAHOBJIeHHA
EneKtpoXnBJIeHHA
PiKJIIOUHTb XOLOJNbHnK Do 3a3emJeHOi p03eTK.
VdEpi
■ Jkso nizac BCTaHOBHeHHn oTpi6Ho 3HrTa DBepuTa, nVB. pOzdiIN «3HimaHH Ta 3amHa DBepqT XoIOJbHnKa" Ta «3HimaHH Ta 3amHa nepeDnix DBepqT MOpO3NJbHOI KaMepu".
■ДерцетаЗakрвaitbcrepmetuHNO.
XoNoDnBnK BnCTaBHeO 3a pIBhem. BiDpeyIIOte BnCOTy BnpiBnHOBaJbHnx HIXOK, 06 BOH NiUHO CTOrJN Ha NiIDOn3i.
Bucota IBepuT OndaKOBa B3doBxBepXhboi CTopoHn. (3a Notpe6n ckopncTaItecra yHKciEIO BpiIBHOBaHHA).
PoznakyBaHHXoJIoNJIbHnKa
OoctabKa XoIooNJIbHnKa
Mihimabha shinpna dBepHoro OTbopy Ma cTaHOBnTn 838 MM (33 houm.). JaKIOO shinpna dBepHoro OTbopy cKaJaac914 MM (36 houm.) a6o MeHse, nOTpi6Ho o6OB'raKOBO 3HrTn dBepzraTa, cKpInhbkN Ta neTJI.
B yci DbepHi OTbOpn 3aKoTyIe XoJIoDJIbHnK Ha 60KobIcSTopoHi.
IopadnHaBnnaDOK TpaHcnpOpTyBaHnXOJIoNbHnKa:
Bawx xoIounlbHnK BaKKn. Y pa3i TpaHcnpotyBaHHXoIOuINbHnKa Ha OounieHHa NObClyroBuHaHH, NoCTeNtHa NiIIO3i KapToH a60 Ibn, 0o6 He noWkoDHTI II. 3aBxNtTARHITbXoIOuINbHnK nO npMIM, KOJI nepeMiUyeTe NOrO. He xntaIte i He KaHTyIte XoIOuINbHnK, KOJI nepeMiUyeTe NOrO, aJxze ce MoKe nOwKOdHTnPiNOry.
3Himitb naKyBaIbHi MaTepiAn
Pn6epiTb peuTkntcpiuK Ta Kneo 3 nobepxohnpeed Tm NK yBimkHytn XOJOnJbHnk. PaJIbceM HaHeciTb Ha Knei HeBeJNKy KJIbKicTb MNoUO 3ac06y dna nocdy. IpotpiTb raHupkoIO, 3MoueHO B TeNII BOdi, i daIte BnCOxHyTN.
Дл пибupaанн CTPIKn a60 KNEIO 3a60pOHaETbcB BKNOPNCOBYBaTN rOCTpi IHCTpyMeHTN, BTnpaTN CnIPT, 3aIMnCTi piINH a60 a6pa3NBHI YnCTuNbHi 3acO6N. Li pehi MOkyTB nOwKOAnTn NOBepXHIO XoIoNDlbHnka.
Ytui3yute a6o 3daTe Ha nepepo6ky Bci nakyBaIbHi MaTepiAn.
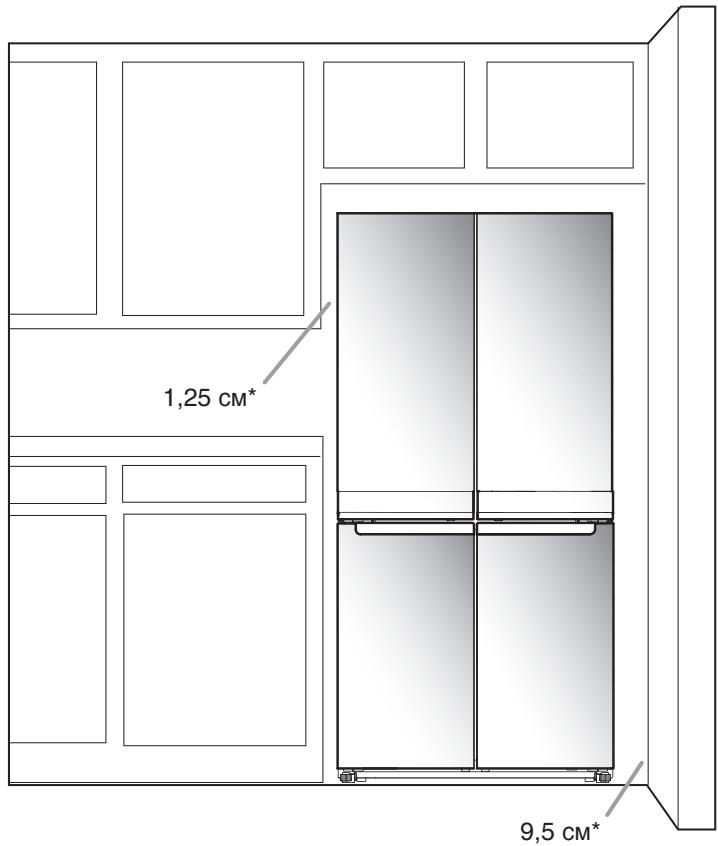
3himahnHa Ta 3amiHa IBepuT XoJIoNJIbHnKa
PIMITKA. BmiprTe u npHny DBeHoro OTbOpy, 06 no6aHTn, Hn oTpi6HO 3HimaTn DBepuTa XoJIoNJbHnka, a6n 3aHeCTn NOrO B pnniueHHa. JKIO nOtpi6HO 3HAn Tn DBepuTa, DoTPmUyTEcb IHcTpyKuHnxue.
YBAGA! Jkso xoIOnOuNbHnK yxe 6ylo BcTaHOBNeHO i BN BuHOCnTe NOro 3 npMlueHHa, BmHKHiTb CnCTeMy KOHTpONIO,peep TIm K 3HimaTn DBePcTa. Bi'ednaHte XoIOnuNbHnK a6o BmKHiTb eJeKTPoxKnBHeHHa. BmMt bXapObo IpoDyKTn Ta perynBoHaH KoHTeHepr Ta noJIuChN 3 DBePcT.
IiDroTyTe NoTpi6Hi IHcTpymeHTa npOuHTaTe Bci IHcTpkykii neped 3HimAHnAM DBePzAT.
NOTPIEHI IHCTPymeHTN: IBePOBNI KJIIOU 6 MM, IBePOBNI KJIIOU 5 MM i xpeCTOBA BnKpyTka #2
ПОЕРДЖЕнь
He6e3neka ypaXeHH eEnKtpnHMM cTpyMOM
Bid'edhaTe KMBlenHn nepu HiX 3HimaTn DbepuTa.
HeDopummaHn ziei BmOrn MoKe np3BecTn do cmepti a6o ypaXeHH eJeKtpuHn m Ctpymom.
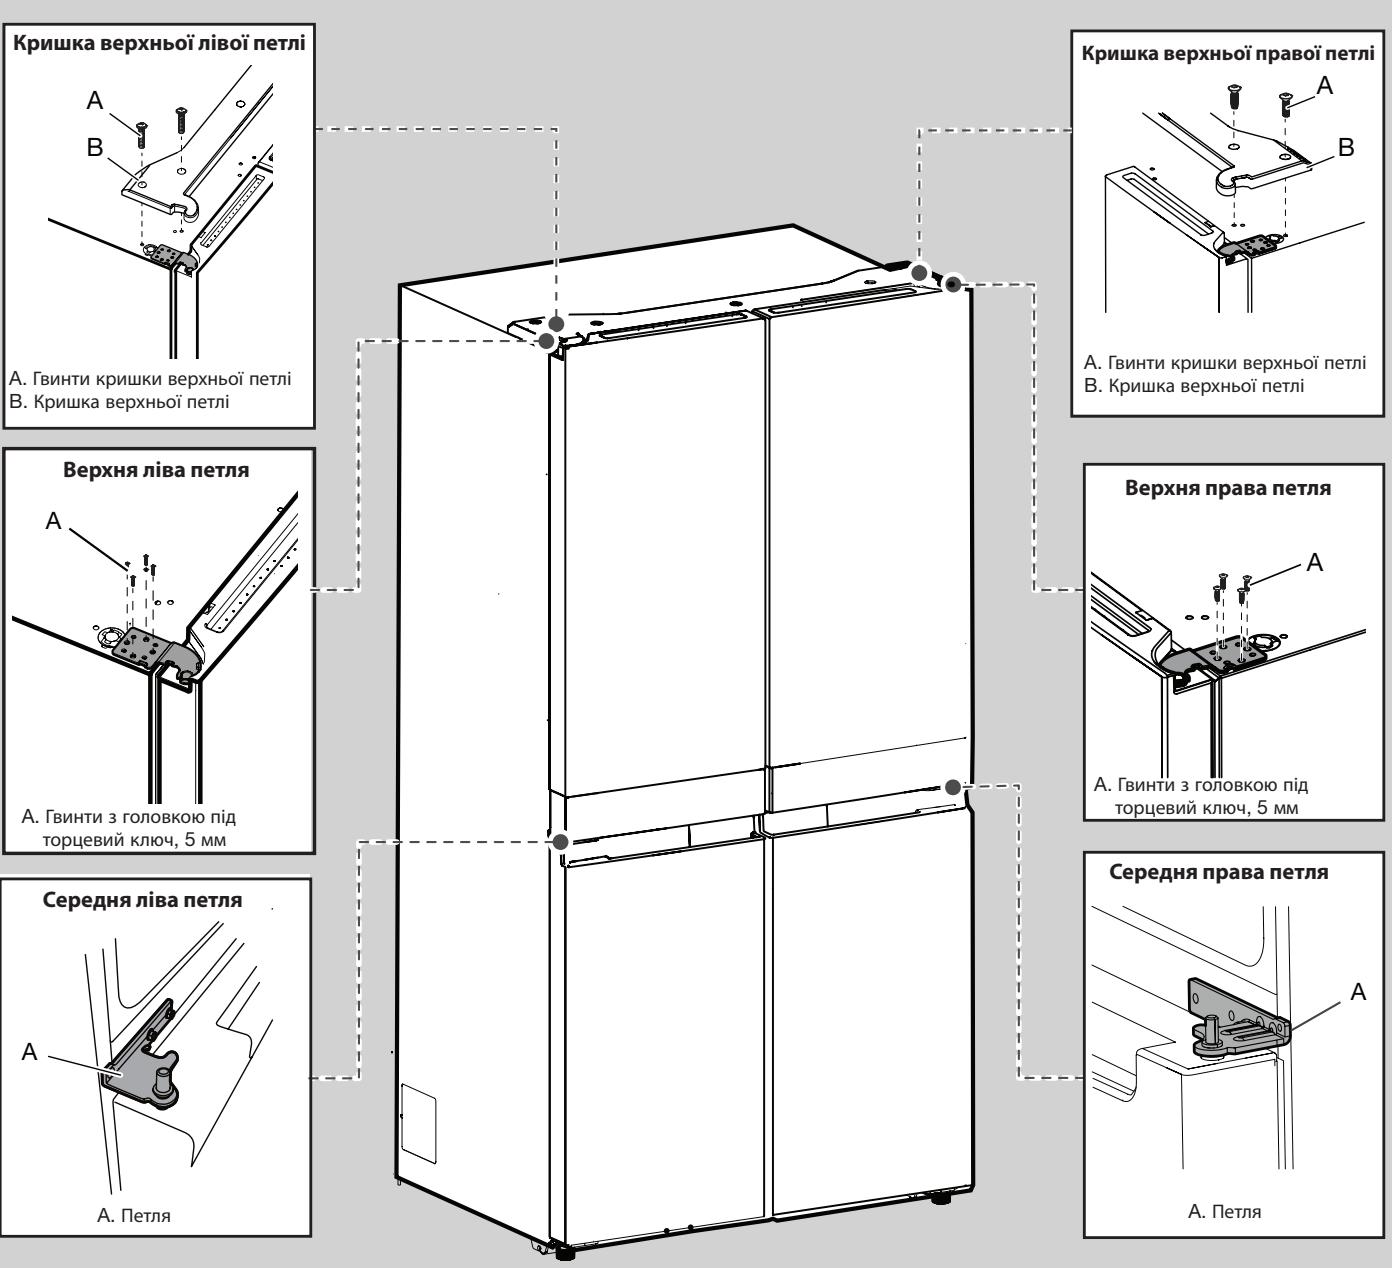
3HimahnHa npaBoi CtyIKN DBepuT
- Biǎ'ědhaǐ Te xǒnóu nǚbǎn k a bō BùmKhīt b e jēkTpǒxuBjēn Hǔ.
- TpmaTe DBeepTa XOJIOINJIbHnKa 3aKpNTmN, POKN Bn He 6yndeToTobi Bi'EDHaTn iX BiKopnyca.
ПРИMITKA. Коли зимастп, 3а6e3neчte ДдадTKOBу onopy дя верцгхлоюльнka. He po3paxobутte Ha Te, со магни в ушьненни верцгуТуримуВатIMyTbixHaMICU, nOKN bI npaioTe.
- BnKOpncToBvOuH xpeTObBy BnKpyTkU, 3HiMiTb KpNShkU 3 BepXhBoi nTeTni.
- BnKOpncTOBvOHyOn IBepOBn KInOu 5 MM, BnKpyTiTb QOTnpn TBnHTn 3 BepXHbOI NeTJI Ta BiKnlaDiTb ix.
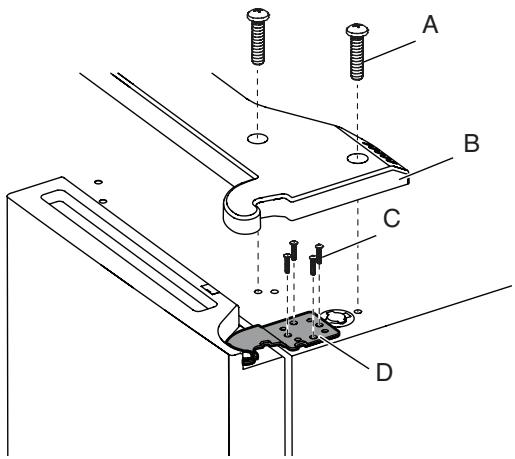
A. Гвинт Кшишkin Верхньовп netЛi
B. Kpnika Bepxhboi netJI
C. ΓΒΗΝΤΗ 3 ΜΟβΚΟΥ ΠΙД
TOPUCEVB NΚΙΥΟ, 5 MM
D. Bēpxhā nētīn
5.Пинимить Деверетахолдьнka 3 плься сердьоi netti.Верх纳петлзимetbaс pa30m i3 Деверетамn.
3HimahnHaJIBOI CTyJKN DBepuT
YBAG! IHTepfeyChi Ka6eni npoknaedeHo Kpi3b liBy nTlHO, TOMy ix NOTpi6HO BiD'EDHaTu, Npeed TmK 3HIMaTu DBepuTa.
- BnKopncToBvOuH xpeTObBy BnKpyTkU, 3HimiTb KpNiKhY 3 BepxHbOi NeTni.
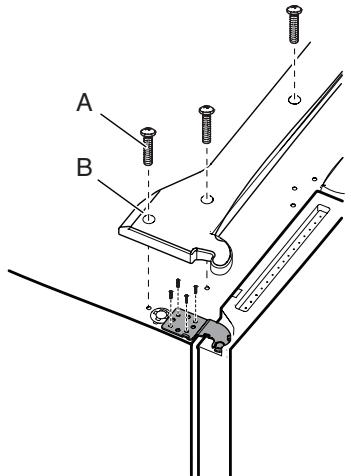
A. Гвint Кршkin Верхнбови.netЛi
B. Kpnska Bepxnboi neTJI
- Po3'eHaIte Dba Ka6eIbHi 3'eHaHnH, po3TaIobaHi Ha BepxHi nobepxHi neTni.
Bi3bmitbcra 3a 6nDbci STOPOHn Ka6eNbHoro 3'EDHaHHa. BeNkIM nalbcem JIBoi pyKn HATNCiHtB Ka6eNbHe 3'EDHaHHa, IIO6 3BilbHHTn 3auiKy u po3'EDHaTHu qactHn 3'EDHaHHa.
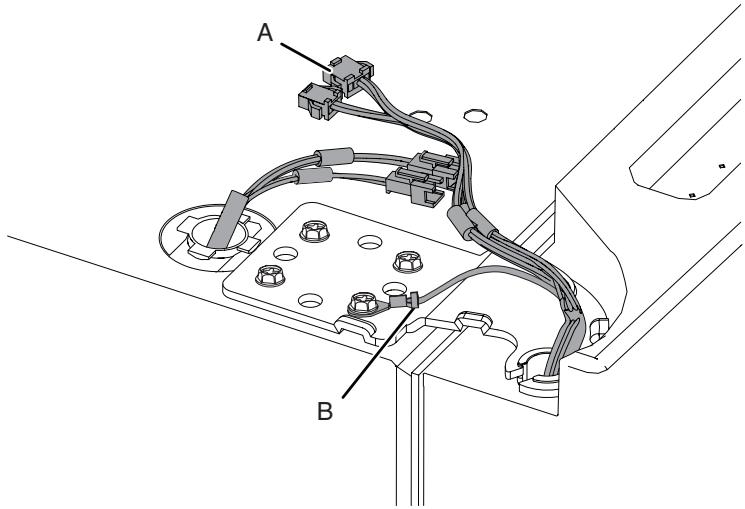
A. Ka6eIbHe 3'eHaHHa
B.Жила 3a3emJIeHHH
- BnKOpncTOByoHn IBePoBN KInOu 5 MM, BnKpyTiB YoTnpn BHyTpIiHi rBnHTn 3 BepXhBoi nTeNl Ta BiKnlaDiTb ix.

A. Refrigerator
B.Freezer
C. Flexi Freeze (only with WQ9 B1L, 6WM24NIHAS and WQ70900SXX)
HaTnCHITb KONKy, 106 aKTHyBaTu a6o BmKhTyN 3ByKOBI CnHann.
-0 BLOKyBaHHA
HaTnCiHb i yTpmyTe KHOkky 6JOKyBaHH npOTrOM 3 cekHy, zo6 akTNByBatn 6JOKyBaHH.
IIO6 BIMKHyTN 6JOKyBaHHaHTNCiTb i yTpmyTe KHONKY 6JOKyBaHH npOTAROM 3cekyHd.
ФункцьблOKуВаHHIirHopyBaTmE6yIb-уКуB3a€MOДIO 3 naHeJIIO KepyBaHHI, NOKI KOpNCTyBaH He po36JIoKYe NaHeIb. L'Функцьпprn3HaueHa 3anObirn HeHaBMnCHm 3MiHa m napametpiB.
BiDcikIaIyBnKOrO 3amopoxyBaHH
Y ckpHbKax JIJIa IuBnKOrO 3amOpoxyBaHHa MOxHa 3pyHo 36epiratn 06'EmHI npOdykTn.
ФункшвидкогоЗamopoxуBaHHЯe3MoryHaДiHOTa 3pyuH036epiratn Bci 3amopoxehi npOyKTn.
IPNMITKA. TemnepaTypa B Mopo3nJIbHi Kamepi MoKe 3Hn3nTnCn DO 3NaueHH, Bn6paHO rJa Kamepn 3 Bn6bOpom TemnepaTypn 3aMopOxyBaHH, KOJI nJr Mopo3nJIbHoI Kamepn 3aJaHO TemnepaTypy, 6JIbUy 3a 3NaueHH dJa Kamepn 3 Bn6bOpom TemnepaTypn 3aMopOxyBaHH.
Kamepa 3 Bn6opom Tempepatny 3amopoxyBaHHa (JIiue Ha moJeIax WQ9 B1LUK, 6WM24NIHAS i WQ70900SXX)
Y kamepi 3 Bn6bopom TempepaTpy 3aMOpoxyBaHnRA MOKHa Bn6paTOn OIN H i3 TpBx pIBHb TEMpepaTpy 3aMOpoxyBaHnRA: -7°C, -12°C, -18°C a60 -20°C, Ⅲo6 3a6e3neuHTn HaNKpaJi yMOBn DnIa 36epirAHn P3Hnx TnIIB XapOvBnX npOdyKTIb. Ⅱo6 MaKcImaJIbHO 36InbUnrTo o'EM MOpO3nJIbHOi Kamepn, MOKHa BnIHrTn CkPnHbKy Ta 3poBtN DOCTUHNO NOJIuChy MOpO3nJIbHOi Kamepn.
3HimahHHBepxHbOICKpNHbKn:
- Bi3bmitb cKpHbky 3a pyKy Ta BHTaH30bHi Do yNopy. PIdHimtB cKpHbky 3 HxHbOi HanpAmHOi.
- YctaHOBIb CkPINbky Ha MicCe, DnIy cboRo nOCTaBte II Ha HIXHIO HAnpAMHy dIy CkPINbKn i 3aWTOBXHiTb II Ha MicCe NOB3 yNOp.
A B T O M A T N U H O P O 3 M O P O X J Y O T C B C I K A M E P R X O J O D N J B H N K A, M O P O 3 N L B H N K A T a 3 B N B O P O M T E M N E P A T y p r 3 A M O P O X Y B A H H N (N I S W H a M O D E N L X W Q 9 B1 L U K, 6 W M 24 N I H A S i W Q 7 0 9 0 0 S X X). O D N A K N O T P I 6 H O O u n i a t n B C I K A M E P R N P N 6 N I 3 H O p a 3 H a M i c a b, ZO6 y h N K H y T n y T b o p e H H C T i k k x 3 a n a x i B. H e r a N H O B N T I P a n a T e p o 3 J N I T I p n o d y K T N.
UHEN30BHIiHIX NOBepXohb
IINB. BiIDOMOCTI npo YnueHHa 3OBHiiuHix NOBepxOHb Ira BaWOI MoDeni.
Ctnlb1-rnaadiDbepcraTa
YBAI! IapaHTi He NooHpiOeTbC Hn ONoKoJxehn HJaDKoro JNCHOBAH3 PnUHHn HEnpaBnBHO BnKOpNCtAHn YnCTNJbHnx 3ac06iB a6o BnKOpNCtAHn HE peKOMeHDoBaHx YnCTNJbHnx 3ac06iB. FocTpi a6o Tyni IHcTpymEnTu NOpPnAOTb JNCHOBAHn.
He niDaaBte cTaleBi npJlaDN BnINBy LyxHnx a60 KOpO3iHNx yMOB, HapnPKnaD BnCOKOi COHOcTi a60 BOIorOCTi. IapaHTi He nouPioEbCra Ha nooKoJKeHHa, CnpuHHei BnINBOM uX yMOB.
X PpOdykTn, 10 MoMiCTaB cHTpyCobI
X Coyc «MapuHapa»
OuichiHnBHyTpihxNIOBepXOHb
- Bi'd'edhaTe XOJOnuNbHnK a6o BmKHiTb eJIeKTpoXnBJeHHa.
- PeTeJIbHO BmMnIe BpyHy, cNoJIoCHiTb I BucyWiTb 3HIMH DeTaJI Ta BHyTpIuHi NOBepxHi. BnKOpNCtOByIe YnCTy rY6Ky a60 M'AKy RaHcIPKy Ta TeNJIu MmJIbHn P03uH i3 M'AKM MnIOUHM 3acO6OM.
IPNMITKA.3a6bopohReTbcBnBkOpncTObyBaTn a6pa3nHBi a60Kopctki YnCTnIbHi 3acO6n, HapnKJa d aePozOI dny uHHeHH BIKOH, KXoHHi cKpe6auch, 3aMnCTi pIuHIn, uCTnJIbHi BICK, KOHcEHTpOBaHi po3uHHNKn, BiD6IIOBAHi a60UCTnJIbHi 60, 10MiCTaHbHaΦTOPOdYKTN, Ha PnACTNKOBHX DeTaJAX, NtKOBaHH BHyTpIiHbOi NOBepxHi Ta DBePcA t abo Ha yuJInbHeHHx.
3.ПдклчитьхолоильнкdoМерекiaboBIOHOBITb eJektpoNocTaayHn.
KoHdEhcaTOp
H a obox cstopohax xoIOniNbHnka e 6araToaipoBe nokpnTTT. TenJI 60Koi nobepxhi - ue HopmaJIbHO.
OcbItIeHHa
OcbitIeHHy y BiDcIKy dJIa CBIXNx npOdyKTiB i B MOpO3NJbHi Kamepi cBITIOJIOdHe, IORo He NOTpI6HO MiHTn. JKIoO OCBiTHeHHy HE BMKAeTbCRA, KOJIu BiIDKnBaIbTb DBePcIra, 3BepHITbcA DO dINlepa, y AKOBO BN pnpIbIaII XOJOIDInhNK.
- CnopoxhItb KoHTeHep IJIyIbOdy.
Akuo Bn BpiuNTe BmKHyTN XoIoOnIbHk Do BiD'3dy:
ПРИMITKA. Перазыть xолдьнку demohctpaцини ржим,pokni noiTe y BiДnyctky.DnB.p03ДЛ «Викорисаня elementtib kepybaHHA».
- BnIMiMb i3 xoJIoNJIbHnKa BcI npOdyKTn.
2.ЯкwoB xOLOdINbHnky e aBTOMaTHnI rToYBaUNbOdy:
BmKHiTb IoJaBaHHa BOiN B roTyBauch bOdy npHaMHi 3a1 DeHb.
KoIbuae ocTaHnHi Ky6nk IbOy, nepeBeiTb nepemkauy noJIOxehnHa Off (O) (BIMK.). 106 BIMKHyBCa DncJIeB rOpi BHyTpIshhBoI NOBepxHi XOJIOINlbHnKa (3aJexHO BiD moJeI).
- CnpoXHiTb KOHTeHep IJIbOdy.
- BumkhItb eJemEnTn KepyBaHHa TempepaTpoIO. IuB. po3diN «BukopncTaHHa eJemEnTiB KepyBaHHa>.
-
OuchbTe XoJIoNJIbHnK i npOtpiT b Noro hacyxo.
-
Ппимотаite CTPIKIO UMaTkn rYm a6O DepeBnH Do BepxHbOi YactNH CToLok O6ox DBePur, uO6 BiDkprTu IX DoCTaTHbO dIy TORo, a6N NOBITpR IOTpanJIrJO BCEpeDInHy. TaKIM YINOM NepeCTaHyTB yTBOPIOBaTnC3aIax N PoCTn PIIICHBA.
TpaHcnopTyBaHHA
KoIb BV 36npaTeC8 TpaHCnOpTyBaTIn XOJIoNJIbHnK y HOBe JKTIO, DToPmUyTeC8 HaBeJeHnx HnXe BkA3iBOK i3 NiIroTOBKn DO TpaHCnOpTyBaHH.
1.ЯкwoB xoIOnIbHnky e aBTOMaTHnI rOyBaUNbOdy:
Bumkhitb noaBaHH BOnu B roTyBauch npHaMHi 3a1 DeHb.
Bi'edhaIe BOOpOpiB iD 3aHbOi CToPOHn XoJIoNJIbHnka.
Koln Binae ocTaHHi Ky6nk IbOy, npeBeDiTb nepemkau y noLoXeHNr Off (O) (Bumk.) a6o Ha roTyBaqi IbOy, a6o Ha naHeJI KepyBaHn (3aJexHo BiD MoJeI).
- BnmiTb yci npOdyKTn 3 xOJOnIbHnka, ynaKyTe Bci 3amopoxeHi npOdyKTn B cyxni IiD.
- CnpoXHiTb KOHTeHep IJIbOdy.
- Bié, dHaTe xOIoDnIbHnK BiE eNeKtpomepeXi.
- PetelbHo OuchTe i npoTpiH noHO hacyxo.
- BtarrhItb yci 3HimHi Detani, Do6pe obrophiB i x i npMOTaTe OndHy do OndHOi, 06 BOH He pyxanbc i He TpickotinPiJ qac nepeBe3eHH.
- 3aIexHo BID moJei NiHimItb nepeHIO qactHy XoIoDnJIbHnka, uO6 NOro 6yNo JERwe BIKOTn, a6o NiHIMtB BnpiBnHOBaHbHi rBnHTn, uO6 BOHn He WkprBaHn NiIIOrgy. DInB. po3dIIIN «BupiBnHOBaHHr DBepT» a60 «BupiBnHOBaHHr XoIoDnJIbHnka Ta 3akpNbAHHH DBepT」.
- 3amotaiTe KneiKOIO CTpiKIOO 3aKpNTi DBePcTAtn npIMOTaTe uHyp XNBJIeHHN DO 3aJNbOCTOPOHXoJOnJIbHnKa.
KoI nepeBe3eTe xOLOdINbHnK y HOBe npMiiueHHa, BCTaBTE BcI DeTJI Ha MICe N O3HaNOMTeCb i3 BkA3iBkAmn 3 PO3DiYy «InCTpyKci 3i BCTaHOBnEHnra>. TaKoX, kXIOOnbHNky e ABtOMaTHnI rTOyBaJNbOy, He 3a6yDbTe NiDKlIOuHTn BOIDOpOBiD DO XOLOdINbHnKa.
ПОШУК I YCUHEHЯ HECПРABHOCTЕN
CnoaTky cnpo6yIte HabeDeHi TyT cnOc6n BupiueHnn, moKJInBO, Bdactbca 6e3 BkJInKy CnyK6n TexHicHOi nIDtpmKn.
ПОТЕДЖЕня

He6e3neka ypaXeHHNe eNeKTPuHnM CTpyMOM
PiiEynIe do 3aemHeoI p03eKn.
He npn6naaTe KOHTaKT 3a3eMJIeHHra.
He BnKOpncTObyTe aanTep.
He BnKOpncTObuYte noObXyBaU.
HedotpmaHHaix IHCTpykui MoKe np3BecTu Do cMepti, noKexi a6o ypaXeHHa eNEKTPuHMM CTpyMOM.
x 11, nnnn nn nnnn nn nnnn nn nnnn nn
www.whirlpool.eu www.whirlpool.eu
:17 7 nnnn nn ninnn nn nnnnnn
nnnnnnnnnnn
TNTNNTNIIO
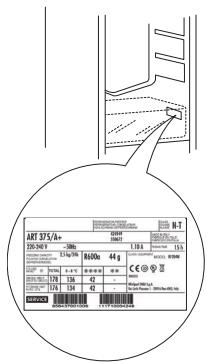
N
| الترجمة | الترجمة | الترجمة |
| الترجمة الحرفية | ||
| 24 مaturity 24 مaturity | . . . . . . . . . . . . . . . . . . . . . . . . . . . . . . . . . . . . . . . . . . . . . . . . . . . . . . . . . . . . . . . . . . . . . . . . . . . . . . . . . . . . . . . . . . . . . . . . . . . . . | . . . . . . . . . . . . . . . . . . . . . . . . . . . . . . . . . . . . . . . . . . . . . . . . . . . . . . . . . . . . . . . . . . . . . . . . . . . . . . . . . . . . . . . . . . . . . . . . . . . . . . . . . . . . . . . . . . . . . . . . . . . . . . . . . . . . . . . . . . . . . . . . . . . . . . . . . . . . . . . . . . . . . . . . . . . . . . . . . . . . . . . . . . . . . . . . . . . . . . . - . . . . . . . . . . . . . . . . . . . . . . . . . . . . . . . . . . . . . . . . . . . . . . . . . . . . . . . . . . . . . . . . . . . . . . . . . . . . . . . . . . . . . . . . . . . . . . . . . . . ? . . . . . . . . . . . . . . . . . . . . . . . . . . . . . . . . . . . . . . . . . . . . . . . . . . . . . . . . . . . . . . . . . . . . . . . . . . . . . . . . . . . . . . . . . . . . . . . . . . . ; . . . . . . . . . . . . . . . . . . . . . . . . . . . . . . . . . . . . . . . . . . . . . . . . . . . . . . . . . . . . . . . . . . . . . . . . . . . . . . . . . . . . . . . . . . . . . . . . . . . - . . . . . . . . . . . . . . . . . . . . . . . . . . . . . . . . . . . . . . . . . . . . . . . . . . . . . . . . . . . . . . . . . . . . . . . . . . . . . . . . . . . . . . . . . . . . . . . . . . . - - . - . - . - . - . - . - . - . - . - . - . - . - . - . - . - . - . - . - . - . - . - . - . - . - . - . - . - . - . - . - . - . - . - . - . - . - . - . - . - . - . - . - . - . - . - . - . - . - . - . - - - - - - - - - - - - - - - - - - - - - - - - - - - - - - - - - - - - - - - - - - - - - - - - - - - - - - - - - - - - - - - - - - - - - - - - - - - - - - - - - - - - - - - - - - - - - - - - - - - - - - - - - - - - - - - - - - - - - - - - - - - - - - - - - - - - - - - - - - - - - - - - - - - - - - - - - - - - - - - - - - - - - - - - - - - - - - - - - - - - - - - - - - - - - - - - - - - - - - - - - - - - - - - - - - - - - - - - - - - - - - - - - - - - - - - - - - - - - - - - - - - - - - - - - - - - - - - - - - - - - - - - - - - - - - - - - - - - - - - - - - - - - - - - - - - - - - - - - - - - - - - - - - - - - - - - - - - - - - - - - - - - - - - - - - - - - - - - - - - - - - - - - - - - - - - - - - - - - - - - - - - - - - - - - - - - - - - - - - - - - - - - - - - - - - - - - - - - - - - - - - - - - - - - - - - - - - - - - - - - - - - - - - - - - - - - - - - - - - - - - - - - - - - - - - - - - - - - - - - - - - - - - - - - - - - - - - - - - - - - - - - - - - - - - - - - - - - - - - - - - - - - - - - - - - - - - - - - - - - - - - - - - - - - - - - - - - - - - - - - - - - - - - - - - - - - - - - - - - - - - - - - - - - - - - - - - - - - - - - - - - - - - - - - - - - - - - - - - - - - - - - - - - - - - - - - - - - - - - - - - - - - - - - - - - - - - - - - - - - - - - - - - - - - - - - - - - - - - - - - - - - - - - - - - - - - - - - - - - - - - - - - - - - - - - - - - - - - - - - - - - - - - - - - - - - - - - - - - - - - - - - - - - - - - - - - - - - - - - - - - - - - - - - - - - - - - - - - - - - - - - - - - - - - - - - - - - - - - - - - - - - - - - - - - - - - - - - - - - - - - - - - - - - - - - - - - - - - - - - - - - - - - - - - - - - - - - - - - - - - - - - - - - - - - - - - - - - - - - - - - - - - - - - - - - - - - - - - - - - - - - - - - - - - - - - - - - - - - - - - - - - - - - - - - - - - - - - - - - - - - - - - - - - - - - - - - - - - - - - - - - - - - - - - - - - - - - - - - - - - - - - - - - - - - - - - - - - - - - - - - - - - - - - - - - - - - - - - - - - - - - - - - - - - - - - - - - - - - - - - - - - - - - - - - - - - - - - - - - - - - - - - - - - - - - - - - - - - - - - - - - - - - - - - - - - - - - - - - - - - - - - - - - - - - - - - - - - - - - - - - - - - - - - - - - - - - - - - - - - - - - - - - - - - - - - - - - - - - - - - - - - - - - - - - - - - - - - - - - - - - - - - - - - - - - - - - - - - - - - - - - - - - - - - - - - - - - - - - - - - - - - - - - - - - - - - - - - - - - - - - - - - - - - - - - - - - - - - - - - - - - - - - - - - - - - - - - - - - - - - - - - - - - - - - - - - - - - - - - - - - - - - - - - - - - - - - - - - - - - - - - - - - - - - - - - - - - - - - - - - - - - - - - - - - - - - - - - - - - - - - - - - - - - - - - - - - - - - - - - - - - - - - - - - - - - - - - - - - - - - - - - - - - - - - - - - - - - - - - - - - - - - - - - - - - - - - - - - - - - - - - - - - - - - - - - - - - - - - - - - - - - - - - - - - - - - - - - - - - - - - - - - - - - - - - - - - - - - - - - - - - - - - - - - - - - - - - - - - - - - - - - - - - - - - - - - - - - - - - - - - - - - - - - - - - - - - - - - - - - - - - - - - - - - - - - - - - - - - - - - - - - - - - - - - - - - - - - - - - - - - - - - - - - - - - - - - - - - - - - - - - - - - - - - - - - - - - - - - - - - - - - - - - - - - - - - - - - - - - - - - - - - - - - - - - - - - - - - - - - - - - - - - - - - - - - - - - - - - - - - - - - - - - - - - - - - - - - - - - - - - - - - - - - - - - - - - - - - - - - - - - - - - - - - - - - - - - - - - - - - - - - - - - - - - - - - - - - - - - - - - - - - - - - - - - - - - - - - - - - - - - - - - - - - - - - - - - - - - - - - - - - - - - - - - - - - - - - - - - - - - - - - - - - - - - - - - - - - - - - - - - - - - - - - - - - - - - - - - - - - - - - - - - - - - - - - - - - - - - - - - - - - - - - - - - - - - - - - - - - - - - - - - - - - - - - - - - - - - - - - - - - - - - - - - - - - - - - - - - - - - - - - - - - - - - - - - - - - - - - - - - - - - - - - - - - - - - - - - - - - - - - - - - - - - - - - - - - - - - - - - - - - - - - - - - - - - - - - - - - - - - - - - - - - - - - - - - - - - - - - - - - - - - - - - - - - - - - - - - - - - - - - - - - - - - - - - - - - - - - - - - - - - - - - - - - - - - - - - - - - - - - - - - - - - - - - - - - - - - - - - - - - - - - - - - - - - - - - - - - - - - - - - - - - - - - - - - - - - - - - - - - - - - - - - - - - - - - - - - - - - - - - - - - - - - - - - - - - - - - - - - - - - - - - - - - - - - - - - - - - - - - - - - - - - - - - - - - - - - - - - - - - - - - - - - - - - - - - - - - - - - - - - - - - - - - - - - - - - - - - - - - - - - - - - - - - - - - + - - - - - - - - - - - - - - - - - - - - - - - - - - - - - - - - - - - - - - - - - - - - - - - - - - - - - - - - - - - - - - - - - - - - - - - - - - - - - - - - - - - - - - - - - - - - - - - - - - - . - - - - - - - - - - - - - - - - - - - - - - - - - - - - - - - - - - - - - - - - - - - - - - - - - - - - - - - - - - - - - - - - - - - - - - - - - - - - - - - - - - - - - - - - - - - - - - - - - - - > - - - - - - - - - - - - - - - - - - - - - - - - - - - - - - - - - - - - - - - - - - - - - - - - - - - - - - - - - - - - - - - - - - - - - - - - - - - - - - - - - - - - - - - - - - - - - - - - - - - = - - - - - - - - - - - - - - - - - - - - - - - - - - - - - - - - - - - - - - - - - - - - - - - - - - - - - - - - - - - - - - - - - - - - - - - - - - - - - - - - - - - - - - - - - - - - - - - - - - - + - - + - - - - - - - - - - - - - - - - - - - - - - - - - - - - - - - - - - - - - - - - - - - - - - - - - - - - - - - - - - - - - - - - - - - - - - - - - - - - - - - - - - - - - - - - - - - - - - - - . - - . - - - - - - - - - - - - - - - - - - - - - - - - - - - - - - - - - - - - - - - - - - - - - - - - - - - - - - - - - - - - - - - - - - - - - - - - - - - - - - - - - - - - - - - - - - - - - - - - . . . . . . . . . . . . . . . . . . . . . . . . . . . . . . . . . . . . . . . . . . . . . . . . . . . . . . . . . . . . . . . . . . . . . . . . . . . . . . . . . . . . . . . . . . . . . . . . . . ? ? . . . . . . . . . . . . . . . . . . . . . . . . . . . . . . . . . . . . . . . . . . . . . . . . . . . . . . . . . . . . . . . . . . . . . . . . . . . . . . . . . . . . . . . . . . . . . . . . . . ? 100% 100% 100% 100% 100% 100% 100% 100% 100% 100% 100% 100% 100% 100% 100% 100% 100% 100% 100% 100% 100% 100% 100% 100% 100% 100% |
N
| الله | الله | الله |
| الله نهش رهورن نهش رهورن نهش رهورن نهش رهورن نهش رهورن نهش رهورن نهش رهورن نهش رهورн نهش رهورن نهش رهورن نهش رهورن نهش رهورн نهش رهورн نهش رهورн نهش رهورн نهش رهورн نهش رهورн نهش رهورн نهش رهورн نهش رهورн نهش رهورн نهش رهورн نهش رهورн نهش رهورн نهش رهورн نهش رهورн ن該ر الله نهش رهورن نهش رهورн نهش رهورн نهش رهورн نهش رهورн ن該ر الله نهش رهورن نهش رهورن نهش رهورн ن該ر الله نهش رهورن نهش رهورн ن該ر الله نهش رهورن نهش رهورн ن該ر الله نهش رهورн نهش رهورн ن該ر الله نهش رهورн ن該ر الله نهش رهورн ن該ر الله نهش رهورн ن該ر الله نهش رهورн ن該ر الله نهش رهورн ن該ر الله نهش رهورн ن該ر الله نهش رهورн ن該ر الله نهش رهورн ن该ر الله نهش رهورн ن該ر الله نهش رهورн ن該ر الله نهش رهورн ن該ر الله نهش رهورн ن該ر الله نهش رهورн ن該ر الله نهش رهورн ن該ر الله نهش رهورн ن該ر الله نهش رheeورن ن該ر الله نهش رهورн ن該ر الله نهش رهورн ن該ر الله نهش رهورн ن該ر الله نهش رهورн ن該ر الله نهش رهورн ن該兒 الله نهش رهورн ن該兒 الله نهش رهورн ن該兒 الله نهش رهورн ن該兒 الله نهش رهورн ن該兒 الله نهش رهورн ن該兒 الله نهش رهورн ن該兒 الله نهش رهورн ن該兒 الله نهش ره线上线下 الله نهش ره线上线下 الله نهش ره线上线下 الله نهش ره线上线下 الله نهش ره线上线下 الله نهش ره线上线下 الله نهش ره线上线下 الله نهش ره线上线下 الله نهش ره线上线下 الله نهش ره线上线下 الله نهش ره线上线下 الله نهش ره线上线下 |
#

wnn nn no
nnnnnnnnnnnnnnn
n nn n nn nnnn
.
.7nnn nnnu n
nnnnn n nn, nnnn nn nnnn nn
. nnnn no917 nx |n7 w .3
.4
.5
00000000000000000000000000000000000000000000
.77777777777777
7
NINNNNINNINNINNINNINNIN
"nnn nn nnnnnnnnnnnnnnnnnnnnnnnnnnnnnnnnnnnnnnnnnnnnnnnnnnnnnnnnnnnnnnnnnnnnnnnnnnnnnnnnnnnnnnnnnnnnnnnnnnnnnnnnnnnnnnnnnnnnnnnnnnn
8
.
yNn nn nnnnnnnnnnnnnnnnnnnnnnnnnnnnnnnnnnnnnnnnnnnnnnnnnnnnnnnnnnnnnnnnnnnnnnnnnnnnnnnnnnnnnnnnnnnnnnnnnnnnnnn
.7n7 nn nnnn nn nnnn nnnn
.1
.2
n n nn nnnnnnnnnnnnnnnnnnnnnnnnnnnnnnnnnnnnnnnnnnnnnnnnnnnnnnnnnnnnnnnnnnnnnnnnnnnnnnnnnnnnnnnnnnnnnnnnnnnnnnnnnnnnnnnnnnnnnnnnnnnnnnnnnnnnnnnnnnnnnnnnnnn
DUNXINJIN7T
.3
nyn
. 1
#
LED n nn nnnn nnnnnnnnnnnnnnnnnnnnnnnnnnnnnnnnnnnnnnnnnnnnnnnnnnnnnnnnnnnnnnnnnnnnnnnnnnnnnnnnnnnnnnnnnnnnnnnnnnnnnnnnnnnnnnnnnnn
yynnnn nn nnnn
niUsin
n nn nnnnnnnnnnnnnnnnnnnnnnnnnnnnnnnnnnnnnnnnnnnnnnnnnnnnnnnnnnnnnnnnnnnnnnnnnnnnnnnnnnnnnnnnnnnnn
.1
790X7 711111111111111111111.2
J7n nn nn nn nn nn nn nn nn nn nn nn nn nn nn nn nn nn nn nn nn nn nn nn nn nn nn nn nn nn nn nn nn nn nn nn nn nn nn nn nn nn nn nn nn nn nn nn nn nn nn nn nn nn nn nn nn nn nn nn nn nn nn nn nn nn nn nn nn nn nn nn nn nn nn nn nn nn nn nn nn nn nn nn nn nn nn nn nn nn nn nn nn nn nn nn nn nn nn nn nn
.3
. nnnn nn (O) 100
. nnnn no9ni7 nx iinu .4
n nn nnnnnnnnnnnnnnn
yoyn nn nnnnnnnnnnnnnnnnnnnnnnnnnnnnnnnnnnnnnnnnnnnnnnnnnnnnnnnnnnnnnnnnnnnnnnnnnnn
"n nn nnnnnnn"
.1
nuiin nnn nn nn nn nn nn .2
.
(0) 1
nnnn nn nnnn nn nnnn nn nnnn nn nnnn
.
.3
nun" 100 .nnnnn nnnn 4
"777
.5
y ynn nn nynn nnn nnn nnn nnn nnn nnn nnn nnn nnn nnn nnn nnn nnn nnn nnn nnn nnn nnn nnn nnn nnn nnn nnn nnn nnn nnn nnn nnn nnn nnn nnn nnn nnn nnn nnn nnn nnn nnn nnn nnn nnn nnn nnn nnn nnn nnn nnn nnn nnn nnn nann
.19 000000000000000000000000000000
.
n001- n n n79-2 11x
:
- 17.17.17.17.17.17.17.17.17.17.17.17.17.17.17.17.17.17.17.17.17.17.17.17.17.17.17.17.17.17.17.17.17.17.
n nn nnnn nnnnnnnnnnnnnnnnnnnnnnnnnnnnnnnnnnnnnnnnnnnnnnnnnnnnnnnnnnnnnnnnnnnnnnnnnnnnnnnnnnnnnnnnnnnnnnnnnnnnnnnnn
:nnn nn nnnn nn nnnn nn
1000 100X Tn X
000 000X
X
17

nniin nni
Tn nn nnnn
.977xixi0n7,ni7n7y
WQ9 B1LUK, () wnnn nn nnnn nn nn nn nn nn nn nn nn nn nn nn nn nn nn nn nn nn nn nn nn nn nn nn nn nn nn nn nn nn nn nn nn nn nn nn nn nn nn nn nn nn nn nn nn nn nn nn nn nn nn nn nn nn nn nn nn nn nn nn nn nn nn nn nn nn nn nn nn nn nn nn nn nn nn nn nn nn nn nn nn nn nn nn nn nn nn nn nn nn nn nn nn nn nn nn nn nn nn nn nn
Tn
1111
.00000000000000000000000000000
n n -1
yNnNnNnNnNnNnNnNnNnNnNnNnNnNnNnNnNnNnNnNnNnNnNnNnNnNnNnNnNnNnNnNnNnNnNnNnNnNnNnNnNnNnNnNnNnNnNnNnNnNnN
.
71n 7yD7yIIONN NNNN NNNN

yNINIIN 7IONN NNNN NNNN
N 77777777777777777777777777777
Tn nnonni
Iionnnn nn nnnnnnnnnnnnnnnnnnnnnnnnnnnnnnnnnnnnnnnnnnnnnnnnnnnnnnnnnnnnnnnnnnnnnnnnnnnnnnnnnnnnnnn
.077 1079n
OIOIOIOIOIOIOIOIOIOIOIOIOIOIOIOIOIOIOIOIOIOIOIOIOIOIOIOIOIOIOIOIOIOIOIOIOIOIOIOIOIOIOIOIOIOIOIOIOIOIOIOIOIOIOIOIO
n nn nnnnnnnnnnnnnnnnnnnnnnnnnnnnnnnnnnnnnnnnnnnnnnnnnnnnnnnnnnnnnnnnnnnnnnnnnnnnnnnnnnnnnnnnnnnnn
:09n nnnn
1
in 1n nn n nn nn nn nn nn nn nn nn nn nn nn nn nn nn nn nn nn nn nn nn nn nn nn nn nn nn nn nn nn nn nn nn nn nn nn nn nn nn nn nn nn nn nn nn nn nn nn nn nn nn nn nn nn nn nn nn nn nn nn nn nn nn nn nn nn nn nn nn nn nn nn nn nn nn nn nn nn nn nn nn nn nn nn nn nn nn nn nn nn nn nn nn nn nn nn nn nn nn nn nn
:ODT OON NITINNNTNNTN
D'97 D'7 D'7 D'7 D'7 D'7 D'7 D'7 D'7 D'7 D'7 D'7 D'7 D'7 D'7 D'7 D'7 D'7 D'7 D'7 D'7 D'7 D'7 D'7 D'7 D'7 D'7 D'7 D'7 D'7 D'7 D'7 D'7 D'7 D'8
,
y.0Tn nIOI 10IOI 9TN .JIN INI .YN
JINN JIN NIN JINN JINN JINN
"nnn" nn n nn nn nn nn
y noonnnn nn nnnnnnnnnnnnnnnnnnnnnnnnnnnnnnnnnnnnnnnnnnnnnnnnnnnnnnnnnnnnnnnnnnnnnnnnnnnnnnnnnnnnnnnnnnnnnnnnnnnnnnn
3 777777777777777
Nnnn nnnnnnnnnnnnnnnnnnnnnnnnnnnnnnnnnnnnnnnnnnnnnnnnnnnnnnnnnnnnnnnnnnnnnnnnnnnnnnnnnnnnnnnnnnnnnnnnnnnnnnnnnnnnnnnnnnnnnnnnnnnnnnn
.07ONWnN
#
nnn nny
"non nn nn nnnn nn nn nn nn
2 7n nnnn nn nnnn nn nnnn nn nnnn
.
ninn nnnn nn nnnn nn nnnnn
n nn nnnnnnnnnnnnnnnnnnnnnnnnnnnnn
yannnnn nn nnnn nn nnnn nn nn nn nn nn nn nn nn nn nn nn nn nn nn nn nn nn nn nn nn nn nn nn nn nn nn nn nn nn nn nn nn nn nn nn nn nn nn nn nn nn nn nn nn nn nn nn nn nn nn nn nn nn nn nn nn nn nn nn nn nn nn nn nn nn nn nn nn nn nn nn nn nn nn nn nn nn nn nn nn nn nn nn nn nn nn nn
n nn nnnnnnnnnnnnnnnnnnnnnnnnnnnnnnnnnnnnnnnnnnnnnnnnnnnnnnnnnnnnnnnnnnnnnnnnnnnnnnnnnnnnnnnnnnnnnnnnnnnnnnnnnnnnnnnnnnn
#
nnnnnnnnnnnnnnnnnnnnnnnnnnnnnnnnnnnnnnnnnnnnnnnnnnnnnnnnnnnnnnnnnnnnnnnnnnnnnnnnnnnnnnnnnnnnnnnnnnnnnnnnnnnnn
n nn nnn nn nn nn nn nn nn nn nn nn nn nn nn nn nn nn nn nn nn nn nn nn nn nn nn nn nn nn nn nn nn nn nn nn nn nn nn nn nn nn nn nn nn nn nn nn nn nn nn nn nn nn nn nn nn nn nn nn nn nn nn nn nn nn nn nn nn nn nn nn nn nn nn nn nn nn nn nn nn nn nn nn nn nn nn nn nn nn nn nn nn nn nn nn nn nn nn nn nn nn nn
n nn nnnn nnnn nnnn nnnn nnnn nnnn
y y
.1n 10°C n nn nn nn nn -7°C
n nn nnnnnnnnnnnnnnnnn
| הכלהה | אכלהה |
| הכלהה 1° הכלהה 2° | ' ''''''''''''''''''''''''''''''''''''''''''''''''''' |
| '''''''''''''''''''''''''''''''''''''''''''''''''"'''''''''''''''''''''''''''''''''''''''''''''''''''''''''''''''''''''''''''''''''''''''''''''''''''' '''''''''''''''''''''''''''''''''''''''''''''''''' |
7 7 7 7 7 7 7 7 7 7 7 7 7 7 7 7 7 7 7 7 7 7 7
ynnn nn n nn
y
n nn nnnnnnnnnnnnnnnnnnnnnnnnnnnnnnnnnnnnnnnnnnnnnnnnnnnnnnnnnnnnnnnnnnnnnnnnnnnnnnnnnnnnnnnnnnnnnnnnnnnnnnnnn
.
n nn nnnn nn nn nn nn nn nn nn nn nn nn nn nn nn nn nn nn nn nn nn nn nn nn nn nn nn nn nn nn nn nn nn nn nn nn nn nn nn nn nn nn nn nn nn nn nn nn nn nn nn nn nn nn nn nn nn nn nn nn nn nn nn nn nn nn nn nn nn nn nn nn nn nn nn nn nn nn nn nn nn nn nn nn nn nn nn nn nn
3 7
TNTNNTNNTNNTNNTNNTNNTNNTNNTNNTNNTNNTNNTNNTNNTNNTNNTNNTNNTNNTNNTNNTNNTNNTNNTNNTNNTNNTNNTNNTNNTNNTNNTNNTNNTNNTNNTNNTN
H
nnnnnnnnnnnnnnnnnnnnnnnnnnnnnnnnnnnnnnnnnnnnnnnnnnnnn
n nn nnnnnnnnnnnnnnnnnnnnnnnnnnnnnnnnnnnnnnnnnnnnnnnnnnnnnnnnnnnnnnnnnnnnnnnnnnnnnnnnnnnnnnnnnnnnn
n nn nnnn
n n 24 nn nn nn nn
.
Jnnnnu 3 nn nnnnnn nn nnnnnn nn nnnnnn nn nnnnnn nn
n7 .977 1nn noon n7 niy 24 ,77 nn nn nn
n nn nnnn nn 24, nnnn noon
n nn nnnn nn nnnn nn nnnn nn nnnn nn nnnn nn nnnn nn nnnn nn nnnn nn nnnn nn nnnn nn nnnn nn nnnn nn nnnn nn nnnn nn nnnn nn nnnn nn nnnn nn nnnn nn nnnn nn nnnn nn nnnn nn nnnn nn nnnn nn nnnn nn nnnn nn nannn nn nnnn nn nnnn nn nnnn nn nnnn nn nnnn nn nnnn nn nnnn nn nnnn nn
JUNIIN JUIN
ynnn nn nnnn nn nnnnnnnnnnnnnnnnnnnnnnnnnnnnnnnnnnnnnnnnnnnnnnnnnnnnnnnnnnnnnnnnnnnnnnnnnnnnnnnnnnnnnnnnnnn
nnnnnnnnnnn no 3 un nnn
.
yin

y
(wnnnnnn nn nnnnnnnnnnnnnnnnnnnnnnnnnnnnnnnnnnnnnnnnnnnnnnnnnnnnnnnnnnnnnnnnnnnnnnnnnnnnnnnnnnnnnnnnnnnnnnn
JIOIXIIXIINNNNINNNNNNNNNNNNNNNNNNNNN
12°C
IINN NNNN NNNN NNNN NNNN NNNN
.
y n nn y nnnn nn nnnn nn nnnn nn nnnn nn nnnn nn nnnn nn nnnn nn nnnn nn nnnn nn nnnn nn nnnn nn nnnn nn nnnn nn nnnn nn nnnn nn nnnn nn nnnn nn nnnn nn nnnn nn nnnn nn nnnn nn nnnn nn nnnn nn nnnn nn nnnn nn nnnn
n nn nnnn
n nn nnnnnnnnnnnnnnnnnnnnnnnnnnnnnnnnnnnnnnnnnnnnnnnnnnnnnnnnnnnnnnnnnnnnnnnnnnnnnnnnnnnnnnnnnnnnnnnnnnn
n nn nnnnnnnnnnnnnnnnnnnnnnnnnnnnnnnnnnnnnnnnnnnnnnnnnnnnnnnnnnnnnnnnnnnnnnnnnnnnnnnnnnnnnnnnnnnnnnnnnnnnnnnnnnnnn
.
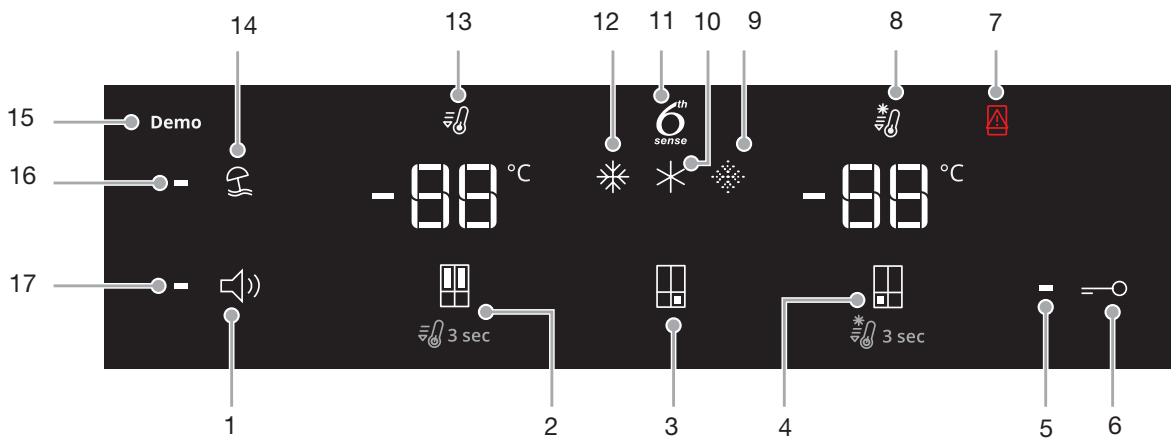
(WQ70900SXX,6WM24NIHAS
(6WM591NIHAS, WQ70900SXX
n97n nnn nn nnnnnnnnnnnnnnnnn
.
nni nni nnnn nn nnnn nnnn nnnn nnnn nnnn nnnn nnnn nnnn nnnn nnnn nnnn nnnn nnnn nnnn nnnn nnnn nnnn nnnn nnnn nnnn nnnn nnnn nnnn nnnn nnnn nnnn nnnn nnnn nnnn nnnn nnnn nnnn nnnn nnnn
nniin nnnn7 nn nnnn 1nnn
n nn nnnnnnnnnnnnnnnnnnn
nni 24 nnnn
JINNN JINNN JYI'97 NNIINON
nDnI D7n
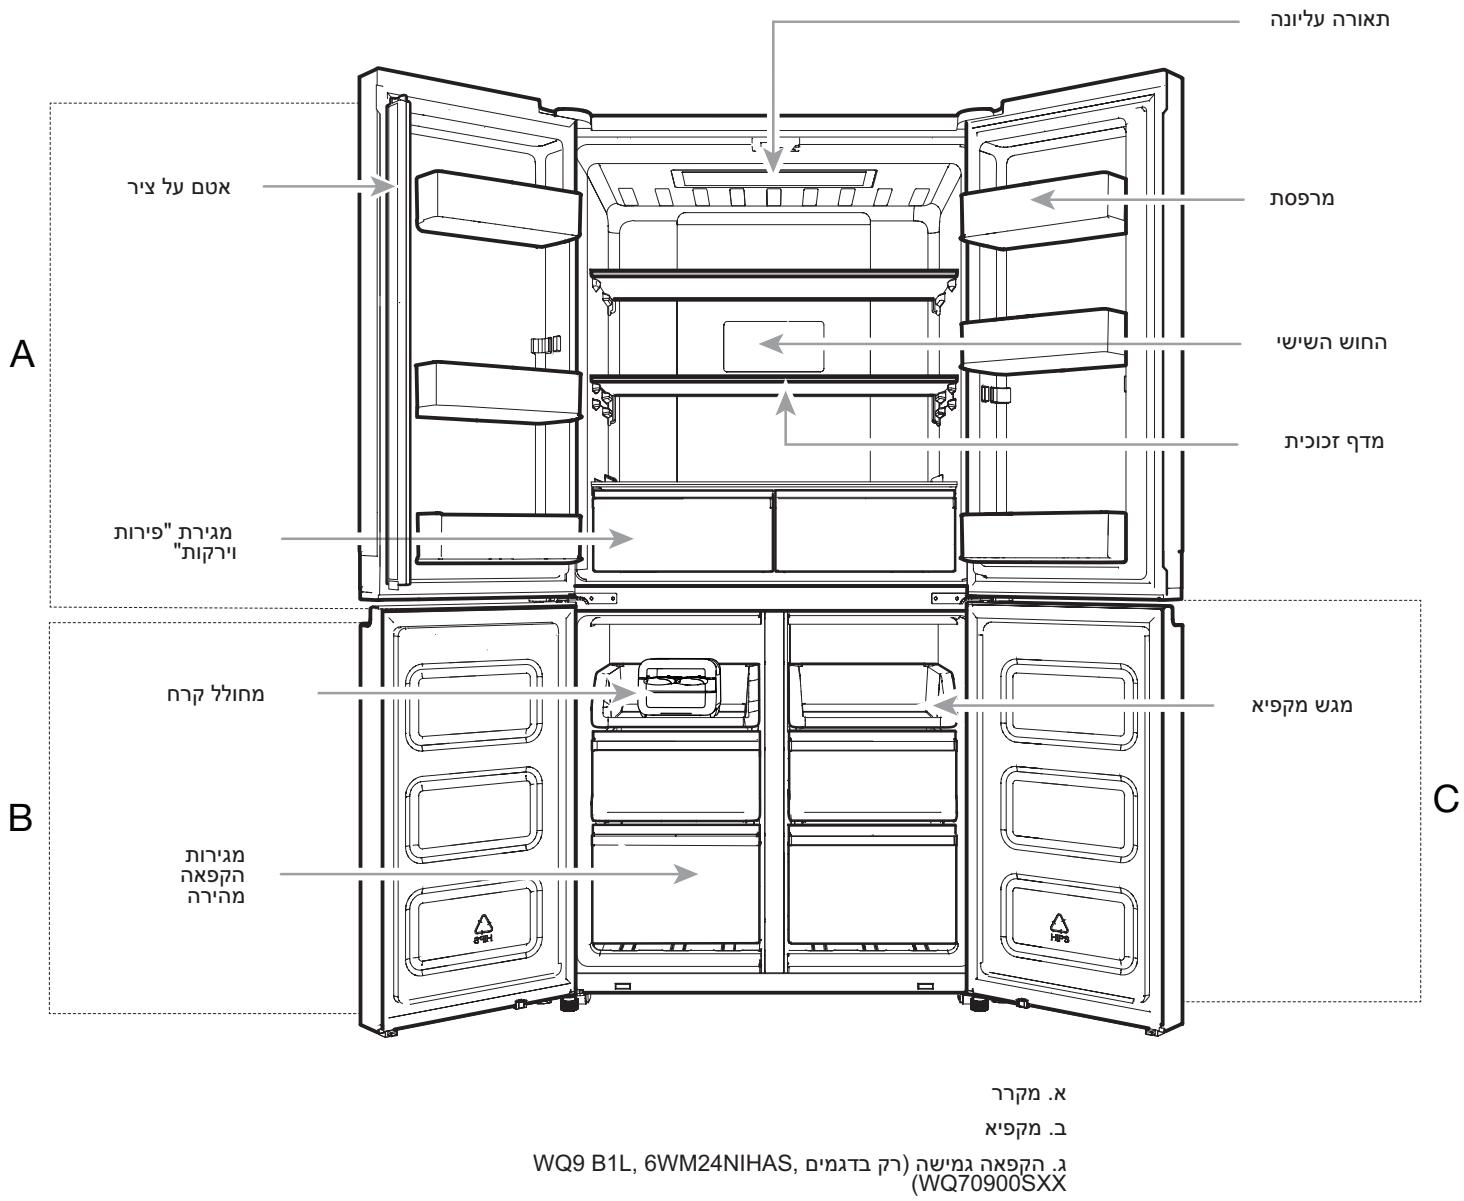
:WQ70900SXX-I WQ9 B1LUK) nnnn
387
208
595
603
nnn
N
70
:6WM24NIHAS) n93
70
:

:
1N IN)3 3 NNN nnnn nn nnnn nn nnnn nn nnnn nn nnnn nn nnnn nn nnnn nn nnnn nn nnnn nn nnnn nn nnnn nn nnnn nn nnnn nn nnnn nn nnnn nn nnnn nn nnnn nn nnnn nn nnnn nn nnnn nn nnnn nn nnnn nn nnnn nn nnnn nn nnnn nn nnnn
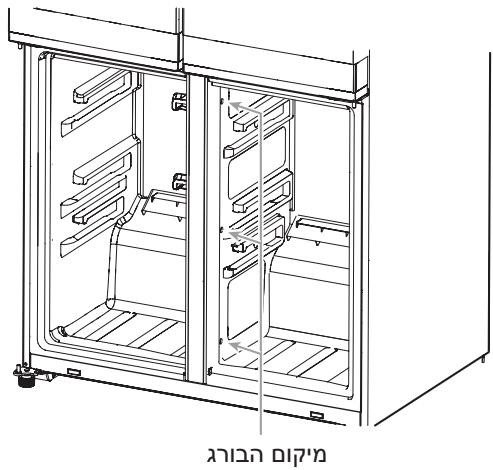
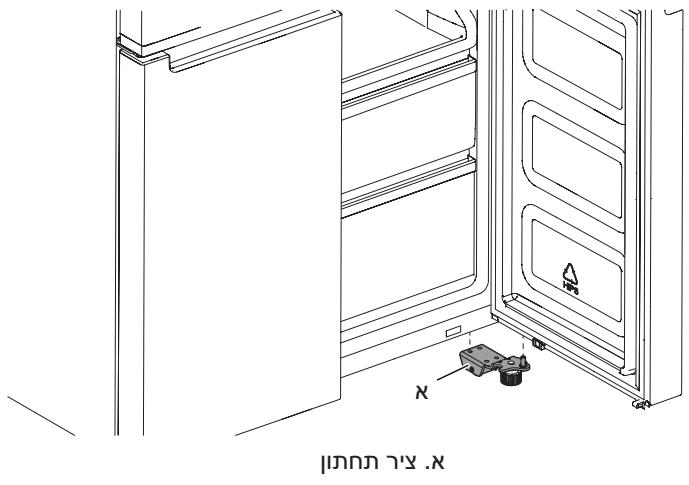
1
1.1 2
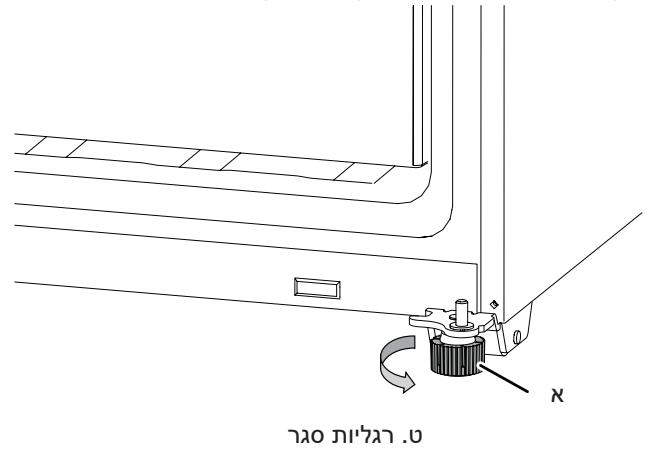
n nn nnnnnnnnnnnnnnnnnnnnnnnnnnnnnnnnnnnnnnnnnnnnnnnnnnnnnnnnnnnnnnnnnnnnnnnnnnnnnnnnnnnnnnnnnnnnnnnnnnnnnnnnnnnnnnnnnnnnnnnnnnnnnnnnnnnnnnnnnnnnnnnnn
n nn nnn
1.1
2.
3.
xnnn nn nnn
1
.2
.3
1910
.5 1n nn nnnn nnnn .1 2
n nn nnnnnnnnnnnnnnnnnnn
1 1
6 n nn 2 on 09 n nn nn nn nn nn nn nn nn nn nn nn nn nn nn nn nn nn nn nn nn nn nn nn nn nn nn nn nn nn nn nn nn nn nn nn nn nn nn nn nn nn nn nn nn nn nn nn nn nn nn nn nn nn nn nn nn nn nn nn nn nn nn nn nn nn nn nn nn nn nn nn nn nn nn nn nn nn nn nn nn nn nn nn nn nn nn nn nn nn nn nn nn nn nn nn nn nn nn nn nn

yNNN
yin yin yin yin yin yin yin yin yin yin yin yin yin yin
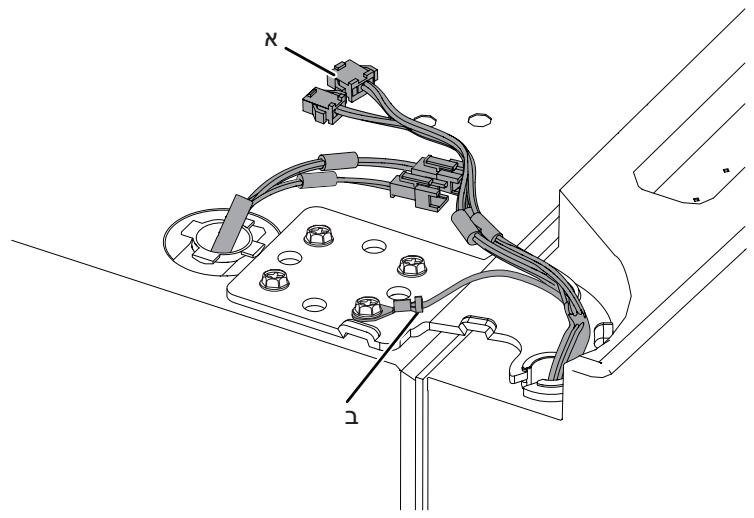
U11n y17n.x
(NTN) nnnn nn.
y 5 3
1
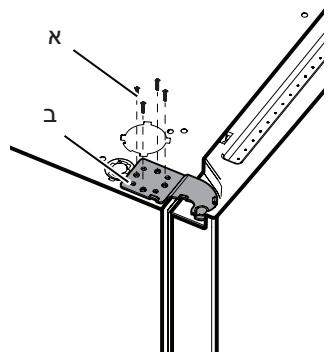
n"517x.
117y
JX .Dn nn nnnn nn nnnnnnnnnnnnnnnnnnnnnnnnnnnnnnnnnnnnnnnnnnnnnnnnnnnnnnnnnnnnnnnnnnnnnnnnnnnnnnnnnnnnnnnnnnnnnnnnnnnnnnnnnnnnnnnnnnnnnnnnnnnnnnnnnnnnnnnnn
4
ynnnnn nn nynnnn nn nnnnnn nn nnnnnn nn nnnnnn nn nnnnnn nn nnnnnn nn nnnnnn nn nnnnnn nn nnnnnn nn nnnnnn nn nnnnnn nn nnnnnn nn nnnnnn nn nnnnnn nn nnnnnn nn nnnnnn nn nnnnnn nn nnnnnn nn nnnnnn nn nnnnnn nn nnnnnn nn nannnnn nn nannnnn nn
0979 n"6 1X nnwnn7 y,ynnnn2 on
1
JINN 10000000000000000000000000000000000000000000000000
n nn nnnnnnnnnnnnnnnnnnnnnnnnnnnnnnnnnnnnnnnnnnnnnnnnnnnnnnnnnnnnnnnnnnnnnnnnnnnnnnnnnnnnnnnnnnnnnnnnnnnnnnnnnnnnnnnnnnnnnnnnnnnnnnnnnnnnn
1111111111111111111111 3
1111111111111111111111 4
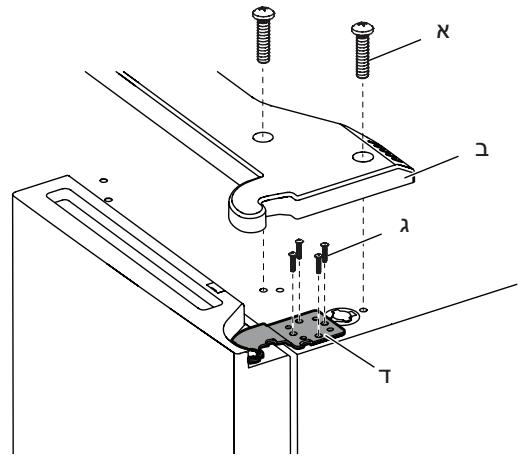
1y noonn
11y noon.
n"517x7n.
1
yN 5
.
nnn nn
n nn nnnnnnnnnnnnnnnnnnnnnnnnnnnnnnnnnnnnnnnnnnnnnnnnnnnnnnnnnnnnnnnnnnnnnnnnnnnnnnnnnnnnnnnnnnnnn
J7n nnon
1
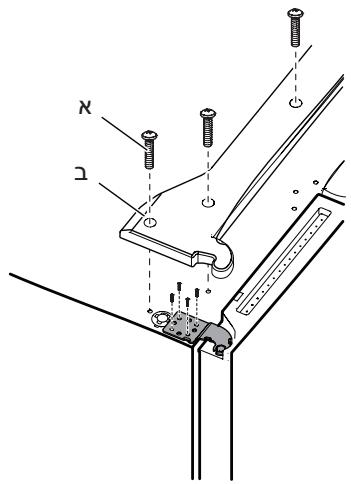
1
y noon.
n nn nnnnnnnnnnnnn
n nn nnnnnnnnnnnnnnnnnnnnnnnnnnnnnnnnnnnnnnnnnnnnnnnnnnnnnnnnnnnnnnnnnnnnnnnnnnnnnnnnnnnnnnnnnnnnnnnnnnnnnnnnnnn
nN 17n N nN nN nN nN nN nN nN nN nN nN nN nN nN nN nN nN nN nN nN nN nN nN nN nN nN nN nN nN nN nN nN nN nN nN nN nN nN
. nnnn nn nnnn nn nn nn nn nn nn nn nn nn nn nn nn nn nn nn nn nn nn nn nn nn nn nn nn nn nn nn nn nn nn nn nn nn nn nn nn nn nn nn nn nn nn nn nn nn nn nn nn nn nn nn nn nn nn nn nn nn nn nn nn nn nn nn nn nn nn nn nn nn nn nn nn nn nn nn nn nn nn nn nn nn nn nn
190X
.29on 057n nn n"6nnn


wnn nn no
nnnnnnnnnnnnnnnnn
ninnnnn nn nnnn nn nnnn nn
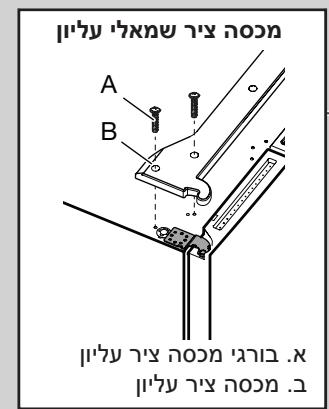
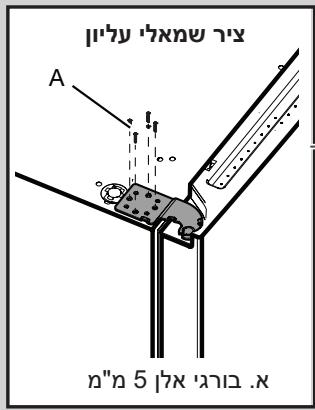
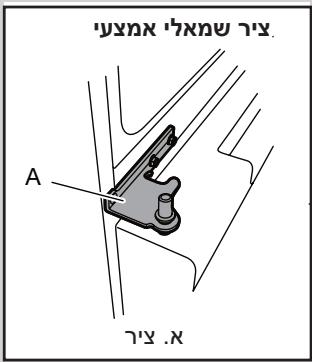
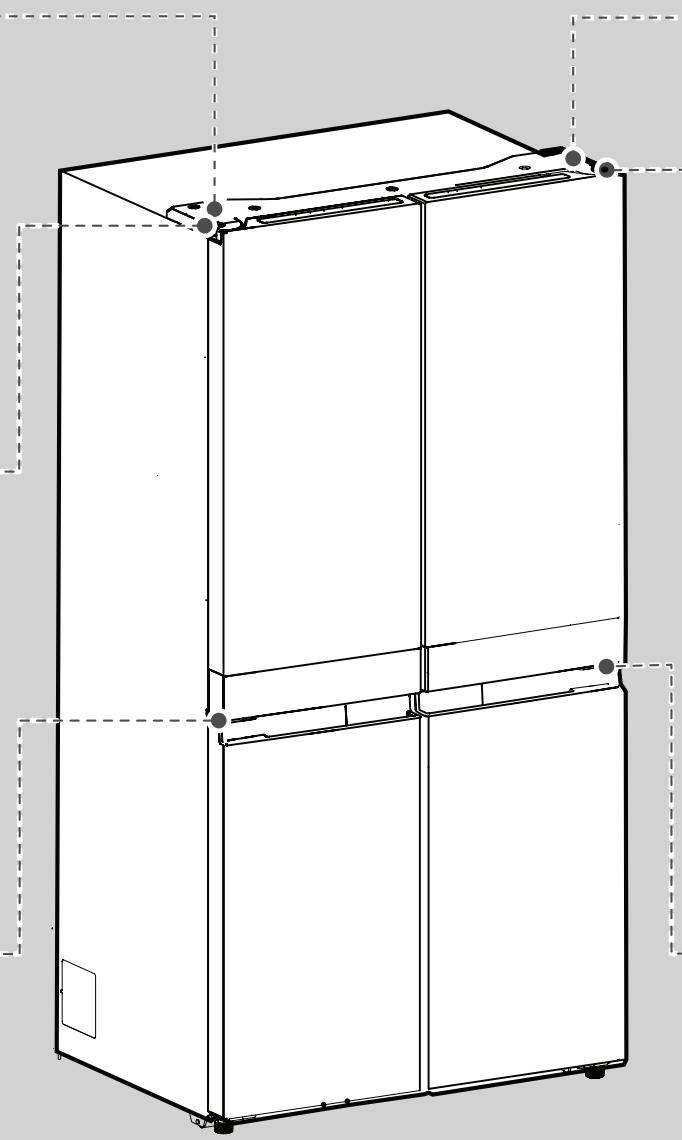
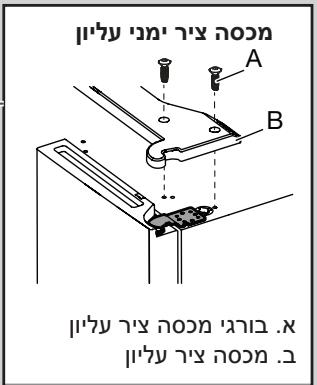
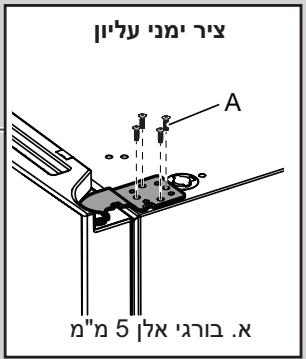
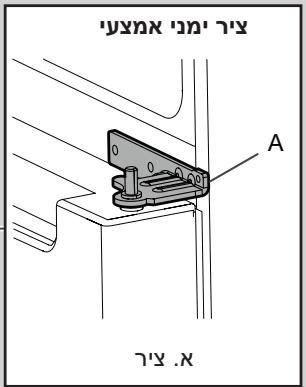
y
777n790n
n914 n nn nnnn nn n 838 nn nn
.
n nn nnnnnnnnnnnnnnnnnnnnnnnnnnnnnnnnnnnnnnnnnnnnnnnnnnnnnnnnnnnnnnnnnnnnnnnnnnnnn
nnn n nn
Tn7N nnnn nn nnnn nn
y. nynn nn nnnn nn nnnn nn nnnn nn
IN yN N INN D'NTN ENNN NNN NNN
"
.7
n nn nnn
.(B) nnnn (A) nn noon nn n
.1nnn nn n 13A n o
.3
nno nnnnnnnnnnnnnnnnnnnnnnnnnnnnnnnnnnnnnnnnnnnnnnnnnnnnnnnnnnnnnnnnnnnnnnnnnnnnnnnnnnnnnnnnnnnnnnnnnnnnnnnnnnnnnnnnnnnnnnnnnnn
n nn nnnn

nnon.
m.
:()nnnn
ywnn nn nnnn nn nnnn nn nnnnnnnnnnnnnnnnnnnnnnnnnnnnnnnnnnnnnnnnnnnnnnnnnnnnnnnnnnnnnnnnnnnnnnnnnnnnnnnnnnnnnnnnn
2 10
(nynnny)yniy
n nn nnnn nnnn nnnn nnnn nnnn nnnn nnnn nnnn nnnn nnnn nnnn nnnn nnnn nnnn nnnn nnnn nnnn nnnn nnnn nnnn nnnn nnnn nnnn nnnn nnnn nnnn nnnn nnnn nnnn nnnn nnnn nnnn nnnn nnnn nn
wnnnn
#
mnnn n
Jn nn nnnn nn n
nnnnn nn nnnn nn
.
.7nnn nnnuh
nannnn n nn, nnnn nn nnnn nn
yannnnn nn nnnnnnnnnnnnnnnnnnnnnnnnnnnnnnnnnnnnnnnnnnnnnnnnnnnnnnnnnnnnnnnnnnnnnnnnnnnnnnnnnnnnnnnnn
ninnnnnnnnnnnnnnnnnnnnnnnnnnnn
10,240-220nnn nn nnnnnnn
-60/50
ynnn nn nnnnnnnnnnnnnnnnnnnnnnnnnnnnnnnnnnnnnnnnnnnnnnnnnnnnnnnnnnnnnnnnnnnnnnnnnnnnnnnnnnnnnnnnnnnnnnnnnnnnn
.
nny nnnnnnnnnnnnnnnnnnnnnn
yinnn 07 ynnn nn nnnn
ywn nn
-
- y qnnn nn n nn n nn n nn
100
17 17 17 17 17 17 17 17 17 17 17 17
yinnnnn
IN DIOIIN. NNNN NNNN NNNN NNNN NNNN NNNN NNNN NNNN NNNN NNNN NNNN NNNN NNNN NNNN NNNN NNNN NNNN NNNN NNNN NNNN NNNN NNNN NNNN NNNN NNNN NNNN NNNN NNNN NNNN NNNN NNNN NNNN NNNN NNNN
n nn nnnnnnnnnnnnnnnnn
Tnun nn
JINI JINN NNNN NNNN IN IN IN
n nn nnnnnnnnnnnnnnnnnnnnnnnnnnnnnnnnnnnnnnnnnnnnnnnnnnnnnnnnnnnnnnnnnnnnnnnnnnnnnnnnnnnnnnnnnnnnnnnnnnnnnnn
nnn
w wwn nn nnnn nn (yonn
y
BD-142004-01. nnnn nn
n (777) n 777 777 777 777 777 777 777 777 777 777 777 777 777 777 777 777 777 777 777 777 777 777 777 777 777 77
y nnnn nn nnnn nn nnnn 4
n nn nnn nnn nnn nnn nnn nnn nnn nnn nnn nnn nnn nnn nnn nnn nnn nnn nnn nnn nnn nnn nnn nnn nnn nnn nnn nnn nnn nnn nnn nnn nnn nnn nnn nnn nnn nnn nnn nnn nnn nnn nnn nnn nnn nnn nnn nnn nnn nnn nnn nnn nenn nnn nnn nnn nnn nnn nnn nnn nnn nnn nnn nnn nnn nnn nnn nnn nnn nnn nnn nann nn nn nn nn nn nn nn nn nn nn nn nn nn nn nn nn nn nn nn nn nn nn nn nn nn nn nn nn nn nn nn nn nn nn nn nn nn nn nn nn nn nn nn nn nn nn nn nn nn nn nn nn nn nn nn nn nn nn nn nn nn nn nn nn nn nn nn nn nn nn nn nn nn nn nn nn nn nn nn nn nn nn nn nn nn nn nn nn nn nn nn nn nn nn nn nn nn
wnnn
JN 10000000000000000000000000000000000000000000000000000000000000000
JIOX. JNN IN YN, JNN JNN WNN N7 JX 4 JNN7 UNN N7 D'UNN D'UNN D'UNN D'UNN D'UNN D'UNN D'UNN D'UNN D'UNN D'UNN D'UNN D'UNN D'UNN D'UNN D'UNN D'UNN D'UNN D'UNN D'UNN D'UNN D'UNN D'UNN D'UNN D'UNN D'UNN D'UN
nnt 19nn7 nnnn nn nnnn nn nnnn nn nnnn nn nnnn nn nnnn nn nnnn nn nnnn nn nnnn nn nnnn nn nnnn nn nnnn nn nnnn nn nnnn nn nnnn nn nnnn nn nnnn nn nnnn nn nnnn nn nnnn nn nnnn nn nnnn nn nnnn nn nnnn nn nnnn nn nnnn
1700 IN D'INN D'T' D'YU D'YN 1X :nynx A. ynnn nn nnn nn n

n nn n nn nn nn nn nn nn nn nn nn nn nn nn nn nn nn nn nn nn nn nn nn nn nn nn nn nn nn nn nn nn nn nn nn nn nn nn nn nn nn nn nn nn nn nn nn nn nn nn nn nn nn nn nn nn nn nn nn nn nn nn nn nn nn nn nn nn nn nn nn nn nn nn nn nn nn nn nn nn nn nn nn nn nn nn nn nn nn nn nn nn nn nn nn nn nn nn nn nn
.
1
JINXONWYN7DYYNANY 4
XOONNNONN,
.7y19 77nn
JNNN NNNN NNNN NNNN NNNN NNNN NNNN NNNN NNNN
.
n nn nnnnnnnnnnnnnnnnnnnnnnnnnnnnnnnnnnnnnnnnnnnnnnnnnnnnnnnnnnnnnnnnnnnnnnnnnnnnnnnnnnnnnnnnnnnnnnnnnnnnnnnnnnnnnnnnnnnnnnnnnnnnnnnnnnnnnnnnnnnnnnnnnnnnn
.1iinn nn yinnu nuiu nnu
(°C).T 1
32^ 16 N ;32°C 10 SN
43°C 16 T ;38°C 16 ST
CFC nn nn nn nn nn nn nn nn (HC)R600a nn nn nn nn nn nn nn nn nn nn nn nn nn nn nn nn nn nn nn nn nn nn nn nn nn nn nn nn nn nn nn nn nn nn nn nn nn nn nn nn nn nn nn nn nn nn nn nn nn nn nn nn nn nn nn nn nn nn nn nn nn nn nn nn nn nn nn nn nn nn nn nn nn nn nn nn nn nn nn nn nn nn nn nn nn nn nn nn nn nn nn nn nn nn nn nn nn nn nn nn
TINN NnONyyn
yynnnn nn nynn nn nnnn 4
nON 77 nNIN NnNnNnNnNnNnNnNnNnNnNnNnNnNnNnNnNnNnNnNnNnNnNnNnNnNnNnNnNnNnNnNnNnNnNnNnNnNnNnNnNnNnNnNnNnNnNnNnNnNnNn
.
D
31
31
32
34
34
34
35
37
37
39
40
40
41
41
41
42
43
43
43
44
44 17
45
45
46
49
#

jai jbi

Juauiu Jia jue laibio priu
J 1
111 111 111 111 111 111 111 111 111 111 111 111 111 111 111 1
| الله | اللهاللهالله | اللهالله |
| اللهالله | اللهالله | اللهالله |
| \(رhaps\dots\)\(مُّلَت\dots\)\(عَلَت\dots\)\(الله\b\dots\)\(مُّلَت\dots\)\(عَلَت\dots\)\(الله\b\dots\)\(مُّلَت\dots\)\(عَلَت\dots\)\(الله\b\dots\)\(مُّلَت\dots\)\(عَلَت\dots\)\(الله\b\dots\)\(مُّلَت\ddots\) | \(مُّلَت\dots\)\(مُّلَت\dots\)\(مُّلَت\dots\)\(مُّلَت\dots\)\(مُّلَت\dots\)\(مُّلَت\dots\)\(مُّلَت\dots\)\(مُّلَت\dots\)\(m\dots\)\(m\dots\)\(m\dots\)\(m\dots\)\(m\dots\)\(m\dots\)\(m\dots\)\(m\dots\)\(m\dots\)\(m\dots\)\(m\dots\)\(m\dots\)\(m\dots\)\(m\dots\)\(m\dots\)\(m\dots\)\(m\dots\) \(m\dots\)\(m\dots\)\(m\dots\)\(m\dots\)\(m\dots\)\(m\dots\)\(m\dots\)\(m\dots\)\(m\dots\)\(m\dots\)\(m\dots\)\(m\dots\)\(m\dots\)\(m\dots\)\(m\dots\)\(m\dots\)\(m\dots\) | \(مُّلَت\dots\)\(mُّلَت\dots\)\(mُّلَت\dots\)\(mُّلَت\dots\)\(m\dots\)\(m\dots\)\(m\dots\)\(m\dots\)\(m\dots\)\(m\dots\)\(m\dots\)\(m\dots\)\(m\dots\)\(m\dots\)\(m\dots\)\(m\dots\)\(m\dots\)\(m\dots\)\(m\dots\)\(\dagger\) |
| \(مُّلَت\dots\)\(mُّلَت\dots\)\(m\dots\)\(m\dots\)\(m\dots\)\(m\dots\)\(m\dots\)\(m\dots\)\(m\dots\)\(m\dots\)\(m\dots\)\(m\dots\)\(m\dots\)\(m\dots\)\(m\dots\)\(n\dots\)\(n\dots\)\(n\dots\)\(n\dots\)\(n\dots\)\(n\dots\)\(n\dots\)\(n\dots\)\(n\dots\)\(n\dots\)\(n\dots\)\(n\dots\)\(n\dots\)\(n\dots\)\(n\dots\)\(n\dots\)\(n\dots\) \(n\dots\)\(n\dots\)\(n\dots\)\(n\dots\)\(n\dots\)\(n\dots\)\(n\dots\)\(n\dots\)\(n\dots\)\(n\dots\)\(n\dots\)\(n\dots\)\(n\dots\)\(n\dots\)\(n\dots\)\(n\dots\)\(n\dots\) | \(مُّلَت\dots\)\(mُّلَت\dots\)\(m\dots\)\(m\dots\)\(m\dots\)\(m\dots\)\(m\dots\)\(m\dots\)\(m\dots\)\(m\dots\)\(m\dots\)\(m\dots\)\(m\dots\)\(m\dots\)\(m\dots\) | \(مُّلَت\dots\)\(mُّلَ�\dots\)\(m\dots\)\(m\dots\)\(m\dots\)\(m\dots\)\(m\dots\)\(m\dots\)\(m\dots\)\(m\dots\)\(m\dots\)\(m\dots\)\(m\dots\)\(m\dots\)\(m\dots\)\(m\dots\)\(m\dots\)\(m\dots\)(\(n\dots\)) |
| \(مُّلَت\dots\)\(mُّلَت\dots\)\(m\dots\)\(m\dots\)\(m\dots\)\(m\dots\)\(m\dots\)\(m\dots\)\(m\dots\)\(m\dots\)\(m\dots\)\(m\dots\)\(m\dots\)\(m\dots\)\(m\) | \(m\dots\)\(m\dots\)\(m\dots\)\(m\dots\)\(m\dots\)\(m\dots\)\(m\dots\)\(m\dots\)\(m\dots\)\(m\dots\)\(m\dots\)\(m\dots\)\(m\dots\)\(m\dots\)\(m\dots\)\(m\dots\)\(m\dot\)\(m\dots\)\(m\dots\)\(m\dots\)\(m\dots\)\(m\dots\)\(m\dots\)\(m\dots\)\(m\dots\)\(m\dots\)\(m\dots\)\(m\dots\)\(m\dots\)\(m\dots\)\(m\dots\)\(m\dots\)\(m\dots\)\(n\dots\)\(n\dots\)\(n\dots\) \(n\dots\)\(n\dots\)\(n\dots\)\(n\dots\)\(n\dots\)\(n\dots\)\(n\dots\)\(n\dots\)\(n\dots\)\(n\dots\)\(n\dots\)\(n\dots\)\(n\dots\) \(n\dots\)\(n\dots\)\(n\dots\)\(n\dots\) | \(m\dots\)\(m\dots\)\(m\dots\)\(m\dots\)\(m\dots\)\(m\dots\)\(m\dots\)\(m\dots\)\(m\dots\)\(m\dots\)\(m\dots\)\(m\dots\)\(m\dots\)\(m\dots\)\(m\dots\)\(m\dots\)\(n\dots\) |
e.l l la l a
Ls. (juaill aolglle "aodll" aols 2y gall pajl) aoiaill p
SERVICE
:JdSd djl jic

sla
(1) led j 2004.
e 1
a a 1
l_x = 0, y = - 12x^2 + 14x + 1
2.
a 1
J
gagll lclallll jlaalll k gaaasall
JUAYI JIE www.whirlpool.eu
la 122 111 123 la lo 124 jS
jll jgoc
sddjgljbjg
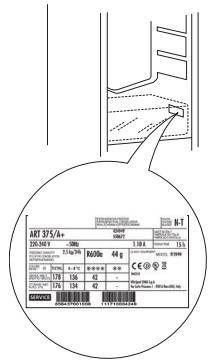
y
Jaii jaii jaii jaii jaii jaii jaii jaii jaii jaii jaii jaii jaii jaii jaii jaii jaii jaii jaii jaii jaii jaii jaii jaii jaii jaii jaii jaii jaii jaii jaii jaii jaii jaii jali
| الله | الإستعمال الحرفية | الإستعمال الحرفية |
| الترجمة الحرفية بعبيعة الحرفية 24 و بعبيعة الحرفية 24 | ملاوي بعبيعة الحرفية | ملاوي بعبيعة الحرفية |
| الترجمة الحرفية 24 و رشboo ملاوي الحرفية الحرفية 24 | ملاوي بعبيعة الحرفية | ملاوي بعبيعة الحرفية |
| "\"ملاوي الحرفية\" | ملاوي بعبيعة الحرفية | ملاوي بعبيعة الحرفية |
| "\"ملاوي الحرفية\" | ملاوي بعبيعة الحرفية | ملاوي بعبيعة الحرفية |
| "\"ملاوي الحرفية\" | ملاوي بعبيعة الحرفية | ملاوي بعبيعة الحرفية |
| "\"ملاوي الحlderانواني ملاوي الحرفية الحرفية 24 | ملاوي بعبيعة الحرفية | ملاوي بعبيعة الحرفية |
| "\"ملاوي الحlderانواني ملاوي الحرفية 24 | ملاوي بعبيعة الحرفية | mلاوي بعبيعة الحرفية |
| "\"ملاوي الحlderانواني ملاوي الحرفية 24 | mلاوي بعبيعة الحvaleداني ملاوي 24 | mلاوي 24 |
| "\"ملاوي الحlderانواني ملاوي 24 | mلاوي 24 | mلاوي 24 |
| "\"ملاوي 140000000000000000000000000000000000000000000000000000000000000000000000000000000000000000000000000000 | mلاوي 140000000000000000000000000000000000000000000000000000000000000000000000000000000000000000000000 | mلاوي 24 |
| "\"ملاوي 14000000000000000000000000000000000000000000000000000000000000000000000000000000000 | mلاوي 14000000000008888888888888888888888888888888888888888888888888888888888888888888888888888888888888888888888888888 | |
| "\"ملاوي 140000000000000000000000000000000000000000000000000000000000000000000000000000000000000000 | mلاوي 140000 | mلاوي 24 |
| "\"ملاوي 1400000000000000000000000000000000000000000000000000000000000000000000000000000 | mلاوي 24 | mلاوي 24 |
| "\"ملاوي 1400000000000000000000000000000000000000000000000000000000000000000000000000 | mلاوي 24 | mلاوي 24 |
| "\"ملاوي 141111111111111111111111111111111111111111111111111111111111111111111111111111111111111111111111111111 | mلاوي 24 | mلاوي 24 |
| "\"ملاوي 1411111111111111111111111111111111111111111111111111111111111111111111111111 | mلاوي 24 | mلاوي 24 |
| "\"مleaوي 1411111111111111111111111111111111111111111111111111111111111111111111111111111111111111111111111 | mلاوي (24) | mلاوي (24) |
| "\"مleaوي 141111111111111111111111111111111111111111111111111111111111111111111111111111111111111111 | mلاوي (24) | mلاawi (24) |
| "\"مleaوي 14111111111111111111111111111111111111111111111111111111111111111111111111111111111111 | mلاawi (24) | mlaawi (24) |
| "\"مleaوي 141111111111111111111111111111111111111111111111111111111111111111111111111 | mلاawi (24) | mlaawi (24) |
| "\"مleaوي 15111111111111111111111111111111111111111111111111111111111111111111 | mلاawi (24) | mlaawi (24) |
| "\"مleaوي 15111111 | mلاawi (24) | mlaawi (24) |
| "\"مleaوي 15111111 | mلاawi (24) | mlaawi (24) |
| "\"مleaوي 15111111 | mلاawi (24) | mlaawi (24) |
| "\"مleaوي 1521111 | mلاawi (24) | mlaawi (24) |
| "\"مleaوي 1521111 | mلاawi (24) | mlaawi (24) |
| "\"مleaوي 1521111 | mلاawi (24) | mlaawi (24) |
| "\"مleaوي 152111 | mلاawi (24) | mlaawi (24) |
| "\"مleaوي 152111 | mلاawi (24) | mlaawi (24) |
| "\"مleaوي 152111 | mلاawi (24) | mlaawi (24) |
| "\"مleaوي 152111 | mلاomega (24) | mlaawi (24) |
| "\"مleaوي 152111 | m leomega (24) | mlaawi (24) |
| "\"مleaوي 152111 | m leomega (24) | mlaawi (24) |
| "\"mleaوي 152111 | m leomega (24) | mlaawi (24) |
| "\"mleaوي 152111 | m leomega (24) | mlaawi (24) |
| "\"mleaوي 152111 | m leomega (24) | mlaawi (24) |
| "\"mleaوي 152211 | m leomega (24) | mlaawi (24) |
| "\"mleaوي 152211 | m leomega (24) | mlaawi (24) |
| "\"mleaوي 152211 | m leomega (24) | mlaawi (24) |
| "\"mleaوي 152211 | m leomega(24) | mlaawi (24) |
| "\"mleaوي 152211 | m leomega(24) | mlaawi (24) |
| "\"mleaوي 152211 | m leomega(24) | mlaawi (24) |
| "\"mleaوي 152211 | m leomega(24) | mlaomega (24) |
| "\"mleaوي 152211 | m leomega(24) | mlaomega (24) |
| "\"mleaوي 152211 | m leomega(24) | mlaomega (24) |
| "\"mleaوي 152211 | m leomega(24) | mlaomega (24) |
y
Jaii i 1
| الله | اللهالله | اللهالله |
| اللهاللهاللهاللهاللهاللهاللهاللهاللهاللهاللهاللهاللهاللهاللهاللهاللهاللهاللهاللهاللهاللهاللهاللهاللهاللهاللهاللهاللهاللهاللهاللهاللهاللهاللهاللهاللهاللهاللهاللهاللهاللهاللهاللهاللهاللهاللهاللهاللهاللهالPHA | اللهاللهاللهاللهاللهاللهاللهاللهاللهالPHA | اللهالله |
| اللهاللهاللهاللهاللهاللهاللهاللهاللهالPHA | .اللهالPHA | اللهالPHA |
| اللهاللهاللهالPHA | .اللهالPHA | اللهالPHA |
| اللهالPHA | .اللهالPHA | اللهالPHA |
| اللهالPHA | .اللهالPHA | اللهالPHA |
| اللهالPHA | .اللهالPHA | اللهالPHA |
| اللهالPHA | .اللهالPHA | اللهالPHA |
| اللهالPHA | .اللهالPHA | اللهالPHA |
| اللهالPHA | .اللهالpha | اللهالPHA |
| اللهالPHA | .اللهالpha | اللهالPHA |
| اللهالPHA | .اللهالpha | اللهالPHA |
| اللهالPHA | .اللهالpha | اللهالPHA |
| اللهالPHA | .اللهالpha | اللهالPHA |
| اللهالPHA | .اللهالpha | اللهالPHA |
| الPHA | .الPHA | الPHA |
| الPHA | .الPHA | الPHA |
| الPHA | .الPHA | الPHA |
| الPHA | .الPHA | الPHA |
| الPHA | .الPHA | الPHA |
| الPHA | .الPHA | الPHA |
| الPHA | .الPHA | الPHA |
| الPHA | .الPHA | الPHA |
| الPHA | .الPHA | الPHA |
#
a
.()
A
aalal 1
a
| الله | الإستعمال الحرفية | الإستعمال الحرفية | |
| الله: الله: الله:الله:الله:الله:الله:الله:الله:الله:الله:الله:الله:الله:الله:الله:الله:الله:الله:الله:الله:الله:الله:الله:الله:الله:الله:الله:الله:الله:الله:الله:الله:الله:الله:الله: | الله: الله: الله: الله: الله: الله: الله: الله: الله: الله: الله: الله: الله: الله: الله: الله: الله: الله: الله: الله: الله: الله: الله: الله: الله: الله: الله: الله: الله: الله: الله: الله: الله: الله: | "الله: الله: الله: الله: الله: الله: "الله: "الله: "الله: "الله: "الله: "الله: "الله: "الله: "الله: "الله: "الله: "الله: "الله: "الله: "الله: "الله: "الله: "الله: "الله: "الله: "الله: "الله: "الله: "الله: "الله: 'الله: "الله: "الله: "الله: "الله: "الله: "الله: "الله: "الله: "الله: "الله: "الله: "الله: "الله: "الله: "الله: "الله: "الله: "الله: "الله: "الله: "الله: "الله: "الله: "الله: “ "الله: "الله: "الله: "الله: "الله: "الله: "الله: "الله: "الله: "الله: "الله: "الله: "الله: "الله: "الله: "الله: "الله: "الله: "الله: "الله: "الله: "الله: "الله: "الله: "الله "الله "الله "الله "الله "الله "الله "الله "الله "الله "الله "الله "الله "الله "الله "الله "الله "الله "الله "الله "الله "الله "الله "الله "الله "الله | "الله: "الialele "الialele "الialele "الialele "الialele "الialele "الialele "الialele "الialele "الialele "الialele "الialele "الialele "الialele "الialele "الialele "الialele "الialele "الialele "الialele "الialele |
| "الialele "الialele "الialele "الialele "الialele "الialele "الialele "الialele "الialele "الialele "الialele "الialele "الialele "الialele "الialele "الialele "الialele "الialele "الialele "الialele | "الialele "الialele "الialele "الialele "الialele "الialele "الialele "الialele "الialele "الialele "الialele "الialele "الialele "الialele "الialele "الialele "الialele "الialele "الialele "الialese "الialele "الialele "الialele "الialele "الialele "الialele "الialele "الialele "الialele "الialele "الialele "الialele "الialele "الialele "الialele "الialele "الialele "الialele "الialele "الialese | "الialele "الialele "الialele "الialele "الialele "الialele "الialele "الialele "الialele "الialele "الialele "الialele "الialele "الialele "الialele "الialele "الialele "الialele "الialele "الialee "الialele "الialele "الialele "الialele "الialele "الialele "الialele "الialele "الialele "الialele "الialele "الialele "الialele "الialele "الialele "الialele "الialele "الialele "الialele "الialee |
.6gbal 1jala jgai gai balsi jia jia jia jai li aie
aagall a 15g 20y gill ill oall lal 20
AD = AQ OQ = BP
3
.4
Lai jie gao yu muol gai li .5
Jusll "Cttlll Clll 1" g jy d a y y Jx J x J x J x J x J x J x J x J x J x J x J x J x J x J x J x J x J x J x J x J x J x J x J x J x J x J x J x J x J x J x J x J x J x J x J x J x
1
2
Ciaiaiaiaiaiaiaiaiaiaiaiaiaiaiaiaiaiaiaiaiaiaiaiaiaiaiaiaiaiaiaiaiaiaiaiaiaiaiaiaiaiaiaiaiaiaiaiaiaiaiaiaiaiaiaiaiaiaiaiaiaiaiaiaiaiaiaiaiaiaiaiaiaiaiaiaiaiaiaiaiaiaiaiaiaiaiaiaiaiaiaiaia
1
Aailll lssg jlll 3
a#
jai jai ball jao aaiill gilg 15 glc oaiill glc kdo jao aiill ooi
.
#
L 1
a i y jui jai gill lly Jaiil cii ic 1y 1e o! 1i a
y
#
:
1
aaiialolalalbbsagaggaiagj jks1.2
aai i 1i ciiaai
| x - 1| = | x - 2| = 1
.3
g 2000
G 4
:
alilalililililililililililililililililililililililililililililililililililil
S OBC = 13S AOB = 12 × 12 × 3 × 4 = 6
aaii aiaiaiaai gaaai jai .1
.2
gall jol 15 gcl 20 y 111 111 111 111 111
alby (O) "alay" ciaaiy lce baiol jao yjaiy laa a gao jic 1y jaii jiall gcl ay iay jaii jaiy gall gajgai
G 3
"calil cialiai" paae r.3jll aai gai ai iie 4
.5
Caaag aagaaaagaaaagaaagaaagaaagaaagaaagaaagaaagaaagaaagaaagaaagaaagaaagaaagaaagaaagaaagaaagaaagaaagaaagaaagaaagaaagaaagaaagaaagaaagaaagaaagaaagaaagaaagaaagaaagaaagaaagaaagaaagaaagaaagaaagaaagaaagaaagaaagaaagaaagaaagaaagaaa
120 1
P_ A = 12
y gill gill l l bll all loa oal aol aol y gall ciaia
pI 111111111111111111111111111
| الإستعمال Y | الإستعمال X |
| الإستعمال Y الإستعمال X الإستعمال Y الإستعمال X | الإستعمال Y الإستعمال X الإستعمال Y الإستعمال X |
| الإستعمال Y الإستعمال X الإستعمال Y الإستعمال X | الإستعمال Y ال,enrollment X ال,enrollment X ال,enrollment X ال,enrollment X ال,enrollment X ال,enrollment X ال,enrollment X ال,enrollment X ال,enrollment X ال,enrollment X ال,enrollment X ال,enrollment X ال,enrollment X ال,enrollment X ال,enrollment X ال,enrollment X ال,enrollment X ال,enrollment X ال,enrollment X ال,enrollment X ال,enrollmentX ال,enrollment X ال,enrollment X ال,enrollment X ال,enrollment X ال,enrollment X ال,enrollment X ال,enrollment X ال,enrollment X ال,enrollment X ال,enrollment X ال,enrollment X ال,enrollment X ال,enrollment X ال,enrollment X ال,enrollment X ال,enrollment X ال,enrollment X ال,enrollment X ال,enrollment X ال,enrollment x ال,enrollment X ال,enrollment X ال,enrollment X ال,enrollment X ال,enrollment X ال,enrollment X ال,enrollment X ال,enrollment X ال,enrollment X ال,enrollment X ال,enrollment X ال,enrollment X ال,enrollment X ال,enrollment X ال,enrollment X ال,enrollment X ال,enrollment X ال,enrollment X ال,enrollment X ال,enrollmentx ال,enrollment X ال,enrollment X ال,enrollment X ال,enrollment X ال,enrollment X ال,enrollment X ال,enrollment X ال,enrollment X ال,enrollment X ال,enrollment X ال,enrollment X ال,enrollment X ال,enrollment X ال,enrollment X ال,enrollment X ال,enrollment X ال,enrollment X ال,enrollment X ال,enrollment X ال,enrollment.x ال,enrollment X ال,enrollment X ال,enrollment X ال,enrollment X ال,enrollment X ال,enrollment X ال,enrollment X ال,enrollment X ال,enrollment X ال,enrollment X ال,enrollment X ال,enrollment X ال,enrollment X ال,enrollment X ال,enrollment X ال,enrollment X ال,enrollment X ال,enrollment X ال,enrollment X ال,enrollment.X ال,enrollment X ال,enrollment X ال,enrollment X ال,enrollment X ال,enrollment X ال,enrollment X ال,enrollment X ال,enrollment X ال,enrollment X ال,enrollment X ال,enrollment X ال,enrollment X ال,enrollment X ال,enrollment X ال,enrollment X ال,enrollment X ال,enrollment X ال,enrollment X ال,enrollment X ال,enrollment× ال,enrollment X ال,enrollment X ال,enrollment X ال,enrollment X ال,enrollment X ال,enrollment X ال,enrollment X ال,enrollment X ال,enrollment X ال,enrollment X ال,enrollment X ال,enrollment X ال,enrollment X ال,enrollment X ال,enrollment X ال,enrollment X ال,enrollment X ال,enrollment X ال,enrollment X ال,enrollment × ال,enrollment X ال,enrollment X ال,enrollment X ال,enrollment X ال,enrollment X ال,enrollment X ال,enrollment X ال,enrollment X ال,enrollment X ال,enrollment X ال,enrollment X ال,enrollment X ال,enrollment X ال,enrollment X ال,enrollment X ال,enrollment X ال,enrollment X ال,enrollment X ال,enrollment X ال,enrollment. X ال,enrollment X ال,enrollment X ال,enrollment X ال,enrollment X ال,enrollment X ال,enrollment X ال,enrollment X ال,enrollment X ال,enrollment X ال,enrollment X ال,enrollment X ال,enrollment X ال,enrollment X ال,enrollment X ال,enrollment X ال,enrollment X ال,enrollment X ال,enrollment X ال,enrollment X ال,enitlement X ال,enrollment X ال,enrollment X ال,enrollment X ال,enrollment X ال,enrollment X ال,enrollment X ال,enrollment X ال,enrollment X ال,enrollment X ال,enrollment X ال,enrollment X ال,enrollment X ال,enrollment X ال,enrollment X ال,enrollment X ال,enrollment X ال,enrollment X ال,enrollment X ال,enrollment X ال,enstitution X ال,enrollment X ال,enrollment X ال,enrollment X ال,enrollment X ال,enrollment X ال,enrollment X ال,enrollment X ال,enrollment X ال,enrollment X ال,enrollment X ال,enrollment X ال,enrollment X ال,enrollment X ال,enrollment X ال,enrollment X ال,enrollment X ال,enrollment X ال,enrollment X ال,enrollment X ال,en- enrollment X ال,enrollment X ال,enrollment X ال,enrollment X ال,enrollment X ال,enrollment X ال,enrollment X ال,enrollment X ال,enrollment X ال,enrollment X ال,enrollment X ال,enrollment X ال,enrollment X ال,enrollment X ال,enrollment X ال,enrollment X ال,enrollment X ال,enrollment X ال,enrollment X ال,enrollment X ال,en– enrollment X ال,enrollment X ال,enrollment X ال,enrollment X ال,enrollment X ال,enrollment X ال,enrollment X ال,enrollment X ال,enrollment X ال,enrollment X ال,enrollment X ال,enrollment X ال,enrollment X ال,enrollment X ال,enrollment X ال,enrollment X ال,enrollment X ال,enrollment X ال,enrollment X ال,enrollment X ال=en- enrollment X ال,enrollment X ال,enrollment X ال,enrollment X ال,enrollment X ال,enrollment X ال,enrollment X ال,enrollment X ال,enrollment X ال,enrollment X ال,enrollment X ال,enrollment X ال,enrollment X ال,enrollment X ال,enrollment X ال,enrollment X ال,enrollment X ال,enrollment X ال,enrollment X ال,enrollment X X X X X X X X X X X X X X X X X X X X X X X X X X X X X X X X X X X X X X X X X X X X X X X X X X X Y Y Y Y Y Y Y Y Y Y Y Y Y Y Y Y Y Y Y Y Y Y Y Y Y Y Y Y Y Y Y Y Y Y Y Y Y Y Y Y Y Y Y Y Y Y Y Y Y Y X X X X X X X X X X X X X X X X X X X X X X X X X X X X X X X X X X X X X X X X X X X X X X X X X x x x x x x x x x x x x x x x x x x x x x x x x x x x x x x x x x x x x x x x x x x x x x x x x x x X X X X X X X X X X X X X X X X X X X X X X X X X X X X X X X X X X X X X X X X X X X X X X X X X L L L L L L L L L L L L L L L L L L L L L L L L L L L L L L L L L L L L L L L L L L L L L L L L L L X X X X X X X X X X X X X X X X X X X X X X X X X X X X X X X X X X X X X X X X X X X X X X X X X y y y y y y y y y y y y y y y y y y y y y y y y y y y y y y y y y y y y y y y y y y y y y y y y y y x x x x x x x x x x x x x x x x x x x x x x x x x x x x x x x x x x x x x x x x x x x x x x x x x y y y y y y y y y y y y y y y y y y y y y y y y y y y y y y y y y y y y y y y y y y y y y y y y y Y Y Y Y Y Y Y Y Y Y Y Y Y Y Y Y Y Y Y Y Y Y Y Y Y Y Y Y Y Y Y Y Y Y Y Y Y Y Y Y Y Y Y Y Y Y Y Y Y y y y y y y y y y y y y y y y y y y y y y y y y y y y y y y y y y y y y y y y y y y y y y y y y y X X X X X X X X X X X X X X X X X X X X X X X X X X X X X X X X X X X X X X X X X X X X X X X X X N N N N N N N N N N N N N N N N N N N N N N N N N N N N N N N N N N N N N N N N N N N N N N N N N N X X X X X X X X X X X X X X X X X X X X X X X X X X X X X X X X X X X X X X X X X X X X X X X X X M M M M M M M M M M M M M M M M M M M M M M M M M M M M M M M M M M M M M M M M M M M M M M M M M M X X X X X X X X X X X X X X X X X X X X X X X X X X X X X X X X X X X X X X X X X X X X X X X X X × × × × × × × × × × × × × × × × × × × × × × × × × × × × × × × × × × × × × × × × × × × × × × × × × × X X X X X X X X X X X X X X X X X X X X X X X X X X X X X X X X X X X X X X X X X X X X X X X X X R 1000000000000000000000000000000000000000000000000000000000000000000000000000000000000000000000000000010000000000000000000000000000000000000000000000000000000000000000000000000000000000000000000000000012000000000000000000000000000000000000000000000000000000000000000000000000000000000000000000000000000800000000000000000000000000000000000000000000000000000000000000000000000000000000000000000000000000060000000000000000000000000000000000000000000000000000000000000000000000000000000000000000000000000005000000000000000000000000000000000000000000000000000000000000000000000000000000000000000000000000000400000000000000000000000000000000000000000000000000000000000000000000000000000000000000000000000000032000000000000000000000000000000000000000000000000000000000000000000000000000000000000000000000000001520000000000000000000000000000000000000000000000000000000000000000000000000000000000000000000000000082525252525252525252525252525252525252525252525252525252525252525252525252525252525252525252525252525245252525252525252525252525252525252525252525252525252525252525252525252525252525252525252525252525255252525252525252525252525252525252525252525252525252525252525252525252525252525252525252525252525253252525252525252525252525252525252525252525252525252525252525252525252525252525252525252525252525252. X |
cuiuuiyjia 3 bai
P A = 1
a 1
aill aaii 1. aaiyall ay yaiy jay
Juaaall Jalaal 0o o
ailllll llllll l 155
Lii i 15i, 1 aicill chwyl (b)all) yjll il jnil ac si
all yall yall
Jklll jlll jilj jilj jilj jilj jilj jilj jilj jilj jilj jilj jilj jilj jilj jilj jilj jilj jilj jilj jilj jilj jilj jilj jilj jilj jilj jilj jilj jilj jilj jilj jilj jilj jilj jilj
:lll gall lgln ac gnaal alilgill llll
: 1
jglll glc alall
山
Culioalglc siaell Cuiialx
ababall
1jijoo
(2)


jaiji jbi
Juauiu Jia jie libiao priu
a
ailllll lllllllllllllllllllll
jie jie jie jie jie jie jie jie jie jie jie jie jie jie jie jie jie jie jie jie jie jie jie jie jie jie jie jie jie jie jie jie
ilil lblllglle clllde jddd
aal aal alal alal alal alal alal alal
Laiu Li Li jia zao all jia jia yueyizil jia all
a a a a a a a a a a a a a a a a a a a a
a a a a a a a a a a a a a a a a a a a a a a a a a a a
s WQ9 B1L, 6WM24NIHAS (a)
(WQ70900SXX
ailllll 100000000000000000000000000000000000000000000000000
a a a a a a a a a a a a a a a a a a a a a a a a a a a a a a a a a a a a a a a a a a a a a a a a a a a a a a
aJg aagaaagaaagaaagaaagaaagaaagaaagaaagaaagaaagaaagaaagaaagaaagaaagaaagaaagaaagaaagaaagaaagaaagaaagaaagaaagaaagaaagaaagaaagaaagaaagaaagaaagaaagaaagaaagaaagaaagaaagaaagaaagaaagaaagaaagaaagaaagaaagaaagaaagaaagaaa
C
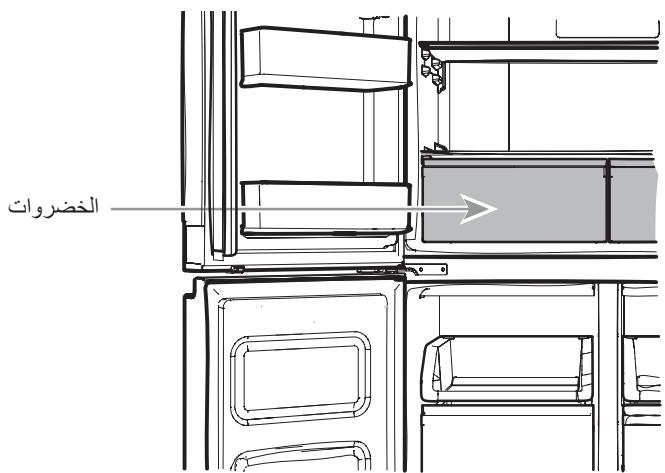
a
1
gill 100
J 2
AilSo jaiu si aad slaill
aiee 1
g jll u kii d. 2012 y n jy s iie gai cai aybc yj aia jll aai y
p l bji y iia jil l o j r jll a jay gai iaiae ci juii ci jci jci jci jci jci jci jci jci jci jci jci jci jci jci jci jci jci jci jci jci jci jci jci jci jci jci jci jci jci jci jci jci jci jci jci jci jci jci jci jci jci jci jci jci jci jci jci jci jci jci jc
iE
Sallgall aolc sll gail aillal oale lla jaoaog yjllgcll J.
.
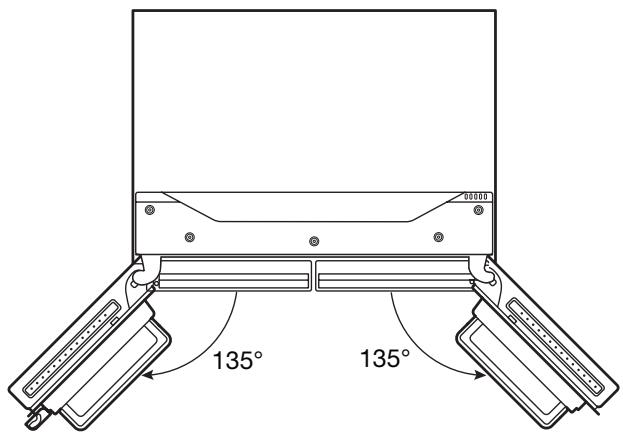
ylll lll 10000000000000000000
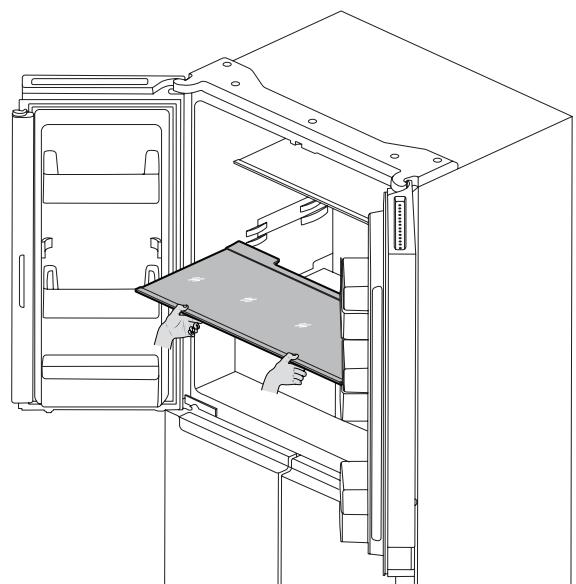
Aolgglc gaa Jsiy jiljaiin jsls
eill sio
i 1 i 1 1 1 1 1 1 1 1 1 1 1 1 1 1 1 1 1 1 1 1 1 1 1

i 1
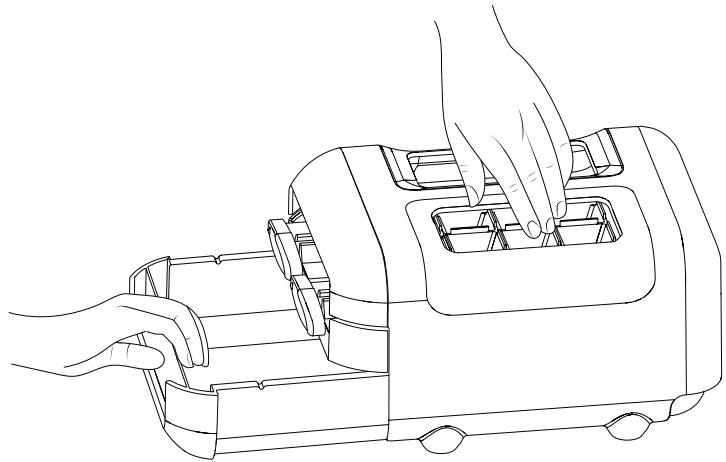
y jall y jll y jll j 1 y l oic 2 aall c jla g yll g iia ag aai j say
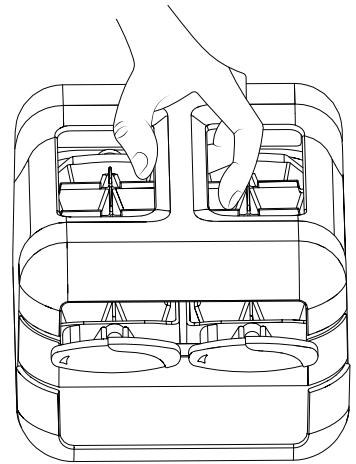
auiiie 1gaii
#
aaiy iiai jiai jia jia jia jia jia jia jia jia jia jia jia jia jia jia jia jia jia jia jia jia jia jia jia jia jia jia jia jia jia jia jia jia jia jia jia jia jia jia jia jia jia jia
1
a 1 a
J 1 J 1 J 1 J 1 J 1 J 1 J 1 J 1 J 1 J 1 J 1 J 1 J 1 J 1 J 1 J 1 J 1 J 1 J 1 J 1 J 1 J 1 J 1 J 1 J 1 J 1 J 1 J 1 J 1 J 1 J 1 J 1 J 1 J 1 J
Jlalll lKjla jglall gii yssyll aall no llll iis poaic. 1ill
Cis 15 a jzjybl y jn jia gai aaiill lgl aylll n jsi loiee iagall lalaiiial ay (aaiilal oiaaiy) Cg 15 aai ll gai baiiell cai! gai j
aie r gai baiell" paaeg jaiyabaibc gai yaiill dic aaiial uay jaiyai
jao ayaiyaiyaiyaiyaiyaiyaiyaiyaiyaiyaiyaiyaiyaiyaiyaiyaiyaiyaiyaiyaiyaiyaiyaiyaiyaiyaiyaiyaiyaiyaiyaiyaiyaiyaiyaiyaiyaiyaiyaiyaiyaiyaiyaiyaiyaiyaiyai
a. aie "Demo" jorj, jn jnnn nn nnnn
j 3 a
j j j j j j j j j j j j j j j j j j j j j j j j j j j j j j j j j j j j j j j j j j j
a
1
a a a a a a a a a a a a a a a a a a a a a a a a a a a a a a a a a a a a a a a a
#
aIolSll lall lal 1 aaii iil iaii iaii iaii iaii iaii iaii iaii iaii iaii iaii iaii iaii iaii iaii iaii iaii iaii iaii iaii iaii iaii
aalall gssg jgs ggs ggs ggs ggs ggs ggs ggs ggs ggs ggs
aallal gaaagai jai jai jia jia jia jia jia jia jia jia jia jia jia jia jia jia jia jia jia jia jia jia jia jia jia jia jia jia jia jia jia jia jia jia jia jia jia jia jia jia jia
alalalallalalalalalalalalalalalalalalalalal
a
#
aagall lalil bial/ bial jll gbl
yolie
a a a a a a a a a a a a a a a a a a a a a a a a a a a a a a a a a a a
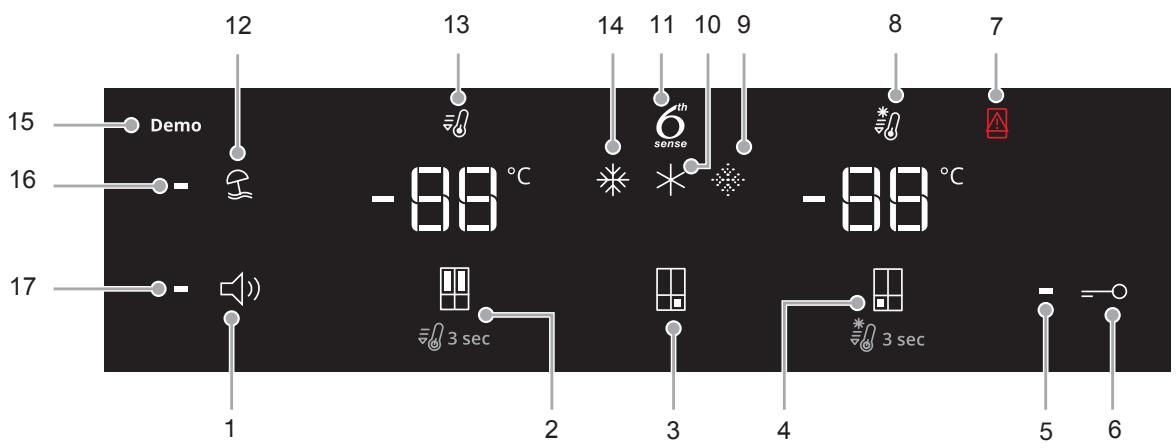
WQ9 B1L, 6WM24NIHAS
(WQ70900SXX
awalwaiwali wjzo.11
WQ9 B1L, 6WM24NIHAS (a)
(WQ70900SXX
gulll 13
albal ell jj.14
WQ9 B1L, 6WM24NIHAS (a)
(WQ70900SXX
albalg 16
i#sall 17
iJyNjC.1
()3d 2
WQ9 B1L, 2000) jzjz jz jz jz jz .3
(WQ70900SXX 6WM24NIHAS
(aill 3dla b).4
jiall joo .5
jiall j.6
2gaiu 7
8
WQ9 B1L, 6WM24NIHAS (a)
(WQ70900SXX
g 15 15
aill 6
a a a a a a a a a a a a a a a a a a a a a a a a a a a a a a a a a a a
A
Jzj 1
aie 15 15
- ( x,y) = 0
WQ9 B1L, 6WM24NIHAS (WQ70900SXX)
a a a a a a a a a a a a a a a a a a a a a a a a a a a a a a a a a
(C°) a
P 15
Jaaiaa aal gall aaauy Cai 24 j
aill 2 1 1 1 1 1 1 1 1 1 1 1 1 1 1 1 1 1
.
y j g a j y jall ay jll g j j j j j j j j j j j j j j j j j j j j j j j j j j j j j j j j j j j j j jj j j j j j j j j j j j j j j j j
ailln oalall all j 6 wao #2 wulg dai prin
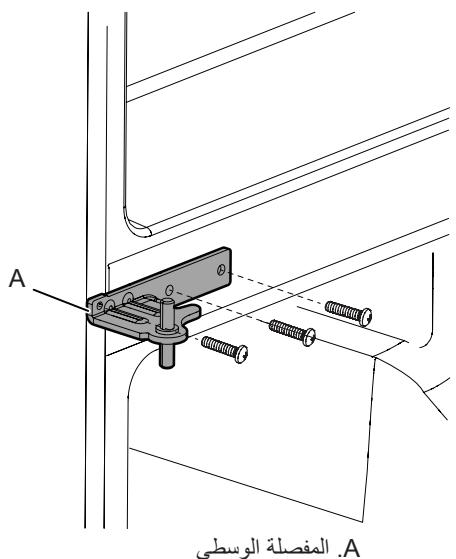

dLwJ L. A
(j)jjj
aagalllllalalal 5 1s
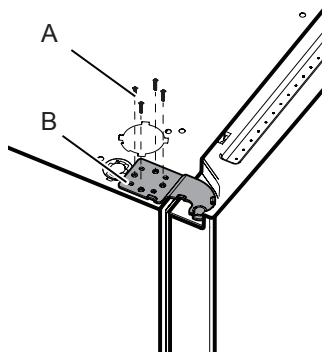
5 1
a. gale lal alalal .B
jell g jie 2018. Cuaaoll Jai ay jus ylll lue Lao:
Jai liai aiSo gi ciill iin aybi biai
4
Jai jai 1000000000000000000000000000000000000000000
S OBC = S AOB + S_ BOC
alaiil j#2 wuus 6 uuaa auiu
.
J 1
laallllallll lallll lalll
aaii yie giaiaial gai iiaiaiaiaiaiaiaia .2
gcllll 5 5
Lolai
Aaallll Jaa Jaa Jaa .1
AaLl aIe 10g Lgao gao Jdaiuai 100
Jjoll glbi Ic lae i .Cuaaiall Jai pi jy jy yll lglal Lac pia 4a 10
Jai laiyy ailsa g yll dui ayabilzai
Aglal alalal jolbll all jy aiae alaie ay.3
4
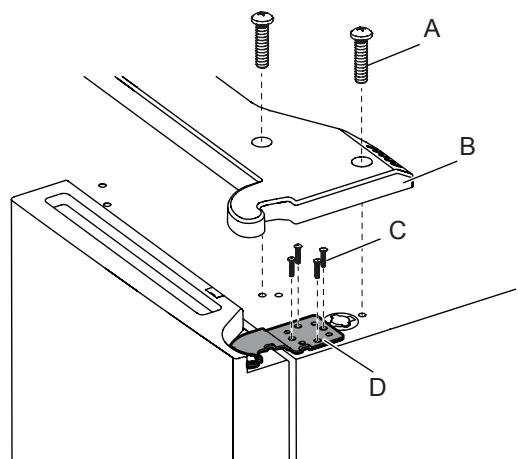
gall jlll 11bc gA
glial 1
5 1
gell Jannll .D
.5
J 1
aill jI Jg Ie aie 1iJ, g yyI yll alia iiaiaiaiaiaiaiaiaiaiaiaiaiaiaiaiaiaiaiaiaiaiaiaiaiaiaiaiaiaiaiaiaiaiaiaiaiaiaiaiaiaiaiaiaiaiaiaiaiaiaiaiaiaiaiaiaiaiaiaiaiaiaia
Aglall alalal all 111111111111111111
a a a a a a a a a a a a a a
a
2 u 5 6


a
y 1
a aal al aal al al al al al al al al al al
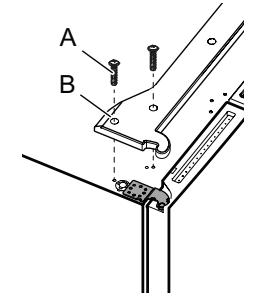
aagall aalaa
y( 1) l1 = y( 2) l2
A. a1 + a2 + a_3 = 6
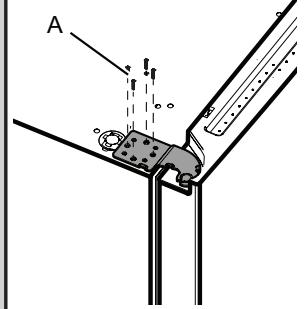
a glsl s y
5 1
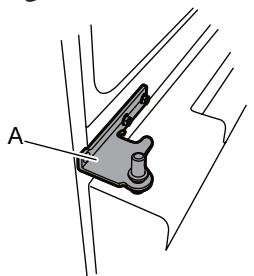
gssss
alal .A
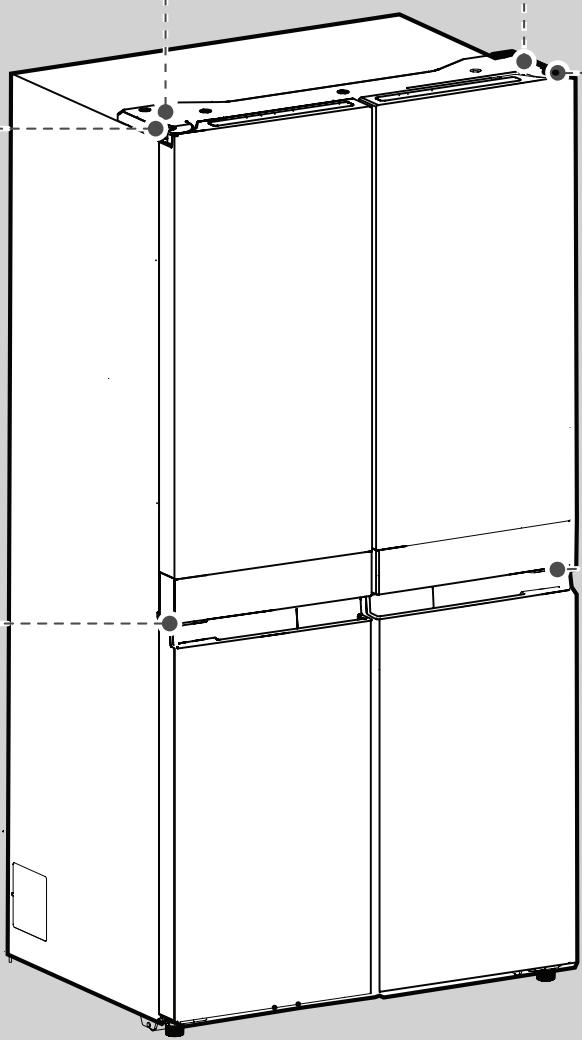
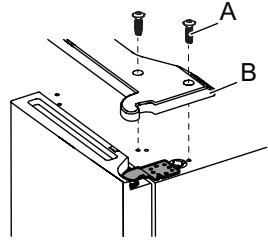
glsl glsl glslglb
S ACD = S COD + S BDO - S BOC
A. g_1 all 二. g = 2 . B. A. 3 × 4

gial
5 1
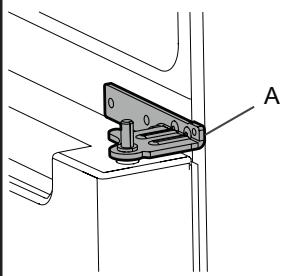
gss
alalil .A
i 1
4
914 33 838 0
Ldallglll 36
ailll llll
:di xi xi
a a a a a a a a a a a a a a a a a a a a a a a a a a a a
a 1
calalil 1 Jaiuui U alll jus u
a 1
ailllll 100
1
aaii
a#
a all j" aall j" all j" all j" all j" all j" all j"
llllllllllllllllllllllllllllll
laai aljao
aiee aee eae ee eae eae eae eae eae eae eae
131 152 153 154 155 156 157
()
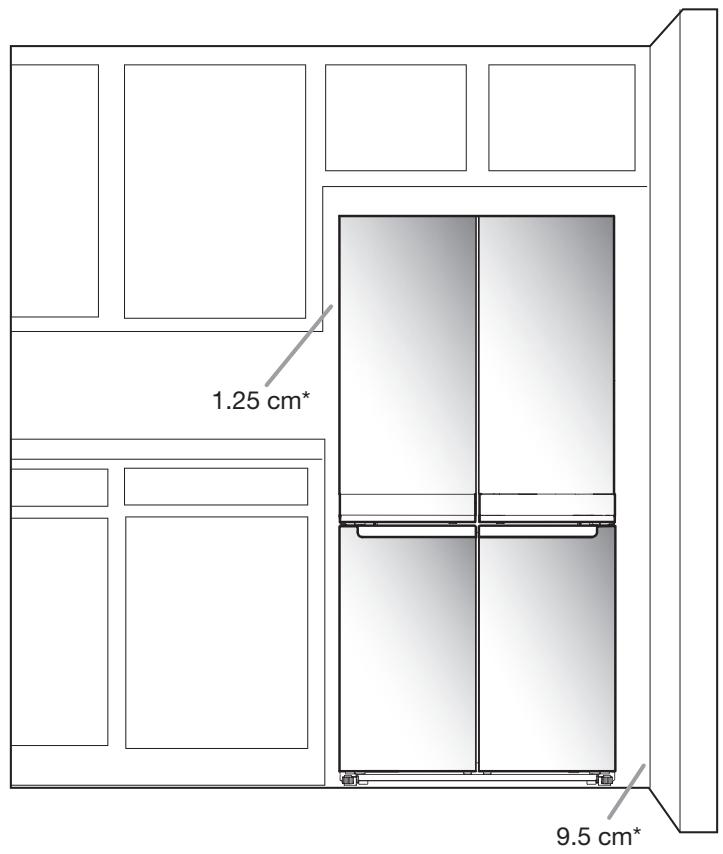

auiy ydl aaioll jbi
()
AIIbI dillip
aal aal al aal al al al al al al al al al al al al
y = 5( 1)
.1
.2


a
y
a aal al aal al al al al al al al al al al
BSS1363A. 13 a a a a a a a a a a a a a a a a a a a a a a a a a a a a a a a
Jill 1362
.(B) jaiial (A) jaiial UJI 1
Juaiai cIa 13 Juaia i
.3
cIolalall cIbce IiJyaiial yjie ic jyaiial llbc bia jz jz Jyaiai 100000000000000000000000000000000000000000000000000000000000000000000
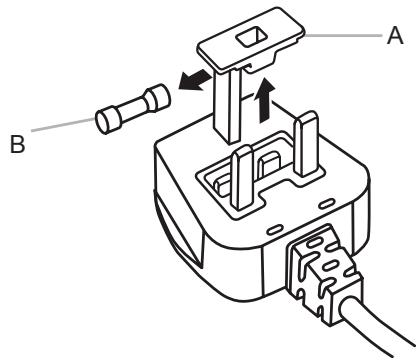
a_4 = 2
yuaia.B
:(1)
j 10000000000000000000000000000000000000000000000000
()
J 100000000000000000000000000000000000000000000000000000000000000000


aiee aee
.()
Allb! alln p#
aal gl gglgall gllllgl lgl
a + b ≤ 1
aill a 1
JgUgeall aalll aalll g
- 240-220
60/50
aill jia gai jgiall jai yai aaiil aai ai
aaiiie aiiie yie 0jie jaiie
Lg 1000000000000000000000000000000000000000000000000000000000000000000000000000000000000000000
Jal galtolol Glc Jaiyolol
a aaa aaa aa aaa aaa aaa aaa aaa aaa aaa
Jgll g Lg 1000000000000000000000000000000000000000000000000000000000000000
(1)
Lg y g y dall all j! g y jy aal al gall ay jz ayj
S OBC = S COD + S_ BOC
Jdallal 150
all
J 1 J 1 J 1 J 1 J 1 J 1 J 1 J 1 J 1 J 1 J 1 J 1 J 1 J 1 J 1 J 1 J 1 J 1 J 1 J 1 J 1 J 1 J 1 J 1 J 1 J 1 J 1 J 1 J 1 J 1 J 1 J 1 J 1 J 1 J
32 16 :N 32 10 :SN
43 16 :T 38 16 :ST
JLILI JLLI JLLI JLLI JLLI JLLI JLLI JLLI JLLI JLLI JLLI JLLI JLLI JLLI JLLI JLLI JLLI JLLI JLLI JLLI JLLI JLLI JLLI JLLI JLLI JLLI JLLI JLLI JLLI JLLI JLLI JLLI JLLI JLLI JLLlJLLlJLLlJLLlJLLlJLLlJLLlJLLlJLLlJLLlJLLlJLLlJLLlJLLlJLLlJLLlJLLlJLLlJLLlJLLlJLLlJLLlJLLlJLLlJLLlJLLlJLLlJLLlJLLlJLLlJLLlJLLlJLLlJLLlJ
i
7
10.
11.
12
12
12.
13
13
15.
17.
18.
19.
20
21
21.
21.
22 1
23
23.
23
23
24 2
24
25
25.
26 1
- SAFETY INSTRUCTIONS
- PERMITTED USE
- IMPORTANT TO BE READ AND OBSERVED
- INSTALLATION
- ELECTRICALWARNINGS
- CLEANING AND MAINTENANCE
- DISPOSAL OF PACKAGING MATERIALS
- DISPOSAL OF HOUSEHOLD APPLIANCES
- ENERGY SAVING TIPS
- REFRIGERATOR SAFETY
- Your safety and the safety of others are very important.
- DANGER
- WARNING
- Location Requirements
- Electrical Requirements
- Electrical Shock Hazard
- Recommended Earthing Method
- For Australia and New Zealand:
- Electrical Requirements (Great Britain and Ireland only)
- Fuse Replacement
- For the Republic of Ireland (only):
- Socket/Plug (valid for both countries):
- INSTALLATION INSTRUCTIONS
- Getting Started
- INSTALLATION CHECKLIST
- Electrical Power
- Doors
- Unpack the Refrigerator
- Refrigerator Delivery
- When Moving Your Refrigerator:
- Remove the Packaging
- Remove and Replace Refrigerator Doors
- Remove Right-Hand Door
- Remove Left-Hand Door
- Replace Right-Hand Refrigerator Door
- Replace Left-Hand Refrigerator Door
- Final Steps
- Remove and Replace Freezer/Flexi Freeze Door
- Refrigerator Levelling
- PARTS AND FEATURES
- NOTE FOR SERVICE:
- STORAGE CAPACITY (WQ9 B1LUK and WQ70900SXX):
- STORAGE CAPACITY (6WM24NIHAS):
- Accessories:
- Using the Controls
- Viewing and Adjusting Temperature Set Points
- Adjusting Fresh Food and Freezer Compartment Temperature:
- IMPORTANT:
- 6th Sense Fresh Lock and Freeze Control
- Flexi Freeze Setting (only with WQ9 B1LUK, 6WM24NIHAS and WQ70900SXX)
- Adjusting Multi Temperature Setting
- Fast Cool
- Fast Freeze
- Holiday Mode
- Sound ON-OFF
- Key Lock
- Demo Mode (only with WQ9 B1LUK, 6WM24NIHAS and WQ70900SXX)
- Additional features
- Door Open Alarm
- Lighting the Refrigerator
- Opening and Closing Doors
- Ice Maker
- Egg Storage
- SHELVES, BINS AND DRAWERS
- Important information to know about glass shelves and covers:
- Shelf Height Adjustment
- Shelves and Shelf Frames
- To remove and replace shelves:
- Crispers
- To remove and replace the Crispers:
- Refrigerator Balconies
- Freezer Storage Compartments
- Freezer Tray
- Freezer Drawers
- Fast Freeze compartment
- Flexi Freeze Compartment (only with WQ9 B1LUK, 6WM24NIHAS and WQ70900SXX)
- To remove the upper drawer:
- Freezer Shelf (only with WQ9 B1LUK)
- Audio Reference
- Accessories
- REFRIGERATOR CARE
- Cleaning
- WARNING
- Explosion Hazard
- Exterior Cleaning
- Style 1 - Smooth Door
- Style 2 - Stainless Steel IMPORTANT:
- Style 3 - Fingerprint-Resistant Stainless IMPORTANT:
- NOTES:
- Interior Cleaning
- Condenser
- Lights
- Holiday and Moving Care
- Holidays
- If You Choose to Leave the Refrigerator On While You're Away:
- If You Choose to Turn Off the Refrigerator Before You Leave:
- Moving
- TROUBLESHOOTING
- AFTER-SALES SERVICE
- BEFORE CALLING THE AFTER-SALES SERVICE
- IF AFTER THE ABOVE CHECKS THE FAULT STILL OCCURS, GET IN TOUCH WITH THE NEAREST AFTER-SALES SERVICE
- Summario
- Compartment de congélation rapide
- YXOD 3A XOJIOJIbHNIKOM 90
- PONCKI YCTPAHEHNE HENCINPABHOCTE 92
- PA3PEUEHHOE INCIOJIb3OBAHNE
- PeKOMeHdyembI MeTOd 3a3EmJIeHnI:
- ANPEDUYPEXDEHNE
- ChTne npaBOv DBepuB
- CHATNE JEBOI DBepci
- YctahOBKa npaBoi DBepuBxOJIoDnIbHoi KaMepbl
- YctaHOBka JIeBOI DBepcI XOJIOINbHOI KaMEpbI
- 3aKJIIOUHTeIbHbIe WArN
- U3MeHeHne yCTaBOK TEMnepaTpypbI
- Ponkn nixpambi
- CHATNE yctaHOBKa IIOJOK:
- Aunkn dIa fpykTOB n Oooste
- BbHMaHne n yctaHOBka Ha MeCTO RnKOB dIy pkykTOB n OBOe:
- BbHMaHne BepXHeRo BbIDBXHOrO RuaNKa:
- Ta6JIuca 3ByKOBbIX CnHajIOB
- PacnpedeneHne ToHOB
- IPEED TEM KAK OBPAAATbCBA CEPBnChbI UENTP
- ECJINIOCSJIPEIPOBEDEHNA BbIiSEYKA3AHHBIX IPOBEPOK HENCIPABHOCTb HE NCYE3JA,OBPATNTECb BBJXKAIIMCEPBNCHBi CEHTP
- Ta6nna
- YIJIHOMOUEHHbI IPECTABNTIELb
- WAARSCHUWINGEN M.B.T. ELEKTRICITEIT
- Sound On/Off (Ljud På/Av)
- RENGJØRING OG VEDLIKEHOLD
- KASTING AV HUSHOLDNINGSAPPPARATER
- KJØLESKAPETS SIKKERHET
- HYLLER, BOKSER OG SKUFFER
- ONACHOCT
- ПРЕДУПЕЖДЕНЕ
- ANPEDAUYIPKDEHNE
- Изwickваня за раимолаганe
- APPEДУПЕЖDEHINE
- Onachoct OT TOKOB yap
- PpenopbuaH MeToD Ha 3a3eMaBaHe
- 3a ABCTpaIIy HOba 3eJaHnIy:
- EneKtpnueckn n3nCKBaHnna (cAmo 3a BeInko6pTuHnna nIrpnaHnna)
- CmHa Ha npednataTeI
- Camo 3a Peny6nka IpnaHnla:
- KoHTaKT/UeIeCEJI (BaIIuHIO 3a IBeTe IbPkaBn):
- Onachoct OT TOKOB ydap
- ПРЕДУПPEЖДЕНЕ
- TbpBNCTbNKN
- CINCSbK 3A N3BbPbBAHE HA IPOBEPKA HA INHCTAJINPAHETO
- Pa3onaKobaHe ha xJaDiNlHnka
- DocTabka Ha XnaJnHnKa
- Korato npemecTBate BaunrXlaaJlnk:
- CbaIaHHe Ha onaKOBkata
- CbaJIaHe I NOCTaBHe Ha MЯCTO Ha BpaTte Ha XJaIINHnka
- CbaIaHHe Ha IaChHaTa BpaTa
- CbaJIaHe Ha JIABaTa Bpata
- IocTABaHE Ha MRCTo Ha DaChata BpaTa Ha XlaDnIHnKa
- IocTabaHe Ha MaCTO Ha JIABaTa Bpata Ha XlaJINHnKa
- PocleHn CTbKn
- KAPALIHTET HA CbXPAHEHNE (WQ9 B1LUK WQ70900SXX):
- Key Lock (3aKJIIOUcBaHe Ha KJIaBnI)
- PékmuHa pa6oTa "Demo" (camo 3a WQ9 B1L, 6WM24NIHAS u WQ70900SXX)
- DonbHnTeJIHHyHKcnn
- Anapma 3a OTBoPeHa Bpata
- OcbetJIeHne Ha xJaIJIHnka
- OTbapЯHe 3aTbapЯHe Ha BpaTnUknte
- Jedorehepatop
- Paft Na pfn3epa (camo 3a WQ9 E1L n WQ9 B1L)
- CnpaBka 3a 3ByKObnte CnHaJI
- 3aahanhe hacnraH
- He n03B0JIaBaIe Ha Te3n BeIecTb Da oCTaHaT Bbpxy IlaHca:
- NoHcTbAHe OTBbTpE
- OTKPNBAHE N OTCTPAHЯBAHE HA HEN3ПРABHOCTN
- POLICE, POSUDE I LADICE
- Informacione koje je važno znati o staklenim policama iPoklopcima:
- Prilagodba visine police
- Sisepindade puhastamine
- ENITPENOMENXPHsH
- EomegakeipokcKaatapiooC
- Police mraznicky (pouze u WQ9 E1L a WQ9 B1L)
- 6th 6. cut Fresh Lock in nadzor zamrznitve sense
- Nastavitev Flexi Freeze (samo p 6WM24NIHAS in WQ70900SXX)
- Police in okvirji polic
- 6th 6th Sense Fresh Locky Freeze Control
- Compartmento Fast Freeze
- ▲WARNUNG
- Explosionsgefahr
- ISTRUZZJONIJIET DWAR IS-SIGURTÀ
- UZU PERMESSAGE
- IMPORTANT TOSSERVAHOM
- LI TAQRAHOM
- INSTALLAZZJONI
- TINDIF U MANUTENZJONI
- RIMITAL-MATERJALITAL-IPPAKKJAR
- RIMITA' APPARATI TAD-DAR
- PARIRI BIEX TIFFRANKA L-ENERGIGJA
- Ghar-Repubblika tal-Irlanda (biss):
- Socket/Plug (validu ghaz-zewg pajjizi):
- TWISSIJA
- CHECKLIST TAL-INSTALLLZZJONI
- + Energija Elettrika
- Bibien
- Ohrog il-Frigg mill-Ippakkjar
- Forniment tal-Frigg
- Meta Čcāqlaq il-Frigg Tieghek:
- Nehhi I-lppakkjar
- Nehhi u Ssotitwixxi I-Bibien tal-Frigg
- Nehi I-Bieba tal-Lemin
- KAPACITA TAL-HAZNA (6WM24NIHAS):
- Accessorji:
- Uzutal-Kontrolli
- Kif Tara u Taggusta I-Punti Ssettjati tat-Temperatura
- Kif Taggusta t-Temperatura tal-Kompartiment tal-Ikel Frisk u tal-Freezer:
- Lock tal-Iffriskar u Kontroll tal-Iffrizar 6th Sense
- Is-Setting Iffrizar Flessibbli (disponibbli biss f'WQ9 B1LUK, 6WM24NIHAS u WQ70900SXX)
- Aggustament tas-Setting ta' Temperaturi Multipli
- Tkessih Malajr
- Iffrizar Malajr
- Apparat li Jaghmel is-Silg
- Hažna tal-Bajd
- XKAFEF, KAXEX U KXAXEN
- Informazzjoni importanti li ghandek tkun taf dwar l-ixkafef talhgieg u l-ghatjien:
- Aggustament tal-Gholi tal-lxkaffa
- 战功
- 6th Sense 6th Sense sense
- 摺険尼日內通同信(WQ9B1LUK,6WM24NIHAS WQ70900SXX簡連)
- ACKS
- Bimorngo p03TaUyBaHn
- ПОЕРДЖЕHHЯ
- IIOPEJXKEHHa
- PekomeHdoBaHm MeToD 3a3EmJIeHHA
- Дя Астралт Ta HoBoi 3eJaHdIi:
- Початок ровоти
- KOHTPOJIbHn CnICOKДЛЯ BCTAHOBJIeHHA
- EneKtpoXnBJIeHHA
- VdEpi
- PoznakyBaHHXoJIoNJIbHnKa
- OoctabKa XoIooNJIbHnKa
- IopadnHaBnnaDOK TpaHcnpOpTyBaHnXOJIoNbHnKa:
- 3Himitb naKyBaIbHi MaTepiAn
- 3himahnHa Ta 3amiHa IBepuT XoJIoNJIbHnKa
- ПОЕРДЖЕнь
- 3HimahnHa npaBoi CtyIKN DBepuT
- 3HimahnHaJIBOI CTyJKN DBepuT
- -0 BLOKyBaHHA
- BiDcikIaIyBnKOrO 3amopoxyBaHH
- Kamepa 3 Bn6opom Tempepatny 3amopoxyBaHHa (JIiue Ha moJeIax WQ9 B1LUK, 6WM24NIHAS i WQ70900SXX)
- 3HimahHHBepxHbOICKpNHbKn:
- UHEN30BHIiHIX NOBepXohb
- Ctnlb1-rnaadiDbepcraTa
- OuichiHnBHyTpihxNIOBepXOHb
- KoHdEhcaTOp
- OcbItIeHHa
- Akuo Bn BpiuNTe BmKHyTN XoIoOnIbHk Do BiD'3dy:
- TpaHcnopTyBaHHA
- ПОШУК I YCUHEHЯ HECПРABHOCTЕN
- ПОТЕДЖЕня
- #
- nyn
- yynnnn nn nnnn
- niUsin
- n nn nnnnnnnnnnnnnnnnnnnnnnnnnnnnnnnnnnnnnnnnnnnnnnnnnnnnnnnnnnnnnnnnnnnnnnnnnnnnnnnnnnnnnnnnnnnnn
- Tn nnonni
- :ODT OON NITINNNTNNTN
- nnn nny
- (6WM591NIHAS, WQ70900SXX
- nDnI D7n
- 1
- n nn nnn
- xnnn nn nnn
- 1910
- n nn nnnnnnnnnnnnnnnnnnn
- n nn nnnnnnnnnnnnn
- y
- 777n790n
- nnn n nn
- :()nnnn
- wnnnn
- mnnn n
- yinnnnn
- nnn
- wnnn
- D
- e.l l la l a
- SERVICE
- a#
- C
- a
- aiee 1
- iE
- eill sio
- yolie
- aill 6
- WQ9 B1L, 6WM24NIHAS (WQ70900SXX)
- J 1
- aaiiie aiiie yie 0jie jaiie
- i
Brand : WHIRLPOOL
Model : WQ9B1L
Category : Fridge