ASP 5-520 N - Log splitter ATIKA - Free user manual and instructions
Find the device manual for free ASP 5-520 N ATIKA in PDF.
User questions about ASP 5-520 N ATIKA
0 question about this device. Answer the ones you know or ask your own.
Ask a new question about this device
Download the instructions for your Log splitter in PDF format for free! Find your manual ASP 5-520 N - ATIKA and take your electronic device back in hand. On this page are published all the documents necessary for the use of your device. ASP 5-520 N by ATIKA.
USER MANUAL ASP 5-520 N ATIKA
Original instructions
After unpacking, check the contents of the box
That it is complete
Check for possible transport damage
Report any damage or missing items to your dealer, supplier or the manufacturer immediately. Complaints made at a later date will not be acknowledged.
1 ready mounted machine unit
1 operating lever
1 operating manual
F
Furniture
Do not operate machine before having read the operating instructions, understood all the notes and assembly the machine as described here.
Keep the instructions in a safe place for future use.
Contents
| Extent of delivery | 1 |
| Symbols machine / operating manual | 11 |
| Proper use | 11 |
| Residual risks | 11 |
| Safe working | 12 |
| Description of device | 13 |
| Positioning | 13 |
| Start-up | 13 |
| Working with the log splitter | 14 |
| Maintenance and care | 15 |
| Guarantee | 16 |
| Spare parts | 16 / 120 |
| Possible problems | 17 |
| Technical data | 17 |
| Declaration of Conformity | 118 |
Symbols machine

Read the operating and safety instructions thoroughly before commissioning the machine.
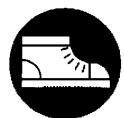
Wear safety gloves when working with the machine to protect the hands from chips and splinters.

Wear safety goggles when working with the machine to protect the eyes from chips and splinters.

Do not remove or modify any protection or safety devices.


Nobody else should be in the working area of the machine other than the operator. Keep other persons or animals out of the danger area (minimum distance 5 m).
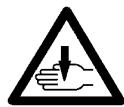
Danger of being cut or trapped; never touch any dangerous parts when the splitting wedge is in motion.
Caution!
Always note when the log ram is in motion.
Caution!
Never remove a log jammed against the wedge by hand.
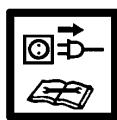
Caution!
Before starting any repair, maintenance or cleaning work, always switch off the motor and remove the plug from the socket.

Stop!
Follow the operating instructions.
Open the bleed screw

Bleeding
Page 14
Symbol machine / packaging

Electrical devices do not go into the domestic rubbish. Give devices, accessories and packaging to an ecofriendly recycling.
According to the European Directive 2002/96/EC on electrical and electronic scrap, electrical devices that are no longer serviceable must be separately collected and brought to a facility for an environmentally compatible recycling.
Proper use
- The log splitter must only be used for splitting logs.
- The log splitter is only applicable for the private utilization in the field of house and hobby.
- Only straight-cut logs are suitable for use with the log splitter.
- Metal parts (nails, wire etc.) must be removed from logs before splitting.
- Every other form of use is considered improper use. The manufacturer accepts no liability for any damages resulting from improper use, and any risk is in this case borne solely by the user.
Residual risks
! Even if used properly, residual risks can exist even if the relevant safety regulations are complied with due to the design determined by the intended purpose.
Residual risks can be minimised if the "Safety information" and the "Intended usage" as well as the whole of the operating instructions are observed.
Observing these instructions, and taking proper care, will reduce the risk of personal injury or damage to the equipment.
- Failure to observe the safety precautions can lead to injury to the operator or damage to property.
- Risk from electricity, by using non-standard electrical connections.
- Touching live parts of opened electrical components.
- Risk of fire and slipping by leaking hydraulic fluid.
In addition, in spite of all the precautionary measures taken, non-obvious residual risks can still exist.
Safe working
Before commissioning this product, read and keep to the following advice. Also observe the preventive regulations of your professional association and the safety provisions applicable in the respective country, in order to protect yourself and others from possible injury.

Pass the safety instructions on to all persons who work with the machine.

Keep these safety instructions in a safe place.
- Make yourself familiar with the equipment before using it, by reading and understanding the operating instructions.
- Do not use the machine for unsuitable purposes (see "Normal intended use" and "Working with the log splitter").
- Ensure that you have stand in a secure standing position and maintain your balance at all times.
Take a working position, which is behind the slide of the area of the operating lever. Never stand in the splitting wedge's zone. - Never stand on top of the machine.
- Pay attention at all times. Take care with what you are doing, and approach the work sensibly. Do not use the machine:
when you are tired.
under the influence of drugs, alcohol or medications that may impair your powers of judgement.
-
When working with the machine, always wear
-
protective goggles or face mask
- safety gloves
ear protection, if necessary - safety shoes with steel toe-caps
Wear suitable work clothing:
- do not wear any loose-fitting clothing or jewellery, since these may be caught or trapped by moving parts
- Within his area of work the operator is responsible for third parties.
- The machine may not be operated by children or young people under the age of 18.
- Keep children away from machine.
- Never operate the machine if other persons are in the immediate vicinity.
- Never leave the saw unattended.
- Keep your workplace in an orderly condition! Untidiness can result in accidents.
- Do not overload the machine! You work better and safer in the given performance range.
- Only operate the machine with complete and correctly attached safety equipment and do not alter anything on the machine that could impair the safety.
- Faulty or damaged parts in the device must be replaced immediately.
- Do not spray machine with water (this is hazardous due to live components).
- Do not leave the machine standing in the rain or use when raining.
- Store the unused machine in a dry locked place away from the reach of children.
- Switch the machine off and remove the mains plug from the socket when
carrying out repair works
- carrying out servicing and repair works, removal of faults
- Transporting
- leaving unattended (even during short interruptions)
-
Check the machine for possible damage
-
Before continuing to use the machine, the protective devices must be inspected to ensure that they work perfectly and with their intended function
- Check whether the parts are damaged. All parts must be correctly installed and fulfil all conditions to ensure perfect operation of the saw
- Damaged guards and parts must be properly repaired or exchanged by a recognized, specialist workshop; insofar as nothing else is stated in the instructions for use.
- Damaged or illegible safety warning labels should be replaced immediately.

Electrical safety
- Electrical connections must conform to IEC 60245 (H 07 RN-F) with a cable cross-section of at least 2.5 ~mm^2 for a maximum cable length of up to 10 ~m
- Never use the machine with a power supply cable of over 10 m in length. Longer power supply cables will cause a drop in voltage. The motor will not be able to provide its maximum performance and the operation of the machine will be impaired.
- When laying the connecting attachments, be sure that they do get crushed or bent, and that the plug-and-socket connection does not get wet.
- Do not use the cable for purposes for which it is not meant. Protect the cable against heat, oil and sharp edges. Do not use the cable to pull the plug from the socket.
- Regularly check the extension cables and replace them if they are damaged.
- Do not use any defective connection cables.
- When working outdoors, only use extension cables especially approved and appropriately labelled for outdoor use.
- Do not set up any provisional electrical connections.
- Never bypass protective devices or deactivate them.

The electrical connection or repairs to electrical parts of the machine must be carried out by a certified electrician or one of our customer service points. Local regulations - especially regarding protective measures - must be observed.

Repairs to other parts of the machine must be carried out by the manufacturer or one of his customer service points.

Use only original spare parts, accessories and special accessory parts. Accidents can arise for the user through the use of other spare parts. The manufacturer is not liable for any damage or injury resulting from such action.
Description of device
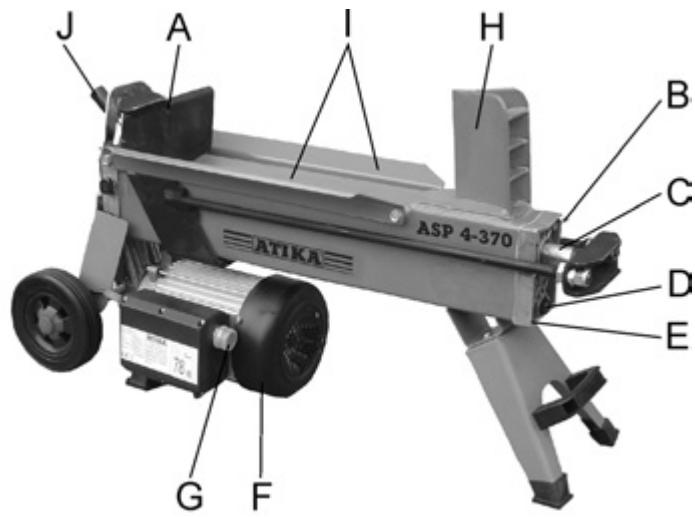
Fig.1 ASP4-370

Fig. 2 ASP 5-520 N
A Logram
B Bleed screw
C Piston rod
D | Dipstick
E | Cylinder cover
F | Electric motor
G | Operating pushbutton
H | Splitting wedge
Log guide plates
J | Operating lever
Positioning
Position the log splitter on a work surface at a height of about 60 - 75cm , this will create an comfortable working position.
Place chocks under the wheels to prevent the machine rolling during operation.
Ensure that the working area meets the following conditions:
- no danger of slipping
level - free of obstacles
- sufficiently well lit
Do not operate the machine in the direct vicinity of gas or petrol pipes or containers, or any other easily inflammable materials.
Start-up
- Check that the machine is completely and correctly assembled.
- Before using the shredder, make sure each time that there are no faulty connections (tears, cuts, etc.)
there are no damage at the machine
all screws are tight - check the hydraulic system for any possible leaks
(1) Mains connection
- Compare the voltage given on the machine model plate e.g. 230 ~V with the mains voltage and connect the machine to the relevant and properly earthed plug.
- Only use connection cables with sufficient diameters.
- Connect the machine via a 30mA fault current safety switch.
(i) Fuse protection: 16 A
Operating pushbutton
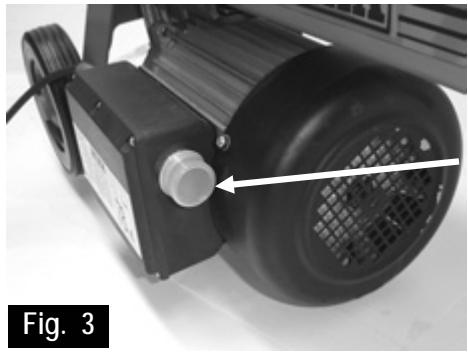
Operating pushbutton
Fig. 3
Switching on
Push the green button. The motor is running as long as the green button remains pushed.
Switching off
Stop pushing the green button.
! Do not use any device where the operating pushbutton does not work properly. Repair or replace damaged pushbuttons immediately.
① Hydraulics
- Never operate the machine in the event of any possible danger from hydraulic fluid.
- Ensure that the machine and working area are clean and free of oil.
Danger of slippage or fire!
- Check the hydraulic reservoir regularly to ensure that it contains enough hydraulic oil (see "Care and maintenance")
Capacity:
2.7 litres
ASP 4-370
3,2 litres
ASP 5-520 N
Working with the log splitter
additional SAFETY INSTRUCTIONS
The log splitter may only be operated by a single person.
- The machine may only be operated by persons over the age of 18 years, and who have read and understood these operating instructions.
- Wear protective equipment (safety goggles/mask, gloves, safety shoes) to protect yourself from possible injury.
- Never try to split logs containing nails, wire or other similar objects.
- Already split wood and wood chips create a dangerous working area. The operator may stumble, slip or fall. Always keep the working area neat and tidy.
- Never place the hands on or near any moving parts of the machine when it is switched on. Maintain a safe distance from the log, the ram and the wedge in order to protect your hands from injury.
- Split only timber which corresponds to the maximal length to be worked with.
What type of logs can I split?
Size of logs
| ASP 4-370 | ASP 5-520 N | |
| Length | max. 370 mm | max. 520 mm |
| Diameter | 50 – 250 mm | |
The log diameter is a recommended guideline figure, because:
thin logs can be difficult to split if they contain knots or if the fibres are too strong.
Do not try to split green logs. Dry logs are much easier to split, and do not cause jams as often as green (damp) wood.
! Hardwood tend to bursting: Exercise utmost caution!
Operation
Two-hand operation
- Press the operating pushbutton on the electric motor – Fig. 3. Wait a few moments until the motor has reached its operating revolutions and the required pressure has been built up in the hydraulic pump.
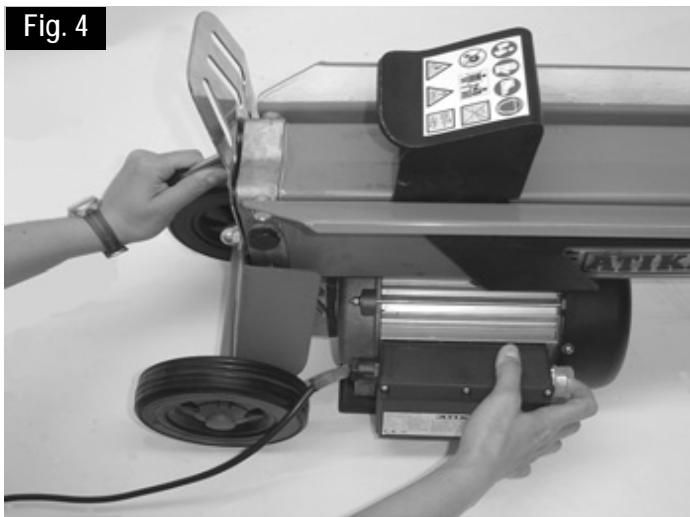
- Press the operating lever down simultaneously - Fig. 4.
The log ram pushes the log against the splitting wedge, and the log will be split.
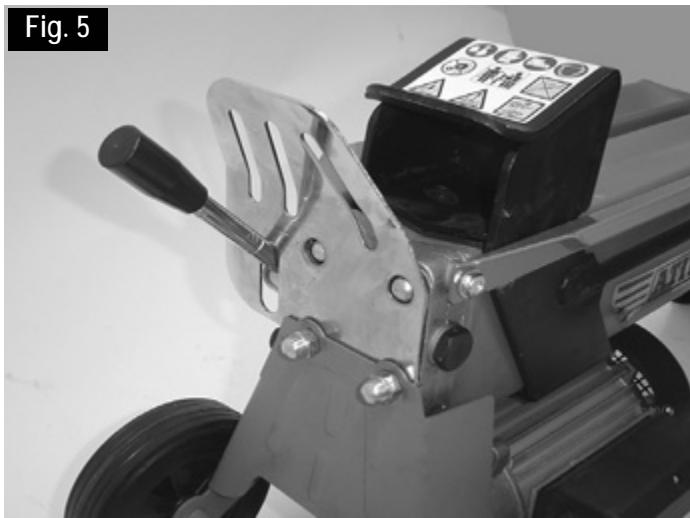
- Release the operating lever as well as the operating pushbutton. The log ram will now return to its original starting position - Fig. 5.
Special instructions for splitting logs:
Preparations:
The logs to be split should be cut to the maximum dimensions (370 or 520 mm long, 50 - 250 mm ). Ensure also that the logs are cut straight and square.
Place the log properly on the log splitter, so as not to cause any risk of stumbling or falling to the operator.
Bleeding
Open the bleed screw 3 - 4 complete turns - Fig. 6.
Close the bleed screw again when you are finished splitting logs.
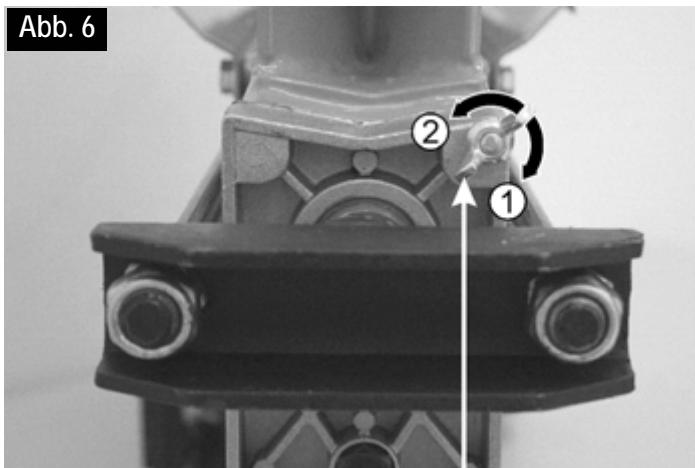
Bleed screw
①
② open (bleeding)
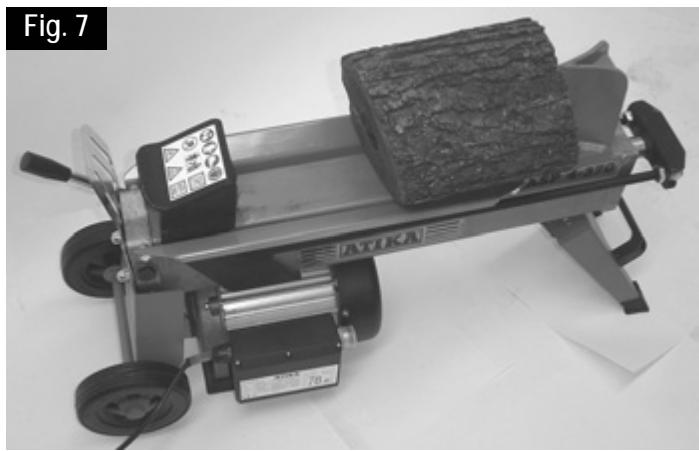
- Splitting logs:
Always place the logs lengthwise and flat on the main frame of the log splitter. The log must be enclosed by the log guide plates. Fig. 7
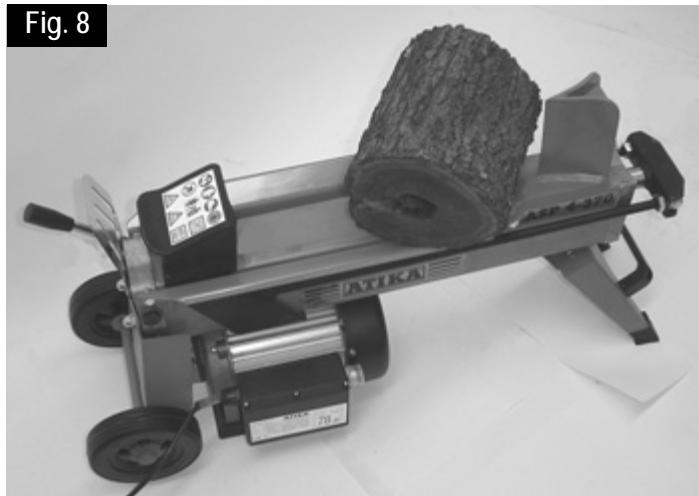
Never place the log on the frame at an angle. Fig. 8
Always ensure that the splitting wedge and the log ram contact the ends of the log at right-angles.
Never try to split two logs at once.
Never try to remove or replace the log during the splitting process.
① Never try to force the splitting of the log by maintaining the pressure for several seconds. This can lead to damage to the machine.
Reposition the log on the main frame and repeat the splitting process, or put the log to one side.
How to release a jammed log?
- Loose the operating lever as well as the operating pushbutton that the log ram can go back.
- Place a triangular wooden chock under the log, then move the log ram forward so that it pushes the chock under the jammed log.
- If the log is not released, keep repeating this procedure, using larger chocks, until the log is released.
Never use a hammer to release a jammed log, and keep your hands away from the log.
Do not enlist the aid of a second person - this is a one-man job.
Do not try to release the log by using a hammer, since this may break the motor block.
Finishing work:
Attend to that the log ram has gone back to its basic position.
Then remove the plug from the power socket.
Close the bleed screw. Fig. 3
Follow the care and maintenance instructions.
Care and maintenance

Remove the plug from the power socket before starting any maintenance or cleaning work.
! Wear protective gloves in order to avoid injury to the hands.
① Observe the following in order to keep the log splitter in good working order:
- Clean the machine thoroughly after you have finished using it.
- Remove any resin remains on the machine.
- Oil the piston rod (Fig. 1 / 2) regularly with an environmentally friendly spray oil.
- Check the oil level and change the oil as necessary.
Sharpening the splitting wedge
After extended periods of use, or if the splitting performance is reduced, sharpen the splitting wedge with a file (and remove any burrs). Fig. 9

How do I check the oil level?
- The log ram must be in its starting position.
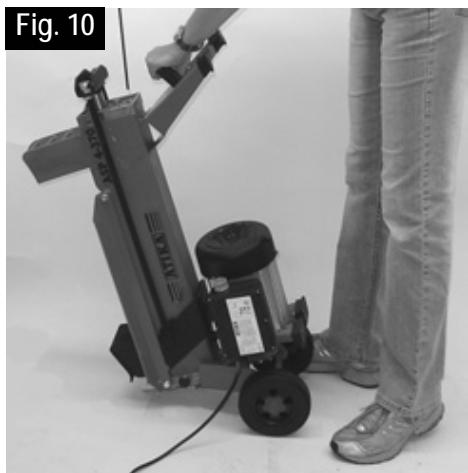
- Stand the log splitter on end, with the filler opening at the top. Fig 10
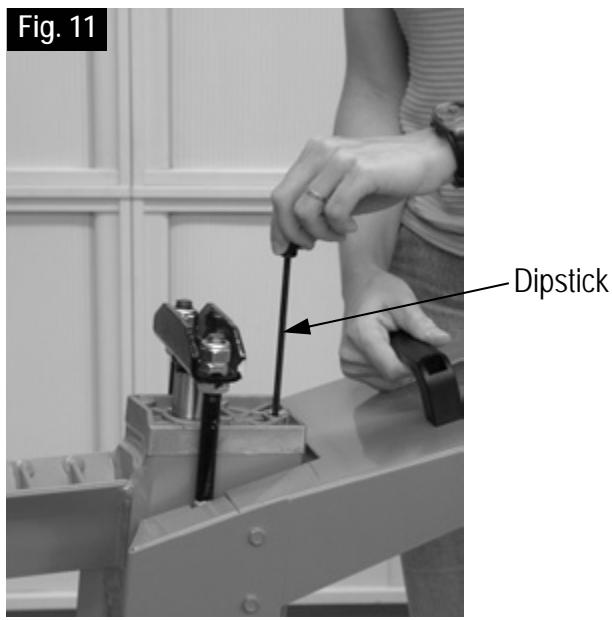
A second person will be required to up-end and hold the log splitter. - Unscrew the dipstick - Fig. 11. Do not drop or lose the oil seal when removing the dipstick.
- Clean the dipstick and the oil seal.
- Replace the dipstick fully into the oil reservoir.
- Now remove the dipstick again, and read off the oil level.
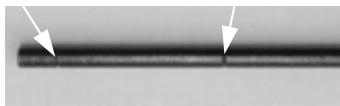
If the oil level is between the two marking on the dipstick, there is sufficient oil in the reservoir.
If the oil level is below the lower marking, more oil should be added with the aid of a clean funnel.
lower marking upper marking
- Check the oil seal and replace it if it is damaged in any way.
Oil seal
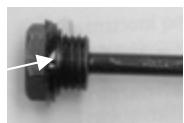
- Replace the dipstick and screw it firmly into place.
Caution! Do not tighten the screw too tightly, since this may damage the oil seal or the thread in the cylinder cover.

When should I change the oil?
The first oil change should be carried out after 50 operating hours, and then every 250 operating hours.
Changing the oil:
- The log ram must be in its starting position.
- Place a container under the log splitter to catch the old oil. The container should have a capacity of at least 4 litres.
- Unscrew the dipstick. Do not drop or lose the oil seal when removing the dipstick.
- Now tip the machine to empty the oil into the container.
- Stand the log splitter on end, with the filler opening at the top. Fig 10.
A second person will be required to up-end and hold the log splitter.
- Pour in the new hydraulic oil (2.7 or 3.2 litres) using a clean funnel.
-
Clean the dipstick and the oil seal.
-
Check the oil seal and replace it if it is damaged in any way.
- Replace the dipstick and screw it firmly into place.
Caution! Do not tighten the screw too tightly, since this may damage the oil seal or the thread in the cylinder cover.
Dispose of the old oil properly (local oil disposal point). The old oil must not be poured into the ground or drainage system, or mixed with other waste.
i Hydraulic oil
We recommend the following hydraulic oils for the hydraulic cylinder:
Shell Tellus T 22
Aral Vitam Gf 22
BP Energol HLP 22 order no. 400142 (1 litre)
Mobil DTE 11
or equivalent
Do not use any other types of oil. The use of any other type of oil will adversely affect the operation of the hydraulic cylinder.
Guarantee
Please observe the enclosed terms of guarantee.
Spare parts
Please refer to the drawing for spare parts.
Ordering spare parts:
- available from the manufacturer
-
orders must quote the following information:
-
spare parts no.
- quantity required
model
name of the model
Example: 360431, 1, Log splitter, ASP 5-520 N
Possible problems
| Problem | possible cause | remedy |
| Logs are not being split properly (insufficient splitting performance) | ⇒ The log is not positioned correctly ⇒ The log exceeds the maximum dimensions or the wood is too hard for the performance of the machine ⇒ The splitting wedge is not working properly ⇒ Oil leak ⇒ Hydraulic pressure too low ⇒ Incorrect connecting lead (longer than 10 m or too small cable cross-section) | ⇒ Reposition the log correctly ⇒ Cut the log to the required dimensions ⇒ Sharpen the splitting wedge, and check for any burrs or notches ⇒ Place a sheet of cardboard under the log splitter in order to locate the leak. To correct the problem, refer to the manufacturer. ⇒ Check the oil level and add more oil if necessary. If the problem cannot be rectified, refer to the manufacturer. ⇒ Use the correct connecting lead |
| Log ram travels out jerkily or under heavy vibration | ⇒ Air in the circuit | ⇒ Open the bleed screw ⇒ Check the oil level and add more oil if necessary. If the problem cannot be rectified, refer to the manufacturer. |
| Log ram will not move out | ⇒ Hydraulic pump defective | ⇒ To correct the problem, refer to the manufacturer. |
| Motor will not start | ⇒ No electrical power ⇒ Connection cable defective ⇒ Electric motor defective | ⇒ Check the fuse (16 A). ⇒ Replace the connection cable or have it checked by an electrician. ⇒ To correct the problem, refer to the manufacturer. |
| Oil leak at the dipstick | ⇒ Oil seal at the dipstick not sealing | ⇒ Replace the oil seal. |
Technical data
| Model | ASP 4-370 | ASP 5-520 |
| Name | ASP 4-370 | ASP 5-520 N |
| Splitting force | 40 kN (4 t) | 50 kN (5 t) |
| Log length | 370 mm | 520 mm |
| Log diameter | 50 – 250 mm | |
| Stroke | 302 mm | 392 |
| Piston rod diameter | 30 mm | |
| Hydraulic oil (max.) | 2.7 litres | 3.2 litres |
| Electric motor performance | P1 = 1500 W (S3) | |
| Power supply | 230 V ~ 50 Hz | |
| Revolutions | 2850 rpm | |
| Dimensions (Length x Width x Height) | 770 x 260 x 455 mm | 940 x 260 x 455 mm |
| Weight | 36 kg | 41 kg |
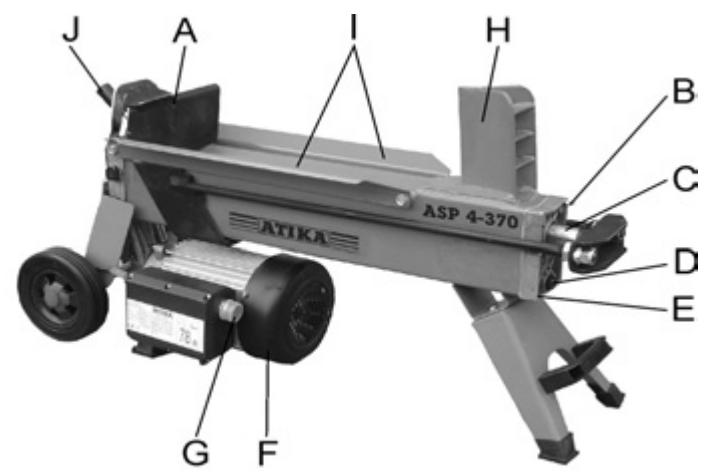
Illustration 1 ASP 4-370

Illustration 2 ASP 5-520 N
Ia He ce eKcIIOaTnpa MaunHata B 6n3oCT do ra3, 6eH3INHOBn KaHaJI INI npYr IecHO rOpIMM MaTePnAnI.
Пускан eксплобатця
- y6eTe ce, Ye ypeIbT e MOHTnpaH n3zraNo B CbOTBETCTBnC ppeDnncAHnTa.
-
Ppei Bcayo non3BaHe npOBepe TcneHTo:
-
npncbeyenHnteHnTe Ka6eJn - 3a DeΦeKTHn Mecta (nykHaTInH, cpe3OBe nJIN dpyrNoDobHn);
He n3noJ3BaIte depeKTn Ka6eN
- ypea - 3a eBentyaJIHn IOBpeiN (noIeHN 6e3OpacHa pa6ota)
-Дали BCNчКи BUNTOBи CbeINHeHЯ ca 3aTeRHaTn 3ДравО
XnDpaBnIkaT3aTeOBe
1 PnncbEiHЯBaHe KbM eJeKtpuYeckaTa Mpeixa
CpaBHeTe NOCOeHOTOBbpxy fapnHaTa Ta6JIka HAnpExeHne C HApExeHMeTO B MpeXaTaNcBpXeTe yPeDa KbM CbOTBeTHNKeHTaKT, KOITOn OTROBapr Ha npedncaHnra.
I3noJI3BaIte yIbJnxTeIeH Ka6eC DOCTaTbUHO rOJIMo HAnpeuHO ceyHHe.
He n3noJ3BaIte deΦeKTHn 3axpaHbaun Ka6eJIn.
- Письешинete урета пешд Дeф ekTHO-TOKOBaTa 3aunTa 30 mA.
i Ppepa3nte1: 16 A
① ByToH 3a o6cJyXBaHe
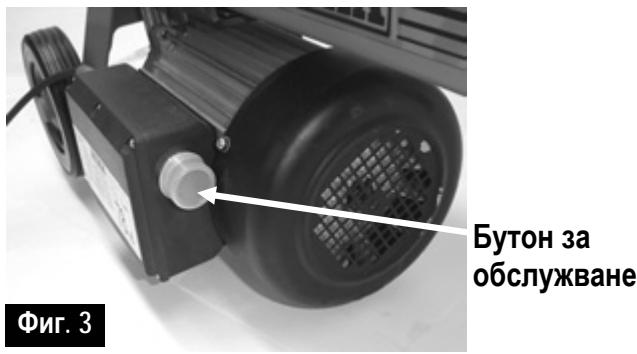
BkIIOUvaHe
HaTnCHete 3eJIeHn6byToN 3a obcIyKBaHe. DBrIraTeIaR pa6oTn, DOKaTO IbpxKeTe 3eJIeHn6 byToN 3a obcIyKBaHe BKJIOueH.
√ N3KJIIOUBAHe
IpycheTe OTHOBO 3eJIeHn8 6yToN 3a o6cnyKBaHe.
He n3noJIbAaTe ypeI, npn KoiTo 6yToHbT 3a 06cIyXBaHe He fynKUHOHa cblIacHo peJa. DaIte NOBpeHn 6yToHn 3a 06cIyXBaHe 3a peMOHT IIN 3a CMHa.
i XnDpaBnka
He n3no3BaIte MaunHaTa HNKora, aKO cbIeCTByBa onaCHOCT OT XnDpaBnUHa TeHOCT.
IodcnpetetoBa,maunHata npabothata obnact da ca ynCTN CBO6OHN OT MacJeHNIETHa. OnachocT OJIb3raHe n noxap!
PeIOBHO npOBepBaITe, daIIMa IOCTaTbUHO XnIpaBmHNo MaIb B pe3epBoapa (BIXK ,PiOdIpBXKa n rpnXn")
CbDpKaHne: 2,7 nItpa ASP4-370 3,2 nItpa ASP5-520N
Pabota c ypeDa 3a HaçenBaHe NaDbpBa 3a RopeHe
Доьнели УКАЗИЕ 3A БE3ОПАСHОCT
- YpeIbT 3a HaucenBaHe Ha IbPbMa MoKe Ja 6bJe O6cJyKBAH OT EINHO EDNHCTBeHO JInCe.
- Camo Лица над 18 говин, кочтс с почени и разбразни ръковордъото за лесллaitуmaТа n3нольват Maшинна.
- -
- -
- -
- -
- -
- -
- -
- -
- -
- -
- -
- -
- -
- -
- -
- -
- -
- -
- -
- -
- -
- -
- -
- -
- -
- -
- -
- -
- -
- -
- -
- -
- -
- -
- -
- -
- -
- -
- -
- -
- -
- -
- -
- -
- -
- -
- -
- -
- -
-
-
- -
- -
- -
- -
- -
- -
- -
- -
- -
- -
- -
- -
- -
- -
- -
- -
- -
- -
- -
- -
- -
- -
- -
- -
- -
- -
- -
- -
- -
- -
- -
- -
- -
- -
- -
- -
- -
- -
- -
- -
- -
- -
- -
- -
- -
- -
- -
- -
- -
-
.
-
-
-
-
-
-
-
-
-
-
-
-
-
-
-
-
-
-
-
-
-
-
-
-
-
-
-
-
-
-
-
-
-
- . . . . . . . . . . . . . . . . . . . . . . . . . . . . . . . . . . . . . . . . . . . . . . . . . . . . . . . . . . . . . . . . . . . . . . . . . . . . .;
...
Hocete npedna3n npncnoc6leny (npedna3en B3bop, pbkabuicn, npedna3n 06yBk), 3a da ce npedna3nte OT Bb3MOxHN HapahBaHH.
Hnkora Da He Ce HaucenBaT CTBOIOBe, KOITO CbIbpxaT NiPOHN, TeJ nn Dpyr npEmdTeN.
- Beue haçeneha Ta dbpBeCSHa n CTbprotHnTe cb3daBaT onacha 06IaCT 3a pa6ToA. CbIeCTByBa onaCHOCT OT cnBBAhe, noxlb3BaHe IIN IpaHaHe. BnHar n oDlbpxaIte peiB pa6OThata 06IaCT.
Hnkora He noctabraIte pBcTe BbPxy IOBBXKnHa cactn Ha MaunHaT a npn BKNoUeHa MaunHa. PdIbpxaIte 6e3oNaCHO pa3CTOaHne OT CTBOJa, Nlb3rauHa n pa3nopHna KInH, 3a da npedna3HTe pBcTe CN OT HapaRaBaHna.
HaçenBaIte eHnCTBeHO bPbEcnHa, KOrTo OTROBApHa MaKcMaJIHATA dJIIXHa 3a o6pa6oTbaHe.
Kakbo Mora da HacenBaM?
TolemnHa Ha CTBOJOBTe, KOINTo Tp86Ba Da ce pa3uenBAt
Bb3MOxHn Hen3npaBHOCTN
Symbol apparatus / emballage
GB under our sole responsibility, that the product
Log splitter ASP 4-370, ASP 5-520 (Serial number: see last page)
is conform with the above mentioned EC directive as well as with the provisions of the guidelines below: 2004/108/EC, 2006/95/EC.
Bc DeKnapnPame Ha CBOA OTROBOPHOCT, Ye npOdyKTbT
Upei 3a HaueBHe Na IbPbA 3a ropeHe ASP 4-370, ASP 5-520 (CepneH Hmep: BxN PocJeHa cTpaHnla)
CbOTBeTCTBa Ha pa3nopeI6nte Ha ropenocOeHInTe DnpeKtBn Ha EO, KaKTo n Ha n3nCKBaHnra Ta Ha npYrnte, OTHacraIte ce 3a Hero DnpeKtBn: 2004/108/EO, 2006/95/EO.