RC-WBDWTC14G - Washing machine Royal Catering - Free user manual and instructions
Find the device manual for free RC-WBDWTC14G Royal Catering in PDF.


User questions about RC-WBDWTC14G Royal Catering
0 question about this device. Answer the ones you know or ask your own.
Ask a new question about this device
Download the instructions for your Washing machine in PDF format for free! Find your manual RC-WBDWTC14G - Royal Catering and take your electronic device back in hand. On this page are published all the documents necessary for the use of your device. RC-WBDWTC14G by Royal Catering.
USER MANUAL RC-WBDWTC14G Royal Catering
| DE | Produktname | KAFFEEAUTOMAT |
| EN | Product name | COFFEE URN |
| PL | Nazwa produktu | ZAPARZACZ DO KAWY |
| CZ | Název výrobku | KÁVOVAR |
| FR | Nom du produit | PERCOLATEUR À CAFÉ |
| IT | Nome del prodotto | BOLLITORE PER CAFFÈ / PERCOLATORE PER CAFFÈ |
| ES | Nombre del producto | CAFETERA INDUSTRIAL / PERCOLADOR DE CAFÉ |
| HU | Termék neve | KÁVÉFŐZŐ AUTOMATA |
| DA | Produktnavn | KAFFEMASKINE / KAFFEKOGER |
| FI | Tuotteen nimi | KAHVINKEITTOLAITE |
| NL | Productnaam | KOFFIEZETAUTOMAAT / KOFFIEUR |
| NO | Produktnavn | KAFFEMASKIN / KAFFEKOKER |
| SE | Produktnamn | KAFFEBRYGGARE |
| PT | Nome do produto | CAFETEIRA ELÉTRICA / PERCOLADOR DE CAFÉ |
| SK | Názov produktu | KÁVOVAR |
| BG | Име на продукта | КАФЕ МАШИНА / КАФЕВАР |
| EL | Όνομα προϊόντος | КАФЕТІЕРА |
| HR | Naziv proizvoda | APARAT ZA KAVU |
| LT | Produkto pavadinimas | KAVOS VIRIMO APARATAS |
| RO | Numele produsului | AUTOMAT DE CAFEA / PERCOLATOR DE CAFEA |
| SL | Ime izdelka | APARAT ZA KAVO |
| DE Modell | EN Product model | PL Model produktu | CZ Model výrobku | FR Modèle | IT Modello | ES Modelo | HU Modell | DA Model | FI Tuotteen malli | NL Productmodel | NO Produktmodell | SE Produktmodell | PT Modelo do produto | SK Model | BG Модел на продукт | EL Movtéло προϊόντος | HR Model proizvoda | LT: Gaminio modelis | RO: Model de produs | SL: Model izdelka | RRC-WBDWTC6GRC-WBDWTC14GRC-WBDWTC6GORC-WBDWTC14GO | |
| DE Hersteller | EN Manufacturer | PL Producent | CZ Výrobce | FR Fabricant | IT Produttore | ES Fabricante | HU Termelő | DA Producent | FI Valmistaja | NL Producent | NO Produsent | SE Tillverkare | PT Fabricante | SK Výrobca | BG Производител | EL Κατασκευαστής | HR Proizvođač | LT Gamintojas | RO Producător | SL Proizvajalec | expondo Polska sp. z o.o. sp. k. | |
| DE Anschrift des Herstellers | EN Manufacturer Address | PL Adres producenta | CZ Adresa výrobce | FR Adresse du fabricant | IT Indirizzo del produttore | ES Dirección del fabricante | HU A gyártó címe | DA Producentens adresse | FI Valmistajan osoite | NL Adres producent | NO Produsentens adresse | SE Tillverkarens adress | PT Endereço do fabricante | SK Adresa výrobcu | BG Адрес на производителя | EL: Διεύθυνση κατασκευαστή | HR Adresa proizvođača | LT Gamintojo adresas | RO Adresa producătorului | SL Naslov proizvajalca | ul. Nowy Kisielin – Innowacyjna 7, 66-002 Zielona Góra | Poland, EU | |


H

|

This User Manual has been translated using machine translation. We have made every effort to ensure the translation is accurate, but please note that automated translations are not perfect and are not meant to replace human translators. The official version of the User Manual is in English. Any differences between the translated version and the original English are not legally binding. If you have any questions about the accuracy of the translation, please refer to the English version, which is the official reference. More language versions are available upon request via info@expondo.com.
1. Technical data
| Parameter description | Parameter value | |||
| Product name | COFFEE URN | |||
| Model | RC-WBDWTC-6G | RC-WBDWTC-14G | RC-WBDWTC-6GO | RC-WBDWTC-14GO |
| Supply voltage [V~] / Frequency [Hz] | 230~/50 | |||
| Rated power [W] | 950 | 1500 | 950 | 1500 |
| IP code | IPX3 | |||
| Capacity [l] | 6 | 14 | 6 | 14 |
| Dimensions [width x depth x height; mm] | 310x280x450 | 375x345x520 | 320x300x440 | 380x370x515 |
| Weight [kg] | 3,3 | 4,7 | 3,3 | 4,7 |
2. General description
The user manual is designed to assist in the safe and trouble-free use of the device. The product is designed and manufactured in accordance with strict technical guidelines, using state-of-the-art technologies and components. Additionally, it is produced in compliance with the most stringent quality standards.
DO NOT USE THE DEVICE UNLESS YOU HAVE THOROUGHLY READ AND UNDERSTOOD THIS USER MANUAL.
To increase the product life of the device and to ensure trouble-free operation, use it in accordance with this user manual and regularly perform maintenance tasks. The technical data and specifications in this user manual are up to date. The manufacturer reserves the right to make changes associated with quality improvement. The device is designed to reduce noise emission risks to a minimum, taking into account technological progress and noise reduction opportunities.
2.1. Legend
| Icon | Description |
 | The product satisfies the relevant safety standards. |
 | Read instructions before use. |
 | The product must be recycled. |
 | WARNING! or CAUTION! or REMEMBER! Applicable to the given situation.(general warning sign) |
 | Wear protective gloves. |
 | This product designed for contact with food |
 | ATTENTION! Hot surface, risk of burns! |
 | Only use indoors. |

PLEASE NOTE! DRAWINGS IN THIS MANUAL ARE FOR ILLUSTRATION PURPOSES ONLY AND IN SOME DETAILS MAY DIFFER FROM THE ACTUAL PRODUCT.
3. Usage safety

ATTENTION! READ ALL SAFETY WARNINGS AND ALL INSTRUCTIONS. FAILURE TO FOLLOW THE WARNINGS AND INSTRUCTIONS MAY RESULT IN ELECTRIC SHOCK, FIRE AND/OR SERIOUS INJURY OR EVEN DEATH.
The terms "device" or "product" are used in the warnings and instructions to refer to: COFFEE URN
3.1. Electrical safety
a) The plug of this unit must fit into the outlet. Do not modify the plug in any way. Original plugs and matching outlets reduce the risk of electric shock.
b) Avoid touching grounded parts, such as pipes, heaters, ovens, and refrigerators. There is an increased risk of electric shock if your body is grounded and touches the unit exposed to direct rain, wet pavement, and operation in a humid environment. If water enters the unit, there is an increased risk of damage to the unit and electric shock.
c) Do not touch the unit with wet or damp hands.
d) Do not use the cord in an unintended manner. Never use it to carry the unit or to pull the plug out of the socket. Keep the cord away from heat sources, oil, sharp edges or moving parts. Damaged or tangled cords increase the risk of electric shock.
e) If you cannot avoid using the unit in a wet environment, use a residual current unit (RCD). Using an RCD reduces the risk of electric shock.
f) Do not use the unit if the power cord is damaged or shows signs of wear. A damaged power cord should be replaced by a qualified electrician or the manufacturers service department.
g) To avoid electric shock, do not immerse the cable, plug, or unit itself in water or other liquid. Do not use the unit on wet surfaces.
h) CAUTION - THREAT TO LIFE! When cleaning or using the unit, never immerse it in water or other liquids.
i) Do not use the unit in rooms with very high humidity / in the immediate vicinity of water tanks!
j) Do not allow the machine to get wet. Risk of electric shock!
3.2. Safety in the workplace
a) Keep the work area tidy and well lit. Disorder or poor lighting can lead to accidents. Be foresighted, watch what you are doing and use common sense when using the unit.
b) If you have any doubts as to whether the product is working properly or if it is damaged, contact the manufacturer ‘s service department.
c) Only the manufacturer ‘s service department can repair the unit. Do not carry out repairs yourself!
d) In case of open flames or fire, use only dry powder or snow (CO2) fire extinguishers to extinguish the live equipment.
e) Check the condition of the safety stickers regularly. Replace them if they are illegible.
f) Keep these instructions for use for future reference. If the unit is to be passed on to a third party, the operating instructions must also be handed over together with the unit.
g) Keep the packaging and small assembly parts out of the reach of children.
h) Keep the unit away from children and animals.
i) When using this unit together with other units, also follow the other instructions for use.

REMEMBER! WHEN USING THE DEVICE, PROTECT CHILDREN AND OTHER BYSTANDERS.
3.3. Personal safety
a) Do not operate this unit if you are tired, ill or under the influence of alcohol, drugs or medication that could impair your ability to operate the unit.
b) The unit is not intended to be used by persons (including children) with reduced mental, sensory or intellectual functions or persons who lack experience and/or knowledge unless they are supervised or have been instructed by a person responsible for their safety on how to operate the unit.
c) The unit may be operated by persons who are physically fit, capable of operating it and appropriately trained, and who have read this instruction manual and have been trained in occupational safety and health.
d) To prevent accidental start-up, make sure the switch is in the off position before connecting to a power source.
e) The unit is not a toy. Children should be watched to ensure that they do not play with the unit.
3.4. Safe device use
a) Do not overload the unit. Use tools that are suitable for the application. A correctly selected unit will do a better and safer job for which it was designed.
b) Do not use the unit if the ON/OFF (I/O) switch does not function properly (does not turn on and off). Units that cannot be controlled by the switch are unsafe, cannot operate, and must be repaired.
c) Unplug the unit before making adjustments, changing accessories, or putting it away. This precaution reduces the risk of accidental start-up.
d) Keep unused equipment out of the reach of children and out of the reach of anyone unfamiliar with the unit or this instruction manual. These units is dangerous in the hands of inexperienced users.
e) Keep the unit in good working condition. Check before each use for general damage or damage to moving parts (cracks in parts and components or any other condition that may affect the safe operation of the unit). If damaged, have the unit repaired before use.
f) Repairs and maintenance should be carried out by qualified personnel using only original spare parts. This will ensure the safety of use.
g) To ensure the designed operational integrity of the unit, do not remove factory-installed covers or loosen screws.
h) Do not move, shift, or rotate the machine while in operation.
i) Clean the unit regularly to prevent permanent dirt build-up.
j) The unit is not a toy. Cleaning and maintenance must not be performed by children without adult supervision.
k) Do not start up an empty unit.
I) Do not tamper with the unit to alter its performance or design.
m) Keep the unit away from sources of fire and heat.
n) Before use, make sure the unit is placed on a flat, level surface, away from the edge of the countertop.
o) Do not turn on the unit if the water is above the maximum fill line or below the minimum fill line.
p) Use of the machine without water is forbidden.
q) If the unit runs dry, it will trigger the overheat protection system, which may shorten the life of the heating element.
r) If the unit runs dry, turn off the power, wait for the temperature of the unit to drop, then pour water into the unit and restart the product.
s) Before starting the unit, make sure that the lid is securely fastened.
t) The unit is hot during operation. Special care should be taken.
u) Do not touch the unit with your hands during or after operation until it has cooled down completely. Danger of burns!
v) Drinks that are kept warm by the unit may get very hot. Be careful not to scald yourself.
w) Switch off the unit before moving it! The handles are only used for transportation when the unit is empty!
x) The unit should only be carried by its handles. It is recommended to wear protective gloves for this purpose. Danger of burns!
y) Wear protective gloves when lifting the lid and keep as much distance as possible. Risk of burns from steam!
z) Let the unit cool down before servicing, maintaining, or transporting it.
aa) Be sure to clean the coffee brewer regularly to prevent permanent dirt buildup.
bb) Change the coffee filters in the machine regularly.

ATTENTION! DESPITE THE SAFE DESIGN OF THE DEVICE AND ITS PROTECTIVE FEATURES, AND DESPITE THE USE OF ADDITIONAL ELEMENTS PROTECTING THE OPERATOR, THERE IS STILL A SLIGHT RISK OF ACCIDENT OR INJURY WHEN USING THE DEVICE. STAY ALERT AND USE COMMON SENSE WHEN USING THE DEVICE.
4. Use guidelines
The unit is designed to brew coffee.
The area of application includes service areas that are accessible to qualified personnel with knowledge and experience of working with the equipment and with health and safety issues.
The user is liable for any damage resulting from unintended use of the device.
4.1. Device description

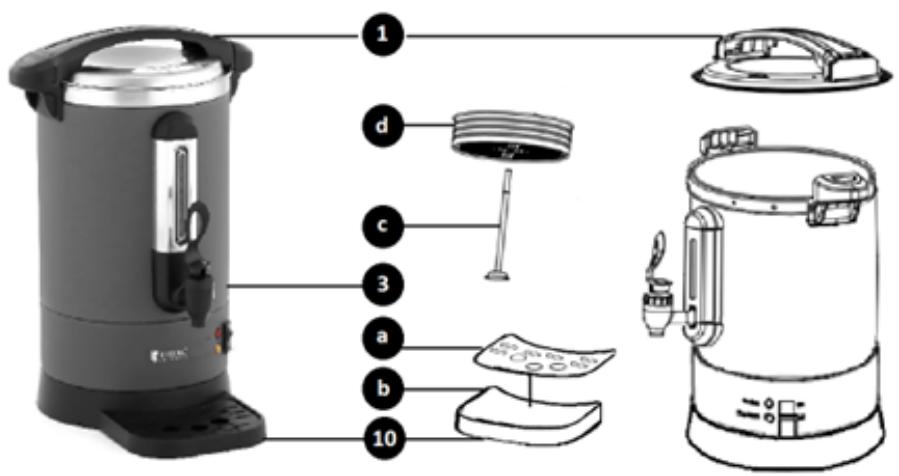
- Lid with handle
- Tank handle
- Tank
- Water level indicator
- Dispenser
- Stem of dispenser valve
- „ON/OFF “ power switch
- Heating control LED
- Control LED for maintaining temperature
- Dish base
- Power cord
Set elements

1. Lid with handle
- Tank
c. Percolator ascending tube
d. Filter basket
- Dish base
a. Sieve
b. Drainer
4.2. Preparing for use
4.2.1. Appliance location
The ambient temperature should be between 10° C and 25° C and the relative humidity should not exceed 85%. Place the unit in a way that ensures good air circulation. Keep the unit away from any hot surfaces. Always operate the unit on a level, stable, clean, fireproof and dry surface and out of the reach of children and persons of impaired mental, sensory and intellectual functions. Place the unit in such a way that the mains plug can be reached at any time. Ensure that the power supply to the unit corresponds to that specified on the identification plate!
Before the first use, disassemble all components and wash them as well as wash the unit tank.
Disassemble the device and all its components and clean them before the first use.
4.3. Assembling the device
a) To remove/install the tank (1) lid, follow the markings on the side locks of the unit. The tank lid lock is released by turning the lid handle (1) counterclockwise. Turning the lid handle clockwise will lock the design.
b) Remove the filter basket (d) and percolator elevation tube (c) from inside the tank (3).
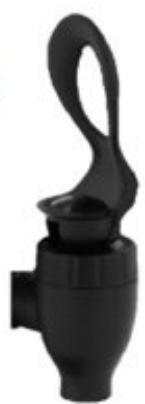
c) Before filling the tank with water, make sure that the valve stem (6) of the dispenser water circuit (5) is in the locked position (C). If necessary, block the dispenser water outlet. The valve stem (6) of the dispenser is controlled by turning it (clockwise/counterclockwise).
d) Fill the dispenser tank with water. The correct water level for the dispenser is between maximum and minimum. Do not operate the dispenser if the water level does not reach the minimum mark or exceeds the maximum volume marked inside the tank.
e) Place the percolator rise tube (c) on the bottom of the tank (3). Slide the end of the tube with the base into the heating section of the tank bottom. Check that it is correctly installed (A).

f) Pre-wet the filter basket (d) with water. Pre-moistening the basket with water can prevent over-ground coffee beans from entering the water.
g) Fill the filter basket (d) with the desired coffee grind content. The use of evenly ground coffee is recommended.
h) Place the filter basket (d) on the ascending tube of the percolator (c). To do this, pass the percolator ascending tube through the opening axis of the filter basket until a resistance is felt. The structures have built-in safety units so that they remain in a fixed position (B).
i) Slide the cover of the unit onto the tank and lock it (see sec.1).
j) Connect the plug of the unit to the electrical outlet.
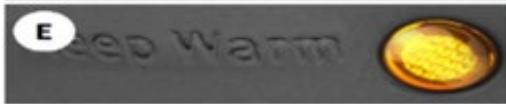
k) The unit has two built-in control LEDs that inform the user about heating the water - the red LED (D- “Heating “) or maintaining a constant temperature of the load - the yellow LED (E- “Keep warm “).
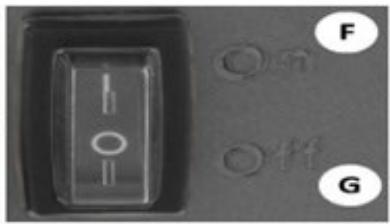
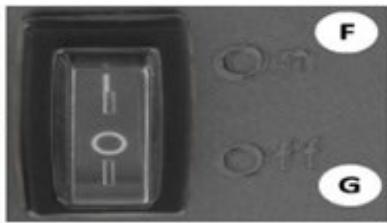
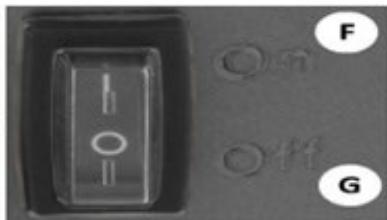
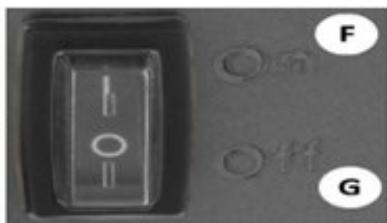
I) Start the unit by setting the power switch to position I (F) (,,ON “). The control LED will light up.


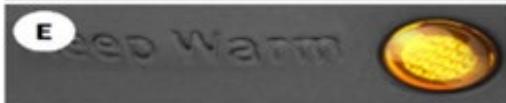
m) When the boiling temperature is reached and the entire load has been filtered, the keep warm LED will turn off. The unit will switch to a constant temperature system. The yellow LED (F) will light up.
n) CAUTION! After the brewing process is complete, it is possible to remove the filtered load. Unlock the machine lid and remove the filter basket together with the percolator ascending tube from the tank. Special precautions must be taken when doing so. Risk of burns!
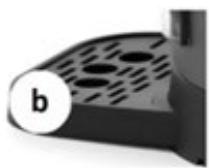
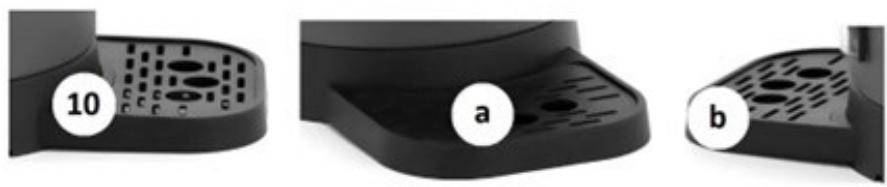
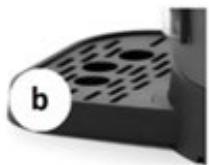
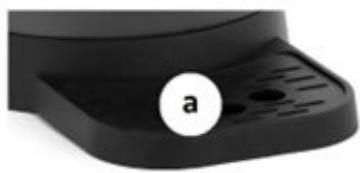
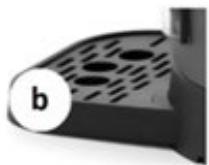
o) The dispenser has a dedicated base on which a container must be placed before the prepared beverage is taken (10). This base consists of a draining board (b) and a sieve (a). The design prevents liquids from spilling on the base on which the unit is placed. For installation, seat the strainer inside the draining board.
p) Place the base on the edge of the unit and lock it with the fasteners.
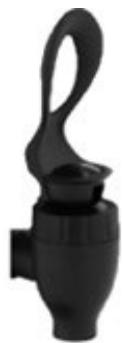
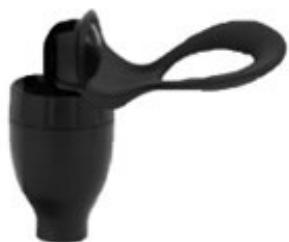
q) Taking the beverage from the tank is done by unblocking the dispenser valve (H) and putting it in the right position (I) (by moving the valve stem up/ down), which causes the liquid to flow out or to stop.
C

r) After use, turn off the unit by setting the power switch to the O (G) position (,,OFF “).
s) Disconnect the unit from the mains supply.
t) Allow the dispenser and the beverage to cool completely before emptying the residual liquid from the container and starting the brewing process again.

CAUTION! THE UNIT IS EQUIPPED WITH A DRY OVERHEATING PROTECTION SYSTEM. IF THE UNIT IS OPERATED WITH THE WATER LEVEL BELOW THE RECOMMENDED MINIMUM, THE UNIT WILL AUTOMATICALLY SWITCH OFF. THE BREWING PROCESS CAN BE RESTARTED AFTER 10 MINUTES.
4.4. Cleaning and maintenance
a) Cleaning and maintenance Pull the mains plug and let the unit cool down completely before cleaning, adjusting or replacing accessories and when the unit is not in use.
b) Pull out the mains plug before each cleaning and when the unit is not in use.
c) Use only non-corrosive cleaning agents for cleaning the surfaces.
d) Only mild detergents designed for cleaning food contact surfaces may be used to clean the unit.
e) After each cleaning, all the parts should be dried well before the unit is used again.
f) Store the unit in a dry and cool place protected from moisture and direct sunlight.
g) Do not spray the unit with a stream of water or immerse it in water.
h) Make sure that no water enters through the ventilation openings in the casing.
i) Clean the ventilation openings with a brush and compressed air.
j) Perform regular inspections of the unit checking technical fitness and any damages.
k) Use a soft cloth for cleaning.
I) Do not use sharp and/or metal objects (e.g. a wire brush or metal spatula) for cleaning, as these may damage the surface of the material from which the unit is made.
m) Do not clean the unit with acidic substances, medical products, diluent, fuel, oil or other chemicals as this may cause damage to the unit.
n) Clean the unit after each use. Do not leave the unit dirty after use.
4.4.1. Disposing of used devices
At the end of its useful life, this product should not be disposed of with normal household waste but should be taken to a collection point for the recycling of electrical and electronic equipment. This is indicated by the symbol on the product, operating instructions or packaging. The materials used in this unit are recyclable according to their marking. You will be making an important contribution to protecting our environment by reusing, recycling or otherwise disposing of used units.
Your local administration will provide you with information about the appropriate disposal point for used units.


C

H

|


C


C


H

|
- Tapa con asa
- Tanque
c. Tubo ascendente del percolador
d. Cesto filtrante - Base del plato
a. Tamiz
b. Escurridor

H
|


H

|

1. Låg med håndtag
- Tank
c. Perkolatorens opstigende rør
d. Filterkurv
- Skålbund
a. Sigt
b. Dræn

1. Kansi kahvalla
- Säiliö


1. Lokk med håndtak
- Tank

C


H

|

- Tampa com alça
- Tanque
c. tubo ascendente do percolador
d. Cesto de filtro - Base do prato
a. Peneira
b. Escorredor
-
Veko s rukovätou
-
Nádoba

- Poklopac s ručkom
- Ručka spremnika
- Spremnik
- Pokazivač razine vode
- Dozator
- Oscilacija ventila dozatora
- Prekidač za napajanje „ UKLJ./ISKLJUČ. “
- LED za kontrolu grijanja
- LED za održavanje temperature
- Baza posude
- Kabel za napajanje
Elementi seta


q) Uzimanje pića iz spremnika vrši se odblokiranjem ventila za doziranje (H) i postavljanjem u ispravan položaj (I) (pomicanjem stabiljike ventila gore/dolje), što uzrokuje istjecanje tekućine ili zaustavljanje.
C

r) Nakon upotrebe isključite uređaj postavljanjem prekidača za napajanje u položaj O (G) („ ISKLJUČENO “).
s) Isključite uređaj iz električne mreže.
t) Prije nego što ispraznite preostalu tekućinu iz spremnika i ponovno pokrenete postupak kuhanja, ostavite da se dozator i napitak potpuno ohlade.

OPREZ! UREĐAJ JE OPREMLJEN SUSTAVOM ZAŠTITE OD PREGRIJANJA. AKO SE UREĐAJ RADI SRAZINOM VODE ISPOD PREPORUČENOG MINIMA, UREĐAJ ĆE SE AUTOMATSKI ISKLJUČITI. PROCES KUHANJA MOŽE SE PONOVNO POKRENUTI NAKON 10 MINUTA.
4.4. Čišćenje i održavanje
This User Manual has been translated using machine translation. We have made every effort to ensure the translation is accurate, but please note that automated translations are not perfect and are not meant to replace human translators. The official version of the User Manual is in English. Any differences between the translated version and the original English are not legally binding. If you have any questions about the accuracy of the translation, please refer to the English version, which is the official reference. More language versions are available upon request via info@expondo.com.
1. Technical data
| Parameter description | Parameter value | |||
| Product name | COFFEE URN | |||
| Model | RC-WBDWTC-6G | RC-WBDWTC-14G | RC-WBDWTC-6GO | RC-WBDWTC-14GO |
| Supply voltage [V~] / Frequency [Hz] | 230~/50 | |||
| Rated power [W] | 950 | 1500 | 950 | 1500 |
| IP code | IPX3 | |||
| Capacity [l] | 6 | 14 | 6 | 14 |
| Dimensions [width x depth x height; mm] | 310x280x450 | 375x345x520 | 320x300x440 | 380x370x515 |
| Weight [kg] | 3,3 | 4,7 | 3,3 | 4,7 |
2. General description
The user manual is designed to assist in the safe and trouble-free use of the device. The product is designed and manufactured in accordance with strict technical guidelines, using state-of-the-art technologies and components. Additionally, it is produced in compliance with the most stringent quality standards.
DO NOT USE THE DEVICE UNLESS YOU HAVE THOROUGHLY READ AND UNDERSTOOD THIS USER MANUAL.
To increase the product life of the device and to ensure trouble-free operation, use it in accordance with this user manual and regularly perform maintenance tasks. The technical data and specifications in this user manual are up to date. The manufacturer reserves the right to make changes associated with quality improvement. The device is designed to reduce noise emission risks to a minimum, taking into account technological progress and noise reduction opportunities.
2.1. Legend
| Icon | Description |
| The product satisfies the relevant safety standards. |
 | Read instructions before use. |
 | The product must be recycled. |
 | WARNING! or CAUTION! or REMEMBER! Applicable to the given situation.(general warning sign) |
 | Wear protective gloves. |
| This product designed for contact with food |
 | ATTENTION! Hot surface, risk of burns! |
| Only use indoors. |

PLEASE NOTE! DRAWINGS IN THIS MANUAL ARE FOR ILLUSTRATION PURPOSES ONLY AND IN SOME DETAILS MAY DIFFER FROM THE ACTUAL PRODUCT.
3. Usage safety

ATTENTION! READ ALL SAFETY WARNINGS AND ALL INSTRUCTIONS. FAILURE TO FOLLOW THE WARNINGS AND INSTRUCTIONS MAY RESULT IN ELECTRIC SHOCK, FIRE AND/OR SERIOUS INJURY OR EVEN DEATH.
The terms "device" or "product" are used in the warnings and instructions to refer to: COFFEE URN
3.1. Electrical safety
a) The plug of this unit must fit into the outlet. Do not modify the plug in any way. Original plugs and matching outlets reduce the risk of electric shock.
b) Avoid touching grounded parts, such as pipes, heaters, ovens, and refrigerators. There is an increased risk of electric shock if your body is grounded and touches the unit exposed to direct rain, wet pavement, and operation in a humid environment. If water enters the unit, there is an increased risk of damage to the unit and electric shock.
c) Do not touch the unit with wet or damp hands.
d) Do not use the cord in an unintended manner. Never use it to carry the unit or to pull the plug out of the socket. Keep the cord away from heat sources, oil, sharp edges or moving parts. Damaged or tangled cords increase the risk of electric shock.
e) If you cannot avoid using the unit in a wet environment, use a residual current unit (RCD). Using an RCD reduces the risk of electric shock.
f) Do not use the unit if the power cord is damaged or shows signs of wear. A damaged power cord should be replaced by a qualified electrician or the manufacturers service department.
g) To avoid electric shock, do not immerse the cable, plug, or unit itself in water or other liquid. Do not use the unit on wet surfaces.
h) CAUTION - THREAT TO LIFE! When cleaning or using the unit, never immerse it in water or other liquids.
i) Do not use the unit in rooms with very high humidity / in the immediate vicinity of water tanks!
j) Do not allow the machine to get wet. Risk of electric shock!
3.2. Safety in the workplace
a) Keep the work area tidy and well lit. Disorder or poor lighting can lead to accidents. Be foresighted, watch what you are doing and use common sense when using the unit.
b) If you have any doubts as to whether the product is working properly or if it is damaged, contact the manufacturer ‘s service department.
c) Only the manufacturer ‘s service department can repair the unit. Do not carry out repairs yourself!
d) In case of open flames or fire, use only dry powder or snow (CO2) fire extinguishers to extinguish the live equipment.
e) Check the condition of the safety stickers regularly. Replace them if they are illegible.
f) Keep these instructions for use for future reference. If the unit is to be passed on to a third party, the operating instructions must also be handed over together with the unit.
g) Keep the packaging and small assembly parts out of the reach of children.
h) Keep the unit away from children and animals.
i) When using this unit together with other units, also follow the other instructions for use.

REMEMBER! WHEN USING THE DEVICE, PROTECT CHILDREN AND OTHER BYSTANDERS.
3.3. Personal safety
a) Do not operate this unit if you are tired, ill or under the influence of alcohol, drugs or medication that could impair your ability to operate the unit.
b) The unit is not intended to be used by persons (including children) with reduced mental, sensory or intellectual functions or persons who lack experience and/or knowledge unless they are supervised or have been instructed by a person responsible for their safety on how to operate the unit.
c) The unit may be operated by persons who are physically fit, capable of operating it and appropriately trained, and who have read this instruction manual and have been trained in occupational safety and health.
d) To prevent accidental start-up, make sure the switch is in the off position before connecting to a power source.
e) The unit is not a toy. Children should be watched to ensure that they do not play with the unit.
3.4. Safe device use
a) Do not overload the unit. Use tools that are suitable for the application. A correctly selected unit will do a better and safer job for which it was designed.
b) Do not use the unit if the ON/OFF (I/O) switch does not function properly (does not turn on and off). Units that cannot be controlled by the switch are unsafe, cannot operate, and must be repaired.
c) Unplug the unit before making adjustments, changing accessories, or putting it away. This precaution reduces the risk of accidental start-up.
d) Keep unused equipment out of the reach of children and out of the reach of anyone unfamiliar with the unit or this instruction manual. These units is dangerous in the hands of inexperienced users.
e) Keep the unit in good working condition. Check before each use for general damage or damage to moving parts (cracks in parts and components or any other condition that may affect the safe operation of the unit). If damaged, have the unit repaired before use.
f) Repairs and maintenance should be carried out by qualified personnel using only original spare parts. This will ensure the safety of use.
g) To ensure the designed operational integrity of the unit, do not remove factory-installed covers or loosen screws.
h) Do not move, shift, or rotate the machine while in operation.
i) Clean the unit regularly to prevent permanent dirt build-up.
j) The unit is not a toy. Cleaning and maintenance must not be performed by children without adult supervision.
k) Do not start up an empty unit.
I) Do not tamper with the unit to alter its performance or design.
m) Keep the unit away from sources of fire and heat.
n) Before use, make sure the unit is placed on a flat, level surface, away from the edge of the countertop.
o) Do not turn on the unit if the water is above the maximum fill line or below the minimum fill line.
p) Use of the machine without water is forbidden.
q) If the unit runs dry, it will trigger the overheat protection system, which may shorten the life of the heating element.
r) If the unit runs dry, turn off the power, wait for the temperature of the unit to drop, then pour water into the unit and restart the product.
s) Before starting the unit, make sure that the lid is securely fastened.
t) The unit is hot during operation. Special care should be taken.
u) Do not touch the unit with your hands during or after operation until it has cooled down completely. Danger of burns!
v) Drinks that are kept warm by the unit may get very hot. Be careful not to scald yourself.
w) Switch off the unit before moving it! The handles are only used for transportation when the unit is empty!
x) The unit should only be carried by its handles. It is recommended to wear protective gloves for this purpose. Danger of burns!
y) Wear protective gloves when lifting the lid and keep as much distance as possible. Risk of burns from steam!
z) Let the unit cool down before servicing, maintaining, or transporting it.
aa) Be sure to clean the coffee brewer regularly to prevent permanent dirt buildup.
bb) Change the coffee filters in the machine regularly.

ATTENTION! DESPITE THE SAFE DESIGN OF THE DEVICE AND ITS PROTECTIVE FEATURES, AND DESPITE THE USE OF ADDITIONAL ELEMENTS PROTECTING THE OPERATOR, THERE IS STILL A SLIGHT RISK OF ACCIDENT OR INJURY WHEN USING THE DEVICE. STAY ALERT AND USE COMMON SENSE WHEN USING THE DEVICE.
4. Use guidelines
The unit is designed to brew coffee.
The area of application includes service areas that are accessible to qualified personnel with knowledge and experience of working with the equipment and with health and safety issues.
The user is liable for any damage resulting from unintended use of the device.
4.1. Device description
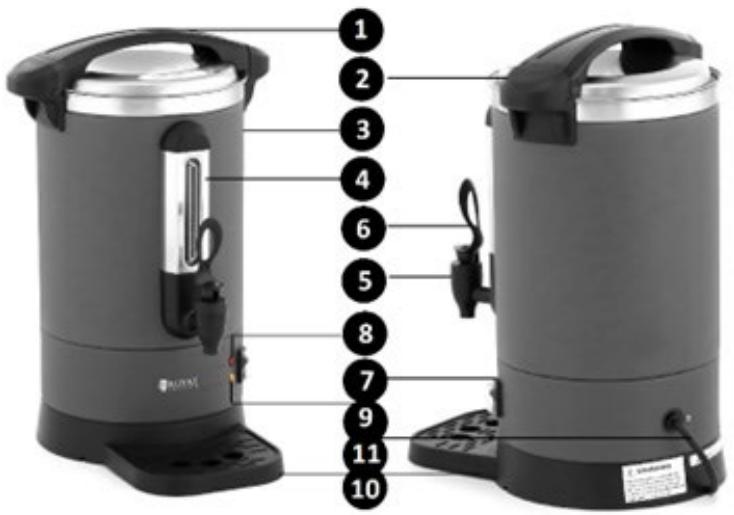
- Lid with handle
- Tank handle
- Tank
- Water level indicator
- Dispenser
- Stem of dispenser valve
- „ON/OFF “ power switch
- Heating control LED
- Control LED for maintaining temperature
- Dish base
- Power cord
Set elements

1. Lid with handle
- Tank
c. Percolator ascending tube
d. Filter basket
- Dish base
a. Sieve
b. Drainer
4.2. Preparing for use
4.2.1. Appliance location
The ambient temperature should be between 10° C and 25° C and the relative humidity should not exceed 85%. Place the unit in a way that ensures good air circulation. Keep the unit away from any hot surfaces. Always operate the unit on a level, stable, clean, fireproof and dry surface and out of the reach of children and persons of impaired mental, sensory and intellectual functions. Place the unit in such a way that the mains plug can be reached at any time. Ensure that the power supply to the unit corresponds to that specified on the identification plate!
Before the first use, disassemble all components and wash them as well as wash the unit tank.
Disassemble the device and all its components and clean them before the first use.
4.3. Assembling the device
a) To remove/install the tank (1) lid, follow the markings on the side locks of the unit. The tank lid lock is released by turning the lid handle (1) counterclockwise. Turning the lid handle clockwise will lock the design.
b) Remove the filter basket (d) and percolator elevation tube (c) from inside the tank (3).
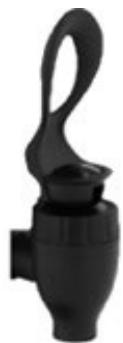
c) Before filling the tank with water, make sure that the valve stem (6) of the dispenser water circuit (5) is in the locked position (C). If necessary, block the dispenser water outlet. The valve stem (6) of the dispenser is controlled by turning it (clockwise/counterclockwise).
d) Fill the dispenser tank with water. The correct water level for the dispenser is between maximum and minimum. Do not operate the dispenser if the water level does not reach the minimum mark or exceeds the maximum volume marked inside the tank.
e) Place the percolator rise tube (c) on the bottom of the tank (3). Slide the end of the tube with the base into the heating section of the tank bottom. Check that it is correctly installed (A).

f) Pre-wet the filter basket (d) with water. Pre-moistening the basket with water can prevent over-ground coffee beans from entering the water.
g) Fill the filter basket (d) with the desired coffee grind content. The use of evenly ground coffee is recommended.
h) Place the filter basket (d) on the ascending tube of the percolator (c). To do this, pass the percolator ascending tube through the opening axis of the filter basket until a resistance is felt. The structures have built-in safety units so that they remain in a fixed position (B).
i) Slide the cover of the unit onto the tank and lock it (see sec.1).
j) Connect the plug of the unit to the electrical outlet.
k) The unit has two built-in control LEDs that inform the user about heating the water - the red LED (D- “Heating “) or maintaining a constant temperature of the load - the yellow LED (E- “Keep warm “).
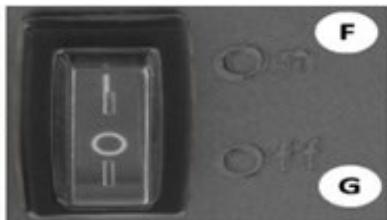
I) Start the unit by setting the power switch to position I (F) (,,ON “). The control LED will light up.
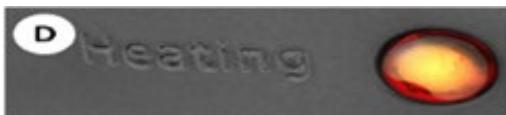


m) When the boiling temperature is reached and the entire load has been filtered, the keep warm LED will turn off. The unit will switch to a constant temperature system. The yellow LED (F) will light up.
n) CAUTION! After the brewing process is complete, it is possible to remove the filtered load. Unlock the machine lid and remove the filter basket together with the percolator ascending tube from the tank. Special precautions must be taken when doing so. Risk of burns!
o) The dispenser has a dedicated base on which a container must be placed before the prepared beverage is taken (10). This base consists of a draining board (b) and a sieve (a). The design prevents liquids from spilling on the base on which the unit is placed. For installation, seat the strainer inside the draining board.
p) Place the base on the edge of the unit and lock it with the fasteners.

q) Taking the beverage from the tank is done by unblocking the dispenser valve (H) and putting it in the right position (I) (by moving the valve stem up/ down), which causes the liquid to flow out or to stop.
C

r) After use, turn off the unit by setting the power switch to the O (G) position (,,OFF “).
s) Disconnect the unit from the mains supply.
t) Allow the dispenser and the beverage to cool completely before emptying the residual liquid from the container and starting the brewing process again.

CAUTION! THE UNIT IS EQUIPPED WITH A DRY OVERHEATING PROTECTION SYSTEM. IF THE UNIT IS OPERATED WITH THE WATER LEVEL BELOW THE RECOMMENDED MINIMUM, THE UNIT WILL AUTOMATICALLY SWITCH OFF. THE BREWING PROCESS CAN BE RESTARTED AFTER 10 MINUTES.
4.4. Cleaning and maintenance
a) Cleaning and maintenance Pull the mains plug and let the unit cool down completely before cleaning, adjusting or replacing accessories and when the unit is not in use.
b) Pull out the mains plug before each cleaning and when the unit is not in use.
c) Use only non-corrosive cleaning agents for cleaning the surfaces.
d) Only mild detergents designed for cleaning food contact surfaces may be used to clean the unit.
e) After each cleaning, all the parts should be dried well before the unit is used again.
f) Store the unit in a dry and cool place protected from moisture and direct sunlight.
g) Do not spray the unit with a stream of water or immerse it in water.
h) Make sure that no water enters through the ventilation openings in the casing.
i) Clean the ventilation openings with a brush and compressed air.
j) Perform regular inspections of the unit checking technical fitness and any damages.
k) Use a soft cloth for cleaning.
I) Do not use sharp and/or metal objects (e.g. a wire brush or metal spatula) for cleaning, as these may damage the surface of the material from which the unit is made.
m) Do not clean the unit with acidic substances, medical products, diluent, fuel, oil or other chemicals as this may cause damage to the unit.
n) Clean the unit after each use. Do not leave the unit dirty after use.
4.4.1. Disposing of used devices
At the end of its useful life, this product should not be disposed of with normal household waste but should be taken to a collection point for the recycling of electrical and electronic equipment. This is indicated by the symbol on the product, operating instructions or packaging. The materials used in this unit are recyclable according to their marking. You will be making an important contribution to protecting our environment by reusing, recycling or otherwise disposing of used units.
Your local administration will provide you with information about the appropriate disposal point for used units.

-
Dangtis su rankena
-
Bakas

1. Capac cu mâner
- Rezervor

C
1. Pokrov z ročajem
- Rezervoar

For the disposal of the device please consider and act according to the national and local rules and regulations.
CONTACT
expondo Polska sp. z o.o. sp. k.





- TECHNICAL DATA
- GENERAL DESCRIPTION
- DO NOT USE THE DEVICE UNLESS YOU HAVE THOROUGHLY READ AND UNDERSTOOD THIS USER MANUAL
- LEGEND
- USAGE SAFETY
- ELECTRICAL SAFETY
- SAFETY IN THE WORKPLACE
- PERSONAL SAFETY
- SAFE DEVICE USE
- USE GUIDELINES
- DEVICE DESCRIPTION
- SET ELEMENTS
- LID WITH HANDLE
- PREPARING FOR USE
- APPLIANCE LOCATION
- ASSEMBLING THE DEVICE
- CLEANING AND MAINTENANCE
- DISPOSING OF USED DEVICES
- LÅG MED HÅNDTAG
- KANSI KAHVALLA
- LOKK MED HÅNDTAK
- ELEMENTI SETA
- ČIŠĆENJE I ODRŽAVANJE
- CAPAC CU MÂNER
- POKROV Z ROČAJEM
- CONTACT
Brand : Royal Catering
Model : RC-WBDWTC14G
Category : Washing machine