
E2500 - Wireless Router LINKSYS - Free user manual and instructions
Find the device manual for free E2500 LINKSYS in PDF.
| Product Type | Advanced Dual-Band N Wireless Router |
| Brand | Linksys |
| Model | E2500 |
| Wireless Standards | 802.11n, 802.11a, 802.11g, 802.11b |
| Frequency Bands | 2.4 GHz and 5 GHz |
| Number of Antennas | 4 internal antennas (2 per band) |
| Ethernet Ports | 4 Gigabit ports (10/100/1000) + 1 Internet port |
| USB Port | No (model without USB) |
| Buttons | Reset, Wi-Fi Protected Setup™ |
| Wireless Security | WEP, WPA, WPA2 (Personal and Enterprise) |
| MAC Filtering | Yes |
| UPnP | Supported |
| Dimensions (L x W x H) | 225 x 35 x 180 mm |
| Weight | 452 g |
| Power Supply | 12 V DC, 1 A (power adapter included) |
| Operating Temperature | 0 °C to 40 °C |
| Operating Humidity | 10 to 80% RH non-condensing |
| Maintenance and Cleaning | Unplug the power, clean with a soft, dry cloth. Do not use chemicals. |
| Spare Parts | Power adapter, Ethernet cable (included). Parts available at linksys.com/support. |
| Repairability | Factory reset via Reset button or web interface (192.168.1.1). Technical support at linksys.com. |
| General Information | Warranty and regulations: see included CD or linksys.com/support. |
Frequently Asked Questions - E2500 LINKSYS
User questions about E2500 LINKSYS
0 question about this device. Answer the ones you know or ask your own.
Ask a new question about this device
Download the instructions for your Wireless Router in PDF format for free! Find your manual E2500 - LINKSYS and take your electronic device back in hand. On this page are published all the documents necessary for the use of your device. E2500 by LINKSYS.
USER MANUAL E2500 LINKSYS
(Lw) Wireless Security < (Lw) Wireless
a
sJ 1
Lg> Lg>
11
12
Cisco Connect
CLiAaGJ 1
12 (Windows XP Service Pack 3.0 Get Windows XP Service Pack 3.0
13 (Jusurj) Your Internet cable is not plugged in
14 (AJ J) cannot access your router
15 (jLJ/ j, eJ/ a, J) Device not found Jw
#
17
18
19
20
21
22
Linksys E900
Linksys E1200
Linksys E1500
Linksys E2500
Linksys E3200
Linksys E4200
Jg
i 100
1
1
1
2
2
2
E900/E1200/E1500/E2500/E3200
a
ailll 100
E4200
Aegell
a111 a111 0
E-Series
3
3
3
3
3
LcdeJIJ no Joo Jc gJcJI Jc
aagaae
Cisco Connect
Cisco Connect
Lgag aegall slae
P
4
5
5
5
6
J 1
(∑LwJlJcJ)Basic Setup < () )Setup
(L)Language
Internet Setup
4.5 L WU1 101
Jl Jll Jll Jll Jll Jll Jll Jll Jll Jll Jll Jll Jll Jll Jll Jll Jll Jll Jll Jll Jll Jll Jll Jll Jll Jll Jll Jll Jll Jll Jll Jll Jll Jll Jll Jll Jll Jll Jll Jll Jll Jll Jll Jll Jll Jll Jll Jll Jll Jll Jll Jell
aaii iig jnnaaia Jll Jll aib Jgno Jusogiy a-aaLJI
.
41 + u + 4q = 1 + u + uq dH
aJg jgl JgJgJXpui X
AaJJJ (JJ) | Jc JcJcJcJJjj
aIwIgJ1
Laliso 10
:JgJ 1 Cisco Connect J
DVD 1
(Lynsys Set up your Linksys Router 2
1:1
Jggs Jgss Jaa Jaa Jgss Jaa Jaa Jaa Jaa Jaa Jaa Jaa Jaa Jaa Jaa Jaa Jaa Jaa Jaa Jaa Jaa Jaa Jaa Jaa Jaa Jaa Jaa Jaa Jaa Jaa Jaa Jaa Jaa Jaa Jaa Jaa Jaa Jaa Jaa Jaa Jaa Jaa Jaa Jaa Jaa Jaa Jaa Jaa Jaa Jaa Jaa Jaa Jaa Jaa Jaa JAA
.(1) Setup j0g abgs.
cbw lgeaall jay all gge IgogjraJyMac Jaiill pblal
(1) Setup jgjg
aagaiI aie JLoSyAaiLaiJc ybi jll LaoJIg 3
Cisco Connect
Ciscocnccs
:JIO aJgGw: a-goll
45 1J8g281 J
LJJJJJ 1
gJgJgJgJgJg
a aalj gaj alalgagai jai
Lgds 4gol 1dcl a
jolal gall (loggall sll lglgall) 21 jolal yolaiyolai yolaiyolai yolaiyolai yolaiyolai yolaiyolai yolaiyolai yolaiyolai yolaiyolai yolaiyolai yolaiyolai yolaiyolai yolaiyolai yolaiyolai yolaiyolai yolaiyolai yolaiyolai yolaiyolai yolai yolaiyolai yolai yolai yolai yolai yolai yolai yolai yolai yolai yolai yolai yolai yolai yolai yolai yolai yolai yolai yolai yolai yolai yolai yolai yolai yolai yolai yolai yolai yolai yolai yolai yolai yolai y
.4 aaiJg "joo oJoo oJoo oJoo oJoo
Laaan
aIblll SLoJI g cIooJIg CIOJIg IIOIOIg IIOIOIg IIOIOIg
.ahJLJI JJI. jJIJIJIJIJIJIJIJIJIJIJIJIJIJIJIJIJIJIJIJIJIJIJIJIJIJIJIJIJIJIJIJIJIJIJIJIJIJIJIJIJIJIJIJIJIJIJIJIJIJIJIJIJIJIJIJIJIJIJIJIJIJIJIJIJIJIJIJIJIJIJIJIJIJIJIJIJIJIJIJIJIJIJIJIJIJIJIJIJIJIJIJIJIJIJIJIJIJIJIJIJ
()
(1) Cisco Connect (2) Cisco Connect (3)
jai oocwll 1 jil gwl l jil jil wll oocwll
(.)
A
. Cisco Connect, 12
Cisco Connect
JcCiscnccnnnnnnnnnnnnnnnnnnnnnnnnnnnnnnnnnnnnnnnnnnnnnnnnnnnnnnnnnnnnnnnnnnnnnnnnnnnnnnnnnnnnnnnnnnnnnnnnnnnnnnnnnnnnnnnnnn
aJgll aJx Cisco Connect 1sclc Laoic Jyolj jgooSJI gLslal (a-golj
.
4k > 300
jolil jii 1sLg 1sLg 1sLg 1s
Linksys.com/support
Paaa Jg5
a128 a 1J aolal j 0k gj jai jgol J aLg pdoJI
.2
L
aLg pssuill Gsul .Cisco Connect plasilw nns 4gJl sblc 13j .admin gJyJyJn JsuLJn JyJyJy
alSg pssimall aag clls G Cisco Connect Cdoosimil
Router settings g Cisco Connect Lg Cg yg s yg
(1/3/s/)Router settings (j) Change jg Cisco Connect 1
.(g) OK ggy (Aa) Advanced settings ggy
-9
1.192.168.1.1 Jiaai a 5, jiu Juaio jgao 5 g
0aolg pssnoo owl: aagll Jb
(4.1) Language
ailll ailll no alg alilio aol plssw (alll) Select your language
(Net) Internet Setup
JgJgJgJgJgJgJgJgJgJgJgJgJgJgJgJgJgJgJgJgJgJgJgJgJgJgJgJgJgJgJgJgJgJgJgJgJgJgJgJgJgJgJgJgJgJgJgJgJgJgJ
(1)Internet Connection Type
JLL
(DHCP - L) Automatic Configuration - DHCP
(IP)Static IP
PPPoE
PPTP
L2TP
(Telstra ) Telstra Cable
(DHCP - L) Automatic Configuration - DHCP
Jgog (DHCP - gai) Automatic Configuration - DHCP gag Jgag a 400 Jalei gi jia jia jia jia jia jia jia jia jia jia jia jia jia jia jia jia jia jia jia jia jia jia jia jia jia jia jia jia jia jia jia jia jia jia jia jia jia jia jia jia jia jia jia jia jia jia jia jia jia jia j
(IP)Static IP
(At IP) Static IP
PPPoE
Jab Jgogjy Dc jL 13 Lq gac .DSL Jua Jl LS 13
.PPPoE .ppn y Ls 13. (PPPoE) Ethernet
(Lw)Basic Setup<(A) Setup
aoleI 15x1 y 1 Cwog. (wLw/ /cX) Basic Setup aLw g Jg
Basic Wireless Settings < (s L L) Wireless
(aLw81 a.5LwU1 cUc)
aLulol oic aieo a5LwUa5,1uUaWU
ab = 16
LwUulolc!aLbL aSLWU (uL) aLlalc
a<1w>1
:1sLLoaieiWJlAeSLSUJLeoJI (as) Network Mode
2.4) N- 品 _ 一 ^ LwUa<11111111111111111111111111111111111111111111
aLbJLs aLs aLs (JaB G/G-SLwUaWi Wireless-B/G Only
Wireless-B/G Only 12 < 12 (204 12 < 12 (204 (jy△Lg 2.4 yj)G-≤LwUJ A<,B-≤LwUJ .(Jz△ B/G-≤LwUJ A<,WJ)
B- _ S LwUJ aS wU J acu a j 1Lc iS 1! (ba B- aS LwUJ aS wJI) Wireless-B Only .(BaB-B- aS LwUJ aS wJI) Wireless-B Only
G-4<swuJ 4<swuJ acj aJ iLc J 1! (jia G-4<swuJ 4<swuJ) Wireless-G Only .(jia G-4<swuJ 4<swuJ) Wireless-G Only
N-aa<swuiaa<jjj aajgj<swuiaa<jjj Wireless-N Only .(JaaN-aa<swuiaa<jjj) Wireless-N Only .
G- 一 _ 一 ^ 一 < L W U I A C Jg B- 一 _ 一 ^ 一 < L W U I A C Jg a j gj (JL) Disabled . (JL) Disabled . L<2.4.2.3
+ = 2
Wireless-A Only g (1b:0) Mixed 154 155 156 157 158 159 160 161 162 163 164 165 166 167 168 169 170 171 172 173 174 175 176 177 178 179 180
jL5 jUuU (Jbea) abled
Mixed.
(1)
a a (PPTP) abai abaa n 10000000000000000000000000000000000000000000000000000000000000000000000000000000000000000000000000000
PPTP
L2TP
a a 15
(Telstra ) Telstra Cable
aolc aee eey
(1b) Lc (L) Keep Alive g (L) JLoJ) Connect on Demand Lo JI (L) Kep Aliveg (L) JLoJ) Connect on Demand J, L) JI Logw yaiy aoy jao 512) Taia JAL ss Cyaay Jauaaw agol J 53] wiojll Jzss Jaaa Jaaagall J 53] Lo (JLa) cog
32 1g j g j g j g j g j g j g j g j g j g j g j g j g j g j g j g j g j g j g j g j g j g j g j g j g j g j g j g j g j g j g j g j g j g j g j g j g j g j g j g j g j g j g j g j g j g j g j g j g j g j g j
ab = 30
j c hll) aagall aeinnall asy ylll aal lal ylll 1000000000000000000000000000000000000000000000000000000000000000000000000000000000000000
a5uac a jasss s 5s g l Jgou (olal) Channel Width 20 MHz or) Auto .(jzir 2.4 2r) N-aaLwUJ A G-aaLwUJ A SJJB-B-aaLwUJ
1231 20 20 20 20 20 20 20 20 20 20 20 20 20 20 20 20 20 20 20 20 20 20 20 20 20 20 20 20 20 20 20 20 20 20
a<11g B-1<1LwU 1<11y b<11u 1<11u 1<11u 1<11u 1<11u 1<11u 1<11u 1<11u 1<11u 2.4 2.4 y) N-<1LwU 1<1LwU G-<1LwU L (JLa) Auto
a a h a b i a j f y a s L u u a l y a g a J p a L oic (SSID) SSID Broadcast SSID 1.4.4.4.4.4.4.4.4.4.4.4.4.4.4.4.4.4.4.4.4.4.4.4.4.4.4.4.4.4.4.4.4.4.4.4.4.4.4.4.4.4.4.4.4.4.4.4.4.4.4.6 100000000000000000000000000000000000000000000000000000000000000000000000000000000000
a
WPA2) WPA2 Personal. (JbIcWPA2/WPA g) WPA2/WPA Mixed Mode
WPA) WPA Personal.
BAC = = 35
g) Security Mode S (JwPA2/WPA w) WPA2/WPA Mixed Mode 3j
jgJwWPA2/WPA a≤LwUJI 1s: jlg> J5 pssu
[\therefore \lg \sin \alpha = \frac{2\sin \alpha }{2}]
j (J) Security Mode S (WPA2) WPA2 Personal
aLo8g (yws WPA2) WPA2 Personal aSLwUJ dLs w jlg J5 pss
Lgui jyj
j (JLo2) Security Mode WPA) WPA Personal 13
jGJIaLg (w PWA) WPA Personal aSLUJ Lc: jLg
[\therefore \lg \sin \alpha = \frac{2\sin \alpha }{2}]

a a a a a a a a a a a a a a a a a a a a a a a a a a a a a a a a a a a a a a a a a a a a a a a a a a a a a a a a a a a a a a a a a a a a a a aa
LwUJnLoX
L) Wireless Security < (L) Wireless
( x,y) = ( ab,52xy)
WPA2 Personal (WPA2/WPA WPA2/WPA Mixed Mode: WPA2/WPA WPA2/WPA Enterprise Mixed Mode: WPA2/WPA) WPA Personal (WPA2/WPA WPA2/WPA Enterprise Mixed Mode: WPA2/WPA) WPA Enterprise Mixed Mode: WPA2/WPA) WPA Enterprise Mixed Mode: WPA2/WPA) WPA Enterprise Mixed Mode: WPA2/WPA) WPA Enterprise Mixed Mode: WPA2/WPA) WPA Enterprise Mixed Mode: WPA2/WPA) WPA Enterprise Mixed Mode: WPA2/WPA) WPA Enterprise Mixed Mode: WPA2/WPA) WPA Enterprise Mixed Mode: WPA2/WPA) WPA Enterprise Mixed mode: WPA2/WPA) WPA Enterprise Mixed Mode: WPA2/WPA) WPA Enterprise Mixed Mode: WPA2/WPA) WPA Enterprise Mixed Mode: WPA2/WPA) WPA Enterprise Mixed Mode: WPA2/WPA) WPA Enterprise Mixed Mode: WPA2/WPA) WPA Enterprise Mixed Mode: WPA2/WPA) WPA Enterprise Mixed Mode: WPA2/WPA) WPA Enterprise Mixed Mode: WPA
1.
a
WPA2.(1) WPA2/WPA (2) WPA2/WPA Enterprise Mixed Mode
(45 WPA) WPA Enterprise .(45 WPA2) Enterprise
Lioic 10aRADIUS pLoIg qwiJy CJIaJIIO RADIUS pLoI
ACD = ACD = 35
S (b1: wPA2/WPA wPA2/WPA Enterprise Mixed Mode wPwPA2/ aSLwUJ Lg> JSS Security Mode
jB j Bw) Security Mode (a WPA2) WPA2 Enterprise 10
WPA2) WPA2 Enterprise aLwUJ Ls. w Jg J5 pssu
J (L) Security Mode S (A WPA) WPA Enterprise 12 JI Jw g (A WPA) WPA Enterprise a L U I Jg Jp Jp Jp Jp Jp
.RADIUS LJ IP g (RADIUS Ls) RADIUS Server
1812 90. RADIUS (RADIUS) RADIUS Port
psJg aagai jyjiaolJI liajl Jj (jjaiJI) Shared Key
(Java) Disabled
Jgogglglo sic sLwUJnLojI Jb0j pai bclOlc! PwS UJnLoJI Jb0j cI 13!
JJ 2 Lj SUI jolal kJy SUI Jn LoJI Jn Jn Jn Jn Jn Jn Jn Jn Jn Jn Jn Jn Jn Jn Jn
Security Mode:
Disabled
RADIUS
Loic IaJ JI (10 pI) .RADIUS pLg 20 q wttJpIwWEP JIJI W
4k > 300
jg jS pssu (JLoI g) Security Mode S RADIUS aJIaR JIaJI cJIaJI g aJI aRIg RADIUS aSLwLI cSI.
.RADIUS _d IP gic (RADIUS _d L) RADIUS Server
1812 100000000000000000000000000000000000000000000000000000000000000000000000000
Jg Jg Jg Jg Jg Jg Jg Jg Jg Jg Jg Jg Jg Jg Jg Jg Jg Jg Jg Jg Jg Jg Jg Jg Jg Jg Jg Jg Jg Jg Jg Jg Jg Jg Jg Jg Jg Jg Jg Jg Jg Jg Jg Jg Jg Jg Jg Jg Jg Jg Jg
( j ) 10) (hex digits 10 bit 40/64) j WEP ( j ) Encryption Lgic ( _j ) LwLg26) (hex digits 26) 104/128-bit g (C) 40/64 Lgcaq C hex digits) (10 10 bit 40/64)
中
Generate WEP JLJ (gJ) Passphrase
WEP (cui) ciao jao aolai j 1-4
1gaiyjxI slcxI .dolsswJ (JLwJ) TX Cliao sss (JLwJcLiao) TX Key
L_g > L_ l_g( L_h + L_h)
Cisco Connect
Jllllllllllllllllllllllllllllllllllllllllllllllllllllllllllllllllllllllllllllllllllllllll
aJgaww aI Jy Cisco Connect pssw cLs oLsic.
:Windows pLbBjJcCsc Ccisco Connect
.Cisco Connect 1

Cisco Connect
Cisco Connect a
:Mac OS X pLbi jjgoc5 Lc Cisco Connect
Jy (CJIaJI) Applications 1

Applications
.Cisco Connect jgj

Connect
Cisco Connect a
JL 1 JLL 1 JLL 1 JLL 1 JLL 1 JLL 1 JLL 1 JLL 1 JLL 1 JLL 1 JLL 1 JLL 1 JLL 1 JLL 1 JLL 1 JLL 1 JLL 1 JLL 1 JLL 1 JLL 1 JLL 1 JLL 1 JLL 1 JLL 1 JLL 1 JLL 1 J.
gagllgcjglglc jglglLil gllslllccn no oolaleill no oolc
linksys.com/support
aJololjoljoljolj jil) 0g Jk jigssSjL jalll JaJl jjbei
aagolal Jgolal Jgolal Jgolal Jgolal Jgolal Jgolal Jgolal
Jus Jus Jus Jus Jus Jus Jus Jus Jus Jus Jus Jus Jus Jus Jus
JgJL JgJgJgJg
Get Windows XP Service Pack 3
(Windows XP Service Pack 3
Service Pack 3 Cisco Connect .Windows XP pLbni jIjI jI jI jI jI jI jI jI jI jI jI jI jI jI jI jI jI jI jI jI jI jI jI jI jI jI jI jI jI jI jI jI jI jI jI jI jI jI jI jI jI jI jI jI jI jI jI jI jI jI jI
oLg>LoIg gIb>1 oIuS>1 oIg>2 0Jg>4 a>
Lig Service Pack 3 JjJ .3 j00
J5 pssu wcls aagbll aoaill aajj jijg c0g JJJU
.0JL 100gJgJgJgJgJgJgJgJgJgJgJgJgJgJgJgJgJgJgJgJgJgJgJgJgJgJgJgJgJgJgJgJgJgJgJgJgJgJgJgJgJgJgJgJgJgJgJgJgJgJg
:Service Pack 3
Jll Jg Ciscocn 1
. Microsoft (update.microsoft.com/windowsupdate)
.1J 1j Microsoft J J Jg g jg J Lg
logal all l (s) Setup 1
a
C
:LiLo Lcck CiscocnCiscocn
aJg jg gJg Jg Jg Jg Jg Jg Jg Jg Jg Jg Jg Jg Jg Jg Jg Jg Jg Jg Jg Jg Jg Jg Jg Jg Jg Jg Jg Jg Jg Jg Jg Jg Jg Jg Jg Jg Jg Jg Jg Jg Jg Jg Jg Jg Jg Jg Jg Jg Jg Jg Jg
A


laliso 1yolal aegjol yglo 05

JSLJ0gJdAaLJIaJgJU
DSLgJ aLJI gJU
aiee no sliie aellbl lio 4 y 15 i8. Jie wll g aellbl Jnno oosJ 2
Jusio JSLg (J5CABLE jiaol j 5j g jLj ddo g jL3.3
L 1
gJdDSL jaiuDSL dLjL dL dL g
.USBJLSSUBJSLaBwglgjLgJLl
JLgI JI L (JLJI Next gJgJg Cisco Connect JI
JgJL JgJQJgJgJgJgJgJgJgJgJgJgJgJgJgJgJgJgJgJgJgJgJgJgJgJgJgJgJgJgJgJgJgJgJgJgJgJgJgJgJgJg
J.S) Your Internet cable is not plugged in
Joo
JdA JgLoaic (Joo yj 1) Your Internet cable is not plugged in JwJl
oLgLgIgIgIgIgIgIgIgIgIg

a + b = 3
aiaipaljia (agall gao aaiall jio 5g) ciinjll gEthernet lln aai
.ogai lgl aaiiaIag aaiiaIgll aegll Ic gogg (ciinjll) Internet g (i) Internet g
.WAN
aagol aalall agol j
Jg.3
Jg.Ls J.
J.
J.
J.
J.
J.
J.
J.
J.
J.
J.
J.
J.
J.
J.
J.
J.
J.
J.
J.
J.
J.
J.
J.
J.
J.
J.
J.
J.
J.
J.
J.
J.
J.
J
(JolJI 1 JI JI 4
JgJgJgJgJgJgJgJgJgJgJgJgJgJgJgJgJgJgJgJgJgJgJgJgJgJgJgJgJgJgJgJgJgJgJgJgJgJgJgJgJgJgJg
J J J J J J J J J J J J J J J J J J J J J J J J J J J J J J J J J J J J J J J J J J J J J J J J J J J J J J J J J J J J
( 1 - a) + b + 1 = 1 + b + 1
View Available Wireless Networks
Change Windows Firewall settings
Open Network Connections
(1) Device not found
jio) a< jgJLwJlajgLoa c (jggJc gJy) "Device not found" AJLw,
LgSgSgSgSgSgSgSgSgSgSgSgSgSgSgSgSgSgSgSgSgSgSgSgSgSgSgSgSgSgSgSgSgSgSgSgSgSgSgSgSgSgSgSgSg
J 1 J 1 J 1 J 1 J 1 J 1 J 1 J 1 J 1 J 1 J 1 J 1 J 1 J 1 J 1 J 1 J 1 J 1 J 1 J 1 J 1 J 1 J 1

a1 = 30, b2 = 40
.Cisco Connect 1
:Mac pLbi jai jil jigssllj gajlc aLl JcX
pLwUu L. AiaJgAirPortjRgRrAeJgIeJgIeJgIeJgIeJgIeJgIeJgIe
LcS LwJ LLaCisco Connect
.JimsRouter
Joo JIOI JIO BroneEagle gog. Linksys E-Series aL
BroneEagle) Linksys E-Series 4
(JL)
gjg jzai jgjgl aol Jx g(jLo21 Cio) aS LwUa S. 11 jg0 aol s 3
Cisco Connect 150
Android

iPhone
gJLJI. JIJIJI .Cisco Connect (JLOJI (JLJI) JIJIJI JIJI JIJI JIJI JIJI JIJI JIJI JIJI JIJI JIJI JIJI JIJI JIJI JIJI JIJI JIJI JIJI JIJI JIJI JIJI JIJI JIJI JIJI JIJI JIJI JIJI JIJI JIJI JIJI JIJI JIJI JIJI JIJI JIJI JIWI
ab = 30
a aal l llll 11111111111111111111111
Cisco Connect 日 _ 1 ^ 日 LgJUwJ J.2LjA.LwUJ A<,JJLgSLWJlJUJLJi .8 (Lq)Finish g

Computers and 1! b. (gj) jg jg jg jg jg jg jg jg jg jg
(s, s) ; s , s , s ) other devices
(1) Other Wireless devices 3
aLwUJ aLjWpU Jc wJ 4
ab = 30
.WPA/WPA2 1
.(Jolclao)gajol aol Jsagogal aswoswss
(JIJ)Next .Cisco Connect 6

31.2×151.7×188.7
(1.23×5.97×7.43)
(7.13) (\dot{\varepsilon} 202.0\delta \delta \delta \delta \delta \delta \delta \delta \delta \delta \delta \delta \delta \delta \delta \delta \delta \delta \delta \delta \delta \delta \delta \delta \delta \delta \delta \delta \delta \delta \delta \delta \delta \delta \delta \delta \delta \delta \delta \delta \delta \delta \delta \delta \delta \delta \delta \delta \delta \delta \delta
0.5 JgC.Jg 12
.RSS210.ICES-003.UL/cUL.FCC
(IEEE 802.11b/g/n) Wi-Fi,CE
WMM WPA2TM
Wi-Fi,Windows7
232)a040110
()104J
Lg-4) 60 J! -20
()140J
80% 10
15 90% 15
1
jzJJIaJz
802.3u .802.11b .802.11g .802.11n
(1-4) Ethernetg (CzjJl) Internet g a Jll
aai: jol yg (joiJl oL) Reset
(Wi-Fi Protected SetupTM)Wi-Fi
Wi-Fi aaaa: aal/ai
(1-4) Ethernet
CAT 5e
:20)802.11n
MCS 8~12 .MCS 0~4 .CH6 @ Lg/1.5 ± 15.0
MCS 13~15 .MCS 5~7 .CH6 @ L/1.5 ± 13.5
:240)802.11n
MCS 8~12.MCS 0~4.CH6@JL/1.5±14.0
MCS 13~15 .MCS 5~7 .CH6 @ l9 J L0/J 1.5 ± 13.5
:802.11g
CH@Jg/1.5±14.5
:802.11b
JSSLLs.CH@JgJLo/J1.5±16.5
J 4.0. gjg j J a J b J d 2.0
(jgJg)gjgjjgJgJgJ
Date
Wi-Fi aaaa: gaaJgaaJI
.Wi-Fi Protected AccessTM 2 (WPA2)
S Lw MAC uic w. WEP
128 J
jlaJpaW
jI
1
点 P( m,m)
1
[\text{S}\lg \left( {n + 1}\right) = n + 1 \cdot {\log }_{2}{n}^{2} + 1]
JLwJb
10
UPnP
L
Loo
| qi#i#i# | UPnP ### |
| Wi-Fi ### liy## | ### |
| .Wi-Fi Protected AccessTM 2 (WPA2) | |
| ### MAC | ### |
| ### 128 | ### |
| 31.2 × 151.7 × 188.7 | ### |
| (### 1.23 × 5.97 × 7.43) | |
| (### 8.91) # 252.7 ### V1 | |
| (### 7.13) # 202.0 ### V2 | |
| 0.5 ### 12 | ### |
| RSS210 .ICES-003 .UL/cUL .FCC | ### |
| .(IEEE 802.11b/g/n) Wi-Fi .CE | |
| ### WMM® .WPA2TM | |
| Wi-Fi. Windows 7 ### | |
| 32) ### 40 ### 0 | ### |
| (### 104 ###) | |
| ### -4) ### 60 ### -20 | ### |
| (### 140 ###) | |
| ### 80% ### 10 | ### |
| ### 90% ### 5 | ### |
| ### |
| ### |
| ### |
| ### |
| ### |
| ### |
| ### |
| ### |
| ### |
| ### |
| ### |
| ### |
| ### |
| ### |
| ### |
| ### |
| ### |
| ### |
| ### |
| ### |
| ### |
| ### |
| ### |
| ### |
| ### |
| ### |
Linksys E1200
| Linksys E1200 | j |
| N-∞ | j |
| E1200 | j |
| 802.3u .802.11b .802.11g .802.11n | j |
| (1-4) Ethernet g (Internet g) | j |
| (1-4) Ethernet g (Internet g) Reset | j |
| (Wi-Fi Protected SetupTM)Wi-Fi | j |
| .Wi-Fi b@b@b@b@b@b@b@b@b@b@b@b@b@b@b@b@b@b@b@b@b@b@b@b@b@b@b@b@b@b@b@b@b@b@b@b@b@b@b@b@b@b@b@b@b@b@b@b@b@b@b@ | j |
| (1-4) Ethernet c@c@c@c | j |
| CAT 5e | j |
| :(j) L@20) 802.11n | j |
| MCS 8~12 .MCS 0~4 .CH6 @ l@l/lll/lll/lll/lll/lll/lll/lll/lll/lll/lll/lll/lll/lll/lll/lll/lll/lll/lll/lll/lll/lll/lll/lll/lll/lll/lll/lll/lll/lll/lll/lll/lll/lll/ll l | j |
| :(j) L@40) 802.11n | |
| MCS 8~12 .MCS 0~4 .CH6 @ l@l/lll/lll/lll/lll/lll/lll/lll/lll/lll/lll/lll/lll/lll/lll/lll/lll/lll/lll/lll/lll/lll/lll/lll/lll/lll / | j |
| :802.11g | |
| CH @ l@l/lll/lll/lll/lll/lll/lll/lll/lll/lll/lll/lll/lll/lll/lll/lll/lll/lll/lll/lll/lll/lll/lll/lll/lll/lll/lll/lll/lll/lll/lll/lll/ll l | j# |
| :802.11b | |
| CH @ l@l/lll/lll/lll/lll/lll/lll/lll/lll/lll/lll/lll/lll/lll/lll/lll/lll/lll/lll/lll/lll/lll/lll/lll/lll/lll/lll/lll/lll/lll/lll / | j |
| ≤4.0 d/s ≤4.0 d/s ≤4.0 d/s ≤4.0 d/s ≤4.0 d/s ≤4.0 d/s ≤4.0 d/s ≤4.0 d/s ≤4.0 d/s ≤4.0 d/s ≤4.0 d/s ≤4.0 d/s ≤4.0 d/s ≤4.0 d/s ≤4.0 d/s ≤4.0 d/s ≤4.0 d/s ≤4.0 | j# |
aill lbeqll
31.2×151.7×188.7
(4.201.23 × 5.97 × 7.43)
(8.96) 254.1
0.5 JgC.Jg 12
RSS210.ICES-003.UL/cUL.FCC
(IEEE 802.11b/g/n) Wi-Fi,CE
Wi-Fi Protected .WMM .WPA2
Windows 7. Setup
(204 32)a2g a40110
()LgJ 104J
Lg-4) 60 J-20
()140J
80% 10
15 90% 15
jiei j 1
jzjjj
Jz
jzjj1aagb,a
ED = 2L0
jll jolwll oLogleog jaiill oLogleog aaiill oLogeall aee
.Linksys.com/support gagall jaii jaii jaii jaii jaii jaii jaii
Joo 10000000000000000000000000000000000
Laiy Iall s21 lal y d g. IEEE 802.11 leo aol aol yg sgs s21 a 22 aie iag llg clll jia acwag aiaaall ay LwLL A5, a 45r Jg wll abai no ae alwll Jw oog log Jlc s21 all agaoog pssll plig kysjlg slwgl og a5, aill lii
aawSleoagbgsdilllll aLxLy.aaonwJALsLWLL
Linksys E1500
Linksys E1500
SpeedBoost acjwll jjzai aiai jgN- ≤ LwA
E1500
802.3u ,802.11b ,802.11g ,802.11n
(1-4) Ethernet9 (C#J) Internet g aJIJI
Wi-Fi a. 品 品 .sLc.l.(y.eJl sLc!)Reset
Wi-Fi aaaa: aai/1aai
(1-4) Ethernet
CAT 5e
:20)802.11n
MCS 8~12.MCS 0~4.CH6@LJ/1.5±17.0
MCS 13~15.MCS 5~7.CH6@Jg/1.5±16.0
:2040)802.11n
MCS 8~12.MCS 0~4.CH6@JgJL/1.5±15.5
MCS 13~15.MCS 5~7.CH6@Jg/1.5±14.0
:802.11g
6.CH6@Jg/1.5±18.0
54.CH6@JbIg/1.5±17.0
:802.11b
UJL.S.CH6@JbJgJLo/JJJ1.5±18.0
J 4.0. gjg j J 3.0
aJbJyJyJyJyJyJyJy
(jg3)yjjgJgJg
Date
.(WPA2)Wi-Fi2 a:
LwMAC uic aWJ.WEP
128 1
jlaJ
jI
:
1j81
1g
JLwJb
UPnP a:aa
LwUJ L
Loo
aill lheol
180× 35× 225
(a_总7.09 × 1.38 × 8.86)
(a#j15.94) 452
- 10g12
FCC, IC, CE, Wi-Fi A/B/G/N
32) 40110
()Lg-104J
Lg-4) 60 J-20
()140J
a 80% 10
15 90% 15
L
a-gjg
aB
15
Ji:1j
jzjjj
J 1
jzjj1aibb
S_ OBC = S_ BOC + S_ BOC
Jal Jol Jol Jol Jol Jol Jol Jol Jol Jol Jol Jol Jol Jol Jol Jol Jol Jol Jol Jol Jol Jol Jol Jol Jol Jol Jol Jol Jol Jol Jol Jol Jol Jol Jol Jol Jol Jol Jol Jol Jol Jol Jol Jol Jol Jol Jol Jol Jol Jol Jol Joll
Joo
Lay lall slll lal y. IEEE 802.11 yleo aol o aol y gssg slls a jy aie y baii g llilg llilb iai jia acjwag aiaaall a5wll al 5y aii y d 45r jao jogll abai no ae Lwll Jai wai o agglog Jolge c slzlll 11111111111111111111111111111
Linksys E2500
Linksys E2500
jll jilipn
E2500
.802.3 .802.11b .802.11g .802.11a .802.11n
802.3ab .802.3u
JgJgJgJgJgJgJgJgJgJgJgJgJgJgJgJgJgJgJgJgJgJgJgJgJgJgJgJgJgJgJgJgJgJgJgJgJgJgJgJgJgJgJgJgJgJgJgJgJgJgJ
jL5g jL2.4JwJb
X
BPSK.QPSK.CCK:802.11b
OFDM:802.11g
OFDM :802.11a
.16-QAM .QPSK .BPSK :802.11n
64-QAM
j2.4
a11@Jb0/Jo-87:802.11b
aJbLcL54@JgJLo/Jo-70:802.11g
MCS15 @ 1019/1234567890.802.11n 20
MCS15@Jg/Jo-66:802.11n40
jL
aLiJy54@JgJyL/1-70:802.11a
MCS23 @ 10/6 -66:802.11n 20
MCS23 @ 101gJ LLo/J-62:802.11n40
j2.4
_x 0 1x + x^2 ≤ 2.94 (x²y²) 1 y²
JgJgJg
a 3.78:(JgLo21)2
y
jL 5
_n 1n^2 + n + 1 = 12^n
J
4.88:(yLo2)2
yjg jy
Date
WPA2 g WPA g WEP
128 1
jlaJ
jI
1
1
(2) (a)
J
aillw
( x,y) = ( ab - a) ( ab + b)
Jy
gjgjgl a
UPnP
JL51 1
Jolli
WPA2 WPA g WEP
L081 12
128
HFS*9 NTFS9 FAT
Jolz
jssllalloLpaac
ailll lheoJI
1
190× 25× 170
(7.48×0.98×6.69)
(7.62) 216
2.1g 12
Wi-Fi A/B/G/N.CE.IC.FCC
Lgjgs32)aogao40J10
()104J
Lg-4) 60J-20
()140J
a 80% 10
15 90% 15
a
Lg
1 1
jJJIaJyA
Linksys.com/support gogol J! Lai jgagogjgogjgogj
Jee! 0000000000000000000000000000000000000
Lai Jie Jil 1521 liLi jie jie IEEE 802.11 1e o o o o o o o o o o o o o
aie aieiig jlllgl llll Jai acjw ag aiaol aL aL aL aL
aJgagJgagJabai no aelalJaoi oJoo
lll aegog piaioll jilil pllig sjjg slgl ago 1
aLsloagbgsJlal aLxL.
Linksys E3200
Linksys E3200
JJIJIJIgJJIJIyLiN
E3200
.802.3 .802.11b .802.11g .802.11a .802.11n
802.3ab .802.3u
jIbJ1
j1
L
1
4.1.2.3 J 6
a_l = 1
1j
1
J
aLJI aWw
UPnP a:aa
(a.15 PIFA jgj3)jL 5
Jal Jol Jol Jol Jol Jol Jol Jol Jol Jol Jol Jol Jol Jol Jol Jol Jol Jol Jol Jol Jol Jol Jol Jol Jol Jol Jol Jol Jol Jol Jol Jol Jol Jol Jol Jol Jol Jol Jol Jol Jol Jol Jol Jol Jol Jol Jol Jol Jol Jol Jol Joll
Joo
Lai ylll sl21 lal b 802.11 leo aol gao s 5a 4 a 3 a 2 a 1 2 a 1 2 a 1 2 a 1 2 a 1 2 a 1 2 a 1 2 a 1 2 a 1 2 a 1 2 a 1 2 a 1 2 a 1 2 a 1 2 a 1 2 a 1 2 a 1 2 a 1 2 a 1 2 a 1 2 a 2
aLsLo 1
Linksys E4200
Linksys E4200
jIbJU
gN LwU
E4200
802.11n, 802.11a, 802.11g, 802.11b, 802.3
802.3u, 802.3ab
j2△Lc5g2.4
(£ Ethernet) £ 10/100/1000
(1-4) Ethernetg (cui) Internet g USB g
Wi-Fi a. 品 _ 1 ^ 出 sLcY.(ycl)Lc!Reset
aolb1:aglo1 aogll
Ethernet(1-4)g.()Internet:
aLjg0jg=3J2e. JLq> 6
jL5g jL2.4JwSJJbJ J
BPSK, QPSK, CCK:802.11b
OFDM :802.11g
OFDM :802.11a
QAM-64,16-QAM,QPSK,BPSK:802.11n
j2.4
11@Jg-87:802.11b
(y≥.)
LiJ 54 @ JgJ L/1-77 :802.11g
(y)
MCS15 @ LgJL/20-70:30:20 20:802.11n
(y≥.)
MCS15 @ LgJ&L/ J-66:340:802.11n
(y≥.)
jL
54 @ 1g Ls/ J-74:802.11a
(y)
MCS23 @ Lg/16-67:20:802.11n
(y)
MCS23 @ 1099 L/16 -64 : 50:40 :802.11n
(y≥.)
(a.LiPIFA 3)jL2.4
(1) 3.31 ≥ PIFA 1
(1JL)JgJgJgJgJgJgJgJgJgJgJgJgJgJgJgJgJgJgJgJgJgJgJgJgJgJgJgJgJgJgJgJgJgJgJgJgJgJgJgJgJgJgJgJgJgJgJgJgJgJgJ
(ρLo)1 1.96≥PIFA3
m = 311
j1
1
JaiI iaiI acw
1
glg21
jglgai jzj
(1)
aillaw
J 1
yjg jy
jJgJl JcJzJll jJLJl JcJU linksys.com/support aJz

JgJgJgJgJgJgJgJgJgJgJgJgJgJgJgJgJgJgJgJgJgJgJgJgJgJgJgJgJgJgJgJgJgJgJgJgJgJgJgJgJgJgJgJgJgJgJgJgJgJgJ

E-Series
CbDbPjKaHne
Kak ce n3pbJnHЯBa Cisco Connect cIeI nHCTaIIpaHe 11
Baunr pyTepe h e nactpoen yCneuHO. 12
CbO6eHne Get Windows XP Service Pack 3 (U3me2IeMe Windows XP Service Pack 3) 12
Cbo6eHne Your Internet cable is not plugged in (Bawuam uHmephem Ka6en He e bKlouyen) 13
Cbo6eHneCannotaccess your router (HaMa docmbndo pymepa). 14
Cbo6eHne Device not found (He e Hamepeho ycmpoucmbo). . . .15
TexHnueckn daHHN
Linksys E900. 17
Linksys E1200. 18
Linksys E1500. 19
Linksys E2500. 20
Linksys E3200. 21
Linksys E4200. 22
I3noJI3BaIte caMo aIaITepe,IOCTaBeH cpyTepe.
- Bytoh 3a 3axpaHbaHe - HaTnchHe | (BKn.) 3a BkIIOuBaHe ha pyTepa.
IzhneoiOToDony
BbHnHnT BnHa BaunpyTeP MoKe Da Bapupa
- Bytoh 3a Hynpahe - Hatnche Te 3aPbXte To3n 6yToH 3a OKoNo 5-10 cekyn (doKaTO CBeTInHnte 3aOnuHaT Da Mrrat eHOBpeMeHHO), 3a da HynpaTe pyTepa Do foabpUHnte My HactpoKn. MoKeTe cbIo da Bb3ctaHOBnTe HaCTPOkNTe NIO NOpa36bnpaHe, KaTO n3NOJ3BaTe NOMOuHaTa nporpaMa-6pay3bp.
E4200
IzhneD otrope
- Инданка_TOPа CBETи NOCTOHHO,ДOKATO 3axpaHbaHeTo e CBbp3aHo N сеД успшно CBbp3BaHe c Wi-Fi Protected Setup. Пулсupa 6abNo NO Врeme Ha CTapTnpaHe,НадстpoиBaHe Na Фьрмуера и по Врeme Ha CBbp3BaHe c Wi-Fi Protected Setup. Мura 6bp3o, korato Ima rpeшka B Wi-Fi Protected Setup.
Izhneoi3aI
- Ethernet noptoBe - CbpxTe Ethernet ka6eIn (HapuHaH Ose MpeXOBn Ka6eIn) KbM Te3n nopToBe Gigabit (10/100/1000), cbc cnHbO cBeTOBO KoDIPAHe, IN KbM dpyrN ka6eHNs Ethernet mpeXOBn ycTpoiCTBa B MpeXaTa.
- INTepHET nopT - CBpbXeTe Ethernet Ka6eJ (Hapuah Ose mpeXOB Ka6eJ nn INTepHeT Ka6eJ) KbM To3n NOpT, C XbITo UBeTOBO KoDIPAHe, N KbM Ba7nRA MoDEM.
- BytoH Wi-Fi Protected SetupTM - HaTnchete To3n 6yToH 3a JeCHO KOHfIgypipaHe Ha 3aunTaHa 6e3KUnHa MpeKa Ha MpeKOBiTyeCTpoiCTBa,Ha KOnTO pa6oTu Wi-Fi Protected Setup. 3a nobee HhOpMaun BnXTe,3aunTa Ha 6e3KUnHaT MapeKa" Ha cTp.8.
USB nopr - 3a da cnojeIaTe IecHO nAmET Ha DnCKa C dpyrN noTpBe6nteIN OT BaWata mpeka nnB INThepHET, CBpbXte USB ycTpoiCTBO KbM To3n nopT. - Bytoh 3a Hynipane - HaTncHete n 3aDpbjKTe T03n 6yToH 3a OKoNo 5-10 cekyni (doKaTo CBeTlnHnte 3anOuHaT Da Mrrat eNHOBpeMeHHo), 3a da Hynipate pyTepa do foabpUHnte My HactpoKn. MoKeTe cbIo da Bb3ctaHOBNTe HAcTPOkNTe IIO NOpa36npaHe, KaTo N3PON3BaTe NOMOuHaTa nporpaMa-6pay3bp.
3axpaHbAbe - CbpxTe BkIooHeHnB KOMPJIeKTa aJaantep 3a npomeHnB TOK KbM To3N NOpT.
BHIMAHNE
I3noJI3BaIte cAmO aIaNTepa,IOCTaBEn C pyTepa.
- Bytoh 3a 3axpaHbaHe - HaTnchTe | (BkI.) 3a BkIIOUBaHe ha pyTepa.
HactpoBbHe Ha pyTepa E-Series
Kbde da hamepnte ose nomoi
BdoJIbHeHne KbM ToBa pbKOBoDCTBO 3a NOTpe6HTeMa MoKeTe Da HamepuTe nOMoU Ha CNeIHNTE MeCTa:
- Linksys.com/support (ДOKУМЕNTаци, ИЗТЕЛЯнь, УСТО 3аДАВИ Вьпроси, ТЕХИЧЕСКА ПОДРьЖКа, КAT HA JИВО, ФОРУМИ)
Cisco Connect nomo (n3nblhe Te Cisco Connect, cnei Koeto upaKHe T Bbpxy "Hayte Noeue", ako mtaKob) - KoHTeKCTHO-3aBnCmHa NOMOu Ha NOMOuHaTa NpOrpama-6pay3bP (OTbOpTe NpOrpamata, CneI KOeTO upaKHeTe BbPxu NOMOu B JcHATA KOnoHa.)
Kakда наст ponte pytepa
Ha-NieChnI r 6bp3 NaHn 3a HacTpoBaHe Ha Baun pyTe e da n3nblHInTe coΦTyepa 3a HacTpoKa Cisco Connect.
Kak da cTapTnpaTe Cisco Connect
Korato cnapate nHCTaIauIOHHN KOMnAKTdNcK, Cisco Connect (coΦTyep 3a NaHacTpoiKa Ha pyTepa) ce nHCTaJInpa aBtOMaTIuHo Ha KOMnIOTbpa BN. CneI ToBa MoKeTe Da n3NoI3BaTe Cisco Connect, 3a da ynpabNaBATE leCHO pyTepa.
3A6EJIEXKKA:
Ако заги Te Инстацнония KOMпakтдиck, може за n3тглnte coфтуера оТ Linksys.com/support.
3a da cnapate Cisco Connect 3a npbB nbr:
- NocTabeTe KOMnakTДИСКаВ CD ИИ DVDs YcTpOиCTBOTO.
- ΜρακHeTε Bbpxy Setup your Linksys Router (HactpoIbaHe Na pyTepa Linksys). Ako He BnKdaTe Toba:
3a Windows, upaKHeTe Bbpxy Ctap, KomnIOrbp, cIeToba upaKHeTe DByKpaTHO Bbpxy CD yCTpoiCTBOTO N IKoHaTa HAcTpoiKa.
3a Mac, ⅢpaKHeTe DBykPaTHo Bbpxu IKOHaTa CD Ha pa6OThnI pIoT, cIeD ToBa ⅢpaKHeTe DBykPaTHo Bbpxu IKOHaTa Setup (HacToPoiKa).
3. CneDbaiTe HNCTpyKcHnTe Ha ekpaHa, 3a da 3aBbPnTe NaHcTpoiKaTa Ha pyTepa.
Static IP (CTaTmueH IP)
Ako Tpr6BaJa n3nOJI3BaTe ΦIκCupaH IP aIpec 3a CBbp3BaHe c IHTepHeT, n36epeTe Static IP (CtAtuyeH IP).
PPPoE
Ako ImaTe DSL Bpb3ka, npOBepe TaJIN Baunr TocTaNK Ha INtePHT yCnyn n3NoJ3Ba npOTOKoJa "Ot ToKa do ToKa" B Ethernet (PPPoE). Ako e Taka, n36epe PPPoE.
PPTP
TyneHnIpy npOTOKoI OT ToCKa Do ToCKa (PPTP) e ycLyra, KOyTO o6uKnHOBeHo ce npInarag 3a BpB3kn B Ebpona. Ako BaWata PPTP Bp3ka NODbpxKa DHCp nnDinHaMnueH IP aDpec, n36epete Obtain an IP Address Automatically (ABTomaTuHNo nOlyuBaHne Ha IP aDpec). Ako Tpr6Ba Da n3noJ3BaTe fNkCupan IP aDpec 3a CBp3BaHe C INHTepHET, n36epeTe Specify an IP Address (Yka3BaHe Ha IP aDpec) n KOHfNurypnpaTe ONUNTe No-DoNy.
L2TP
TynenepnoToKoJ3a CnoJ 2 (L2TP) e ycnyra, KoTo o6nKHOBeHo ce npuiIar3a Bpb3Kn BVn3paen.
Telstra Cable
Telstra Cable e ycnyra, kOyTo 6nKHOBeHo ce npilara 3a Bpb3kn B ABCTpAlna.
Wireless > Basic Wireless Settings
WPA2/WPA Mixed Mode (WPA2/WPA syme Hen pejkm), WPA2 Personal (WPA2 liuHa), WPA Personal (WPA liuHa)
3ABEJIEXKNI
Ako n36epeTe WPA2/WPA cmecen pexm KaTo BaW Pexm Ha 3aunTa, BcraKo yctpoiCTBO bB BAaata 6e3xnuHa mpeka TPR5BA da n3no13Ba WPA2/WPA u eHa n cbua φpa3a 3a doCTbI.
Ako n36epeTe WPA2 IuHa KaTo BaU Pekm Ha 3aIuTa, BCaKO yctpoiCTBO BvB BaSha Ta 6e3KnuHa MpeKa TPR5BA Da n3noJ3Ba WPA2 IuHa n eHa n Cbua pa3a 3a DoCTbn.
Ako n36epete WPA nUHa KaTO BaW PExMM Ha 3aunTa, BcKo yctpoiCTBO BbB BaaTa 6e3KmHa MpeXa TPR5BA Da n3noJ3Ba WPA nUHa n eHa n Cbua pa3a 3a DocTbn.

OTbApR Ce rIaBHOTo MeHIO Ha Cisco Connect.
3aДастарate Cisco Connect Ha KomnIOrIbpc Mac OS X:
- OtvbopeTe Finder n ⅢpaKHeTe Bbpxy PpInoxeHnB IeBn paHeI.

- IIpaKHeTe DByKpaTHO Bbpyx IKoHaTa Cisco Connect.

OTbaprCe rIaBHOTo MeHIO Ha Cisco Connect.
- CtraptnaipTe Cisco Connect.
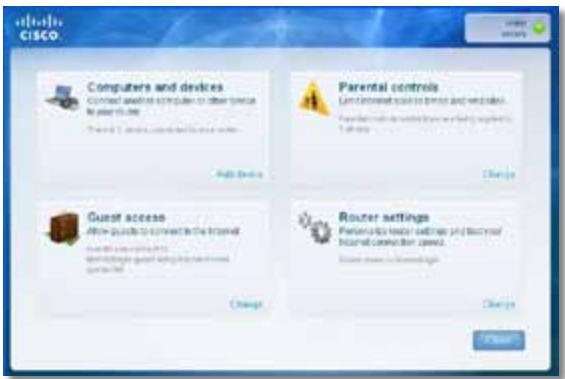
- ΜιρακHeTe Bbpxy Computers and devices (KOMnIOTp n uycTroPoiCTBa). ΠοΥBЯBa ce ekpaHbT Computers and other devices (KOMnIOTp n npуrnyycTroPoiCTBa).
- ⅢpaKHeTe Bbpxy Other Wireless devices (Дуги 6eЗкуну устюства).
- Pa3peweTe Wi-Fi Bpb3kaTa Ha BaWeTo MpeXkoBO yCTpoiCTBO, cIeT TOBa InpoBeJeTe TbpcHe Ha MMeTo Ha BaWata 6e3KuHa MpeXa. BnXte B DOKyMeHTaunrTa Ha yCTpoiCTBOTO 3a NOMOu.
3A6EJIEXKA
BaeweTo 6e3xnuHo yctpoiCTBO Tp86Ba da noDdbpxka WPA/WPA2.
- Ha yctpoiCTBOTO B 6e3KnUHaT a MpeXa N36epTe NMeTo Ha MpeXaTa Ha Baunr pyTeP n BBBeTe npOJa (KnIOu Ha MpeXaTa).
- B Cisco Connect ΦρακHeTe Bbpxy Next (Hπpeπ).
Ppimep:Ha Baushn CmapfoH nn Dpyro 6e3xuH OcTpoiCTBO HamepeTe Wi-Fi MeHIOTo n npoBeTe TbpcHe Ha doctbnH 6e3xuHmpeKn. B To3n npimep, KaTO n3noJI3BaTe mHopMaunra 3a MpeKaTa, PpeOCTaBeHa oT Cisco Connect n noka3Ana B npednHn eKpaH, HATNCHe BronzeEagle.
Android
iPhone
- BbBedeTe napolata (Klou Ha mpeka), npedocTaBeHn ot Cisco Connect. B To3n npimep Kluoyt Ha mpekaTa a e B6eM9UkCjz.
3ABEJIEXKA
B napona tce npabn pa3nka mejdy malkn ngabn 6ykbn. Ybepete ce, ye BbBeKdaTe npabnH0 6ykbnte.
- Korato BaaweTo 6e3KnUHO yCTpoiCTBO e ycneuHO Cbbp3aHo C BaWata 6e3KmHa MpeJa, BbBeTe NMe 3a yCTpoiCTBoto B Cisco Connect, a cned ToBa upaKHeTe Bbpxy Finish (TOTOBO).
TexHnueckn daHnn
Linksys E900
| Име на модаlea | Linksys E900 |
| Описанце | Pyтep Wireless-N |
| Homeр на модаlea | E900 |
| Стоadingарты | 802.11n, 802.11g, 802.11b, 802.3u |
| Портоve | Зхранвае, Иntер在网络 Ethernet (1-4) |
| Бутои | Reset (Нулиранe), Wi-Fi Protected Setup™ |
| Сbvetoiodи | Зхранвае/Wi-Fi Protected Setup, Иntер在网络, Ethernet (1-4) |
| Тил океolumbahe | CAT 5e |
| Изльчвана мошист | 802.11n (20 MHz): 15,0 ± 1,5 dBm @ CH6, MCS 0~4, MCS 8~12 13,5 ± 1,5 dBm @ CH6, MCS 5~7, MCS 13~15 802.11n (40 MHz): 14,0 ± 1,5 dBm @ CH6, MCS 0~4, MCS 8~12 13,5 ± 1,5 dBm @ CH6, MCS 5~7, MCS 13~15 802.11g: 14,5 ± 1,5 dBm @ CH6, BCNUCKи скорости 802.11b: 16,5 ± 1,5 dBm @ CH6, BCNUCKи скорostи |
| Усilвано на сantothenа | ≤ 2,0 dBi, ≤ 4,0 dBi (2 сantotheni) |
| UPnP | побържа ce |
| Зашота на сantothenа мрека | Wi-Fi Protected Access™ 2 (WPA2), WEP, сantotheno Фильриране по MACaadесdo 128-6итовошифравае |
| Клоч за сашота - сantothene |
Pa60Tha cpeda
| Размeperи | 188,7 × 151,7 × 31,2 MM (7,43" × 5,97" × 1,23") |
| Терло на устroduяствOTO | 202,0r (7,13 унuzи.) |
| Зхранваши | 12 V, 0,5 A |
| Сергийф尼克ати | FCC, UL/cUL, ICES-003, RSS210, CE, Wi-Fi (IEEE 802.11b/g/n), WPA2TM, WMM®, Wi-Fi Protected Setup, Windows 7 |
| Разовтаемперараза | ot 0 до 40°C (ot 32 до 104°F) |
| Темперараза за сбхараhausen | ot -20 до 60°C (ot -4 до 140°F) |
| Разовта влажноct | ot 10 до 80% бez конденираhoe |
| Влажноct за сбхараhausen | ot 5 до 90% bez конденираhoe |
BENEKNI
3a INΦopMaζη 3a HOpMaTnBHaTa ypeɪδa, rapaHζηrTa n 6e3oNaCHOCTTa BνЖTe KOMnAκTДИСKa, ДОCTaBeH C Baʌŋ pyTeρ, ИЛ N OΤιДeTe Ha Linksys.com/support.
CneuΦkaunTe npLexaT Ha npomEn 6e3 npedn3BeCTne.
*MaKcImaHnTe pa6oTHn poka3aTeJn ca n3BneueHn OT cneuФnKaunTe Ha CtaHdapt 802.11 Ha IEEE. DeIcTBnTeJHnTe pa6oTHn poka3aTeJn MoKeJa ca pa3JInuChN, BKJIouHTeJHo PO-HNCbK KaNAuHTet 3a pa6oTa B 6e3JNuHa MPeKa, npOyCsKaTeJHa CnOCo6HOCT 3a DaHHN, DnApa3OH N POKpTHe. KaueCTBOTO Ha pa6oTa 3aBvncn OT MHORO foakTopn, ycIOBnI ni papaMeTpN, BKJIouHTeJHo pa3CToRHeTO OT ToUkKaTa 3a DoCTbN, o6ema Ha TpaΦuKa B MPeKaTa, CTpOnTeJHnTe MaTePnaIi N KOHCTpyKcIyTA Ha CrpaJaTa, n3IPOJ3BaHaTa ONEpaCIOHHa CnCTeMa, KOMbHaCzIraTa OT n3IPOJ3BaHn UcToPoJCTBa 3a 6e3JNuHa MPeKa, cmUeHnI n dpyrN He6laorponrTHn ycIOBnI.
Linksys E1200
| Име на м odeла | Linksys E1200 |
| Описанne | Pyтep Wireless-N |
| Homeр на м odeла | E1200 |
| Стандарту | 802.11n, 802.11g, 802.11b, 802.3u |
| Портоve | Зхранвае, Иntер在网络 Ethernet (1-4) |
| Бутои | Reset (Нулиранe), Wi-Fi Protected Setup™ |
| Сbvetoюд | Зхранвае/Wi-Fi Protected Setup, Иntер在网络 Ethernet (1-4) |
| Тип оkaбелявае | CAT 5e |
| Изльчвана мошист | 802.11n (20 MHz): 15,0 ± 1,5 dBm @ CH6, MCS 0~4, MCS 8~12 13,5 ± 1,5 dBm @ CH6, MCS 5~7, MCS 13~15 802.11n (40 MHz): 14,0 ± 1,5 dBm @ CH6, MCS 0~4, MCS 8~12 13,5 ± 1,5 dBm @ CH6, MCS 5~7, MCS 13~15 802.11g: 14,5 ± 1,5 dBm @ CH6, BCNUCKи скорости 802.11b: 16,5 ± 1,5 dBm @ CH6, BCNUCKи скорostи |
| УсILAвае на сanteнatable | V1: ≤ 2,5 dBi, ≤ 4,0 dBi (2 сanteи) V2: ≤ 2,0 dBi, ≤ 4,0 dBi (2 сanteи) |
| UPnP | побържа ce |
| ЗашURA на сеэнчната мрека | Wi-Fi Protected AccessTM 2 (WPA2), WEP, сеэнчно ФиNTриране по MACaadесdo 128-6итовошифровае |
| Клоч за сашURA - сиитовe | |
| РабOTHA среда | |
| Размери | 188,7 × 151,7 × 31,2 ММ (7,43" × 5,97" × 1,23") |
| Тerglio на устroduствOTO | V1: 252,7r (8,91 унции.) V2: 202,0r (7,13 унции.) |
| Зхранвае | 12 V, 0,5 A |
| Сергийфikати | FCC, UL/cUL, ICES-003, RSS210, CE, Wi-Fi (IEEE 802.11b/g/n), |
WPA2™, WMM®, Wi-Fi Protected Setup, Windows 7
| Рабограда Temпepатура | ot 0does 40°C (ot 32 does 104°F) |
| Temпература за сбхсанниоve | ot -20does 60°C (ot -4does 140°F) |
| Рабограда влажност | ot 10does 80% be3 конденир |
| Влажност за сбхсанниоve | ot 5does 90% be3 конденир |
BENEKNI
3a INΦopMaζη 3a HOpMaTnBHaTata ypeɪδa, rapaHζηra T a N 6e3oNaCHOCTTa BIXTe KOMnAκTДИСKa,ДОCTaBeH C Baɪnja pyTe, ИΙΝΟΤιДeTe Ha Linksys.com/support.
CneuNkauNTe noJLexat Ha npomEn 6e3 npedn3BeCTne.
*MakcimmaHnTe pa6oTHn NOKa3aTeJI Na 3BVeueHn OT cneuФNkaCInTe Ha CtAndapr802.11 Ha IEEE. DeIeCTBuNTeHNTe pa6oTHn NOKa3aTeJI MOKeJa ca pa3JNUChN, BKNIOUHTeJIHO PO-HNCbK KanaUHTeT 3a pa6oTa B 6e3XnUHa MPeKa, npOpyCKaTeJIHa CnOCo6HoCT 3a DaHHN, DnApa3OH N POKpHTne. KaueCTBOTO Ha pa6oTa 3aBnCSOn OT MHOro foAKTopn, YCIOBnI N npaMeTpN, BKIOUHTeJIHO p3CTOraHHeTO OT ToCHkTa 3a DOCTbN, O6ema Ha TpaΦnKa B MPeKaTa, CTPOUENTHNe MaTePnaJI N KOHCTpyKcIyTA Ha CrpaJaTa, IN3PON3BaHaTa ONepaCIOHNa CnCTeMa, KOMbHaCuaIyTa OT IN3PON3BaHn UcToPoIcTBA 3a 6e3XnUHa MPeKa, CMUeHn I dpyrN He6laOrpIpyTHn YcIOBnI.
Linksys E1500
ImeHaMoedena LinksysE1500
Описане Ртср Wireless-N cб SpeedBoost
HomepHaMoDena E1500
Ctanhaptn 802.11n,802.11g,802.11b, 802.3u
Портоve 3axpaHbaHe,ИнтepHTи Ethernet (1-4)
Бутони Нулрази, Wi-Fi Protected Setup
CBeToIIOIo 3axpaHbAHe/Wi-Fi Protected Setup, INHTepHET, Ethernet (1-4)
Tinoka6eIbAhe CAT 5e
I3JIbUBaHaMoUHOCT 802.11n (20 MHz):
YcJIbAHe Ha aHTeHaTa ≤ 3,0 dBi, ≤ 4,0 dBi, ≤ 4,5 dBi
UPnP noIbpxa ce
3aunTa Ha 6e3KnUHaTa MpeXa Wi-Fi Protected Access 2 (WPA2), WEP, 6e3KnUHo fHnTprnPaHe no MAC aDpec
Klou 3a 3auNTa -6ntOBe Do 128-6ntOBo uΦpoBaHe
Linksys E1500
Pyrep Wireless-N cbc SpeedBoost
E1500
802.11n, 802.11g, 802.11b, 802.3u
3axpaHbHe, INHTepHeT n Ethernet (1-4)
Hynipane, Wi-Fi Protected Setup
3axpaHbaHe/Wi-Fi Protected Setup, INHTepHeT, Ethernet (1-4)
CAT5e
802.11n (20 MHz):
17,0 ± 1,5 dBm @ CH6, MCS 0~4, MCS 8~12
16,0 ± 1,5 dBm @ CH6, MCS 5~7, MCS 13~15
802.11n (40 MHz):
15,5 ± 1,5 dBm @ CH6, MCS 0~4, MCS 8~12
14,0±1,5 dBm @ CH6, MCS 5~7, MCS 13~15
802.11g:
18,0 ± 1.5 dBm @ CH6, 6 Mbps
17,0±1.5 dBm @ CH6, 54 Mbps
802.11b:
18,0 ± 1,5 dBm @ CH6, BCNUKn ckopoctn
≤3,0 dBi, ≤4,0 dBi, ≤4,5 dBi
(3 aHTeHN)
PonDbpxa ce
Wi-Fi Protected Access 2 (WPA2),
WEP,6e3xuHNoΦnItpuPAne no MAC aIpec
128-6nTOBO uΦpOBAHe
Pa60Tha cpega
Pa3mepn 188,7×151,7×31,2MM
(7,43^ × 5,97^ × 1,23^ )
TeTnOHa yCTpoIcTBOTo 254,1r (8,96 yHcnn)
3axpaHbaHe 12V,0,5A
CepTnΦnKaTn FCC,UL/cUL,ICES-003,RSS210, CE,Wi-Fi (IEEE 802.11b/g/n), WPA2,WMM,Wi-Fi Protected Setup,Windows7
Pa6oTHa TempepaTypa ot 0do 40^ (ot 32 do 104^
Tempepatya 3a cbxpaHHe oT-20 do 60^ (oT-4do 140^
Pa6OTha BlaJxHocT 10do 80% 6e3 KOHdEh3npaHe
Blaaxhoct3a cxbxpaHene oT 5do 90% 6e3 KOHdEHNpaHne
BENEXKNI
3a INΦopMaζη 3a HOpMaTnBHaTa ypeД6a, rapaHζηra η 6e30NaChOCTTa BnXTe KOMnaKTДИСka, ДОCTaBeH C BaIηra pyTeρ, илу OTnIeTe Ha Linksys.com/support.
CpeuΦnKaunTe nOJIeXaT Ha npomEni 6e3 npedn3BeCTne.
*MaKcImaHnHTe pa6oTHn poka3aTeJn ca n3BLeueHn OT cneuФnKaUInTe Ha CtAndapr 802.11 Ha IEEE. DeIcTBnTeHNHe pa6oTHn poka3aTeJn MoKe da ca pa3JInuChN, BKJIouHnTeJHo PO-HNCbK KaNaCITet 3a pa6oTa B 6e3JnUHa MPeJa, npOpyckaTeJHa CnOCo6HOCT 3a DaHHN, DnApa3OH N POKPrtne. KaueCTBOTO Ha pa6oTa 3aBnCn OT MHOro foakTopn, YcIOBnI I npaMeTpN, BKJIouHnTeJHo pa3CTOraHHeTO OT ToCHkTa 3a DoCTbN, O6ema Ha TpaΦuKa B MPeJaTaN, CTpOnTEHnTe MaTePnaNl N KOHCTpyKcIyTA Ha CrpaJATA, IN3NoJ3BaHaTaN OepaCIOHHa CNCTeMa, KOMbHaCzIyTA OT IN3NoJ3BaHn UcToPoJCTBa 3a 6e3JnuHa MPeJa, CmUeHnN I dpyrN He6laorponrTHn YcIOBnI.
Linksys E2500
| Иme на модалa | Linksys E2500 |
| Описане | Усьвършеньстван дычестоен N рутер |
| Homeр на модалa | E2500 |
| Стоандарту | 802.11n, 802.11a, 802.11g, 802.11b, 802.3, 802.3u, 802.3ab |
| БрòйаNTeHи | 4 обioso, 2 вътpeшни aNTeHи за Всеки OT |
| разноочьтOTнITE диапазони | 2,4 GHz и 5 GHz |
| С отделяне (дa/нe) | He |
| Модалачия | 802.11b: CCK, QPSK, BPSK |
| 802.11g: OFDM | |
| 802.11a: OFDM | |
| 802.11n: BPSK, QPSK, 16-QAM, 64-QAM | |
| Чувствітелноct на приеманe | 2.4 GHz |
| (TиПично) | 802.11b: -87 dBm @ 11 Mbps |
| 802.11g: -70 dBm @ 54 Mbps | |
| 802.11n 20 MHz: -70 dBm @ MCS15 | |
| 802.11n 40 MHz: -66 dBm @ MCS15 | |
| 5 GHz | |
| 802.11a: -70 dBm @ 54 Mbps | |
| 802.11n 20 MHz: -66 dBm @ MCS23 | |
| 802.11n 40 MHz: -62 dBm @ MCS23 | |
| Усільbaнe на щNTeHата в дBi | 2,4 GHz: |
| АNTeHа 1 (задна дясан): ≤ 2,94 DBI | |
| aNTeHа 2 (otпре徳 Вдясно): ≤3,78 dBi | |
| 5 GHz | |
| АNTeHа 1 (пре徳 дясан): ≤5.86 dBi | |
| АNTeHа 2 (пре徳 лява): ≤4,88 dBi | |
| UPnP | побдьржа ce |
| Функции 3a зашита | WEP, WPA, WPA2 |
| Ключ 3a зашита - битove | do 128-битовошифраванe |
Pa6oTHa cpega
| Габашни размeperи | 225 x 35 x 180 мм (8,86" x 1,38" x 7,09") |
| Терло на устroduствOTO | 452 r (15,94 унции) |
| Зхраимbaне | 12 V, 1 A |
| Сертофikати | FCC, IC, CE, Wi-Fi A/B/G/N |
| РавOTна темпepатура | ot 0 до 40°C (ot 32 до 104°F) |
| Temпepатура за сбхсане | ot -20 до 60°C (ot -4 до 140°F) |
| РавOTна влажност | ot 10 до 80% OTHOCHTeЛнa влажност, 6e3 кондэнз汞пао |
| Влажност за сбхсане | ot 5 до 90% 6e3 кондэнз汞пао |
BENEXKNI
3a INΦopMaζη 3a HOpMaTnBHaTa ypeδa, rapaHζηra η 6e3oNaCHOCTTa BnKTe KOMNaKTДИСKa, IOCTaBeH C BaIηra pyTeρ, IJI N O TnIeTe Ha Linksys.com/support.
CneuΦnKaunTe npAnEkaT Ha npomEn 6e3 npEduN3BecTne.
*MaKcImaHnHTe pa6oTHn pOKa3aTeJn ca n3BLeueHEn OT cneuΦnKauznTe Ha CtAndaprT 802.11 Ha IEEE. DeiCTbnteHNrte pa6oTHn pOKa3aTeJn MOKe da ca pa3JInuHn, BkJIouHTeJnHO PO-HNCbK kanaUHTet 3a pa6oTa B 6e3xuHa MPeka, npOnyckaTeJncaNOC6HoCT 3a daHHn, dnaPaa3OH n NOKpItnE. KaueCTBOTo HA pa6oTa 3abncn OT MHOro foakTopn, ycIOBnI niapaMeTpri, BkJIouHTeJnpo3CTOraHHeTO OT ToQKaTa 3a DoCTbI, o6ema Ha TpaΦnka B MPekaT, CTpOnTEHnTe MaTePnaJIIn KOHCTpyKcIyrTa Ha CrpaJaTa, n3NoJ3BaHaTa ONepaCIOHHa CNTeMeA, KOM6bHaZrTa OT n3NoJ3BaHn yCTpOietCBa 3a 6e3xuHa MPeka, CmUeHn I npYr He6laoropnTn YcIOBnI.
Linksys E3200
| Име на м odeла | Linksys E3200 |
| Описанne | Високoeф ekтivен двуестон N ручер |
| Homeр на м odeла | E3200 |
| Стандарtn | 802.11n, 802.11a, 802.11g, 802.11b, 802.3, 802.3u, 802.3ab |
| Брой сanteи | 6 ошо, 3 вътresses сanteи за всякоторг范围内 Димаэони 2,4 GHz и 5 GHz |
| С отделяне (да/нe) | He |
| Сkopост на komутуруемь пор | 10/100/1000 Mbps |
| Портоve | Иntер在网络, Ethernet (1-4), зхранвае |
| Бутон | Hybrочан, Wi-Fi Protected Setup |
| Сbvетюноïd | Зхсанвае, Ethernet (1-4) |
| Модulatory | 802.11b: CCK, QPSK, BPSK 802.11g: OFDM 802.11a: OFDM 802.11n: BPSK, QPSK, 16-QAM, 64-QAM |
| Чувст BVтелноct на приемаоhe | 2.4 GHz 802.11b: -87 dBm @ 11 Mbps (телочио) 802.11g: -77 dBm @ 54 Mbps (телочио) 802.11n (20 MHz): -71 dBm @ MCS15 (телочио) 802.11n (40 MHz): -68 dBm @ MCS15 (телочио) 5 GHz 802.11a: -75 dBm @ 54 Mbps (телочио) 802.11n 20 MHz: -70 dBm @ MCS15 (телочио) 802.11n 40 MHz: -67 dBm @ MCS15 (телочио) |
| Усileвае на сanteи�а | 2.4 GHz (дирални сanteи)Атени 1 ≤ 3 dBiАтени 2 ≤ 4 dBiАтени 3 ≤ 4 dBi5 GHz (дирални сanteи)Атени 1 ≤ 4,5 dBiАтени 2 ≤ 4,5 dBiАтени 3 ≤ 4,5 dBi |
Ctanhaptn 802.11n,802.11a,802.11g,802.11b,802.3, 802.3u,802.3ab
PaiooceToTa 2,4n5GHz
Скорост на Комутугемя пот 10/100/1000 Mbps (Gigabit Ethernet)
IopToBe 3axpaHbAHe,USB,VHTepHET,Ethernet (1-4)
Бутони Нулранe, Wi-Fi Protected Setup
CBeToIIOIoI TOpEn IaHEn: 3axpaHbAne 3aJeH paHEn: INHTepHET, Ethernet (1-4)
bpoaHTeH 6 o6uO,3 BbTpeuHn aHTeHn 3a BCEKn OT paAnoueCTOTnHe dnaana30Hn 2,4 GHz n 5 GHz
CotdJIaHe (da/He) He
Módylaци 802.11b: CCK, QPSK, BPSK
802.11g:OFDM
802.11a: OFDM
802.11n: BPSK, QPSK, 16-QAM, 64-QAM
UyBCTBNTeHIOCT Ha npiMaHe 2.4 GHz
YcJIbAHe Ha aHTeHaTa B dBi 2,4 GHz (3 BbTpEwHn aHTeHn PIFA)
802.11b: -87 dBm @ 11 Mbps (Тиниуно)
PIFA 1≤ 3.31 dBi (Дясна)
802.11g: -77 dBm @ 54 Mbps (Тишично)
PIFA 2≤ 3.45 dBi (npedna)
802.11n 20 MHz: 20 MHz: -70 dBm
PIFA 3≤ 1.96 dBi (IЯВа)
@MCS15 (tɪnɪnɪhɒ)
5 GHz (3 VbTpewHn aHTeH n PIFA)
PIFA 1≤ 3.71 dBi(JaCHa)
PIFA 2≤ 3.60 dBi (npedHa)
PIFA 3 ≤ 1.27 dBi (лява)
IopdbpxaHn aaiIOBc nCTeM
3a yctpoiCTBOTO 3a cbxpaHeneFAT32,NTFS n HSF+
UPnP noIbpxa ce
Функцииза зацида WEP, WPA, WPA2
Klou 3a 3auNTa -6ntOBe Do 128-6ntOBo uΦpObaHe
Pa60Tha cpea
a6a nTn p a3Mepn 225× 25× 160m m
(8,86^ × 0,98^ × 6,30^ )
TeTnoHa yctpoCTBOTO 360r(12,7yHcunn)
3axpaHbaHe 12V,2A
CeptnuΦnKaTu FCC, IC, CE, Wi-Fi a/b/g/n,
Windows 7, DLNA
Pa6oTHa TempepaTypa ot 0do 40^ (ot 32 do 104^
Tempepatya 3a cbxpaHHe oT-20 do 60^ (oT-4do 140^
Pa6OTHa BnaxHocT 10do 80% OTHOCHTeHa BnaXHOCT,
6e3 KOHNDeH3npaHe
BlaЖHOC3a CbXpaHeHne ot 5do 90% 6e3 KOHdE3npaHne
BENEXKNI
3a INΦopMaζη 3a HOPMaTινBHaTa ypeɪδa, rapaHζηraɪa N 6e3ɔnɑsHcOCTTb BIXTe KOMπaKTДИСka, IocTaBeH C Baɪnɪya pyTeP, nɪŋ OɪntɪdTe Ha Linksys.com/support.
CneuΦkaunite noJleXaT Ha npomEni 6e3 npedn3BeCTne.
*MakcimmaHnTe pa60THn nOKa3aTeHn ca n3BneHn OT cneuΦNkauHnTe Ha CtaHdapr802.11 Ha IEEE. DeiCTBnTeHnTe pa60THn nOKa3aTeHn Moje da ca pa3JIuHn, BKNIOUHTeHNO p-nHcBk KaanaHTet 3a pa6oTa B 6e3KnuHa MpeKa, npOynCkAteHn CaIocO6HOCT 3a daHN, dnaPAn3oH n NOKpHTne. KaueCTBOTO Ha pa6oTa 3aBvCSn OT MHOrO oakTOpN, yCNoBn I napamETpn, BKNIOUHTeHNO pa3CTOHNTo OT TOChkTA 3a DoCTbN, o6ema Ha TpaΦNkBA MpeXaTa, CTPONTeHnMeTepNaJIn N KOHCTpyKzraTa Ha crpaJaTa, n3NOJ3BaHATA ONEpaOnOHnCaCTeMa, KOM6bHaZnTaOT n3NOJ3BaHn YcTPOCTBa 3a 6e3KnuHa MpeKa, CMySeHnN IN DpyrN He6laGornpnTHn YcNobn.
Iocete linksys.com/support 3a texHnuecka nOdprbXka, yOcToBaHa c HaRaDi

Cisco, em6nemata Ha Cisco n Linksys ca TbproBCK mApKn nn pernctpnauHn TbproBCK mApKn Ha Cisco n/nn HeHnHTe ounn B CbeHNHeHNTe 4aTn n dpyn cTpaHn. Cnncbk Ha TbproBCKnTE mApKn Ha Cisco moKe da 6bnde HamepeHn Ha www.cisco.com/go/trademarks. BcnuK dpyr n TbproBCK mApKn, ynomehATn B TO3n DOKyMeHt, ca cbotBeHnTe IM npntexkATEnn.

Rada E
Obsah
Přehled výrobku
E900/E1200/E1500/E2500/E3200 1
Pohled zezadu 1
Pohled zespodu 1
E4200. 2
Pohled seshora 2
Pohled zezadu 2
WPA2/WPA Mixed Mode, WPA2 Personal, WPA Personal
POZNÁMKY
WPA2/WPA Enterprise Mixed Mode, WPA2 Enterprise, WPA Enterprise
- Spustte software Cisco Connect.
15,0 ± 1,5 dBm @ CH6, MCS 0~4, MCS 8~12
13,5 ± 1,5 dBm @ CH6, MCS 5~7, MCS 13~15
802.11n (40 MHz):
14,0 ± 1,5 dBm @ CH6, MCS 0~4, MCS 8~12
13,5 ± 1,5 dBm @ CH6, MCS 5~7, MCS 13~15
802.11g:
WPA2™, WMM®, Wi-Fi Protected
Setup,Windows7
Provozní teplota
0až40°C
Skladovaci teplota
-20 až 60 °C
Provozní vlhkost
17,0 ± 1,5 dBm @ CH6, MCS 0~4, MCS 8~12
16,0 ± 1,5 dBm @ CH6, MCS 5~7, MCS 13~15
802.11n (40 MHz):
15,5 ± 1,5 dBm @ CH6, MCS 0~4, MCS 8~12
14,0 ± 1,5 dBm @ CH6, MCS 5~7, MCS 13~15
802.11g:
18,0 ± 1,5 dBm @ CH6, 6 Mb/s
17,0±1,5 dBm @ CH6, 54 Mb/s
802.11b:
Sadan startes Cisco Connect 3
Bruge Cisco Connect til at administrire routeren 3
Your Internet cable is not plugged in
(Internetkablet er/DD)-meddeelse. 13
Cannot access your router
(Kan化进程) 14
Sādan startes Cisco Connect
WPA2/WPA Mixed Mode, WPA2 Personal, WPA Personal
NOTER
WPA2/WPA Enterprise Mixed Mode, WPA2 Enterprise, WPA Enterprise
Meldung Your Internet cable is not plugged in
Tasten Reset, Wi-Fi Protected SetupTM
LEDs Netzstrom/Wi-Fi Protected Setup, Internet, Ethernet (1-4)
Kabeltyp Kat. 5e
Wi-Fi Protected Access™ 2 (WPA2),
WEP, Wireless-MAC-Filtering
Mývúma Your Internet cable is not plugged in
(To kaIawio IiaikTuov 8ev ival ouv8eEevo) .13
Mývúma Cannot access your router
( i a v a d u v a t n a o o y a c) 14
Mnua Device not found (Aev ) 15
PpOdeltaPpOεC
Linksys E900. 17
Linksys E1200. 18
Linksys E1500. 19
Linksys E2500. 20
Linksys E3200. 21
Linksys E4200. 22
Eπισκόπηση προῖντος
E900/E1200/E1500/E2500/E3200
πίσω ὄψη
H M E I H
Tva yekataohtnoe to Service Pack 3:
15 ± 1,5 dBm @ CH6, MCS 0~4, MCS 8~12
13,5±1,5 dBm @ CH6, MCS 5~7, MCS 13~15
802.11n (40 MHz):
14 ± 1,5 dBm @ CH6, MCS 0~4, MCS 8~12
13,5±1,5 dBm @ CH6, MCS 5~7, MCS 13~15
802.11g:
14,5 ± 1,5 dBm @ CH6, áloi oí puθμoi μετáδoanç
802.11b:
WPA2™, WMM®, Wi-Fi Protected
Setup,Windows7
0^ EwC 40°C (32° EwC 104°F)
p a i a k n c -20° 60^ (-4° 140^)
FCC, IC, CE, Wi-Fi a/b/q/n,
Windows 7, DLNA
0^ 40^ ( 32^ 104°F
Oeepokpaia aiotheKevonc
-20^ 60^ (-4^ 140^)
Yypaia etoupyiac
Where to find more help. 3
How to set up your router 3
How to start Cisco Connect 3
Use Cisco Connect to manage your router 3
How to manually set up your router. 3
Advanced Configuration
How to open the browser-based utility 4
Setup > Basic Setup. 5
Language 5
Internet Setup 5
Wireless > Basic Wireless Settings 6
Wireless Settings 6
Wireless Security
Wireless > Wireless Security. 8
Personal options 8
Office options 8
Option settings 8
Troubleshooting
How to run Cisco Connect after setup 11
Your router was not successfully set up 12
Get Windows XP Service Pack 3 message 12
Your Internet cable is not plugged in message 13
Cannot access your router message 14
Device not found message 15
Specifications
Linksys E900. 17
Linksys E1200. 18
Linksys E1500. 19
Linksys E2500. 20
Linksys E3200. 21
Linksys E4200. 22
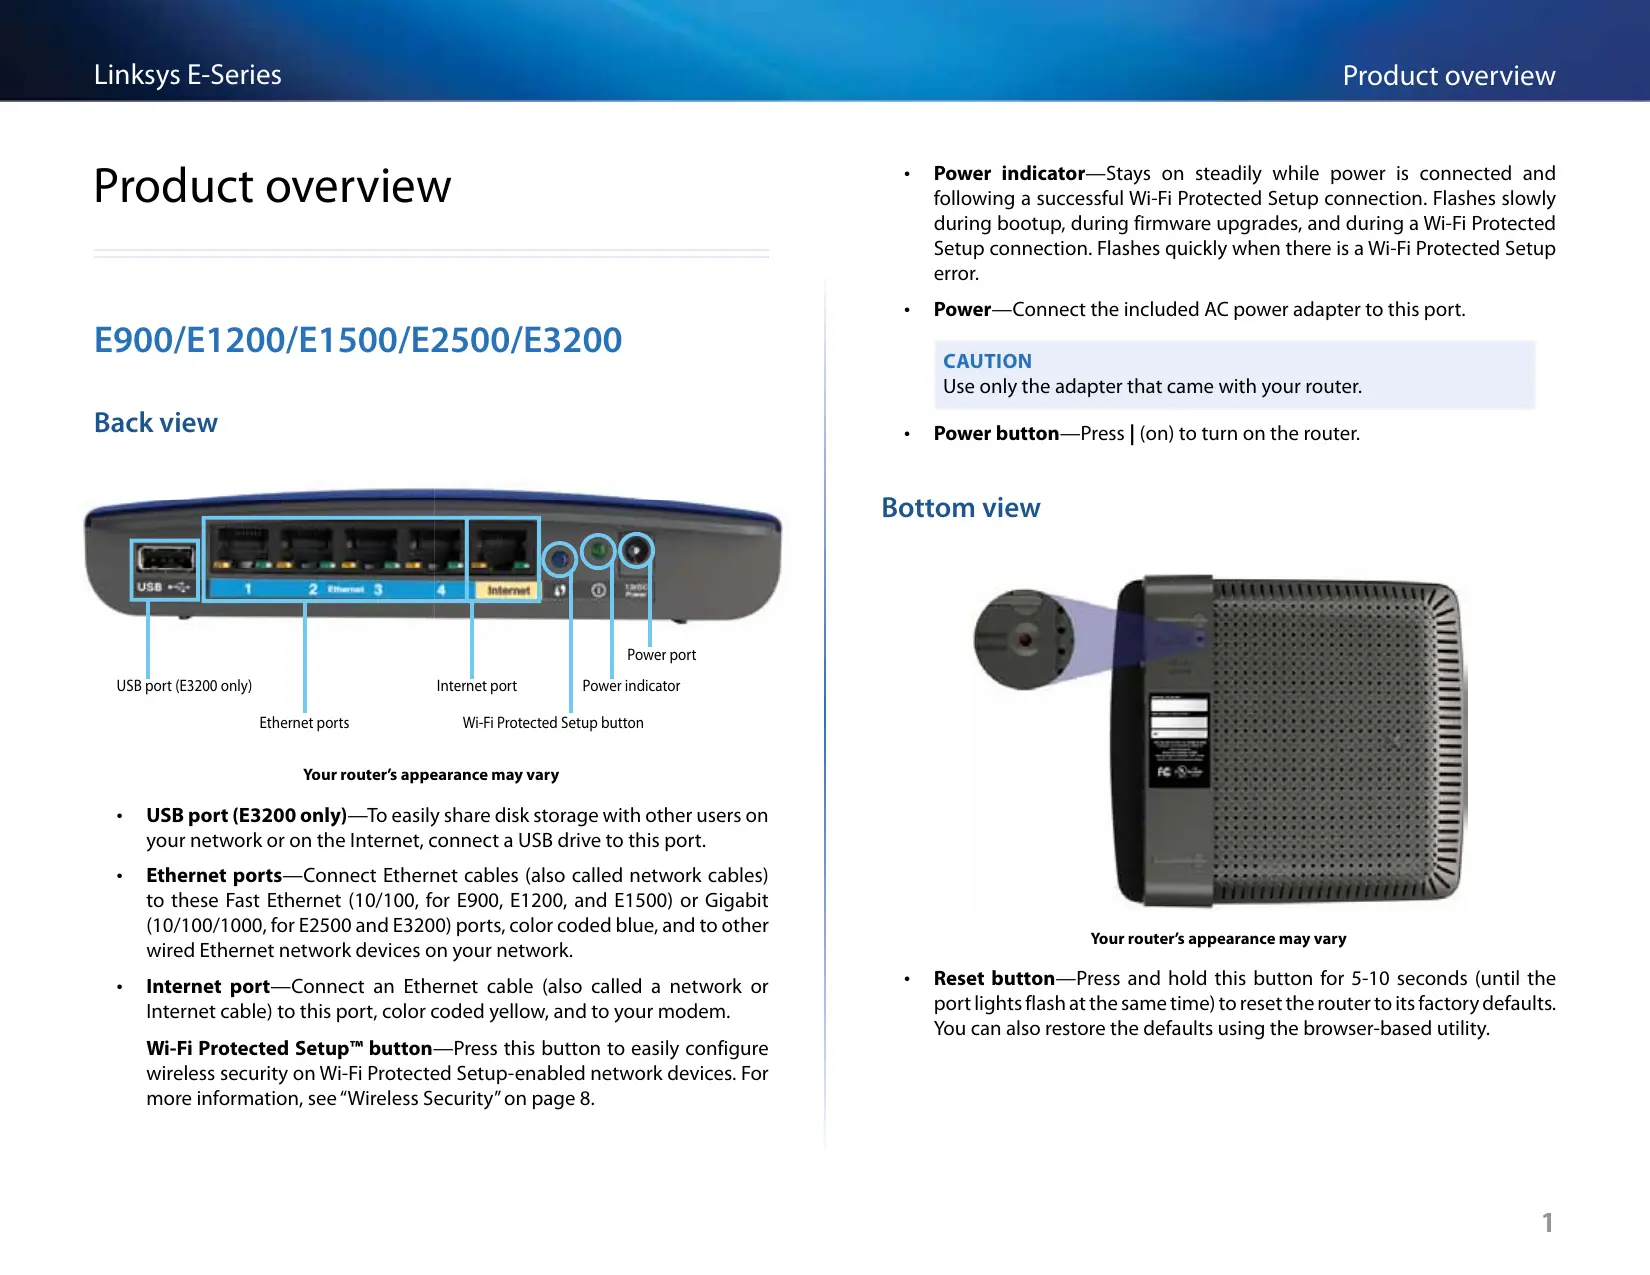
Product overview
E900/E1200/E1500/E2500/E3200
Back view
Your router's appearance may vary
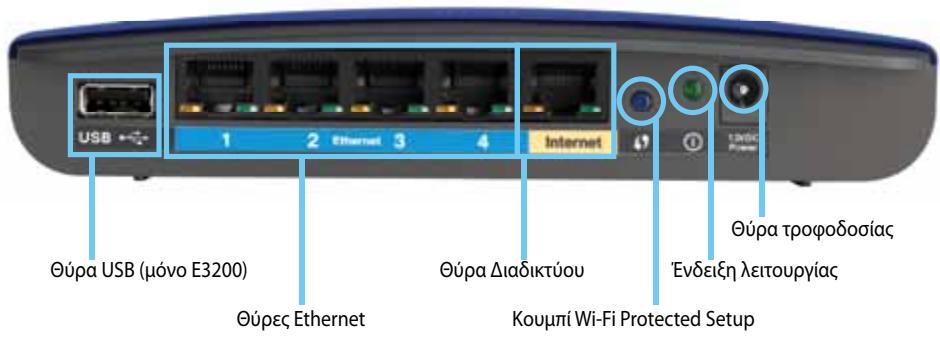
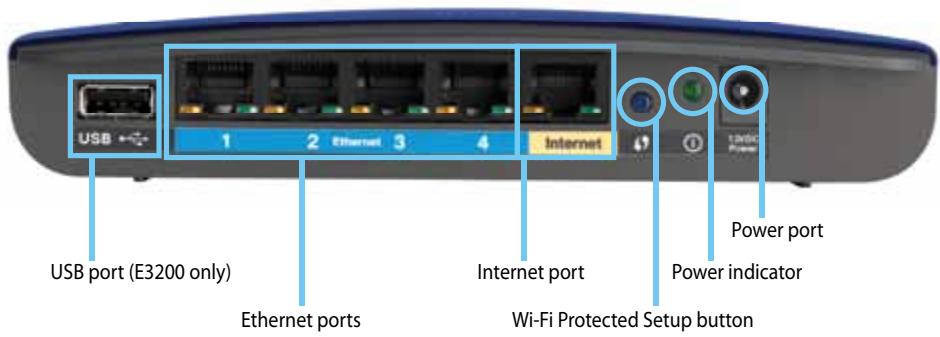
- USB port (E3200 only)—To easily share disk storage with other users on your network or on the Internet, connect a USB drive to this port.
- Ethernet ports—Connect Ethernet cables (also called network cables) to these Fast Ethernet (10/100, for E900, E1200, and E1500) or Gigabit (10/100/1000, for E2500 and E3200) ports, color coded blue, and to other wired Ethernet network devices on your network.
- Internet port—Connect an Ethernet cable (also called a network or Internet cable) to this port, color coded yellow, and to your modem.
Wi-Fi Protected Setup™ button—Press this button to easily configure wireless security on Wi-Fi Protected Setup-enabled network devices. For more information, see "Wireless Security" on page 8.
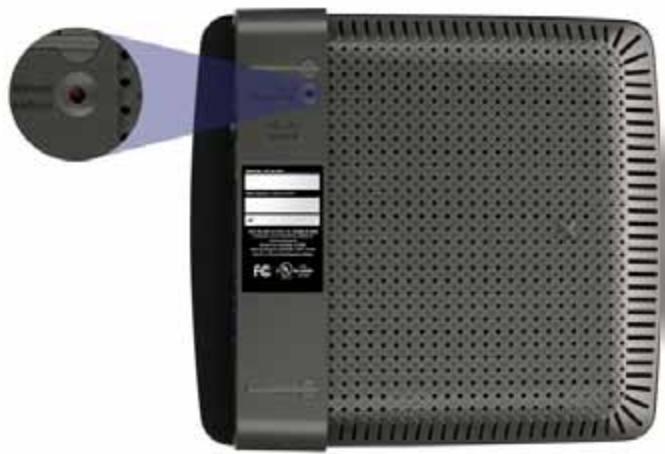
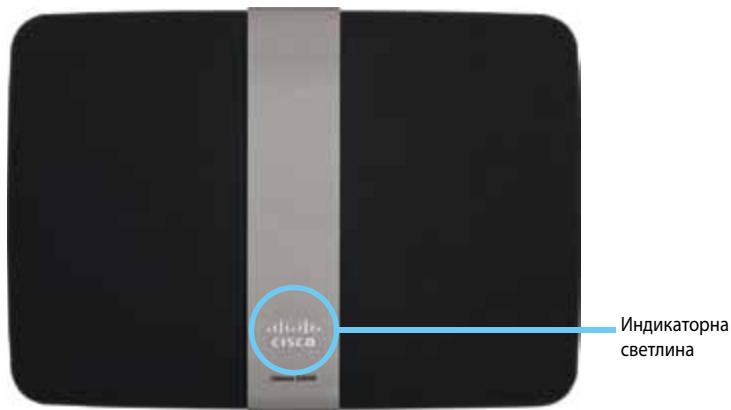
- Power indicator—Stays on steadily while power is connected and following a successful Wi-Fi Protected Setup connection. Flashes slowly during bootup, during firmware upgrades, and during a Wi-Fi Protected Setup connection. Flashes quickly when there is a Wi-Fi Protected Setup error.
- Power—Connect the included AC power adapter to this port.
CAUTION
Use only the adapter that came with your router.
- Power button—Press | (on) to turn on the router.

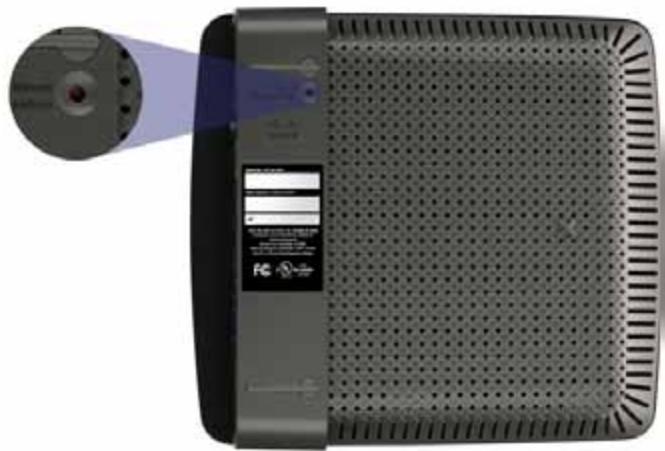
Bottom view
Your router's appearance may vary
- Reset button—Press and hold this button for 5-10 seconds (until the port lights flash at the same time) to reset the router to its factory defaults. You can also restore the defaults using the browser-based utility.
E4200
Top view
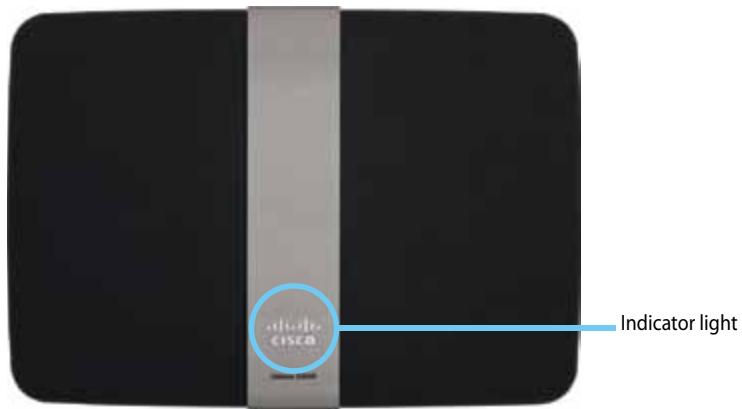
- Indicator light—Stays on steadily while power is connected and following a successful Wi-Fi Protected Setup connection. Pulses slowly during bootup, during firmware upgrades, and during a Wi-Fi Protected Setup connection. Flashes quickly when there is a Wi-Fi Protected Setup error.
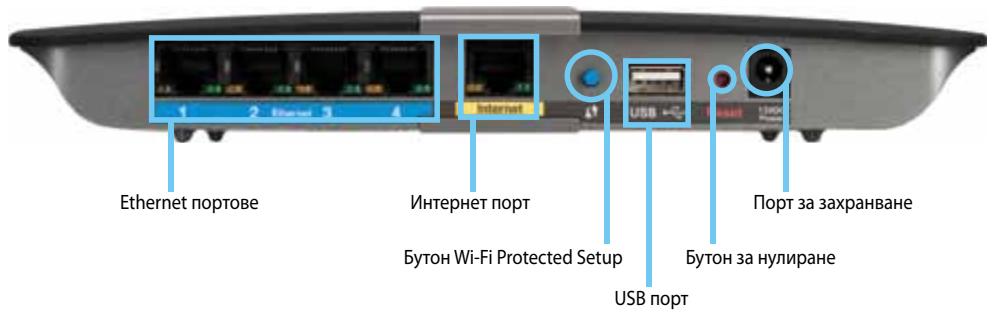
Back view
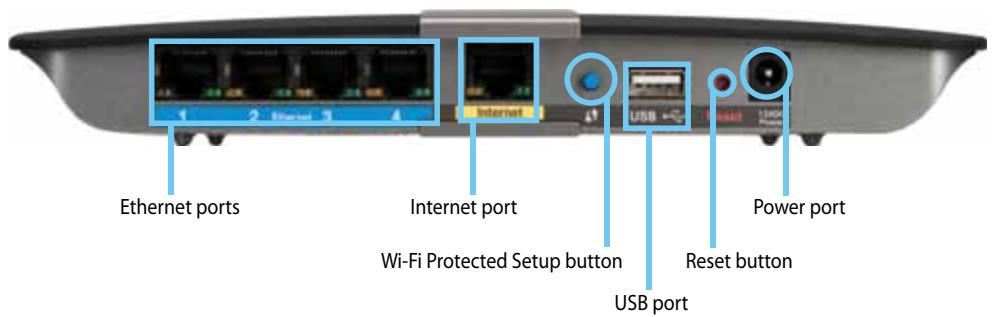
- Ethernet ports—Connect Ethernet cables (also called network cables) to these Gigabit (10/100/1000) ports, color coded blue, and to other wired Ethernet network devices on your network.
- Internet port—Connect an Ethernet cable (also called a network or Internet cable) to this port, color coded yellow, and to your modem.
- Wi-Fi Protected Setup™ button—Press this button to easily configure wireless security on Wi-Fi Protected Setup-enabled network devices. For more information, see "Wireless Security" on page 8.
- USB port—To easily share disk storage with other users on your network or on the Internet, connect a USB drive to this port..
- Reset button—Press and hold this button for 5-10 seconds (until the port lights flash at the same time) to reset the router to its factory defaults. You can also restore the defaults using the browser-based utility.
- Power—Connect the included AC power adapter to this port.
CAUTION
Use only the adapter that came with your router.
- Power button—Press | (on) to turn on the router.
Setting Up Your E-Series Router
Where to find more help
In addition to this User Guide, you can find help at these locations:
- Linksys.com/support (documentation, downloads, FAQs, technical support, live chat, forums)
- Cisco Connect help (run Cisco Connect, then click Learn More where available)
- Browser-based utility context-sensitive help (open the utility, then click Help in the right-side column.)
How to set up your router
The easiest and fastest way to set up your router is to run the Cisco Connect setup software.
How to start Cisco Connect
When you run the setup CD, Cisco Connect (your router's setup software) is automatically installed onto your computer. You can then use Cisco Connect to easily manage your router.
NOTE:
If you lose your setup CD, you can download the software from Linksys.com/support.
To start Cisco Connect for the first time:
- Insert the CD into your CD or DVD drive.
- Click Set up your Linksys Router.
If you do not see this:
- For Windows, click Start, Computer, then double-click the CD drive and the Setup icon.
-
For Mac, double-click the CD icon on your desktop, then double-click the Setup icon.
-
Follow the on-screen instructions to complete your router setup.
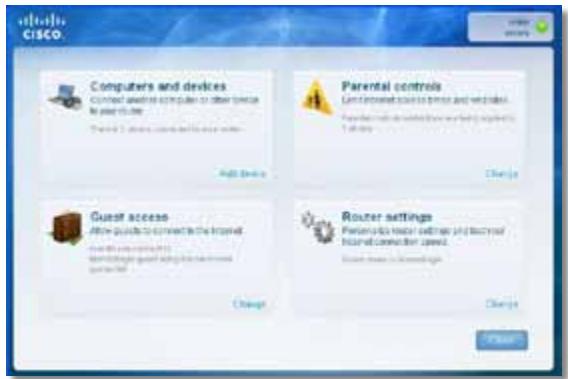
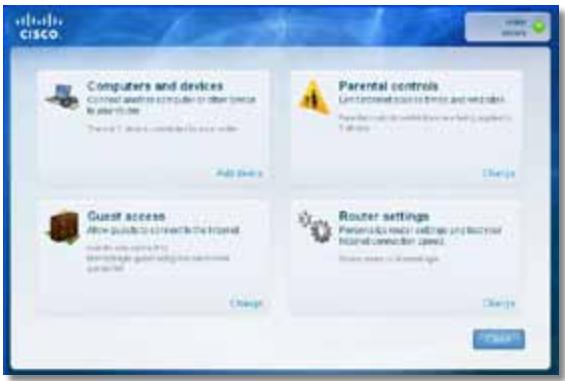
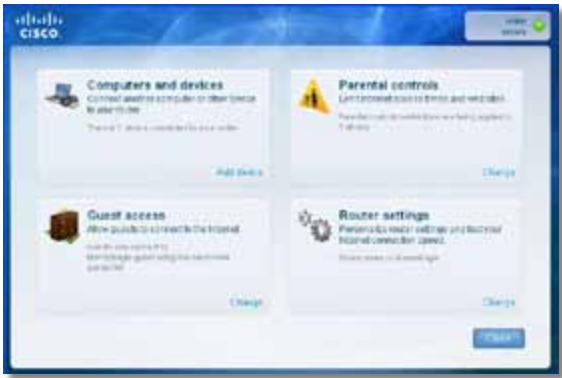
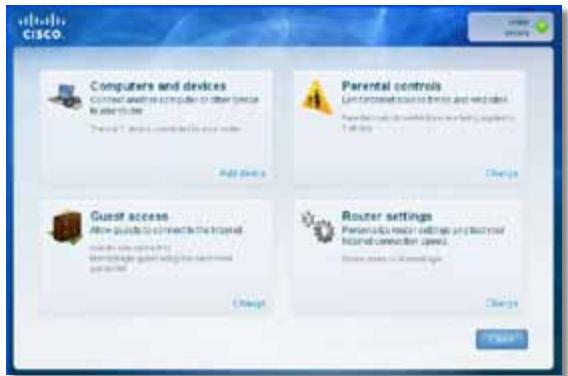
Use Cisco Connect to manage your router
After your router has been set up and Cisco Connect has been installed, you can use Cisco Connect to easily manage many of your router's settings such as:
- Connect devices to your network
Test your Internet connection speed - Configure parental controls
- Set up guest access
- Change your router's name and password
How to manually set up your router
After setting up the router with the setup software (located on the CD), the router will be ready for use. If you would like to change its advanced settings, or if the software does not run, use the router's browser-based utility. You can access the utility with a web browser on a computer connected to the router. For more information on using the utility, see "How to open the browser-based utility" on page 4.
Advanced Configuration
How to open the browser-based utility
To access some advanced settings, you need to open the browser-based utility.
To open the browser-based utility:
- Run Cisco Connect, click Change under Router settings, click Advanced settings, then click OK.
-or-
Open a web browser on a computer connected to your network, then go to 192.168.1.1.
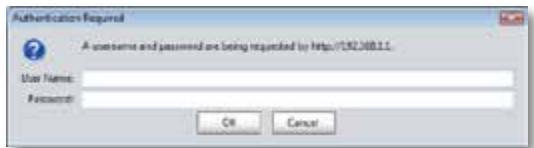
The router prompts you for a user name and password.
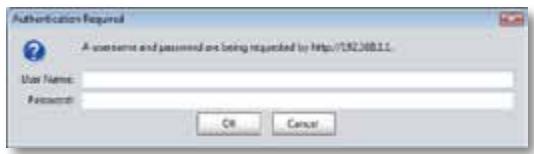
- Enter the user name and password, then click OK. The utility's main menu opens.
TIPS
If you set up your router without using Cisco Connect, your router's default username and password is admin.
If you used Cisco Connect to set up your router, you can see your router's user name and password by running Cisco Connect, then clicking Router settings.
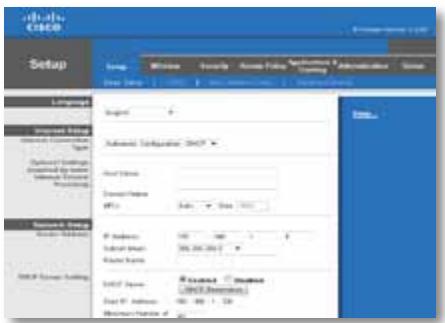
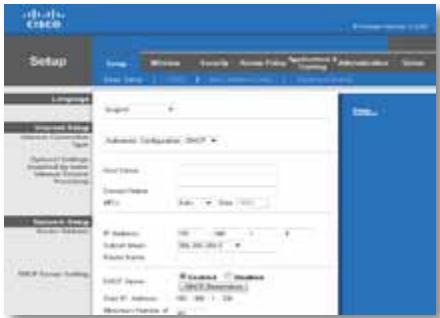
Setup > Basic Setup
The first screen that appears is the Basic Setup screen. This allows you to change the router's general settings.
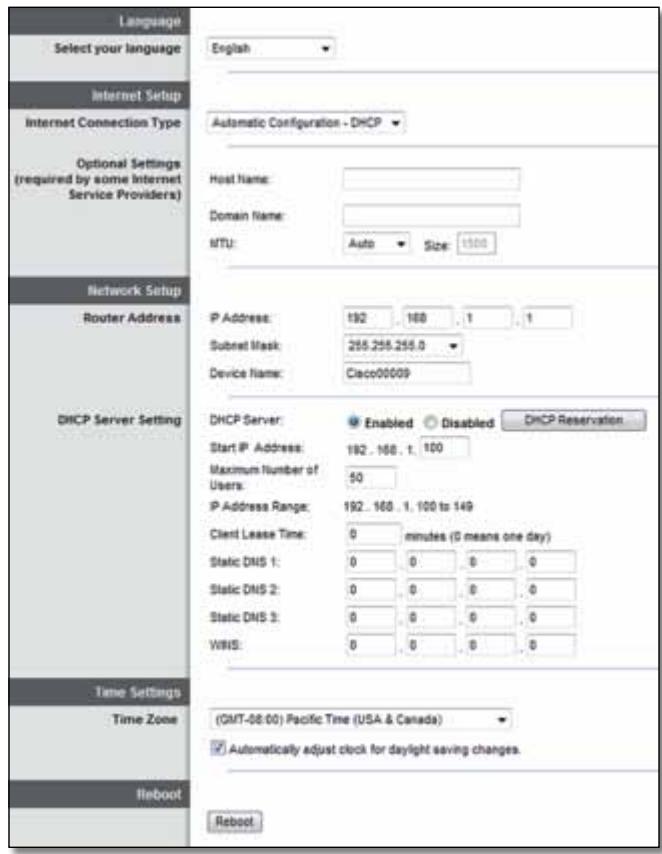
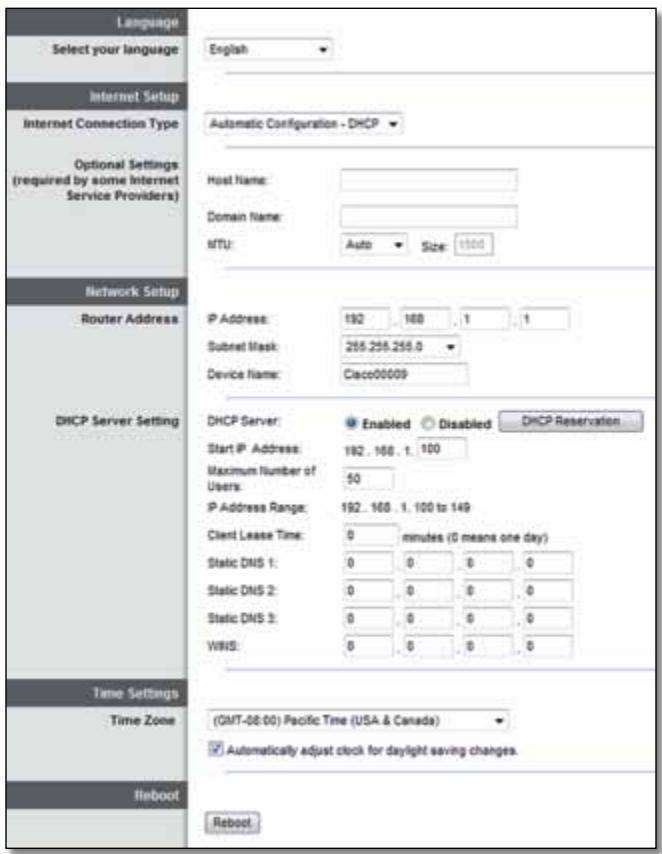
Language
Select your language To use a different language, select one from the dropdown menu. The language of the browser-based utility will change five seconds after you select another language.
Internet Setup
The Internet Setup section configures the router to your Internet connection. Most of this information can be obtained through your Internet Service Provider (ISP).
Internet Connection Type
Select the type of Internet connection your ISP provides from the drop-down menu. The available types are:
Automatic Configuration - DHCP
Static IP
- PPPoE
PPTP
L2TP
- Telstra Cable
Automatic Configuration - DHCP
The default Internet Connection Type is Automatic Configuration - DHCP (Dynamic Host Configuration Protocol). Keep the default only if your ISP supports DHCP or if you connect using a dynamic IP address. (This option usually applies to cable connections.)
Static IP
If you are required to use a fixed IP address to connect to the Internet, select Static IP.
PPPoE
If you have a DSL connection, check whether your ISP uses Point-to-Point Protocol over Ethernet (PPPoE). If so, select PPPoE.
PPTP
Point-to-Point Tunneling Protocol (PPTP) is a service that generally applies to connections in Europe. If your PPTP connection supports DHCP or a dynamic IP address, then select Obtain an IP Address Automatically. If you are required to use a fixed IP address to connect to the Internet, then select Specify an IP Address and configure the options below.
L2TP
Layer 2 Tunneling Protocol (L2TP) is a service that generally applies to connections in Israel.
Telstra Cable
Telstra Cable is a service that generally applies to connections in Australia.
Connect on Demand or Keep Alive
The Connect on Demand and Keep Alive options let you choose whether the router connects to the Internet only as needed (useful if your ISP charges for connect time), or if the router should always be connected. Select the appropriate option.
Wireless > Basic Wireless Settings
The basic settings for wireless networking are set on this screen.
NOTE
After you set up the wireless network(s), set up the wireless security settings.
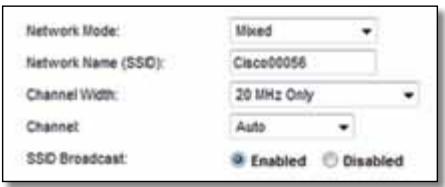
Wireless Settings
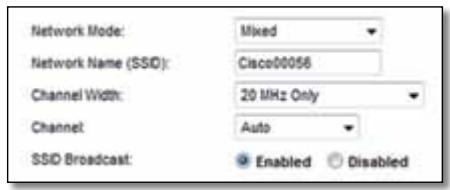
Network Mode Select the wireless standards your network will support.
- Mixed If you have Wireless-N (2.4 GHz), Wireless-G, and Wireless-B devices in your network, keep the default, Mixed.
- Wireless-B/G Only If you have both Wireless-B and Wireless-G (2.4 GHz) devices in your network, select Wireless-B/G Only.
- Wireless-B Only If you have only Wireless-B devices, select Wireless-B Only.
- Wireless-G Only If you have only Wireless-G devices, select Wireless-G Only.
- Wireless-N Only If you have only Wireless-N (2.4 GHz) devices, select Wireless-N Only.
- Disabled If you have no Wireless-B, Wireless-G, and Wireless-N (2.4 GHz) devices in your network, select Disabled.
NOTE
If you have a dual-band router, you can select Mixed, Wireless-A Only, Wireless-N Only, or Disabled for the 5 GHz band.
If you are not sure which mode to use, keep the default, Mixed.
Network Name (SSID) The Service Set Identifier (SSID) is the network name shared by all devices in a wireless network. It is case-sensitive and must not exceed 32 keyboard characters. The default is Cisco followed by the last 5 digits of the router's serial number, which is found on the bottom of the router. If you used the setup software for installation, then the default Network Name is changed to an easy-to-remember name.
NOTE
If you restore the router's factory default settings (by pressing the Reset button or using the Administration > Factory Defaults screen), the Network Name will return to its default value. Change the Network Name back to its original name, or you will have to reconnect all devices on your wireless network to the new network name.
Channel Width For best performance in a network using Wireless-B, Wireless-G and Wireless-N (2.4 GHz) devices, select Auto (20 MHz or 40 MHz). For a channel width of 20 MHz, keep the default, 20 MHz only.
Channel Select the channel from the drop-down list for Wireless-B, Wireless-G, and Wireless-N (2.4 GHz) networking. If you are not sure which channel to select, then keep the default, Auto.
SSID Broadcast When wireless clients survey the local area for wireless networks to associate with, they will detect the SSID broadcast by the router. To broadcast the router's SSID, keep the default, Enabled. If you do not want to broadcast the router's SSID, then select Disabled.
Wireless Security
Wireless > Wireless Security
The wireless security settings configure the security of your wireless network(s). The router supports the following wireless security options: WPA2/WPA Mixed Mode, WPA2 Personal, WPA Personal, WPA2/WPA Enterprise Mixed Mode, WPA2 Enterprise, WPA Enterprise, WEP, and RADIUS. (WPA stands for Wi-Fi Protected Access. WEP stands for Wireless Equivalent Privacy. RADIUS stands for Remote Authentication Dial-In User Service.)
Personal options
| Security Option | Strength |
| WPA2 Personal | Strongest |
| WPA2/WPA Mixed Mode | WPA2: Strongest WPA: Strong |
| WPA Personal | Strong |
| WEP | Basic |
Office options
The office options are available for networks that use a RADIUS server for authentication. The office options are stronger than the personal options because WPA2 or WPA provides encryption while RADIUS provides authentication.
| Security Option | Strength |
| WPA2 Enterprise | Strongest |
| WPA2/WPA Enterprise Mixed Mode | WPA2: Strongest WPA: Strong |
| WPA Enterprise | Strong |
| RADIUS | Basic |
Option settings
WPA2/WPA Mixed Mode, WPA2 Personal, WPA Personal
NOTES
If you select WPA2/WPA Mixed Mode as your Security Mode, each device in your wireless network MUST use WPA2/WPA and the same passphrase.
If you select WPA2 Personal as your Security Mode, each device in your wireless network MUST use WPA2 Personal and the same passphrase.
If you select WPA Personal as your Security Mode, each device in your wireless network MUST use WPA Personal and the same passphrase.
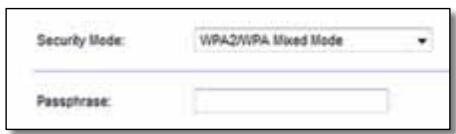
Passphrase Enter a passphrase of 8-63 characters. The default is password. If you used the setup software for installation, then the default is changed to a unique passphrase, which you can find by running Cisco Connect, then clicking Router settings.
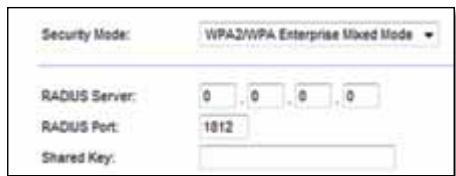
WPA2/WPA Enterprise Mixed Mode, WPA2 Enterprise, WPA Enterprise
These option is used in coordination with a RADIUS server. (These should only be used when a RADIUS server is connected to the router.)
NOTES
If you select WPA2/WPA Enterprise Mixed Mode as your Security Mode, each device in your wireless network MUST use WPA2/WPA Enterprise and the same shared key.
If you select WPA2 Enterprise as your Security Mode, each device in your wireless network MUST use WPA2 Enterprise and the same shared key.
If you select WPA Enterprise as your Security Mode, each device in your wireless network MUST use WPA Enterprise and the same shared key.
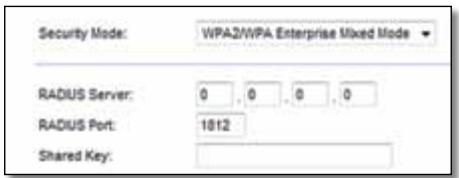
RADIUS Server Enter the IP address of the RADIUS server.
RADIUS Port Enter the port number of the RADIUS server. The default is 1812.
Shared Key Enter the key shared between the router and the server.
WEP
WEP is a basic encryption method, which is not as secure as WPA.
NOTE:
If you select WEP as your Security Mode, each device in your wireless network MUST use WEP and the same encryption and shared key.
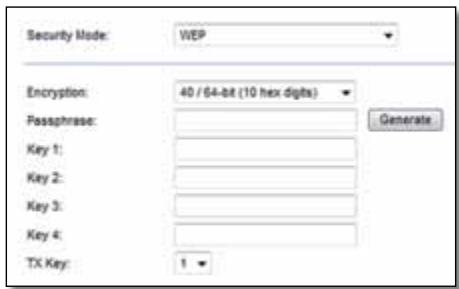
Encryption Select a level of WEP encryption, (40/64-bit 10 hex digits) or 104/128-bit (26 hex digits). The default is 40/64-bit (10 hex digits).
Passphrase Enter a passphrase to automatically generate WEP keys. Then click Generate.
Key 1-4 If you did not enter a passphrase, enter the WEP key(s) manually.
TX Key Select a default TX (Transmit) Key to use. The default is 1.
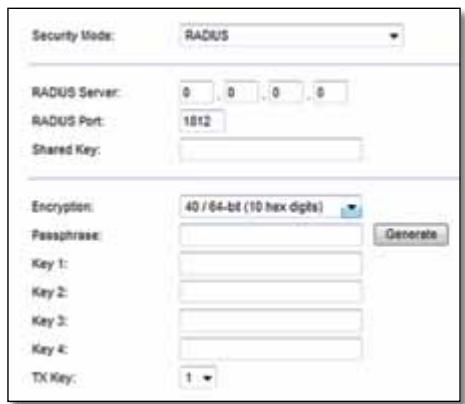
RADIUS
This option features WEP used in coordination with a RADIUS server. (This should only be used when a RADIUS server is connected to the router.)
NOTE:
If you select RADIUS as your Security Mode, each device in your wireless network MUST use RADIUS and the same encryption and shared key.

RADIUS Server Enter the IP address of the RADIUS server.
RADIUS Port Enter the port number of the RADIUS server. The default is 1812.
Shared Secret Enter the key shared between the router and the server.
Encryption Select a level of WEP encryption, (40/64-bit 10 hex digits) or 104/128-bit (26 hex digits). The default is 40/64-bit (10 hex digits).
Passphrase Enter a passphrase to automatically generate WEP keys. Then click Generate.
Key 1-4 If you did not enter a passphrase, enter the WEP key(s) manually.
TX Key Select a default TX (Transmit) Key to use. The default is 1.
Disabled
If you choose to disable wireless security, you will be informed that wireless security is disabled when you first attempt to access the Internet. You will given the option to enable wireless security, or confirm that you understand the risks but still wish to proceed without wireless security.

Troubleshooting
This chapter can help you solve common setup issues and connect to the Internet. Your router's CD includes Cisco Connect, the router setup software that makes it easy to connect network devices, change router settings, control guest access, enable parental controls, and connect to the Internet. Cisco Connect is also installed onto your computer during setup. If Cisco Connect is prevented from completing the setup, this chapter will guide you through finding solutions.
You can find more help from our award-winning customer support at linksys.com/support.
How to run Cisco Connect after setup
When you run the setup CD, Cisco Connect is automatically installed onto your computer. You can then use Cisco Connect to easily manage your network.
To start Cisco Connect on a Windows computer:
- Click Start, All Programs, then click Cisco Connect.

The Cisco Connect main menu opens.
To start Cisco Connect on a Mac OS X computer:
- Open Finder and click Applications in the left panel.

- Double-click the Cisco Connect icon.

The Cisco Connect main menu opens.
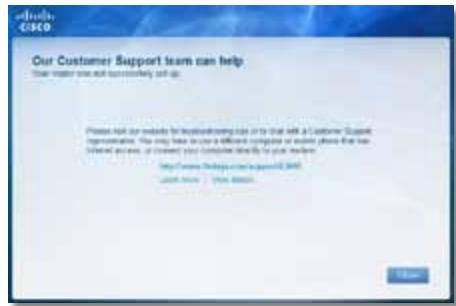
Your router was not successfully set up

If Cisco Connect did not complete the setup, you can try the following:
- Press and hold the Reset button on your router with a paperclip or pin for 10-15 seconds, then run the Setup program again on the router's CD.


Your router's appearance may vary
- Temporarily disable your computer's firewall (see the security software's instructions for help), then run the Setup program again on the router's CD.
- If you have another computer, use that computer to run the Setup program again on the router's CD.
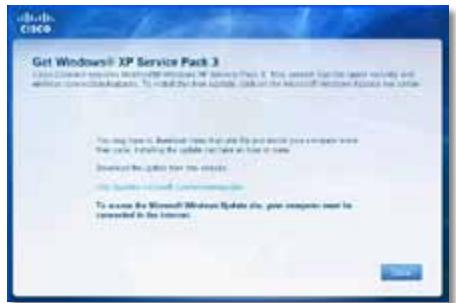
Get Windows XP Service Pack 3 message
On Windows XP computers, Cisco Connect requires Service Pack 3 in order to work. If you receive a "Get Windows Service Pack 3" message when setting up your router for the first time, follow these troubleshooting steps.
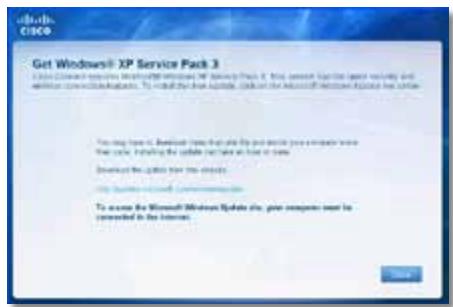
If the currently installed Service Pack is older than version 3, you need to download and install Service Pack 3.
TIP
To temporarily connect to the Internet and download the required Service Pack, you can use the included Ethernet cable to connect your computer directly to your modem.
To install Service Pack 3:
- Click the link in the Cisco Connect error message or connect to the Microsoft Update website (update.microsoft.com/windowsupdate).
- Follow the instructions on the website or contact Microsoft if you need further help.
- After downloading and installing Service Pack 3, run the Setup program on your router's CD.
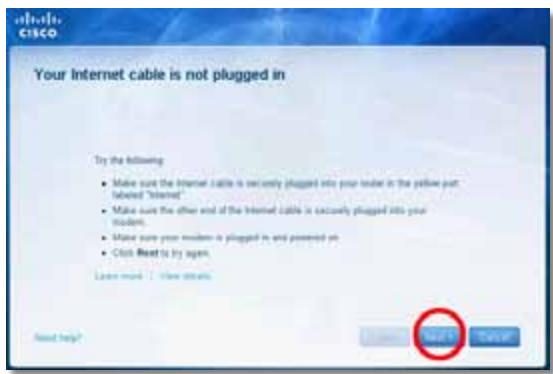
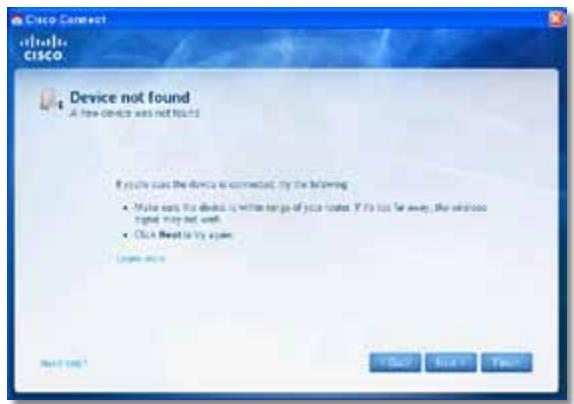
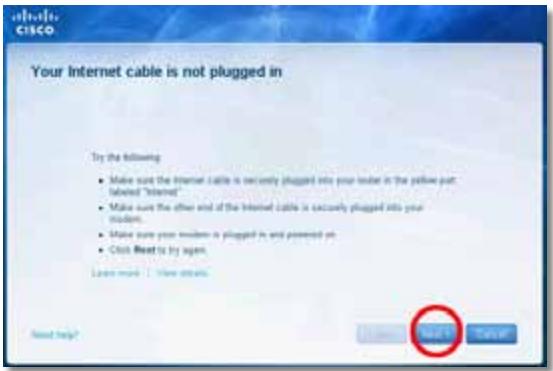
Your Internet cable is not plugged in
message
If you get a "Your Internet cable is not plugged in" message when trying to set up your router, follow these troubleshooting steps.
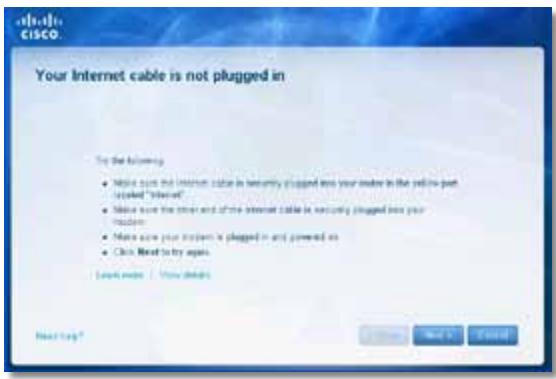
To fix the problem:
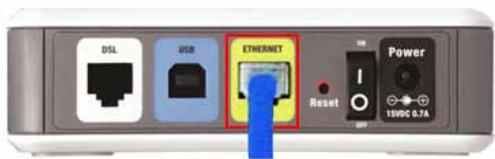
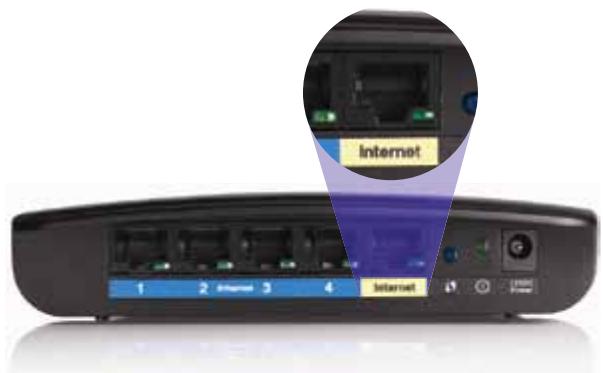
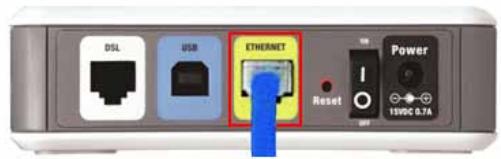
- Make sure that an Ethernet or Internet cable (or a cable like the one supplied with your router) is securely connected to the yellow Internet port on the back of the router and to the appropriate port on your modem. This port on the modem is usually labeled Ethernet, but may be named Internet or WAN.
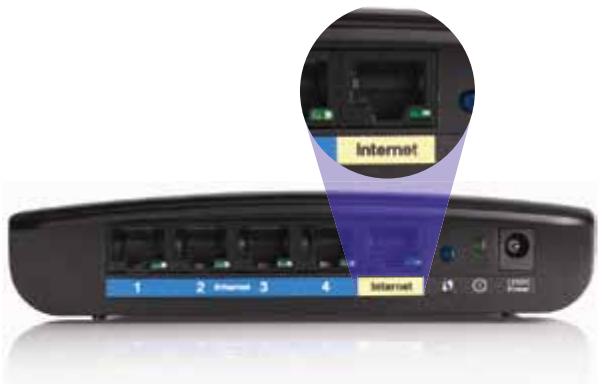
Back view of router

Back view of cable modem
Back view of DSL modem
- Make sure that your modem is connected to power and is turned on. If it has a power switch, make sure that it is set to the ON or I position.
- If your Internet service is cable, verify that the cable modem's CABLE port is connected to the coaxial cable provided by your ISP.
Or, if your Internet service is DSL, make sure that the DSL phone line is connected to the modem's DSL port.
- If your computer was previously connected to your modem with a USB cable, disconnect the USB cable.
- Return to the Cisco Connect window and click Next to try again. If the window has already been closed, run the Setup program again on the router's CD.
Cannot access your router message
If you cannot access your router because your computer is not connected to your network, follow these troubleshooting steps.
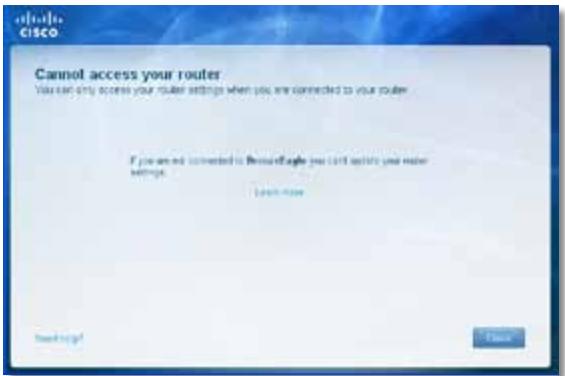
To access your router, you must be connected to your own network. If you currently have wireless Internet access, the problem may be that you have accidentally connected to a different wireless network.
To fix the problem on Windows computers:
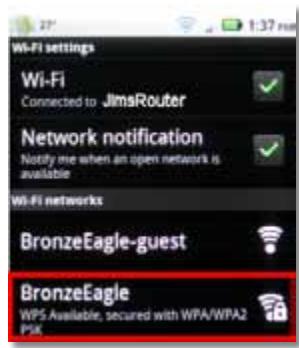
- On your Windows desktop, right-click the wireless icon in the system tray.

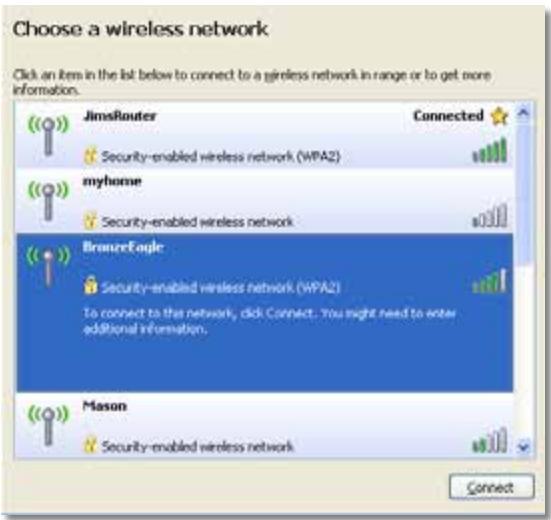
- Click View Available Wireless Networks. A list of available networks appears.
| Disable Status Repair |
| View Available Wireless Networks |
| Change Windows Firewall settings |
| Open Network Connections |
- Click your own network name, then click Connect. In the example below, the computer was connected to another wireless network named JimsRouter. The name of the Linksys E-Series network, BronzeEagle in this example, is shown selected.

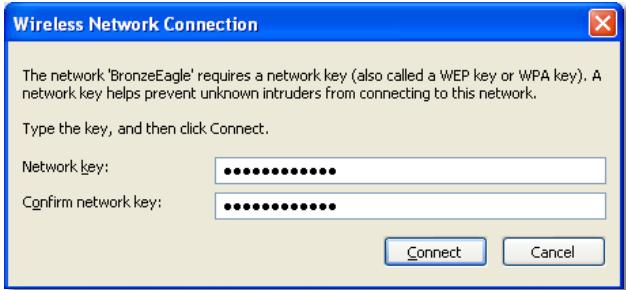
- If you are prompted to enter a network key, type your password (Security Key) into the Network key and Confirm network key fields, then click Connect.
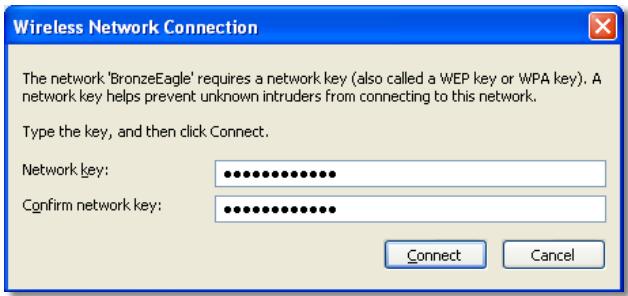
Your computer connects to the network, and you should now be able to access the router.
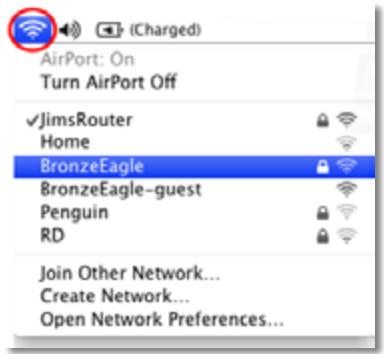
To fix the problem on Mac computers:
- In the menu bar across the top of the screen, click the AirPort icon. A list of wireless networks appears. Cisco Connect has automatically assigned your network a name.
In the example below, the computer was connected to another wireless network named JimsRouter. The name of the Linksys E-Series network, BronzeEagle in this example, is shown selected.
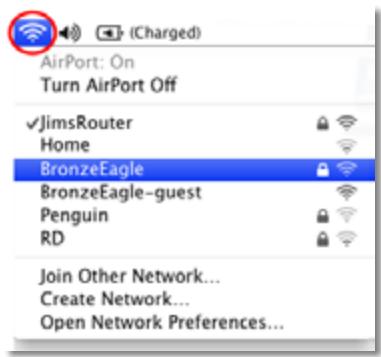
- Click the wireless network name of your Linksys E-Series router (BronzeEagle in the example).
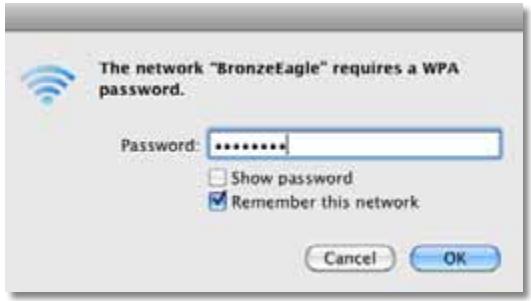
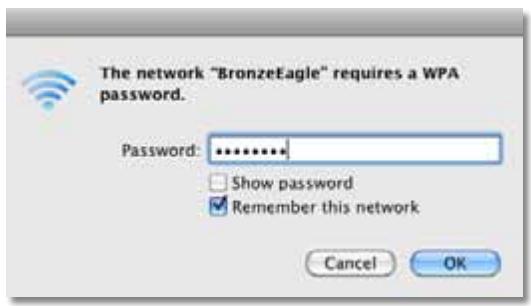
- Type your wireless network password (Security Key) into the Password field, then click OK.
Device not found message
If you get a "Device not found" message when trying to connect a network device (such as an iPhone, iPod, or smartphone), follow these troubleshooting steps.
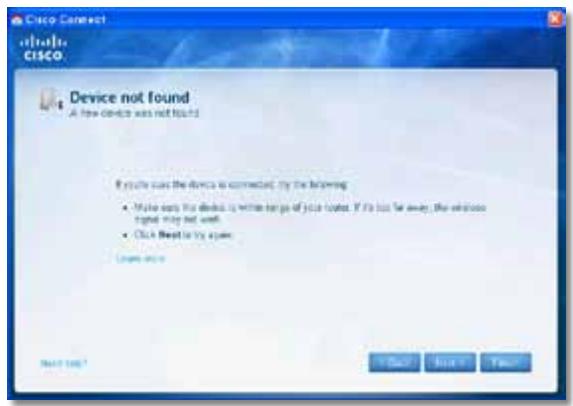
TIP
For a stronger signal during initial setup, move your wireless devices near your router. Long distances make it harder for the router to detect the devices.
To fix the problem:
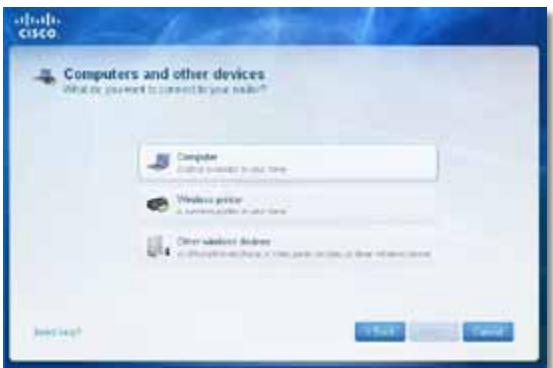
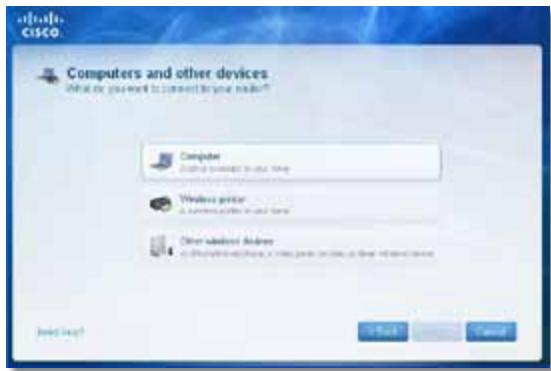
- Run Cisco Connect.
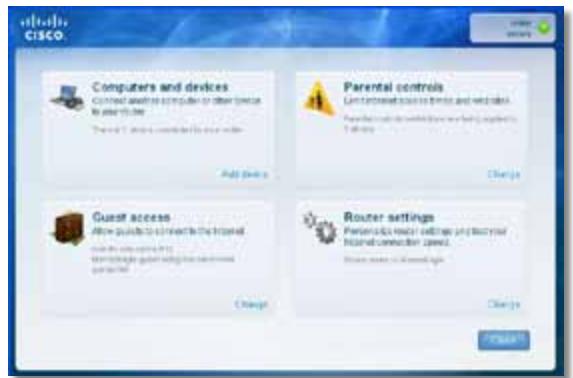
- Click Computers and devices. The Computers and other devices window appears.
- Click Other Wireless devices.

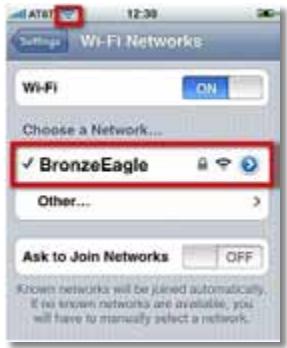
- Enable your wireless network device's Wi-Fi connection, then search for your wireless network name. See your device documentation for help.
NOTE
Your wireless device must support WPA/WPA2.
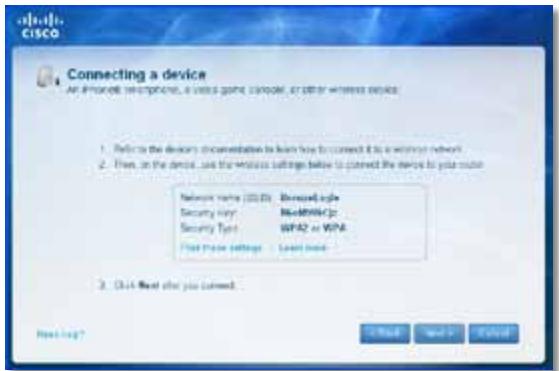
- On the wireless network device, select the network name of your router and enter the password (Security Key).
- In Cisco Connect, click Next.
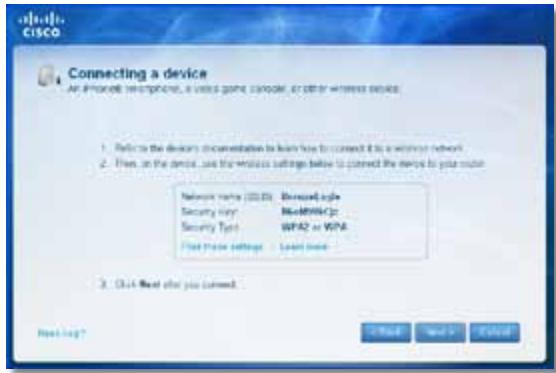
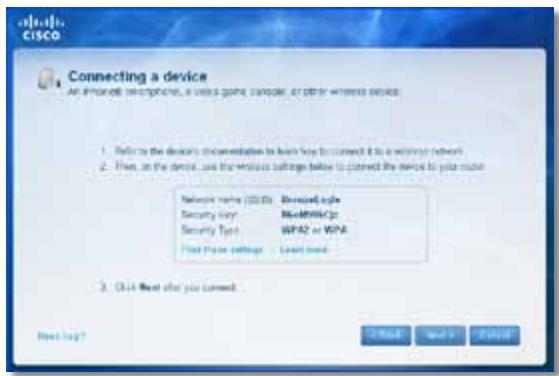
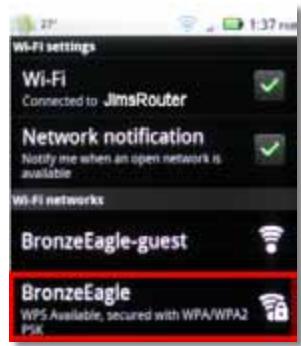
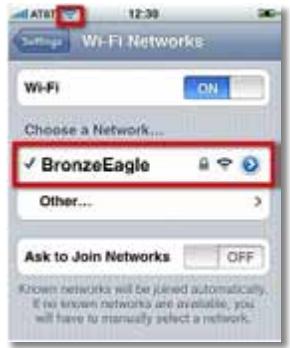
Example: On your Smartphone or other wireless device, locate the WiFi menu and search for available wireless networks. In this example, using the network information provided by Cisco Connect shown in the previous screen, click BronzeEagle.
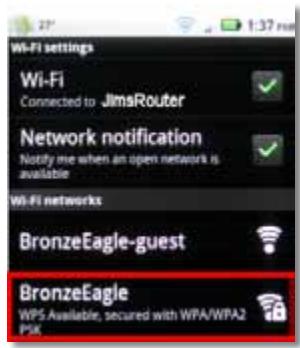
Android
iPhone
- Enter the password (Security Key) provided by Cisco Connect. In this example, the security key is B6eM9UkCjz.
NOTE
The password is case sensitive. Make sure that you enter letters in the correct case.
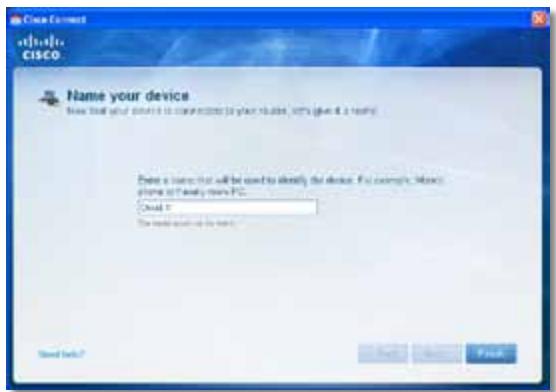
- When your wireless device is successfully connected to your wireless network, enter a name for the device in Cisco Connect, then click Finish.

Specifications
Linksys E900
Model Name Linksys E900
Description Wireless-N Router
Model Number E900
Standards 802.11n, 802.11g, 802.11b, 802.3u
Ports Power, Internet, and Ethernet (1-4)
Reset, Wi-Fi Protected SetupTM
LEDs Power/Wi-Fi Protected Setup, Internet, Ethernet (1-4)
Cabling Type CAT 5e
Transmitted Power 802.11n (20 MHz):
15.0 ± 1.5dBm @ CH6, MCS 0~4, MCS 8~12
13.5 ± 1.5dBm @ CH6, MCS 5~7, MCS 13~15
802.11n (40 MHz):
14.0 ± 1.5dBm @ CH6, MCS 0~4, MCS 8~12
13.5 ± 1.5dBm @ CH6, MCS 5~7, MCS 13~15
802.11g:
14.5 ± 1.5dBm @ CH6 , all rates
802.11b:
16.5 ± 1.5dBm @ CH6 , all rates
Antenna Gain ≤ 2.0dBi,≤ 4.0dBi (2 antennas)
UPnP Supported
Wireless Security Wi-Fi Protected Access™ 2 (WPA2), WEP, wireless MAC filtering
Security Key Bits Up to 128-bit encryption
Environmental
Dimensions 188.7 × 151.7 × 31.2 ~mm
(7.43^ × 5.97^ × 1.23^ )
Unit Weight 202.0g (7.13 oz.)
Power 12V, 0.5A
Certifications FCC, UL/cUL, ICES-003, RSS210, CE, Wi-Fi (IEEE 802.11b/g/n), WPA2™, WMM®, Wi-Fi Protected
Setup,Windows7
Operating Temp. 0 to 40^ (32 to 104^ )
Storage Temp. -20 to 60^ (-4 to 140^ )
Operating Humidity 10 to 80% non-condensing
Storage Humidity 5 to 90% non-condensing
NOTES
For regulatory, warranty, and safety information, see the CD that came with your router or go to Linksys.com/support.
Specifications are subject to change without notice.
Maximum performance derived from IEEE Standard 802.11 specifications. Actual performance can vary, including lower wireless network capacity, data throughput rate, range and coverage. Performance depends on many factors, conditions and variables, including distance from the access point, volume of network traffic, building materials and construction, operating system used, mix of wireless products used, interference and other adverse conditions.
Linksys E1200
Model Name Linksys E1200
Description Wireless-N Router
Model Number E1200
Standards 802.11n, 802.11g, 802.11b, 802.3u
Ports Power, Internet, and Ethernet (1-4)
Reset, Wi-Fi Protected SetupTM
LEDs Power/Wi-Fi Protected Setup, Internet, Ethernet (1-4)
Cabling Type CAT 5e
Transmitted Power 802.11n (20 MHz):
15.0 ± 1.5dBm @ CH6, MCS 0~4, MCS 8~12
13.5 ± 1.5dBm @ CH6, MCS 5~7, MCS 13~15
802.11n (40 MHz):
14.0 ± 1.5dBm @ CH6, MCS 0~4, MCS 8~12
13.5 ± 1.5dBm @ CH6, MCS 5~7, MCS 13~15
802.11g:
14.5 ± 1.5dBm @ CH6 , all rates
802.11b:
16.5 ± 1.5dBm @ CH6 , all rates
Antenna Gain V1: ≤2.5 dBi, ≤4.0 dBi (2 antennas)
V2: ≤ 2.0 dBi, ≤ 4.0 dBi (2 antennas)
UPnP Supported
Wireless Security Wi-Fi Protected Access™ 2 (WPA2),
WEP, wireless MAC filtering
Security Key Bits Up to 128-bit encryption
Environmental
Dimensions 188.7 × 151.7 × 31.2 ~mm
(7.43^ × 5.97^ × 1.23^ )
Unit Weight V1:252.7g (8.91 oz.)
V2: 202.0g (7.13 oz.)
Power 12V,0.5A
Certifications FCC, UL/cUL, ICES-003, RSS210,
CE, Wi-Fi (IEEE 802.11b/g/n),
WPA2™, WMM®, Wi-Fi Protected
Setup,Windows7
Operating Temp. 0 to 40^ (32 to 104^ )
Storage Temp. -20 to 60^ (-4 to 140^ )
Operating Humidity 10 to 80% non-condensing
Storage Humidity 5 to 90% non-condensing
NOTES
For regulatory, warranty, and safety information, see the CD that came with your router or go to Linksys.com/support.
Specifications are subject to change without notice.
Maximum performance derived from IEEE Standard 802.11 specifications. Actual performance can vary, including lower wireless network capacity, data throughput rate, range and coverage. Performance depends on many factors, conditions and variables, including distance from the access point, volume of network traffic, building materials and construction, operating system used, mix of wireless products used, interference and other adverse conditions.
Linksys E1500
| Model Name | Linksys E1500 |
| Description | Wireless-N Router with SpeedBoost |
| Model Number | E1500 |
| Standards | 802.11n, 802.11g, 802.11b, 802.3u |
| Ports | Power, Internet, and Ethernet (1-4) |
| Buttons | Reset, Wi-Fi Protected Setup |
| LEDs | Power/Wi-Fi Protected Setup, Internet, Ethernet (1-4) |
| Cabling Type | CAT 5e |
| Transmitted Power | 802.11n (20 MHz): 17.0 ± 1.5 dBm @ CH6, MCS 0~4, MCS 8~12 16.0 ± 1.5 dBm @ CH6, MCS 5~7, MCS 13~15 802.11n (40 MHz): 15.5 ± 1.5 dBm @ CH6, MCS 0~4, MCS 8~12 14.0 ± 1.5 dBm @ CH6, MCS 5~7, MCS 13~15 802.11g: 18.0 ± 1.5 dBm @ CH6, 6 Mbps 17.0 ± 1.5 dBm @ CH6, 54 Mbps 802.11b: 18.0 ± 1.5 dBm @ CH6, all rates |
| Antenna Gain | ≤3.0 dBi, ≤4.0 dBi, ≤4.5 dBi (3 antennas) |
| UPnP | Supported |
| Wireless Security | Wi-Fi Protected Access 2 (WPA2), WEP, wireless MAC filtering |
| Security Key Bits | Up to 128-bit encryption |
Environmental
| Dimensions | 188.7 × 151.7 × 31.2 mm (7.43″ × 5.97″ × 1.23″) |
| Unit Weight | 254.1g (8.96 oz.) |
| Power | 12V, 0.5A |
| Certifications | FCC, UL/cUL, ICES-003, RSS210, CE, Wi-Fi (IEEE 802.11b/g/n), WPA2, WMM, Wi-Fi Protected Setup, Windows 7 |
| Operating Temp. | 0 to 40°C (32 to 104°F) |
| Storage Temp. | -20 to 60°C (-4 to 140°F) |
| Operating Humidity | 10 to 80% non-condensing |
| Storage Humidity | 5 to 90% non-condensing |
NOTES
For regulatory, warranty, and safety information, see the CD that came with your router or go to Linksys.com/support.
Specifications are subject to change without notice.
Maximum performance derived from IEEE Standard 802.11 specifications. Actual performance can vary, including lower wireless network capacity, data throughput rate, range and coverage. Performance depends on many factors, conditions and variables, including distance from the access point, volume of network traffic, building materials and construction, operating system used, mix of wireless products used, interference and other adverse conditions.
Linksys E2500
| Model Name | Linksys E2500 |
| Description | Advanced Dual-Band N Router |
| Model Number | E2500 |
| Standards | 802.11n, 802.11a, 802.11g, 802.11b, 802.3, 802.3u, 802.3ab |
| # of Antennas | 4 total, 2 internal antennas per each 2.4 GHz & 5 GHz radio band |
| Detachable (y/n) | No |
| Modulation | 802.11b: CCK, QPSK, BPSK 802.11g: OFDM 802.11a: OFDM 802.11n: BPSK, QPSK, 16-QAM, 64-QAM |
| Receive Sensitivity (Typical) | 2.4 GHz 802.11b: -87 dBm @ 11 Mbps 802.11g: -70 dBm @ 54 Mbps 802.11n 20 MHz: -70 dBm @ MCS15 802.11n 40 MHz: -66 dBm @ MCS15 5 GHz 802.11a: -70 dBm @ 54 Mbps 802.11n 20 MHz: -66 dBm @ MCS23 802.11n 40 MHz: -62 dBm @ MCS23 |
| Antenna Gain in dBi | 2.4 GHz: Antenna 1 (right rear): ≤2.94 dBi Antenna 2 (front right): ≤3.78 dBi 5 GHz: Antenna 1 (right front): ≤5.86 dBi Antenna 2 (front left): ≤4.88 dBi |
| UPnP | Supported |
| Security features | WEP, WPA, WPA2 |
| Security key bits | Up to 128-bit encryption |
Environmental
| Dimensions | 225 x 35 x 180 mm (8.86" x 1.38" x 7.09") |
| Unit Weight | 452 g (15.94 oz) |
| Power | 12V, 1A |
| Certifications | FCC, IC, CE, Wi-Fi A/B/G/N |
| Operating Temp. | 0 to 40°C (32 to 104°F) |
| Storage Temp. | -20 to 60°C (-4 to 140°F) |
| Operating Humidity | 10 to 80%, relative humidity non-condensing |
| Storage Humidity | 5 to 90% non-condensing |
NOTES
For regulatory, warranty, and safety information, see the CD that came with your router or go to Linksys.com/support.
Specifications are subject to change without notice.
Maximum performance derived from IEEE Standard 802.11 specifications. Actual performance can vary, including lower wireless network capacity, data throughput rate, range and coverage. Performance depends on many factors, conditions and variables, including distance from the access point, volume of network traffic, building materials and construction, operating system used, mix of wireless products used, interference and other adverse conditions.
Linksys E3200
| Model Name | Linksys E3200 |
| Description | Maximum Performance Dual-Band N Router |
| Model Number | E3200 |
| # of Antennas | 6 total, 3 internal antennas per each 2.4 GHz & 5 GHz radio band |
| Detachable (y/n) | No |
| Switch Port Speed | 10/100/1000 Mbps |
| Ports | Internet, Ethernet (1-4), USB, Power |
| Buttons | Reset, Wi-Fi Protected Setup |
| LEDs | Power, Ethernet (1-4) |
| Modulation | 802.11b: CCK, QPSK, BPSK 802.11g: OFDM 802.11a: OFDM 802.11n: BPSK, QPSK, 16-QAM, 64-QAM |
| Receive Sensitivity | 2.4 GHz 802.11b: -87 dBm @ 11 Mbps (Typical) 802.11g: -77 dBm @ 54 Mbps (Typical) 802.11n (20 MHz): -71 dBm @ MCS15 (Typical) 802.11n (40 MHz): -68 dBm @ MCS15 (Typical) 5 GHz 802.11a: -75 dBm @ 54 Mbps (Typical) 802.11n 20 MHz: -70 dBm @ MCS15 (Typical) 802.11n 40 MHz: -67 dBm @ MCS15 (Typical) |
| Antenna Gain | 2.4 GHz (Dipole Antennas) Antenna 1 ≤ 3 dBi Antenna 2 ≤ 4 dBi Antenna 3 ≤ 4 dBi 5 GHz (Dipole Antennas) Antenna 1 ≤ 4.5 dBi Antenna 2 ≤ 4.5 dBi Antenna 3 ≤ 4.5 dBi |
| UPnP | Supported |
| Security features | WEP, WPA, WPA2 |
| Security key bits | Up to 128-bit encryption |
Storage File System Support FAT, and NTFS, and HFS+
Environmental
| Dimensions | 6.69" x 0.98" x 7.48" (170 x 25 x 190 mm) |
| Unit Weight | 7.62 oz (216 g) |
| Power | 12V, 2A |
| Certifications | FCC, IC, CE, Wi-Fi A/B/G/N |
| Operating Temp. | 32 to 95°F (0 to 35°C) |
| Storage Temp. | -4 to 140°F (-20 to 60°C) |
| Operating Humidity | 10 to 80% relative humidifi- non-condensing |
| Storage Humidity | 5 to 90% non-condensing |
NOTES
For regulatory, warranty, and safety information, see the CD that came with your router or go to Linksys.com/support.
Specifications are subject to change without notice.
Maximum performance derived from IEEE Standard 802.11 specifications. Actual performance can vary, including lower wireless network capacity, data throughput rate, range and coverage. Performance depends on many factors, conditions and variables, including distance from the access point, volume of network traffic, building materials and construction, operating system used, mix of wireless products used, interference and other adverse conditions.
Linksys E4200
| Model Name | Linksys E4200 |
| Description | Maximum Performance Wireless-N Router |
| Model Number | E4200 |
| Standards | 802.11n, 802.11a, 802.11g, 802.11b, 802.3, 802.3u, 802.3ab |
| Radio Frequency | 2.4 and 5 GHz |
| Switch Port Speed | 10/100/1000 Mbps (Gigabit Ethernet) |
| Ports | Power, USB, Internet, Ethernet (1-4) |
| Buttons | Reset, Wi-Fi Protected Setup |
| LEDs | Top panel: Power Back panel: Internet, Ethernet (1-4) |
| Number of Antennas | 6 total, 3 internal antennas per each 2.4 GHz and 5 GHz radio band |
| Detachable (y/n) | No |
| Modulations | 802.11b: CCK, QPSK, BPSK 802.11g: OFDM 802.11a: OFDM 802.11n: BPSK, QPSK, 16-QAM, 64-QAM |
| Receive Sensitivity | 2.4 GHz 802.11b: -87 dBm @ 11 Mbps (Typical) 802.11g: -77 dBm @ 54 Mbps (Typical) 802.11n: 20 MHz: -70 dBm @ MCS23 (Typic) 802.11n: 40 MHz: -66 dBm @ MCS23 (Typic) 5 GHz 802.11a: -74 dBm @ 54 Mbps (Typical) 802.11n: 20 MHz: -67 dBm @ MCS23 (Typic) 802.11n: 40 MHz: -64 dBm @ MCS23 (Typic) |
| Antenna Gain in dBi | 2.4 GHz (3 internal PIFA antennas) PIFA 1 ≤ 2.5 dBi (Right) PIFA 2 ≤ 2.31 dBi (Front) PIFA 3 ≤ 2.99 dBi (Left) 5 GHz (3 internal PIFA antennas) PIFA 1 ≤ 3.84 dBi (Right) PIFA 2 ≤ 4.19 dBi (Front) PIFA 3 ≤ 3.49 dBi (Left) |
| Supported File Systems | |
| for Storage Device | FAT32, NTFS, and HSF+ |
| UPnP | Supported |
| Security Features | WEP, WPA, WPA2 |
| Security Key Bits | Up to 128-bit encryption |
| Environmental | |
| Dimensions | 8.86" x 0.98" x 6.30" (225 x 25 x 160 mm) |
| Unit Weight | 12.7 oz (0.36 g) |
| Power | 12V, 2A |
| Certifications | FCC, IC, CE, Wi-Fi a/b/g/n, Windows 7, DLNA |
| Operating Temp. | 32 to 104°F (0 to 40°C) |
| Storage Temp. | -4 to 140°F (-20 to 60°C) |
| Operating Humidity | 10 to 80% relative humid non-condensing |
| Storage Humidity | 5 to 90% non-condensing |
NOTES
For regulatory, warranty, and safety information, see the CD that came with your router or go to Linksys.com/support.
Specifications are subject to change without notice.
Maximum performance derived from IEEE Standard 802.11 specifications. Actual performance can vary, including lower wireless network capacity, data throughput rate, range and coverage. Performance depends on many factors, conditions and variables, including distance from the access point, volume of network traffic, building materials and construction, operating system used, mix of wireless products used, interference and other adverse conditions.
Visit linksys.com/support for award-winning technical support

Cisco, the Cisco logo, and Linksys are trademarks or registered trademarks of Cisco and/or its affiliates in the United States and other countries. A listing of Cisco's trademarks can be found at www.cisco.com/go/trademarks. All other trademarks mentioned in this document are the property of their respective owners.

Serie E
Contedio
- Execute Cisco Connect.
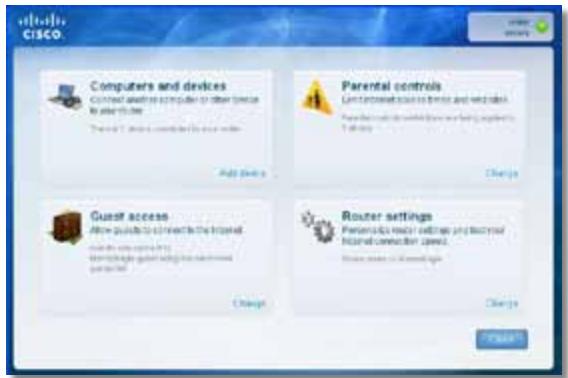
WPA2/WPA Mixed Mode (Modo WPA2/WPA mixto), WPA2 Personal y WPA Personal
NOTAS
- Execute Cisco Connect.

- Sezione Computers and devices (Computadoras y dispositivos). Aparece la pantalla Computers and other devices (Computadoras yotros dispositivos).
- Haga Cli en Other Wireless devices (Otros dispositivos inalábricos).
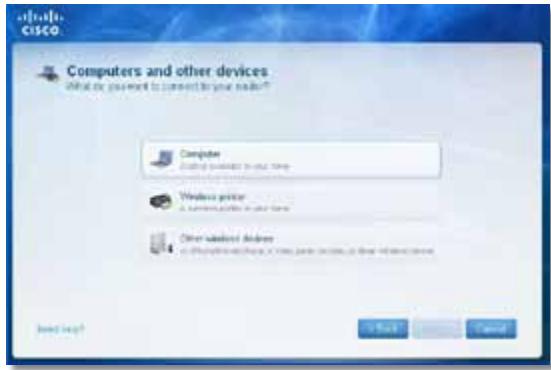
Your Internet cable is not plugged in
WPA2/WPA Mixed Mode, WPA2 Personal, WPA Personal
HUOMAUTUKSIA
WPA2/WPA Enterprise Mixed Mode, WPA2 Enterprise, WPA Enterprise
- Kännista Cisco Connect.

Reset, Wi-Fi Protected SetupTM
Merkkivalot
Virta/Wi-Fi Protected Setup,
Internet, Ethernet (1-4)
Kaapelin tyyppi:
CAT 5e
Lähetysteho
802.11n (20 MHz):
15,0 ± 1,5 dBm @ CH6, MCS 0~4, MCS 8~12
13,5 ± 1,5 dBm @ CH6, MCS 5~7, MCS 13~15
802.11n (40 MHz):
14,0 ± 1,5 dBm @ CH6, MCS 0~4, MCS 8~12
13,5 ± 1,5 dBm @ CH6, MCS 5~7, MCS 13~15
802.11g:
Wi-Fi Protected Access™ 2 (WPA2), WEP,
langaton MAC-suodatus
WPA2TM, WMM®, Wi-Fi Protected
Setup,Windows7
Käytölämpötila
0-40°C (32-104°F)
Sälytyslämpötila
-20-60°C (-4-140°F)
15,0 ± 1,5 dBm @ CH6, MCS 0~4, MCS 8~12
13,5 ± 1,5 dBm @ CH6, MCS 5~7, MCS 13~15
802.11n (40 MHz):
14,0 ± 1,5 dBm @ CH6, MCS 0~4, MCS 8~12
13,5 ± 1,5 dBm @ CH6, MCS 5~7, MCS 13~15
802.11g:
Reset, Wi-Fi Protected Setup
Merkkivalot
Virta/Wi-Fi Protected Setup, Internet, Ethernet (1-4)
Kaapelin typpi:
CAT5e
Lähetysteho
802.11n (20 MHz):
17,0 ± 1,5 dBm @ CH6, MCS 0~4, MCS 8~12
16,0 ± 1,5 dBm @ CH6, MCS 5~7, MCS 13~15
802.11n (40 MHz):
15,5 ± 1,5 dBm @ CH6, MCS 0~4, MCS 8~12
14,0 ± 1,5 dBm @ CH6, MCS 5~7, MCS 13~15
802.11g:
18,0 ± 1,5 dBm @ CH6, 6 Mbps
17,0 ± 1,5 dBm @ CH6, 54 Mbps
802.11b:
18,0 ± 1,5 dBm @ CH6, kaikki nopeudet
Antennivahvistus
≤3,0 dBi, ≤4,0 dBi, ≤4,5 dBi
(3 antenna)
UPnP
Tuettu
Langaton sujoaus
Wi-Fi Protected Access 2 (WPA2), WEP, langaton MAC-suodatus
WPA2, WMM, Wi-Fi Protected
Setup,Windows7
Käyttolampötila
0-40°C (32-104°F)
-20-60°C (-4-140°F)
Sälytyslämpötila
Message Your Internet cable is not plugged in
(VotrecableInternetn'estpasbranche) 13
Message Cannot access your router
Telstra Cable (Câble Telstra)
WPA2/WPA mode mixte, WPA2 personnel, WPA personnel
REMARQUES
- Executez Cisco Connect.

Alimentation / Wi-Fi Protected Setup, Internet, Ethernet (1-4)
Type de câblage
CAT5e
15 ± 1,5 dBm @ CH6, MCS 0~4, MCS 8~12
13,5 ± 1,5 dBm @ CH6, MCS 5~7, MCS 13~15
802.11n (40 MHz):
14 ± 1,5 dBm @ CH6, MCS 0~4, MCS 8~12
13,5 ± 1,5 dBm @ CH6, MCS 5~7, MCS 13~15
802.11g:
WPA2™, WMM,®, Wi-Fi Protected
SetupTM,Windows7
Alimentation / Wi-Fi Protected Setup, Internet, Ethernet (1-4)
Type de cablage
CAT5e
15 ± 1,5 dBm @ CH6, MCS 0~4, MCS 8~12
13,5 ± 1,5 dBm @ CH6, MCS 5~7, MCS 13~15
802.11n (40 MHz):
14 ± 1,5 dBm @ CH6, MCS 0~4, MCS 8~12
13,5 ± 1,5 dBm @ CH6, MCS 5~7, MCS 13~15
802.11g:
WPA2™, WMM,®, Wi-Fi Protected
SetupTM, Windows 7
Alimentation / Wi-Fi Protected Setup, Internet, Ethernet (1-4)
Type de cablage
CAT5e
17± 1,5 dBm @ CH6, MCS 0~4, MCS 8~12
16 ± 1,5 dBm @ CH6, MCS 5~7, MCS 13~15
802.11n (40 MHz) :
15,5 ± 1,5 dBm @ CH6, MCS 0~4, MCS 8~12
14 ± 1,5 dBm @ CH6, MCS 5~7, MCS 13~15
802.11g:
18 ± 1,5 dBm @ CH6, 6 Mbit/s
17 ± 1,5 dBm @ CH6, 54 Mbit/s
802.11b:
18 ± 1,5 dBm @ CH6, tous taux
Gain de I'antenne
≤ 3,0 dBi, ≤ 4 dBi, ≤ 4,5 dBi
(3 antennes)
UPnP
Pris en charge
Sécurité sans fil
Wi-Fi Protected Access 2 (WPA2),
WEP, filtrage MAC sans fil
Configuration binaire
WPA2, WMM, Wi-Fi Protected
Setup,Windows7
Telstra Cable (Câble Telstra)
- Double-cliquez sur I'icone Cisco Connect.
- Executez Cisco Connect.

PIFA 2≤ 3,45 dBi (Avant)
PIFA 3 ≤ 1,96 dBi (Gauge)
5 GHz (3 antennas internes PIFA)
PIFA 1≤ 3,71 dBi (Droite)
PIFA 2≤ 3,60 dBi (Avant)
PIFA 3 ≤ 4,27 dBi (Gauge)
Certifications FCC, IC, CE, Wi-Fi A/B/G/N, Windows 7, DLNA
WPA2/WPA Mixed Mode, WPA2 Personal, WPA Personal
MEGJEGYZESEK
WPA2/WPA Enterprise Mixed Mode, WPA2 Enterprise, WPA Enterprise
Pesan Your Internet cable is not plugged in
(Kabel Internet Anda tidak terhubung). 13
Pesan Cannot access your router
Static IP (IP Statics)
WPA2/WPA Mixed Mode (WPA2/WPA Mode Campuran), WPA2 Personal (WPA2 Pribadi), WPA Personal (WPA Pribadi)
CATATAN
WPA2/WPA Enterprise Mixed Mode (WPA2/WPA Enterprise Mode Campuran), WPA2 Enterprise, WPA Enterprise
- Klik ganda ikon Cisco Connect.

Jika Anda mendapatkan pesan "Your Internet cable is not plugged in" (Kabel Internet Anda tidak terhubung)—that's what I want to do.
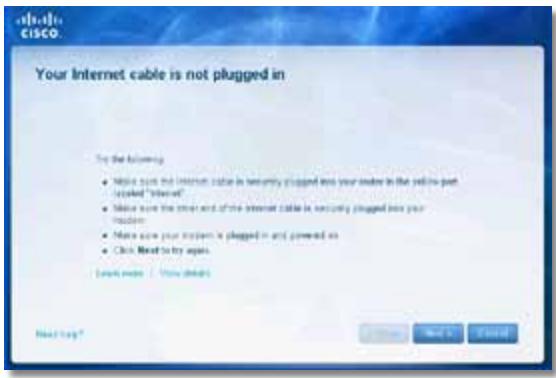
- Jalankan Cisco Connect.

Reset, Wi-Fi Protected Setup™
LED
Daya/Wi-Fi Protected Setup, Internet, Ethernet (1-4)
Jenis Kabel
CAT5e
Daya Transmis
802.11n (20 MHz):
15,0 ± 1,5 dBm @ CH6, MCS 0~4, MCS 8~12
13,5 ± 1,5 dBm @ CH6, MCS 5~7, MCS 13~15
802.11n (40 MHz):
14,0 ± 1,5 dBm @ CH6, MCS 0~4, MCS 8~12
13,5 ± 1,5 dBm @ CH6, MCS 5~7, MCS 13~15
802.11g:
14,5 ± 1,5 dBm @ CH6, semua peringkat
802.11b:
16,5 ± 1,5 dBm @ CH6, semua peringkat
Penguatan Antena
V1: ≤2,5 dBi, ≤4,0 dBi (2 antenna)
V2: ≤2,0 dBi, ≤4,0 dBi (2 antenna)
UPnP
Didukung
Keamanan Nirkabel
Wi-Fi Protected Access™ 2 (WPA2),
WEP, penyaringan MAC nirkabel
Bit Kunci Keananan
Hingga enkripsi 128-bit
Lingkungan
Dimensi
188,7×151,7×31,2 mm
(7,43^ × 5,97^ × 1,23^ )
Berat Unit
V1: 252,7 g (8,91 oz.) V2: 202,0 g (7,13 oz.)
Daya
12V,0,5A
Sertifikasi
FCC, UL/cUL, ICES-003, RSS210,
CE, Wi-Fi (IEEE 802.11b/g/n),
WPA2TM, WMM®, Wi-Fi Protected
Setup,Windows7
Suhu Pengoperasian
Reset, Wi-Fi Protected Setup
LED
Daya/Wi-Fi Protected Setup,
Internet, Ethernet (1-4)
Jenis Kabel
CAT5e
Daya Transmisi
802.11n (20 MHz):
17,0 ± 1,5 dBm @ CH6, MCS 0~4, MCS 8~12
16,0 ± 1,5 dBm @ CH6, MCS 5~7, MCS 13~15
802.11n (40 MHz):
15,5 ± 1,5 dBm @ CH6, MCS 0~4, MCS 8~12
14,0 ± 1,5 dBm @ CH6, MCS 5~7, MCS 13~15
802.11g:
18,0 ± 1,5 dBm @ CH6, 6 Mbps
17,0 ± 1,5 dBm @ CH6, 54 Mbps
802.11b:
18,0 ± 1,5 dBm @ CH6, semua peringkat
Penguatan Antena
≤3,0 dBi, ≤4,0 dBi, ≤4,5 dBi
(3 antenna)
UPnP
Didukung
Keamanan Nirkabel
Wi-Fi Protected Access 2 (WPA2),
WEP, penyaringan MAC nirkabel
Bit Kunci Keamanan
Hingga enkripsi 128-bit
Lingkungan
Dimensi
188,7× 151,7× 31,2mm
(7,43^ × 5,97^ × 1,23^ )
Berat Unit
254,1g (8,96 oz.)
Daya
12V,0,5A
Sertifikasi
FCC, UL/cUL, ICES-003, RSS210,
CE, Wi-Fi (IEEE 802.11b/g/n),
WPA2, WMM, Wi-Fi Protected
Setup,Windows7
Suhu Pengoperasian
Wireless > Basic Wireless Settings
Messaggio Your Internet cable is not plugged in
Messaggio Cannot access your router
(Impossible accedere al router) 14
Internet Connection Type (Tipodi connectione Internet)
Static IP (IP statico)
Telstra Cable (Cavo Telstra)
Wireless > Wireless Security (Protezione wireless)
WPA2/WPA Mixed Mode (Modalità mista WPA2/WPA), WPA2 Personal, WPA Personal
NOTE
WPA2/WPA Enterprise Mixed Mode (Modalità mista WPA2/WPA Enterprise), WPA2 Enterprise, WPA Enterprise
Per installment Service Pack 3:
15,0 ± 1,5 dBm @ CH6, MCS 0~4, MCS 8~12
13,5 ± 1,5 dBm @ CH6, MCS 5~7, MCS 13~15
802.11n (40 MHz):
14,0 ± 1,5 dBm @ CH6, MCS 0~4, MCS 8~12
13,5 ± 1,5 dBm @ CH6, MCS 5~7, MCS 13~15
802.11g:
14,5 ± 1,5 dBm @ CH6, toute le velocità
802.11b:
Certificazioni FCC, UL/cUL, ICES-003, RSS210, CE, Wi-Fi (IEEE 802.11b/g/n), WPA2™, WMM®, Wi-Fi Protected Setup, Windows 7
Temperatura d'esercizio Da 0 a 40^ (da 32 a 104^ )
WPA2™, WMM®, Wi-Fi Protected Setup, Windows 7
Your Internet cable is not plugged in
Cisco Connect starten
- Start Cisco Connect.

Reset, Wi-Fi Protected SetupTM
LED's
Power/Wi-Fi Protected Setup,
Internet, Ethernet (1-4)
Typebekabeling
CAT 5e
Uitzendvermögen
802.11n (20 MHz):
15,0 ± 1,5dBm @ CH6, MCS 0~4, MCS 8~12
13,5 ± 1,5dBm @ CH6, MCS 5~7, MCS 13~15
802.11n (40 MHz):
14,0 ± 1,5dBm @ CH6, MCS 0~4, MCS 8~12
13,5 ± 1,5dBm @ CH6, MCS 5~7, MCS 13~15
802.11g:
14,5 ± 1,5dBm @ CH6, alle snelheden
802.11b:
16,5 ± 1,5dBm @ CH6, alle snelheden
Antenneversterking
≤ 2.0 dBi, ≤ 4.0 dBi (2 antennas)
UPnP
Ondersteund
Wi-Fi Protected Access™ 2 (WPA2),
WPA2™, WMM®, Wi-Fi Protected
Setup,Windows7
Bedrijfstemperatuur
0 tot 40^
Opslagtemperatuur
-20 tot 60^
Bedrijfsvochtigkeit
10 tot 80% , nicht-condenserend
Opslagvochtigkeit
5 tot 90% , nicht-condenserend
OPMERKINGEN
Reset, Wi-Fi Protected SetupTM
LED's
Power/Wi-Fi Protected Setup, Internet, Ethernet (1-4)
Typebekabeling
CAT5e
Uitzendvermögen
802.11n (20 MHz):
15,0 ± 1,5dBm @ CH6, MCS 0~4, MCS 8~12
13,5 ± 1,5dBm @ CH6, MCS 5~7, MCS 13~15
802.11n (40 MHz):
14,0 ± 1,5dBm @ CH6, MCS 0~4, MCS 8~12
13,5 ± 1,5dBm @ CH6, MCS 5~7, MCS 13~15
802.11g:
14,5 ± 1,5dBm @ CH6, alle snelheden
802.11b:
16,5 ± 1,5dBm @ CH6, alle snelheden
Antenneversterking
V2: ≤2.5 dBi, ≤4.0 dBi (2 antennas)
V2: ≤2.0 dBi, ≤4.0 dBi (2 antennas)
UPnP
Ondersteund
WPA2™, WMM®, Wi-Fi Protected
Setup,Windows7
Bedrijfstemperatuur
0tot 40^
Opslagtemperatuur
-20 tot 60^
Bedrijfsvochtigkeit
10 tot 80% , nicht-condenserend
Opslagvochtigkeit
5 tot 90% , nicht-condenserend
OPMERKINGEN
Reset, Wi-Fi Protected Setup
LED's
Power/Wi-Fi Protected Setup,
Internet, Ethernet (1-4)
Typebekabeling
CAT5e
Uitzendvermögen
802.11n (20 MHz):
17,0 ± 1,5 dBm @ CH6, MCS 0~4, MCS 8~12
16,0 ± 1,5 dBm @ CH6, MCS 5~7, MCS 13~15
802.11n (40 MHz):
15,5 ± 1,5 dBm @ CH6, MCS 0~4, MCS 8~12
14,0 ± 1,5 dBm @ CH6, MCS 5~7, MCS 13~15
802.11g:
18,0 ± 1,5 dBm @ CH6, 6 Mbps
17,0 ± 1,5 dBm @ CH6, 54 Mbps
802.11b:
18,0 ± 1,5dBm @ CH6, alle snelheden
Antenneversterking
≤3.0 dBi, ≤4.0 dBi, ≤4.5 dBi
(3 antennes)
UPnP
Ondersteund
Wi-Fi Protected Access™ 2 (WPA2),
WPA2™, WMM®, Wi-Fi Protected
Setup, Windows 7
Bedrijfstemperatuur
0 to 40^
Opslagtemperatuur
-20 tot 60^
Bedrijfsvochtigkeit
10 tot 80% , niedenserend
Opslagvochtigkeit
5 tot 90% , nicht-condenserend
OPMERKINGEN
Internet Connection Type (Type Internett-tilkobling)
WPA2/WPA Mixed Mode, WPA2 Personal, WPA Personal
MERKNADER
WPA2/WPA Enterprise Mixed Mode, WPA2 Enterprise, WPA Enterprise
Knapper Reset (Tilbakestill), Wi-Fi Protected SetupTM
LED-lamper Strøm/Wi-Fi Protected Setup, Internett, Ethernet (1-4)
Kabeltype CAT 5e
Overfort effekt 802.11n (20 MHz):
15,0 ± 1,5 dBm @ CH6, MCS 0~4, MCS 8~12
13,5 ± 1,5 dBm @ CH6, MCS 5~7, MCS 13~15
802.11n (40 MHz):
14,0 ± 1,5 dBm @ CH6, MCS 0~4, MCS 8~12
13,5 ± 1,5 dBm @ CH6, MCS 5~7, MCS 13~15
802.11g:
14,5 ± 1,5 dBm @ CH6 ved alle hastigheter
802.11b:
Sertifering FCC, UL/cUL, ICES-003, RSS210, CE, Wi-Fi (IEEE 802.11b/g/n), WPA2™, WMM®, Wi-Fi Protected Setup, Windows 7
Driftstemperatur 0-40°C (32-104°F)
Oppbevaringstemperatur -20-60°C (-4-140°F)
WPA2™, WMM®, Wi-Fi Protected Setup, Windows 7
| Driftstemperatur | 0–40 °C (32–104 °F) |
| Oppbevaringstemperatur | -20–60 °C (-4–140 °F) |
| Luftfuktigkeit for drift | 10–80 %/DDKondenserende |
| Luftfuktigkeit for oppbevaring | 5–90 %/DDKondenserende |
MERK:
Hvis du vil ha informasjon om forskritter, garanti og sikkerhet, kan du se CDen som fulgte med ruteren eller gå til Linksys.com/support.
Reset (Tilbakestill), Wi-Fi Protected Setup
LED-lamper
Strøm/Wi-Fi Protected Setup, Internett, Ethernet (1-4)
Kabeltype
CAT 5e
Overfort effekt
802.11n (20 MHz):
17,0 ± 1,5 dBm @ CH6, MCS 0~4, MCS 8~12
16,0 ± 1,5 dBm @ CH6, MCS 5~7, MCS 13~15
802.11n (40 MHz):
15,5 ± 1,5 dBm @ CH6, MCS 0~4, MCS 8~12
14,0 ± 1,5 dBm @ CH6, MCS 5~7, MCS 13~15
802.11g:
18,0 ± 1,5 dBm @ CH6, 6 Mbps
17,0 ± 1,5 dBm @ CH6, 54 Mbps
802.11b:
≤3,0 dBi, ≤4,0 dBi, ≤4,5 dBi
(3 antenner)
UPnP
Stottes
Trädløs sikkerhet
Wi-Fi Protected Access 2 (WPA2), WEP, tradløs MAC-adressefiltrerin
WPA2, WMM, Wi-Fi Protected Setup, Windows 7
Driftstemperatur
0-40°C (32-104°F)
Oppbevaringstemperatur
-20-60°C (-4-140°F)
Luftfuktigkeit for drift
Wireless > Basic Wireless Settings
- Uruchom program Cisco Connect.
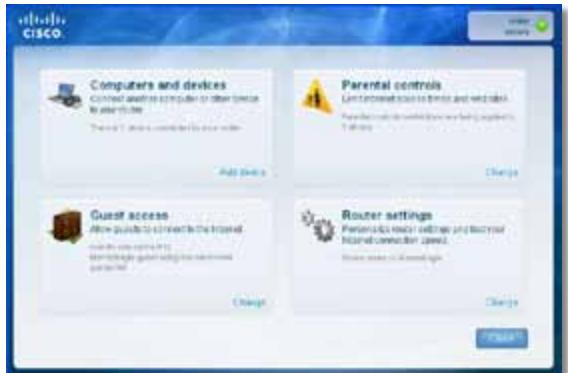
Mensagem Your Internet cable is not plugged in
Modo misto WPA2/WPA Enterprise, WPA2 Enterprise, WPA Enterprise
- Execute o Cisco Connect.
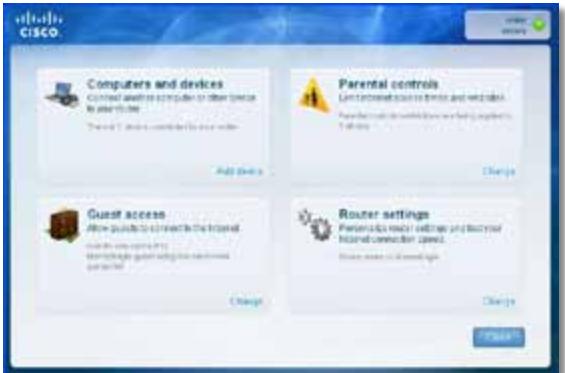
WPA2™, WMM®, Wi-Fi Protected
Setup,Windows7
Temp. de funciona 0 a 40^ (32 a 104^ )
Temp. de armazenamento -20 a 60^ (-4 a 140^ )
Mensagem Your Internet cable is not plugged in
Telstra Cable (Cabo Telstra)
WPA2/WPA Mixed Mode (Modo misto WPA2/WPA), WPA2 Personal (WPA2 personal), WPA Personal (WPA personal)
OBSERVATIONS
WPA2/WPA Enterprise Mixed Mode, WPA2 Enterprise, WPA Enterprise
Para instalar Service Pack 3:
- Execute o Cisco Connect.
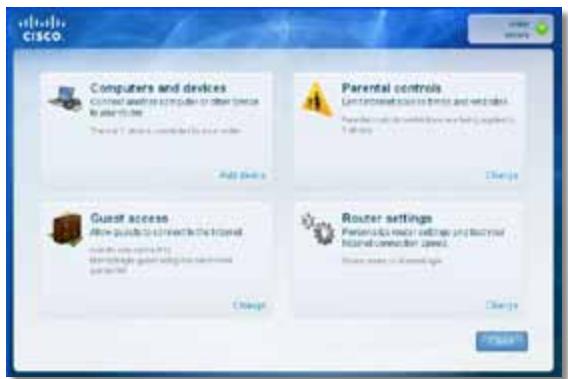
Mesajul Your Internet cable is not plugged in
(Cablul dvs. de Internet nu este conectat) 13
Mesajul Cannot access your router
- Executați Cisco Connect, faceti clipe Change (Modificare) la Router settings (Setar router), faceti clipe Advanced settings (Setari avansate), apoi faceti clipe OK.
-sau-
Static IP (IP static)
Telstra Cable (Cablu Telstra)
WPA2/WPA Mixed Mode (Mod mixt WPA2/WPA), WPA2 Personal, WPA Personal
NOTE
WPA2/WPA Enterprise Mixed Mode (Mod mixt WPA2/WPA Enterprise), WPA2 Enterprise, WPA Enterprise
- Faceti clipe Start, Toate programele, apoi faceti clipe Cisco Connect.

Se descide meniul principal Cisco Connect.
Se deschide meniul principal Cisco Connect.
- Executati Cisco Connect.
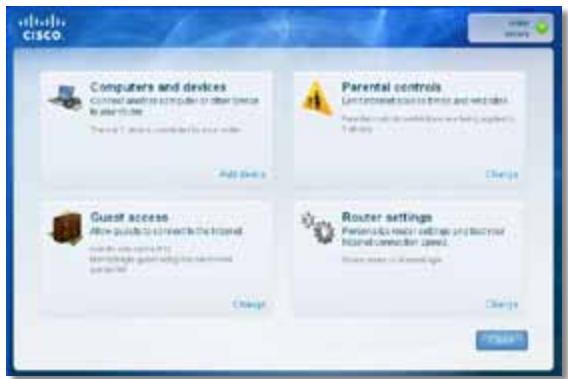
- Faceti clipe Computers and devices (Computere 山 dispositive). Apare fereastra Computers and other devices (Computere 山 alte dispositive).
- Faceti clic pe Other Wireless devices (Alte dispositive färä fir).

YcTaHOBka BaUeRo MapuTy3aTopa He BbINOpHeHa. 12
Coo6eHne Get Windows XP Service Pack 3
(Пolyчимь nakем обномени 3 за Windows XP) . . . . . . . . . . . . . . . . . . . . . . . . . . . . . . . . . . .
Coo6üenhe Your Internet cable is not plugged in
(Ka6eIb IVHmepHema He noDkLIOueH). 13
Coobüenne Cannot access your router
(Mapupymuzamop HeodocmyneH) 14
Coobue He Device not found (YcmpoUcmbHe HaudeHo) . 15
TexHnueckne xapaKTepeNCTnKN
Linksys E900. 17
Linksys E1200. 18
Linksys E1500. 19
Linksys E2500. 20
Linksys E3200. 21
Linksys E4200. 22
O63opПробodyкта
E900/E1200/E1500/E2500/E3200
Bvndc3aDn
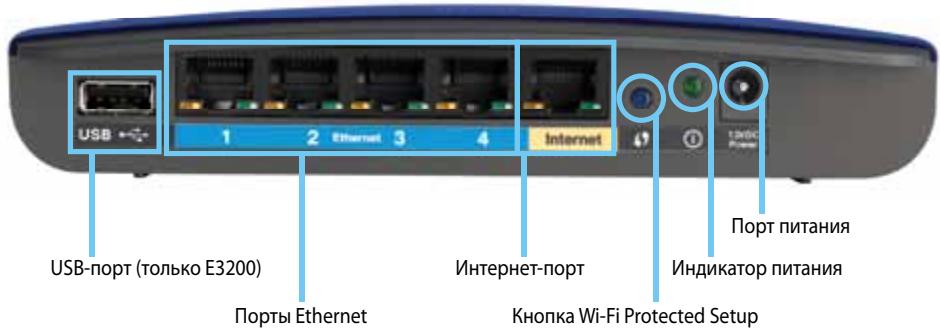
BheuHn Bm BaWero MappyTu3aTopa MoKeT OTNuHaTbCt OT NOKa3aHHoro Ha pucyHke
- Nopr USB (ToIbko E3200)—ПОДКЛЮЧИТЕ КэТOMу nopTu USB-haKoPITeNb ДЯ COBMeCTHOrO ИСПОЛьЗOBaHЯДИСКOBOrO XpaHINIIuSa C ДPyrgIMN ПОЛьЗOBaTeЯМВ в Вашей сети пп в сети ИNTepHET.
- IopTb Ethernet—Поdkлочte Ka6eIи Ethernet (TaKxe Ha3bIaEBmceTeBbIMn Ka6eJIaMn) K 3Tm npTam Fast Ethernet (10/100 nJa E900 n1200 n E1500) nIgabit (10/100/1000 nJa E2500 n E3200), mMeoIcM CInHIOU cBeTOBvO KoIDnPOBkU, n dpyrIM npOBODhIM yCTpOJCTBaM B BaSeI cTeN Ethernet.
- NopT INItePHT—ПОДКЛIOUHTe Ka6eNb Ethernet (TaKxHe Ha3bIBaEMbl cTeBbIM IIN INItePHT-Ka6eMe) K ATOMy NOpTy JxENToro UBeTa, n K BaIeMy MoDemy.
Khonka "Wi-Fi Protected Setup"-HaJMMte 3Ty KHONKy, yTO6bl cIerKocTbIO HAcTpOHTb CnCTeMy 6e3OpaChOcTN 6ecnpoBODHO CTNI Wi-Fi Protected Setup-dnA noDkJIuOeHHbIX yCTpoiCTB cETN.ДлЯ NOlyueHnnoPdPo6HO nHΦopMaUIN 7eJIKNHtE 3deCb: «Be3OpaChOcTB 6ecnpoBODHO cETN» Ha cTp.8.
Internet Connection Type (Tin coeHHeNc INHTepHeTOM)
BbI6epnte B BbIpaIouiem MeHIO TnI COeINHeHc c INHTepHeTOM, IpeIOCTaBIAEMORO BaIIM mHTepHEr-tpoBaIdepom. PpeIraIOTcA cnEduOuIe BapnaHTbl:
Automatic Configuration - DHCP (AbTomatuecka konhnyupaia - DHCP)
Static IP (Ctatauueckn IP-aepec)
- PPPoE
PPTP
L2TP
- Telstra Cable (Ka6eJIb Telstra)
Automatic Configuration - DHCP (AbTomatnuecka konΦuŋpɑuŋa-DHCP)
Tin coeHHeHn c INHTepHcTOM nO yMOJuaHnO - Automatic Configuration - DHCP (ABTomatuecka KOHfNpyaun - DHCP) (PpOTOKoI dInHaMnueckoKOHfNpyaunXocTa). IcnoJIb3yIte erO ToJIbKO B TOM cIyae, ecNI noCTabUHK INHTepHcT-YcIyR oEcsneuHbaeT pOdEprkKy npOTOKoI DHCP nIIeCNI coeINHeHne yCTaHAbLIbAeTcra C pONou DInHaMnueckoro IP-aDpeca. (B TAKOM BapNaHTe POnKJIIOUeHn ObBuHO pPImeHJeOTcKa6eJIbHbIe coeINHeHn.)
Static IP (Ctatauheckn IP-aDpec)
EcnBbHe yBepeHb, KaKoI pexIM cJeDyET NcNoJb3ObaTb, OCTaBbTe BapNaHT, NcNoJb3YeMbI NO yMOJIaHnIO - Mixed (Kom6uHnpOBaHHbI).
Network Name (SSID) (CeteBoe nMRA (SSID)) SSID - 3TO nMRA cETn, nCNoB3yeMOE BCEMN yCTpOJCTBAMN B 6ecnpoBOADHO cETn. OHO dONXHO BBODNTbCS C yUeTOM perNtpa N He MOKeT coepKaatb 60JIe 32 cIMBOLOB. IOn yMOnuHnIO nCNoB3yeTcC Cisco, 3a KOTOpbIM cIeDyIOT 5 nocJeHNx cnΦp cepniHoro Homepa MapspTy3aTopa, yKa3aHnBn Ha HNXHei naHeJI mApSpTu3aTopa. EcIn Bbl nCnoB3OBaIIy UCTaHOBOOHoe PO dLn yCTaHOBKn, TO nMRA cETn NO yMOnuHnIO MeHReTcHa IerKo 3aONMHaOUnceCnMRA.
ПОНМЕЧАНЕ
Channel (KaHaI) BpackpbVbAIOUeMcCnNcKe Bbl6epnte KaHaI dJIe CeTei Wireless-B, Wireless-G n Wireless-N (2,4 T). EcnBHe yBpeHb, KaKo KaHaI cJeDyET NcNoJb3OBA Tb, OCTaBbTe BapNaHT, NcNoJb3yeMbI NO yMOJuaHIO - Auto (ABTO)
WPA2/WPA Mixed Mode, WPA2 Personal, WPA Personal
ПОНМЕЧАЙ
WPA2/WPA Enterprise Mixed Mode, WPA2 Enterprise, WPA Enterprise
3Ta onu nCnoB3yeTcBO B3aHMoJeCTBnC RADIUS-cepBepom. (3ToT cNoCo6 moKHO npImeHrTb TOnbKO B cLyuae NOpKnIoueHnRADIUS-cepBepa K MapspTytn3aTopy.)
ПРИМЕЧАЦА
- HaxMMTe Nysck, PnporpaMMbl, 3aTeM HaxMMte Cisco Connect.

ÖtkpbıBaetcı ÜnalbHOe MeHIO Cisco Connect.
Ecnu YcTaHOBka Cisco Connect He 6bIa BbINOnHeHa, MoXHo nonpo6oBaTb cneDyUoee:
C nomoubou cKpeKNn nn 6ynaBKn Haxmnte u ydepxnBaIte KhoNky C6poc Ha MapuTytn3aTope B TeueHne 10-15 cekynd, a 3aTeM 3aNyctnte nporpaMMy Setup (YcTaHOBka) Ha KomnakT-DnCKe MapuTytn3aTopa.
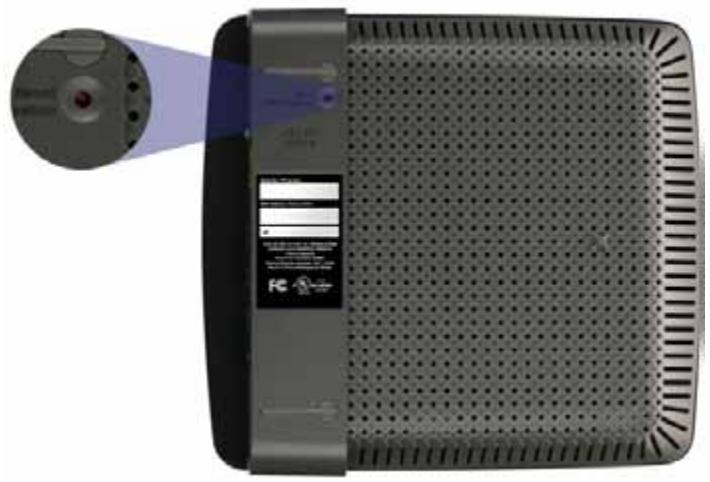

BheuHn BvD BaWero MapwpyTu3aTopa MoKeT OTNuHaTbCra O T NokaahHOrO Ha pucyHke
BpeMeHHO OTKJIIOUHTe 6paHdMayp KOMNbIOTepa (JnA CNPaBKn CM. HNCTpyKcIIO dnn o6ecneueHn 6e3OnaChocTn), a 3aTeM 3aNyCTnte npoRpaMMy Setup (YctaHOBka) Ha KOMNaKT-DnCke MapuTyn3aTopa.
- Ecni y Bac ecTb dpyroKOMnbIOTep,To 3aNyCTnTe Ha HEM nporpaMMy YctaHOBka Ha KOMNaKT-dnCKe MapwpyTu3aTopa.
CoobüeHne Get Windows XP Service Pack 3 (Получumb naKem обновели徳 3 за Windows XP)
Ha KOMnbIOpExpax C Windows XPДЯ ПО Cisco Connect Tpe6yeTcnaKet 0bHOBLeHn3. Ecn npn HacToPoe MapspTyIn3aTopa B nepBbI pa3 Bbl nOlyuHn coo6eHne «Get Windows Service Pack 3», BbINOJIHnTe cJeDyUoiNe DeiCTBnI NO yCTpaHEnIO HeNoJaOK.
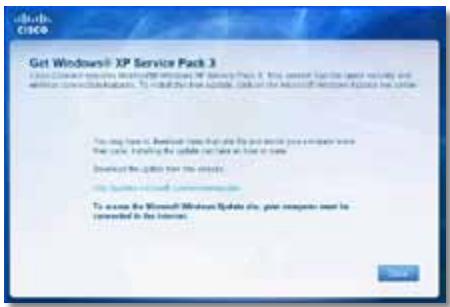
Ecn y Bac Ha KOMnbItepe Ceuac UcTaHOBLeH 6OJIe paHHa BepCna NaKeTa O6HOBHeH, Yem BepCna 3, To Heo6XoJMo 3aRpy3nTb N UcTaHOBnTb NaKeT O6HOBHeH 3.
COBET
ДяВременого NOДКLOЧENЯ KИNTepHeTu 3aRpy3KN Tpe6yemoro NaKeta O6HOBLeHЯ MOKHO NcNoIb3OBAtB BXoJrIb B KOMJIeKT NOCTabKn Ka6eIb Ethernet ДЯ NOДКLOчENЯ KOMNbIOTepa HeNOCpeDCTBeHHO KMODemy.
CoobseHne Device not found (YcmpoUcMbO He hauDeHo)
Ecn npn nonbItke nodklouheny cTeBbix yctpoiCTB (taKnx kaK iPhone, IPod nnn cMaprfoH) Bbl noyuynn coo6uHne «YcTpoiCTBO He haJeHO», BblnoHNTE CNeDyUOuIe DeICTBnI PO yCTpaHEHIO HENoJaOK.
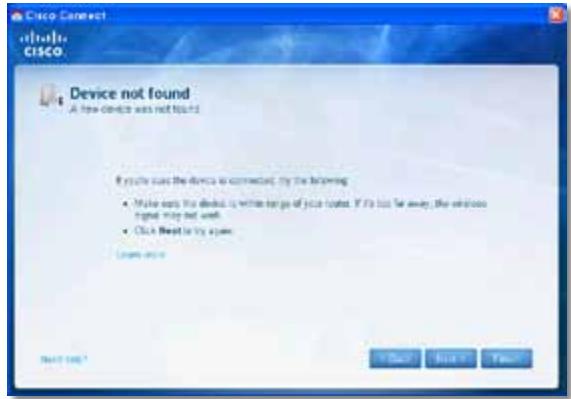
COBET
Wi-Fi Protected Access™ 2 (WPA2),
Bec yctpoiCTBa 202,0 r (7,13 yHninn)
Питанne 12B,0,5A
CepTnΦnKauzna FCC,UL/cUL,ICES-003,RSS210,
CE, Wi-Fi (IEEE 802.11b/g/n),
WPA2™, WMM®, Wi-Fi Protected
Setup,Windows7
Pa6oay TeMnepaTpa OTo 0do 40^ (32-104°F)
Tempeatypa xpaenHn O-20do 60^ (oT-4do 140^
Pa60a8 BnaxHoCTb 10-80% (6e3 KOHdeHcaun)
BlaXHocTb xpaHeHH 5-90% (6e3 KOHdeHcaUN)
ПОНМЕЧАНЯ
Инфорmaцию O hopmaTиВax, rapaHTи N 6e3OpaNacHoctn CM. Ha KOMпakT-Dincke, пилагаemOM K MapшpyTu3aTOpy, пин Ha Be6-ctpaHnue Linksys.com/support.
TexHueckne XapaKTePncTnKMOyT 6bITb N3MeHeHbI 6e3 npedBaupntelbHorO yBeDOMJeHna.
MaKcImaJIbHna npOn3BoDInTeJbHOCTb onpeJeHa BV COOTBETCTBmN C Tpe6ObaHnA Mn CTaNdApTa IEEE 802.11.ФakTuYeCKne XapakTepnCTnKn, B TOM YncIe EMKOCTb, npOnyckHnA cnOCo6HOCTb, DnAna3OH n NOKpbItNe 6ecnpoBOdHoi CETn, MOrYt OTnuaTbcr OT yka3aHHbIX. XapakTepnCTnKn cETn ONpeJenIOrTcM HorumMi akTopamn, ycNoBnAmn i nepemEnHbIMn POKa3aTeJIaMn, BKlNoUaPacCTOraHne OT TOkN DoCTyna, oBeBem cTeBOrO TpaΦnKa, KOHCTpyKcIuN mATEpnaJIbI, nCNoJIb3yeMyI ONEpaZIoHNHyU CNTeMycOBOKUnHOCTb nCNoJIb3yeMbIX cTeBbIX pOdoyKTOB, NOMExn I dpyrHe Ne6laoropnTbIe akTopbl.
Linksys E1200
| Ha3BaHne MoDeJIи | Linksys E1200 |
| Описане | Mapшутузатор Wireless-N |
| Homep moDeJIи | E1200 |
| Стандары | 802.11n, 802.11g, 802.11b, 802.3u |
| Порны | Power (Питане), Internet (ИntернeТ)и Ethernet (1-4) |
| Кнорки | Сбрс, Wi-Fi Protected Setup™ |
| Индikatopы | Питане/Wi-Fi Protected Setup,ИnterNet, Ethernet (1-4) |
| Тип kaБеля | CAT 5e |
| Мошность пeredачи | 802.11n (20 MГц):15,0 ± 1,5 дБм ри CH6, MCS 0~4, MCS 8~1213,5 ± 1,5 дБм ри CH6, MCS 5~7, MCS 13~15802.11n (40 MГц):14,0 ± 1,5 дБм ри CH6, MCS 0~4, MCS 8~1213,5 ± 1,5 дБм ри CH6, MCS 5~7, MCS 13~15802.11g:14,5 ± 1,5 дБм ри CH6, ри几乎所有 сокорстях802.11b:16,5 ± 1,5 дБm ри CH6, ри几乎所有 сокорстях |
| Коэфциент усilеняиаHTeHNBiВ дБ OTHOCITeMbHоIЗOTPOnHоДАТeHNBi | V1: ≤2,5 дБи, ≤4,0 дБи (2 aHTeHNBi)V2: ≤2,0 dБи, ≤4,0 dБи (2 aHTeHNBi)Да |
| Подэржka UPnP | Да |
| Заша та бес四项ю сети | Wi-Fi Protected Access™ 2 (WPA2),WEP, Филь tradeяMAC-aadpecobВ бес四项ю сети |
| Разрадность клоча6e3Опасности | До 128 SFYOB |
Sporocilo »Your Internet cable is not plugged in
(Internetkabel ni priklopljen)« 13
Sporocilo »Cannot access your router
- ZaZenite Cisco Connect.
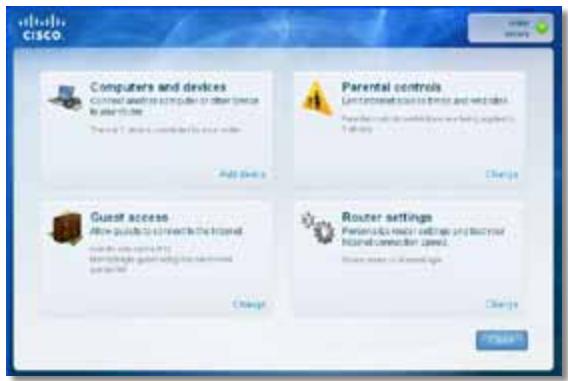
- Kliknite Computers and devices (Računalniki in naprave). Prikaže sezaslon Computers and other devices (Računalniki in druge naprave).
- Kliknite Other Wireless devices (Druge brezije naprave).
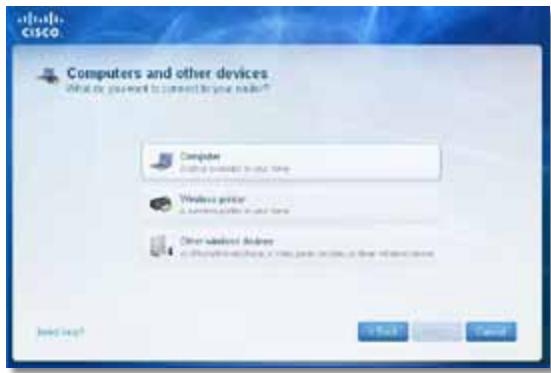
- Omogocite povezavo Wi-Fi omreznepnaprave, nato pa poiscite ime breznicega omreza. Pomooc poiscite v dokumentaciji naprave.
OPOMBA
Starta Cisco Connect 3
Anvanda Cisco Connect till att hantera routern 3
Meddelandet Your Internet cable is not plugged in
Meddelandet Device not found
Starta Cisco Connect
Ström/Wi-Fi Protected Setup, Internet, Ethernet (1-4)
Kabeltyp
KAT5e
Överfüringseffekt
802.11n (20 MHz):
15,0 ±1,5 dBm vid CH6, MCS 0-4, MCS 8-12
13,5 ±1,5 dBm vid CH6, MCS 5-7, MCS 13-15
802.11n (40 MHz):
14,0 ±1,5 dBm vid CH6, MCS 0-4, MCS 8-12
13,5 ±1,5 dBm vid CH6, MCS 5-7, MCS 13-15
802.11g:
14,5 ±1,5 dBm vid CH6, alla hastigheter
802.11b:
16,5 ±1,5 dBm vid CH6, alla hastigheter
Antennförstärkning
V1: ≤ 2,5 dBi, ≤ 4,0 dBi (2 antennaer)
V2: ≤ 2,0 dBi, ≤ 4,0 dBi (2 antennaer)
UPnP
Funktioner
Sakerhet for tradlost
Wi-Fi Protected Access 2 (WPA2),
WEP, tradlós MAC-filtrering
WPA2™, WMM®, Wi-Fi Protected
Setup, Windows 7
Wuwaanwana Wai-Fi Protected Setup wawewaeauwaa Wai-Waunwaeauwaa Wi-Fi Protected Setup Wai-Waewaeauwaa Wi-Fi Protected Setup
Power—LiauuaaueauieACiunwaae
2
山
#
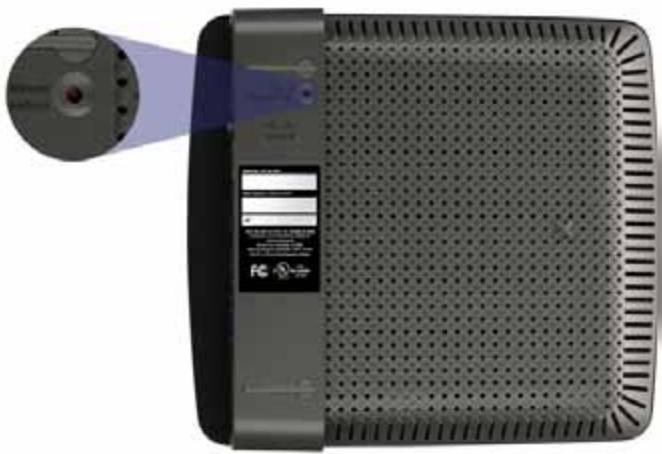
yauoovaaevaaevaaananaanuann
- 5-10 n(aunwawwawu)
E4200
nnuu
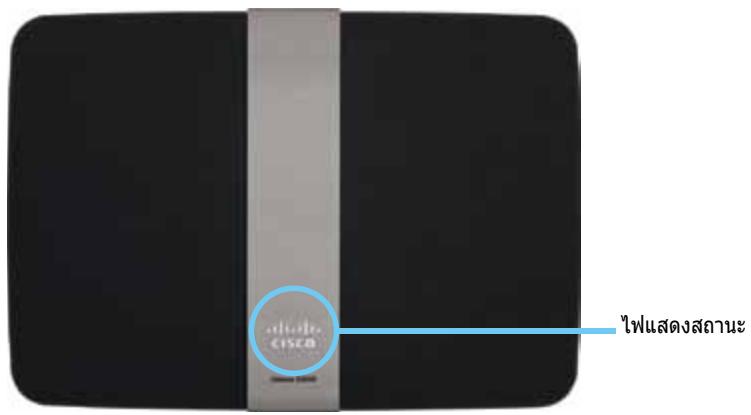
Wuaanuunw-wwanauanwauanwauanwauanwauanwauanwauanwauanwauanwauanwauanwauanwauanwauanwauanwauanwauanwauanwauanwauanwauanwauanwauanwauanwauanwauanwauanwauanwauanwauanwauanwauanwauanwauanw
#
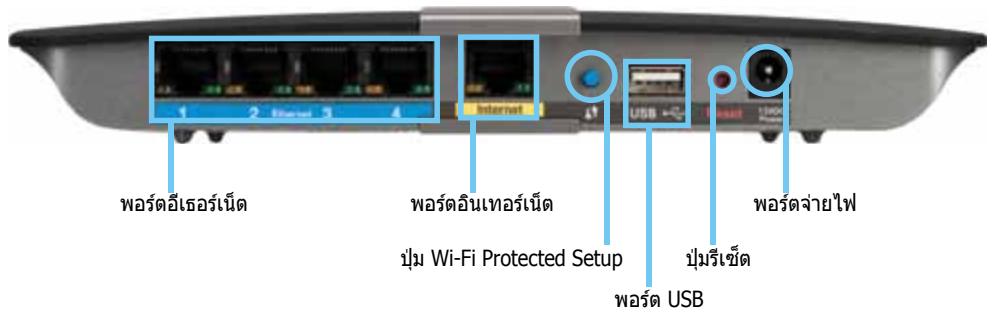
Waaiaaiaaiaaiaaaiaaaiaaaaaaaaaaaaaaaaaaaaaaaaaaaaaaaaaaaaaaaaaaaaaaaaaaaaaaaaaaaaaaaaaaaaaaaaaaaaaaaaaaaaaaaaaaaaaaaaaaaaaaaaaaaaaaaaaaaaaaaaaaaaaaaaaaaaaaaaaaaaaaaaaaaaaaaaaaaaa aa
Waaanana 1-aaananaa aanana (waaananaa ananaa
Wi-Fi Protected SetupTM—nunu wauwauwauwauwauwauwauwauwauwauwauwauwauwauwauwauwauwauwauwauwauwauwauwauwauwauwauwauwauwauwauwauwauwauwauwauwauwauwauwauwauwauwauwauwauwauwauwauwauwauwauwu wuuu wuuu wuuu wuuu wuuu wuuu wuuu wuuu wuuu wuuu wuuu wuuu wuuu wuuu wuuu wuuu wuuu wuuu wuuu wuuu wuuu wuuu wuuu wuuu wuuu wuuu wuuu wuuu wuuu wuuu wuuu wuuu wuuu wuuu
wau USB-uuuuaa aauuuaa uuuuauuauuauu
- 5-10 n(aunwawwawu)
-
20
山l-()
E-Series
W
anunnnaananaananaananaananaananaananaananaanana
Linksys.com/support (lanan, nunu, FAQ, nunu, nu, live chat, wu)
Cisco Connect (Cisco Connect Learn More
- 1500000000000000000000000000000000000000000000000000000000000000
1
CISCO Connect
Cisco Connect
CISCO Connect (wWuWuWuWuWuWuWuWuWuWuWuWuWuWuWuWuWuWuWuWuWuWuWuWuWuWuWuWuWuWuWuWuWuWuWuWuWuWuWuWuWuWuWuWuWuWuWuWuWuWuWU WU WU WU WU WU WU WU WU WU WU WU WU WU WU WU WU WU WU WU WU WU WU WU WU WU WU WU WU WU WU WU WU WU WU WU WU WU WU WU WU WU WU WU WU WU WU WU WU WU WU
nannnnnnnnnnnnnnnnnnnnnnnnnnnnnnnnnnnnnnnnnnnnnnnnnnnnnnnnnnnnnnnnnnnnnnnnnnnnnnnnnnnnnnnnnnnnnnnnnnnnnnnnnnnnnn
Linksys.com/support
Cisco Connect
- 1
- Set up your Linksys Router (wntwnlntnlln Linksys wann)
nnaunuaunuunan:
Windows Start (5u), Computer (nauwua) uauuuaaunw CD uauanau Setup (v)
- lstn Mac 1uuaa aen CD uuaa nauauauauauauauauauauauauauauauauauauuuau
3. 1
Cisco Connect
Nvnnnne nnnnne nnne nnnnne nnnnne nnnnne nnnnne nnnnne nnnnne nnnnne nnnnne nnnnne nnnnne nnnnne nnnnne nnnnne nnnnne nnnnne nnnnne nnnnne nnnnne nnnnne nnnnne nnnnne nnnnne nnnnne nnnnne nnnnne nnnnee
- 7
·
Guest
山
1
157000000000000000000000000000000000000000000000000000000000000000000000000000000000
75
1
Jnuuunnuuuaaunnuuunnuuunnuuunnuu Unnna Unnna Unnna Unnna Unnna Unnna Unnna Unnna Unnna Unnna Unnna Unnna Unnna Unnna Unnna Unnna Unnna Unnna Unnna Unnna Unnna Unnna Unnna Unnna Unnna Unnna Unnna Unnna Unnna Unnna Unnna Unnna Unnna Unnna UuuuuuuuuuuuuuuuuuuuuuuuuuuuuuuuuuuuuuuuuuuuuuuuuuuuuuuuuuuuuuuuuuuuuuuuuuuuuuuuuuuuuuuuuuuuuuuuuuuuuuuuuuuuuuuuuuuuuuuuuuuuuuuuuuuuuuuuuuuuuuuuuuuuuuuuuuuuuuuuuuuuuuuuuuuuuuuUU
Static IP (IP地址)
wnnnn nn nip IP uanrnnnnaaennnnae aannnnae ennnnnae ennnnnae Static IP (IP nnnaa)
PPPoE
wnnnnnaa aDSL nnaa anISP naan Point-to-Point Protocol over Ethernet (PPPoE) nn nn nn nn PPoE
PPTP
Point-to-Point Tunneling Protocol (PPTP) 1uunununununununununun unu uun PPTP uununununuDHCP wra IP uanunurunu Unn an Obtain an IP Address Automatically (uIP uanunurunu) unununununununu uip IP uanunurunu unwauuauuauuauuauuuu uunnaeunu Specy an IP Address (nu IP uanunur) uauuauuau
L2TP
Layer 2 Tunneling Protocol (L2TP) iuunnnnnaaiaua
Telstra Cable
Telstra Cable 1uunnnnnaaannnnaa aaa
Connect on Demand (d) uauuuaaauauuauu) uauuauuuuuuuuuuuuuuuuuuuuuuuuuuuuuuuuuuuuuuuuuuuuuuuuuuuuuuuuuuuuuuuuuuuuuuuuuuuuuuuuuuuuuuuuuuuuuuuuuuuuuuuuuuuuuuuuuuuuuuuuuuuuuuuuuuuuuuuuuuuuuuuuuuuuuuuuuuuuuuuuuuuuuuuuuuuuuuuuuuuuuuuuuuuuuuuuuuuuuuuuuUU
An Connect on Demand (uaaannnnnna) uae Kep Alive (anrnnnna) nnnnnnnae nnne anennnnae anennnnae anennnnae anennnnae anennnnae anennnnae anennnnae anennnnae anennnnae anennnnae anennnnae anennnnae anennnnae anennnnae anennnnae anennnnae anennnnae anennnnae anennnnae anennnnae anennnnaee
>
nnae nnnnne nnnnne nnnnne nnnnne nnnnne nnnnne nnnnne
H
n75v7u7u7u
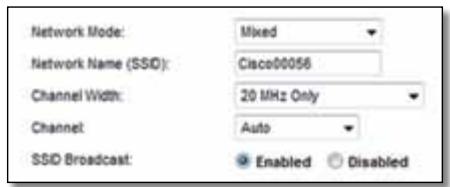
- Mixed (wau) wunwnuunnunnun Wireless-N (2.4 GHz), Wireless-G uau Wireless-B uauuauuauuauu uuuuuaaauuauuauuauuauuauuauuauuauuauuuuauuuuuuuuuuuuuuuuuuuuuuuuuuuuuuuuuuuuuuuuuuuuuuuuuuuuuuuuuuuuuuuuuuuuuuuuuuuuuuuuuuuuuuuuuuuuuuuuuuuuuuuuuuuuuuuuuuuuuuuuuuuuuuuuuuuuuuuuuuuuuuuuuuuuuuuuuuuuuuuuuuuuuuuuuuuuuuuuuuuuuuuuuuuuuuuuuuuuuuuuuUU
- Wireless-B/G Only (Wireless-B/G wɪnəʊ) wɪnəʊwɪvʌŋrəl
- Wireless-B uər Wireless-G (2.4 GHz) ɪnəʊwɪvʌŋu lɪnər
- Wireless-B/G Only (Wireless-B/G wɪnəʊ)
- Wireless-B Only (Wireless-B wɪnəu) wɪnəgɪdɪwɪzəlɪsər Wireless-B wɪnədɪn Wireless-B Only (Wireless-B wɪnəu)
- Wireless-G Only (Wireless-G wɪnəu) ɪnʌŋgɪdɪwɪvərɪsɪnərɪ Wireless-G wɪnədɪn Wireless-G Only (Wireless-G wɪnəu)
- Wireless-N Only (Wireless-N wɪnju) ɪnʌnəʊnɪaɪwɪvərɪnəʊnɪ Wireless-N (2.4 GHz) ɪnɪdən Wireless-N Only (Wireless-N wɪnju)
- Disabled (िमिदु) नन्दुलावर्थी Wireless-B, Wireless-G uav Wireless-N (2.4 GHz) कृपान्दुलावर्थी कृपान्दु�ोत Disable (िमिदु)
vuiu
SSID Broadcast (ntwnuww SSID) nnaa aauau uauu uauu uauu uauu uauu uauu uauu uauu uauu uauu uauu uauu uauu uauu uauu uauu uauu uauu uauu uauu uauu uauu uauu uauu uauu uauu uauu uauu uauu uauu uauu uauu uauu uauu UuuuuuuuuuuuuuuuuuuuuuuuuuuuuuuuuuuuuuuuuuuuuuuuuuuuuuuuuuuuuuuuuuuuuuuuuuuuuuuuuuuuuuuuuuuuuuuuuuuuuuuuuuuuuuuuuuuuuuuuuuuuuuuuuuuuuuuuuuuuuuuuuuuuuuuuuuuuuuuuuuuuuuuuuuuuuUU
n
>
n wipwipwipwipwipwipwipwipwipwipwipwipwipwipwipwipwipwipwipwipwipwipwipwipwipwipwipwipwipwipwipwipwipwipwipwipwipwipwipwipwipwipwipwipwipwipwipwipwipwipwip
| "WPA2 Personal | watnam |
| WPA2/WPA Mixed Mode | WPA2: watnam WPA: wwn |
| WPA Personal | wwn |
| WEP | watnam |
#
RADIUS 1unrnnnnaa WPA2 wpaWPA wpa RADIUS
| "WPA2 Enterprise" | "WPA2: ยงinelicitad |
| WPA2/WPA Enterprise Mixed Mode | WPA2: ยงinelicitad WPA: ยง |
| WPA Enterprise | ยง |
| RADIUS | "\w" |
n
WPA2/WPA Mixed Mode, WPA2 Personal, WPA Personal
#
WPA2/WPA Enterprise Mixed Mode, WPA2 Enterprise, WPA Enterprise
RADIUS (nrsrnnnnsrrnrnnnrsrrnrsrrnrsrrnrsrrnrsrrnrsrrnrsrrnrsrrnrsrrnrsrrnrsrrnrsrrnrsrrnrsrrnrsrrnrsrrnrsrrnrsrrnrsrrnrsrrnrsrrnrsrrnrsrrnrsrrnrsrrnrsrrnrsrrnrsrrnrsrrnrsrrnrsrrnrsrrnrsrrnrsrr
vua
wnnnnnaan WPA2/WPA Enterprise Mixed Mode nnnnnnnnnnnnnnnnnnnnnnnnnnnnnnnnnnnnnnnnnnnnnnnnnnnnnnnnnnnnnnnnnnnnnnnnnnnnnnnnnnnnnnnnnnnnnnnnnnnnnnnnnnnnnnnnnnnnnnnnnnnnnnnnnnnnnnnnnnnnnnnnnnnnnnnnnnnnn
WPA2 Enterprise WPA2 Enterprise
WPA Enterprise WPA Enterprise
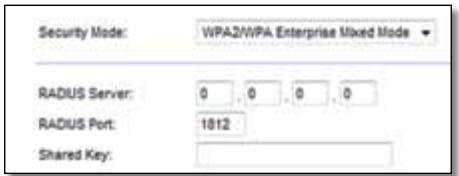
RADIUS Server (RADIUS) IP 10 IP 10 IP 10 IP 10 RADIUS
RADIUS Port (wad RADIUS) 1aunwnuuaawarwauwurwur RADIUS
Shared Key (xiv)
WEP
WEP 1
vaiy
WEP WEP WEP WEP WEP WEP WEP WEP WEP WEP WEP WEP WEP WEP WEP WEP WEP WEP WEP WEP WEP WEP WEP WEP WEP WEP WEP WEP WEP WEP WEP WEP WEP WEP WEP WEP WEP WEP WEP WEP WEP WEP WEP WEP WEP WEP WEP WEP WEP WEP WEP
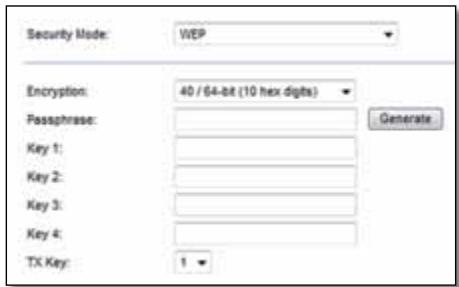
Encryption (ngwovn) ngwovn WEP, 40/64-bits (10 hex digits) (40/64-10 (ngwovn 10 n)) w104/128-bits (26 hex digits) (104/128-10 (ngwovn 26 n)) w104waaon 40/64-bits (10 hex digits) (40/64-10 (ngwovn 10 n))
Passphrase (wawu) wauwawu wauwau WEP uauauuuu uauuauu Generate (
Key 1-4 (a1 1-4) wnnnauuunlauuswauu uilaauuWEP
TX Key (Tx) xan TX (Transmit) 1
RADIUS
RADIUS (
V
RADIUS RADIUS
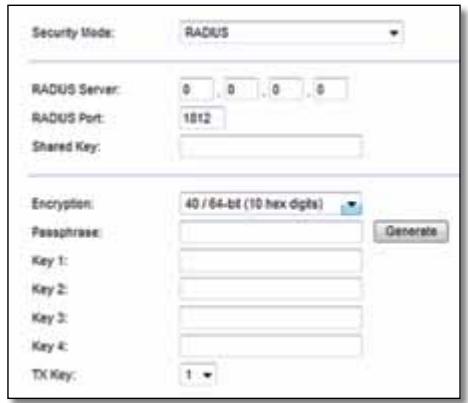
RADIUS Server (RADIUS) IP Address: 10.169.255.10 RADIUS
RADIUS Port (wa RADIUS) 1aunwunwauwauwauwauwau RADIUS
Shared Secret (nunu u nnu) uunu u u u
Encryption (ngwovn) ngwovn WEP, 40/64-bits (10 hex digits) (40/64-10 (ngwuvun 10 wan)) wan 104/128-bits (26 hex digits) (104/128-10 (ngwuvun 26 wan)) wan wanwan 40/64-bits (10 hex digits) (40/64-10 (ngwuvun 10 wan))
Passphrase (rws) 1aunwauu wewy WEP 1uua uua uau
Key 1-4 (第1-4) wannauu uauuauwauu uauuau WEP uuuuauu TX Key (第TX) uanux TX (Transmit) uunuuaa uauuauu uauuauu
Disabled (ilna)
nunnnnnnnnnnnnnnnnnnnnnnnnnnnnnnnnnnnnnnnnnnnnnnnnnnnnnnnnnnnnnnnnnnnnnnnnnnnnnnnnnnnnnnnnnnnnnnnnnnnnnnnnnnnnnnnnnnnnnnnnnnnnnnnnnnnnnnnnnnnnnnnnnnnnnnnn nn nannn nn nannn nn nannn nn nannn nn nannn nn nannn nn nannn nn nannn nn nannn nn nannn nn nannn nn nannn nn nannn nn nannn nn nannn nn nannn nn nannn nn nannn nn nannn nn nannn nn nannn nn nannn nn nannn nn nannn nn nannn nn nennn nn nannn nn nannn nn nannn nn nannn nn nannn nn nannn nn nannn nn nannn nn nannn nn nannn nn nannn nn nannn nn nannn nn nannn nn nannn nn nannn nn nannn nn nannn nn nannn nn nannn nn nannn nn nannn nn nannn nn nannn nn n ann

n56n
Cisco Connect Windows:
- Start (5), All Programs (uunnuu), Cisco Connect

LynanCiscoCISCOConnect
CISCO Connect Mac OS X:
- Finder Applications

- 乌拉门阿纳拉纳au Cisco Connect

Lynanaynay Cisco Connect
n

nncisco Connect 1nnnne nne nee nee nee nee nee nee nee nee nee nee nee nee nee nee nee nee nee nee nee nee nee nee nee nee nee nee nee nee nee nee nee nee nee nee nee nee nee nee nee nee nee nee nee nee nee nee nee nee nee nee neee
10-15 1n Setup (n)
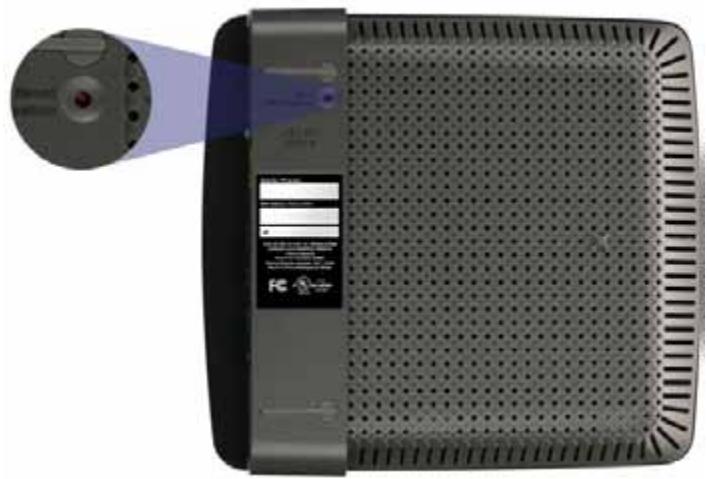

y
- 1
- wunnnaaunwauuauauu uunuaunwauauauauuu Setup (
Get Windows XP Service Pack 3
(Windows XP Service Pack 3)
wnnnnnaeWindowsXPawnnncr Cisco Connect nnuuau Service Pack 3 wannnnnnaeunnue nnnnneau "Get Windows Service Pack 3" uannnneauonnneauauauauauauau
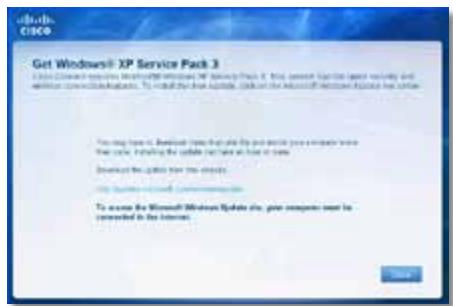
wn Service Pack 3 nnnnnaaannnnae nnne nnne nnne nnne nnne nnne nnne nnne nnne nnne nnne nnne nnne nnne nnne nnne nnne nnne nnne nnne nnne nnne nnne nnne nnne nnne nnne nnne nnne nnne nnne nnne nnne nnne nnne nnne nnne nnne nnne nnne nnne nnne nnne nnne nnne nnne nnne nnne nnne nnne nnnee
山
nnuuunnnnnaaannnnnnaeauan Service Pack
Service Pack 3:
- 1.1.1.1.1.1.1.1.1.1.1.1.1.1.1.1.1.1.1.1.1.1.1.1.1.1.1.1.1.1.1.1.1.1.1.1.1.1.1.1.1.1.1.1.1.1.1.1.1.1.1 500000000000000000000000000000000000000000000000000000000000000000000000000000000000000000000
-
wntwunwnuunwunwunwunwunwunwunwunwunwunwunwunwunwunwunwunwunwunwunwunwunwunwunwunwunwunwunwunwunwunwunwunwunw
-
nnuuunnuuunnuuauauauauauau Service Pack 3 uuuuuuuuuuuuuuuuuuuuuuuuuuuuuuuuuuuuuuuuuuuuuuuuuuuuuuuuuuuuuuuuuuuuuuuuuuuuuuuuuuuuuuuuuuuuuuuuuuuuuuuuuuuuuuuuuuuuuuuuuuuuuuuuuuuuuuuuuuuuuuuuuuuuuuuuuuuuuuuuuuuuuuuuuuuuuuuuuuuuuuuuuuuuuuuuuuuuuuuUU
Your Internet cable is not plugged in (
"Your Internet cable is not plugged in" (You'll see a red button on your computer).
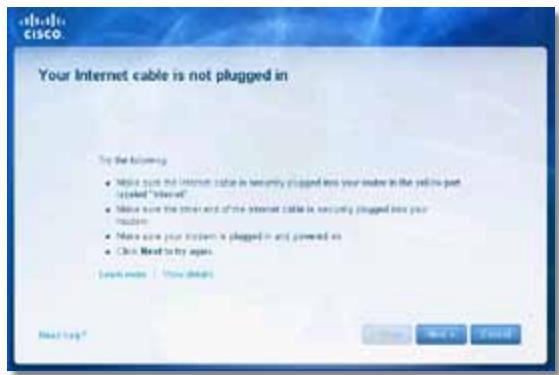
unununulnyu:
- 电
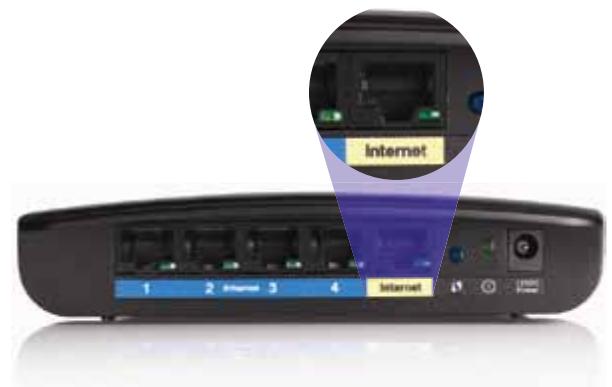
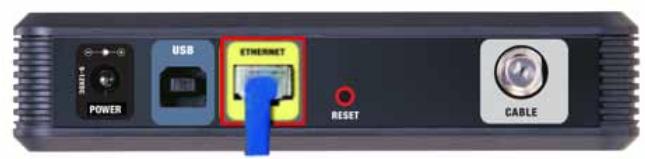

mnuuynnuuysDSL
- 2017年全国卷Ⅱ(1)(10分)
- wannuulwunrnnnnaeauanrnnnnaeauon nanaaunwau CABLE uauuuaauuuuauauauauauauu Coax uauuauu ISP uauu
wunwnnnnnaaennnnn nn nnnn nnnn nnnn nnnn nnnn nnnn nnnn nnnn nnnn nnnn nnnn nnnn nnnn nnnn nnnn nnnn nnnn nnnn nnnn nnnn nnnn nnnn nnnn nnnn nnnn nnnn nnnn nnnn nnnn nnnn nnnn nnnn nnnn nnnn nn
- wannanwWnnaaavnnaaennnnnneu USB aenauwnu nnaeau USB uuaan
- nauuunnuu Cisco Connect uanuaan Next (nul) waaanauauauu nn uannnnnaaunuauuuauauauuuuuuuuuuuuuuuuuuuuuuuuuuuuuuuuuuuuuuuuuuuuuuuuuuuuuuuuuuuuuuuuuuuuuuuuuuuuuuuuuuuuuuuuuuuuuuuuuuuuuuuuuuuuuuuuuuuuuuuuuuuuuuuuuuuuuuuuuuuuuuuuuuuuuuuuuuuuuuuuuuuuuuuuuuuuuuuuuuuuuuuuuuuuuuuuuuuuuuuuuUU
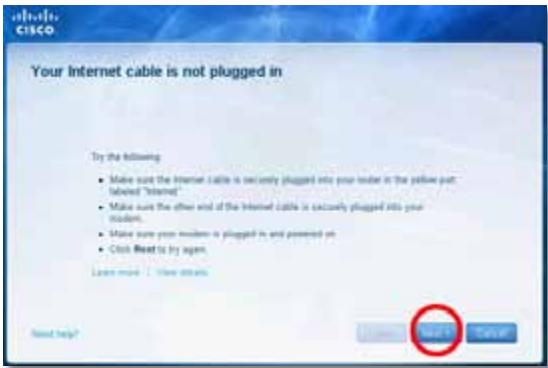
Cannot access your router
()
yannnnnnae nnnnne nee eae nee nee nee nee nee nee nee nee nee nee nee nee nee nee nee nee nee nee nee nee nee nee nee nee nee nee nee nee nee nee nee nee nee nee nee nee nee nee nee nee nee nee nee nee nee nee nee nee nee nee neee
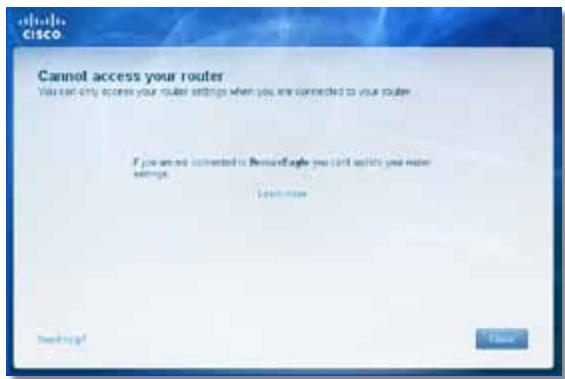
- Network key (B) Confirm network key Connect (u)
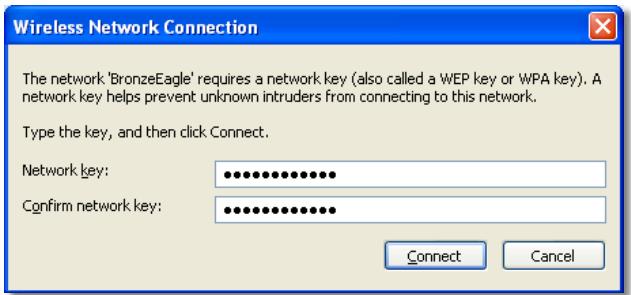
y
- 2019年全国联考卷15题解析 Linksys E-Series 2019 (BronzeEagle 2019)
- wuwwawwawwawwawwawwawwawwawwawwawwawwawwawwawwawwawwawwawwawwawwawwawwawwawwawwawwawwawwawwawwawwawwawwawwawwawwawwaw
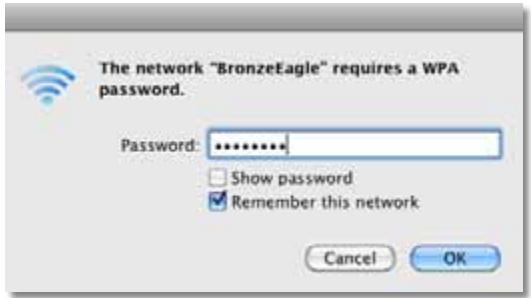
Device not found (Jwwnn)
- Computers and devices (nauwuiuuaaun) nnuu Computer and other devices (nauwuiuuaaun) uuu
- Other Wireless devices (aunnnae)
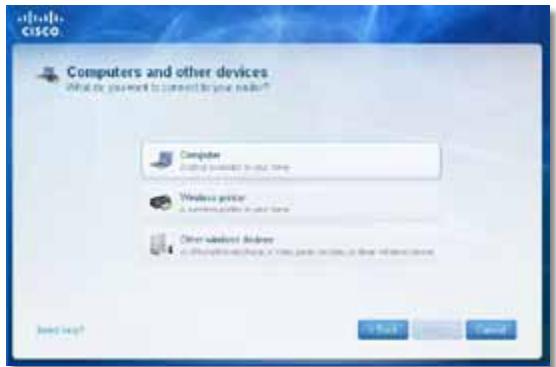
- 1uunwua Wi-Fi wauanuwnuauuauu uauuun
#
WPA/WPA2
: 1: 1: 1: 1: 1: 1: 1: 1: 1: 1: 1: 1: 1: 1: 1: 1: 1: 1: 1: 1: 1: 1: 1: 1: 1: 1: 1: 1: 1: 1: 1: 1: 1: 1
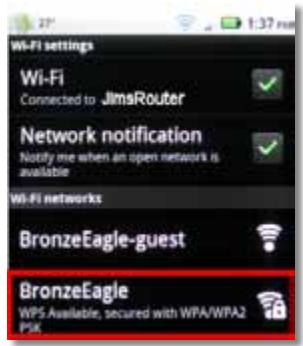
Android
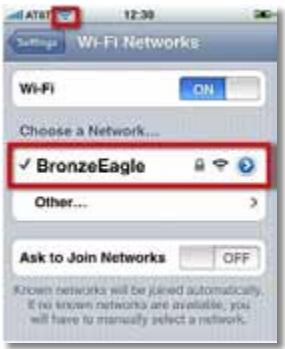
iPhone
- iauwawu (nunwnu wnuu u) nncisco Connect nuuauu u uauu uuuu B6eM9UkCjz
H
- 1auauauauuauuauauauauuuuuuuuuuuuuuuuuuuuuuuuuuuuuuuuuuuuuuuuuuuuuuuuuuuuuuuuuuuuuuuuuuuuuuuuuuuuuuuuuuuuuuuuuuuuuuuuuuuuuuuuuuuuuuuuuuuuuuuuuuuuuuuuuuuuuuuuuuuuuuuuuuuuuuuuuuuuuuuuuuuuuuuuuuuuuuuuuuuuuuuuuuuuuuuuuuuuuuuuuUU
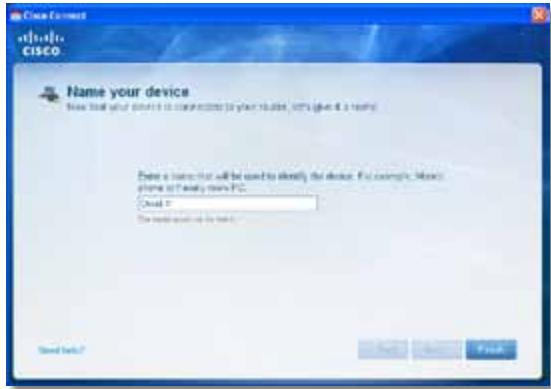
N
Linksys E900
| ### | Linksys E900 |
| ### | Wireless-N Router |
| ### | E900 |
| ### | 802.11n, 802.11g, 802.11b, 802.3u |
| ### | Power, ### protected SetupTM |
| ### LED | Power/Wi-Fi Protected Setup, ### protected Setup, ### protected Setup (1-4) |
| ### LED | CAT 5e |
| ### LED | 802.11n (20 MHz): 15.0 ± 1.5dBm @ CH6, MCS 0~4, MCS 8~12 13.5 ± 1.5dBm @ CH6, MCS 5~7, MCS 13~15 802.11n (40 MHz): 14.0 ± 1.5dBm @ CH6, MCS 0~4, MCS 8~12 13.5 ± 1.5dBm @ CH6, MCS 5~7, MCS 13~15 802.11g: 14.5 ± 1.5dBm @ CH6, ### protected 802.11b: 16.5 ± 1.5dBm @ CH6, ### protected |
| ### LED | ≤2.0 dBi, ≤4.0 dBi (2 ### protected) |
| UPnP | ### |
| ### LED | Wi-Fi Protected AccessTM 2 (WPA2), WEP, Wireless MAC Filtering |
| ### LED | ### protected 128 ### |
| 泰国泰国泰国泰国泰国泰国泰国泰国泰国泰国泰国泰国泰国泰国泰国泰国泰国泰国泰国泰国泰国泰国泰国泰国泰国泰国泰国泰国泰国泰国泰国泰国泰国泰国泰国泰国泰国泰国泰国泰国泰国泰国泰国泰国泰国泰国泰国泰国泰国泰国泰国泰国泰国泰国泰国泰国泰国泰国泰国泰国泰国泰国泰国泰国泰国泰国泰国泰国泰国泰国泰国泰国泰国泰国泰国泰国泰国泰国泰国泰国泰国泰国泰国泰国泰国泰国泰国泰国泰国泰国泰国泰国泰国泰国泰国泰国泰国泰国泰国泰国 泰国泰国泰国泰国泰国泰国泰国泰国泰国泰国泰国泰国泰国泰国泰国泰国泰国泰国泰国泰国泰国泰国泰国泰国泰国泰国泰国泰国泰国泰国泰国泰国泰国泰国泰国泰国泰国泰国泰国泰国泰国泰国泰国泰国泰国泰国泰国泰国泰国泰国泰国泰国泰国泰国泰国泰国泰国泰国泰国泰国泰国泰国泰国泰国泰国泰国泰国泰国泰国泰国泰国泰国泰国泰国泰国泰国泰国泰国泰国泰国泰国泰国泰国泰国泰国泰国泰国泰国泰国泰国泰国泰国泰国泰国泰国泰国泰国泰国泰国 |
| 188.7 × 151.7 × 31.2 m² (7.43" × 5.97" × 1.23") |
| 202.0 n. (7.13 a.a.a.) |
| 12V, 0.5A |
| FCC, UL/cUL, ICES-003, RSS210, CE, Wi-Fi (IEEE 802.11b/g/n), WPA2™, WMM®, Wi-Fi Protected Setup, Windows 7 |
| 0 ° 40°C (32 ° 104°F) |
| -20 ° 60°C (-4 ° 140°F) |
| 10 ° 80% l/m² m² m² m² m² m² m² m² m² m² m² m² m² m² m² m² m² m² m² m² m² m² m² m² m² m² m² m² m² m² m² m² m² m² m² m² m² m² m² m² m² m² m² m² m² m² m² m² m² m² m² |
| 5 ° 90% l/m² m² m² m² m² m² m² m² m² m² m² m² m² m² m² m² m² m² m² m² m² m² m² m² m² m² m² m² m² m² m² m² m² m² m² m² m² m² m² m² m² m² m² m² m² m² m² m² |
vnnn nnnn nn nnnnnnnnnnnnnnnnnnnnnnnnnnnnnnnnnnnnnnnnnnnnnnnnnnnnnnnnnnnnnnnnnnnnnnnnnnnnnnnnnnnnnnnnnnnnnnnnnnnnnnnnnnnnnnnnnnnnnnnnnnnnnnnnnnnnnnnnnnnnnn nn nannn nn nannn nn nannn nn nannn nn nannn nn nannn nn nannn nn nannn nn nannn nn nannn nn nannn nn nannn nn nannn nn nannn nn nannn nn nannn nn nannn nn nannn nn nannn nn nannn nn nannn nn nannn nn nannn nn nannn nn nannn nn nennn nn nannn nn nannn nn nannn nn nannn nn nannn nn nannn nn nannn nn nannn nn nannn nn nannn nn nannn nn nannn nn nannn nn nannn nn nannn nn nannn nn nannn nn nannn nn nannn nn nannn nn nannn nn nannn nn nannn nn nannn nn narnn nn
nnae nnnnnaaee nnnnne nnnnne nnnnne nnnnne nnnnne nnnnne nnnnne nnnnne nnnnne nnnnne nnnnne nnnnne nnnnne nnnnne nnnnne nnnnne nnnnne nnnnne nnnnne nnnnne nnnnne nnnnne nnnnne nnnnne nnnnne nnnnnee nnnnne nnnnne nnnnne nnnnne nnnnne nnnnne nnnnne nnnnne nnnnne nnnnne nnnnne nnnnne nnnnne nnnnne nnnnne nnnnne nnnnne nnnnne nnnnne nnnnne nnnnne nnnnne nnnnne nnnnne nnnnae
Linksys E1200
| ### | Linksys E1200 |
| ### | Wireless-N Router |
| ### | E1200 |
| ### | 802.11n, 802.11g, 802.11b, 802.3u |
| ### | Power, ### protected SetupTM |
| ### LED | Power/Wi-Fi Protected Setup, ### protected Setup, ### protected Setup (1-4) |
| ### LED | CAT 5e |
| ### LED | 802.11n (20 MHz): 15.0 ± 1.5dBm @ CH6, MCS 0~4, MCS 8~12 13.5 ± 1.5dBm @ CH6, MCS 5~7, MCS 13~15 802.11n (40 MHz): 14.0 ± 1.5dBm @ CH6, MCS 0~4, MCS 8~12 13.5 ± 1.5dBm @ CH6, MCS 5~7, MCS 13~15 802.11g: 14.5 ± 1.5dBm @ CH6, ### protected 802.11b: 16.5 ± 1.5dBm @ CH6, ### protected V1: ≤2.5 dBi, ≤4.0 dBi (2 ### protected) V2: ≤2.0 dBi, ≤4.0 dBi (2 ### protected) |
| UPnP | ### |
| ### | Wi-Fi Protected AccessTM 2 (WPA2), WEP, Wireless MAC Filtering |
| ### | ### |
nunnnnna
| ywntnqneq | 188.7 × 151.7 × 31.2 mm. (7.43" × 5.97" × 1.23") |
| ywnneq | V1: 252.7 n. (8.91 aauu) |
| V2: 202.0 n. (7.13 aauu) | |
| wntnq | 12V, 0.5A |
| wntnq | FCC, UL/cUL, ICES-003, RSS210, CE, Wi-Fi (IEEE 802.11b/g/n), WPA2TM, WMM®, Wi-Fi Protected Setup, Windows 7 |
| wntnq | 0 °C 40°C (32 °C 104°F) |
| wntnq | -20 °C 60°C (-4 °C 140°F) |
| wntnq | 10 °C 80% wntnq |
| wntnq | 5 °C 90% wntnq |
vua
n nn nnnn nnnn nnnn nnnn nnnn nnnn nnnn nnnn nnnn nnnn nnnn nnnn nnnn nnnn nnnn nnnn nnnn nnnn nnnn nnnn nnnn nnnn nnnn nnnn nnnn nnnn nnnn nnnn nnnn nnnn nnnn nnnn nnnn nnnn nn nnnn nn nnnn nn nnnn nn nnnn nn nnnn nn nnnn nn nnnn nn nnnn nn nnnn nn nnnn nn nnnn nn nnnn nn nnnn nn nnnn nn nnnn nn nnnn nn nnnn nn nnnn nn nnnn nn nnnn nn nnnn nn nnnn nn nnnn nn nnnn nn nnnn nnnn nn nnnn nn nnnn nn nnnn nn nnnn nn nnnn nn nnnn nn nnnn nn nnnn nn nnnn nn nnnn nn nnnn nn nnnn nn nnnn nn nnnn nn nnnn nn nnnn nn nnnn nn nnnn nn nnnn nn nnnn nn nnnn nn nnnn nn
Linksys E1500
| ### | Linksys E1500 |
| ### | Wireless-N Router w### SpeedBoost |
| ### | E1500 |
| ### | 802.11n, 802.11g, 802.11b, 802.3u |
| ### | Power, ### Wi-Fi Protected Setup (1-4) |
| ### | Wi-Fi Protected Setup |
| ### LED | Power/Wi-Fi Protected Setup, ### Wi-Fi (1-4) |
| ### LED LED LED | CAT 5e |
| ### LED | 802.11n (20 MHz): 17.0 ± 1.5 dBm @ CH6, MCS 0~4, MCS 8~12 16.0 ± 1.5 dBm @ CH6, MCS 5~7, MCS 13~15 802.11n (40 MHz): 15.5 ± 1.5 dBm @ CH6, MCS 0~4, MCS 8~12 14.0 ± 1.5 dBm @ CH6, MCS 5~7, MCS 13~15 802.11g: 18.0 ± 1.5 dBm @ CH6, 6 Mbps 17.0 ± 1.5 dBm @ CH6, 54 Mbps 802.11b: 18.0 ± 1.5 dBm @ CH6, ### |
| ### | ≤3.0 dBi, ≤4.0 dBi, ≤4.5 dBi (3 ###) |
| UPnP | ### |
| ### | Wi-Fi Protected Access 2 (WPA2), WEP, Wireless MAC Filtering |
| ### | ### |
| ### | ### 128 ### |
nunnnnna
| ยงrneacreney | 188.7 × 151.7 × 31.2 mm. (7.43" × 5.97" × 1.23") |
| ยงrneacreney | 254.1 n. (8.96 a.a.a.) |
| ยงrneacreney | 12V, 0.5A |
| ย诗句rneacreney | FCC, UL/cUL, ICES-003, RSS210, CE, Wi-Fi (IEEE 802.11b/g/n), WPA2, WMM, Wi-Fi Protected Setup, Windows 7 |
| ย诗句rneacreney | 0 °00' 40°C (32 °00' 104°F) |
| ย诗句rneacreney | -20 °00' 60°C (-4 °00' 140°F) |
| ย诗句rneacreney | 10 °00' 80% ① ② ③ ④ ⑤ ⑥ ⑦ ⑧ ⑨ ⑩ ⑪ ⑫ ⑭ ⑮ ⑯ ⑰ ⑱ ⑲ ⑳ |
| ย诗句rneacreney | 5 °00' 90% ① ② ③ ④ ⑤ ⑥ ⑦ ⑧ ⑨ ⑩ ⑪ ⑫ ⑶ ⑷ ⑸ ⑹ ⑺ ⑻ ⑼ ⑽ ⑨ ⑩ ⑪ ⑫ ⑭ ⑮ ⑯ ⑰ ⑱ ⑲ ⑳ |
vua
n nn nnnn nnnn nnnn nnnn nnnn nnnn nnnn nnnn nnnn nnnn nnnn nnnn nnnn nnnn nnnn nnnn nnnn nnnn nnnn nnnn nnnn nnnn nnnn nnnn nnnn nnnn nnnn nnnn nnnn nnnn nnnn nnnn nnnn nnnn nnne
Linksys E2500
| ### | Linksys E2500 |
| ### | ### |
| ### | E2500 |
| ### | 802.11n, 802.11a, 802.11g, 802.11b, 802.3, 802.3u, 802.3ab |
| ### | ### |
| ### | ### 6 dB, ### 2 dB
2.4 GHz ### 5 GHz |
| ### | ### |
| ### | 802.11b: CCK, QPSK, BPSK 802.11g: OFDM 802.11a: OFDM 802.11n: BPSK, QPSK, 16-QAM, 64-QAM |
| ### | 2.4 GHz |
| ### | 802.11b: -87 dBm @ 11 Mbps 802.11g: -70 dBm @ 54 Mbps 802.11n 20 MHz: -70 dBm @ MCS15 802.11n 40 MHz: -66 dBm @ MCS15 5 GHz 802.11a: -70 dBm @ 54 Mbps 802.11n 20 MHz: -66 dBm @ MCS23 802.11n 40 MHz: -62 dBm @ MCS23 |
| ### | ### |
| ### | 2.4 GHz:
1 (###): ≤2.94 dBi2 (###): ≤3.78 dBi5 GHz:1 (###): ≤5.86 dBi2 (###): ≤4.88 dBi |
| UPnP | ### |
| ### | WEP, WPA, WPA2 |
| ### | ### 128 ### |
n nn nnnn nnnn nnnn nnnn nnnn nnnn nnnn nnnn nnnn nnnn nnnn nnnn nnnn nnnn nnnn nnnn nnnn nnnn nnnn nnnn nnnn nnnn nnnn nnnn nnnn nnnn nnnn nnnn nnnn nnnn nnnn nnnn nnnn nnnn nnne
Linksys E3200
| ### | Linksys E3200 |
| ### | ### |
| ### | ### |
| ### | E3200 |
| ### | 802.11n, 802.11a, 802.11g, 802.11b, 802.3, 802.3u, 802.3ab |
| ### | ### |
| ### | ### 6 dBm, ### 7 dBm, ### 8 dBm, ### 9 dBm, ### 10 dBm, ### 11 dBm, ### 12 dBm, ### 13 dBm, ### 14 dBm, ### 15 dBm, ### 16 dBm, ### 17 dBm, ### 18 dBm, ### 19 dBm, ### 20 dBm, ### 21 dBm, ### 22 dBm, ### 23 dBm, ### 24 dBm, ### 25 dBm, ### 26 dBm, ### 27 dBm, ### 28 dBm, ### 29 dBm, ### 30 dBm, ### 31 dBm, ### 32 dBm, ### 33 dBm, ### 34 dBm, ### 35 dBm, ### 36 dBm, ### 37 dBm, ### 38 dBm, ### 39 dBm, ### 40 dBm, ### 41 dBm, ### 42 dBm, ### 43 dBm, ### 44 dBm, ### 45 dBm, ### 46 dBm, ### 47 dBm, ### 48 dBm, ### 49 dBm, ### 50 dBm, ### 51 dBm, ### 52 dBm, ### 53 dBm, ### 54 dBm, ### 55 dBm, ### 56 dBm, ### 57 dBm, ### 58 dBm, ### 59 dBm, ### 60 dBm, ### 61 dBm, ### 62 dBm, ### 63 dBm, ### 64 dBm, ### 65 dBm, ### 66 dBm, ### 67 dBm, ### 68 dBm, ### 69 dBm, ### 70 dBm, ### 71 dBm, ### 72 dBm, ### 73 dBm, ### 74 dBm, ### 75 dBm, ### 76 dBm, ### 77 dBm, ### 78 dBm, ### 79 dBm, ### 80 dBm, ### 81 dBm, ### 82 dBm, ### 83 dBm, ### 84 dBm, ### 85 dBm, ### 86 dBm, ### 87 dBm, ### 88 dBm, ### 89 dBm, ### 90 dBm, ### 91 dBm, ### 92 dBm, ### 93 dBm, ### 94 dBm, ### 95 dBm, ### 96 dBm, ### 97 dBm, ### 98 dBm, ### 99 dBm, ### 100 dBm, ### 101 dBm, ### 102 dBm, ### 103 dBm, ### 104 dBm, ### 105 dBm, ### 106 dBm, ### 107 dBm, ### 108 dBm, ### 109 dBm, ### 110 dBm, ### 111 dBm, ### 112 dBm, ### 113 dBm, ### 114 dBm, ### 115 dBm, ### 116 dBm, ### 117 dBm, ### 118 dBm, ### 119 dBm, ### 120 dBm, ### 121 dBm, ### 122 dBm, ### 123 dBm, ### 124 dBm, ### 125 dBm, ### 126 dBm, ### 127 dBm, ### 128 dBm, ### 129 dBm, ### 130 dBm, ### 131 dBm, ### 132 dBm, ### 133 dBm, ### 134 dBm, ### 135 dBm, ### 136 dBm, ### 137 dBm, ### 138 dBm, ### 139 dBm, ### 140 dBm, ### 141 dBm, ### 142 dBm, ### 143 dBm, ### 144 dBm, ### 145 dBm, ### 146 dBm, ### 147 dBm, ### 148 dBm, ### 149 dBm, ### 150 dBm, ### 151 dBm, ### 152 dBm, ### 153 dBm, ### 154 dBm, ### 155 dBm, ### 156 dBm, ### 157 dBm, ### 158 dBm, ### 159 dBm, ### 160 dBm, ### 161 dBm, ### 162 dBm, ### 163 dBm, ### 164 dBm, ### 165 dBm, ### 166 dBm, ### 167 dBm, ### 168 dBm, ### 169 dBm, ### 170 dBm, ### 171 dBm, ### 172 dBm, ### 173 dBm, ### 174 dBm, ### 175 dBm, ### 176 dBm, ### 177 dBm, ### 178 dBm, ### 179 dBm, ### 180 dBm, ### 181 dBm, ### 182 dBm, ### 183 dBm, ### 184 dBm, ### 185 dBm, ### 186 dBm, ### 187 dBm, ### 188 dBm, ### 189 dBm, ### 190 dBm, ### 191 dBm, ### 192 dBm, ### 193 dBm, ### 194 dBm, ### 195 dBm, ### 196 dBm, ### 197 dBm, ### 198 dBm, ### 199 dBm, ### 200 dBm, ### 201 dBm, ### 202 dBm, ### 203 dBm, ### 204 dBm, ### 205 dBm, ### 206 dBm, ### 207 dBm, ### 208 dBm, ### 209 dBm, ### 210 dBm, ### 211 dBm, ### 212 dBm, ### 213 dBm, ### 214 dBm, ### 215 dBm, ### 216 dBm, ### 217 dBm, ### 218 dBm, ### 219 dBm, ### 220 dBm, ### 221 dBm, ### 222 dBm, ### 223 dBm, ### 224 dBm, ### 225 dBm, ### 226 dBm, ### 227 dBm, ### 228 dBm, ### 229 dBm, ### 230 dBm, ### 231 dBm, ### 232 dBm, ### 233 dBm, ### 234 dBm, ### 235 dBm, ### 236 dBm, ### 237 dBm, ### 238 dBm, ### 239 dBm, ### 240 dBm, ### 241 dBm, ### 242 dBm, ### 243 dBm, ### 244 dBm, ### 245 dBm, ### 246 dBm, ### 247 dBm, ### 248 dBm, ### 249 dBm, ### 250 dBm, ### 251 dBm, ### 252 dBm, ### 253 dBm, ### 254 dBm, ### 255 dBm, ### 256 dBm, ### 257 dBm, ### 258 dBm, ### 259 dBm, ### 260 dBm, ### 261 dBm, ### 262 dBm, ### 263 dBm, ### 264 dBm, ### 265 dBm, ### 266 dBm, ### 267 dBm, ### 268 dBm, ### 269 dBm, ### 270 dBm, ### 271 dBm, ### 272 dBm, ### 273 dBm, ### 274 dBm, ### 275 dBm, ### 276 dBm, ### 277 dBm, ### 278 dBm, ### 279 dBm, ### 280 dBm, ### 281 dBm, ### 282 dBm, ### 283 dBm, ### 284 dBm, ### 285 dBm, ### 286 dBm, ### 287 dBm, ### 288 dBm, ### 289 dBm, ### 290 dBm, ### 291 dBm, ### 292 dBm, ### 293 dBm, ### 294 dBm, ### 295 dBm, ### 296 dBm, ### 297 dBm, ### 298 dBm, ### 299 dBm, ### 300 dBm, ### 301 dBm, ### 302 dBm, ### 303 dBm, ### 304 dBm, ### 305 dBm, ### 306 dBm, ### 307 dBm, ### 308 dBm, ### 309 dBm, ### 310 dBm, ### 311 dBm, ### 312 dBm, ### 313 dBm, ### 314 dBm, ### 315 dBm, ### 316 dBm, ### 317 dBm, ### 318 dBm, ### 319 dBm, ### 320 dBm, ### 321 dBm, ### 322 dBm, ### 323 dBm, ### 324 dBm, ### 325 dBm, ### 326 dBm, ### 327 dBm, ### 328 dBm, ### 329 dBm, ### 330 dBm, ### 331 dBm, ### 332 dBm, ### 333 dBm, ### 334 dBm, ### 335 dBm, ### 336 dBm, ### 337 dBm, ### 338 dBm, ### 339 dBm, ### 340 dBm, ### 341 dBm, ### 342 dBm, ### 343 dBm, ### 344 dBm, ### 345 dBm, ### 346 dBm, ### 347 dBm, ### 348 dBm, ### 349 dBm, ### 350 dBm, ### 351 dBm, ### 352 dBm, ### 353 dBm, ### 354 dBm, ### 355 dBm, ### 356 dBm, ### 357 dBm, ### 358 dBm, ### 359 dBm, ### 360 dBm, ### 361 dBm, ### 362 dBm, ### 363 dBm, ### 364 dBm, ### 365 dBm, ### 366 dBm, ### 367 dBm, ### 368 dBm, ### 369 dBm, ### 370 dBm, ### 371 dBm, ### 372 dBm, ### 373 dBm, ### 374 dBm, ### 375 dBm, ### 376 dBm, ### 377 dBm, ### 378 dBm, ### 379 dBm, ### 380 dBm, ### 381 dBm, ### 382 dBm, ### 383 dBm, ### 384 dBm, ### 385 dBm, ### 386 dBm, ### 387 dBm, ### 388 dBm, ### 389 dBm, ### 390 dBm, ### 391 dBm, ### 392 dBm, ### 393 dBm, ### 394 dBm, ### 395 dBm, ### 396 dBm, ### 397 dBm, ### 398 dBm, ### 399 dBm, ### 400 dBm, ### 401 dBm, ### 402 dBm, ### 403 dBm, ### 404 dBm, ### 405 dBm, ### 406 dBm, ### 407 dBm, ### 408 dBm, ### 409 dBm, ### 410 dBm, ### 411 dBm, ### 412 dBm, ### 413 dBm, ### 414 dBm, ### 415 dBm, ### 416 dBm, ### 417 dBm, ### 418 dBm, ### 419 dBm, ### 420 dBm, ### 421 dBm, ### 422 dBm, ### 423 dBm, ### 424 dBm, ### 425 dBm, ### 426 dBm, ### 427 dBm, ### 428 dBm, ### 429 dBm, ### 430 dBm, ### 431 dBm, ### 432 dBm, ### 433 dBm, ### 434 dBm, ### 435 dBm, ### 436 dBm, ### 437 dBm, ### 438 dBm, ### 439 dBm, ### 440 dBm, ### 441 dBm, ### 442 dBm, ### 443 dBm, ### 444 dBm, ### 445 dBm, ### 446 dBm, ### 447 dBm, ### 448 dBm, ### 449 dBm, ### 450 dBm, ### 451 dBm, ### 452 dBm, ### 453 dBm, ### 454 dBm, ### 455 dBm, ### 456 dBm, ### 457 dBm, ### 458 dBm, ### 459 dBm, ### 460 dBm, ### 461 dBm, ### 462 dBm, ### 463 dBm, ### 464 dBm, ### 465 dBm, ### 466 dBm, ### 467 dBm, ### 468 dBm, ### 469 dBm, ### 470 dBm, ### 471 dBm, ### 472 dBm, ### 473 dBm, ### 474 dBm, ### 475 dBm, ### 476 dBm, ### 477 dBm, ### 478 dBm, ### 479 dBm, ### 480 dBm, ### 481 dBm, ### 482 dBm, ### 483 dBm, ### 484 dBm, ### 485 dBm, ### 486 dBm, ### 487 dBm, ### 488 dBm, ### 489 dBm, ### 490 dBm, ### 491 dBm, ### 492 dBm, ### 493 dBm, ### 494 dBm, ### 495 dBm, ### 496 dBm, ### 497 dBm, ### 498 dBm, ### 499 dBm, ### 500 dBm, ### 501 dBm, ### 502 dBm, ### 503 dBm, ### 504 dBm, ### 505 dBm, ### 506 dBm, ### 507 dBm, ### 508 dBm, ### 509 dBm, ### 510 dBm, ### 511 dBm, ### 512 dBm, ### 513 dBm, ### 514 dBm, ### 515 dBm, ### 516 dBm, ### 517 dBm, ### 518 dBm, ### 519 dBm, ### 520 dBm, ### 521 dBm, ### 522 dBm, ### 523 dBm, ### 524 dBm, ### 525 dBm, ### 526 dBm, ### 527 dBm, ### 528 dBm, ### 529 dBm, ### 530 dBm, ### 531 dBm, ### 532 dBm, ### 533 dBm, ### 534 dBm, ### 535 dBm, ### 536 dBm, ### 537 dBm, ### 538 dBm, ### 539 dBm, ### 540 dBm, ### 541 dBm, ### 542 dBm, ### 543 dBm, ### 544 dBm, ### 545 dBm, ### 546 dBm, ### 547 dBm, ### 548 dBm, ### 549 dBm, ### 550 dBm, ### 551 dBm, ### 552 dBm, ### 553 dBm, ### 554 dBm, ### 555 dBm, ### 556 dBm, ### 557 dBm, ### 558 dBm, ### 559 dBm, ### 560 dBm, ### 561 dBm, ### 562 dBm, ### 563 dBm, ### 564 dBm, ### 565 dBm, ### 566 dBm, ### 567 dBm, ### 568 dBm, ### 569 dBm, ### 570 dBm, ### 571 dBm, ### 572 dBm, ### 573 dBm, ### 574 dBm, ### 575 dBm, ### 576 dBm, ### 577 dBm, ### 578 dBm, ### 579 dBm, ### 580 dBm, ### 581 dBm, ### 582 dBm, ### 583 dBm, ### 584 dBm, ### 585 dBm, ### 586 dBm, ### 587 dBm, ### 588 dBm, ### 589 dBm, ### 590 dBm, ### 591 dBm, ### 592 dBm, ### 593 dBm, ### 594 dBm, ### 595 dBm, ### 596 dBm, ### 597 dBm, ### 598 dBm, ### 599 dBm, ### 600 dBm, ### 601 dBm, ### 602 dBm, ### 603 dBm, ### 604 dBm, ### 605 dBm, ### 606 dBm, ### 607 dBm, ### 608 dBm, ### 609 dBm, ### 610 dBm, ### 611 dBm, ### 612 dBm, ### 613 dBm, ### 614 dBm, ### 615 dBm, ### 616 dBm, ### 617 dBm, ### 618 dBm, ### 619 dBm, ### 620 dBm, ### 621 dBm, ### 622 dBm, ### 623 dBm, ### 624 dBm, ### 625 dBm, ### 626 dBm, ### 627 dBm, ### 628 dBm, ### 629 dBm, ### 630 dBm, ### 631 dBm, ### 632 dBm, ### 633 dBm, ### 634 dBm, ### 635 dBm, ### 636 dBm, ### 637 dBm, ### 638 dBm, ### 639 dBm, ### 640 dBm, ### 641 dBm, ### 642 dBm, ### 643 dBm, ### 644 dBm, ### 645 dBm, ### 646 dBm, ### 647 dBm, ### 648 dBm, ### 649 dBm, ### 650 dBm, ### 651 dBm, ### 652 dBm, ### 653 dBm, ### 654 dBm, ### 655 dBm, ### 656 dBm, ### 657 dBm, ### 658 dBm, ### 659 dBm, ### 660 dBm, ### 661 dBm, ### 662 dBm, ### 663 dBm, ### 664 dBm, ### 665 dBm, ### 666 dBm, ### 667 dBm, ### 668 dBm, ### 669 dBm, ### 670 dBm, ### 671 dBm, ### 672 dBm, ### 673 dBm, ### 674 dBm, ### 675 dBm, ### 676 dBm, ### 677 dBm, ### 678 dBm, ### 679 dBm, ### 680 dBm, ### 681 dBm, ### 682 dBm, ### 683 dBm, ### 684 dBm, ### 685 dBm, ### 686 dBm, ### 687 dBm, ### 688 dBm, ### 689 dBm, ### 690 dBm, ### 691 dBm, ### 692 dBm, ### 693 dBm, ### 694 dBm, ### 695 dBm, ### 696 dBm, ### 697 dBm, ### 698 dBm, ### 699 dBm, ### 700 dBm, ### 701 dBm, ### 702 dBm, ### 703 dBm, ### 704 dBm, ### 705 dBm, ### 706 dBm, ### 707 dBm, ### 708 dBm, ### 709 dBm, ### 710 dBm, ### 711 dBm, ### 712 dBm, ### 713 dBm, ### 714 dBm, ### 715 dBm, ### 716 dBm, ### 717 dBm, ### 718 dBm, ### 719 dBm, ### 720 dBm, ### 721 dBm, ### 722 dBm, ### 723 dBm, ### 724 dBm, ### 725 dBm, ### 726 dBm, ### 727 dBm, ### 728 dBm, ### 729 dBm, ### 730 dBm, ### 731 dBm, ### 732 dBm, ### 733 dBm, ### 734 dBm, ### 735 dBm, ### 736 dBm, ### 737 dBm, ### 738 dBm, ### 739 dBm, ### 740 dBm, ### 741 dBm, ### 742 dBm, ### 743 dBm, ### 744 dBm, ### 745 dBm, ### 746 dBm, ### 747 dBm, ### 748 dBm, ### 749 dBm, ### 750 dBm, ### 751 dBm, ### 752 dBm, ### 753 dBm, ### 754 dBm, ### 755 dBm, ### 756 dBm, ### 757 dBm, ### 758 dBm, ### 759 dBm, ### 760 dBm, ### 761 dBm, ### 762 dBm, ### 763 dBm, ### 764 dBm, ### 765 dBm, ### 766 dBm, ### 767 dBm, ### 768 dBm, ### 769 dBm, ### 770 dBm, ### 771 dBm, ### 772 dBm, ### 773 dBm, ### 774 dBm, ### 775 dBm, ### 776 dBm, ### 777 dBm, ### 778 dBm, ### 779 dBm, ### 780 dBm, ### 781 dBm, ### 782 dBm, ### 783 dBm, ### 784 dBm, ### 785 dBm, ### 786 dBm, ### 787 dBm, ### 788 dBm, ### 789 dBm, ### 790 dBm, ### 791 dBm, ### 792 dBm, ### 793 dBm, ### 794 dBm, ### 795 dBm, ### 796 dBm, ### 797 dBm, ### 798 dBm, ### 799 dBm, ### 800 dBm, ### 801 dBm, ### 802 dBm, ### 803 dBm, ### 804 dBm, ### 805 dBm, ### 806 dBm, ### 807 dBm, ### 808 dBm, ### 809 dBm, ### 810 dBm, ### 811 dBm, ### 812 dBm, ### 813 dBm, ### 814 dBm, ### 815 dBm, ### 816 dBm, ### 817 dBm, ### 818 dBm, ### 819 dBm, ### 820 dBm, ### 821 dBm, ### 822 dBm, ### 823 dBm, ### 824 dBm, ### 825 dBm, ### 826 dBm, ### 827 dBm, ### 828 dBm, ### 829 dBm, ### 830 dBm, ### 831 dBm, ### 832 dBm, ### 833 dBm, ### 834 dBm, ### 835 dBm, ### 836 dBm, ### 837 dBm, ### 838 dBm, ### 839 dBm, ### 840 dBm, ### 841 dBm, ### 842 dBm, ### 843 dBm, ### 844 dBm, ### 845 dBm, ### 846 dBm, ### 847 dBm, ### 848 dBm, ### 849 dBm, ### 850 dBm, ### 851 dBm, ### 852 dBm, ### 853 dBm, ### 854 dBm, ### 855 dBm, ### 856 dBm, ### 857 dBm, ### 858 dBm, ### 859 dBm, ### 860 dBm, ### 861 dBm, ### 862 dBm, ### 863 dBm, ### 864 dBm, ### 865 dBm, ### 866 dBm, ### 867 dBm, ### 868 dBm, ### 869 dBm, ### 870 dBm, ### 871 dBm, ### 872 dBm, ### 873 dBm, ### 874 dBm, ### 875 dBm, ### 876 dBm, ### 877 dBm, ### 878 dBm, ### 879 dBm, ### 880 dBm, ### 881 dBm, ### 882 dBm, ### 883 dBm, ### 884 dBm, ### 885 dBm, ### 886 dBm, ### 887 dBm, ### 888 dBm, ### 889 dBm, ### 890 dBm, ### 891 dBm, ### 892 dBm, ### 893 dBm, ### 894 dBm, ### 895 dBm, ### 896 dBm, ### 897 dBm, ### 898 dBm, ### 899 dBm, ### 900 dBm, ### 901 dBm, ### 902 dBm, ### 903 dBm, ### 904 dBm, ### 905 dBm, ### 906 dBm, ### 907 dBm, ### 908 dBm, ### 909 dBm, ### 910 dBm, ### 911 dBm, ### 912 dBm, ### 913 dBm, ### 914 dBm, ### 915 dBm, ### 916 dBm, ### 917 dBm, ### 918 dBm, ### 919 dBm, ### 920 dBm, ### 921 dBm, ### 922 dBm, ### 923 dBm, ### 924 dBm, ### 925 dBm, ### 926 dBm, ### 927 dBm, ### 928 dBm, ### 929 dBm, ### 930 dBm, ### 931 dBm, ### 932 dBm, ### 933 dBm, ### 934 dBm, ### 935 dBm, ### 936 dBm, ### 937 dBm, ### 938 dBm, ### 939 dBm, ### 940 dBm, ### 941 dBm, ### 942 dBm, ### 943 dBm, ### 944 dBm, ### 945 dBm, ### 946 dBm, ### 947 dBm, ### 948 dBm, ### 949 dBm, ### 950 dBm, ### 951 dBm, ### 952 dBm, ### 953 dBm, ### 954 dBm, ### 955 dBm, ### 956 dBm, ### 957 dBm, ### 958 dBm, ### 959 dBm, ### 960 dBm, ### 961 dBm, ### 962 dBm, ### 963 dBm, ### 964 dBm, ### 965 dBm, ### 966 dBm, ### 967 dBm, ### 968 dBm, ### 969 dBm, ### 970 dBm, ### 971 dBm, ### 972 dBm, ### 973 dBm, ### 974 dBm, ### 975 dBm, ### 976 dBm, ### 977 dBm, ### 978 dBm, ### 979 dBm, ### 980 dBm, ### 981 dBm, ### 982 dBm, ### 983 dBm, ### 984 dBm, ### 985 dBm, ### 986 dBm, ### 987 dBm, ### 988 dBm, ### 989 dBm, ### 990 dBm, ### 991 dBm, ### 992 dBm |
Cisco, Iaivnvo Cisco uae Linksys 1uovnnunrnuuauoavvocnunnuuauoovvocnvo Cisco uav/vuauvnuuauuauuauuauuauuauuauuauuauuauuauuauuauuauuauuuauuauuuuuuuuuuuuuuuuuuuuuuuuuuuuuuuuuuuuuuuuuuuuuuuuuuuuuuuuuuuuuuuuuuuuuuuuuuuuuuuuuuuuuuuuuuuuuuuuuuuuuuuuuuuuuuuuuuuuuuuuuuuuuuuuuuuuuuuuuuuuuuuuuuuuuuuuuuuuuuuuuuuuuuuuuuuuuuuuuuuuuuuuuuuuuuuuuuuUU

E-Series
Içindekiler
Ürüne Genel Bakış
E900/E1200/E1500/E2500/E3200 1
Arkadan görünüm 1
Alttan görünüm 1
E4200. 2
Ustten görünüm 2
Arkadan görünüm 2
E-Series Router'inizi Kurma
Your Internet cable is not plugged in
(Internet kablonuz takili degil) mesaji 13
Static IP (Statik IP)
WPA2/WPA Mixed Mode (WPA2/WPA Karma Modu), WPA2 Personal (WPA2 Kişisel), WPA Personal (WPA Kişisel)
NOTLAR
WPA2/WPA Enterprise Mixed Mode (WPA2/WPA Şirket Karma Modu), WPA2 Enterprise (WPA2 Şirket), WPA Enterprise (WPA Şirket)
15,0 ± 1,5dBm @ CH6, MCS 0~4, MCS 8~12
13,5 ± 1,5dBm @ CH6, MCS 5~7, MCS 13~15
802.11n (40 MHz):
14,0 ± 1,5dBm @ CH6, MCS 0~4, MCS 8~12
13,5 ± 1,5dBm @ CH6, MCS 5~7, MCS 13~15
802,11g:
14,5±1,5dBm @ CH6,TÜm hizlar
802.11b:
16,5±1,5dBm @ CH6,TÜm hizlar
Anten Kazanci V1: ≤ 2,5 dBi, ≤ 4,0 dBi (2 anten)
V2: ≤ 2,0 dBi, ≤ 4,0 dBi (2 anten)
UPnP Destekleniyor
Kablosuz Güvenligi Wi-Fi Protected Access™ 2 (WPA2), WEP, Kablosuz MAC Filtreleme
WPA2™, WMM®, Wi-Fi Protected
Setup,Windows7
17,0 ± 1,5 dBm @ CH6, MCS 0~4, MCS 8~12
16,0 ± 1,5 dBm @ CH6, MCS 5~7, MCS 13~15
802.11n (40 MHz):
15,5 ± 1,5 dBm @ CH6, MCS 0~4, MCS 8~12
14,0 ± 1,5 dBm @ CH6, MCS 5~7, MCS 13~15
802,11g:
18,0 ± 1,5 dBm @ CH6, 6 Mbps
17,0 ± 1,5 dBm @ CH6, 54 Mbps
802.11b:
WPA2, WMM, Wi-Fi Protected
Setup,Windows7
| Boyutlar | 225 x 35 x 180 mm (8,86 inç x 1,38 inç x 7,09 inç) |
| Birim A®,rl®, | 452 g (15,94 oz) |
| Güç | 12V, 1A |
| Sertifikalar | FCC, IC, CE, Wi-Fi A/B/G/N |
| Çalı®,ma Sıçak®, | 0 - 40 °C (32 - 104 °F) |
| Depolama Sıçak®, | -20 - 60 °C (-4 - 140 °F) |
| Çalı®,ma Nem Orani | %10 - 85 arasi,®,®,®,®,®,®,®,®,®,®,®,®,®,®,®,®,®,®,®,®,®,®,®,®,®,®,®,®,®,®,®,®,®,®,®,®,®,®,®,®,®,®,®,®,®,®,®,®,®,®,®,®,®,®,®,®,®,®,®,®,®,®,®,®,®,®,®,®,®,®,®,®,®,®,®,®,®,®,®,®,®,®,®,®,®,®,®,®,®,®,®,®,®,®,®,®,®,®,®,®,® |
| Depolama Nem Orani | %5 - 85 arasi,®,®,®,®,®,®,®,®,®,®,®,®,®,®,®,®,®,®,®,®,®,®,®,®,®,®,®,®,®,®,®,®,®,®,®,®,®,®,®,®,®,®,®,®,®,®,®,®,®,®,®,®,®,®,®,®,®,®,®,®,®,®,®,®,®,®,®,®,®,®,®,®,®,®,®,®,®,®,®,®,®,®,®,®,®,®,®,®,®,®,®,®,® |
NOTLAR
JaHCTaJIIOBaTnMapIpyTu3aTOp. 3
JaK 3aynctntn Cisco Connect 3
KepyIte cBoiM MapuTy3aTopoM 3a DOnomoroCisco Connect 3
JaHaAsTByBaTnMapwpyTu3aTopBpyHy. 3
Додасткови налaweтувашия
Yk BiikpnTu cnjx6oBy nporpaMy, 0 npaioe y 6pay3epi . . . .4
Setup > Basic Setup (HanaTbHaHHa > Ba3OBe HanaTbHaHHa).5
Language (MoBa) 5
Internet Setup (HanaHTyBaHHa IInTepeHety) 5
Wireless > Basic Wireless Settings (Бeздроювий 3В'язOK >
Ba3oBi hanaaHTyBaHHn 6e3dpoToboro 3B'ra3ky) .6
HaanuTyBaHHa 6e3npoTOBOrO 3B'ra3ky 6
3axnct 6e3dpoTOBOrO 3B'ЯЗКу
UcynenHHeCnPaBHOCTeI
Jk 3anyctntn Cisco Connect nicna iHctalayii. .11
MapuTn3aTOp He BdaIOcra ycniUHO iHCTaIIOBAtn 12
Повимлени Get Windows XP Service Pack 3
(ПOTрибна сисма Windows XP Service Pack 3) 12
Повідомлени Your Internet cable is not plugged in
(IHTepHeT-Ka6eIb He niiKluOyeHo) 13
Повимлени Cannot access your router
(HemoxjlnBO OTpImaTn DoCTyn Do MapuTy3aTopa). 14
WEP-ze6a3OBnMeToD 1uΦpyBaHHa,HeHaCTiBKnHaDiHn,YK WPA.
ПРИМITKA.
UcynHeHnHeCnpaBHOCTeH
Ihopmaiz y zuomy po3diJI MOxE DoONOMOTn po3B'3aTn po3NOBcIOJxHei np6lemn, 10 BUNHkaOTb nID qac IHCTaJIu, Ta nIKNIOHTncsdo IHTepHeTy. Ha KOMNaKT-DnCKy DO MapwpyTN3aTopa e IHCTaJIuHa nporpama Cisco Connect, 10 Do3BOJAE NERKO nIKNIOUATm MepexeBi npicTpoi, 3MIHOBATn HalaWtYBaHHa MapwpyTN3aTopa, KOHTPOJIIOBATn DOCTyn IraTROCTeB, BMKAtN 6aTBkICbkKoHTPOlb Ta nIKNIOUATncsdo IHTEpHeTy. Cisco Connect nID qac IHCTaJIuZI takoX BCTAHOBIOETbcra Ha Baaw KOMN'OTep. JAKso nporpamc Cisco Connect He BdaETbcra BVKOHATn IHCTaJIuO, y zuomy po3diJI MOxHa 3HaNTn notpi6Hi piueHHA.
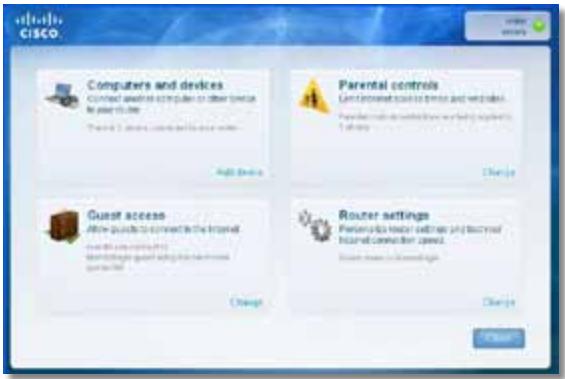
- Hatachitb Nsck, Yci nporpamn, nOtim Bn6epiB Cisco Connect.

BiДкрпсьсг罗ЛовсMeHIO Cisco Connect.
Uo6 3anyctntu Cisco Connect Ha KOMn'ioTepi i3 cnCTeMoIO Mac OS X:
- BiKpnTe Finder i Bn6epiB Pporpamn Ha naHeni IibOpyu.

Uo6 BCTaHOBTu Service Pack 3:
- Knaichi Nobinahn B nobiOmJeHni Cisco Connect npo nomuKy a6o niiKlouItbcy do Be6-caity Microsoft Update (update.microsoft.com/ windowsupdate).
- Дотримутесь сгтукци Ha Be6-caTi a60 3BepHITbC8 B KOMпанIO Microsoft,якso Bamnotpi6Ha ДогаTKOBa ДОПOMORA.
- Пись заразхения Татановления Service Pack 3 azynctitп рогаму Setup (Встановления) на komпакт-диwickу до марштузаТopa.
Повимлень Your Internet cable is not plugged in (Intergent-kaбель не пidкlioуно)
KIO nIac cnpoBn BCTaHOBHeHHaMapwpyTn3aTopa 3'YBnEbCn NOBIOMHeHHN 'Your Internet cable is not plugged in》(lHTepHeT-Ka6eJb He niKluOeHo), BVkoHaTe TaKi KpOKn IJI BnpiUeHH np6JeMn.
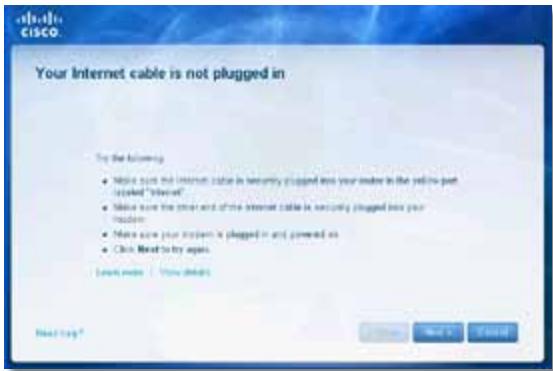
Uo6 Bvpiuntn npo6nemy:
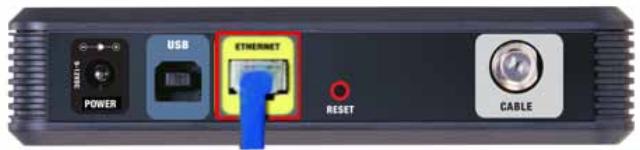
BuznKa6eBbNooMoedeMy33aoy
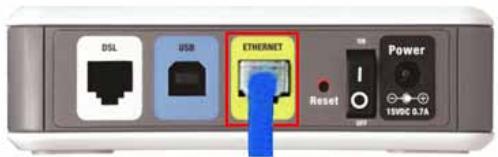
BuznyoMoemyDSL33aoy
- NepekoHaITeC8, 10 MoDEm PiIKKluOeHo Do eJIeKTpOmepeKi Ta BBIMKHeHO. KaHbOMy E nepemMkau KINBLeHHn, nepekoHaITeC8. 10 No I BCTaHOBJeHO B pIoJKeHHN ON (YBMK.) a6o I.
3.ЯкwoiHTepHeT-nocnynHaadaIObCBAm 3aДOnOMoroIO Ka6eJIIO,pepeBipTe, 1o6do npOpy CABLE (KA6EJIb) Ha moJemi 6yIo NidkIIOyeHO KoAKciaIbHn Ka6eJIb,HaadHn npObaIdepom HTepHeTy.
A6o J, kIHTepHET HaadaTbca 3a DOnOMOrOIO a6OHeHTcbKoi IiHiD SL, IpekeHaTeC, 10 TeJefoh DSL nIKluoyeHO do npTy DSL Ha Mojemi.
4.Якwo kOMn'IOTe paHIe 6yNo NiKJIuOeHo Do MoEmy 3a DoIOnOMoroUo USBKa6eJIIO, BiD'EnHaIte USB-Ka6eJIb.
5. Повернить сд д Вікha Cisco Connect Ta HаTNCHITb Next (Дani), пбб NOВТОПИТССРОБ. Ржо ВіКН 6ул зakрITO, зарсгтп prorpaMy Setup (Встановлени) Ha KOMNAKT-DИСКУ до МарштуNTaTOPa.
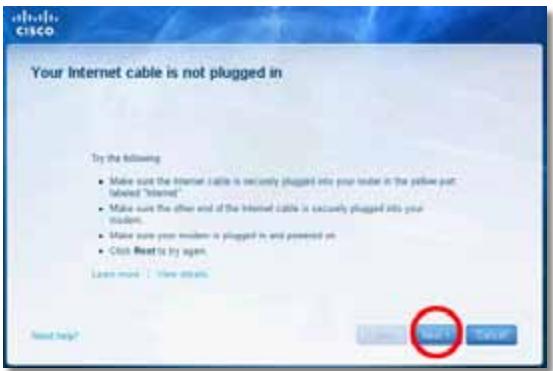
Повidiомлени Cannot access your router (Hemожимьо отpresmaТи достун до марштунзаTopа)
JaKIO Do MapuTy3aTopa He BdaeTbCg OTpMaTu N DOCTyIYepe3 Te, IIO KOMN'IoTeP He NiKJIouyeNo Do MepeXi, BVKOHaiTe Taki KpOKn Dny BvpiWeHHN pno6Jemn.
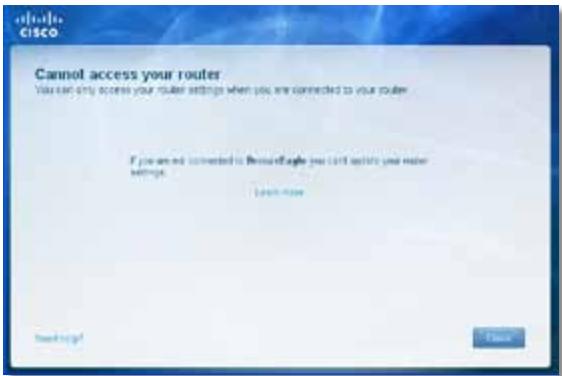
Lio6 oTpImaTn DocTy np Do MapuTy3aTopa, Notpi6Ho NiKJIOUHTncsdo BlaCHOI MEpexi. KaHapazYBaC e63dpoTOBn DocTy n Do lHTepHETy, pO6Lnema MoKe PONraTn BV TOMy, 0o BN BuNaIDKOBO NiKJIOUHINcSdo iHWOI 63dpoTOBOI MEpexi.
Uo6 BnpiuHTn npo6emy Ha KOMN'IoTepax i3 cunTeMoIO Windows:
- Ha pobochomy ctoni Windows dBiCi KlaunHt bpaoIO KHONKO MmHi Ha 3naKy 6e3dpoTOBOr 3B'3Ky Ha naHeI 3aBdaHb.

- Hatachitb Ipepernaytu DocTynni 6e3apoToBi Mepeksi. 3'ABNTbcra CnncOK doctynHnx Mepek.
| Disable Status Repair |
| View Available Wireless Networks |
| Change Windows Firewall settings |
| Open Network Connections |
- Knauchitb Ha3By BnacHoi Mepeksi, a notim HataNCHtB Pdklountncy. y npKnadi HxJee Komn'IOTep 6yNo nikLIOeHo Do iHsOIO Mepeksi niD Ha3BOIO JimsRouter. Ha3By Mepeksi Linksys cepii E BronzeEagle y npKnadi noka3aHO BnDIneHHM.
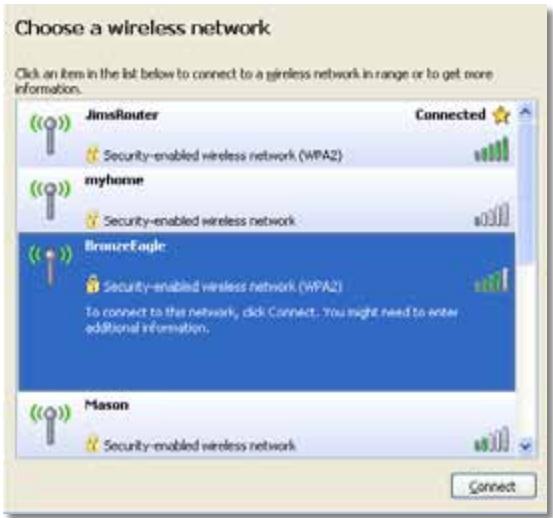
4.Якso 3'Явntьса 3aNTДЯ BBeDEHн KJIIOUma MEPEKIXI, BBeDITb CBI napoB (KJIIOU 3axNCTy)у NOJIA KJIIOUma MEPEKIXI Ta NiIITBepdXeHHN KJIIOUma MEPEKIXI a NOTIM HaTnCHITb PIIkKIOUHTnCra.
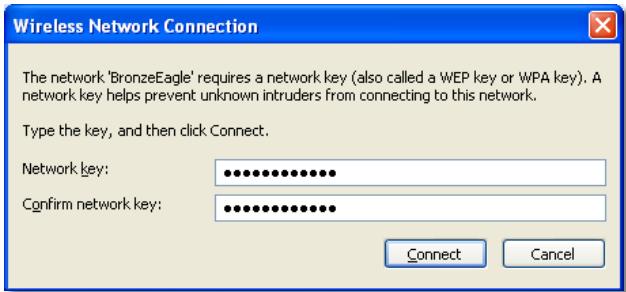
KoMn'otep nikknoHTbcra do MepeXi, i DocTyn do MapuTnaTopa Mae 6yTu.
Uo6 BvpiuHTn npo6emy Ha KOMn'IoTepax i3 cnCTeMoIO Mac:
- Ha naheni MeHIO Bropi ekpaHa KnauHiTb 3HaQOK AirPort. 3'ABNTbcnCnCOK 6e3dpoTOBux Mepex. PporpamOo Cisco Connect Bawiin Mepexi aBTOMaTuHNo pncBOEHO Ha3By.
Y npnKnaI HnXue KOMn'IOTep 6yIo NiIKnIoueHo Do iHwoI MepeXi NiI H a3BOIO JimsRouter. Ha3By MepeXi Linksys cepii E BronzeEagle y npnKnaI pOKa3aHO BnDiJIeHNHaM.
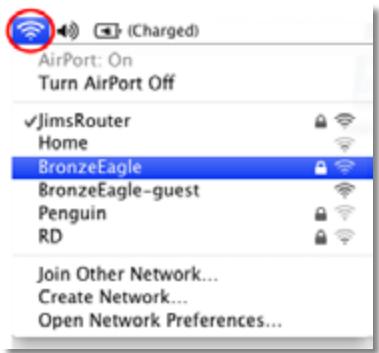
- KnaunHb HauBv 6e3DpoToboi Mepexi CBORo MapuTy3aTopa Linksys cepii E (BronzeEagle y npknadi).
- BveiMb npoBcBoe6e3pOToBOoi MepeXi (KnUoy 3axncty) y none Napolb, notim HATNCiTB OK.

BezdpoToBm npicTpi Mae nipTpmyBaTu WPA/WPA2.
- Ha 6e3dpoTObOMy MepeXeBOMy npicTpo Bn6epiTb Ha3By MepeXi CBOrO MapuTyN3aTopa Ta VBeiItb napoIb (KJIIOU 3axnCTy).
- Y Cisco Connect HATNCHITb Next (Jani).
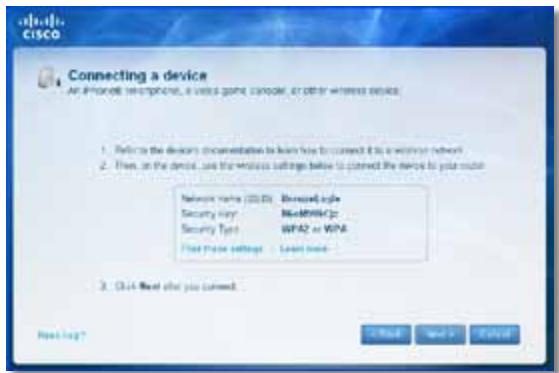
PpNKlaIa: 3NaIITb MeHIO Wi-Fi y CBOcMy cMaprfoHi qn iHsOMy 6e3dpoTobOMy npicTrooi Ta BnKOHaIte NOnuK DocTyunHx 6e3dpoTobHX mepek. Y cBOMy npKladai 3 BnKOpNCTaHnM iHΦopMaui II pro Mepexy, HadaHOi Cisco Connect, kY noka3aHo Ha IonepeHbOMy ekpaHI, Bn6epitb BronzeEagle.
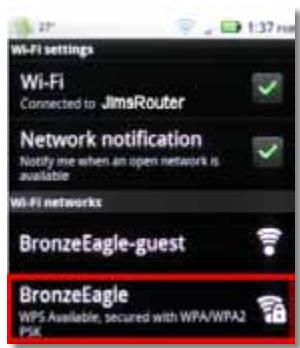
Android
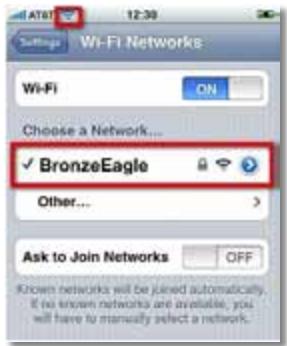
iPhone
- BVeDiTb napoiB (KJIou 3axnCTy), HadaHni Cisco Connect. Y cIbOmy npNKlaDi KJIou 3axnCTy - B6eM9UkCjz.
ПРМITKA
y napoli BpaxoByeTbCpeRicTp CmBolIIB. IpekoHaTeCra, 0c CmBolN BBOaTbCBAOTpiHOMy pericpti.
- Koln 6e3dpoTobn npucptpi 6yde ycniuho niKluoyeno do 6e3dpoTOBoi Mepeki, BBeiItb Ha3By dny npucptpoB Cisco Connect, a notim HATNCHTb Finish (3aBepwn).
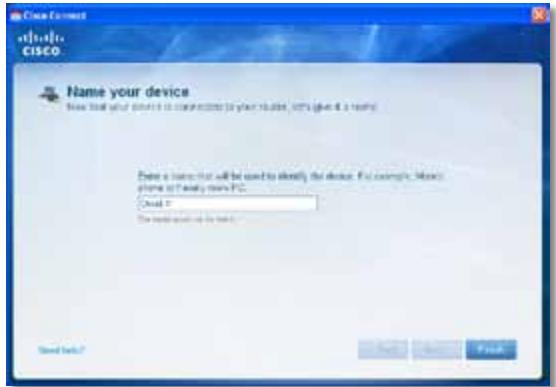
Cpeunphiakii
Linksys E900
| Ha3ba moDéni | Linksys E900 |
| Опис | Бe3dpoToBn МаршуТиЗаТор Wireless-N |
| Homep moDéni | E900 |
| СтандагтNi | 802.11n, 802.11g, 802.11b, 802.3u |
| Пор Tin | ЖиВLENь, InteRPHeT ta Ethernet (1-4) |
| Кнорки | Reset (Скuidань), Wi-Fi Protected Setup™ |
| СвiTлODiOДn | ЖиВLENь/Wi-Fi Protected Setup, InteRPHeT, Ethernet (1-4) |
| Тип Кабелю | CAT 5e |
| ПOTужнисть пeredачi | 802.11n (20 MГц): 15,0 ± 1,5 dBm до CH6, MCS 0~4, MCS 8~12 13,5 ± 1,5 dBm до CH6, MCS 5~7, MCS 13~15 802.11n (40 MГц): 14,0 ± 1,5 dBm до CH6, MCS 0~4, MCS 8~12 13,5 ± 1,5dBm до CH6, MCS 5~7, MCS 13~15 802.11g: 14,5 ± 1,5 dBm до CH6, уci webuДковоcti 802.11b: 16,5 ± 1,5 dBm до CH6, уci webuДковоcti |
| Підсілінney aHTeHи | ≤2,0 dBi, ≤4,0 dBi (2 aHTeHи) |
| UPnP | ПідtrpIMyΕлья |
| Зхисст 6e3dpoToBOro 3В'яЗky | Wi-Fi Protected AccessTM 2 (WPA2), WEP, 6e3dpoToBe φíльтуваньу MAC |
| Розяд клича зaxисту | do 128-розядноушифруваньу |
3oBhiHoi KaKTopu
Cach khoi dong Cisco Connect 3
Su dung Cisco Connect de quan ly bo dinh tuyen 3
Cach cai dāt bó dinh tuyén theo cach thu cóng . . . . . . . . . . . . . . .
Cái hìn nang cao
Wireless > Basic Wireless Settings
(Khongday>Cai dát khong day co bān). 6
Cai dαt khongday 6
BáoMZt khOngday
Wireless > Wireless Security (KhôngDay > Bǎo mat khôngDay) .8
Tuy chon cānhàn 8
Thòng bó Your Internet cable is not plugged in
(Chua cãm cap Internet) 13
Thòng bó cannot access your router
(Khong the truy cap bo dinh tuyén). 14
Thong bao Device not found (Khong tim thay thiét bj). 16
Đếctinh ký thuat
Linksys E900. 18
Linksys E1200. 19
Linksys E1500. 20
Linksys E2500. 21
Linksys E3200. 22
Linksys E4200. 23
Tóng quan sàn phám
E900/E1200/E1500/E2500/E3200
Matsau

Hinh dang bo dinh tuyén co the thay doi
- Cóng USB (chi tiên cho E3200)—Dé chia sé dung luong ò dia vói cac nguòi dung kháctron gäng cua ban hoac trèn InternetMZt cach dé dang, két nài ò USB vói cóng nay.
- Cóng Ethernet—Két não cap Ethernet (con duoc goi là cap mang) vói cac cóng Fast Ethernet (10/100,дан cho E900 va E1200 va E1500) bóc Gigabit (10/100/1000,дан cho E2500 va E3200), có mau xanh va cac thiet bi mäng Ethernet códay khac trèn mäng;cua ban.
- Cóng Internet—Két néi cap Ethernet (con duoc goi là cap mang hoac Internet) vói cóng nay, có mù vàng, vá vói modem că ban.
Nút Wi-Fi Protected SetupTM—Nhán nút nay dé cau hinh bao mát khòngDay trèn cac thiét bi mang kich hoat Cai dāt bao vě Wi-Fi mòt cach dé dang. De biét them thong tin, hyxem "Báo mát khòngday" trèn tranq 8.
- Chi bónguàn dièn—Luǒn sáng khi có nguò dièn vā két néi Cài dǎt bǎo vě Wi-Fi thành cóng. Nháp nháy chām khi khǒi dòng, náng cap chuǒng trinh co sò vàstrong két néi Cài dǎt bǎo vě Wi-Fi. Nháp nháy nhanh khi có lòi Cài dǎt bǎo vě Wi-Fi.
- Nguon dien—Két此時 bién dāi nguón AC di kém vovi cóng nay.
THANTRONG
Chi su dung bo thich ung di cung bo dinh tuyen cua ban.
- Nút nguôn—Nhán | (bát) dé bát bó dinh tuyén.
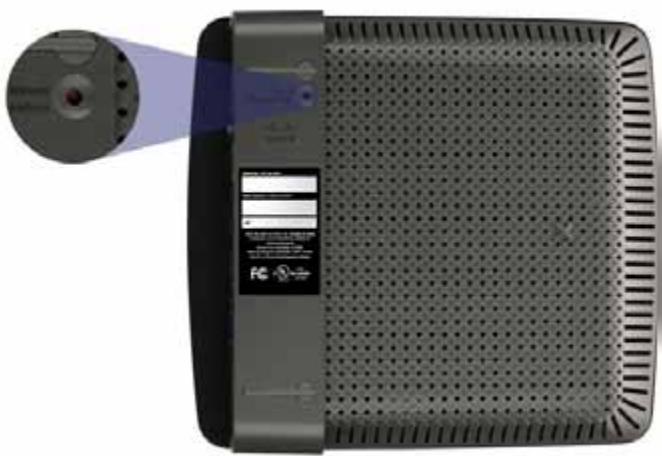
Māt dáy
Hinh dang bo dinh tuyén co the thay dai
Cach khói dong Cisco Connect
Khi ban chay CD cai dát, Cisco Connect (phân mém cai dát cua bó dinh tuyén) duoc tu dong cai dát trén may tính cua ban. Sau do, ban co the su dung Cisco Connect de quan ly bó dinh tuyénMZt cach dé dang.
LUU Y:
Telstra Cable (Cáp Telstra)
- Bám dup vao biéu tuqng Cisco Connect.

Menu chinh Cisco Connect ro ra.
B oxidative tuyen cua ban chuva duoc cai dathanh cong
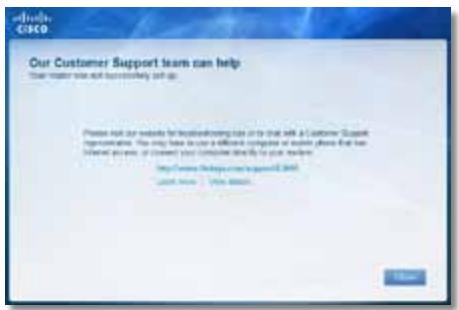
Thòng bóa Your Internet cable is not plugged in (Chūa*cám cap Internet)
Néu bàn nhān duoc thong bó “Your Internet cable is not plugged in” (Chua cām cap Internet) khi có cai dαt bó dinh tuyén, hāy lam theo cac buóc khác phuc su co sau.
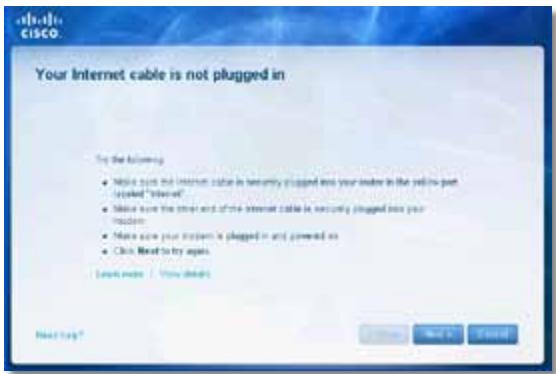
Dé khac phuc su co:
- Dân bǎo rāng cap Ethernet hoac Internet (hoac cap gion voi cap duoc cung cap cung bó dinh tuyén) dā duoc cam chac chan vao cóng Internet mau vang o' phia sau bó dinh tuyén vài vovi cóng tuong ung trén modemCEE bān. Cóng nay tiên modem thuong có nhān Ethernet, ngung có the co ten Internet hoac WAN.

Māt sau bó dinh tuyén
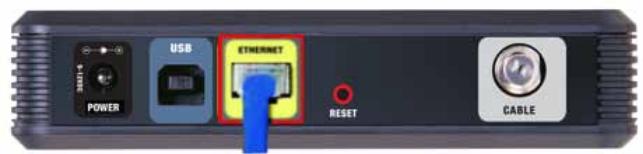
Matsau modem cap

Măt sau modem DSL
-
Dàm bao rang modem cua bān dā cam vào nguò nà dā bát. Néu có thiet bi chuyén mach nguò, dàm bao rang thiet bi nay dā duoc BAT hoac ò vi tri I.
-
Néu dich vú Internet cua ban l'a cap, xác nhàn ràng cóng CABLE (CÁP) cua modem cap dã két nãoói cap dong truc duoc cung cap bói ISP cua ban.
Hoac, néu dìch vú Internet cuà ban là DSL, dàm bǎo ràng duòng day dién thoaí DSL dā két néi vovi cóng DSL cuà modem. - Néu may tính cua bān dā két néi vovi modem bang cap USB trunc day, hāy rút cap USB.
- Quay tro lái cua so Cisco Connect và bám Next (Tiép theo) dé thú lái. néu cua so dā dong, chay lái chuong trinh Setup (Cài dát) tren CD cua bó dinh tuyén.
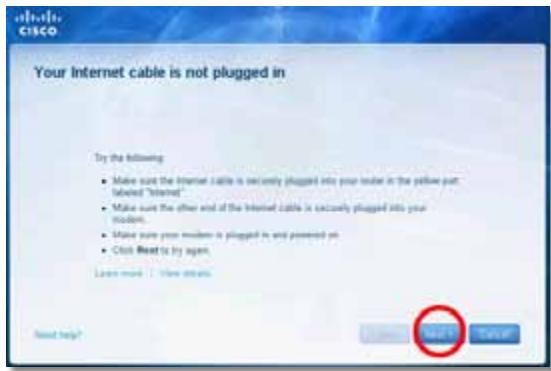
Thòng bó Cannot access your router (Khòng the truy cap bó dinh tuyén)
Den LED Nguon/Wi-Fi Protected Setup, Internet, Ethernet (1-4)
Loai cap CAT 5e
Nguonphát 802.11n (20 MHz):
15,0 ± 1,5dBm @ CH6, MCS 0~4, MCS 8~12
13,5 ± 1,5dBm @ CH6, MCS 5~7, MCS 13~15
802.11n (40 MHz):
14,0 ± 1,5dBm @ CH6, MCS 0~4, MCS 8~12
13,5 ± 1,5dBm @ CH6, MCS 5~7, MCS 13~15
802.11g:
14,5 ± 1,5dBm @ CH6, tát cà dinh mác
802.11b:
16,5 ± 1,5dBm @ CH6, tát cà dinh mác
Dǒ tǎng fích cǔa āng ten V1: ≤2.5 dBi, ≤4.0 dBi (2 āng ten)
V2: ≤2.0 dBi, ≤4.0 dBi (2 Ång ten)
UPnP Co hfo tro
Báo mát khòngday Wi-Fi Protected Access™ 2 (WPA2), WEP, loc MAC khòngday
Bit mā khoá bao māt Mā hoá tí da 128-bit
Mói truong
Kich thuoc 188,7 × 151,7 × 31,2 mm
(7,43^ × 5,97^ × 1,23^ )
Trong luong thiet bi V1: 252,7g (8,91 oz.) V2: 202,0g (7,13 oz.)
Nguôn 12V, 0,5A
Chungchi FCC,UL/cUL,ICES-003,RSS210
CE, Wi-Fi (IEEE 802.11b/g/n),
WPA2™, WMM®, Wi-Fi Protected
Setup, Windows 7
Nhiét do hoat dong 0 dén 40^ (32 dén 104^ )
Nhiét dô bao quàn -20 dén 60°C (-4 dén 140°F)
5 GHz (3 Ång ten PIFA trong)
PIFA 1 ≤ 3,71 dBi (Phài)
PIFA 2 ≤ 3,60 dBi (Truóc)
PIFA 3 ≤ 4,27 dBi (Trái)
Hé thóng têp duoc hô tro dansh cho Thiét bi luu tru
UPnP
Tinh nang bao mhat
Bit mā khoá bao mát
FAT32, NTFS, and HSF+
Có hótro
WEP, WPA, WPA2
Ma hóá tói da 128-bit
Mói truong
| Kích thúóc | 225 x 25 x 160 mm (8,86" x 0,98" x 6,30") |
| Trùng网络传播这段时间 | 360 g (12,7 oz) |
| Nguàn | 12V, 2A |
| Chúng chì | FCC, IC, CE, Wi-Fi a/b/g/n, Windows 7, DLNA |
| Nhiế tát hoat dòng | 0 dén 40°C (32 dén 104°F) |
| Nhiế tát bǎo quán | -20 dén 60°C (-4 dén 140°F) |
| Dó am hoàt dòng | 10 - 80%, do am tuǒng bói, không ngùng tú |
| Dó am bǎo quán | Không ngùng tú 5 dén 90% |
LUU Y
Dé biét thong tin quy dinh, bao hanh va an toan, hyx xem CD di kém vói bó dinh tuyén hoac truy cap Linksys.com/support.
Cac dac tinh ky thuat co the thay dai ma khong cān thong bao.
Dat hièu suát tí da nhò cac dac tinh kǔ thuát cuà Chuan IEEE 802.11. Hièu suát thuc né có the thay doi, trong do có cóng suá t cua mang khòngday, tóc do truyen du lieu, pham vi vùng pu sóng. Hièu suát pu tuoc vào nhieu yéu tó, dieu kien v bién só nuh: khoang cach tí diem truy cap, luu luong mang, vát lieuu va cau trunc xay dung, hé dieu hàn h s dung, két hop cac san pham khòng day, nhieu va cac dieu kien bát loi khac.
Truy cap linksys.com/support de nhān hō tro dā dat giāi thuǒng

- Lg> Lg>
- #
- Jg
- i 100
- E-Series
- P
- Cisco Connect
- Lgds 4gol 1dcl a
- Laaan
- A
- Paaa Jg5
- (4.1) Language
- (Net) Internet Setup
- (1)Internet Connection Type
- (DHCP - L) Automatic Configuration - DHCP
- (IP)Static IP
- PPPoE
- (Lw)Basic Setup<(A) Setup
- Basic Wireless Settings < (s L L) Wireless
- (aLw81 a.5LwU1 cUc)
- ab = 16
- a + b = 2a
- PPTP
- L2TP
- (Telstra J ) Telstra Cable
- ab = 30
- BAC = BCAC = 35
- LwUJnLoX
- L) Wireless Security < (L) Wireless
- ( x,y) = ( ab,52xy)
- (Java) Disabled
- RADIUS
- L_g > L_ l_g( L_h + L_h)
- Applications
- Get Windows XP Service Pack 3
- (Windows XP Service Pack 3
- Device not found
- Linksys E1200
- aill lbeqll
- ED = 2L0
- Linksys E1500
- aill lheol
- S_ OBC = S_ BOC + S_ BOC
- Linksys E2500
- Linksys E3200
- Linksys E4200
- CbDbPjKaHne
- TexHnueckn daHHN
- IzhneoiOToDony
- E4200
- IzhneD otrope
- Izhneoi3aI
- BHIMAHNE
- HactpoBbHe Ha pyTepa E-Series
- Kbde da hamepnte ose nomoi
- Kakда наст ponte pytepa
- Kak da cTapTnpaTe Cisco Connect
- 3A6EJIEXKKA:
- 3a da cnapate Cisco Connect 3a npbB nbr:
- Static IP (CTaTmueH IP)
- Telstra Cable
- Wireless > Basic Wireless Settings
- WPA2/WPA Mixed Mode (WPA2/WPA syme Hen pejkm), WPA2 Personal (WPA2 liuHa), WPA Personal (WPA liuHa)
- 3ABEJIEXKNI
- 3aДастарate Cisco Connect Ha KomnIOrIbpc Mac OS X:
- 3A6EJIEXKA
- 3ABEJIEXKA
- TexHnueckn daHnn
- BENEKNI
- Pa60Tha cpega
- BENEXKNI
- Pa6oTHa cpega
- Pa60Tha cpea
- Obsah
- Přehled výrobku
- WPA2/WPA Mixed Mode, WPA2 Personal, WPA Personal
- POZNÁMKY
- WPA2/WPA Enterprise Mixed Mode, WPA2 Enterprise, WPA Enterprise
- Sādan startes Cisco Connect
- NOTER
- PpOdeltaPpOεC
- Eπισκόπηση προῖντος
- E900/E1200/E1500/E2500/E3200
- πίσω ὄψη
- H M E I H
- Tva yekataohtnoe to Service Pack 3:
- Advanced Configuration
- Wireless Security
- Troubleshooting
- Specifications
- Product overview
- Your router's appearance may vary
- CAUTION
- Top view
- Back view
- Setting Up Your E-Series Router
- Where to find more help
- How to set up your router
- How to start Cisco Connect
- NOTE:
- To start Cisco Connect for the first time:
- Use Cisco Connect to manage your router
- How to manually set up your router
- How to open the browser-based utility
- To open the browser-based utility:
- TIPS
- Setup > Basic Setup
- Language
- Internet Setup
- Internet Connection Type
- Automatic Configuration - DHCP
- Static IP
- Connect on Demand or Keep Alive
- NOTE
- Wireless Settings
- Wireless > Wireless Security
- Office options
- Option settings
- NOTES
- WEP
- Disabled
- How to run Cisco Connect after setup
- To start Cisco Connect on a Windows computer:
- To start Cisco Connect on a Mac OS X computer:
- Your router was not successfully set up
- If Cisco Connect did not complete the setup, you can try the following:
- Get Windows XP Service Pack 3 message
- TIP
- To install Service Pack 3:
- Your Internet cable is not plugged in
- message
- To fix the problem:
- Cannot access your router message
- To fix the problem on Windows computers:
- To fix the problem on Mac computers:
- Device not found message
- Linksys E900
- Environmental
- Contedio
- WPA2/WPA Mixed Mode (Modo WPA2/WPA mixto), WPA2 Personal y WPA Personal
- NOTAS
- HUOMAUTUKSIA
- Telstra Cable (Câble Telstra)
- WPA2/WPA mode mixte, WPA2 personnel, WPA personnel
- REMARQUES
- MEGJEGYZESEK
- Static IP (IP Statics)
- CATATAN
- WPA2/WPA Enterprise Mixed Mode (WPA2/WPA Enterprise Mode Campuran), WPA2 Enterprise, WPA Enterprise
- Lingkungan
- Internet Connection Type (Tipodi connectione Internet)
- Static IP (IP statico)
- Telstra Cable (Cavo Telstra)
- Wireless > Wireless Security (Protezione wireless)
- WPA2/WPA Mixed Mode (Modalità mista WPA2/WPA), WPA2 Personal, WPA Personal
- WPA2/WPA Enterprise Mixed Mode (Modalità mista WPA2/WPA Enterprise), WPA2 Enterprise, WPA Enterprise
- Per installment Service Pack 3:
- Cisco Connect starten
- OPMERKINGEN
- Internet Connection Type (Type Internett-tilkobling)
- MERKNADER
- MERK:
- Modo misto WPA2/WPA Enterprise, WPA2 Enterprise, WPA Enterprise
- Telstra Cable (Cabo Telstra)
- WPA2/WPA Mixed Mode (Modo misto WPA2/WPA), WPA2 Personal (WPA2 personal), WPA Personal (WPA personal)
- OBSERVATIONS
- Para instalar Service Pack 3:
- Static IP (IP static)
- Telstra Cable (Cablu Telstra)
- WPA2/WPA Enterprise Mixed Mode (Mod mixt WPA2/WPA Enterprise), WPA2 Enterprise, WPA Enterprise
- TexHnueckne xapaKTepeNCTnKN
- O63opПробodyкта
- BheuHn Bm BaWero MappyTu3aTopa MoKeT OTNuHaTbCt OT NOKa3aHHoro Ha pucyHke
- Internet Connection Type (Tin coeHHeNc INHTepHeTOM)
- Automatic Configuration - DHCP (AbTomatnuecka konΦuŋpɑuŋa-DHCP)
- Static IP (Ctatauheckn IP-aDpec)
- ПОНМЕЧАНЕ
- ПОНМЕЧАЙ
- ПРИМЕЧАЦА
- CoobüeHne Get Windows XP Service Pack 3 (Получumb naKem обновели徳 3 за Windows XP)
- COBET
- CoobseHne Device not found (YcmpoUcMbO He hauDeHo)
- ПОНМЕЧАНЯ
- OPOMBA
- Starta Cisco Connect
- nnuu
- W
- 1
- 75
- Static IP (IP地址)
- Connect on Demand (d) uauuuaaauauuauu) uauuauuuuuuuuuuuuuuuuuuuuuuuuuuuuuuuuuuuuuuuuuuuuuuuuuuuuuuuuuuuuuuuuuuuuuuuuuuuuuuuuuuuuuuuuuuuuuuuuuuuuuuuuuuuuuuuuuuuuuuuuuuuuuuuuuuuuuuuuuuuuuuuuuuuuuuuuuuuuuuuuuuuuuuuuuuuuuuuuuuuuuuuuuuuuuuuuuuuuuuuuuUU
- >
- n75v7u7u7u
- vuiu
- n
- vua
- vaiy
- V
- Disabled (ilna)
- n56n
- (Windows XP Service Pack 3)
- 山
- Service Pack 3:
- Your Internet cable is not plugged in (
- unununulnyu:
- Cannot access your router
- ()
- Device not found (Jwwnn)
- vnnn nnnn nn nnnnnnnnnnnnnnnnnnnnnnnnnnnnnnnnnnnnnnnnnnnnnnnnnnnnnnnnnnnnnnnnnnnnnnnnnnnnnnnnnnnnnnnnnnnnnnnnnnnnnnnnnnnnnnnnnnnnnnnnnnnnnnnnnnnnnnnnnnnnnn nn nannn nn nannn nn nannn nn nannn nn nannn nn nannn nn nannn nn nannn nn nannn nn nannn nn nannn nn nannn nn nannn nn nannn nn nannn nn nannn nn nannn nn nannn nn nannn nn nannn nn nannn nn nannn nn nannn nn nannn nn nannn nn nennn nn nannn nn nannn nn nannn nn nannn nn nannn nn nannn nn nannn nn nannn nn nannn nn nannn nn nannn nn nannn nn nannn nn nannn nn nannn nn nannn nn nannn nn nannn nn nannn nn nannn nn nannn nn nannn nn nannn nn nannn nn narnn nn
- nunnnnna
- Içindekiler
- Ürüne Genel Bakış
- E-Series Router'inizi Kurma
- Static IP (Statik IP)
- WPA2/WPA Mixed Mode (WPA2/WPA Karma Modu), WPA2 Personal (WPA2 Kişisel), WPA Personal (WPA Kişisel)
- NOTLAR
- WPA2/WPA Enterprise Mixed Mode (WPA2/WPA Şirket Karma Modu), WPA2 Enterprise (WPA2 Şirket), WPA Enterprise (WPA Şirket)
- Додасткови налaweтувашия
- 3axnct 6e3dpoTOBOrO 3B'ЯЗКу
- UcynenHHeCnPaBHOCTeI
- ПРИМITKA.
- UcynHeHnHeCnpaBHOCTeH
- Uo6 BCTaHOBTu Service Pack 3:
- Повимлень Your Internet cable is not plugged in (Intergent-kaбель не пidкlioуно)
- Uo6 Bvpiuntn npo6nemy:
- Повidiомлени Cannot access your router (Hemожимьо отpresmaТи достун до марштунзаTopа)
- Uo6 BnpiuHTn npo6emy Ha KOMN'IoTepax i3 cunTeMoIO Windows:
- Uo6 BvpiuHTn npo6emy Ha KOMn'IoTepax i3 cnCTeMoIO Mac:
- ПРМITKA
- Cpeunphiakii
- 3oBhiHoi KaKTopu
- Cái hìn nang cao
- BáoMZt khOngday
- Đếctinh ký thuat
- Tóng quan sàn phám
- Hinh dang bo dinh tuyén co the thay doi
- THANTRONG
- Cach khói dong Cisco Connect
- LUU Y:
- Telstra Cable (Cáp Telstra)
- B oxidative tuyen cua ban chuva duoc cai dathanh cong
- Thòng bóa Your Internet cable is not plugged in (Chūa*cám cap Internet)
- Dé khac phuc su co:
- Thòng bó Cannot access your router (Khòng the truy cap bó dinh tuyén)
- Mói truong
- LUU Y
Brand : LINKSYS
Model : E2500
Category : Wireless Router