
WRT3200ACM - Wireless Router LINKSYS - Free user manual and instructions
Find the device manual for free WRT3200ACM LINKSYS in PDF.
| Product Type | Wireless Router |
| Brand | Linksys |
| Model | WRT3200ACM |
| Dimensions (L x W x H) | 200 x 150 x 30 mm |
| Weight | 600 g |
| Power Supply | 12 V DC, 3 A |
| Wireless Standards | IEEE 802.11a/b/g/n/ac |
| Frequency Bands | Tri-band: 2.4 GHz + 2 x 5 GHz |
| Maximum Throughput | AC3200 (N600 + AC1300 + AC1300) |
| Ethernet Ports | 4 Gigabit ports (LAN) + 1 Gigabit port (WAN) |
| USB Ports | 1 x USB 3.0, 1 x eSATA/USB 2.0 combo |
| Antennas | 4 external detachable antennas |
| Processor | Marvell Armada 385 1.6 GHz dual core |
| Memory | 512 MB RAM, 128 MB Flash |
| Key Features | Tri-band AC3200, MU-MIMO, Beamforming, QoS, VPN Server/Client, Open Source ready |
| Security | WPA2 Personal/Enterprise, SPI firewall, MAC filtering, VPN IPsec/OpenVPN |
| Maintenance and Cleaning | Unplug the device, clean with a dry, soft cloth. Do not use chemicals. |
| Spare Parts and Repairability | No spare parts provided. Professional repair recommended. |
| General Information | Manual available as PDF on the manufacturer's website. 2-year warranty. |
Frequently Asked Questions - WRT3200ACM LINKSYS
User questions about WRT3200ACM LINKSYS
0 question about this device. Answer the ones you know or ask your own.
Ask a new question about this device
Download the instructions for your Wireless Router in PDF format for free! Find your manual WRT3200ACM - LINKSYS and take your electronic device back in hand. On this page are published all the documents necessary for the use of your device. WRT3200ACM by LINKSYS.
USER MANUAL WRT3200ACM LINKSYS
Wireless-G ADSL Home Gateway
About This Guide
Icon Descriptions
While reading through the User Guide you may see various icons that call attention to specific items. Below is a description of these icons:

NOTE: This check mark indicates that there is a note of interest and is something that you should pay special attention to while using the product.

WARNING: This exclamation point indicates that there is a caution or warning and it is something that could damage your property or product.

WEB: This globe icon indicates a noteworthy website address or e-mail address.
Online Resources
Website addresses in this document are listed without http:// in front of the address because most current web browsers do not require it. If you use an older web browser, you may have to add http:// in front of the web address.
| Resource | Website |
| Linksys | www.linksys.com |
| Linksys International | www.linksys.com/international |
| Glossary | www.linksys.com/glossary |
| Network Security | www.linksys.com/security |
Copyright and Trademarks
Specifications are subject to change without notice. Linksys is a registered trademark or trademark of Cisco Systems, Inc. and/or its affiliates in the U.S. and certain other countries. Copyright © 2007 Cisco Systems, Inc. All rights reserved. Other brands and product names are trademarks or registered trademarks of their respective holders.
Chapter 1: Product Overview 4
Front Panel. 4
Back Panel 4
Chapter 2: Wireless Security Checklist 5
General Network Security Guidelines 5
Additional Security Tips 5
Chapter 3: Installation 6
Connection 6
Setup 6
Chapter 4: Advanced Configuration 7
Setup > Basic Setup 7
Setup>DDNS. 11
Setup > Advanced Routing 12
Wireless > Basic Wireless Settings 13
Wireless > Wireless Security 13
Wireless > Wireless Access 15
Wireless > Advanced Wireless Settings 15
Security > Firewall 16
Security >VPN Passthrough. 17
Access Restrictions > Internet Access 17
Applications and Gaming > Single Port Forwarding. 18
Applications and Gaming > Port Range Forwarding 19
Applications & Gaming > Port Range Triggering 20
Applications and Gaming > DMZ 20
Applications and Gaming > QoS 20
Administration > Management. 21
Administration > Reporting 22
Administration > Diagnostics 23
Administration > Back Up & Restore. 23
Administration > Factory Defaults. 24
Administration > Firmware Upgrade 24
Administration > Reboot. 24
Status > Gateway. 25
Status > Local Network. 25
Status > Wireless Network 26
Status >DSL Connection. .26
Appendix A: Troubleshooting 28
Appendix B: Specifications 29
Appendix C: Warranty Information 30
Appendix D: Regulatory Information 31
FCC Statement 31
Safety Notices. 31
Industry Canada Statement 31
Declaration of Conformity with Regard to EU Directive 1999/5/EC (R&TTE Directive) .32
CE Marking 33
National Restrictions 33
Product Usage Restrictions 34
Technical Documents on www.linksys.com/international 34
User Information for Consumer Products Covered by EU Directive 2002/96/EC on Waste
Electric and Electronic Equipment (WEEE). 35
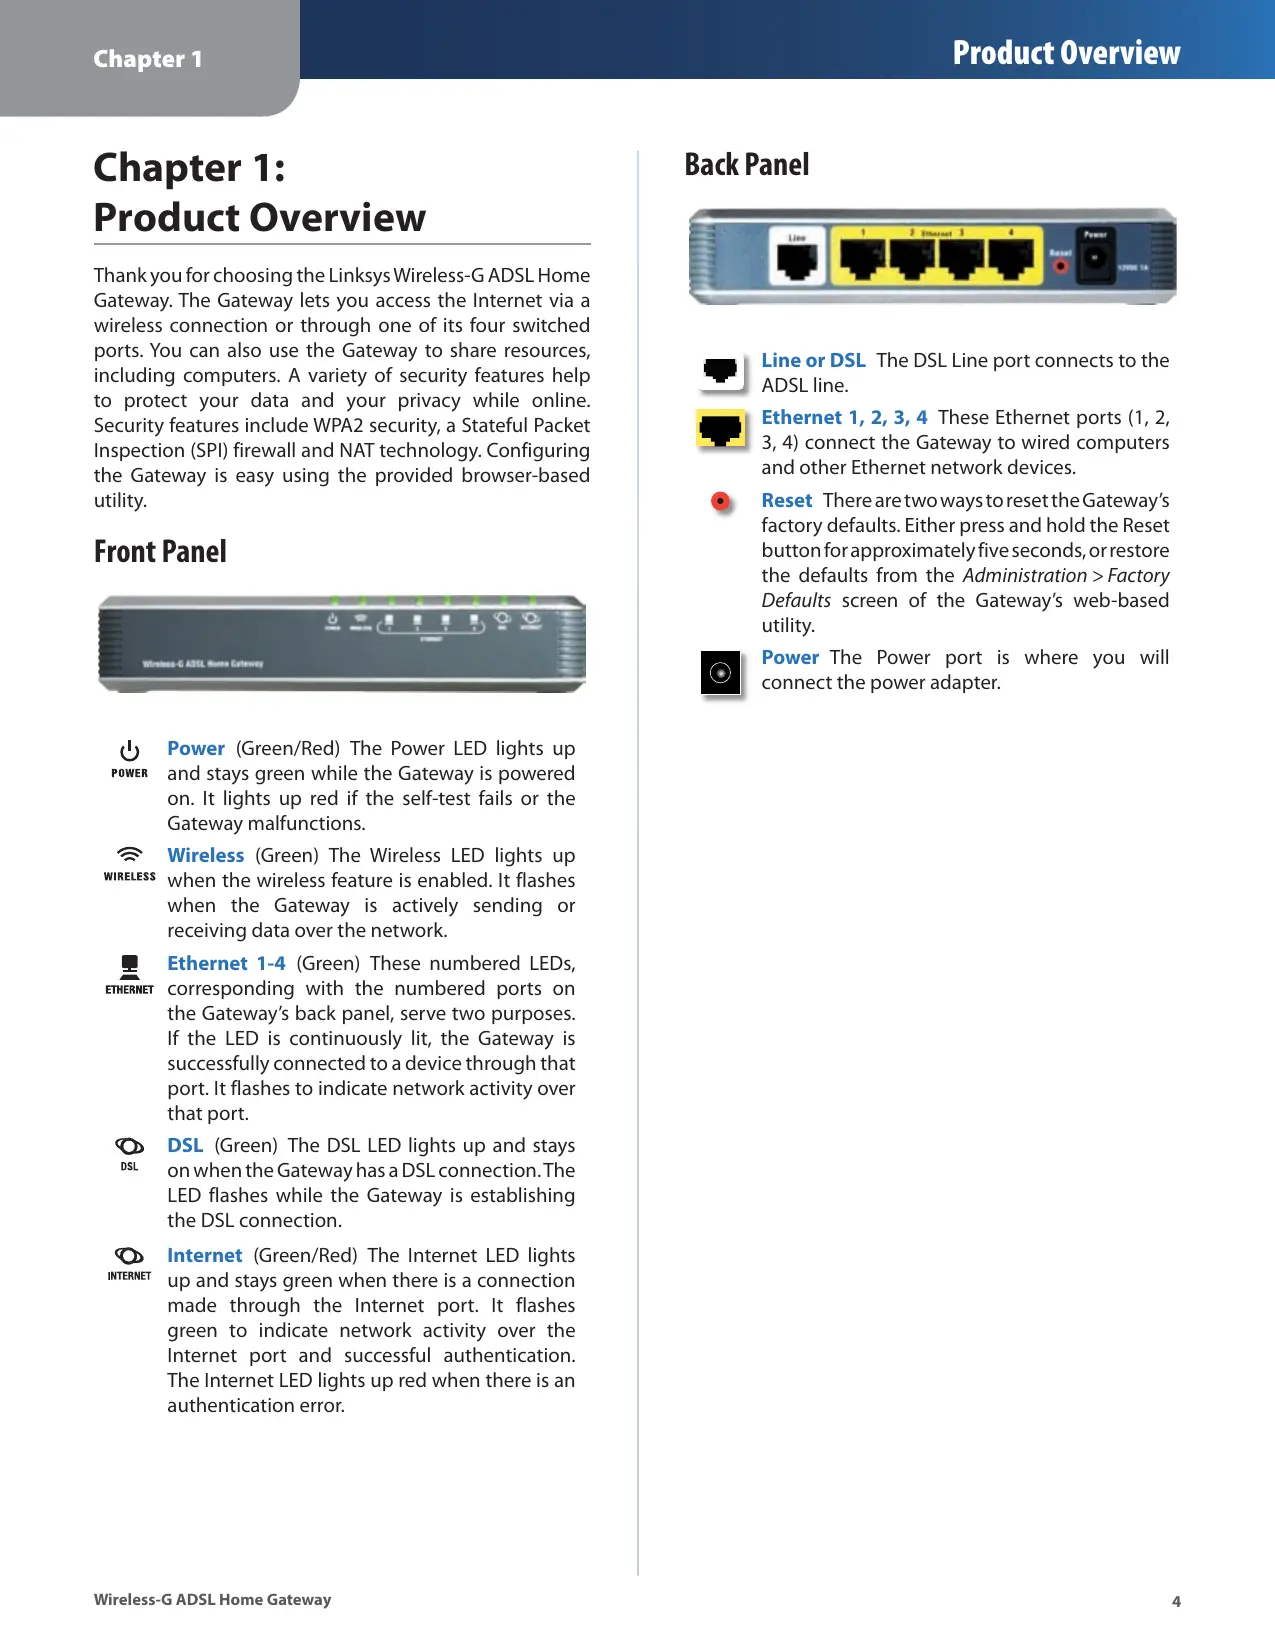
Chapter 1: Product Overview
Thank you for choosing the Linksys Wireless-G ADSL Home Gateway. The Gateway lets you access the Internet via a wireless connection or through one of its four switched ports. You can also use the Gateway to share resources, including computers. A variety of security features help to protect your data and your privacy while online. Security features include WPA2 security, a Stateful Packet Inspection (SPI) firewall and NAT technology. Configuring the Gateway is easy using the provided browser-based utility.
Front Panel
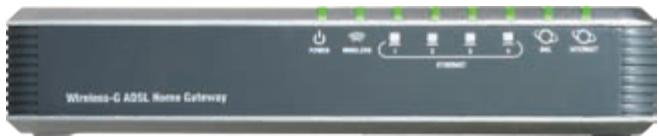

Power (Green/Red) The Power LED lights up and stays green while the Gateway is powered on. It lights up red if the self-test fails or the Gateway malfunctions.

Wireless (Green) The Wireless LED lights up when the wireless feature is enabled. It flashes when the Gateway is actively sending or receiving data over the network.

Ethernet 1-4 (Green) These numbered LEDs, corresponding with the numbered ports on the Gateway's back panel, serve two purposes. If the LED is continuously lit, the Gateway is successfully connected to a device through that port. It flashes to indicate network activity over that port.

DSL (Green) The DSL LED lights up and stays on when the Gateway has a DSL connection. The LED flashes while the Gateway is establishing the DSL connection.

Internet (Green/Red) The Internet LED lights up and stays green when there is a connection made through the Internet port. It flashes green to indicate network activity over the Internet port and successful authentication. The Internet LED lights up red when there is an authentication error.
Back Panel
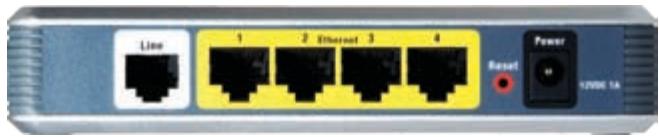

Line or DSL The DSL Line port connects to the ADSL line.

Ethernet 1, 2, 3, 4 These Ethernet ports (1, 2, 3, 4) connect the Gateway to wired computers and other Ethernet network devices.

Reset There are two ways to reset the Gateway's factory defaults. Either press and hold the Reset button for approximately five seconds, or restore the defaults from the Administration >Factory Defaults screen of the Gateway's web-based utility.

Power The Power port is where you will connect the power adapter.
Chapter 2: Wireless Security Checklist
Wireless networks are convenient and easy to install, so homes with high-speed Internet access are adopting them at a rapid pace. Because wireless networking operates by sending information over radio waves, it can be more vulnerable to intruders than a traditional wired network. Like signals from your cellular or cordless phones, signals from your wireless network can also be intercepted. Since you cannot physically prevent someone from connecting to your wireless network, you need to take some additional steps to keep your network secure.

1. Change the default wireless network name or SSID
Wireless devices have a default wireless network name or Service Set Identifier (SSID) set by the factory. This is the name of your wireless network, and can be up to 32 characters in length. Linksys wireless products use linksys as the default wireless network name. You should change the wireless network name to something unique to distinguish your wireless network from other wireless networks that may exist around you, but do not use personal information (such as your Social Security number) because this information may be available for anyone to see when browsing for wireless networks.

2. Change the default password
For wireless products such as access points, routers, and gateways, you will be asked for a password when you want to change their settings. These devices have a default password set by the factory. The Linksys default password is admin. Hackers know these defaults and may try to use them to access your wireless device and change your network settings. To thwart any unauthorized changes, customize the device's password so it will be hard to guess.

3. Enable MAC address filtering
Linksys routers and gateways give you the ability to enable Media Access Control (MAC) address filtering. The MAC address is a unique series of numbers and letters assigned to every networking device. With MAC address filtering enabled, wireless network access is provided solely for wireless devices with specific MAC addresses. For example, you can specify the MAC address of each computer in your home so that only those computers can access your wireless network.

4. Enable encryption
Encryption protects data transmitted over a wireless network. Wi-Fi Protected Access (WPA/WPA2) and Wired Equivalency Privacy (WEP) offer different levels of security for wireless communication.
A network encrypted with WPA2/WPA is more secure than a network encrypted with WEP, because WPA2/WPA uses dynamic key encryption. To protect the information as it passes over the airwaves, you should enable the highest level of encryption supported by your network equipment.
WEP is an older encryption standard and may be the only option available on some older devices that do not support WPA.
General Network Security Guidelines
Wireless network security is useless if the underlying network is not secure.
- Password protect all computers on the network and individually password protect sensitive files.
- Change passwords on a regular basis.
- Install anti-virus software and personal firewall software.
- Disable file sharing (peer-to-peer). Some applications may open file sharing without your consent and/or knowledge.
Additional Security Tips
- Keep wireless routers, access points, or gateways away from exterior walls and windows.
- Turn wireless routers, access points, or gateways off when they are not being used (at night, during vacations).
- Use strong passphrases that are at least eight characters in length. Combine letters and numbers to avoid using standard words that can be found in the dictionary.

WEB: For more information on wireless security, visit www.linksys.com/security
Chapter 3: Installation
Linksys strongly recommends that you run the Setup CD-ROM. If you have problems running the Setup CD-ROM, use this chapter.
Connection
- Make sure that all the devices that you are working with are powered down, including your computer(s) and the Gateway. If you have a modem connected to your network, disconnect it. The Gateway replaces your modem.
- Connect one end of the provided Ethernet cable to your computer's Ethernet adapter. Connect the other end of the Ethernet cable to one of the Ethernet ports on the back of the Gateway.
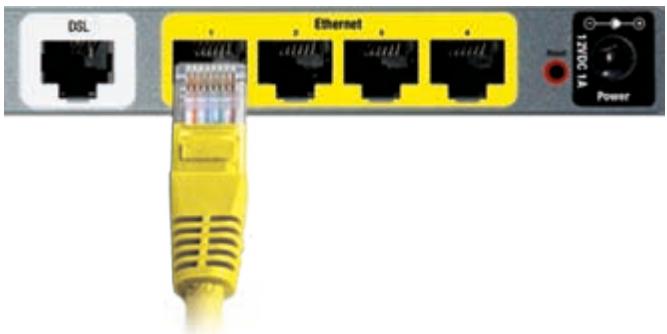
Connect the Computer
- Repeat step 2 for every computer or device that you want to connect to the Gateway via Ethernet. If you connect more than four computers to the Gateway, you also need to connect a switch to the Gateway.

NOTE: If your computer's Ethernet adapter is not set up, refer to the Ethernet adapter's documentation for more information.
- Connect one end of the phone cable to the DSL port on the back of the Gateway.
- Connect the other end of the phone cable to the wall jack with ADSL service or microfilter.
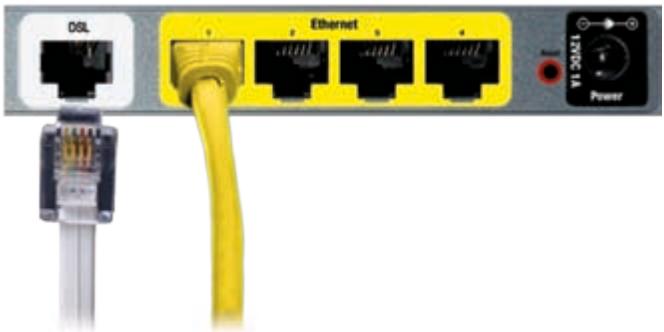
Connect the DSL

NOTE: To avoid interference, you may need to place a microfilter or splitter between the phone cable and wall jack. Contact your ISP to determine if one is required. (UK residents need to connect the microfilter to the wall phone jack with ADSL service and then connect one end of the provided phone cable to the DSL port on it.) If you have more than one phone and you experience static on the line after installing the Gateway, then you need to install an additional microfilter for each phone or fax that you use. If you use ISDN, then you do not need a microfilter.
- Connect the power adapter to the Gateway's power port and the electrical outlet.
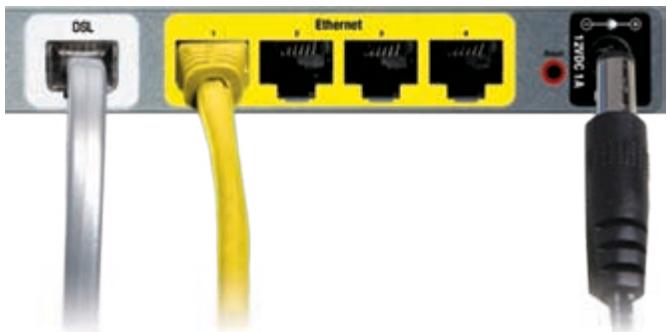
Connect the Power
- Power on the computer that you want to use to configure the Gateway.
- The Power, Wireless, and at least one of the numbered Ethernet (1, 2, 3, or 4) LEDs should light up. If not, make sure the Gateway is powered on and the cables are securely connected.
Connection is complete.
Continue to the "Setup" section.
Setup
For setup, configure the Gateway to access the Internet through your ADSL Internet Service Provider (ISP). Use the setup information provided by your ISP.
Continue to "Chapter 4: Advanced Configuration", and complete the following sections:
- Setup > Basic Setup
- Wireless > Basic Wireless Settings
- Wireless > Wireless Security
After completing the setup, test the Gateway. Enter www.linksys.com/uk/registration in the web browser's Address field, and press Enter.
Installation is complete.
Chapter 4: Advanced Configuration
After setting up the Gateway with the Setup Wizard (located on the CD-ROM), the Gateway will be ready for use. However, if you'd like to change its advanced settings, use the Gateway's web-based utility. This chapter describes each web page of the utility and each page's key functions. You can access the utility via a web browser on a computer connected to the Gateway.
The web-based utility has these main tabs: Setup, Wireless, Security, Access Restrictions, Applications & Gaming, Administration, and Status. Additional tabs will be available after you click one of the main tabs.

NOTE: When first installing the Gateway, you should use the Setup Wizard on the Setup CD-ROM. If you want to configure advanced settings, use this chapter.

NOTE: For New Zealand residents, refer to the note under RFC 2364 PPPoA.
How to Access the Web-Based Utility
To access the web-based utility, launch the web browser on your computer, and enter the Gateway's default IP address, 192.168.1.1, in the Address field. Then, press Enter.
A login screen appears. Use the default user name and password, admin, unless you have changed them during the Setup Wizard. (You can set a new user name and password from the Administration tab's Management screen.) Click OK to continue.
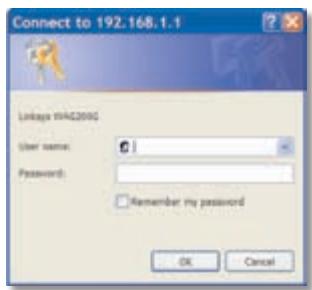
Login Screen
Setup > Basic Setup
The first screen that appears is the Basic Setup screen. This allows you to change the Gateway's general settings.
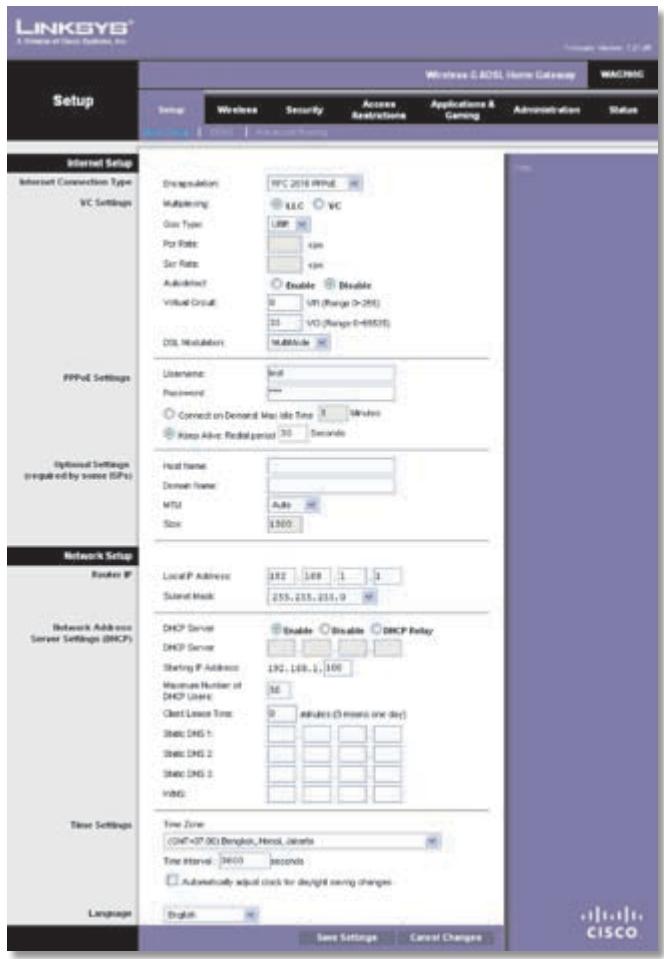
Setup > Basic Setup
Internet Setup
The Internet Setup section configures the Gateway to your Internet connection. Most of this information can be obtained through your ISP.
Internet Connection Type
Encapsulation Select the appropriate encapsulation method from the drop-down menu. Each Basic Setup screen and available features will differ depending on which encapsulation method you select. These are the available methods:
RFC2364PPPoA
RFC2516 PPPoE
RFC 1483 Routed
RFC 1483 Bridged
- Bridge Mode Only
VC Settings
Configure your Virtual Circuit (VC) settings in this section.
Multiplexing Select LLC or VC, depending on your ISP.
QoS Type Select from the drop-down menu: CBR (Continuous Bit Rate) to specify fixed bandwidth for voice
or data traffic; UBR (Unspecified Bit Rate) for applications that are not time-sensitive, such as e-mail; or VBR (Variable Bit Rate) for bursty traffic and bandwidth-sharing with other applications.

NOTE: If the QoS Type setting is CBR, then the SCR Rate is not configurable. If the QoS Type setting is UBR, then the PCR and SCR Rate settings are not configurable.
PCR Rate For the Peak Cell Rate (PCR), divide the DSL line rate by 424 to get the maximum rate the sender can send cells. Enter the rate in the field (if required by your service provider).
SCR Rate The Sustain Cell Rate (SCR) sets the average cell rate that can be transmitted. The SCR value is normally smaller than the PCR value. Enter the rate in the field (if required by your service provider).
Autodetect Select Enable to have the VPI/VCI settings automatically detected, or select Disable to enter the values manually.
Virtual Circuit These fields consist of two items: VPI (Virtual Path Identifier) and VCI (Virtual Channel Identifier). Enter the settings provided by your ISP.
DSL Modulation Select the appropriate mode: MultiMode, T1.413, G.dmt, G.lite, ADSL2, or ADSL2+. Contact your ISP if you are not sure which mode to use.
Follow the instructions for your type of encapsulation.
RFC 2364 PPPoA
Some DSL-based ISPs use PPPoA (Point-to-Point Protocol over ATM) to establish Internet connections. If you are connected to the Internet through a DSL line, check with your ISP to see if they use PPPoA. If they do, you will have to enable PPPoA.
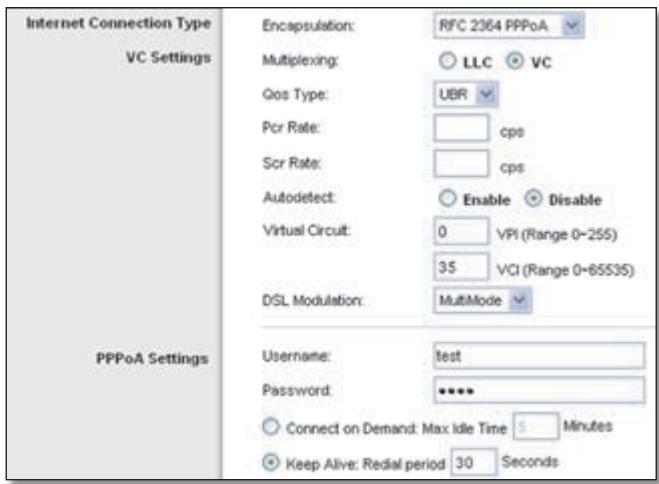
Internet Connection Type > RFC 2364 PPPoA
PPPoA Settings
Username and Password Enter the User Name and Password provided by your ISP.
Connect on Demand: Max Idle Time You can configure the Gateway to cut the Internet connection after it has been inactive for a specified period of time (Max Idle Time). If your Internet connection has been terminated due to inactivity, Connect on Demand enables the Gateway to automatically re-establish your connection as soon as you attempt to access the Internet again. To use this option, select Connect on Demand. In the Max Idle Time field, enter the number of minutes you want to have elapsed before your Internet connection terminates. The default Max Idle Time is 5 minutes.
Keep Alive: Redial Period If you select this option, the Gateway will periodically check your Internet connection. If you are disconnected, then the Gateway will automatically re-establish your connection. To use this option, select Keep Alive. In the Redial Period field, specify how often you want the Gateway to check the Internet connection. The default Redial Period is 30 seconds.

NOTE: For New Zealand, follow these instructions:
- Select RFC 2364 PPPoA from the Encapsulation drop-down menu.
- For the Virtual Circuit ID, enter 0 for the VPI and 100 for the VCI.
- Select VC for Multiplexing.
- Select Multimode from the DSL Modulation drop-down menu.
- Obtain the User Name and Password details from your ISP.
RFC 2516 PPPoE
Some DSL-based ISPs use PPPoE (Point-to-Point Protocol over Ethernet) to establish Internet connections. If you are connected to the Internet through a DSL line, check with your ISP to see if they use PPPoE. If they do, you will have to enable PPPoE.
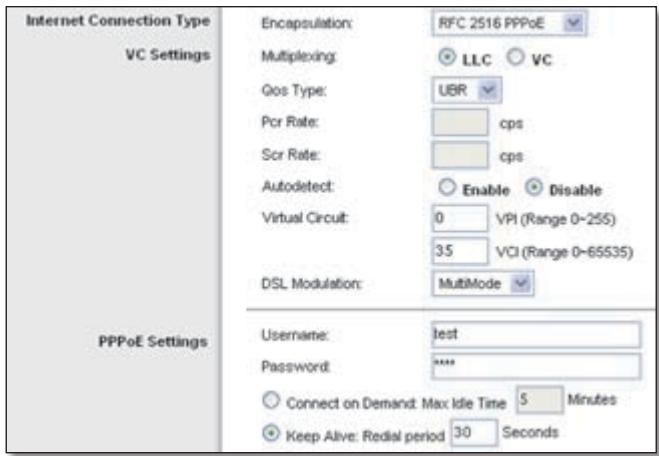
Internet Connection Type > RFC 2516 PPPoE
PPPoE Settings
Username and Password Enter the User Name and Password provided by your ISP.
Connect on Demand: Max Idle Time You can configure the Gateway to cut the Internet connection after it has been inactive for a specified period of time (Max Idle Time). If your Internet connection has been terminated due to inactivity, Connect on Demand enables the Gateway to automatically re-establish your connection as soon as you attempt to access the Internet again. To use this option, select Connect on Demand. In the Max Idle Time field, enter the number of minutes you want to have elapsed before your Internet connection terminates. The default Max Idle Time is 5 minutes.
Keep Alive: Redial Period If you select this option, the Gateway will periodically check your Internet connection. If you are disconnected, then the Gateway will automatically re-establish your connection. To use this option, select Keep Alive. In the Redial Period field, specify how often you want the Gateway to check the Internet connection. The default Redial Period is 30 seconds.
RFC 1483 Routed
If you are required to use RFC 1483 Routed, then select RFC 1483 Routed.
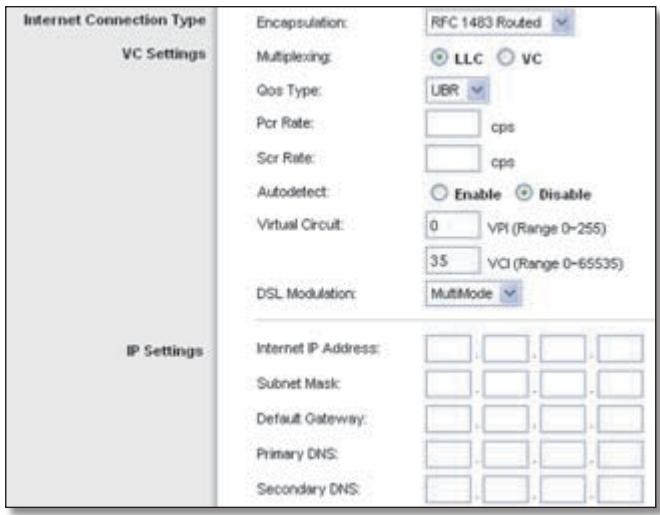
Internet Connection Type > RFC 1483 Routed
IP Settings
Your ISP provides these settings.
Internet IP Address Enter the Gateway's IP address, as seen from the Internet.
Subnet Mask Enter the Gateway's Subnet Mask, as seen from the Internet (including your ISP).
Default Gateway Enter the IP address of the ISP server.
Primary (Required) and Secondary (Optional) DNS Enter the DNS (Domain Name System) server IP address(es) provided by your ISP. At least one is required.
RFC 1483 Bridged
If you are required to use RFC 1483 Bridged, then select RFC 1483 Bridged.
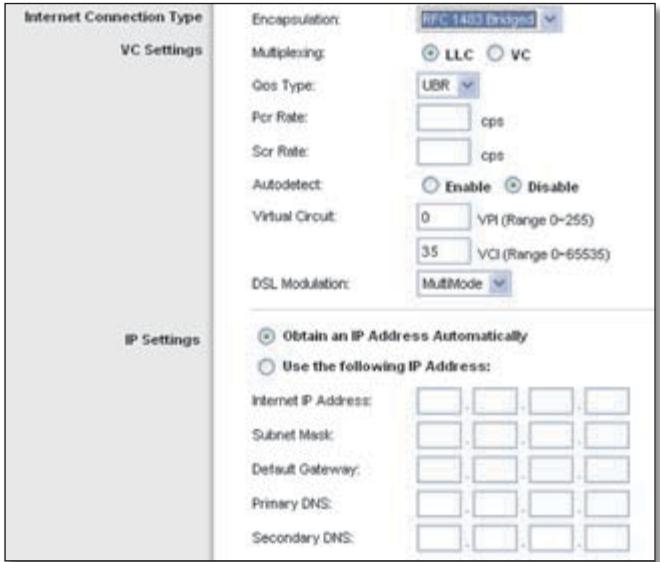
Internet Connection Type > RFC 1483 Bridged
IP Settings
Select Obtain an IP Address Automatically if your ISP says you are connecting through a dynamic IP address.
If you are required to use a permanent (static) IP address to connect to the Internet, then select Use the following IP Address. Your ISP provides the settings needed for the following fields:
Internet IP Address Enter the Gateway's IP address, as seen from the Internet.
Subnet Mask Enter the Gateway's Subnet Mask, as seen from the Internet (including your ISP).
Default Gateway Enter the IP address of the ISP server.
Primary (Required) and Secondary (Optional) DNS Enter the DNS (Domain Name System) server IP address(es) provided by your ISP. At least one is required.
Bridge Mode Only
If you are using your Gateway as a bridge, which makes the Gateway act like a stand-alone modem, select Bridge Mode Only. All NAT and routing settings are disabled in this mode.
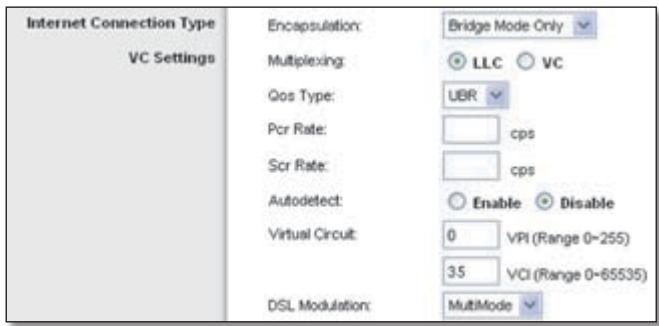
Internet Connection Type > Bridged Mode Only
Optional Settings
Some of these settings may be required by your ISP. Verify with your ISP before making any changes.
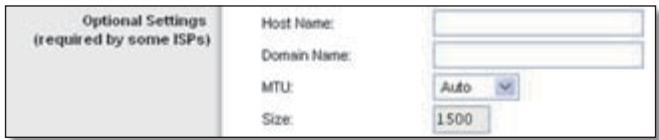
Optional Settings
Host Name and Domain Name These fields allow you to supply a host and domain name for the Gateway. Some ISPs, usually cable ISPs, require these names as identification. You may have to check with your ISP to see if your broadband Internet service has been configured with a host and domain name. In most cases, leaving these fields blank will work.
MTU MTU is the Maximum Transmission Unit. It specifies the largest packet size permitted for Internet transmission.
Select Manual if you want to manually enter the largest packet size that is transmitted. To have the Gateway select the best MTU for your Internet connection, keep the default, Auto.
Size When Manual is selected in the MTU field, this option is enabled. Leave this value in the 1200 to 1500 range. The default, MTU is configured automatically.
Network Setup
The Network Setup section changes the settings on the network connected to the Gateway's Ethernet ports. Wireless setup is performed through the Wireless tab.
Router IP
The values for the Gateway's Local IP Address and Subnet Mask are shown here. In most cases, keeping the default values will work.

Router IP
Local IP Address The default value is 192.168.1.1.
Subnet Mask The default value is 255.255.255.0.
Network Address Server Settings (DHCP)
The settings allow you to configure the Gateway's Dynamic Host Configuration Protocol (DHCP) server function. The Gateway can be used as a DHCP server for your network. A DHCP server automatically assigns an IP address to each computer on your network. If you choose to enable the Gateway's DHCP server option, make sure there is no other DHCP server on your network.
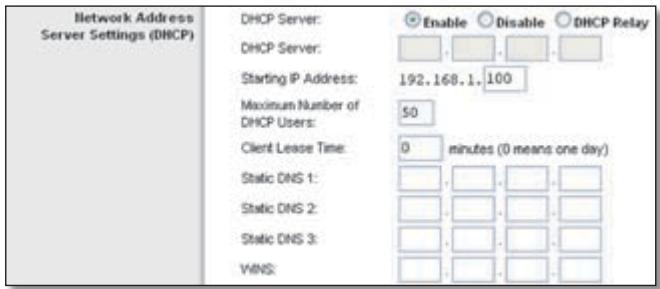
Network Address Server Settings (DHCP)
DHCP Server A Dynamic Host Configuration Protocol (DHCP) server automatically assigns an IP address to each computer on your network for you. Unless you already have one, Linksys recommends that you keep the default, Enable. You can also use the Gateway in DHCP Relay mode. (This setting is not available for all encapsulation types.)
DHCP Relay To use the Gateway in DHCP Relay mode instead of using it as a DHCP server, select this option.
DHCP Server Enter the DHCP server IP address to relay DHCP requests from the local network when the Gateway is in DHCP Relay mode. (This setting is not available for all encapsulation types.)
Starting IP Address Enter a value for the DHCP server to start with when issuing IP addresses. Because the Gateway's default IP address is 192.168.1.1, the Starting IP Address must be 192.168.1.2 or greater, but smaller than 192.168.1.253. The default is 192.168.1.100.
Maximum Number of DHCP Users Enter the maximum number of users (network devices) that can obtain an IP address. The number will vary depending on the starting IP address entered and cannot be greater than 253. The default is 50.
Client Lease Time The Client Lease Time is the amount of time a network device will be allowed connection to the Gateway with its current dynamic IP address. Enter the number of minutes that the device will be "leased" this dynamic IP address. After the time is up, the device will be automatically assigned a new dynamic IP address. The default is 0 minutes, which means one day.
Static DNS 1-3 The Domain Name System (DNS) is how the Internet translates domain or website names into Internet addresses or URLs. At least one DNS server IP address is provided by your ISP. You can enter up to three DNS server IP addresses here. The Gateway will use these for quicker access to functioning DNS servers.
WINS The Windows Internet Naming Service (WINS) converts NetBIOS names to IP addresses. If you use a WINS server, enter that server's IP address here. Otherwise, leave this field blank.
Time Settings
Time Zone Select the time zone in which your network functions.
Time Interval Change how often the Gateway updates its time.
Automatically adjust clock for daylight saving time Select this option if you want the Gateway to automatically adjust for daylight saving time.
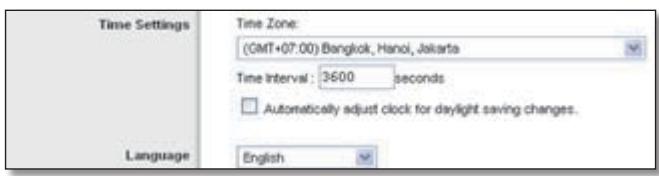
Time Settings and Language
Language
Language To use a different language, select one from the drop-down menu. The language of the web-based utility will change five seconds after you select another language.
Click Save Settings to apply your changes, or click Cancel Changes to cancel your changes.
Setup > DDNS
The Gateway offers a Dynamic Domain Name System (DDNS) feature. DDNS lets you assign a fixed host and domain name to a dynamic Internet IP address. It is useful when you are hosting your own website, FTP server, or other server behind the Gateway.
Before you can use this feature, you need to sign up for DDNS service with a DDNS service provider, www.dyndns.org or www.TZO.com. If you do not want to use this feature, keep the default, Disabled.
DDNS
DDNS Service
If your DDNS service is provided by DynDNS.org, then select DynDNS.org from the drop-down menu. If your DDNS service is provided by TZO, then select TZO.com. The features available on the DDNS screen will vary, depending on which DDNS service provider you use.
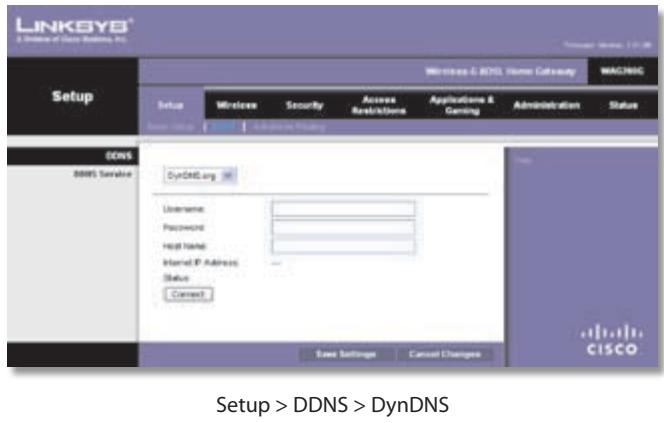
DynDNS.org
Username Enter theUsername for your account.
Password Enter the Password for your account.
Host Name Enter the DDNS URL assigned by the service.
Internet IP Address The Internet IP address of the Gateway is displayed.
Status Displays the status of the DDNS service connection.
Connect To manually trigger an update, click this button.
Click Save Settings to apply your changes, or click Cancel Changes to cancel your changes.
TZ0.com
E-Mail Address Enter the E-mail Address for your account.
TZO Password Enter the Password for your account.
Domain Name Enter the DDNS URL assigned by the service.
Internet IP Address The Internet IP address of the Gateway is displayed.
Status Displays the status of the DDNS service connection.
Connect To manually trigger an update, click this button.
Click Save Settings to apply your changes, or click Cancel Changes to cancel your changes.
Setup > Advanced Routing
The Advanced Routing screen is used to set up the Gateway's advanced routing functions. It contains three sections: Operating Mode, Dynamic Routing, and Static Routing.
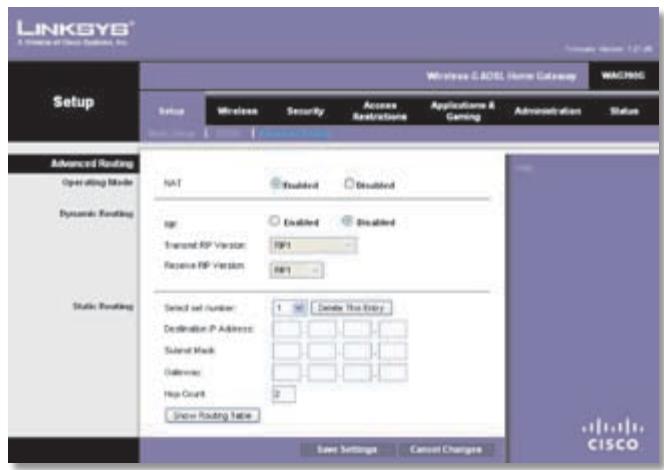
Setup > Advanced Routing
Advanced Routing
Operating Mode
NAT If this Gateway is hosting your network's connection to the Internet, keep the default, Enabled. If another
gateway or router exists on your network, select Disabled.
Dynamic Routing
RIP This allows the Gateway to automatically adjust to physical changes in the network's layout and exchange routing tables with other router(s). The Gateway determines the packets' route based on the fewest number of hops between source and destination. Select Enabled to use Dynamic Routing. Otherwise, keep the default, Disabled.
Transmit RIP Version Select the appropriate protocol version, RIP1, RIP1-Compatible, RIP2, or Disable. This should match the version supported by other routers on your LAN.
Receive RIP Version Select the appropriate protocol version, RIP1, RIP2, or Disable. This should match the version supported by other routers on your LAN.
Static Routing
A static route is a pre-determined pathway that network information must travel to reach a specific host or network. Enter the following information to set up a new static route.
Select Set Number To set up a static route between the Gateway and another network, select a number from the drop-down list. The Gateway supports up to 20 static route entries. Click Delete This Entry to delete a static route.
Destination IP Address The Destination IP Address is the IP address of the remote network or host to which you want to assign a static route. Enter the IP address of the host for which you wish to create a static route. If you are building a route to an entire network, be sure that the network portion of the IP address is set to 0.
Subnet Mask The Subnet Mask determines which portion of a Destination IP Address is the network portion, and which portion is the host portion.
Gateway The IP address of the gateway device that allows contact between the Gateway and remote network or host.
Hop Count This is the number of hops to each node until the destination is reached (16 hops maximum). Enter the appropriate Hop Count.
Click Show Routing Table to view the static routes you have already set up.
Routing Table
For each route, the Destination LAN IP address, Subnet Mask, Gateway, and Interface are displayed. Click Refresh to update the information. Click Close to exit this screen.
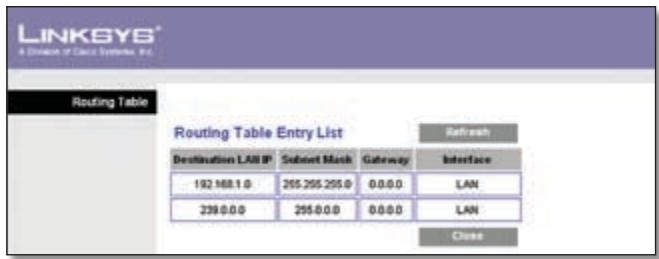
Advanced Routing > Routing Table
Click Save Settings to apply your changes, or click Cancel Changes to cancel your changes.
Wireless > Basic Wireless Settings
The basic settings for wireless networking are set on this screen. This screen allows you to choose your wireless network mode and wireless security.
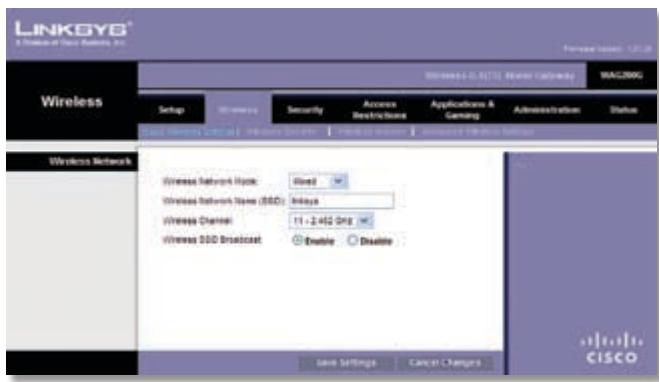
Wireless > Basic Wireless Settings
Wireless Network
Wireless Network Mode Select the wireless standards running on your network. If you have Wireless-G and Wireless-B devices in your network, keep the default, Mixed. If you have only Wireless-G devices, select G-Only. If you have only Wireless-B devices, select B-Only. If you do not have any wireless devices, select Disabled.
Wireless Network Name (SSID) The network name is case-sensitive and must not exceed 32 characters (use any of the characters on the keyboard). Linksys recommends that you change the default, to a unique name of your choice.
Wireless Channel Select the channel you want to use. All devices in your wireless network must use the same channel in order to communicate.
Wireless SSID Broadcast When wireless devices survey the local area for wireless networks to associate with, they will detect the wireless network name or SSID broadcast by the Gateway. If you want to broadcast the Gateway's SSID, keep the default, Enable. Otherwise, select Disable.
Click Save Settings to apply your changes, or click Cancel Changes to cancel your changes.
Wireless > Wireless Security
The Wireless Security screen configures the security of your wireless network(s). The supported wireless security modes are WPA2-Personal, WPA-Personal, WPA2-Mixed, and WEP. WPA (Wi-Fi Protected Access), is a security standard stronger than WEP (Wired Equivalent Privacy) encryption. WPA2 is a more advanced, more secure version of WPA. For detailed instructions on configuring wireless security on the Gateway, refer to "Chapter 2: Wireless Security".
Wireless Security
Security Mode Select the security method for your wireless network. Proceed to the appropriate instructions. If you do not want to use wireless security, keep the default, Disabled.

NOTE: If you use wireless security, remember that each device in your wireless network MUST use the same security method and settings, or else the wireless devices cannot communicate.
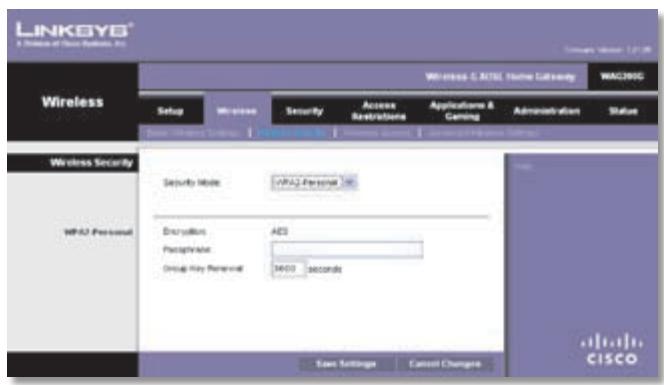
WPA2-Personal (Recommended)
Security Mode > WPA2-Personal
Encryption The method is AES.
Passphrase Enter a key of 8 to 63 characters.
Group Key Renewal Enter how often the Gateway should change encryption keys. The default is 3600 seconds.

WPA-Personal
Security Mode > WPA-Personal
Encryption The method is TKIP.
Passphrase Enter a key of 8 to 63 characters.
Group Key Renewal Enter how often the Gateway should change encryption keys. The default is 3600 seconds.
WPA2-Mixed
This option allows clients to use EITHER WPA-Personal OR WPA2-Personal.
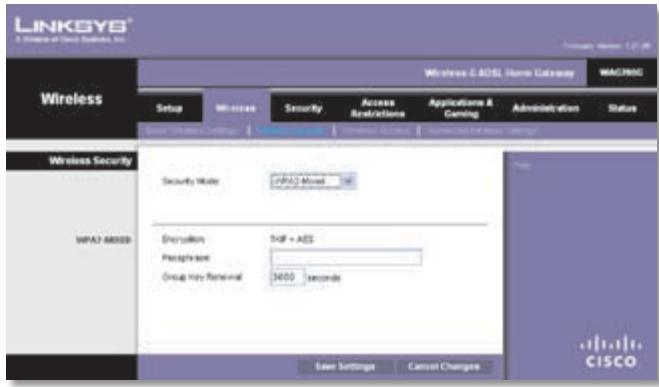
Security Mode > WPA2-Mixed
Encryption The method is TKIP + AES.
Passphrase Enter a key of 8 to 63 characters.
Group Key Renewal Enter how often the Gateway should change encryption keys. The default is 3600 seconds.

WEP
Security Mode > WEP
Default Transmit Key Select which Transmit Key to use. The default is 1.
WEP Encryption Select a level of WEP encryption, 64-bit or 128-bit.
Passphrase Enter a Passphrase to automatically generate WEP keys. Then click Generate.

NOTE: The WEP Passphrase is compatible with Linksys wireless products only. If you are use non-Linksys products, manually enter the appropriate WEP key on those devices.
Key 1-4 If you did not enter a Passphrase, enter the WEP key(s) manually.
Click Save Settings to apply your changes, or click Cancel Changes to cancel your changes.
Wireless > Wireless Access
Wireless access can be filtered by using the MAC addresses of the wireless devices transmitting within your network's radius.

Wireless > Wireless Access
Wireless Network Access
Allow All/Restrict Access To filter wireless users by MAC address, either permitting or blocking access, select Restrict Access. If you do not wish to filter users by MAC address, keep the default, Allow All.
Prevent listed computers from accessing the wireless network Select this to block wireless access by MAC address. This setting is selected by default.
Permit only listed computers to access the wireless network Select this to allow wireless access by MAC address.
Edit MAC Address Access List Click this to open the MAC Address Filter List screen.
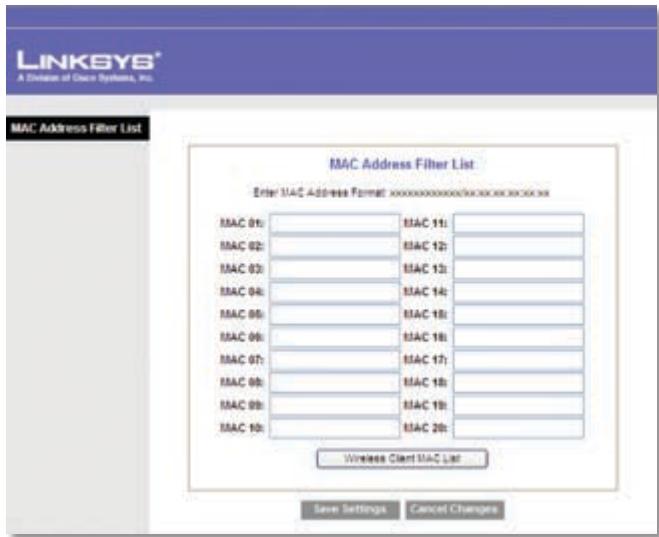
MAC Address Filter List
MAC Address Filter List
MAC 01-20 Enter the MAC addresses of the devices whose wireless access you want to block or allow.
Wireless Client MAC List Click this to open the Wireless Client List screen.
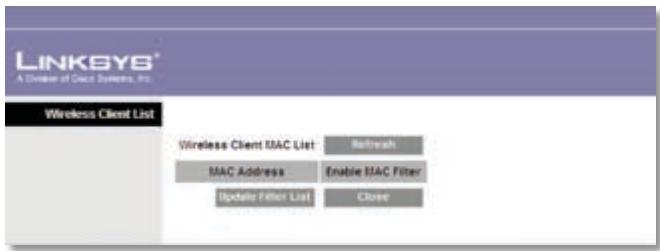
Wireless Client List
Wireless Client List
This screen lists the MAC addresses of the wireless devices. Select Enable MAC Filter for any device you want to add to the MAC Address Filter List. Then click Update Filter List.
To retrieve the most up-to-date information, click Refresh. To exit this screen and return to the Wireless MAC Filter List screen, click Close.
Click Save Settings to apply your changes, or click Cancel Changes to cancel your changes.
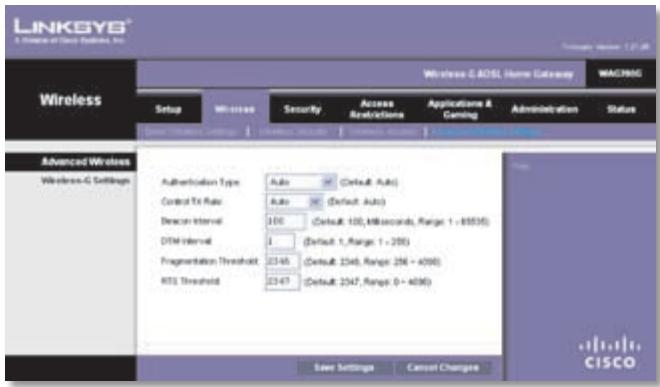
Wireless > Advanced Wireless Settings
The Advanced Wireless Settings screen is used to set up the Gateway's advanced wireless functions. These settings should only be adjusted by an expert administrator as incorrect settings can reduce wireless performance.
Wireless > Advanced Wireless Settings
Advanced Wireless
Wireless-G Settings
Authentication Type The default is Auto, which allows either Open System or Shared Key authentication to be used. With Open System authentication, the sender and the recipient do NOT use a WEP key for authentication. With Shared Key authentication, the sender and recipient
use a WEP key for authentication. Select Shared Key to only use Shared Key authentication.
Control TX Rate The Control TX Rate should be set depending on the speed of your wireless network. Select from a range of transmission speeds, or keep the default, Auto. When the Auto setting is selected, the Gateway automatically uses the fastest possible data rate and enables the Auto-Fallback feature, which negotiates the best possible connection speed between the Gateway and a wireless device.
Beacon Interval Enter a value between 1 and 65,535 milliseconds. The Beacon Interval value indicates the frequency interval of the beacon. A beacon is a packet broadcast by the Gateway to synchronize the wireless network(s). The default value is 100.
DTIM Interval This value, between 1 and 255, indicates the interval of the Delivery Traffic Indication Message (DTIM). A DTIM field is a countdown field informing clients of the next window for listening to broadcast and multicast messages. When the Gateway has buffered broadcast or multicast messages for associated clients, it sends the next DTIM with a DTIM Interval value. Its clients hear the beacons and awaken to receive the broadcast and multicast messages. The default value is 1.
Fragmentation Threshold This value specifies the maximum size for a packet before data is fragmented into multiple packets. If you experience a high packet error rate, you may slightly increase the Fragmentation Threshold. Setting the Fragmentation Threshold too low may result in poor network performance. Only minor reduction of the default value is recommended. In most cases, it should remain at its default value of 2346.
RTS Threshold Should you encounter inconsistent data flow, only minor reduction of the default, 2347, is recommended. If a network packet is smaller than the preset RTS threshold size, the RTS/CTS mechanism will not be enabled. The Gateway sends Request to Send (RTS) frames to a particular receiving station and negotiates the sending of a data frame. After receiving an RTS, the wireless station responds with a Clear to Send (CTS) frame to acknowledge the right to begin transmission. The RTS Threshold value should remain at its default value of 2347.
Click Save Settings to apply your changes, or click Cancel Changes to cancel your changes.
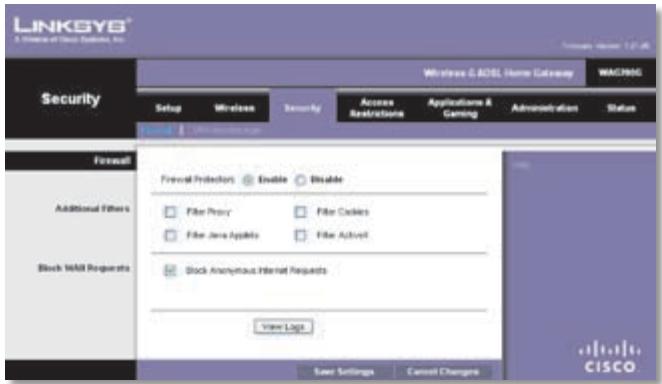
Security > Firewall
The Firewall screen is used to configure a firewall that can filter out various types of unwanted traffic on the Gateway's local network.
Security > Firewall
Firewall
Firewall Protection To use firewall protection,keep the default selection, Enable. To turn off firewall protection, select Disable.
Additional Filters
Filter Proxy Use of WAN proxy servers may compromise the Gateway's security. Denying Proxy will disable access to any WAN proxy servers. Select Filter Proxy to enable proxy filtering. Deselect the feature to allow proxy access.
Filter Java Applets Java is a programming language for websites. If you deny Java, you run the risk of not having access to Internet sites created using this programming language. Select Filter Java Applets to enable Java filtering. Deselect the feature to allow Java usage.
Filter Cookies A cookie is data stored on your computer and used by Internet sites when you interact with them. Select Filter Cookies to filter cookies. Deselect the feature to allow cookie usage.
Filter ActiveX ActiveX is a programming language for websites. If you deny ActiveX, you run the risk of not having access to Internet sites created using this programming language. Select Filter ActiveX to enable ActiveX filtering. Deselect the feature to allow ActiveX usage.
Block WAN Requests
Block Anonymous Internet Requests This feature makes it more difficult for outside users to work their way into your network. This feature is selected by default. Deselect the feature to allow anonymous Internet requests.
View Log To view the logs, click View Log.
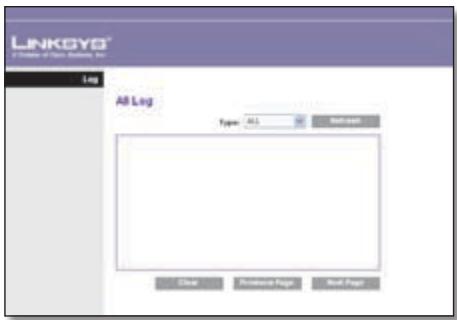
View Log
Log
Type Select from the following: ALL, System Log, Access Log, Firewall Log, VPN Log, UPnP Log, Incoming Log, or Outgoing Log.
Click Refresh to update the log. Click Clear to clear all the information that is displayed. Click Previous Page to view the previous page of information. Click Next Page to view the next page of information.
Click Save Settings to apply your changes, or click Cancel Changes to cancel your changes.
Security > VPN Passthrough
The VPN Passthrough screen allows you to enable VPN tunnels using IPSec, PPPoE, PPTP, or L2TP protocols to pass through the Gateway's firewall.
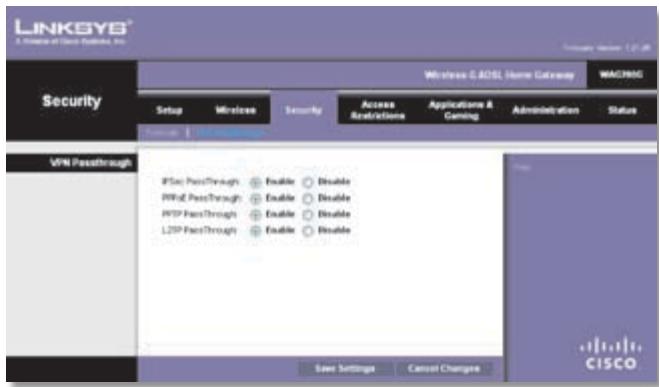
Security >VPN Passthrough
VPN Passthrough
IPSec Passthrough Internet Protocol Security (IPSec) is a suite of protocols used to implement secure exchange of packets at the IP layer. To allow IPSec tunnels to pass through the Gateway, keep the default, Enable.
PPPoEPassthrough Point-to-PointoverEthernet(PPPoE) allows PPPoE to be tunneled through an IP network. To allow PPPoE tunnels to pass through the Gateway, keep the default, Enable.
PPTP Passthrough Point-to-Point Tunneling Protocol (PPTP) allows the Point-to-Point Protocol (PPP) to be
tunnelled through an IP network. To allow PPTP tunnels to pass through the Gateway, keep the default, Enable.
L2TP Passthrough Layer 2 Tunneling Protocol is the method used to enable Point-to-Point sessions via the Internet on the Layer 2 level. To allow L2TP tunnels to pass through the Gateway, keep the default, Enable.
- Click Save Settings to apply your changes, or click Cancel Changes to cancel your changes.
Access Restrictions > Internet Access
The Internet Access screen allows you to block or allow specific kinds of Internet usage and traffic, such as Internet access, designated services, and websites during specific days and times.
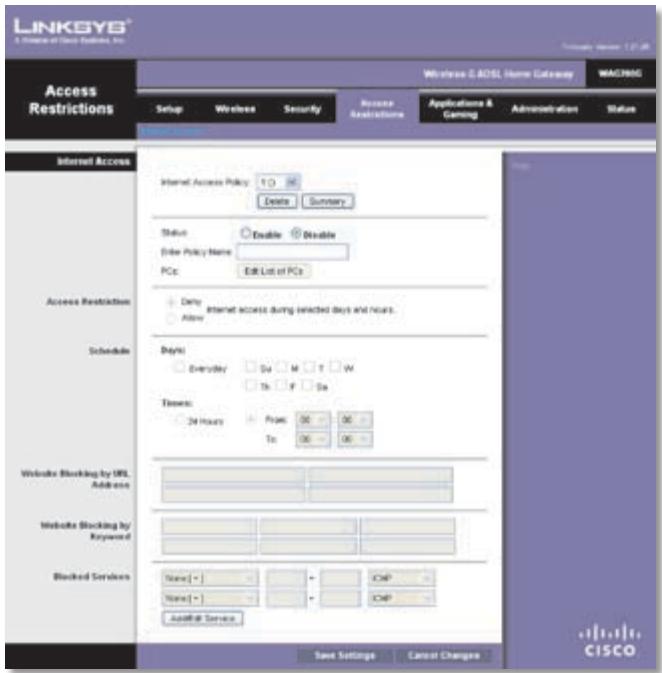
Access Restrictions > Internet Access
Internet Access
Internet Access Policy Access can be managed by a policy. Use the settings on this screen to establish an access policy (after Save Settings is clicked). Selecting a policy from the drop-down menu will display that policy's settings. To delete a policy, select that policy's number and click Delete. To view all the policies, click Summary.
Summary
The policies are listed with the following information: No., Policy Name, Days, and Time of Day. To delete a policy, select Delete. To return to the Internet Access Policy screen, click Close.
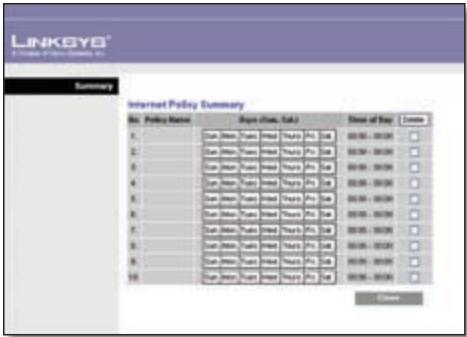
Summary
Status Policies are disabled by default. To enable a policy, select its number from the drop-down menu, and select Enable.
To create a policy, follow steps 1-10. Repeat these steps to create additional policies, one at a time.
- Select a number from the Internet Access Policy dropdown menu.
- To enable this policy, select Enable.
- Enter a Policy Name in the field provided.
- Click Edit List of PCs to select which computers will be affected by the policy. The Internet Access PC List screen appears. You can select a computer by MAC address or IP address. You can also enter a range of IP addresses if you want this policy to affect a group of computers. After making your changes, click Save Settings to apply your changes, or click Cancel Changes to cancel your changes. Then click Close.
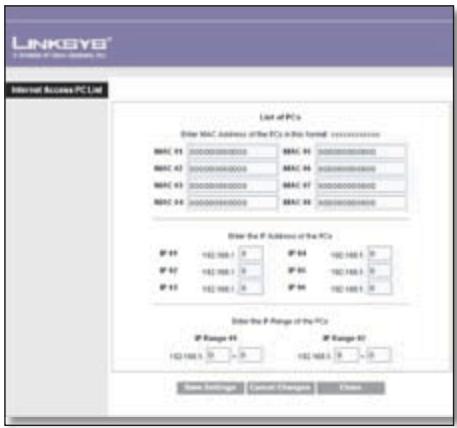
Internet Access Computer List
- Specify the Access Restriction to apply to the computers you selected in step 4. Select Deny to block Internet access, or Allow to allow Internet access.
- Specify when this policy will be in effect. Select the days: individual days of the week, or Everyday. Then select the time span within each day: specific start and end times using the From and To fields, or 24 Hours.
-
To block websites by URL address, enter each URL in a separate Website Blocking by URL Address field.
-
To block websites using keywords, enter each keyword in a separate Website Blocking by Keyword field.
- You can filter access to various services accessed over the Internet, such as FTP or telnet. From the Blocking Services list, select the service you want to block; the port numbers and protocol for the selected service are automatically displayed.
If the service you want is not listed, then add it; enter its port numbers in the fields provided; then select its protocol: ICMP, TCP, UDP, or TCP & UDP from the drop-down menu. Then click Add.
If you want to modify the service you added, select it, and them make your changes. Then click Modify.
If you want to delete a service you added, select it, and then click Delete.
When your changes have been made, click Save Settings.
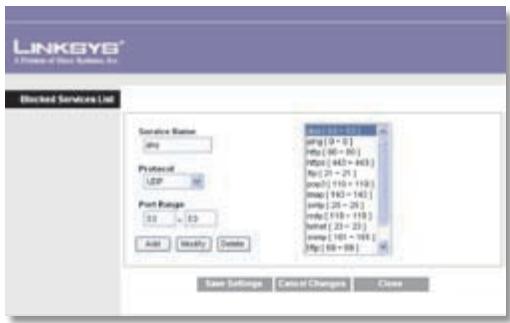
Blocked Services List
- Click Save Settings to save the policy's settings. To cancel the policy's settings, click Cancel Changes.
Applications and Gaming > Single Port Forwarding
The Single Port Forwarding screen allows you to customize port services for common applications.
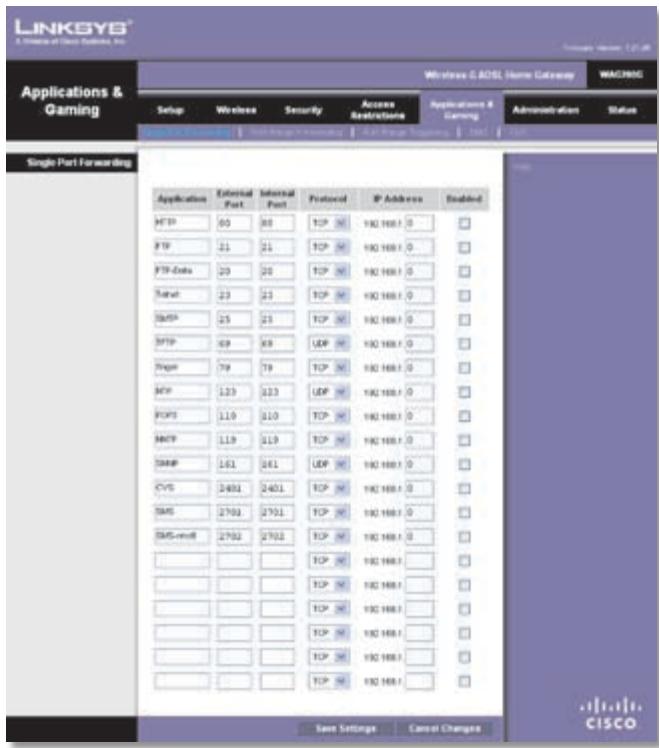
Applications and Gaming > Single Port Forwarding
When users send these types of requests to your network via the Internet, the Gateway will forward those requests to the appropriate servers (computers). Before using forwarding, you should assign static IP addresses to the designated servers.
Single Port Forwarding
To forward a port, enter the information on each line for the criteria required.
Application Enter the name you wish to give the application. Each name can be up to 12 characters.
External and Internal Port Enter the external and internal port numbers.
Protocol Select the protocol used for this application, either TCP or UDP.
IP Address For each application, enter the IP address of the computer that should receive the requests.
Enabled For each application, select Enabled to enable port forwarding.
Click Save Settings to apply your changes, or click Cancel Changes to cancel your changes.
Applications and Gaming > Port Range Forwarding
The Port Range Forwarding screen allows you to set up public services on your network, such as web servers, ftp servers, e-mail servers, or other specialized Internet applications. (Specialized Internet applications are any applications that use Internet access to perform functions such as videoconferencing or online gaming. Some Internet applications may not require any forwarding.)
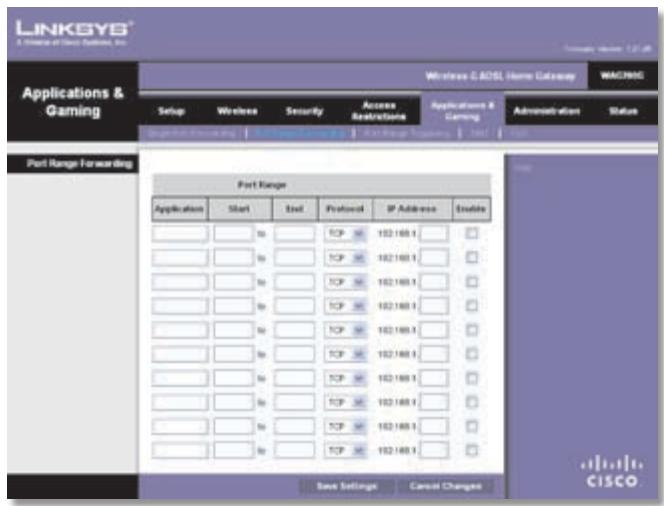
Applications and Gaming > Port Range Forwarding
When users send these types of requests to your network via the Internet, the Gateway will forward those requests to the appropriate servers (computers). Before using forwarding, you should assign static IP addresses to the designated servers.
If you need to forward all ports to one computer, click the DMZ tab.
Port Range Forwarding
To forward a port range, enter the information on each line for the criteria required.
Application In this field, enter the name you wish to give the application. Each name can be up to 12 characters.
Port Range Start and End Enter the number or range of port(s) used by the server or Internet applications. Check with the Internet application documentation for more information.
Protocol Select the protocol used for this application, either TCP or UDP, or Both.
IP Address For each application, enter the IP address of the computer running the specific application.
Enabled Select Enabled to enable port forwarding for the applications you have defined.
Click Save Settings to apply your changes, or click Cancel Changes to cancel your changes.
Applications & Gaming > Port Range Triggering
The Port Range Triggering screen allows the Gateway to watch outgoing data for specific port numbers. The IP address of the computer that sends the matching data is remembered by the Gateway, so that when the requested data returns through the Gateway, the data is pulled back to the proper computer by way of IP address and port mapping rules.
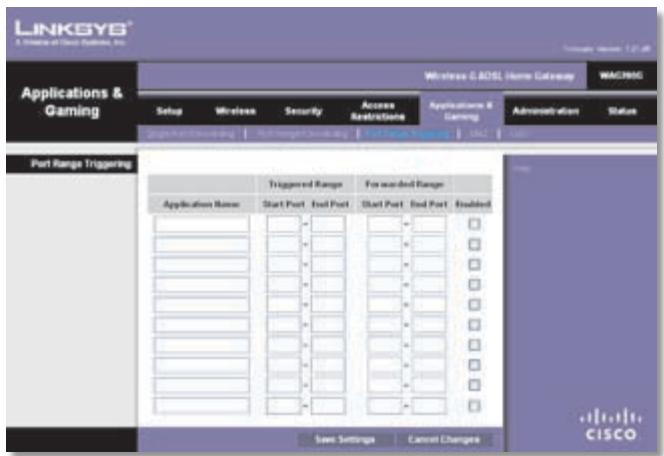
Applications and Gaming > Port Range Triggering
Port Range Triggering
To trigger a port range, enter the information on each line for the criteria required.
Application Name Enter the application name of the trigger.
Triggered Range Start Port and End Port For each application, enter the starting and ending port numbers of the triggered port number range. Check with the Internet application documentation for the port number(s) needed.
Forwarded Range Start Port and End Port For each application, enter the starting and ending port numbers of the forwarded port number range. Check with the Internet application documentation for the port number(s) needed.
Enable Select Enable to enable port triggering for the applications you have defined.
Click Save Settings to apply your changes, or click Cancel Changes to cancel your changes.
Applications and Gaming > DMZ
The DMZ feature allows one network computer to be exposed to the Internet for use of a special-purpose service such as Internet gaming or videoconferencing. DMZ hosting forwards all the ports at the same time to one computer. The Port Range Forwarding feature is more
secure because it only opens the ports you want to have opened, while DMZ hosting opens all the ports of one computer, exposing the computer to the Internet.

Applications and Gaming > DMZ
DMZ
Any computer whose port is being forwarded must have its DHCP client function disabled and should have a new static IP address assigned to it because its IP address may change when using the DHCP function.
DMZ Hosting To disable DMZ hosting, keep the default, Disable. To expose one computer, select Enable. Then configure the following setting:
DMZ Host IP Address Enter the IP address of the computer.
Click Save Settings to apply your changes, or click Cancel Changes to cancel your changes.
Applications and Gaming > QoS
Quality of Service (QoS) ensures better service to high-priority network traffic, which may involve demanding, real-time applications, such as videoconferencing.
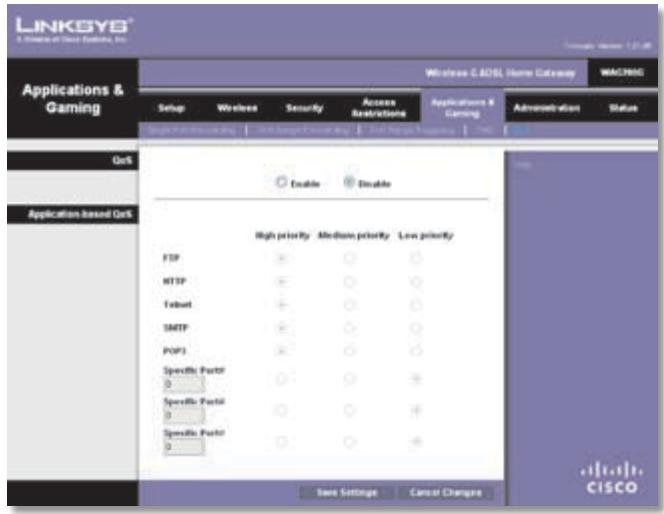
Applications and Gaming > QoS
QoS (Quality of Service)
QoS To use QoS, select Enable. Otherwise, keep the default, Disable.
Application-based QoS
Application-based QoS manages information as it is transmitted and received. Depending on the settings of the QoS screen, this feature will assign information a high, medium, or low priority for the five preset applications and three additional applications that you specify.
The five preset applications are the following:
FTP (File Transfer Protocol)
A protocol used to transfer files over a TCP/IP network (Internet, UNIX, etc.). For example, after HTML pages are developed for a website on a local machine, they are typically uploaded to the web server using FTP.
- HTTP (HyperText Transport Protocol)
The communications protocol used to connect to servers on the World Wide Web. Its primary function is to establish a connection with a web server and transmit HTML pages to the client web browser.
Telnet
A terminal emulation protocol commonly used on Internet and TCP/IP-based networks. It allows a user at a terminal or computer to log onto a remote device and run a program.
- SMTP (Simple Mail Transfer Protocol)
The standard e-mail protocol on the Internet. It is a TCP/IP protocol that defines the message format and the message transfer agent (MTA), which stores and forwards the mail.
- POP3 (Post Office Protocol 3)
A standard mail server commonly used on the Internet. It provides a message store that holds incoming e-mail until users log on and download it. POP3 is a simple system with little selectivity. All pending messages and attachments are downloaded at the same time. POP3 uses the SMTP messaging protocol.
Specific Port# You can add three more applications by entering their respective port numbers in these fields.
High priority/Medium priority/Low priority For each application, select High priority (traffic on this queue shares 70% of the total bandwidth), Medium priority (traffic on this queue shares 15% of the total bandwidth), or Low priority (traffic on this queue shares 10% of the total bandwidth).
Click Save Settings to apply your changes, or click Cancel Changes to cancel your changes.
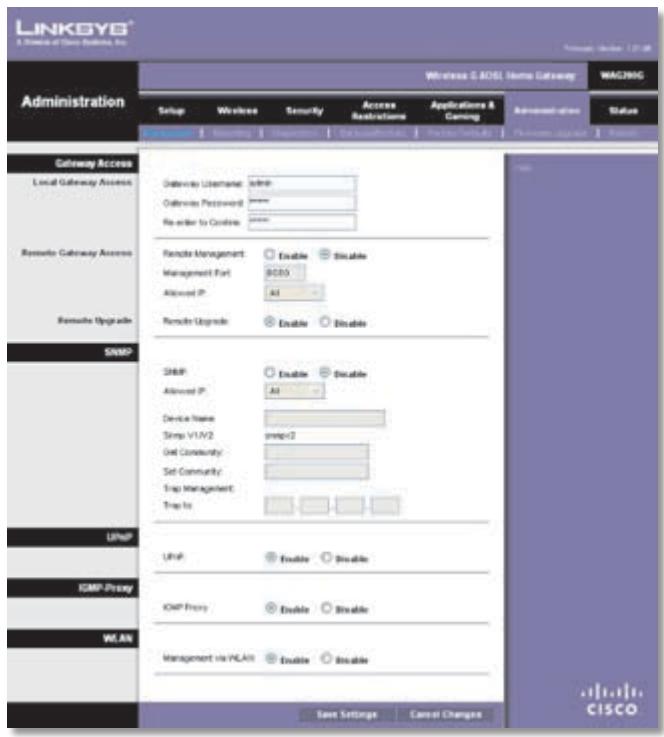
Administration > Management
This screen allows the network's administrator to manage specific Gateway functions for access and security.
Administration > Management
Gateway Access
Local Access
To ensure the Gateway's security, you will be asked for your User Name and password when you access the Gateway's web-based utility. The default User Name and password are admin.
Gateway username Enter the default Gateway
Username, admin.
Gateway Password Linksys recommends that you change the default Gateway Password, admin, to one of your choice.
Re-Enter to Confirm Enter the Gateway Password again to confirm.
Remote Access
Remote Management To permit remote access to the Gateway from outside the local network, select Enable. Otherwise, keep the default, Disable.
Management Port Enter the port number that will be open to outside access.
Allowed IP Select All if you want to allow access from any IP address. Select IP Addr. if you want to specify the IP address that can access the Gateway. Then complete the
IP Address fields. Select IP Range if you want to specify a range of IP addresses that can access the Gateway. Then enter the starting and ending IP addresses of the range.

NOTE: To manage the Gateway remotely, enter http://
Remote Upgrade
Remote Upgrade To allow remote upgrades of the Gateway, select Enable. Otherwise, keep the default, Disable.
SNMP
SNMP is a popular network monitoring and management protocol.
SNMP To use SNMP, select Enable. Otherwise, select Disable.
Allowed IP Select All if you want to allow access from any IP address. Select IP Addr. if you want to specify the IP address that can access the Gateway. Then complete the IP Address fields. Select IP Range if you want to specify a range of IP addresses that can access the Gateway. Then enter the starting and ending IP addresses of the range.
Device Name Enter the name of the Gateway.
SNMP V1/V2 The version used is displayed.
GetCommunity Enter the password that allows read-only access to the Gateway's SNMP information.
Set Community Enter the password that allows read/write access to the Gateway's SNMP information.
Trap Management: Trap to Enter the IP address of the remote host computer that will receive the trap messages.
Remote Upgrade To allow remote upgrade, select Enable. Otherwise, keep the default setting, Disable.
UPnP
Universal Plug and Play (UPnP) allows Windows to automatically configure the Gateway for various Internet applications, such as gaming and videoconferencing.
UPnP If you want to use UPnP, keep the default, Enable. Otherwise, select Disable.
IGMP
IGMP Proxy Internet Group Membership Protocol (IGMP) is a system to improve multicasting for wireless clients. This should be set to Enable if your clients support it; otherwise, select Disable.
WLAN
If you are using the Gateway in a public domain where you are giving wireless access to your guests, you can disable wireless access to the Gateway's web-based utility.
Management via WLAN This feature allows the Gateway to be managed by a wireless computer on the local network when it logs into the Gateway's web-based utility. You will only be able to access the utility via a wired connection if you disable this feature. To allow wireless access to the utility, keep the default, Enable. Otherwise, select Disable.
Click Save Settings to apply your changes, or click Cancel Changes to cancel your changes.
Administration > Reporting
The Gateway can keep logs of traffic and events for your Internet connection.
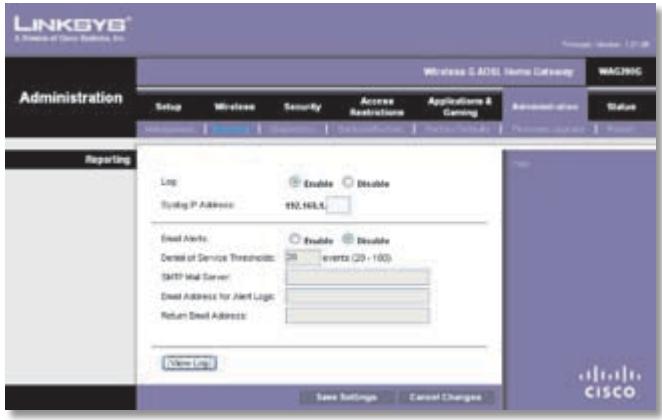
Administration > Reporting
Reporting
Log To disable the Log function, keep the default, Disable. To monitor traffic between the network and the Internet, select Enable. With logging enabled, you can choose to view temporary logs.
Syslog IP Address Enter the IP address of the computer that should receive logs.
E-Mail Alerts To enable E-Mail Alerts, select Enable.
Denial of Service Thresholds Enter the number of Denial of Service attacks that will trigger an e-mail alert.
SMTP Mail Server Enter the IP address of the SMTP server.
E-Mail Address for Alert Logs Enter the e-mail address that will receive alert logs.
Return E-Mail address Enter the return address for the e-mail alerts. (This can be a dummy address.)
View Log To view the logs, click View Log.
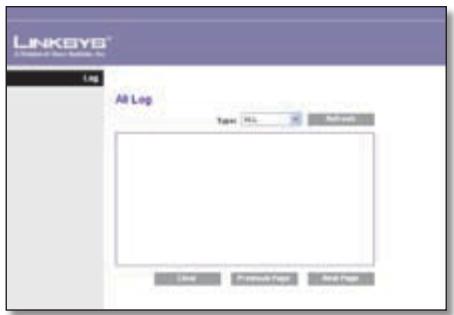
View Log
Log
Type Select from the following: ALL, System Log, Access Log, Firewall Log, VPN Log, UPnP Log, Incoming Log, or Outgoing Log.
Click Refresh to update the log. Click Clear to clear all the information that is displayed. Click Previous Page to view the previous page of information. Click Next Page to view the next page of information.
Click Save Settings to apply your changes, or click Cancel Changes to cancel your changes.
Administration > Diagnostics
The ping test allows you to check the connections of your network devices, including connection to the Internet.
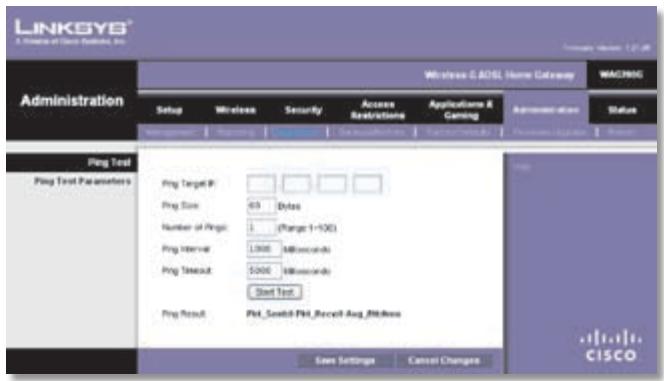
Administration > Diagnostics
Ping Test
Ping Test Parameters
The ping test checks the status of a connection.
Ping Target IP Enter the IP address that you want to ping. This can be either a local (LAN) or Internet (WAN) IP address.
Ping Size Enter the packet size you want to use. The default is 60 bytes.
Number of Pings Enter how many times you want to ping. The default is 1.
Ping Interval Enter the number of milliseconds between pings. The default is 1000 milliseconds.
PingTimeout Enter the number of milliseconds before the ping test will time out. The default is 5000 milliseconds.
Start Test To run the test, click this button. The Ping Test screen will show if the test was successful. Click Close to return to the Diagnostics screen.
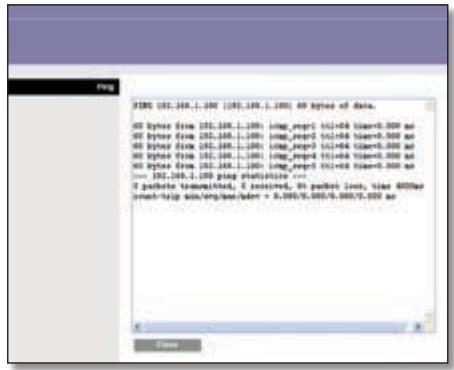
Diagnostics > Ping
Ping Result The results of the ping test are displayed.
Click Save Settings to apply your changes, or click Cancel Changes to cancel your changes.
Administration > Back Up & Restore
The Back Up & Restore screen allows you to back up or restore the Gateway's settings using a configuration file.
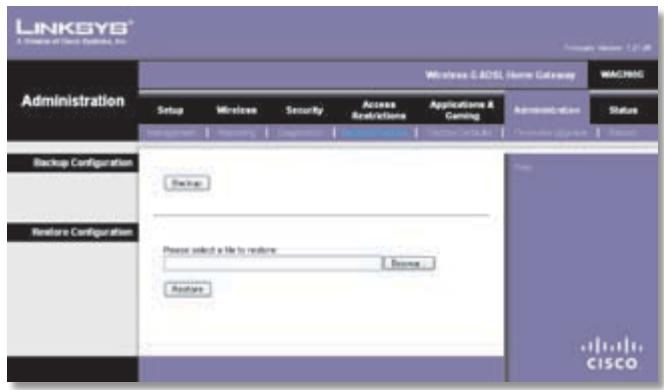
Administration > Back Up & Restore
Back Up Configuration
Back Up To save the Gateway's settings in a configuration file, click Back Up and follow the on-screen instructions.
Restore Configuration
To use this option, you must have previously backed up its configuration settings.
Please select a file to restore Click the Browse button and select the Gateway's configuration file.
Restore To restore the Gateway's configuration settings, click this button and follow the on-screen instructions.
Administration > Factory Defaults
This screen allows you to restore the Gateway's configuration to its factory default settings.
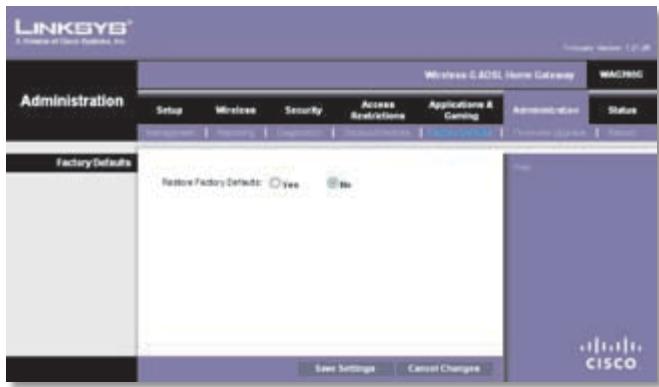
Administration >Factory Defaults

NOTE: Restoring factory defaults deletes all custom settings. To retain your custom settings, use the Administration > Back Up & Restore screen to back up the settings before you restore the factory defaults.
Factory Defaults
Restore Factory Defaults To reset settings to the default values, select Yes. Any custom Gateway settings you have saved will be lost when the default settings are restored.
Click Save Settings to apply your changes, or click Cancel Changes to cancel your changes.
Administration > Firmware Upgrade

Administration > Firmware Upgrade
The Firmware Upgrade screen allows you to upgrade the Gateway's firmware. Do not upgrade the firmware unless you are experiencing problems with the Gateway or the new firmware has a feature you want to use.
Firmware Upgrade
Before upgrading the firmware, download the Gateway's firmware upgrade file from the Linksys website, www.linksys.com/international. Then extract the file if needed.
Please Select a File to Upgrade Click Browse and select the extracted firmware upgrade file.
Upgrade After you have selected the appropriate file, click this button, and follow the on-screen instructions.
Language To use a different language, select one from the drop-down menu. The web-based utility will switch to the new language five seconds after your selection is made.
Administration >Reboot

Administration >Reboot
The Reboot screen allows you to reboot your Gateway.
Reboot Mode To reboot your Gateway, select Hard or Soft. Choose Hard to power cycle the Gateway or Soft to restart it without a power cycle. Use a Hard reboot to restart all applications and processes from a clean state.
To begin the reboot process, click Save Settings. When a screen appears asking you if you really want to reboot the Gateway, click OK. Click Cancel to cancel the reboot.
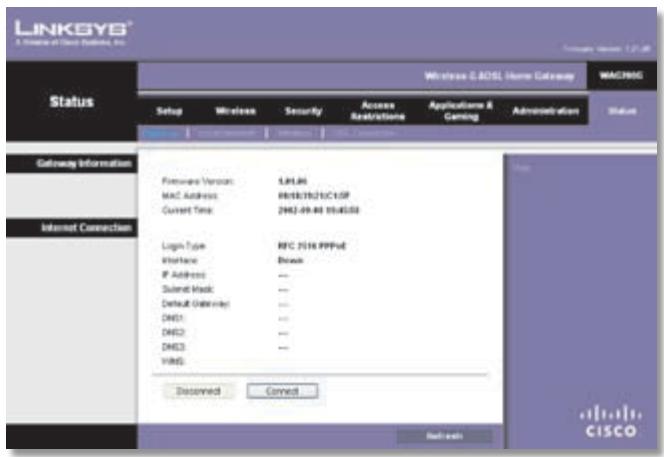
Status > Gateway
The Gateway screen displays information about the Gateway and its current settings.
Status > Gateway
Gateway Information
Firmware Version The version number of the Gateway's current firmware is displayed.
MAC Address The Gateway's MAC address, as seen by your ISP, is displayed.
Current Time The time set on the Gateway is displayed.
Internet Connection
This section shows the current network information stored in the Gateway. The information varies depending on the Internet connection type selected on the Basic Setup screen.
Click Refresh to update the on-screen information.
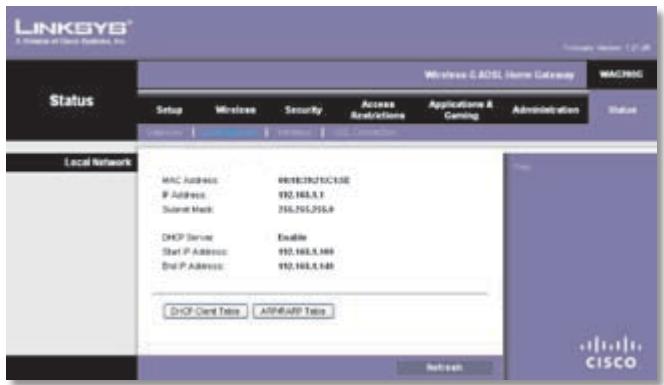
Status > Local Network
The Local Network screen displays information about the local wired network.
Status > Local Network
Local Network
MAC Address The MAC address of the Gateway's local, wired interface is displayed.
IP Address The Gateway's IP address, as it appears on your local network, is displayed.
Subnet Mask The Subnet Mask of the Gateway is displayed.
DHCP Server
DHCP Server The status of the Gateway's DHCP server function is displayed.
Start IP Address For the range of IP addresses used by devices on your local network, the starting IP address is displayed.
End IP Address For the range of IP addresses used by devices on your local network, the ending IP address is displayed.
DHCP Client Table Click this button to view a list of devices that are using the Gateway as a DHCP server.

DHCP Active IP Table
DHCP Active IP Table
The DHCP Active IP Table lists computers and other devices that have been assigned IP addresses by the Gateway. The list displays Client Host Name, IP Address, MAC Address, and Expire time (how much time is left for the current IP address). To remove a DHCP client, click Delete. To retrieve the most up-to-date information, click Refresh. To exit this screen and return to the Local Network screen, click Close.
ARP/RARP Table Click this button to view the current IP and MAC addresses of the Gateway's local network clients.
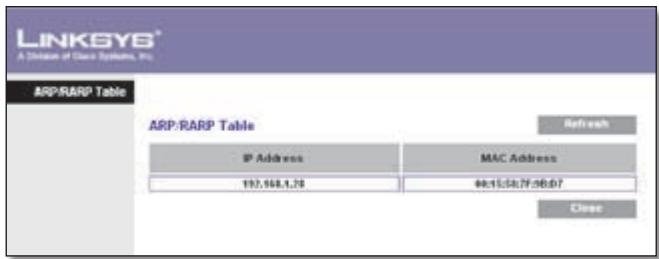
ARP/RARP Table
ARP/RARP Table
An ARP request is a request sent by the Gateway asking local network devices with IP addresses for their MAC addresses, so the Gateway can map IP addresses to MAC addresses. RARP is the reverse of ARP. (This data is stored in temporary memory and changes periodically.) To retrieve the most up-to-date information, click Refresh. To exit this screen and return to the Local Network screen, click Close.
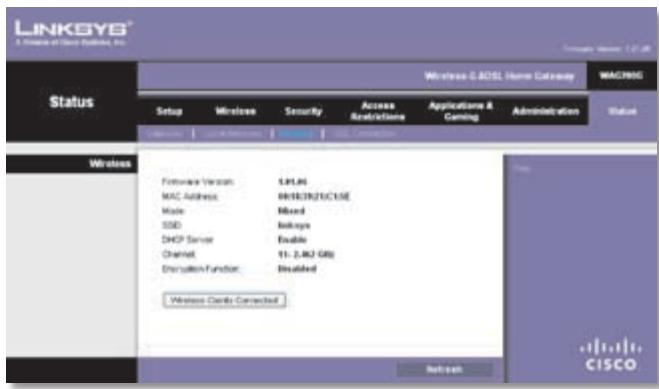
Status > Wireless Network
The Wireless Network screen displays information about your wireless network.
Status > Wireless Network
Wireless Network
Firmware Version The version number of the firmware is displayed.
MAC Address The wireless MAC address of the Gateway's local, wireless interface is displayed.
Mode The wireless network mode of the Gateway is displayed.
SSID The wireless network name, which is also called the SSID, is displayed.
DHCP Server The status of the Gateway's DHCP server function is displayed.
Channel The channel of the wireless network is displayed.
Encryption Function The wireless security method is displayed.
Wireless Clients Connected Click this button to view a list of wireless clients connected to the Gateway.

Connected Wireless Clients
Connected Wireless Clients
The list of wireless devices displays Computer Name, IP Address, and MAC Address. To retrieve the most up-to-date information, click Refresh. To exit this screen and return to the Wireless screen, click Close.
Status > DSL Connection
The DSL Connection screen displays information about your DSL connection.

Status >DSL Connection
DSL Connection
DSL Status The status of the DSL connection is displayed.
DSL Modulation Mode The DSL Modulation Mode selected on the Basic Setup screen is displayed.
DSL Path Mode The DSL Path Mode is displayed.
Downstream Rate The download speed of traffic from the Internet to the Gateway is displayed.
Upstream Rate The upload speed of traffic from the Gateway to the Internet is displayed. For ADSL connection, the Upstream Rate is typically 25% of the Downstream Rate.

NOTE: The Downstream and Upstream Rates are affected by distance from and configuration of the DSL central office.
Upstream Margin The Upstream Margin is displayed.
Downstream Margin The Downstream Margin is displayed.
Downstream Line Attenuation The Downstream Line Attenuation is displayed.
Upstream Line Attenuation The Upstream Line Attenuation is displayed.
Downstream Transmit Power The Downstream Transmit Power is displayed.
Upstream Transmit Power The Upstream Transmit Power is displayed.
PVC Connection
Encapsulation The Encapsulation setting selected on the Basic Setup screen is displayed.
Multiplexing The Multiplexing setting selected on the Basic Setup screen is displayed.
QoS The QoS method selected on the Basic Setup screen is displayed.
PCR Rate The PCR value entered on the Basic Setup screen is displayed.
SCR Rate The SCR value entered on the Basic Setup screen is displayed.
Autodetect The Autodetect setting selected on the Basic Setup screen is displayed.
VPI The VPI value entered on the Basic Setup screen is displayed.
VCI The VCI value entered on the Basic Setup screen is displayed.
Enable The number of Permanent Virtual Circuits (PVC) is displayed.
PVC Status The status of the PVC is displayed.
Appendix A: Troubleshooting
Your computer cannot connect to the Internet.
Follow the instructions until your computer can connect to the Internet:
- Make sure that the Gateway is powered on. The Power LED should be green and not flashing.
-
If the Power LED is flashing, then power off all of your network devices, including the Gateway and computers. Then power on each device in the following order:
-
Gateway
-
Computer
-
Check the LEDs on the front panel of the Gateway. Make sure the Power, DSL, and at least one of the numbered LEDs are lit. If they are not, then check the cable connections. The computer should be connected to one of the ports numbered 1-4 on the Gateway, and the Line port of the Gateway must be connected to the ADSL line.
When you double-click the web browser, you are prompted for a username and password. If you want to get rid of the prompt, follow these instructions.
Launch the web browser and perform the following steps (these steps are specific to Internet Explorer but are similar for other browsers):
- Select Tools > Internet Options.
- Click the Connections tab.
- Select Never dial a connection.
- Click OK.
You are using a static IP address and cannot connect.
Refer to Windows Help and change your Internet Protocol (TCP/IP) Properties to Obtain an IP address automatically.
The computer cannot connect wirelessly to the network.
Make sure the wireless network name or SSID is the same on both the computer and the Gateway. If you have enabled wireless security, then make sure the same security method and key are used by both the computer and the Gateway.
You need to modify the basic settings on the Gateway.
Run the Setup Wizard on the Setup CD-ROM.
You need to modify the advanced settings on the Gateway.
Open the web browser (for example, Internet Explorer or Firefox), and enter the Gateway's IP address in the address field (the default IP address is 192.168.1.1). When prompted, complete the User name and Password fields (the default user name and password is admin). Click the appropriate tab to change the settings.

WEB: If your questions are not addressed here, refer to the Linksys website, www.linksys.com/international
Appendix B: Specifications
Model Number WAG200G
Standards IEEE 802.11g,IEEE 802.11b,
IEEE 802.3u, IEEE 802.3,
g.992.1 (g.dmt), g.992.2 (g.lite),
g.992.3, g.992.5, T1.413i2,
U-R2 for Annex B
Ports Line (or DSL), Ethernet (1-4), Power
Button Reset
Cabling Type CAT5 UTP,RJ-45,RJ-11
LEDs Power, Wireless, Ethernet (1-4), DSL, Internet
Antennas 1 Non-Detachable
Transmit Power 18 dBm
UPnP Able
Security Features Password-Protected Configuration for Web Access
PAP and CHAP Authentication
Denial of Service (DoS) Prevention
SPI Firewall Protection
URL Filtering, and Keyword, Java,
ActiveX, Proxy, Cookie Blocking
ToD Filter (Blocks Access by Time)
VPN Passthrough for IPSec, PPTP, and
L2TP Protocols
WPA2, WPA; 128, 64 Bits WEP with
Passphrase WEP Key Generation
SSID Broadcast Disable
Access Restriction by MAC and IP
Addresses
Security Key Bits 64,128,256
Environmental
Dimensions 140x140x27mm
(5.51'' × 5.51'' × 1.25'')
Weight 350 g (12.35 oz)
Power 12VDC, 1A
Certification CE, FCC, IC-03, Wi-Fi, A-tick,
Telepermit, IDA, Anatel
Operating Temp. 0 to 40^ (32 to 104^ )
Storage Temp. -20 to 70^ (-4 to 158^
Operating
Humidity 10 to 85% Noncondensing
Storage Humidity 5 to 90% Noncondensing
Appendix C: Warranty Information
Linksys warrants to You that, for a period of three years (the "Warranty Period"), your Linksys Product will be substantially free of defects in materials and workmanship under normal use. Your exclusive remedy and Linksys' entire liability under this warranty will be for Linksys at its option to repair or replace the Product or refund Your purchase price less any rebates. This limited warranty extends only to the original purchaser.
If the Product proves defective during the Warranty Period call Linksys Technical Support in order to obtain a Return Authorization Number, if applicable. BE SURE TO HAVE YOUR PROOF OF PURCHASE ON HAND WHEN CALLING. If You are requested to return the Product, mark the Return Authorization Number clearly on the outside of the package and include a copy of your original proof of purchase. RETURN REQUESTS CANNOT BE PROCESSED WITHOUT PROOF OF PURCHASE. You are responsible for shipping defective Products to Linksys. Linksys pays for UPS Ground shipping from Linksys back to You only. Customers located outside of the United States of America and Canada are responsible for all shipping and handling charges.
ALL IMPLIED WARRANTYES AND CONDITIONS OF MERCHANTABILITY OR FITNESS FOR A PARTICULAR PURPOSE ARE LIMITED TO THE DURATION OF THE WARRANTY PERIOD. ALL OTHER EXPRESS OR IMPLIED CONDITIONS, REPRESENTATIONS AND WARRANTYES, INCLUDING ANY IMPLIED WARRANTY OF NONINFRINGEMENT, ARE DISCLAIMED. Some jurisdictions do not allow limitations on how long an implied warranty lasts, so the above limitation may not apply to You. This warranty gives You specific legal rights, and You may also have other rights which vary by jurisdiction.
This warranty does not apply if the Product (a) has been altered, except by Linksys, (b) has not been installed, operated, repaired, or maintained in accordance with instructions supplied by Linksys, or (c) has been subjected to abnormal physical or electrical stress, misuse, negligence, or accident. In addition, due to the continual development of new techniques for intruding upon and attacking networks, Linksys does not warrant that the Product will be free of vulnerability to intrusion or attack.
TO THE EXTENT NOT PROHIBITED BY LAW, IN NO EVENT WILL LINKSYS BE LIABLE FOR ANY LOST DATA, REVENUE OR PROFIT, OR FOR SPECIAL, INDIRECT, CONSEQUENTIAL, INCIDENTAL OR PUNITIVE DAMAGES, REGARDLESS OF THE THEORY OF LIABILITY (INCLUDING NEGLIGENCE), ARISING OUT OF OR RELATED TO THE USE OF OR INABILITY TO USE THE PRODUCT (INCLUDING ANY SOFTWARE), EVEN IF LINKSYS HAS BEEN ADVISED OF THE POSSIBILITY OF SUCH DAMAGES. IN NO EVENT WILL LINKSYS' LIABILITY EXCEED THE AMOUNT PAID BY YOU FOR THE PRODUCT. The foregoing limitations will apply even if any warranty or remedy provided under this Agreement fails of its essential purpose. Some jurisdictions do not allow the exclusion or limitation of incidental or consequential damages, so the above limitation or exclusion may not apply to You.
This Warranty is valid and may be processed only in the country of purchase.
Please direct all inquiries to: Linksys, P.O. Box 18558, Irvine, CA 92623.
Appendix D: Regulatory Information
FCC Statement
This product has been tested and complies with the specifications for a Class B digital device, pursuant to Part 15 of the FCC Rules. These limits are designed to provide reasonable protection against harmful interference in a residential installation. This equipment generates, uses, and can radiate radio frequency energy and, if not installed and used according to the instructions, may cause harmful interference to radio communications. However, there is no guarantee that interference will not occur in a particular installation. If this equipment does cause harmful interference to radio or television reception, which is found by turning the equipment off and on, the user is encouraged to try to correct the interference by one or more of the following measures:
Reorient or relocate the receiving antenna
- Increase the separation between the equipment or devices
- Connect the equipment to an outlet other than the receiver's
- Consult a dealer or an experienced radio/TV technician for assistance
FCC Radiation Exposure Statement
This equipment complies with FCC radiation exposure limits set forth for an uncontrolled environment. This equipment should be installed and operated with minimum distance 20~cm between the radiator and your body.
Safety Notices
- Caution: To reduce the risk of fire, use only No.26 AWG or larger telecommunication line cord.
- Do not use this product near water, for example, in a wet basement or near a swimming pool.
- Avoid using this product during an electrical storm. There may be a remote risk of electric shock from lightning.
Industry Canada Statement
This device complies with Industry Canada ICES-003 and RSS210 rules.
Operation is subject to the following two conditions:
- This device may not cause interference and
- This device must accept any interference, including interference that may cause undesired operation of the device.
To reduce potential radio interference to other users, the antenna type and its gain should be so chosen that the EIRP is not more than required for successful communication.
Industry Canada Radiation Exposure Statement
This equipment complies with IC radiation exposure limits set forth for an uncontrolled environment. This equipment should be installed and operated with minimum distance 20 cm between the radiator & your body.
This transmitter must not be co-located or operating in conjunction with any other antenna or transmitter.
Declaration of Conformity with Regard to EU Directive 1999/5/EC (R&TTE Directive)
Compliance Information for 2,4-GHz and 5-GHz Wireless Products Relevant to the EU and Other Countries Following the EU Directive 1999/5/EC (R&TTE Directive)
| Бълга рски [Bulgarian] | Това оборudвае отоваря на сьшесстени иизwickаня и пиюжими Клайзни на Директува 1999/5/EC. |
| Česky [Czech]: | Toto zařízení je v souladu se základnímì požadavky a ostatními opodovájdícímì ustanoveními Směrnice 1999/5/EC. |
| Dansk [Danish]: | Dette udstyr er i overensstemmelse med de væsentlige krav og andere relevante bestemmelsei Direktiv 1999/5/EF. |
| Deutsch [German]: | Dieses Gerät entspricht den grundlegenden Anforderungen und den weiteren entsprechenden Vorgaben der Richtlinie 1999/5/EU. |
| Eesti [Estonian]: | See seade vastab direktiivi 1999/5/EÜ olulistele nõuetele ja teistele asjakohastele sätetele. |
| English: | This equipment is in compliance with the essential requirements and other relevant provisions of Directive 1999/5/EC. |
| Espanol [Spanish]: | Este equipo cumple con los requisitos esencias asi como conoras disposiciones de la Directiva 1999/5/CE. |
| Еληνική [Greek]: | Aútóc o εξοπλιομός είναι σε οὐμόρφωούη με τις ouσιώδεις απαίτησεις και áλλες σχέτικές διατάξεις της Εθηγίας 1999/5/EC. |
| François [French]: | Cet apparéil est conforme aux exigences essentielles et aux autres dispositions pertinentes de la Directive 1999/5/EC. |
| ʃlenska [Icelandic]: | Petta tæki er samkvæmt grunnkröfum og öðrum viðeigandi ákvæðum Tilskipunar 1999/5/EC. |
| Italiano [Italian]: | Questo apparato é conforme ai requisiti essenziali edagli altri principi sanciti alla Direttiva 1999/5/CE. |
| Latviski [Latvian]: | Šī iekārta atbilst Direktīvas 1999/5/EK būtiskajām prasibām un citiem ar to saistītajiem noteikumiem. |
| Lietuviç [Lithuanian]: | Šis jrenginys tenkina 1999/5/EB Direktyvos esminius reikalavimus irKitas šios direktyvos nuostatas. |
| Nederlands [Dutch]: | Dit apparaat voldoet aan de essentiele eisen en andere van toepassing+zijnde bepalingen van de Richtlijn 1999/5/EC. |
| Malti [Maltese]: | Dan l-apparat huwa konformi mal-htigiet essenzjali u l-provedimenti l-ohra rilevanti tad-Direttiva 1999/5/EC. |
| Magyar [Hungarian]: | Ez a keszülék teljesíti az alapvető követelményeket és más 1999/5/EK irányelven meghatározott vonatkoź rendelkezéket. |
| Norsk [Norwegian]: | Dette utstyret er i samsvar med de grunnleggende krav og andere relevante bestemmelsei EU-direktiv 1999/5/EF. |
| Polski [Polish]: | Uržadzenie jest zgodne z ogólnymi wymaganiami oraz szczególnymi warunkami okreslonymi Dyrektywą UE: 1999/5/EC. |
| Portugués [Portuguese]: | Este equipamento está em conformidade com os requisitos essenciais e outras provisões relevantes da Direcita 1999/5/EC. |
| Română [Romanian] | Acest echipament este in conformitate cu cerintele esentiale si cu alte predereri relevante ale Directei 1999/5/EC. |
| Slovensko [Slovenian]: | Ta naprava je skladna z bistvenimi zahtevami in ostalimi relevantnimi pogoji Direktive 1999/5/EC. |
| Slovensky [Slovak]: | Toto zariadenie je v zhode so základnými požiadavkamiainýmiprislužnýminariadieniamidi direktív: 1999/5/EC. |
| Suomi [Finnish]: | Tämä laite tāyttää direktiivin 1999/5/EY olennaiset vaatimukset ja on siinä asetettujen muiden laitetta koskevien määäräysten mukainen. |
| Svenska [Swedish]: | Denna utrustning är i overensstammelse med de väsentiga kraven och andra relevanta bestämelsei i Direktiv 1999/5/EC. |
For all products, the Declaration of Conformity (DofC) is available through one or more of these options:
- A pdf file is included on the product's CD.
- A print copy is included with the product.
- A pdf file is available on the product's webpage. Visit www.linksys.com/international and select your country or region. Then select your product.
If you need any other technical documentation, see the "Technical Documents on www.linksys.com/international" section, as shown later in this appendix.
The following standards were applied during the assessment of the product against the requirements of the Directive 1999/5/EC:
- Radio: EN 300 328 and/or EN 301 893 as applicable
EMC: EN 301 489-1, EN 301 489-17 - Safety: EN 60950 and either EN 50385 or EN 50371
Dynamic Frequency Selection (DFS) and Transmit Power Control (TPC) are required for operation in the 5 GHz band.
DFS: The equipment meets the DFS requirements as defined in ETSI EN 301 893. This feature is required by the regulations to avoid interference with Radio Location Services (radars).
TPC: For operation in the 5 GHz band, the maximum power level is 3 dB or more below the applicable limit. As such, TPC is not required.
CE Marking
For the Linksys Wireless-N, -G, -B, and/or -A products, the following CE mark, notified body number (where applicable), and class 2 identifier are added to the equipment.
C∈0560
or
C∈0678
or
C∈0336 ①
or
C∈C
Check the CE label on the product to find out which notified body was involved during the assessment.
National Restrictions
This product may be used in all EU countries (and other countries following the EU directive 1999/5/EC) without any limitation except for the countries mentioned below:
In the majority of the EU and other European countries, the 2,4- and 5-GHz bands have been made available for the use of wireless local area networks (LANs). The table labeled "Overview of Regulatory Requirements for Wireless LANs" provides an overview of the regulatory requirements applicable for the 2,4- and 5-GHz bands.
Later in this document you will find an overview of countries in which additional restrictions or requirements or both are applicable.
The requirements for any country may evolve. Linksys recommends that you check with the local authorities for the latest status of their national regulations for both the 2,4- and 5-GHz wireless LANs.
Overview of Regulatory Requirements for Wireless LANs
| Frequency Band (MHz) | Max Power Level (EIRP) (mW) | Indoor ONLY | Indoor & Outdoor |
| 2400-2483.5 | 100 | X | |
| 5150-5350† | 200 | X | |
| 5470-5725† | 1000 | X |
+Dynamic Frequency Selection and Transmit Power Control are required in the frequency ranges of 5250-5350 MHz and 5470-5725 MHz.
The following countries have restrictions and/or requirements in addition to those given in the table labeled "Overview of Regulatory Requirements for Wireless LANs":
Denmark
In Denmark, the band 5150 - 5350 MHz is also allowed for outdoor usage.
For 2,4 GHz, the product should not be used outdoors in the band 2454 - 2483,5 MHz. There are no restrictions when used in other parts of the 2,4 GHz band when used indoors. Check http://www.arcep.fr/ for more details.
Applicable Power Levels in France
| Location | Frequency Range (MHz) | Power (EIRP) |
| Indoor (No restrictions) | 2400-2483.5 | 100 mW (20 dBm) |
| Outdoor | 2400-2454 | 100 mW (20 dBm) |
| 2454-2483.5 | 10 mW (10 dBm) |
Italy
This product meets the National Radio Interface and the requirements specified in the National Frequency Allocation Table for Italy. Unless this 2,4-GHz wireless LAN product is operating within the boundaries of the owner's property, its use requires a "general authorization". Please check http://www.comunicazioni.it/it/ for more details.
The outdoor usage of the 2,4 GHz band requires an authorization from the Electronic Communications Office. Please check http://www.esd.lv for more details.
2,4 GHz frekveču joslas izmantošanai Črpus telpām nepieciesama atlauja no Elektronisko sakaru direkcijas. Vairak informacijs: http://www.esd.lv.
Notes:
-
Although Norway, Switzerland and Liechtenstein are not EU member states, the EU Directive 1999/5/EC has also been implemented in those countries.
-
The regulatory limits for maximum output power are specified in EIRP. The EIRP level of a device can be calculated by adding the gain of the antenna used (specified in dBi) to the output power available at the connector (specified in dBm).
Product Usage Restrictions
This product is designed for indoor usage only. Outdoor usage is not recommended, unless otherwise noted.
2,4 GHz Restrictions
This product is designed for use with the standard, integral or dedicated (external) antenna(s) that is/are shipped together with the equipment. However, some applications may require the antenna(s), if removable, to be separated from the product and installed remotely from the device by using extension cables. For these applications, Linksys offers an R-SMA extension cable (AC9SMA) and an R-TNC extension cable (AC9TNC). Both of these cables are 9 meters long and have a cable loss (attenuation) of 5 dB. To compensate for the attenuation, Linksys also offers higher gain antennas, the HGA7S (with R-SMA connector) and HGA7T (with R-TNC connector). These antennas have a gain of 7 dBi and may only be used with either the R-SMA or R-TNC extension cable.
Combinations of extension cables and antennas resulting in a radiated power level exceeding 100mW EIRP are illegal.
Third-Party Software or Firmware
The use of software or firmware not supported/provided by Linksys may result that the equipment is no longer compliant with the regulatory requirements.
Technical Documents on www.linksys.com/international
Follow these steps to access technical documents:
- Enter http://wwwlinksys.com/international in your web browser.
- Select the country or region in which you live.
- Click the Products tab.
- Select the appropriate product category.
- Select the product sub-category, if necessary.
- Select the product.
- Select the type of documentation you want from the More Information section. The document will open in PDF format if you have Adobe Acrobat installed on your computer.

NOTE: If you have questions regarding the compliance of this product or you cannot find the information you need, please contact your local sales office or visit www.linksys.com/international
User Information for Consumer Products Covered by EU Directive 2002/96/EC on Waste Electric and Electronic Equipment (WEEE)
This document contains important information for users with regards to the proper disposal and recycling of Linksys products. Consumers are required to comply with this notice for all electronic products bearing the following symbol:

English - Environmental Information for Customers in the European Union
European Directive 2002/96/EC requires that the equipment bearing this symbol on the product and/or its packaging must not be disposed of with unsorted municipal waste. The symbol indicates that this product should be disposed of separately from regular household waste streams. It is your responsibility to dispose of this and other electric and electronic equipment via designated collection facilities appointed by the government or local authorities. Correct disposal and recycling will help prevent potential negative consequences to the environment and human health. For more detailed information about the disposal of your old equipment, please contact your local authorities, waste disposal service, or the shop where you purchased the product.
Блгарский (Bulgarian) - Информacea OTHOCHO ona3BaHTo Ha OkolHaTa cpea 3a Notpe6nteN B Ebponecknca b103
Ebronecka dinpektbva 2002/96/EC n3nckbva ypeinte, Hocesi TOni CmBON Bbpxu n3denneto n/nnn onakobkata My, da He ce nXbBpIa T C HecoptnapHn 6ntOBn OTnadtu. CmBolbt O6o3naHaa, ye n3denneto Tp86Ba da ce n3xBbprr OTeJnHOOTcMeTOcb6npaHTo HA o6nKHOBeHnTe 6ntOBn OTnadTu. Baasa e OTROBOPHOCTTa To3n I npyrte enektpnueckn n eektponHH ypeNi Da Ce n3XBpIaT B ppeBapNTelHo ONpeJeleno OT dbbxabHnTe nnn O6unHcKn OprAHn CneuaJIIN3npaHn NyHKTOBE 3a Cb6npaHe. PpaBnHTo n3XBbpIaHne n pezIKnPaHne 3e cnoMOrHat Da ce npedotbpaTet eBentUaHN BpeHn 3a OKoHaTcpeDa n 3dpabeto Ha HaceleHneto nocledctBna. 3a No-nOpO6Ha INΦOpMaZrO THOCHO n3XBbpIaHeTo Ha BaWnte CTapu ypeNi ce 6bPheT KbM MeCTHnTE Blaactn, cnjXbnte 3a CMeTOcb6npaHne nnn Mara3InHa, ot KOITcE 3aKynlnu ypeDa.
WEB: For additional information, please visit www.linksys.com/international