Drumfit Flow Arion - Fitness Equipment CECOTEC - Free user manual and instructions
Find the device manual for free Drumfit Flow Arion CECOTEC in PDF.


| Product type | Folding treadmill for home use |
| Brand | Cecotec |
| Model | Drumfit Flow Arion |
| Category | Fitness equipment |
| Users | Adults only |
| Dimensions (L × W × H) | 150 × 70 × 120 cm |
| Running surface | 120 × 40 cm |
| Device weight | 38 kg |
| Maximum user weight | 120 kg |
| Power supply | 220-240 V ~ 50 Hz |
| Motor power | 2.5 HP (peak) |
| Adjustable speed | 1 – 12 km/h |
| Adjustable incline | Manual adjustment 0-3% |
| Training programs | 12 built-in programs |
| Screen | Backlit LED screen |
| Connectivity | Bluetooth, built-in speakers |
| Transport and storage | Transport wheels, easy folding system |
| Maintenance and cleaning | Clean the belt after use; regularly check screws and wear |
| Safety | Magnetic safety key with automatic stop |
| Spare parts and repairability | Spare parts available on request from Cecotec after-sales service |
| General information | 2-year warranty, Cecotec technical support |
Frequently Asked Questions - Drumfit Flow Arion CECOTEC
User questions about Drumfit Flow Arion CECOTEC
0 question about this device. Answer the ones you know or ask your own.
Ask a new question about this device
Download the instructions for your Fitness Equipment in PDF format for free! Find your manual Drumfit Flow Arion - CECOTEC and take your electronic device back in hand. On this page are published all the documents necessary for the use of your device. Drumfit Flow Arion by CECOTEC.
USER MANUAL Drumfit Flow Arion CECOTEC
SAFETY INSTRUCTIONS....5
ESPAÑOL....81
ENGLISH....97
FRANÇAIS....110
DEUTSCH....125
ITALIANO....141
PORTUGUÊS....156
NEDERLANDS....171
POLSKI....186
ČEŠTINA....201
MAGYAR....215
ΕΛΛΗΝΙΚΑ 230
TÜRKÇE......245
العربية 259
CATALÀ....271
FIGURES....286
NOTA
EU01_123836 Drumfit flow ARION
EN • The coding in this manual is generic and applies to all code variants of the appliance.
Read the following instructions carefully before using the product. Keep this instruction manual for future reference or new users.
- Read these instructions thoroughly before assembling
or using the treadmill, as they contain important information that will help you achieve the best performance from your equipment.
- Safe and efficient use can be only achieved if the machine is properly assembled, maintained, and used.
- It is your responsibility to make sure every user is informed about the warnings and precautions stated in this instruction manual.
- This appliance can be used by children aged 8 years and above and people with reduced physical, sensory, or mental capabilities or lack of experience and knowledge if they have been given supervision or instruction concerning the use of the appliance in a safe way and understand the hazards involved. Children must not play with the appliance. Cleaning and maintenance should not be carried out by children without supervision.
- Keep children and animals away from the working area as small parts could cause risk of suffocation if swallowed.
- Keep children and animals away from the treadmill. It is designed for adults only.
- Check that the screws and nuts are securely fastened before using the treadmill. The safety level of the machine can be only maintained through regular examination for damage and/or signs of wear and tear.
- Always use the treadmill as indicated in this instruction manual. If you find any defective parts
when assembling or testing the treadmill, or if it produces unusual noise during use, stop using it immediately and contact Cecotec's Technical Support Service. Do not use the treadmill until the problem has been solved.
- Any misuse or non-compliance with these instructions voids the warranty and the manufacturer's liability.
- Before starting an exercise programme, you should consult your doctor to determine if you have any physical or health conditions that could create a risk to your safety, or prevent you from using the treadmill properly. Your doctor's advice is essential if you are taking medication that affects your heart rate, blood pressure, or cholesterol level.
- Be aware of your body signals. Incorrect or excessive exercise can deteriorate your health. Stop exercising if you experience any of the following symptoms: pain, tightness in your chest, irregular heartbeat, extreme shortness of breath, dizziness, or nausea. If you experience any of these conditions, you should consult your physician before continuing with your training programme.
- Care must be taken when lifting or moving the treadmill so as not to injure your back.
- Keep your hands and any loose clothing or objects away from all moving parts.
- Make sure you have enough space to lay out the parts before starting.
- Do not place any sharp objects around the treadmill.
- This product is intended for household use only. Do not use it in shops, institutions, or for therapeutic purposes. It is not recommended for outdoor use.
- You are buying this equipment to exercise at your own risk. If you have any health condition or feel you may be at risk of one, please consult with your physician or doctor before starting any exercise programme.
- Follow the recommended warm-up and stretching exercises before using the equipment to exercise.
- Only one person at a time should use the treadmill.
- Wear appropriate clothing when using the treadmill. Avoid wearing loose clothing which may get caught in the treadmill or that may restrict or prevent movement. Start using the treadmill at a slow speed, holding on to the handlebars firmly.
- This product is suitable for a maximum user weight of 130 kg.
- This training device is not suitable for high-precision purposes.
- Exercise extreme caution when adjusting the belt. Keep your fingers, hair, and clothing away from the belt.
- Do not cover the belt with sheets or any textile item, nor use it if covered with any of these items. It may get hot and cause fire, injury, or electric shock.
- If repairs are required, consult your supplier for further information or contact Cecotec's Official Technical Support Service.
• Take into account the maximum positions of the
adjustable components.
- Treadmill location:
- Place the treadmill on a flat, smooth, and stable surface with a protective floor covering or carpet.
- Make sure you leave a minimum of 2 metres around the treadmill.

- Do not place anything behind the treadmill that could obstruct the emergency exit.
- Do not stand on the treadmill if you are not using it or if you are preparing to use it. Place both feet on the treadmill's side borders. Get on it only when you are ready.
- Never start at full speed.
- Do not jump on the treadmill.
- Keep the treadmill away from excessive humidity and dust.
-
Make sure that those present during the exercise are aware of potential hazards, e.g., protruding moving parts.
-
Incorrect/excessive training can cause injuries.
- Do not arch your back when using the treadmill, always try to keep your back straight.
- WARNING: the heart rate sensors may be inaccurate, as it is not a medical device. Sensors can give you estimated heart rate information.
- If you feel any discomfort, stop exercising immediately. It may be dangerous for your health. If it persists, go immediately to the nearest medical centre.
- WARNING: do not run the treadmill when folded up.
- WARNING: wait for the running surface to come to stop completely before folding the treadmill.
- Noise emission under load is higher than without load.
- To make an emergency stop, place your hands on the handlebars, and place your feet on the side borders.
- Always attach the safety clip to your clothing at waist level and attach the safety key to the control panel before starting your workout.
- To prevent accidents, this treadmill comes with a safety key to be securely attached to your clothing. In the event that you accidentally trip or slip while walking or running on the treadmill, remove the safety key from the console to stop the treadmill's motor. Re-insert the safety key to resume the training.
https://cecotec.es/es/information/declaration-of-conformity
ENGLISH
1. Parts and components
Fig. 1
- Left and right upright
- Left and right upright cover
- Handrail assembly
- Safety lock
- Display assembly
- Console assembly
- Running platform assembly
- Silicone lubricating oil bottle
- M1015 half round head screw
- M1025 half round head screw
- M1035 half round head screw
- M1040 half round head screw
- M1065 half round head screw
- Left cup holder
- Right cup holder
- Power cable
- M10 flat washer
- M10 spring washer
- Cross wrench
- ST4.212 self-tapping countersunk head screws
- Allen key S5
- Allen key S6
- Gas spring connection assembly
Note:
The graphics in this manual are schematic representations and may not exactly match the product.
2. Before use
- This appliance comes in a packaging designed to protect it during transport. Remove the appliance from its box. You can keep the original box and other packaging materials in a safe place to prevent damage to the appliance if you need to transport it in the future. If you wish to dispose of the original packaging, make sure all items are recycled properly.
- Check that all parts and components are included and in good condition. If any of them are missing or damaged, please contact Cecotec's Official Technical Support Service immediately.
Box content:
- Product
ENGLISH
- Instruction manual
- Do not remove the product's serial number in order to keep proper traceability if technical assistance is required.
3. Assembling the machine
Step 1:
Fig. 2
a. Connect the console output line (A) to the console top line (a). Attention! After connecting all cables, plug the connected cables into the top cover of the console to avoid pressing on the cables during installation.
b. Use a cross wrench (85) to tighten the 8 ST4.2X12 self-tapping countersunk head screws (64) and secure the display (33) to the console top cover (30).
c. Pull out the left cup holder (28) and push the clip (G) on the cup holder into the clip hole (g) of the console cover. Then, use a cross wrench (85) to attach the left cup holder (28) to the console top cover (30) with 4 ST4.2X12 countersunk head self-tapping screws (64) and secure it.
d. Pull out the right cup holder (29) and push the clip (G) on the cup holder into the clip hole (g) of the console cover. Then, use a cross wrench (85) to attach the right cup holder (29) to the console top cover (30) with 4 ST4.2X12 countersunk head self-tapping screws (64) and secure it.
Step 2:
Fig. 3
a. Connect the top line of the console (A) to the middle line of the handrail (a).
b. Connect the middle pulse sensor cable (B) to the lower pulse sensor cable (b).
c. Connect the middle heart rate line (E) to the lower ambient light line (e). Attention! After connecting all cables, carefully route them inside the left and right handrail tubes to prevent them from being pinched during installation.
d. Insert the left and right handrail foam (27) into the square tubes of the console top cover (30). Align the screw holes, then use the Allen wrench (84) to fasten each side using 4 M10×35 half round head screws, along with spring washers (60) and flat washers (59), firmly securing the handrails to the console assembly.
Step 3:
Fig. 4
a. Place the right upright assembly (5) on the treadmill platform. Then connect the middle line of the console (A) to the bottom line of the console (a). Carefully pass the connected
ENGLISH
wires through the hole inside the upright. Align the L-shaped bracket of the upright assembly (5) with the square tube at the base. Match the screw holes.
b. Insert an M10×40 half round head bolt (44) through a spring washer (60) and a flat washer (59), then use the Allen wrench (84) to tighten it securely.
c. Insert a M10×65 half round head bolt (45) through a spring washer (60) and a flat washer (59), and tighten it also using the Allen key (84).
d. Repeat the same steps to install the left upright (4).
e. Finally, snap the left upright cover (25) and right upright cover (26) into place on the respective uprights.
Step 4:
Fig. 5.
a. Connect the midline of the handrail (A) to the midline of the console (a).
b. Insert the U-shaped brackets, which are attached to the left and right handrail foam (27), into the corresponding holes in the left and right uprights. Align the screw holes.
c. On each side, use three M10×15 half round hex head screws (52) with flat washers (59). Pass the screws through the holes in the upright and into the threaded holes in the handrails. Use the Allen key (84) to tighten them securely.
d. Set the safety interlock switch (35) on the control panel.
Step 5:
Fig. 6.
a. To fold the treadmill, hold position A with your right hand and lift the platform upwards. Push firmly until you hear a click at point B, indicating that the platform is securely locked.
b. Insert the connection assembly (9) into the U-shaped bracket on the running platform. Align the holes and secure each side using a M10×25 half round head screw.
c. To move and store the treadmill, use the front wheels (24) located under the platform after folding it. These allow forward and backward movement.
Note: Hold firmly in position A on both sides to prevent the frame from tilting forward during transport.
d. If the treadmill wobbles due to uneven flooring, adjust the adjustable foot pad (23) as shown in the illustration. Turn clockwise or anticlockwise to level the machine.
e. To unfold the treadmill, hold position A with your right hand and lift the platform slightly. Use your foot to gently release the lock at point B while simultaneously guiding the main frame down with your right hand. Allow the frame to slowly lower to the ground. Ensure that people and pets are kept out of the area to avoid injury.
Note: Connect the power only after completing all installation steps and confirming that nothing is missing. Refer to the following sections for operating instructions.
4. Operation
Preparation
If you are over 45 years of age or have any health concerns, and this is your first time exercising, consult your physician or a qualified professional before using the treadmill.
Before getting on the treadmill, stand to the side and familiarize yourself with the basic controls, such as how to start, stop and adjust the speed. Once you are comfortable, place yourself on the plastic non-slip side rails and hold the handrail with both hands. Start the treadmill at a low speed of 1.6 to 3.2 km/h (1.6 to 3.2 km/h). Stand up straight, look ahead, and gently step onto the treadmill with one foot to test the movement. Then start walking on the treadmill. Once you feel comfortable, gradually increase the speed to 3-5 km/h. Maintain this pace for about 10 minutes and then stop the machine slowly.
Exercising guideline
Start by standing next to the treadmill and familiarising yourself with how to adjust the speed and incline. Only use the treadmill when you feel comfortable with the controls.
Start walking at a steady pace for 1 kilometre and record the time it takes you. This may take 15 to 25 minutes. At a speed of 4.8 km/h, walking 1 kilometre takes approximately 12 minutes. Once you can do this comfortably, you can gradually increase the speed and incline. A steady 30-minute walk at a moderate pace and incline provides an effective cardiovascular workout.
Please note: Progress takes time. This training is designed to support long-term health, not to achieve immediate results.
Training frequency
Try to exercise 3 to 5 times a week, dedicating 15 to 60 minutes per session. It is more effective to establish a regular exercise schedule than to exercise only occasionally. You can control the intensity by adjusting both speed and incline.
We recommend starting with no incline. When you feel ready to intensify your workout, adjusting the incline is an excellent way to enhance your training.
Intensity of training
Quick method - 15-to-20-minute workout:
This method is an efficient way to exercise. Start with a 2-minute warm-up at 4.8 km/h. Then, increase the speed to 5.3 km/h and 5.8 km/h, maintaining each speed for 2 minutes. Then increase the speed by 0.3 km/h every 2 minutes until your breathing is faster but still comfortable. Maintain this pace as long as you can. If you get out of breath, reduce your speed by 0.3 km/h (0.2 mph). Reserve the last 4 minutes for gradual cooling.
If increasing the speed proves difficult, try increasing the incline slightly. Even a slight incline can significantly increase the intensity of your workout.
Calorie burning method:
This approach is designed to optimize calorie consumption. Start with a 5-minute warm-up at 4-4.8 km/h. Then increase your speed by 0.3 km/h every 2 minutes until you reach a challenging speed that you can maintain for 45 minutes.
To intensify the workout, try exercising at this pace while watching an hour-long television program. Each time there is an announcement, increase the speed by 0.3 km/h, and then return to the previous speed when the program continues. These brief periods of increased intensity will elevate your heart rate and calorie burn. Always leave the last 4 minutes for cooling.
Recommended equipment
All you need is a pair of well-fitting, supportive running shoes. Ensure that the soles are clean to avoid damaging the belt. Wear comfortable, breathable clothing suitable for exercise.
Warm-up exercises
Reminder
No matter what type of exercise you do, it is best to start with some stretching exercises. Warm muscles are easier to stretch, so start with a 5-10 minute warm-up. Then, stop and perform the following stretches. Then repeat each stretch 5 times, holding each leg for 10 seconds or more. For best results, repeat the stretches again after your workout.
Stretching down: With your knees slightly bent, slowly lean forward from the waist. Relax your back and shoulders and stretch toward your toes as much as possible. Hold this position for 10 to 15 seconds, then relax. Repeat 3 times. Fig. 7
Hamstring stretching: Sit on an exercise mat with one leg extended. Bend the other leg inward so that the sole of the foot is against the inner thigh of the extended leg. Stretch forward with hands toward the toes of the outstretched leg. Hold this position for 10 to 15 seconds, then relax. Repeat 3 times with each leg. Fig. 8
Calf/Achilles tendon stretching: Stand in front of a wall or tree with both hands resting on it. Extend one leg backwards. Keep your back leg straight and your heel on the floor as you
lean towards the wall or tree. Hold the stretch for 10-15 seconds, then relax. Repeat 3 times with each leg. Fig. 9
Quadriceps stretching: Place your left hand on a wall or table for balance. With the right hand, reach back and grasp the right ankle, gently bringing the heel toward the buttocks until you feel the stretch in the front of the thigh. Hold for 10-15 seconds, then relax. Repeat 3 times with each leg. Fig. 10
Sartorius stretching (inner thigh): Sit with the soles of your feet together and your knees pointing outward. Hold the feet with both hands and pull gently toward the groin. Hold the stretch for 10-15 seconds, then relax. Repeat 3 times. Fig. 11
Operation instructions
Description of the console display
Fig. 12
- Time display: Shows the duration of the training.
- Dot matrix (16×8): Shows a bar graph for the training program profile.
- Distance display: Shows the distance covered during training.
- Speed display: Shows the current running speed.
- Heart rate / Calories display: Shows the heart rate or calories burned. The corresponding icon will light up to indicate which parameter is currently displayed.
- Incline display: Shows the current incline level.
Button functions
- "P" button – Programme selection: Navigate through the training programs in the following order: P01-P15, FAT and Manual mode.
- "M" button – Mode selection: Browse by: Time countdown, Distance countdown, Calorie countdown and Manual mode.
- In standby mode: It is used to select countdown modes in the following order: Manual, Time countdown, Distance countdown, Calorie countdown (repeats in a loop).
- In body fat measurement mode: It is used to establish body fat parameters in the following sequence: Gender → Age → Height → Weight.
- SPEED ▲ / ▼ - Speed Adjustment: Adjusts the speed during a workout. It can also be used to change the settings when the treadmill is stopped.
- SPEED (3, 6, 9, 12) - Fast Speed buttons: Instantly adjusts the speed to 3, 6, 9 or 12 km/h.
- INCLINE ▲ / ▼ – Incline adjustment: Adjusts the incline level during a workout. It can also be used to modify the configuration when stopped.
- INCLINE (3, 6, 9, 12) – Quick incline buttons: Instantly adjusts the incline level to 3%, 6%, 9% or 12%.
Note: When any key is pressed correctly, a warning sound will be heard. If the key is pressed to adjust the parameter beyond the limit, a long warning sound will be heard. There will be no warning sound when the key is pressed ineffectively.
Main functions
When turned on, all display windows will light up for 2 seconds and then go into standby mode.
Quick start (Manual mode) Place the safety key and press the start button. After a 3-second countdown, the treadmill will start at minimum speed.
- Use the SPEED buttons ▲ / ▼ to adjust the speed.
• Use the INCLINE buttons ▲ / ▼ to adjust the incline level.
• To stop the treadmill, press the stop button at any time.
Countdown mode: Press the "M" button to switch between time, distance and calorie countdown.
- The corresponding window will display a default value and start flashing.
• Use SPEED ▲ / ▼ (and/or INCLINE ▲ / ▼) to set the desired value. - Press Start, and the treadmill will start operating at the minimum speed after a 3-second countdown.
- Adjust the speed or incline at any time using the appropriate buttons.
- When the countdown reaches zero, the treadmill will gradually slow down and stop automatically.
- You can also press the stop button at any time to end the training.
Programme mode: Press the "P" button to select one of the 15 built-in training programs (P01-P15).
- The TIME window will display a preset duration and flash. Use SPEED ▲ / ▼ and/or INCLINE ▲ / ▼ to adjust the total training time. Each program consists of 16 segments. The time per segment is equal to the total time ÷ 16.
- Press Start to begin. After a 3-second countdown, the treadmill will start at the speed and incline of the first segment. At the end of each segment, the treadmill will automatically adjust the speed and inclination for the next segment.
- After completing the 16 segments, the treadmill will gradually slow down and stop. During training, you can manually adjust the speed and incline, but it will return to the programmed values at the start of each new segment.
- You can also press the stop button at any time to end the programme.
Heart rate measurement
Hold the metal sensors on both handrails with both hands. After approximately 5 seconds, the PULSE window will display your heart rate. To get a more accurate reading, measure your heart rate while standing on the treadmill and keep your hands on the sensors for at least 30 seconds.
Note: Heart rate readings are intended for general fitness reference only and should not be used for medical purposes.
Body fat measurement mode
- In standby mode, press the "P" button. When the display shows "FAT", you have entered the Body fat measurement mode.
- Press the "M" button to toggle between the following parameter categories:
a. Gender (F-1)
b. Age (F-2)
c. Height (F-3)
d. Weight (F-4)
- After selecting each category, use the SPEED ▲ / ▼ or INCLINE ▲ / ▼ buttons to adjust the value accordingly.
- Once all parameters are set, press the MODE button again. The display will show F-5 and then ---, indicating that the treadmill is ready for measurement. At this point, fasten the metal sensors on both handrails. After about 5 seconds, your Body Mass Index will appear on the display.
Training parameters – Default values and configuration range
| Parameter | Default value | Configuration range | Remarks |
| Gender (F-1) | 0 (Male) | 0 – 1 | 0 = Male, 1 = Female |
| Age (F-2) | 25 years | 10 – 99 years | |
| Height (F-3) | 170 cm | 100 – 240 cm | |
| Weight (F-4) | 70 kg | 20 – 160 kg |
Body Mass Index (BMI) reference table
| BMI value | Body condition |
| < 19 | Underweight |
| 19 – 26 | Normal |
| 27 – 30 | Overweight |
| > 30 | Obese |
Sleep mode
If the treadmill remains idle for more than 10 minutes while stopped, the system will turn off all displays and enter sleep mode. Press any key to activate the system.
Safety key function
If the safety key is removed at any time, the treadmill will stop immediately, and all data will be reset to zero.
All display windows will show "--".
All normal operations and training should be performed with the safety key securely in place.
| Display range | Default manual | Default programme | Configuration range |
| Speed | 1-20KM | ---- | ---- |
| Incline | 20% | 0% | ---- |
| Time | 0:00–99:59 | 30:00 | 30:00 |
| Distance | 0.00KM-99.9KM | 1.00KM | ---- |
| Calories | 0Kcl-999Kcl | 50Kcl | ---- |
Training parameters display and configuration ranges
Integrated programme profiles (P01-P15)
| Program\Time | Duration per segment = total workout time + 16 | ||||||||||||||||
| 1 | 2 | 3 | 4 | 5 | 6 | 7 | 8 | 9 | 10 | 11 | 12 | 13 | 14 | 15 | 16 | ||
| P01 | SPEED | 2 | 3 | 3 | 4 | 4 | 5 | 5 | 3 | 4 | 5 | 4 | 4 | 3 | 3 | 5 | 3 |
| INCLINE | 1 | 1 | 2 | 2 | 3 | 3 | 2 | 2 | 1 | 2 | 2 | 1 | 3 | 2 | 2 | 2 | |
| P02 | SPEED | 2 | 4 | 4 | 5 | 6 | 6 | 6 | 4 | 5 | 6 | 4 | 4 | 2 | 5 | 4 | 2 |
| INCLINE | 1 | 2 | 2 | 2 | 3 | 2 | 2 | 2 | 2 | 2 | 3 | 3 | 4 | 3 | 2 | 2 | |
| P03 | SPEED | 2 | 4 | 4 | 6 | 7 | 7 | 7 | 4 | 7 | 7 | 4 | 4 | 4 | 5 | 3 | 2 |
| INCLINE | 2 | 3 | 3 | 2 | 3 | 3 | 2 | 2 | 2 | 2 | 4 | 4 | 6 | 3 | 2 | 2 | |
| P04 | SPEED | 3 | 5 | 5 | 6 | 5 | 7 | 7 | 8 | 8 | 5 | 9 | 5 | 6 | 4 | 4 | 3 |
| INCLINE | 2 | 3 | 3 | 2 | 3 | 3 | 2 | 2 | 2 | 2 | 4 | 4 | 6 | 3 | 2 | 2 | |
| P05 | SPEED | 2 | 4 | 4 | 5 | 7 | 5 | 6 | 7 | 8 | 8 | 5 | 4 | 6 | 5 | 4 | 2 |
| INCLINE | 3 | 3 | 3 | 4 | 5 | 5 | 4 | 4 | 4 | 4 | 5 | 5 | 3 | 2 | 2 | 2 | |
| P06 | SPEED | 2 | 4 | 4 | 4 | 8 | 8 | 6 | 7 | 8 | 8 | 6 | 4 | 5 | 4 | 3 | 2 |
| INCLINE | 3 | 5 | 5 | 5 | 4 | 3 | 3 | 3 | 3 | 4 | 4 | 4 | 3 | 4 | 3 | 2 | |
| P07 | SPEED | 2 | 3 | 3 | 3 | 3 | 4 | 5 | 3 | 4 | 5 | 3 | 3 | 6 | 5 | 3 | 3 |
| INCLINE | 4 | 4 | 4 | 4 | 6 | 6 | 6 | 7 | 7 | 8 | 8 | 9 | 6 | 5 | 4 | 4 | |
| P08 | SPEED | 2 | 3 | 3 | 6 | 4 | 6 | 7 | 4 | 6 | 7 | 4 | 4 | 3 | 4 | 4 | 2 |
| INCLINE | 4 | 5 | 5 | 5 | 6 | 7 | 8 | 9 | 9 | 9 | 10 | 10 | 12 | 8 | 6 | 3 | |
| P09 | SPEED | 2 | 4 | 4 | 7 | 7 | 8 | 4 | 8 | 9 | 9 | 4 | 4 | 6 | 3 | 3 | 2 |
| INCLINE | 5 | 5 | 5 | 6 | 4 | 4 | 6 | 6 | 5 | 5 | 8 | 8 | 9 | 7 | 4 | 2 | |
| P10 | SPEED | 2 | 4 | 5 | 6 | 4 | 6 | 8 | 8 | 6 | 6 | 5 | 4 | 4 | 4 | 3 | 3 |
| INCLINE | 5 | 6 | 6 | 6 | 8 | 8 | 4 | 4 | 4 | 5 | 5 | 8 | 10 | 8 | 6 | 3 | |
| P11 | SPEED | 2 | 5 | 8 | 10 | 10 | 10 | 7 | 7 | 10 | 10 | 5 | 5 | 5 | 5 | 4 | 3 |
| INCLINE | 4 | 5 | 3 | 2 | 2 | 2 | 2 | 2 | 2 | 4 | 5 | 6 | 5 | 5 | 2 | 0 | |
| P12 | SPEED | 3 | 4 | 9 | 9 | 5 | 8 | 5 | 9 | 7 | 5 | 5 | 7 | 5 | 7 | 6 | 3 |
| INCLINE | 1 | 2 | 3 | 2 | 5 | 0 | 0 | 2 | 3 | 5 | 7 | 3 | 6 | 5 | 3 | 3 | |
| P13 | SPEED | 3 | 6 | 7 | 5 | 7 | 5 | 5 | 7 | 9 | 5 | 8 | 5 | 9 | 9 | 4 | 3 |
| INCLINE | 3 | 3 | 5 | 6 | 3 | 7 | 5 | 3 | 2 | 0 | 0 | 5 | 2 | 3 | 2 | 1 | |
| P14 | SPEED | 2 | 2 | 4 | 5 | 4 | 3 | 2 | 1 | 2 | 3 | 4 | 5 | 4 | 3 | 2 | 1 |
| INCLINE | 4 | 4 | 4 | 4 | 6 | 6 | 6 | 7 | 7 | 8 | 8 | 9 | 6 | 5 | 4 | 4 | |
| P15 | SPEED | 2 | 4 | 6 | 8 | 4 | 4 | 2 | 2 | 2 | 4 | 6 | 8 | 4 | 4 | 2 | 2 |
| INCLINE | 3 | 3 | 3 | 4 | 5 | 5 | 4 | 4 | 4 | 4 | 5 | 5 | 3 | 2 | 2 | 2 | |
| P16 | SPEED | 2 | 4 | 6 | 8 | 6 | 4 | 2 | 2 | 2 | 4 | 6 | 8 | 4 | 4 | 2 | 2 |
| INCLINE | 5 | 5 | 5 | 6 | 4 | 4 | 6 | 6 | 5 | 5 | 8 | 8 | 9 | 7 | 4 | 1 | |
| P17 | SPEED | 2 | 2 | 6 | 6 | 6 | 6 | 2 | 2 | 2 | 2 | 6 | 6 | 6 | 6 | 2 | 2 |
| INCLINE | 4 | 5 | 5 | 5 | 6 | 7 | 8 | 9 | 9 | 9 | 10 | 10 | 12 | 8 | 6 | 3 | |
| P18 | SPEED | 2 | 3 | 4 | 5 | 4 | 5 | 3 | 2 | 2 | 3 | 4 | 5 | 4 | 5 | 3 | 2 |
| INCLINE | 4 | 4 | 4 | 4 | 6 | 6 | 6 | 7 | 7 | 8 | 8 | 9 | 6 | 5 | 3 | 2 | |
| P19 | SPEED | 2 | 4 | 6 | 2 | 2 | 4 | 6 | 2 | 2 | 4 | 6 | 2 | 2 | 4 | 6 | 2 |
| INCLINE | 3 | 5 | 5 | 5 | 4 | 3 | 3 | 3 | 3 | 4 | 4 | 4 | 3 | 4 | 3 | 2 | |
| P20 | SPEED | 1 | 3 | 4 | 5 | 4 | 3 | 2 | 1 | 1 | 3 | 4 | 5 | 4 | 3 | 2 | 1 |
| INCLINE | 3 | 3 | 3 | 4 | 5 | 5 | 4 | 4 | 4 | 4 | 5 | 5 | 3 | 2 | 2 | 2 |
Safety measures for training
Before beginning any exercise routine, consult a qualified professional. They can recommend the most appropriate frequency, intensity and duration of exercise for your age and physical condition.
If you experience chest tightness or pain, irregular heartbeat, shortness of breath, dizziness or any other discomfort during exercise, stop immediately and seek professional advice before continuing. If you use the treadmill regularly, you can select a walking or jogging speed that feels natural to you. If you are unsure of the proper speed or lack experience, refer to the following general guidelines:
| Speed (km/h) | |
| 1.0 – 3.0: | People with low physical condition |
| 3.0 – 4.5: | Sedentary or inactive people |
| 4.5 - 6.0: | Average walkers |
| 6.0 - 7.5: | Fast walkers |
| 7.5 - 9.0: | Light runners |
| 9.0 - 12.0: | Moderate runners |
| 12.0 - 14.5: | Experienced runners |
Note: For walkers, a speed of less than or equal to 6.0 km/h is more appropriate. For runners, a speed greater than or equal to 8.0 km/h is more appropriate.
5. Cleaning and maintenance
- Before cleaning or performing any maintenance, always unplug the treadmill from the mains socket.
- Remove dust regularly to keep all components clean.
- Be sure to clean the exposed areas on both sides of the treadmill, as this helps prevent debris buildup under the belt.
- Make sure your shoes are clean to avoid getting foreign objects under the treadmill, which can damage the running platform and the treadmill itself. Clean the treadmill surface with a damp cloth and mild soap.
- Be careful not to splash water on any electrical components or under the treadmill.
- Clean the engine compartment with a vacuum cleaner at least once a year to remove dust and ensure proper operation.
Warning: Always unplug the treadmill before moving or removing the motor cover.
Belt and treadmill lubrication
The deck of this treadmill has been pre-lubricated at the factory.
Friction between the belt and the deck significantly affects the performance and life of the belt, so regular lubrication is essential.
We recommend checking the platform surface periodically. If you notice any damage or wear, please contact our Technical Support Service.
Lubrication programme:
● Light use (less than 3 hours/week): Lubricate once a year
• Moderate use (3-5 hours/week): Lubricate every 6 months
- Intensive use (more than 5 hours/week): Lubricate every 3 months
Maintenance instructions
To best maintain your treadmill and prolong its life, we recommend turning the machine off and letting it rest for 10 minutes after every 2 hours of continuous use.
If the belt is too loose, it may slip during use. If it is too tight, it can reduce motor performance and increase wear on the rollers and belt.
The ideal belt tension allows each side of the belt to be lifted approximately 50-75 mm off the platform by hand.
Treadmill alignment and tension adjustment
Proper alignment and belt tension are essential for optimal treadmill performance and user safety.
Belt alignment
Place the treadmill on a level surface and run it at a speed of approximately 6-8 km/h (4-6 mph).
- If the belt moves to the right, turn the right adjustment bolt clockwise 1/2 turn, and the left adjustment bolt counterclockwise 1/2 turn. Fig. 12
- If the belt moves to the left, turn the left adjustment bolt clockwise 1/2 turn, and the right adjustment bolt counterclockwise 1/2 turn. Fig. 13
6. Troubleshooting
Error codes and solutions
E01: Communication failure
E03: Hall sensor failure
E05: Overcurrent protection
E12: Undervoltage
E13: Overvoltage
E14: Overheating
E15: IPM Module failure
Basic troubleshooting guide
E01 – Communication failure: This indicates a communication error between the console and the lower control board. It may be caused by a loose or disconnected communication cable. Check all connections from the console to the lower controller to ensure that each pin is fully inserted. Inspect the cables for damage and replace them if necessary. If the communication circuit of the console or controller is defective, replace the affected part.
E03 – Hall sensor failure: This means that no engine speed signal was received for more than 3 seconds. The probable cause is a disconnected or defective sensor. Check if the Hall sensor plug is correctly connected. Reconnect it firmly or replace the motor if the problem persists.
E05 – Overcurrent protection: Occurs when the current exceeds the safety limit of the system, often due to overload, mechanical blockage or excessive resistance that prevents the motor from rotating. Restart the machine after checking for blockages. If there is a burning smell or abnormal motor sound, the motor or controller may be damaged and should be replaced. Also check that the power supply meets the required voltage specifications.
E12 – Undervoltage: Caused by low input voltage or a fault in the voltage sensing circuit. Disconnect the power supply and check the voltage. After confirming that it is normal, turn the machine back on. If the problem persists, replace the controller.
E13 – Overvoltage: Caused by excessively high input voltage or a malfunction in the voltage sensing system. Disconnect the power, verify that the input voltage is within specifications, and then turn the unit back on. If the error persists, it may be necessary to replace the controller.
E14 – Overheating protection: Results from poor heat dissipation due to a faulty fan or dust accumulation. Turn off the power, inspect the fan and clean any internal dust. If overheating continues after restarting, replace the controller.
E15 – IPM Module failure: Indicates a fault in the IPM Module of the motor control system. Turn off the power for two minutes and then restart. If the error is not resolved, the controller must be replaced.
7. Technical specifications
Product: Drumfit flow ARION
Product reference: EU01_123836
Voltage: 220-240 V\~
Frequency: 50/60 Hz
Power: 2237 W
Maximum user weight: 130 kg
Speed: 1-20 km/h
Running surface: 52 × 140 cm
Dimensions: 1821 mm x 858 mm x 1492 mm
Weight: 78 kg
HC Class
Technical specifications may change without prior notice to improve product quality. Made in China | Designed in Spain
8. Recycling of electrical and electronic equipment

This symbol indicates that, according to the applicable regulations, the product and/or batteries must be disposed of separately from household waste. When this product reaches the end of its service life, you must remove the batteries/accumulators and take it to a collection point designated by local authorities.
For detailed information on how to properly dispose of electrical and electronic equipment and/or the corresponding batteries, consumers should contact their local authorities. Information regarding national packaging recycling systems and their marking can be found on our website.
Compliance with the above guidelines will help protect the environment.
9. Technical support and warranty
Cecotec shall be liable to the end user or consumer for any lack of conformity that exists at the time of product delivery under the terms, conditions and deadlines established by applicable regulations.
Repairs should be carried out by qualified personnel.
If at any moment you detect any problem with your product or have any doubt, do not hesitate to contact the official Cecotec Technical Support Service at +34 96 321 07 28.
10. Copyright
The intellectual property rights over the texts in this manual belong to CECOTEC INNOVACIONES, S.L. All rights reserved. The content of this publication may not, either in part or in its entirety, be reproduced, stored in a retrieval system, transmitted or distributed by any means (electronic, mechanical, photocopying, recording or similar) without prior authorisation from CECOTEC INNOVACIONES, S.L.
11. Simplified EU Declaration of Conformity
Cecotec Innovaciones hereby declares that this appliance complies with the essential requirements and other relevant provisions of the regulations applicable in the European Union. This appliance has been designed, manufactured and tested in compliance with required safety and quality standards. The full text of the EU Declaration of Conformity can be found on the following website:
https://cecotec.es/es/information/declaration-of-conformity
FRANÇAIS
Programme Lubrification :
Calorieverbrandingsmethode:
https://cecotec.es/es/information/declaration-of-conformity
POLSKI
https://cecotec.es/es/information/declaration-of-conformity
ΕΛΛΗΝΙΚΑ
https://cecotec.es/es/information/declaration-of-conformity
العربية
FIG 5

FIG 6
3

FIG 7
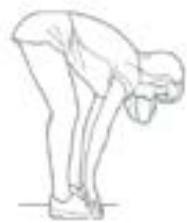
FIG 8

FIG 9

FIG 10

FIG 11

Figura 12
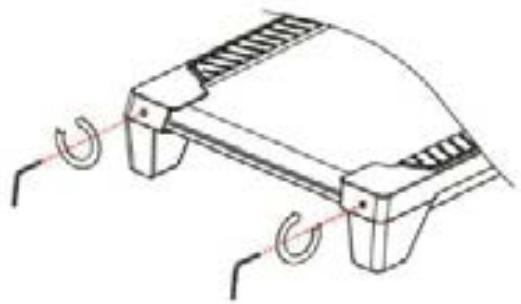
Figura 13

www.cecotec.es
Cecotec Innovaciones S.L. Av. Reyes Cabólicos, 60 46910, Alfafer, Valencia (Spain)
- NOTA
- ENGLISH
- PARTS AND COMPONENTS
- BEFORE USE
- BOX CONTENT
- ASSEMBLING THE MACHINE
- STEP 1
- STEP 2
- STEP 3
- STEP 4
- STEP 5
- OPERATION
- PREPARATION
- EXERCISING GUIDELINE
- TRAINING FREQUENCY
- INTENSITY OF TRAINING
- CALORIE BURNING METHOD
- RECOMMENDED EQUIPMENT
- WARM-UP EXERCISES
- REMINDER
- OPERATION INSTRUCTIONS
- BUTTON FUNCTIONS
- MAIN FUNCTIONS
- HEART RATE MEASUREMENT
- BODY FAT MEASUREMENT MODE
- SLEEP MODE
- SAFETY KEY FUNCTION
- TRAINING PARAMETERS DISPLAY AND CONFIGURATION RANGES
- SAFETY MEASURES FOR TRAINING
- CLEANING AND MAINTENANCE
- BELT AND TREADMILL LUBRICATION
- MAINTENANCE INSTRUCTIONS
- TREADMILL ALIGNMENT AND TENSION ADJUSTMENT
- BELT ALIGNMENT
- TROUBLESHOOTING
- ERROR CODES AND SOLUTIONS
- BASIC TROUBLESHOOTING GUIDE
- TECHNICAL SPECIFICATIONS
- RECYCLING OF ELECTRICAL AND ELECTRONIC EQUIPMENT
- TECHNICAL SUPPORT AND WARRANTY
- COPYRIGHT
- SIMPLIFIED EU DECLARATION OF CONFORMITY
- FRANÇAIS
- PROGRAMME LUBRIFICATION
- CALORIEVERBRANDINGSMETHODE
- ΕΛΛΗΝΙΚΑ
Brand : CECOTEC
Model : Drumfit Flow Arion
Category : Fitness Equipment