Drumfit Rower 9000 Regatta - Fitness Equipment CECOTEC - Free user manual and instructions
Find the device manual for free Drumfit Rower 9000 Regatta CECOTEC in PDF.


| Product type | Rower |
| Brand | Cecotec |
| Model | Drumfit Rower 9000 Regatta |
| Use | For home use only |
| Maximum user weight | 110 kg |
| Resistance type | Water resistance |
| Monitor | LCD screen showing time, distance, calories, and stroke count |
| Training programs | Several predefined programs |
| Seat | Sliding and padded |
| Pedals | Adjustable with straps |
| Frame | Sturdy steel frame |
| Transport | Integrated transport wheels |
| Console power supply | 2 AAA batteries (not included) |
| Cleaning | Damp cloth, avoid abrasive products |
| Maintenance | Periodically check the tightness of screws and the condition of parts |
| Safety | Use on a flat surface, keep a 0.6 m clearance around, max weight 110 kg |
| Spare parts | Available from Cecotec customer service |
| Warranty | Legal 2-year warranty |
| General information | Instruction manual included in several languages |
Frequently Asked Questions - Drumfit Rower 9000 Regatta CECOTEC
User questions about Drumfit Rower 9000 Regatta CECOTEC
0 question about this device. Answer the ones you know or ask your own.
Ask a new question about this device
Download the instructions for your Fitness Equipment in PDF format for free! Find your manual Drumfit Rower 9000 Regatta - CECOTEC and take your electronic device back in hand. On this page are published all the documents necessary for the use of your device. Drumfit Rower 9000 Regatta by CECOTEC.
USER MANUAL Drumfit Rower 9000 Regatta CECOTEC
Rowing machine with magnetic resistance system.
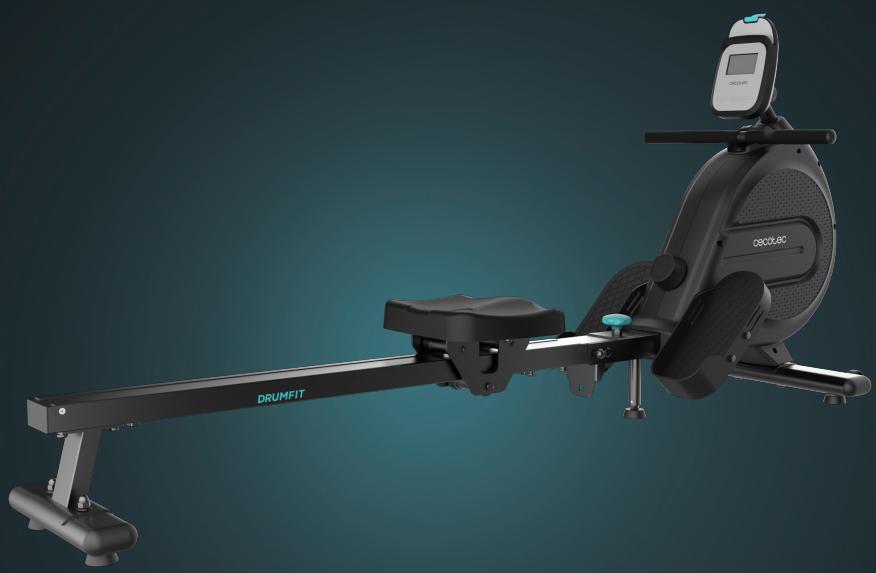
DRUMFIT
Safety instructions 7
-
Parts and components 46
-
Before use 48
-
Operation 48
-
Cleaning and maintenance 52
-
Information on exercising 52
-
Troubleshooting 53
-
Technical specifications 53
-
Disposal of old electrical and electronic appliances 53
-
Technical support and warranty 54
-
Copyright 54
SOMMAIRE
Read these instructions thoroughly before using the device. Keep this instruction manual for future reference or new users.
- Read the entire manual before assembling and using the machine. The product will only be safe if it is properly assembled, cared for and used correctly. It is your responsibility to make sure every user is informed about the warnings and precautions stated in this instruction manual.
- This device is designed for domestic use only and is not intended for bars, restaurants, farmhouses, hotels, motels, and offices.
- Before starting a training session, it is recommended that you consult your doctor if you have any adverse health or physical condition that may pose a risk to your safety or
make it difficult to use the appliance properly. Your doctor's advice is essential if you are taking medication that affects your heart rate, blood pressure, or cholesterol level.
- Be aware of your body signals. Incorrect or excessive exercise can deteriorate your health. Stop exercising if you experience any of the following symptoms: pain, tightness in your chest, irregular heartbeat, extreme shortness of breath, dizziness, or nausea. If you experience any of these conditions, you should consult your doctor before continuing with your training.
- It is not recommended for outdoor use.
- Leave a free space of at least 0.6 m in front of all access areas of the machine in case of emergency. You can share the access areas with other machine nearby. Always ensure there are not any objects blocking the entrance and exit of the machine.
- Keep children and pets away from the machine. Do not allow children to use it and/or play with the machine. It is designed for adults only.
- This device can be used by people with reduced physical, sensory, or mental capabilities or lack of experience and knowledge if they have been given appropriate supervision or instruction concerning the use of the appliance in a safe way and understand the hazards involved. Children must not play with the machine. Cleaning and user maintenance should not be carried out by unsupervised children.
- Maximum user weight: 110 kg.
- Wear suitable clothing while using the machine. Avoid wearing loose clothing which may get caught in the equipment.
-
Use the rowing machine on a solid, even surface with a protective cover for your floor or carpet.
-
Use the machine as indicated in this instruction manual. If you find any defective component while assembling or checking the machine, or if you hear any unusual noise coming from the equipment during use, stop using it. Do not use the equipment until the problem has been solved.
- Warning: replace faulty components immediately and/or keep the equipment out of use until repaired.
- Warning: incorrect or excessive training can lead to health injuries.
- Warning: if any of the adjustment devices are protruding, they may interfere with the user's movement.
- Make sure the screws and nuts are securely tightened before using the machine.
- If repairs are required, please consult your supplier for further information or contact the official Cecotec Technical Support Service.
- The air bike is not suitable for therapeutic use.
- Be careful when moving or lifting the machine to avoid injuring your back.
- Safe and efficient use can be only achieved if the machine is properly assembled, maintained, and used.
- It is your responsibility to make sure every user is informed about the warnings and precautions stated in this instruction manual.
- Warning: the safety level of the equipment can only be maintained if it is regularly checked for damage and wear.
- Pay special attention to the components that are most susceptible to mechanical wear.
Instructions on batteries
- The console uses two AAA batteries.
-
Do not burn or expose the batteries to high temperatures, as they may explode.
-
Leaks from the batteries can occur under extreme conditions. Do not touch any liquid that leaks from the batteries. If the liquid gets into contact with skin, wash immediately with soap and water. If the liquid gets into the eyes, wash them immediately with clean water for a minimum of 10 minutes and seek medical attention. Wear gloves to handle the batteries and dispose of them immediately in accordance with local regulations.
- Avoid contact between the batteries and small metal objects such as paper clips, coins, keys, nails, or screws.
- Do not tamper with the batteries in any way.
- Batteries must be removed for safe disposal.
- Keep the batteries out of the reach of children when there is a risk of ingestion.
- Battery ingestion can cause burns, soft-tissue perforation, and death. It can cause severe burns within two hours of the ingestion.
- In case of battery ingestion, please seek medical attention immediately.
- The batteries must be inserted according to the correct polarity.
- Discharged batteries must be removed from the console and disposed of safely.
- If the device is to be stored unused for a long period of time, the batteries should then be removed.
- The supply terminals must not be short-circuited.
INSTRUCTIONS DE SÉCURITÉ
the graphics in this manual are schematic representations and may not exactly match the device.
Fig. 1
| Number | Description | Specifications | Quantity |
| 1 | Main frame | 1 | |
| 2 | Front stabiliser | 1 | |
| 3 | Gasket | 10* 20*1.6 | 5 |
| 4 | Pressure washer | 10 | 2 |
| 5 | Flat head hex screw | M10*60 | 2 |
| 6 | Hexagon head bolt with pivot | M8*20*P1.0 | 4 |
| 7 | Flat washer | 8* 16*1.6 | 12 |
| 8 | Left pedal | 1 | |
| 9 | Sliding rail connector | 1 | |
| 10 | Pressure washer | 8 | 1 |
| 11 | Hex screw | M8*20 | 12 |
| 12 | Countersunk head self-tapping screw | M5*12 | 8 |
| 13 | Sliding rail stop | 1 | |
| 14 | Rear stabiliser | 1 | |
| 15 | Connector for sliding rail and rear stabiliser | 1 | |
| 16 | Cap nut | M10 | 2 |
| 17 | Sliding rail | 1 | |
| 18 | Saddle | 1 | |
| 19 | Ball bolt | 1 | |
| 20 | Hex bolt | M10*100 | 1 |
| 21 | Hex locknut | M10 | 1 |
| 22 | Right pedal | 1 | |
| 23 | Pedals bar | 2 | |
| 24 | Knob | 1 | |
| 25 | Console | 1 | |
| 26 | Rear cover of the console bracket | 1 | |
| 27 | Self-tapping socket head screw | M6*12 | 1 |
| 28 | Gasket | Φ6*Φ16 | 1 |
| 29 | Console bracket | 1 | |
| 30 | Decorative cover | 1 |
2. BEFORE USE
- This appliance is packaged in a way as to protect it during transport. Take the device out of its box and remove all packaging materials. You can keep the original box and other packaging elements in a safe place. This will help you prevent damage to the device when transporting it in the future. In case the original packaging is disposed of, make sure all packaging materials are recycled accordingly.
- Make sure all parts and components are included and in good conditions. If there is any piece missing or in bad conditions, contact the official Cecotec Technical Support Service immediately.
Box content
- Rowing machine
- Tool kit
- Batteries 2 x AAA
- Instruction manual
3. OPERATION
Installation instructions
STEP 1. Fig. 2
- Connect the main frame (1) to the front stabiliser (2). Secure them with two flat head hex screw (5), two gaskets (3) and two pressure washers (4).
STEP 2 Fig. 3
- Place the rear stabiliser (14) under the connector for the sliding rail and rear stabiliser (15). Next, secure the two parts with the two cap nuts (16) and two gaskets (3).
- Put the connector on the sliding rail. Then, secure the two parts with four hex screws (11), two pressure washers (10) and two flat washers (7).
STEP 3 Fig. 4
- Firstly, remove the stop from the sliding rail (13). After that, place the saddle (18) on the front of the sliding rail.
- Insert the connector (9) in the sliding rail hole and secure it with dour hex screws (11), two
pressure washers (10) and two flat washers (7).
- Replace the stop (13) on the sliding rail and secure it tightly with a countersunk head self-tapping screw (12).
STEP 4. Fig. 5
- Connect the main frame with the sliding rail connector (9).
- Secure it with a hex bolt (20), a hex locknut (21) and a gasket (3).
- Insert the ball bolt (19).
- Secure the knob (24) with the upper nut to ensure that it is secure.
STEP 5. Fig. 6.
- Insert the pedals bar (23) into the main frame hole (1).
- Insert the right (22) and left (8) pedals into the pedals bar (23).
- Secure each pedal with two flat washers (7) and two hexagon head bolts with pivot (6). You will need to use two spanners at the same time to secure them tightly.
STEP 6. Fig. 7
- Using the tip of a hexagonal screw, remove the screws at the rear of the console (25). Next, connect the two cables of the console to the two cables in the console bracket (29). Allign them with the four holes in the console and reinstall them with the screws that you had previously removed.
- Remove the self-tapping socket head screw (27) and the gasket (28) from the main frame (1). Place the decorative cover (30) on the console bracket (29) and, then, connect the main frame cables (1) with those of the console bracket (29). After that, insert the console bracket (29) into the main frame hole (1). Refit the self-tapping socket head screw (27) and the gasket (28). Make sure the screws are securely fastened and put the decorative cover (30).
- Finally, put the rear cover of the console bracket (26).
Resistance adjustment and folding
Resistance adjustment. Fig. 8
The resistance is adjusted by turning and adjusting the knob. Clockwise rotation increases the resistance, while counterclockwise rotation reduces it. The machine has 8 adjustment positions.
Folding the machine
Step 1. Loosen the knob and remove it.
Fig. 9
Step 2. Slowly lift the sliding rail until it is upright and insert the knob into the hole. Adjust the position of the knob nut and then turn the knob to the corresponding position. The machine shall be folded correctly.
Fig. 10
Display modes
Fig. 11
| Name | Function |
| MODE | Mode selection button |
| SET | Set the incremental value |
| RESET | Set value to 0 (delete) |
Operation
Switch on the LCD display for one second. At the same time, the machine emits a long beep, the COUNT icon is shown and the display shows 0. Normal mode is activated one second later.
Button functions
MODE
Press the MODE button to enter the setting mode and select the function to be configured. When pressing it, the corresponding digit of a determined function flashes. If 15 seconds pass without making any adjustments, the console exits the setting mode automatically.
The switching order of the functions is:
TIME, COUNT, DIST, CALORIES, STROKES/MIN.
Exit the setting mode and go back to normal mode.
SET
- Once you have selected the corresponding function, press the SET button to increase the setting value. If you continue to press for 2 seconds, it will increase rapidly (1 second increases by 5 units).
RESET
- When you want to reset the value of a function, press the RESET button.
- If you have not entered the setting mode, the RESET button will not work.
- Press and hold the RESET button for 2 seconds to clear all data; all parameters will go back to zero. The LCD display will show all the parameters for 1 second. At the same time, the machine will emit a beep for a long time and then, the COUNT icon and the display will show "0".
TIMER
- It measures the time elapsed from the start of the movement to the stop of the movement, it returns to zero after reaching the maximum value. After pressing a button, start the timer.
- If you do not start moving after 4 seconds, the time stops and "STOP" is shown on the display. Set the exercise time; the machine will emit a beep when you reach the programmed time.
- The value ranges from 0:00 to 99:00.
500 M/MIN
This is a system default setting. It indicates the time required to row a distance of 500 m. The value ranges from 0:00 to 99:00.
CNT (Counter)
- Measuring range: 0 \~9999, when the maximum value of the range is reached, the counter returns to zero.
- Setting range: 10 to 9990. Each press on the setting adds 10 units.
DIST
- It measures the distance travelled from the start of the movement to the stop of the movement.
- Measuring range: 0.0 \~99.9 KM (MI.), when the maximum value of the range is reached, the counter returns to zero.
CAL
- Measures the number of calories burned from the start of exercise to the end of exercise.
- Measuring range: 0 \~9999, when the maximum value of the range is reached, the counter returns to zero.
STROKES/MIN
It measures the frequency of rows per minute of movement.
SLEEP
If, after 4 minutes, there is no movement and no heart rate signal input, or if you do not press any button, the display enters sleep mode. The LCD display switches off after entering sleep mode.
Switching on the console
The console switches on when you press a button, change the mode, select/change a function, change/set/reset a value, or start moving.
Beep
When the machine switches on, it emits a beep.
- The machine emits a beep each time you press a button. If you long press a button, the machine will emit the same beep.
- When the set time, distance and calories go back to zero, the machine will emit four beeps. If you press a second button before the beep finishes, then the machine stops emitting the sound. If you press a second button, the machine stops emitting a sound, and the button function is not operated.
Batteries
- The display needs 2 AAA batteries.
- If you cannot visualise the console display correctly, reinstall the batteries to obtain better results.
- When you change the batteries, all records are deleted.
- Change the batteries. Press the button at the back of the console to open the batteries compartment and replace the batteries.
4. CLEANING AND MAINTENANCE
Maintenance
- Periodically check the machine for loose or damaged parts.
- Before each use, check that all machine components are securely fastened and replace defective parts in good time.
- Clean the machine regularly, using a soft cloth and neutral detergent, and do not use solvents or corrosive detergents.
- Any problems related to the bearing, drive belt or wear and tear of the rotating parts should not be repaired by yourself; contact the official Cecotec Technical Support Service.
- Avoid exposing the machine to direct sunlight, especially the console. Store the rowing machine in a clean and dry place, out of the reach of children and pets.
Note: If you have a problem with the machine, stop using it until the problem is solved.
5. INFORMATION ON EXERCISING
A proper workout should consist of the following three phases:
- Warm-up: consists of a session of stretching and low-intensity exercise lasting 5 to 10 minutes. A proper warm-up increases your body temperature, heart rate, and circulation in preparation for exercise. Fig. 12
- Training: consists of 20 to 30 minutes of exercise. (Note: during the first few weeks of exercise do not keep your heart rate high for more than 20 minutes). Fig. 13
- Cool-down: consists of 5 to 10 minutes of stretching exercises. This will increase the flexibility of your muscles and will help prevent injuries. Fig. 12
Workout routine
- To maintain or improve your physical condition, exercise three times per week, with at least one day of rest between workouts.
- After a few months of regular exercise, you may exercise up to five times a week, if desired. Keep in mind that the key to success is making exercise a regular and enjoyable part of your everyday life.
6. TROUBLESHOOTING
| Problem | Possible cause | Possible solution |
| Low resistance | Incorrect resistance adjustment. | Adjust the resistance according to your level. |
| Wear on the belt or chain. | Replace the belt or chain if necessary. | |
| Excessive noise | Loose or ill-fitting parts. | Check and tighten all loose parts. |
| Wear on the belt or chain. | Replace the belt or chain if necessary. | |
| The console does not operate | Electrical connection problems. | Check electrical connections and cables. |
| Dead batteries in the console. | Replace the console batteries. | |
| Uneven movement | Saddle or rail wear. | Lubricate or replace worn parts. |
| Loose or worn pedals. | Adjust or replace pedals as necessary. |
7. TECHNICAL SPECIFICATIONS
Product reference: 07223
Product: Drumfit Rower 9000 Regatta
Maximum user weight: 110 kg
HC class
Technical specifications may change without prior notification to improve product quality.
Made in China | Designed in Spain
8. DISPOSAL OF OLD ELECTRICAL AND ELECTRONIC APPLIANCES

This symbol indicates that, according to the applicable regulations, the product and/or batteries must be disposed of separately from household waste. When this product reaches the end of its shelf life, you should dispose of the cells/batteries/accumulators and take them to a collection point designated by the local authorities.
Consumers must contact their local authorities or retailer for information concerning the correct disposal of old appliances and/or their batteries.
Compliance with the above guidelines will help protecting the environment.
9. TECHNICAL SUPPORT AND WARRANTY
Cecotec shall be liable to the end user or consumer for any lack of conformity that exists at the time of delivery of the product under the terms, conditions, and deadlines established by the applicable regulations.
It is recommended that repairs be carried out by qualified personnel.
If at any moment you detect any problem with your product or have any doubt, do not hesitate to contact the official Cecotec Technical Support Service at +34 96 321 07 28.
10. COPYRIGHT
The intellectual property rights over the texts in this manual belong to CECOTEC INNOVACIONES, S.L. All rights reserved. The contents of this publication may not, in whole or in part, be reproduced, stored in a retrieval system, transmitted, or distributed by any means (electronic, mechanical, photocopying, recording or similar) without the prior authorization of CECOTEC INNOVACIONES, S.L.
1. PIÈCES ET COMPOSANTS
NOTE :
STROKES/MIN (COUPS PAR MINUTE)
Fig./Img./Abb./Afb./ Rys./Obr. 1
03 Φ10*Φ20*1.6 2PCS
04 M10x55L 2PCS
05 ∅10x∅20x2T 2PCS
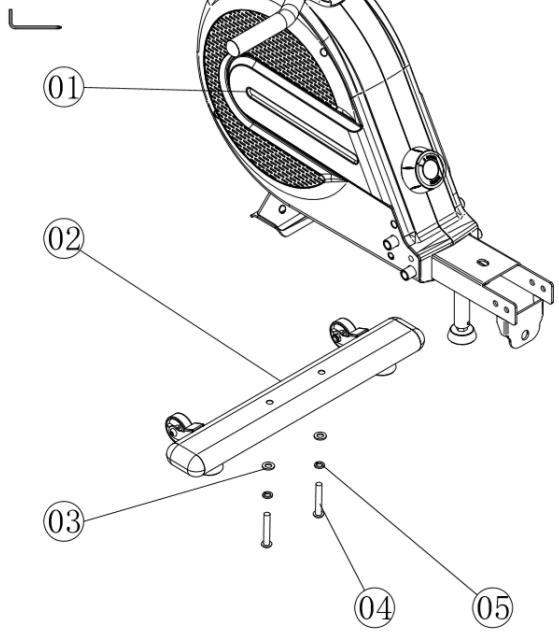
Fig./Img./Abb./Afb./Rys./Obr. 2

Fig./Img./Abb./Afb./Rys./Obr. 5

Fig./Img./Abb./Afb./ Rys./Obr. 3

Fig./Img./Abb./Afb./Rys./Obr. 4
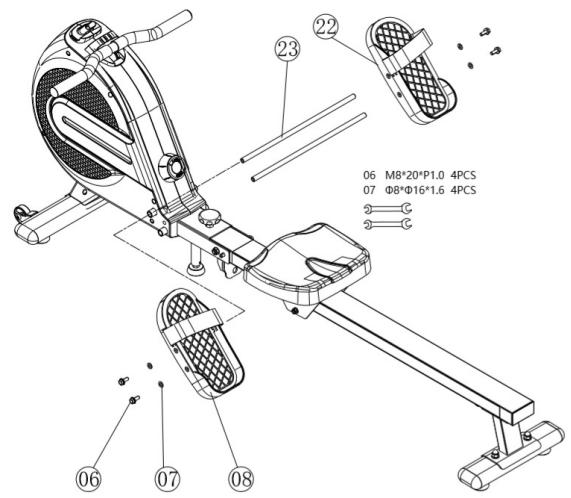
Fig./Img./Abb./Afb./ Rys./Obr. 6

Fig./Img./Abb./Afb./ Rys./Obr. 7
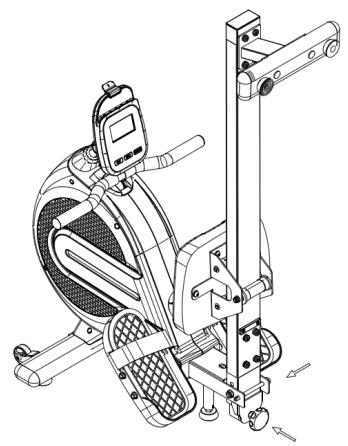
Fig./Img./Abb./Afb./ Rys./Obr. 10

Fig./Img./Abb./Afb./Rys./Obr. 11

Fig./Img./Abb./Afb./Rys./Obr. 8
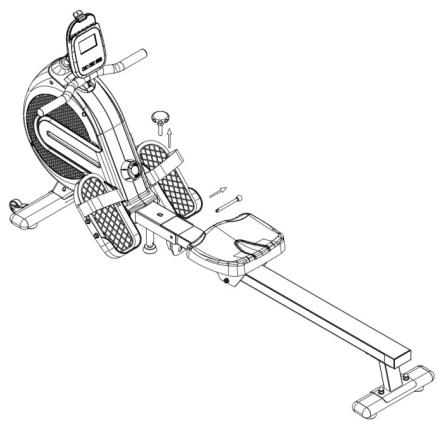
Fig./Img./Abb./Afb./Rys./Obr. 9
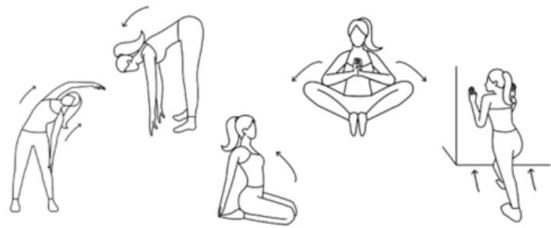
Fig./Img./Abb./Afb./Rys./Obr. 12

Fig./Img./Abb./Afb./ Rys./Obr. 13
www.cecotec.es

- SOMMAIRE
- INSTRUCTIONS ON BATTERIES
- INSTRUCTIONS DE SÉCURITÉ
- BEFORE USE
- BOX CONTENT
- OPERATION
- INSTALLATION INSTRUCTIONS
- STEP 1. FIG. 2
- STEP 2 FIG. 3
- STEP 3 FIG. 4
- STEP 4. FIG. 5
- STEP 5. FIG. 6
- STEP 6. FIG. 7
- RESISTANCE ADJUSTMENT AND FOLDING
- RESISTANCE ADJUSTMENT. FIG. 8
- FOLDING THE MACHINE
- STEP 1. LOOSEN THE KNOB AND REMOVE IT
- DISPLAY MODES
- BUTTON FUNCTIONS
- MODE
- SET
- RESET
- TIMER
- 500 M/MIN
- CNT (COUNTER)
- DIST
- CAL
- STROKES/MIN
- SLEEP
- SWITCHING ON THE CONSOLE
- BEEP
- BATTERIES
- CLEANING AND MAINTENANCE
- MAINTENANCE
- INFORMATION ON EXERCISING
- WORKOUT ROUTINE
- TROUBLESHOOTING
- TECHNICAL SPECIFICATIONS
- DISPOSAL OF OLD ELECTRICAL AND ELECTRONIC APPLIANCES
- TECHNICAL SUPPORT AND WARRANTY
- COPYRIGHT
- PIÈCES ET COMPOSANTS
- STROKES/MIN (COUPS PAR MINUTE)
Brand : CECOTEC
Model : Drumfit Rower 9000 Regatta
Category : Fitness Equipment